• Skip to content
  • Skip to primary sidebar
SimpliFaster

SimpliFaster

cart

Top Header Element

  • Facebook
  • Instagram
  • Twitter
  • YouTube
  • Login
  • cartCart
  • (925) 461-5990
  • Shop
  • Request a Quote
  • Blog
  • Buyer’s Guide
  • Freelap Friday Five
  • Podcast
  • Job Board
    • Candidate
    • Employer
    • Facebook
    • Instagram
    • Twitter
    • YouTube
You are here: Home / Blog

Blog

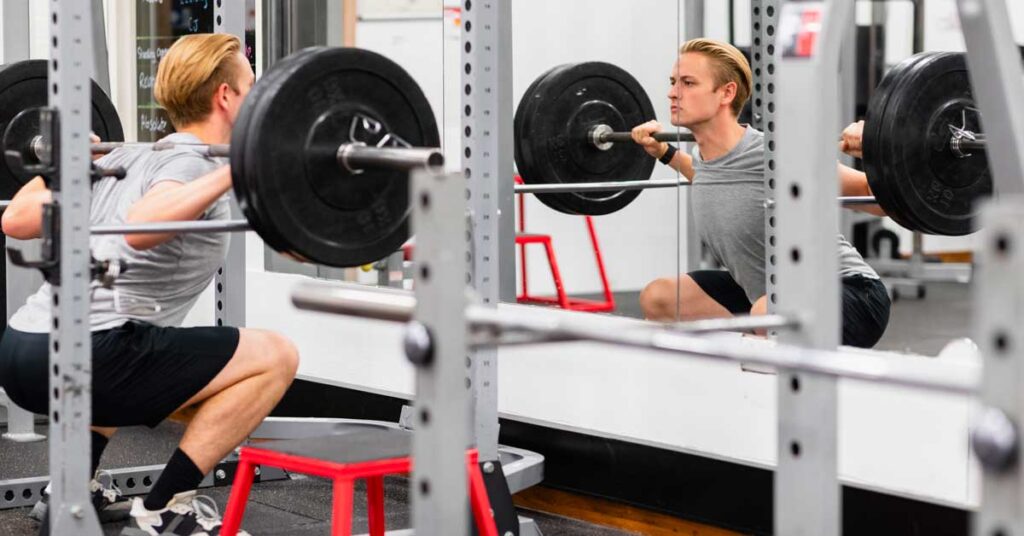
Back Squat Weight Room

Only 2-3 Squat Racks, Little Space, and One Coach? No Problem!

Blog| ByBen Charles

Back Squat Weight Room

Not everyone can have 10+ squat racks and platforms with all the bells and whistles like Tendo units, safety squat bars, and Freelap timers. Many coaches work in a situation where the budget is small and equipment is limited.

I wanted to write this to provide my personal experience working at small schools and making do with what was provided. Explaining how I made it work may help other coaches utilize everything they have at their disposal to provide the best program they can for their athletes.

My Coaching Situation

Before recently getting a job with EXOS to train military members at Fort Bragg in North Carolina, I worked as the Strength and Conditioning Coach for Western Technical College’s baseball team in La Crosse, Wisconsin. In my prior experiences at Saint Mary’s University and Winona State, I learned how to make do with limited space and/or equipment.

Saint Mary’s had three squat racks with attached platforms, a rack of dumbbells, 1-2 back extension machines, four lat pulldown/seated row machines, a few pairs of resistance bands, and some stability balls. Down the stairs from the weight room were the indoor track and rubber-floored basketball courts, which was a great space for speed and agility training (when in-season teams weren’t using it). As you can tell, there wasn’t much weight room equipment for the 250-300 athletes that needed it.

It was a very similar scenario at Western Technical College. They had two squat racks with attached platforms, a rack of dumbbells up to 100 pounds (with only two benches), a rack of kettlebells, stability balls, bands, a couple machines, one glute-ham device (GHD), and one cable machine. Their small basketball court where they do their warm-ups and plyometrics was up the stairs from the weight room. I trained about 40 baseball players, separated into two groups of 20, in this space at 6:00 a.m. and 7:00 a.m. on Mondays, Wednesdays, and Fridays. I was the only strength coach during their training, so it was my responsibility to make sure guys trained effectively and safely with the limited space and equipment.

Based on these experiences working with limited staff and equipment, I’ve compiled three tips that ensure everyone can do their workout within an hour, says @Mccharles187. Share on X

Based on these experiences working with limited staff and equipment, I’ve compiled three tips I’ve found useful. These ensure everyone can do their workout within an hour, efficiently using our limited equipment to obtain the adaptations and results we need to promote speed, power, strength, hypertrophy, or work capacity, depending on the time of year and goals for the athletes.

1. Pairings Are Your Friend

This is an easy and effective way to avoid athletes standing around waiting for equipment. Combine exercises in pairs, trios, or even quads, have your athletes in groups of 3-4 ,and rotate through those pairings before moving on to the next group of exercises. Generally, I like to do combos of three that include:

  • A1. Lower body push
    A2. Upper body pull

    A3. Lower body mobility drill

  • B1. Upper body press
    B2. Lower body pull

    B3. Upper body mobility drill

  • C1. Accessory
    C2. Accessory

    C3. Accessory

Using this setup, I can have groups of three athletes per station where one athlete does the first exercise, one does the second exercise, and the third does the mobility drill. If I have a group of four, that fourth will be the spotter/getting ready to do the first exercise. Then they will rotate through A1-A3 before moving on to B1-B3 and C1-C3. With my 20 guys, I will have two groups doing A’s, two groups doing B’s, and 1-2 groups doing C’s—then, they all rotate accordingly. As much as I like to have them do it in order, it’s just not realistic or efficient. Work with what you have.

2. One Exercise Per Piece of Equipment

This is huge—only use one exercise per piece of equipment. This ensures that everyone will have access to equipment without waiting. If we use the above examples, it will look like this:

  • A1. Barbell back squat
    A2. Chin-ups or v-grip pulldowns

    A3. 90-90 rotations

  • B1. DB military press
    B2. Split-stance KB RDL

    B3. T-spine rotations

  • C1. Band pull-aparts
    C2. Mini-band monster walks

    C3. Planks

As you see in the above workout, every exercise has its own equipment, because if I had used DB military press with DB RDLs there wouldn’t be enough dumbbells to go around. The way I set up my sessions is this: In our basketball court, we start with our dynamic warm-ups (about five minutes) followed by a pairing of a lower body plyometric with an upper body plyometric (medball-related exercises). Athletes get into groups of 2-3 to get through the plyos within 10 minutes. At this point, the session is 15 minutes in, so afterward we go to the weight room and spend the last 30-35 minutes doing our main training for the day.

When I program for the weight room, I note how many pieces of equipment I have and what pairings would be good together to keep things efficient, says @Mccharles187. Share on X

When I program for the weight room, I note how many pieces of equipment I have and what pairings would be good together to keep things efficient. In my mind, I want to accomplish a squat, hinge, upper press, upper pull, 2-3 mobility drills (at least one upper and one lower), a core exercise, and a grip/wrist exercise. This was a baseball team, so my accessory/mobility drills were more baseball-specific with thoracic mobility, hip mobility, wrist/grip strength, and scapular/rotator cuff stability/mobility.

I usually think of what barbell exercises I want to do first, since I think these will be my biggest bang for the buck, and pair them with something simple that can be done within the area of the squat rack/platform, so everyone can rotate in. For example, on Mondays I programmed back squats with chin-ups and a lower body mobility drill because our chin-up bar was next to our racks and it was easy to walk over and do them—and the mobility drill can be done anywhere, since you don’t need equipment for them most of the time. Because each exercise used a different piece of equipment (or no equipment), I never had athletes waiting in line for something, and they did my go-to exercises to promote power and strength (as well as mobility, which made it easier for them to get their squats to depth after each set).

Following that, we did an upper press paired with a rotator cuff exercise and a thoracic mobility drill: an example would be a single arm upright kettlebell press with band pull-aparts with chicken wing thoracic rotations on all fours. Our next pair would be a hinge exercise paired with a core exercise with another lower body mobility drill. Because we used a barbell and a kettlebell already for back squats and our upright press, I’d use a dumbbell and do an RDL variation with bird dogs and 90-90 rotations. Finally, we’d finish with a grip exercise like farmer’s carries to end the session.

This is the summation of the workout:

(In gymnasium)

  • Dynamic warm-up: 5 minutes
  • Plyometrics (if you like Olympic weightlifting, you could do this here instead): 10 minutes
  1. Lower body plyometric (depth jumps off a box) 3-4 x 3-5 reps
  2. Upper body plyometric (medball slams) 3-4 x 6-10 reps

(Head to weight room)

  • Weight room: 30-35 minutes
  • A1. Back squat APRE 10 (3 warm-ups sets, 2 workings sets)
    A2. Chin-ups 5 x 3-5 reps (add weight as needed)

    A3. Lunge-position stretch 5 x 5 belly breaths

  • B1. SA half kneeling kettlebell upright press 3 x 8-12 each (great for baseball for shoulder stability and overall grip)
    B2. Band pull-aparts 3 x 8-12 each

    B3. Quadruped chicken wing thoracic rotations 3 x 8-12 each

  • C1. Dumbbell split stance RDL 3 x 6-10 each
    C2. Bird dogs 3 x 8-12 reps each

    C3. 90-90 rotations 3×10 each

  • Farmer’s carry 3 x 30 yards

This was a workout I did with my baseball players, and I found it very effective. We were in an early off-season phase during the fall semester, so the reps/volume was very high. As the semester progressed, we worked our way down the rep range to focus on strength (3-6 reps of 4-5 sets or APRE 6) and then eventually peak strength (1-4 reps of 4-5 sets or APRE 3).

In short, one exercise per piece of equipment. Use that creative mind!

3. Identify Your Focus Exercises

Focus on 1-2 main exercises that you want to coach and check technique, then pair those with easier exercises that you don’t need to worry too much about. As the only coach on the floor, I couldn’t realistically watch every athlete for every single set and rep and watch them like a hawk. When doing your pairings, pick that one exercise that you want to watch them do and let the other pairings be exercises athletes can confidently do on their own without hurting themselves.

When doing your pairings, pick one exercise that you want to watch them do and let the other pairings be exercises athletes can confidently do on their own without hurting themselves. Share on X

If we use the A pairings again, I’d be looking at everyone’s back squat a lot more than I’d be watching them do chin-ups and mobility drills. In the B pairings, I watched how everyone hinges, because most athletes can military or bench press without screwing up too much. Knowing you can turn your back without worrying someone will hurt themselves while you’re focused on the main exercises will give you a sense of ease and less stress.

Results

The results you can expect from running workouts in this format are athletes getting through their exercises effectively and efficiently without long wait times. You also successfully program exercises that will influence adaptions to reduce injuries and enhance performance with the limited space and equipment you have.

Within the week, during three training sessions at Western Tech, my athletes were able to do their warm-ups, plyometrics, back squats, deadlifts, barbell reverse lunges, RDL variations, chin-ups/pull-ups, upper presses, and row variations, along with mobility and stability exercises—all within 50 minutes, with only two squat racks/platforms, dumbbells, kettlebells, and bands. We even performed APRE training with back squats, deadlifts, and DB bench press and witnessed great results with athletes increasing weight on the bar or dumbbells by 5-10 pounds and/or increasing by 2-4 reps of the same weight on a weekly basis.

We did the simple things really well, and the hard work paid off. My guys were workhorses, and I had to reinforce how to be more of a racehorse focusing on quality over quantity, says @Mccharles187. Share on X

We did the simple things really well, and the hard work paid off. Having my exercise selection with equipment and space in mind helped my athletes get there. Athletes seeing their numbers go up really helped build buy-in to my program, and athletes thanked and fist bumped me, telling me how great a job we were doing. They saw that doing a workout under an hour three days per week, while also focusing on sleep and nutrition (I took wellness surveys of their stress levels, hours of sleep, and body weight before every session to hold them accountable), was giving better results than training five days a week for 1.5-2 hours. My guys were workhorses, and I had to reinforce how to be more of a racehorse focusing on quality over quantity.

Using these three tips, I see no reason you can’t get your team in and out of the weight room within an hour and still get in solid, quality training. It’s about being efficient and setting up a constant, fluid, and well-oiled machine of athletes rotating exercises and pairings. Athletes will pick up on how you set up your stations and get the hang of it quickly. Good luck and get after it!

Since you’re here…
…we have a small favor to ask. More people are reading SimpliFaster than ever, and each week we bring you compelling content from coaches, sport scientists, and physiotherapists who are devoted to building better athletes. Please take a moment to share the articles on social media, engage the authors with questions and comments below, and link to articles when appropriate if you have a blog or participate on forums of related topics. — SF

Teen pushups

Performance Training for the Inconsistent Athlete

Blog| ByAustin McClinton

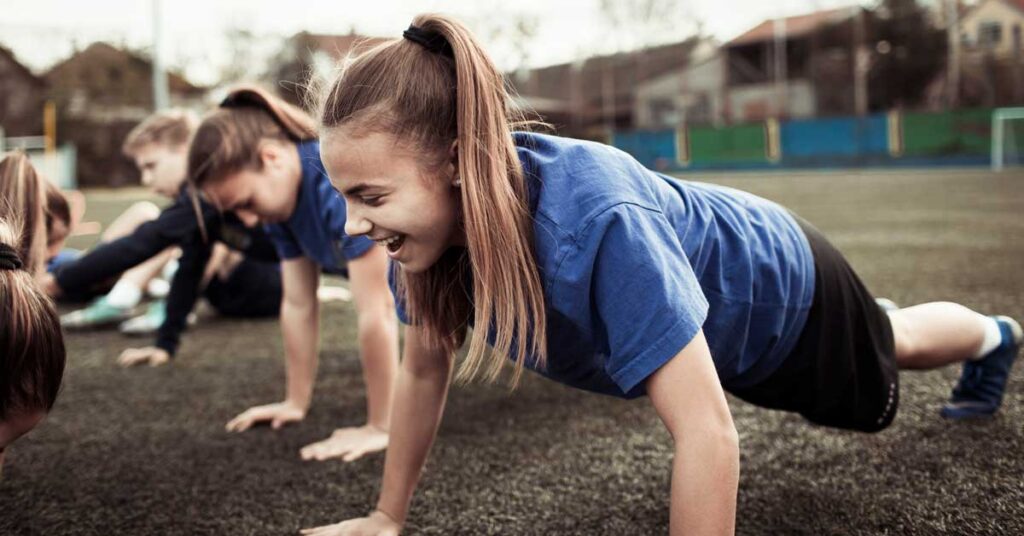
Teen pushups

I would love to have athletes available to train 52 weeks out of the year—and I’m sure many of you would echo that sentiment. That way, we can have our best shot of implementing the programs that we neurotically designed for our players and their needs. In D1 college athletics, you may get close to this, but even those coaches have to navigate time off and dead periods.

Training, by nature, is incomplete.

As strength and conditioning coaches, we are at best a small sliver of an already overflowing pie. I am not discounting the work that we do; many of us are reading, iterating, listening to podcasts, talking within our network, and exhausting any other avenue in order to put our best foot forward for our players. With that being said, solid training relies on long-term consistency over short-term intensity. Therein lies my problem.

Solid training relies on long-term consistency over short-term intensity. Share on X

If you’ve been in the iron game long enough, you will quickly find out that things never quite go as planned. What was once a meticulously mapped out four-week training block has suddenly become an index card with scribbles and revisions in red ink. This is an all too familiar experience of mine, working at a private PK–12 school. In a lot of ways, it is similar to many public schools, but there are two unique constraints that are central to my demographic:

  • Over 80% of students participate in at least one athletic sport. As a school, we rely on and encourage our students to participate in multiple sports.
  • There are far more days out of school and dead periods that limit exposures to consistent training.

I am a huge advocate of multi-sport participation: the benefits far outweigh the drawbacks from where I sit. The differentiation between sports and their required abilities are themselves a training means for our students. From a training perspective, this simply requires getting a little creative and dialing in what is realistic in terms of adaptations. This article will help outline some simple, practical training tools that you can use if you find yourself in the same situation. I am a believer that something is still better than nothing at all.

A Mile Wide, An Inch Deep

Strength and conditioning at a secondary school can at times feel like Groundhog Day. Depending on certain circumstances, it might be six weeks or so before you see an athlete again. I’m half-joking here, but the bottom line is, as a coach, I have to be comfortable with uncertainty and have the willingness to adapt on the fly. I’ve experimented with highly-focused training blocks—I felt that if I only have x amount of time, I might as well invest heavily in the target quality that will give me biggest bang for my buck.

Though I had success with this model, I’m not sure it was the best overall package for my athletes. As I transitioned to a more diverse program, I started to see equal if not better results. I also found that athletes enjoyed training much more and didn’t experience the staleness that comes with mind-numbing repetition.

As I transitioned to a more diverse program, I started to see equal if not better results. Share on X

I began creating base templates that I could use for my training sessions. Once I have a base template, I can iterate and make adjustments on the fly. Training sessions would be forecasted out on a daily and weekly basis, so I could be flexible whenever I was thrown a curveball. I made templates for:

  • Weight room
  • Speed training
  • Conditioning

I like a concurrent approach to training, so I would utilize these templates almost like a menu at a restaurant: I wanted everything to be present in some form or fashion. Based on the constraints and what our goal was at the time, the distribution of each session type would change. Let’s look at how I set up weight room work for my athletes.

Weight Room

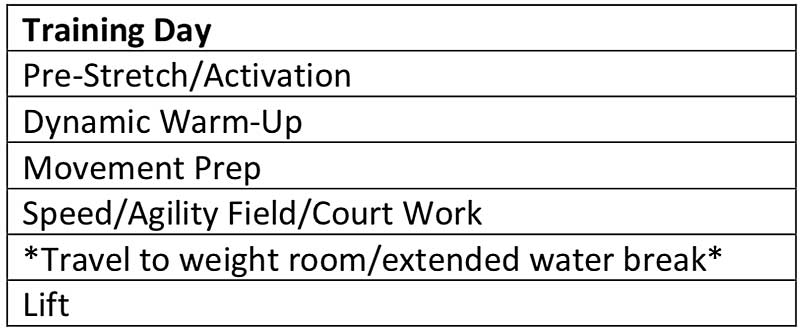
In the weight room I had to be simple. Simple in this case doesn’t mean easy. I wanted to have a training menu in place that took little time to teach, but still ticked off a lot of boxes. Here is my basic outline of what a session could look like.

Session Outline
Image 1. Basic session outline.

Heart Rate Elevation

Now let’s get through each category and I will show you some specific movements that I like to use. We start off every weight room session with some form of heart rate elevation. I like to use jumping rope or extensive jumps for this period. Not only do they raise heart rate, these jumps also help with elasticity, stiffness, and coordination of the lower limbs. These are done regardless of upper or lower emphasis. On upper body days, I might incorporate extensive medicine ball throws in this initial period or put them in as a primer before a main lift. Here is an example training menu that I pull from.

HR Elevation
Image 2. Training menu of exercises

Mobility

The next phase of the workout will focus on mobility. I am guilty of neglecting mobility in my programs—I always thought there were other things that needed to be done that were of a higher priority. It wasn’t until I started adding in some mobility exercises into my own sessions where I could see a huge difference in my performance. Not to mention my body felt a ton better.

For my purposes, I am not trying to reinvent the wheel. Joe Defranco has a short and sweet mobility routine called “Limber 11.” It goes through some foam rolling, stretches, and range of motion drills that can prepare the body for training. The circuit works, so I use it. Every so often I will add in some crawling to shake things up. While crawling is not technically mobility driven, it does have a stability component along with many other benefits. Five to ten minutes is all you need here.

Power

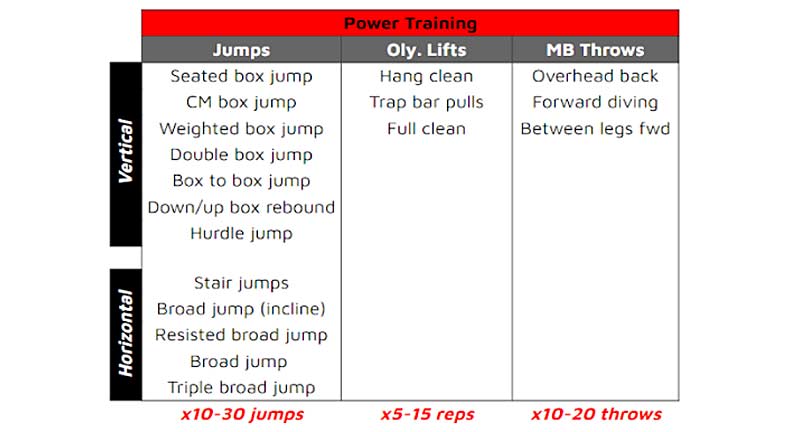
Once we finish up the initial warm up, I have the athletes perform some power-type activities. The movements during this period can be any type of jump, plyometric, Olympic lift variation, or medicine ball throw. Jumps/plyos are always included. The Olympic lifts or medicine ball throws will be the secondary choice.

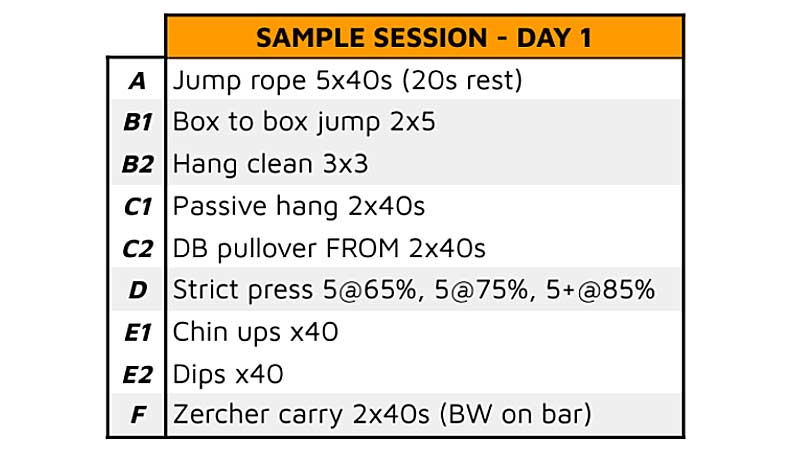
Typically, the prescription will be based on the sport, the athlete, what needs to be addressed, and training logistics. For the inconsistent athlete it is best to err on the side of caution. If I get an athlete of very low training age, I tend to always pick jumps. You can get a lot out of 15-20 quality, coached-up box jumps. If I see an athlete who has accumulated training sessions, I will dose hang cleans—light and fast cleans will reinforce technique and give us the primer power work that we want. Again, reps stay in the 10-20 range. Quality over quantity.

For the inconsistent athlete it is best to err on the side of caution. Share on X

Early in my coaching, Olympic lifts were a no go for me. I always felt that it took too much time, and quite frankly I wasn’t extremely confident in teaching them. What changed my mind was hearing great coaches like Al Vermeil, Dan John, and others speak about the benefits, along with how to progress the lifts. Like many things, I started with myself. After about four weeks, I felt polished enough to where I could train using a hang clean. From a performance and overall well-being side of things, adding these Olympic lift variations was a big net positive. Not to say they should be done with everyone, but it’s worth exploring and talking to coaches about. Here is an example breakdown of:

  1. What movements make up this period.
  2. How they are progressed throughout training.
Power Training
Image 3. Progression of power training exercises.

Range of Motion

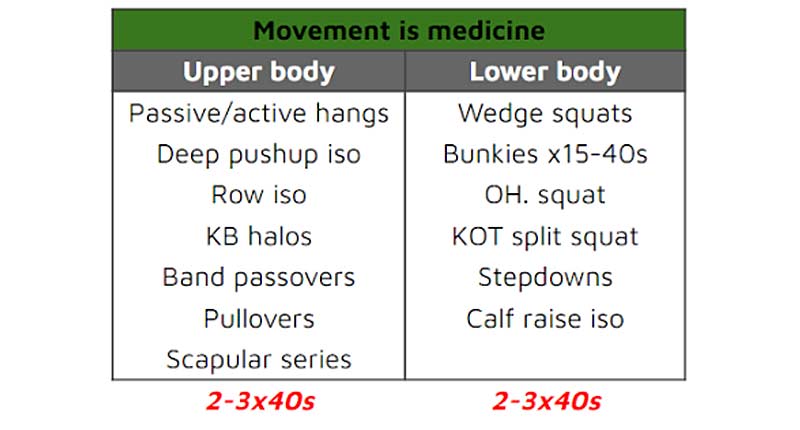
At this point in the session, the athletes are warmed up and primed for the main lifts and our “meat and potatoes.” During their main lift work up sets, I like to add in one to three movements to help with range of motion and overall integrity of specific body regions. I like to call these add-ins movement is medicine. These are done at relatively light intensity and the main goal is to grease the groove. Typically, I prescribe time instead of repetitions. It is also a good chance to put a tempo cadence on the repetitions to further time under tension and muscular work.

Here is a list of some of my go-to upper and lower body movements. I choose these for inconsistent athletes because they:

  • Are extremely easy to teach.
  • Require little equipment.
  • Can be done alongside their main lifts.
  • Address common movement issues that I see in my population of athletes.
  • Strengthen supportive structures that would take up too much time on their own.
  • Can aid in the warming up of specific musculature needed in the main lifts.
ROM Exercises
Image 4. Range of motion exercises.

Strength

For our strength work I keep it very simple. Sorry if you were looking for some Russian top-secret, double probation program, as Buddy Morris would say. The two best programs, in my opinion, are Jim Wendler’s 5/3/1 and Dan John’s Easy Strength. These programs trim the fat and are as essentialist as it gets for training. As long as you have a push, pull, hinge, and squat somewhere in your training, you will be fine.

As long as you have a push, pull, hinge, and squat somewhere in your training, you will be fine. Share on X

Both programs treat strength as a skill. You complete every rep in training and you “own” every rep. You can study up on both of these by clicking on the links above. I will provide the base template for 5/3/1 in terms of percentages. I like a total body approach, but strength work can easily be split into upper/lower. If you want to get fancier and your athletes are developed enough, you can adopt a Westside-style approach.

4 Week Template
Image 5. Base template for 5/3/1 training.

At this point in the session, the athletes have done a good bit of work. Training sessions using this approach tend to be a little on the longer side, but the volume associated with this program is built in a way that isn’t very taxing to athletes. This program is meant to accumulate repetitions from a variety of movements and planes of movement.

Since a program like this spares precious resources of the body, intensities of the main lifts can be programmed in waves. Once athletes become skillful at the lifts, then you can make trips up above their true 85% 1RM more often. For younger athletes, I will be overly safe when determining rep max ranges. I would rather them be too low than too high with their weight. A majority of early adaptation will be through the nervous system in the first place, so rep execution is crucial. I am a firm believer that this is a well-rounded GPP program that can be implemented to both prepare athletes for the season as well as train them during the in-season period.

For younger athletes, I will be overly safe when determining rep max ranges. Share on X

Accessory Lifts

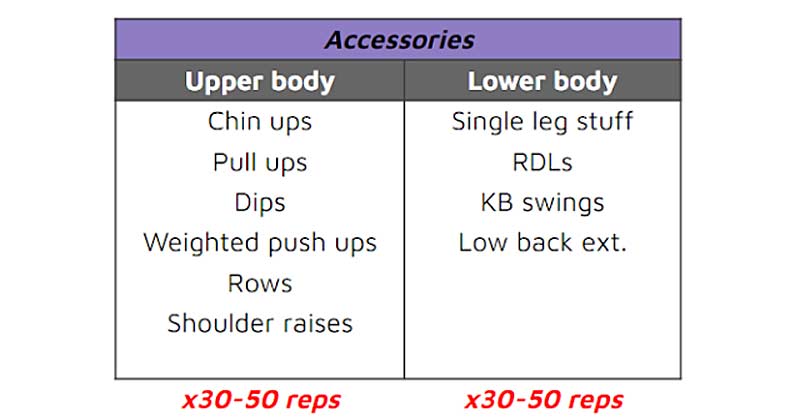
When it comes to accessory lifts, I pick those that give the most bang for your buck. Sure, I will add in some neck, traps, arms, and calves every once in a while—however, in my experience, athletes will end up doing this stuff on their own anyway. Don’t pick too many accessories, maybe just two or three depending on the session. Here are some of my favorites. Again, I choose these most often because they are no-fluff and they are effective as accessories to the main lifts.

Accessory Lifts
Image 6. Examples of accessory lifts.

Finisher

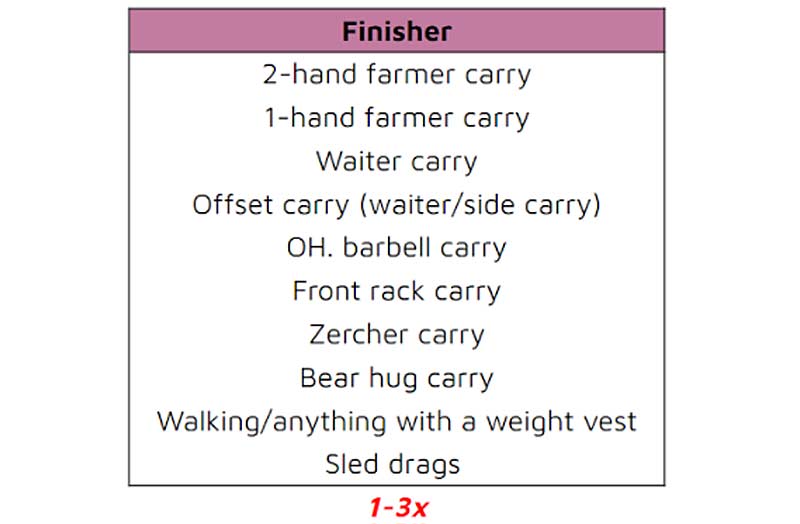
To cap off a session, more times than not I have athletes do a “finisher.” This isn’t your workout-of-the-day lactate-fest. All parties enjoy the finisher so that’s a win. My go-to is always a carry variation. Dan John talks about anaconda strength. Being able to brace and stabilize is important, especially under fatiguing conditions. Distances or times don’t have to be crazy—just enough for the athletes to feel it. They should leave the gym feeling good. Even if they grinded through it, they leave with a sense of pride.

Being able to brace and stabilize is important, especially under fatiguing conditions. Share on X

A recent conversation with Al Vermeil has opened my eyes to the importance of mental conditioning—if athletes believe they are working hard and you are gradually increasing that work over time, a winning culture has the soil to grow. As a coach, you have to keep them going up to a level that they never thought they could reach. But you have to be smart about it.

Other things I use are prowler pushes, rower machines, battle ropes, grip challenges, and long duration iso holds. Here are some of my favorite carries.

Finishers
Image 7. Examples of carries to finish a training session.
Sample Training Session
Image 8. Sample session putting it all together.

Final Thoughts

So, there you have it. A typical training session I would run that touches on a lot of different things. Sure, it doesn’t follow a neat periodization scheme; it does, however, give the athlete sound training and it also keeps them excited about coming back.

A perfect plan is useless if you have no one to use it with. Share on X

A perfect plan is useless if you have no one to use it with. If you coach athletes that are in and out due to school, sports, and family, then this is for you. It is hard to run a block system or a concurrent methodology if you only get four weeks here and four weeks there with athletes. When time is the enemy, any quality work is good work. It also gives you chances to try out new training methods. In my experience, young athletes love to be the guinea pigs as long as you explain to them what, how, and why. My speed and conditioning work would follow that general outline. The key is to not overcomplicate things. Exercise prescription and workloads are still based on common sense principles.

Give the athletes what they need and what they are ready for. A rule of thumb from coach Charlie Francis is looks right, flies right. You’ll know when changes need to happen. If it doesn’t work, reassess and find a new path.

Since you’re here…
…we have a small favor to ask. More people are reading SimpliFaster than ever, and each week we bring you compelling content from coaches, sport scientists, and physiotherapists who are devoted to building better athletes. Please take a moment to share the articles on social media, engage the authors with questions and comments below, and link to articles when appropriate if you have a blog or participate on forums of related topics. — SF


In Season Basketball

5 Key Protocols for In-Season Basketball Training

Blog| ByJustin Ochoa

In Season Basketball

One of my most significant mindset shifts occurred a few years ago, when someone referred to in-season as the longest, most consistent, unbroken training block of the year. This is so true—basketball off-season is in the summer, with numerous potential non-training periods. The season is, hands down, where you spend the most unbroken time with your roster. (I wish I remembered who tweeted that first so I could give a shoutout—apologies for my lousy memory).

Before adopting this outlook, I valued in-season training…but not as much as I should have. I knew it was important and obviously crucial to our athletes’ success, but I still was probably selling myself and our athletes short when it came to in-season protocols.

Now, in-season training is much more of a focused process than checking a box that simply says we lifted that day. For both the team and private settings, here are some helpful philosophies that I’ve used to get incredible results and feedback from our athletes.

1. Off-Season Influences In-Season

One of the biggest influences in any athlete’s training should be their own personal training history. Exercise history plays a significant role, no matter what time of year it is or what phase of training they’re in.

One of the biggest influences in any athlete’s training should be their own personal training history…In the case of the in-season athlete, this history is critical info, says @JustinOchoa317. Share on X

More seasoned athletes will have a long list of things they’ve tried, enjoyed, and/or hated, things that worked, things that failed, and so on. Inexperienced athletes with a low training age don’t have that list yet, but they have limitations as to what their programs can look like simply based on their training age (or lack thereof).

In the case of the in-season athlete, this training history is critical info. What did they do in the off-season and/or preseason? This answer should definitely dictate many in-season decisions.

It’s advantageous for coaches to look deeply into this because every athlete will have a different off-season. This is true at every level of the game, from high school to professional. A majority of these athletes are not running a program written by their team strength coach, and in some cases, some don’t even train regularly.

  • If athlete A participates in a well-organized program all off-season that includes lifting, sprint work, agility work, and skill development, I would say they had a useful off-season.
  • If athlete B needed surgery at the end of the season and spent the entire off-season doing physical therapy, that’s a very different situation than athlete A.
  • If athlete C doesn’t lift a single time and plays pick-up all off-season, that’s another unique scenario compared to athletes A and B.

But what if they’re all teammates? When they get back to their team, what if they all have the exact same program?

No bueno. There is no way players B and C can hang with player A in a training setting. But we see this all the time in sport. I understand the challenges that come with each sector of training, from private to team at various levels. Still, there must be some level of continuity in what that athlete has been doing and what they continue to do in-season. Otherwise, we risk a stupid and highly avoidable injury in training—which should never happen.

By using their off-season training info to drive their in-season programming, you’ll have a much better idea of their current strengths and weaknesses and how you can address each and then progress the athlete appropriately throughout the year.

2. Fill Gaps with Training

Piggybacking off point #1, in-season training is an excellent opportunity to fill gaps in an athlete’s training. This is twofold:

  1. First, of course, you could fill the gaps they may have from their off-season training situation.
  2. More importantly, though, in-season training should fill gaps caused throughout the year by the demands of the sport itself.

For basketball players, there are some catch-all red flags that we can look for as coaches, aside from the player’s individual needs.

The first gap we could potentially fill throughout the year is range of motion. Basketball is dominated by partial ranges of motion:

  • A defensive stance is a wide half squat.
  • Jump takeoffs often occur from a quarter squat position.
  • A jump shot is released in partial shoulder flexion.

Hoopers overload those partial ranges throughout the year and could lose strength and stability in the deeper ranges of those movements.


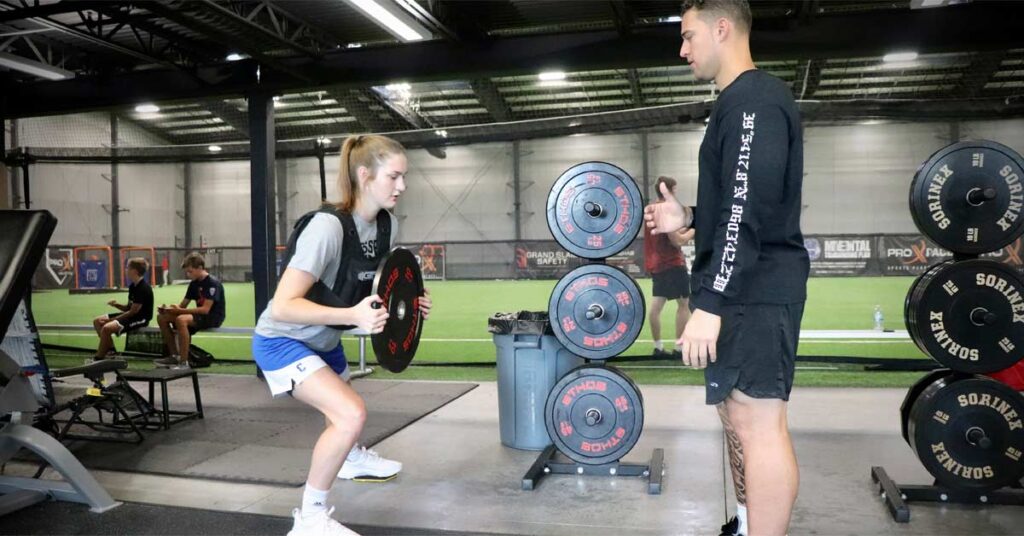
Video 1. In this example, the athlete maximizes ROM in this lunge variation by using a large plate to create a deficit, allowing him to sink deeper into his lunge and train strength through available ROM.

Just because many of the movements we see on the court are partial ROM doesn’t mean full ROM movements never happen. They do. And by continuing to give your athletes access and ownership of those full ranges via training, you’ll help them stay prepared for all movement scenarios they may see in the game.

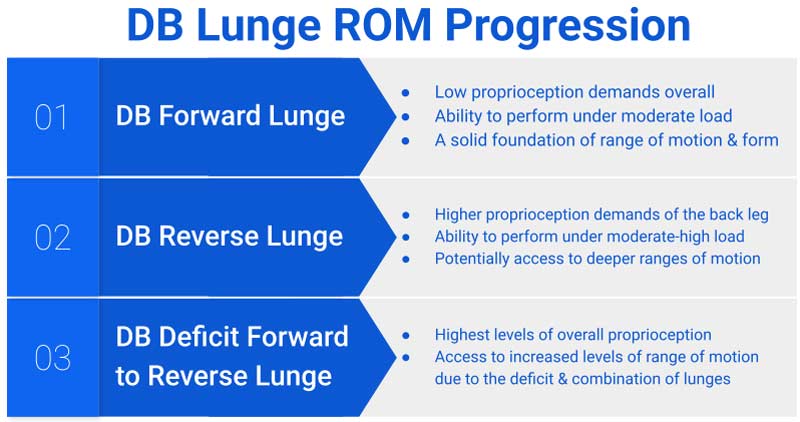
DB Lunge ROM
Figure 1. An example of a simple progression from a standard forward lunge to a reverse lunge, and then combining the two and adding a deficit to maximize range of motion.

Another critical gap we can fill in-season is exposure to specific outputs the athletes may lack during the game.

This is where my opinion may differ from a lot of coaches out there—many coaches I know believe that we should avoid jumping in-season because the players get that in their sport or that we should avoid sprinting because they get enough of that in their sport. I disagree. We should find jump and sprint variations that they don’t get exposure to in their sport and use them as catalysts to improve the actual in-sport variations. Keeping our speed and power outputs is a major goal during the season.

We should find jump and sprint variations that athletes don’t get exposure to in their sport and use them as catalysts to improve the actual in-sport variations, says @JustinOchoa317. Share on X

For example, I don’t think there’s any harm in appropriate volumes of single-leg jumping for an athlete that is a two-foot jumper on the court. I feel that this gives them exposure to their non-preferred jumping style in a safe and controlled setting, enhancing their output and giving them confidence in that style of jumping.


Video 2. Believe it or not, this athlete had trouble touching the rim using a single leg (left) takeoff simply due to lack of exposure. As you can see, he doesn’t lack the physical qualities.

The highest jumper I’ve ever trained is a two-foot jumper. His max approach jump has been measured as high as 47 inches. He can get that high going left-right and right-left. At one point, he could barely touch the rim off a left-leg-only takeoff. He had no injuries or abnormalities in structure—he simply wasn’t good at it. And because he wasn’t good at it, he was discouraged from training it. And discouraged to use that takeoff in games. This could have potentially taken away playmaking opportunities.

We worked on it at very moderate doses and eventually got his ability in a single-leg takeoff within 10% of his preferred two-foot gather. Now he has access to all four takeoff styles with confidence, which has undoubtedly positively impacted his game.


Video 3. This athlete performs a 30-meter sprint against 1 kilogram on the 1080 Sprint, which is basically a full-court sprint (plus 4 extra feet), with the goal of maximal velocity and maximal recovery time between reps.

The same can be said about speed. Basketball is a game full of so many different paces, but a large portion of the game is played in acceleration. Many athletes don’t get much max velocity exposure in the games, so we can fill that gap by training max velocity during the season.

Again, just because basketball is acceleration-dominant doesn’t mean max velocity will never happen. It will. And, again, by continuing to give your athletes max velocity exposure, you’ll help them stay prepared for all paces of the game and probably make improvements along the way. More than likely, if max velocity improves, so will acceleration—it’s a win-win.

There are so many gaps we can fill as coaches during the season. The examples I used are simply the ones that I consider the most universal in in-season programming.

Other more unique examples include:

  • Movement patterns: What movement patterns are basketball players not getting directly from the sport? Can you load them and achieve a productive outcome?
  • Diet and nutrition: What nutrients do athletes lack during the season? Being indoors and a winter sport, I would venture to say vitamin D is probably a concern. Can we eat or supplement that? What nutrients do we lose in sweat? Can we eat and supplement them?
  • Feet: Basketball shoes are great for basketball but terrible for our feet. Can we train without our shoes whenever possible to restore foot function and continue to give our foot/ankle stimulus directly on the floor?


Video 4. Tightrope walks are now a staple for our basketball players. Get them out of their overprotective shoes and let their feet feel a training stimulus again.

3. Assess, Don’t Guess

I’ve written about VBT in the past, so it’s no secret that I am a huge fan of technology in training. During the season, technology can help coaches make more informed decisions based on the trends of the data we have access to.

Some coaches have access to extraordinary amounts of tech and data, while others may have little to no tech implementation. I think there’s something here for everyone. What the Los Angeles Lakers have will be different from what the 1A high school in rural Indiana has. But having something helps!

The more you can go from “I’m not too sure” to “I think so” to “I’m pretty sure,” the better. Use whatever you can to take the guesswork out of your system.

We all have access to two old school and FREE readiness indicators: the box score and the schedule. These include crucial info: minutes played and travel logistics, says @JustinOchoa317. Share on X

Velocity-based training is an excellent way to have a built-in readiness test within your training. Simply looking at what the athlete did in previous weeks versus what they’re doing on that day can help you make on-the-fly programming decisions for each individual athlete. The autoregulation is built in because you’re training for a target bar velocity rather than a target load or target percentage of 1RM.

And while VBT is cool and all, we still have access to two old school and FREE readiness indicators:

  1. The box score.
  2. The schedule.

These two things include a pair of crucial pieces of info:

  1. Minutes played.
  2. Travel logistics.

Basketball season is a grind, with a lot of travel and potential back-to-backs. Depending on the level of play, this can really impact player energy.

During the season, athletes who aren’t getting a lot of playing time can capitalize on many training opportunities. On the flip side, athletes who start and play most of the game will obviously have higher levels of fatigue accumulation throughout the year. The programs for these two groups of athletes may look different from day to day.

We can use box scores as a bare minimum for readiness testing. My colleague, Coach Dre Davis, head basketball coach at Warren Central High School, uses a “Total Work Chart” to get an even more in-depth look at the box score. This chart includes minutes played, scoring, assists, rebounds, and all the typical statistics, but he also tracks high-effort situations such as charges taken, 50/50 balls won, defensive five-second calls, and other stats that don’t show up in the box score.

The amount of “total work” an athlete does on the court may not show up in the box score. However, it gives us a good idea of how active and impactful a player was during their time on the court and is another great tool to coincide with the standard box score for determining how players may feel throughout the year.

Be rigid with your training goals but flexible with how you help athletes achieve those goals. This goes for training year-round, not just during the season, says @JustinOchoa317. Share on X

Be rigid with your training goals but flexible with how you help athletes achieve those goals. This goes for training year-round, not just during the season—but finding ways to mold your program around the individual will always pay off.

4. Watch Film

This is my absolute favorite way to improve in-season training—watching the game that I love! The first article I wrote for SimpliFaster was about how strength coaches can influence training by watching film. Since writing that, I believe in film study with even more conviction.

Earlier in this article, we talked about filling gaps, and watching film is one way you can further understand how to do so. When you watch game film, you can take note of movement quality, repetitive movement patterns, major inefficiencies, major strengths, and more than just the X’s and O’s of the game.

When it comes to film study, you can get as deep as you want and as creative as you want. Not to mention, technology like Hudl and Synergy can sort all of these plays by player, actions, outcomes, and just about any other variable you can think of.

Basketball Data
Figure 2. As a student of the game and a genuinely curious coach, I like to analyze even players who I don’t work with. NBA players usually have much more available film and data: this shows that an NBA athlete drives left at a far more frequent rate than going right. This player missed several games and eventually ended his season with a right hamstring injury while driving to his left. When driving to the left, the demands and stresses on the right ankle, adductors, and hamstring complex are enormous. Perhaps this helps explain a non-contact right hamstring injury late in the season that, if uncovered earlier, could have driven different training and therapy decisions.

Also, we can watch how things transfer (or don’t transfer) from training to the game. One of the most significant examples that come to mind is when coaches try to coach a “false step” out of an athlete. Then, when you watch the actual sport, you see nothing but “false steps.” So maybe we should just leave the false step alone because it is a natural and efficient movement strategy and train our athletes to be robust and durable enough to perform that false step without further risk of injury.

The possibilities are truly endless when using film study to find creative ways to help our athletes. It’s a highly untapped resource in our field, says @JustinOchoa317. Share on X

This video shows a random possession from the 2021 WNBA Finals game 4—as you can see, on the offensive side of the ball alone, there are two false steps within one possession. Trying to coach this movement out of athletes is not a good use of our time because it will consistently continue to happen naturally in games.

The possibilities are truly endless when using film study to find creative ways to help our athletes. It’s a highly untapped resource in our field. It’s fun, engaging, and outside the box. All of this helps us grow as coaches. So many hunches can be confirmed on film, giving coaches the confidence to act on those hunches and potentially make impactful training decisions for the athletes.

5. Communicate Proactively

Last but certainly not least comes communication. The key here is proactive versus reactive communication. Honestly, this might be the most important point here, but if I started the article off with something this boring and straightforward, you wouldn’t still be reading.

As much as I love technology and new ideas, I still think personal connections are the lifeblood of our industry. Earning trust, showing empathy and support, and trying to be a universal resource to our athletes at all times is probably the best injury mitigation strategy we have.

As coaches, we must remain proactive during the season with our communication and player relationship development. S&C coaches, along with all medical personnel, should know about every bump, bruise, ache, and pain. This way, we can respond to small things while they’re small and avoid them becoming big things in the future.

As much as I love technology and new ideas, I still think personal connections are the lifeblood of our industry, says @JustinOchoa317. Share on X

The basketball season is a grind, for sure—but that doesn’t mean we can’t continue to improve through it! By taking these five fundamental actions, we can give our athletes a safe and effective in-season training experience and help reduce the myths of in-season training to help push our field forward to new levels.

Since you’re here…
…we have a small favor to ask. More people are reading SimpliFaster than ever, and each week we bring you compelling content from coaches, sport scientists, and physiotherapists who are devoted to building better athletes. Please take a moment to share the articles on social media, engage the authors with questions and comments below, and link to articles when appropriate if you have a blog or participate on forums of related topics. — SF

Back Squat

Bilateral vs. Unilateral: The Great Squat Debate

Blog| ByDrew Hill

Back Squat

Twitter is a dangerous place to be when you don’t retweet what the masses believe. It never fails; each time I type in my username and password, I find comments that raise my eyebrow, but I hesitate to chime in. There is a lot of toxicity among coaches who disagree in the field of sports performance. As we all know, Twitter has evolved into a dumping ground for people to leave their opinions—good or bad. I appreciate positive discourse as much as the next person, but personal growth rarely occurs on this particular social platform.

So, when I discovered dozens of tweets from GOOD strength coaches saying they didn’t want to bilateral back squat anymore, I genuinely had to reevaluate my stance (no pun intended). This wasn’t your standard lowbrow name-calling, but a series of points that made great sense.

So, I thought to myself, why DO we back squat bilaterally?

Out with the Old, In with the New?

Strength is very important. Years of research and anecdotes have proven that getting stronger yields great results, especially at first. Physics will even teach us that the ability to create force affects all movement. In 1969, the University of Nebraska saw the value of strength in sports and hired Boyd Epley as the first-ever strength and conditioning coach. While other teams were favoring calisthenics, Nebraska was bending bars and getting PRs. Nebraska won five national championships with the help of Boyd and his revolutionary weight training.1

Fast forward to today, and even the smallest of junior highs has some form of weight room access. The sporting world has come to realize that Strength is King! But this wasn’t the argument I was seeing on Twitter; it was about which strength actually mattered. The longer you are in this field, the more exercises you will see come and go—not because of their effectiveness but because of their popularity.


Video 1. An incoming eighth-grader squatting 300 pounds for 10 reps.

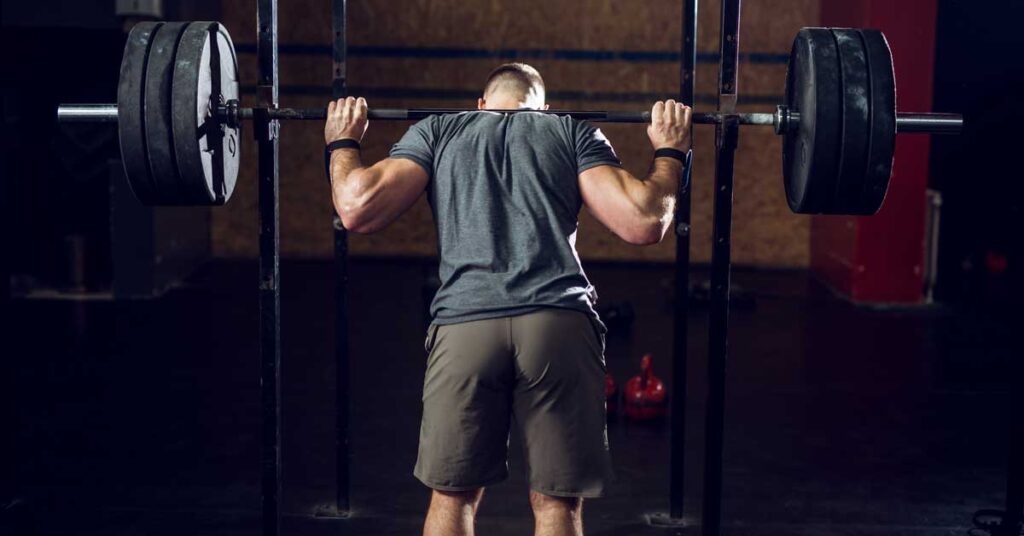
The bilateral squat is one of the most common exercises athletes do. Walk into an offseason program, and you will find some version of it being done: back, front, box, and in many high schools, the quarter. But on the “opposite” side of sports training, things look slightly different.

We are slowly turning the bilateral back squat into the Batman of S&C. It came in to save us from small legs and slow sprints, and now we want nothing to do with it, says @endunamoo_sc. Share on X

Therapists and athletic trainers spend most of their time developing single limb and unilateral squat strength and proprioception. Both seem to get results and make athletes feel and perform better. With squats being the breadwinner of the weight room for so many years, I wanted to know why many seasoned coaches were protesting the traditional bilateral version for the more “therapeutic” unilateral? We are slowly turning the bilateral back squat into the Batman of strength and conditioning. It came in to save us from small legs and slow sprints, but after years of being misunderstood, we want nothing to do with it. You either die a hero or live long enough to become the villain.

If Everyone Else Jumped Off a Bridge, Would You?

Whenever I saw the “squat” signal on Twitter, I peeked at the comments to see what most of the complaints were and found a lot of pros and cons to the arguments. Rather than Monday Morning Quarterbacking the discussion among my peers, I decided to step into the arena and give my two cents. For each argument, I wanted to share my own pro and con and cite my reasoning for either/or.

I don’t want to see new coaches look at the anti-squat movement and take it as gospel without hearing an argument from the pro side. But I also don’t think we should ignore the great points made for unilateral dominant lifting. If this happens, we might find a generation of athletes missing out on the fundamental advantages of either version. After hours of sleuthing, I determined these were the three primary conflicts to both argue against and defend.

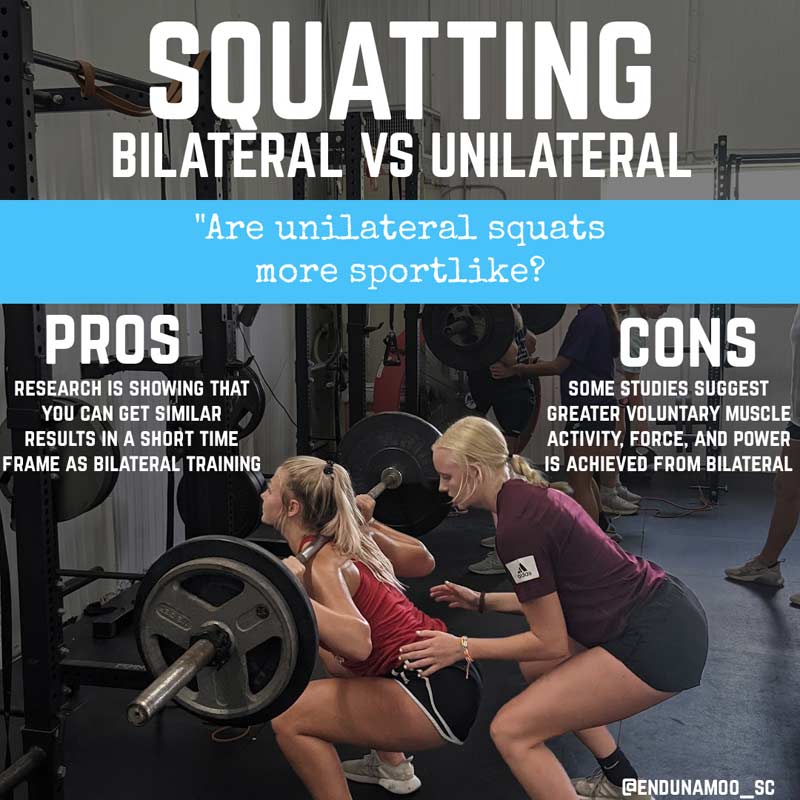
1. Unilateral Squats Are More “Sport-Like”

This has to be the biggest and most common argument against traditional bilateral squatting. And I get it. Unilateral training is a critical component in building transferable performance.

Pros

There is a difference between saying you should squat unilaterally and saying you should only squat unilaterally. Read that again if you need to. I also need to express that unilateral is not the same as single leg. By splitting the stance, we can mimic the hip angles of sprinting. This is most likely why some research finds that unilateral strength training (even with less weight) can create nearly equal performance gains as bilateral strength training.2 If less weight can achieve almost identical gains in performance, this might be a low-cost way to improve performance in the weight room.

There is a difference between saying you should squat unilaterally and saying you should ONLY squat unilaterally, says @endunamoo_sc. Share on X

Cons

That being said, let’s not forget a primary reason we train hard in the weight room—to improve key performance indicators (KPIs). There will be many arguments about strength training, but ultimately, we spend hours in the weight room to maximize our muscles’ output. There are many arguments as to what a good KPI is but being able to produce more FORCE is not up for debate.

Newton’s laws show us that we cannot affect our surroundings or ourselves without force. So, if the goal is to produce more force, we want to be able to maximally recruit more muscles and generate a greater output when we train. The max voluntary contraction is when we can utilize more of our muscles’ force potential on and off the field.

When performing bilateral squats, we are in a balanced and controlled environment that allows for greater voluntary contraction, force, and power without worrying about BALANCE.3,4 The most significant drawback of unilateral training is the inhibitory component of finding your ground. If I pushed you while you stood on one leg or two, on which would you have better balance? Two legs, of course.

Therefore, greater voluntary contraction is possible in this position. It’s the same thing as lifting weights on imbalanced surfaces. If the ground under you is shaking, you produce less force as your body prioritizes not falling over. This doesn’t mean we shouldn’t strengthen our bodies unilaterally, but it does mean that max contraction, and possibly max force, is easier to train from a bilateral stance.

Squat Debate

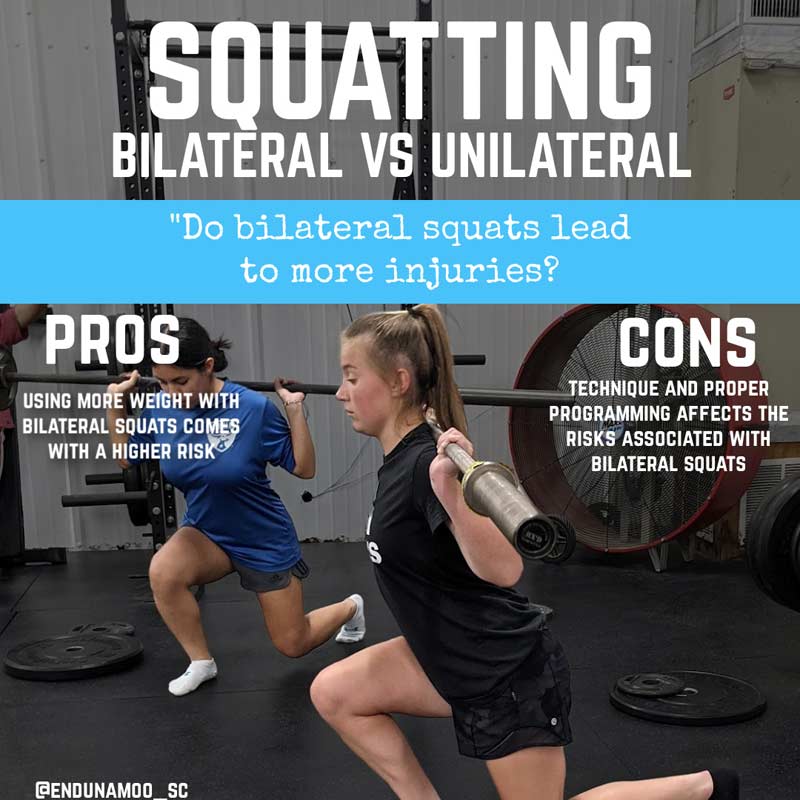
2. Bilateral Squats Are More Dangerous and Lead to Injuries

I was surprised when I saw this comment pop up more than once. I shrugged it off, assuming the injuries were most likely related to the knee—an old adage some coaches have against deep squats. However, to my surprise, the argument was that bilateral squats caused back injuries in athletes. As someone who powerlifted for his college and has a decade of competitive history, I took this one personally. It took years to convince people squatting wasn’t counterproductive for knees, and now we’ve demonized it for the back.

Pros

If you’ve ever worked with high-commodity athletes, you know what rule #1 is DON’T HURT THE ATHLETE. Working with someone who is or has the potential to “make it” is a curse and a blessing at the same time. So, when faced with exercise selection, you must choose what has the highest reward for the lowest risk.

If someone tells you that bilateral squatting has no risk, they are lying to you. Likewise, if someone says doing anything in the weight room has no risk, they’re also lying. For example, throwing a medball against a wall seems harmless…right? Unless that someone is a college pitcher, that ball bounced back faster than they expected, it jammed their finger, and they have games coming up. So, if we have someone in a competition phase or who has a nagging injury exacerbated by bilateral squatting, it might be best to utilize unilateral squats instead.

Cons

Like most people, I trained like I was invincible in my early competitive days. I thought I had all the techniques figured out, but in true Dunning-Kruger fashion, I had a lot to learn. As you can guess, my youth wore off, and I suffered a pretty frustrating back injury—not from squatting, but deadlifting. I let my ego determine how I lifted and not my actual physical preparedness.

Being in college and surrounded by people who really didn’t know how to help me, I had to go on a personal journey to fix my technique. At the end of this adventure, I concluded that these four minimum tenets, which have reduced (if not eliminated) back injuries from our program over the years, should take priority.

  1. Proper abdominal bracing (intra-abdominal pressure).
  2. Depth of movement over weight lifted.
  3. When range of motion (ROM) is affected, cue knees over toes, not chest down.
  4. DO NOT overarch the low back or shift the hips to get away from sticking points.

The first cue has to be the most critical yet under-taught component to lifting in most weight rooms. I have even found myself teaching bracing patterns to high school state powerlifting champs who regularly suffer back pain at school. Within weeks of rehab and technique corrections, they hit PRs and feel healthy again.

I would compare athletes back squatting to my grandparents on the computer—the tool is as good as the person using it, says @endunamoo_sc. Share on X

Teaching a young adult to curb their ego even when you’re not looking is easier said than done. If I had a dollar each time a kid broke one of these rules on their own to get an out of gym “PR,” I’d have enough money for a new truck. Bilateral squats don’t inherently have high risks when being implemented. I would compare athletes back squatting to my grandparents on the computer—the tool is as good as the person using it.

Bilateral Unilateral Squats

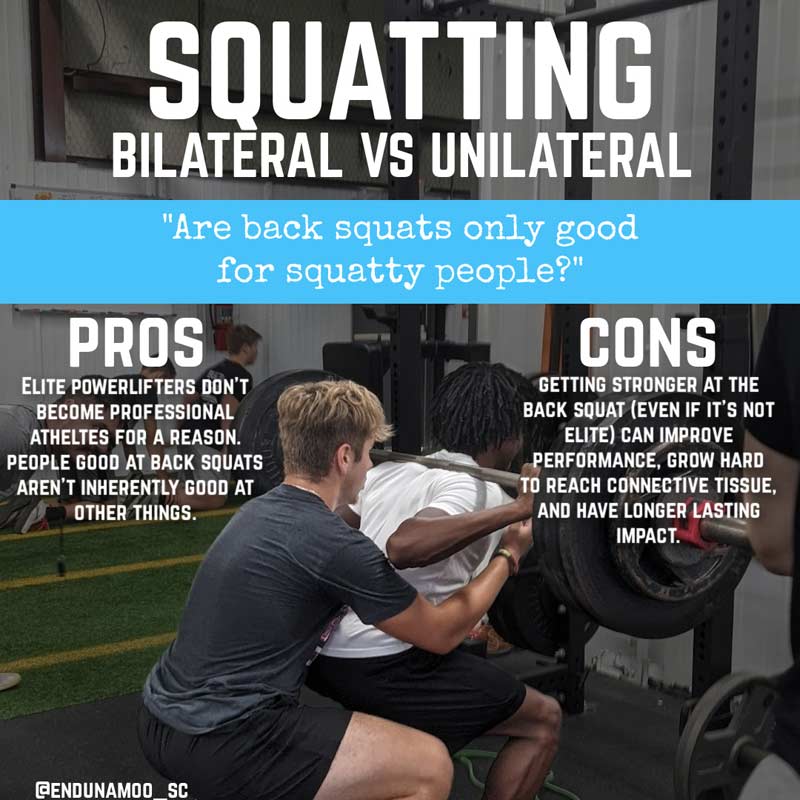
3. Back Squats Are for Squatty People, Not Athletes

Let’s be honest; the only sports requiring a perfect squat are weightlifting ones. I absolutely understand where this argument comes from, but if this is the case, NO athlete should lift any weight. Since we can agree that strength training has benefits, we need to decide if and when to change the type of lifting based on our athletes.

Pros

The number of elite powerlifters transferring into the NFL or MLB is equal to the number of people who can prove that the earth is flat—zero. However, many ex-college football players have found success in powerlifting after a subpar collegiate experience (yours truly included). If the list is so heavily stacked in one direction, we must ask, why is that?

The answer must be that back squats favor athletes who are not particularly, for lack of a better term, athletic. There are many ways to improve strength in athletes outside of the bilateral squat, and honestly, it’s a numbers game in the end.

This next story is an anecdote, but I bet many coaches have their own versions. I have an international basketball player who comes home with horrible knee pain every offseason. A combination of genetics, poor collegiate training, and the grind of being in another country causes his body to fall apart each season. Standing at 6 foot 6, he was never a good squatter, and most of his college coaches didn’t even train the lower body in the weight room. Once he is back, we are able to get his legs healthy and stronger, but the approach we take is not the old-school HEAVY WEIGHTS method. The majority of his strength program is unilateral, with some bilateral squat work. At most, he back squats 300 pounds for one rep without any discomfort.

That being said, we will perform sets of 5 and 10 doing split squats at 150-plus pounds. Simple math reveals that 150 pounds per leg equals 300 pounds total, but instead of one hard rep, we are accumulating much more volume. I’ll admit that my math is oversimplified since his other leg contributes, and range of motion might be a factor. However, ultimately, we are still developing strength at “similar” loads and higher volume.

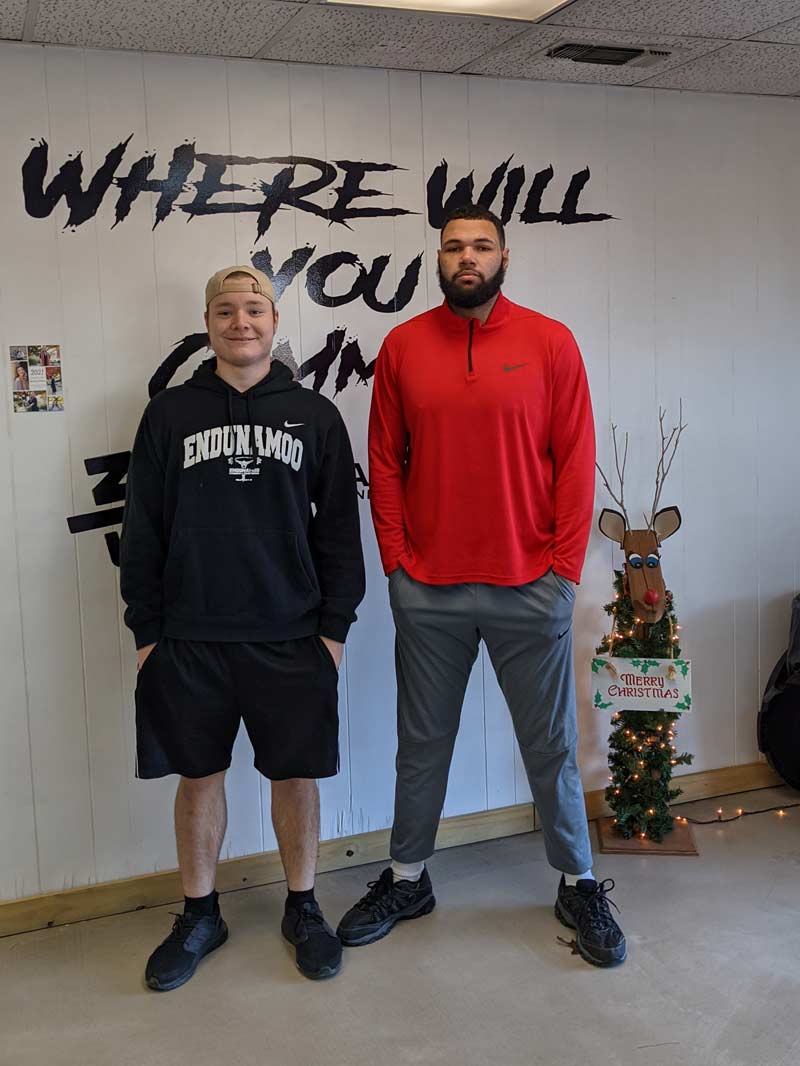
Squatty Non-Squatty
Image 1. On the left, a college freshman powerlifter (squatty); on the right, a D1 basketball player (not squatty).

Cons

If you’ve ever been in a college weight room, you know you will find plenty of individuals opposed to bilateral squatting—most of them being “dramatic” athletes. I have seen guys who made it to the NFL do anything and everything they can to not squat.

“It’s my back.”
“My leg is sore from practice.”
“I have a headache.”

Once I sifted through the excuses, I learned it had little to do with the exercise itself and everything to do with how weak they are at it. Plenty of professional athletes never had to back squat as they dominated their sports. Lebron James hasn’t done a squat yet (even though his trainer thinks he did). These are top-tier athletes who don’t enjoy being bad at something, and since they are not built squatty, they want nothing to do with it. The solution is not to convince them they will be a state champion powerlifter but to explain the many benefits of getting stronger in the deep squat. Squatting should have little to do with how much they lift and more with how much more they can correctly do than when they started.

Squatting should have little to do with how much they lift and more with how much more they can correctly do than when they started, says @endunamoo_sc. Share on X

If I had to give a quick list of reasons bilateral squats are beneficial, I’d tell them:

  1. Deep back squats are correlated with the improved thickness of the ACL and connective tissues within the knee. Whether or not you can squat a lot, performing regular deep squats through adolescence seems to grow this essential tissue.5
  2. Improving the squat is associated with increased vertical and improved sprint times. You don’t have to lift a house to see benefits from getting stronger.6 Likewise, bilateral training might impact things that require more strength, such as change of direction and deceleration.7
  3. Bilateral performance training seems to have a greater magnitude for performance increases with a longer impact duration. While research shows unilateral training has rapid, short-term gains (less than six weeks), bilateral development has a slower but greater and longer-lasting process (12+ weeks).8

Squatty Debate

Should I Do Bilateral or Unilateral Squats?

It’s the great debate. Bilateral squats were once a hero to the people, saving the town. But now the crowd is divided on whether we need this “vigilante” in our weight rooms anymore. Post a video of a heavy back squat on Twitter, and one group will praise the performance while another will call for your head. After hours of deliberation and study, I knew there had to be more to the story.

Many papers show that unilateral training and bilateral training improve performance, but the combination of the two ultimately creates the BEST results, says @endunamoo_sc. Share on X

When you research bilateral versus unilateral training, you will begin to see a trend. Many papers show that unilateral training and bilateral training improve performance, but the combination of the two ultimately creates the best results.9In a world of black and white, Republican and Democrat, Apple and Android, it might be best to fall in between somewhere. Based on my exploration of social media strength coaches, I believe following these rules should create the safest and most productive program:

  1. Perform bilateral squats within the capacity of the user at a minimum effective volume.
  2. DO NOT treat unilateral training like an afterthought but program the intensity to match the rest of your program.
  3. If bilateral squat training creates a recurring problem for an individual, remove that risk factor
  4. Pairing bilateral and unilateral training seems to produce the best long-term results. There can be more than one hero in this movie.

So, the next time someone asks whether they should do unilateral squats or bilateral squats, I’m going to say YES.

Since you’re here…
…we have a small favor to ask. More people are reading SimpliFaster than ever, and each week we bring you compelling content from coaches, sport scientists, and physiotherapists who are devoted to building better athletes. Please take a moment to share the articles on social media, engage the authors with questions and comments below, and link to articles when appropriate if you have a blog or participate on forums of related topics. — SF


References

1. Shurley JP and Todd JS. “The Strength of Nebraska.” Journal of Strength and Conditioning Research. 2012;26(12):3177–3188.

2. Speirs DE, Bennett MA, Finn CV, and Turner AP. “Unilateral vs. Bilateral Squat Training for Strength, Sprints, and Agility in Academy Rugby Players.” Journal of Strength and Conditioning Research. 2016;30(2):386–392. doi: 10.1519/JSC.0000000000001096. PMID: 26200193.

3. Eliassen W, Saeterbakken AH, and van den Tillaar R. “Comparison of Bilateral and Unilateral Squat Exercises on Barbell Kinematics and Muscle Activation.” International Journal of Sports Physical Therapy. 2018;13(5):871–881.

4. Núñez FJ, Santalla A, Carrasquila I, Asian JA, Reina JI, and Suarez-Arrones LJ “The effects of unilateral and bilateral eccentric overload training on hypertrophy, muscle power and cod performance, and its determinants, in team sport players.” PLOS ONE. 2018;13(3):e0193841.

5. Grzelak P, Podgorski M, Stefanczyk L, Krochmalski M, and Domzalski M. “Hypertrophied cruciate ligament in high performance weightlifters observed in magnetic resonance imaging.” International Orthopaedics. 2012:36(8):1715–1719.

6. Wisløff U, Castagna C, Helgerud J, et al. “Strong correlation of maximal squat strength with sprint performance and vertical jump height in elite soccer players.” British Journal of Sports Medicine.2004;38:285–288.

7. Appleby BB, Cormack SJ, and Newton RU. “Unilateral and bilateral lower-body resistance training does not transfer equally to sprint and change of direction performance.” Journal of Strength and Conditioning Research. 2020;34(1):54–64.

8. Makaruk H, Winchester J, Sadowski J, Czaplicki A, and Sacewicz T. “Effects of Unilateral and Bilateral Plyometric Training on Power and Jumping Ability in Women.” Journal of Strength and Conditioning Research. 2011;25(12): 3311–3318. 10.1519/JSC.0b013e318215fa33.

9. Ramírez-Campillo R, Burgos CH, Henríquez-Olguín C, et al. “Effect of Unilateral, Bilateral, and Combined Plyometric Training on Explosive and Endurance Performance of Young Soccer Players.” Journal of Strength and Conditioning Research. 2015; 29(5):1317–1328. doi: 10.1519/JSC.0000000000000762

Trinity WR

Facility Finders: Trinity College (CT)

Blog| ByJohn Delf-Montgomery

Trinity WR

Welcome back to another installment of Facility Finders, where I find the newest weight room remodels or projects from across the country, spanning all sectors of strength and conditioning. This process isn’t taught to any coach in school, and it is a once-in-a-career type of activity for many of us.

All facility designs need questions to be asked and decisions to be made, such as:

  • How big can or will the space be?
  • What type of equipment needs to be purchased?
  • Which brands, purveyors, and manufacturers should be chosen?

I want to highlight how to answer those questions, and many more, during the design process. First, we will examine how and why those decisions were made at Trinity College.

Facility Finders reached out to Coach Bill DeLongis, the Head Strength and Conditioning Coach at Trinity College in Hartford, Connecticut, who recently remodeled his weight room. Most coaches find themselves involved in renovating an existing facility because it is rare that the budgets at most schools allow for a brand-new building where the coach gets to design every square foot. This type of redesign is common at Division III schools like Trinity College, and DeLongis was able to upgrade the facility to a space that better fits his coaching philosophy.


Video 1. A virtual tour of the facility at Trinity College, remodeled under the direction of Coach Bill DeLongis.

Facility Decisions

In 2017, Coach DeLongis was asked to design a complete renovation of Trinity’s varsity weight room. After a year of meeting with equipment companies and choosing everything that he wanted, he saw his hard work pay off in 2018. His three main concerns for this project were:

  1. Quality of equipment.
  2. Flow of the room.
  3. Cost (via versatility/reliability).

“We run a lot of small group sessions with various teams sharing the room, so I needed sections in the room to create a better flow for when the room is crowded,” said Coach DeLongis, discussing how he needed the room to flow.

Trinity Dumbbells
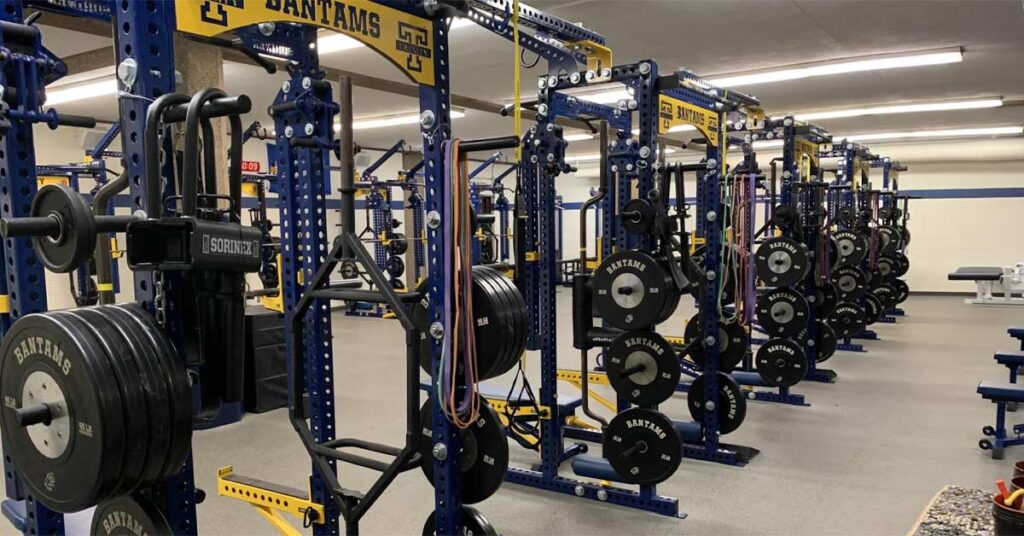
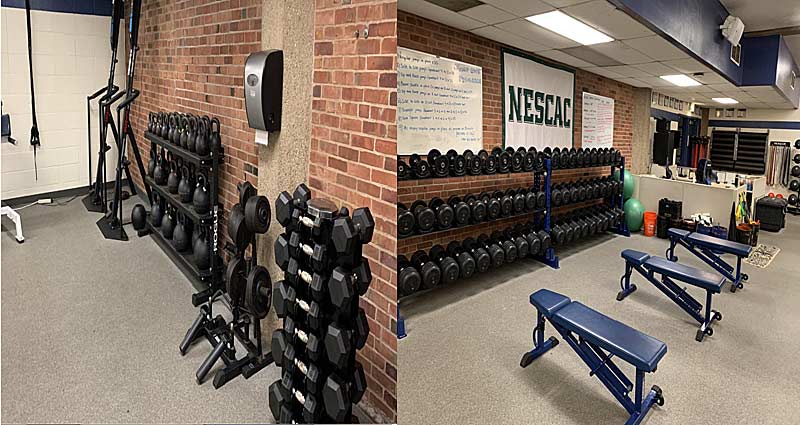
Images 1a & 1b. Auxiliary training spaces around the racks at Trinity are separate from the main training area. These spaces feature dumbbells, kettlebells, versa climbers, and benches.

Trinity has a utility space that athletes use for warming up and medball work. It also serves as an auxiliary training space for larger groups.

“We sometimes put out squat stands on the outdoor turf to use if we need,” DeLongis said, mentioning a key small school hack to grow their square footage when needed.

It is multi-use spaces close to one another that enable schools like Trinity to train all of their 28 sports in a facility the size of theirs. Turf space in the front and back of the weight room gives coaches a place to have a team warming up or finishing while another team is in the weight room training. That ability—along with staffing—allows smaller weight rooms to function with a constant flow of teams and groups.

It is multi-uses spaces close to one another that enable schools like Trinity to train all of their 28 sports in a facility the size of theirs, says @johndelf99. Share on X
Squat Racks
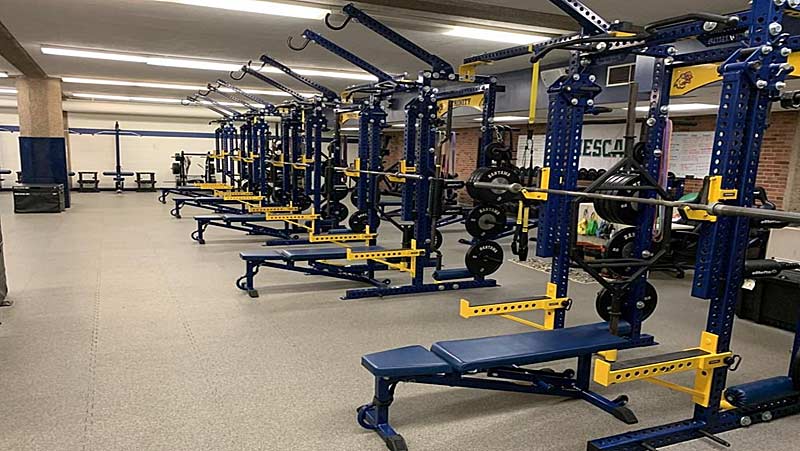
Image 2. Five of the 10 total racks at Trinity that Sorinex fully customized

When deciding on the company they wanted to bring in to source their facility’s needs, Trinity chose South Carolina-based Sorinex. Why Sorinex?

“Sorinex is the industry-leading equipment company our country has to offer for our athletes. They are the best,” DeLongis said. “Our budget for this project was not massive, so a lot of the bells and whistles as far as attachments were something we would shoot to add over time. That ability to have a base rack from Sorinex that we can add on to slowly was the piece that schools like Trinity need.”

Similarly, many schools do not have the huge budget to pay for everything in one fell swoop, and new attachments are created after facilities are remodeled. The fact that Sorinex designs its products to essentially “plug and play” is an essential aspect of their versatility. As things evolve and change within the industry, the ability to add pieces that the athletes need—and remove the pieces that no longer serve their purpose—is something you don’t get with a fixed machine or specialty equipment.

Think about this: Jammer arms were a must-have for “explosive” training, then coaches realized how much better they were as liftoff releases. That versatility gives longevity to those add-ons, and I think Jammer arms would be obsolete now without that multi-use functionality.

Spotter Arms
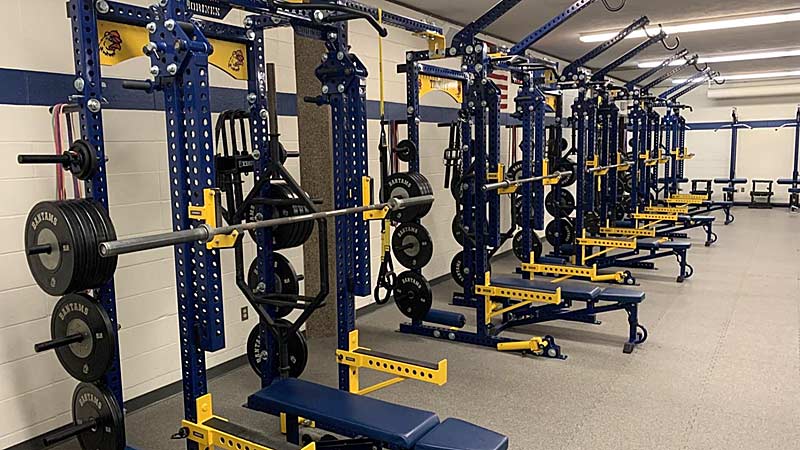
Image 3. Showcasing Trinity’s customized Sorinex racks, including the specialty spotter arm attachments.

Reliable quality was the last factor that Coach DeLongis praised, explaining that they were replacing old Sorinex equipment from the early 2000s with new Sorinex equipment.

“Being at a D-III school, there is no telling when the next renovation will be—so I didn’t want to skimp on the racks,” DeLongis said, a statement that should resonate with a lot of coaches undergoing similar projects around the country.

DeLongis also went to numerous other college weight rooms on site visits to learn from their coaches and see their spaces. These visits gave him ideas and helped him solidify his decision to source from Sorinex. He specifically remembered that Sorinex representatives brought him to their headquarters in South Carolina, where he was able to design the space with their sales teams and put his hands on and try their products. These companies specializing in customization want to make your space as efficient as possible.

These companies specializing in customization want to make your space as efficient as possible, says @johndelf99. Share on X

I think about how coaches have always complained about pillars or poles being in the middle of the room and how it wasted square footage. Now these companies design storage that wraps around those poles and pillars, so there is no more wasted space. They are geniuses who lean on their expertise and the input and philosophies of the coaches who are their clients.

“Feeling like a valued customer was the icing on the cake,” Coach DeLongis added.

Cable Stacks
Image 4. Cable stacks and low row stations on the adjacent wall at Trinity allow for a more open floor plan by the racks. Also pictured are the squat stands used in the turf area.

Specialty Equipment

We all love specialty equipment, and at Trinity College, they are no exception. Trinity utilizes technology like the RepOne Velocity Based Training Encoder (tether) and B Strong Blood Flow Restriction Kits for hypertrophy training and athletes recovering from injuries. Other pieces of specialty equipment they use in programming are cable stacks with low row stations, weight releasers for eccentric work, jammer arms, overcoming isometric boards, and triphasic hooks for plyometrics.

Additionally, they break out some “strongman”-type equipment: atlas stones, sandbags, yoke, logs, and farmer’s handles to help with general physical preparation work.

“Having the strongman equipment is something that our athletes do within training or on off days to help with cardio and general strength building,” DeLongis replied when I asked how they were able to use it enough to justify the purchase cost. “These pieces of equipment are used almost every day by almost all of our sports.”

Lastly, some recovery modalities they use outside of the training room include foam rollers and body tempering rollers.


Video 2. The importance of a balanced strength coach refrigerator and the need for coaches to stay fueled between sessions.

Stay in Touch

Thank you again for reading this Facility Finders installment featuring Trinity College. Remodeling a facility is something that a lot of coaches will have the ability to do at some point in their careers, and I hope the remodel at Trinity can help you in your next project. As always, feel free to comment below on things you would like to see next or something you have questions on!

Since you’re here…
…we have a small favor to ask. More people are reading SimpliFaster than ever, and each week we bring you compelling content from coaches, sport scientists, and physiotherapists who are devoted to building better athletes. Please take a moment to share the articles on social media, engage the authors with questions and comments below, and link to articles when appropriate if you have a blog or participate on forums of related topics. — SF


Curling

Performance Training for Niche Winter Sports with Siobhan Milner

Freelap Friday Five| BySiobhan Milner, ByElisabeth Oehler

Curling

Siobhan Milner believes we’re made to move. She has more than a decade of experience working with everyone from Olympians and national-level athletes to clients in the clinical population. She uses her expertise to help athletes improve their sports performance and prevent, manage, and recover from injuries.

Siobhan is currently a strength and conditioning coach with TeamNL (Dutch Olympic team), training S-1 short track speed skaters and the national curling team. She also works with several independent athletes, primarily in endurance sports and dance, and with clients seeking her knowledge in injury rehabilitation.

Siobhan Milner is a believer in evidence-based exercise prescription, but she also strongly believes that all training should be athlete-focused: specific to their goals, their needs, and their likes and dislikes. Most of all, she loves seeing changes in her athletes’ lives—whether it’s at the level of function, pain, or performance.

Freelap USA: You are currently a strength and conditioning coach for Team Netherlands, the Dutch Olympic team, and work with short track speed skaters. Can you give us an overview of how you identify the sport’s physical demands and injury risks and your programming considerations for speed skaters?

Siobhan Milner: A lot of it comes down to looking at the way the athletes move on the ice. I look at joint angles, forces experienced, and repetitive movements or held positions for an idea of what they need physically and what may be at risk for overuse injuries. Of course, we also have a lot of data on our athletes over the years, so we can take stock of what kind of injuries are popping up (and when) to get an idea of how we can be proactive in preventing them.

One big consideration for programming is that in short track speed skating, there’s a lot of lumbar flexion involved and incredibly high forces. When this is coupled with periods of frequent time on the ice, it can mean being particularly careful not to overload the spine in strength training sessions while still ensuring that the back gets enough stimulus to stay strong.

Freelap USA: You’re not only the strength and conditioning coach for short track speed skating but also for the national curling team of Team Netherlands. Curling is an Olympic sport where most people probably don’t automatically expect the athletes to spend much time with strength training. What does the seasonal preparation of a curling athlete look like, and what is your main focus for them?

Siobhan Milner: It’s a super interesting sport to work with! I sometimes wish I could work with all the “weird” sports because this is where you learn so much as an S&C coach.

I think curling is also experiencing a big shift where the importance of S&C is being recognized. When I look at the upcoming curling teams around the globe, they’ve all got a serious S&C program involved in their development. I think that any curling program that doesn’t will be seriously hindered in the future.

My curling athletes are super strong. I have not worked with them for a full Olympic cycle, as I took over from their former S&C coach earlier in 2021. So, I can only speak to how we’ve worked in the lead-up to Olympic qualifications in 2021.

When we combine this with the fact that it’s a really cognitively involved sport in relatively cold conditions, curling quickly becomes quite an interesting puzzle for an S&C coach. Share on X

Curling is essentially an endurance sport when we look at both the heart rate data from games and that a game lasts roughly 2.5–3 hours. However, short bursts of power are involved, primarily from the upper body during sweeping. When we combine this with the fact that it’s a really cognitively involved sport in relatively cold conditions, it quickly becomes quite an interesting puzzle for an S&C coach.

In the weight room, we’re usually more focused on muscular endurance in the preparatory season, with specific exercise selection for coordination and balance (sometimes specifically to just train the ability to focus and be present). There are times in the season where we’ve worked on hypertrophy because we know that when there are a lot of back-to-back games, curlers can lose a fair bit of weight. Therefore, we want to have some wiggle room there to avoid losing too much muscle mass.

We do a fair bit of basic endurance training for conditioning, as this reflects their energy system demands on the ice. But we also incorporate higher-intensity work, especially as we have seen from the research in recent years how beneficial this is for endurance athletes.

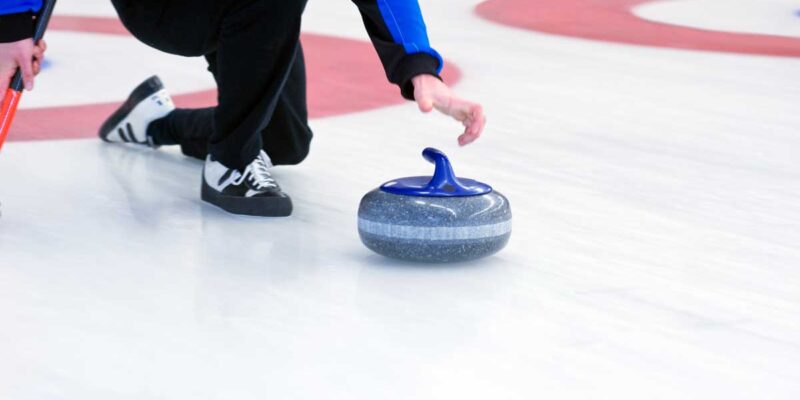
Regarding injury risk and physical demands, curlers require a great deal of hip extension and a lot of hamstring strength. When they throw rocks, one leg ends up in a super low lunge, while the other foot is really tucked in under the body—the hamstring seriously fires up here when this is done well. Like many other ice sports—hockey, short track, and long track speed skating—the adductors can be a weak point. What’s interesting with curling is that we have to find the sweet spot where we keep the adductors strong, but we don’t make them tighten up too much and impact their mobility on the ice in these deep lunges.

Freelap USA: You have a huge variety of sports you work with, coaching athletes in cross country skiing, curling, and speed skating, but also professional dancers and endurance athletes. What are your recommendations for young strength and conditioning coaches working with many different sports, especially sports they don’t know much about initially or haven’t participated in themselves? 

Siobhan Milner: I started out mainly coaching endurance athletes—triathlon, marathon, cyclists—because that’s where my own sporting background lies. But what I found was that most strength and conditioning training for practitioners is geared toward team sports. Team sports, of course, tend to be much more speed- and power-based. So really, the initial thought was, this is where the jobs will be, I have to be adaptable!

I think it’s really important to conduct needs analyses of the sports we’re working with, but then go beyond that. The TeamNL curling team offered to take me out on the ice and teach me how to curl, so I took them up on that. It was great because whenever they corrected me (and I finally did it right!), I’d have a new “aha” moment about their movement requirements and capabilities.

Especially when working with more experienced athletes, we’ve got to humble ourselves. Know that the athlete knows their body better than you ever will. Take a whole lot of notes, listen to what they tell you, watch their sport, and ask a ton of questions. 

Especially when working with more experienced athletes, we’ve got to humble ourselves. Know that the athlete knows their body better than you ever will, says @SiobhanCMilner. Share on X

Freelap USA: Injury rehabilitation is your main educational background; you have done an MSc in Rehabilitation Sciences at McGill University in Canada and worked with elite athletes from different sports, but also individuals with lower back pain, chronic lung diseases, and cancer. What are the main differences and similarities in your rehab approach? What did you learn when working with patients with cancer or chronic lung disease that can be applied to performance settings?

Siobhan Milner: I’ve definitely got a colorful educational and work history! I also did a BPhEd (Hons) in Exercise Prescription & Management, which had a big focus on athletic performance and athletic injury, and I worked for a while for Siliconcoach on video analysis software for athletes. But during that BPhEd degree, I also pursued courses at the undergraduate and graduate levels in clinical exercise physiology. This got me curious, and then a scholarship came up for that position at McGill.

The MSc was a super interesting program because I was the only one with an exercise science background. My colleagues were medical doctors, physiotherapists, even some psychologists. I learned so much from being involved in such an interdisciplinary program and getting to bounce ideas off all my colleagues.

I still work with a few clients specifically for rehabilitation. The most obvious difference is the rate of progression in their loading. The athletes tend to reach plateaus a lot easier, and we’ve got to keep challenging them and pushing through. My rehab clients often need to go at a much slower pace of progression than even your “standard” everyday client. Sometimes the pace can be so slow that your S&C brain might think, “Is anything really happening here?” But it is, and it does. It’s a big reminder of the existence of the minimal effective dose.

My rehab clients often need to go at a much slower pace of progression than even your ‘standard’ everyday client… It’s a big reminder of the existence of the minimal effective dose. Share on X

The biggest thing I’ve taken with me from my work in rehab into S&C is “patient-centered care.” I don’t coach from the standpoint of me being the one who calls the shots. Of course, I’m willing to do that when needed, and I obviously write all the programming for athletes. But what I mean is I come in genuinely curious about the athletes’ experiences, and I want to make sure that we’re getting the intended result.

For some athletes, this can take getting used to. Sometimes they’re used to being told “just do it” when something doesn’t feel right (or “just skip it!” with no alternatives offered). I’m always interested in how we can make the program work for that particular individual. I’m always asking how things feel, what they’re noticing, how their body is responding, etc. I think body awareness is hugely underrated, and it is so important for athletes both inside and outside the weight room.

Freelap USA: Injury history is a significant factor in prescribing strength training programs for athletes. What’s your approach in considering injury history, and what principles do you follow as a rehabilitative exercise specialist when working with an athlete who has had one or multiple severe injuries before?

Siobhan Milner: I always want to know the basics of when the injury occurred and how. I also want the diagnosis and grading where relevant, and I want to know what their physical therapist has worked on with them and what the injured area responded well to (and not so well too). In particular, my education in pain science during my MSc made me realize how multifactorial injuries are. So, I like to dig a lot deeper, especially for athletes who still experience pain from an injury—whether intermittently or chronically.

We know that there’s a huge psychological component to pain, which doesn’t make the pain any less real. But sometimes, athletes really need to be reassured and educated on the pain system, and they need to be empowered to learn about pain in their own bodies. I’m sure many coaches have had experience with those athletes who are given the “all-clear” from a tissue health perspective, but there’s still something going on at the level of pain.

This can be a complex issue, where you have to work closely with the team physiotherapist. I’m grateful for great relationships there. A big consideration is finding out what makes the athlete feel fearful and working with and around that. We often have to overcome a particular fear of movement, so again, educating them on pain signals, reassuring them about their capabilities and tissue health, and being patient. Injuries are frustrating for athletes, so it doesn’t help them if we also get frustrated during the recovery process!

Since you’re here…
…we have a small favor to ask. More people are reading SimpliFaster than ever, and each week we bring you compelling content from coaches, sport scientists, and physiotherapists who are devoted to building better athletes. Please take a moment to share the articles on social media, engage the authors with questions and comments below, and link to articles when appropriate if you have a blog or participate on forums of related topics. — SF


Box Jump

A Modified Approach to the Tier System

Blog| ByKendall Green

Box Jump

From what I’ve gathered thus far in my career as a strength and conditioning professional, the observation and adaptation of our programming must work in tandem with the observation and adaptation of our athletes.

The challenges that the emergence of COVID-19 presented to strength and conditioning coaches—as well as private performance facility trainers and coaches—was almost overwhelming. When reopening my training facility and also eventually returning to the high school I previously coached at, there were constraints outside of the actual training that I had to address from a function and time-use standpoint: no indoor usage early on, athletes masked for a period of time, and 45-minute time restrictions weren’t ideal by any stretch of the imagination.

Thankfully, I was using my “off time” (technically unemployed for 3.5 months) and was exposed mentally and physically to some great methods that swung the pendulum back in our favor.

Applying Models

The keys to any successful program include:

  1. Knowing your athletes/sports.
  2. Knowing the training goals.
  3. Understanding all variables and limiting factors (space, time, equipment, participation numbers, etc.).
  4. Understanding progressions and regressions of all programmed exercises and movements.
  5. Keeping it simple.

Over the last several years, while working in both the public and private sectors, I had adopted the Tier System created by Coach Joe Kenn as the primary format for all the athletes I worked with.

To give a quick synopsis of the Tier System, it’s quite simple and highly effective for the development of athletes:

  • A “whole-body” weekly alternating rotation of total body (T/t), lower body (L/l), and upper body (U/u) focused training days.
Tier
Figure 1. Basic 3-day (3 × 3) in the Tier System format.

Depending on training phase, experience, season (in or out), and other training variables, this template can be expanded to a more detailed and complex plan.

Emphasis
Figure 2. 3-Day (4 × 5) in the Tier System format.

The system’s simplicity and effectiveness alone sold me almost immediately. And the fact that it had been developed and tested well before I was even in the field was the icing on the cake. Coach Kenn published The Strength Training Playbook for Coaches in December 2002, and it still stands the test of time almost 20 years later.

COVID-19 presented a couple of problems that threatened continued progress. One in particular was time, says @KoachGreen_. Share on X

Because of its straightforward structure, I was also able to incorporate the High-Low Model popularized by Coach Charlie Francis (see figure 1) and participation in Coach Mike Tucker’s “Sprintember” in 2020 and 2021.

But, as mentioned above, COVID-19 presented a couple of problems that threatened continued progress. One in particular was time.

Program Shift

As practitioners, we understand (or at least we should) the S.A.I.D. principle, the demands of individual sports, and how to adjust certain training protocols and modalities to create physiological adaptations. But for some reason, every program I’ve been a part of since I was an athlete in high school seems to separate field/court performance qualities (primarily speed and agility) from the rest of training. In some cases, it’s understandable: too many athletes, not enough staff, not enough space, etc.

What that often looks like is:
Total Training Time
Total Training Time = 60+ minutes

In current times, when many S&C professionals have to follow more restrictive guidelines, I’d like to propose a better solution. I’ve coined it the ‘SPS Model’, says @KoachGreen_. Share on X

When time and space wasn’t an issue—pre-COVID-19—this format was sufficient. But in current times, when many strength and conditioning professionals have to follow more restrictive guidelines, I would like to propose a better solution. I’ve coined it the SPS Model (speed, power, strength).

SPS Model
Figure 3. I call this the SPS Model or System (speed, power, strength).

Before I continue to state my case, I would like to remind readers that there are very few new or original ideas in strength and conditioning. The Bob Alejo quote “tell me what it is, and I’ll tell you what we used to call it” rings true. That being said, I will take my liberties and refer to it as the “SPS System.”

The SPS System

The objective of developing and utilizing the SPS System is simple: take what works and is absolutely necessary and discard the rest.

Here’s what it looks like, and then I’ll break it down:

Total training time = < 50 minutes

Time, as a significant factor for all things human, was my primary driving force. In the public sector, as mentioned before, teams were limited to 45-minute sessions because of the need to split the team in half for spacing purposes. Using the SPS System with a football team under these conditions, we were able to split the team into “Bigs” (linemen) and “Skills” (non-linemen), giving the linemen earlier access to the weight room and giving the skills more field time.

In my private facility, there was a little more flexibility as far as duration goes, but because my space is limited (1,400 total square foot facility with approximately 1,100 square feet of usable space), group times—particularly high school and college groups—had to be separated to give individuals options to come at different times to limit congestion. This time separation allowed the training groups to go from 6-8 athletes at a time to 3-5. Profuse cleaning of all equipment after each use was also an additional, necessary time-suck.

Taking the overall structure of the Tier System, the foundation and weekly flow of the High-Low model, and the methods and protocols of “Sprintember,” we have found what seems to hit the “minimum effective dose” and “maximal recoverable dose” on the head.

We have found a system that seems to hit the ‘minimum effective dose’ and ‘maximal recoverable dose’ on the head, says @KoachGreen_. Share on X

This 3 × 3 (in Tier System terms) Hi-Lo cycle begins with a Monday high-intensity day. Along with this new model, we’ve found that most, if not all, of the athletes we work with don’t need any pre-activation or stretching (e.g., foam rolling). That being said, we start with some type of warming activity—jumping jacks, jump rope, bike ride, etc.—and go straight into our dynamic warm-up.

We change the dynamic warm-up quarterly throughout the year, so there is no mystery or nuance to it, making it easier for us to blend the movement prep into the session. This process from warming to prep takes less than 12 minutes on average.

Movement prep for speed and/or agility days consists of one or two drills from the A-series (Mach drills). We perform these from traditional and nontraditional positions, depending on the activity for that portion of the session. On plyometric days, the movement prep normally consists of various lower-leg priming movements that gradually increase in amplitude, intensity, and volume. This portion of the session takes about five minutes.

Moving from movement prep into what I believe to be the crux of the training session, we get to the “S”: Speed (agility/plyo).

You may be questioning the use of plyometrics in the same place as speed training on non-sprint days. It has become more evident from data and real-time observation that the fastest athletes are usually capable of jumping the highest and furthest, and the athletes who jump the highest and furthest are statistically faster—keeping in mind vertical jump-ability is relative to body displacement, while horizontal jump-ability is the second-best display of horizontal power (second only to sprinting). Therefore, the two are categorized into the same performance quality.

Speed and agility—time of year and training phase will determine which takes precedence—training for field and court athletes is one of the primary reasons I am eager to share this system. The highest priority for any athletic performance training program should be the activity that is nearest, or most transferable to, the actual sport. For field and court sports, that is speed and agility (as it relates to a specific sport).

Speed and agility training for field and court athletes is one of the primary reasons I am eager to share this system, says @KoachGreen_. Share on X

In this “S” training session block, we do anywhere from 3-8 sprints of 5-30 yards, and we laser-time as often as possible (Dashr), particularly during the summer and off-seasons. For plyometrics, athletes execute 4-12 jumps (reps/sets dependent on jump variation and number of ground contacts). This segment takes no more than 15 minutes.

After taking care of our primary (or Tier 1) training focus, we can execute the physiological qualities that enhance the primary’s function and capacity. In the case of our general template, Monday is a total body, power focus day followed by lower body strength. Our secondary focus is either a single power exercise, separated into a contrast set, or a major-assisted set (major movement superset with an assistance or mobility movement). Strength is programmed in the same manner. With this format, there are no more than five actual lifts per session.

The reps and sets for the “Power” and “Strength” portions of training simply follow the training goal continuum guidelines.

Prilepin
Figure 4. The Power and Strength portions of training commonly visualized and presented as Prilepin’s chart.

Now that I have broken down the system’s objectives, flow, and function, here’s a week of training that was programmed for the summer volleyball group and another programmed for an individual football player post partial MCL tear preparing to enter his first year in college:

Programming Volleyball
Figure 5. A week of programming for a summer volleyball group.
Programming Football
Figure 6. A week of programming for an individual football player (post partial MCL tear).

This system is not meant to be groundbreaking or a replacement for any existing programs. The intention is to provide a solution for coaches to pinpoint exactly what is needed within their training to optimize training time and maximize results. Doing so will prioritize exactly what each individual and team needs to succeed.

Art of Acceleration

The Art of Acceleration: A Practical Guide for All Levels and Group Sizes

Blog| ByScott Salwasser

Art of Acceleration

In his course “The Art of Acceleration,” Les Spellman lays out the blueprint for creating an individualized speed development program that has been proven to get tremendous positive results. There is no disputing the science or the program’s effectiveness; however, critics are typically unsure of this approach’s applicability to a large, diverse group of athletes—particularly in the public (as opposed to private) domain.

I have successfully applied this approach from the Power 5 collegiate level all the way down to the high school level. What follows isn’t a regurgitation or a summary of the course. Instead, it’s a practical guide of the ins and outs and dos and don’ts of how you can logistically implement these principles yourself, presented by someone who has practical experience with this system.

For full disclosure, I didn’t just learn about the concepts presented when I watched this course, as it was only released recently. This is a speed journey and the evolution of ideas that Les has taken to a level that he and I only dreamed about years ago, when we were exchanging DMs with JB Morin and filming Pro Day guys with the first-generation MySprint app. “The Art of Acceleration” is the single best resource on the market for learning how to be a scientific architect of speed and developing an individualized program that will make your athletes significantly better in a very short amount of time.

This course will help you prescribe targeted intervention strategies that are logistically manageable and brutally effective at improving an athlete’s speed & acceleration abilities. Share on X

The course shows what makes Spellman truly unique—it’s not just a collection of drills but an entire attitude and approach toward speed development that is innovative and effective. You will be able to assess athletes efficiently and prescribe targeted intervention strategies that are logistically manageable and brutally effective at improving an athlete’s speed and acceleration abilities. It takes the guesswork out of programming and allows you to “look under the hood” at the underpinnings of an athlete’s expression of speed, diagnose in an objective manner precisely what they need to improve upon, and prescribe a training program specifically designed to address these needs. Best of all, it shows you how to create a system around these assessments, making it organized, structured, and adaptable to all training environments.

Programming

Background and Connections

I first met Les Spellman in 2012, when I was working at Sparta Performance Science in California’s Silicon Valley, and he was a rugby athlete for USA 7’s who had popped in for some training sessions. We were doing some cutting-edge stuff with force plate technology and individualizing training programs based on movement signatures derived from vertical jumping. It opened to me an entirely new way of looking at movement and planted the seeds for doing the same type of analysis for speed development.

When I left Sparta and went to the University of California, we were the first college football team to utilize force plate technology. I was given the freedom to apply the concepts adopted from Sparta to our team’s speed development program by associating certain movement signatures derived from force plate testing with specific strengths and weaknesses in the 40-yard dash. I wrote an article about it you can still find: “Forty Yard Sprints and Force Plates; How to Sniper Speed Development.”

While a step in the right direction, it was imperfect because it was based on vertical rather than horizontal force production.

From Cal, I moved on to Texas Tech, where, as the Director of Speed & Power for football, I had free rein to go as far down the rabbit hole as I needed to find something to give our team a competitive edge. This is where things really started to accelerate (no pun intended). This period was when JB Morin’s research, among others, began to introduce force-velocity profiling, and it is also when I reconnected with Les and connected with Cam Josse. Both were outstanding, like-minded resources for pushing the envelope on individualizing speed development. You can read about what we were doing at Tech in “Optimizing Sprint & Jump Training Based on Individual Force-Velocity Profiling.”

As the system started to evolve and Les (and Cam, for that matter) started to get the recognition they deserve, I continued to apply these principles at the University of South Carolina with Combine/Pro Day and return to play (RTP) football athletes and again with the football team at Washington State University. Finally, it is the foundation of my system even now at the high school level at Bishop Lynch High School in Texas, where I currently coach along with being a member of the Spellman Performance team for the NFL Combine campaign. That’s what makes this system great: its versatility. Les’ system has produced numerous first-round draft picks, Olympians, and professional athletes, but it has also helped develop middle school and high school athletes.

Les’ system has produced numerous first-round draft picks, Olympians, and professional athletes, but it has also helped develop middle school and high school athletes, says @CoachSSal. Share on X

Read on for a “from the trenches” perspective on how you can implement it with your population, regardless of your level.

Three Components of Training Acceleration

Les breaks training down into three components:

  • Physical
  • Technical
  • Stimulus

We’ll work through them in that order.

Physical

This piece refers to an athlete’s force production and power output ability. The first thing we need to do is force-velocity and load-velocity profile the athletes to “look under the hood” and gain insight into these abilities. This profile tells you at what velocity the athlete performs suboptimally, coinciding with a specific piece of the sprint (start/early accel, transition, or MaxV), and dictates where you will get the most bang for your buck in training.

LVP
FVP

You can, if necessary, run this system without profiling your athletes. As the largest co-ed private high school in Texas, we have close to 700 athletes. They haven’t all been profiled, and arguably, many of them can improve simply with basic skill development (and it’s clear they all need to get stronger). But for many, such as varsity football and athletes from other sports who have committed to play at the collegiate level, the system is very beneficial.

Also, because the athlete-to-coach ratio is so high, it’s not always in our best interest logistically. But all of our teams still implement this system; it is just periodized in a vertically integrated and comprehensive fashion, progressing from short to long, slow to fast, heavy to light, etc., in specific blocks of time. This system produces a “well-balanced” program addressing all strength and speed qualities.

In college, however, because there are more coaches and fewer athletes and the technology is so much better, profiling each athlete on your respective team is a valuable use of time to gain insight and individualize programming for a superior competitive edge.

Now that Les has pioneered GPS to profile athletes if you have that technology, it is your best bet, as it is time-efficient and user-friendly. You don’t even need to have any “testing” day: just have the athletes sprint 30 yards with their unit on—non-weighted for FVP and then at 25%, 50%, and 75% body weight for LVP—and you’re all set. It looks just like a typical training session.


Video 1. Slow motion view of athlete accelerating into a sprint while capturing GPS data.

With any GPS units that only give you max velocity (as opposed to isolating each rep), you simply utilize the same process, just in reverse. Start with heavy and record each rep’s velocity value, as each rep will get progressively faster. Without GPS, it takes a little bit more time, but with the next-best option—laser timing gates—you just set up a testing day where you get 10-yard (or ideally 5-yard) splits with each load for each athlete and plug them into the spreadsheet that comes with the course (or JB Morin’s spreadsheet that can be found online).

One last option is the MySprint app, which I still use occasionally. It works well with smaller groups and can be useful anywhere there is less of a budget for technology. When I first made the move to the high school level, I dusted off the app and started filming sprints. The best thing to do in this instance is to first film all the sprints in the “slo-mo” video setting—otherwise it won’t work in the app—rather than trying to run the app in the heat of battle.

Bang out all the videos first, then go back when you have time and run the analyses. Force-velocity profiling will help you “bucket” athletes by their primary needs. Load-velocity profiling will help you prescribe individualized sled loads, just like you would for a barbell exercise in the weight room, based off the sled load that produces peak power.

Reactive Strength Index (RSI) and vertical force velocity profiling are other beneficial tests, as you will learn in the course—these are a secondary means of bucketing athletes, and for us they help dictate strength protocols in the weight room. RSI measures the athlete’s ability to be elastic (optimize ground time relative to air time), and there are various pieces of equipment to measure this, most commonly the Just Jump mat. Force-velocity profiling will direct you as to what strength qualities will be best addressed for that athlete in a weight room setting (e.g., max strength, strength-speed, speed-strength, etc.) for best results in performance.

Any device that measures barbell velocity will work well in this instance. JB Morin has an outstanding resource online for computing this as well. However, once again, the My Jump 2 app has stood the test of time for both of these; just remember to film in slow motion first and analyze later, just like the sprints.

Technical

As mentioned in the course, the start profile is the key metric that we initially need to identify in this domain. This is simply a measurement of time to toe-off out of a static stance, and then air time and ground time of the 0 step, first step, and second step, contrasted with the step length of each as well. The simplest way is to just set up cones as references (hash marks on a football field work as well) to gauge step length, and then use the app of your choice (I use Runmatic) to time the slo-mo video to get the air times and ground times. This will identify the athlete’s strengths and weaknesses in early acceleration and, when compared to the FVP information we gathered, give a clearer picture of where to “bucket” the athlete (which we will get more into later).


Video 2. Performing a video review to provide specific feedback to athletes.

The same thing can be done for max velocity mechanics. I usually choose three steps, culminating in the penultimate step of the sprint, and repeat the same exact process in order to see ground and air time metrics in the later phases of the sprint. This, combined with the RSI measurement we took, will once again aid in “bucketing” the athlete into the correct training program.

You can see in the charts the ideal ratios for these values, but in general we want to see the ground times get shorter, the air times get longer, and the step lengths increase as the athlete advances. Another useful metric here is the “kickback score,” which is a way to evaluate technical efficiency and evaluate to what extent the athlete “butt kicks” rather than steps over the knee in a concise fashion. For this, you will need a kinogram (again, I use Runmatic).

*Key side note: Even though the majority of traditional speed training focuses on the start and the finish, the transition is a place where, anecdotally, I have seen many athletes fail. This is something profiling will help identify. If they have a good start and still reach a high velocity but for some reason aren’t running the time you would expect, this is probably the culprit.

Even though the majority of traditional speed training focuses on the start and the finish, the transition is a place where, anecdotally, I have seen many athletes fail, says @CoachSSal. Share on X

In a conversation we had about this very phenomenon, Bobby Stroupe called this “the black hole.” In profiling, this shows up as an athlete who has a poor “DRF” (decrease in ratio of force). Essentially, they are capable of producing a high amount of horizontal force, but they bail on it in favor of vertical too quickly. We will dive deeper into this, as well as training interventions, later in the programming section.


Video 3. Athletes performing wall drills in a speed training session.

Stimulus

This is true, full-speed, all-out sprinting. The two most important things here are being patient in order to give sufficient rest times and ensuring maximal volitional intent. One minute of recovery per 10 yards of true speed is the standard recipe, which sounds like a lot, but I have found that if you are truly watching, coaching, giving feedback, and encouraging athletes to listen to each others’ corrections, the time flies by.

As far as the intent piece, there are several ways to manage this. First, as I always joked in college, you could line up a bunch of guys wearing NFL polos with clipboards and stopwatches. Seeing as that’s not a realistic option for most, the next best way is to laser time the sprints. You will get max effort typically because athletes are competitive; they want to beat their time, and you can’t hide from the truth. Having that data is also an excellent way to track progress over time. A live feed from a GPS system works as well if you have staff free to monitor the laptop without any coaching responsibilities.

Another efficient way to get maximal intent that works in all scenarios, both low-tech and high-tech, is simply to race. Again, athletes are by nature competitive: they love to win and hate to lose. To keep the races fresh and give everyone a fighting chance, I set up a number of different “heats” based off speed. Each week, we tabulate the results, and if an athlete had the most wins in their heat, they move up a group; if they came in last the most times in their heat, they move down a group. The number of races is based on a predetermined volume I want to hit. As stated in the course, 150 yards on an acceleration day and 250 yards on a max velocity day (resisted sprints are accounted for in this total too) are good thresholds.

Another efficient way to get maximal intent that works in all scenarios, both low- and high-tech, is simply to race. Again, athletes are by nature competitive: they love to win and hate to lose. Share on X

We typically time on max v days and race on accel days. Obviously, if you have GPS units, you will wear them throughout. With this setup for the “stimulus” aspect, nobody on your team gets stale, and they know they must show up to perform.

Putting It All Together

There’s a section in the course that lays out very clearly and succinctly the various options to choose from for planning a microcycle. I’ll detail my preference, which is a three-day speed model:

  • Early acceleration day
  • Late acceleration/transition day
  • Maximal velocity day

Program Templates
From there, I bucket athletes based off FVP. This is all covered in the course, but if you haven’t seen it, I will summarize how I approach it. The particular variables we look at are F0, Peak RF, DRF, and V0:

  • F0 – The total amount of force produced, which is clearly heavily influenced by the weight room and strength qualities.
  • RF – The ratio of horizontal to vertical forces at the beginning of the sprint (to put it in perspective, below 50% Hz is bad, 50%–55% Hz is solid, 55%–60% is good, above that is outstanding).
  • DRF – The decrease in ratio of force—essentially how much Hz force an athlete loses in favor of vertical for every incremental increase in speed (once again, to provide perspective, 10% and above is poor, 9% is okay, 8% is solid, and 7% is good).
  • V0 – Maximal velocity and the ranges will vary by age, sport, and position.

As I mentioned earlier, the overall scheme of the speed program is shorter to longer (distance), heavier to lighter (resistance), and slower to faster (velocity) over the course of the training cycle. This is where the individualization starts to bleed into the program. The course refers to these buckets as 2A-2C and 1A-1C. First, it is important to note that all athletes will spend time training all qualities: strength-speed/early accel, speed-strength/late accel, and velocity in a weekly micro. This ensures the retention of qualities that are already strengths and also allows for overlaps in training that help logistically.

However, in the first layer of individualization, athletes poor in F0 and RF (2C-2B) will stay in the first block (heavy) for an extended period of time and with a much higher percentage of weekly volume devoted to early accel/strength-speed work. Athletes who are poor in RF and DRF (2C-1C) will advance to the second block (medium) and stay there for an extended period and with a much higher percentage of weekly volume devoted to late accel/speed-strength work. Athletes who are poor in DRF and V0 (2B-2C) will advance to the third block (light) and stay there for an extended period while allotting a higher percentage of weekly volume to velocity work.

You will rarely see an athlete who is good at everything but just needs to get even faster. In fact, at the high school level, most athletes are in bucket 2B or 2C and need strength stimuli. But even assuming you have a wide variety of athletes, at this level there are still at the most three groups going at one time and typically only two (easily handled by almost any coaching staff). Athletes on a training template with less than three speed days would obviously prioritize their needs. For instance, in an athlete needing strength-speed, early accel would be one full day, and then if there’s a second speed day, late accel, and then max v only if there’s a third day allocated for speed, such as in my preferred model.

You will rarely see an athlete who is good at everything but just needs to get even faster. In fact, at the high school level, most athletes are in bucket 2B or 2C and need strength stimuli. Share on X

The next piece of individualization, the LVP (load-velocity profile), just dictates the weight on the sled. This gives you the load associated with peak horizontal power as well as the loads associated with different speed decrements and therefore different strength qualities (i.e., strength-speed, speed-strength, etc.). We already do this in the weight room; just carry the same method over to the field. Set each sled off the highest possible load, with a variety of plates, and give each athlete their number. Post it in the locker room and carry a list out to the field with you on a clipboard just in case. If you have Run Rockets or the like, this becomes even easier—just know your number and turn the dial.

Everybody, regardless of what bucket/block they’re in, will sled sprint, all that’s different is the load. If you haven’t LVP’ed, use percent of body weight but still manipulate it heavy, medium, and light to correspond with the different horizontal strength qualities. If you don’t have sleds, use bands: again, thick, medium, and thin as resistance. These are also more portable and easier to set up for coaches who are crunched for time between groups or must change locales frequently.

Dichotomy of Needs: Physical vs. Technical

Essentially, if the requisite strength qualities are in place as evidenced by profiling and secondary tests such as RSI and vertical jump FVP, but we’re still not getting the times desired, then it’s likely a technical issue.

Each session will already have a technical and physical component, so at this point, it’s simply a matter of volume. All the athletes in your group will already be doing the same drills, but technical guys will stay on the technical piece for slightly longer before moving over to the sleds; physical guys will move to the sleds earlier to get a few extra reps there. Then everyone will come together for the stimulus and race.

Logistics shouldn’t scare you. At the most, a coach will have 2–3 things going on at once. Last summer, when I first moved to the high school realm, I was a one-man show; even then, I still had a technical drill and a physical drill going on at once (directly overseen by a position coach), while I oversaw the whole operation. The technical group would pop off two reps for every one rep of the physical group, but I controlled rest times and each set was on my whistle. The sport coaches helped with organizing lines, crowd control, and motivation, while I coached and controlled work to rest.

We got better.

Obviously, in the system “physical” alludes to resisted running but also includes plyometrics and med ball throws. The list of plyos that you can use is long and distinguished (showing my age with the Top Gun reference), but in general, accel days are complemented by longer GCT exercises like broad jump variations while speed days are complemented by shorter GCT exercises like pogos, hurdle hops, etc.

As far as the technical piece, Les has another outstanding course called “Speed Pillars” that gives an idea of the drills that complement this system. In acceleration, examples include A-series, wall drills, banded projection and banded three-step, MB starts, kneeling starts, and four- and seven-cone drills. Velocity examples include dribble series, straight leg series, an assortment of bleeds, buildups, and wicket runs of varying distances. You probably have your own favorites. Obviously, that’s just a start, but it gives you an idea—drill selection will be dictated in large part by training emphasis and also placed on the yearly training calendar as coordination, difficulty, and intensity progress over time.

An additional aspect that falls more in line with the “art” side that can be influenced by these protocols is coaching language. Cueing can have a tremendous impact on coaxing technical adjustments; however, coaches often just repeat the same handful of tired and worn-out cues. With this system, coaches can individualize their feedback based off how the athletes are bucketed in much the same way that the program is individualized into groups to emphasize certain qualities. For instance, a 2C athlete (lacking force) and a 1C athlete (lacking reactivity) might do the exact same drill, but the 2C athlete could be encouraged to “push,” “project,” or “drive” while the 1C athlete might be encouraged to “pop,” “punch,” or “spring.” Tailoring instruction to meet the needs of the athletes will complement the environmental interventions and optimally bring out the desired technical and physical qualities we want to develop.

Tailoring instruction to meet the needs of the athletes will complement the environmental interventions and optimally bring out the desired technical and physical qualities, says @CoachSSal. Share on X

Different Sports and Different Positions

The last layer of bucketing would be adjustments made based on sport or position. For instance, some sports have little to no max velocity requirements. Some positions, such as a lineman in football, do not have the same high-velocity requirements as a skill position player. I like to include max-velocity work whenever possible, because as Ken Clark and others have demonstrated, raising maximal velocity raises all associated speed qualities, just like raising maximal strength raises the ceiling on the ability to develop associated strength qualities. That being said, for some sports/positions, it’s not as big of a priority. So, in my lineman example, no matter how the lineman tests, he will never be in the velocity bucket, ensuring that he always gets an extra helping of volume where he needs it most: in early acceleration work.

Additionally, I have seen tremendous success with this system in the return to play population. There are several reasons for this:

  1. The abundance of physical data provides metrics to compare an athlete to their “healthy” self to make a quantitative decision as far as what percentage of health the athlete is functioning at. JB Morin has shown that even when an athlete is able to hit their previous max velocity, some of the underlying force parameters are still sub-par, risking reinjury.
  2. The technical analyses provide the qualitative piece to determine if the athlete is moving well or still has visible compensation in their movement patterns.
  3. All the resisted running—progressing from heavy, short, and slow to light, long, and fast—is a good ramp-up to return to play, as often it is the speed of movement that is painful, not the muscular effort. This allows us to execute sprinting movements in a high-force, but safe, low-velocity environment. This is complemented by skips, switches, and dribbles at higher limb velocities but still traveling forward at a safe, scalable pace.

Bang for Your Buck

Now to the important part. This all sounds good in theory, and you can see how it’s simple enough to pull off logistically…but is it worth it? Does it work? Why does it work? Specifically, what type of results can you expect?

In addition to Les’ resume with top-flight draft picks, improving their times and draft stock, I have consistently seen improved times at every level and in every situation that I’ve been in. And the best part is I can look under the hood and see why they improved; or, if they didn’t improve as much as we wanted, I can see what went wrong and know precisely what to work on.

Let’s look at some numbers from an athlete I consider to be the median of what you can expect. Rather than just give a summary of values, I think it’s more beneficial to really dive into a truly representative subject and look at the good, the bad, and the ugly of a standard eight-week “pre-40-yard dash test” training cycle and the effect it had on a college football player, in both the physical and technical realms. Then I will quickly touch on how he was bucketed and what interventions we made.
30m Pre-Post

First, the physical. As you can see, this athlete shaved .2 off his 30-meter time in a standard eight-week cycle. The benefit of this system, again, is that rather than guess, we can see exactly how this happened. His velocity improved from 16.5 mph to 18.2 mph, and his theoretical max velocity (V0, or the speed he would reach based on his acceleration curve if he had continued to run past 30 meters) improved from 16.8 mph to 18.6 mph.

Velo Pre-Post

These numbers are from the MySprint app, which I’ve found to be conservative on velocity measures. This athlete touched 19 mph on their tested 40 according to GPS. In that same picture, you can also see that his F0 or total force and relative force (N/KG) at the beginning of the sprint actually got worse. This obviously was not the intent, and had I done a better job of retaining this piece, the results could’ve been even better. I attribute this to getting speed greedy and de-emphasizing general strength work. It was a good learning experience.

Power Pre-Post

In this next image, you can see that, even though the force production took an unfortunate dip, peak power still improved from 1,815 watts to 1,869 watts, indicating an improved ability to produce force at higher speeds, which was one of our primary training targets. In this view, you also see this athlete’s main weakness: DRF, which improved from a terrible 11% to a mediocre 9%—but even that small change can yield significant improvement in late acceleration for an athlete that has this as their weakness. RF stayed relatively the same at 55% and 56%.

So how can the athlete still have a decent start and maintain their RF (recall, ratio of horizontal to vertical force at the beginning of sprint) even with a decrease in total force? Mechanical (i.e., technical) efficiency.

Drive Index Pre Post

In this image, you can see that the athlete shaved .1 off their “start profile” (remember, one of the primary technical KPIs), which is essentially their time to 0 step, and first and second step. He decreased ground contact time on his first contact and decreased air time on both steps (arguably too much when compared to the ideal measures). This resulted in a greater horizontal orientation of the body and a steeper angle of projection and allowed him to hit the same stride lengths with a more positive shin angle, when analyzed on film.

This subject was bucketed as a 1C, being physically deficient in velocity-based power. He had a balanced vertical FV profile, so good vertical force, solid F0, and a good RF; and, as we say, technically sound at early acceleration. He had a terrible DRF and a poor RSI, and his 10–20 split was his worst split, relatively speaking, keeping him from hitting a sufficiently fast top speed. His training focused on medium to light resisted sprints and reactive plyos while focusing his stimulus work on 20- to 30-yard sprints. He obviously improved a lot in a short period of time. As I suspected, the new vertical FVP revealed a force deficiency, which, along with the dip in F0, meant a renewed need for the weight room and heavier sled clusters to complement the continued accel work to keep improving DRF.

This subject is par for the course of what you can expect with this system. Anecdotally, I train myself with this same system and broke 20 mph as measured by GPS and ran under a 5.0 electronic at 41 years old for the first time since my late 20s. (I was only a 4.8 guy when I played in college anyway.) Obviously, there are other training components necessary for the success of a team sports athlete such as ESD, general strength, deceleration, mobility, etc. They are beyond the scope of this article, but the system incorporates those as well, and perhaps I can write a follow-up on that process.

Closing Thoughts

The beauty of this system is that it is an organized and methodical way to evaluate and group athletes based on specific needs in a fashion that is easy to manage and—most importantly—it gets results. It is impossible to do the “Art of Acceleration” course justice in a single article, but hopefully this gives you a glimpse of how simple and effective it can be to use with your athletes.

The beauty of this system is it is an organized and methodical way to evaluate and group athletes based on specific needs in a fashion that is easy to manage and—most importantly—it gets results. Share on X

Go out and pick up the course, and while you’re at it get “Speed Pillars” too. You won’t regret it. Try it with your own teams and let us know if you have any questions. Best wishes and welcome to Speed City.

Since you’re here…
…we have a small favor to ask. More people are reading SimpliFaster than ever, and each week we bring you compelling content from coaches, sport scientists, and physiotherapists who are devoted to building better athletes. Please take a moment to share the articles on social media, engage the authors with questions and comments below, and link to articles when appropriate if you have a blog or participate on forums of related topics. — SF


PR Push

“PR-Itis”: The Biggest Threat to Athlete Development and How to Combat It

Blog| ByMatt Tometz

PR Push

An athlete of mine finished their sprint and immediately looked back at me and said “Was that a PR [personal record]?” I said “No, it was not,” then registered the disappointed look on their face. Keep in mind, this athlete is only 10 years old (but very athletic and very competitive). I know this is not a healthy mindset for speed training and athletic development, so I need a solution to this problem.

PR-itis is a term my colleagues and I have coined to explain the belief that any training rep that is not a PR is a wasted training rep. PR-itis stems from the story athletes tell themselves about the process of progress—it is an unrealistic set of expectations about what the process of progress in athletic development really looks like.

PR-itis is a term my colleagues and I have coined to explain the belief that any training rep that is not a PR is a wasted training rep, says @CoachBigToe. Share on X

The root of this issue is that numbers are easy to understand and that the process of progress does not always follow a linear track. Those factors, combined with the amount of technology and instant data available these days, can lead to athletes misunderstanding the context for their own training data, which sets the stage for PR-itis. It is important for athletes to understand that in the process of progress, PRs will not happen every day—but there are still other objective measures of progress.

My athlete and I then had a conversation where I showed him a range of numbers, looking at both their PR and what 95% of their PR is. Next, I explained that that is our range of what is considered a high-quality, high-intensity rep for speed gains. The following week, my athlete finished their first sprint and immediately asked “Was that within my range?” (wipes tear away after proud coaching moment).

Imagine how impactful this lesson will be for this athlete years down the road, now that we have addressed their PR-it is and replace it with a new story of what their own progress looks like on a day-to-day and week-to-week basis.

The Origin of 95% Threshold

Developed by legendary speed coach Charlie Francis and adopted by one of his mentees, speed coach Derek Hansen, 95% of a PR is the threshold I have targeted as a high-intensity nervous system stimulus to improve speed. With how objective and instant feedback is with technology, we need something just as objective to help combat PR-itis and create context for our athletes.

The 95% threshold gives an objective way for me as a coach to change the context and expectations of a daily training session.

The 95% threshold gives an objective way for me as a coach to change the context and expectations of a daily training session, says @CoachBigToe. Share on X

95% In Real Training Sessions

Below is a chart I created in Microsoft Excel (my favorite) that has 95% of a large range of PR’s. I printed this out, laminated it (also my favorite), and taped it to the wall right next to the laser timing gates in the facility where I coach. I use this chart in two primary ways:

  1. For a quick reference of how to respond to my athlete asking “Was that within my range?”
  2. A conversation starter in between sprints to educate my athletes on PR-itis.
95% Chart
Image 1. Excel spreadsheet calculating 95% of a range of PR’s.

The 95% threshold also opens up a conversation about the process of progress. I was going through this talk with a group of high school athletes and asked them to list all the factors that contribute to sprinting at 100% and getting a new PR. In the facility I coach at, our main sprint times we test 1-2x a week include a Flying 10-yard sprint and “5-15” acceleration (first and last timing lasers are 5 and 15 yards away from the start line, respectively). Their answers included:

  • Sleep
  • Nutrition
  • The previous day’s training
  • Mental readiness
  • Motivation
  • Playing on 3 soccer teams (in the case of my 10-year-old athlete from before…)

Then I asked “What happens when one or two of those things are off? How often are all those things perfectly aligned?” This was a big lightbulb moment: with all the factors of being an athlete—let alone a student-athlete—PRs probably are not going to happen as often as they would hope. But now they have an objective way to evaluate the process that is not a PR.

With all the factors of being an athlete—let alone a student-athlete—PRs probably are not going to happen as often as they would hope, says @CoachBigToe. Share on X

Designing speed training for my athletes, we are going to sprint and time our sprints every session. The data is consistent, instant, and relevant to their goals of becoming faster. However, only being together for 2 hours of their entire week, there are 168 other hours that can detract from what we are trying to accomplish. PR’s do not (and will not) happen every session, but we need improvement to justify continuing the plan. When life and being an athlete with outside influences affects our training session, 95% is a new gauge of progress that is not a PR.

Getting faster over time is a combination of improved sprinting mechanics and improved neural output. Knowing all the factors that go into sprinting a PR (and everything else my athletes have going on), we can determine progress by improving mechanics and giving our nervous system high-intensity stimuli that will add up over time. This is through knowing that increased performance will come when most of the outside factors align (actually recovering from training, adequate sleep, proper nutrition, etc.).

Surprisingly, I have found only 11% of the time my athletes are under 95%, but that is an article for a different day.

Flying 10 Graph
Image 2. An example of an athlete’s Flying 10 sprint times over 19 sessions with their rolling average and 95% threshold. With this concept, 18/19 training sessions would be productive compared to the highs and lows of only tracking PR’s.

Below 95%

Within our 95% threshold, we also have below 95% and what that means. Just as easily as we can use a percentage of a PR to say “That was great, keep going,” we can also use it to say “Today might not be the best day for speed development” or “That was a little slow, how are you feeling today?”

On a normal training day, my athletes will walk in and I will ask how they are feeling, how was practice, how was school…but their answers never really get too deep. But if my athlete is under 95%, then I will definitely ask more questions.

Let’s say an athlete’s PR for a Flying 10 is 1.235 seconds. If they sprint a time slower than 1.297, I’ll check in with a question and conversation. It could have been that they just “felt” off, that they were thinking about technique too much, or needed that as a final warm-up. If they sprint two times that are slower, I will legitimately consider modifying the training session. It is hard to argue and say everything is okay with how objective the threshold is. However, it is important to open a discussion first with your athlete instead of jumping directly to a decision.

Then, I will learn that my athlete had 4 games in 2 days, they have not eaten anything that day, or they barely slept. These are all important details that athletes sometimes keep to themselves. With this new information, then I can make better decisions as a coach to guide my athlete and the rest of the training session.

One sprint under 95% opens a conversation and 2 sprints will almost always lead to modification. The premise of adapting the training session is that we are playing the long game. One session cannot make or break us, but it can take us in the opposite direction of our goal. How do we get the most out of today to help us achieve our speed goals in the future? What else can we do today that is not max-effort sprinting to help us achieve our speed goals?

One sprint under 95% opens a conversation and 2 sprints will almost always lead to modification, says @CoachBigToe. Share on X

The answer is mechanical work, active recovery, and/or sub-maximal lifting to set us up for success in the NEXT training session.

This is easier said than done, especially when dealing with one (or a few athletes). Within big groups, the issue is singling out a few athletes to stop training or do something different while everyone else continues. And that is always the issue with bigger groups: quality control. Understanding the dynamic of an athlete being in a group, assuming there would only be 3-5 timed sprints anyways, let them complete 3 and let the rest of the athletes do “bonus” timed sprints. Remember, it’s not always what you do as a coach but the athlete’s interpretation of it. Specifically making an athlete do less is different than letting other athletes do more.

Will an extra sprint or two under 95% ruin an athlete? No. But will it put them into a slightly more decreased state of performance than they were before, detracting from the end goal? Yes. There is no right or wrong, but there are consequences of both.

However, I must say that within groups of 8-12 athletes, when I do have 1 or 2 that are under 95%, they are OK with not doing all the sprints because I have set the foundation of explaining the 95% concept over the prior training sessions and time together. This is effective because I give an explanation to the athletes and also give an alternative option. “You’re under 95% today, so I’m going to let the rest of the group do two more sprints, let’s go through our sled marching series/A-series/whatever it may be in the meantime, then we will all do our agility work together.”

Below 95% justifies and opens a check-in with athletes about how they are feeling that otherwise might not have happened.

Near 100%

On the flip side, if an athlete is very close to a PR, I will almost always give them “bonus” sprints. Knowing PR’s will not happen all the time, let’s take advantage of when they are close.

Just because my program says “4 timed sprints,” does not mean I have to stick to it. If the athlete’s body and mind are in a state to sprint fast and sprinting fast aligns with the training goal, squeeze everything out of that training session.

Knowing PR’s will not happen all the time, let’s take advantage of when they are close, says @CoachBigToe. Share on X

Conclusion

Here is a quick cheat sheet for combatting PR-itis with percentage thresholds:
Chart

Our athletes want to succeed more than anything. They will give their all every session, try their hardest on every rep, and consequently want to see improvements from their efforts. Likewise, as a coach, we want to see our athletes improve and achieve success.

Understanding PR-itis and the 95% threshold does not discredit the pursuit of becoming better, but do not let the stories your athletes are telling themselves and their misunderstanding of their own data discourage and derail them from their process of progress. Use 95% of your athlete’s PR to combat PR-itis, justify conversations about the process of progress, and help them rewrite the story of what their athletic development actually looks like.

Since you’re here…
…we have a small favor to ask. More people are reading SimpliFaster than ever, and each week we bring you compelling content from coaches, sport scientists, and physiotherapists who are devoted to building better athletes. Please take a moment to share the articles on social media, engage the authors with questions and comments below, and link to articles when appropriate if you have a blog or participate on forums of related topics. — SF


Hunter Soccer

Shifting the Team Culture in Soccer Through S&C and Cognitive Coaching

Blog| ByNoah Kaminsky

Hunter Soccer

Without a vision for success, you cannot design the process necessary to realize your goals. My coaching story begins with that vision, but the story I’d like to share aims to instruct on the process. I hope that new coaches (or even veterans) will benefit from this analysis of my time with the Hunter Boys Varsity and Junior Varsity Soccer team. After four years coaching the team (three as head coach), I asked my graduating seniors to reflect on their experiences. This is their reflection as much as it is my own.

Hunter College High School (HCHS) is not your average school—its graduates consistently go on to attend Ivy League universities and top academic institutions like Stanford, MIT, and Duke. The school offers an array of challenging coursework and student-run extracurriculars ranging from cultural clubs to academic competitions. The school also boasts more than 40 sports teams for grades 7–12, but graduates are rarely recruited to Division 1 teams.

As an alum, I fit the HCHS student-athlete archetype: I played soccer, swam competitively, and ran track. I contributed significantly to the success of each team because I was a decent athlete who trained hard and led by example. You can imagine my surprise when I was promptly cut from Cornell University’s D1 Men’s Track & Field team after fall training—very simply, I wasn’t good enough to make the team.

That moment became my athletic inflection point.

Getting cut motivated me to ask questions about my high school sports experience that I hadn’t previously considered. Today, my coaching embodies the answers to those questions.

When I returned to HCHS as an assistant soccer coach in 2016, I wanted to lead a team for which sport was more than a means to diversify a college application. I wanted an experience that rivaled the value students and parents placed on the debate team, science research, and music performance groups. I wanted to coach a soccer team that could serve as a course in training theory, personal maturation, teamwork, and leadership for its athletes.

I wanted to coach a soccer team that could serve as a course in training theory, personal maturation,teamwork, and leadership for its athletes. Share on X

A few problems immediately stood in the way of that vision:

  • Minor injuries occurred frequently.
  • Our team’s performance depended too much on the presence of a few individuals.
  • Our offense appeared chaotic and unguided by style or strategy.

To address these concerns, I needed a multi-year plan to cement lasting improvement and shift the culture of our team. I wasn’t trying to craft a miracle. I wanted to facilitate a better experience for my athletes—the experience I never had. I lost my junior year soccer season due to injury. In high school, our team’s individual skills were great, but our teamwork was poor.  Failing to address these problems in my own athletic experience, I became motivated to prevent such failures for the athletes I was coaching.

Balancing Fitness and Skill Development

To address the team’s offensive strategies, I began watching more professional soccer and reading the relevant literature. I also tried my best to listen to my athletes and logically apply their feedback as often as was reasonable. I presented various feedback opportunities to my athletes over the past four years, but they were never so formalized as the reflections I collected at the end of our fall 2019 season, which I have included here.

    “I witnessed quite a few injuries during my time, including a broken wrist of my own during my freshman year on the team. The rate of catastrophic injuries was relatively stable throughout my first three years on the team. This year, on the other hand, we had almost no injuries—which is nearly unheard of on a team of more than 30 guys. Although this could be attributed partially to luck, I think the focus on strength training, adequate stretching, and healthy eating all contributed to our improvement. I am far from the strongest guy on the team, but this year I felt confident and safe on the field throughout the entire season.” – Eric, Midfielder, Class of 2020

Eric was a crucial member of our midfield, and his comment on luck is humbling because good fortune will always claim a role in sports injury assessment. I make no exception for Hunter Boys Soccer; however, Eric’s evaluation of catastrophic injuries is somewhat inaccurate. Injuries persisted throughout his first three years on the team, but they diminished more than Eric acknowledges in his reflection.

Hunter Players
Image 1. Matthew, Eric, Jules, and the Hunter Boys Soccer team preparing to warm up for a HCHS Soccer playoff.

In fall 2016, Eric’s first year on the team, we lost five athletes to significant bone or muscular injury. In Eric’s senior year, fall 2019—when strength training shared the greatest portion of practice time since its introduction to the team—we had zero catastrophic injuries. Each year forward saw fewer athletes with a similar degree of injury. As one of Eric’s senior teammates explains below, the benefit of increased strength training extended well beyond injury prevention.

    “While my teammates may not have appreciated it enough, each year saw massive improvements which played a role in getting us through longer games. For instance, in the round of 16 playoffs match of fall 2019 season, we played the full 80 minutes, plus extra time, and into penalties. Even in the last few minutes of extra time, our team was able to keep pushing forward and this was mainly due to improved stamina and conditioning.” – Matthew, Midfielder, Class of 2020

Matthew was another excellent midfielder who benefited greatly from our new balance of fitness and skill development. He was a proficient playmaker, moving the ball effortlessly from defense to offense, but I often worried that his thin physique increased his risk of injury in harder tackles. Matthew improved his deadlift by more than 50 pounds from his junior to senior year, and he saw less significant improvements—but improvements nonetheless—in his other lifts over the same period.

While the wider athletic community and its highest-level practitioners have known how crucial strength and conditioning is for competitive and recreational sports for decades, its intrinsic value remains poorly emphasized, or utilized, in most youth sports programs in New York City. In public high schools and athletic clubs, I have not observed coaches balancing the physical demands of their athletes’ technical skills. My experience as both a youth athlete and a coach in the city reinforces this training deficiency.

I introduced mandatory strength and conditioning to my soccer team because my coaching education indicated it was the obvious solution to reduce injuries. Many stakeholders on the team didn’t see it that way—initially, strength and conditioning was undervalued by my players, some of their parents, and even my athletic director.

Many of my soccer players didn’t want to hear that they needed less time playing soccer and more time in the weight room…In all fairness, players were right to assert their skepticism. Share on X

No different than my observations, my team struggled to adopt this new balance between fitness and skill development. Many of my soccer players didn’t want to hear that they needed less time playing soccer and more time in the weight room. Without getting too esoteric on the peer-reviewed sports medicine literature, I would tell athletes and parents, “You spend less time preventing injury than time lost due to being injured.” The bumper sticker ideology only carried so far, but as you’ll see, they eventually embraced this philosophy.

    “I needed preseason to reaffirm my soccer skills and get comfortable with the team before I was able to perform to the highest of my ability. With a greater focus on strength work, I had trouble feeling comfortable on the field until midway through the season. However, by the end of the season, I felt better than I probably would have felt without strength training.” – Eric

In all fairness, my players were right to assert their skepticism. I was a first-time head coach and didn’t want to close myself off to feedback. Some of my practice drills were too complicated, and my judgments on positioning overlooked seasoned relationships between certain players. I knew how I wanted my team to play, but I was still working out my process for getting there.

    “Practices weren’t necessarily seen as the best use of our time, since there was often discussion and explanation before our drills. Usually, I preferred drills that were rote repetition of a simple action or a combination of simple actions.” – Ben, Defender, Class of 2020

Ben was never an obstinate or obstructive player. He offers a glimpse at what was clearly on the minds of his teammates during my early years. Explanation of drills can feel redundant when athletes have performed them before, but a team deserves time for reflection on their collective and individual choices. As a coach, you have to guide those conversations to keep players’ comments positive, discrete, and goal oriented. Over the years, I have simplified the drills and promoted older players in leading reflections.

On the Offensive

A fast-paced possession game, in which no player holds onto the ball longer than two seconds, requires being in the right place at the right time. The speed and endurance necessary to sustain that style of play came from sprints in our warm-up and time in the weight room. I encouraged my players to perform their cardio development on their own.

The more difficult, cognitive component of “right place, right time” demanded a familiarity and trust among players through our drills in practice, which focused on perception, anticipation, and reaction to ball movement. Some coaches refer to these skills as “soccer intelligence” or “cognitive soccer.” With our offense, I emphasized cognitive soccer in practice over and above individual technique.

My emphasis on individual cognitive skills was foundational for building trust between players. Once that trust existed, I let my best 11 players solve their own tactical problems. Share on X

In fact, prior to coaching, I never realized that my success as a player derived greatly from my own cognitive skills rather than my footwork or finesse with the ball. My perception, anticipation, and reaction were instrumental to the tactical choices I made in a game, so it is no wonder I coach the Hunter Boys Soccer team the same way. My emphasis on individual cognitive skills was foundational for building trust between players. Once that trust existed, I let my best 11 players solve their own tactical problems.

Hunter Soccer
Image 2. The Hunter soccer team with Coach Noah Kaminsky.

Substitutes are not second-rate players when they train similarly to the starting 11. Instead, they serve as they are named: replacements to starters with little disruption in the relentless pursuit of scoring goals. In our league, substitutions are unlimited, and players are allowed re-entry.

Though our wingers are generally the most athletic players on the team, the demanding nature of their position requires frequent substitution. Speed and strength endurance underwrite their ability to defend, counter, sprint, and cross the ball. This strategy continues to work well for us. In addition to their athleticism, I appreciate our wingers who ask for a substitution when they feel fatigued. The weight room is a great place to acquaint yourself with humility.

I emphasized a style of play contingent upon positioning and quick-paced, intelligent passing. Strength and speed training prepared my team to play their game faster and more consistently than their opponents through the full 80 minutes or more.

Ideally, good clean soccer maintains possession and avoids dangerous tackles. Inevitably, this forces your opponents to utilize dirtier tactics to retrieve the ball, so increases in absolute strength became a necessity. I used the one rep max as my indicator for the ability to withstand a tackle.

This time in the weight room may have come at the cost of practicing fundamental skills, such as dribbling and shooting, but I didn’t believe many players needed to practice those fundamentals beyond the early part of our season. Most Hunter soccer players arrived already proficient, or even advanced, in those fundamental skills as freshmen because they had been playing soccer for several years with a local club team. The August preseason refreshed those fundamental skills—then, we gradually moved away from basic drills to embrace cognitive skills as the season progressed.

    “…For any school team, the club players who spend all year playing soccer were able to translate these skills in the high school season and become standout players. Without a coach who was well-versed in soccer-specific drills and tactics, players were left wanting more out of each practice. While this lack of knowledge may have stunted technical growth, I feel our team was still able to develop physically and psychologically over my four years.” – Matthew

I admit that offensive tactics remain the weakest component in fulfilling my vision for the team, but Matthew’s words amplify the improvements made despite the weakness. I suspect Matthew’s concern for “specific drills and tactics” derived from his early soccer education. A different style of play probably would benefit my professional development, but it’s also possible those “specific drills and tactics” fit Matthew’s expectant style of play alone. If it challenged or slowed the organic, unified growth of our team, then I’m comfortable with their exclusion.

Matthew was a fantastic soccer player, whom I could trust with leading drills and fostering team culture. He wasn’t the coach. Each year, I had to be mindful of those differences to continuously craft a cognitive offense.

    “Learning how to function relative to my teammates was something that came out of drills that allowed for multiple decisions, like a simple 3v3 possession drill, where you get a bit of a feel for how your teammates both defend you and move around you. It’s a wonderful feeling to be able to predict your opponent or your teammate and make a play off of that intuition.” – Ben

Teamwork took its shape organically from the trust developed between naturally talented players and teammates who made up for their skill deficits with hard work. We will always have keystone players, but strength and conditioning has diminished our reliance on them, creating a synergy for any individual player to insert themselves into the game smoothly without harming the offensive or defensive strategy.

We will always have keystone players, but strength and conditioning has diminished our reliance on them. Share on X

I expect that cognitive soccer will remain the core of our offense because gameplay encounters minimal disruption with our seniors’ departure. As long as the underclassmen have been practicing alongside older teammates and pushing numbers in the weight room, I expect a seamless transition to the new season.

Confidence Is Key

Confidence is a hard variable to measure: it’s intangible and unquantifiable. I have a few indicators to gauge team confidence, but I recognize that their credibility is limited.

At a selective preparatory high school like Hunter, there are innumerable competing factors for a student-athlete’s time. Music lessons, math tutoring (as tutor or pupil), debate team, school publications, and science competitions are just a few of the activities that consume students’ time besides their usual 3+ hours of nightly homework. Practice attendance may not be a great indicator for commitment outside of our school community, but it’s a reasonable gauge for our team.

    “Everybody showing up is crucial to encouraging a motivated team.”– Ben

I counted many more absences in my early days coaching. Athletes show up because they know what you’re doing for them—and what they’re doing for each other—has value. Like I noted earlier, I began relying more on low-stakes games for warm-ups—like Lions & Tigers, variations on tag, and relay races— merely to increase the fun factor. As Tony Holler preaches, “lighting a fire” or “filling their tank” instead of draining it is the easiest way to keep kids coming back.

    “One of the most significant differences that I’ve noticed throughout my time on the team is a change in the team’s mentality. With each passing year, I feel like the team has become more tightly knit and inclusive. As a freshman, I had a close bond with my fellow freshman members of the team, but I felt quite isolated from the rest of the team. Lacking the skill or fitness to compete for a starting spot, I wasn’t as motivated as I should have been at practice and saw the road to getting a starting spot as a matter of others leaving at the end of the year rather than me getting better myself. However, the level of commitment and devotion that I have seen from current freshmen and sophomores has improved significantly since my time in their shoes.
    I believe that this change in mentality is a result of a more inclusive, but also a more competitive, environment where freshmen are seen as more than just benchwarmers. This season, both freshmen and sophomores were consistently present on the starting lineup, which had a big impact on the morale of younger players and the work ethic of older players, who were pushed beyond complacency.”– Eric

Eric’s reflection brings tears to my eyes. His words capture the first time anyone admitted that my vision for Hunter Boys Soccer had been realized, even if just partially. I appreciate the comparison he offers about his first year on the team to that of the freshmen in his senior year. He acknowledges younger players’ value and participation have risen.

I counted many more absences in my early days coaching. Athletes show up because they know what you’re doing for them—and what they’re doing for each other—has value. Share on X

I am fortunate for where the team’s attitude toward them has landed. Our youngest players deserve to be treated like rock stars, because they are the future of the team. They may not play the most minutes, but they are still the most important to sustaining the team’s success in the long haul. One of our freshmen, who had been known all too well by teachers like me for his eighth grade hallway antics, became an exemplary athlete for his work ethic and attitude.

    “Going into this season, I had an expectation that I’d be riding the bench, carrying the gear, and fetching balls the whole season. And while I did my fair share of that, I also felt like I immediately got welcomed into a family—the Hunter Soccer team—which was really special. Throughout preseason, I heard many of the upper-termers talk about how much worse the team would be than years past, and I’ve definitely caught myself slipping into that sort of mindset going into next season, but we exceeded expectations from last season. I was proud of that. The season certainly taught me a lot. I began to understand a deeper, more advanced version of the sport that I’d been playing for 10 years prior, and I found a new passion in the weight room.” –Jules, Defender, Class of 2023

Jules’ confidence in the team and in himself encapsulates the personal growth possible in one season for a young player. Whereas Eric, Matthew, and Ben offer perspectives in hindsight, Jules’ reflection confirms our team’s multi-year shift in its present character. I’m horribly biased, but I would like to recognize the hope that Jules shares implicitly in his reflection too. Every freshman on every team should feel like Jules did at the end of their first season.

Takeaways for All Teams

While Hunter Boys Soccer always benefited from the leadership of its upperclassmen, past classes never emphasized fitness as much as I have since I became head coach. I raised our fitness expectations out of necessity to prevent injuries. My focus on speed and strength raised our ceiling higher than a similar emphasis on soccer skills would have over the same period. In my own reflection on the balance between skills and fitness, I find myself returning to a quote in my article “What to Do If Your Athletes Are Not Improving”: Australian track coach Alan Launder wrote “that which is technically desirable must be physically possible.”

In soccer, Launder’s maxim doesn’t apply to the technical skills necessary for any given moment, but rather their continuous performance throughout an entire game. Beyond one day’s session, a minimum requisite strength also applies to the demands of a week or a season. Increased absolute strength attenuates the compounded effect of soccer practice on the body. Heavy resistance training encourages teammates to push each other toward bigger numbers. If you can foster a supportive fraternal atmosphere during strength sessions, then that same spirit should easily extend to the soccer field, where it can reduce interpersonal conflicts and increase your opportunities to offer feedback.

Final Four
Image 3. A Final Four appearance for the Hunter Boys Soccer team.

When I collected these reflections, the Hunter Boys were one penalty kick away from the city championship finals. We played a shortened spring 2021 season with no playoffs due to the pandemic; when we returned fully in fall 2021, we went undefeated and qualified for the city championship finals. We didn’t win the championship, but again we leveled up—adding further evidence to support my process.

High school coaching really distills down to galvanizing your team toward a common goal and educating each athlete in the process for getting them there. Share on X

I’ll be the first to admit my understanding of soccer has not increased significantly. High school coaching really distills down to galvanizing your team toward a common goal and educating each athlete in the process for getting them there. Hunter Boys Soccer needed confidence, a more cohesive offensive strategy, and more explicit measures of improvement than just wins and losses. I reconfigured our process to address those deficits and accepted the multi-year timeline.

I don’t like to think of myself as an innovator—I am a young coach who heeds the advice of the best practitioners in sport. I’m still nervous on game day; I still agonize over the day-to-day planning, but that’s where game changers thrive. I know I’m doing something right when I feel like I can never get it right. A shift in team culture comes directly from the coach.

Since you’re here…
…we have a small favor to ask. More people are reading SimpliFaster than ever, and each week we bring you compelling content from coaches, sport scientists, and physiotherapists who are devoted to building better athletes. Please take a moment to share the articles on social media, engage the authors with questions and comments below, and link to articles when appropriate if you have a blog or participate on forums of related topics. — SF


Reactive Strength Output

Reactive Strength Output: A Measure of Reactive Strength and Neuromuscular Strain in Plyometric Movements

Blog| ByAsh Buckman

Reactive Strength Output

By Ash Buckman and Matt McInnes Watson

Plyometric performance dictates key movement actions within team, combat, invasion, and court-based sports. A soccer player outjumping a defender to win a header, the quick feet of a boxer to dodge an incoming punch, a winger in rugby cutting to evade a fullback, and a basketball player leaping up for a game-defining dunk all require the presence of plyometric competency. Proficient landing/takeoff mechanics in sports can be the 1% difference between winning and losing.

The use of plyometric training can improve these KPIs to enhance athletic performance. Effective long-term plyometric training can produce one of two responses:

  1. An athlete who can produce force quicker.
  2. An athlete who can produce more force over time.

If we can produce an athlete who adapts in one of these two ways, they have the potential to better execute locomotive movements by jumping higher, running faster, and being more agile. With research showing variations in plyometrics leading to more significant increases in performance, the recent use of plyometric training has increased, and development in the area is also growing. Thus, to account for the surge in popularity, work must be done to improve monitoring, coaching, and training.

As mentioned in our previous article*, the reactive strength index (RSI) is a valuable testing measure to identify an athlete’s ability to produce vertical force through flight time or jump height (FT/JH) over the time spent on the floor (GCT). When using RSI as a testing measure, we can assess peak performance output from protocols such as a drop jump or a 10/5 repeated jump, yet that is the extent of its use.

Furthermore, we believe RSI as a performance output value is fundamentally flawed. RSI intends to express the plyometric work performed by an athlete and how they have utilized their reactive strength. The issue with RSI lies in the fact that it does not consider the approach into the landing, in which an athlete must react to produce a performance output.

The issue with RSI lies in the fact that it does not consider the approach into the landing, in which an athlete must react to produce a performance output, say @AshBuckman & @mcinneswatson. Share on X

By creating a reactive strength ratio (RSRatio) to monitor plyometric momentum in horizontal movements, we have been able to appreciate the work that goes into producing an RSI value. If we break down the term “reactive strength,” we can gain a better understanding of what the term means and what is required to utilize reactive strength in given movements.

  • Reactive – Acting in response to a stimulus rather than absorbing/controlling it.
  • Strength – The capacity of an object or substance to withstand great force or pressure.
  • Reactive Strength – The ability to withstand eccentric loading from a stimulus and reproduce with maximal concentric force into subsequent takeoff.

Breaking down and comprehending the definition makes it easier to understand why RSI might not be the best measure of reactive strength since it does not consider the person’s ability to be reactive to an incoming landing.

Approaches to landings vary in plyometric movements based on variables such as flight times, fall height, and speed. Thus, the levels of reactive strength needed to reproduce force will differ even if RSI values are the same. This is not a criticism of RSI, which is highly useful as a monitoring and tracking tool for coaches and athletes. However, the value has a strong focus on the performance outcome rather than the process.

RSI is more of a direct measure of the stretch-shortening cycle, with RSI having been adapted to account for CMJ with the RSI-Mod equation. Thus, it is arguably closer to a measure of impulse than reactive strength. If we want to measure an athlete’s reactive strength capabilities, we must consider not only the outgoing performance (RSI) but also the incoming momentum and how that will affect the outcome.

*Note: This article is a follow-up to “Reactive Strength Ratio: A New Way of Evaluating and Monitoring Plyometrics” by Matt McInnes Watson and myself—we would highly recommend using that article as your starting point.

Introducing Reactive Strength Output

As practitioners, we aim to quantify and analyze as much as possible to ensure we provide our athletes with the best coaching possible. RSI has been fundamental in measuring athlete progress and neuromuscular readiness, but we believe there is more to be derived from data collected in plyometric movements. By introducing RSRatio, we can now analyze plyometric movements’ fluidity and provide coaching cues to manipulate variables to enhance performance. Still, we believe there is even more scope for analysis. In many other exercise types, it is possible to measure the value of work done, whether that is force or power. This is an element of plyometrics that we can add to RSI to assist in exercise monitoring.

RSOutput was a metric created to add to the RSI value to identify the level of work performed during plyometric movements. This new metric aimed to consider the varying approaches into plyometric landings as part of the overall value to determine the neuromuscular strain and effort experienced during movements.

You can see a practical example of this when comparing two drop jumps from different box heights, where the higher box may produce a lower RSI value. However, by considering the load in the increased approach to ground contact, the actual work performed may be greater than the lower box height that produced a greater output. By just considering the RSI scores, coaches and athletes may be led to believe that the athlete experienced increased work during the lower box height. Using RSOutput, we can quantify the body’s ability to tolerate incoming load and produce an output measure (RSI).


Video 1. A comparison of two drop jump performances with similar RSI values of a 15-centimeter and 45-centimeter box height.

Measuring Reactive Strength Output

When creating a method to calculate reactive strength, we felt it was important to understand the impact of the approach on the movement and account for incoming RSI—this allows us to consider the athlete’s ability to manage eccentric landing forces from the incoming FT and then reproduce it. We can account for the mean workload needed to complete the plyometric movement by taking the average value of both incoming and outgoing RSI. A lower incoming RSI will reduce the mean compared to outgoing RSI, whereas a higher incoming RSI will increase the mean.

When an exercise has an RSRatio of 1, incoming RSI will not affect mean RSI due to a balance of incoming and outgoing plyometric momentum. By using this mean value, large incoming RSI values that lead to smaller outgoing RSI values aren’t solely dependent upon the output value and will account for the increased loading of the approach. However, by only collecting the mean of incoming and outgoing RSI, values may be equal in two plyometric movements even though one may have a much larger incoming RSI leading to increased loading to overcome.

Therefore, we must divide the value by RSRatio to account for the more significant neurological stimulus attained from increased incoming FT or drop heights. By dividing the average by the RSRatio, we can account for this increased loading of plyometric movements where RSRatio <1 generates a reactive strength value that reflects the movement’s demands.

RSO Calculation
Image 1. The data that produces the RSOutput calculation.

When using RSOutput to measure a drop jump movement (fall from a box), you must double the incoming flight time to determine the box height as the apex of a full jump (the 0.6-meter box fall time is 0.350, but it is 0.700 in the equation). An example of the calculation process for a drop jump can be seen below.

    RSOutput = ((Outgoing RSI + Incoming RSI) / 2) / (RSRatio)

    Box Height: 0.3m = 0.247s Fall Time

    Incoming RSI: Approach time – (2 * 0.247) / 0.185 GCT = 2.68

    Outgoing RSI: Flight time – 0.550 / 0.185 GCT = 2.97

    RSRatio: 2.97 / 2.678 = 1.11

    RSOutput: ((2.68 + 2.97) / 2) / 1.11 = 2.54

In the above example, the fall into the ground contact is lower than the next flight time from the jump; thus, the incoming RSI will be lower than the outgoing RSI. This has reduced the overall mean RSI, as it would be perceived as easier than reproducing the same outgoing RSI from a higher box height. By dividing by the RSRatio score, we further reduce the RSOutput score due to the reduced eccentric loading experienced from the movement. This example has an increased concentric workload compared to eccentric, and the strain on the body would be less than if the athlete had fallen from a greater height.

While RSOutput isn’t an objective measure of work done like force or power, in the absence of force plates, it provides a useful metric to understand the athlete’s level of reactive strength. Share on X

While RSOutput is not an objective measure of work done like force (Newtons) or power (Watts), with the absence of force plates, it provides a useful metric to understand the level of reactive strength utilized by the athlete.

Implications for Training and Coaching

It is crucial to understand the purpose of RSOutput in terms of when we should use it, what it means for training, and how we can optimize athlete performance from the values we obtain. By combining RSOutput with RSI rather than replacing it, we can create a broader picture of the athlete’s performance and genuinely understand how the body works. With all three values (RSOutput, RSRatio, and RSI), we can obtain all the information required to assess plyometric movements.

By combining RSOutput with RSI rather than replacing it, we can create a broader picture of the athlete’s performance and genuinely understand how the body works. Share on X

We need to collect RSI, as it provides us with the performance output measure; however, by collecting RSOutput, we can identify training zones and exercises to help improve plyometric performance. And, finally, by including RSRatio, we can measure plyometric momentum in locomotive movements and determine whether the plyometric movement has a concentric or eccentric focus. We can adjust extensive plyometric exercises by adapting elevation and incoming FT during approaches to force an RSR of less than 1 and increase the level of reactive strength utilization while similarly controlling the approach to induce an RSR of more than 1 to work on mechanics and concentric effort.

Reinventing Drop Jump Testing

Identifying optimal height for peak RSI values has been part of research and coaching debates for many years, not just as a method of tracking athlete progress but also profiling them based on their ability to handle increased fall heights. Coaches and athletes have used tests such as drop jump profiling and the 10/5 RSI test to determine an athlete’s optimal RSI score through controlled and self-regulated fall heights. The aim from training, then, is to see improvements in RSI scores from self-regulated or set drop heights or to see increases in fall heights with a similar RSI depending on the required adaptation from training.

However, when looking to train athletes to see improvements in drop jump performance, coaches often train at a supramaximal height to increase the eccentric loading. Identifying the increase in drop height is random and uncalculated. Yet, by calculating values such as RSRatio and RSOutput, it is possible to increase the control over exercise prescription and intensity for plyometric exercises, especially when vastly differing box heights could have similar RSI values.

Drop Jump Profile
Image 2. A drop jump profile identifies the relationships between RSI, RSRatio, and RSOutput across varying drop jump heights.

When looking to profile athletes using varying drop jump heights, coaches can obtain RSOutput values to provide a bigger picture of an athlete’s reactive strength, which can aid in the programming of plyometric exercises. The graph above shows a drop jump profile with RSRatio and RSOutput values plotted against RSI across varying drop heights. This allows us to identify optimal drop height for RSI as traditionally used but also to see the height at which an athlete is maximally working their reactive strength through RSOutput. This highlights that, as drop height increases, the level of reactive strength increases even when RSI has decreased, until a point where RSOutput will plateau and then eventually drop.

So, what does this tell us?

By pinpointing fundamental values such as peak RSI, RSRatio = 1, and peak RSOutput, we can start to identify potential training zones for not only drop jumps but locomotive extensive plyometric exercises. In the adapted graph below, we have plotted these key values and corresponded them to one another. We calculated predicted peak RSI using trendlines on Excel, which would suggest that for this athlete, an optimal box height would be 0.34 meters and was at an RSRatio of 0.97.

To generally improve RSI, we would suggest training at an RSRatio of around 1 in drop jumps and locomotive plyometrics due to the close nature of peak RSI to RSRatio = 1. Peak RSOutput was achieved at 0.5 meters; thus, when looking to maximally stimulate the neuromuscular system, we would suggest this particular athlete train around this value, and in extensive plyometrics, an RSRatio of 0.8 should be the target.

Every athlete will be different, and although most would follow a similar trend, it is worth profiling your athlete and getting accustomed to their profile and training based on their reactive strength to get the best adaptations from the training.

Second Drop Jump Profile
Image 3: Drop jump profile 2, with key performance measures identified from the values across a range of drop heights. These values are crucial to determining training intensities and prescribing effective box heights.

To Conclude

RSOutput is a practical value that can help identify an athlete’s level of reactive strength and provide guidelines to help with training zones within plyometric exercises. In conjunction with RSI and RSOutput, breaking down an athlete’s plyometric capacity and increasing plyometric training specificity depending on the athlete, block of training, and sport is possible.

RSOutput is a practical value that can help identify an athlete’s level of reactive strength and provide guidelines to help with training zones within plyometric exercises, say @AshBuckman & @mcinneswatson. Share on X

RSRatio and RSOutput are metrics that can be recorded through simple technologies and linked into many exercises to look to enhance sporting performance. We recommend that coaches explore their use with the athletes they train.

Since you’re here…
…we have a small favor to ask. More people are reading SimpliFaster than ever, and each week we bring you compelling content from coaches, sport scientists, and physiotherapists who are devoted to building better athletes. Please take a moment to share the articles on social media, engage the authors with questions and comments below, and link to articles when appropriate if you have a blog or participate on forums of related topics. — SF


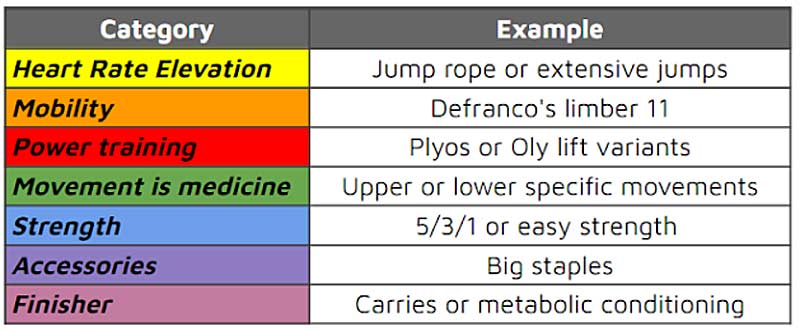
Matt Watson 2Matt McInnes Watson is a track and field and performance coach. He has a master’s degree in athletic development and is currently studying for a Ph.D. in plyometrics. Watson is the owner of Plus Plyos, a coaching business that provides supplementary plyometric programs through video format. He is currently teaching in the United Arab Emirates, and he coaches multiple athletes from the U.K. and U.S.

Tactical Athlete on Hike

Misconceptions of Training the Tactical Athlete

Blog| ByDanny Foley

Tactical Athlete on Hike

There is no shortage of misconceptions surrounding the tactical population and approaches for strength and conditioning. For the better part of four years, I’ve been working predominantly with the Special Operations community and some Special Forces personnel. I work with both active duty and veteran populations, and it’s honestly difficult to describe some of the things I’ve heard about their training and the physical demands of their work—from the old adages like “resting is a sign of weakness” and “if it doesn’t hurt, it isn’t changing you” to more current and nuanced ideologies such as trend dieting, nonconventional health treatments, and extreme training endeavors.

The collective evolution of exercise and training across all military branches is actually quite fascinating, and it’s safe to say it has continued to improve and become more pragmatic for our service members.

Nevertheless, while there is almost always good intention, there is also a fair amount of misapplication, sometimes unbeknownst to the coach/instructor or the athlete. Through my work at Virginia High Performance (VHP), I’ve been afforded a tremendous opportunity to not only work with these individuals in a one-on-one manner but to do so with very little constraint or oversight. This opportunity has given me an enormous amount of time to try different methods and applications. Importantly, it has also given me the chance to make mistakes and see what definitely does not work.

With that in mind, in this article, I’d like to discuss what I feel are three of the most prominent misconception-based mistakes that occur when working with the tactical population.

Mistake #1. Attempting Movement Mimicry and Assimilation

Without a doubt, the number one mistake I see made with tactical athletes is attempting to assimilate or replicate in the gym what they do professionally. There are many issues with this approach. Chief among them is that it gives the immediate impression that you really don’t understand the constructs of your role as a strength and conditioning coach—so, instead, you’re just going to play charades.

Without a doubt, the number one mistake I see made with tactical athletes is attempting to assimilate or replicate in the gym what they do professionally, says @danmode_vhp. Share on X

It’s important to recognize the substantial amount of time, intensity, effort, and resources put into our service members’ professional development. As such, they spend considerable time doing things like weaponry work, close-quarters combat (CQB), and marksmanship drills. Not to mention, they perform all these things under the direction of the most skilled instructors in the world. This makes it far from logical or practical to assume that the handful of hours we see someone in a gym will have any bearing on the thousands of hours of development they’ve had on base or command.

If you’re a strength and conditioning coach working with a basketball player, it wouldn’t make much sense to do things like a Pallof press while the athlete is dribbling a basketball. Why? Well, because the ball-handling aspect isn’t demanding enough for the athlete to promote any sort of adaptation, nor is the Pallof press promoting enough of a stimulus to drive a physical adaptation. Drills like this also lack the contextual demands for transfer (e.g., no defender or objective, making ball handling non-specific). Effectively, you’re just having them do two things worse at once and in a way that doesn’t provide any sort of meaningful outcome.

Banded Shot
Image 1. Mimicry gone wrong.

The exact same case applies to tactical athletes. So, rather than tying bands to guns for “resisted draw, aim, shoot,” simply assess them as athletes and do your job.

We are rooted in the foundations of anatomy, biomechanics, and physiology, and that is precisely how we can best influence our athletes—tactical or otherwise. My inherent goal is to simply be the best professional I can be and emphasize exactly what I know and can best provide for them. You’re not trying to make them better operators; you’re simply looking to influence or improve the physical qualities required of them to be more capable of performing their job.

This generally leads to basic things we would see in any other specific population:

  • Injury management and restoration.
  • Improving strength and speed.
  • Improving conditioning.
  • Restoring joint ROM/tissue quality as needed.

Leave the tactical skill development for the true experts, and you can focus on the components you’re able to influence and keep pushing.

Mistake #2. Finding Failure (Disproportionate Volume/Intensity)

Whereas the assimilation and movement mimicry tactics are poor training, overloading tactical athletes is nothing short of you becoming a liability to their career. Disproportionate volumes and intensities in training are clear injury risk amplifiers with this population—not just acutely or in the moment, but also setting them up for failure when they conduct their training at work. There is an inherent presence of high-volume, high-intensity demands for military operators, making them prime candidates for mechanical overload syndrome.

The best results I’ve had with tactical athletes in a four-week stretch have been the result of mostly unloading them and promoting more parasympathetic applications, says @danmode_vhp. Share on X

As performance coaches, when tactical athletes come to us, we must be measured with when and how we apply high force or high-volume loading. Beyond overstressing the athlete in a global sense through poor programming, we also need to be mindful of not overloading the athlete in a localized manner either. An easy example would be understanding the demands of kit, helmet, and night vision nods and that because of this demand, heavy back squatting is likely a poor option for most operators. Bad things happen when you place compression on top of compression (e.g., cervical discs, thoracocervical junction).

Additionally, assuming that they can endure it in the training setting just because they’re accustomed to high volume or extreme intensities is a critical disservice. In fact, I can say that the best results I’ve had with this tier of athletes in a four-week stretch have been the result of mostly unloading them and promoting more parasympathetic applications.

Omegawave
Image 2. An Omegawave reading showing a steep decline in readiness.

On average, roughly 70% of athletes we see are in an overly sympathetic state when they start with us. This means their body is in constant overdrive and has difficulty with sleep and/or relaxing, a compromised ability to recover, impaired metabolic function, and likely some level of endocrine strain. The crazy part is that without sophisticated tools like the Omegawave and Oura ring to measure this, you can rarely tell that they’re in a state of unrest or true exhaustion. Taking athletes with this kind of metabolic profile and throwing them into high-intensity or high-volume programming (e.g., heavy bench press, exhaustive “WODs” going for long-distance runs with a weight vest on) is unequivocally an imprudent approach.

Meet them where they are, and when working with active-duty populations, be sure you thoroughly understand the physical demands of their work environment. You’d be blown away by how much improvement someone can make when they just allow their body to downregulate for a few weeks and train with some level of intensity and consistency. It honestly doesn’t take much.

You’d be blown away by how much improvement someone can make when they just allow their body to downregulate for a few weeks and train with some level of intensity and consistency. Share on X

But no matter what style of training you believe in or utilize, just don’t simply crush them with overzealous intensities and volumes. I promise you don’t need to put on a show by demonstrating how “hard” you can push them. Just assess and apply what’s needed.

Mistake #3. Assuming Ability = Training

The last misconception I want to throw at you is to never assume that just because this population tends to be highly fit, they understand what they’re doing when it comes to training and nutrition. I have met some of the most wildly “in shape” and physically impressive individuals in the world through my work. I’ve worked with several individuals who’ve climbed Everest, Rainier, and other peaks and some who’ve completed Iron Mans, 100-mile runs, 24-hour marathons, and so forth.

I mention all that to say this: Do not confuse physical ability or genetics for knowing how to train optimally. I promise you, very few athletes actually do.

DXA Example
Image 3. DEXA scan measuring body comp.

I’ll leave you with a quick story. I recently finished working with an athlete who checked IN at 7.5% body fat (only the second time I’ve seen someone under 10%). My initial thought was, well, what am I possibly going to be able to help this dude with? He had completed multiple marquee events and physical endeavors and was insanely committed to maintaining his training priorities and health-conscious lifestyle.

Never assume that just because this population tends to be highly fit, they understand what they’re doing when it comes to training and nutrition, says @danmode_vhp. Share on X

As it turned out, he was driving himself into a (somewhat severe) catabolic state. He was in a true overtraining state, resulting in metabolic/endocrine strain lethargy and hormonal decrements. Over the four weeks we worked together—and in conjunction with multiple modalities—we were able to, in a sense, reverse the effects of overtraining. This was achieved by improving his parasympathetic function and indirectly addressing his metabolic and endocrine impairments through strategic programming and nutritional planning.

The wild part is that we trained twice a day for four weeks, lifted heavy twice a week, and sprinted twice a week and still managed to improve PSNS/SNS balance and hormone profile. It was one of the wildest work situations I’ve had this year.

Since you’re here…
…we have a small favor to ask. More people are reading SimpliFaster than ever, and each week we bring you compelling content from coaches, sport scientists, and physiotherapists who are devoted to building better athletes. Please take a moment to share the articles on social media, engage the authors with questions and comments below, and link to articles when appropriate if you have a blog or participate on forums of related topics. — SF


  • « Go to Previous Page
  • Page 1
  • Interim pages omitted …
  • Page 47
  • Page 48
  • Page 49
  • Page 50
  • Page 51
  • Interim pages omitted …
  • Page 164
  • Go to Next Page »

Primary Sidebar

Latest Posts

  • Building a Better High Jump: A Review of Stride Patterns
  • How We Got Our First Sprint Relays to State in Program History
  • Science, Dogma, and Effective Practice in S&C

Topics

  • Changing with the Game
  • Game On Series
  • Getting Started
  • high jump
  • Misconceptions Series
  • Out of My Lane Series
  • Rapid Fire
  • Summer School with Dan Mullins
  • The Croc Show
  • track and field
  • What I've Added/What I've Dropped Series

Categories

  • Blog
  • Buyer's Guide
  • Freelap Friday Five
  • Podcasts

COMPANY

  • Contact Us
  • Write for SimpliFaster
  • Affiliate Program
  • Terms of Use
  • SimpliFaster Privacy Policy
  • DMCA Policy
  • Return and Refund Policy
  • Disclaimer

Coaches Resources

  • Shop Online
  • SimpliFaster Blog
  • Buyer’s Guide
  • Freelap Friday Five
  • Coaches Job Listing

CONTACT INFORMATION

13100 Tech City Circle Suite 200

Alachua, FL 32615

(925) 461-5990 (office)

(925) 461-5991 (fax)

(800) 634-5990 (toll free in US)

Logo of BuyBoard Purchasing Cooperative. The word Buy is yellow and shaped like a shopping cart, while Board and Purchasing Cooperative are in blue text.
  • Facebook
  • Instagram
  • Twitter
  • YouTube

SIGNUP FOR NEWSLETTER

Loading

Copyright © 2025 SimpliFaster. All Rights Reserved.