A Guide to Assessing Mobility for Strength and Conditioning Coaches
In this Article
- Why Should Coaches Perform ROM Assessments?
- Performing ROM Assessments
- Using a Smartphone to Perform ROM Assessments
- Palpating Bony Landmarks
- Supine Active Hip Flexion Test
- Thomas Test
- Modified Thomas Test
- Active Hip Rotation Test (Internal and External)
- Supine Hip Abduction Test
- Active Knee Extension Test
- Modified Weight-Bearing Lunge Test
- What to Do Next?
- References

Summary
When an athlete lacks range of motion in an anatomical region, it compromises their movement quality, potentially leading to compensations that increase injury risk. In the first of a two-part series, Coach Louis Howe teaches S&C coaches how to identify relevant anatomical landmarks and then use their smartphone to help perform lower extremity assessments.
Strength and conditioning (S&C) coaches are commonly responsible for programming mobility exercises for their athletes, with the goal to either improve movement quality or reduce injury risk. If you ask a room full of coaches to list the mobility exercises they regularly program, you’ll no doubt receive an endless list of movements along with countless variations. Ask the same group of coaches to list tests they employ that accurately and reliably identify deficits or changes in an athlete’s mobility, and the list will generally be significantly shorter. This is likely the reason so many athletes are prescribed countless shoulder, thoracic, hip, and ankle mobility exercises as part of their routines—if you can’t assess something, better do the exercises to develop it, just in case.
S&C coaches should possess a basic skill set that allows them to reliably measure an athlete’s range of motion (ROM), which underpins fundamental movements, says @LouisHowe_SandC. Share on XThis leads to extended warm-ups and “filler” exercises being scattered throughout training programs with little return for improvements in performance. To avoid valuable training time being wasted performing needless mobility exercises, S&C coaches should possess a basic skill set that allows them to reliably measure an athlete’s range of motion (ROM), which underpins fundamental movements.
The goal of this two-part series will be to demonstrate ROM assessments that require no specialized equipment, but produce data that is reliable and valid, in order to direct the training process. Part 1 will focus on lower extremity assessments, while Part 2 will cover tests for the upper extremities.
Why Should Coaches Perform ROM Assessments?
Mobility underpins our ability to perform exercises through a full ROM, allowing us to adhere to our technical model for any given movement. This is an important consideration, as the ability to safely load an exercise through full ROM may support greater development in muscle hypertrophy1 and maximal strength2. However, when an anatomical region lacks ROM, movement quality will be compromised, and the consequence may be compensatory movements that have the potential to increase injury risk.
The squat is an example of this for a lower extremity exercise. During the high bar back squat, up to approximately 40 degrees of ankle dorsiflexion ROM is needed in order to allow an athlete to maintain a relatively upright torso while breaking parallel3(although this value depends on anthropometric dimensions and the strategy the athlete adopts). In instances where an athlete possesses significantly less ankle dorsiflexion ROM, reduced depth4, greater knee valgus5, increased forward trunk lean6, and excessive spinal flexion7may occur as a compensation to achieve squat depth.
An example for the upper extremity is an athlete struggling to extend their thoracic spine, where overhead pressing may be compromised. Thoracic spine extension, a capacity that is becoming significantly compromised in today’s technology-driven society8, is fundamental to an athlete’s ability to perform the overhead press.
Generally speaking, athletes likely need approximately 15 degrees of thoracic spine extension9to facilitate scapulothoracic motion (although this value likely depends on the athlete’s start position). When an athlete demonstrates poor thoracic spine extension, shoulder ROM will be compromised10, leading to trouble with locking out. A compensation may be to sway the pelvis forward and hyperextend the lower segments of the lumbar spine, to orient the barbell over the shoulder joint and finish the movement. As a consequence, this may negatively alter the load-bearing strategy of the spine.
Performing ROM Assessments
Assessing ROM requires S&C coaches to have a skillset that allows us to collect objective data that can highlight if an athlete lacks mobility in any anatomical region. Traditionally, ROM assessments have required us to have access to, and experience in, using specialized equipment (e.g., inclinometers and goniometers), along with excellent palpatory skills that many S&C coaches do not possess. However, the accessibility of smartphones offers S&C coaches the opportunity to bypass this obstacle.
Smartphones equipped with gyroscopes are able to determine the orientation of the phone in space and allow for the measurement of angles using free applications. As a result, innovative research has shown smartphones can accurately and reliably measure joint angles during various ROM assessments if used in a similar fashion to inclinometers.11,12,13
Innovative research has shown smartphones can accurately and reliably measure joint angles during various ROM assessments if used in a similar fashion to inclinometers, says @LouisHowe_SandC. Share on XWithin this article, I’ll focus on commonly used ROM assessments, demonstrating how to perform and collect objective data for the following ROM assessments:
- Supine active hip flexion test
- Thomas test
- Modified Thomas test
- Supine active hip abduction test
- Active hip rotation test (internal and external)
- Active knee extension test
- Modified weight-bearing lunge test
Using a Smartphone to Perform ROM Assessments
Before we discuss techniques, it’s important we cover some ground rules for using smartphones to measure ROM in order to standardize our procedures:
- Prior to testing, remove your phone case, which may potentially alter the contour of the phone.
- Calibrate the phone against either a vertical (e.g., wall) or horizontal (e.g., table) reference point, depending on the test. It is important that the surface you’re using is, in fact, level (this can be checked with a spirit level). Not all free applications allow you to zero the smartphone, which should be a consideration when selecting an application to perform ROM assessments.
- There isn’t much evidence for this, but I’d suggest (at least until there is evidence that says otherwise) that coaches be cautious about using different phone models interchangeably. Measuring the inclination of a bony landmark with an iPhone SE may produce different results than using a more recent and larger model.
- Again, there is little evidence for this, but I would caution against using different applications interchangeably.
Palpating Bony Landmarks
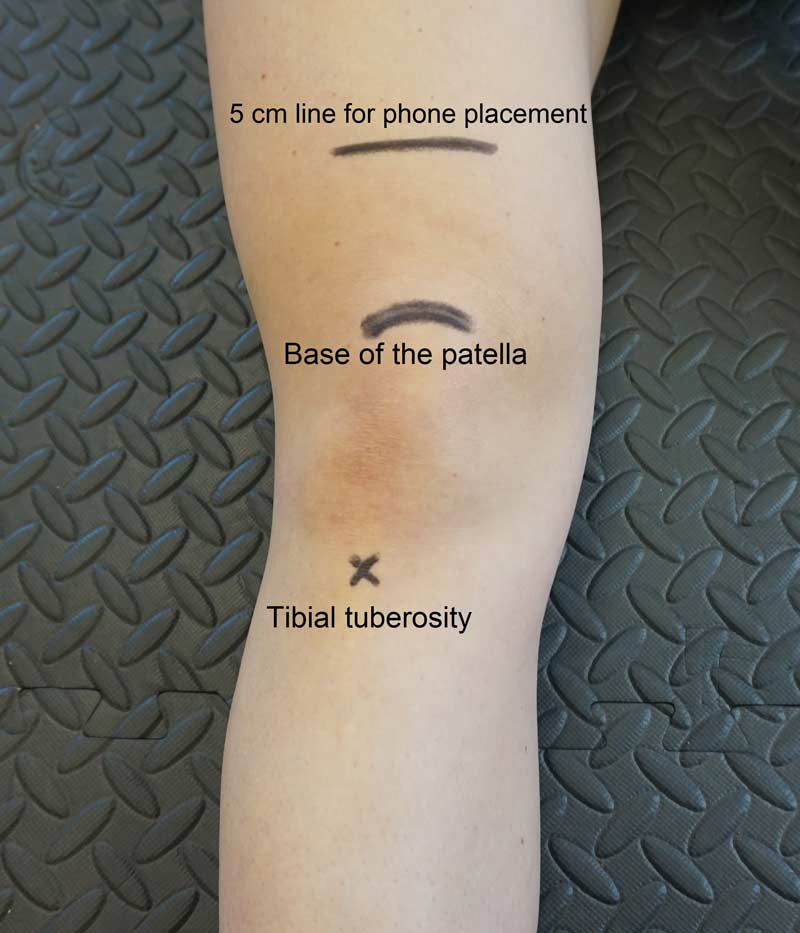
For most S&C coaches, identifying anatomical landmarks can be a difficult skill to master and this may limit their ability to perform ROM assessments. However, it is important to locate some landmarks in order for us to optimize our phone placement and take reliable measures. For all of the assessments shown here, I’ve kept the number of landmarks for coaches to identify at a minimum. Below is an image of all relevant anatomical regions that we need to locate for the lower extremity assessments.
To give coaches a reference for what may be normal, I’ve provided some values for performance variables that can help decision-making. This is always a very superficial process, so please treat any normative values provided in this next section with caution. The importance of the values derived from ROM assessments should be determined on an individual basis.
Supine Active Hip Flexion Test
This test allows us to establish hip flexion ROM. During the squat, the hip may flex anywhere from 110-125 degrees.14This test will produce a value that is relative to the anterior thigh being vertical—meaning that values will be much lower than those seen during squatting (see video 1). I generally just use this value to identify change, although in my experience, athletes with greater than 20 degrees possess more than enough hip flexion to perform deep squats.
Starting position: Athlete lies in a supine position with the legs extended.
Movement: Athlete maximally flexes at the hip while simultaneously flexing at the knee.
Measurement: Prior to performing the test, locate the base (top) of the patella. Draw a line 5 centimeters above the base of the patella that runs in a transverse direction (see figure 1). At maximum flexion, align the top of the phone with this line (set in portrait and calibrated to a vertical reference).
Video 1 shows how to assess hip flexion ROM.
Video 1. Flexibility of the hip is often seen as only “interesting” in some coaching and therapy circles, but if combined with other data sets, it could be revealing.
Thomas Test
This version of the Thomas test is used to identify restriction of the uniarticular hip flexor muscles (i.e., iliacus, psoas major, and tensor fascia lata) and passive structures of the anterior hip (i.e., joint capsule and extracapsular ligaments). In my experience, restriction in hip extension is actually relatively rare for the athletic population. When most athletes present with restriction in hip extension, it is most commonly due to a lack of extensibility for the biarticular hip flexors. I always cue athletes to “pull” the test leg down so it’s not just passive stiffness against the weight of the leg I’m assessing. For this test, sufficient hip extension is represented as the thigh being parallel to the floor.
When most athletes present with restriction in hip extension, it’s most commonly due to a lack of extensibility for the biarticular hip flexors, says @LouisHowe_SandC. Share on XStarting position: Athlete lies in a supine position with both hips and knees maximally flexed so that the pelvis is posteriorly rotated and the lumbar spine is flat against the ground.
Movement: Athlete maximally extends the test leg in an attempt to make contact between the back of the thigh and the ground. Importantly, coaches should monitor the position of the non-test leg, making sure the hip remains maximally flexed throughout the test.
Measurement: Prior to performing the test, locate the base (top) of the patella. Draw a line 5 centimeters above the base of the patella that runs in a transverse direction (see figure 1). At maximum hip extension, align the top of the phone with this line (phone set in landscape and calibrated to a horizontal reference).
Video 2 shows how to assess hip extension ROM.
Video 2. When testing the hip, make sure you don’t reduce risk or function to maximal range or strength, but think coordination as well. Table or floor testing has poor correlation with some real movements, but when scores are out of normative range, it could be a clue to an existing problem.
Modified Thomas Test
The modified Thomas test (this variation is sometimes called the Kendall test) allows coaches to identify a lack of extensibility in the rectus femoris muscle—a biarticular muscle that both flexes the hip and extends the knee. When an athlete struggles to maintain an upright trunk or neutral spine alignment during a lunge pattern, the common culprit is the rectus femoris muscle. As this test measures tibia angle relative to vertical, full ROM would be an athlete achieving an angle of 0 degrees.
When an athlete struggles to maintain an upright trunk or neutral spine alignment during a lunge pattern, the common culprit is the rectus femoris muscle, says @LouisHowe_SandC. Share on XStarting position: Athlete lies in a supine position on a plinth or high bench (important that the foot can clear the floor), so that the knees hang over the table/bench by a few inches. The start position for this test is the finish position for the Thomas test: The knee of the test leg is extended, and the back of the thigh contacts the table/bench, while the non-test leg is maximally flexed at the hip to posteriorly rotate the pelvis.
Movement: Athlete is cued to maximally flex the knee on the test leg. Again, coaches should monitor the non-test leg to make sure the hip remains maximally flexed throughout the test.
Measurement: Prior to performing the test, locate the tibial tuberosity (see figure 1). At maximum knee flexion, align the phone with this anterior border of the tibia just below the tibial tuberosity (phone set in portrait and calibrated to a vertical reference).
Video 3 shows how to assess the biarticular rectus femoris extensibility.
Video 3. Modified Thomas tests are still very useful for coaches and therapists to see changes from a training program, but don’t expect big changes overnight. One variable helps paint a picture, but can never be a magic bullet for analysis purposes.
Active Hip Rotation Test (Internal and External)
To test hip rotation, athletes can be in either a seated or supine position. The decision is yours, and you should base it on the demands imposed on the athlete. For example, if you want to know why an athlete keeps spinning their feet out during the descent phase of the squat, checking while they’re in a seated position with the hip flexed is more relevant.
Normative values for hip internal and external rotation are 35 degrees and 45 degrees, respectively.15However, these values will be heavily influenced by the bony architecture of the acetabulum and femur15. Therefore, coaches should show caution when interpreting these results.
Starting position: With the athlete either lying supine or seated on a plinth or high bench, position the knees so they are a few inches over the table/bench and flexed to 90 degrees. The athlete moves the non-test leg off the edge of the table/bench without rotating the pelvis.
Movement: Athlete is cued to maximally internally (foot away from the midline) or externally (foot towards the midline) rotate the hip while maintaining alignment of the pelvis and knee.
Measurement: Prior to performing the test, draw a line 10 centimeters above the tip of the lateral malleolus (the bottom of the ankle bone on the outside of the lower leg). At maximum rotation (either direction), align the bottom of the phone with this line (phone set in portrait and calibrated to a vertical reference).
Video 4 shows how to assess hip rotation ROM.
Video 4. Hip rotation assessments are great when they are active, as there is more to them than isometric strength. Combining strength and mobility is a great way to see how an athlete uses their range of motion in isolation.
Supine Hip Abduction Test
In my experience, hip abduction ROM is hugely underrated as a potential cause for limited squat depth. During the squat, the hip flexes while simultaneously abducting to approximately 30-40 degrees (the knee moving away from the midline of the body).3The cues “sit into the hole,” “knees out,” or “spread the floor” facilitate getting the hip into an abducted position. This is important to optimize squat mechanics.
Athletes with long torsos relative to their femurs will require less ankle dorsiflexion ROM to achieve any given trunk angle during the squat. We obviously can’t alter their femur length structurally, but we can functionally. If we cue our athletes to abduct their hips (get the knees out), the athletes will reduce their femur length in the anterior-posterior direction while maintaining their torso length. This results in a functional shortening of the femur relative to the torso in the sagittal plane and, therefore, reduces ankle ROM demands during squatting.16
We can’t alter an athlete’s femur length structurally, but we can functionally, says @LouisHowe_SandC. Share on XAs a side note, this is why the functional movement screen deep squat biases athletes with excellent ankle dorsiflexion ROM. By forcing the athletes to have their feet pointed straight ahead, athletes must demonstrate exceptional levels of ankle ROM.17Even just a small amount of toe-out, which increases hip abduction, can improve overhead squat performance.18
For this assessment, the value produced is relative to vertical, so values greater than 40 degrees are likely sufficient for most activities.
Starting position: Athlete lies in a supine position with the legs extended. The test leg is flexed at the hip and knee to 90 degrees.
Movement: The athlete maximally abducts at the hip (moves the knee away from the midline of the pelvis) while the coach stabilizes the pelvis, preventing rotation from occurring.
Measurement: At the point of maximal hip abduction, place the phone on the medial surface at approximately mid-thigh (phone set in portrait and calibrated to a vertical reference).
Video 5 shows how to assess hip abduction ROM.
Video 5. You can do another hip evaluation supine, if guided properly. You may need to escalate athletes who have pain to sports medicine staff if they are visually uncomfortable while performing the movement.
Active Knee Extension Test
The active knee extension test assesses the length of the biarticular hamstring muscles. This is particularly relevant for most hip hinging exercises, such as the Romanian deadlift. Athletes who demonstrate minimal hip flexion before losing their neutral spine alignment during Romanian deadlifts (or any hinging exercise where the knee is relatively extended) should be checked for hamstring extensibility using the active knee extension test. This test provides values relative to vertical, with normal for the active knee extension considered to be less than 20 degrees.19
You should check athletes who show minimal hip flexion before losing their neutral spine alignment during Romanian deadlifts for hamstring extensibility using the active knee extension test. Share on XStarting position: Athlete lies in a supine position with the legs extended. The test leg is flexed to 90 degrees at the hip and knee, while the foot is maintained in a neutral position.
Movement: The athlete maximally extends the knee while maintaining hip and foot alignment.
Measurement: At the point of maximal knee extension, place the phone on the anterior border of the tibia below the tibial tuberosity (phone set in portrait and calibrated to a vertical reference).
Video 6 shows how to assess hamstring extensibility.
Video 6. Extension qualities are both subjective and objective if done correctly. You must make extra effort to ensure the athlete does not compensate.
Modified Weight-Bearing Lunge Test
Ankle dorsiflexion ROM can impact squat mechanics.4,6,8,17To measure ankle dorsiflexion ROM, weight-bearing methods are more functionally relevant to closed-chain exercises than non-weight-bearing methods. This is commonly shown in research where weight-bearing lunge test performance correlates with movement quality during squatting and landing tasks, and non-weight-bearing techniques do not.4
Video 7 below demonstrates how to measure ankle dorsiflexion ROM using the modified weight-bearing lunge test. For this assessment, a value of 0 degrees represents the tibia being upright and the ankle in a neutral alignment. As activities like the deep squat require approximately 40 degrees of ankle dorsiflexion ROM14, you can use this value to determine a deficit. However, I generally want my athletes to achieve 45 degrees for this test, as this allows me some leeway for the error associated with this assessment.
Starting position: Athlete sets up in a half-kneeling position, with the front foot half a foot length ahead of the back knee. They position the front leg so the knee is located directly over the toes to encourage a neutral alignment of the foot. The pelvis faces forward and the trunk is positioned relatively upright. The athlete may hold onto a stable object (e.g., the wall) to help maintain balance.
Movement: The athlete reaches the front knee as far forward as possible, while cued to maintain pelvic alignment and keep the heel down. Coaches must be sure that the athlete does not pronate at the foot (represented as a collapse of the medial longitudinal arch during the movement) to prevent the midtarsal joint contributing to the assessment outcome.
Measurement: At the point of maximal ankle dorsiflexion prior to heel lift, place the phone on the anterior border of the tibia below the tibial tuberosity (phone set in portrait and calibrated to a vertical reference).
Video 7 shows how to assess ankle dorsiflexion ROM.
Video 7. Modifications to the conventional lunge are a sound option for those with attention to detail. You can test athletes quickly and effectively with this variation.
What to Do Next?
Now that we’ve covered how to perform ROM assessments using a smartphone, all that’s left is for you, as a coach, to practice the techniques shown and develop expertise. In my experience, a few hours of practice are all you need to reach the reliability values commonly reported in the literature. On that note, I highly recommend you start to establish your own reliability values now in order to perform this test repeatedly.
References
1. McMahon, G. E., Morse, C. I., Burden, A., Winwood, K., & Onambélé, G. L. “Impact of range of motion during ecologically valid resistance training protocols on muscle size, subcutaneous fat, and strength.” The Journal of Strength and Conditioning Research. 2014; 28(1): 245-255.
2. Pinto, R. S., Gomes, N., Radaelli, R., Botton, C. E., Brown, L. E., & Bottaro, M. “Effect of range of motion on muscle strength and thickness.” The Journal of Strength and Conditioning Research. 2012; 26(8): 2140-2145.
3. Swinton, P. A., Lloyd, R., Keogh, J. W., Agouris, I., & Stewart, A. D. “A biomechanical comparison of the traditional squat, powerlifting squat, and box squat.” The Journal of Strength and Conditioning Research. 2012; 26(7): 1805-1816.
4. Dill, K. E., Begalle, R. L., Frank, B. S., Zinder, S. M., & Padua, D. A. “Altered knee and ankle kinematics during squatting in those with limited weight-bearing–lunge ankle-dorsiflexion range of motion.” Journal of Athletic Training. 2014; 49(6): 723-732.
5. Macrumors, E., Bell, D. R., Boling, M., Lewek, M., & Padua, D. “Effect of limiting ankle-dorsiflexion range of motion on lower extremity kinematics and muscle-activation patterns during a squat.” Journal of Sport Rehabilitation. 2012; 21(2): 144-150.
6. Fuglsang, E. I., Telling, A. S., & Sørensen, H. “Effect of ankle mobility and segment ratios on trunk lean in the barbell back squat.” The Journal of Strength and Conditioning Research. 2017; 31(11): 3024-3033.
7. List, R., Gülay, T., Stoop, M., & Lorenzetti, S. “Kinematics of the trunk and the lower extremities during restricted and unrestricted squats.” The Journal of Strength and Conditioning Research. 2013; 27(6): 1529-1538.
8. Heneghan, N. R., Baker, G., Thomas, K., Falla, D., & Rushton, A. “What is the effect of prolonged sitting and physical activity on thoracic spine mobility? An observational study of young adults in a UK university setting.” BMJ open. 2018; 8(5): e019371.
9. McKean, M. R., & Burkett, B. J. “Overhead shoulder press–In-front of the head or behind the head?” Journal of Sport and Health Science. 2015; 4(3): 250-257.
10. Barrett, E., O’Keeffe, M., O’Sullivan, K., Lewis, J., & McCreesh, K. “Is thoracic spine posture associated with shoulder pain, range of motion and function? A systematic review.” Manual Therapy. 2016;26:38-46.
11. Bucke, J., Spencer, S., Fawcett, L., Sonvico, L., Rushton, A., & Heneghan, N. R. “Validity of the digital inclinometer and iphone when measuring thoracic spine rotation.”Journal of Athletic Training. 2017; 52(9): 820-825.
12. Charlton, P. C., Mentiplay, B. F., Pua, Y. H., & Clark, R. A. “Reliability and concurrent validity of a Smartphone, bubble inclinometer and motion analysis system for measurement of hip joint range of motion.” Journal of Science and Medicine in Sport. 2015; 18(3): 262-267.
13. Vohralik, S. L., Bowen, A. R., Burns, J., Hiller, C. E., & Nightingale, E. J. “Reliability and validity of a smartphone app to measure joint range”. American Journal of Physical Medicine and Rehabilitation. 2015; 94(4): 325-330.
14. Todoroff, M. “Dynamic Deep Squat: Lower-Body Kinematics and Considerations Regarding Squat Technique, Load Position, and Heel Height.” Strength and Conditioning Journal. 2017; 39(1): 71-80.
15. Neumann, D. A. (2002). Kinesiology of the musculoskeletalsystem. St. Louis: Mosby.
16. Demers, E., Pendenza, J., Radevich, V., & Preuss, R. “The Effect of Stance Width and Anthropometrics on Joint Range of Motion in the Lower Extremities during a Back Squat.” International Journal of Exercise Science. 2018; 11(1): 764.
17. Rabin, A., & Kozol, Z. “Utility of the overhead squat and forward arm squat in screening for limited ankle dorsiflexion.” The Journal of Strength and Conditioning Research. 2017; 31(5): 1251-1258.
18. McMillian, D. J., Rynders, Z. G., & Trudeau, T. R. “Modifying the Functional Movement Screen deep squat test: the effect of foot and arm positional variations.” The Journal of Strength and Conditioning Research. 2016; 30(4): 973-979.
19. Hansberger, B. L., Loutsch, R., Hancock, C., Bonser, R., Zeigel, A., & Baker, R. T. “Evaluating the relationship between clinical assessments of apparent hamstring tightness: a correlational analysis.” International Journal of Sports Physical Therapy. 2019; 14(2): 253.
