• Skip to content
  • Skip to primary sidebar
SimpliFaster

SimpliFaster

cart

Top Header Element

  • Facebook
  • Instagram
  • Twitter
  • YouTube
  • Login
  • cartCart
  • (925) 461-5990
  • Shop
  • Request a Quote
  • Blog
  • Buyer’s Guide
  • Freelap Friday Five
  • Podcast
  • Job Board
    • Candidate
    • Employer
    • Facebook
    • Instagram
    • Twitter
    • YouTube
You are here: Home / Blog

Blog

Lumbar Spine Posture Lifting

When Posture Matters: The Importance of Lumbar Spine Alignment During Heavy Lifting

Blog| ByLouis Howe

Lumbar Spine Posture Lifting

During full range of motion (ROM) bilateral lifting exercises such as squats and deadlifts, a neutral spine posture—defined as an individual’s relaxed standing posture where the stress on the spinal column and muscular effort required to maintain this alignment is minimal26—is commonly included as part of the technical model. However, lumbar spine flexion away from the neutral posture is unavoidable during these exercises.23 During heavy squatting and deadlifting performed through a full ROM, the lumbar spine will typically flex between 50% and 80% of maximum flexion.15 In fact, even when people are coached to maintain a lordotic posture during lifting, flexion relative to a standing posture still occurs.14,22

As spine injuries are common in sports where heavy lifting exercises are performed, avoiding end range flexion could be an important strategy to reduce lifting-related injuries. Share on X

Although spine flexion during lifting exercises is commonly thought to increase injury risk, submaximal amounts of lumbar flexion may improve lifting performance and possibly lower injury risk through the following mechanisms:

  1. Decreasing the external moment arm of the barbell relative to the lumbosacral and hip joints, allowing more load to be lifted.18
  2. Maximizing the hip extensor internal muscles moment arm9 by decreasing the amount of hip joint flexion required to lower the center of mass a given distance28.
  3. Lengthening the erector spinae muscles, resulting in greater torque generation capability.27
  4. Potentially facilitating the contribution of the lumbodorsal fascia in providing an internal extensor moment, enhancing metabolic efficiency.14
  5. Optimizing load sharing by reducing the compressive loading on spinal structures such as the facet joints and the posterior annulus of the disc.2

While it is important to acknowledge the advantages of lifting with moderate amounts of lumbar spine flexion, it should also be recognized that maximally flexing the spine under the extremely high compressive loads seen in the weight room may increase injury risk. As spine injuries are common in sports where heavy lifting exercises are performed (e.g., weightlifting and powerlifting1), avoiding end range flexion could be an important strategy to reduce lifting-related injuries. This article will present evidence for the potential risk associated with lifting in a maximally flexed posture and provide tools that coaches can use to help athletes avoid end range flexion during bilateral lifting exercises.

How Does Maximal Spinal Flexion During Lifting Increase Injury Risk?

During heavy lifting exercises (“heavy” is defined in this article as loads exceeding 10RM), the compressive forces are incredibly high13, surpassing the ultimate strength of the spine reported in cadaver studies29. This disparity can be explained by the osteoligamentous structure’s capacity to remodel following exercise, over time building the spine’s tolerance for the compressive loads experienced during lifting.18 While it is important to appreciate the adaptive capacity of the body, it should not be regarded as infinite. Therefore, lifting technique should complement good programming to help mitigate injury risk and develop robustness.

The primary concern with maximally flexing the trunk during heavy lifting exercises is the tolerance of the spine to compressive forces. When fully flexed, the compressive strength of the passive spine has been shown to decrease by approximately 23%-47% in cadaver models compared to an alignment where the end plates are positioned parallel to each other (which represents a slightly flexed position).19

The primary concern with maximally flexing the trunk during heavy lifting exercises is the tolerance of the spine to compressive forces, says @LouisHowe_SandC. Share on X

One reason for this is that as the posterior ligaments are recruited with full spine flexion, they increase the intradiscal pressures, resulting in a diminished capacity for loading.7 This occurs as the posterior ligaments of the neural arch provide an internal extensor moment to counteract the flexion moment that occurs with lifting. However, the posterior ligaments possess a shorter moment arm relative to the extensor muscles and, consequently, a very high compressive penalty.12

Importantly, this only occurs as we get closer to end range flexion. At 50% and 75% of maximal lumbar spine flexion, ligaments are less strained, resulting in only marginal increases in intradiscal pressures relative to a position of 0% flexion.7 This is one reason why no difference exists in the ultimate compressive strength of the lumbar spine when comparing postures of 0% and 75% of maximal flexion.7

Stress concentrations may also increase on specific spinal structures with a maximally flexed posture. When the lumbar spine is moderately flexed, the superior and inferior endplates are parallel to each other, resulting in an even distribution of load across the disc.5 However, when the spine is maximally flexed, stress concentrations occur at the anterior aspect of the interbody joint, further diminishing the compressive strength of the lumbar spine.

Adams and Hutton4 found end range flexion at a spinal segment increased compression on the anterior annulus by approximately 30%, while stretching the posterior annulus of the intervertebral disc by 50%. This is one reason high compressive forces can cause wedge fractures of the anterior vertebral body when motion segments are fully flexed18, and why full flexion combined with compression can cause posterior disc herniation3.

Another consideration is the anterior shear loading imposed by the supraspinous and interspinous ligaments when recruited with full lumbar spine flexion. Relative to compression, the lumbar spine has a low tolerance threshold for anterior shear forces (approximately 2,000-3,000 N)17 that may be approached with heavy lifting.16 The interspinous and supraspinous ligaments are oriented such that when the lumbar spine is fully flexed, these ligaments pull the superior vertebra forward relative to the vertebra below.21 Consequently, full spine flexion will increase the anterior joint shear forces, increasing the loading on the structures of the neural arch.17

This may explain the findings of Potvin et al.30, where anterior joint shear loads were greater when the lumbar spine was fully flexed compared to a less flexed posture. Lumbar flexion does have advantages when considering shear loading, as it reduces the anterior shear forces imposed by gravity.8 However, there may be a compromise for managing these loads, where joint shear forces can be reduced by allowing moderate flexion to decrease the loading caused by gravity, while avoiding maximal recruitment of the ligaments.

Lastly, when hyperflexion occurs as it can during heavy lifting12, the supraspinous and interspinous ligaments may be the first structures to be damaged6. This risk can be attenuated by avoiding end range flexion at each motion segment by just a few degrees.12

How Can We Coach Athletes to Avoid Full Spine Flexion?

While avoiding maximal spine flexion has the potential to reduce injury risk, moderate flexion (60%-80% of maximum flexion) can improve lifting performance while encouraging optimal load sharing at the spine.2 Consequently, coaches should encourage athletes to maintain a spine alignment that resides within the physiological limits of their ROM during heavy lifting. Generally, allowing the lumbar spine to flex to the point it flattens enables moderate flexion to occur, while avoiding a kyphotic posture of the lumbar spine will help prevent reaching end ROM.2

Coaches should encourage athletes to maintain a spine alignment that resides within the physiological limits of their ROM during heavy lifting, says @LouisHowe_SandC. Share on X

Below is a range of approaches that coaches can incorporate into their practice to help athletes develop coordination strategies that may reduce their injury risk when learning lifting exercises. Importantly, these strategies should be considered in the context of a sensible lifting program that incorporates progressive overload to drive structural adaptations.

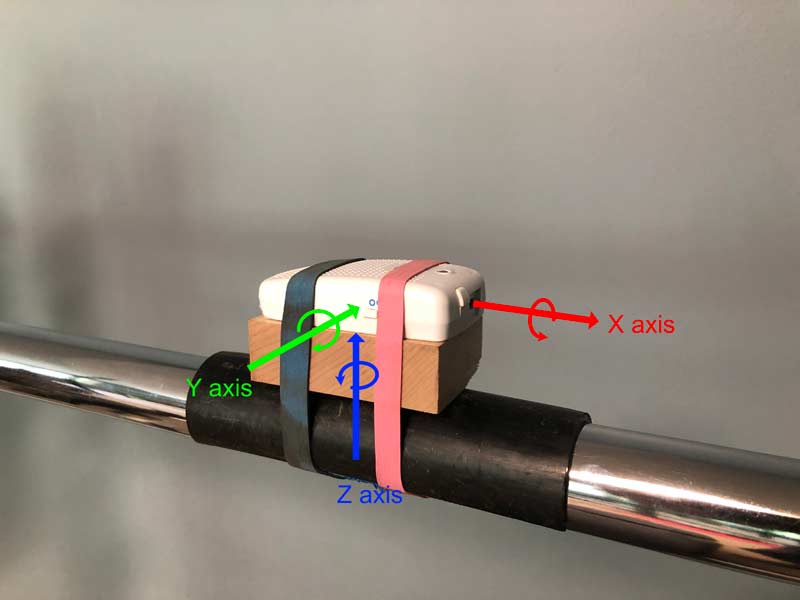
I will also present evidence to support each approach. To accomplish this, I’ve provided images and data taken from a single athlete to demonstrate the effectiveness of each coaching tool. To record lumbar spine posture, peak flexion angles for each movement were calculated using two inertial measurement units (IMUs) positioned at L1 and S2. All values were normalized to the athlete’s standing neutral posture and the maximum flexion angle achieved during the standing flexion test.12

1. Cueing

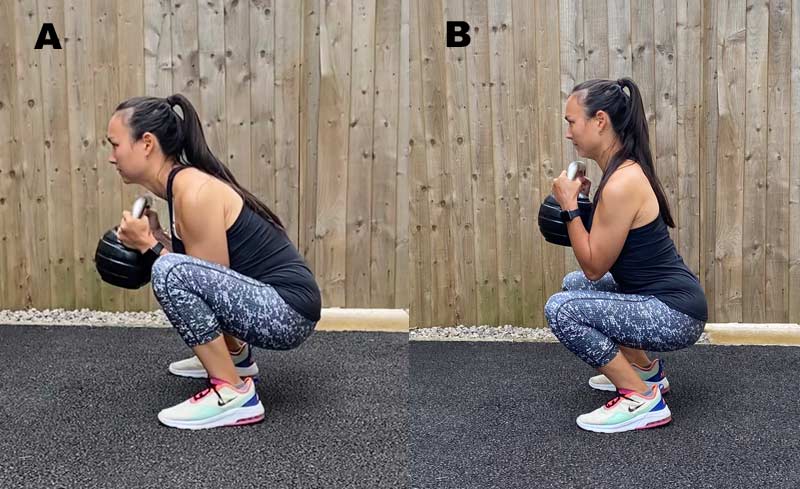
While obvious, cueing spine posture is well-supported by the literature as a strategy to avoid end range spine flexion. For example, asking athletes to lift “without rounding the lower back” and “maintaining the arch of the spine” has been shown to reduce lumbar spine flexion when lifting a 7.3-kilogram box from the floor.10 While this evidence doesn’t directly relate to heavy deadlifting or squatting, it does provide proof of concept—lumbar spine flexion during lifting can be decreased with appropriate cueing. Depending on the lifting exercise and the athlete’s interpretation, cues that prevent spine motion and/or facilitate lower extremity contribution to lowering the center of mass should be used help each athlete identify movement strategies that avoid end range spine flexion.

Kettlebell Posture
Figure 1a. While performing a goblet squat, the athlete was cued to “relax the trunk and allow it to fall forward as you squat down as low as you can,” resulting in 108% of maximum flexion. Figure 1b. During the same exercise, the athlete was cued to “stand upright in a relaxed posture, brace the trunk muscles, and lock the spine in this position as you squat down as low as you can,” resulting in 57% of maximum flexion.

2. Develop Awareness for Spine Position

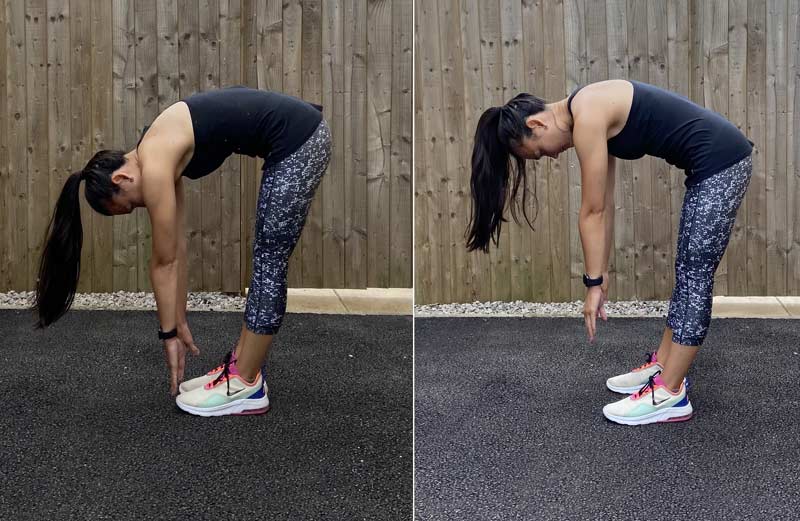
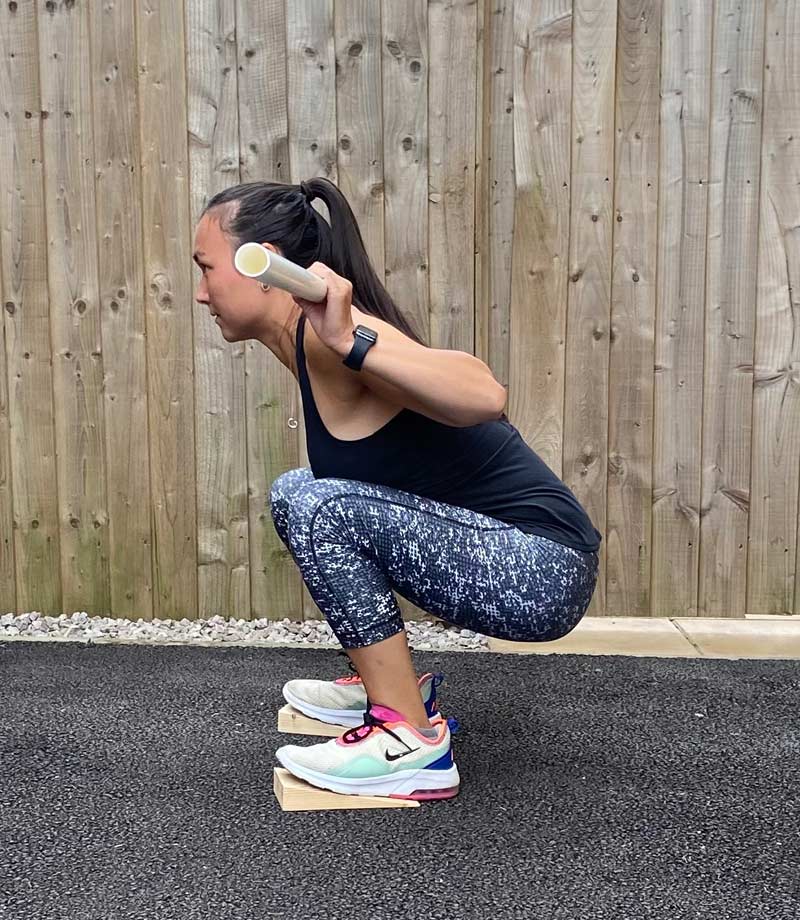
While cueing lumbar spine posture will help most athletes avoid full spine flexion, tactile feedback can also be used to develop the proprioceptive awareness needed to prevent end ROM flexion from occurring during lifting exercises. Example strategies include placing a PVC pipe longitudinally along the spine or applying tape to the spine in order to provide feedback on when the athlete is approaching end ROM flexion during hinging and squatting exercises.

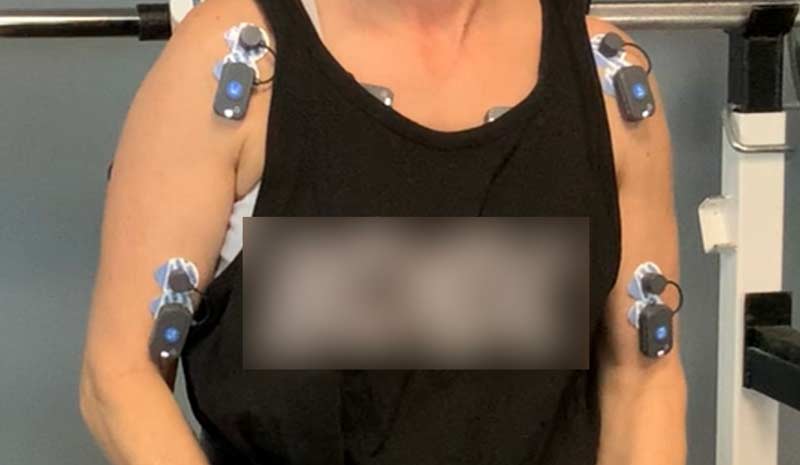
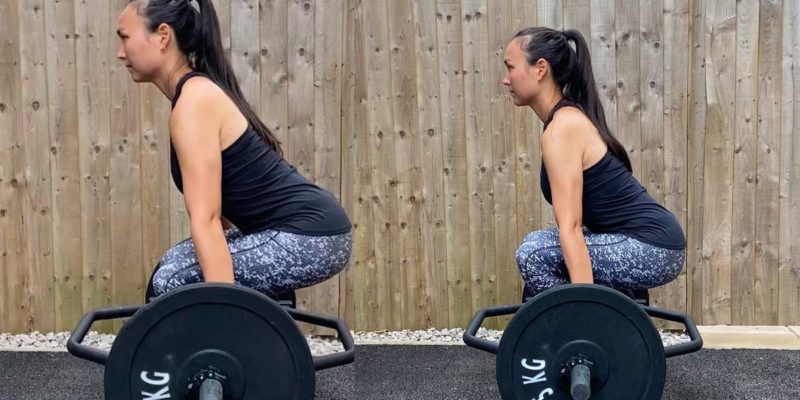
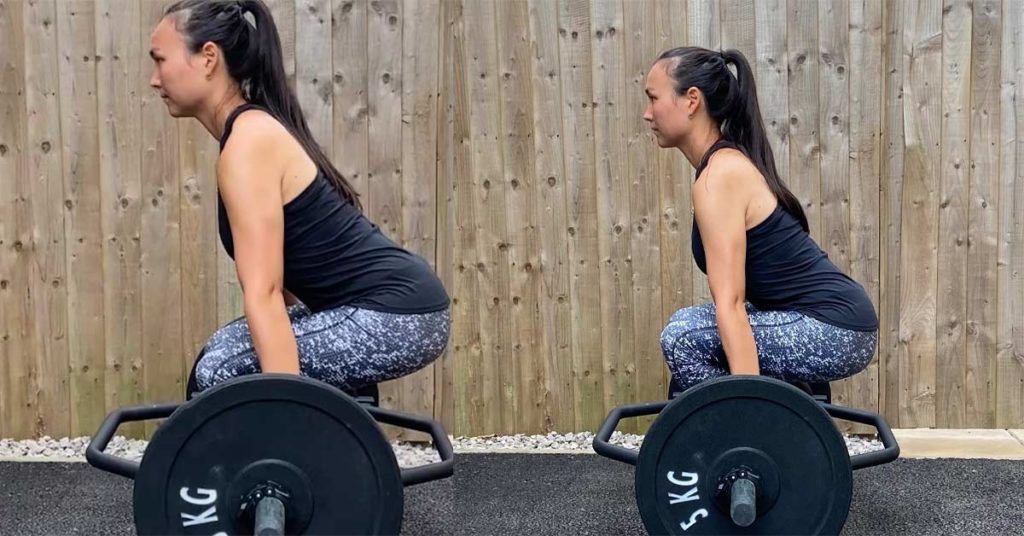
Like cueing, taping the lumbar spine (as shown in figure 2) has been shown to significantly reduce lumbar spine flexion while increasing hip and knee joint flexion during a lifting task.28 Technology like IMUs has also been used to provide real-time feedback to help individuals develop lifting strategies that avoid maximal spine flexion.11 These strategies should be used as a teaching tool, and in most cases, only 1-2 sessions are required to have lasting effects. Figures 2 and 3 demonstrate how tape can be applied to the lumbar spine to help athletes develop an awareness for when their posture approaches end range flexion.

Coaches can apply tape to the lumbar spine to help athletes develop an awareness for when their posture approaches end range flexion, says @LouisHowe_SandC. Share on X
Tape application
Figure 2. With the athlete in prone lying, tape was applied longitudinally along the lumbar spine muscles between T12 and L5.
Spinal Flexion
Figures 3a and 3b. Comparison of the athlete’s standing flexion test. When the spine was taped, lumbar spine flexion decreased by 44%, demonstrating the effectiveness of tape for limiting lumbar spine flexion.

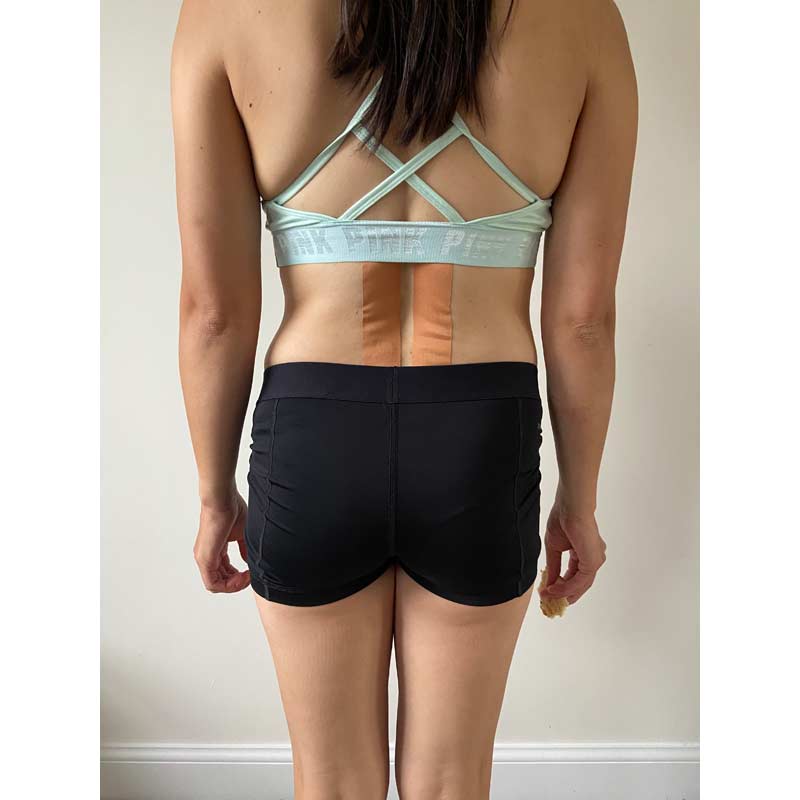
 3. Tailor Exercise Selection to the Athlete

Exercise selection will have a large influence on spine posture when lifting for individuals with limited mobility relative to the exercise. For example, a snatch-grip deadlift demands large amounts of hip flexion that, if lacking, will drive compensations at neighboring joint segments. For this exercise, lumbar spine flexion is a common strategy for lowering the hands to the barbell when hip mobility is restricted.

Snatch Grip Deadlift
Figure 4. With the cueing used for figure 1B, lumbar flexion was 82% of maximum flexion when performing a snatch-grip deadlift.

4. Customize ROM

This builds on the previous point and is a similar strategy that you can use to control for spine flexion. There is no rulebook saying that athletes should perform all deadlifts from the floor with 17.7-inch plates. For hypomobile or tall athletes, pulling from blocks or squatting to parallel may be needed to help avoid end range spine flexion.

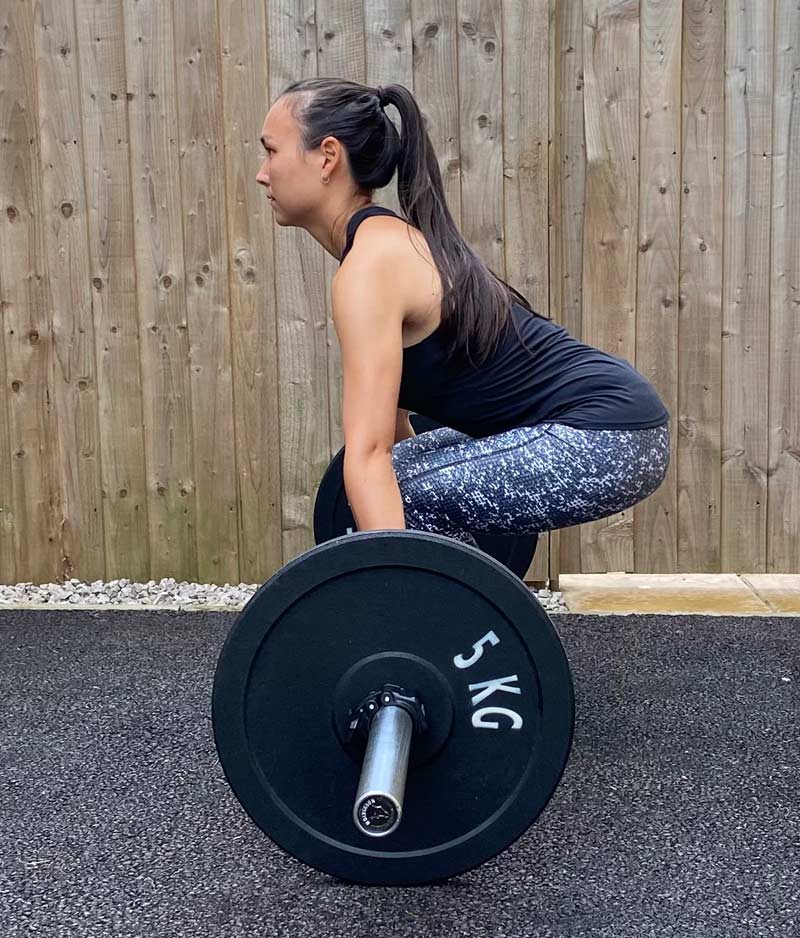
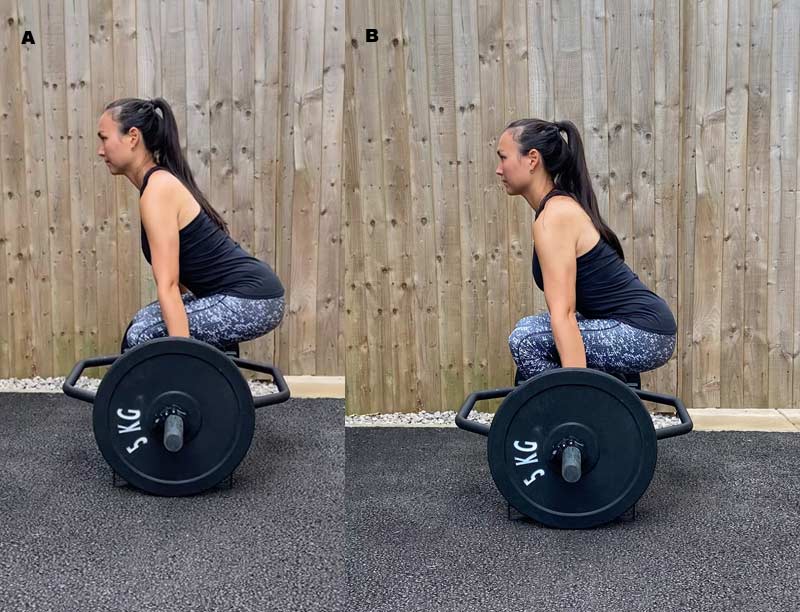
Coaches should consider an athlete’s capacity to avoid a kyphotic spine posture when deciding on the end ROM of the exercise, says @LouisHowe_SandC. Share on X

As spine flexion gradually increases when lifting,10 reducing the ROM of the lifting exercise will decrease the amount of spine flexion.31 Therefore, coaches should consider an athlete’s capacity to avoid a kyphotic spine posture when deciding on the end ROM of the exercise. Figure 4 demonstrates the effects of lifting ROM on spine posture by comparing lumbar flexion during trap bar deadlifts performed on the ground and from a 4-inch platform.

Trab Bar Deadlift
Figure 5a. Trap bar deadlift from the ground, resulting in 48% of maximum lumbar spine flexion. Figure 5b. Trap bar deadlift from a 4-inch platform, resulting in 58% of maximum lumbar spine flexion.

5. If Needed, Develop an Athlete’s Ankle and Hip Mobility

Having sufficient ankle and hip mobility is crucial for avoiding end range spine flexion when performing full ROM lifting exercises. For example, when ankle dorsiflexion ROM is restricted, it limits the forward displacement of the knees, causing the pelvis to move further back relative to the base of support. To maintain balance, excessive forward lean of the trunk is required, which may result in end range spine flexion.24 Similarly, when hip mobility is limited, early posterior tilt of the pelvis can occur during squatting, increasing spine flexion.25

Back Squat
Figure 6. The athlete performs a back squat with a 10-degree forefoot elevation, simulating restricted ankle dorsiflexion ROM. As the knee is unable to move forward, the pelvis must go backward to facilitate knee flexion. This causes the lumbar spine to flex to 95% of maximum flexion for this athlete, as the trunk leans forward to keep the center of mass over the base of support to maintain balance.

Movement to Protect the Spine

The spine is incredibly robust and can bear extremely high loads in a range of different postures. During full ROM lifting exercises, lumbar spine flexion is unavoidable and has the potential to improve lifting performance. However, athletes who lift heavy with a maximally flexed lumbar spine posture may have a greater risk of injury, as the compressive strength of the spine is compromised, and the intervertebral discs and posterior ligaments are stressed/strained.

Avoiding end range lumbar flexion can be achieved by developing movement skill through coaching coordination patterns that optimize load sharing at the spine and selecting lifting exercises that account for the athlete’s physical attributes. This can be supplemented, where appropriate, with mobility exercises to help athletes access greater lower-extremity contribution to lowering the center of mass during lifting exercises.

Since you’re here…
…we have a small favor to ask. More people are reading SimpliFaster than ever, and each week we bring you compelling content from coaches, sport scientists, and physiotherapists who are devoted to building better athletes. Please take a moment to share the articles on social media, engage the authors with questions and comments below, and link to articles when appropriate if you have a blog or participate on forums of related topics. — SF


References

1. Aasa U, Svartholm I, Andersson F, and Berglund L. “Injuries among weightlifters and powerlifters: a systematic review.” British Journal of Sports Medicine. 2017; 51:211-219.

2. Adams MA and Dolan P. “How to use the spine, pelvis, and legs effectively in lifting.” In: Movement, Stability and Lumbopelvic Pain. Churchill Livingstone, Edinburgh, pp. 167-183, 2007.

3. Adams MA and Hutton WC. “The effect of posture on the strength of the lumbar spine.” Engineering in Medicine. 1981;10:199-202.

4. Adams MA and Hutton WC. “Prolapsed intervertebral disc: a hyperflexion injury.” Spine. 1982;7:184-191.

5. Adams MA and Hutton WC. “The effect of posture on the lumbar spine.” The Journal of Bone and Joint Surgery, British volume. 1985;67:625-629.

6. Adams MA, Hutton WC, and Stott JR. “The resistance to flexion of the lumbar intervertebral joint.” Spine. 1980;5:245-253.

7. Adams MA, McNally DS, Chinn H, and Dolan P. “The clinical biomechanics award paper 1993 posture and the compressive strength of the lumbar spine.” Clinical Biomechanics. 1994;9:5-14.

8. Arjmand N and Shirazi-Adl A. “Biomechanics of changes in lumbar posture in static lifting.” Spine. 2005;30:2637-2648.

9. Arnold AS, Salinas S, Hakawa DJ, and Delp SL. “Accuracy of muscle moment arms estimated from MRI-based musculoskeletal models of the lower extremity.” Computer Aided Surgery. 2000;5:108-119.

10. Beach TA, Stankovic T, Carnegie DR, Micay R, and Frost DM. “Using verbal instructions to influence lifting mechanics–Does the directive ‘lift with your legs, not your back’ attenuate spinal flexion?.” Journal of Electromyography and Kinesiology. 2018;38:1-6.

11. Boocock M, Naude Y, Taylor S, Kilby J, and Mawston G. “Influencing lumbar posture through real-time biofeedback and its effects on the kinematics and kinetics of a repetitive lifting task.” Gait & Posture. 2019;73:93-100.

12. Cholewicki J and McGill SM. “Lumbar posterior ligament involvement during extremely heavy lifts estimated from fluoroscopic measurements.” Journal of Biomechanics. 1992;25:17-28.

13. Cholewicki J, McGill SM, and Norman RW. “Lumbar spine loads during the lifting of extremely heavy weights.” Medicine & Science in Sports & Exercise. 1991;23:1179-1186.

14. Dolan P, Mannion AF, and Adams MA. “Passive tissues help the back muscles to generate extensor moments during lifting.” Journal of Biomechanics. 1994;27:1077-1085.

15. Edington C. “Lumbar spine kinematics and kinetics during heavy barbell squat and deadlift variations” (Doctoral dissertation), University of Saskatchewan Saskatoon; 2017.

16. Edington C, Greening C, Kmet N, et al. “The effect of set up position on EMG amplitude, lumbar spine kinetics, and total force output during maximal isometric conventional-stance deadlifts.” Sports. 2018;6:90.

17. Gallagher S and Marras WS. “Tolerance of the lumbar spine to shear: a review and recommended exposure limits.” Clinical Biomechanics. 2012;27:973-978.

18. Granhed H, Jonson R, and Hansson T. “The loads on the lumbar spine during extreme weight lifting.” Spine. 1987;12:146-149.

19. Gunning JL, Callaghan JP, and McGill SM. “Spinal posture and prior loading history modulate compressive strength and type of failure in the spine: a biomechanical study using a porcine cervical spine model.” Clinical Biomechanics. 2001;16:471-480.

20. Hales ME. “Improving the deadlift: Understanding biomechanical constraints and physiological adaptations to resistance exercise.” Strength and Conditioning Journal. 2010;32:44-51.

21. Heylings DJ. “Supraspinous and interspinous ligaments of the human lumbar spine.” Journal of Anatomy. 1978;125:127-131.

22. Holder L. “The effect of lumbar posture and pelvis fixation on back extensor torque and paravertebral muscle activation” (Doctoral dissertation), Auckland University of Technology; 2013.

23. Howe L and Lehman G. “Getting out of neutral: the risks and rewards of lumbar spine flexion during lifting exercises.” Strength and Conditioning. 2021;60:19-31.

24. List R, Gülay T, Stoop M, and Lorenzetti S. “Kinematics of the trunk and the lower extremities during restricted and unrestricted squats.” The Journal of Strength and Conditioning Research. 2013;27:1529-1538.

25. Mata AJ, Hayashi H, Moreno PA, Dudley RI, and Sorenson EA. “Hip flexion angles during supine range of motion and bodyweight squats.” International Journal of Exercise Science. 2021;14:912-918.

26. Panjabi MM. “The stabilizing system of the spine. Part II. Neutral zone and instability hypothesis.” The Journal of Spinal Disorders. 1992;5:390-397.

27. Parnianpour M, Li F, Nordin M, and Kahanovitz N. “A database of isoinertial trunk strength tests against three resistance levels in sagittal, frontal, and transverse planes in normal male subjects.” Spine. 1989;14:409-411.

28. Pinto BL, Beaudette SM, and Brown SH. “Tactile cues can change movement: An example using tape to redistribute flexion from the lumbar spine to the hips and knees during lifting.” Human Movement Science. 2018;60:32-39.

29. Porter RW, Adams MA, and Hutton WC. “Physical activity and the strength of the lumbar spine.” Spine. 1989;14:201-203.

30. Potvin JR, McGill SM, and Norman RW. “Trunk muscle and lumbar ligament contributions to dynamic lifts with varying degrees of trunk flexion.” Spine. 1991;16:1099-1107.

31. Yanagisawa O, Oshikawa T, Adachi G, Matsunaga N, and Kaneoka K. “Acute effects of varying squat depths on lumbar intervertebral disks during high‐load barbell back squat exercise.” Scandinavian Journal of Medicine & Science in Sports. 2021;31:350-357.

Tricep Dips

Small School S&C with Taylor Quick

Freelap Friday Five| ByTaylor Quick, ByCody Hughes

Tricep Dips

Taylor Quick is a sports performance and football coach for Union High School in Union, Mississippi. He has a bachelor’s and master’s degree in exercise science. He is Strength and Conditioning Coach Certified through the Collegiate Strength & Conditioning Association.

Freelap USA: Small school strength and conditioning can be challenging. What are the typical challenges you see in implementing an S&C program in a small school?

Taylor Quick: One of the biggest challenges is orchestrating year-round training in a setting that is often devoid of a true off-season. With small schools, we share athletes. We don’t have a choice. In those small populations, the best football players are often the best basketball players and baseball players. The best volleyball players are often your best basketball and softball players. This creates a very peculiar dynamic that has to be navigated well in order to meet the needs of the athlete and the teams they are a part of.

One of the biggest challenges of implementing S&C in a small school is orchestrating year-round training in a setting that is often devoid of a true off-season, says @coachtquick. Share on X

Another challenge is resource allocation. Money is usually more limited in smaller schools. Being able to work within a budget while also finding ways to supplement it can be very time consuming. The last challenge I see most frequently is strength coaches also being classroom teachers. I have yet to be in a position that did not have me teaching a non-strength-related curriculum at least half of the day.

Freelap USA: As you mentioned, resources are often limited in the H.S. setting in particular. In what ways do you have to get creative to train appropriately?

Taylor Quick: We rotate multiple groups through our room simultaneously. Because of limited resources and equipment, it is virtually impossible to have every athlete following our lift for the day in the same order. We use stations to move our athletes through the lift for the day.

One of the biggest assets we have procured recently is a full set of bands for each rack in our room. This has allowed us to fill in some gaps in our accessory training that were otherwise missing due to space and equipment limitations.

Freelap USA: How do you battle training multisport athletes who are always in-season?

Taylor Quick: This is a tough nut to crack at times. With football, scheduling is pretty easy. Games are only on Fridays, and you can get into a routine pretty quickly. However, keeping in mind that you have a chunk of your football guys who will walk into the gym for basketball the Monday after they play their last football game of the season is important. We have to gear training to provide as seamless of a transition as possible. These guys go from in-season football playing only one game per week straight into in-season basketball and playing 2-3 games per week.

Freelap USA: What strategies do you use to properly teach your main lifts in a team setting?

Taylor Quick: Teaching anything in a team setting is a challenge when there is exactly one of you and anywhere from 30-50 athletes at one time. One of the ways I’ve found success with this is by going through the technical aspects of the movement in front of the group prior to the team lift beginning. During the lift, I move around from group to group and station to station as much as possible and make corrections as necessary.

Remembering that these are high school athletes and not Olympic-level weightlifters, professional powerlifters, or Olympic-level track athletes is important. Many coaches get caught up in perfection of the technical aspect of a lift and completely overcoach it. Check the important boxes and let them feel through the movement for corrections that need to be made.

Freelap USA: How do you manage volume and intensity with novice-level athletes?

Taylor Quick: One of the mistakes that I see many coaches make is treating low training age athletes as if they are made of glass. There is absolutely a need to mitigate risk by managing volume and intensity but doing so to the point of losing the stimulus is simply swinging the risk to the other end of the spectrum.

One of the mistakes I see many coaches make is treating low training age athletes as if they are made of glass, says @coachtquick. Share on X

I allow my athletes to operate on feel quite a bit. In our program, if they are hurting, tight, sore, etc., they are encouraged to voice that. We talk through it and come up with a strategy to insulate them for that lift. The goal for us each day is to apply an appropriate stimulus commensurate with whatever else they have had going on that day. If we had a particularly taxing practice on schedule for that day, the lift is going to be adjusted to accommodate for that.

Since you’re here…
…we have a small favor to ask. More people are reading SimpliFaster than ever, and each week we bring you compelling content from coaches, sport scientists, and physiotherapists who are devoted to building better athletes. Please take a moment to share the articles on social media, engage the authors with questions and comments below, and link to articles when appropriate if you have a blog or participate on forums of related topics. — SF


Bodyweight Training Fighters

The Performance-Based Advantages of Bodyweight Training for Fighters

Blog| ByAlex Chrysovergis

Bodyweight Training Fighters

It is no secret that any fighter—or any athlete—must become strong to be effective, and the indisputable truth is that achieving this requires lifting weights. But, in my time, I’ve seen countless athletes who can easily back squat enormous loads shake like jelly when they try to do a simple bodyweight lunge because they lack stability and body control. Their strength is useless because it cannot be expressed properly.

This is where bodyweight training comes in. By wisely incorporating a few exercises into your training, you will develop the awareness and proprioception needed for gains to properly manifest.

By wisely incorporating a few bodyweight exercises into your training, you will develop the awareness and proprioception needed for strength gains to properly manifest. Share on X

Plyometrics, isometrics, and slow eccentrics play a key role in counterbalancing the lack of external resistance, since they are methods that can effectively stimulate the muscles involved. What follows are 13 of my favorite bodyweight movements for martial artists, self-defenders, and combat sports athletes, presented in order of neurological demand (which would also usually be the order of execution during a workout).

Lower Body Plyometrics

Lower body plyometrics are inherently explosive, which can place high demands on the nervous system. This is why they are best performed at the beginning of a workout, right after warming up, when the athletes are still fresh.

The idea is to perform low reps with maximum intent on each set. Excessive reps will cause fatigue, and the nervous system will lose the ability to effectively recruit the maximum amount of high-threshold muscle fibers, which results in you getting slower overall.

1. Skater Jumps 

Skater jumps are often found in martial arts training programs, and for good reason—they can teach the ability to quickly move out of the line of attack in order to evade an incoming strike. If you’re fast enough, there’s a high probability that you can launch a successful counterattack as well. I also like this movement because it utilizes the frontal plane, which can be neglected sometimes as people tend to emphasize forward and backward motion.


Video 1. In order to perform the skater jump, bend one leg behind the other at an angle, but don’t touch the ground. This way, all your weight is now on the supporting leg.

Have your athletes load their weight on their hips by hinging, then launch sideways and land on the other leg by bending their hips and knee to properly absorb the force, and finish in a mirrored starting stance. Try not to touch the ground with both legs at any time during the set.

  • Do 12 sets of four explosive reps (two per side) with a 45-second rest between them, starting from the opposite side every time.

2. Backward Broad Jump

Most athletes are already familiar with the classic broad jump and its benefits, but not many practice the backward variation. Jumping in the opposite direction will significantly test your coordination. That’s not the only benefit for a fighter though, as it also teaches them to quickly pull their legs out of their opponent’s reach during a takedown attempt.


Video 2. Place your feet at about your squatting width. Start from a semi-squat stance and propel yourself backward as far as possible.

Taking care to not let their knees cave in, athletes should immediately perform the next jump in a set, minimizing contact time with the ground in order to also work on their reactive strength. After the last jump, stick to the landing position for a moment. Keep in mind that the backward broad jump is far more challenging than the original, so you will not cover as much distance as you might expect. Start slow and progress in baby steps to minimize the risk of injury.

  • Perform six sets of three repetitions each, with a 30-second rest in between.

3. Sprawl to Staggered Broad Jump

The sprawl to staggered broad jump is an advanced plyometric exercise designed to not only teach the athlete to move out of harm’s way when facing a takedown attempt, but also to get back up as fast as possible and generate force immediately after.


Video 3. Assume a staggered stance. Crouch and place your hands on the ground, then quickly shoot your legs back. Your front leg should extend all the way to the back, instep touching the floor, while your back leg should bend to the side for balance and support.

In the movement, make sure the athlete lies down completely, touching both belly and chest on the ground. To finish the sprawl, they get back up on their feet in a fighting stance as fast as humanly possible. Have them instantly create momentum by swinging their arms and jumping as far as they can. Although they started the jump from a fighting stance, be sure they land with both feet in line, just like in any normal jump.

  • Perform eight sets of two reps with 45 seconds of rest between sets.

Upper Body Plyometrics

As with the lower body plyos, we’re talking about violent movements, so these are best performed at the beginning of your workout, preceded by a good warm-up. Plan them for after the lower body plyos if you’re doing both in the same workout.

Again, the high-sets, low-reps protocol remains. Take plenty of rest between sets—even more than what is prescribed, if necessary—in order to be as aggressive as possible in every single repetition. Just be mindful not to overdo it, as too much rest will allow their nervous system to completely relax, taking their mind out of “the zone.”

4. Plyo Push-Ups

The plyo push-up is considered a staple movement for developing upper body explosiveness. Mimicking the motion of a punch or a shove, the horizontal push is one of the most fundamental human movement patterns.


Video 4. Begin from a classic push-up position, placing your hands just outside of your sternum and keeping your legs next to each other. Lower yourself until your chest—and only your chest—barely touches the ground.

The athlete’s hips and quads should stay off the floor at all times, and their elbows should have an angle of approximately 45 degrees to the back at this point. In other words, if an observer were to look from above, they should look like an arrow. This position protects the rotator cuffs from excessive internal rotation, which can lead to injury over time.

If you find their arms are flaring out too much, have them turn their palms outward in a slight angle, which will help minimize the problem. As soon as they reach the bottom of the range of motion, they should violently push the earth away to propel into the air.

Some athletes feel the need to clap while airborne, but clapping doesn’t add any benefits to the exercise, and nobody deserves applause for completing a single push-up. (Plus, if you fail, you may literally find yourself facing off against the ground, which is not an opponent you can defeat.) So, it’s best they keep their hands in position, ready to help with the landing. As soon as they reach the ground again, they should lower their weight once more as they enter their next repetition.

  • Perform eight sets of three reps each, taking 30 seconds of rest.


5. Inverted Plyo Pull-Ups

Pulling is equally important as pushing in terms of performance, but twice as important in terms of preserving the structural integrity of the body. Practically speaking, martial artists often need to pull their opponent violently to control or grapple with them. This is where the inverted plyo pull-ups really shine.

Horizontal pulling exercises greatly alleviate the muscular imbalances that athletes tend to develop due to constantly rounding their shoulders while delivery countless strikes forward. Share on X

Furthermore, horizontal pulling exercises greatly alleviate the muscular imbalances that athletes tend to develop due to constantly rounding their shoulders while delivering countless strikes forward. Add our daily habit of being hunched over our computers or phones to the mix, and you can clearly see why the anterior chain gets way more stimulation than the posterior in total, making it unevenly stiffer.

Therefore, this list would be incomplete—and probably dangerous in the long term—if it didn’t include some pulling exercises (which your workout program should include, no matter what you’re training for).


Video 5. Stabilize a bar on a rack at about your belly button’s height. Get underneath, grab it with a slightly-wider-than-shoulders grip, and place your heels on a bench so that you find yourself in a fully extended supine position, parallel to the ground. Pull explosively until your chest almost hits the bar.

Ideally, the athlete should let go of the bar momentarily as they reach the top, as if wanting to launch through it. Then, they grab it again and slowly descend back in place in a controlled manner. Their body should be in a rigid plank stance throughout the move, keeping the chest out and shoulders back. Also, this probably doesn’t need to be mentioned, but you can never be too safe: Make sure they are properly aligned with the rack during the execution to avoid displacing the bar and risking injury.

  • Perform six sets of four reps each, and rest around 30 seconds in between.

Lower Body Strength

We are now moving into standard lower body strength development. Slow eccentrics and isometric holds are key in this part, as they are an excellent way to stimulate the muscles when no external resistance is available. These exercises should follow the plyometrics if you decide to perform both in the same workout.

6. The Copenhagen Hold

This version of the side plank primarily targets the adductors and will, in turn, make any stance that requires inner thigh strength very effective, like the guard position or the triangle choke for ground fighters.


Video 6. Begin from a standard side plank position, resting your upper body on your forearm with your elbow placed exactly under your shoulder. Place the upper leg on top of a bench and press into it so that you lift yourself off the ground.

The athlete should keep their whole body completely extended in this movement—no hinging the hips and no leaning the torso forward. They will raise their lower leg as well, so that it makes contact with the bottom of the bench. Hold this position for 30 seconds on each side while squeezing both legs into the bench as hard as possible.

If they find this easy and need a progression, have athletes place their top leg in the handle of a suspension trainer. Being unstable by nature, the suspension trainer will offer a much bigger challenge. If, on the other hand, you are looking for a regression, simply reduce the length of the lever by resting the knee on the bench instead of the foot.

  • Rest for a full minute between sets and go for a total of four to five sets.

7. Kneeling Leg Extensions

The kneeling leg extension is a great bodyweight quad builder, but what I like about it the most is that it keeps the core and glutes actively engaged at all times, which is very reminiscent of the way the body works during combat. No matter what maneuver a fighter performs, it is never led by a single, isolated muscle or muscle group—it is always a full body movement.

No matter what maneuver a fighter performs, it is never led by a single, isolated muscle or muscle group—it is always a full body movement. Share on X


Video 7. Begin by dropping on your knees and keeping your feet flat on the ground, all the way to the toes. Tighten your core and glutes, keep your hands by your sides, and lower yourself backward in a slow and controlled fashion.

The athlete should keep their body straight and not hinge the hips. This eccentric phase should last for three seconds. When they reach the lowest possible point, they should stay there for one more second and then come back up in normal speed. If they find it hard to do, you can give them some help by attaching a band to a stable object in front of them—they will hold this with their hands extended in front of their chest.

  • Perform 10 reps, rest for 90 seconds and repeat for three sets.
  • 8. Nordic Curls

It would be unwise not to include a leg exercise for the posterior chain, and in my opinion, the Nordic Curl is one of the best of its kind. Just like the kneeling leg extension, not only will it torch your hamstrings and glutes, but it will also demand that you keep your core braced throughout the movement.


Video 8. Kneel on a soft surface, stand tall, and wedge your feet behind an immovable object.

If you’re at the gym, you can use a standard, plate-loaded bar—just be sure to secure it safely in place. If you or your athletes are doing this at home, any sturdy object that can support your weight will do, but there’s always the alternative of having a partner hold your legs down tightly.

To do the Nordic curl, athletes should squeeze the glutes, hamstrings, and abs and begin leaning forward, reaching as low as possible, to the point where they are unable to hold the weight anymore. They should get there slowly, taking a full three seconds. As soon as they are out of control, they should use the hands to break the fall and immediately push back up, just enough so the muscles can take over again and return to the starting position.

Again, have them resist the urge to hinge the hips, especially during the concentric part (when it is the most tempting). This cannot be stressed enough: In order for this to work, they must involve the hands as little as possible.

If they are having a really hard time with this and/or range of motion is too small, you can always tie a band directly behind them and around the chest so that it slows the descent and helps on the way up.

  • Perform four sets of 10 reps and take 90 seconds of rest.

Upper Body Strength

Keep this part for after you’re done with your plyometrics and your lower body strength. Once again, slow eccentrics and isometric holds will trigger muscle growth more effectively and lead the nervous system to faster adaptations.

9. Diamond Push-Ups

The reason you will find many push-up variations on this list is because I am a firm believer that, as far as bodyweight exercises are concerned, they are a great tool for developing strength, explosiveness, and muscular endurance in many of the muscle groups that are involved in punching. They mostly include, but are not limited to, the chest, triceps, and front deltoids. This does not mean that the push-up is the only exercise that matters, or that you should be doing it every day: I’m just presenting some options.

As far as bodyweight exercises are concerned, they are a great tool for developing strength, explosiveness, and muscular endurance in many of the muscle groups that are involved in punching. Share on X

There are many other important upper body muscles to consider when building striking power, like, for example, the serratus anterior. With that said, when it’s time to emphasize triceps development, look no further than the diamond push-up.


Video 9. Assume a standard push-up position, but this time open your palms and bring them together so that the thumbs and index fingers touch, forming the shape of a diamond. Place your hands directly below your chest.

If the athlete performs this correctly, their elbows will point backward, not sideways, when bending them. Once more, they must take three seconds to get to the ground and, once down, stay still for another two seconds, obviously without touching the floor. Then push and get back up in normal speed. This is one rep.

  • Perform four sets of 12 and rest for 90 seconds in between.
  • 10. Wide Push-Ups

Just as before, the setup and technique are identical.


Video 10. The only difference with the wide push-up is that the hands are to be placed even wider than in a standard push-up, as the emphasis shifts to the pectorals.

Once more, the eccentric phase lasts for three seconds, and the isometric hold at the bottom lasts for two.

  • Perform four sets of 12 and rest for 90 seconds in between.

11. Hollow Body Pull-Ups

As stated before, even though isolation work does have its merits, the bulk of a fighter’s program should include exercises that involve the entire body. In this sense, the hollow body pull-up is superior to its traditional, bodybuilding-oriented cousin—plus, it enforces more lat engagement.


Video 11. Grab the bar with a shoulders-width grip. Compress your abdominals, which will cause your chest to drop forward a little bit, just like when performing the first part of a crunch.

The athlete will keep their legs straight, glued together, and bring them slightly in front of them, with the toes pointed. Next, they will pull the bar until their chin is above it—if done correctly, their elbows will be pointing forward in a 45-degree angle and not sideways like in the traditional pull-ups. They should stay on the top for three seconds and take another three to slowly return to the bottom position with fully extended hands.

  • Perform three sets of six to eight reps and rest for up to 90 seconds.

Core Strength

This last category of exercises focuses on the core. Keep them for the last part of your workout, after you’re done with your plyometrics and strength exercises.

12. Arch Rocks

When we think about core strength, we tend to bring the abs and general anterior chain to mind. But the core actually consists of anything that is not our arms, legs, and head; therefore, the importance of the posterior is immense too. I’m also a big fan of isometric strength, because it gives an athlete the ability to grapple more effectively and take less punishment when absorbing hits.

I’m also a big fan of isometric strength, because it gives an athlete the ability to grapple more effectively and take less punishment when absorbing hits. Share on X

Enter the Arch Rocks: a great tool for strengthening the posterior chain isometrically. As far as your back is concerned, this one will work your spinal erectors, lats, and traps, but it also greatly involves the gluteals and hamstrings.


Video 12. Lay in a prone position, with your legs stuck together and your arms fully extended above your head, biceps always maintaining contact with your ears.

The athlete will lift their legs off the floor, so that their quads aren’t touching it—same for head, hands, and chest—until their body forms a smooth, long curve reminiscent of…you guessed it, an arch. Gently rock back and forth while maintaining a rigid body.

Perform five sets of 30 seconds for max repetitions—the reason I prescribe time instead of a fixed number of reps for this one is that the quality of the movement matters greatly in order for it to work. So, instead of fixating on a number, just make sure the technique is perfect and the muscles tense, and they continue until it’s over. Take one minute of rest between sets, and if you would like to progress further, have athletes try holding a weight with their hands. Be warned, loading this exercise makes it very difficult, so start with a small plate as light as 2.5 pounds.

13. Alternating Hanging Knee Raises

Finally, it’s time to take care of the anterior. The alternating hanging knee raises will require total core strength, but they will mostly tax your hip flexors, which are key for kicking, bending, and swiveling the hips. As a side note, be aware that plenty of martial arts practitioners suffer from tight hip flexors, which can lead to many issues, including low back pain. So be mindful and keep them strong, but also mobile and flexible.


Video 13. Hang from the bar using a full grip, thumb fully wrapped around it. Bring your left knee up momentarily, as close to your chest as possible, and return the leg to its starting position.

The athletes should perform the movement slowly to avoid kipping. Repeat on the right side, and continue in this fashion, always alternating the legs.

  • Do three sets of as many reps as you can endure, taking a full minute of rest in between.

Drawing Conclusions

The performance-based advantages of training without equipment were highlighted earlier, so no need to be redundant here. Still, there is one more key benefit of bodyweight exercises, and it’s pretty important nowadays: recent global circumstances have taught us that access to the gym can sometimes become a rare commodity. In those instances, we now know that we should have a backup plan for working out at home.

Recent global circumstances have taught us that access to the gym can sometimes become a rare commodity. Bodyweight exercises can help you get in great shape until you return to routine. Share on X

In such a setting, can bodyweight training completely substitute for weights? No, it cannot. If you are in pursuit of the best version of yourself, you need both. But it can certainly help you get in great shape until you can return to your standard routine. These are by no means the only exercises you’ll ever need, but hopefully this list has given you some ideas to create your own bodyweight-only workout, or perhaps add to the one you already stick with. Good luck!

Since you’re here…
…we have a small favor to ask. More people are reading SimpliFaster than ever, and each week we bring you compelling content from coaches, sport scientists, and physiotherapists who are devoted to building better athletes. Please take a moment to share the articles on social media, engage the authors with questions and comments below, and link to articles when appropriate if you have a blog or participate on forums of related topics. — SF


Fitness Club

How to Land Your Dream Job (and 7 Keys to Becoming Indispensable)

Blog| ByKyle Davey

Fitness Club

A young trainer grew dissatisfied. The gym he worked at was moving in a direction he didn’t agree with and he became more and more unfulfilled at work with each passing day. Plus, his family was growing and he needed more income than his employer could provide to sustain his family’s modest lifestyle.

He considered options. Having family-first priorities, uprooting and leaving town wasn’t on the table. Working at a competing gym? That wasn’t a better option than where he already worked. Starting his own business? That didn’t feel wise or realistic.

He felt trapped.

The very thought of changing careers made his stomach churn: he’d poured his heart into training—it was his passion, his hobby, and his profession. And yet his family was more important, so he job shadowed and interviewed for positions outside of the performance and fitness realms.

None of it felt right, but the jobs paid the bills. He’d have done anything to protect his kids, including changing careers, but it would’ve come at a price: a piece of his soul. Then, he caught wind of a sports performance-based physical therapy clinic opening in town. He knew the owner of the PT practice and got in touch.

The only problem? The owner wasn’t looking to hire a trainer.

But he did welcome someone he could trust to build the business while he wasn’t in the building—someone who would carry the torch in the right direction, a leader who could help turn a beautiful but empty building into a bustling, healing, and athletic development environment.

He was looking for someone who thought like him: a business owner.

I fit that bill, and that wasn’t by accident.

Being an Asset

I’ve made diligent study of seven areas that helped transform me from “just a trainer” to an asset for any business:

  1. Leadership
  2. Business Development
  3. Sales
  4. Copywriting
  5. Marketing
  6. Communication: Verbal and Written
  7. Management

As a result of these skill sets (all of which have nothing to do with training), I was able to negotiate a salaried position that paid significantly more than what I was previously making. I have benefits (including a healthy retirement match), my income supports my family, I make breakfast for my kids every morning and tuck them in every night, I’ve played an instrumental role in building an amazing business that does great work for the community, and I didn’t have to sell my soul and become a person who looks forward to Friday just to make ends meet.

When God opened the door, I didn’t have to get ready. I was prepared to walk through it. Are you preparing yourself to walk through the right doors?

Are you preparing yourself to walk through the right doors? @KD_KyleDavey Share on X
Value
Image 1. An email I received from one of the CEOs of the company. Note that she is not praising my ability to teach frontside mechanics or deliver creative external cues.

Pro or Bust

Most trainers get into this business at a young age with aspirations of working in professional or Division 1 sports. The allure is understandable: you want to work with the best, share in their limelight, and—although we know in our hearts this isn’t true—the illusion that working with the best makes us the best is a captivating one.

As a young buck with nothing but time (and student loans), it’s no problem to pick up and move across the country to work for pennies (or nothing—what we in the United States call an internship). After you’ve got that experience on your resume, you might even land your first job and make $30-40k per year.

Living the dream, baby.

Division 1 or professional sports. Drive right up to the plane, no security. Wi-Fi on the whole flight. Hotels. Fans. TV. The whole nine. But along the way, you have to ask yourself what are my values in life? What brings me joy, fulfillment, and meaning? Does my career path align with those values? Do I want a family? If so, does my current role provide the time, income, and benefits necessary to meet my vision for family life?

And, perhaps most importantly: what is my purpose? 

Without clarity in these domains, you will never find happiness or fulfillment. I’m not discounting the idea of working at a high level; rather, I’m pointing out that arbitrarily making that your goal is superficial and will not result in fulfillment. Just like money doesn’t equal happiness, D1 or pro sports doesn’t guarantee it either.

Just like money doesn’t equal happiness, D1 or pro sports doesn’t guarantee it either, says @KD_KyleDavey. Share on X

The private sector can afford you a more compatible lifestyle, but whether you choose to open your business or work as an employee, you have to earn and be worth it. That’s got very little to do with training skill and very much to do with how you can impact a business.

Harsh Realities of the Private Sector

Let’s get this out of the way first: status as an ex-D1 or pro sports strength coach (or player) is NOT enough to land you a dream job in the private sector.

Thinking about starting your own business? I won’t discourage you from doing so, but I will caution you to familiarize yourself with the realities of running a business. If you think talent as a strength coach is predictive of running a successful strength and conditioning business, you are in for a rude awakening. Stretch shortening cycles and velocity-based training don’t pay the bills. We must know these and other concepts to deliver on the promises we make when selling our services, but the reality is that understanding S&C is not a prerequisite for landing sales, filling your schedule, and making money.

Reputation
Image 2. Reputation may bring in some clients initially, but it won’t completely fill (or keep full) your roster.

Isn’t Business Ownership the Dream?

Business owners often work 12-16 hour days, 5-7 days per week. This is especially true for relatively young businesses (under three years old or so). Further, sometimes owners go without a paycheck for several of the first months of business. Even further, there is typically a significant financial risk involved with starting a business. Someone has to pay for the space and equipment, and that someone is you.

If you’re the entrepreneurial type, by all means, dive in. However, starting a business isn’t a journey everyone wants to take. If you’re someone who loves S&C but doesn’t care to run a business, working as an employee may be a better fit.

I reject the notion that owning your own gym is the “next step” and pinnacle of working in our sphere. If you choose (or have chosen) to start your own show, that’s fantastic. But there is absolutely nothing wrong with finding meaningful, fulfilling work as an employee, doing a damn good job, being appreciated, and getting paid well for it.

I reject the notion that owning your own gym is the “next step” and pinnacle of working in our sphere, says @KD_KyleDavey. Share on X

Good business owners have established a strong vision. They know what they want to accomplish and what impact they want to make in the community and on the world.

In my opinion, the greatest opportunity to be successful lies in aligning your work with your personal values and vision. As an employee, that means finding a business whose values and vision you share. If you do, it will be easy to buy in 100% and pour your heart into your work and company.

That gives you potential to become indispensable. But heart alone won’t get you there—you need heart and a skill set.

Becoming Indispensable

While big businesses can afford specialists, small businesses—like most S&C operations—often cannot. A jack of all trades thus provides tremendous value. I’ve identified seven skills that will transform you from a “trainer” to someone who will be indispensable in any strength and conditioning or fitness business.

The goal isn’t to become an expert in any one of these areas; instead, you want to be like a heptathlete, above average in each. You’ll notice not one of these categories is training related—we need to be good at that function of our job, of course. But the reality is that being a good trainer is not a prerequisite for running a successful training business.

1. Leadership

A leader is someone who influences the emotions and behaviors of others. Simon Sinek describes leaders as those who “draw people into a circle of trust” and who make their employees feel safe. What Sinek means is that leaders remove unnecessary fear and tension from the workplace, allowing everyone to be fully comfortable and do their best work.

Easier said than done.

Sinek’s book, Start with Why, details the underlying principle he believes unites people in business. In his own words: “people don’t buy what you do, they buy why you do it.”

Compare these two sentiments:

  • I train athletes to be as fast and explosive on the field as possible.
  • When I was a kid, sports were the only thing that got me through. They taught me how to push myself beyond what I thought was possible, and I’ve carried that lesson my whole life. Now, I want to give back and do my part to teach kids that they can achieve more than they ever thought possible.

People don’t care what you do, they care why you do it. Staff members will work harder and be more motivated if the business has a strong “why.” Community members will be more supportive and potential clients more likely to purchase services as a result.

People don’t care what you do, they care why you do it, says @KD_KyleDavey. Share on X

In short: you’ll make more money and have a better time doing it.

Another of Sinek’s works, Leaders Eat Last, is more of a how-to guide that provides real-life examples of leadership at work, giving big picture strategies as well as practical advice on how to become a more effective leader for your team. As you can imagine from the title, taking care of those around you is a critical element of effective leadership.

A coworker recently mentioned that people notice the energy I bring to work. I smile and say hello to nearly everyone. I go out of my way to make conversation and introduce myself to people. And I make it a point to walk around the building and ask “How are you?” to each of my coworkers, first thing, every morning (which one of them eventually admitted was annoying at first, until he realized I actually cared about his response).

Some may call this habit “wasting time”—on the contrary, it is creating an atmosphere for success.

“You probably don’t know it, but those little things go a long way,” is feedback I’ve received.

I do know it. That’s why I do it.

2. Business Development

You probably have a sense of how to assess and progress an athlete—do you also have a sense of how to assess and progress a business?

  • Does the business have a strong employee culture?
  • Is the client experience amazing?
  • Is the process from I’m curious about this place to I’m now in the building as easy and seamless as possible for potential clients?
  • Are there systems in place to ensure that the business won’t crumble if an employee calls out sick or quits unexpectedly?

Good to Great by Jim Collins is widely regarded as one of greatest business books ever written. Collins analyzed businesses whose stock returns beat the general stock market by an average of seven times for 15 straight years. In other words, he analyzed businesses that did exceedingly well (in terms of money earned) for at least 15 years in a row.

Good to Great Book
Image 3. “Good to Great,” by Jim Collins.

The book pinpoints several commonalities between these companies. What they did, and what their competitors did not do, is what helped them take the leap from a good company to a great one. A few key elements for a company to become great were:

  • Strong leadership.
  • A laser-like focus on a few clear goals.
  • A culture of discipline.

After reading this book while on a vacation, I came back re-energized and with a new gameplan. Following five straight months of generating lower revenues than the previous month, my team turned a corner and broke the streak. Our revenues then increased for six straight months, setting company records along the way.

All I did differently was apply the lessons learned in Good to Great. Namely, I identified each of our team member’s why, created a common goal that encapsulated each of them, and rallied our team around that goal. The vibe in the office shifted, we recommitted to our purpose and work, and the money flowed from there.

Another worthwhile read, Never Lose a Customer Again, forces you to face the reality that you probably aren’t knocking your clients’ socks off. Businesses that create fans and treat their customers amazingly are more successful than those that take a more traditional, transactional approach. Exceeding expectations and delivering a little bit of shock and awe will keep clients around longer and generate new clients faster.

Exceeding expectations and delivering a little bit of shock and awe will keep clients around longer and generate new clients faster, says @KD_KyleDavey. Share on X

People talk. Fewer clients cancelling training and more clients signing up = money in the pocket.

Never Lose a Customer Again provides a step-by-step guide designed to help you assess the client experience you deliver. Then it teaches you how to make it better. Two other amazing resources are Grit, by Angela Duckworth, and The E-Myth Revisited, by Michael Gerber.

Running a business isn’t for the faint of heart. In Grit, Duckworth defines exactly what grit is and then gives you the tools necessary to develop it so you may be successful in the long run.

She teaches how to get up after getting kicked in the face over and over and over again.

The E-Myth Revisited defines the difference between working in your business and working on your business. Many entrepreneurs make the assumption that being a good technician (for us, being a trainer) means they can run a successful business. As discussed earlier, that’s not the case. Gerber discusses the evolution of a business, how to avoid common-yet-fatal pitfalls, and how to think big, like a leader and manager should.

Lastly, Pete Dupuis, co-owner of Cressey Sports Performance, puts out an excellent newsletter once per week in which he shares the four most valuable pieces of content he’s consumed during the week. Pete is not a trainer, he’s a business guy who runs a highly successful training facility, and his insights are both practical and relatable.

3. Sales

Sales are both an art and a science, much like training. A gifted salesperson is an excellent conversationalist and an asset to any company. The most obvious link is to selling services or products, but the value does not stop there.

Any time you represent your business, you are essentially in a sales scenario. Giving a tour to a local sports club, presenting at a rotary meeting, or talking with a parent before or after a game are all opportunities to, well, sell yourself.

The better you are at this, the more value you bring to your company. The word salesman carries a negative connotation for many people: a sleazy guy trying to coax you into buying a crappy car for more than it’s worth (and with a high interest rate to boot).

But that’s not what sales is. Sales is simple problem solving.

If you have a problem and I have a solution for that problem, let’s do business together. If not, let’s not. To find out if we fit each other’s needs, let’s have a conversation about it. That’s all sales is. It’s helping people who want and need your help.

I’ve read a lot of sales guides, and the absolute best I’ve encountered is SPIN Selling by Neil Rackman. Rackman is a scientist who spent his career studying successful salesmen. He discovered the best are excellent listeners: they read between the lines, ask great questions, and understand what someone is trying to say but can’t quite articulate. Through simple, non-confrontational conversation, they learn where their product would benefit the customer (what problems it solves), and they help the customer realize the same.

The best rarely have to “close the sale”—instead, the customer usually asks how to sign up. These successful salesmen ask four types of questions (in order, hence the acronym SPIN):

  1. Situation questions.
  2. Problem questions.
  3. Implication questions.
  4. Need payoff questions.

These questions move the customer from “here is my situation” to “yes, that is a problem” to “wow, you’re right, that is a really big problem” to “yes, I definitely need to solve that problem. Can you help me with that?”

Once there, if your product delivers a solution, the sale becomes the logical next step.

4. Copywriting

Copywriting is essentially sales, but over a written medium such as email, a web page, or social media. Copywriting is much, much more challenging than in-person sales because you aren’t actively talking to someone. Instead, they’re reading words you’ve written. You don’t get to ask questions and read their tone. It’s a one-way conversation, and you have to be right on the money to be successful.

Copywriting is very powerful when executed well. Good copy grabs the reader’s attention and directs him or her down the desired path: subscribing to a newsletter, clicking a link to go to another webpage, following a social media account, or making a purchase.

Good copy grabs the reader’s attention and directs him or her down the desired path, says @KD_KyleDavey. Share on X

Bad copy doesn’t get read beyond the first few words and results in nothing but the browser closing. Being a decent copywriter puts you miles ahead of not even knowing what copywriting is. You may not land a million-dollar gig writing an email campaign (yes, such jobs exist), but with just basic copywriting skills, the engagement on your IG content will go up and your website will receive more “contact me” requests from prospective clients.

If you’re an absolute beginner, a good place to start is Why Do You Hate Money by Joey Percia. Percia is a trainer-turned-copywriter, and his book is written specifically for fitness and performance professionals. Percia teaches formulas for writing headlines that draw the reader in, tips and tricks of writing the type of copy that keeps the reader’s attention, and some technical skills (like creating effective sales funnels and email marketing campaigns).

For a more in-depth and advanced look at writing effective copy, The Ultimate Sales Letter by Dan Kennedy is a phenomenal tool. Kennedy is a copywriting and marketing legend. His track record of writing highly effective copy—meaning, composing paragraphs that result in people sending money to other people—speaks for itself. He’s also mentored hundreds of copywriters who became great. He knows what he’s doing and how to teach it to others.

Understanding the basic principles of writing effective copy makes you the clear go-to for marketing and effectively running social media platforms and online sales campaigns for your company.

5. Marketing

Marketing is an umbrella term that encapsulates every aspect of a company’s outward appearance, from social media presence to the logo to t-shirt design to the website appearance, etc.

One of my favorite marketing books is Magnetic Marketing by Dan Kennedy (author of The Ultimate Sales Letter). The premise of Magnetic Marketing is that if you have a clear understanding of who your target audience is, what pains and what motivates them—and, how you can help—then you can establish marketing materials which speak directly to these people and attract them to your business.

Hence, you need not market to everyone. You probably don’t want to do business with everyone, anyway. Instead, figure out exactly who you do want to serve, what they feel, want, and need, and then speak to them directly in your marketing materials.

Magnetic Marketing walks you through this process.

For free, highly practical tips, I’ve greatly enjoyed www.marketingexamples.com (which I discovered from the Pete Dupuis newsletter). If you sign up for the newsletter, the first five emails cover specific topics, like how to design an effective sales page, and tips for writing more effective copy.

A great resource that is specific to fitness is The Wealthy Fit Pro’s Guide To Getting Clients and Referrals by Jon Goodman and Mike Doehla. Early in Goodman’s career as a personal trainer, he recognized that most of us in fitness are pretty terrible at all things business. He founded the Personal Trainer Development Center and has since taken it upon himself to empower trainers with the business and marketing savvy necessary to financial success.

Split into three sections, the book is business and marketing 101 specifically for those of us in the fitness and performance realm:

  1. “How to Get More People to Buy From You”
  2. “50 Proven Ways to Get More Clients”
  3. “How to Get More Referrals”

Brilliant marketers also have a firm understanding of human psychology. Knowing a bit about what does and does not make people tick provides a grasp on the underlying principles of human behavior. There are more books on psychology and behavior than anyone can read, but an absolute game changer for me was Influence: The Psychology of Persuasion, by Robert Cialdini.

Cialdini, a psychology professor and acclaimed sales coach and marketing consultant, teaches what he calls the six universal principles of influence, and how you can use them to influence others.

Would you ever agree to put a freeway billboard in your front yard to promote safe driving? You’d be shocked to hear over 90% of folks asked said yes, they indeed would put a freeway sized billboard in their front yard, because they had been subtly buttered up to the idea over the course of a few weeks.

If this sounds crazy, it’s because it is. Who in their right mind would agree to a billboard that says “drive safe” in their front yard? When the right psychological tools were in play, it became an obvious choice for them. This is what brilliant marketers do: they set the right psychological tools in place to make their business the obvious choice. Influence will teach you these tools and how to use them to drive clients your way.

Brilliant marketers set the right psychological tools in place to make their business the obvious choice, says @KD_KyleDavey. Share on X

6. Communication: Verbal and Written

Effective communication is the ability to understand others, be understood, develop deep relationships, and influence actions and behaviors. Poor communication means you have little influence over the way people think and feel and are thus less effective in achieving any desired outcome.

Poor communication means you have little influence over the way people think and feel and are thus less effective in achieving any desired outcome, says @KD_KyleDavey. Share on X
Poor Communication
Image 4. A prime example of the ramifications of poor communication.

Strong communicators make very effective leaders. Obtaining buy-in from staff members and clients alike is critical to achieve business and training success.

Communication is how you get it.

The book Just Listen radically changed my life: it’s made me a stronger husband, father, son, manager, employee, and leader. The book teaches you how to deeply connect with people so that they trust, respect, and like you. As the title implies, closing your mouth and listening to others is the first step. By doing so you allow the other person to feel understood, which is a building block for bonding and developing a strong relationship.

Without feeling understood, behavior is unlikely to change, whether it’s a marital spat or a poor habit at work. Hence, listening is a critical skill for effectively communicating and eliciting behavioral change.

I would be remiss not to mention perhaps the most famous book on communication, How to Win Friends and Influence People. The timeless advice given is easily digestible, highly practical, and quickly applicable. From simple suggestions, like smile more, to deeper concepts, like asking questions that entice others to open up to you, this book is full of advice.

Conscious Coaching by Bret Bartholomew is another great resource specific to S&C. The book is specifically written about connecting better with athletes, but the general skills he teaches are equally applicable to everyone you interact with. Bartholomew identifies several different types of athletes (from easygoing to entitled to hard-working to lazy) and lays out how to connect with each. These personality archetypes also exist in our employees and other co-workers, so knowing how to positively interact with them is valuable.

Tometz Writing
Image 5. Writing well is a critical skill. This screenshot is taken from one of Matt Tometz’s Instagram posts.

Communication via a written medium is part of daily life for us: text, email, social media, etc. Possessing strong writing skills effectively conveys your intelligence and helps you better express yourself.

Elements of Style by William Strunk teaches you how to let your own voice come through in your writing. It also touches on some technical concepts, like best uses of semicolons and commas, but it’s mostly written to teach the reader how to confidently express him or herself via writing.

7. Management

In my opinion, management is really just a combination of leadership and communication. Anybody can learn to make schedules or crunch numbers in a budget. That’s not what management is about. Management is about motivating a crew of people to do their best work so the business thrives. Thus, the manager’s dilemma is to increase employee satisfaction (so employees are happy and stick around) and create a culture of excellence.

Management is about motivating a crew of people to do their best work so the business thrives, says@KD_KyleDavey. Share on X

First, Break all the Rules: What the World’s Greatest Managers do Differently is the culmination of over 80,000 interviews conducted by the Gallup Organization. They narrowed down what effective managers do and do not do. Some of the key concepts include treating every employee like an individual, focusing on enhancing strengths vs. improving weaknesses, and measuring and rewarding desired outcomes.

Sounds basic, but when executed well, these tenets have profound organizational effects. They keep employees happy, engaged, and motivated, which is a key part of the recipe for business success.

Effectively managing people is essential for smooth business operations and is a highly sought after skill. Being a strong manager makes you a more attractive candidate in the job marketplace.

Go, Do, Be

The most successful businesses have great cultures and happy employees, are led by strong leaders, and have fantastic sales and marketing systems that drive customers toward the business.

If you possess each of these qualities and skill sets, you bring tremendous value to the workplace. You put yourself in a position to demand and deserve a great salary—especially if you also deliver training such that you offset the cost of your own salary.

No savvy employer wouldn’t at least consider such an employee. A jack of all trades is what small businesses need, and if you become that jack you are indispensable.

Become indispensable and create your dream job and dream life.

Since you’re here…
…we have a small favor to ask. More people are reading SimpliFaster than ever, and each week we bring you compelling content from coaches, sport scientists, and physiotherapists who are devoted to building better athletes. Please take a moment to share the articles on social media, engage the authors with questions and comments below, and link to articles when appropriate if you have a blog or participate on forums of related topics. — SF


Foley Band Header

8 Training Applications for Resistance Bands

Blog| ByDanny Foley

Foley Band Header

I recently posted an article examining my reservations and growing reluctance on using static loading with my athletes, so naturally I wanted to follow that up with a practical and detailed look at how and why I utilize band loading. If you’ve followed me on social media the last few years, you know my affinity for bands is hardly a secret. Over time, what began out of honest demand (as well as the necessity to find ways to load my athletes while circumventing injuries), has evolved into more consistent applications, of which there are many. Through the years, I’ve found that, if nothing else, resistance bands are extremely versatile and can be tremendous resources in training, irrespective of the athlete’s health or abilities.

Despite the goofy stuff we see circulating on social media, I would encourage you to keep an open mind to the incredible versatility of resistance bands, says @danmode_vhp. Share on X

The propensity for global misuse and misappropriation of band training has, unfortunately, given the method a bad reputation, making it inadvertently perceived as something only for social media clout or attention grabbing. But despite the goofy stuff we see circulating on social media, I would encourage you to keep an open mind to the incredible versatility of resistance bands and see how some of these applications can be utilized for the athletes or individuals you work with. My hope in this article is:

  • To provide comprehensive descriptions of how and why to use resistance bands in training.
  • To include for what populations or situations their inclusion would be pragmatic.

Given this is a rather extensive list of applications, let’s save the small talk and dive right in.

(To see a playlist of exercises in each category, click the subhead title.)

1. Applied (Primary Load)


When it’s the primary load, band tension provides an isoinertial resistance type, meaning the muscles are contracting against a constant resistance. This is the primary difference as compared to static load, in which muscular effort is variable throughout the range of motion (ROM) depending on joint position/angle (think about the top versus bottom portion of a dumbbell bicep curl).

Having the working muscle under tension throughout the entire ROM provides a greater total work output, increasing the workload efficiency. The load-length relationship is curvilinear, meaning the further the band is stretched, the greater the imposed resistance. As such, this provides an eccentric overload effect, placing an emphasis on terminal strength/stability. An important disclaimer here: Band tension is at its lightest resistance during the bottom ranges of motion (typically, deep flexion), so for this reason, it’s critical to recognize you still need to use static load to develop the complete ranges of motion.

Band loading offers the distinct advantage of loading multiple vectors or planes. Moreover, athletes can coordinate their most natural path of motion (POM) to achieve these certain movements. The precision and specificity of bands also make them great for confidence, which motivates the athlete to have more ownership over the movement. Being able to isolate and include very specific vectors is especially helpful for rehabbing injuries, but also for emphasizing positional/plane deficiencies or avoiding overstressing particular joints.

Primary Load

Band tension offers optimal muscular loading and tendon stretching while de-emphasizing compressive joint load. Because the moment arm is constantly changing throughout the POM, it prompts the athlete to position themselves for better mechanical leverage as they move. As shown by Jakobsen1, band tension may also produce greater muscle activation on certain exercises and at critical phases of these movements (e.g., tension increasing during a split squat at 10- to 30-degree knee extension).

Band loading offers the distinct advantage of loading multiple vectors or planes. Moreover, athletes can coordinate their most natural path of motion (POM) to achieve these certain movements. Share on X

It has also been shown there’s generally a greater proprioceptive demand when using bands. These subtle changes in how the movement is being executed challenge proprioception naturally and are a simple way to maximize your programming. In my opinion, this rep-to-rep variation provides a great stimulus that requires the athlete to remain alert throughout the entire set, as no two reps will be identical.

 2. Unloading/Assisted

Band unloading is intended to help athletes perform certain movements or ROM that cannot be performed at bodyweight. This is typically best suited for novice athletes or those coming off injury.

This tactic has been particularly helpful for me when working with athletes battling chronic joint pain, recently coming off surgery, or who just have positional or localized weaknesses. Using band tension in this fashion creates an inverted length-tension relationship to the movement.

In other words, as the athlete moves into deeper ranges of motion (typically flexion), they are generally at their weakest point of the movement. Meanwhile, the band is being stretched to its greatest point, thus providing the most amount of assistance for the athlete. What this effectively does is reduce body mass proportionally to distance traveled and “unloads” the athlete in the bottom ROM. The band assistance can be progressively reduced and done so in a very incremental manner, providing a smooth and natural transition working back to bodyweight.

Unloading Assisted

I also use this application for healthy athletes for a few reasons, though this is infrequent. The unloaded setup can be useful for athletes who need to monitor overstressing certain joints (e.g., tendonitis, arthritis) or just curbing stress accumulation altogether (e.g., in-season athlete, high-intensity training phases). A good example here is a band supported bent row for an athlete who battles mild low back pain but needs to strengthen their hinge position.

3. Accommodating (Static/Dynamic Hybrid)

Accommodating resistance—likely the most common band application—was popularized by Louie Simmons of Westside Barbell in the early ’90s. As Louie has shown, this can be used for a litany of movements, but it is most commonly applied to compound primary lifts (i.e., bench/squat/dead) and common accessories such as RDLs, bent rows, and split squats. While Westside is obviously a powerlifting philosophy, there are several reasons to model these methods in the sport world—the foremost being that band tension is a great tool for developing speed and power. Accommodating resistance has been shown to be highly effective for optimizing power and rate of force output.2

Because of the increased resistance at terminal ROM, there is an increasing demand for acceleration as the athlete approaches end range. As such, they may offer an optimal application for the stretch-shortening cycle (SSC)3, as the tensile nature of the bands has shown to be beneficial for elastic strength properties such as tendon elasticity. Because band tension increases linearly with displacement, there is a greater demand for force output throughout the entire ROM as compared to the same load, but static.2 The force due to band tension in conjunction with forces due to gravity collectively challenges all structures and systems in a unique way, and when applied appropriately, can be highly effective throughout an athlete’s training cycle.

Accommodating Resistance

Athletes absolutely need both static and dynamic resistance types, and there are endless variables we could argue that will influence the rates, frequencies, and intensities at which each load type should be applied. All things being equal, however, I look at it like this: Develop functional strength through static load first and actualize the foundational strength through dynamic loading with more tenured athletes.

For young/novice athletes (less than 15 years old), static load is preferred due to its simplicity and general carryover. Similarly for developmental athletes (15-24 years old), static load is best for applying significant load and force, and dynamic loading can start to be introduced in a variety of situations. For this demographic, bands can start to have more practical inclusion and be sampled with big lifts. Dynamic load is best reserved for high-velocity/power loading, introducing new and multiple vectors, vector-specific loading, and general motor control/proprioception development.

4. Joint Distraction/Traction</h2

Another method that has been increasingly adopted by coaches is joint traction, popularized by Kelly Starrett in his groundbreaking book Supple Leopard. The theory here is that the band tension helps to disassociate (or distract) the joint socket, thereby providing a better opportunity to move through a full ROM or bypass particular painful sites.

Join Traction

To my knowledge, there isn’t much (or any) formal research on the efficacy of joint traction. However, anecdotally, this method can help increase localized passive ROM, help with nerve/circulatory entrapment, and be an effective tool for improving joint capsule adhesion and immobility. Beyond the mobility component, I include this often just for the circulation effects. Even if it’s transient, increasing the localized presence of fluids such as synovial fluid, hyaluronic acid, and lymphatic fluid generally does more good than harm for the athlete.

5. Offset Loading


Offset loading is a much less common application, but one I’ve personally had a lot of success with. The thought process here is to use band tension as a means to load the frontal plane while performing a sagittal-based movement.


Video 1. Kettlebell Offset Band Split Squat.

This application can be simply and intuitively added to common movements (e.g., push-up/split squat/bridge), providing intermediate progressions. Say, for instance, a push-up progression is:

  1. Starting with bodyweight.
  2. Band offset.
  3. Plate loaded.
  4. Band resisted.
  5. Plyometric overspeed push-up.

In this fashion, offset resistance can be a foundational piece for developing robust rotational strength, as introducing a frontal plane tension specifically challenges trunk stability (anti-rotation/bending) and general proprioception. While the powerhouse rotational muscles include lats, obliques, the glutes, and adductors, smaller refined muscles such as QL, transverse abdominis, and erectors are also significant here. I believe offset resistance is an effective way to stress some of these smaller muscles that can be difficult to stress in conventional compound loading.

I believe offset resistance is an effective way to stress some of these smaller muscles that can be difficult to stress in conventional compound loading, says @danmode_vhp. Share on X

6. Chaos Method

The chaos application has been scrutinized more than applauded, likely due to recent viral videos where it was shown in an imprudent fashion. I’ll say upfront this isn’t something that you should use often, and certainly not with athletes who lack foundational strength or stability. Nevertheless, when applied safely and correctly, this can be a great option to challenge motor control, muscular co-contraction, proprioception, and trunk stability.

I’ve also found this setup particularly useful for joint injuries—for my athletes with shoulder, wrist, or elbow pain/limitations, I use chaos push-up and inverted row variations in place of the traditional. This does two things:

  1. It removes the presence of compressive load (on the push-up), which reduces the magnitude of stress on the joint itself.
  2. The absence of external stability prompts greater demand on the joint receptors, along with promoting optimal co-contraction between muscle groups to create intrinsic stabilization.4

This can also be used as an advanced method—one that I was introduced to (extensively) by Cal Dietz. Using the heavy bands for movements like hamstring tantrums and cuff tantrums offers a unique way to create a massive overspeed effect, exposing the body to speeds it couldn’t reach normally. This application is believed to be effective for challenging autonomic (antagonist) inhibition, which would potentiate faster firing rates. The ballistic demand with this application makes it a great option during max speed/power phases, and it can be highly beneficial for the joint and soft tissue receptors.

7. Unloading (Supra Strength)

This form of band unloading is much less commonly practiced, but another one we can attribute to Louie Simmons and Westside Barbell. Also known as a “reverse band” setup, this application reduces the total mass of the barbell at the greatest point of strain. When using static load by itself, we are inherently limited by the concentric phase of the movement, as we are fundamentally much stronger eccentrically3. This means that when using static load, we are somewhat underloading the eccentric phase, and as we know, we are weaker in deep flexion.

So, with the unloading mechanism providing peak tension at the bottom portion of the movement, we get the most assistance when we need it most. I particularly like using this setup for bench press, rack pull, and overhead press, which are movements that typically have sharp sticking points.

Beyond using this to work supramaximal intensities, this approach can also be used for efficient volume accumulation. I add this into hypertrophy phases to perform “excess” volume without overtaxing the joints. An example, using the bench, would be:

  • Finishing a primary block of 4×6 @ 80%.
  • Then doing 4×6 @ 90% with band unloading as your secondary block.

While pure eccentric load is obviously needed, this can help pace the workload without having to get away from heavy loads entirely. This is another application that I’ve noticed older/veteran athletes tend to appreciate, and not even as supramaximal.

8. Unloading (Overspeed)

Finally, we have an overspeed application, which I was also introduced to via Cal Dietz. While this is similar to the supra strength application, here the bands unload body mass to allow athletes to move faster than they normally could. By doing so, it reduces the amortization phase of the stretch-shortening cycle (SSC), which promotes an accelerated contraction2. The overspeed method is another advanced tactic that shouldn’t really be utilized until foundational strength and speed have been well established. For advanced athletes, however, this is a fantastic programming tool that can help emphasize elastic/reflexive traits, speed, and proprioceptive response.

For advanced athletes, the overspeed method of unloading is a fantastic programming tool that can help emphasize elastic/reflexive traits, speed, and proprioceptive response, says @danmode_vhp. Share on X


Video 2. Band-overspeed depth jump to countermovement jump.

A few of my common go-to’s include pogo hops, RFE split jumps, and push-ups. And for advanced athletes, I like to use this setup for depth jumps as well (see above). It’s important these types of movements are coached clearly, and the movements must be executed with full intent. The purpose of reducing mass is to help move as fast as absolutely possible. A high intent and alertness are required to get the most of this type of application.

Bringing It All Together

As surprising as it may seem, there is still quite a bit unknown regarding resistance bands and their utilization or effectiveness in training. By far, the most important thing to recognize is intent is the key variable to it all. Whether using static or dynamic loading, the way in which that exercise is performed is often more significant than the exercise or load type.

Dynamic vs Static

Bands are extremely versatile, and while we’ve seen a few popularized applications over the years, I’d encourage you to examine some other ways to include bands (e.g., offset, unloading, vector-specific loading). Static loading is tried and true. When aiming for absolute force, the primary emphasis should be static loading. When emphasizing speed, power, motor control, or proprioception, dynamic resistance may be the better option.

Foundational speed/strength should be developed predominantly through static load before extensive band loading. Given the significantly increased demand for intrinsic stability with band loading, it may be imprudent for young and/or developmental athletes to prioritize dynamic loading. There is always a tradeoff between static and dynamic resistance. Understanding where your athletes are in their development and in their sport’s calendar are the critical variables to determine how much of each you should include.

Since you’re here…
…we have a small favor to ask. More people are reading SimpliFaster than ever, and each week we bring you compelling content from coaches, sport scientists, and physiotherapists who are devoted to building better athletes. Please take a moment to share the articles on social media, engage the authors with questions and comments below, and link to articles when appropriate if you have a blog or participate on forums of related topics. — SF

References

1. Jakobsen, MD, Sundstrup, E, Andersen, CH, Aagaard, P, and Andersen, LL. “Muscle activity during leg strengthening exercise using free weights and elastic resistance.” Human Movement Science. 2012;32(1):65-78.

2. Walker, S, Blazevich, AJ, Haff, GG, Tufano, JJ, Newton, RU, and Hakkinen, K. “Greater strength gains after training with accentuated eccentric than traditional isoinertial loads in already strength-trained men.” Frontiers in Physiology. 2016;7:149.

3. Aboodarda, SJ, George, J, Mokhtar, AH, and Thompson, M. “Muscle strength and damage following two modes of variable resistance training.” Journal of Sports Science & Medicine. 2011;10(4):635-642.

4. Ebben, WP and Jensen, RL. “Electromyographic and kinetic analysis of traditional, chain, and elastic band squats.” The Journal of Strength and Conditioning Research. 2002;16(4):547-550.

Basketball Coach

High Performance Library: Prepared

Blog| ByCraig Pickering

Basketball Coach

Every once in a while, I choose a book that happens to be perfectly in sync with the stage of life I’m in. When I picked up Prepared: Unlocking Human Performance with Lessons from Elite Sport by Paul Gamble, I wasn’t entirely sure what to expect. Gamble is the author of a number of books on the technical side of coaching (including, strength and conditioning and speed and agility), but Prepared is a step above in terms of levels of thinking.

At that same time, I had become even more interested in coaching and in understanding what makes a good coach. I was less concerned with the technical Xs and Os and more on:

  • The non-technical skills and actions of effective coaches.
  • The psychological attributes of elite coaches (which include having a drive for personal development, and possessing high levels of emotional awareness, understanding, and control).
  • How coaches learn (a mixture of on-the-job experience, discussions with others, experience as an athlete, and formal education).

The aim of Prepared is to explore how to enhance human performance—which, as Gamble points out in the prologue, is not just constrained to sport but can be applied to high-performing individuals across a variety of domains. This is important because elite coaches are able to apply their knowledge from a wide variety of disciplines in differing contexts. The book is split into four key sections:

  1. Part one explores the creation of the environment, which is where coach–athlete interactions occur and where optimization can support sustained success.
  2. Part two looks at leading and coaching others, which is a recognition of the importance of both leadership and development as important functions of the coach.
  3. Part three explores the art of coaching.
  4. Part four focuses on the importance of managing the self in coaching.
Elite coaches are able to apply their knowledge from a wide variety of disciplines in differing contexts, says @craig100m. Share on X

1. Creating the Environment

The environment in which we coach can be highly influential in terms of supporting athlete development. Research into Talent Development Environments (TDEs) by Russell Martindale and colleagues, for example, has identified some key traits of successful TDEs, such as having a long-term vision, purpose, and identity; coherent support and messaging; role models; and regular review processes.

Similarly, research into Athletic Talent Development Environments (ATDEs) by Henriksen and colleagues, led to the development of two models of successful ATDEs: the Athletic Talent Development Model and the Environmental Success Factors working model, both of which highlight the important role aspects such as family, school, peers, the media, various sporting programs, and espoused values play in the development of future athletes.

In Prepared, Gamble writes that effective change begins with the environment over which we have stewardship. As a coach, controlling and optimizing the environment of practice is an area that, while often poorly considered, could reap potentially huge rewards. This also links into the second part of the book on leadership. When I look at sporting systems (which is a slightly esoteric way of saying how elite sport is delivered across a country), I tend to consider it through “spheres of influence.”

As a coach, controlling and optimizing the environment of practice is an area that, while often poorly considered, could reap potentially huge rewards, says @craig100m. Share on X

A performance director has a wide sphere of influence. It is macro in nature: they have to work with various partners and set strategy, which filters down to the system. The next level is national coaches; their sphere of influence is also quite large but constrained to their own event group—they have ownership of performance in their area of expertise, and again have to influence down (to the coaches in their event group). The next level, that of personal coaches, is the most granular sphere of influence: the individual coach working with their own group of athletes. While this might be the smallest sphere, it’s also potentially the most important, as it is where champions are made. As a coach, your sphere of influence is composed of the group of athletes you work with, therefore creating the environmental conditions for success is crucial.

So, how do we do this?

Firstly, we need to create a culture of high performance. Gamble identifies the fluffiness of the word culture—he refers to it as the ‘C’ word and quotes a paper that refers to it as “the most vaguely deployed term in social science.” This means that we must live the values and behaviors we want our athletes to exhibit; we can’t expect them to be on time if we’re constantly late, and we can’t expect them to exhibit resilient behaviors if we’re consistently moaning. There must be clarity for your athletes and any support staff you work with about the standards and behaviors that are required from them—but, crucially, you must also model these behaviors and live up to these standards.

Next, Gamble examines the dynamics of the performance environment we create. If we want high performance from our athletes, then we need to create an environment that is conducive to high performance. Key among this is setting a climate that is motivational for the athletes who are in it, something which the All Blacks rugby team took very seriously, as outlined in a seminal paper on their approach. Everyone involved in the environment (in this case, coach and training group) must be aligned on a shared goal, which everyone works towards.

As a coach, you likely have goals for the athletes you work with; the key here would be to work with them to ensure that your goals and their goals align. Once alignment has occurred, the next step is to develop a set of process goals and key performance indicators—milestones that let you know that you’re on your way to success and identify small deviations from the path before they become large ones. Leadership style is also important here, with most successful coaches utilizing a transformational leadership approach. This includes:

  • Possessing inspirational motivation (articulating your vision to the people you work with).
  • Having high performance expectations.
  • Being an effective role model.
  • Providing individual consideration to the athletes you work with.

Transformational leadership is the ability to motivate and inspire others to success and, as such, is an important component of a successful talent development environment—certainly more so than a transactional leadership style.

When it comes to setting a performance environment, Gamble also writes about the value of diversity—particularly cognitive diversity—as a way of fostering better decision-making processes. Attempting to gain insights from people with different experiences can bring new ideas to the table. Seeking out and analyzing new ideas and fresh ways of thinking—from a variety of different domains—is very useful. This, in turn, helps guard against binary thinking—another of Gamble’s key performance environmental pillars—whereby we view issues as either/or, and miss the context (something increasingly important in the tribalism demonstrated on social media).

Attempting to gain insights from people with different experiences can bring new ideas to the table. Share on X

2. Leading and Coaching Others

In this section, Gamble discusses some of the contemporary issues in coaching today, identifying key traits of elite coaches that are present across a variety of different sports and domains, such as curiosity, skepticism, and divergent thinking.

These skills come in handy for coaches in the modern era, where there is more information and research being shared than ever before. Coaches need to be able to critically analyze what is being offered, before integrating what they think will work into their practice. An example of this is the illogic of being data driven; we should not blindly accept the data output we collect, but instead use it to inform our decisions about what approach to take.

Elite coaches also tend to possess high levels of both inter- and intra-personal intelligence (knowledge of others and knowledge of self), two skills that broadly comprise emotional intelligence. These, along with emotional management and being able to understand emotions in others, are the cornerstones of developing functional relationships. Emotional intelligence in coaching is crucial; the athletes we work with will experience a variety of stressors throughout their life, both in their sporting and personal lives, and a healthy coach–athlete relationship can provide the athlete with the tools to successfully navigate these stressors. But it’s also important in managing our own coaching abilities—if we can successfully understand and control (or regulate) our emotions, we can make better decisions, understand when we are acting with bias, and be less likely to respond with anger.

If we can successfully understand and control (or regulate) our emotions, we can make better decisions, understand when we are acting with bias, and be less likely to respond with anger, says @craig100m. Share on X

Being able to manage and control our own emotional states means that, as coaches, we can take steps to insulate our athletes from some level of stress. For example, at a major championship, a coach who is nervous and anxious is far more likely to:

  1. Pass this nervousness and anxiety onto their athletes.
  2. Make poor decisions that harm performance.

The first point relates to stress contagion, whereby our athletes pick up on our feelings of stress and anxiety and begin to exhibit them too—it’s clear to see how this may harm their performance. Similarly, being able to understand the emotional states of the athletes we work with—a further hallmark of emotional intelligence—means that we can identify when they are struggling to regulate their own emotions. In turn, this allows us to develop strategies to make them better in this area, which Gamble outlines through his strategies for manipulating challenge and perceived threats during training. This then allows the athlete to develop resilience and perform better in subsequent competitions.

The final pillar Gamble identifies in this section is a big one: agency.

Gamble writes that agency allows us to avoid a victim mindset—both in ourselves and in the athletes we work with. In part, this is by acknowledging that our choices and actions have a significant influence in creating our reality. As such, being accountable for our outcomes and accepting responsibility for when things don’t go well, is crucial—something that can be effectively role-modelled by coaches to their athletes. Elite athletes, for example, are much more likely to make the choice to practice the skills they’re not so good at—they are accountable for their performances and want to be successful, so, given the choice, they select a process which supports their success. In essence, they own their performance.

Elite athletes are much more likely to make the choice to practice the skills they’re not so good at, says @craig100m. Share on X

3. The Art of Coaching

In part three of Prepared, Gamble explores contemporary issues affecting sports coaching and human performance. One of these aspects is iatrogenics. In medicine, this refers to an illness caused by a medical examination or treatment (i.e., accidently harming someone). This is in contrast to the notion of first, do no harm (or primum non nocere). Gamble explores the concept of iatrogenics in sports and coaching—it is perhaps best illustrated by medal targets, which, in the face of recent sporting scandals, have had the unexpected effect of driving unethical (and, in some cases, illegal) behavior.

Similarly, training too intensely or too often, while coming from the hope of improving athlete performance, actually has the opposite effect, leading to overtraining and underperformance. Load management is another area where Gamble identifies iatrogenic behavior in practice—while the idea of quantifying load to identify at-risk athletes is useful in theory, in practice we often see athletes incorrectly designated as at-risk, who then see an unnecessary reduction in load—and, as a result, perhaps underperform due to a lack of stimulus.

In this section, Gamble also discusses tempering, whereby we use training to impart strength and toughness into the athletes we work with. By applying stress to our athletes, we can drive positive adaptations. This means that we might have to reconsider some commonly held beliefs. For example, when it comes to training loads, we are typically counselled to avoid any major spikes. However, Gamble writes that something without any tolerance for deviation from normal is a fragile system; so, by attempting to reduce any unpredictability, we’re actually harming our athlete’s performance longer-term. Utilizing both variability and volatility in our program, therefore, allows us to create performers who are both future-proof and highly adaptive—similar to the worst case scenario approach to developing training programs.

Something without any tolerance for deviation from normal is a fragile system; so, by attempting to reduce any unpredictability, we’re actually harming our athlete’s performance longer-term. Share on X

4. Managing the Self

The importance of this is identified in the section introduction, where Gamble writes: “Our physical and mental wellbeing is integral to our ability to fulfil the requirements of our role in service of athletes; we have an obligation to fulfil these responsibilities.”

This underpins the importance of taking care of ourselves so that, like our athletes, we can perform at the highest level. It also relates to knowing how to get the best out of ourselves, including self-improvement. Whole chapters are devoted to navigating the information age and the importance of sleep—two aspects all coaches potentially vie with from time to time.

The final chapter outlines how stress affects our ability to think clearly—something which affects us all with increasing regularity—and provides some strategies we can use to optimize our own performance under stress and pressure.

A Spot in Your HP Library

Prepared was the best book I read in 2020. Ensuring we understand that coaching is much more than just technical knowledge, and then taking steps to ensure we’re taking care of the other aspects, is a crucial yet potentially under-explored area of understanding when it comes to optimizing human performance.

In Prepared, Gamble provides a clear framework to begin thinking about some of these issues and considering how to implement them in our practice. I got so much from the book when I first read it and, going over my notes when writing this article, I was reminded of even more practical take-homes. The reference list alone is worth the price of the book and taking time to go through some of the papers and resources listed there will expose you to many new ideas and ways of thinking. As I said at the start, I came across this book at the time of my life where I was primed to get the most out of it—if you’re involved in coaching in any capacity, there will be a lot you can take from it as well.

Since you’re here…
…we have a small favor to ask. More people are reading SimpliFaster than ever, and each week we bring you compelling content from coaches, sport scientists, and physiotherapists who are devoted to building better athletes. Please take a moment to share the articles on social media, engage the authors with questions and comments below, and link to articles when appropriate if you have a blog or participate on forums of related topics. — SF


Eugenia Bradshaw Athletes

5 Lessons Learned During a Lifetime of Coaching Teenagers

Blog| ByEugenia Bradshaw

Eugenia Bradshaw Athletes

Picture this: You are coming off a great winter track season. You’re getting ready for spring and about to have a preseason meeting. There are several upperclassmen on your team, and now you must decide who will be captain. You give it a lot of thought and decide on a junior because he has great leadership skills and is an outstanding overall team player—at the preseason meeting, you announce the decision.

Later that night, when you are home, you get a phone call from a disgruntled parent who TELLS you his son should be captain and that he is the fastest athlete on the team.

What do you say?

For me, the answer was: “I don’t choose my captain based on how fast an athlete can run, and although your son is a talented athlete, he isn’t the fastest. Your son has many positive attributes but is not quite ready to be in that position right now.” Over the years, I’ve found the best way to handle situations like this is to listen to what the parent has to say and then respond in as nonconfrontational a manner as possible (and if a situation does get escalated, then I would talk to my AD).

These lessons have helped me turn situations with teenage athletes and their parents into productive rather than destructive experiences. Share on X

If you’ve experienced similar situations dealing with teenage athletes and their parents, you’re not alone. I’m here to share five recommendations that I’ve picked up through 15 years of coaching that have allowed me to turn this scenario—and others like it—into productive rather than destructive experiences.

  1. Learn how to deal with teenagers.
  2. Know their why.
  3. Understand how each athlete learns.
  4. Accept that parents won’t always agree with you.
  5. Be okay with breaking your own rules.

1. Learn How to Deal with Teenagers

Understanding the physical and psychological development of high school athletes will ultimately benefit both the coach and the athlete. If you haven’t spent time with teenagers lately…this could be difficult. In my case, I have five kids of my own and have lived through the ups and downs of raising adolescents. In addition, my kids were very involved in organized sports (bringing with them a house full of their friends who were also teenage athletes). Having exposure to my own kids and their friends gave me an edge at understanding and working with this age group.

What can you do if you don’t have your own kids?

Interact with relatives around this age or friends who have teenage kids: spend some time with them and have conversations with them. Observe how they think and recognize what is important to them. Talk to them about their experiences with sports, but mostly listen and learn.

You will be spending lots of time with your athletes, and it’s a good idea to have some idea about how they operate. Coaching high school kids is an adolescent roller-coaster ride, and you just bought a ticket as they mature from insecure freshmen to confident seniors, with plenty of growing pains in between. I have learned that coaches become significant fixtures athletes depend on, so if you “get” them, they appreciate it, and things will go more smoothly.

Track team
Image 1. Learn to listen to and communicate with your teen athletes.

Beyond that, take the time to learn to understand what motivates teenagers from an athletic standpoint. When it comes to figuring out what makes each athlete tick, late quarterback coach Tom Martinez describes it this way in the book Outliers: “Every kid’s life is a mix of shit and ice cream. If the kid has had too much shit, I mix in some ice cream. If he has had too much ice cream, I mix in some shit.”

Understand that these are kids, and sometimes it’s not their fault that they’ve been fed ice cream all the time and treated like everything they do is great. As coaches, we need to figure out strategies for dealing fairly with each of these extremes, as well as everyone and everything in-between.

Kids act a certain way for a reason. There may be pressures at home, school, or with peers that are having a significant impact on their behavior. Be aware of withdrawn, depressed, or concerning behavior—if you think there is an issue, don’t ignore it. All teens handle pressure differently.

If I suspect an athlete is acting differently, I ask how they’re doing I in a way that they won’t feel judged. The important thing is to listen. Share on X

In my experience, if I suspect an athlete is acting differently, I ask how they are doing in a way that they won’t feel judged. Kids have opened up to me about all kinds of things: bullying, depression, anxiety, and family issues. The important thing is to listen, and if you feel it’s something that needs to be further addressed, speak to the school counselor or parent.

2. Know Their “Why”

Why did this athlete come out for the team? What is their motivation for being there? You may think you know, but don’t be so sure—remember, your mind works very differently than a teenager’s.

With my athletes, during the first week of the season I started simply asking the question and having them write their answer down on an index card. Some of the responses I have gotten are:

  • To get faster for a different sport.
  • To keep in shape.
  • To make friends.

If athletes come out for the team for non-competitive reasons—for example, just to make friends—I don’t care, because if they are a contributing factor and work hard, it’s all good. In some cases, they end up really enjoying the sport and flourish! If an athlete says they want to compete in college, then you can have the realistic conversation of what it takes and the standards they must hit. From there, you can be on the same page, and they know it will take hard work.

Athlete Why
Image 2. Knowing each athlete’s “why” and what they value can guide how you coach different athletes and help them set goals.

Some athletes need relationships before competition, others need competition before relationships. I believe this is where boys and girls differ—after spending my first seven years coaching in an all-girls school, then moving on to a coed high school, I have experienced a difference. Girls often value the relationship before competition, and boys the competition before the relationship.

Some athletes need relationships before competition, others need competition before relationships. I believe this is where boys and girls differ. Share on X

To help fill that social bucket, I have the athletes take an unstructured lap before we start practice. They can do it in groups or with one of their close friends, and it gives them a few minutes to unwind from their school day and socialize before we get started.

3. Understand How Each Athlete Learns

Aside from the psychological aspect of coaching, it is important to consider how each individual athlete learns. You can explain something to two equally talented sprinters, and one will get it right away and the other may need a physical demonstration. Some athletes are visual, some are auditory, and some need both. Add to this mix differences in chronological age, training age, social age, and personality, and you have a million different possibilities.

As an example, I will use two different long jumpers: one male, one female, both talented. Both juniors (and also talented sprinters), the male was jumping mid-22 feet and the female high-17 feet. When going over the penultimate step with both, the male became fixated on it and continued to overthink it, while the female just ran and jumped. This was how they approached school: one was an overthinker, and one was not. Make sure to adjust your coaching style to meet the needs of the athlete.

In the case of the two jumpers, what I found successful was to give much less technical information to the male jumper and work on only one cue at a time. For example, one cue I gave him was to focus on a tree visible in the sightline beyond the pit so he wouldn’t look at the board. This simple cue kept him in an erect upright position. As far as the female jumper…if it’s not broke, don’t fix it. If I showed her a video, she could adjust without too much of an explanation: less was more with her.

As coaches, it is our responsibility to get the best out of our athletes—to do this, you must realize no two are the same. Share on X

As coaches, it is our responsibility to get the best out of our athletes—to do this, you must realize no two are the same. Mike Boyle summed this up, saying: “Don’t strive to show how smart you are. Instead, strive to show what a great teacher you are. I believe the key to Keep It Short and Simple (KISS) is to strive to Make it Simple and Short (MISS).”

4. Accept That Parents Won’t Always Agree with You (and Five Keys to Building Successful Relationships)

When you have been coaching for years in high school, you end up dealing with hundreds of parents, and you can count on some of them not agreeing with you. I have had my issues in the past—and some of the parents have been difficult—but for the most part, the majority have been very pleasant.

Five keys I’ve learned over the years to establish successful relationships with parents are:

  • Establish your expectations. Hold a preseason parent-athlete meeting, which can be over Zoom or in person. Discuss practice expectations for parents and athletes, uniforms and practice wear, competitions…anything you as a coach find important to running a successful team. You will find that some of these items stay constant over the years and some change. As we all know, this last year was very different and, as a result, so was the information we covered.
  • Review your school’s athletic department policy. Get to know your Athletic Director and their school-wide policies—every school is different. Help them understand your coaching style and what your goals are. You want to make sure your AD has your back as a coach and will stand up for you when needed. I have had outstanding ADs who were always willing to help and do what was best for the athlete, coach, and program.
  • Write and distribute your own rules and expectations. When things are in writing and everyone is on the same page, it prevents future problems.
  • Review your team goals, priorities, and philosophy. These are some of the first things covered in the beginning of the season. Also added to this list are personal goals athletes have for themselves and upperclassmen’s desire to play at the next level. (That’s a discussion for another article.)
  • Encourage athletes to speak with you before bringing a parent into the conversation. When students start high school, I encourage them to learn to advocate for themselves. If they have a problem, they should speak to the coach first instead of having their parent call. I also encourage them to speak to the captain if it is something they think is appropriate. This allows captains to become leaders and problem-solvers. If the captain thinks it is something that needs to be discussed with the coach, they will direct it that way. I have found this a great way to teach many different lessons to athletes.

5. Be Okay with Breaking Your Own Rules

Rules are essential for any successful team, BUT it’s also important to know there are exceptions to the rules. You’re the coach—when you feel you need to break them, it’s okay; you just need a valid reason.

For example, one of my rules for practice over break was that you had to make at least four of the practices during the week to compete. One athlete was not showing up to most of the practices. When I asked him about it, he told me he lived with his mom, and she had to work—and that it took him two hours to get to practice with public transportation. That would be four hours a day to get back and forth to practice. In my book, this is a valid reason for me to break the rules.

A Coach Is Always Needed

In Martin Rooney’s book High Ten, I found the quote “Because everyone always needs a coach, a coach is always needed.” This is a sentiment many of us feel and the reason why we should evaluate and reflect on lessons we have learned from year to year. Every year I learn something new, whether it is how to better train my athletes, communicate with them, or create a better team culture. These are the things that keep us doing what we love and motivate us to move forward.

This past year was very difficult for athletes and coaches because of the pandemic. When I reflect, I think about how happy I was, first just to get to coach at all, and then with the performances: a freshman male breaking 11 seconds in the 100m and freshman female hitting a 12.2. Those are the things that get me excited, but I also think about how disjointed the team felt.

This is when I must think about the team culture and what it was lacking. We had kids missing numerous practices, relays that weren’t cohesive, and athletes not reaching their potential. I just figured it was a pandemic and need to ease up on them, but I was wrong, and I learned some new lessons that will help me.

How do I move forward and improve my team? I take my notebook and write down what kind of team culture I want to create. Our motto will be #trusttheprocess, and I will get wristbands to remind them.

How do I start to create team culture? It starts with the coach motivating them to believe in themselves and the team—behaviors reinforce our beliefs and that will lead us to where I think we should be as a team.

Trust the Process
Image 3. #Trusttheprocess.

After 15 years of coaching high school track and field, I know I LOVE it and NEED to do it, but I also need to learn from my own lessons. I hope that my years of experience will get you thinking and sharing with other coaches—at the end of the day, as one of my ADs said to me, “you are changing lives, one at a time.”

If you’re a coach starting out, there will be days you go home and feel like hanging up the stopwatch and clipboard. DON’T! It will get better. Share on X

If you’re a coach starting out, there will be days you go home and feel like hanging up the stopwatch and clipboard. DON’T! Trust me, I have been there, and I still have my moments, but it will get better. Taking the coaching roller-coaster ride with your athletes over their high school career is something you don’t want to give up on. The enormous sense of pride and satisfaction far outweighs the frustration you may feel from time to time.

Look at your coaching journey as an education: the lessons you learn from one season will benefit you in the next. The first year you coach you are like a freshman; four years later you are a senior. One day you will turn around and 15 years will have passed, and you will realize how many young athletes you have helped—and that’s worth it because if you are a coach, you NEED to help people.

I hope my lessons will help you. Hold on tight and enjoy the ride!

Since you’re here…
…we have a small favor to ask. More people are reading SimpliFaster than ever, and each week we bring you compelling content from coaches, sport scientists, and physiotherapists who are devoted to building better athletes. Please take a moment to share the articles on social media, engage the authors with questions and comments below, and link to articles when appropriate if you have a blog or participate on forums of related topics. — SF


Bench Press

Using EMG and Inertial Analysis to Improve the Bench Press

Blog| ByMike Croskery

Bench Press

The bench press exercise may be one of the most popular conditioning exercises to build upper body strength and muscle development. In the sport of powerlifting, it is one of the three main lifts used in competition, along with the squat and deadlift. The goal to try and maximize the weight successfully lifted in competition involves a combination of optimal biomechanics and muscle physiology to result in the generation of a high amount of force from the upper body. With this in mind, we will look at some of the factors that can go into the decision to find an optimal grip width to maximize outcomes.

We chose the ‘simple’ approach to investigate whether a wider grip would have a favorable effect on the mechanics and physiology of the lift and lead to potentially greater results. Share on X

Our study here begins with a competitive powerlifter who was looking to improve his bench press performance. With a variety of techniques available that can have an effect on lifting performance—such as elbow position, degree of arch, speed of approach, location of the bar in relation to the shoulder and chest, etc.—we chose the “simple” approach to investigate whether a wider grip would have a favorable effect on the mechanics and physiology of the lift and lead to potentially greater results.

Materials and Methods

To tackle this issue, I used an inertial sensor (G-Sensor) and eight EMG sensors from BTS Bioengineering to track the kinematics of the bar and to analyze the neuromuscular contribution from the left and right sides of the body, respectively. I chose to examine the chest, arm, and shoulder muscles, as these are the muscles considered to have the largest contribution to the movement and that are commonly used in research about the bench press.

Sensor BTS
Image 1. G-Sensor attached to the bar using some common materials. Arrows indicate positive values for linear acceleration and angular rotation.

Acceleration Velocity
Figure 1. This graph shows velocity (green) and acceleration (red) normalized to peak values for comparison purposes. The orange line indicates the start of the concentric portion, the dark green line indicates the start of the sticking region, and the purple line indicates the end of the sticking region.

The G-Sensor was attached to the mid-point of the bar on the side opposite to the lifter. As the G-Sensor uses a triaxial accelerometer to measure acceleration, the sensor was oriented so that the Z axis was perpendicular to the bar, with the X and Y axes consequently being parallel to the bar. Positive acceleration in the Z axis is away from the ground, in the X axis, it’s toward the lifter’s left side, and in the Y axis positive acceleration is away from the lifter. In addition, the inertial sensor also contains a triaxial gyroscope and a magnetic sensor to measure angular velocity and angles along the three axes. This results in positive values when the sensor is rotated about the axis in a counterclockwise direction.

EMG Sensors
Image 2. Placement of the BTS FREEEMG Sensor for the pectorals major, interior deltoid, triceps brachii long head (not visible), and biceps brachii long head.

The wireless FREEEMG sensors were placed on the sternal portion of the pectoralis major, anterior deltoid, long head of the biceps brachii, and the long head of the triceps brachii according to the locations specified by SENIAM standards and Cram’s Introduction to Surface Electromyography, 2nd Edition. The sites were cleaned with alcohol, and a skin prep gel was used to ensure a strong signal.

To enable a good comparison between both lifts, we chose to perform them on the same day while keeping the electrodes in place—this reduced confounding variables that can come from replacing the electrodes and inter-day performance variability. The lift intensity was estimated to be greater than 90% MVC, and the same weight was used for the two lifts after an incremental warm-up with progressively heavier weights and rest of at least 3-5 minutes between. The grip widths varied by approximately 3.5 inches, and our lifter had trained and competed with the narrower grip. However, both grips felt similar on execution, hence the problem of choosing a “better” grip.

Both the narrow and wide grips (they varied by approximately 3.5 inches) felt similar on execution, hence the problem of choosing a ‘better’ grip. Share on X

As is common in the research, I have divided the lift into five key events:

  1. The beginning of the eccentric phase, defined as where both the acceleration and velocity are zero or below zero.
  2. The concentric portion of the lift, where velocity returns to zero.
  3. The start of the sticking region, where acceleration drops below zero.
  4. The end of the sticking region, where acceleration returns above zero.
  5. The end of the movement, where velocity and acceleration return back to zero.

*Note that with a sampling rate of 100 Hz, some of the events may not be exactly at zero but very close to it.

You can see that the narrow grip resulted in lower acceleration and, consequently, lower velocity throughout the lift. This resulted in a longer time to complete the repetition. There was no attempt to control speed, as the lift was to be performed at the normal pace used in competition.

Remember, the higher and lower acceleration values are a result of higher and lower forces applied to the bar (force = mass x acceleration). Since the weight was the same in the two different techniques, we can see there were substantially higher forces applied around the start of the concentric portion to the beginning of the sticking portion during the wider grip press compared to the narrow grip. The opposite was true for the eccentric portion, as there are lower forces acting on the bar to lower it (lower accelerations) at the beginning of the eccentric portion for the wider grip.

Bench Press Kinematics
Figure 2. Bench Press Kinematics: The blue lines represent the wide grip and the red lines represent the narrow grip. Dashed lines indicate the start of the concentric movement. Vertical solid lines represent the beginning and end of the sticking region, as do the red squares (start of sticking region) and green squares (end of sticking region).

In order to lower the bar, the combined forces of the muscles need to decrease to below the force from gravity. As the bar accelerates downward, the muscles then have to increase the force to decelerate the bar to a stop and then continue to apply force to overcome gravity and lift it back up. The narrow grip required less force to move into the concentric portion of the lift because the deceleration force wasn’t as great to overcome.

Chart EMG BTS
Figure 3. Looking at the values for the different lifts, we can see a higher mean and standard deviation for the wider grip, which indicates a choppier or jerky movement during the sticking region.

Jerk is also known as the rate of change of acceleration (calculated by taking the derivative of acceleration), which in this case would also relate to the rate of force development, since the mass of the bar is the same. Jerk can also indicate smoothness of technique during the lift. In general, a better execution or technique application will be smoother and less choppy on the bar. The best portion to compare our different techniques is the sticking region, since the acceleration and velocity are similar. Looking at the values for the different lifts, we can see a higher mean and standard deviation for the wider grip, which indicates a choppier or jerky movement during the sticking region.

Assessment and Prescription

In examining the path of the bar, the narrow grip resulted in a greater horizontal movement of approximately 40 centimeters away from the shoulder as opposed to the more vertical path of the wider grip. Vertical displacement was similar, with the wider grip being slightly deeper, most likely due to the position it touched on the chest being slightly lower. Overall, vertical displacement was greater in the narrow grip press.

Our graphs on the right give insight into how the bar tilted, rolled, and rotated during the lift. We can see the bar is very stable laterally, with more roll in the narrow grip at the bottom of the movement. Inexperienced lifters often show much less control during a maximum or close to maximum lift, with substantially more tilt and rotation compared to an elite powerlifter. Although not apparent in our case, significant tilt and rotation differences may also indicate a left/right imbalance, which should be investigated further to determine the cause.

Although not apparent in our case, significant tilt and rotation differences may also indicate a left/right imbalance with the lifter, which should be investigated further to determine the cause. Share on X

Now that we have an idea how the bar moved through space, let’s take a closer look at how the muscles contributed to the movement.

EMG Bench Press
Figure 4. EMG data during the full lift. The dashed lines represent the start of the concentric movement, and the solid vertical lines represent the sticking region.

Remember that increased activation does not necessarily mean increased absolute force for the different muscles. For example, we can see that the left pectoralis had lower EMG voltages compared to the right—although that could mean there was less activation, it doesn’t necessarily mean it occurred. Our EMG sensors measure the combined action potentials of the motor units immediately under the skin, and to a certain depth within the muscle. Factors that can affect the EMG reading include:

  • The electrode position in relation to the innervation zone.
  • The thickness between the top of the skin and the muscle.
  • The conductivity of the skin.
  • The alignment of the electrodes with the muscle fibers.

These factors are controlled for by carefully landmarking the position and angle of the electrodes, as well as cleaning and preparing the skin equally at all sites. Generally, a difference within 10% is normal, with anything above 20% indicative of a possible imbalance.

In our case, the pectoralis and triceps are outside of that range. This would warrant a closer look to see if a strength difference exists in order to rule out possible electrode misalignment or differences between muscle structures. This can be done either with unilateral strength testing particular to that muscle or by performing an appropriate isometric maximal voluntary contraction (IMVC) for each of the muscles and normalizing the EMG to the peak value obtained. This would give us a better idea how the muscles work in relation to their maximal capacity while also rechecking our electrode locations and positions.

We are more concerned about how the left & right muscles activate during the two different techniques, and not so much about possible force production differences between the sides at this stage. Share on X

In addition, assessing muscle fatigue through spectral analysis and comparing the change of median frequency during the lift can also provide insight into how the muscles are responding.

Although a strength discrepancy would be relevant to the performance, our objective is to determine if a technique change could result in a better performance. We are more concerned about how the left and right muscles activate during the two different techniques, and not so much about possible force production differences between left and right sides at this stage.

In order to have a fair comparison, the results are normalized to the highest of the peak value obtained from the two attempts. This is referred to as the dynamic peak method and helps us compare the two lifts better.

Normalized EMG
Figure 5. EMG data normalized to the peak value during the two lifts for the mean of the pectorals, anterior deltoid, and triceps brachii, as well as each of the individual muscles. Dashed lines represent the start of the concentric movement, and solid vertical lines represent the sticking region.

These graphs represent the normalized activity of three of the four measured muscles as well as the mean of the three prime movers (pectorals major, anterior deltoid, and triceps brachii). I chose to remove the biceps from the overall mean to remove the possible confounding effects. In the bench press movement, the biceps is generally considered to be a stabilizer as well as an antagonist, and not a major contributor to the lift.

Looking at the normalized EMG values, intuitively we would expect lower activation during the eccentric component because of the reduced force required to lower the bar combined with the mechanical advantage of the muscle fiber’s ability to generate higher tension with less activation during eccentric contractions. This would then be followed by rapidly increasing activation at the beginning of the concentric movement and continued activation in all muscle groups until the end of the sticking region. Once out of the sticking region, better biomechanics should result in less activation overall to continue to lift the bar to the finish.

Normalized Sticking
Figure 6. Normalized EMG data and acceleration cycle for the sticking region. Vertical solid lines represent the lowest value for acceleration for the two lifts. Blue lines represent the wider grip, and red lines represent the narrow grip.

In examining the actual normalized activation patterns, our previously described general trend seems to carry over until the approach of the sticking region in both lifts. The left side appears to have a burst of activity about halfway between the start of the concentric and the start of the sticking region, and then it decreases. Activity appears to recover at about the midpoint of the sticking region and resumes its climb until the end of this region. After the sticking phase, there is a general decrease in activation to complete the movement.

In both lifting techniques, the left side hit a peak of combined muscle activity at the end of the sticking region, whereas the right side hit peak activation at the start of the sticking region. In theory, part of this initial burst of activity could be enhanced by post activation potentiation, although this is thought to dissipate by approximately 0.3 seconds after initiation (especially after factoring in electromechanical delay) and is not believed to have a large contribution in a slower movement like the bench press.

As less activation is described as a decrease in EMG amplitude and is generally associated with less force production, it is plausible that this decrease in activation contributes to the sticking portion of the lift. However, contrary to this specific issue, some studies have suggested that the decrease in acceleration is more likely caused by a poor mechanical position rather than a decrease in muscle activation.1,2 Note that the wide grip had a larger mean negative acceleration (lower force acting on the bar) than the narrow grip. In this lifter, the problem is probably compounded by less muscle activity at a time when more force is required.

The level of muscle fatigue should also be considered when trying to determine which technique may be optimal for our powerlifter, especially considering the time difference between the two lifts. Maximal exertion can rapidly decrease metabolic and neural reserves, and this can obviously affect the amount of force the muscle can generate.

Since the EMG signal is made up of many motor unit action potentials registered in the form of electric waves, it is possible to dissect the final EMG signal mathematically to give us an idea of the mean and median speed of these motor unit waveforms in the form of an overall frequency. Median frequency shifts have been widely researched in both isometric and dynamic contraction, and it is generally accepted that a lower median frequency is a result of fatigue within the muscle. This is as a result of metabolic and neural factors such as a slowing of the conduction velocity, as well as changes in recruitment patterns and motor unit size, to name a few. This can give us more information as to how much fatigue may be a factor in the final lift performance.

Bench Press Fatigue
Figure 7. As frequency values resemble more of a scatter plot, it can be useful to generate a trend line to see how median frequency behaves over time. For comparison purposes, the median frequency was normalized to the peak value much like the EMG levels.

Looking at the sum of the normalized frequencies for the three prime movers in the two lifts for both the concentric and sticking portions, the narrow grip press showed a trend of decreasing values across almost all muscles except the right triceps, whereas the wider grip only suggests fatigue in the pectorals and right deltoid.

Decreasing median frequency is widely believed to be related to fatigue, while increasing median frequency is usually associated with recovery or increasing neural efficiency. These results could also lend support to further investigate the potential for a difference in strength levels between the left and right sides.

We must also consider that the narrow grip press lasted longer (timewise) and may have exhausted the muscles capacity earlier than the shorter wide grip press. Also, the wider grip press was performed after the narrow grip press, and the lifter may have experienced greater fatigue effects, which could show as an increased slope in the trend line.

Should our lifter change to a wider grip from the narrow grip? Here are some deciding factors.

EMG Chart
Figure 8. When deciding whether our lifter should use a wide or narrow grip, here are some advantages and disadvantages we considered.

As you can see, our decision is multifactorial and has advantages and disadvantages. There appear to be more reasons against staying with a narrow grip than with the wider grip. However, retraining neural patterns can take time, which may not fit into every competitor’s schedule. Considering both attempts were perceived to be near maximal, and the narrow grip had been the historical grip used, we may get faster progress by switching to the wider grip, as we have potentially more room to improve.

If we stay with the narrow grip press, we could improve performance by increasing hypertrophy of the prime movers and addressing the apparent deactivation at the start of the sticking period. Share on X

If we stay with the narrow grip press, ways to improve performance would be to increase hypertrophy of the prime movers and address the apparent deactivation at the start of the sticking period. Hypertrophy is typically achieved by using exercises that target the muscle with an increase in volume at moderate intensities. Changing activation throughout the movement can be approached by increasing resistance at the onset of decreasing activation (chains or elastics applied to the bar using straps for the appropriate increase in resistance at the right time, manually applied resistance, machines with appropriate force curves, changes in acceleration, etc.) while minimizing techniques that can aggravate the situation such as forced reps and assisted reps.

If we switch to the wider grip, we would still do all of the above since these are universal issues; however, we might emphasize pec hypertrophy more and focus on incorporating the new grip into training while trying to minimize risk of injury during the transition. Neural adaptations in performance happen faster than hypertrophic adaptations, so we would expect an improvement in approximately six to eight weeks. This would also be a good time to retest to compare again and determine if we achieved the specified goals.

If we switch to the wider grip, we might emphasize pec hypertrophy more and focus on incorporating the new grip into training while trying to minimize risk of injury during the transition. Share on X

Since there is also the possibility of a strength imbalance between the left and the right, it would also be wise to confirm this through unilateral strength testing. We could do this with an EMG assessment, with each muscle normalized to an IMVC to see how the left and right sides perform compared to their max. Although the bench press may be a maximum lift, and you might think we could just use the lift as the maximal contraction, all the muscles may not be performing at maximal activation, so an individual IMVC needs to be performed for each muscle group involved. Higher activation in a muscle group relative to its maximal force production compared between the left and right sides might confirm if the left side is working harder than the right.

Final Takeaways

It’s important to remember that the factors we’ve assessed are only one aspect of evaluating the bench press movement. Future assessments might consider how additional agonist muscles, along with antagonist muscles, activate—doing so to examine how the whole musculature contributes to the final performance. By examining antagonist muscle groups, you may find some are more or less active during the movement, thus affecting the final force production to move the bar. Also, this was just one trial, and it is usually advisable to have at least three trials to confirm the first trial wasn’t unique.

The use of new technology to help decipher complex interactions between factors that can improve performance is a constantly developing process. The fact that you can combine and sync physiological effects such as EMG results along with kinematic and dynamic information from inertial sensors opens up a wide range of possibilities that would not have been likely with observation alone.

Although the amount of data you can receive can sometimes be overwhelming, staying focused on one aspect can help keep you on track as to what information is relevant and what is not. I know for myself it has really opened my eyes to the complex process that goes on behind the scenes of a movement that seems simple, like the bench press.

Since you’re here…
…we have a small favor to ask. More people are reading SimpliFaster than ever, and each week we bring you compelling content from coaches, sport scientists, and physiotherapists who are devoted to building better athletes. Please take a moment to share the articles on social media, engage the authors with questions and comments below, and link to articles when appropriate if you have a blog or participate on forums of related topics. — SF


References

1. Elliott B., Wilson G., and Kerr G. “A biomechanical analysis of the sticking region in the bench press.” Medicine & Science in Sports & Exercise. 1989;21(4):450-462.

2. Stastny P., Gołaś A., Blazek D., et al. “A systematic review of surface electromyography analyses of the bench press movement task.” PLoS ONE. 2017;12(2):1-16.

MMA Training

How to Organize and Develop an Effective Training Plan for an MMA Fighter

Blog| ByJimmy Pritchard

MMA Training

MMA (mixed martial arts) is a sport that has grown exponentially across the globe. Organizations such as the Ultimate Fighting Championship (UFC), Bellator Fighting Championship, and One Fighting Championship (ONE FC) organize events on an almost weekly basis, offering viewers battles between the most highly skilled MMA athletes in the world. The growth of combat sports has made athletes more competitive and skilled than ever—consequently, effective strength and conditioning tactics are an even more important piece of the puzzle for a successful outcome.

Fighters must develop a robust level of metabolic conditioning, strength, power, and speed to complement their skill, so that as time wears on, they can remain sharp and focused. Share on X

The fighter will always have two primary opponents upon entering the cage: the fighter standing across from them and their own preparedness. Fighters must develop a robust level of metabolic conditioning, strength, power, and speed to complement their skill, so that as time wears on, they can remain sharp and focused. Due to the complexity and many physical demands of MMA, as well as the challenges of organizing training, I have had to meticulously structure my programs to meet these various demands when training my combat sport athletes.

Energy Systems

When analyzing the physical demands of MMA, it can be overwhelming to even begin thinking about developing a program. Athletes require high levels of metabolic conditioning, the ability to rapidly generate explosive knockout power, the strength to take down and control an opponent on the ground, and everything in between. Each of these skills relies heavily on different energy system pathways, some of which directly compete with one another in terms of training, which makes matters extremely complex. Figure 1 below demonstrates actions seen in a typical MMA bout, as well as the corresponding energy system they utilize.

Energy System Chart
Figure 1. Actions seen in a typical MMA bout, as well as the corresponding energy system they utilize. Some of them directly compete with one another in terms of training, making matters extremely complex. Adapted from the work of Bounty PL, Campbell BI, Galvan E, Cooke M, and Antonio J. (1).

The style, size, and matchup a fighter has will ultimately determine what blend of these movements takes place in a fight. Some fighters specialize in grappling-based arts (e.g., Brazilian jiu-jitsu, wrestling, Greco-Roman, etc.) or striking (e.g., boxing, Muay-Thai, taekwondo, etc.), while others possess a somewhat even blend of them all. According to the UFC, as of 2018, heavyweights had the highest occurrence of fights finished by knockout (KO/TKO) at 60.1%, whereas women’s strawweight contenders had both the highest percentage of submission finishes at 27.1% and the highest percentage of decision bouts at 65.9%. This only adds to the list of considerations we must contemplate when designing a program.

This is similar to a sport like American football, where coaches cannot simply train skill position athletes (wide receivers, running back, etc.) as they would an offensive or defensive lineman due to the discrepancy in the playing style. Even though it’s the same game—or in terms of fighting, the same sport—there are very different performance strategies.

Metabolic Conditioning

MMA bouts are formatted as either three five-minute rounds for a standard match or five five-minute rounds for championship and main event bouts. Fighters must possess enough stamina to recover quickly between rounds, as well as maintain a high level of intensity throughout each round to ensure the best possible chance of winning. As previously mentioned, some fights end in the very early stages of competition—whether it be by knockout, submission, or injury—but for those who go the entire distance, it is advantageous for a fighter to possess robust levels of metabolic conditioning.

For those who go the entire distance, it is advantageous for a fighter to possess robust levels of metabolic conditioning, says @jimmypritchard_. Share on X

Traditionally, many coaches would prescribe long, slow, steady-state aerobic activity for their fighters to build aerobic endurance. These activities included things such as jogging, biking, and swimming for multiple hours a week at or near ~40%-70% max heart rate. This would build the foundation for the fighter, who would then build further from there and eventually train in a more specific manner as the fight neared.

While this method may still have merit in some instances, coaches have instead begun to introduce their fighters to high-intensity interval training (HIIT) to produce similar, and in some cases superior, results in a shorter period of time. This type of training involves brief bouts of intense exercise (approximately >90% VO2 peak) interspersed with often longer bouts of lower-intensity recovery. The major benefits of HIIT over low-intensity steady-state conditioning (LISS) appear to be that adaptations are achieved in a shorter amount of time, and negative interactions between strength and power development are less likely to happen when training concurrently.1,2

A HIIT session can be formatted in many ways, and it certainly cannot go without being said that fighters get a great deal of this conditioning in their skill sessions. Depending on how specific a coach would like to get, they may format a general HIIT session as something like 30 seconds of running on an incline treadmill followed by two minutes of walking and active recovery.

I may have the fighter do one minute of striking combinations, followed by one minute of takedown defense and sprawling, followed by 1-5 minutes of active or passive recovery.1 Another popular option is to set up a series of resistance exercises (also known as circuit training) and have a fighter execute each one back-to-back with little to no rest for upward of 2-3 minutes.1 The options are seemingly limitless, and it is in this area that art meets science, allowing coaches the artistic freedom to craft a session built uniquely for their fighter. Important considerations the coach can manipulate are:

  • The rest period.
  • Mode of exercise.
  • Volume.
  • Duration.

Strength and Power

Strength and power are critical components that contribute to the success of MMA fighters. Strength underpins power, and power is often associated with explosiveness, which is of utmost importance for throwing punches, kicks, elbows, knees, etc.1 Furthermore, the ability to sustain such power across a fight is critical—thus, training a fighter’s power endurance or ability to resist fatigue and sustain power output is of utmost importance.

The major issue that I run into when structuring a plan for combat sport athletes, particularly when seeking to increase power, is where, when, and how often to train for it, says @jimmypritchard_. Share on X

The major issue that I run into when structuring a plan for combat sport athletes, particularly when seeking to increase power, is where, when, and how often to train for it. It is commonly accepted that power will suffer at the expense of increasing cardiovascular endurance, but gains can still be made. Intelligent programming can help mitigate the negative consequences.

Research suggests that gains in power and maximum strength can be made using a daily undulating model similar to that of a classic strength-power periodization model (where multiple weeks are dedicated to strength endurance, and then power training, sequentially) which could allow for the development of multiple training aspects at once.1,3 It is possible that one day a week of power training could help to sustain or even build power for a fighter, while allowing for the training of many other physiological qualities simultaneously.

When designing a workout intended to increase power, emphasis must be placed on rapidly moving the weight through the concentric portion of the lift and keeping resistance between 40% and 80% of the athlete’s 1RM for each given exercise.1,4 Exercises may vary on their optimal load depending on whether they are upper body or lower body, pushing, pulling, hinging, jumping, or a host of other factors; therefore, coaches must do their own research to discover proper loading schemes for their athletes.

One last important consideration when seeking to improve strength and power in fighters is the specific development of isometric strength. Many of a fighter’s grappling and clinching scenarios involve gripping, squeezing, and holding their opponent in order to maintain or improve position, work through a takedown, or finish a submission. This is where coaches must again get creative in their training techniques by implementing exercises such as weighted carries, holding or squeezing medicine balls and sandbags, or even dead hangs from a bar, to name a few. Bounty et al.1 even suggest using towels for pull-ups, rows, and hangs to further tax the grip strength of fighters and provide a novel stimulus.

Speed

Speed is a critical component in MMA, as fighters must be able to rapidly generate strikes, evade their opponents, and close distances as quickly as possible. Speed is often trained and displayed in sparring and technical skill sessions, but trainers can also help to develop it through several other training methods. Plyometric training—specifically unloaded drop jumps and hurdle jumps—has been shown by Gomez et al.7 to increase kicking power in football players when combined with resistance training. One could extrapolate this information and potentially reproduce similar results with fighters whom they train and perhaps even build from it, using both upper and lower body plyometrics to increase kicking and punching power.

Ballistic methods such as weighted jump squats have also been shown to improve movement speed6 when loads were used at ~30% 1RM. As previously discussed in the power development section, selecting the proper load for executing these movements is of utmost importance to yield optimal results. Speed is a rather delicate physiological quality to train, particularly when looking at the fine motor skill involved in movements such as a punch, kick, knee, or elbow. Attempting to load these movements without a firm understanding of the cause-and-effect relationship should be avoided.

Putting It Together

The most difficult part of training an MMA fighter is not the training itself, but rather the organization of all the training components combined. The best resource I have come across to help do so is the book Science and Application of High Intensity Interval Training, by Martin Buchheit and Paul Laursen,5 specifically the chapter that Dr. Duncan French contributes to discuss exactly how this can be done. Below is an adapted table from the book:

MMA Training Schedule
Figure 2.  In a chapter in  “Science and Application of High-intensity Interval Training,” edited by Paul Laursen and Martin Buchheit, Dr. Duncan French discusses exactly how to organize all of the training components for an MMA fighter. I’ve adapted the chart (5).

To better understand this outline, once must understand what each “type” of HIIT targets. As such, each is described below:

  1. Type 1: Aerobic Oxidative
  2. Type 2: Aerobic Oxidative + Neuromuscular
  3. Type 3: Aerobic Oxidative + Anaerobic Glycolytic
  4. Type 4: Aerobic Oxidative + Anaerobic Glycolytic + Neuromuscular
  5. Type 5: Anaerobic Glycolytic + Neuromuscular

Each of these training types are further detailed in the book, with information about work-to-rest ratios, volume, mode of exercise, and much more. As you can see, the skill sessions (e.g., wrestling, striking, etc.) provide the majority of what one may classically define as conditioning.

The most difficult part of training an MMA fighter is not the training itself, but rather the organization of all the training components combined, says @jimmypritchard_. Share on X

This type of programming requires sound communication between the strength and conditioning coach and specific skill coaches for each discipline, as they can work together to provide the targeted stimulus within each session. It is easy to see where a lack of communication can quickly result in overtraining, as a striking coach and grappling coach may cross over with back-to-back type 5 sessions on the same day (or something similar) and create unwanted, excessive fatigue in the fighter. Most high-level fighters now have a primary coach who helps to organize all of the training and communication between parties; therefore, it is important that a strength and conditioning coach plays a major role in the planning.

In order to successfully develop a plan for an MMA fighter, I always target each of the factors previously mentioned to some degree. Every aspect of the program will then be tailored to the fighter depending on their own individual strengths and weaknesses, as well as who their opponent is and how much time is available before competition. I view every program much like a stone that I must sculpt; who it is I am training will determine how it looks in the end.

Since you’re here…
…we have a small favor to ask. More people are reading SimpliFaster than ever, and each week we bring you compelling content from coaches, sport scientists, and physiotherapists who are devoted to building better athletes. Please take a moment to share the articles on social media, engage the authors with questions and comments below, and link to articles when appropriate if you have a blog or participate on forums of related topics. — SF


References

1. Bounty P.L., Campbell, B.I. Galvan E., Cooke M., and Antonio J. “Strength and Conditioning Considerations for Mixed Martial Arts.” Strength & Conditioning Journal. 2011;33:56-67.

2. Gibala M.J. and McGee S.L. “Metabolic adaptations to short-term high-intensity interval training: a little pain for a lot of gain?” Exercise and Sports Sciences Review. 2008;36:58-63.

3. Hartmann H., Bob A., Wirth K., and Schmidtbleicher D. “Effects of different periodization models on rate of force development and power ability of the upper extremity.” The Journal of Strength & Conditioning Research. 2009;23:1921-1932.

4. Kilduff L.P., Bevan H., Owen N., et al. “Optimal loading for peak power output during the hang power clean in professional rugby players.” International Journal of Sports Physiology and Performance. 2007;2:260-269.

5. Laursen P. and Buchheit M (Eds). Science and Application of High-intensity Interval Training. Human Kinetics: 2019.

6. McBride J.M., Triplett-McBride T., Davie A., and Newton, R.U. “The effect of heavy- vs. light-load jump squats on the development of strength, power, and speed.” The Journal of Strength & Conditioning Research. 2002;16:75-82.

7. Perez-Gomez J., Olmedillas H., Delgado-Guerra S., et al. “Effects of weight lifting training combined with plyometric exercises on physical fitness, body composition, and knee extension velocity during kicking in football.” Applied Physiology, Nutrition, and Metabolism. 2008;33:501-510.

Track Drills Turf

Drills for the Win – An Altered Approach During a Unique Season

Blog| ByRob Assise

Track Drills Turf

The 2021 track and field season was unlike any other, and because of the restrictions and restructuring caused by COVID-19, I felt like a first-year coach. As with any new situation, there were many circumstances to learn from. I tend to be my biggest critic at the end of the season, and it is hard for me to look outside of areas where I failed:

  • I was unable to get our most talented jumper to the starting line.
  • I was unable to get our most versatile jumper to the finish line.
  • While we were able to get our most improved jumper to the finish line, it was with results that were lower than we had hoped for.

Fortunately, I work with a fantastic coaching staff who would remind me of the aspects that were going well. At the end of the season, our head coach told me he thought I did some of my best coaching ever, and he was probably correct. Of course, I will not forget the areas in which I failed (I carry a momento that I see every day as a reminder), but our delayed and shortened season posed new problems that required me to think differently. On the plus side, I was able to create some solutions to those problems, many of which will be part of what we do moving forward.

Technical Difficulties and Drills

While there is obviously a technical component to all track and field events, in my opinion, the hurdles, jumps, and throws involve another layer. With more than half of the 2020 season being cancelled and then the 2021 season being delayed and shortened, that additional layer became even more complicated. In many ways, track coaches around the country were coaching two classes of freshmen. I’m sure all event areas were feeling this too, but from a jumps coach perspective, it made practice difficult to manage. Our juniors and seniors were light years ahead of the freshman and sophomores, so there was often a canyon between their technical competencies.

What would be the best way to maximize practice time to address each athlete’s individual needs? The answer—due to our COVID-altered school schedule—ended up being drill work during ‘pre-practice.’ Share on X

So, what would be the best way to maximize practice time to address each athlete’s individual needs? The answer ended up being drill work during “pre-practice.” Due to our COVID-19-altered school schedule, I was able to offer our jumpers opportunities to come to practice 15-30 minutes early, two to three times per week, in order to complete tasks specific to their needs.

Before I go any further, I think it is important to discuss what constitutes a drill. I do not have a formal definition, but what I will offer in this article are activities which:

  • Train a physical demand of the event.
  • Allow the athlete to feel a movement that is part of the event.

In general, I would say that I am not a “drill guy.” I think the most important technical coaching occurs when the athlete is rehearsing the event. In high jump practice, this would be short or full approach work. In long and triple jump practice, this would be short approach work (4-12 steps; triple may not include all three phases).

If an athlete can make changes in these sessions, I have found the transfer to competition to be more likely. The only drawback in making technical changes within these sessions is that they often take a lot of time, which was something we did not have due to the compressed season length. Complexity was further increased by having a higher percentage of athletes who were competing in the jumps for the first time.

The drills completed during pre-practice were my attempt at accelerating the learning curve of our jumpers. None of the drills used were new. In a normal year, they would have been sprinkled in as needed. With the implementation of pre-practice, the frequency of the drills increased significantly when compared to a normal season.

The drills completed during pre-practice were my attempt at accelerating the learning curve of our jumpers, says @HFJumps. Share on X

Most importantly, the drills utilized were specific to each individual athlete. This was based on observing them sprint and jump multiple times prior to assigning the drills that would be their focus. This is probably the most critical part of drill assignment. For example, if an athlete has technical competency in the long jump landing, performing a drill targeting the long jump landing is nothing more than a waste of time and energy, which are our two most precious resources.

Individualization Chart
Image 1. A major bridge to building athlete buy-in is the feeling you are addressing their individual needs. While 80%-95% of training is the same for each athlete, what you can attain by the 5%-20% that addresses what they need as an individual is worth its weight in gold.

Repetition and Variation

When utilizing drills, I try to balance repetition and variation. There needs to be enough repetition so that transfer is made to the event. John Wooden’s Eight Laws of Learning support this: explanation, demonstration, imitation, repetition, repetition, repetition, repetition, repetition. A simple example is the swing leg extension that happens in galloping and run-run-jumps. This motor pattern should be replicated in all three jumps (long jump style dependent), but that does not happen for all athletes. Repping thousands of these during a season/career assists in the transfer of swing leg extension.

Coupled with repetition is variation. If an athlete goes through the motions, learning does not occur. Therefore, whenever a drill is being performed, it is important for an athlete to have one or more of the following:

  • A specific movement they are trying to achieve.
  • A specific action they are trying to feel.
  • A handicap to elicit the desired objective.
  • A challenge that makes the objective more difficult.

In the aforementioned run-run-jump example, if an athlete is having difficulty with a rolling penultimate foot contact, I may have them do it barefoot to enhance the sensory component of the drill. If that doesn’t work, I may have them place their hands on their hips to allow them to focus their attention on foot contact. If there is still difficulty, we will slow the drill down as much as possible and then build it back up.

Once they have the rolling penultimate down, I will challenge them to toggle a normal and rolling foot contact between reps or within a rep (within a rep is extremely challenging!). Toggling is helpful because it is required if the athlete does both long and triple jump or high and triple jump. Without further ado, let’s get to the drills that formed our 2021 pre-practice!

Infinity Locomotion

I first heard of the Infinity Walk through Coach Dan Fichter at a Track-Football Consortium. I refer to it as “infinity locomotion” because of the various movements I use (walking, skipping, crawling, etc.) It is a method created by Dr. Deborah Sunbeck, and she explains it in her book Infinity Walk, Book 1: The Physical Self. An introductory video for the method can be found here. I strongly advise watching this prior to reading and watching my example video below. Here are some of the reasons for using infinity locomotion:

  • Complete Eye Movement – By completing infinity locomotion in both directions, while keeping focus on a stationary or moving target, the athlete is more likely to go through a full range of eye movement. What makes the figure eight path unique is its combination of movement in the sagittal and frontal planes. There would be less stimulus if only moving forward and backward or left and right because only one plane would be addressed at a time.
  • Neural Priming – The figure eight pattern of infinity walking and the additional challenges that can be implemented provide “multiple sensory and motor sources of neural priming which are needed to learn.”1 In simple terms, the Infinity Walk wakes up the brain and gets it ready to learn. Seems like a no-brainer (pun intended) to use in any academic or athletic setting where skills will be taught!
  • Vestibular Ocular Reflex (VOR) Stimulus – If you were to stare at an object and then move to the left while maintaining your gaze on the object, your eyes would move to the right. This is the VOR in action. The vestibular system is responsible for regulating eye, neck, spinal, and limb movements to maintain gaze.2
    • I have seen Fichter speak many times, and one consistent message he has in his presentations is that the eyes are the most under-trained part of the body.

Steering

    is a topic I often discuss when it comes to the jump approaches, and it is often an issue with novice jumpers (particularly with those who had minimal exposure to ball sports growing up). Infinity locomotion checks a box for vision training.
  • Vestibular Stimulus as a Global Extensor – “The vestibular system is a major source of excitatory influence to extensor or antigravity muscles, particularly in axial or proximal limb muscles, and of reciprocal inhibition to certain flexor muscles.”3 Once again, the figure 8 pattern and visual focus pose a challenge to the vestibular system, which will wake up the extensors, so the participant remains upright. In a normal school year, students sit at a desk for about six hours each day. Sitting has a strong bias for being in a state of flexion, as does “cell phone posture,” so it makes sense to excite those extensors prior to athletic activity!


Video 1. Here, two athletes perform an infinity skip. The water bag, bungee, and arm movements all challenge balance and coordination. The options for variation are only limited by a coach’s creativity. For additional information and examples, see Cal Dietz’s “The Goat Performance Drill” part 1 and part 2 on YouTube.

If you watch Dr. Sunbeck’s video, you will notice the figure 8 oriented more side-to-side versus the examples of Homewood-Flossmoor jumpers, whose figure 8 was biased forward and backward.

Infinity
Image 2. Altering infinity locomotion to fit the demands of the horizontal jumps.

My reasoning behind altering the drill was that I found it to be more specific to the demands of the long jump and triple jump. By rotating the figure 8, the drill involved a higher degree of convergence and divergence for the eyes. Convergence is especially important in the horizontal jump approach because the target (the board) continually gets closer (until the jumper loses sight of it). Most of the time, I placed a small cone on the ground for the jumpers to focus on (this was the case in the video), doing so to be consistent with the jump board being located on the ground.

By rotating the figure 8, the infinity locomotion drill involved a higher degree of convergence and divergence for the eyes, says @HFJumps. Share on X

As athletes moved closer to the visual focal object, I encouraged them to keep their head level (neutral neck) and track their eyes down to the visual target. There were times we altered the visual focus point or even made it mobile. We also did Dr. Sunbeck’s variation periodically. (Upon reflection, high jumpers will probably do a 50/50 split in the future, due to the nature of the approach.)

It is important to note that I have no idea if my variation takes away from any of the aforementioned benefits of the traditional Infinity Walk. I felt my rationale was solid for the change, and athlete feedback was positive, so I went with it. This was the one drill completed by every jumper who was present for pre-practice.

Ball Landing

Sometimes the universe aligns itself and makes it possible for people like me to make some minor discoveries. At the start of our season, we were indoors due to weather conditions and had to find space to practice away from our indoor track. We ended up in what I think is our cheerleading room. In that room, there were at least 25 exercise balls. I just remember thinking “That’s a lot of balls.”

Fast forward two days. We were back outside, and I had athletes completing a variation of a chair landing drill on the high jump mat because our sandpit was water-logged. An athlete made the comment that he was not a fan of the drill on the high jump mat because it was possible for the chair to tip over and hit him in the head. A second athlete immediately commented “There has to be something else we could use.” I agreed and told them I would think about it.

Later that night, I fell asleep, and in my dream, I saw the exercise balls in the cheerleading room. The next morning, I ordered three exercise balls to be used for the drill. I did not notice any major difference in utilizing the ball versus the chair, and a perk of the ball was it “softened” the landing, which allowed us to be able to perform the drill on FieldTurf. This made it easier for me to keep an eye on all athletes during pre-practice because our horizontal jump area is located outside of our track stadium.


Video 2. The progression in the “chair landing drill” link above can be followed for this drill. The timing of flexing the knees when the feet hit the sand and having the butt replace the heels can only be replicated during a jump, but the movement itself can be rehearsed with this drill.

It is important to note that this drill IS NOT a cure-all for landing issues. Many athletes are not in position to execute a quality landing due to what has happened prior to landing time. Common issues are poor flight angle and over-rotation, which are products of poor hip displacement and poor posture at take-off, respectively. Posture and hip displacement are big rock issues, and if they are a limiting factor, coaches should be sure athlete’s training programs prioritize their improvement.

Run-Run-Jumps

I mentioned some of the variations and benefits of run-run-jumps (RRJs) earlier in the article, and if I had to pick a favorite jump drill, I would have to say RRJs take the prize. I love gallops, skips, and bounds, but RRJs are unique with the inclusion of a true penultimate step. The numerous combinations of foot contact and arm action create a substantial amount of variation, which is a fantastic coordination challenge. Normally, we reach a solid degree of competency over the course of the first two weeks of the season and include them in our warm-ups and workouts two to three times a week for the remainder of the year.

If I had to pick a favorite jump drill, run-run-jumps take the prize. I love gallops, skips, and bounds, but RRJs are unique with the inclusion of a true penultimate step, says @HFJumps. Share on X

With a compressed timeline, we had less time to spend on RRJs on the front end, and I had some athletes really struggling with the coordination and rhythm of the drill. Pre-practice reps were extremely helpful in getting them up to speed with the rest of the group, which enhanced their confidence.


Video 3. Here is a variation of run-run-jumps, which would be utilized for the horizontal jumps. Additional variations and explanations of RRJs, galloping, and skipping can be found via this resource.

Serpentine Runs

I have advocated for the use of curvilinear sprinting and running in many pieces (here, here, here, here, and here). Clearly, I think it is kind of a big deal for all—it simply creates athletes who are more robust. While most of the information I have put out has dealt with curvilinear sprinting, there is definitely a place for submaximal curvilinear work.

I do like curve runs (think of running around a soccer circle) because it allows athletes to feel outward foot pressure, a key in the high jump approach; however, I have begun to prefer runs that follow a serpentine path (also called wave runs or slaloms). The reason for this is it provides athletes with the opportunity to continually exit and enter the curve. This is important because it gives athletes the chance to practice getting into a full body lean (straight line from ankle to head). Too often, athletes feel they are leaning properly, but they are actually bent laterally at the waist and/or neck—not an ideal way to transmit force!

I have begun to prefer runs that follow a serpentine path (also called wave runs or slaloms) because they give athletes the opportunity to continually exit and enter the curve, says @HFJumps. Share on X

The amplitude and wavelength for the runs can be altered. Since this is a pre-practice activity, the intensity of the runs was relatively low, which can be controlled by a relatively large amplitude and wavelength. We tended to set the course with cones on our infield, with a “vertical” distance from crest to trough of 5 yards (amplitude 2.5 yards) and a “horizontal” distance of 10 yards (wavelength 20 yards).

Curvilinear
Image 3. Athletes follow a curvilinear path through the orange dots (cones). They complete one rep going to the “right” and one rep going to the “left,” which keeps balance in the number of “turns.”


Video 4. A simple submaximal serpentine run.

Besides looking for a full body lean, another factor I like to see is big ranges of motion with the arms and legs. (Note: This was addressed with the athlete in video 4.) I typically spend most of my time cueing athletes to drive their arms down to get the hands to clear their glutes (the hand movement should end behind the glute, creating a window of daylight between hand and glute).

This motion is admittedly biased toward high jumpers, as it will be present in their approach, but it allows for a more fluid run for all because small ranges of motion tend to create sharp corners instead of a rounded path. Yes, I think it is imperative for all jumpers to complete curvilinear work!

Antepenultimate Box

Over the years, I would say that I have had a higher percentage of jumpers who had too large of a takeoff angle during long jump than too low. It seems to be more common for many athletes to block at the board, achieving minimal hip displacement and leading to too high of an exit from the ground and too steep of an entrance back in during landing.

This may have been unique to the population I coach, but this past year I had the exact opposite: five long jumpers, four of whom were new to the event, were classic line-drive flight cases. Normally, I try to work through this during short approach work and full approach rehearsal, but once again, due to compressed time, I tried to speed up progression through the regular use of a drill. The antepenultimate (third-to-last step) box drill is one I have sprinkled in during past seasons for those with too low of a takeoff angle.

In order for a long jumper to attain proper jump height, they must decrease the height of their center of mass prior to takeoff. Usually, attaining a rolling or heel-toe contact during the penultimate step will lead to the required jump angle. Some jumpers, however, need an additional stimulus to get a feel for the center of mass lowering, and this drill gives that sensation.

Although it’s impossible to say, I feel as if the antepenultimate box drill may have led to the most notable changes in those long jumpers assigned to perform it, says @HFJumps. Share on X

Although it is impossible to say, I feel as if this drill may have led to the most notable changes in those who were assigned to perform it. All five improved one meter or more from the season’s start to its finish, and their changes in flight pattern could have been identified by anyone who was paying minimal attention.


Video 5. While this jumper probably exaggerates the takeoff angle beyond what it needs to be during this drill, I was okay with it because it balanced out when we went to complete jumps on the runway. I suggest a box height between 2 and 4 inches.

Drills Discussed in Previous Pieces

There are additional drills that I have covered in previous pieces, so instead of going into detail on them again, they are linked here for your convenience.

  • Curve Initiation and Curve Drills – All videos in the article except #4. These have a bias toward high jumpers, but there is certainly value in many of them for all.
  • Low Lunge Walks – I love this drill because you can tell so much about an athlete’s gait without having them sprint.
  • Suspended 1-2 – See video #4. This is mainly for triple jumpers, but the hip displacement piece and swing leg extension can be utilized for long jumpers as well.

Moving Forward

Our normal practice start time is 3:30 p.m. One item I am going to propose to our coaching staff is moving the start time back to 3:45, so all athletes (not just jumpers) can partake in their own pre-practice.

I think that our coaches giving our athletes specific items related to their needs (which we already do), with the addition of time to address them, has the potential to reap significant rewards. A second installment of this series will showcase our most improved long jumper and how we devised his specific pre-practice routine.

Since you’re here…
…we have a small favor to ask. More people are reading SimpliFaster than ever, and each week we bring you compelling content from coaches, sport scientists, and physiotherapists who are devoted to building better athletes. Please take a moment to share the articles on social media, engage the authors with questions and comments below, and link to articles when appropriate if you have a blog or participate on forums of related topics. — SF

References

1. Sunbeck, D. Infinity Walk.

2. Keshner, E.A. and Peterson, B.W. “Mechanisms controlling human head stabilization. I. Head-neck dynamics during random rotations in the horizontal plane.” Journal of Neurophysiology. 1995;73:2293-2301.

3. Markham, C.H. “Vestibular control of muscle tone and posture.” Canadian Journal of Neurological Sciences. 1987;14:493-496.

Educated Athletes

Four Reasons to Educate Your Athletes (and How to Provide That Foundation)

Blog| ByAshton King

Educated Athletes

Let me start by saying that it is always the coach’s job to be more educated and prepared to teach on a subject than their athletes. Additionally, “educated” in this sense is not about having a CSCS or a master’s in exercise science—I define educated as having a general understanding of the principles, reasoning, data, and technology in an athlete training program. It is, however, also very necessary to ensure your athletes are educated on the programs they are part of.

This is also something to consider when writing programs for an athlete. I have athletes who have been with me for more than three years now, and they could pretty much run the gym at this point. These athletes will get very detailed notes, loading schemes, etc.; new athletes, meanwhile, will have more general notes and basic lift cards. It is important to understand both the mental and physical capabilities of an athlete when programming for them. Generally speaking, athletes who are less educated in the weight room are also less experienced—therefore, it just makes sense to give them a more basic lift then an athlete who has three-plus years in the same system.

Coaches should always be in a position of authority in a coach and athlete relationship; however, if a coach is concerned about sharing the reasons behind an athlete’s training program with that athlete, this should be a red flag for both athlete and coach. Having educated athletes not only leads to more success, but it also keeps the athlete-coach relationship strong by encouraging each party to stay accountable to the other.

Here are the four important reasons to have educated athletes:

  1. Streamlined communication
  2. Athlete buy-in
  3. Ease of use
  4. Knowledge of results

1. Streamlined Communication

Quality communication in the weight room allows athletes to be time efficient and get the desired results from the program, and most importantly, it keeps them safe. Imagine asking an athlete to go and spot one of their peers when they have no knowledge of how to properly spot a fellow athlete? This is a lack of education that first results in poor communication and then finally results in a safety concern for both athletes involved.

Quality communication in the weight room allows athletes to be time efficient and get the desired results from the program, and most importantly, it keeps them safe, says @kingashton1. Share on X

Additionally, in a session with the music blaring, imagine answering what RPE means 20 times. When aiming to streamline communication, it is not so a coach can say go self-myofascial release your vastus medialis—a coach in that situation should still probably say go foam roll your inner quads.

When streamlining communication, there are a few important things that an athlete should understand.

  • Rep schemes and the rest that goes along with them. Athletes have to understand what they are training for: is it fitness, strength, hypertrophy? Athletes should generally understand that the lower the number of reps, the higher the intensity, and thus the more rest that is generally needed. This helps to combat athletes who don’t listen to the desired rest time that is given for a set, as they now understand the why behind the program.
  • Loading parameters. Athletes should understand any loading parameters that are on their workout card. If it is percentage- or velocity-based, they should understand how to calculate for the correct weight for that given set. In a perfect world, athletes would have resources at every rack for this (for example, a percentage chart or a velocity drop chart on every rack). If athletes are using RIR or RPE, they should have a good understanding of these parameters and how they can be used to adjust intensity.
  • Tempos. If you are writing tempos on a card, and it reads 3100, athletes need to understand what that means. Is it 3 eccentric, 1 isometric, 0 concentric, and 0 rest between reps? What about a pull-up when the concentric is the first action in the movement? Athletes need to have this clearly defined for them, and they also need to have a general understanding of what the eccentric, isometric, and concentric portions of the lift are. Finally, they must know what a five or three count actually is.
  • Any notes on their cards. When putting notes on an athlete’s cards, if they are not actionable for the athlete, it is a waste of time. If you write “retract and depress scaps” and an athlete has no idea what scaps are, that’s entirely a waste of time. When writing notes, think like an athlete and make sure the notes provide the desired feedback.

For example, when intaking athletes at my gym on the final day of their assessment, we sit down with the athlete and their guardians and go through their entire workout. We make sure to highlight the key points outlined above and ensure they have a good understanding of their workout the first day. Not only does this help them in the training process, it also makes the transition to training easier for our floor trainers, as the athletes now have a solid starting foundation.

Coach Ashton King

2. Athlete Buy-In

There is no better way to drive buy-in than having the athletes feel like they are a part of their own development process. This assumes that the program is well thought out, is scientifically sound, and has specific goals for each athlete individually. But, hey, every program in the strength and conditioning world meets that criteria, so what do I have to worry about, right?

Nonetheless, this is also a great way to build culture among athletes, which is what everyone chases in their weight rooms. Ensure you have a few seniors helping freshmen set up a Tendo unit and reminding them of the loading parameters, or athletes pulling together, saying this is going to suck, but there is a reason for it, and we need to get it done. This, as opposed to just lining up on the line and running every time the whistle blows like a bunch of Pavlov’s dogs.

When athletes have an understanding of the why, it is much easier for them to buy in to the day-to-day tasks. I was speaking with a Navy SEAL who is now a BUDs instructor, and he said he has seen numerous people come into BUDs in incredible physical shape, but they don’t make it. He has also seen people who are pretty out of shape make it through the training. He said the single biggest difference in the people that make it versus the ones who don’t is that the ones who do want to be a Navy SEAL more than anything else in the world. These people know exactly why they are at BUDs—they want to be a SEAL. I am the last person to encourage the comparison between the military and training for sport, but this conversation provides a valuable hint at the power of understanding why you are doing something.

I always encourage our athletes to ask why they are doing something. I see this as an opportunity to connect with that athlete and really drive their buy-in to our program, says @kingashton1. Share on X

I always encourage our athletes to ask why they are doing something. I see this as an opportunity to connect with that athlete and really drive their buy-in to our program. I regularly float around between sets and strike up a conversation such as “how does this feel?” or “do you see how this can help your on-field performance?” This is often sufficient to generate enough of a conversation to communicate the why to that athlete and increase their confidence in the program. This has also led to some great follow-up conversations with our athletes who are more interested in the subject, so much so that it has led to them being hired on as interns.

3. Makes Weight Room Setup Easier

At my gym, we have Tendo units, Just Jump pads, InBody devices, laser timers, contact grids—you name it, and we likely have it or are looking to get it. This is a little bit of a humblebrag, but the point is we have a lot of tech, and we have to learn how to implement it with our athletes. There is nothing worse than having to set up a Tendo unit for the same athlete six weeks in a row or having to set up a Just Jump pad to get a few vertical jumps.

It is the strength staff’s job to have these devices set up and ready to roll for the day; however, if you can properly teach an athlete to set it up correctly for their personal use, that is vitally important. Additionally, data is only as good as its validity and reliability. If the Tendo unit is supposed to be set up at a filter of 15 and it is set up at 35, that changes the data—or, if athletes are supposed to start 80 centimeters behind the laser timer but get too close, that changes the data as well.

Furthermore, if athletes do not know what the numbers being spit out to them are, they have no way to track the correct data. If they were to record flight time—rather than vertical jump—that would be an issue. It is also vitally important that they know what they are looking for. For example, when looking at a Tendo unit, if they track average power rather than peak power, their numbers will be way off. Finally, educated athletes are able to do general troubleshooting on their own, which frees up the coach to work with other athletes.

Even if a coach does not have this technology at their disposal, it is still vitally important that athletes track data correctly. If an athlete has a one-plus set, it is important that they record the correct number of reps on the plus set. Additionally, when athletes need to set up their racks for an exercise, they need to know how to do that. If an athlete has to do a banded back squat but has no idea how to properly put bands on, this not only leads to poor training, but also presents a safety concern.

Overall, when athletes know how to set up the technology and exercises they use, it ensures that the data they collect is both reliable and valid, while allowing the coach to not have their head buried in computers the whole training session. It also ensures that the exercises are being performed and set up correctly each and every time an athlete does their workouts.

When athletes know how to set up the technology and exercises they use, it ensures that the data they collect is both reliable and valid, and exercises are being performed and set up correctly. Share on X

In the weight room, if an athlete asks me how to set something up for them, rather than running over and doing it for them, I take the time to walk them through the process for themselves. Often, this is the only time they will ever ask, as they will be able to set it up themselves, or they will be able to work through it with someone in their training group.

4. Validates Results

While the above three reasons are important, I feel that knowledge of results is the most important. When training day-in and day-out, an athlete can’t help but want to see positive results. Athletes who are educated on the training process are able to better understand the results they see.

The education process also keeps athletes more engaged through the various mesocycles during the years. Rather than wanting to see their 40-yard dash time drop during a GPP cycle, an athlete could be presented with their fitness test results instead. Or, if they see all of their results at once, the athlete can better understand why their fitness test got better but their 40-yard dash did not improve.

This sound understanding of their results keeps all parties accountable. When an athlete and a coach both know the results from a given training cycle, they both know whether the program did what it was designed to do. This creates a positive rapport between athletes and coaches by encouraging open communication about their results and whether or not they met the athlete and coach’s expectations. There is nothing more important to fostering a positive athlete-coach relationship than open communication about expectations and results.

There is nothing more important to fostering a positive athlete-coach relationship than open communication about expectations and results, says @kingashton1. Share on X

Every 12 weeks, we reassess our athletes through our assessment process. At the end of the week, we take the time to meet with each athlete individually. We go over their assessment results and explain what went well and what went poorly. We also set the stage for the next cycles of training by explaining what we will be focusing on and why. This way, when they come to their next assessment, they know what numbers they are looking to improve.

Steps You Can Take to Educate Athletes

Here are six actionable steps you can take to educate your athletes:

  1. Take time at the start of the season or when they start in your program to teach athletes the basics. Teaching them things such as loading schemes, daily procedures, notes, and basic movements on the first day goes a long way toward the education of your athletes over time.
  2. During daily training groups, float around and have small side conversations with athletes about the exercises they are performing and why each is important.
  3. Be transparent. During a GPP phase, some workouts may be more difficult and less enjoyable for athletes to perform than workouts during a peaking phase. Tell your athletes this and why; they will appreciate you for it.
  4. Set time aside to meet with your athletes individually or in small groups. In the same way sport coaches meet with their athletes at the end of the preseason or post season, take this time with your athletes as well.
  5. Aim to do something weekly to continue your athlete’s education.
  6. Put together a database for your athletes. Your more engaged athletes will take advantage of this and pass along their knowledge to the others in the group.

There’s a good chance that your educated athletes will also become your more successful athletes.

Since you’re here…
…we have a small favor to ask. More people are reading SimpliFaster than ever, and each week we bring you compelling content from coaches, sport scientists, and physiotherapists who are devoted to building better athletes. Please take a moment to share the articles on social media, engage the authors with questions and comments below, and link to articles when appropriate if you have a blog or participate on forums of related topics. — SF


Female Soccer Player

Youth Strength & Conditioning and Injury Prevention with Erica Suter

Freelap Friday Five| ByErica Suter, ByCody Hughes

Female Soccer Player

Erica Suter is a certified strength and conditioning coach in Tampa, Florida, and online for thousands of youth soccer players. She has worked with kids, starting at the elementary level and going all the way up to the college level, for the past nine years. She believes in long-term athletic development and the gradual progression of physical training for safe and effective results. She helps youth master the basic skills of balance, coordination, and stability and ensures they blossom into powerful, fast, and strong athletes when they’re older. Beyond working with kids, she mentors coaches of youth athletes in her Total Youth Female Athlete Fitness Video Course and Community. Erica is driven and excited to provide youth coaches with simple, actionable drills to build their athletes into strong, fast, and healthy humans.

Follow all content at ericasuter.com.

Freelap USA: Youth athletes are more injured than ever before. What patterns have you picked up on that you personally believe are causing this trend?

Erica Suter: Kids are being overtrained and underprepared. Of course, there are many layers to this discussion, the first one being a lack of long-term athletic development that works on basic motor skills through backyard and neighborhood play and being exposed to a variety of movement patterns.

Many youth athletes are under a year-round organized sports model that pushes them into specialization and too much focus on sport-specific skills. What this does is cause overtraining of a small number of muscle groups, while ignoring others. This leads to compensations and imbalances in their later years, with the majority of young athletes manifesting overuse or non-contact ACL injuries in their high school years. Other layers of the discussion go beyond physical training and permeate into a lack of nourishment and sleep and being sympathetically dominant from tech use.

Freelap USA: Women’s soccer is known as one of the most injury-plagued sports in all of athletics. Why is that? In what ways can we mitigate injury risk in women soccer players?

Erica Suter: Women’s soccer is becoming faster paced and more physical, so players need to continue to build robust bodies to handle the increasing demands. Soccer players lack two main pieces: speed and strength. Too often, women players shy away from the weight room to go on more endurance runs because they need to get “fit.” Lack of fitness is not an issue, as this bucket is already filled in the small-sided and large-sided games they do at practice.

Additionally, the average distance a women’s soccer player covers in a game is around 5-6 miles. Strength is critical for women to be exposed to a higher stimulus than the game, so their muscles can handle the high forces. Most non-contact ACL injuries are caused by a weakness in the muscles and inability to handle force, so it ends up going to the joints.

Eccentric training is also paramount, and I would prefer this to formal “agility” training so players can focus on landing mechanics on one leg and in multiple planes; firing the glutes, quadriceps, and hamstrings; and really feeling what muscles need to be activated.

Looking to hamstring pulls, they do not happen as much in the women’s game, but they still happen due to a lack of strength as well as exposure to maximal velocity runs. This is why players need to speed train year-round in an oscillating manner, working on low-cost movements in the season to dial in coordination, rhythm, and balance. Low-volume sprint work or submax sprint work is excellent.

Freelap USA: The female athlete ACL epidemic is still ongoing. What are some key guidelines that will help coaches mitigate ACL injury risk?

Erica Suter: All coaches need to incorporate a proper warm-up for their girls. The warm-up should focus on the basic motor skills such as coordination, balance, and spatial awareness, as well as be enough to excite, not fatigue, the nervous system with jumping and landing mechanics and a few acceleration runs in various planes to prepare for training or the match.

The standard needs to be set...to strength train year-round so girls build the muscles that protect the knee. At this point, strength training needs to be non-negotiable for young girls. Share on X

I am a big fan of hip bridge variations to fire the glutes and reset the posture before a game, as well as work on breathing through the diaphragm. The majority of soccer girls are slumped over, with shoulders rounded and head forward, which is the cause of a lot of knee pain and lack of control of momentum when cutting and changing direction.

The standard needs to be set within the team culture to strength train year-round so girls build the muscles that protect the knee—from the foot to the calves to the quadriceps to the hamstrings to the gluteals to the anterior or posterior core. At this point, strength training needs to be non-negotiable for young girls. U.S. soccer even states that girls are 4-8 times more likely to tear an ACL, so these numbers should alarm coaches and inspire them to take action.

Freelap USA: Young athletes are on the go and often in some variation of a competition season. What are some suggestions for parents and coaches on how to combat the inevitable grueling club circuit that players participate in to get exposure?

Erica Suter: Parents either leave the system or continue—there are no other choices. The youth sports system is not going to change its year-round model because parents are feeding it money. Why would clubs stop this business model if so many dollars are coming in during the year?

I recommend parents let their child take at least three months off from the grueling model, so they can give their bodies and minds a break. If the coach has a problem with this, then parents can tell the coach that during these three months off from practice, they are going to have their child build their body in the gym, revamp their nutrition plan, and take a vacation to recover, and then they’ll be hungry when they come back for the season. If a coach has a problem with this, the child has the wrong coach.

Freelap USA: With your experience with so many youth athletes, how can practitioners create an environment that encourages youth athletes to train rather than turn them away?

Erica Suter: Trainers can create an environment for youth athletes to train by first making it fun. The more kids can leave a workout with a big smile on their faces, while also feeling like they had a solid workout, the better. Training young ones can be both intense and fun at the same time, with clever games like dodgeball, handball, wall ball, and tag variations. All of these games can achieve the physiological stimulus kids need to improve aerobic and anaerobic performance, while also focusing in on physical qualities like coordination, balance, and spatial awareness. The best part is, kids don’t even realize they’re hustling during these games because they are having so much fun.

Youth coaches should set a fun and competitive culture that inspires kids to love movement and learn good health habits young, says @fitsoccerqueen. Share on X

I also recommend coaches focus on culture first before getting into the nitty gritty of sets, reps, x’s and o’s. Coaches should set a fun and competitive culture that inspires kids to love movement and learn good health habits young. Beyond physical training, kids need to be taught the other components of performance, such as nutrition, sleep, and recovery. I recommend coaches journal with their youth athletes weekly, have consistent discussions on nutrition, and build them into better humans who eventually can be autonomous to take care of themselves later in life.

Since you’re here…
…we have a small favor to ask. More people are reading SimpliFaster than ever, and each week we bring you compelling content from coaches, sport scientists, and physiotherapists who are devoted to building better athletes. Please take a moment to share the articles on social media, engage the authors with questions and comments below, and link to articles when appropriate if you have a blog or participate on forums of related topics. — SF


  • « Go to Previous Page
  • Page 1
  • Interim pages omitted …
  • Page 54
  • Page 55
  • Page 56
  • Page 57
  • Page 58
  • Interim pages omitted …
  • Page 164
  • Go to Next Page »

Primary Sidebar

Latest Posts

  • Building a Better High Jump: A Review of Stride Patterns
  • How We Got Our First Sprint Relays to State in Program History
  • Science, Dogma, and Effective Practice in S&C

Topics

  • Changing with the Game
  • Game On Series
  • Getting Started
  • high jump
  • Misconceptions Series
  • Out of My Lane Series
  • Rapid Fire
  • Summer School with Dan Mullins
  • The Croc Show
  • track and field
  • What I've Added/What I've Dropped Series

Categories

  • Blog
  • Buyer's Guide
  • Freelap Friday Five
  • Podcasts

COMPANY

  • Contact Us
  • Write for SimpliFaster
  • Affiliate Program
  • Terms of Use
  • SimpliFaster Privacy Policy
  • DMCA Policy
  • Return and Refund Policy
  • Disclaimer

Coaches Resources

  • Shop Online
  • SimpliFaster Blog
  • Buyer’s Guide
  • Freelap Friday Five
  • Coaches Job Listing

CONTACT INFORMATION

13100 Tech City Circle Suite 200

Alachua, FL 32615

(925) 461-5990 (office)

(925) 461-5991 (fax)

(800) 634-5990 (toll free in US)

Logo of BuyBoard Purchasing Cooperative. The word Buy is yellow and shaped like a shopping cart, while Board and Purchasing Cooperative are in blue text.
  • Facebook
  • Instagram
  • Twitter
  • YouTube

SIGNUP FOR NEWSLETTER

Loading

Copyright © 2025 SimpliFaster. All Rights Reserved.