• Skip to content
  • Skip to primary sidebar
SimpliFaster

SimpliFaster

cart

Top Header Element

  • Facebook
  • Instagram
  • Twitter
  • YouTube
  • Login
  • cartCart
  • (925) 461-5990
  • Shop
  • Request a Quote
  • Blog
  • Buyer’s Guide
  • Freelap Friday Five
  • Podcast
  • Job Board
    • Candidate
    • Employer
    • Facebook
    • Instagram
    • Twitter
    • YouTube
You are here: Home / Blog

Blog

A group of focused individuals, wearing sports attire, look intently towards their left. A man in a cap is at the forefront, with others slightly blurred in the background, indicating a team game or strategy discussion.

Alphabet Soup—Learning the ABCs of S&C Certification

Blog| ByRaymond Tucker

A group of focused individuals, wearing sports attire, look intently towards their left. A man in a cap is at the forefront, with others slightly blurred in the background, indicating a team game or strategy discussion.

In August of 2015, the NCAA enacted legislation requiring all Division I full-time strength and conditioning coaches to be certified by an accredited certification body. This legislation has since prompted high school athletic directors to require that high school strength and conditioning coaches also obtain certification from an accredited organization.  

This is significant for coaches, because there are numerous certifications out there that are not from an accredited certification body and it is very important for coaches entering the field to have an understanding of what they will need in order to obtain the positions they are applying for as strength and conditioning coaches. This article will give young S&C coaches—and even older coaches—the information they need to make good decisions when it comes to obtaining valuable certifications.  

Because there are numerous certifications out there that are not from an accredited certification body, it is very important for coaches entering the S&C field to have an understanding of what they will need, says @DrRaymondTucker. Share on X

The two most popular accredited certification bodies for strength and conditioning are the National Strength and Conditioning Association (NSCA) and the Collegiate Strength and Conditioning Coaches Association (CSCCa). The NSCA offers the Certified Strength and Conditioning Specialist (CSCS) certification, while the CSCCa provides the Strength and Conditioning Coach Certified (SCCC) certification. The key difference between these two certifications is that obtaining the SCCC requires candidates to complete a 640-hour, hands-on practical internship under the supervision of an SCCC-certified strength and conditioning coach and pass a written exam. In contrast, the CSCS certification can be attained simply by passing the certification exam, without the same requirement for practical experience.  

Certifications & Career Opportunities

Employment opportunities at the high school, collegiate, and professional levels typically require coaches to hold either the Certified Strength and Conditioning Specialist (CSCS) or the Strength and Conditioning Coach Certified (SCCC) certification before applying. Over the years, many coaches who are experts in strength and conditioning have created and developed the curriculum in these certification courses. These courses are based on those expert coaches’ extensive training, education, contributions to training methodologies that improve athletic performance.  

The CSCS and SCCC certification textbooks and resources will educate you, and the exam will test your ability to apply theory and scientific knowledge to reduce the chance of injury and improve athletic performance. One of the drawbacks of the CSCS and SCCC is that they do not really teach you a system of training that you can implement with your athletes or clients.  

Athletic administrators, however, view the CSCS and the SCCC as the gold standards of strength and conditioning. One of the distinguishing factors between the two is that the CSCS is geared toward any coach or personal trainer who wants to get certified as a strength and conditioning coach. The SCCC, meanwhile, is geared specifically to those individuals seeking a career as a collegiate strength and conditioning coach. Also, the CSCCa is a practical program that gives coaches an opportunity to learn by conducting strength assessments in real time and you will be provided instruction by a certified collegiate coach who is experienced in training elite groups of athletes on a daily basis.  

One of the distinguishing factors between the CSCS & SCCC is that the CSCS is geared toward any coach or personal trainer who wants to get certified as a strength and conditioning coach, says @DrRaymondTucker. Share on X

There are many excellent strength and conditioning certification courses available that provide a clear blueprint and a training system you can use with your athletes after completing the course. One certification that has gained popularity worldwide is the Certified Functional Strength Coach (CFSC) Level 1 and 2, offered by Coach Michael Boyle at MBSC. Another quality certification is the EXOS-XPS Performance Specialist Certification. If a coach wanted to learn more about speed and multidirectional training, Coach Lee Taft has several good certification courses and ALTIS education has several courses such as the foundation course and the short sprint courses. Finally, if a coach wanted to learn more about Olympic weightlifting, the USAW L1 and L2 courses are second to none and the majority of the coaches in the field of strength and conditioning have taken one or both of these courses.  

While several certifications teach you how to incorporate various tools and methods into your strength and conditioning program—such as the Vertimax, kettlebells, TRX, and Dynamax—coaches need to understand that these are merely training tools and methods, not an entire training system.  

As a coach or member of a coaching staff, it’s crucial to determine how these training methods fit into your overall training approach. Unfortunately, many coaches in the industry become certified in these specific methods and end up basing their entire training system around them. Coaches need to remember that these companies aim to educate you on a training method, while also promoting their products. The rest of this article will focus on three of the common questions asked by young coaches entering the field, with an answer that will provide some guidance in helping to make the right decision.      

Question A: “Do I need certifications?”

The answer to the question is yes. Administrators at various levels have required coaches to have either the CSCS or SCCC certification to even be considered for an interview. In some cases, they may even ask candidates to submit a video of them coaching various exercises to evaluate their coaching skills.  

Most coaches who are interested in careers in strength and conditioning prefer the SCCC certification due to the internship requirement, which must be completed under a certified strength and conditioning coach. This internship is an excellent opportunity for any coach, as you will be introduced to a training system. The internship would also connect you to other industry coaches and allow you to network with other professionals. 

Question B: “What other certifications do I need to complete to make myself more marketable?”

As young coaches entering the field of strength and conditioning, many of us have mistakenly pursued one certification after another in hopes that these credentials would enhance our marketability and lead to job opportunities. Some experienced strength and conditioning coaches in the profession, who may not hold numerous certifications, often joke about those who list various credentials after their names, referring to it as “chasing alphabets” or “alphabet soup.”  

There are both pros and cons to obtaining multiple certifications.  

On the positive side, if you’re older or have a busy lifestyle, you might find it challenging to quit your job for an internship, or you may lack the time or resources to travel, meet coaches, or attend conferences. In such cases, enrolling in a certification course can be a valuable experience, offering you access to educational material you can review and continue to learn whenever you need it. On the negative side, they can be quite expensive, and some certifications may overlap with others you have already obtained. Some courses may not meet your educational expectations, and some require an annual renewal fee. 

On the negative side, courses can be quite expensive, and some certifications may overlap with others you have already obtained. Some courses may not meet your educational expectations, and some require an annual renewal fee. Share on X 

Left side: People exercising on a gym mat with text CFSC, Schertz, TX, Level 1 Course, November 23rd 2024. Right side: Group of coaches standing with text NSCA Coaches Conference, January 8-10, 2025, New Orleans, LA & Online, 2.0 CEUs Category A.
Image 1. Conference fliers from past events attended.

Several years ago, there was only one certification in the strength and conditioning profession: the CSCS offered by the NSCA. The purpose of obtaining this certification was to demonstrate that individuals had acquired and understood the scientific knowledge necessary to reduce the risk of injury and improve athletic performance. Since this was the first strength and conditioning certification for coaches, it was considered to be the gold standard for hiring strength and conditioning coaches across various levels, from high school to collegiate and professional sports.  

Over the years, several other certifications in strength and conditioning have emerged, allowing coaches to deepen their knowledge in different areas. Some coaches who have completed these various certification courses often add these credentials to the end of their names as a symbol of accomplishment and dedication to their education, enhancing their skills as coaches. However, we have coaches in the field of strength and conditioning who tease other coaches for going through various certification classes and adding the multiple alphabets at the end of their last name.  

Coaches need to understand that adding the various alphabets to the end of your last name after completing a certification course does not make you a better coach. Applying what you have learned from courses such as the Functional Movement Screen, Certified Functional Strength Coach, Performance Specialist, Certified Speed and Agility and the United States Weightlifting is what ultimately makes you a better coach. I have noticed that you find more coaches in the private sector who have attended several certification courses compared to a coach at the high school, collegiate, or professional level, because most coaches working in these various environments do not have the time to attend these clinics or study at home because of their work schedules.  

Coaches need to understand that adding the various alphabets to the end of your last name after completing a certification course does not make you a better coach. Applying what you have learned does, says @DrRaymondTucker. Share on X

Question C: “Should I be prepared to invest in my education as a coach?”

The answer to this question is also yes. As a strength and conditioning coach, you should take the time to educate yourself and improve. If taking a certification course from one of the leading experts in strength and conditioning will enhance your coaching ability, then you should take the course. Some of these certifications are being taught by experts in strength and conditioning who have traveled the world to learn from other strength and conditioning coaches, and they want to share what they have learned. So, why not pay to learn?    

What makes me qualified to write this article is that as a young coach in the field, I tried to take every course I could because I was trying to learn from some of the best in the profession, and I just wanted to get better. Here are some of the courses I took: 

  • Functional Strength Coach Level 1  
  • Speed Specialist United States Track & Field Cross Country Association Certification  
  • Speed and Agility Coach  
  • Performance Specialist XPS 
  • Certified Functional Movement Screen  
  • Level 1 Sport Performance Certification  
  • Certified Strength and Conditioning Specialist (CSCS) 
  • Level 1 Track and Field Coach  

And, yes, I added the various alphabets to the end of my last name, and I was never embarrassed to add them because I invested in my education as a coach. One of the early mistakes I made when taking these certification courses, however, is that I didn’t stop to apply what I learned in my training with my athletes or take the time to practice what I learned.  

One of the early mistakes I made when taking certification courses, however, is that I didn’t stop to apply what I learned in my training with my athletes or take the time to practice what I learned, says @DrRaymondTucker. Share on X

Over the years, I have now found myself going back through these courses and applying what I have learned with the athletes I work with. For example, one of the certification courses that I have gone back through a number of times is Michael Boyle’s Functional Strength, rereading the books and watching the videos over again. The certification is very practical and provides a simple process of getting good at the basics. I have used this training system with middle school, high school, and collegiate athletes as well as general population clients, and I have seen the improved results in movement, strength, power, and speed. Not only do the athletes enjoy the training, I also use this system in my own training and I have enjoyed the benefits of what I learned in this course.  

My recommendation to any coach is to invest in your education by reading books, attending conferences, and taking certification courses. However, it’s essential to take the time to practice and apply what you have learned. If you complete and pass a certification course, be proud of your accomplishment and consider adding the letters indicating your certification to your last name: you’ve worked hard and invested your time in these courses, so celebrate your achievements. Don’t worry about other coaches who make dismissive comments about you for having several letters after your name. Throughout my coaching career, I’ve attended many conferences, and you would be surprised at the number of coaches who have multiple certifications and proudly display their “alphabet soup” after their names. You are responsible for your own learning as a coach, and do not let another coach discourage you from being your best—because, your athletes deserve your best.  

A woman in athletic wear crouches in a sprinters starting position, poised and ready to move forward. The black and white image highlights her focused expression and muscular definition, a reminder of the injury risks athletes face while pushing their limits.

Bridging the Gap Between Awareness and Action in Youth Injury Prevention with Demotu 3D Analysis

Blog| ByCasey Baker

A woman in athletic wear crouches in a sprinters starting position, poised and ready to move forward. The black and white image highlights her focused expression and muscular definition, a reminder of the injury risks athletes face while pushing their limits.

Change your perspective, and you will change your perception. 

Whoever coined that phrase truly grasped the transformative power of a mindset shift. My own journey of transformation unfolded when I recognized a pervasive issue in my coaching approach. As a traditional coach focusing on skills, fundamentals, and personal baseball lessons for youth and little league players, I observed that many athletes aspired to reach elite levels but lacked the foundational attributes essential for high performance. Critical components like strength, movement skills, posture, mobility, body control, timing, sequencing, and rhythm were missing elements that should have been cultivated from a much earlier age. 

I realized that by continuing to offer lessons that provided momentary success, I was inadvertently contributing to a false sense of accomplishment. It became clear that fundamental change was needed, not just in terms of coaching methods, but in my entire approach to athlete development. Driven by this insight, I shifted my perspective and transitioned from being a traditional coach to embracing a more holistic role. 

As the Director of Sports Programming at Redline Siouxland, I now lead with innovation and an unwavering commitment to continuous improvement. My focus is on creating comprehensive programs that develop better athletes from the ground up. By integrating advanced training methodologies and emphasizing early development of essential physical attributes, I aim to bridge the gap between aspiration and ability. 

This shift in perspective has reshaped my understanding of effective coaching. It has ignited my passion to inspire athletes to see their worth beyond just success, and to strive for the best version of themselves.  

At Redline Siouxland, most of our athletes are everyday middle school students participating in school and local travel programs. These young athletes work to improve their skills, but are not yet setting goals beyond high school. Typically, they are coached by volunteer or appointed parents who—despite their best efforts and commitment—often have limited time, resources, and formal education in sports training. Consequently, their 90-minute practices frequently lack structured strength and conditioning programs, proper warm-up routines, and injury prevention exercises crucial for promoting overall athlete well-being and performance. 

Research shows that consistent participation & health are more critical than having a highly skilled athlete who is frequently absent due to injuries. Without the ability to consistently participate, all other skills become… Share on X 

My mission is to develop an environment where athletes embrace who they are while rising to the challenge of realizing their goals and pursuing their best selves, both personally and athletically. Over the years, my approach has evolved significantly. I’ve come to believe that the most vital attribute for an athlete is not physical ability, but avail-ability. Research shows that consistent participation and health are more critical than having a highly skilled athlete who is frequently absent due to injuries.1 Without the ability to consistently participate and perform, all other skills become secondary. Embracing this mindset has created a perpetual cycle of growth, constantly challenging and redefining my approach to coaching.

Identifying the Problem: The Impact of Optimism Bias 

By centering my efforts on enhancing athlete availability, I began to identify the key factors contributing to athletes’ lack of participation. No surprise—injuries were the primary cause of athlete unavailability. However, what truly astonished me was the apparent indifference exhibited by parents and coaches when confronted with this critical issue. 

This realization led me to explore the concept of optimism bias, which I discovered was contributing to an increase in athletic injuries—even amid heightened awareness.2 Optimism bias is the tendency to believe that we are less likely to experience negative events compared to others. In the context of sports, this bias is particularly vexing because team sports often involve an element of bravery and invincibility. Athletes and parents are lulled into a false sense of security when reckless play at an early age does not result in serious injury. 

In the context of sports, optimism bias is particularly vexing because team sports often involve an element of bravery and invincibility. Share on X 

Furthermore, the practice of prioritizing intensity over fundamentals becomes increasingly risky during adolescence, as that stage of development brings about drastic variances in size and strength among athletes. This mismatch can lead to heightened injury risks that are often underestimated due to optimism bias. 

Conversely, many coaches encounter athletes who fall behind physically during maturation. These athletes tend to shift into a “protect” mode, becoming more aware of risks and consciously avoiding situations that could cause harm. While this cautious approach reduces their likelihood of injury, it also limits their effectiveness and confidence in performance. 

Understanding these dynamics, I recognized a need to address the impact of optimism bias on athletic injuries. To better support all athletes, I had to adapt my coaching methods—both for those who are overly optimistic about their invulnerability and those who are exceedingly cautious. 

Locating the Awareness-Action Gap: A Missed Opportunity

Optimism bias wasn’t just a distant theory, it stared me in the face when I witnessed the effects firsthand with one of my athletes. 

During a routine warm-up at Redline Siouxland, I observed a significant difference in the ability of a 15-year-old girl (who we’ll call Snips) to execute single-leg, lateral bounds. A dedicated and ambitious sprinter, she’d set a goal of winning the 100 meters at the state track meet this spring and was also an extremely talented hockey player. In Redline classes, Snips executed drills exceptionally well on a day-to-day basis, showing little to no consequences of any physical imbalances. Intrigued by the vast difference in her performance between double-leg activities and single-leg exercises, I approached her. 

“Have you ever noticed a difference between your left and right side?” I asked. 

“It’s always been that way,” she replied. 

“Are you experiencing any soreness, or does anything feel a little off today?” 

“Nope, I feel good,” she said. 

Her responses were casual, but the disparities I observed were anything but. Concerned, I decided to explore further. I had Snips perform single-leg bench squats on a slightly unstable surface. She completed an easy set of 10 reps on her left leg, but struggled to complete even one balanced rep on her right leg. The severe knee valgus and ankle supination on her right side were alarming, signaling a high risk for injuries like ACL tears. 

We tried one more exercise: single-leg Romanian deadlifts with no weight. Again, Snips easily performed 10 reps with her left leg, but produced zero quality reps with her right. 

The fact that Snips excelled in track and hockey without apparent issues perhaps contributed to an underlying optimism bias. Her elite athleticism masked the imbalances that posed significant injury risks in other activities. Here was my opportunity to address the injury risk caused by the clear imbalance in mobility and strength between her hips and legs. I seized the moment to inform her about her risks, bolstering my points with statistics and emphasizing the critical importance of muscle balance. I passionately explained how addressing this imbalance could not only prevent injuries but also enhance her overall performance across all sports. 

“Okay, thanks coach,” she said. And then she left. 

The indifference of her response and the subsequent silence from her parents left me both puzzled and frustrated. Determined to take further action, I emailed her parents with detailed explanations, research, and statistics on the injuries their daughter was at risk for, yet received no response. Figuring my email may not have been received, I then called and left a voice message, encouraging them to reach out with any questions after reading my email. Despite my best efforts to raise awareness, I was unable to generate any meaningful action. 

This experience unveiled the stark reality of the awareness-action gap caused by optimism bias. Despite increased awareness of injury prevention, the disconnect between understanding the risks and taking concrete action remained evident. 

This wasn’t just a professional insight; it was a personal awakening that made me feel naïve and lacking. I had to improve. 

Understanding the Awareness-Action Gap

Reflecting on my experience with Snips, I realized her situation wasn’t unique. To fully grasp why my efforts weren’t yielding the desired results, I needed to understand the underlying factors contributing to this disconnect. 

The Growing Awareness of Injury Prevention

In recent years, there has been a significant increase in injury prevention programs and initiatives, such as the Healthy People 2030 initiative, which aims to prevent both intentional and unintentional injuries, including those in youth sports. Despite these efforts, the number of youth athletes being injured is at an all-time high.  

According to the National Safety Council, sports and recreational injuries increased by 2% in 2023, following a 20% increase in 2021 and a 12% increase in 2022. In 2023, 3.7 million people were treated in emergency departments for injuries involving sports and recreational equipment, an alarming figure that highlights the extent of the issue. 

Why Does the Awareness-Action Gap Exist?

Despite the growing awareness and extensive research, science is unlikely to uncover a 100% foolproof way of preventing injuries. The sheer volume of information on injury prevention available online can be overwhelming, leading to decision paralysis, where athletes and parents are unsure where to start or which direction to take.  

The sheer volume of information on injury prevention available online can be overwhelming, leading to decision paralysis, where athletes and parents are unsure where to start or which direction to take. Share on X 

Coaches and athletes often fall prey to a lack of personalization and cognitive biases, such as optimism bias, which leads them to underestimate the likelihood of injuries. Additionally, generic information and one-size-fits-all approaches can fail to address the specific needs and circumstances of individual athletes, resulting in inaction. 

Ways Coaches Contribute to the Awareness-Action Gap

Reflecting on my own practices, I recognized that coaches—myself included—might inadvertently contribute to this gap by: 

  • Overwhelming with Information—Providing too much information at once can lead to decision paralysis. I realized that by inundating athletes and parents with an overload of details, I might have been adding to their confusion rather than alleviating it. 
  • Lack of Credibility—If coaches do not establish credibility or fail to provide evidence-based recommendations, athletes and parents may not trust the information and thus may not take action. I questioned whether I was effectively communicating my expertise and the validity of my advice. 
  • Generalized Advice—Offering generalized advice that does not consider the unique needs and circumstances of individual athletes can result in inaction. I acknowledged the need to tailor my approach to each athlete’s specific situation. 

Continuing Challenges

Despite my newfound understanding of the awareness-action gap and the factors contributing to it, I found myself without a clear path forward. Even with a deep comprehension of the problem, I lacked direction on how to effectively bridge this gap and implement strategies that would lead to tangible action and improved outcomes for my athletes.  

A Timely Partnership

During Redline Athletics’ next bi-weekly education call, our leaders announced a new partnership with Demotu’s 3D performance app.  We had 90 days to “give it a try” and assess its value. The timing could not have been more perfect given my current challenges with injury prevention. Within minutes of learning about Demotu, I knew I had discovered the very tool that could illuminate my path forward and transform my approach to coaching. 

Eager to put Demotu to the test, I checked my Redline class schedule to see if Snips signed up for any of the week’s remaining classes. She was scheduled for the very next day, and within 15 minutes of her class starting, I had completed all six functional assessments with her using the Demotu app.   

Within minutes of learning about Demotu, I knew I had discovered the very tool that could illuminate my path forward and transform my approach to coaching. Share on X 

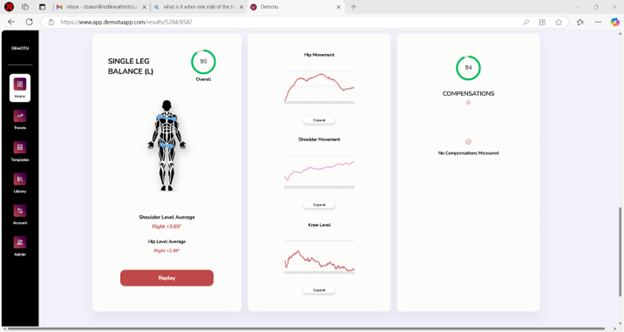
Instant results brought a tangible realism to what I had previously discussed, immediately capturing Snips’ interest. The 0 to 100 scoring system and the diagrams illustrating hip and shoulder alignment provided her with a clear understanding of her imbalances. As she scanned the results (Figure 1), her eyes widened.  
“Wow, I didn’t realize it was that off,” she murmured. Her body language changed as her feeling of invincibility dissipated. 

Screenshot of a health app showing exercise balance results. Left panel displays a digital human silhouette and rating score of 56. Middle shows graphs for hip, shoulder, and knee movement. Right panel shows compensations score of 73 with indicators.

Digital interface showing a single leg balance analysis with scores and graphs. A diagram of a human skeleton is on the left. Graphs indicate hip, shoulder, and knee movement. A compensation score is displayed on the right. Browser tabs are visible above.
Figure 1. The left leg has a score of 90 and shows no compensation measured, while the right leg has a score of 73, indicating excessive hip imbalance.

Demotu accomplished in minutes what I’d been striving to convey for weeks. The app translated complex data into intuitive visuals that sparked immediate understanding. Seeing Snips’ transformation, I realized this tool could revolutionize not just individual assessments but the way we approach athlete development as a whole. 

Immediate Action for My Athlete

Building on the initial assessments with Demotu, we effectively utilized the app to showcase and pinpoint Snips’ injury risks. Demotu’s PDF summary option provided a straightforward, point-and-click way for me to send her assessment summary to her parents.  

To my delight, this feature sparked their interest and initiated meaningful conversations about her well-being. I showed them the app and after a quick tour of its features, they both felt confident in their ability to put it to use. The app graphs previous data alongside new assessments, allowing them to visualize changes over time in both movement scores and mechanical metrics, turning risk from hypothetical to quantifiable.   

With her parents’ involvement, I created and assigned a tailored workout plan for Snips. This included the Hip Flexor Stretch, Single-Leg Romanian Deadlifts, Side-Lying Reverse Clamshells (targeting glute stability), and Copenhagen Planks with knee bent, specifically addressing her hip imbalance and compensations. Demotu’s versatility and portability allow Snips to supplement her exercises alongside her in-season hockey program. Demotu’s transparency allows all her coaches to view her plan and track her progress, fostering a cohesive approach to her training. 

Snips was particularly impressed by how the app increased her awareness of her body and mechanics. She mentioned feeling more conscious of her form and found herself implementing new habits and checking her posture throughout the day. Her parents have also started recognizing her day-to-day actions that contribute to her imbalances—like sitting with one leg tucked for long car rides, for example—and they can prompt her to make adjustments based on Demotu’s alerts. Who would have thought that a single app could foster such a cohesive support system for an athlete? 

Snips’ Progress

Nearly 60 days have passed, and I must say, the most significant improvement I’ve observed in Snips is the near complete elimination of her kinesthetic dysmetria. While she has always been able to follow coaching cues, her self-correction is now evident, accurate, and deliberate. We plan to reassess her functional movements after the hockey season and adjust for pre-season track. I’m eager to see the results. 

Demotu’s Continuing Impact on Redline Siouxland

Introducing Demotu 3D Analysis into our training at Redline Siouxland has been nothing short of transformative. What began as a solution for a single athlete has evolved into a cornerstone of our coaching methodology, reshaping how we approach injury prevention and athlete development. 

Effortless Adoption and Time-Saving Assessments

Implementing Demotu has been remarkably smooth. With no setup required, a single assessment can be completed in as little as two minutes. Coaches can opt to perform all six movement evaluations and fifteen joint comparison tests, completing them in about twenty minutes. This rapid process allows us to provide comprehensive evaluations without sacrificing valuable training time. 

With Demotu, coaches can opt to perform all six movement evaluations and fifteen joint comparison tests, completing them in about twenty minutes. Share on X 

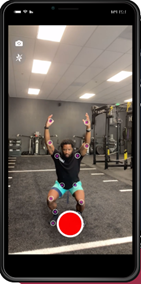
Using your device’s camera, position the athlete about ten feet away and the Demotu app will accurately locate key joints and limbs. Simply hit the record button, which initiates the assessment, and the video stops automatically when the required movement is completed.  

A person in a gym kneeling on a mat with arms raised overhead, positioned in front of a smartphone displaying fitness tracking markers on their joints. The gym has equipment like weights and exercise machines in the background.
Figure 2.  The streamlined process for using Demotu with your device makes assessments both accurate and precise.

The ease of Demotu’s operation allows our coaches to decide how and when to use the program. Assessments can be conducted spontaneously during sessions without disrupting class flow or needing to schedule separate appointments. This capability ensures we can fully assess every member, embedding injury prevention into the very fabric of our programs. 

Cultivating a Culture of Awareness

The impact of Demotu extends beyond individual assessments—it has cultivated a culture of awareness and attentiveness throughout Redline Siouxland. Athletes are becoming more conscious of their movements and form, while coaches are continuously engaged in monitoring and supporting their progress. Parents appreciate the transparency and involvement, strengthening trust in our programs. 

All coaches at Redline Siouxland have access to the Demotu platform, facilitating teamwork and coordination. Sharing data and insights has never been easier, allowing coaches to adjust training plans in real time and ensure consistency in our methods. This unified approach not only enhances the quality of coaching, but also contributes to our collective commitment to continuous improvement. 

A Personalized Approach & Vision for Widespread Impact

At Redline Siouxland, we pride ourselves on avoiding a cookie-cutter mentality. With Demotu, we can now tailor every aspect of our training. The app offers individualized recommendations based on each athlete’s unique movement profile, guiding targeted interventions to correct issues before they lead to injury. This individualized attention ensures that each athlete receives the specific support they need to excel. 

The Demotu app offers individualized recommendations based on each athlete’s unique movement profile, guiding targeted interventions to correct issues before they lead to injury. Share on X 

At its highest potential, Demotu could exist in every school or doctor’s office, providing teachers, healthcare providers, and educators with the information and direction needed to help not only athletes but all children address potential injury risks head-on. By making such advanced tools accessible, we can foster a generation that values health, well-being, and proactive prevention. 

Overcoming Uncertainty and Embracing Progress

At a time when I felt surrounded by youth athletic injuries and powerless to make a difference, my heart urged me to do more, but my head was overwhelmed with information. This left me stuck paralyzed by uncertainty and doubt. Then, the Demotu 3D app became available, providing me with the guidance and inspiration I needed to confidently act.  

As the saying goes, “A journey of a thousand miles begins with a single step.” Demotu helped me—and by extension, my athletes—take that crucial first step. 

References

  1. Healthy People 2030. “Building a Healthier Future for All.”
  2. Weinstein. “Unrealistic optimism about susceptibility to health problems.”
Person doing a squat with a barbell in front of a mirror at a gym. They are wearing a gray shirt and black shorts. The focus is on their form as they look determinedly into the mirror.

Strength & Conditioning for Non-Strength Coaches

Blog| ByDavid Neill

Person doing a squat with a barbell in front of a mirror at a gym. They are wearing a gray shirt and black shorts. The focus is on their form as they look determinedly into the mirror.

Have you been scrolling social media and trying to learn the basics of running a training program? Social media is full of strength and conditioning coaches trying to show off new and complicated training methods, arguing over the nuances of Nordic hamstring curls, or bashing non-strength coaches for flaws in their programming.  

If you’re a sport coach trying to run a weight room or a young S&C coach just getting into the field, none of this is helpful. You need the basic principles of S&C laid out so you can run your training program safely and effectively. In this series of articles, my goal is to do just that: communicate the basics clearly and concisely.  

  • Showing how to run an effective training program that can be tailored to your situation.  
  • Laying out critical mistakes to avoid so your athletes don’t get injured.  
  • Painting a clear picture of how to approach strength & conditioning if you’re not an expert. 

I am closing in on my 15th year as a strength coach. In that time, I have worked with athletes of all levels: Olympians, NFL players, 5-star collegiate athletes, middle school, high school, and elementary school. I’ve coached with all the resources that the University of Texas had to offer and I’ve had to fundraise to pay for enough barbells and plates to make a high school weight room functional. That experience has given me a full picture of the field of S&C and helped shape some foundational principles that will safely build athleticism at any level.  

In the first article in this series on the foundations of S&C, we will be taking the view from 10,000 feet. In the next three articles, we will dig more into the specific details on programming, exercises, and conditioning—however, I believe it’s best to understand the whole picture before diving into the deep end. 

Adaptations Are the Goal

When broken down to its most basic function, strength & conditioning is the art of creating adaptations within the human body. We apply a stimulus (lifting, running, jumping, etc.) and that stimulus applies stress. When the body encounters enough stress and is given adequate time to recover, it adapts to that stress and changes. 

Apply heavy loads in the weight room and the body will build bigger, stronger muscles. Apply cardiovascular stress through conditioning and the lungs, heart, and tissues will adapt to allow better endurance. Apply neural stress through challenging movement drills and the brain will adapt new movement patterns.  

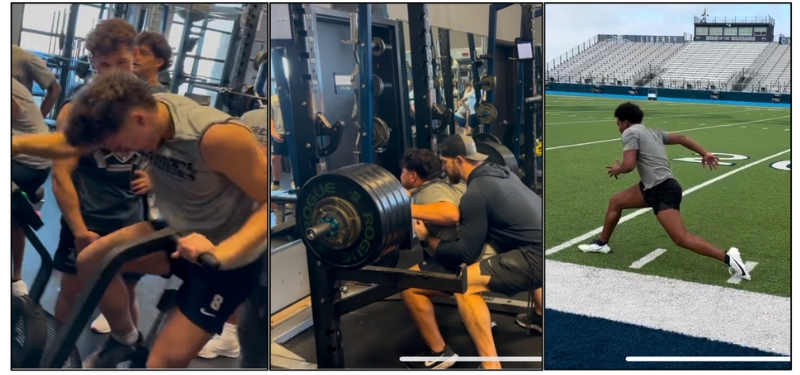
Three images: 1) Group of young men in a gym preparing for weightlifting. 2) A person lifting weights with a coachs assistance. 3) An athlete performing a sprint start on a football field.
Image 1. Providing a purposeful stress to create a desired adaptation.

Coaches need to understand this fundamental framework when designing a training program. Everything we do is designed to cause adaptations within the athlete—we are stress appliers. Apply too little and athletes don’t see change. Apply too much and athletes get injured. Apply the right amount and they are transformed.  

Everything we do is designed to cause adaptations within the athlete—we are stress appliers. Apply too little and athletes don’t see change. Apply too much and athletes get injured. Apply the right amount and they are transformed. Share on X 

This is where it’s important for me to mention the SAID principle (Specific Adaptations to Imposed Demands). This law states that the human body will adapt very specifically to whatever stress you put on it. Athletes who only perform long, slow conditioning runs will get really good at running slow for a long time. But they won’t get fast. Athletes who only ever lift 10-15 reps will get really good at muscular endurance. But they won’t get very strong.  
Movement Patterns vs. Muscles

The first major pitfall non-strength coaches make is taking a bodybuilder’s mindset into an athlete’s weight room. Bodybuilding is highly effective at one thing: building muscle. When working with athletes, however, our goals are much broader. Sure, we want to build muscle. But we also want to build strength and power. And prevent injury. And build endurance. And train speed. Bodybuilding isn’t designed to touch any of those other qualities.  

So, when choosing exercises for your program, you can’t use a bodybuilding lens. To be clear: this means you can’t design your program based on having chest day, leg day, back day, and arm day.  

Instead, your lens should be one that focuses on movement patterns. Sprinting, cutting, jumping, and contact can all be broken down into common human movement patterns. If we strengthen these patterns in the weight room, the results will be positive on the field of play. There are 4 major pattern categories we start with when programing: 

  1. Lower Body Push (Squat/Lunge) 
  2. Lower Body Pull (Deadlift/RDL/Cleans) 
  3. Upper Body Push (Bench/Incline/Overhead press) 
  4. Upper Body Pull (Rows/Pull-up) 

Your lens should be one that focuses on movement patterns. Sprinting, cutting, jumping, and contact can all be broken down into common human movement patterns, says @DNeill62. Share on X 

In addition, some coaches will add Rotation as a pattern and give Olympic variations their own category. But, for simplicity, you should choose 3-4 compound exercises* in each pattern. Make these exercises the meat and potatoes of your program. The goal is to progressively overload each exercise to build strength and power over the course of a training cycle.  

Planning a fairly-even balance between categories is also important. Too much pushing and not enough pulling can create imbalances in the shoulder that put athletes at risk for injury. Too much squatting and not enough posterior chain work limits overall lower body strength gains. You get the idea. 
*Compound exercises are multi joint movements that use multiple muscle groups to accomplish general strength tasks. Think squat, bench, lunge, cleans vs biceps curls or leg extensions. 

Lower Body Push Exercises Lower Body Pull Exercises
  • Back Squat
  • Front Squat
  • Bulgarian Split Squat
  • Step Up
  • Lunges
  • Leg Press
  • Deadlift
  • Hex Deadlift
  • RDL
  • Power Clean/Hang Clean
  • Single Leg RDL
  • GHR Back Extensions
Upper Body Push Exercises Upper Body Pull Exercises
  • Bench Press
  • Incline
  • Overhead Press/Z Press
  • DB Bench/Incline/Overhead
  • Weighted Pushups
  • Machine Presses
  • Bent Over Row
  • Pull Ups
  • Chest Supported Row
  • DB Row
  • Inverted Row
  • Pulldowns/Machines

Table 1. Common, staple exercises coaches use for each category. 

Don’t Make These Mistakes

We will dig into the details of programming in later articles, giving you tools to make competent decisions as you design your training plan. From the start, however, I want to identify the most common mistakes I see uninformed coaches make in their programs, as the following half-dozen mistakes will hurt your athletes. 

1. Too Much, Too Fast

Want to get fired…and face multiple lawsuits on top of that? Give a bunch of kids Rhabdomyolysis. Rhabdo occurs when an athlete trains too intensely, too soon after a significant break. The muscles of the body accumulate more damage than the body can repair, flooding the blood stream with proteins and overwhelming the kidneys.  

The muscle tissue swells up, CK* counts shoot through the roof, and the athlete will be hospitalized. In extreme cases, the athlete can die. Two weeks of acclimation training can prevent this. Spend the first two weeks of training with lowered volume and less running so that athletes’ bodies can adapt. No bootcamps, no hell weeks, no “setting the tone” workouts during this period. This also saves the more intense training stimulus for later in the program when it is needed for progression.  

Spend the first two weeks of training with lowered volume and less running so that athletes’ bodies can adapt. No bootcamps, no hell weeks, no ‘setting the tone’ workouts during this period, says @DNeill62. Share on X  

A couple of things to remember: the smaller muscles of the upper body—especially forearms and biceps—are the most susceptible to the damage that can lead to rhabdo. Keep the curl competitions out of the program in the first two weeks. Athletes who are previously well trained are also more susceptible. They have the mental and physical capability of training extremely hard, but their bodies can’t keep up until they acclimate.   

After extended breaks, I like to implement a two-week block focused on rebuilding movement patterns with lighter loads. We will use tempo goblet squat, pushups, assisted rows, and RDLs. This prepares our patterns for the heavier lifting to come and prevents detrained athletes from overdoing it during this precarious period. 

*Note: CK is short for Creatine Kinase, an enzyme found in skeletal & heart muscle. When levels are dangerously elevated from excessive muscle damage, kidney damage/failure can occur and even death in extreme cases. 

2. All Conditioning, Zero Speed 

The Old School approach is “we will get our guys in better shape than anyone else, at any cost.” As mentioned earlier, the problem is that when all you do is run long and slow…you get really good at running slow. There are, no doubt, benefits to building aerobic capacity and developing the energy systems athletes will use in sport. But to play fast, you have to train fast. A significant portion of your field training should be focused on acceleration, max velocity, sport specific agility, and timed sprint testing. If all of your outside work is 100s and gassers, you’re going to have a slow team.  

To play fast, you have to train fast. A significant portion of your field training should be focused on acceleration, max velocity, sport specific agility, and timed sprint testing, says @DNeill62. Share on X 

3. Impossible Percentages

Occasionally you will see a Twitter post with a whiteboard workout that goes something like this:   

5×10 Back Squat @90% 

5×10 Bench Press @90% 

5×10 Deadlift @90% 

Etc… 

Not only is this a great way to get kids hurt, it’s also physically impossible. Years of research has shown that there are upper limits to what percentages an athlete can perform at given rep ranges. According to the NSCA,1 the absolute limits are: 

1 Rep 100% 

2 Reps 95% 

3 Reps 93% 

4 Reps 90% 

5 Reps 87% 

6 Reps 85% 

7 Reps 83% 

8 Reps 80% 

9 Reps 77% 

10 Reps 75% 

Understand—these are the MAX repetitions at given percentages. This is all-out, empty-the-tank effort. This is the ceiling. Very rarely should you program these percentages at these rep ranges. Never program over these ranges, because it’s physically impossible. In general, you should be programming significantly lower than these for general working sets (in a later article, I will go into detail about how to program percentages).   

4. Heavy Weight, Poor Technique

The goal of the weight room is to get stronger. But focus too much on weight at the expense of technique and you actually limit progress long term. And, get kids hurt. The only reps that should count are reps that are done with excellent technique. Develop technical standards that all of your coaches and athletes understand, then strictly adhere to them.  


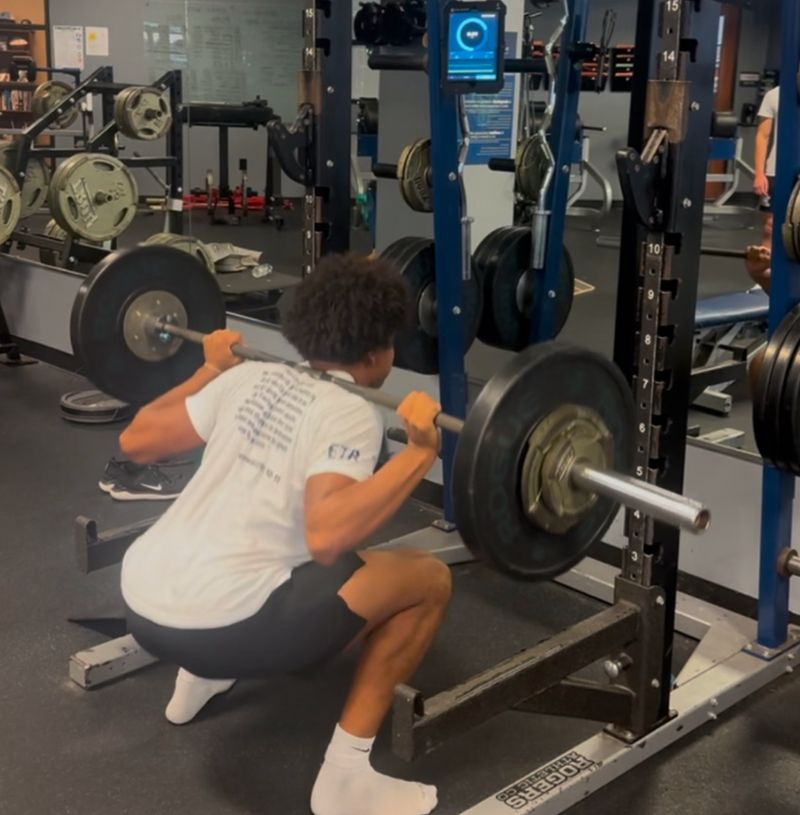
A person is performing a barbell squat in a gym, facing a squat rack. They are wearing a white T-shirt, black shorts, and white socks. Various gym equipment and weight plates are visible in the background.
Image 2. D1 commit demonstrates our squat expectations: neutral spine/head, hips below parallel, and knees tracking over toes.

If you sacrifice technique on a lift in order to load more weight, the athlete is strengthening a poor movement pattern. Poor movement patterns are inferior to good movement patterns at building strength because they move the stress away from the target muscle groups. In the end, your athletes will hit walls that they can’t overcome without a significant regression to fix their technique. 

Poor movement patterns are inferior to good movement patterns at building strength because they move the stress away from the target muscle groups, says @DNeill62. Share on X 

5. Teaching Olympic Lifts with No Olympic Lifting Background

To Olympic lift, or not to Olympic lift? This seems to be a never-ending controversy in strength & conditioning. While I won’t comment on the benefits and drawbacks of the Olympics lifts, I will say that only coaches who know how to properly teach and perform them need to include them in their program.  

Olympic lifts are among the most technically difficult movements you can perform in the weight room and require a trained eye to coach. Including them when you aren’t familiar is a recipe for disaster. 

6. Exercise Order

A poor understanding of exercise order can ruin training effects. In general, you should start your training with the most technical lifts (like cleans) and finish with the most physically exhausting lifts. This is because fatigue from one exercise can decrease performance in another. So, if you have a heavy squat session before bench press, bench performance will suffer. However, since bench press isn’t as taxing on the whole body as the squat, heavy bench before squatting is unlikely to affect performance. Technical ability and focus both decrease through fatigue, so you shouldn’t program Olympics and other technical exercises late in a session.   

Keep in mind how much soreness and CNS fatigue a session will create when planning your splits. If you lift heavy legs and do conditioning on Monday, you will risk poor output and injury with sprints on Tuesday, says @DNeill62. Share on X 

Conditioning before lifting will also decrease your output, so save it until last when possible. If you run gassers before sprint work, then you won’t truly get high-output sprints. Also, keep in mind how much soreness and CNS fatigue a session will create when planning your splits. If you lift heavy legs and do conditioning on Monday, you will risk poor output and injury with sprints on Tuesday.  

Fail to Plan, Plan to Fail 

Having solid plan for your training cycle is of the utmost important if you are going to see the results you’re looking for with your athletes. We will do a much deeper dive into these areas in later articles, but here is a quick overview of a few key decisions a coach needs to make before a training cycle begins. 

Training Splits

How many days are you going to train? What adaptations are you trying to achieve on each day? How can we avoid one day of training interfering with the next?  

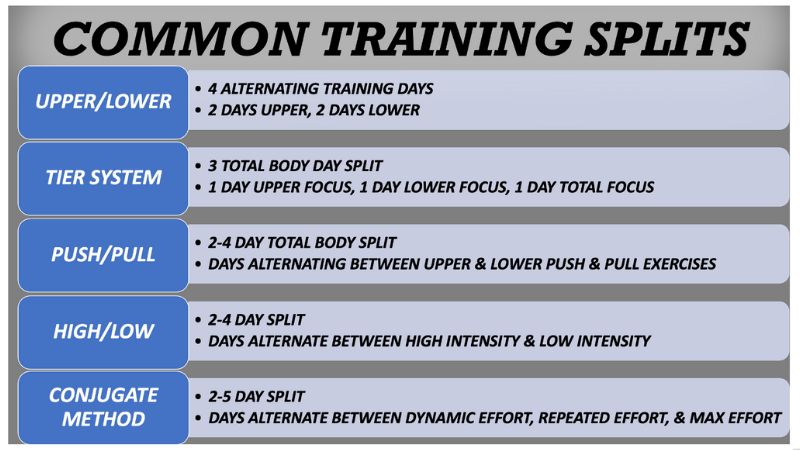
These are important questions when deciding on splits. Training splits answer these questions and determine how the weekly training plan looks. Common training splits are:  

  • Upper/Lower 
  • Tier System 
  • Conjugate Method 
  • Push/Pull 
  • High/Low training 

I would avoid trying to program bodybuilding-style, body-part splits with athletes.  

Image showing a table titled Common Training Splits with five workout plans: Upper/Lower, Tier System, Push/Pull, High/Low, and Conjugate Method, each with a brief description of their routine and alternating days focus.
Figure 1. Common training splits.

Periodization

In S&C, we operate in small 2-4 week blocks, or microcycles. These cycles allow us to focus on a specific quality as a priority for a period of time before changing up sets, reps, and volume with a new cycle and then chasing a different adaptation.  

Often, these are blocked together in an order where one cycle supports the next. For instance, traditional periodization started with a hypertrophy phase to build muscle, then followed with a strength phase to make the new muscle stronger, then finished with a power phase to take that strength and make it explosive. Common periodization models are traditional linear, block periodization, and wave periodization. 

Annual football training plan for 2019-20, featuring weeks with varying emphasis on speed, strength, and conditioning. It includes color-coded sections for winter, spring, summer, and in-season training, with details on practices, rest, and intensity levels.

Speed, Agility & Conditioning

You want to plan your speed, agility, and conditioning work to progress over time to promote continued adaptation. This might mean increasing conditioning volume, agility complexity, or sprint intensity as a cycle progresses. Always remember to have a goal you are trying to build to at the end of a cycle that supports what you are doing on the field. If you work with baseball players, it doesn’t make sense to build them up to 2–3 mile runs when those efforts look nothing like the energy system demands of the sport.  

Preparing to Zoom in

Strength & conditioning is an amazing field; it can, however, have an overwhelming amount of information available on how to develop better athletes. But it doesn’t have to be complicated. A simple, well-designed program that is coached at a high level will transform your athletes.  

You don’t need to be an expert to understand the foundational principles of this field, and following best practices will improve your teams while keeping them healthy. As we go through this series, my aim is to provide you with easy-to-understand, foundational concepts so that you can be your best and avoid the pitfalls that so many coaches fall into.  

References

  1. NSCA Training Load Chart.
A shirtless man runs on an empty road at sunset. The sunlight creates a warm glow, highlighting his silhouette. He wears shorts and running shoes, with his back to the camera and arms slightly bent. The scene conveys movement and determination.

Rediscover Wave Loading: Program Design for Speed and Power

Blog| ByKim Goss

A shirtless man runs on an empty road at sunset. The sunlight creates a warm glow, highlighting his silhouette. He wears shorts and running shoes, with his back to the camera and arms slightly bent. The scene conveys movement and determination.

Although strength coaches rarely use wave loading, the method has a proven track record for developing the fastest, most powerful muscle fibers. I was first introduced to wave loading 50 years ago through an article about Bulgarian weightlifter Andon Nikolov in Muscle Builder/Power magazine—Nikolov won gold at the 1972 Olympics and later broke four world records. More about Nikolov later, but let’s start my sales pitch by reviewing how muscles function.  

Motor units tell muscles to contract. There are low-threshold and high-threshold motor units, with the high-threshold motor units controlling the fastest, most powerful muscle fibers. The catch is that higher threshold motor units are recruited only when the central nervous system determines that greater muscle force is necessary.  

Citing neurological development, Russian sprint coach Ben Tabachnik (PhD) says the best ages for increasing stride frequency are generally between 8 and 13. This restriction suggests that more mature sprinters typically experience greater performance improvements due to variables such as improved stride length. This idea is evident when comparing the difference in stride length between Usain Bolt’s 100m world records in 2008 and 2009. 

In 2008, Bolt ran 9.69 to shatter the world record, and the following year he improved to 9.58. One difference was that Bolt covered the distance in 41.4 steps in 2008, compared to 40.92 steps in 2009. (For reference, in 1991, Carl Lewis set a world record of 9.86, finishing the race in 43 steps.) OK, so what does this have to do with pumping iron?  

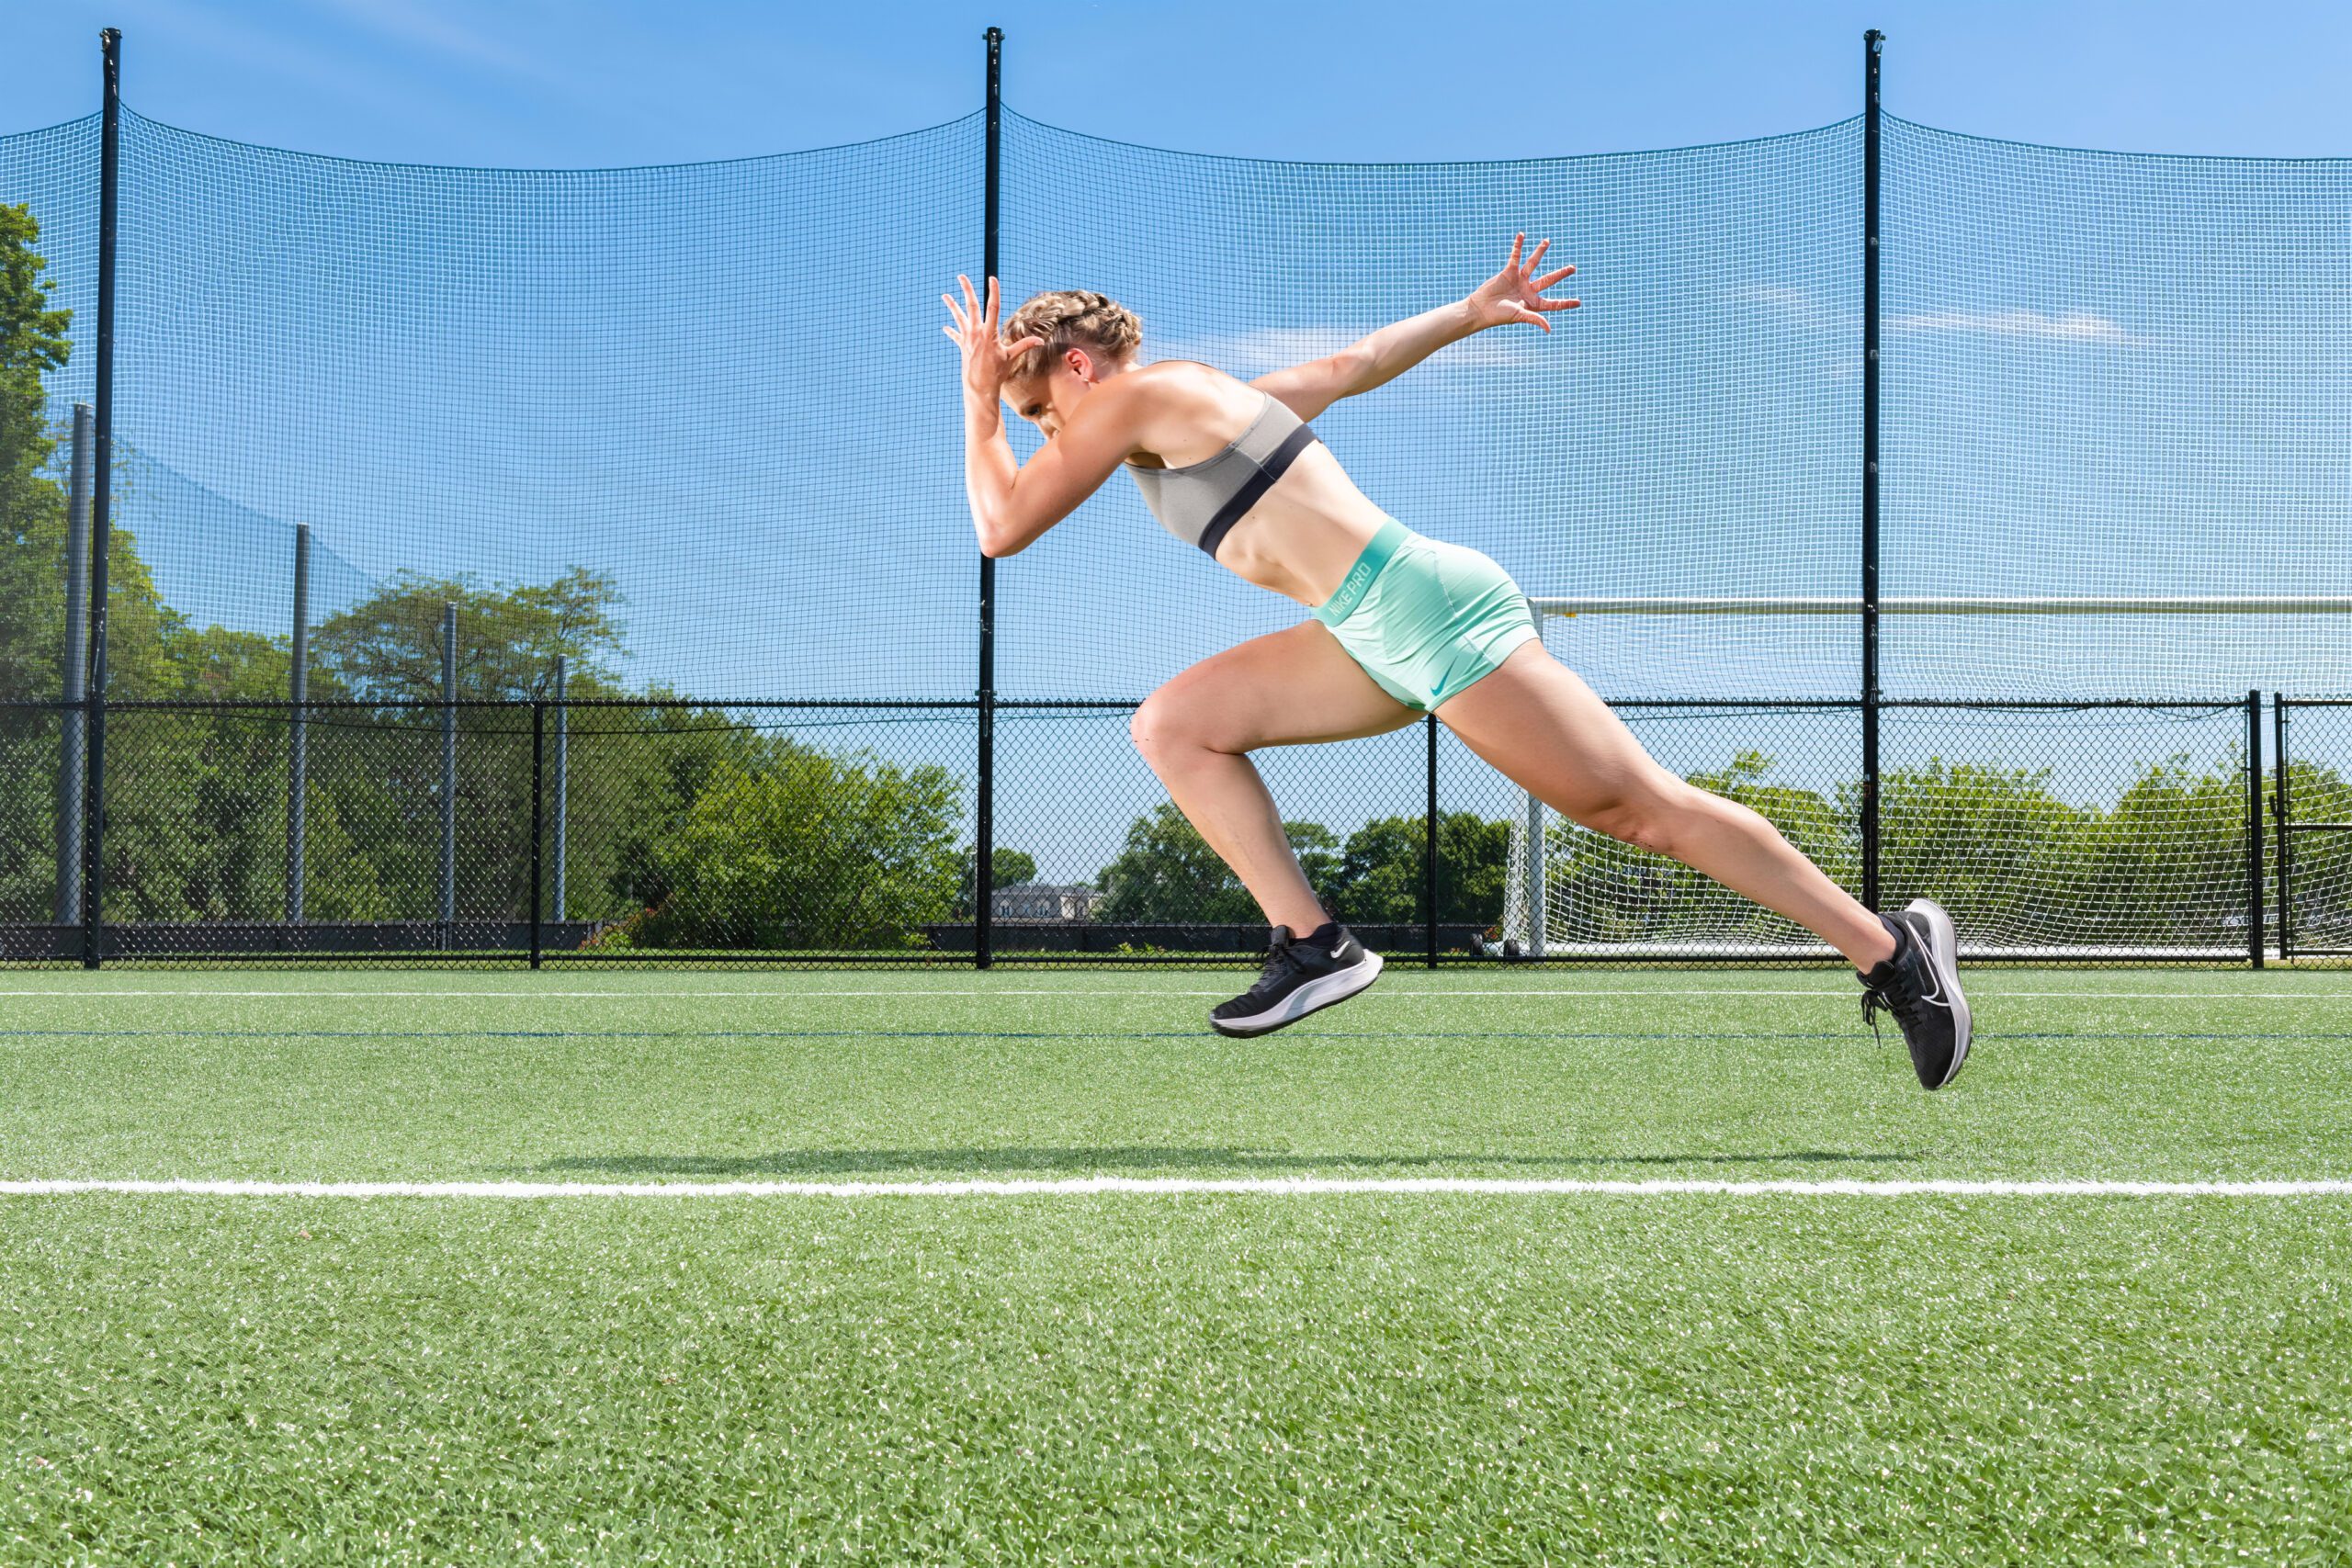
Stride length is strongly influenced by how much force the athlete applies to the ground (as I assume Bolt’s leg bones didn’t get longer between 2008 and 2009). In a study involving 33 sprinters published in the Journal of Applied Physiology, researchers concluded that “…runners reach faster top speeds not by repositioning their limbs more rapidly in the air, but by applying greater support forces to the ground.” This effect is illustrated in Image 1 below, where the power this athlete generated by hip, knee, and ankle extension elevated her above the ground, increasing the distance she covered with each step. This brings us to the concept of “mass-specific force.” 

Barry Ross is the author of the track and field classic Underground Secrets to Faster Running and worked with Allyson Felix. Ross discussed the importance of mass-specific force in sprinting. “It isn’t merely the amount of force applied to the ground that increases stride length; it’s the amount of force in relation to bodyweight.” For this reason, Ross believed that increased strength developed by lifting weights could translate into faster sprinting times if those gains are not associated with a significant increase in bodyweight. Let me expand on this point. 

Many sprint coaches don’t see the strength developed in the weightroom transfer to the track because they use (often unintentionally) bodybuilding protocols. Bodybuilding protocols encourage the development of substances that increase size and weight but do not (for lack of a better word) amplify muscle power. This “sarcoplasmic hypertrophy” is one reason bodybuilders, although strong, are often not as strong as they appear.  

Many sprint coaches don’t see the strength developed in the weightroom transfer to the track because they use (often unintentionally) bodybuilding protocols that increase size and weight but do not ‘amplify’ muscle power. Share on X

To improve mass-specific force, sprinters must focus on developing just the muscle fibers, a process known as “myofibrillar hypertrophy.” Ross noted that when Felix improved her deadlift from 125 to 300 pounds, she only increased her bodyweight by two pounds. Ross believes this led to her improving her 200m sprint time from 22.83 to 22.11 (22.30 adjusted for altitude). 

The takeaway is that if running faster or jumping higher is a priority, you must find ways to get stronger without getting bigger. Wave loading is a way to do just that. 

A person in athletic wear sprints across a grassy sports field on a sunny day. The runner is in a high-motion pose, with one arm forward and the other back. A black fence and trees are in the background under a clear blue sky.
Image 1. Stride length is influenced by how much force can be applied into the ground quickly, which involves the activation of high-threshold motor units. Shown is Maddie Frey, a sprinter from Brown University who broke the 32-year-old school record in the 200m. (Karim Ghonem photo)

The Switch to Fast Twitch

Wave loading is a variation of contrast training, scientifically referred to as “Post-Tetanic Potentiation” (PTP). PTP suggests that prior muscular contractions affect a muscle’s ability to generate subsequent force.  

In the early 1980s, Bigger Faster Stronger (BFS) began showcasing a striking demonstration of contrast training during their athletic fitness clinics. BFS clinicians would have an athlete perform a vertical jump, which they would measure. The athlete would then work up to a heavy set of box squats and retest their vertical. Because the box squat recruits the fast-twitch muscles without excessively fatiguing the legs, those fibers remain activated and powerful during the retest, enabling them to jump higher.  

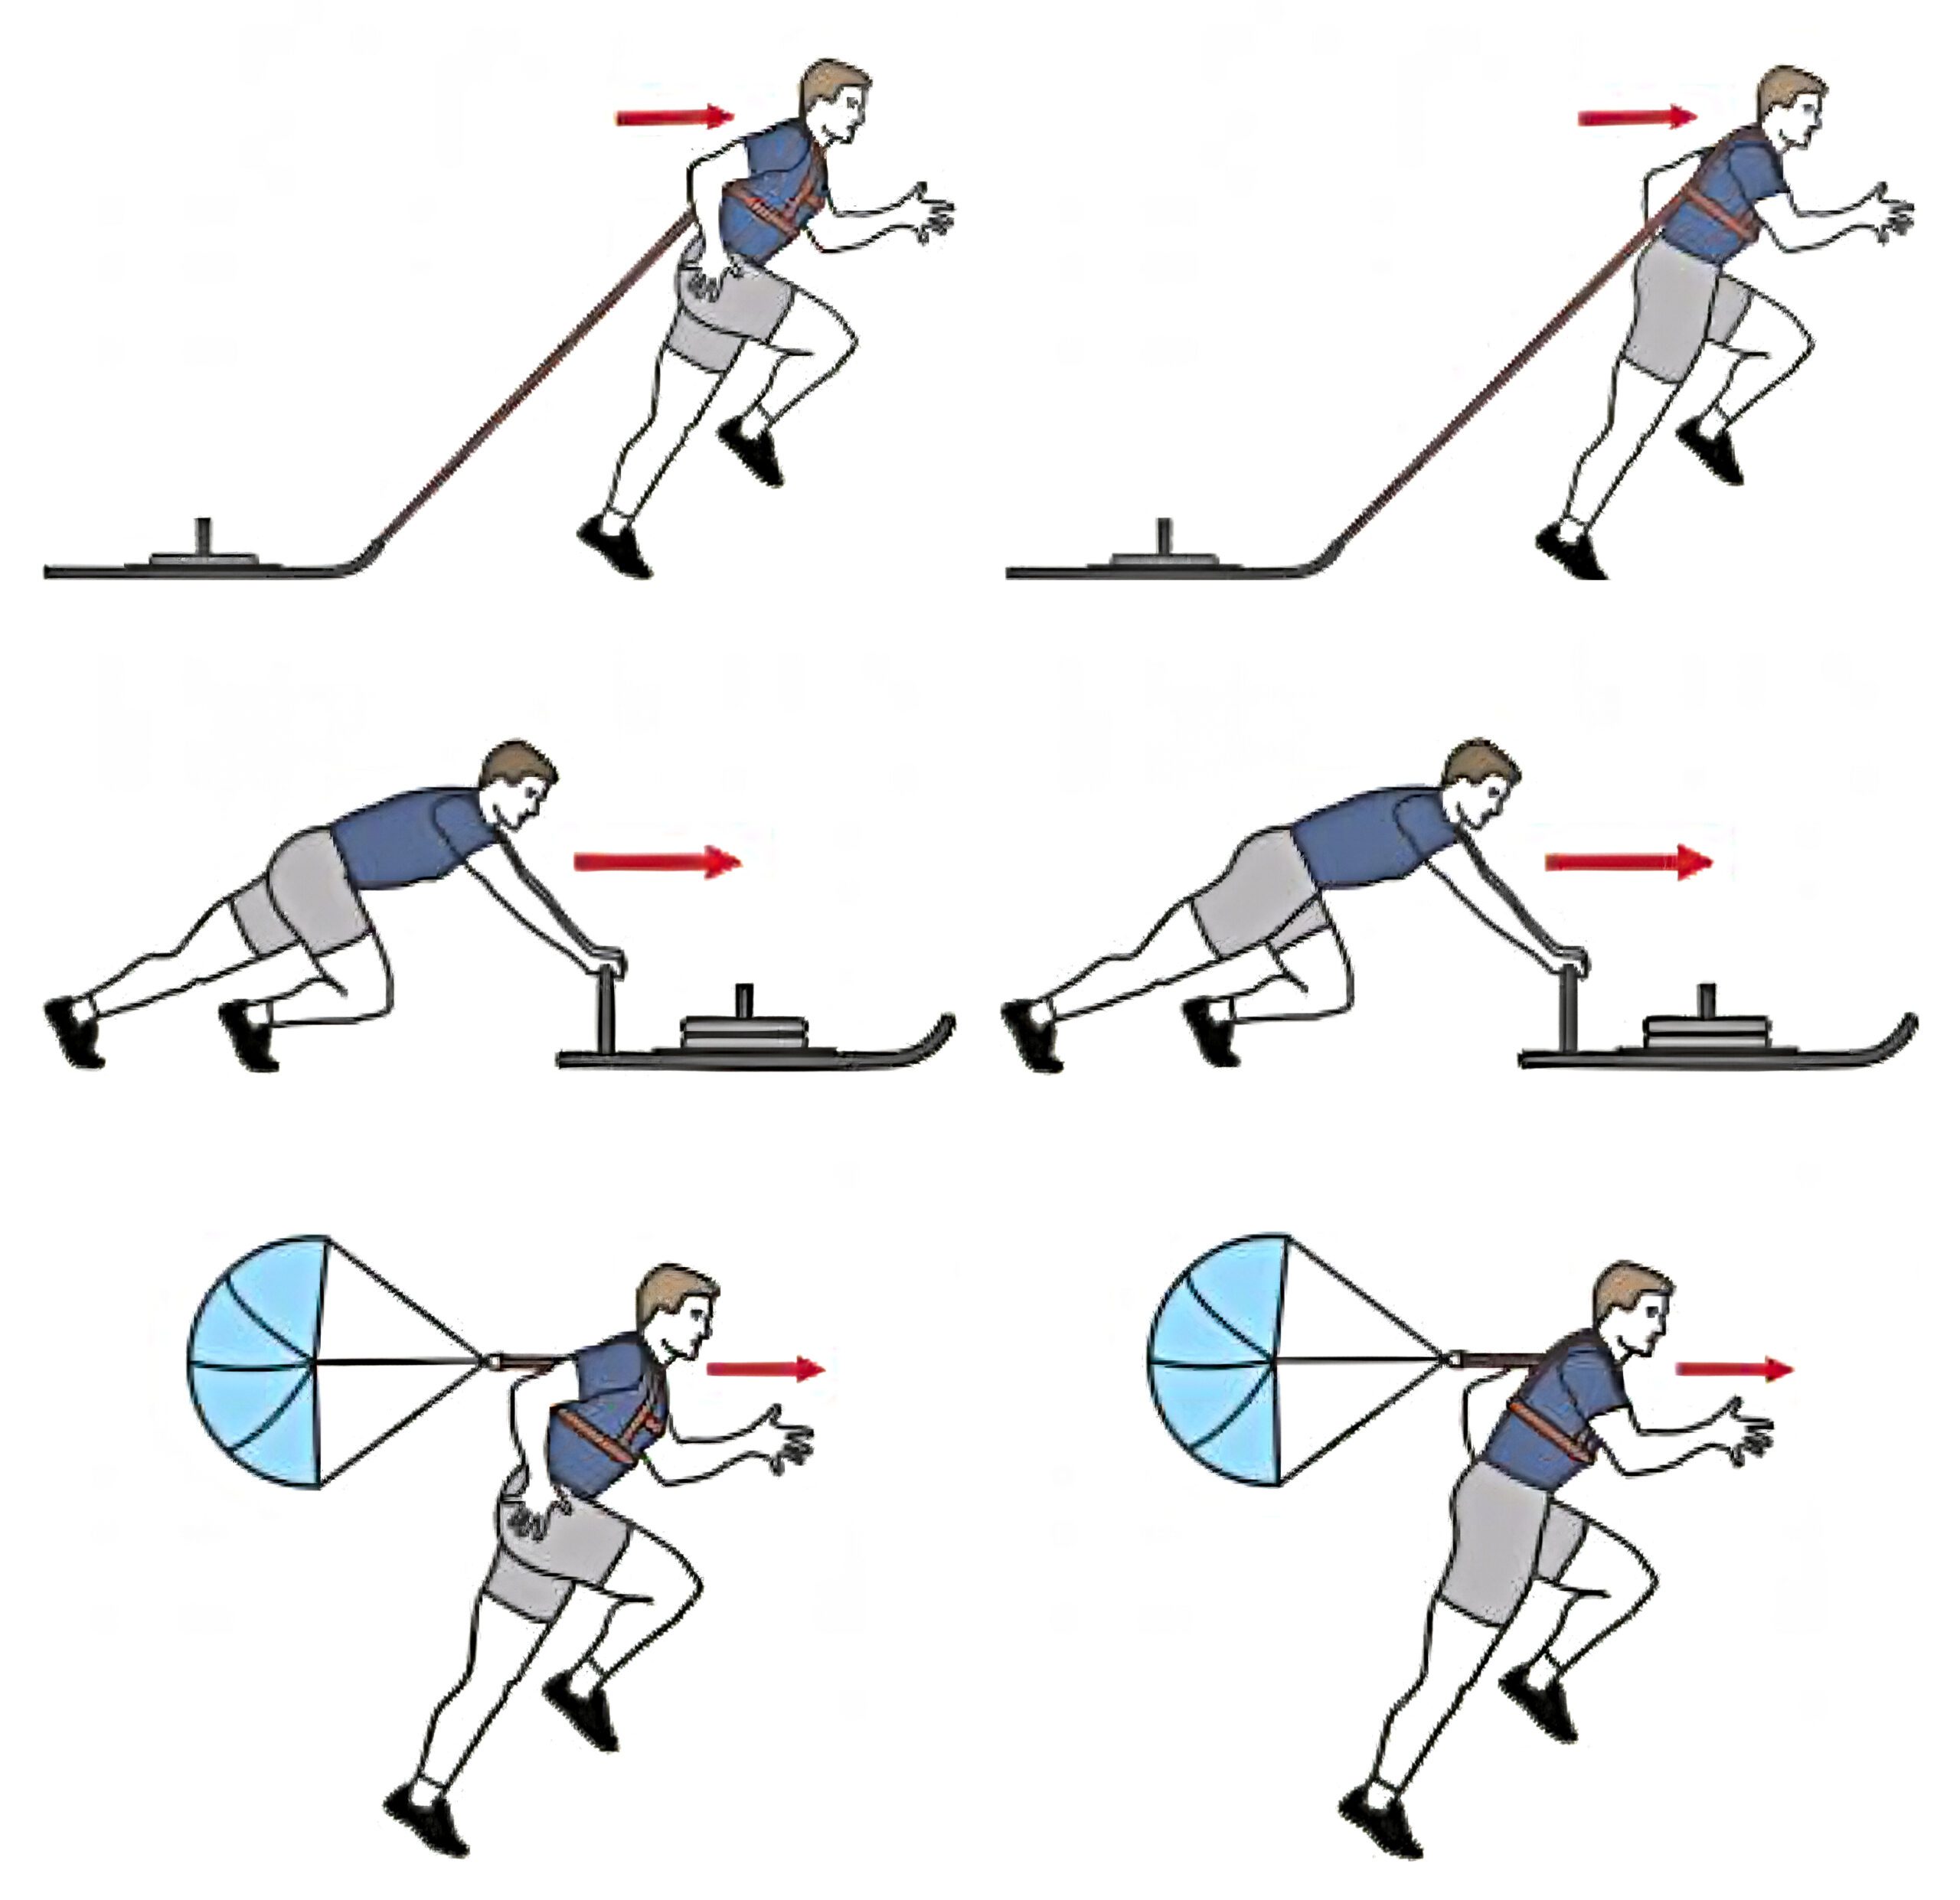
When I coached at the Air Force Academy in the 1980s, we began using contrast training with our football team. We had athletes first pull a sled and then perform short sprints without it. During this time, speed parachutes gained popularity as a contrast training method (in fact, in the early 1990s, BFS worked with Dr. Tabachnik to promote this product, which he introduced to the US market). These devices featured a quick-release mechanism that allowed athletes to disengage the chute mid-stride. Later, push sleds such as the Prowler® became a popular resistance running tool. To perform contrast training with a push sled, the athlete briefly pushes the weighted sled, then releases their grip and sprints past it. 

Illustration of a person performing six speed training exercises: uphill sprint, sled push, sled pull, sprint with large parachute, resistance bands, and sled drag, all emphasizing leg and torso movement.
Image 2. Popular resistance devices for sprinters: Pull sleds, push sleds, and speed parachutes. (Drawings by Sylvain Lemaire, HexFit.com)

In weightlifting, the intensity of a lift is determined by how close the weight lifted is to your one-repetition maximum. If you can lift 100 pounds for one rep and do so, your intensity is 100 percent. Conversely, if you lift 90 pounds for four reps, you might feel like you’re working harder, but your intensity remains at just 90 percent. 

As a general guideline, weights of at least 85 percent of your one-repetition maximum (1RM) represent an intensity level that will recruit high-threshold motor units. Completing 10 reps represents approximately 75 percent of your one-repetition maximum, which will not significantly develop the fast-twitch fibers. This relationship has important implications for program design for athletes who want to run faster, jump higher, throw faster, kick further, and become more powerful overall. 

Having addressed the science stuff, let’s now look at two types of wave loading that can be performed in the weightroom. 

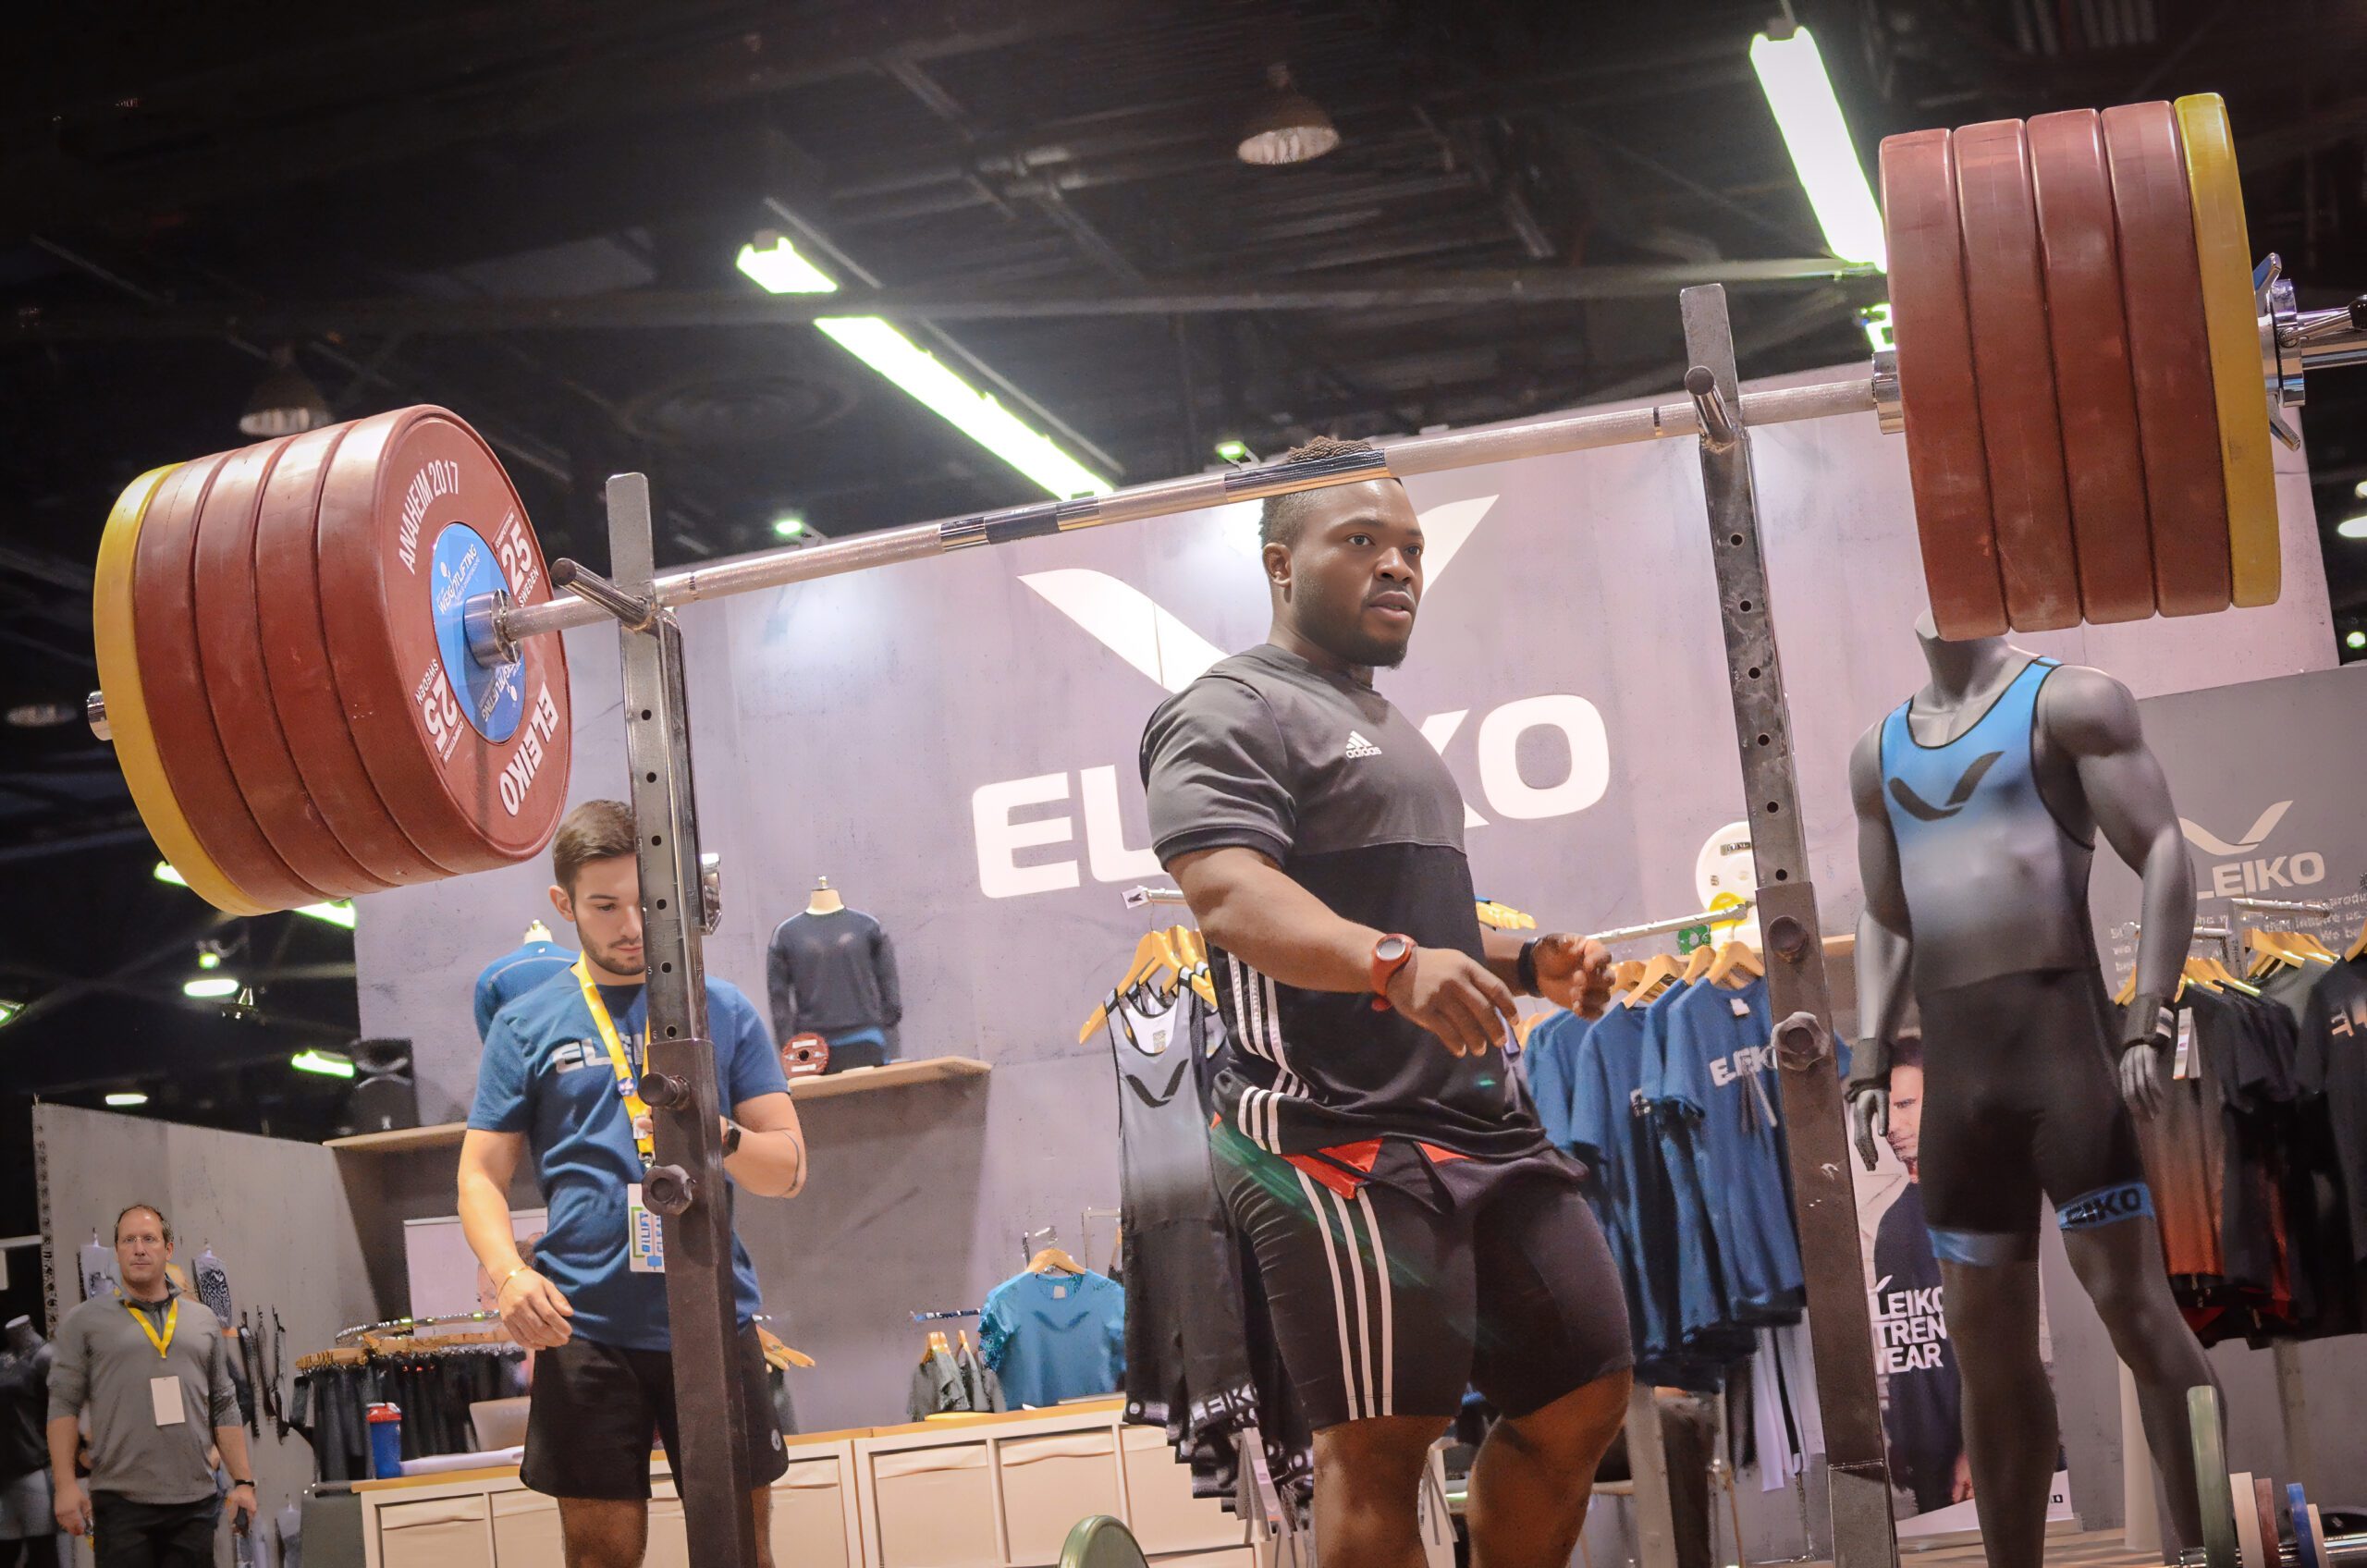
A weightlifter prepares to lift a heavily loaded barbell during a competition. A person stands nearby monitoring. Various gym apparel and equipment are displayed in the background.
Image 3. Wave loading is a powerful training method that can be used on the athletic field and in the weightroom. (Photo by Ryan Paiva, LiftingLife.com.)

Wave Loading Method #1: Back-Off Sets

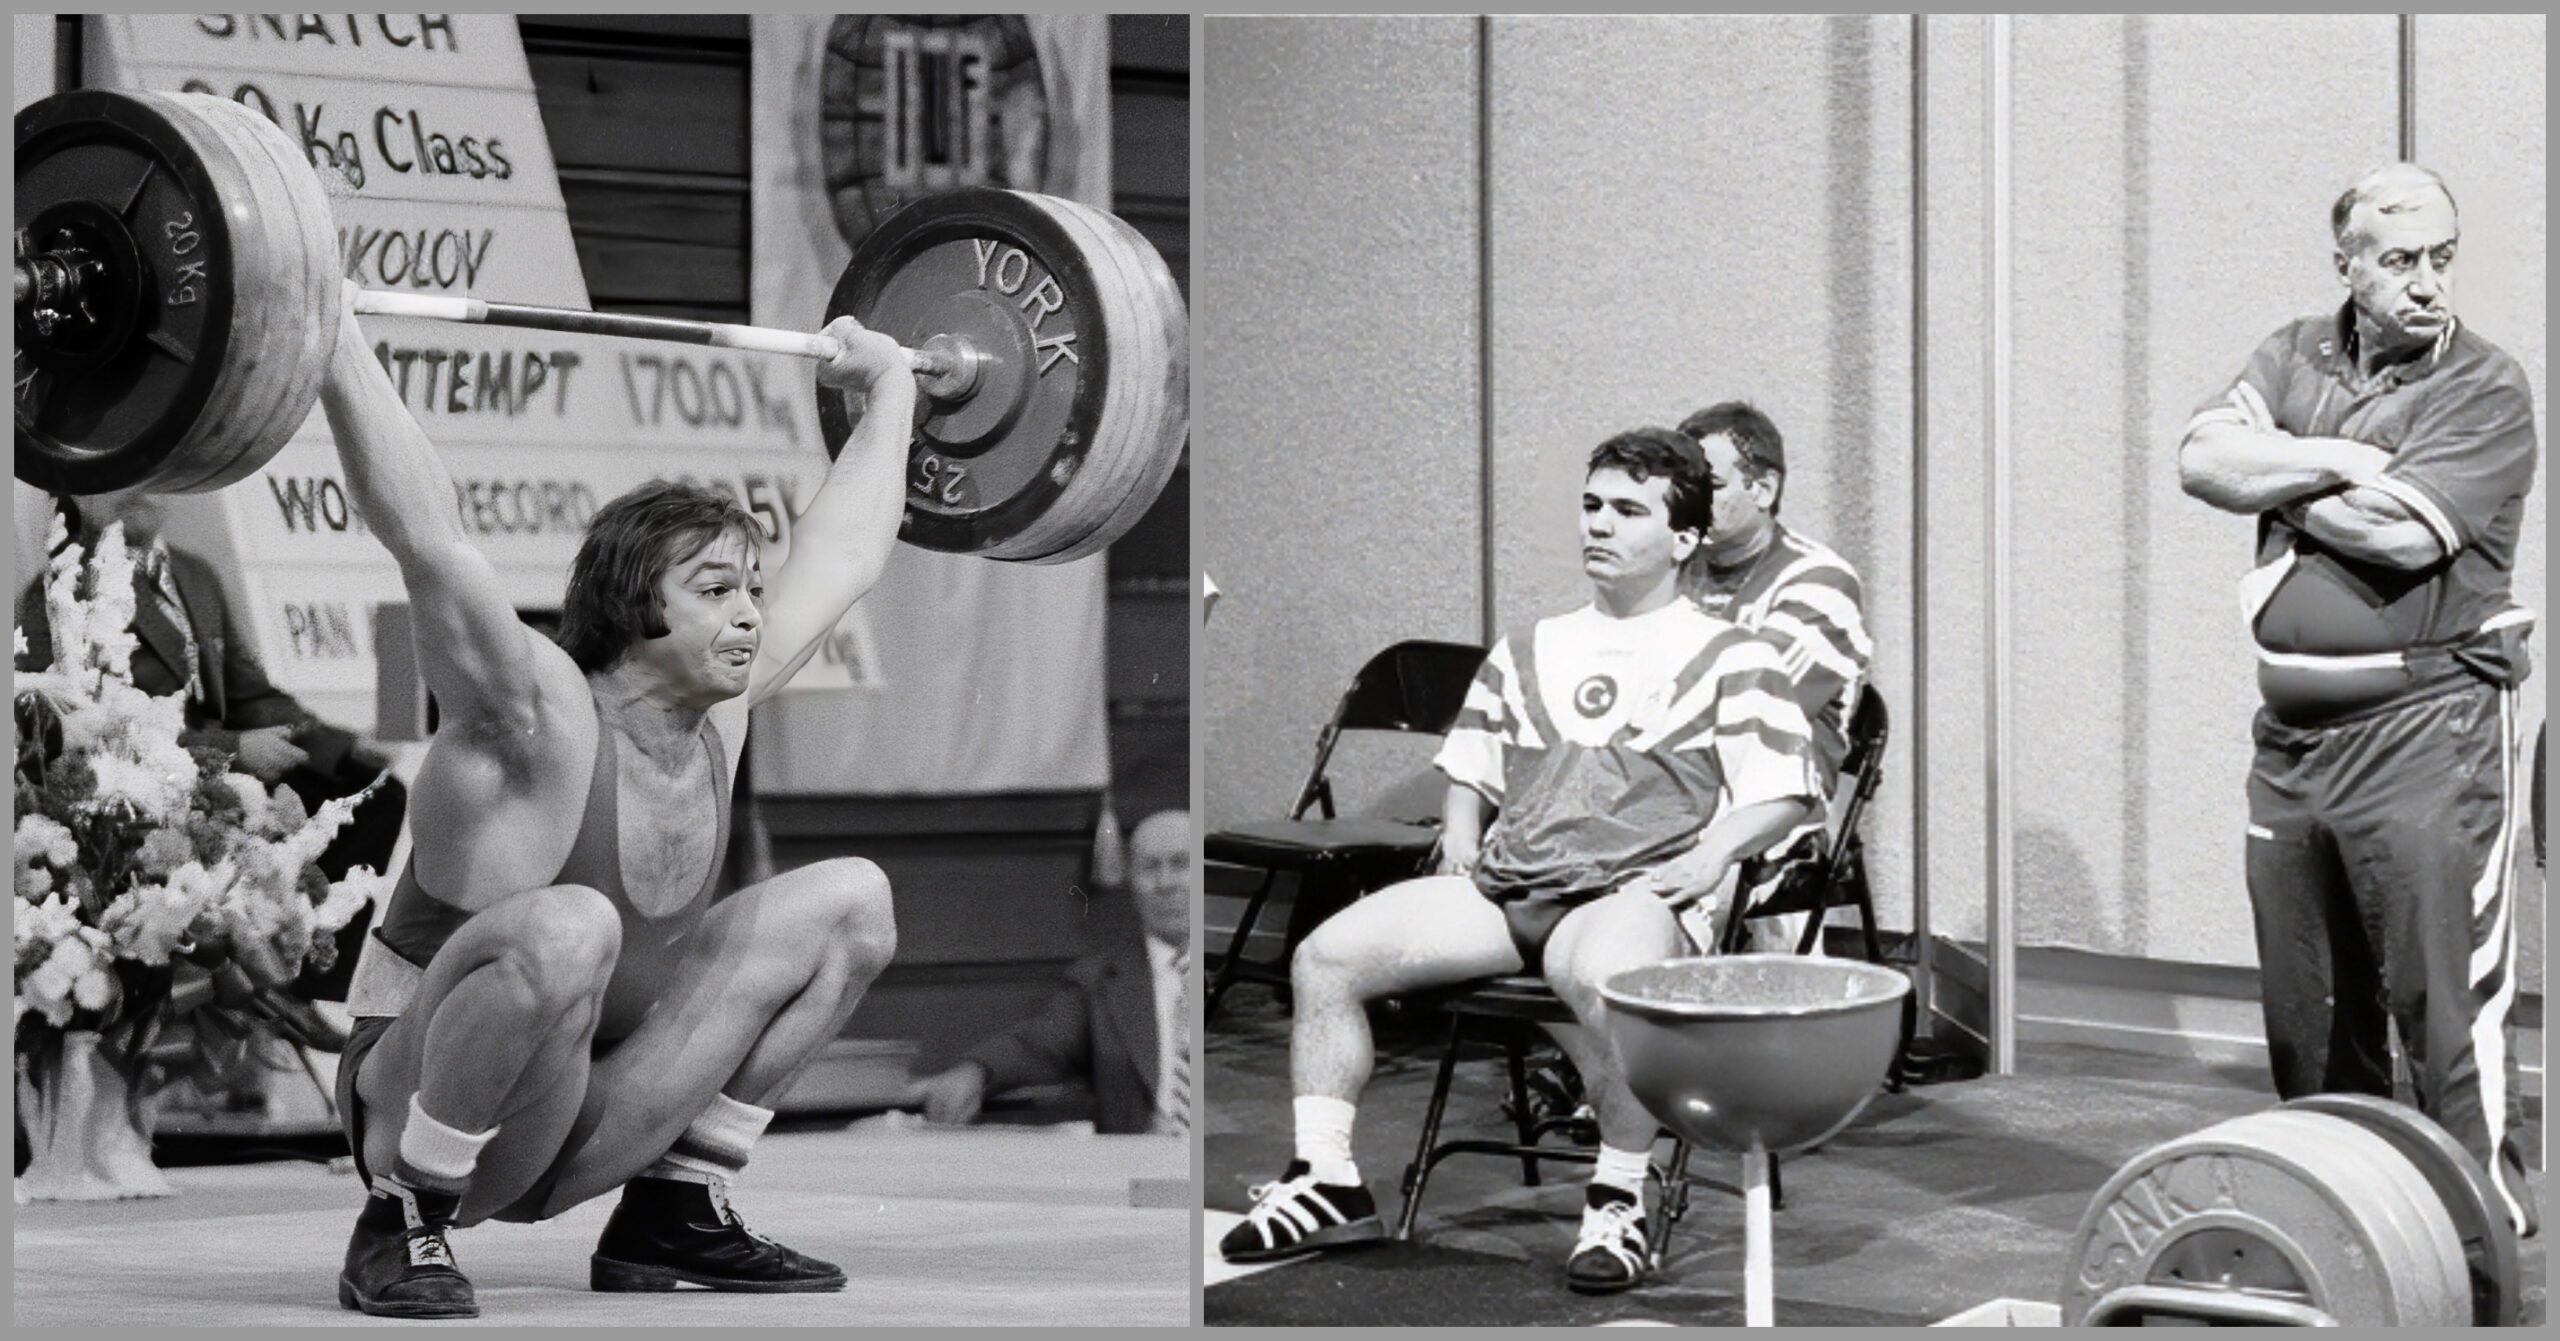
Understanding the history of wave loading is essential for appreciating its value. This brings us back to Nikolov, one of three Bulgarians to win a gold medal in the 1972 Olympics. These victories helped Bulgaria upset the heavily-favored Russians for team time, which shocked the Iron Game community.  

I say “shocked” because the Russians were the dominant force in weightlifting in the 1960s. Reasons for their success included substantial financial support from their government and a large genetic pool of reportedly over 100,000 competitor weightlifters. In contrast, the Bulgarian weightlifting program operated with limited financial resources and had only a few thousand weightlifters. However, these disadvantages were offset in 1969 when Ivan Abadjiev became the head coach.  

Under Abadjiev’s leadership, the Bulgarians became a weightlifting powerhouse for two decades, producing 9 Olympic and 57 World champions. I wanted to learn more. 

A split image: Left shows a weightlifter in mid-squat, holding a barbell overhead on a platform, banners behind. Right depicts two men seated and observing, one wearing a tracksuit and the other casual, with an older man standing.
Image 4. Andon Nikolov was one of the first Bulgarians to win Olympic gold under Coach Ivan Abadjiev’s guidance. At right is Abadjiev with Naim Süleymanoğlu, pound-for-pound, the greatest weightlifter ever. (Bruce Klemens photos)

With the wave loading method I read about in Muscle Builder/Power, Nikolov would work up to a maximum or near-maximum in a lift, then decrease the weight to complete his repetitions with heavier weights than could be utilized in a conventional pyramid approach. We can call this approach “back-off” sets, although another name could be “reverse pyramid.”  

Besides recruiting fast-twitch fibers, the heavy singles raise the “shutdown threshold” of a tension/stretch receptor known as the Golgi tendon organ (GTO). An example of the shutdown threshold occurs during an arm-wrestling match when the weaker opponent’s arm suddenly slams onto the table, safeguarding their muscles from tearing. 

Here are two contrasting workouts showing how back-off sets allow athletes to lift heavier weights for multiple repetitions. Both methods prescribe “working sets” of three sets of three reps. 

Set Conventional Approach Back-Off Sets
1 50% x 5* 50% x 5
2 60% x 4 60% x 4
3 70% x 3 70% x 3
4 80% x 3 80% x 2
5 85% x 3 x 3 85% x 1
6 None 90% x 1
7 None 95% x 1
8 None 87.5-90% x 3 x 3

*Percent is the percent of 1-repetition maximum 

As you can see, the back-off series allowed the athlete to lift significantly heavier weights for the working sets. It accomplished these results without a substantial increase in volume (+3 reps), leading to a high level of fatigue that could affect the amount of weight lifted. The back-off set approach also comes with a physiological bonus.  

After lifting your maximum or close to it, the bar feels lighter when you reduce the weight to perform your working sets, boosting your confidence to complete more reps. This is akin to using chains attached to a barbell during squats. As the lifter bends their knees, the chain links begin to rest on the floor, and the resistance decreases, giving the athlete confidence to complete the lift or squat more deeply. 

Rediscover Wave Loading: Program Design for Speed and Power Share on X 

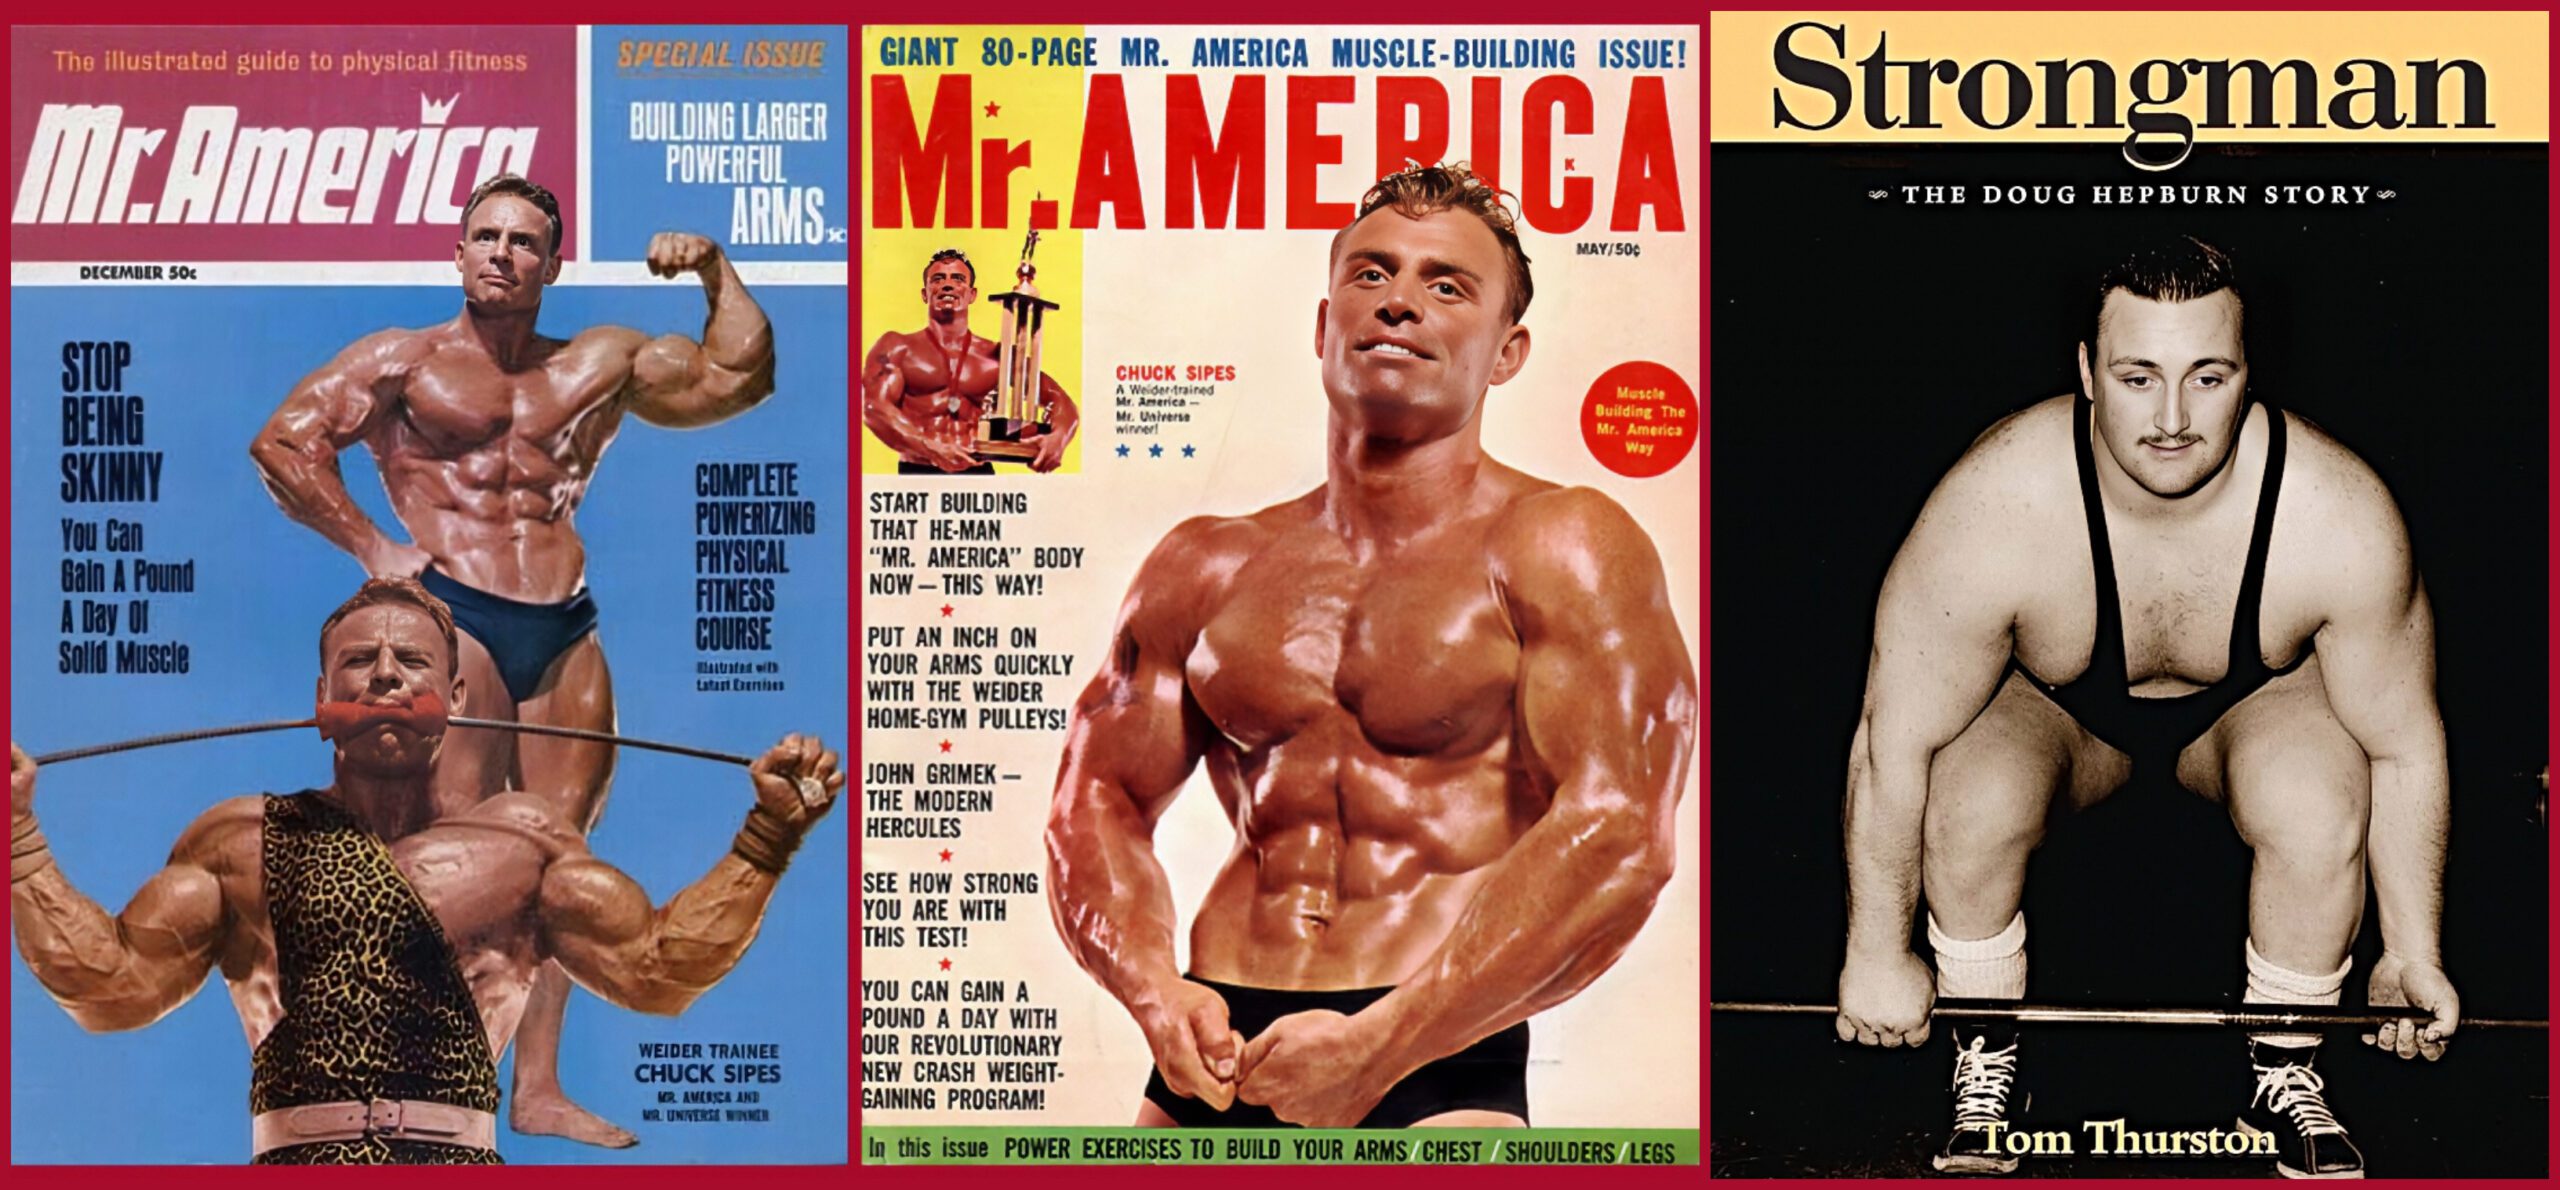
Giving credit where it’s due, legendary strength athlete Doug Hepburn and bodybuilding champion Chuck Sipes practiced forms of contrast training. Hepburn broke eight world records in weightlifting and won the 1953 World Championships. He was the first man to bench press 500 pounds and did a one-arm military press of 200 pounds. Sipes was the 1960 IFBB Mr. Universe and was as strong as he looked. At a bodyweight of 220 pounds, Sipes bench pressed 570 pounds, squatted 600, and did a “cheat” barbell curl with 250. 

Hepburn would perform low reps with maximal weights on one exercise, then decrease the weight and get in his reps. Sipes would support heavy weights in the lockout or near-lockout positions. For example, during a deadlift workout, he might perform standard deadlifts, deadlifts from below the knees, and conclude with deadlift holds. In one example, he would perform deadlift holds for six sets, holding the weight for one minute per set. (Note: The issue with using isometrics for contrast training is they are especially fatiguing; however, to be fair, Sipes said he used heavy supports for tendon and ligament strength.) 

Three vintage bodybuilding magazine covers: Mr. America features a muscular man posing; another Mr. America cover shows a man flexing; Strongman showcases a weightlifter lifting a barbell. Bright colors and bold text highlight fitness themes.
Image 5. Bodybuilding champ Chuck Sipes and strongman Doug Hepburn were Iron Game pioneers who used variations of contrast training to achieve phenomenal strength levels.

While back-off sets are effective, another wave-loading approach allows athletes to train at even higher intensity levels. 

Wave Loading Method #2: The Abadjiev Method

In 2013, I attended a seminar by Coach Abadjiev. Much of his lecture discussed concepts such as the neurological adaptations caused by the Protein Memory Hypothesis. Abadjiev said protein memory deals with how the protein strands synthesized by mRNA with 90 percent lifts differ from those synthesized by 95 percent lifts…ah, sure. Anyway, the point was that to achieve physical superiority, Abadjiev believed that weightlifters must train as heavy as possible as often as possible. 

The next day I spent an hour with Abadjiev in our gym, asking him questions and observing him train one of his lifters. I asked him about using weights in the 75-85 percent range to improve speed, which seemed a popular approach by Russian weightlifters. He responded: “I don’t want my weightlifters to lift light weights fast—I want them to lift heavy weights fast!” This idea is similar to the methods promoted by Charlie Francis, who saw little value in having sprinters perform longer distance runs for sprinters. Okay, now for the details.

When aiming for a maximum single, a common approach for an athlete is as follows: 

50% x 5 

60% x 3  

70% x 2  

80% x 2 

85% x 1 

90% x 1 

95% x 1 

Go for a maximum  

Although this method prepares an athlete for a maximum lift, Abadjiev discovered how to enable his athletes to lift even heavier weights. Specifically, he had his athletes work up to a maximum single, reduce the weight, and then work back up to another max. His athletes would often perform several of these waves.  

Rediscover Wave Loading: Program Design for Speed and Power Share on X 

Often, particularly with advanced athletes, wave loading enables athletes to surpass the results of previous attempts, increasing the training stimulus. Here’s an example, using 100 pounds as a personal best for a power clean: 

1st Wave 2nd Wave 3rd Wave
50 x 5 90 x 2 92.5 x 1
65 x 4 95 x 1 97.5 x 1
80 x 3 97.5 x 1 100 x 1
90 x 2 100 x 1 102.5 x 1
95 x 1 102.5
100

I first tried Abadjiev’s wave-loading method with a former D1 college lineman who had decided to focus on weightlifting. I watched him compete in a local meet—where he made all his attempts and snatched 230 pounds—and then invited him to our gym. A week later, he performed several waves in a single workout and finished with 255 pounds.  

Here’s a closer look at this method in action. Video 1 (below) shows Nikki, a former D1 field hockey player, performing the power clean. On her first wave, she easily succeeded with 65.5 kilos (144 pounds). She jumped to 70.5 kilos, but could only manage a high pull. We lowered the weight to 66.5, which she made, followed by successes at 67.5, 69.5, 70.5, and 71.5 (157 pounds). The result is that the second wave enabled Nikki to increase the intensity of her workout by about nine percent.  

Video 1. A real-world demonstration of how wave loading can enable athletes to use heavier weights for a given workout. 

Getting the Most out of Wave Loading

Although I could write a book wave loading, here are ten guidelines I’ve found effective for getting the most out of this remarkable training method. 

1. Perform wave loading exercises first in a workout.

You should schedule wave loading at the beginning of a workout when you are fresh and can put the most effort into these sets. Expanding on this idea, legendary strength coach Charles Poliquin said that fatigue changes the pH levels in the blood, affecting the muscles’ ability to contract. 

[bctt tweet=”Schedule wave loading at the beginning of a workout when you are fresh and can put the most effort into these sets—Charles Poliquin said that fatigue changes the pH levels in the blood, affecting the muscles’ ability to contract.”] 

2. Reserve wave loading for multi-joint movements.

To stimulate maximum muscle mass development, a bodybuilder might perform exercises to target each of the three heads of the triceps: long, medial, and lateral.  

A general rule for someone who isn’t a bodybuilder is, “If you take care of the larger muscle groups, the smaller ones will take care of themselves.” Therefore, athletes who perform dips, which work all three heads of the triceps, don’t need to perform finishing sets of rope triceps pressdowns. Similarly, because so many sets are performed with this method, using it exclusively with multi-joint movements reduces your workout time. 

Two black and white photos of a weightlifter in action. On the left, the lifter squats with a barbell. On the right, they squat again, wearing a U.S.A. shirt. Both images show focus and strength. Background elements include gyms and other people.
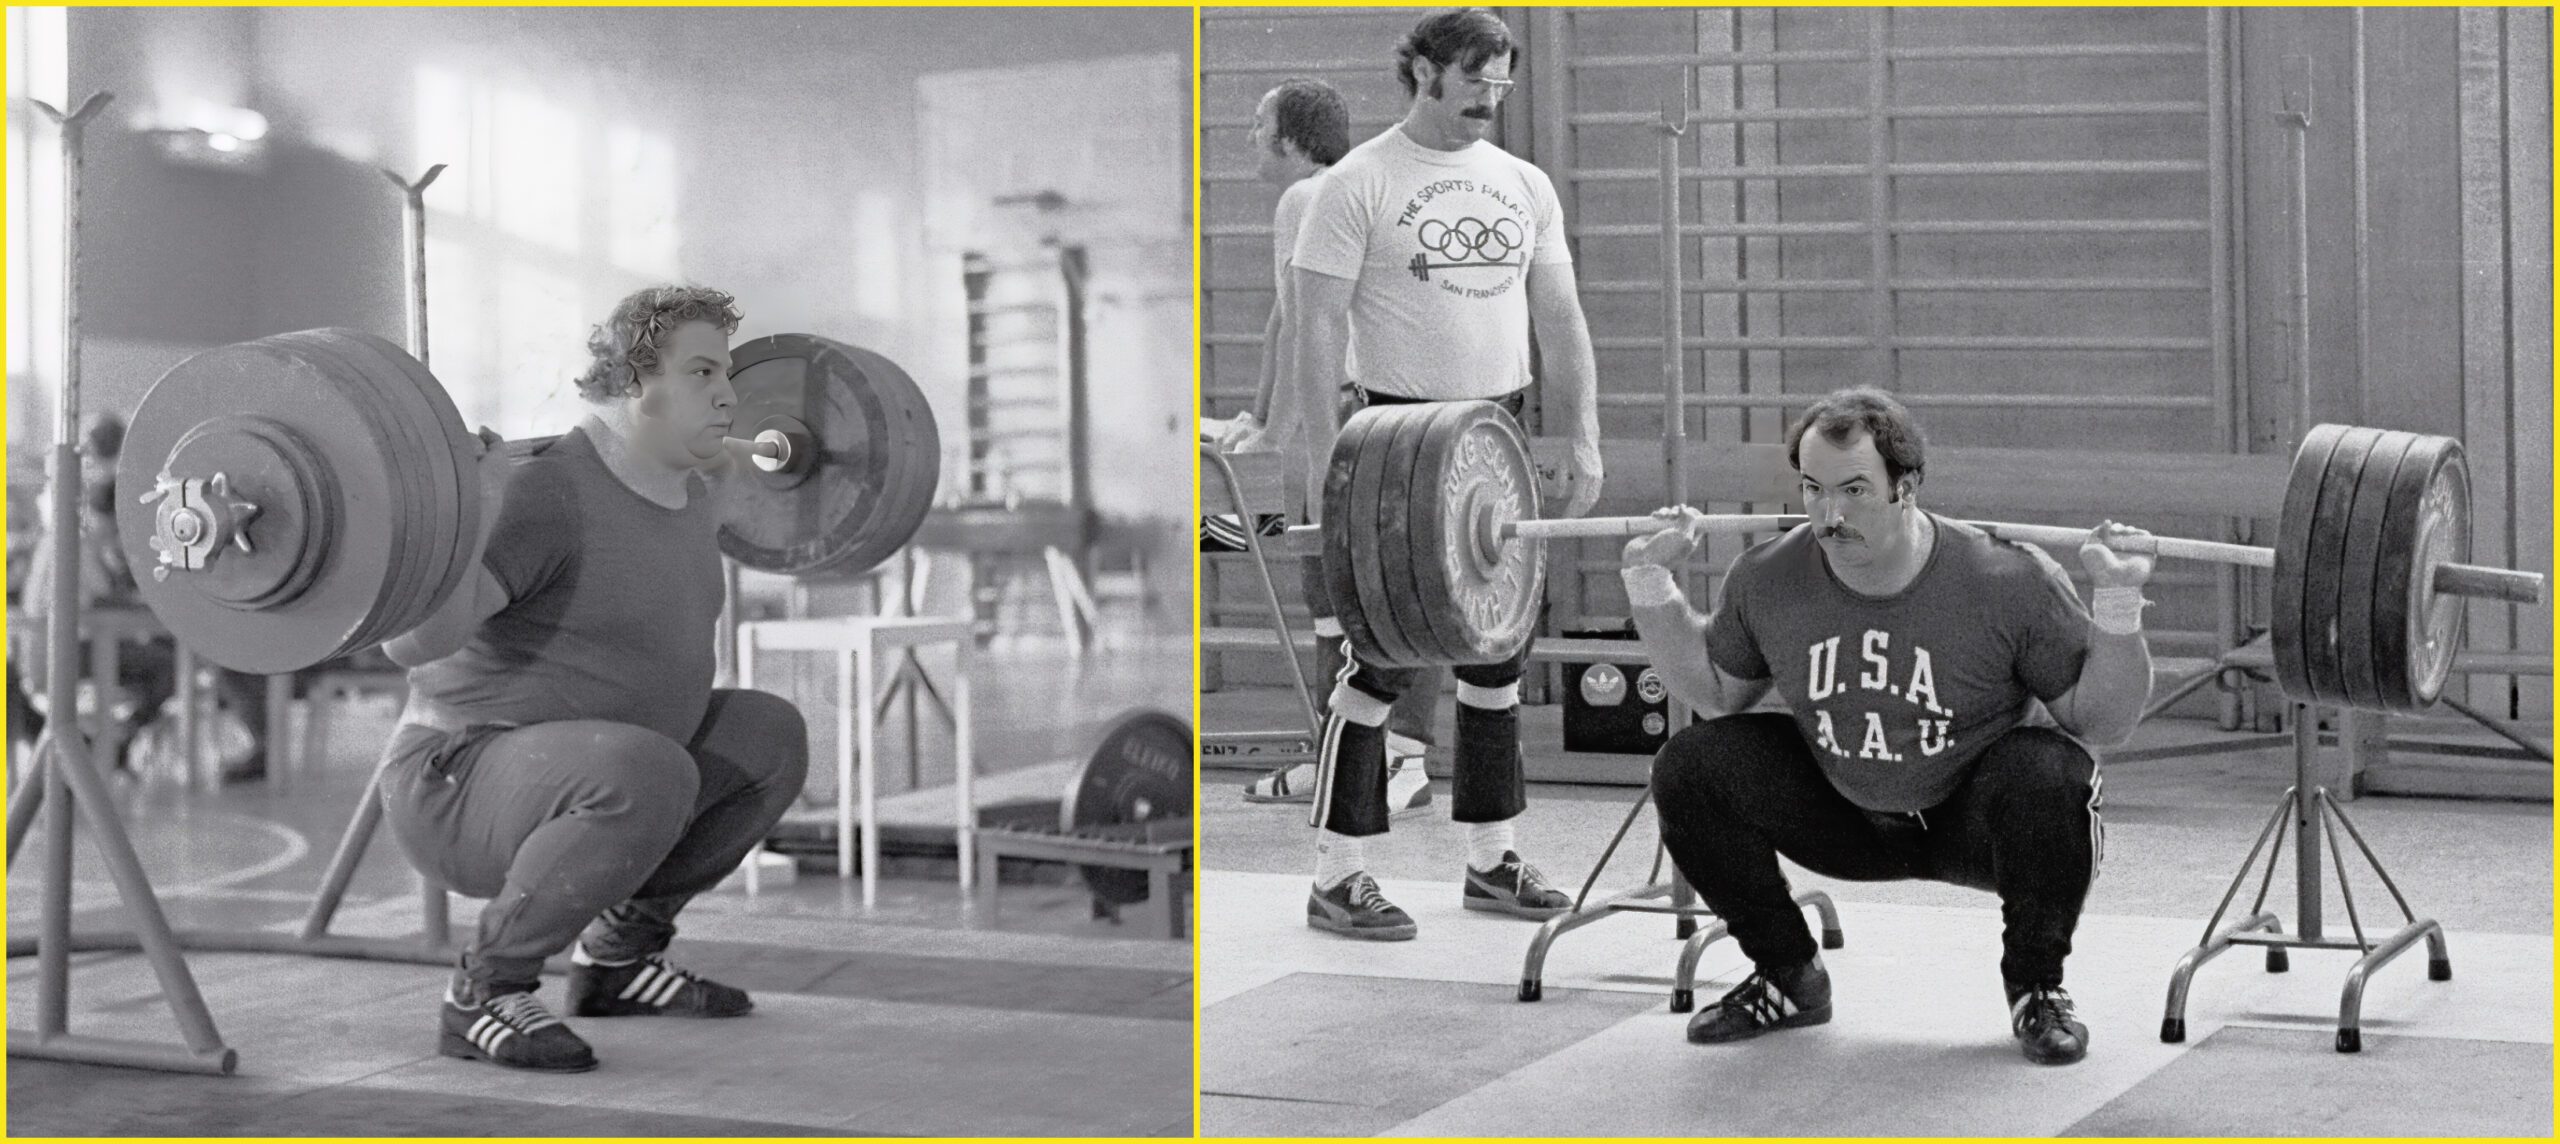
Image 6. Wave loading is particularly effective for squats. Gerd Bonk from East Germany (left) put the shot 17.82 meters in the youth division and became the first person to clean and jerk 550 pounds (250 kilos). Representing the University of Tennessee, Tom Stock won the SEC championship in shot put and later became the 1979 Pan American weightlifting champion. (Photos by Bruce Klemens)

3. Perform wave loading sparingly.

Wave loading is a highly taxing training method that necessitates longer recovery times. For instance, completing a wave loading session with squats on Monday can result in lingering fatigue that would impact your ability to lift monster weights on Wednesday. 

You must also consider that not all exercises have the same recovery periods. The recovery period for a squat may be longer than for a military press, and the recovery period for a deadlift may be longer than for a conventional deadlift.  

A conventional hex bar deadlift is performed with a more upright spine than a conventional deadlift, which might lead to a shorter recovery period. Additionally, a high hex bar deadlift has a significantly shorter range of motion, which should lead to an even shorter recovery period. 

4. Cycle wave loading into long-term planning.

To get the most out of wave loading, scheduling it at the most appropriate times is essential. Because it is so physically demanding, you would not perform wave loading a few days before a major athletic competition. 

Here is a general outline of a four-week weightlifting cycle inspired by Coach Spassov that I’ve used with several of my competitive weightlifters: 

Week 1: Deloading 

Week 2: High Volume 

Week 3: High Intensity 

Week 4: Peaking 

In this example, back-off sets (higher volume) could be performed during Week 2 and the Abadjiev Method (higher intensity) during Week 3. 

5. Focus on low reps for speed and power.

As Ross explained when he worked with Allyson Felix, activating these high threshold motor units in the weightroom could increase stride length as long as there are also minimal increases in bodyweight. Let me share three real-world examples of weightlifters who dramatically increased how much they lifted over several years while remaining in the same bodyweight division.  

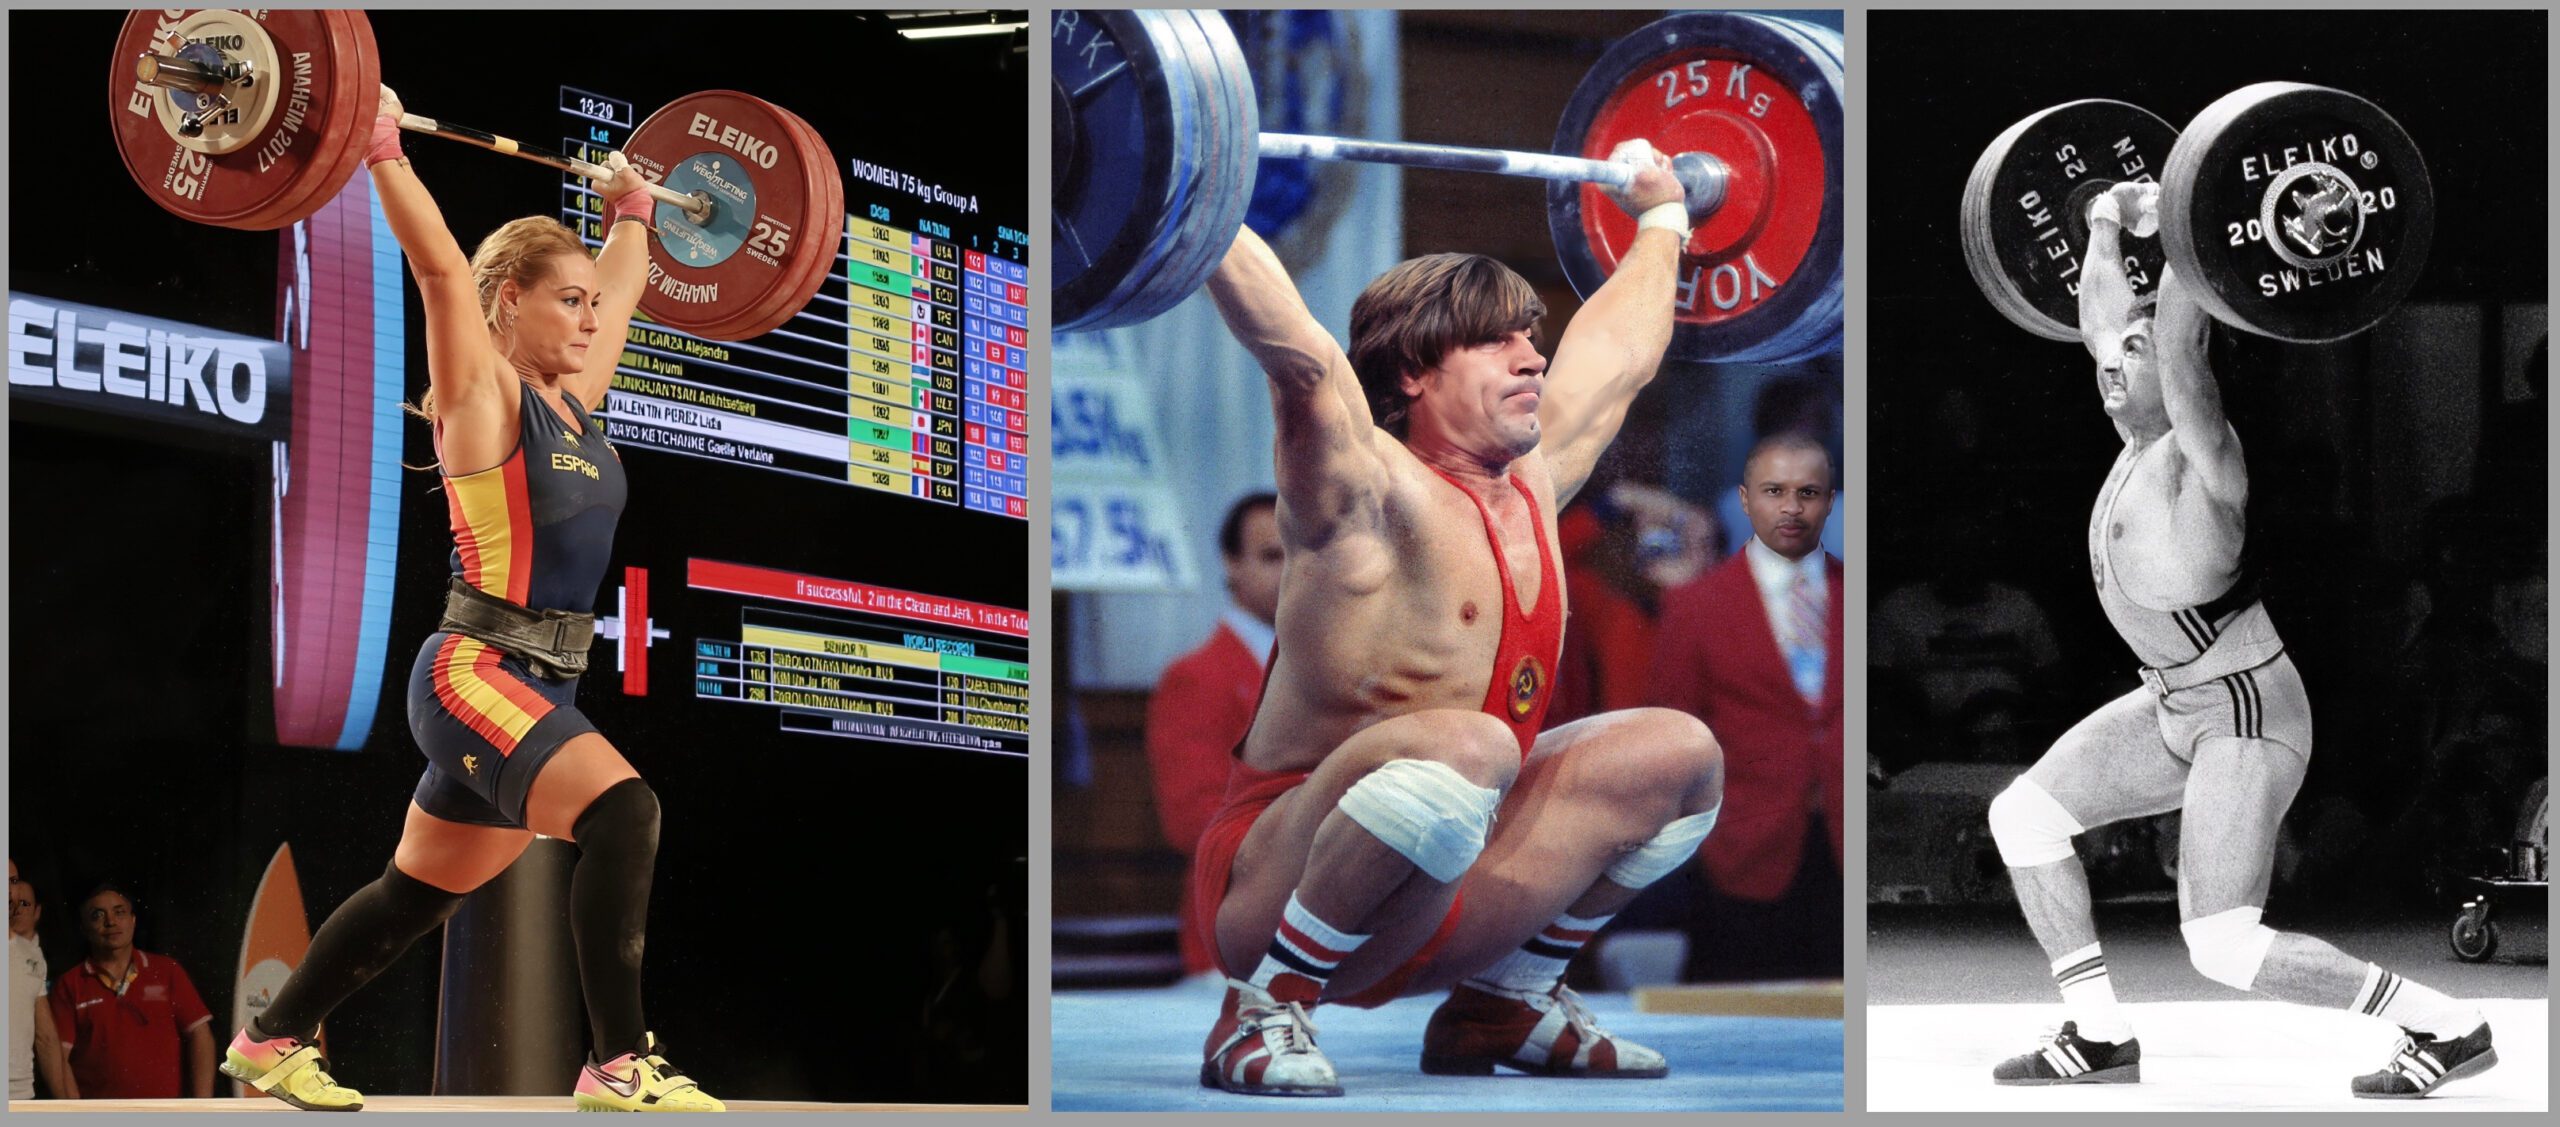
Image 7 below shows three weightlifters who won Olympic gold. The men’s first and last lifts in this table represent world records, so they all competed at the highest levels and possessed superior technique. All three lifters’ body weight remained the same despite spans of six, eight, and nine years. By focusing on training the high-threshold motor units, they got stronger without getting bigger. 

Name BW Year Snatch Clean and Jerk
David Rigert 198 1970 357 —–
David Rigert 198 1971 —– 457
David Rigert 198 1978 397 488
Yuri Vardanyan 181 1978 375 462
Yuri Vardanyan 181 1984 397 493
Lidia Valentin 165 2005 229 257
Lidia Valentin 165 2014 273 324

Notes: 

— BW = Bodyweight 

— All weights in pounds 

— Lidia Perez Valentin’s initial lifts were performed at the Junior World Championships 

I should point out that Rigert was known for exceptional sprinting ability (reportedly running 10.4 in 100m) and Vardanyan for his jumping ability, as he could reportedly standing long jump 12.1 feet and high jump seven feet using a three-step approach and forward takeoff. There are YouTube videos showing Vardanyan performing remarkable displays of his jumping ability.  

Three separate images of weightlifters performing lifts. The first shows a person lifting a barbell overhead on stage. The second depicts a person in a squat with a barbell lifted. The third shows a person achieving a lift in a black and white photo.
Image 7. Weightlifters Lidia Perez Valentin, David Rigert (center), and Yuri Vardanyan made exceptional progress for several years without increasing their body weights. (Left photo by Joseph McCray, liftinglife.com; middle and right photos by Bruce Klemens.)

6. Use longer rest periods.

The nervous system may need 5-7 times more rest than the muscular system—you wouldn’t rest for 15 seconds between sets of 50-meter sprints if speed development is the goal. For lifting, rest periods should range from 180 to 300+ seconds, depending on the training priority and repetition intensity chosen. Here is an example, using the 2nd wave in the previous example: 

Percent of 1RM Rest (seconds)
90 x 2 180s
95 x 1 240s
97.5 x 1 300s
100 x 1 300s
102.5 300s
Begin 3rd wave

An exception would be if you used wave loading with supersets involving two exercises, such as a push press and deadlift. Rest periods with these protocols could be shortened as returning to the first set takes longer. 

7. Use a rep range for back-off sets.

One challenge in designing workouts is that numerous variables influence an athlete’s performance in a specific session, so a coach can only make an educated guess. (Fun Fact: One college strength coach told me he intentionally kept Monday workouts light because many of his athletes were often hungover from partying the night before!) 

Let’s say an athlete is scheduled to perform three sets of three reps using 85 percent of their one-rep max. In this case, 85 percent might be too light or too heavy to achieve optimal loading, so the odds of a coach guessing the optimal weight are 1:3.   

Instead of prescribing a single repetition number, use a rep range, such as 2-4, to optimally challenge the athlete. 

One highly effective variation of back-off sets for this purpose—and a favorite of Coach Poliquin—is the 1-6 Method. To the best of my knowledge, Dragomir Cioroslan, an Olympian and the coach of 1984 Olympic Champion Nicu Vlad, created it. 

In superset style, the 1-6 Method alternates between sets of one repetition and six repetitions. You start with about 90 percent of your 1RM for the first set and 75 percent for the set of six, increasing these percentages each set. After each set, the athlete rests for about four minutes. The weight for each superset increases. 

After warm-up sets, here is how such a workout could progress for an athlete who squats 300 pounds: 

Set 1: 1 rep with 270 pounds  

Set 2: 6 reps with 225 pounds  

Set 3: 1 rep with 275 pounds 

Set 4: 6 reps with 230 pounds 

Set 5: 1 rep with 280 pounds 

Set 6: 6 reps with 235 pounds 

Although this topic is beyond the scope of this article, my colleague Paul Gagné uses a form of the 1-6 Method with isoinertial (flywheel) training, alternating heavy disks with lighter ones. He also performs more repetitions, because achieving optimal speed requires a few “garbage reps” to tighten the belt’s slack. 

8. Be conservative at first.

The number of waves an athlete can perform is influenced by their conditioning level. While it’s impressive to hear about the accomplishments of elite weightlifters breaking PRs on multiple waves, a beginner should start with only one wave. As a general guideline, you are probably doing too many waves if you do not exceed the previous maxes on your last wave. 

9. Use wave loading to correct errors in weightlifting exercises.

Poor technique often hinders the performance of heavy lifts or partial movements, such as the snatch. Wave loading is an effective method for correcting errors that cause athletes to miss maximal weights. Also, with highly technical lifts such as the snatch, the improvements in a single wave loading workout can often be exceptional—backing off with lighter sets may enable the athlete or their coach to figure out how to correct the fault.  

Rediscover Wave Loading: Program Design for Speed and Power Share on X 

https://simplifaster.com/wp-content/uploads/2025/02/Video-2-Wave-Loading-.mp4

Video 2. A real-world demonstration of how wave loading can enable athletes to correct technique faults in the snatch. 

In Video 2, you’ll see Lisa, a former collegiate tennis player, performing snatches. She made a shaky snatch with 41 Kilos (90 pounds) and then missed 42 kilos twice. On the second wave, she dropped to 37 kilos, then made 39, 42, 43, and 45 kilos (99 pounds), approximately a 10-percent improvement. She even seemed a little faster.  

One more example. Athletes often miss a maximum power clean because they begin with the bar moving forward, away from the body’s center of mass. Once the athlete reaches their peak on the first wave, they can reduce the weight and perform a few light clean deadlifts to the knees to strengthen the optimal bar path. After a few of these sets, the athlete would work back up in the power clean to a new maximum. 

10. Introduce variety into waves with similar exercises.

Similar exercises can be integrated into a wave-loading series to introduce variety into a workout. For example, you might perform two waves of hex bar deadlifts using the low handles and switch to the high handles for the third wave. This method ensures that the final set involves heavier weights, which is motivating for the athlete. 

Wave loading is a proven training method for increasing strength and explosiveness in athletes. Follow these guidelines to see what this high-intensity training method can do for you! 

References

Tabachnik, Ben. Personal Communication. January 1994 

Weyand PG, Sternlight DB, Bellizzi MJ, and Wright S. “Faster top running speeds are achieved with greater ground forces not more rapid leg movements.” Journal of Applied Physiology (1985). November 2000;89(5):1991-9. 

Stone MH, Sands WA, Pierce KC, Ramsey MW, Haff GG. “Power and power potentiation among strength-power athletes: preliminary study.” International Journal of Sports Physiology and Performance, March 2008;3(1):55-67. 

Ross, Barry. Underground Secrets to Faster Running, BearPowered, November 2, 2005. [Also, a non-dated article by Ross called “The Holy Grail in Speed Training.] 

Shepard, Greg. “Sprint Chute™ Training Guidelines.” Bigger Faster Stronger, Spring 1994. 

Thurston, Tom. Strongman: The Doug Hepburn Story, Ronsdale Press, August 16, 2003. 

Weis, Dennis B. “Echoes from the Power Storm that was Chuck Sipes!” Critical Bench.com, 2011. 

Abadjiev, Ivan. Personal Communication, May 19, 2013 

Francis, Charlie and Coplon, Jeff. Speed Trap: Inside the Biggest Scandal in Olympic History, St Martin’s Press, January 1, 1991.  

Thibaudeau, Christian. “The 1-6 Loading Scheme for Strength and Size.” Thibarmy.com, April 17, 2018. 

Gagné, Paul. Personal Communication, December 15, 2024. 

Athlete performs 180 degree cut test for change of direction, timed using the Sportreact system.

180° Cut Testing: A Superior Standard for Change of Direction

Blog| BySteve Breitenstein

Athlete performs 180 degree cut test for change of direction, timed using the Sportreact system.

For decades, the standards in agility testing at combine events, in college S&C, and at the high school level have been the 5-10-5 Pro Shuttle, the T Test, and the 3 Cone Test.1 Through years of working in the private sport performance space, we coached thousands of football players to set up as precisely as possible, choreograph the footwork like a dance, and maximize every cutting angle based on athlete limb length, flexibility, and strength in order to minimize time in the cut and maximize explosion out of the cut. By this description alone, it becomes clear that this is not agility and barely even feels like a change of direction measurement—instead, it more resembles a dance performance.

Agility requires reaction to a stimulus as well as an understanding of space, speed, and strategy. The term agility is falsely thrown around too often to describe change of direction. If a pattern is being timed, it can’t truly be agility but is rather Complex Reactive Change of Direction, because there is a start and an end to a pattern.

In June of 2023, by chance I was contacted by Anto Siric, the CEO of Sportreact, through social media. Eventually, we were able to connect on Zoom—like so many tech demos, it was impressive in concept and looked solid over Zoom…but I needed to get my hands on it to really know. Fast-forward three months later and Anto and his team came through Chicago and agreed to stop by our facility to show the system in person—they set up pods, ran through a barrage of drills and timing options, and took tons of videos. At the time, our facility was already utilizing a pair of timing systems and it didn’t make sense to add another, despite Sportreact looking even more impressive in person than on video. Once I had the chance to begin coaching at a different facility, the decision was a no brainer: I called Anto!

In my 20 years of coaching athlete development, I’ve found the Sportreact system to be in a class of its own with the ability to design and execute complex and creative setups—multiple combinations of pods utilizing colors, numbers and symbols, as well as timing gates in order to challenge athletes. As the standards that athletes are compared to become less repeatable, the closer the drill is to true agility.

In my 20 years of coaching athlete development, I’ve found the @Sportreact22549 system to be in a class of its own with the ability to design and execute complex and creative setups, says @SteveBstein. Share on X

These conflicts of Agility vs. Change of Direction, Athleticism vs. Choreography, and Standards vs. Worthless Numbers led us to reflect as a staff and ask three important questions.

1. Why Was the 5-10-5 Pro Shuttle Failing Us at Our Training Facility?

The primary issue was whether it was truly testing an athlete’s ability to change direction like in sport; and, equally problematic, was then attempting to test groups of athletes. Here are a few common challenges:

  1. Typically hand-timed – Accuracy, validity and consistency issues.
  2. Athlete error – Starting in the wrong direction, rolling start, no hand touch, wrong hand touch, slips.
  3. Timer error – Electronic gates can have issues because the athlete starts in beam, causing missed reps.
  4. Time consuming – Challenging to test large groups of athletes.

Does performing a good 5-10-5 actually indicate an athlete will have dynamic change of direction on the field or court? Personally, I haven’t seen a great carryover. I worked with a high school football Defensive End that got down to an electronic 4.3 second 5-10-5. We worked 100’s of reps with countless slips, half reps, and restarts. His speed did not match that time, but he was long-limbed and together we created the best footwork pattern and angles to allow him to perform at a combine event—ultimately, though, his ability to play his position was what got him the opportunity to play at the next level.

Does performing a good 5-10-5 actually indicate an athlete will have dynamic change of direction on the field or court? Personally, I haven’t seen a great carryover says @SteveBstein. Share on X

2. Where Was the T Test Failing Us at Our Training Facility?

This was largely due to the exact same reasons as the 5-10-5…but adding to it were the injuries that occurred when athletes were competing on the backpedal. Surprising at first, but we saw multiple wrist injuries from falling back and catching with the hands—and for those who failed to catch themselves, concussions from hitting the back of their head.

Again, if we are spending valuable coaching time working athletes through a test—instead of coaching the underlying athleticism—it just doesn’t make sense! Space is always going to be a restriction in training and the requirement of the T Test would dampen our ability to efficiently train.

3. Where Was the 3 Cone Test Failing Us at Our Training Facility?

Again, the reasons boiled down to athlete error, inability to laser time, and large group sizes. It just doesn’t make sense as a standard to measure change of direction and does not even come close to measuring agility. This is an extremely choreographed pattern for those who run it well! As a drill, this moved from a timed metric of performance to an opportunity for athletes to be challenged in a variety of cone patterns and competition races. The rapid change of direction and variety of angles throughout the drill are a great stimulus in training, but not the standard for change of direction or agility.

The rapid change of direction and variety of angles throughout the 3 Cone Drill are a great stimulus in training, but not the standard for change of direction or agility says @SteveBstein. Share on X

In 2015, I had the opportunity to visit with the Milwaukee Bucks of the NBA and spend a few hours with Coach Mike Davie. Along with Suki Hobson, Coach Davie was doing great work with ACL return to play and patellar pain management. The topic of data collection around linear speed and change of direction came up and I shared the frustrations I had felt with the 5-10-5, especially for basketball players. Davie shared with me a test they were using for performance, but also as a gauge for return to play.

The Setup:

  • Athlete starts 5 yards from a laser gate, with a line 5 yards beyond the gate.
  • Athlete sprints through gate, touches foot to line, performs 180° cut, and sprints back through the gate.
  • Repeat for the other foot.

Finding the athlete’s best times on each foot can highlight:

  1. Athlete’s ability to use speed in and out of a cut.
  2. A difference in cutting side—indication of imbalance and future injury risk.
  3. Return to play—how close are they to previous best and/or opposite side (ankle and knee injuries)?

I brought this idea back to our facility and we beta tested it for a couple months, then mixed it in with 5-10-5.  Immediately we were impressed with how quickly we could set up the 180 Cut Test and have athletes running it with minimal instruction. As a staff, our focus was back on coaching the skill of change of direction vs. coaching an athlete to perform a test. Overall athlete engagement improved, as there was less time standing waiting and less frustration about the repeated errors they experienced executing the 5-10-5.

We were impressed with how quickly we could set up the 180 Cut Test and have athletes running it with minimal instruction—our focus was back on coaching the skill of COD vs. coaching an athlete to perform a test, says @SteveBstein. Share on X

Fast forward 5 years, and the only athletes we now had training 5-10-5 were preparing for a football combine event—instead, our athletes were running 100’s of 180° cut tests each week. Often at the professional and college level, coaches track numbers every 4-12 weeks, and early in our group training business, we followed suit. There wasn’t enough control in the private setting to actually capture prime performance numbers. A few factors were the number of games played over the weekend, fatigue, and soreness from other training as well as overall fatigue from school and life. We moved to a system of daily data captures, so that over the course of 8-12 weeks, a pattern of performance was identified compared to one-off testing days.

From over 10,000 tested reps, we realized that the test wasn’t just a test, but a fantastic training stimulus—the ease with which we could repeatedly time the movement drove high intent on each rep. The simplicity of the setup allowed it to be quick and portable, with all ages of athletes picking it up within 1 or 2 reps—meaning we weren’t coaching how to perform the drill, but rather coaching how to sprint and cut better! Athletes were challenged to incorporate strategy to maximize performance, meaning pace, angles and projection. With only a foot touch to the line vs a hand touch, athletes were creating shapes that we would see in sport and allowed a better connection of training to competition!


Video 1. 180° Cut Test.

Video 2 180° Cut shown in a team setting.

Performing a team athletic assessment with the Sportreact 2-gate setup, 16 athletes were able to get 3 reps each side in 6 minutes, in addition to Linear Speed testing, Vertical Jump, 10-5 RSI Test, and Broad Jump. Together this creates a great picture of athleticism in addition to sport coach feedback on how they apply it in competition.

Simple Standards to Get Started

After timing and recording over 10,000 reps of middle school, high school, and college athletes we were able to categorize data into average, above average, and excellent for male and female athletes. Having these standards is highly valuable to give a vision on Day 1 of where an athlete is compared to where they need to be. Instead of just saying a specific number, it becomes a range that athletes move into and out of—which is important for those returning from injury or those with a low initial training age.

A table showing time categories for running. Columns list Middle School Male/Female, High School Male/Female, College Male/Female. Rows indicate Excellent, Above Avg., and Average, with specific time ranges in seconds.
Table 1. 180° Cut Test Benchmarks (5 yard lead-in and 5 yard touch and return).

Table 1. 180° Cut Test Benchmarks (5 yard lead-in and 5 yard touch and return).

Records were also regularly posted and competed for, but these standards stayed true year after year for the demographic of athletes we were working with across multiple team and individual court, field, and ice sports.

Return to Play

In a field focused on maximizing performance and athleticism, utilizing the 180° cut as a precursor for injury and return to sport is crucial. The desirable ratio side-to-side is similar to that in order to be cleared for return to play from an ACL: 95% of the healthy side.3 Even in a “healthy” athlete, if there is a significant discrepancy, that should be addressed. The issue could be a mobility, strength, or technical issue—and just like a muscular imbalance side to side, or a significant difference in the ability to hop and stick, there is an increased likelihood of injury.

    “The ankle is the most common site of injury in 24 of 70 sports. Ankle sprain accounted for 76.7% of injuries, followed by fractures at 16.3%. Basketball and soccer have a higher proportion of ankle injuries. In soccer, the risk of injury during match play is 4 to 6 times greater than during training.

    Once an ankle sprain occurs, up to 80% will suffer recurrent sprains, and up to 72% develop recurrent symptoms or chronic instability. Basketball athletes are 5 times more likely to injure an ankle after a prior ankle injury, with a recurrence rate of 73%. Recurrence most strongly correlates with premature return to sport and a prior ankle injury.”2

Utilizing the 180° Cut to assess prior to injury—and then add value to the discussion whether an athlete is ready to be on “no restrictions” status or not post-injury—is an invaluable addition to training. When data such as speed, jumping height, and ability is presented to athletes, the story becomes clearer.

Utilizing the 180° Cut to assess prior to injury—and then add value to the discussion whether an athlete is ready to be on ‘no restrictions’ status or not post-injury—is an invaluable addition to training. Share on X

Final Thoughts

In the end, the 180° Cut Assessment allows a consistent, reliable, and quick way to standardize change of direction. This approach falls into the mindset of “Let the test be the training and the training be the test,” utilizing a quality and adaptable timing system to drive intent every single rep.

Creative Utilizations of the 180° Cut Assessment in Training:

  1. Changing the lead-in distance and/or the distance after the gate—not standardized, but a great training stimuli.
  2. Having athletes compete in races—one athlete is timed and the other is not. This may or may not capture the athletes best, but poses question do they abandon technique in competition?
  3. Varying locomotions—not standardized, but changing it before a rep or during a rep based on visual or audio cue (examples: shuffle to start, sprint at the gate, shuffle back from the line touch to the gate).
  4. Incorporate sport skill into the cut (examples: dribble a basketball or soccer ball or cradle a lacrosse stick).

Setting the foundation of change of direction with the 180 Cut has allowed for extreme creativity in training, where the Sportreact system allows for an open, unpredictable pattern of movement while driving intent with a high standard of timing feedback. While the purest form of agility is competing in sport, the Sportreact system is providing the closest way to facilitate and measure it in training!

Since you’re here…
…we have a small favor to ask. More people are reading SimpliFaster than ever, and each week we bring you compelling content from coaches, sport scientists, and physiotherapists who are devoted to building better athletes. Please take a moment to share the articles on social media, engage the authors with questions and comments below, and link to articles when appropriate if you have a blog or participate on forums of related topics. — SF


Athlete performs Yuri exercise to develop horizontal force in early acceleration phase of a sprint.

Complications & Rising Action: Steps 1-6 in a Sprint

Blog| ByChris Korfist

Athlete performs Yuri exercise to develop horizontal force in early acceleration phase of a sprint.

Step 1 is the first of the many barriers we will encounter on our journey. It isn’t a true physical barrier, but more of a speed barrier. 3.0 m/s second would be that barrier—from my data on the 1080, that is the speed at which enough momentum has been generated to set up a proper first step. That is the speed that should project the body about .5m (I am measuring that with my 1080 equipment).

The reason why a “speed barrier” exists is that if an athlete is slower than 3.0 m/s in their first step, the body will not have the velocity to create stability. So, in order to create stability, the body slows down and puts the first step in place that prevents a fall. Watch someone learning how to ride a bike—without the initial velocity or push from a parent, they wobble and sometimes fall. The body reacts the same way. It will move in ways that create stability before allowing for performance. The easiest way to gain stability is to stand up. Or, do the opposite, lowering the center of mass—this is where you may see an excessive lean or an athlete pushing their hips behind the contact point. Both of these are the neurological responses for stability.

The reason why a ‘speed barrier’ exists is that if an athlete is slower than 3.0 m/s in their first step, the body will not have the velocity to create stability says @korfist. Share on X

So, before drilling all the different techniques that may or may not help the athlete reach the speed barrier (usually not), get physics on your side and hit that velocity, see how it works.

The Exciting Force: Next Steps in Acceleration

Let’s say you get to 3.0 m/s. We can now progress into the action of the story. Step 1 hits at about .5m with the foot underneath the center of mass with a rigid ankle. A good measurement is checking where the hip is in relation to the first foot contact. If the athlete reaches too far, the center of mass won’t project as much. I stole this idea from Coach Neel in Austin TX as a good way to measure actual placement. This also gives a good cue for the athlete to see where they are. Another consideration—too far in the initial landing spot usually sets up a really short second step. So, there is a sweet spot.

A person in motion, seemingly mid-jump or leaning forward, in an indoor setting. They are wearing athletic clothing and sneakers, with gym equipment and mats visible in the background. The image is slightly blurred.
Image 1. Using PVC pipes, I can set the appropriate distances so athletes can see where they need to get to or how close they are to the appropriate distance.

Back to the story. The foot hits and the athlete has projected out to .5m. The body has to deal with a vertical force while trying to push horizontally. The added vertical force creates a new barrier: the leg. In fact, it becomes a barrier for every step. An athlete has to move their center of mass (hips and torso) 60 degrees over a fixed point (leg) while getting pulled into the ground. If we take a 3-frame shot, this looks like the athlete is pulling their hips past their foot.

A person in a black top and red shorts is starting a sprint on an indoor track. The sequence shows them transitioning from crouching to taking off. Other people and equipment are visible in the background.
Image 2. 3-frame stills.

An exercise to strengthen this would be a simple resisted run. But most of the time, untrained athletes can’t find that position with a heavy weight around their waist. They tend to bend and lose the shin/torso relationship, and it becomes a different exercise. This is why I like Yuri’s. I can position their foot and torso in a position and pull their hips forward. Or, I can reverse the Yuri and use a cable with a foot strap around the ball of their toe, having them push back. This will force the athlete to keep a rigid ankle.

If I wanted to add a vertical component, an athlete can also add bands over their shoulders as well. Or, we can add an inter-thigh component and band up the opposite thigh as well.


Video 1. This is the basic Yuri, where the athlete has to pull their body across the band.


Video 2. Adding more to the basic, the HF requires more inter-thigh action using the hips to help the movement.


Video 3. Adding vertical pressure forces the body to deal with a vertical overload  in addition to 2 horizontal forces.

What muscles are working? What needs to be Sprint Strength. In 2021, the Scandinavian Journal of Medicine Science Sports published a brilliant paper entitled “How muscles maximize performance in accelerated sprinting” by Marcus Pandy, Adrian Lai, Anthony Schade, and Yi-Chung Lin. Measuring 19 foot strikes, they wanted to determine what muscles were working. The paper is a gold mine of information and warrants multiple readings. But, to sum it up: gastrocs, hamstrings, and glute medius need to be strong.

Gastrocs ideally contract from a plantarflexed position. While the Soleus offer vertical lift, the gastrocs need to create torque. This means that instead of raising vertically, like in a traditional weight room calf exercise, gastrocs will rotate the heel forward over the ball of the toe. Imagine a socket anchored on the ball of your big toe, your gastroc is what rotates the socket from a horizontal position (9 or 3 on a clock) to noon. Below is a good example of how to create torque in your gastroc exercises.


Video 4. Torque Calf Raise.

The hamstring involved in these early steps is the long head of the biceps femoris. This hamstring is the muscle that brings the foot into the ground. In fact, this is the hamstring that brings the leg into the ground throughout the entire sprint. The faster the leg goes into the ground, the faster an athlete runs… thanks Ken Clark. This movement is what creates tangential velocity.

The problem for this muscle on the first step is the bend in the torso. This position stretches the long head of the biceps femoris to its furthest position, which is why so many hamstring injuries occur in these early acceleration steps. How can we strengthen this position? Use a cable machine to pull down with your leg. Postural changes will change the exercise (Side note: in the next article, I will write more about hamstrings).


Video 5. Simple biceps femoris pull.

One would think the glute max would be next in the importance for the recruitment during the early steps in an acceleration. Controversially, at this point, research shows that the glute max helps to raise and stabilize the torso. Surprisingly, it is the glute medius that slides in for their number three spot for muscle recruitment during the early accel stages. More specifically, the posterior head of the glute med. Traditionally thought of as a hip abductor, the posterior head also extends the hip with the foot turned out. And, as mentioned in a previous article, if one end of the joint is locked, it will bring the other side forward. In this case, it will bring the opposite hip forward. The hip flexion will help create space between the peak hip flexion point and the ground, so the limb has extra time to accelerate into the ground.

An easy exercise is to get in an accel position and pull your swing thigh forward, forcing the rotation of the hip. I like to use a box to emphasize height in the swing leg.


Video 6. Low HF 2 Ways: focus on the far athlete.

Where are the traditional weight room exercises? They can help, but a problem arises when we flip the frames from the earlier trio image on the side and you can see what we are trying to do.

A series of three images depicts a person in black and red athletic gear kicking a soccer ball on an indoor track. The person is captured in different stages of the kicking motion.
Image 3. Trio of stills flipped vertically.

He pushes with his shins, staying parallel with his torso. He gets his horizontal force by rolling shins down. In the weight room, most machines deal in a vertical aspect, where novice athletes lose that shin/torso relationship. This is a hard pattern to replicate in a gravity-driven environment.

Another aspect of the accel phase that is worth noting is the frequency at which the legs cycle. After logging thousands of runs on the 1080 Sprint, I have found that really fast people have a high rate of turnover in the early stage of the run. One paper showed Usain Bolt having a frequency of 4.8hz in the first 10m of a 100m. Christian Coleman and Su Bingtian in 2018 were hitting about 4.6hz in the first 3 steps. An average HS sprinter is about 3.8hz. A simple coaching cue would be to focus on turnover when accelerating.

Moving on from acceleration, the next chapter in our story will be about top-end speed.

Since you’re here…
…we have a small favor to ask. More people are reading SimpliFaster than ever, and each week we bring you compelling content from coaches, sport scientists, and physiotherapists who are devoted to building better athletes. Please take a moment to share the articles on social media, engage the authors with questions and comments below, and link to articles when appropriate if you have a blog or participate on forums of related topics. — SF


Elvis Pereymer, CTO & C-Founder of Rock Daisy joins the SimpliFaster interview series The Connection to discus their company's Athlete Management System.

The Connection—Episode #3 Featuring Elvis Pereymer of RockDaisy: “Simplifying the Complex”

Blog, Podcast| ByThe Connection

Elvis Pereymer, CTO & C-Founder of Rock Daisy joins the SimpliFaster interview series The Connection to discus their company's Athlete Management System.

“One of the biggest hurdles that coaches often feel is that they’re overwhelmed by how complicated data collection can seem, and many times they don’t even know what to do with the data that they get.”

Elvis Pereymer, CTO and Co-Founder of RockDaisy joins SimpliFaster’s Nate Huffstutter for a compact and informative discussion about ways that coaches can use RockDaisy’s Athlete Management System (AMS) to make their workflows more efficient.

“Coaches can feel like they need to be a data scientist to use an AMS, but that’s not the case with RockDaisy,” says Pereymer. “We emphasize time-saving. At the end of the day, coaches we speak to spend hours on Excel and Google Sheets, and while it’s great that you have that skill, let’s get back to coaching and we help with that.” 


Connection Short Take #1: Elvis Pereymer on ways to simplify data collection and visualization.

We emphasize time-saving—coaches we speak to spend hours on Excel and Google Sheets, and while it’s great that you have that skill, let’s get back to coaching, says Elvis Pereymer @RockDaisyAMS. Share on X

Pereymer emphasizes that everything in their system is treated as a metric. This allows for immediate use of the software with basic inputs like attendance, which can then be visualized in templates that create a green-yellow-red indicators or other effective presentations. Additionally, with their vendor APIs, RockDaisy can sync, integrate, and present data from a wide range of popular technologies, from GPS to force plates to timing systems and much, much more


The Connection Episode 3. Watch the full episode with RockDaisy CTO & Co-Founder Elvis Pereymer.

“We’ve designed our dashboard templates to be incredibly flexible so they can work regardless of the data source you’re using,” Pereymer says. “Let’s say you’re collecting vertical jump data with a contact mat and you want to start visualizing it. You can use a dashboard we call ‘The Daily Trend by Athlete’ where you simply choose vertical jump as your metric, choose a date range, choose a group of athletes, and instantly you’ll have that data broken down over time, but with some context to it.”


Connection Short Take #2: Elvis Pereymer on the practicality and flexibility of RockDaisy’s dashboards.

Expanding on their mission to make data collection and communication a seamless process, RockDaisy have also begun developing workout builder tools for coaches to deliver programming directly to their athletes either via traditional printed training cards or digitally to the athlete’s device.

“Our workout builder is evolving,” Pereymer says. “But today a coach can create multiple programs and have each program individualized per athlete…and we have multiple delivery methods to deliver that to an athlete.

For more practical ways to use RockDaisy’s software tools, read:

  • “Demystifying APIs (to Spend More Time Coaching and Less Time Managing Data),” by Chris Tanck.
  • “Unlocking Success: The Benefits of Baseline Athlete Performance Tests,” by Chris Tanck.

Since you’re here…
…we have a small favor to ask. More people are reading SimpliFaster than ever, and each week we bring you compelling content from coaches, sport scientists, and physiotherapists who are devoted to building better athletes. Please take a moment to share the articles on social media, engage the authors with questions and comments below, and link to articles when appropriate if you have a blog or participate on forums of related topics. — SF


Athlete runs agility drill timed with the Freelap system with the results projects on the high school gym scoreboard.

Creative Ways to Time Agility Drills with Freelap and Post to Your Scoreboard

Blog| ByKenny Hill

Athlete runs agility drill timed with the Freelap system with the results projects on the high school gym scoreboard.

Use your imagination here–go ahead and picture a coach running an agility drill “the old-fashioned way.” Most of you will visualize that coach standing near the line with a stopwatch, trying to start the drill on the athlete’s initial movement and then stopping the watch as their body crosses the finish line. Times are being yelled out, maybe even written down, but most often…they are quickly forgotten.

I can remember being the athlete in the drill and never really knowing if I was getting better or if the coach just drank extra coffee that day and had a quicker stopwatch finger. Like a lot of schools, we had a record board that we kept; but, also like most schools, it was very hard to know how accurate any of those times actually were. Every athlete and coach can easily see that some athletes are faster than others, but bad times were always easy to dismiss on the coach’s slow finger instead of the athlete’s effort.

With the proliferation of automatic timing systems–like the Freelap timing system that we currently use–we are now able to start tracking accurate data on our athletes. Accurate data has made our athletes more accountable to the times, which has led to increased effort in the drills. As the effort increases on the training days, the times drop steadily and the results truly get displayed in the athletes’ respective sports.

Accurate data has made our athletes more accountable, which has led to increased effort in the drills. As the effort increases in training, the times drop steadily & the results truly get displayed in the athletes' sports. Share on X

I have been lucky enough to have graduated from and now coach at Deer Creek – Mackinaw High School, giving me roughly 20 years of experience with the athletic culture of the school. Agility training has always been a key component of our training at Dee-Mack. We’ve used a lot of drills over the course of time, but the two primary agility drills we always come back to are:

  • The 3 cone drill or “L drill” that you would see at the NFL Combine.
  • The 5-10-5 shuttle or “Pro-agility” (also a common Combine drill).

Now, we also mix in a variety of agility drills to challenge athletes in other planes, but as we try to collect data and show them improvement, these are the two drills that we come back to on a regular basis.

In this article, I’m going to cover how we transitioned our agility drills from stopwatches and clipboards to making use of the technologies we have available. I’m excited to share how we made some slight modifications to the drills we all know and love, and how those efforts have made training easier on the coach and the resulting data more accurate for the athlete.

Where It All Started

As our Head Girl’s Track Coach, speed is of the utmost importance to me. Additionally, in my role as Defensive Coordinator for our football team, I’m very big on change of direction and acceleration. Now, obviously speed is still a very important factor in football as well—as has been well documented by many authors on this blog–but these two areas have been the key focus for me in the training of our athletes since I joined the program as an assistant coach.

Our Freelap system has been a huge part of making these two very important qualities more of a focus in our programs. Back in early 2019, when I was still just starting to establish myself as an assistant football and assistant track coach full of youthful enthusiasm and great ideas (many of which came from the SimpliFaster blog and the Twitter feeds of its authors), I went to a booster club meeting with our girl’s head track coach and we asked them for $1,000. Then, I needed to ask our head football coach for $900 and the track program would make up the other $900 of the $2,800 Freelap package we were hoping to purchase.

All of this was a lot to ask from multiple programs and stakeholders, needing them to believe in this new style of training that I was a huge proponent of (while also being the youngest coach in the room). Thankfully, even though we had won state championships in football and track events in the 5 years leading up to this point, our coaches and school were open to new ideas and not just sticking to the way things have always been done.

My main pitch to them was that accurate times and immediate feedback would make a difference with our athletes. With everyone bought in, we started during track season and off-season football training with a focus on training flat speed with 10-yard flies and 40-yard dashes. We saw the improvements most people see when they implement Freelap, but at the time, using Freelap for timing agility just wasn’t something I was thinking of. I am by no means saying we pioneered using the Freelap for agility drills, but it was not something that I had really seen on Twitter, SimpliFaster, or any of the other mediums where I would get coaching ideas.

But once we started playing around with using it for the L Drill and Pro-Agility, we saw what a great tool this is for training agility—as well as for ease of use and data collection and athlete tracking.

Once we started playing around with using Freelap for the L Drill and Pro-Agility, we saw what a great tool this is for training agility—as well as for ease of use and data collection and athlete tracking, says @khill_19. Share on X

Steps Along the Way

For the last few years, we’ve been using Freelap to train agility and track athlete data over time. We recognized an immediate benefit from being able to call out accurate times and have kids see their times increase over months, striving for PRs in our drills just like they would on the track.

A huge benefit along the way for our athletes’ work in the agility drills was adding what we call “Athletic PE” for 7 periods of our school day, where before we only had 2 periods. Now, under Coach Cody Myers, we were getting most of our athletes training throughout the school day and were using Freelap 3-4 days a week to train speed and agility, tracking all the data.

In terms of how we actually set up and use the Freelap for our agility drills, our process is a little different than the way most people are doing it. We needed a way to just have 1 total time for the drill, so that when it went up on the board it was not just the last segment lap but a total time for the drill. So, we set up our drills with a START and FINISH cone, and we have 1 or 2 people do the job we lovingly call “cone swinging.” When we first started this way, Coach Myers or I would do the honors all on our own, but now we have the athletes do it for us.


Video 1. Zoomed-in view of “cone swinging.”

To run the drill:

  • The athlete starts a yard away from the middle, opposite of the direction they are going to start.
  • The START cone is placed in the mid-line of the drill or the start/finish line. When the athlete crosses the middle, our first cone swinger will pull the START cone back so the chip does not read on that cone again.
  • Once they have passed back through the middle on their 10 yard segment of pro agility or the initial down and back of the L drill, then the FINISH cone swinger will place their cone in at the finish line.

This can be seen in the above video—the process requires a bit more work while the drill is going on, but no times have to be added after an athlete has finished. This has created more meaningful times to be displayed on the video board and has made data tracking after the fact much easier.


Video 2. Pro Agility drill with cone swingers.

Video 3. L Drill with times posted on Daktronics scoreboard.

Where We Are Going

Recently, coach Myers wrote an article about how we use the Daktronics video boards in conjunction with our Freelap system for running 40s and doing some of our jump work. I’m going to expand on that a little bit with this piece on agility, as we use it in much the same way.

What we're trying to do is give that instant visual feedback to the athletes that not only they can see…but we can see, their friends can see, and that really pushes the drills to the next level, says @khill_19. Share on X

What we’re trying to do is give that instant visual feedback to the athletes that not only they can see…but we can see, their friends can see, and that really pushes the drills to the next level. We know that we are very blessed to have a cutting-edge technological system like a Daktronics video board at our disposal, thanks to some generous sponsors in our community. The biggest reason why we felt using the large format display in our training was necessary was we started seeing that as our training went on, kids would kind of coast or take drills off. Often, they would work just hard enough to look like they were working hard enough, because if the time wasn’t in large numbers where everyone could see, then they could get away with not giving their full max effort.


Video 4. Pro Agility drill with times posted on Daktronics scoreboard.

As coaches, we know this hurts their training and progress–what we have found is by using the video board to put those times on display for all to see, we have helped combat that issue and kept our athletes pushing hard thanks to that added bit of peer pressure.

Step-by-Step: How to Add Freelap Times to Your Video Board

If you are interested in taking your timed days and turning them into something more with your Daktronics video board & Freelap Timing System, here are the steps we have used to do that.

  1. Purchase an Apple TV (You will need an apple device running the Freelap application to mirror to this device later)—any Apple TV will work.
  2. Unbox Apple TV, plug in, turn on, and sign in.
  3. Go to settings—remember password for screen mirroring (you will want to do this privately so others will not have access to mirroring on the video board). If you would like to set a custom password, you can also do that.
  4. You will then have to turn on your video board (most outdoor systems have a breaker to flip).
  5. Connect the HDMI into the HDMI port on your DMP8000.
  6. Go to your show control computer and create a button that will play the HDMI input. Right click and click on “New Button.” Click 2 and select “Full Screen Takeover.” Click 4 and “Add”

Screenshot of a software interface with three tabs. The left pane shows menu options and file operations. The center pane displays a list of directories with checkboxes. The right pane shows a smaller directory view with selected items highlighted.

    You will follow the folders to get to the devices folder where you will select “DeckLink SDI Micro.”

Screenshot of a DISPLAY.STUDIO file browser showing a directory path and four items: a folder named nd_by_name and three DPF files named DeckLink SDI Micro, HS-TRACK-LAPTOP (OBS Preview), and Integrated Webcam. Options are Cancel and Open.

  1. Click on the button to play the HDMI feed on your video board (you should see the home screen of your Apple TV on your video board and will be able to use the remote for anything you want to do outside of timing).
  2. In your Freelap app, go to settings—general settings and adjust the full screen configuration. You will need to adjust it to display LAP if you are wanting it to display a time and MPH if that is what you are wanting to display.

Split-screen image showing two settings menus on a black background. The left menu lists options: Settings, Notifications, Learning Center. The right menu includes General Settings like time format, date format, units, and theme options, with a Save button.

  1. We will need to create an exercise. In addition to our agility day, we heavily track two other things, a full 40 with a 1-yard start and Flying 10s for miles per hour. We use an agility workout, just as a placeholder, and to allow us to use the LAP mode from the previous step. The screenshots are for the 2 sprint days, but the same process is followed for agility. You can even skip adding distances here if you do not want by clicking the No option

Screenshot of an app interface with sections MPH Video Board and 40 Video Board. It displays options for setting Sport, Timing Method, and Distances. Selections include Running, Standard Timing, and distance values. Save buttons are present.

  1. Go back to the homepage on the Freelap application. Click the + button and add a new workout. Choose the exercise you created and start the workout.

A smartphone screen displays a workout app with fields for workout date, time, sport, BLE device, athlete selection, team choice, and exercise type. Options include Running, Relay Coach BLE, Single or Team, Without Start List, and MPH Video Board.

  1. Take your iPad and you will go to mirroring to connect. At this point, type in the custom password given to you on the Apple TV. You can find this in your general settings.
  2. Choose full screen mode on the Freelap application and turn the iPad horizontally.

Gone are our days of using a stopwatch for our agility drills, but we still use a record board. The difference now is that the athletes believe the times that are on the board are accurate, thanks to the integration of our Freelap system. Athletes look forward to competing against their old PRs and trying to secure—or keep—a spot on our Top 10 board.

As we continue to try to push our athletes' training experience forward, finding new ways to challenge them has become pivotal in keeping them excited about their training, says @khill_19. Share on X

As we continue to try to push our athletes’ training experience forward, finding new ways to challenge them has become pivotal in keeping them excited about their training. Never be afraid to experiment with using the technology for training in new, creative ways. Dropping the stopwatches in a drawer has been the best thing we have done for our agility training, allowing us to drink our coffee or energy drinks between athletes’ reps without it affecting the training results for the day!

Since you’re here…
…we have a small favor to ask. More people are reading SimpliFaster than ever, and each week we bring you compelling content from coaches, sport scientists, and physiotherapists who are devoted to building better athletes. Please take a moment to share the articles on social media, engage the authors with questions and comments below, and link to articles when appropriate if you have a blog or participate on forums of related topics. — SF


Coach times sprinter using the new Dashr Silver reflectorless timing system.

Reflectorless Laser Timing—Athletic Timing Reimagined

Blog| ByChase Pfeifer

Coach times sprinter using the new Dashr Silver reflectorless timing system.

“If you don’t innovate, you die.” Both coaching and technology are constantly evolving and follow this mantra from Disney CEO Bob Iger to a Tee. When the playing field and the resources change, you adapt to make the winning move.

When it comes to electronic timing, coaches care most about a system’s:

  1. Accuracy
  2. Reliability
  3. Ease of use

If you have those three qualities and make the tech affordable, the industry now has a valuable tool that can be used at all levels of athletics. It was through these needs that Dashr was born.

In 2015, I was in my doctoral studies within the Nebraska Athletic Performance Lab when the University of Nebraska was looking to purchase a $30,000 timing system. Being the one engineer in the room, I stood up in the meeting and told them I could make what they needed for under $2k. By March, Nebraska had what they needed.

At that time, Nebraska tested every varsity athlete at least once per year. It did not matter if you played football or women’s rifle: we tested your 10 yd sprint, 5-10-5, and vertical. We also tested athletes in the walk-on programs, and it was there that I saw athletes not making the cut because they simply didn’t know how to test. A kid that could move great but didn’t know how to do a proper 3-point start or footwork for the 5-10-5 would lose out to another kid that had the proper coaching, but was obviously a lesser athlete.

I had a conversation with Boyd Epley (assistant AD at Nebraska at the time) about this, and he told me that athletes at the high school level do not have access to this kind of tech, so the parents that can send their kids to trainers/coaches outside the high school had a massive advantage. That is when he told me about his company Epic Athletic, and his goal to provide affordable tech to high schools. Based off his lengthy experience in the industry and the constant testing that I was a part of, I assembled a team to make a commercially available timing product geared toward high schools.

After two years of use, refinement, and validation with the University of Nebraska, we released our first Dashr timing product (2.0) in 2017. Over the years, continuous improvement to the mobile app and hardware has created an easy-to-use laser timing system, which offers athlete data management that enables programs of every size to take advantage of electronic measurement.

Innovation is essential when it improves an existing solution or creates a solution where one was not yet available. In laser timing, we were an innovator back in 2017 by becoming the first system controlled exclusively by a mobile app. This allowed for a more adaptive, more intuitive user interface while greatly reducing the cost of production. Now that we have been in the industry for nearly a decade, it is time for another game changer.

When it comes to electronic timing, coaches care most about accuracy, reliability, and ease of use. If you have those 3 qualities and make the tech affordable, the industry now has a valuable tool to use at all levels of athletics. Share on X

Reflecterless Laser Timing

Most technology comes with its own challenges—to find space for innovation, we started by looking at the main challenges faced by coaches with laser timing technology. We have found that their main challenges include:

  1. Range – How far can the timing gates can be from each other or the control module? Utilizing wireless technology or lengths of cables, this may be 40 yards, 60 yards, or up to several 100 yards.
  2. Sunlight – Does external light impact the timing system? With a laser to reflector system, light is bouncing around and direct sunlight can make it difficult for the sensor to detect the laser.
  3. Set-up and footprint – How long does it take to set-up the system, and how much space does it take up? Extending multiple tripods and aiming lasers at reflectors takes up time and space.
  4. Portability – Are you able to pack up the system for travel and safe storage?
  5. Data Management – How easily can you save, track, analyze, and distribute testing data?
  6. Continuity of support – How does a coach stretch their funds to best help their athletes? The needs of a coach’s program is constantly evolving, but budgets are limited.

What you get by addressing all these challenges come together with the Dashr Silver timing system.

Dashr Silver timing gates do not use a reflector. Reflectorless means that where previously you would need to set up two tripods, you now only need one. Reflectorless means that you no longer need to line up lasers and reflectors and worry about them becoming misaligned. Reflectorless means that set up is simply placing a laser on the ground and turning it on.


Video1. Dashr Silver in use at the 2024 FBU Futures Camp

Now let’s dig into how we are attacking these key challenges coaches face with electronic timing.

1. Range

A big part of making the Dashr system innovative and affordable required being able to operate the system with a mobile app on the coach’s phone or tablet. We all have a computer in our pocket, why spend another $1,000+ plus on a custom control module? The challenge with using the coach’s device is that there is no control over the capabilities of that device.

Two otherwise identical devices might have different apps, different cases, or one may just be a lemon…and, on top of that, what are the Bluetooth capabilities? How good is the WiFi/network connection? If the phone is placed on the ground, what happens to wireless connections? These are all things that can easily be solved through a quick call or email to go over best practices, but it can be hard to get operators to completely read instructions or get on a call in the middle of a testing event.

With Dashr Silver, all the lasers connect to each other—so there will be no more reliance on the coach’s phone or tablet outside of a simple connection to the starting laser. Just keep your phone near the starting gate and let the system roll! If you are doing a linear sprint or laps around a track, we recommend you keep each laser within 75 yards of the preceding one, and you can connect up to 10 lasers at once—so, with 10 gates you could go as far as 675 yards!

With @DashrMPS Silver, all the lasers connect to each other—so there will be no more reliance on the coach’s phone or tablet outside of a simple connection to the starting laser. Share on X
Diagram showing a Bluetooth connection from a smartphone to a starting laser. The starting laser connects via RF to additional lasers, with each connection spanning up to 75 yards. A maximum of 10 silver lasers can be connected.
Image 1. The Dashr Silver connection protocol/range.

2. Sunlight

Any laser-to-reflector system needs to take the light from sunlight into consideration. Our Dashr Blue lasers greatly reduce the sun’s impact compared to our 2.0 laser, and following our “Outdoor Tips” will make sure the sun does not affect the system. The challenge here is that the user needs to follow these instructions when they have a thousand other things going on.

Thanks to our new technology, the sun has absolutely ZERO impact on the reflectorless Dashr Silver system! Orient the laser however you would like, indoors or outdoors.


Video 2. Using the Dashr Silver system from every angle in full sunlight.

3. Set up & Footprint

With the Dashr 2.0 lasers, we went through a dozen or more tripod manufacturers to find a lightweight, compact, and sturdy tripod without ever finding a great solution. With the development of Dashr Blue in 2021, we decided to design our own tripods. Being tech guys, designing a tripod was not the core of what we were working on—but taking the time to do this was a massive upgrade in the product that should have been addressed earlier. The user experience regarding the setup and teardown of the system—as well as the reasonable weight of the complete system—was central to making a system that could easily be used by a single coach at short notice.

This being said… Dashr Silver only requires mini tripods, so set up is incredibly fast as there is no need to extend legs, adjust heights, screw on components, or hit a reflector with a laser. The footprint of the system is also reduced from two tripods with a 12-22 inch radius down to a single, low-profile tripod with a 12 inch radius. With Dashr Silver on a track, you can run two sprints using three lanes compared to one sprint using three lanes when using traditional laser timing.

The @DashrMPS Silver only requires mini tripods, so set up is incredibly fast as there is no need to extend legs, adjust heights, screw on components, or hit a reflector with a laser. Share on X

Because of the need to aim the previous laser models, every tripod required a mobile head on it. When it came to the design of the Dashr Silver device, the simplest answer was to do what every other laser timing gate had done before it and simply provide a singular mounting point for an external aiming device. But when you step back from this feature, you will notice that there are only two distinct ways that this device needs to be aimed. It either needs to aim horizontally to capture a three point start or angled up to catch a torso running by. The simplest answer turned out to be the best, which was to simply provide two fixed mounting points:

  • Use the one at the bottom for a hand start.
  • Use the angled one for a through gate.
A gym floor with blue and green court lines. Two tall tripods stand on either side and a smaller, flat tripod lies on the ground between them.
Image 2. Dashr Sliver gate next to Dashr Blue gate.

4. Portability

Dashr timing systems have always been designed to be portable, but when using laser-to-reflector systems, the sheer number of tripods required for larger events adds up quickly. An Under Armour combine with 1,000+ athletes uses three lanes of the 40yd dash with a split, along with three lanes of the pro-agility and L-drills. With the Dashr Blue system, this requires 24 taller tripods and 6 mini tripods, along with our recommended tripod and phone holder at each station. With the Dashr Silver, this is reduced to 15 mini tripods.

Additionally, the shift from AA batteries in the Dashr Blue system to the USB-cabled external battery opens up additional power opportunities, depending on where you do your testing. You might have your own USB power banks or choose to simply plug the gates into the wall in your facility during training.

Now it will be even easier to travel and deploy your timing system!

Multiple images display silver and blue Dash-branded cases on a gym floor. The cases are open, revealing various black tripods and equipment inside. Some stands are assembled beside the cases.
Image 3. New Dashr case next to an old one. All the components removed.

5. Data Management

Coaches got into coaching because they love their sport and want to see their athletes succeed. With all the demands on the time of their athletes, it is up to the coach to find the most efficient ways to use their limited time to help their athletes reach their potential. The Dashr Dashboard is a great tool for doing this. It automatically brings all your testing data together, preventing additional record-keeping steps and potential human errors. With that said, there is hesitation amongst coaches to give up the tradition of a clipboard and pencil. Decades of results were recorded on clipboards, why should it be abandoned now?

With all the demands on the time of their athletes, it is up to the coach to find the most efficient ways to use their limited time to help their athletes reach their potential. The @DashrMPS Dashboard is a great tool for doing this. Share on X

Now is the time, because for no additional cost, the coach can allow athletes to self-sign up, provide biometric data, and retrieve their results all while reducing the time-requirements placed on the coach. The coach creates a Roster on their Dashr Dashboard and simply posts the unique Invite Code on their bulletin board (or email, text, etc.). The athlete downloads the Dashr Player Profile App for free and enters the code.

Now, the athlete is instantly added to the coach’s account and is a member of the new roster. Seconds after an athlete records a result on the field, their phone receives that result, providing the athlete with a full record of all their results at any time, without the coach having to lift a finger.

With the Dashr Player Profile App, athletes can track their progress, run reports, enter competitions, create trading cards, and even increase their chances of getting recruited.

A collage of smartphone screens showing the Dashr app interface. Screens display features like connecting with coaches, tracking improvements, viewing results, sharing achievements, and joining competitions. Diagrams and performance metrics are visible.
Image 4. Screen displays in the Dashr Player Profile App.

6. Continuity of Support

It is one thing to have access to technology and equipment, it is another to know how to properly use it and benefit from all the pertinent features. A main goal for us at Dashr has been to err on the side of having too much information available to our users. This makes for complicated web development and upkeep, but we have an operational walk through for every drill we offer through the app as well as details on each product we provide. In addition, we have a searchable list of articles that dive even deeper into the system. We have made the system incredibly user friendly, but we want our users to explore all the possibilities available.

In addition to online resources, we support online chat, email, and phone—as well as the ability to schedule video calls with our team. If you have a question, concern, or just want to learn more, please feel free to reach out!

From a financial perspective, we have worked to make all our technology as affordable as possible—but electronic timing is one piece of an ever-evolving ecosystem for a coach. That is why we will continue to develop new technologies and reimagine existing ones—like the jump mat—to offer as many solutions as possible under one platform. As it currently stands, timing, reaction testing, jumps, biometrics, simple AMS, reporting, and data distribution (Player Profile App) are available through Dashr and we have a long list of additional products and software updates in the works. Our goal is to be the singular solution for the coach who needs multiple products and software platforms.

A young athlete wearing a sports jersey and shorts jumps on a grassy field during a sports event. Other participants and a coach, seated and wearing a cap, watch and take notes. Palm trees and a blue sky are in the background.
Image 5. Dashr Jump Mat released Jan 2025.

How to Operate Dashr Silver

Now that you know what advancements have been made, let’s get to operating the new Dashr Silver system!


Video 3. Silver in operation. 

Operation is as simple as it gets.

  1. Register your Silver laser in the app.
  2. Select the drill you want to run.
  3. Connect the equipment.
  4. Test your athletes.

Detailed instructions for this can be found within our online resources for drill operation. Simply select a drill to check it out.

When you first open up the Silver system, you will notice that all of the lasers are attached to mini tripods and angled up. This orientation is used for static starts as well as splits/finish gates. As previously mentioned, there is another mounting location on the laser for a horizontal set-up.

When setting up a Silver laser, place it on the ground and plug it into an included USB battery. For static starting using the angled orientation, position the laser so that when the athlete is at the starting line the laser hits their waist (2.5-5 ft from the laser). Both you and the athlete will know this because the lights on the laser will turn red when someone is in the laser. For these starts, the clock will start when the athlete leaves the laser.

For your downfield gates (optional splits and the finish) you will use this same set-up. Make sure your laser is oriented along the line you want them to cross.

Diagram illustrating proper positioning for running form video capture. Shows three setups: front view (4-6 ft distance), side view (2.5 ft away angled at 5 ft height), and back view (6 ft distance) with cameras placed at each position.
Image 6. The more traditional Dashr Blue set-up compared the new Dashr Silver set-up.

Note that in order to hit the torso of the athlete, they should be 2.5-5 feet away from the laser. Being too close may not trigger precisely on their start due to their leg swinging through (body detection technology), too far and they will be outside the 6 foot window. If you want to increase this window, you can attach the sliver laser to a taller tripod using the horizontal mounting thread on the bottom of the Dashr Silver laser.

For static starts in a 3-point stance, we recommend using the horizontal mounting thread on the bottom of the Silver laser. There is no visible laser (like with Blue), but the lights on the Silver laser will go red when the athlete’s hand is in the laser—so it is easy for them to know if they are in the laser or not. If you are timing off the back foot in a 2-point static start, it is much easier to move or angle the laser to hit the foot because you are not needing to hit a reflector.

A small tripod-mounted electronic device with red and green lights is on a wooden floor. In the second image, a person is adjusting or using the device next to a black line on the floor.
Image 7. Silver laser-mounted horizontal on mini tripod.

We recommend timing off the hand in a 3-point starts, or using the flying drill with the athlete positioned just behind the starting laser for 2-point starts. However you decide to time your athletes, make sure that you are consistent.

Video 4. 3-point vs 2-point starts. 

There are sure to be additional advancements with reflectorless technology as new potential is realized. For one, the lights on the Silver lasers can be used for reactive drills. Currently, you can perform the reactive shuttle and the reactive agility drill using just Silver lasers, no Dashr React modules necessary. We anticipate adding in the ability to do reactive starts for dashes as well!

Conclusion

Adaptation and innovation will forever be a part of athletic training, and sometimes the best way to push training further faster is to pair it with technology that is as creative as you are as a coach.

Ultimately, coaching comes down to preparing your athletes with the right tools to set them up for success. We at Dashr are committed to bringing cutting edge technology to all athletes and finding ways to enable all athletes to reach their potential.

Since you’re here…
…we have a small favor to ask. More people are reading SimpliFaster than ever, and each week we bring you compelling content from coaches, sport scientists, and physiotherapists who are devoted to building better athletes. Please take a moment to share the articles on social media, engage the authors with questions and comments below, and link to articles when appropriate if you have a blog or participate on forums of related topics. — SF


A woman in athletic wear stands with hands on hips. Text on the image: Rapid Fire Powered by SimpliFaster Episode 9 Victoria Saucedo.

Rapid Fire—Episode #9 Featuring Victoria Saucedo: “Adapting to the New Realities of College Athletics”

Blog, Podcast| ByJustin Ochoa, ByVictoria Saucedo

A woman in athletic wear stands with hands on hips. Text on the image: Rapid Fire Powered by SimpliFaster Episode 9 Victoria Saucedo.

“You’re dealing with physicality, you’re dealing with IQ, you’re dealing with finesse, and you’re putting it all together in one conference and saying ‘hey, go do this 18 times.’”

What does it mean for a college S&C coach in California to suddenly find their team in a recently-reshaped, national-based conference playing teams from Texas to Pennsylvania, Kentucky to the Carolinas, Notre Dame to Boston College, and the southern tip of Florida to upstate New York? Joining the performance team for Stanford women’s basketball this past year, Coach Victoria Saucedo immediately found that within her responsibility to develop fast, physical, durable, and available athletes, crucial considerations would be both the high competitive level of each team on their schedule plus the logistical rigors of that schedule itself.

On a new episode of SimpliFaster’s Rapid Fire, Saucedo sits down with host Justin Ochoa for a quick and purposeful talk on the rapidly-changing landscape of NCAA sports. This involves managing athletes through a year-round season that more and more resembles a professional model…all while still dealing with student-athletes in a high academic setting and balancing games, team practices, mandatory lifts, and voluntary sessions.

“There might be a 20-30 minute lift where we’re still touching something they specifically need,” Saucedo says, describing how she plans and earns buy-in for the three optional workouts she plans to supplement the team’s two weekly lifts. “There may be some type of fascial movement, some type of VBT, some type of exercise they specifically need like a tendinitis protocol…or, even extra conditioning.”


Rapid Fire Episode 9. Watch the full episode with Coach Victoria Saucedo and Coach Justin Ochoa.

In a year-round model that only includes a 2-week off-season, Saucedo describes how she uses VBT, force plate data, and other performance technologies to support her athletes across the physical rigors of challenging practices, training sessions, and intense game play.

Adapting to the in-season complication of repeatedly flying from the west coast to the east coast, Saucedo has also instituted a hydration testing program—executed the day before, day of, and day after each game—to monitor and mitigate the risk of dehydration from all of those longer flights.

“When I compute the hydration testing and I input the numbers and those come up different colors, I shoot it to the players and let them know how many water bottles and electrolyte packets they should be drinking,” Saucedo explains. “And then we test again the next day and hopefully (the numbers) are all up.”

When I compute the hydration testing and I input the numbers and those come up different colors, I shoot it to the players and let them know how many water bottles and electrolyte packets they should be drinking, says @saucyy_vic. Share on X

With the travel demands, in addition to cramping issues and dehydration, on the road Saucedo has to account for:

  • Whether she will have designated facility to plan lifts in on the or if she will need to create a plan using a hotel weight room.
  • Number of stops involved in the cross-country flight and how to account for proper nutrition during that time span.
  • Which east/west direction and legs of a flight lend themselves to napping and how to manage those sleep protocols.


Rapid Fire Excerpt. Victoria Saucedo on the new-look ACC and planning as a west coast coach in that conference.

“I’m worrying about recovery, worrying about injury mitigation, worrying about stiffness” Saucedo says. “And coming back (from the east coast), whether it’s after a win or a loss…it’s just so much longer.”

Since you’re here…
…we have a small favor to ask. More people are reading SimpliFaster than ever, and each week we bring you compelling content from coaches, sport scientists, and physiotherapists who are devoted to building better athletes. Please take a moment to share the articles on social media, engage the authors with questions and comments below, and link to articles when appropriate if you have a blog or participate on forums of related topics. — SF


A series of three images shows a person in a black shirt and red shorts starting to sprint on an indoor track. The person is in various stages of the start, with blurred movement depicting speed. Background includes seating and another person standing.

The Zero Step: Winning Before the First Foot Hits the Ground

Blog| ByChris Korfist

A series of three images shows a person in a black shirt and red shorts starting to sprint on an indoor track. The person is in various stages of the start, with blurred movement depicting speed. Background includes seating and another person standing.

It shocks me every time I ask an athlete “how do you work on starts” and their response is “I don’t.” They might do squats or cleans, but they don’t work on the actual start itself. They go through full workouts of vertical force and do nothing to develop horizontal force. There is currently an overwhelming amount of research to back up the importance of horizontal force on a great race start.

One of my favorite papers is from Giuseppe Rabita et al, “Sprint Mechanics in World-Class Athletes: a New Insight into the Limits of Human Locomotion.” In this incredible 2015 paper, Rabita shows that—in elite sprinters—the biggest difference is the 0 step: or, who projects their hips the fastest and farthest, which requires the most force and power. As a high school coach the past 33 years, I believe the 0 step is even more important at this younger level. If you win the 0 step…in most cases, it is over.

So, how can we win the 0 step?

Athletes in maroon and black uniforms spring off starting blocks in an indoor track race. The track is red with white lane markings. A man in a red outfit and other people are visible in the background.
Image 1. What does it look like to win the 0 step out of the blocks?

The 0 step is what happens before the athlete’s foot hits the ground. If we have data on what that looks like, we can replicate it in training (caveat: all my data is from my 1080 Motion equipment—my numbers may vary from yours due to environment and other factors). In order to be fast, you need to hit 3.0 m/s or 6.7 mph on your first step. If the athlete has not reached that threshold, their body is not moving fast enough to get the center of mass forward enough to get the first step under or behind the mass.

To be fast, you need to hit 3.0m/s or 6.7mph on your 1st step. If the athlete has not reached that threshold, their body is not moving fast enough to get the center of mass forward enough to get the 1st step under or behind the mass. Share on X

This results in some decelerating effects—for example, the first step becomes a brake because it is too far in front of the center of mass. It lands there for balance, so the athlete doesn’t fall. Another effect to gain stability is to stand up. The subconscious mind is looking for stability. The conscious brain knows it is in a race, so it will set the eyes closer to the finish line. This is why people lean forward in their starts. So, before you try to technique your way to a better start, make sure that you have the initial velocity to support the technique.

An 8 N/kg push should get your center of mass to travel about .5m or .54 yards. That would get the athlete to move 3.0 m/s. Herein lies the “weight room conundrum.” I have seen a huge squatter generate 5 N/kg and 1.3 m/s by the first step. And guys that can’t squat or clean a respectable amount, but can push out at 3.5 m/s generating 8.7 N/kg. It is not always about how much can the athlete lift in any case necessary, but whether they can direct the force appropriately and usefully.

In a traditional weight room mindset, more is better. Or, farther is better. But the problem is in the future of the run. A huge push might be too much for the body to keep up with, resulting in a braking second step that can’t possibly keep up with the projection, resulting in a deceleration early in the run. Bottom line? There is a sweet spot.

Sprint Strength and the 0 Step

What is Sprint Strength for this first push? Sprint Strength is generating 8 N/kg in a horizontal fashion off both feet. The most common error is that athletes push off the front foot and just swing or step the rear leg forward. There is no rear leg drive. Rear leg drive is 40% of the equation on a 0 step.

Sprint Strength is generating 8 N/kg in a horizontal fashion off both feet. The most common error is that athletes push off the front foot and just swing or step the rear leg forward. There is no rear leg drive, says @korfist. Share on X

Remember back to the days of Physics class? Force is getting a still mass to move. The back leg has to start the action in motion with a huge shove forward. The huge shove does move the mass forward, but it also rolls the front-leg knee down into a horizontal position while moving the hips forward—ideally keeping the front shin at about 20 degrees. What it should look like is that as the knees are even with the front leg in the blocks, the athlete’s belly button should be over the line.

Two athletes in motion at the starting blocks on an indoor track, wearing athletic gear. They appear to be sprinting as others watch in the background. Various sports equipment is scattered around.
Image 2. The athlete on the left is close. His knees are even, but instead of pushing forward, he is pushing up. The athlete on the right is in a correct position.

How can I train that huge shove? Elevate the back foot with a focus on pushing the knee down. The higher you place the back leg on the blocks or even a wall, the more forward roll with the front knee you will achieve.

Video 1. As you can see here, the athlete’s back foot is on top of the blocks—that is usually high enough.

You can eventually move that foot closer to the ground and then put a hand or two down, depending on what you are timing for. If they stumble out, they are not going fast enough to be stable.

Another easy tip is to take a false step with the front foot. By picking up the front foot and driving from there back, it gets the athlete’s momentum moving quickly and their front shin has no choice but to roll forward.


Video 2. Horizontal push with unloaded 1080 Motion cable to collect data.

For the actual push, readers should note that the athlete above is pushing against the ground concentrically, under no load. What is generating the force in the position? Research says it is dominated by plantar flexion and knee flexor moments. The better sprinter produces double the power of the next athlete from the knee flexor (“Lower Limb Joint kinetics during the first stance phase in athletics sprinting: Three elite case studies,” Bezodis, et al, 2013). It is plantar flexion with knee flexion under no load.

So, we set up a hack squat scenario from a single leg.


Video 3. Hack Squat Step up. Vastus Lateralis is the main driver. If we push off our forefoot, we can add plantar flexion.

Or we can do a very narrow single leg jump. The key here is to drive with the leg and not extend through the lower back.


Video 4. Narrow Squat Jump.

Why a hack squat and not a back squat or clean? My concern with a squat or a clean is that we recruit with our lower back to stand up a common movement when pushing or pulling against a bar. A great exercise to deal with this issue is a single, single-leg jump. To make it harder, try driving off the ball of the big toe with the heel elevated. That is the strength that is needed to push.


Video 5. Strap Hack Squat.

For a more “on the track” exercise to target this quality, try a resisted run. Focus just on the first and second step under resistance. As the athlete progresses, lower the resistance so they have to balance and push.


Video 6. First step exercise using resistance from 1080 Quantum.


Video 7. 2-Step exercise with band resistance.

If you are lucky enough and own a 1080 Sprint, focus just on the first step. If the athlete needs to hit 3.5 m/s, put enough tension on the line to slow the athlete down by 50%. Hopefully, if they increase speed at that tension, they are generating more force.

To sum up, our initial move needs to be a minimum of 3 m/s, generating 8 N/kg. If you can’t hit that number, the next chapter is a different story than what it should be.

Since you’re here…
…we have a small favor to ask. More people are reading SimpliFaster than ever, and each week we bring you compelling content from coaches, sport scientists, and physiotherapists who are devoted to building better athletes. Please take a moment to share the articles on social media, engage the authors with questions and comments below, and link to articles when appropriate if you have a blog or participate on forums of related topics. — SF


A person exercises in a gym, performing various activities: pulling a weighted sled, doing barbell lifts, executing a glute bridge, and doing push-ups beside a kettlebell. The gym is equipped with various fitness machines and weights.

Time-Efficient Strength Training Methods for the Tactical Athlete

Blog| ByBrandon Holder

A person exercises in a gym, performing various activities: pulling a weighted sled, doing barbell lifts, executing a glute bridge, and doing push-ups beside a kettlebell. The gym is equipped with various fitness machines and weights.

Tactical athletes don’t often work a standard 9-5 schedule. There are multiple factors that would then affect a prescribed training program—varying types of shift work, long hours (12+ hour shifts), family life, and exposure to higher amounts of stress than the average individual.

When coaching these men and women—or if you yourself are considered a tactical athlete—it is important to utilize time-efficient methods when training due to the uncertainty of training schedules. Time limitations, or being willing to alter workouts entirely, is the reality that we must operate in.

In my experience working with this population, the training compares more closely to that of the general population than that of elite athletics. This is not to discredit any of the unbelievably-fit tactical athletes that exist out there, but it more reflects their day-to-day lives and responsibilities outside of work—simply put, their primary job is not to play a sport.

While the tactical athlete must be physically fit and prepared to handle the demands of the job, a majority do not have a high training age or much exposure to structured strength and conditioning programs. This allows improvements to be made, especially in strength, while requiring less of a stimulus or needing more advanced training methods. Just having a simple, sound, and scalable training program will work better than you think.

While the tactical athlete must be physically fit and prepared to handle the demands of the job, a majority do not have a high training age or much exposure to structured strength and conditioning programs. Share on X

The methods listed in this article work because they allow the individual to fit it in any schedule restraint, are intense enough to build strength, and can be progressed or adjusted week to week.

5 Practical Training Methods that Work

Here are some training methods to utilize in the busy tactical athlete’s strength and conditioning program.

  • Cluster Sets
  • EMOMs
  • Total Rep Sets
  • Drop Sets
  • Escalated Density Training

Cluster Sets

Cluster sets are fantastic to build strength due to the improved rep quality performed throughout the series. To perform, you will break up a set into clusters—these are typically 3-5 within a set (though not limited to that number). Each cluster has a prescribed rep scheme, with rest allotted in between each before moving on to the next.

For example, instead of performing a set of 12 continuous reps of an exercise—where technique and rep quality will diminish the longer the set continues as fatigue sets in—a cluster set would instead break up the set into more palatable clusters, with a short break in-between.

Keeping this example, the set will be executed by performing clusters of 4 reps. The individual will perform 4 reps, then rest 20 seconds, perform 4 reps, rest 20 seconds, perform 4 reps to complete the set and rest 2-3 minutes before performing the next set.

Diagram titled Cluster Sets showing 12 Reps divided into three parts: 4 Reps, then :20 seconds rest, followed by 4 Reps, then another :20 seconds rest, and ending with 4 Reps.
Figure 1. Cluster Sets.

While there is a time and place for these continuous higher rep ranges in training, considering the strength training for the tactical athlete, we want to perform the heaviest, fastest, highest quality reps in the safest, most efficient manner (all things that cluster sets can accomplish if used appropriately).


Video 1. Hex bar deadlift cluster set.

Here are some examples of cluster sets often used in training.

  • Chin-Ups (5.3.2)
  • Incline Bench Press (4.4.4)
  • Squat /Deadlift (1.1.1.1.1)

EMOM

Every minute on the minute is a training method in which athletes perform a set at the start of each minute for a set time frame. While this protocol is often used for general conditioning, it is great to build strength or strength endurance in the tactical athlete.

While the EMOM protocol is often used for general conditioning, it is great to build strength or strength endurance in the tactical athlete, says Brandon Holder. Share on X

To maintain the focus on strength development, the reps should be kept lower during these series to ensure more recovery and a greater emphasis on a higher weight selection. EMOMs will typically be set for 8 up to 15 sets, so while the weight selection is higher than usual, it is still in the 70-80% intensity ranges for this population. Exercise selection should be kept lower (1-2 exercises per series) for similar reasons.

  • Kettlebell Swings x 5 + Weighted Push-Ups x 5
  • Sandbag Shoulder Squat x 1 each side.
  • Front Squat x 3


Video 2. EMOM kettle bell swings and push-ups.

Total Rep Sets

Total rep sets are simple to execute: select a number and work to complete that number in as few sets as possible, breaking it up however needed. To develop strength, the weight selection is key for this—a standard recommendation would be loads of around RPE 8-9 or 75-90%. There are always situations that could alter this, so use your best judgement.

Be sure to stop a rep or two shy of hitting complete failure and keep rest limited, typically not working over a minute’s length. This method will work within a rep range of 20-50 reps depending on the exercise.

Some examples of this method would include:

  • Dumbbell Push Press x 30
  • Single Arm Dumbbell Rows x 25 each arm
  • Barbell Inverted Rows x 50

Progress this by increasing the reps required for completion each week, 5-10.

This method also works great for accessory exercises, for performing high amounts of repetitions with resistance bands, or for using machine exercises to accumulate more training volume in a shorter amount of time.

Often, accessory work can get overlooked (or even skipped), so prioritizing it in a different, more intense manner can help encourage the tactical athletes to not overlook these blocks of training.


Video 3. Lying leg curls in a total rep set.

Some examples:

  • Band Pull-Aparts x 100
  • Lying Leg Curls x 50
  • Band Face-Pulls x 100

Drop Sets

Utilizing drop sets in training is great to increase the intensity of a set in a safe, seamless manner. When using drop sets in training for the tactical athlete, the concept won’t be exactly the same as many may first remember from reading Muscle & Fitness magazine. Instead of performing each set to complete failure, the athlete will work to a prescribed rep scheme—once completed, the weight will then be reduced 10-20% and performed again to failure, or a rep or two short.

When selecting exercises to perform with this method, they need to be adjustable, quick, and safe.

Weight Drop Set Examples

  • Chin-Ups
  • Bulgarian Split Squats
  • Dumbbell Chest Supported Rows

Drop sets can also be performed by instead adjusting the position of an exercise, making it more or less advantageous throughout the series.

Mechanical Drop Set Examples

  • TRX Inverted Rows
  • Dumbbell Bench Press

Escalating Density Sets

I first read about escalating density training (EDT) years ago through a training manual written by Jim “Smitty” Smith. This training method focuses on short, intense bouts of work alternating between exercises for a listed time frame.

Select 2-3 exercises, movements that will not interfere with another, or train similar patterns/muscle groups. I would recommend keeping this simple by alternating between upper and lower body exercises. The exercises will be performed back-to-back, with little-to-no rest in between for the time frame.

The objective is to perform as many quality reps as possible, avoiding failure or poor-quality repetitions. The sets are performed up to 10 reps, saving a rep or two in reserve. If performed correctly, the reps will naturally drop throughout the set but allow the individual to accumulate a high workload.

If Escalating Density Training (EDT) is performed correctly, the reps will naturally drop throughout the set but allow the individual to accumulate a high workload. Share on X

Like the other protocols, weight selection is crucial for the method to be performed successfully. Performed too heavy and there will be limitations on the total work completed; performed too light and you will be hindering any positive gains that could be made.

This checks off a lot of training boxes for the tactical athlete due to the short time, anywhere between 5-20 minutes per set, and the ability to train total body through major movement patterns efficiently.

Here is an example listed below.

A workout table showing reps for RDL and chin-ups alongside elapsed time. Row 1: 10 reps for both, 0 seconds. Row 2: 8 and 7 reps, 55 seconds. Row 3: 7 each, 1:55. Row 4: 4 and 6 reps, 3:10. Row 5: 4 and 5 reps, 4:10. Row 6: 3 and 5 reps, 5 minutes.
Figure 2. Sample 5-minute EDT Set.

When progressing EDT sets, work on increasing the work being completed in the set through increasing the time or total reps completed; if exceeding those goals, then consider increasing the weight being used.

Examples:

  • RDL /Chin-Ups
  • Reverse Lunges /Single Arm Rows
  • Kettlebell Overhead Press /Lateral Squats
  • Floor Press /Front Squat         


Video 4. Escalating Density Training, alternating TRX rows with DB RDLs.

Conclusion

Tactical athletes can have a range of limitations that don’t allow for an “optimal” training schedule—they should, however, still follow a program designed to make progress while being flexible enough to adjust to their chaotic schedules.

Implementing the training methods presented in this article will help offer solutions to provide that framework to a training program.

Since you’re here…
…we have a small favor to ask. More people are reading SimpliFaster than ever, and each week we bring you compelling content from coaches, sport scientists, and physiotherapists who are devoted to building better athletes. Please take a moment to share the articles on social media, engage the authors with questions and comments below, and link to articles when appropriate if you have a blog or participate on forums of related topics. — SF


  • « Go to Previous Page
  • Page 1
  • Page 2
  • Page 3
  • Page 4
  • Page 5
  • Interim pages omitted …
  • Page 164
  • Go to Next Page »

Primary Sidebar

Latest Posts

  • How We Got Our First Sprint Relays to State in Program History
  • Science, Dogma, and Effective Practice in S&C
  • Rapid Fire—Episode #16 Featuring George Greene: Holistic Athlete Management

Topics

  • Changing with the Game
  • Game On Series
  • Getting Started
  • Misconceptions Series
  • Out of My Lane Series
  • Rapid Fire
  • Summer School with Dan Mullins
  • The Croc Show
  • What I've Added/What I've Dropped Series

Categories

  • Blog
  • Buyer's Guide
  • Freelap Friday Five
  • Podcasts

COMPANY

  • Contact Us
  • Write for SimpliFaster
  • Affiliate Program
  • Terms of Use
  • SimpliFaster Privacy Policy
  • DMCA Policy
  • Return and Refund Policy
  • Disclaimer

Coaches Resources

  • Shop Online
  • SimpliFaster Blog
  • Buyer’s Guide
  • Freelap Friday Five
  • Coaches Job Listing

CONTACT INFORMATION

13100 Tech City Circle Suite 200

Alachua, FL 32615

(925) 461-5990 (office)

(925) 461-5991 (fax)

(800) 634-5990 (toll free in US)

Logo of BuyBoard Purchasing Cooperative. The word Buy is yellow and shaped like a shopping cart, while Board and Purchasing Cooperative are in blue text.
  • Facebook
  • Instagram
  • Twitter
  • YouTube

SIGNUP FOR NEWSLETTER

Loading

Copyright © 2025 SimpliFaster. All Rights Reserved.