• Skip to content
  • Skip to primary sidebar
SimpliFaster

SimpliFaster

cart

Top Header Element

  • Facebook
  • Instagram
  • Twitter
  • YouTube
  • Login
  • cartCart
  • (925) 461-5990
  • Shop
  • Request a Quote
  • Blog
  • Buyer’s Guide
  • Freelap Friday Five
  • Podcast
  • Job Board
    • Candidate
    • Employer
    • Facebook
    • Instagram
    • Twitter
    • YouTube
You are here: Home / Blog

Blog

Glycolitic Training

Anaerobic Lactic (Glycolytic) Conditioning for Beginner, Intermediate, and Advanced Athletes

Blog| ByAlex Roberts, BySteve Haggerty

Glycolitic Training

Fair warning: improving an athlete’s anaerobic lactic abilities is not for the faint of heart. The work is intense and, if done correctly, can push an athlete to their limits. With that said, an efficient and powerful anaerobic lactic system can play a significant role in how much success athletes have during competition. Nothing good comes easy, right?

This article will take a look at the anaerobic lactic (glycolytic) energy system. Details will be given on when the glycolytic system is relied upon, how the system creates energy, and various methods to improve the system for different levels of athletes (beginner, intermediate, and advanced).

Anaerobic means “without oxygen,” and lactic means there will be a buildup of the wrongly vilified byproduct of anaerobic (and aerobic) exercise, lactic acid. The glycolytic system does not require oxygen to produce adenosine triphosphate (ATP), which is the fuel your muscles run on, and lactic acid will accumulate within the muscles being used.

As mentioned in our previous article on aerobic fitness, the aerobic energy system can produce ATP for extremely long durations but cannot produce energy at a fast rate for explosive movements. This is where the anaerobic systems (both the glycolytic system and the anaerobic alactic system, the topic of a different article) come into play. The glycolytic system can provide ATP for 60–90 seconds before fatigue sets in. To use a car analogy, if the aerobic system is an athlete’s gas tank, the glycolytic system can be thought of as a car’s ability to operate at its highest RPM for just over 60 seconds. Imagine putting the gas pedal to the floor and going as fast as the car is capable of for one minute.

Most people have been led to believe two myths about lactic acid: It causes the burning sensation felt during a workout and is responsible for muscle soreness the day after a workout. Share on X

When discussing the glycolytic system, it’s important to discuss the role of lactic acid. The anaerobic system’s main substrates are glucose (blood sugar) and glycogen (stored sugar). We will use the general term “carbohydrate” for both glucose and glycogen in the rest of this article. During the process of breaking these substrates down to produce ATP, lactic acid is created and accumulates in the working muscles. Most people have been led to believe two myths about lactic acid:

  1. Lactic acid causes the burning sensation felt in the working muscles during a workout.
  2. Lactic acid is responsible for muscle soreness the day after a workout.

These are both false. The buildup of hydrogen causes the burning sensation felt during exercise, and the tearing of muscles during exercise causes muscle soreness in the days after a workout.

Lactic acid actually assists in prolonging exercise duration, as it can be converted to glucose—which can then be used to produce more ATP. There are multiple steps in the process of converting lactate to ATP that are outside the scope of this article, but with the help of mitochondria and the Krebs cycle, lactate oxidation takes place and ultimately leads to lactate being an important substrate that affects how long an athlete can perform for.

Measuring and tracking glycolytic endurance may not be as important as measuring and tracking aerobic fitness unless the athletes being trained are short- to mid-distance track runners. In that case, comparing sprint times and comparing splits are easy ways to see what progress is being made.

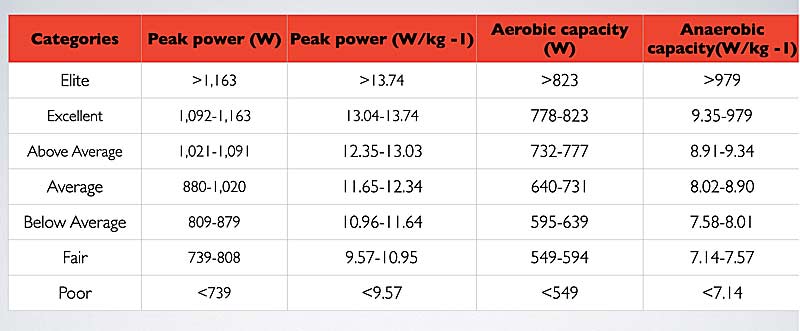
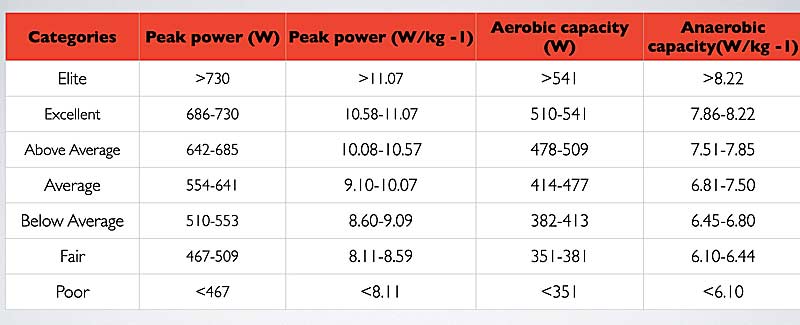
If coaches or athletes want to measure glycolytic endurance, the 30-second Wingate test is easy to perform and doesn’t take long to complete. An explanation of the test can be found here. Zupan et al. (2009) conducted a study to create classification guidelines for the 30-second Wingate test for both male and female collegiate athletes. Their results can be found below.

Wingate Men
Figure 1. Wingate test peak power and anaerobic capacity classifications for male collegiate athletes (Zupan, 2009).

Wingate Women
Figure 2. Wingate test peak power and anaerobic capacity classifications for female collegiate athletes (Zupan, 2009).

Author’s note: Throughout these articles on conditioning, the main citation used will refer to Joel Jamieson’s Ultimate MMA Conditioning. While this book is specific to mixed martial arts, the methods discussed in it can be applied to any sport, from cross country to shot put. During my years as an athletic performance student, my mentors referred to Ultimate MMA Conditioning as the gold standard for energy system development (ESD). As I have ventured into running a year-round high school athletic performance program for various sports, I have found Jamieson’s methods to be second to none.

Simply put, conditioning is specific to the sport at hand, says Alex Roberts & @Steve20Haggerty. Share on X

Jamieson defines conditioning as “a measure of how well an athlete is able to meet the energy production demands of their sport.” This means that a basketball player who can jump, cut, and shoot efficiently while still making it back on defense for the entirety of the game is just as conditioned as a long jumper who can jump and recover three or more times during a meet. Simply put, conditioning is specific to the sport at hand.

How Do You Improve Glycolytic Fitness?

There are two components of glycolytic fitness that affect how efficient the system is: glycolytic power and glycolytic capacity. There are two contributing factors to glycolytic power. The first is how “glycolytic” your muscle tissues are. Glycolytic muscle tissues rely heavily on the anaerobic system for ATP and contain a high number of the enzymes that are necessary to break down glucose for energy.

Another contributing factor to glycolytic power is the development of the nervous system. The more developed an athlete’s nervous system is, the more efficient their body will be at activating and coordinating the muscles needed to produce high levels of power.

How do you go about developing an athlete’s nervous system? Spend more time lifting relatively heavy weights in the weight room.

Glycolytic capacity mainly depends on how well an athlete can tolerate the byproducts of anaerobic exercise. Included in this is how efficient the body is at converting lactic acid to glucose and, ultimately, back to ATP. As mentioned previously, the buildup of hydrogen during intense exercise is believed to be the cause of the burning sensation in the working muscles. The presence of hydrogen decreases the acidity of the muscle cells, and the ability to clear this hydrogen from the working muscles helps improve glycolytic capacity. Another factor in glycolytic capacity is the availability of the proper substrates, mainly glucose and glycogen.

There are fewer ‘moving parts’ in the glycolytic system than in the aerobic system. This means the ability to improve this system through training is limited, says Alex Roberts & @Steve20Haggerty. Share on X

It should be noted that there are fewer “moving parts” in the glycolytic system than in the aerobic system. This means the ability to improve this system through training is limited. Research has shown that the glycolytic system is also limited by genetics (Bouchard et al., 1992). You should keep these two points in mind when training to improve an athlete’s glycolytic system.

To summarize, there are two ways to improve this system:

  1. Glycolytic power is improved by producing as much energy as possible in the appropriate amount of time (15–90 seconds).
  2. Glycolytic capacity is improved by sustaining this high level of output for a longer period.

Beginner

The beginner athlete has rarely, if ever, done true conditioning work. It’s even rarer for them to have done conditioning specific to their glycolytic system. Before implementing any specific conditioning parameters with these athletes, your initial focus should be on having them understand what working at maximal intensity for 15–30 seconds feels like. An easy way to do this is by having athletes perform 15-second reps of a full-body, high-intensity movement (sprints, assault bike sprints, sport-specific movements, etc.). One set of three reps, with 90 seconds of rest between reps, should do the job. Ensuring they know what 100% intensity feels like will help prevent wasted conditioning sessions.

Once athletes have a feel for where they should be working during glycolytic training sessions, you can implement glycolytic power intervals. Glycolytic power intervals improve glycolytic fitness by:

  1. Forcing the working muscles to rely more on anaerobic metabolism.
  2. Increasing the presence of enzymes involved in breaking down glucose within the working muscles.

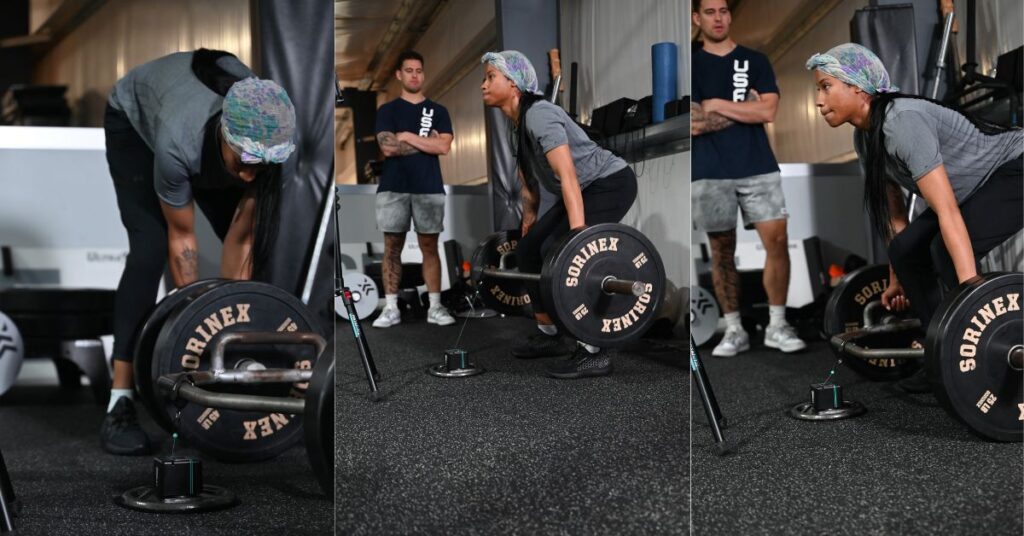
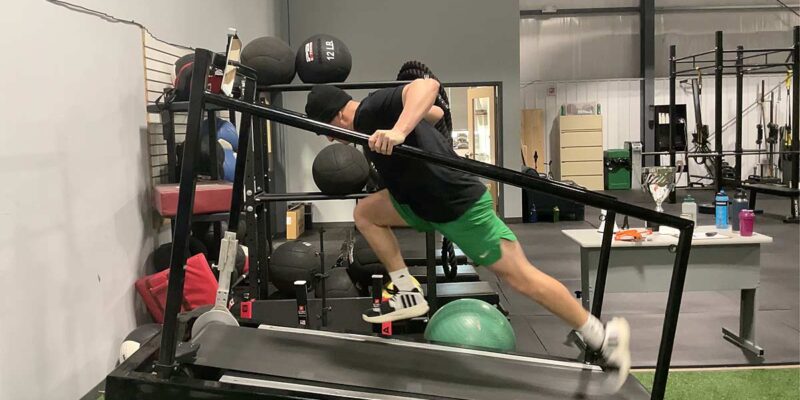
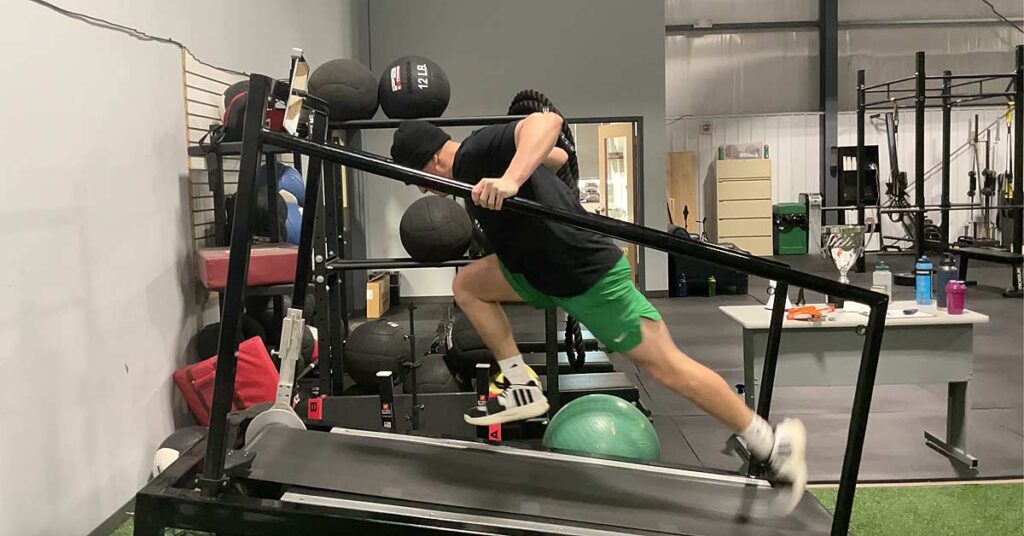
With any type of power training, any effort less than maximum will be insufficient. Furthermore, strict rest periods are essential to ensure the desired training stimulus is being targeted. A wide variety of exercises can be used as long as they are explosive (preferably full-body) movements. Sprinting, lunge jumps, squat jumps, etc., are all great choices. Exercises specific to the athlete’s sport can also be prescribed. Keep in mind that only the working muscles will reap the adaptations mentioned above.

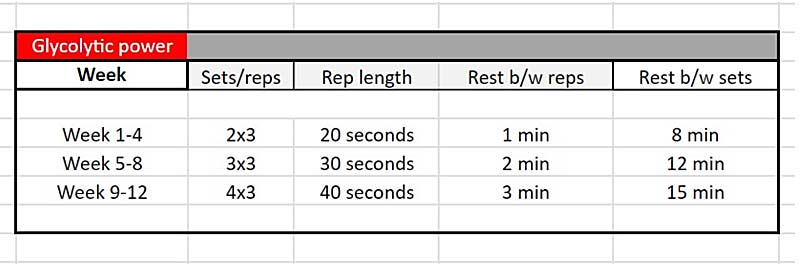
During glycolytic power intervals, reps should last 20–40 seconds (starting on the lower end). Athletes should be given 1–3 minutes of rest between each rep, depending on how long their working reps last. Perform three reps per set and 2–4 sets per session. They should be given 8–15 minutes of rest between sets. Active rest is ideal, but beginner athletes can start with true rest for the first 1–2 months.

To reiterate, the rest intervals—both during and between sets—are extremely important to ensure the proper stimulus is being provided for beginner athletes, says Alex Roberts & @Steve20Haggerty. Share on X

One session per week should be sufficient for beginner athletes. To reiterate, the rest intervals—both during and between sets—are extremely important to ensure the proper stimulus is being provided. The beginner athlete won’t be able to fully recover between reps but should be able to fully recover between sets.
Glycolitic Power

Intermediate

An athlete who has performed at least three months—or one full off-season—of consistent glycolytic power intervals can be bumped up to the intermediate level. With a solid foundation of glycolytic power abilities, the focus can be shifted to maintaining maximal glycolytic outputs for longer periods.

Glycolytic capacity intervals are the next step in improving the ability of the glycolytic system. The shift from power intervals to capacity intervals simply has to do with work-to-rest ratios. Capacity intervals call for longer work intervals and shorter rest periods. These intervals improve the glycolytic system by increasing the body’s ability to buffer the byproducts of anaerobic exercise, leading to longer maximal outputs.

Apart from the differing work:rest ratios, glycolytic power and capacity intervals are very similar. The same exercises can be used. In fact, if not the same, it’s recommended to at least keep the exercises similar. This helps keep the transition from power to capacity work as smooth as possible.

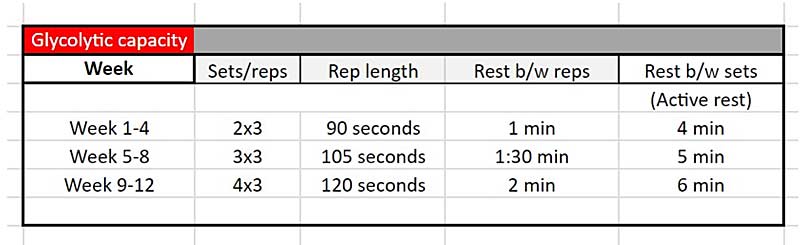
During glycolytic capacity intervals, reps should last 90–120 seconds, and rest intervals should be decreased to 1–2 minutes. Three reps per set and 2–4 sets per session remain identical to the power intervals. Active rest (jogging, jump rope, stationary bike, etc.) between sets should last 4–6 minutes.

It’s important to remind athletes to complete all reps at the highest intensity possible, even if they feel fatigue setting in halfway through the reps, says Alex Roberts & @Steve20Haggerty. Share on X

With shorter rest and longer work intervals, this method will be much more intense than the power intervals. It’s important to remind athletes to complete all reps at the highest intensity possible, even if they feel fatigue setting in halfway through the rep. Being able to perform at high intensities for long periods can directly affect an athlete’s success.
Glycolitic Capacity

Advanced

After athletes have completed at least three months or one full off-season of glycolytic capacity intervals, they can begin working on advanced methods. They should have a solid foundation of glycolytic power and capacity. Staying consistent with the methods described in the previously published aerobic system article, advanced athletes will transition to explosive repeats specific to the glycolytic system.

Glycolytic explosive repeats can be thought of as intensified glycolytic capacity intervals, meaning even shorter work:rest ratios. This method increases the presence of enzymes involved in glycolytic ATP production and continues to improve the body’s ability to buffer byproducts of anaerobic exercise.

The glycolytic explosive repeat method calls for increased work and decreased rest every week. Work intervals can be anywhere from 12–40 seconds, while rest intervals should be between 10 and 30 seconds. Choose 1–3 exercises (ideally similar/identical to the previously used exercises), perform 6–10 sets per exercise, and complete this up to three times in a session. Six to eight minutes of active rest should be completed between each series.

As athletes get further into the program, work and rest times should be inversely related... The explosive repeat method is simple and easy to progress, says Alex Roberts & @Steve20Haggerty. Share on X

As athletes get further into the program, work and rest times should be inversely related. This means work intervals will start low (12 seconds) during week 1 and increase to 40 seconds by the time week 4 comes around. Rest intervals will start high (30 seconds) and decrease to 10 seconds during week 4. Example:

  • Week 1: 12–15 seconds of work, 30 seconds of rest.
  • Week 2: 15–20 seconds of work, 20 seconds of rest.
  • Week 3: 20–30 seconds of work, 15 seconds of rest.
  • Week 4: 30–40 seconds of work, 10 seconds of rest.

The explosive repeat method is simple and easy to progress. By the time athletes reach the advanced level, they should be well-prepared to handle weekly intensifications. To make your program’s glycolytic explosive repeat portion last longer than four weeks, increase the work interval by 2–3 seconds and decrease the rest interval by 2–5 seconds each week.

An athlete’s ability to generate extremely high amounts of power during short, explosive bouts of exercise can be the difference between winning and losing. First, getting athletes to understand what it feels like to work at or near maximal exertion and then progressively having them maintain that output for a longer period will get their bodies better at producing and maintaining high energy outputs.

Athletes who can maintain power outputs throughout the full length of the competition—whether that’s the wrestler whose tenth shot looks and feels identical to their first shot, the running back who breaks a 70-yard touchdown run in the last minute of the game, or the 400-meter sprinter who can put it into sixth gear on the final straight of the race—are usually the ones that come out on top. Increase an athlete’s glycolytic ability and watch them pull away from the opponent during the final moments of competition.

References

Bouchard C, Dionne FT, Simoneau, JA, and Boulay MR. “Genetics of aerobic and anaerobic performances.” Exercise and Sport Sciences Reviews. 1992;20:27–58.

Cairns SP. “Lactate oxidation in human skeletal muscle mitochondria.” American Journal of Physiology-Endocrinology and Metabolism. 2013;304(7):E686–E694.

Jamieson, J. (2009). Ultimate MMA Conditioning. Performance Sports Inc.

Zupan MF, Arata AW, Dawson LH, Wile AL, Payn TL, and Hannon ME. “Wingate Anaerobic Test Peak Power and Anaerobic Capacity Classifications for Men and Women Intercollegiate Athletes.” Journal of Strength and Conditioning Research. 2009;23(9):2598–2604.

Since you’re here…
…we have a small favor to ask. More people are reading SimpliFaster than ever, and each week we bring you compelling content from coaches, sport scientists, and physiotherapists who are devoted to building better athletes. Please take a moment to share the articles on social media, engage the authors with questions and comments below, and link to articles when appropriate if you have a blog or participate on forums of related topics. — SF


Steve HaggertySteve Haggerty is a sports performance coach at Parkview Sports Medicine (PSM) in Fort Wayne, Indiana, and an NFL Draft Prep specialist at Bommarito Performance Systems (BPS) in Miami, Florida. He spent the last two years at BPS working with NFL Pro Bowlers as well as MLB and NHL All Stars in their off-season training. Haggerty took on the lead role of preparing college football players for the NFL Combine and Pro days. At PSM, he leads the youth “Edge” program with athletes from a variety of different ages and sports.

VBT for Basketball

Using Velocity-Based Training to Mitigate Injury Risk for Basketball Players

Blog| ByJustin Ochoa

VBT for Basketball

By now, we all understand the mistake in the phrase “injury prevention” training, but we also understand the concept and its well-intentioned origin. We definitely, absolutely, positively can NOT train to 100% prevent sports injuries—not playing sports is the only way to prevent sports injuries.

What we CAN do is utilize the technology and advances in coaching to help our athletes reduce certain risk factors that are controllable variables in injuries. Qualities like movement fluency, fatigue, training volume, proper use of equipment, and work capacity are all things that coaches can influence and help athletes optimize, which, in turn, reduces the risk of certain injuries.

IFTTT means if this, then that. It’s a term used in software that refers to the connecting of multiple apps and platforms to automate chain reactions. If this happens, then trigger that, that, and that to happen automatically.

This is how I view the concept of using training to reduce injury risk. Choose concepts and programming that serve an initial purpose but also lead to these automated chain reactions.

I firmly believe VBT can play a significant role in mitigating risk factors that could lead to common basketball injuries such as ankle sprains, tendonitis, and muscle strains, says @JustinOchoa317. Share on X

This is where velocity-based training (VBT) comes into play, and I firmly believe that VBT can play a significant role in mitigating risk factors. Again, not eliminating injury—not even reducing injury. Simply decreasing risk factors that could lead to common basketball injuries such as ankle sprains, tendonitis, and muscle strains.

Common Basketball Injuries

Sprains, strains, tendonitis, and tendinopathy are the most common basketball injuries at every level. We often focus on the tragic injuries, such as ligament tears, tendon ruptures, or broken bones, but those don’t happen at as high of a rate as the former. It’s just what we hear about in the headlines.

In every basketball locker room, there will pretty much always be an athlete battling at least one of those nagging injuries.

Basketball Injury Iceberg

Ankle Sprains

The most common example is an ankle sprain. Death, taxes, and hoopers spraining an ankle are the guarantees in life. Can you prevent them? No. Are there controllable risk factors? Yes.

Uncontrollable factors would be the dreaded “coming down on someone’s foot” ankle sprain. You can chalk those up to bad luck.

Other common sprains, whether from a sharp cut or a simple move they’ve done thousands of times, can be the most mysterious and frustrating injuries for basketball players. Many times, we can tighten up the laces and use adrenaline to get through the pain, but some sprains just point blank take us out, and there’s no looking back from there.

As it relates to training, one of the biggest controllable risk factors of ankle sprains is actually body composition. Research shows that we should place emphasis on ensuring that athletes have and maintain the appropriate body composition.

As it relates to training, one of the biggest controllable risk factors of ankle sprains is actually body composition, says @JustinOchoa317. Share on X

This may seem obvious in the world of football, where some of the athletes are strategically “overweight” or play a position that involves one-on-one combat every single rep, but it’s also valid for basketball players.

Body composition is very strongly related to conditioning, and conditioning is very strongly related to fatigue levels. We’ll talk about fatigue and its influence on injury throughout this article, but an athlete’s body composition will represent their playing weight, too.

On many basketball frames, an extra 10 pounds can really bring a lot of unwanted load and force into some of the cuts, plants, and landings that happen thousands of times throughout the season. If the athlete is not structurally capable of withstanding those forces, that could start to take a toll on joint and tissue health.

Two other major risk factors are an imbalance in ankle flexor strength and poor dynamic balance.

And lastly, fatigue. Fatigue—which is a common denominator in all injuries—is an important risk factor because of the domino effect it can have on other functions, such as proprioception, muscle activation, and neuromuscular response time.

Tendonitis/Tendinopathy

In the realm of tendon injuries, basketball players commonly suffer from tendonitis or tendinopathy in either the Achilles or patellar tendon.

When hoopers do too much too soon, that painful tenderness below the kneecap is a major sign of Jumper’s Knee. Usually, we see cases of this at the high school level after holiday breaks due to a rapid decrease in activity followed by a rapid increase in activity. At the more advanced levels, it can be more of an overuse injury that has a few additional factors at play.

Like ankle sprains, body composition is an important risk factor for both Achilles and patellar tendon dysfunction. The main culprit to these injuries, though, is a rapid increase or spike in loading that overwhelms the current capacity of the tendon or region of the body.

This is why you can all but guarantee seeing a few of these issues pop up during training camp or early in the pre-season. If an athlete did not adequately prepare for the game’s demands, that load tolerance imbalance will undoubtedly flare up as Achilles tendonitis or patellar tendon pain.

Muscle Strains

When it comes to muscle strains, the calves and hamstrings are the common areas of the body that basketball players will injure. As mentioned before, fatigue, body composition, and increased loading are key risk factors of muscle strains. Muscle strength is also a key factor. As the famous Westside Barbell saying goes, “Weak things break.”

And no, a basketball player doesn’t need to be as strong as a Westside Barbell powerlifter. Actually, I would highly advise against aiming for those levels of strength, but having a respectable level of relative strength will provide a resiliency and robustness to the athlete that can truly impact their longevity.

Vitruve Trap Bar

Strained muscles can be scary for basketball players because they are so sharp and immediate—the injury can feel like something much worse in the moment. We see this all the time—especially at the pro level—where there is an element of showmanship as well. A player goes down after an awkward move, and the crowd goes dead silent.

Fans, coaches, and teammates all base their assumptions on the player’s reaction…and it looks as if their career may have just ended.

The player limps off the court on their own strength, goes back to the locker room for 12 minutes, then comes back out and finishes the game with a triple double.

That illustrates the immediate pain, panic, and severity of a muscle strain acutely—and it’s even worse when it becomes a chronic injury or a recurring one. Many of these risk factors go hand-in-hand and layer with each other. These risk factors all overlap, and the kicker is that the No. 1 risk factor in ALL of these injuries is having a previous injury.

The kicker is that the #1 risk factor in ALL of these injuries is having a previous injury, says @JustinOchoa317. Share on X

So, a previous sprained ankle is a risk factor for calf muscle strain. And a prior calf muscle injury is a risk factor for an Achilles injury.

So, what do we do? Try to keep these risk factors minimized by all means. And we can try to quantify these efforts by using VBT.

Using VBT to Minimize Risk Factors

You can use velocity-based training for a lot of things in sports performance training, but at its core, I simply look at it as a quantification system. VBT quantifies movement velocity during training, which allows coaches to leverage real-time data to make informed decisions on load, volume, exercise selection, and intensity in an adaptive manner.

VBT systems like Vitruve can be implemented into any program and immediately make a positive impact because they give coaches objective information.
Injury Risk Venn Diagram
There are three essential keys to VBT when it comes to injury risk minimization:

  1. Individualized load prescription.
  2. Fatigue and recovery monitoring.
  3. Targeted neuromuscular adaptations.

1. Individualized Load Prescription

Precise loading suggestions are a huge benefit of using VBT. Unlike percentage-based programs or perceived effort tracking, the feedback from the lifting data is objective and unique to the athlete. This moves the needle for us in terms of injury risk reduction because appropriate loading of lifts leads to proficient execution with less compensatory movement.

Rapid increase in load and weakness are two major contributors to the risk factors of tendon injuries & muscle strains. Using VBT to prescribe individualized loads can directly influence these factors. Share on X

If we revisit the risk factors of tendon injuries and muscle strains, rapid increase in load and weakness are two major contributors. By using VBT to prescribe individualized loads, we can directly influence these factors.
L/V Profile Benefits
One helpful tool for load prescription is a load-velocity profile. I use the standard L/V profile protocol built into the Vitruve app; however, there are external spreadsheets that coaches can use as well.

An L/V profile provides a baseline for each athlete in terms of what loads are associated with what velocity ranges in any given lift. This method can also predict a pretty accurate 1RM, which gives coaches the option to utilize that for prescribing load as well throughout a program.

An L/V profile requires the athlete to perform 4–5 sets of 1–5 reps at increasingly heavier loads. These reps illustrate the inverse relationship between load and velocity, making it a unique profile for each athlete that can help coaches understand what qualities an athlete may need to enhance.

Most importantly, the L/V profile establishes a baseline of bar speeds at various loads—and how the athlete’s movement looks at each load. This is what can help with the loading prescription most because, based on that data, coaches can program sets for either target bar speeds or target loads and appropriately assign volumes for those sets that are in line with the athlete’s current ability.

Using this method to expose the athlete to progressive overload throughout a program checks two important boxes for us with respect to injury risk.

  1. Progressive: Assures us that athletes are NOT experiencing a rapid spike in weight room-related loads that would cause tendon pain or dysfunction.
  2. Overload: Assures us that athletes ARE developing strength over time, helping them adapt to training.

Can you do this without VBT?

Sure. Lifters did it for decades.

But can you precisely and objectively quantify the training and manage the data without VBT?

NOPE.

2. Fatigue and Recovery Monitoring

Another thing you can precisely and objectively quantify with VBT is fatigue level. Not only can we use VBT to look at readiness to train, but on a micro level, we can also look at intra-set fatigue.

Being able to control the micro helps influence the macro. In other words, monitoring fatigue daily can help reduce the over-accumulation of fatigue over the course of a program.

Again, in all of the injury risks we identified, fatigue was repeatedly a factor. Very rarely have we seen basketball players suffer non-contact injuries at the beginning of a game or practice: that is when we are most primed for performance, and fatigue is at a low level.

It’s usually in those ugly fourth quarters or toward the end of a tough practice when we see these unfortunate injuries.
Hierarchy of Risk Factors

At the micro level, one of the most impactful tools built into the Vitruve app is the intra-set fatigue monitor. Velocity loss during a set is an objective way to measure fatigue, and we know from research that more is not always better.

Training to failure was once believed to be the best way to get stronger—then, the threshold changed to at-or-near failure. Now that we have tools like Vitruve and other VBT devices to help us actually quantify velocity loss, the studies show that failure may occur around 30%–40% velocity loss—the drop-off between the first rep and the worst rep.

Thanks to the work of Pareja-Blanco in 2016, it is clear that outside of pure hypertrophy, there is no benefit of training at 40% velocity loss. When studied against a 20% velocity loss group over an eight-week program, the 20% group had similar strength gains, better sprint gains, and better jump gains and did so with 40% less volume over the course of the study.

Better results with less volume, less fatigue, and less risk of injury? Sounds like an absolute no-brainer to me.

Whether it’s built into the app or needs to be monitored manually by a coach or athlete, the velocity loss within a set is a critical metric when it comes to fatigue management with athletes. Share on X

So, whether it’s built into the app or needs to be monitored manually by a coach or athlete, the velocity loss within a set is a critical metric to pay attention to when it comes to fatigue management with athletes—which, in turn, can aid us in reducing other injury risk factors that are related to fatigue.

Some helpful ways that I’ve implemented this concept into my program include:

  • Using Vitruve’s built-in feature to alert the athlete when they’ve reached a 20% velocity loss. The app will flash red and make a loud noise, reminding the athlete what we have already discussed about velocity loss. No matter what, the next rep will be the last rep of that set.
  • Assigning velocity-loss cut-off sets. Instead of assigned reps, we estimate and assign the best load for a rep range and target bar speeds for those reps, and instruct the athlete to perform as many reps as possible until they hit 20% or more in velocity loss—then stop the set.
  • The above concepts are more strength-based; I assign a 10% velocity loss for power- or speed-based work. This helps keep the reps very powerful and fast, with high bar speeds, and even further reduces fatigue accumulation during more neurologically taxing lift selections.
  • And lastly, looking at the average velocity of a set as a whole and comparing it to the previous set(s). If the previous set has a 0%–5% velocity loss, that means we can adjust the weight to go heavier. If the previous set has a 5%–15% velocity loss, we can experiment with an increase in load but also stay put. If the previous set has a 15+% velocity loss, we’ll stay at that weight and emphasize that metric for the next set before either reducing the total remaining volume or adjusting the load to be lighter.

All of these strategies can be instrumental in controlling the day-to-day fatigue of our athletes. Not to mention, some athletes may need to be even more conservatively managed due to their schedule for the rest of that day. Maybe they have practice later, or a workout, or even a game—those velocity loss thresholds would become even stricter and more precise to make sure that we don’t interfere with game performances due to fatigue.

Another important consideration when it comes to injury risk management and fatigue management is that many of these injuries are incorrectly viewed as a biomechanical issue rather than a neuromuscular one.

Another important consideration when it comes to injury risk and fatigue management is that many injuries are incorrectly viewed as a biomechanical issue rather than a neuromuscular one. Share on X

As coaches, we’re quick to think that we always have the lift, drill, or program that can help avoid these injuries by enhancing the athlete’s structural integrity. And don’t get me wrong, that resiliency plays a huge role. But a lot of these injuries are not happening due to biomechanics.

Let’s take a non-contact ankle sprain, for example. The inversion moment of the sprain can happen as fast as 50 milliseconds. Even if we work on ankle function relentlessly, there’s nothing we can do in the weight room that is that fast. An extremely quick plyometric happens at 150 milliseconds. An elite-level sprint ground contact happens at around 90 milliseconds.

So, what can operate at speeds as fast as 50 milliseconds? Our brain. Our neuromuscular system.

This illustrates the neurological nature of some of these injuries, which showcases the importance of fatigue management. Of course, sprints, plyos, and lifting are crucial, but these alone cannot reduce the risk of injury.

Less fatigue can lead to a better performance from our neuromuscular system—more optimal and efficient “firing” patterns of our muscles. This neurological efficiency can lead to better usage of our structural system.

Therefore, while physical exercise is a non-negotiable component of injury risk reduction, we also need to make sure that our athletes can actually reap the benefits of their physical efforts.

“Robbing Peter to pay Paul” means to discharge one debt only to incur another. A lot of times that is what we unintentionally do in training. We train so hard to enhance the physical qualities needed to meet the demands of the sport, only to rob the neuromuscular system of its function and efficiency in the process.

Using VBT to help measure and manage fatigue can help us walk this fine line of training extremely hard but also recovering adequately, giving our athletes the best chance to perform at their best when they are under the most stress.

3. Targeted Neuromuscular Adaptations

Another great feature of VBT is the ability to chase specific adaptations with real-time feedback. This goes hand-in-hand with the previous two features discussed: we can prescribe specific loads at specific target bar speeds in an effort to unlock specific adaptations as a result of the lift.

This is great for training in general, but I want to zoom in a little bit on a specific scenario as it relates to the topic of injury prevention—return to play.

We know that a huge risk factor in injury is having a previous injury. So, if an injury occurs, it is even more critical to properly rehab and return to play with precision. If we can help the athlete restore function, we can potentially reduce the risk factors of re-injury.

Hindsight being 20-20, we can look at the Kevin Durant Achilles tear as an example of this. Earlier in that playoff series, he suffered a calf strain.

Potentially, that had an influence on his Achilles injury. Ultimately, he was one of the best players in the world on the biggest stage, so keeping him off the court would have been next to impossible—but that is the risk I’m sure he was notified of and completely willing to take to win a championship.

I know a large number of physical therapists, coaches, and practitioners who are now using VBT as a staple in their programs because of the valuable feedback given within each session. This can help both the performance and medical staff compare current performance with previous data (especially if they’ve used VBT in the past) to paint a clearer picture of where that athlete is in their recovery process.

VBT can help both the performance and medical staff compare current performance with previous data to paint a clearer picture of where that athlete is in their recovery process. Share on X

Even further, coaches and practitioners can start to compare metrics from an injured to a non-injured side and use that as a benchmark of recovery. Metrics like velocity, power, or range of motion can be extremely useful when looking at the effectiveness of an athlete’s rehab and strength program on their way back from injury.

Split Squat Assessment

Let’s take that same example of a right ankle sprain and put it into context. Using VBT to track this athlete performing a split squat, you notice that the left leg averages .65 m/s over a set of five reps, and the right leg averages .45 m/s over a set of five reps. Same weight, same reps, much different execution.

The athlete is telling you they’re good to go and feel ready to play. Of course, they are—athletes love to play. They’re tough. They want to compete.

Maybe their ROM tests even come back normal, and they look good when they move.

But you look at this VBT data and can undoubtedly say that there is a strength discrepancy on that right leg. Now, you can have further discussions or conduct further testing to see if additional interventions may be needed to help get the athlete back on the court.

I’m not saying you need to shut every athlete down until they’re completely symmetrical (good luck) or protect every athlete like a delicate little flower, but at least having this information accessible gives you the best chance to put them in situations to succeed.

If it’s the playoffs, maybe it’s “Tape it up and go get us a win.” If it’s the pre-season, perhaps it’s “Let’s take tonight off and do some extra rehab to get ready for next week.” The VBT data doesn’t force us to make any decisions; it just helps us make the most informed one.

To bring it all back together, we know for a fact that injuries cannot be 100% predicted or 100% prevented. However, we can identify risk factors that are more predictable and preventable and try to influence those factors with training.

Introducing a training aid, such as VBT, to help monitor and measure those efforts has shown to be well worth the investment in both time and resources. The more we know, the more we can help.

Since you’re here…
…we have a small favor to ask. More people are reading SimpliFaster than ever, and each week we bring you compelling content from coaches, sport scientists, and physiotherapists who are devoted to building better athletes. Please take a moment to share the articles on social media, engage the authors with questions and comments below, and link to articles when appropriate if you have a blog or participate on forums of related topics. — SF


Tyler Ray Jump Guys

Mastering Vertical Jump Technique with Tyler Ray

Freelap Friday Five| ByTyler Ray

Tyler Ray Jump Guys

Coach Tyler Ray is a pioneer of modern vertical jump technique and a 20-year veteran strength coach. Tyler’s early days as an athlete truly informed the coach he has become today. He competed for the University of Windsor Track and Field team and was part of three National Championship teams during his time there, competing as a multi-event athlete in the pentathlon.

Following this, he moved into the world of professional dunking and was able to increase his vertical jump to a staggering 48 inches, competing in shows and contests around the globe. With a background in human kinetics and education, Tyler quickly found his calling in working with athletes. Now, 20 years later, he is considered to be at the top of his field, and through the help of social media, he has grown his private-sector business to have more than 150 certified jump technique coaches worldwide (and growing). Tyler works out of his private gym at his home in Harrow, Ontario, Canada, right on Lake Erie. 

Freelap USA: How valuable was your playing and performing experience in terms of helping develop your content and coaching and build buy-in with your athletes?

Tyler Ray: It’s really the second half of the coin. For a coach, it always helps to have that reference point (playing), especially with what I do with vertical jumping. The “feel” aspect of jumping is so important. As my track and field career came to a close (as a multi-event athlete at the University of Windsor in Canada), I was exposed to the world of professional dunking through the medium of YouTube.

Flashing back to the archives of YouTube in 2005–2006, when it was just becoming a burgeoning source of entertainment, there happened to be a channel called Team Flight Brothers that featured random guys who just seemed to be on a different level athletically. Then, with the NBA and streetball came this specialty of dunking. Thankfully, with guys like Vince Carter and others following the lead of Michael Jordan in the early 2000s, dunking became something that was much more sought after.

I feel like I got into it at a really cool time, and I had a lot of really crazy experiences traveling around the world and competing in front of large crowds. That gave me a unique lens to coach through because it was in this kind of niche sport. I was creative with my workouts, and over the period of two years post-track and starting in the dunk scene, I added about 10 or 11 inches to my approach vertical jump—which was a really, really cool feeling.

Especially being in it myself, as it was this fringe sport and had such a specific focus on “how do I get my body, a human body, to displace itself the largest amount off the ground?” I firmly believe that jumping is one of, if not the most, all-encompassing human actions and movements that we have to display elite athleticism. Pro dunking was a really unique experience that is invaluable to who I am as a coach now.

I firmly believe that jumping is one of, if not the most, all-encompassing human actions and movements that we have to display elite athleticism. Share on X

Freelap USA: How would you boil down the biggest rocks and summarize your overall jump philosophy, and how did you go from there not being much information out there on this topic to becoming one of the world’s top coaches?

Tyler Ray: Technique is everything, and you work technique until the day you retire. It’s like weightlifting or any of those sports with such a high demand for efficiency; it requires constant touchpoints on technique. I was very used to technical practices with track and field. Since the combination of my training and coaching careers, I had worked with people who wanted to jump higher. They knew me as the guy locally—that’s where the name “the jump guy” came from.

I have athletes in multiple sports trying to optimize vertical jumping, which really is optimizing athleticism, just with vertical jumping being a measure of that. But from the world of pro dunking, how high you jump is so incredibly important to your success as a dunker because it gives you so many more options.

Efficiency is the vehicle; all the work you do in the gym is building the engine. It’s like, “Why wouldn’t I want to place that engine in a much higher-performing chassis, something that can really manage the forces and manage the power that it’s creating?” And that’s how I’ve always understood vertical jump technique. We create strength/power output—if you’re leaking energy in any one area through that sequence of jumping, then why have we worked so hard to create this power that you’re not using?

Aside from the concept of efficiency, a key is helping athletes determine what their body can tolerate and then finding out how close you can push it to that limit. Learning how to create and manage your maximum controlled velocity is a big misnomer. I think in the industry right now, it’s believed that more speed is better, right? And yes, it is, until it’s not.

We know that there’s a point of diminishing returns when speed becomes something that the physical body can no longer tolerate, and therefore, we have a breakdown in technique. Helping people find and establish that helps them craft a much more intuitive feel for the action of jumping.

There are people who just really spent more time jumping—when you distill it down to the core, they just did it more. We have patterning and priming for jumping, so I knew I could help people experience more of that. I hated hearing coaches and trainers say, “You either can jump or you can’t.” It was intellectually lazy. In my mind, we train every other skill, right?

Of course, you can train your efficiency and technique to be faster, so you can train your body to be more efficient in jumping. It’s simply allowing them to have a deeper understanding of when and why they pick up speed, when and why they lower their hips, when to accelerate, etc.

My job was to find a way to package and communicate that on a global scale because it was something that I inherently understood. I can tell when I coached it in my early years that I was speaking it in a way that I understood it, but not everybody initially got what I meant. How do I make this as palatable as possible to a large audience? I looked for things on technique over the years and never really found anything, so I just assumed that I was kind of doing my own thing.

Thankfully, the medium of social media allowed me to get a lot of that information out much further. Lo and behold, I found a large tribe of individuals who understood the importance, and it’s kind of just grown and scaled from there.

Freelap USA: In the last three years or more, you’ve had a business partner in a different country. How do you make that work at a world-class level?

Tyler Ray: It was challenging, for sure, to have a business partner three time zones away. And also because he was also a full-time engineer on top of being a full-time coach. Our meetings were challenging to make happen. I made the trip to him a couple of times a year and spent a week, and we would do a lot of our kind of brainstorming and things like that.

Being in the private sector before I brought a partner in, every decision that I had I could just commit to fully and move forward with. When you bring a partner on, you now have two different views on the same topic. How and what you communicate (to others) is now filtered through two layers to ensure both voices are heard and understood. Within the business, their voice needs to be understood, and their vision needs to be taken into consideration.

There was a period when we were feeling each other out, figuring out how to work with each other, and determining what each other’s strengths were so that we could use our time together efficiently. If you’re getting into business with someone for the first time, be prepared to have a longer period in the beginning, even just to yourself, when you can determine exactly what roles each individual will take on. This will ensure your business stays efficient so that you’re not trying to do the same thing or do it in a different way.

You also need a very clear-cut vision of how to move forward. That was the biggest thing—I noticed the amount of checking in with each other that had to happen. In a lot of ways, it eased some of the workflow. But in a lot of ways, I felt it doubled my workflow.

I had to do the task mentally first, then explain it, justify it, and execute it. In the past, I would’ve just thought it, brainstormed it, and then committed to it and moved forward. A business partner adds a layer of decision-making I wasn’t prepared for, but the benefits are you have another person to spitball ideas with, so it doesn’t feel like you’re in it alone. If you’re an individual who works well within a team structure and you’d like to be able to bounce ideas around, it’s ideal to have someone in your corner to help you out with that. There are pros and cons on both sides, for sure.

Freelap USA: What was your process from the first thought/idea of the home gym to the first day of opening it up? And your thoughts on renting space versus investing and creating your own?

Tyler Ray: I started in commercial spaces, larger gyms, as I think a lot of people do in their early years. You had to cut your teeth first. Now, there’s not necessarily that same barrier to entry with having to cut your teeth and put your time in. I think social media has provided a layer of presenting yourself where you can walk into a lot more (training spaces) now than you could when I was first coming up. But those were invaluable times in my career because I learned how to work with multiple populations and troubleshoot with individuals who aren’t necessarily athletes. It gave me a really strong sense of how to communicate with different populations.

Ultimately, if you think you’re headed toward the home gym setup/private sector life, you also have to be prepared for the fact that, depending on what you have access to and what your space is like, it will filter out a certain amount of the athlete population. Some like bigger group environments; some like the look of a certain type of gym, maybe a more professional-looking space.

I had two iterations of home gyms before I ended up in my current private space here. I went first from parks (a neutral location) to a bedroom. I had literally taken one of the bedrooms in my house and built a platform and a squat rack out of wood and had just a few pieces of equipment where athletes would train with me. Then, it was a detached garage that was 350 square feet. At each step, I upgraded some of the equipment, and that attracted a few more individuals.

But I had a vision to work toward something that felt very exclusive. That’s when I had the opportunity to buy a piece of land out here on Lake Erie in Ontario, and I knew I had to build the vision that I had. Two years before we started building this house, I had actually drawn a picture on a whiteboard of this gym that I’m currently in, and it looks identical. I was very fortunate to be able to do this, but it was off the back end of all those different chapters of my life. Stepping out of “Mom and Dad’s house,” which is what the commercial gyms were to me, I wanted to earn my stripes on my own and end up in something a bit more exclusive and elite.

Then I built, and built, and built until I had this private facility vibe where people travel in. It’s more of an experience than necessarily the day-to-day training. I do have athletes that come in here throughout the week, but I keep it small just to keep my coaching sharp. Then I have athletes traveling from all over throughout the year to spend a weekend or a few days in a row with me, so we can really do detail work. Because, again, what I’ve kind of worked myself toward is this more specialty type of coach.

Are you a FAN of the idea of being a successful coach, or are you actually WORKING toward becoming one? Share on X

It’s a grind, but I’m super happy where I ended up. If you’re on this path, if this is what you truly want, it will challenge you to constantly revisit, “How important is it actually to you?” Are you a fan of the idea of being a successful coach, or are you actually working toward becoming one? And that was the question that I asked myself over and over again.

Freelap USA: Having a very specific niche, how did your certification come to fruition, and what are the keys to consistently offering a high-quality product where the customers get a lot of value?

Tyler Ray: I wish I had an exact formula for you. It was such a product of trial and error. I look back, and the one thread of consistency throughout the whole process was that I committed to every decision I made. I believed wholeheartedly that I could figure out a way to package it and create a certification, even though the majority of people I talked to about this said, “You can’t have a certification.”

People who knew me locally, who I grew up with and were in the industry with me, for some reason thought only accredited certifications were important. And I realized very quickly that I could continue to ascend in the ranks of the private sector without dipping my finger into the accredited side of things.

Out of the gate, I was a CSCS, got a master’s degree, and put a lot of work into being an accredited coach. But after the first five years, when I had to recertify, I realized I didn’t have to just pay. I wasn’t going to become a collegiate-level strength and conditioning coach; I’m not a good employee, if I’m being honest. I’m not good at working for other people because I like to do what makes sense in my own brain. But I would love to be the person who that team’s professional sources information from.

In my mind, I’m at the collegiate and professional level because people have sourced and implemented my work into their programs. I built the confidence that I could and then found some people who would give it a chance.

You can have an idea and put it all together and package it, but if no one pays you money and trusts you enough to do it, that only has as much value as you give it. Thankfully, because I put so much emphasis on building my social media community, building trust, and showing people how passionate I was about teaching, it was just a matter of people saying, “As soon as you offer something, we’ll take it.”

Cutting my teeth on those first couple (certification) groups was helpful because I got a ton of feedback from them. Then it was trying to figure out what my certification is useful for. Why would someone want to take it? It becomes part of a toolbelt, like anything else. That’s what I think certifications are, especially specialty certifications: just another tool in the belt. I’m trying to pack as much value into my one individual tool as possible.

I think certifications, especially specialty certifications, are just another tool in the tool belt. I’m trying to pack as much value into my one individual tool as possible. Share on X

The point of the course is to teach jump technique—its importance and how to teach it—but also to help you become the best coach and trainer that you possibly can be. I’m also there as a resource. You take the course, then you have access to me for your questions moving forward. If you’re working with an athlete and have questions, let’s chop it up together. We’ll figure it out together. It was adding as much value to it as possible. Thankfully, enough people got the certification, and it was good, that now, it’s just word of mouth at this point.

Since you’re here…
…we have a small favor to ask. More people are reading SimpliFaster than ever, and each week we bring you compelling content from coaches, sport scientists, and physiotherapists who are devoted to building better athletes. Please take a moment to share the articles on social media, engage the authors with questions and comments below, and link to articles when appropriate if you have a blog or participate on forums of related topics. — SF


RSA Contrast Training

Using the French Contrast Method to Build Repeat Sprint Ability

Blog| ByNolan Dreher

RSA Contrast Training

Most of us have heard of the French Contrast method, popularized by Cal Dietz. For those unfamiliar, the method is composed of a heavy compound movement, an unweighted plyometric, a weighted plyometric, and an assisted plyometric, using post-activation potentiation (or PAP) to increase power and speed.

The French Contrast method creates an environment for repeated power outputs, which is great when it comes to repeat sprint ability for team sport athletes. Energy system development is critical for all athletes, and all energy systems are present at all times. Team sports are typically won on big powerful plays (breakaways from defenders, closing distances, and quick bursts of acceleration/deceleration).

We are looking to train the ATP-CP system—our “fast twitch,” in layman’s terms. It is important to remember we are training max effort outputs, so sufficient rest between reps is critical. Here at Total Athlete Performance (TAP), we use the model of one minute of rest for every 10 yards sprinted. The options are seemingly endless for whatever movements you select.

Sprint Contrast, modeled in the same format as French Contrast, is a method we love for repeat sprint ability and speed development. Share on X

These “seemingly endless” opportunities have led us to think outside the box when it comes to sprint training. Sprint Contrast, modeled in the same format as French Contrast, is a method we love for repeat sprint ability and speed development. We’ve implemented this as a heavy resisted sprint, vector-specific unweighted plyometrics, resisted sprint, and acceleration or fly. (This model is, of course, subject to change.)

As coaches, we should understand when to implement a method like this, taking into consideration the level of the athlete, time of year, and current condition of the athlete(s) you work with. This is not just something to throw your athletes into—there should be a period of build-up on technical qualities along with physiological qualities. We like using this method in preparation for peaking our athletes because it lays a solid foundation for enhancing qualities of power and repeat sprint ability.

How It Works

The way we went about using this method was simple. If we look at a five-day training plan (Monday–Friday), Monday is acceleration-based, Wednesday is max velocity focus, and Friday is a change of direction and agility-focused day. We used this method on Monday and Wednesday, which were our linear sprint-focused days.

When programming speed, we use load-velocity profiling (LVP), which allows us to select a load that will bring that athlete’s sprinting velocity down to a certain velocity. For example, if an athlete who runs a 1.02 10-yard fly (20 mph) does a sprint with a sled—and that sled reduces his speed to 10 mph—we now know that the load on that sled reduces the athlete’s velocity by 50% (10 mph).

Depending on the quality we want to train, we will use a velocity decrement that correlates to that quality. For example, with an athlete who struggles in early acceleration, we would choose a heavier V-DEC (velocity decrement), from 50% to 75%. We use these loading parameters to attack certain sprinting qualities:

  • 75%+ starting strength
  • 40%–60% power
  • 10%–40% speed strength (late acceleration)
  • 10% technical competency

When implementing these heavier loads for resisted sprinting, it is important to take yardage into consideration. It is unrealistic to expect someone to sprint with a 75% velocity decrement past 10 yards.

When implementing these heavier loads for resisted sprinting, you must take yardage into consideration. It’s unrealistic to expect someone to sprint with a 75% velocity decrement past 10 yards. Share on X

V-Dec Recommendations
Figure 1. We typically refer to the above recommendations when programming loaded sled sprints.

With our loading and quality parameters covered, let’s dive into the method and exercise selection we used.

The SHREDmill—a self-propelled, non-curved, non-motorized treadmill—is an effective tool for working early acceleration, from both a stimulus and a technical perspective. The SHREDmill is particularly great from a switching aspect.


Video 1. A key performance indicator for us is the ability to switch from the hip, which can be developed in training with a SHREDmill.

On our acceleration day, our first exercise was a SHREDmill Gear 1 sprint. The belt gives instant feedback on the athlete’s ability to switch from the hip. Gear 1 on the SHREDmill is heavy, typically a 40%–60% V-DEC, depending on how technically sound the athlete is. If you do not have a SHREDmill, it’s okay! You can also use a heavy sled.


Video 2. We typically cue “open up” (big thigh splits), “attack back,” and “away.”

The second movement we chose was a horizontal hurdle hop into a broad jump. This plyometric allows us to keep consistency with our direction of force in the horizontal vector. Any sort of horizontal plyometric is fine.


Video 3. Space out hurdles a little further than your typical hurdle hop. We do not want an extended ground contact into the broad jump.

Our third movement (weighted plyometric) was a 30% V-DEC sprint on the Run Rocket (or sled) for 10 yards. Again, here we just want to enhance the neural drive right before the exposure of the 5/10 or 10/20 acceleration.


Video 4. We typically cue our athletes on acceleration days to be “violent at the start.”

Finally, the athlete would run the 5/10 or 10/20 acceleration. We have seen a lot of athletes set personal records because of the huge potentiation effect. Coaches need to be sure to keep the yardage and volume low in resisted sprints and plyometrics to not overcook the steak before the lasered sprint time.


Video 5. Using laser timers gives us instant feedback on each sprint while also upping athlete intent.

We used this concept on our max velocity day as well. Our thought process on applying this concept was slightly different. We understand that max velocity sprinting is the fastest plyometric that we can do. Keeping that in mind, our potentiation ideas were slightly different.

There is a fine line between cooking the steak and potentiating an athlete. Max velocity sprinting is very neurologically demanding, so we do not want to bog the system down with heavy resisted sprints before a longer sprint at top speed. Instead, we used an overspeed movement.

Max velocity sprinting is very neurologically demanding, so we don’t want to bog the system down with heavy resisted sprints before a longer sprint at top speed. We use an overspeed movement instead. Share on X

Overspeed movements force athletes to switch and exchange their limbs faster than they could manually. Our athletes seem to feel “supercharged,” as if it has some sort of neurological potentiation effect. Our overarching theme of building repeat sprint ability is still intact, with the athlete still being tasked with delivering high power outputs at an even higher velocity. This differs from our acceleration days, which are filled with short bursts of heavier loads at lower velocities and are more “power” based.

Our first movement on this day was a 15-yard Run Rocket sprint at a 25% V-DEC, trying again to enhance the neural drive and potentiate the athlete.


Video 6. We like to cue “attack the first 10 yards,” then start to transition.

Next was a high double hurdle hop. Staying with our theme of a vector-specific plyometric, we wanted a plyometric with a more vertical orientation of force.


Video 7. We encourage our athletes to spend little time on the ground.

The third movement we selected was an assisted primetime. Essentially, we want the athlete to feel what it’s like to switch fast from the hip, similar to our aim with the SHREDmill. The ability to switch and exchange our limbs is a KPI (key performance indicator) in both acceleration and max velocity sprinting.

The overspeed stimulus is a great potentiator before running at max velocity. Note that we only do this with higher-level athletes who can handle the stimulus. For our younger athletes, we used a trampoline RFI (reflexive firing isometric) sprint. The trampoline provides a similar stimulus in the manner that the athlete has to switch faster because of the reflexive nature of the trampoline. It also allows us to focus on positioning, timing, and rhythm.


Video 8. This is a movement that we only use with our more advanced athletes.


Video 9. Positioning cues we use for this movement are: “be tall,” “lift front-side” (A-position), and “switch hard and fast.”

Finally, the athlete would run the 20-yard build 10-fly. Just like on our acceleration days, we saw a lot of our athletes set personal bests.


Video 10. We like to remind our athletes to relax and feel smooth, not to fight for a personal best.

Results on RSA

When thinking about team sports and the demands on athletes, repeat sprint ability is paramount. The ability to repeat and produce power over and over is essential, making this method optimal for team sport athletes.

Sprint Results
Figure 2. Data chart of elite high school athlete on max velocity sprint contrast.

As you can tell, this particular athlete set personal bests on his 20-yard build 10 fly three weeks in a row. He increased his top speed window (speed reserve has grown), while also increasing his ability to repeat short bursts of acceleration.

Note that this is just a method, not a training principle. Stick to what makes sense for your athletes. But we’ve used the method here at TAP and seen good results with it.

Since you’re here…
…we have a small favor to ask. More people are reading SimpliFaster than ever, and each week we bring you compelling content from coaches, sport scientists, and physiotherapists who are devoted to building better athletes. Please take a moment to share the articles on social media, engage the authors with questions and comments below, and link to articles when appropriate if you have a blog or participate on forums of related topics. — SF


Shoulder Care

Shoulder Care: Organizing and Programming Drills for the Overhead Athlete

Blog| ByMatt Tometz

Shoulder Care

One of my favorite things about this field is when really good coaches can boil down big, complex topics into simple, digestible phrases. For me, Eric Cressey’s summary of shoulder care was a lightbulb moment: shoulder care is about “keeping the ball on the socket.”

At the end of the day, the ball of the humerus has to stay on the socket of the scapula, making the glenohumeral (shoulder) joint. With all the stresses we put on the shoulder in overhead sports, how do we prepare the shoulder joint to maintain its integrity (ball on socket) as best as possible for as long as possible?

“Overhead athletes” as a category includes baseball, softball, volleyball, and tennis players, football quarterbacks, and swimmers, to name just a few. Since most of my experience has been with baseball athletes, that’s the lens I’ll use to frame this article. Still, it’s 100% worth mentioning that I’ve applied all of these concepts to my swimmers and believe that effort positively affected their shoulder health.

Wall Slides
Image 1. An example of one of my favorite drills to teach protraction/upward rotation. The foam roller allows the forearms to get overhead while the athlete tries to maintain a protracted position or “rounded back.”

With this simple yet universal idea of “keeping the ball on the socket,” we must understand the throwing motion and all the demands it puts on the shoulder joint that threaten joint integrity. The two most demanding actions are layback (max external rotation) and ball release (shoulder protraction and upward rotation), where the most eccentric stress happens. That just means when the arm switches muscle actions quickly, first going from cocking the arm to accelerating the baseball forward, and second from baseball release to decelerating the arm. (This can also apply to hitting a volleyball or serving a tennis ball.) These forces make the arm want to fly off the shoulder, and we need to prepare the muscles not to let that happen, or “keep the ball on the socket.”

However, it’s important to keep in mind that throwing is a total-body motion and involves the kinetic chain, with ground reaction forces going up the leg, to the hips, through the torso, to the ball, and finishing through the arm. Additionally, the scapula (half of the shoulder joint) will largely dictate what the arm (humerus) is able to do.

Let’s view this ‘shoulder care’ topic as a total body puzzle that requires good scapular movement and strength of the rotator cuff through both specific and large ranges of motion, says @CoachBigToe. Share on X

Ultimately, throwing uses the entire kinetic chain—so whatever certain joints can’t do that is required to throw, different areas of the body will compensate to figure it out/make it happen. And likewise, whatever the scapulae can’t do, the humerus will try to figure out on its own. So, let’s view this “shoulder care” topic as a total body puzzle that requires good scapular movement and strength of the rotator cuff (four muscles largely involved with ball-on-socket stability) through both specific and large ranges of motion.

Cressey Tometz
Image 2. Me and Eric Cressey when he put on a seminar at TCBoost Sports Performance when I was an intern in the summer of 2016.

In this article, I’ll take you through my framework of organizing and programming shoulder care exercises. Before moving on, I want to give a huge shoutout to Eric Cressey for everything he has done for this field. Personally, I’ve slowly accumulated the majority of my knowledge on this topic through being a fan and consumer of his content over the last 7+ years. Although this is my interpretation and application of his information, it wouldn’t be possible without a solid foundation first.


Video 1. This will help illustrate the concepts below, including almost all of the specific exercises. This is a very visual topic in nature, so please reference the video as needed to understand the content fully.

Exercise Categories

(at 0:18 in video, with video examples at 2:52)

Not all shoulder care drills are created equal. Some require external load, some use partner resistance, some are held for a long period, some are perturbations to build proprioception, some are meant for off-season development, and some are better suited for in-season training.

Although the concepts below are universal, not every type of exercise listed below will 100% cover all the possible exercises you can do. This is just a place to start building your exercise library and understanding the variables that underpin exercise progression, as these categories are listed in mostly progression order.

End-Range-of-Motion Isometric Holds

Although we live most of our lives in the middle of most joints’ range of motion, injuries often happen when we take those joints to the extreme ranges of motion where they’re weakest. Athletes are sometimes required to be in these end ranges of motion, which often include a lot of force and a time constraint (e.g., acting fast to complete a play). So, the joint has to be strong in a weak position and still have time to stabilize or perform the action.

End-range-of-motion isometric holds are great for building some time under tension in those relatively weak positions, as well as improving the range of motion in that joint. This type of drill makes sense in the early off-season to start building capacity and strength in those joints. Progressions include longer holds or adding a weight.

Controlled Articular Rotations

Building on the end-range-of-motion isometric holds above, controlled articular rotations apply the same logic but are for the entire joint, not just a singular joint action. This mostly applies to joints with the largest range of motion: the hips, shoulders, and the scapulothoracic joint. In a slow and measured manner, controlled articular rotations take that joint through the largest range of motion possible, really using the muscles to find the extreme ranges of motion.

Quadruped Hip Cars
Image 3. Quadruped hip CARS are an example of a controlled articular rotation drill working the hip through its fullest range of motion in a slow and controlled manner.

CARS make the most sense in the early off-season to build capacity and strength in those joints and a greater range of motion. Additionally, you can apply these drills in any warm-up (in a lower rep fashion) to thoroughly warm up the joint or as an active recovery workout to restore potentially lost range of motion in that joint. Progressions can be adding a weight or simply just achieving a large range of motion.

Concentric Raises

This is probably what most people think of when they think of a rep of an exercise: an entire rep of both the up and down, controlled the whole time but not focusing on a specific phase. What most people don’t understand is that concentric muscle action is the weakest part of the muscle action compared to eccentric and isometric muscle actions. Raises work well as a simple way to groove that movement pattern through a full range of motion and for a moderate to large number of reps.

What most people don’t understand is that concentric muscle action is the weakest part of the muscle action compared to eccentric and isometric muscle actions, says @CoachBigToe. Share on X

Rhythmic Stabilizations

There’s a much-repeated quote from Bruce Lee I’ll use to illustrate the challenge of training for sport: “I fear not the man who has practiced 10,000 kicks once, but I fear the man who has practiced one kick 10,000 times.” Well, that’s not exactly how sport is played. I’m not one to critique a legend, but it’s an interesting concept to play off. In sport, there’s a lot of unpredictability within practicing and performing relatively the same movements.


Video 1. A snippet of two rhythmic stabilization shoulder care drills where the partner taps the athlete’s arm while they try to resist the motion.

Pitching would be a “closed chain” movement where the athlete initiates the movement on their own and doesn’t have to react, allowing them to practice the same throw 10,000 times. However, pitchers have multiple pitches; they must react and throw while playing defense, their rhythm and timing can get messed up when they’re paying attention to runners on base, and so on. Therefore, they need their throwing muscles, the entire kinetic chain, to be strong and safe in a variety of positions.

Hitting and defense would be an “open chain” movement where the athlete has to react to the pitch, the batted ball, etc.—basically, no swing or defensive movement is exactly the same. So, the entire kinetic chain for both rotation in swinging and running on defense has to be strong and safe in a variety of positions.

Moral of the story: as a performance coach, I’m here to make athletes and not “baseball players.” I need to prepare my athletes for all of the unpredictable elements of sport, including all the joints (shoulder, hips, scapulothoracic, etc.) and muscle actions required to be ready and durable to handle that.

Rhythmic stabilizations are unpredictable, partner-administered perturbations to a joint in a specific position. In other words, the partner applies taps in a random pattern of both timing and force to try to move the body part/joint out of position while the athlete tries to stay still, fighting the taps.

Rhythmic stabilizations are great for developing the proprioception of muscles to react to the unpredictable movement demands placed on them in sports, says @CoachBigToe. Share on X

This type of drill is great for developing the proprioception of muscles to react to the unpredictable movement demands placed on them in sports. The athlete needs to be strong and stable within all the various positions in the moment from the partner perturbations. These drills make the most sense in active recovery and in the middle of the off-season as a progression of isometric holds.

Eccentrics – Both Submaximal and Supramaximal (Partner-Assisted)

Eccentric muscle actions occur when the muscles actively lengthen and the joint angle of the muscles involved increases. Think about lowering the weight during a bicep curl or controlling the descent on a squat. This type of muscle action is used in every throw, every swing, and every stride in sprinting, most often when deceleration happens in that movement.

Half-Kneeling Rotations
Image 4. An example of a manual-resisted eccentric drill where the partner forces (in a controlled manner) the athlete’s shoulder into internal rotation, causing the external rotation muscles to create high amounts of force in trying to resist the movement.

Also, eccentric muscle actions are when muscles can produce the most force and, consequently, develop the most strength. It’s a great challenge to maintain posture and joint positioning while controlling eccentric muscle action, especially with maximal intent. Within eccentrics, there are two main types:

  1. Yielding eccentrics are at submaximal intensity; think about yielding like a squat you can control on the way down for a specific duration (like four seconds), then squat it back up.
  2. Supramaximal eccentrics are with forces above an athlete’s muscles’ capabilities to isometrically or concentrically resist the force; think about supramaximal like a squat heavier than a one-rep max that you can only control going down but can’t hold at the bottom or squat back up.

Submaximal eccentrics make sense in the middle of a training program to progress from isometric holds, and supramaximal eccentrics make sense at the end of a program as the most forceful and challenging type of drill your athletes can do.

I listed these exercise categories from simple to complex and in an order pretty similar to how I’d progress them in a program. As I get into the shoulder-specific categories below, try to envision how the categories above apply to create a structured and logical progression of exercises.

Shoulder Care Categories

(at 1:40 in the video, with considerations at 9:05)

External Rotation

As mentioned earlier, max external rotation is very demanding on the shoulder joint. This happens as the torso and shoulder start to rotate forward while the arm and hand move backward, creating a lot of eccentric stress and whip-reversing the momentum of the baseball/arm.

Also, a big lightbulb for me from Eric Cressey is that during external rotation of the shoulder joint, the ball of the humerus wants to also glide forward (which can cause irritation in the front of the shoulder). So, the primary purpose of external rotation drills is to strengthen the rotator cuff in positions of shoulder abduction and external rotation (elbow up at 90 degrees at the side of the body).

Drills and Examples

  • Prone external rotation lift-offs.
  • Chest-supported external rotations.
  • TRX external rotation holds.
  • Banded external rotation walk-outs.
  • Half-kneeling ER banded press and raises.
  • Half-kneeling shoulder external rotation partner stabilizations.
  • Half-kneeling shoulder external rotation manual eccentrics.


Video 2: A snippet of some considerations to keep in mind when programming your shoulder external rotation drills to make sure you’re working the correct muscles and the exercises make sense in the big picture of the training week.

Considerations

I like to save my external rotation exercises for the last day of the training week. It makes sense to me that the rotator cuff is extremely important to keep the shoulder joint stable during throwing, so I need it as fresh as possible during the week. Then, on the training week’s last day, I can really fatigue those muscles of my athletes with upcoming rest the next few days.

Additionally, it is important to avoid “forward dumping” of the ball of the shoulder, which can cause pinching in the front of the shoulder. Be conscious of keeping the ball of the shoulder square in the middle of the shoulder joint.

Posterior Tilt

The posterior tilt is probably one of the most underappreciated movements that the scapulothoracic joint (scapulae on the rib cage) needs to do well. Think about this in a classic shoulder “Y” position: for the arms to go both above and behind the athlete’s head, the top of the scapulae needs to move backward while the bottom stays still. Good posterior tilt will help the athlete achieve better external rotation at layback. One of the main muscles helping to perform this action is the lower trapezius, so what I call a “Y raise” others may call a “low trap raise.”

The posterior tilt is probably one of the most underappreciated movements that the scapulothoracic joint (scapulae on the rib cage) needs to do well, says @CoachBigToe. Share on X
Banded Raises
Image 5. An example of a posterior tilt drill and the classic “Y” position of the arms to engage the lower trap muscle.

Drills and Examples

  • Chest-supported Y raises.
  • Banded half-kneeling Y raises.
  • Banded Y walk-outs.
  • TRX Y holds.
  • TRX Y eccentrics.
  • Chest-supported shoulder Y stabilizations.

Considerations

There are many muscles that work on the shoulder and scapulothoracic joint, but we need to keep the main ones doing their job when working on specific movements. There’s a lot of overlap in muscle attachments and functions; with 17 muscles that attach to the scapulae for eight main movements, understanding what muscles we don’t want working is just as valuable as understanding which ones we do.

The upper trapezius (probably what most people think of as the “trap” muscle) also helps elevate the shoulder blade, but we need that muscle to stay off during our Y exercises. On the flip side, the lats helps bring the shoulder blade down so that muscle needs to relax to let the arm go overhead. 

Protraction/Upward Rotation

I understand the concern about not wanting to overdo overhead exercises because the athletes are in that position so much during sport, but I’d argue that completely ignoring these exercises for that reason does more harm than good. It’s important to expose them to overhead positions and challenge their ability to be strong and stable in them, developing the muscles they’ll use when they go overhead in sports. Remember, it’s not the poison itself that’ll get you (the exercise); it’s the dose (how much).

Remember, it’s not the poison itself that’ll get you (the exercise); it’s the dose (how much), says @CoachBigToe. Share on X

As mentioned earlier, the scapulae function will dictate the arm’s ability to go overhead in a healthy and sustainable way. Again, from Eric Cressey, we need the scapulae to be able to “reach, round, and rotate” about the rib cage; round means protraction (the opposite of pinching your shoulder blades, so it looks like rounding your back), and rotate means upward rotation. The main muscle for this movement will be the serratus anterior, helping bring the shoulder blades from behind the body to in front around the rib cage.

Pike Position
Image 6. An example of an upward rotation drill where the scapula has to upwardly rotate to get the arm in a good position (keeping the ball on the socket) to stay strong in a loaded overhead position.

Drills and Examples

  • Banded cat-cow.
  • Banded cat-cow walk-outs.
  • Foam roller wall slides.
  • Pike position holds.
  • Push-up position to opposite toe touch.
  • Pike position shoulder taps.
  • Pike position inchworms.
  • Backward pike position walking.

Considerations

As listed above for our posterior tilt exercises, we need the right muscles to do the right job. Keeping big muscles like the upper trap and lats off allows smaller muscles like the serratus anterior to function correctly. This, in turn, creates good movement habits, which increases the longevity of athletes going overhead.

Thoracic Spine (T-Spine)

The first of the two categories that doesn’t (directly) involve the shoulder is the thoracic spine. As stated above, the thoracic spine is extremely important to help the scapulae work as effectively as possible (scapulothoracic joint); this, in turn, will help the arm move more efficiently. The thoracic spine—or the middle 12 vertebrae of the spine, each of which has ribs attached—needs to flex/extend and rotate.

Wall T-Spine Rotations
Image 7. An example of a thoracic spine drill where the athlete has to separate the lower body (being held in place by the wall) from the upper body by trying to rotate the chest and elbows toward the wall.

Being able to extend the thoracic spine will help with getting the shoulder into external rotation at layback and flexion, which helps get the arm in front of the body for ball release. Lastly, rotation of the thoracic spine helps with hip-shoulder separation, which is imperative for an effective kinetic chain when throwing.

Drills and Examples

  • Side-lying t-spine windmills.
  • Quadruped t-spine openers.
  • Seated twist-bend-breathes (which I shamelessly stole from the Titleist Performance Institute).
  • Half-kneeling wall rotations.

Considerations

The t-spine has to function in a variety of different pressures, if you will. The athlete has to stay smooth and fluid, getting into a good attacking position (like before spiking a volleyball or layback in a baseball throw). But then the athlete needs to switch into propulsion by creating pressure and accelerating the arm/ball forward. The breath will be very important—exhaling to be relaxed to allow new ranges of motion and also inhaling to force the ribs to expand in that new range of motion. I coach my athletes to breathe out while getting into the end range of motion and to breathe in to create a new range of motion.

Additionally, the exercises mentioned above are mainly for t-spine rotation, while mobile and adequate flexion and extension are also required of the t-spine for overhead athletes. However, many protraction/upward rotation exercises also work on the flexion/extension of the t-spine.

Hips

The second category that doesn’t involve the shoulder is the hips. The case for this category is extremely similar to the thoracic spine; working up the kinetic chain, the hips need to internally rotate, externally rotate, and extend for effective rotation to get up the rest of the body.

What the hips can’t do will either lead to decreased rotation effectiveness (less velocity) or cause other joints up the kinetic chain to compensate and do things they weren’t made to do. Share on X

What the hips can’t do will either lead to decreased rotation effectiveness (less velocity) or cause other joints up the kinetic chain to compensate and do things they weren’t made to do. What the hips can’t do will also lead to the lumbar spine compensating, then the thoracic spine, then the scapulae, then the shoulder joint, and so on.

Drills and Examples

  • Hip 90/90 internal and external rotation lift-offs.
  • Quadruped hip CARS.
  • Rack-supported standing hip CARS.
  • Hip 90/90 heel taps.
  • Hip 90/90 switches (no hands).

Considerations

When working on very specific movements and joint actions, it’s very easy for compensations and other muscles to take over. It’s important not to rush through these exercises and to be conscious of minimizing movement of the rest of the body.

Other

Not every shoulder care category and drill will fit cleanly in an exercise category. Here are two drills I like, both controlled articular rotations, that don’t have a clear shoulder care category.

  • Prone Shoulder Controlled Articular Rotations
  • TRX Shoulder-Controlled Articular Rotations

Programming Shoulder Care Exercises

From all the information above, the real challenge remains: how do we organize these exercises within a week to develop those muscles in training without increasing the risk of injury or taking away from the ability to play the sport itself at a high level due to excessive fatigue? These muscles are used for multiple hours a day in practice with every throw and swing, so we must be conscious about not overdoing it.

With that being said, there’s truly no right or wrong when programming these exercises as long as you have logic and justification for making the choices you make.

I recommend supersetting these exercises with non-competing muscle groups/exercises. As weird as it might sound, shoulder care exercises work great to program on lower-body days. For example, after hitting a heavy set of squats, would pairing hip-controlled articular rotations help or hurt the next set of squats? I’d argue that it would hurt, as those hip muscles need as much recovery as possible to keep the main thing the main thing (squatting heavy). Pairing a squat with a shoulder external rotation or protraction exercise would make more sense, as those muscles aren’t used during a squat.

Additionally, if your programs are already tight on time and maximized for efficiency of more primary exercise selection, you can easily add these exercises into a warm-up or cool-down as a not-very-time-intensive way to build frequency and exposure to these exercises. These can also be added to active recovery/mobility circuits on off-days.

As there’s no perfect program, I believe it’s also valuable to discuss when not to perform these exercises. I am a believer in following a high-low training model, basically trying to consolidate your stress to make your hard days hard and light days light.

With this in mind, I would consider a big pitching outing—for example, more than 100 pitches—a very stressful event for the arm and body. Consequently, post-game probably should not include these exercises. But on the flip side, a medium-sized outing—like 40 pitches—might warrant performing some of the more stressful exercises if the coach says the athlete won’t pitch the next day. These exercises are used to turn a “medium” intensity day into a “high” intensity day, setting them up for a nice recovery day the next day. Additionally, exercises like controlled articular rotations would fit very well in an active recovery mobility circuit, aiming to regain lost range of motion the day after pitching.

Is this to say this article includes every exercise, variation, type, and category of shoulder care?

Absolutely not. Will every drill fit cleanly into one of these categories? Nope. Are there exercises I’m learning and experimenting with that will grow my arsenal every week? Absolutely.

What I outlined here is what works for me with my athletes, both efficiently and effectively for my coaching/programming style and having 35+ athletes in the facility I train at. But what I hope for you is that this article gives you a framework and starting point to organize your thoughts and help you write your programs more efficiently. These principles and concepts are universal in training and programming, but seeing some of the structure and thought processes behind them might just be what you need to take your shoulder care to the next level.

Since you’re here…
…we have a small favor to ask. More people are reading SimpliFaster than ever, and each week we bring you compelling content from coaches, sport scientists, and physiotherapists who are devoted to building better athletes. Please take a moment to share the articles on social media, engage the authors with questions and comments below, and link to articles when appropriate if you have a blog or participate on forums of related topics. — SF


Top Static Stretches

A Pro Runner’s Guide to Seven of the Best Post-Run Stretches

Blog| ByViktoriia Tkachuk

Top Static Stretches

There are two types of stretches involved in running: dynamic (usually done pre-running) and static (usually performed post-running). Here, we’ll focus on the best post-run stretches you can do to enhance your muscle recovery after training or competing.

To start with, is post-run stretching even worth the extra time and effort? Yes, it definitely is.

Giving your muscles a good ol’ stretch after a hefty running session can be beneficial. As your muscles warm up, they become more flexible—stretching them right after running could prove beneficial for your range of motion, as well as accelerate your muscle recovery rate. Stretching after running can also help with muscle stiffness that can occur post-workout (aka delayed onset muscle soreness, or DOMS).

Stretching muscles right after running could prove beneficial for your range of motion, as well as accelerate your muscle recovery rate. Share on X

Now that we’ve agreed that post-run stretching is good for you, what are the best post-run stretches you can incorporate into your routine? These stretches target key muscle groups used in running: hamstrings, quads, calves, and glutes. The hamstring stretch, quad stretch, and low lunge are some of the best stretches that improve flexibility and reduce muscle soreness.

Static vs. Dynamic Stretching

Everyone should do a post-run stretch, especially runners. However, before stretching can actually do anything for you, you need to understand what types of stretches there are, how they differ, and when to do them.

Don’t worry; you won’t be bombarded with too much information because there are only two types of stretches— static and dynamic—and they serve different purposes.

In short, static stretches are usually done post-run to help with muscle stabilization and recovery, while dynamic stretches are typically performed as a pre-run warm-up routine to help boost performance.

Viktoriia Tkachuk

Static Stretches

First, let’s go over static stretches: these involve holding a stretch for a designated time (e.g., 30–60 seconds), targeting specific muscle groups. These are the stretches you want to do after your run because they help your muscles recover, improve flexibility, and reduce the risk of injury (especially in people over 65).

Dynamic Stretches

Then, we have dynamic stretches—these involve movement to warm up your body and prepare your muscles for the range of motion needed for running. They can also improve your running form by enhancing neuromuscular coordination.

Video 1. Dynamic hip stretch.

Timing Your Stretches

Why do you need to do each type of stretch at a specific time? The reason is that static stretches focus on relaxing your muscles and improving their length, whereas dynamic stretches prepare your muscles for the workout and make them more pliable. Thus, there’s really no reason to mix these two (or to do, for example, dynamic stretches after your run).

You may wonder which type of stretches are better and what you should focus on more. The answer is that you want to do both because they will make your running routine more balanced.

You want to do both dynamic and static stretches because they will make your running routine more balanced. Share on X

In fact, Frontiers in Physiology conducted a study on the impact stretching has on running performance. While it concluded that both dynamic (before running) and static stretches (after running) have an overall positive impact on running economy, dynamic stretches of up to 3.5 minutes accompanied by a pre-run warm-up have a significant positive effect (especially on runners who are less flexible).

Pro Tip: If you want to get the most out of your stretches, think about including a foam roller in your routine. Foam rolling before dynamic stretches can help loosen up tight muscles and prepare them for running, while foam rolling after static stretches can help reduce the tension in your muscles and make them recover faster.

Detailed Guide to Post-Run Stretches: 7 Examples

Now that we’ve learned what type of stretches you want to do after your run, it’s time to get into more detail on how to do them.

The post-running stretches you choose can make a difference in how you feel and how quickly your muscles recover, so make sure to do them correctly. More importantly, don’t skip this part of your workout routine.

Pro Tip: Before going into specific stretches, it is important to point out that all the stretches should be done in a slow, controlled manner. Rushing or aggressively performing stretches may lead to injury.

1. Hamstring Stretch
The hamstring stretch targets the muscles at the back of your thighs. Sit on the ground, extend one leg, and bend the other leg at the knee. Reach for your toes on the extended leg while keeping your back straight, and hold for 30­–60 seconds.

Not only will this improve your flexibility, but it will also prevent any potential pain in your lower back; if you’re a runner, you know that lower back pain is a very common issue. This stretch is as effective as it is simple; it will lengthen your hamstring muscles and improve your range of motion.

2. Quad Stretch
For the quad stretch, you need to stand upright and pull one foot up toward your glutes while holding it by the ankle. Make sure your knees are close together and your posture is straight. This is an excellent way to target your quads, and holding this stretch for 30–60 seconds can help with that annoying feeling of tightness and reduce muscle imbalances that could lead to injuries like runner’s knee.

3. Calf Stretch
You might be wondering how to stretch your calves post-run. Well, this kind of stretch is great for the calf muscles, and if you experience calf cramps or shin splints, you shouldn’t skip it. It will help elongate the muscle fibers and improve blood flow, which will result in a quicker recovery.

To do the calf stretch, place one foot a step behind the other and push the back of the heel into the ground. Then, lean forward a bit while keeping the back leg straight. Hold this position for 30­–60 seconds and then repeat with the other leg.

4. Low Lunge Stretch
This one is great for opening up the hips, a common tight spot for runners. It will also help improve your stride and running form because it will allow for a greater range of motion.

Get into a lunge position with one foot forward and the other extended back. Lower your hips toward the ground and feel that stretch in the hip flexors and the quads of your back leg.

5. IT Band Stretch
IT band syndrome is something a lot of runners struggle with, and this stretch can help prevent or alleviate it. You need to hold the stretch for 30–60 seconds on each side to get the most out of it and to target your iliotibial band (a ligament that runs down the outside of the thigh). Stand upright, cross one leg behind the other, and lean forward a little to the side of the back leg.

6. Standing Quad Stretch
If you ever get bored of the standard quad stretch, you can do this variation—it’s pretty much the same stretch, but you do it while standing on one leg. It will not only target your quads but also engage your core and improve your balance and stability. This is particularly useful for trail runners or those who run on uneven surfaces.

7. Lying Side Quad Stretch

This is another take on the quad stretch, and it’s a more relaxed version. It’s perfect to do after your run because it allows you to focus on the stretch without worrying about balance. Besides, it’s easier to hold.

Lie on your side and pull the top leg’s ankle toward your glutes. Don’t forget to keep your knees close together!
Running Stretch Chart
Pro Tip: When it comes to post-run stretches, it’s all about consistency. Make this a regular part of your running routine, just like warming up before your run. If you keep at it, not only will these stretches help your flexibility, but they will also help make your running form more balanced and efficient.

3 Tips for Effective Stretching

We’ve gone over the best post-run stretches, so now it’s time to see how to get the most out of them. These stretches are super simple, and there’s not a whole lot of science behind them. They’re easy to do, you don’t need to spend hours doing them, and they’re effective. Still, there’s more to them than just pulling your muscles and hoping for the best.

Believe it or not, you can make mistakes while stretching, and you can also do some things to make your stretches even more effective. Share on X

Believe it or not, you can make mistakes while stretching, and you can also do some things to make your stretches even more effective.

1. How Long to Hold Each Stretch

The length of time you hold a stretch will directly affect its effectiveness. If you’re doing static stretches, you should hold each stretch for 30–60 seconds. This time frame is the sweet spot that will allow your muscle fibers to lengthen and relax, which is what you need to improve flexibility and reduce muscle tension.

If you hold a stretch for less than 30 seconds, your muscles won’t have enough time to relax, and you’ll end up missing out on the full benefits of the stretch. On the other hand, holding a stretch for more than 60 seconds can lead to overstretching and injuries.

If you’re doing dynamic stretches, hold each for 15–30 seconds and focus on smooth, controlled movements.

2. Breathing Techniques

If you’ve ever done any research on working out in general, you know the part breathing has in it. It’s something that gets overlooked all the time, but it’s super important. To relax your body, you need deep, diaphragmatic breathing. Proper breathing will make the stretch more effective.

Inhale deeply through your nose and feel your diaphragm expanding. Then, exhale through your mouth. This type of breathing will help activate the parasympathetic nervous system, which helps with relaxation.

Don’t hold your breath or do shallow breathing because these can create tension in your body and make it harder to stretch effectively.

3. Signs You Are Overstretching

Always remember that stretching is supposed to feel like tension relief—it should never cause pain. If you feel any sharp or stabbing pain, your muscles are shaking, or you have to force the stretch, then you’re overstretching.

This can lead to muscle strains and tears and set your training schedule back. It can also increase the risk of chronic injuries. Always listen to your body and note the difference between a good stretch and pushing too far.

FAQs

Why is stretching after running important?

There are a few reasons—stretching after you run will help your muscles relax, recover more quickly, and reduce soreness. Stretching will also improve flexibility and range of motion, which can be great for your performance. Stretching after your run should be a regular part of your workout, and you shouldn’t skip it.

How long should I stretch after running?

This will depend on your needs, but generally, aim for about 10–15 minutes of static stretches. You should hold each stretch for 30–60 seconds and target key muscle groups (hamstrings, quads, calves).

Can stretching improve my running performance?

Yes, it can—in several ways. If you stretch on a regular basis, you will improve your flexibility and range of motion, which means your strides will become more efficient, and your running form will get better. It will also help reduce muscle fatigue and soreness, which can be great for your overall training capacity. If you combine static stretches (after your run) with dynamic stretches (before your run), your running performance can become more balanced and effective.

What is the difference between static and dynamic stretches?

In short, they serve different purposes. Static stretching basically means holding a stretch for an extended period (ideally, 30–60 seconds) to relax and lengthen specific muscle groups. You do them after your workout to help your muscles recover. Dynamic stretches involve actual movement, and they’re done before a workout to prepare the muscles. Both of these types of stretches are equally important for a balanced workout routine.

Wrap-Up

Post-running stretches are more than just “good for you”: they’re essential for optimal performance and long-term health, so don’t skip them. People often associate stretching with building flexibility, but that’s not correct. Stretching is a rounded approach to muscle health, preventing injuries and improving your performance.

People often associate stretching with building flexibility, but that’s incorrect. Stretching is a rounded approach to muscle health, preventing injuries and improving your performance. Share on X

Did you know stretching was so important? Did you know to stretch post-run? Do you skip stretching, or is it a regular part of your routine? What benefits have you noticed since you started stretching on a regular basis?

We’d love to know the answers to all of these questions, so do not hesitate to chip in with your experiences and ideas. If you have any further questions or things to add, feel free to add them in the comments section below. We can’t wait to build upon this to make this article even better!

Since you’re here…
…we have a small favor to ask. More people are reading SimpliFaster than ever, and each week we bring you compelling content from coaches, sport scientists, and physiotherapists who are devoted to building better athletes. Please take a moment to share the articles on social media, engage the authors with questions and comments below, and link to articles when appropriate if you have a blog or participate on forums of related topics. — SF

References

1. Konrad A, Močnik R, Nakamura M, Sudi K, and Tilp M. “The Impact of a Single Stretching Session on Running Performance and Running Economy: A Scoping Review.” Frontiers in Physiology. 2020;11:630282. (accessed November 2, 2023).

2. “The Importance of Stretching,” Harvard Health Publishing. (accessed November 2, 2023).

3. Mayo Clinic Staff, “Calf Stretch,” Mayo Clinic, (accessed November 2, 2023).

4. Mayo Clinic Staff, “Stretching: Focus on flexibility,” Mayo Clinic, (accessed November 2, 2023).

5. Page P. “Current Concepts in Muscle Stretching for Exercise and Rehabilitation.” The International Journal of Sports Physical Therapy. 2012;7(1):109–119, (accessed November 2, 2023).

Warm-Up Variations

Vary Your Warm-Ups: Three Protocols for Better Athletic Development

Blog| ByStephen Georgio

Warm-Up Variations

When it comes to warming up, it is easy to get trapped in the monotony of following similar protocols for far too long. Typically, warm-ups include foam rolling, static stretching, dynamic stretching, activation, or a combination of these elements. We can all agree that hammering the basics is extremely important, and mastery is the result of 10,000 or so reps; however, variety can also be very beneficial at specific times.

For athletes, this time can come at various phases throughout the year. For the general population, this can be whenever your warm-ups or workouts feel stale. I typically implement warm-ups with more movement variety during the post-season or pre-season periods and warm-ups with more work capacity during the off-season. This article will cover three different warm-up protocols and numerous ideas to implement to enhance the start of your sessions.

Three Steps to Creating a Quality Warm-Up

The first step in any good warm-up is goal setting. What exactly are you trying to accomplish during your training? It would be wise to figure out your end goal and then work back from there.

The first step in any good warm-up is goal setting. What exactly are you trying to accomplish during your training? Your end goal should be based on the type of training. Share on X

Your end goal should be based on the type of training—a strength training warm-up may look completely different than a Brazilian jiu-jitsu warm-up, for example. The goals that I look to accomplish within a warm-up period include heart rate elevation, muscle activation, skill development, and, potentially, flexibility. (I say “potentially” because the nature of these exercises may or may not lead to an increase in flexibility.)

The next step is structure. A solid warm-up should be organized and sound. One way is to follow the R7 system, developed by Mike Robertson and Bill Hartman, which provides an effective step-by-step approach for an optimal order of exercises. The first three steps in this system include:

  1. Release (soft tissue work).
  2. Reset (improving body and joint positioning).
  3. Readiness (heart rate elevation and preparing the body for the session to come).

Checking off all of these boxes will not always be possible, but aiming to do so will leave you with a solid foundation. There should also be structure in terms of flow, something that is modeled by Mike Boyle and MBSC. A great warm-up flow includes starting with drills where you are supine, then prone, followed by kneeling or half-kneeling, and, finally, drills where you are standing. Try to avoid making your athletes, or yourself, stand up and down multiple times throughout a warm-up. Enhance your structure by making one drill flow into the next whenever possible!

The final step is perfection, or the pursuit thereof. Coach Alan Bishop once tweeted, “The warm up is the workout.” Therefore, you should strive to get better at each drill. Much like a complex exercise, you can measure progress based on getting better at a warm-up protocol.

Try to avoid making your athletes, or yourself, stand up and down multiple times throughout a warm-up. Enhance your structure by making one drill flow into the next whenever possible. Share on X

Many coaches will even use warm-ups to assess any lack of flexibility, coordination, etc., during certain drills. The warm-up can be a great time to develop foundational skills; you should not take it lightly. With this being said, you should run it with intent. Don’t be afraid to run warm-ups numerous times until they are done with the highest standard and execution possible.

Three Warm-Up Protocols

The protocols listed below have been implemented, tested, and refined with great results! Our athletes and I have found them to be just as fun as they are productive. Those who got better at these protocols saw great improvements in movement quality, motor control, and leadership!

1. 2 Tuff 2 Tap

The first warm-up protocol is called 2 Tuff 2 Tap. This series of exercises fits best into the Animal Flow bucket. “Animal Flow” comprises various yoga, gymnastics, and animal-like movements that are ground-based and done with only body weight. This specific list is based on martial arts drills from the Animals MMA gym in Yonkers, NY. The warm-up is as follows:

  • Egg roll x 10
  • Roll back to hamstring x 10
  • Full forward/back roll x 5 (if on a supportive surface)
  • Glute bridge with reach x 10e
  • Segmented roll x 1e
  • Sit through x 10e
  • Down dog to cobra x 10
  • Technical stand-up x 5e
  • Full get-up x5


Video 1. 2 Tuff 2 Tap warm-up.

This warm-up will check off each criterion listed above (heart rate elevation, etc.) and can significantly increase playfulness in your warm-ups! You can really implement it at any time. Early off-season would be a good place to start, given the extremely general and unspecific nature of each drill; however, utilizing these drills close to the season can be beneficial to prepare the tissues for just about anything.

You can also use this warm-up for athletes or teams that need to improve their proprioception and motor control. Your athletes will find these drills extremely challenging at first but will slowly improve over the semester.

2. Discipline Equals Freedom

The second warm-up protocol is called “Discipline Equals Freedom.” This warm-up, inspired by Jocko Willink’s book, is a circuit-style warm-up utilizing only body weight. The warm-up is as follows:

Round 1

  • 1 push-up
  • 1 full squat
  • 1 burpee (4 count)
  • 5 jumping jacks

Round 2

  • 2 push-ups
  • 2 full squats
  • 2 burpees (4 count)
  • 10 jumping jacks

Round 3

  • 3 push-ups
  • 3 full squats
  • 3 burpees (4 count)
  • 15 jumping jacks

Continue for five rounds (5 reps of all exercises and 25 jumping jacks).


Video 2. Discipline Equals Freedom warm-up (first round only shown).

This warm-up is a GREAT way to develop work capacity if done at a high pace. Ensure full range of motion and perfect technique with each movement. This is also a technique to develop leadership and culture throughout the year. Pick a different athlete to lead each drill and have the entire team count on cadence!

3. Bodyweight Buy-In

The third protocol is a “Bodyweight Buy-In.” Much like you need to buy yourself into a poker table in Vegas, you can also buy yourself into a weight room (you can also buy yourself out!). Your athletes cannot begin their first exercise(s) until they finish their buy-in. The warm-up is as follows:

Accumulate in as few sets as possible with great technique. Break these up as much as needed:

  • 50 push-ups
  • 10 pistol squats each side
  • 30 chin-ups


Video 3. Bodyweight Buy-In.

The Bodyweight Buy-In warm-up is elite with regard to skill development, specifically with long-levered athletes who need more relative strength. Share on X

This type of warm-up is elite with regard to skill development, specifically with long-levered athletes who need more relative strength. Pick movements that your team struggles with or needs more reps to perfect. It is a great way to develop the push-up, chin-up, pistol squat, split squat, overhead squat, and other foundational exercises. Utilize this when teams come straight to lift after practice, and watch these movements significantly improve!

Final Thought—LTAD Warm-Ups

Periodization for warm-ups can be thought of in the same light as strength, speed, or conditioning periodization. Whenever possible, I try to think about the big picture and write warm-ups for an entire semester or longer. As I map out my end goal of the semester and backtrack, I do some of the same with warm-ups. I do this best by progressing warm-ups alongside training phases.

This begins with simple exercises done at a slow pace and ends with exercises that more closely mimic the sport. I start with a lot of simplicity and teaching and end with exploration and freedom.


Video 4. Gamified warm-ups.

A sample progression is as follows:

Phase 1

  • Simple, general exercises
    • For example: half kneeling ankle rocks, adductor rocks, etc.
  • Exercises on command
    • Up and down commands, counting on cadence, etc.
  • Slow tempos
    • Pauses and very slow eccentrics

Phase 2

  • More complex, specific exercises
    • Stretch-squat-reach, lateral squat, split stand t-spine rotations
  • Specific groups
    • Hip internal rotation group, hip external rotation group, etc.
  • Increase in volume
    • Circuit style, multiple sets, etc.

Phase 3

  • Specific exercises
    • Mimic sport movements and planes of motion
  • Reactive drills
    • Increase neural drive and coordination
  • Gamified drills
    • Enhance competitive drive and fun

Since you’re here…
…we have a small favor to ask. More people are reading SimpliFaster than ever, and each week we bring you compelling content from coaches, sport scientists, and physiotherapists who are devoted to building better athletes. Please take a moment to share the articles on social media, engage the authors with questions and comments below, and link to articles when appropriate if you have a blog or participate on forums of related topics. — SF


4x200 Relay

How to Develop a Successful 4x200m Relay Team

Blog| ByJohn Brumund-Smith

4x200 Relay

This article is designed to be a one-stop shop for coaching the 4x200m relay. We will not delve into energy systems or specific training strategies for the 200m dash but will instead focus on the unique aspects of the 4x200m relay (especially practicing the handoffs). Hopefully, there is enough here for the beginning coach to get a grasp on the event while also introducing some new elements to help experienced coaches.

I. Why Is the 4x200m Relay Unique?

Let us be brutally honest here: the 4x200m relay is often seen as a B-team relay, especially until the championship season begins. The 4x100m, 4x400m, and 4x800m relays get significantly more glory across most of the year. This is partially because many states did not even compete a 4x200m relay at their championship series until this millennium. Some still don’t compete a 4x200m at State.

Another reason the 4x200m relay is an afterthought is because it is crammed right in the middle of the meet. In Illinois, the 4x800m and 4x100m relays are the first two running events, and the 4x400m relay, of course, ends each meet. The 4x200m relay is stuck right in the middle, with the 400m dash and 300m hurdles coming right after it. That pulls out a lot of people who would potentially be running on a team’s A 4x200m relay.

Illinois allows athletes to compete in four running events, which means you will often see athletes competing in the 4x100m, 100m, 4x200m, and 200m. But in some states (like Wisconsin), athletes are limited to just three running events. That pulls a lot of athletes out of the 4x200m relay, especially when you factor in athletes running the 300m hurdles, 400m dash, and 4x400m relay. Additionally, coaches are becoming more aware of not overloading athletes before the championship meets, which means limiting events. The 4x200m relay is often the first event dropped from a top athlete’s docket.

Despite all the problems with the 4x200m relay being difficult to load during the season, one fact remains: the 4x200m still counts for the same number of points as the 4x100m, 4x400m, and 4x800m.


Video 1: If you have never seen a 4x200m relay before, it is quite a spectacle. Since the race is run in lanes the entire time, the opening stagger is huge. There are a variety of handoff techniques, lineup decisions, and race strategies to consider.

II. What’s Great About the 4x200m Relay?

One great benefit of the 4x200m relay early in the season is providing those “B-team” athletes with a chance to get varsity experience. In 2016, we had a great sprint crew and did not fully load our A 4x200m relay until the Sectional Championships. We had nine athletes win outdoor invitationals for us in the 4x200m relay that year.

As a coach, in order for you to make this relay an important breeding ground for success during the season, you have to treat the 4x200m like an A relay. Attitudes are contagious, so even though I have spent the majority of this article so far telling you why the 4x200m relay does not get respect, you need to make sure you emphasize and prioritize it.

III. Picking a Lineup

The 4x200m relay is not quite as complicated as the 4x100m relay, and your four best available 200m runners will almost always end up on your 4x200m relay A team. Unlike the 4x100m relay, where you ideally want to stick with the same four athletes all year, switching up the 4x200m relay is much easier.

This is a unique sprint relay in the sense that every athlete runs almost the same leg. In a 4x100m relay, some athletes run curves while others run straightaways, and some athletes run with the baton in their left hand and others in their right hand. In the 4x400m relay, the leadoff is in lanes the whole time, the second leg has to cut in, and the third and fourth legs must worry about catching a baton in traffic. But in the 4x200m relay, every athlete runs a corner and a straightaway in their lane the whole time.

There are some unique aspects to the 4x200m that make choosing a lineup very important. The most obvious is that the leadoff athlete comes out of blocks, so you should aim to put a good starter on that leg. However, I believe this is the relay where getting a lead early is least important.

I believe the 4x200m relay is the relay where getting a lead early is least important, says @LFHStrack. Share on X

In the 4x100m relay, the stagger is so small that athletes can gauge their position early on, so having a lead gives a psychological advantage. In the 4x400m and 4x800m relays, getting a lead early is very important to make the handoffs easier. But in the 4x200m relay, the race is run in lanes with such a huge stagger, and the handoff zone is so large (30 meters) that most athletes cannot tell where their position is early in the race. The psychological advantage is much lower. Ideally, you would have your leadoff get you in first place, but that’s not as essential as it is in the other relays.

Relay Curve
Image 1. The stagger at the start of the 4x200m relay is quite large. This brings race modeling into play, as leadoff athletes in the outside lanes will have to run a significant portion on the curve after finishing the homestretch. (Photo by Brian Zeeman)

The main difference in the leadoff leg is the large, somewhat ridiculous stagger. When you run a 200m, you expect to have about 100 meters on a curve and then 100 meters on a straightaway. However, the leadoff runners in the outside lanes can end up running about 35 meters on a curve, 100 meters on a straightaway, and then another 65 meters on the curve. This makes the race difficult to approach strategically. The later you get in the legs, the more the ratio “evens out” and the more similar to a regular 200m race you get. If you have an athlete who has trouble with race modeling, for whatever reason, put them on the later legs.

If you choose not to switch hands with the baton, you will have to consider which hand the athletes are comfortable carrying the baton in. The standard is that the leadoff and third runners carry the baton in their right hand, the second leg carries it in their left, and the anchor leg catches it left and can choose whether or not to switch it to their right hand. However, because all the athletes will run a corner and a straightaway, you can be much more flexible.

For example, your leadoff can run with the baton in the left hand without any issue. You can even have some athletes switch hands and others not. But whatever you choose to do, the athletes must be completely aware during practice and certainly before the race begins.

IV. Handoffs

Without question, the 4x200m relay handoffs are the most complicated. With the exception of the baton position, 4x100m relay handoffs are pretty standardized and relatively easy to practice. Handoffs for the 4x400m and 4x800m relays are open and relatively easy to practice and execute. However, there are many options for 4x200m relay handoffs, and many of them are extremely difficult to practice (due to factors we will discuss). First, let’s talk about the givens.

Lane Discipline

At all times and in all races, lane discipline must be maintained. Simply put, the athletes need to leave enough space in the lane so they don’t tangle up their legs with one another. The general rule is that the baton always stays in the middle of the lane. So, if the incoming runner has the baton in their right hand, they will be on the inside of the lane; this means the outgoing runner will receive the baton in their left hand and be on the outside of the lane. Regardless of the style of handoffs you perform, you need to follow lane discipline.

Lane Discipline
Image 2. Proper lane discipline means the athletes do not risk running into each other. In photo A, each athlete has their own side of the lane, while in photo B, they are both in the middle of the lane, and their feet will eventually occupy the same space.

Handing Off in the Zone

The new 30-meter exchange zone simplifies handoffs because athletes no longer need to worry about handing off too early. The expanded exchange zone also adds the possibility of extending certain legs. Theoretically, the middle runners (second and third legs) could run a 230-meter leg if they caught the baton at the very beginning of the zone and handed it off at the very end.

Handing off at the very end is risky, of course, and nobody catches it at the very beginning unless there is a problem. However, a crafty coach could definitely manipulate the zones a bit to get the fastest athletes the baton for longer while minimizing the baton time of the slower athletes. In a race often won by hundredths of a second, this could be the difference between winning and losing.

At the 2022 Sectional Championships, our 4x200m relay team had two athletes who were a step above our other two. We put one of the studs on the second leg and our fastest athlete on the anchor leg. Those two athletes started at the very back of the zone, while our third leg started about 15 steps ahead. This extended the distance our two studs had to race with the baton and, therefore, shortened the distance of our other two athletes. The strategy worked as we beat the qualifying time by just 0.19 seconds.

Note also that the athletes must start inside the zone. They cannot have any part of their body make contact with the track outside the beginning of the zone. For a legal handoff, the baton must be passed within the zone. This means that it is possible that the outgoing runner’s feet will be outside the zone, but the baton is passed within the zone, and the handoff is legal. The baton is what counts, not the runner.

Now let’s get into some of the options you have when practicing and completing 4x200m relay handoffs, in order.

Stance

When choosing a stance, the outgoing athlete needs to be in a position to sprint and see the incoming runner. All the stances shown in image 3 accomplish that task; however, I must advise against choosing stance C due to butt interference. Please, please, please do not teach your athletes this stance. In fact, actively encourage your athletes to avoid it.

Firm ground contact will not only allow the athlete to be faster out of the stance but also will increase consistency, says @LFHStrack. Share on X

For high school athletes, I recommend stance A. It is versatile, simple, and appropriate for the speed of high school athletes. Regardless of the stance you choose, a great piece of advice for the athletes is to make firm contact with the track with both feet as they get into their stance. Some athletes are jittery and bounce around a bit; others are more timid and will only have soft contact with the track as the incoming runner approaches. The ground contact needs to be firm, just as if the athlete was putting pressure on the starting blocks. Firm contact will not only allow the athlete to be faster out of the stance but also will increase consistency.

6 Receiving Stances
Image 3. Pictured are six stances for the outgoing runner: (A) two-point stance, (B) two-point stance with feet switched, (C) two-point stance with “butt interference” (not recommended), (D) three-point stance, (E) three-point stance with arm up, and (F) three-point stance looking under legs. Notice that in all examples, the athlete starts inside the zone.

“Go” Marks

Since the timing of the 4x200m relay handoff is critical, using a “go” mark is essential. The mark offers a visual cue for the outgoing runners to start their acceleration. You can either have the outgoing runner anticipate when the incoming runner will hit the mark, or you can have the outgoing runner begin acceleration when they see the incoming runner hit the mark.

Though there are many items you can use as a go mark (in a pinch, I’ve seen athletes use dandelions or even their own spit), the standard items are a tennis ball cut in half or a piece of athletic tape. Certain tracks and competitions have rules for what is allowed, so be sure you know going into a meet what marks are available. Most high school meets allow tennis balls or chalk marks, while most college meets allow tape. Image 4 shows what some of these marks look like from the outgoing runner’s point of view.

Go Marks
Image 4. The photos show how three “go” marks look from the outgoing runner’s point of view. Photo A has one tennis ball, B shows a handoff zone with two tennis balls, and C has the zone marked with two pieces of tape.

One decision you have to make as a coach is whether to use one mark or two. When using two marks, the athletes look at a zone versus a single mark. Generally, this zone is 3–5 steps long. When using a zone, the outgoing runner goes when the incoming runner steps into the zone.

As a coach, I have my athletes use one mark because that gives the outgoing athletes only one object to focus on instead of two.

One decision you have to make as a coach is whether to use one ‘go’ mark or two. When using two marks, the athletes look at a zone versus a single mark, says @LFHStrack. Share on X

If you choose to use tennis balls for your go marks, always keep plenty on hand. I suggest going to the tennis coach and asking for all the old tennis balls they are done using. Cut them in half, draw your team logo on them with a marker, and keep at least two dozen on hand at practice. Give one to the athletes who consistently need them at meets, and keep plenty in your coaching bag. An athlete scampering around before a race trying to find a tennis ball is not in the state of mind you want heading into an important race.

Another option is to use the exchange zone itself as your go mark. Due to the large zone (30 meters), you might not want every athlete starting at the very beginning of the zone. So you can have your athletes use the mark for the exchange zone itself as their go mark. See video 2 for an example of how to use the zone or an object as your go mark.


Video 2: Using the exchange zone as your go mark versus using an object as your go mark. Notice also that the athletes must start inside the zone. In both examples, you will notice he uses 15 steps.

Steps

Once you have figured out where to start and what to use as your go mark, you must figure out how many steps to put between the two. These steps are usually measured by having the athletes mark them off heel-to-toe (see video 2). In general, the faster the incoming athlete, the more steps you need to take. We usually start the season with everyone using 13 steps and adjust from there. By the end of the season, most of our varsity athletes are using 15–16 steps.

While the number of steps largely depends on the speed of the incoming runner, there are a few other factors in play. One is the speed of takeoff (which I’ll cover in the next section), and another is how you choose to use the go mark. If you choose to have your outgoing runners anticipate the incoming runner hitting the go mark, then they will use a relatively low number of steps (12–16); if you choose to have your outgoing runners start acceleration as soon as they see the incoming runner hit the go mark, they will use a relatively high number of steps (16–20).

Speed of Takeoff

One of the most difficult decisions you need to make is how fast the outgoing runner needs to start off. The general principle is to match the speed of the incoming runner. This is fairly easy in the 4x400m and 4x800m relays and also relatively easy in the 4x100m relay because virtually every outgoing runner starts off at 100%. There is some subtlety to the speed of takeoff in the 4x200m relay, with little margin for error, which makes it an extremely important skill.

One option is to start as fast as possible, just like in the 4x100m relay. However, there are two potential downsides to this strategy:

  • Sprinting at top speed makes it very easy to run away from the incoming runner, who is fatigued and losing speed.
  • The steps will need to be shortened due to the increased speed of takeoff, which means the incoming runner will be quite close to the outgoing runner as the outgoing runner takes off. This naturally triggers a “defense mechanism” whereby the incoming runner slows down for fear of running into the outgoing runner.

Due to the problematic nature of this strategy, I do not recommend the outgoing runner starting off at 100% in the 4x200m relay. Instead, I recommend the runners start off around 80%–90% of their top speed. This is not a fool-proof strategy, however. High school athletes notoriously struggle with estimating their perceived speed. Tell them to run a 32-second 200m rep; some will run 26 seconds while others will run 38 seconds.

If you tell your athletes to go out at 85%, they will likely perform well in practice where there is minimal pressure. However, when the pressure is on in a meet, those same athletes might fall back on one extreme or another. Just about every coach has stories of athletes who either start way too fast or way too slow when the pressure is on.

This is why practice makes perfect. The more practice the athletes get with the proper takeoff speed, the more prepared they will be in meet situations.

Another way to reinforce this delicate takeoff speed is to implement it in practice situations outside of specific handoff work. For example, if you do submaximal repeats, you can instruct your athletes to start at the same speed (85%) on every rep. That way, when you describe what you look for in the 4x200m relay takeoff speed, you can say it is the same takeoff speed as your submaximal reps.

Commands

If you do blind handoffs for the 4x200m relay, you must set up commands. For a verbal command, the incoming runners will yell out Stick! when they are ready to hand off the baton. Your athletes can yell out whatever they want, but Stick! seems to be the consensus.

The timing of this command is critical, as many beginners yell too late when a little anticipation is needed. Correct your athletes in practice if they yell the command too soon or too late. I ask my athletes to yell the command when they feel they are two arm lengths away from their teammate.

The timing of the handoff command is critical. I ask my athletes to yell the command when they feel they are two arm lengths away from their teammate, says @LFHStrack. Share on X

An important phrase to remember with blind handoffs is Command-Hand-Reach. This is the order of execution for the incoming runner:

  1. Yell the command.
  2. See the target hand.
  3. Reach with the baton.

Too often, incoming runners reach before they see the target hand and sometimes before they even yell the command. It is so important for the incoming runner to see the target before reaching for it with the baton. For one, most runners naturally start slowing down a bit when they reach out with the baton. Keep the arms pumping to keep your speed up. Look at image 5 to see the incoming runner’s arms still pumping as the outgoing runner gives the target.

Reaching too soon increases the chance that the outgoing runner will knock the baton out of the incoming runner’s hand. So remember: Command-Hand-Reach!

4x200 Relay Exchange
Image 5. Giving a high, steady target is the key to efficient exchanges. (Photo by Mimi Noonan)

Another option is silent exchanges. A common strategy is to have the outgoing runners take six steps and then throw their hands back.

There are positives and negatives to both the verbal and silent exchanges. Many coaches who swear by the silent exchanges tell me they are worried their outgoing runners will have to pick their teammate’s voice out of a crowd of eight athletes yelling Stick! at the same time. That may be a valid point, but in my 20 years of coaching track, I have never once had a kid tell me, “I couldn’t hear him say Stick!” If that ever did happen, maybe I would change my strategy, but for now, my athletes use verbal commands on blind handoffs.

It is also important to note the commands required if the outgoing runner takes off too early. You need these commands whether you are executing a verbal or silent exchange. Incoming runners who believe they will not catch their teammates should yell Slow! which, of course, means the outgoing runner should keep running but slow down. If the outgoing runner goes out way too early or the outgoing runner is almost at the end of the zone, the incoming runner should yell Stop!

Some coaches teach their outgoing runners to peek over their shoulder if they hear the command to slow or stop so they can gauge where their teammate is and execute a better exchange. While this certainly helps in many situations, one main problem is that athletes who peek over their shoulders will almost certainly move their target hand.

If you use open handoffs, you do not need to worry about commands. One benefit of open handoffs is that they limit the risk inherent in blind handoffs. Open handoffs are generally seen as slower than blind handoffs, but if you practice them consistently, the benefits can outweigh the negatives. Starting off too early or too fast can be death with blind handoffs but only requires a minor adjustment with open handoffs.


Video 3. Blind handoffs vs. open handoffs: The first handoff also shows a great example of Command-Hand-Reach.

Hand Placement

You can have the fastest athletes who follow lane discipline and take off at the right time, but that could all be for naught without proper hand placement. Regardless of which hand placement you pick, the main priority is to keep a steady target. A moving target is much harder to hit than a stationary target, so you want your outgoing runner to give a target that is steady and easy to see. Image 6 shows a variety of different hand placements.

Hand Positions Relay
Image 6. The photos show five blind hand positions: (A) the stop sign, (B) flat hand, (C) underhand, (D) the stop sign to the side, and (E) the stop sign with lean.

The stop sign method (A) is the most desirable because of the large target it presents. Many athletes with lower joint flexibility may need to flex their elbows more than the athlete in image 6. Variations of the stop sign include D and E. Some coaches choose D because it is a more natural position—you can see the athlete is not as crunched up in his shoulders. However, I have found that because the shoulder in position D is not in a natural running position, the first few arm swings after the athlete receives the baton are less than ideal.

For position E, the athlete leans forward, which has two benefits: 1) many athletes are still accelerating at this point, which means they’re already leaning forward, and 2) the lean helps get the hand higher in the air, thus giving a better target.

Position B shows a flat hand, which feels more natural to most athletes than the stop sign. I have found that in the heat of the moment, many athletes forget about the stop sign and revert to the flat hand. Honestly, most athletes I have coached are most comfortable with the flat-hand method, and if it works, I don’t change it.

Position C shows underhand or upsweep passing. The benefit is that it most closely mimics proper sprint form. One negative is that the handoff is given lower, so you lose a few feet of space on each handoff because the athletes must be closer to each other to make a proper exchange. The second negative is that the runners gradually run out of room with their hands on the baton.

Of course, another option is to complete open handoffs, like a sped-up version of a 4x400m relay handoff.

Reach

The last aspect of the handoff is the act of the incoming runner placing the baton into the outgoing runner’s hand. While this may seem—and should be—incredibly simple, a great many botched handoffs occur exactly at this point.


Video 4. Brad Fortney and Carly Fehler demonstrate different reach techniques for the sprint relays, including the “push,” “flat,” “above,” and “swing” techniques. With very few exceptions, athletes should use the “push” technique (also called “candlestick”). In no instances should any athlete use the “above” or “swing” technique.

As mentioned in the Commands section, the incoming runner needs to follow Command-Hand-Reach. Give the command, see the target hand, then reach with the baton. Be sure to instruct your incoming runners to keep running at top speed until they have handed off the baton!

Perhaps the most important part of the reach is that the incoming runners must continue running at top speed until they have handed off the baton, says @LFHStrack. Share on X

Too many runners consider their leg of the relay finished once they give the command, so they slow down when the baton is still in their hand. This can be disastrous, so you must constantly reinforce your athletes to run through the zone. This is explained more in Section VI: Run Through the Zone.

V. Practicing Handoffs

In my opinion, 4x200m relay handoffs are the hardest to practice. The 4x400m and 4x800m exchanges are slower and less technical and include exclusively open handoffs. The 4x100m is faster, but there is less of a fatigue factor, so as long as you are fresh while practicing them, race conditions are relatively easy to replicate. But with the 4x200m relay, it is very difficult to replicate in practice how fast an athlete will finish in a race.

There are two main issues we see in performing 4x200m relay handoffs in practice:

  1. The incoming runner will speed up if the outgoing runner is getting away from them.
  2. The incoming runner has trouble gauging their appropriate finishing race speed.

Let us tackle #1 first. Often, coaches instruct their incoming runners in practice to run in at 85% to simulate the fatigue at the end of a 200m race. So, the runner does as asked and runs it at a submaximal speed, but then the outgoing runner takes off a bit too soon and looks like they’re going to get away.

In this scenario, most of the incoming runners will then speed up to catch the outgoing runner. They are able to speed up because they are not running at full speed, but in an actual race, they will not be able to speed up! If athletes practice this way, they will not have successful handoffs in the race. If you practice handoffs by having the incoming runner going 85%, you must instruct that incoming runner to keep a consistent speed.

Regarding #2, many athletes seem to believe they will be running full speed at the end of a 200m race, so they run full speed in practice. Obviously, athletes are battling fatigue at the end of a 200m race and are not near their top speed. So, a solution for many coaches is to have the athletes simulate their finishing 200m speed by running submaximally at something like 85%. This is hard to estimate and can lead to the issue we discussed in the previous paragraph.

So, how do we fix these problems? How do we get our athletes to simulate their 200m finishing speed without actually having them run a full 200m in practice?

Burpees.

Yes, I know that burpees are the bane of many fitness experts. Hear me out. We need to simulate the finishing speed of a 200m in practice without actually cashing the athletes to that extent. I have found that having the athletes perform 6–10 burpees and then pick up the baton and sprint all out does a great job of simulating the correct speed.

I have found that having the athletes perform 6–10 burpees and then pick up the baton and sprint all out does a great job of simulating the correct speed, says @LFHStrack. Share on X


Video 4. The incoming runners perform eight burpees before attempting the handoff at top speed. This is a great low-cost way to simulate the approximate finishing speed of a 200m race.

The burpees appropriately fatigue the athletes in the short term without causing any lingering fatigue in the long term. This has the added benefit of putting pressure on the athletes to get it right since they certainly do not want to continue doing more burpees if they mess up the handoff.

Another strategy is to run a continuous relay, which can double as a submaximal workout. An example of this would be to set up the athletes in practice as if they are running an actual 4x200m relay. The athletes would then run the first 50 and last 50 meters of their leg at 100% while “floating” the middle 100 meters. This would appropriately fatigue the athletes for a handoff without having them go through the tax of an all-out 200-meter rep.

There are two strategies to ensure the athletes run the correct portions at top speed. One is to set out cones or markers for when each athlete needs to switch gears, and another is to have the coach blow their whistle when the gears need to be switched.

VI. Run Through the Zone

While running through the zone is incredibly important in every relay, it is perhaps most important in the 4x200m relay. This is due to two factors:

  1. The incoming runner is dealing with fatigue near the end of the race.
  2. The outgoing runner is catching a blind handoff.

While outgoing runners in the 4x400m and 4x800m relays look over their shoulder at the incoming runners and can, therefore, adjust their speed to compensate, the blind handoffs in the 4x200m make this difficult.

The cardinal sin of relay running is slowing down while still holding the baton. I preach this to my athletes dozens and dozens of times, yet I still see it quite a bit, often when athletes slow down after giving the Stick! command. The main issue is that the outgoing runner rapidly picks up speed at this point, so any slowing down by the incoming runner will almost certainly jeopardize the exchange. You have undoubtedly seen this with your athletes in the 4x100m, 4x200m, 4x400m, and even 4x800m.

The cardinal sin of relay running is slowing down while still holding the baton. I preach this to my athletes dozens and dozens of times, says @LFHStrack. Share on X

You need to emphasize this with your athletes every single day that you practice handoffs! Even if the handoff is successful, remind your athletes not to slow down in the zone.

A great way to emphasize running through the zone in practice is to have the incoming runners continue running at top speed even after they have handed off the baton. If you have multiple athletes doing handoffs at the same time, start the incoming runners all at the same mark at the same time (the hurdle marks work great). Let them know two races are going on: 1) the outgoing runner crossing the end of the exchange zone with the baton, and 2) the incoming runner crossing the end of the exchange zone. If you work on this early in the season, you should not have a problem with athletes failing to run through the zone in meets.

The two things I tell every member of my 4x200m relay team before every race are, “Leave on time and run through the zone.” If they all do that, we should be good.

A potential solution to this problem is to implement open handoffs, as covered several times in this article. Our 2022 4x200m relay at Lake Forest High School used open handoffs and qualified for the IHSA State Championships. We again implemented them in 2023, but the athletes talked me into switching back to blind handoffs for the Conference and Sectional meets. Everything went well at Conference, but we were disqualified for running out of the zone at Sectionals, which would have been unlikely with open handoffs.

VII. Indoor 4x200m

Call it a guilty pleasure, but I love the indoor 4x200m relay. What I mostly love is the chaos and the strategy. Indoor competitions are mostly about fun, and the indoor 4x200m relay is a lot of fun.

The key to winning the indoor 4x200m relay is getting the lead on the first leg. Passing on tight indoor tracks is very difficult, so your position after the cut-in will determine your position at the finish line over half the time. The team in fourth place has to hand off in lane four, which adds meters and confusion to the race.

Put your fastest guy on leadoff. If you know your fastest guy will only get you in about fourth place in the fast heat, seed yourself slow to get in a slower heat. Get the lead in that heat, and your time should be a lot faster than if you were in fourth place in the fast heat. This is gamesmanship, sure, but indoor meets are for fun. Gamesmanship is expected.

Relay Team
Image 7. These four athletes set an indoor school record of 1:32.98 on a flat 200m track and won the 30-team Madison West Relays in 2022. We seeded them slow and put our fastest athlete first so we could get the lead and ensure easier handoffs. Indoors is fun; gamesmanship is expected!

My second-best recommendation for the indoor 4x200m relay is to use open handoffs instead of blind handoffs. This is especially important on the third and fourth legs when athletes are not confined to their own lane. Despite the best intentions of the officials, many athletes line up in the wrong order.

The order for handoffs is determined as the athletes are on the backstretch, so the team in first place has their next athlete line up in lane 1, the team in second place lines up in lane 2, etc. However, many high school athletes just wander out there and stand wherever they feel like. Even if the athletes do line up correctly, the orders can change when runners pass each other. (This is difficult, but it happens.) In virtually every indoor 4x200m relay, you will have an athlete who lines up in the wrong place. This means at least one other team has to adjust. You need responsible, experienced athletes who can quickly adapt to the situation.

Before you get to the meet, find out if the race will use a two-turn, three-turn, or four-turn stagger (some even use an eight-turn stagger; lanes all the way!). In a two-turn or four-turn stagger, the athletes cut in on a curve. In a three-turn stagger, the athletes cut in on a straightaway. There is no standard, so contact the meet host ahead of time to find out and prepare your athletes.

VII. Conclusion

The 4x200m relay might not be one of the most glamorous events in track & field, but it counts for just as many points as every other relay, says @LFHStrack. Share on X

The 4x200m relay might not be one of the most glamorous events in track & field, but it counts for just as many points as every other relay. Treat it as an important event, work on the handoffs, run through the zone, and have fun!

Since you’re here…
…we have a small favor to ask. More people are reading SimpliFaster than ever, and each week we bring you compelling content from coaches, sport scientists, and physiotherapists who are devoted to building better athletes. Please take a moment to share the articles on social media, engage the authors with questions and comments below, and link to articles when appropriate if you have a blog or participate on forums of related topics. — SF


Mark Rippetoe Gym

Talking About the Starting Strength Method with Mark Rippetoe

Freelap Friday Five| ByMark Rippetoe, ByKim Goss

Mark Rippetoe Gym

Charles Atlas, Jack LaLanne, and Arnold Schwarzenegger are muscle-building and athletic fitness pioneers who changed the game. One name to add to that list is Mark Rippetoe, the charismatic founder of Starting Strength. Rippetoe walked the talk as an athlete. He played football and then focused on powerlifting from 1979 to 1988. At a body weight of 220 pounds, his best lifts include a 611-pound squat, a 396 bench press, a 633 deadlift, and a 275 power clean.

In 1997, Rippetoe focused on coaching weightlifters at the Wichita Falls Athletic Club and saw several of his lifters compete internationally. From 1999 through 2005, Rippetoe taught courses for USA Weightlifting, and he was in the first group of coaches to be certified by the National Strength and Conditioning Association. He is a bestselling author, and his Starting Strength franchise is expected to expand to 100 gyms within the next five years.

Rippetoe believes that the foundation of athletic performance is strength, and the barbell is the best tool for building it. Here are some of his other thoughts.

Freelap USA: What are the key components of the Starting Strength Method?

Mark Rippetoe: The exercises and the programming. Our position is that strength is the ability to apply force against an external resistance, and it is displayed in six fundamental movement patterns. These patterns are as follows:

  1. Picking something off the ground.
  2. Lifting something over your head.
  3. Pushing something away from you.
  4. Pulling something toward you.
  5. Squatting down and back up.
  6. Throwing things.

If your training focuses on these movement patterns and you use progressively heavier weights, you will get stronger. The exercises we have chosen to strengthen these movement patterns are the squat, bench press, press, deadlift, and power clean, and our primary assistant exercise is the chin-up. These exercises use as much muscle mass as possible, are performed through the most effective range of motion possible, and enable you to use as much weight as possible. These are the only exercises you need to do for the first year or year-and-a-half of training.

The only exercises you need to do for the first 1–1 1/2 years of training are the squat, bench press, press, deadlift, and power clean, along with the chin-up as the primary assistant exercise. Share on X

Rippetoe Books
Image 1: Mark Rippetoe’s bestselling books discuss the basic principles of the Starting Strength Method and are used as textbooks in his seminars.

Freelap USA: What is your Two-Factor Model of Sports Performance?

Mark Rippetoe: The Two-Factor Model states that two avenues of adaptation are required to achieve a higher level of performance: training and practice. Training stimulates physiological adaptation; practice is the repetition of skills displayed during performance. Take baseball as an example.

Strength is the physiological adaptation for baseball, but you won’t develop strength by throwing a 4-ounce baseball. You develop strength for baseball by performing the squat, the bench press, and the power clean. Performing these exercises in a progressive manner will make you strong enough to play baseball at a higher level and prevent you from hurting your shoulders.

Practice for baseball is exactly what you might suspect it is because throwing a baseball is specific to baseball. If you’re a pitcher, you’re throwing a baseball 60 feet, 6 inches. So, practice for baseball is throwing 60 feet, 6 inches, and repeating that for thousands and thousands of reps. Throwing a 6-ounce baseball will not make you stronger, is not specific to throwing a 4-ounce baseball, and will only mess up your timing and provide more business for physical therapists.

What about sprinting? We know that the practice for sprinting is sprinting, but we also know that sprinting is force-production based—the more force a sprinter puts into the ground, the more distance they will cover with each stride. What increases force production? Strength. What is the best way to improve strength? Barbell exercises such as the squat and the deadlift.

Freelap USA: Your company has 21 Starting Strength gyms open, and you sold another 20 franchises. At a time when smaller gyms are struggling against the major gym chains, how are your gyms able to succeed?

Mark Rippetoe: Everyone who comes to our gyms is taught the Starting Strength Method—that’s what we do, and nobody training at our gyms works out unsupervised. Our target demographic is 55-year-old males, but we have 20% women. Our program is successful because it works for everyone, and we project that within five years, we will have 100 Starting Strength gyms.

Starting Strength Boise
Image 2: The Starting Strength franchise is projected to expand to 100 gyms within five years.

Freelap USA: What major changes have you seen in the strength coaching profession since you started coaching?

Mark Rippetoe: There haven’t been any major changes for the good of the profession, but there have been many fads that have come and gone. One fad right now is functional training, which represents a fundamental misunderstanding of what we’re supposed to be doing in the weight room in light of the Two-Factor Model.

Proponents of functional training are trying to make training look like practice. You can’t make a guy stronger with a 20-pound dumbbell while he’s standing on an unstable surface. And if you don’t think an athlete needs to be stronger, why are you a strength coach?

It’s really very simple. Strength is force production, and force production is measured by how much weight is on the bar. The weight on the bar goes up; force production goes up, says @SS_strength. Share on X

It’s really very simple. Strength is force production, and force production is measured by how much weight is on the bar. The weight on the bar goes up; force production goes up. Why do athletes take steroids? Because they know that steroids will make them stronger.

Freelap USA: How can high school coaches apply the Starting Strength principles to their athletes?

Mark Rippetoe: The first step is to purchase a copy of Starting Strength: Basic Barbell Training and Practical Programming for Strength Training—those are our two main textbooks. I should point out that Starting Strength is in its third edition, and it is the best-selling book on strength training in the history of publishing. After studying these books, you should attend a Starting Strength Seminar because we pull it all together for you.

At our seminars, we spend 25 contact hours reviewing our material in a highly intensive manner, and our staff demonstrates and coaches our five basic barbell lifts. Attendees will be required to perform these lifts and to coach them—because when you coach, you learn!

Since you’re here…
…we have a small favor to ask. More people are reading SimpliFaster than ever, and each week we bring you compelling content from coaches, sport scientists, and physiotherapists who are devoted to building better athletes. Please take a moment to share the articles on social media, engage the authors with questions and comments below, and link to articles when appropriate if you have a blog or participate on forums of related topics. — SF


Softball vs baseball

Creating a Plan for In-Season Softball Training

Blog| ByTimothy Rattan

Softball vs baseball

Having grown up immersed in the baseball community—participating both as a player and a coach—I gained a profound appreciation for the significance of comprehensive training methods aimed at optimizing athletic performance. In my early coaching days, I initially perceived baseball and softball as closely intertwined sports. However, my perspective has slightly shifted as I have worked closer with softball athletes. This has pushed me to further refine my training framework and approach.

Upon examining and reverse-engineering the sports of both baseball and softball, I recognized numerous obvious parallels between the two. Nevertheless, a critical yet often disregarded difference lies in the positional aspect, particularly in the contrasting qualities required of the pitchers.

A critical yet often disregarded difference between baseball and softball lies in the positional aspect. Share on X

As I prepare to strategize and train the Simon Fraser University (SFU) softball team for the upcoming season, I’ve structured their developmental approach into four perspectives via a position-based analysis:

  1. Positional Reverse Engineering
  2. Key Performance Indicators
  3. Strength and Conditioning (S&C) Performance Tracking
  4. Stress Management

1. Reverse Engineering Sport

In dissecting the sport of softball, I identified areas crucial for development. These specific areas of focus encompassed:

  • Arm Angle: This is defined as where the ball is released in respect to the position. From a pitcher’s perspective, the arm angle is below and will have a high stress point on the elbow, in comparison to fielders who have an arm angle which releases the ball high and places a higher amount of stress on the rotator cuff.
  • Hip Movement: From a pitching perspective, with the unilateral movement involved, there is more extension that places a higher demand on the joint. From a fielder’s perspective, the major focus then shifts to the hitting side, which will still involve extension but considers a larger amount of rotation in the movement.
  • Sling Aspect: This is in reference to the oblique slings (core), which are used differently depending on the position of the athlete: for stabilization to secure the pelvis in pitchers vs. being more ballistic and requiring more of a rotational component for fielders.
  • Speed: This area differentiates between training in more of an acceleration phase for pitchers in comparison to fielders, who are required to touch on maximum velocity training more frequently.
  • Output: Pitchers are required to produce a higher amount of power at a repeated level in comparison to fielders, who require more maximal force production.

Throughout the season, my intent is to evaluate and refine these aspects to propel performance forward.

Having established these key focal points, I proceeded to dive deeper into the difference between fielders and pitchers. To achieve this, I embarked on a more detailed breakdown to discover how these identified areas differ in their significant between the positions. The examination, presented in figures 1.1, 1.2, and 1.3, describe how these aspects will be distinctly emphasized and targeted for training throughout the entirety of the season.

Moreover, this comprehensive analysis not only seeks to optimize individual player performance, but also aims to tailor training methodologies to suit the specific demands associated with

The major point where we see a difference is in the pitching position with the arm angle, hips, and sling involvement. Share on X

As mentioned previously, baseball and softball have always been viewed quite similarly. The major point where we see a difference is in the pitching position with the arm angle, hips, and sling involvement. As described above, as we notice with a softball player, the definitions of arm angle, hip movement, and sling aspect for a pitcher in the sport of baseball are almost flipped and more reflective of that of a fielder in the sport. Arm angle and hip movement will be more rotator cuff focused and from a higher release point, with the hips requiring a larger amount of dissociation and rotation to generate power.

Softball In-Season Qualities
Figure 1.1. Arm Angle & Hip Movement; Figure 1.2. Sling Aspect & Speed; Figure 1.3. Outputs.

2. Key Performance Indicators

An integral aspect for any sports performance division to consider revolves around identifying and analyzing key performance indicators (KPIs) specific to the team and the sport. Tailoring them to align with the positional requirements within the sport is critical. As I established both KPIs and Performance Monitoring (discussed below), I emphasized the value of simplicity and advocated for a streamlined approach without additional complexity.

During the selection of KPIs, I focused on pinpointing the primary areas that exert a significant influence on softball games. Notably, I singled out speed and arm strength, particularly emphasizing velocity. Speed in softball is a game changer, particularly due to the base paths being 60 feet (20 yards). For the majority of team sport athletes, this is now cracking into the distance where maximum velocity is reached. By having speed as a KPI, you can alter the game by simply making your athletes become better through acceleration (batter’s box to first base).

Arm strength (and thus throwing velocity) can counteract speed from the perspective of team defense. The faster you can throw the ball across the diamond may play a role in getting an out or extending an inning, with athletes only needing to cover 20 yards of distance to be safe from base to base. These elements offer straightforward assessment and lend themselves to consistent monitoring that can be recurrently executed throughout the course of the game.

Figure 2.1 describes the different KPIs between pitchers and fielders, highlighting their direct correlation to the essence of the game itself. This graphic representation serves to showcase the distinct yet interconnected performance metrics vital for both positions in softball, emphasizing their relevance within the sport.

KPIs can be quite difficult to fully integrate if your sport and strength coaches are not on the same page. Having a planned and structured timeline on when to take KPIs is critical. In my program, KPIs and monitoring will be taken on a biweekly basis and speed KPIs will be taken on Game Day-1, as this allows coaches to ensure speed training residuals are not lost throughout the season. When it comes to velocity tracking, this can be done on Game Day-2 or during a pitcher’s scheduled bullpen session.

Softball KPIs
Figure 2.1. Key Performance Indicators.

3. S&C Performance Monitoring

Similar to the approach taken with KPIs, simplicity underlies the establishment of performance monitoring protocols. I’ve chosen to categorize elements into seven distinct categories:

  • Power
  • Neuromuscular
  • Vertical Displacement
  • Horizontal Displacement
  • Max Strength
  • Reactive Strength
  • Anthropometrics

Avoiding fixation on a singular metric and embracing a range of straightforward data points enables a more comprehensive assessment when implementing a peaking protocol.

Avoiding fixation on a singular metric and embracing a range of straightforward data points enables a more comprehensive assessment when implementing a peaking protocol. Share on X

The specific metrics slated for monitoring throughout the season with the SFU softball team are illustrated in Figure 3.1. The primary objective involves gathering information continually over the year. While the aim is to see advancement across all categories, the data, whether indicating progress or setbacks, will illustrate a picture that indicates where an athlete should focus their attention in terms of training. The goal is to progress in all areas, and the data collected plays a vital role as an assessment tool and direction for programming, whether it reflects advancement or challenges.

Monitoring
Figure 3.1. S&C Performance Tracking & Monitoring

4. Stress Management

The role of the strength and conditioning coach transcends that of just making athletes bigger, faster, and stronger. Upon utilization of periodization, advanced methodologies, and techniques, it becomes evident that an S&C coach must possess a profound understanding of stress and load management. I have always viewed my training and periodization system as a large puzzle piece, offering a visual framework to easily structure weekly plans. To further enhance this approach, I’ve meshed my system with Daniel Bove’s quadrant system to incorporate stress management—in this case, specifically tailored towards softball athletes.

The role of the strength and conditioning coach transcends that of just making athletes bigger, faster, and stronger. Share on X

Stress assessment is simplified by breaking it down into four quadrants: Quadrant 1 denotes low tissue stress in conjunction with low neural stress, Quadrant 2 signifies high tissue stress with low neural stress, Quadrant 3 represents low tissue stress paired with high neural stress, and Quadrant 4 indicates high tissue stress coupled with high neural stress. Overlaying these quadrants with my own training system became apparent as an effective approach.

Quadrant System
Figure 4.1. S&C Quadrant System.

Figure 4.1 illustrates the correlation between my training system and stress management represented within each quadrant. The subsequent step involved dissecting the equivalent stress within the sport itself.

Stress Management
Figure 4.2. Sport Quadrant System.

Figure 4.2 describes how I segmented the game of softball through gameplay, practices, and individual training, factoring in the distinct roles of pitchers and fielders. This newly integrated system aims to analyze weekly stress totals to distinguish between “high” and “low” stress weeks. By monitoring loads not only in the weight room but also during practices, this approach fosters improved communication among players, coaching staff, sports medicine personnel, and performance staff, ultimately fostering holistic athlete development.

Final Thoughts

The holistic approach, centered on training methodologies tailored to the unique demands of softball and specifically structured around different player positions, serves not only to optimize individual performance, but also fosters improved communication. This multifaceted strategy, intricately woven into the developmental plan for the SFU Softball Team, represents a step toward understanding and enhancing athlete performance.

By deconstructing the sport based on its specific needs and positional requirements, this approach contributes significantly to advancing the field of strength and conditioning, paving the way for more targeted and effective training methodologies in the realm of softball and potentially other sports as well.

Since you’re here…
…we have a small favor to ask. More people are reading SimpliFaster than ever, and each week we bring you compelling content from coaches, sport scientists, and physiotherapists who are devoted to building better athletes. Please take a moment to share the articles on social media, engage the authors with questions and comments below, and link to articles when appropriate if you have a blog or participate on forums of related topics. — SF


References

Bove, D. (2022). The quadrant system: Navigating stress in team sport. Athlete Framework.

Bove, D. (2023). Takeoff: A Visual Guide to Training and Monitoring Lower Body Power. Athlete Framework.

Robertson, K. (2022). Athlete Monitoring. Lecture.

Care, T. (2023). Holistic Performance Management Concurrent Model. Lecture.

Kierra Marshall Firefly

Helping High School Athletes Recover Faster with Firefly Recovery

Blog| ByLauren Campbell

Kierra Marshall Firefly

By Lauren Campbell & Conlan Sodrosky

Although high school athletes, coaches, and parents recognize the critical importance of recovery in athletic performance, it is often difficult for high school athletes to fit adequate recovery time into their demanding schedules. Finding time to recover is even more critical for track and field athletes, such as distance runners who can run upward of 60–75 miles per week, placing tremendous strain on young bodies.

Prioritizing recovery is the backbone of athletic success, playing a pivotal role in performance optimization and injury prevention. With their developing bodies and intense training schedules, high school athletes are particularly vulnerable to the cumulative effects of physical exertion. Efficient recovery becomes essential in ensuring sustained performance and long-term athletic development.

Prioritizing recovery is the backbone of athletic success, playing a pivotal role in performance optimization and injury prevention. Share on X

In the competitive landscape of high school track and cross country, achieving peak performance is a constant pursuit. Track athletes strive to attain PRs and break school and state records while often seeking to compete at a collegiate level. However, the demanding nature of training and racing often leaves young athletes susceptible to fatigue and delayed recovery. Recognizing these challenges, coaches across the nation have turned to the Firefly Recovery device to address the unique and demanding needs of their high school track athletes. Firefly Recovery is used by more than 700 professional and collegiate teams to help their athletes recover faster and perform better.

High school students juggle academic commitments, social engagements, jobs, extracurricular activities, and family responsibilities, leaving them with limited time for adequate rest and recovery. Balancing rigorous training regimens with academic pressures can lead to increased stress, diminished sleep, and heightened fatigue, which can impede physical and mental well-being. The keys to recovery are well known—adequate sleep, sufficient hydration, and proper nutrition—but finding time for this with all of the other commitments can be challenging. In addition, many athletes look for additional ways to boost their recovery but struggle to find time to fit another task into their busy days.

Gaining an Edge in Recovery

Athletic recovery is built on the cornerstones of proper nutrition, hydration, quality sleep, cross-training, and strength training. The Firefly Recovery device provides a cutting-edge addition to elevate your recovery that is tailored to the unique demands faced by high school track and cross-country athletes. This innovative technology employs neuromuscular electrical stimulation, complementing traditional recovery practices by enhancing blood circulation, promoting targeted muscle recovery, and reducing recovery time.

These small, portable, and user-friendly devices (recognized as the GQ Winner of Best Wearable Recovery Device) leverage a non-invasive appearance, which makes them an ideal choice for young athletes seeking an efficient and convenient recovery solution. The devices can be used pre or post training or meet and can even be worn in the car or during class.
Firefly Legs

How It Works

Firefly sends small electrical pulses to gently stimulate your peroneal nerve (which runs from hip to toe) and creates a slight foot twitch, which increases blood flow to speed up recovery. Share on X

Firefly sends small electrical pulses to gently stimulate your peroneal nerve (which runs from the hip to the toe) and creates a slight foot “flutter” or twitch, which increases blood flow to speed up recovery. Firefly functions as a science-based, “passive soleus pump” that stimulates the lymphatic response and increases venous and arterial blood flow back to your heart.  Increased blood flow means your muscles get more oxygen and nutrients, which helps your body recover from exercise faster and reduces soreness.


Video 1. Pro beach volleyball player and five-time Olympian Kerri Walsh explains the simple steps to use the device.

Firefly is versatile and can be used:

  • Pre-workout as a warm-up (30–60 minutes).
  • Post-training or meet to recover (1–4 hours).
  • During travel to promote healthy blood flow and keep legs feeling fresh (duration of travel).

Results on the Track

North Scott High School in Eldridge, Iowa, and Montour High School in Pittsburgh, Pennsylvania, are two programs that have adopted Firefly for their track athletes. By integrating the recovery tool, their young runners can reduce fatigue and foster a holistic approach to well-being throughout their athletic journey.

“This past spring, we had a number of kids qualify and run in four different events over a three-day state track meet,” said Tony Stewart, Head Strength and Conditioning Coach at North Scott High School. “We were able to provide them each with a pair of Firefly devices that they used at the hotel in the evening to help recover from the day and be prepared to compete again the following day. All of our athletes reported back that they loved the device.”

High school athletes using Firefly have reported a noticeable reduction in muscle fatigue and soreness. The targeted neuromuscular stimulation facilitates enhanced blood flow, expediting the removal of metabolic waste and promoting a quicker recovery turnaround. Firefly’s positive impact on reducing fatigue ensures that athletes approach each session with increased readiness, fostering consistent and sustainable performance increases.

Firefly’s positive impact on reducing fatigue ensures that athletes approach each session with increased readiness, fostering consistent and sustainable performance increases. Share on X

“When it comes to the recovery efforts for high school track athletes and the year-round training and competition, it is essential to have a recovery tool that is efficient, portable, and easy to use,” said Jay Martinez, Head Strength and Conditioning Coach at Montour High School.

“Incorporating the Firefly recovery tool for our athletes has been an essential part of how we do things at Montour High School. The recovery and the ability for athletes to rebound for back-to-back training sessions has been great. The feedback from the athletes has been nothing but positive; they feel less fatigued when they have them and more recovered, while the soreness that usually comes days after high-intensity training days has been diminished.”


Video 2. Recent high school graduates Leo and Lex Young received national attention for their stellar performance at Newbury Park High School, where they broke school, state, and national records. Here, they discuss how Firefly Recovery works and why they enjoy using it.

There is an additional psychological benefit to recovery that is explained by Dr. Jim Taylor, an internationally recognized authority on the psychology of athletic performance.

“Firefly recovery devices are ideal for high school track athletes because they ensure a faster physical recovery from intense workouts and hard race efforts,” said Dr. Taylor, who is also a professional triathlete. “They also provide psychological benefits because when you’re feeling rested and recovered, and your body feels good, you’ll be motivated, confident, relaxed, and focused for upcoming workouts and races. Firefly devices are also practical because you can wear them in class, on the bus, almost anywhere, so you can actively recover even with your demanding schedule.”

The efficacy of Firefly is further supported by a clinical study that underscores its superiority in enhancing blood microcirculation compared to intermittent compression boots. The study demonstrates that Firefly’s neuromuscular electrical stimulation (NMES) technology surpasses traditional compression methods in promoting more efficient blood flow, a crucial factor in accelerated recovery. Moreover, the findings suggest that incorporating Firefly into the rehabilitation process post-lower limb injury can be particularly advantageous for athletes.

The device’s ability to aid both physiological and psychological aspects of recovery has been observed to lead to significant performance increases within just 24 hours post-strenuous exercise. This scientific validation further solidifies Firefly as an invaluable tool for high school track and cross country athletes, not only offering tangible physical benefits but also contributing to the overall well-being and resilience of these young competitors. By addressing the unique challenges young athletes face, the device emerges as a game-changer, empowering the next generation of runners to navigate their demanding schedules with resilience, improved recovery, and a renewed capacity for athletic excellence.

Frequently Asked Questions

Does Firefly have clinical studies?

Yes, Firefly has been clinically validated to improve recovery. Please review our clinical studies on the Firefly website.

How does Firefly differ from muscle stim?

The Firefly is a modified NMES that stimulates a nerve versus a muscle; it is not a muscle stim or TENS unit. Stimulating the peroneal nerve causes muscles to contract and increase blood flow. Stimulating a muscle (with traditional NMES) for extended periods can cause muscle fatigue. The Firefly safely avoids muscle fatigue that can be caused by TENS.

Is Firefly a single-use device?

The Firefly device is reusable during the 30-hour life of the battery and can be used for multiple recovery sessions. Afterward, the battery can be removed and recycled like any household battery but cannot be replaced. The Firefly device is not rechargeable at this time. We are looking at ways to extend the life of the product and make Firefly rechargeable.

How much does Firefly cost?

One pack of Firefly Recovery devices costs $48 and is available in the Firefly Recovery Shop. In addition, Firefly offers subscriptions and bundles to reduce the price so that the total cost is under $1.50 per hour of treatment.

Since you’re here…
…we have a small favor to ask. More people are reading SimpliFaster than ever, and each week we bring you compelling content from coaches, sport scientists, and physiotherapists who are devoted to building better athletes. Please take a moment to share the articles on social media, engage the authors with questions and comments below, and link to articles when appropriate if you have a blog or participate on forums of related topics. — SF


Conlon Sodrosky
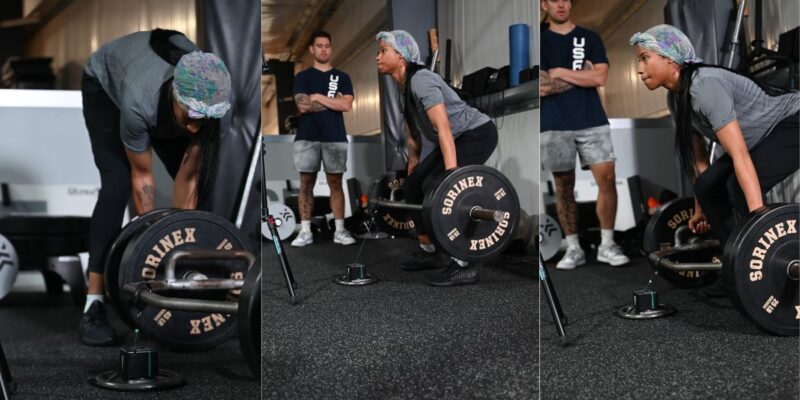
Conlan Sodrosky is a Firefly Recovery sales representative with six years of experience as an athletic trainer at the D1 and professional sports levels, working with Wake Forest football and the Atlanta Falcons of the NFL. Conlan attended Penn State University for his undergraduate degree in athletic training and the University of South Carolina, where he acquired a master’s degree in advanced sports medicine. Conlan is currently working with high school coaches and athletic trainers nationwide to help them implement Firefly within their programs to enhance their student athlete’s recovery.

ACL Injury

Game over Too Soon: The Consequences of Rushed ACL Rehab

Blog| ByKelsey Kryger

ACL Injury

Pop! goes the anterior cruciate ligament. ACL tears are not a rare injury in the athletic world. As an athlete, if you haven’t suffered one yourself, you’re likely terrified of the dreaded ACL tear happening to you one day—and rightfully so. Tearing your ACL, having surgery, and working through the rehabilitation process is no easy venture.

ACL rehabilitation is an all-encompassing process that takes over nearly every aspect of the injured athlete’s life for the year—and then some. So, why is there such a gap in the quality of rehab plans from physical therapists? Why are there such high ACL reinjury rates for athletes?

I tore my ACL in my early 20s during an indoor soccer game, playing on some pretty worn-out turf. Though I played in this adult soccer league for fun, we were losing, and I was frustrated about it—once an athlete, always an athlete. I went in for a sloppy tackle to get the ball, and after winning it, it was all downhill. I did it to myself.

My ACL injury was non-contact, as is the case with many. After winning the ball, I planted my left foot firmly and was shielding the ball from another opponent. Somehow, I twisted in the wrong direction and heard the infamous “pop.” Down I went.

ACL Brace

While rehabbing, I got connected with the @theaclclub Instagram community and, shortly after, became their social media manager. It was through my own sub-par physical therapy and seeing the struggles of other ACL patients that I realized just how little is known about this specific rehab process—even with between 100,000 and 200,000 ACL tears suffered yearly in the United States alone.

The Biggest ACL Rehab Misconception

Urgency can be the greatest enemy in ACL rehab. Athletes are the population predominantly dealing with this injury, and they’re eager to get back to playing. Many grab hold of the outdated 6–9-month return-to-sport timeline with a tight fist, and unfortunately, their physical therapists or surgeons may tell them the same.

Urgency can be the greatest enemy in ACL rehab. Share on X

At @theaclclub, I have the great pleasure of being connected with some of the most knowledgeable ACL physical therapists around the world. Two of them—Ravi Patel and Tommy Mandala—spoke with me directly to provide additional insights on how to be successful in your ACL rehabilitation process.

“No one should be cleared before nine months post-op, based on the mountains of research and evidence to show that should be our minimum cut-off,” says Ravi Patel, physical therapist, performance coach, and founder of The ACL Athlete. “Time alone will not do anything for us.”

As has been found by Sports Health, delaying return to sport to align with ACL graft integration and maturation decreases reinjury risk, which is why it’s recommended to wait until 9 to 12 months after surgery. But even that timeline can be too soon if the athlete is not engaging in an ACL rehab plan that will fully prepare them to return to sport.

Where the ACL Rehab Process Falls Short

“One of the biggest challenges faced by ACL patients is the tendency for their physical therapist to underload them early in the process and then rapidly overload them in the middle- to late-phase,” said Tommy Mandala, physical therapist and founder of All in ACL.

Mandala continued, “Early in their rehab, many ACL patients are given low-level exercises, like leg lifts, bridges, clamshells, and band walks—which do very little to prepare them for higher-level activities.”

It’s true. Aside from the hamstring curl, leg press, and knee extension machines, I didn’t utilize weights at all in my early rehab. Most of the exercises I saw included what Mandala mentioned, as well as indoor biking and bodyweight squats. By the time I hit three months post-op, I was starting to run on the treadmill without ever performing a strength test. It’s no wonder I felt so weak and unstable, but I didn’t know any better.


Video 1. Performing leg raises post-surgery.

And similar to my experience, when the “standard ACL timeline” allows, athletes are rapidly overloaded with more complex moves like lunges, jumping, running, and even returning to sport. The struggle is that most ACL patients don’t know any better and are doing their best with the resources they have available to them.

“Early progressive overload and continued patience as you rebuild strength symmetry before getting into those more dynamic movements are the key to success in ACL rehab,” Mandala concluded.

Progressive overload—just like in weightlifting. An ACL tear is a significant injury, and it requires you to rebuild gradually. After surgery, muscle atrophy in the injured leg hits quickly. Graduating from low-level bodyweight movements straight into running on that depleted leg is a huge leap. If you take that same drastic leap too soon onto the pitch, you won’t be adequately prepared for the chaos of a full-speed competitive game.

Graduating from low-level bodyweight movements straight into running on that depleted leg is a huge leap…It’s these huge leaps that lead to high reinjury rates in the first place. Share on X

It’s these huge leaps that lead to high reinjury rates in the first place.

Another significant problem lies in the lack of proper strength testing from physical therapists. In fact, many athletes go through physical therapy without ever receiving an actual strength test, which measures muscular strength and compares symmetry in each leg.

“Studies show that successfully passing a series of single-leg hop tests, along with a series of strength tests for your quad and hamstring, all with symmetry of 90% matching the other side, reduces risk of reinjury by 84% when returning to sport,” added Mandala.

Don’t make the mistake of letting time be the be-all and end-all measurement of progress or the next steps in your ACL rehab. One day, around four months post-op, my physical therapist said, “Congratulations! It’s your rehab graduation day,” and sent me on my way without any strength testing. I only ever realized I needed a strength test from managing the @theaclclub Instagram account.

“Imagine if I got my doctorate solely based on doing three years of grad school, with no testing. That’s how much of ACL rehab is done. Often, after six months, athletes are cleared to return to sport. No testing or criteria has been met, but rather, it’s because they’ve reached a six-month point with their surgeon or rehab professional,” Patel told me.

It’s what is accomplished from both a physical and mental preparation standpoint, criteria-based testing, rehab, and training during this time—and beyond—that will ultimately influence successful return to sport and activities.

7 Best Practices for Successfully Returning to Sport

Seeing such high ACL reinjury rates can feel discouraging for athletes. Of course, full-speed games are unpredictable, and things that are out of your control can always happen. But you have more power over your ACL rehab than you may think. Heed these seven best practices from a pair of physical therapists specializing in ACL RTP for successfully returning to sport.

1. Quad Strength Is Key

The importance of quad strength is severely underlooked in ACL rehab, yet after surgery, this is the spot where you’ll immediately start noticing a difference. As a soccer player, I always prided myself on my strong quads. So, it was completely shocking when my surgical leg went from firm and strong to that of a hot dog within a week’s time. Even just flexing the quad and lifting my leg after surgery felt like mission impossible.

The importance of quad strength is severely underlooked in ACL rehab, yet after surgery, this is the spot where you’ll immediately start noticing a difference. Share on X

Atrophy takes over, so regaining quad strength is extremely important. After all, every 1% increase in quad strength is a 3% decrease in risk of a re-tear.

Mandala said, “Gaining strength in this rehab, while maintaining a quiet knee, free of swelling, is the name of the game in successful return to sport.”

2. Vet Your Physical Therapist

Many folks make the mistake of going to their nearest surgeon and the recommended physical therapist and hoping for the best. It’s essential that you vet your ACL care team, including your surgeon and physical therapist. You’re not expected to know everything, but there are important questions to ask your physical therapist before you commit to working with them.

Mandala, amongst many other specialized physical therapists, encourages asking the number one question: “How many ACL patients do you work with per year?”

A physical therapist who sees upward of five ACL patients each year is a good number to aim for. It’s a unique injury, and athletes need to work with someone who helps ACL patients regularly and understands the process. Unfortunately, the traditional healthcare model can limit even the best clinicians.

Here are some other important questions to ask your physical therapist:

  • What criteria do you use for return to sport?
  • How long should it take to get back to sport? (Watch if they say less than nine months.)
  • How heavy can you load me during rehab? (Fifty pounds and heavier needs to be available.)
  • How do you measure quad strength or force gauge? (Words to look for: handheld dynamometer or an isokinetic dynamometer/Biodex.)
  • What tools do you have access to during rehab? (Helpful items can be blood flow restriction cuffs and electric stimulation.)
  • What are your keys for patients during recovery? (Recommendations can include being around teammates, journaling, sports psychologist, nutrition, etc.)
  • Will I see more than one provider? (Personal preference is to see the same provider or work with a few different ones within the practice you trust.)

Patel stated, “People assume that their healthcare system is set up to take care of them from start to finish, but it’s not, and you have to be your own advocate—from vetting surgeons to physical therapists to any other professionals involved, as most are not experts in ACL rehabilitation.

Get ahead of this. Do your research and find an ACL expert to guide you on your journey. Don’t assume the system will take care of you, and always be your own advocate. And lastly, choose what is truly needed over what’s available or convenient. I promise you will thank yourself in a year,” he concluded.

3. Understand What You Need to Succeed

Having worked with many ACL patients, Patel advises that ACL patients need three things in this process to return to sport successfully.

  • Making sure the patient has solid evidence-based and criteria-driven testing every 4–6 weeks. This includes range of motion, functional positions, quadriceps and hamstring isolated strength, jump, deceleration, and change of direction profiling.
  • Appropriate planning and programming for the patient’s specific needs and gaps to help meet the proper criteria being tested and sport demands.
  • Having expert support each step of the way.

4. Do Your Homework

Your rehab homework, that is. ACL rehabilitation is like having a full-time job you didn’t ever apply for. Of course, you have to attend your physical therapy sessions with a focused mind and a ready-to-work mentality. But you also have to work on your own time.

“Two physical therapy visits per week for an hour per session is still less than 2% of your week. Your success in ACL rehab is dependent upon what you do with the other 98% of the week!” Mandala declared.

5. Don’t Underestimate the Early Post-Op Days

The early days of ACL rehab are more important than you might think, and their significance is often underestimated. The immediate post-op days can be painful and full of exhaustion. You may even be scared to hurt yourself somehow. But this is where the foundation is built.

“You can easily make this process two times longer if you don’t focus on those basics early, such as getting the knee quiet and strong.” Patel went on. “People assume the knee just needs to heal, which is partially correct. The other part is doing your job to make sure your range of motion is perfect, quads are firing on all cylinders, your walking is normal, and you’ve got your pain and swelling under control.”

Hitting these key points early and over-excelling in the post-op phase will allow you to have an easier mid and late stage.

6. Prioritize Patience

As social media manager for @theaclclub, a community with more than 30,000 followers, I’ve received many messages asking how to speed up the ACL recovery process. Spoiler alert: you can’t, and you shouldn’t. No athlete wants to hear about the importance of patience, but it truly is a virtue that will serve you well in ACL rehab.

No athlete wants to hear about the importance of patience, but it truly is a virtue that will serve you well in ACL rehab. Share on X

“Don’t rush trying to get back—play the long game, instead. You can’t rush biology. This recovery takes time not only to heal but also to physically and mentally get back to better than before. Don’t beat yourself up if it takes over a year to feel that. Your older self will also appreciate that you didn’t rush back,” Patel encouraged.

7. Conquer Your ACL Rehab

ACL rehabilitation is a tough battle that can certainly feel overwhelming—especially if it’s your first major injury. There are so many things learned from simply going through it, and we all have different resources available to us. Take your ACL rehab process one step and one day at a time while doing all you can to be your best advocate.

Since you’re here…
…we have a small favor to ask. More people are reading SimpliFaster than ever, and each week we bring you compelling content from coaches, sport scientists, and physiotherapists who are devoted to building better athletes. Please take a moment to share the articles on social media, engage the authors with questions and comments below, and link to articles when appropriate if you have a blog or participate on forums of related topics. — SF


References

Mandala, Tommy. All in ACL.

Patel, Ravi. The ACL Athlete.

Friedberg RP and d’Hemecourt PA. “Anterior cruciate ligament injury.” Uptodate. 2023.

Brinlee AW, Dickenson SB, Hunter-Giordano A, and Snyder-Mackler L. “ACL Reconstruction Rehabilitation: Clinical Data, Biologic Healing, and Criterion-Based Milestones to Inform a Return-to-Sport Guideline.” Sports Health. 2021;14(5):770–779.

  • « Go to Previous Page
  • Page 1
  • Interim pages omitted …
  • Page 16
  • Page 17
  • Page 18
  • Page 19
  • Page 20
  • Interim pages omitted …
  • Page 164
  • Go to Next Page »

Primary Sidebar

FEATURED

  • Using Speed and Power Data to Bucket and Train Faster Athletes
  • Plyometric Training Systems: Developmental vs. Progressive
  • 9 (Fun!) Games to Develop Movement Skills and Athleticism

Latest Posts

  • Rapid Fire—Episode #15 Featuring Kyle Brown: What is Universal Speed Rating (USR)?
  • Why We Don’t Perform Hang Cleans
  • 1080 Sprint: Four Essential Tips You Won’t Find in the Manual

Topics

  • Adult training
  • App features
  • Artificial Intelligence
  • Athlete
  • Athlete performance
  • Baseball
  • Buyer's Guide
  • Career
  • Certifications
  • Changing with the Game
  • Coach
  • Coaching
  • Coaching workflows
  • Coching
  • College athlete
  • Course Reviews
  • Dasher
  • Data management
  • EMG
  • Force plates
  • Future innovations
  • Game On Series
  • Getting Started
  • Injury prevention
  • Misconceptions Series
  • Motion tracking
  • Out of My Lane Series
  • Performance technology
  • Physical education
  • Plyometric training
  • Pneumatic resistance
  • Power
  • Power development
  • Practice
  • Rapid Fire
  • Reflectorless timing system
  • Running
  • Speed
  • Sports
  • Sports technology
  • Sprinters
  • Strength and conditioning
  • Strength training
  • Summer School with Dan Mullins
  • The Croc Show
  • Track and field
  • Training
  • Training efficiency
  • Wave loading
  • What I've Added/What I've Dropped Series
  • Youth athletics
  • Youth coaching

Categories

  • Blog
  • Buyer's Guide
  • Freelap Friday Five
  • Podcasts

COMPANY

  • Contact Us
  • Write for SimpliFaster
  • Affiliate Program
  • Terms of Use
  • SimpliFaster Privacy Policy
  • DMCA Policy
  • Return and Refund Policy
  • Disclaimer

Coaches Resources

  • Shop Online
  • SimpliFaster Blog
  • Buyer’s Guide
  • Freelap Friday Five
  • Coaches Job Listing

CONTACT INFORMATION

13100 Tech City Circle Suite 200

Alachua, FL 32615

(925) 461-5990 (office)

(925) 461-5991 (fax)

(800) 634-5990 (toll free in US)

Logo of BuyBoard Purchasing Cooperative. The word Buy is yellow and shaped like a shopping cart, while Board and Purchasing Cooperative are in blue text.
  • Facebook
  • Instagram
  • Twitter
  • YouTube

SIGNUP FOR NEWSLETTER

Loading

Copyright © 2025 SimpliFaster. All Rights Reserved.