Start with a Bang (and Other Keys to Winning in the 4×100 Relay)

Summary
The handoffs in a 4x100m relay are one area in track and field that requires precision. Coach Brumund-Smith discusses how to use the bang step and other strategies for reliable handoffs. He then takes a comprehensive look at key factors for winning, including lane discipline, stance, passing zones, and drills.
Coaches are in constant pursuit of peak performances, personal records, and maximum efforts. With all these superlative focuses, consistency often gets overlooked. Yet coaches should always strive for consistency. In track and field, one area in which reliability and precision are absolutely essential is during handoffs in a 4x100m relay. Tony Holler, whose Plainfield North team recently set an Illinois all-time best of 41.29 in the event, has developed the “bang step” to add consistency to the handoffs.
In this article, we’ll go over the bang step and why you should consider adding it to your program and then proceed with a comprehensive look at key factors for success in racing the 4x100m relay.
I. What is the Bang Step?
Every quality 4x100m relay uses a “go” mark, which for most high school athletes is a tennis ball cut in half. The challenge lies in defining what the go mark actually means. In the simplest possible terms, the outgoing runner starts sprinting when the incoming runner hits the go mark. Most coaches, however, agree that the outgoing runner has to anticipate when the incoming runner will hit the go mark. This can be an inconsistent guessing game, which is why the bang step is so important.
In the words of Tony Holler, “The bang step defines go.” No more hoping, no more guessing. With the bang step, you can review video (you absolutely should video record your handoffs in practice) to see if the athletes leave on time.
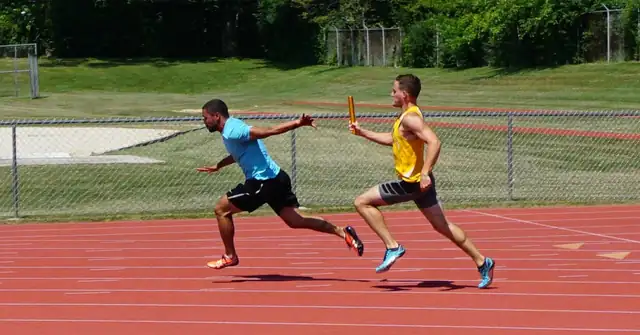
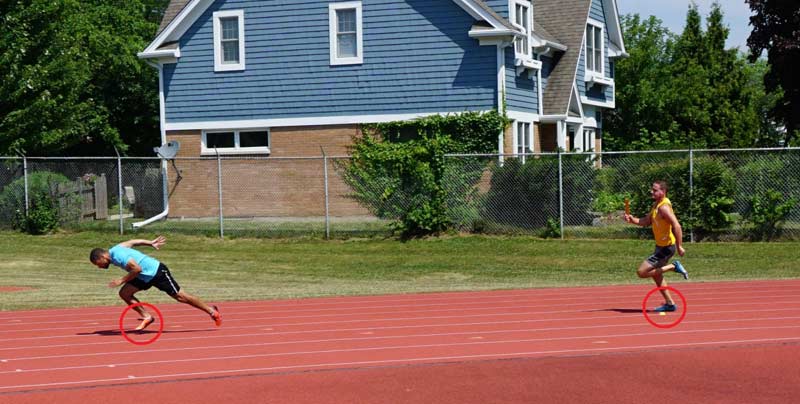
Video 1. Here’s a great example of a perfectly executed bang step by the middle legs of Lake Forest High School’s 2016 4x100m relay in a late-season practice. The incoming runner, Jonathan DiValerio, hits the go mark (the tennis ball next to his left foot) just as the outgoing runner, Chris Meng, takes his first sprinting step—the bang step. (See Image 2 below for a still shot.)
The video has a simple indicator to look for: As the incoming runner hits the go mark, the outgoing running should have his very first step (the bang step) hit the ground. The outgoing runner is still anticipating the incoming runner hitting the go mark, but now he has a tangible, reviewable goal to shoot for.
Video 2. Brandon Stryganek (Illinois ’15) receiving from Austin McIlvaine (John Carroll ’18).
The bang step also gives the incentive to be aggressive. In the past, when I reviewed videos of my athletes to see if they left on time, I would watch to see if the outgoing runner’s back foot left the track when the incoming runner was at the go mark. That was great for consistency, and we did have great handoffs with this method. But the bang step adds an aggressive component by emphasizing when the outgoing runner’s first step hits the track rather than when it leaves the track. The step now becomes the focus, instead of the toe-off—an important distinction.
The #BangStep gives athletes an aggressive mindset as they fixate on putting the first step into the ground appropriately, says @LFHStrack. Share on XThe distinction may be subtle, but focusing on the step instead of the toe-off gives athletes a more aggressive mindset as they fixate on putting that first step into the ground appropriately. After all, a lazy step can get off the ground at the same time as an active step, but a lazy step will never hit the ground as quickly as an active step.
The placement of the bang step is nearly as important as the timing. The outgoing runner’s first step must be made heading down the track to execute the bang step properly. Too often, an athlete will step out more than necessary toward the middle of the lane, which requires compensation and sacrifices distance and often power. Stepping out toward the middle of the lane also starts the outgoing runner toward a potentially dangerous handoff since it compromises lane discipline.
By using the bang step, you communicate to your outgoing runners that their first step is hugely important, not just in timing but in execution.
The rest of this article will focus on the 4x100m relay as a whole, hopefully leaving no stone unturned. First, we’ll discuss the givens, then the options, then finally the extra odds and ends, including drills and strategies even the most seasoned coaches can learn from.
II. The Givens
While there are many debatable parts of the 4x100m relay, some aspects are set in stone.
1. Lane Discipline
- 1st runner runs on the inside of the lane with the baton in the right hand
- 2nd runner runs on the outside of the lane with the baton in the left hand
- 3rd runner runs on the inside of the lane with the baton in the right hand
- 4th runner runs on the outside of the lane with the baton in the left hand (may switch hands upon receiving the baton)
The basic principle is that the baton stays in the middle of the lane. Since the first and third runners are sprinting around a corner, they’ll run the shortest possible distance if they stay on the inside of the lane. The second and fourth runners are competing on a straightaway, so they gain no advantage by running on the inside. When the baton stays in the middle of the lane and the athletes exhibit proper lane discipline, the handoffs are much cleaner, significantly reducing the risk of getting tangled up.
You might assume that running on the inside of the lane would not be an issue for the first and third runners, since running on the inside is a major advantage, but several teams have been disqualified because a curve runner was inexplicably running in the middle of the lane and, therefore, running extra meters. This makes some sense if the incoming runner has to move out to avoid interfering with another athlete (see Image 5, stance C2). Yet some teams—most notably the Great Britain men in the 2012 Olympics—have nobody racing inside and don’t maintain lane discipline for whatever reason. This video from the 1997 World Championships shows all eight athletes demonstrating great lane discipline on the second leg.
2. Passing Within the Zone
What used to be the acceleration zone is now part of a 30-meter exchange zone, according to a new rule that goes into effect for the 2019-20 season. The rule has extended the old 20-meter exchange zone into the old 10-meter acceleration zone. Now, both zones are part of the exchange zone (the acceleration zone has been eliminated). It’s also important to note that the baton needs to be in the zone, not the athlete.
Eliminating the acceleration zone makes passing the baton within the exchange zone a significantly easier task, says @LFHStrack. Share on XEliminating the acceleration zone makes passing the baton within the exchange zone a significantly easier task. Since outgoing runners are now required to start within the exchange zone (just like in a 4x400m or 4x800m relay), the chances of disqualification for passing off early are virtually eliminated. Runners must complete passes before the end of the 30-meter exchange zone, and again it is the baton that counts, not the athlete! The outgoing runner can be outside the zone, but if the baton is inside the zone when they complete the handoff, the exchange is legal.
Just because you can start at the very beginning of the exchange zone does not mean you have to. In all but the rarest of cases, however, every outgoing athlete in the 4x100m relay will start at the very back of the acceleration zone (see Image 4). This gives the athletes time to get up to speed before receiving the baton.
I’ve only started an athlete ahead of the zone once in my career, and it was only by two strides. In this situation, the incoming runner was significantly faster than the outgoing runner, and the two had consistently been handing off very early in the zone. To maximize the speed of the incoming runner, I started the outgoing runner up a few strides.
III. The Options
While lane discipline is a given, coaches still have many options for the 4x100m relay. Your decisions on the following options will depend mostly on your athletes’ ability levels, experience, and familiarity. Uniformity can be great, but don’t be afraid to let athletes make their own choices, as long as those choices benefit the team as a whole.
1. Stance
The way the outgoing runner stands in anticipation of breaking into his bang step is incredibly important. While the main consideration is being able to sprint, the athlete must also be able to see the incoming runner hit the go mark.
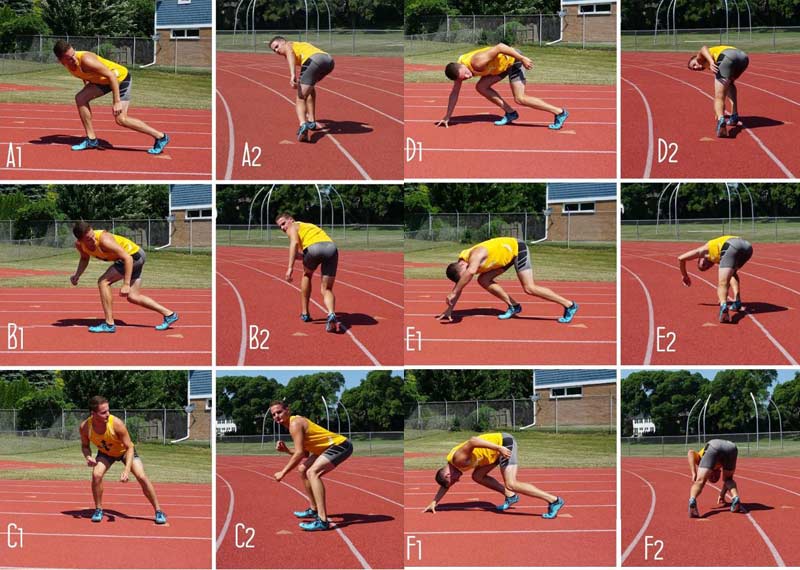
Most high school athletes will start with stance A or B. I highly recommend stance A over stance B due to the leg placement. Stance A allows the athlete to open up the shoulders much more, making their view over their inside shoulder much more comfortable. Technically, the two-point stances are the slowest of all the stances shown in Image 5 (nobody running a 40-yard dash starts in a two-point stance). However, they’re the easiest to learn and also the easiest to view the incoming runner. Look at the head placements of A2 and B2 as compared to D2, E2, and F2. Once the eyes pass a 60°tilt, perception drastically changes.
Never teach stance C. I only include it in this post to point out the foolishness of having athletes in this stance. First of all, look at the position of the feet in C1 in relation to all the others in Image 5. To maximize acceleration, the runner’s feet should aim down the track in the direction the athlete wishes to go, as demonstrated in A1, B1, D1, E1, and F1.
Notice that in C1, the feet are positioned at a 90°angle to the direction the athlete wishes to go. To sprint, the athlete first has to shift his feet in the correct direction. Also, look at how far the athlete’s butt protrudes into the next lane. This problem is either negligible or non-existent in all the other stances. Do not teach stance C and avoid contributing to “butt interference.”
In the 4x100m relay, most high school teams are better served when the outgoing runner uses a two-point stance, says @LFHStrack. #4x100mRelay Share on XThree-point stances like D, E, and F give the outgoing runner more ability to accelerate but limit their vision. For very elite high school teams, college teams, and professional teams, these stances or their variations can be very beneficial. The runners can sacrifice the reduced vision for the increased acceleration. The majority of high school teams, however, are better served using a two-point stance shown in A and B.
Regardless of the stance you choose, a great piece of advice for the athletes is to make firm contact to the track with both feet as they get into their stance. Some athletes are jittery and will bounce around a bit, others are more timid and will only have soft contact with the track as the incoming runner approaches. The ground contact needs to be firm, just as if the athlete was putting pressure on the starting blocks. Firm contact will not only allow the athlete to be faster out of the stance but also will increase consistency.
2. Go Marks
Since the timing of the 4x100m relay handoffs is critical, the use of a go mark is essential. The mark offers a visual cue for the outgoing runner to start his acceleration. When using the bang step, the outgoing runner aims to land his first step on the ground at the same time the incoming runner reaches the go mark.
Though there are many items you can use as a go mark (in a pinch, I’ve seen athletes uses dandelions or even their own spit), the standard items are a tennis ball cut in half or a piece of athletic tape. Certain tracks and competitions have rules for what is allowed, so be sure you know going into a meet what marks are available. Most high school meets allow tennis balls or chalk marks, while most college meets allow tape. The Olympics allows one piece of tape. Image 6 shows what some of these marks look like from the outgoing runner’s point of view.
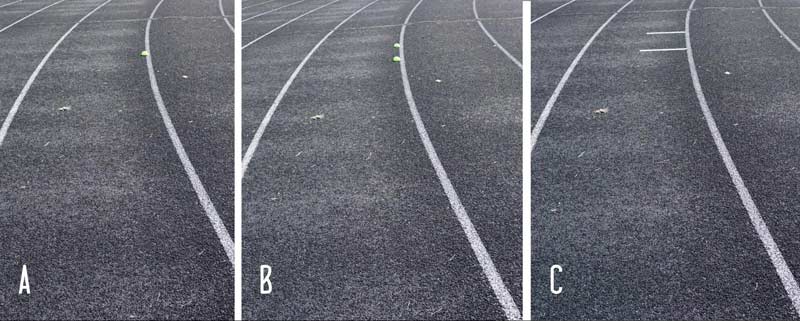
One decision you have to make is whether to use one mark or two. When using two marks, the athletes look at a zone versus a single mark. Generally, this zone is between 3-5 steps long. When using a zone, the outgoing runner goes when the incoming runner steps in the zone.
As you can see in Image 6, the zone is significantly easier to see when using tape than when using tennis balls. As a coach, I have my athletes use one mark because that gives the outgoing athlete only one object to focus on instead of two. If I had to look at a zone, especially if the zone was just a tennis ball, I’d end up at the back tennis ball instead of the zone between the two tennis balls.
If you choose to use tennis balls for your go marks, keep plenty on hand at all times. I suggest going to the tennis coach and asking for all the old tennis balls they’re done using. Cut them in half, draw your team logo on them with a marker, and keep at least two dozen on hand at practice. Give one to the athletes who consistently need them at meets, and keep plenty in your coaching bag for meets. An athlete scampering around before a race trying to find a tennis ball is not in the state of mind you want heading into a very technical event.
3. Commands
Since 4x100m handoffs are blind, the outgoing runner needs to know when to throw their hand back to receive the baton. Some coaches like verbal commands, while others prefer silent exchanges. Both options have their positives and negatives.
For a verbal command, the incoming runner will yell out Stick! when they’re ready to hand off the baton. Your athletes can yell out whatever they want, but Stick! seems to be the consensus. The timing of this command is critical, as many beginners yell too late when a little anticipation is needed. Correct your athletes in practice if they’re yelling the command too soon or too late. I ask my athletes to yell the command when they feel they’re two arm-lengths away from their teammate.
The 20-meter exchange zone made silent exchanges rather easy to execute. The outgoing runner would throw their hand back as soon as they entered the exchange zone. This eliminated the need for them to say anything at all and virtually guaranteed a team would not get disqualified for handing off too early.
Now that the entire 30-meter zone will be one big exchange zone, coaches who use silent exchanges will have to vary their strategy, says @LFHStrack. Share on XNow that the entire 30-meter zone will be one big exchange zone, coaches who use silent exchanges will have to vary their strategy. Until the tracks are repainted, the old zone marks will remain, but the need to throw the hand back at that mark has been eliminated. Coaches who use silent exchanges will now have to find a reason behind the timing of their outgoing athlete throwing their hand back.
Several coaches I talked to who use silent exchanges gave a few possible adjustments they will make to the new zones. Many pointed out that the old exchange zone triangles will still be present on most tracks for years to come, which means they won’t have to change their strategy at all. On tracks where the old exchange zone triangles are removed, coaches suggested such strategies as throwing the hand after ten steps, throwing the hand once the athlete feels they’re up to speed or putting a tennis ball down as a mark where an athlete is supposed to throw their hand.
There are positives and negatives to both the verbal and silent exchanges. Many coaches who swear by the silent exchanges tell me they’re worried their outgoing runners will have to pick their teammate’s voice out of a crowd of eight different athletes yelling Stick! at the same time, not to mention the teammates and coaches yelling from the sidelines. That may be a valid point, but in my 17 years of coaching track, I’ve never once had a kid tell me, “I couldn’t hear him say Stick!” If that ever did happen, maybe I would change my strategy, but for now, my athletes use verbal commands.
Regardless of whether you use verbal or silent commands, you need to have a standard to keep everyone on the same page, says @LFHStrack. #4x100Relay Share on XWhat type of command is best for your team? That’s up to you and your athletes to decide, but I do recommend coming up with a standard for your program, so everybody is on the same page. I choose to teach the verbal command because the main complaint against the verbal command—that your teammate will not hear the command—has never happened to my athletes. The verbal command also allows the outgoing runner to keep their arm focused on acceleration until the moment before they’re ready to receive the baton.
While many coaches focus on handing off as early in the zone as possible, the best handoffs I’ve seen came near the end of the zone. On an exchange late in the zone, athletes using the silent exchange run with their arm thrown back for about 15 meters. The same athletes using a verbal command use both arms to accelerate in the 15 meters. Adjustments could be made for the outgoing athlete to throw their hand back later in the zone, but what happens if the incoming runner is ready to hand off earlier? As far as I’m concerned, verbal commands are beneficial, especially for younger or less experienced athletes.
Verbal commands in the exchange zone allow for two-arm acceleration and are especially beneficial for younger or less experienced athletes. Share on XIt’s also important to note the commands required if the outgoing runner takes off too early. You need these commands whether you’re executing a verbal or silent exchange. Incoming runners who believe they won’t catch their teammates should yell, Slow!, which of course means the outgoing runner should keep running but slow down. If the outgoing runner went out way too early, or the outgoing runner is almost at the end of the zone, the incoming runner should yell, Stop!
Some coaches teach their outgoing runners to peek over their shoulder if they hear the command to slow or stop so they can gauge where their teammate is and execute a better exchange. While this certainly helps in many situations, one main problem is that athletes who peek over their shoulder almost certainly move their target hand. Again, you should practice this. Sometimes in practice, I’ll instruct my outgoing runners to leave early so we can see how the incoming runner will react.
4. Hand Placement
You can have the fastest athletes who follow lane discipline and take off at the right time, but that could be all for naught without proper hand placement. Regardless of which hand placement you pick, the main priority is to keep a steady target. A moving target is much harder to hit than a stationary target, so you want your outgoing runner to give a target that’s steady and easy to see. Image 7 shows a variety of different hand placements.
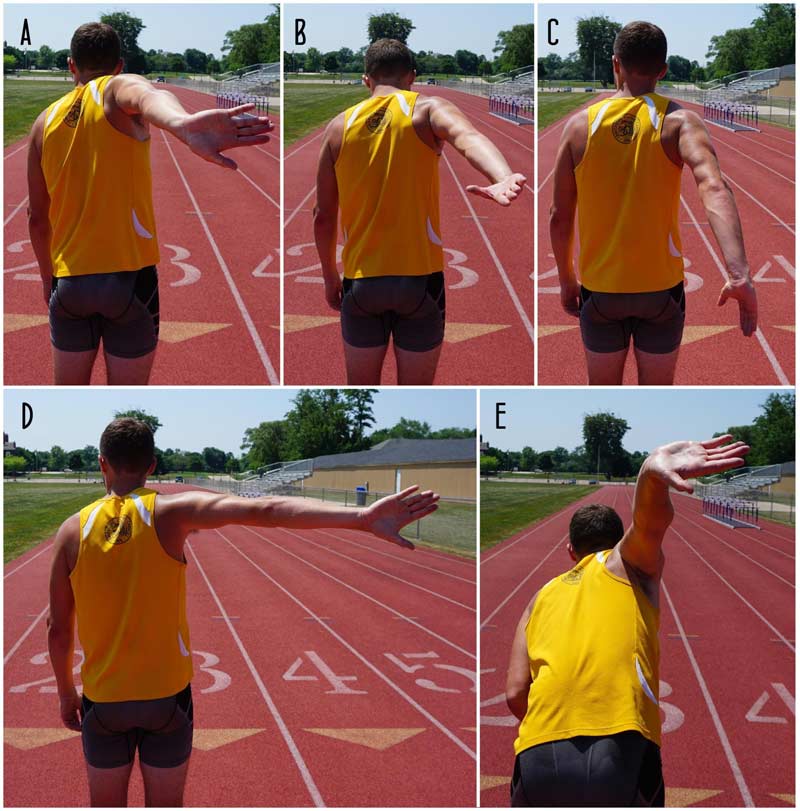
The stop sign method (A) is the most desirable because of the large target it presents. Many athletes with lower joint flexibility may need to flex their elbow more than the athlete in Image 7. Variations of the stop sign include D and E. Some coaches choose D because it’s a more natural position—you can see the athlete is not as crunched up in his shoulders. I’ve found, however, that because the shoulder in position D is not in a natural running position, the first few arms swings after the athlete receives the baton are less than ideal.
For position E, the athlete leans forward, which has two benefits: 1) many athletes are still accelerating at this point, which means they’re already leaning forward, and 2) the lean helps get the hand higher in the air, thus giving a better target. In 2017, the second leg on our 4x100m relay was about five inches taller than our third leg, who was also hampered by poor shoulder flexibility. By using position E, our third leg gave a better, higher target, which allowed for significantly better handoffs. We qualified for the State Championships by 0.01 seconds that year, so this seemingly minor change allowed us to achieve our goal.
While the stop sign is the most desirable hand placement, the flat hand feels more natural to most athletes. If it works, I don't change it. Share on XPosition B shows a flat hand, which feels more natural to most athletes than the stop sign. I’ve found that in the heat of the moment, many athletes forget about the stop sign and revert to the flat hand. Honestly, the majority of athletes I’ve coached are most comfortable with the flat hand method, and if it works, I don’t change it.
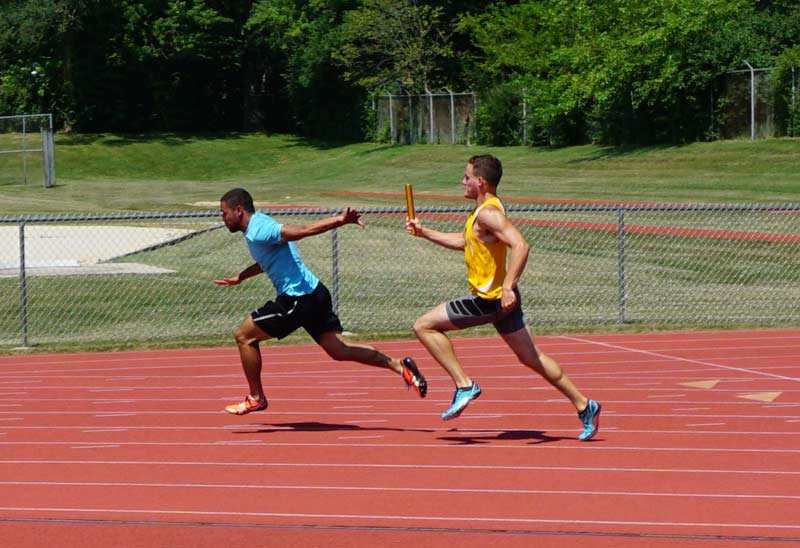
Image 7, position C shows underhand or upsweep passing. The underhand pass has been around for a hundred years—Jesse Owens’ team used it in the 1936 Olympics—but was eventually phased out before recently coming back into vogue thanks to the success of Japan’s silver medal 4x100m performance at the 2016 Olympics. The benefit is that it most closely mimics proper sprint form. An athlete’s hands in a sprint do not naturally come as high as you see in positions A, B, D, or E.
There are two negatives to this handoff style, however. First, the handoff is given lower, so you lose a few feet of space on each handoff because the athletes have to be closer to each other to make a proper exchange. Even if you only lose a total of one meter during the three handoffs, it probably equates to a tenth of a second or more. The second issue is the baton spacing, which I’ll discuss in the next two paragraphs.
5. Reach
The last aspect of the handoff is the incoming runner’s placement of the baton into the outgoing runner’s hand. While this may seem—and should be—incredibly simple, a great many botched handoffs occur exactly at this point.
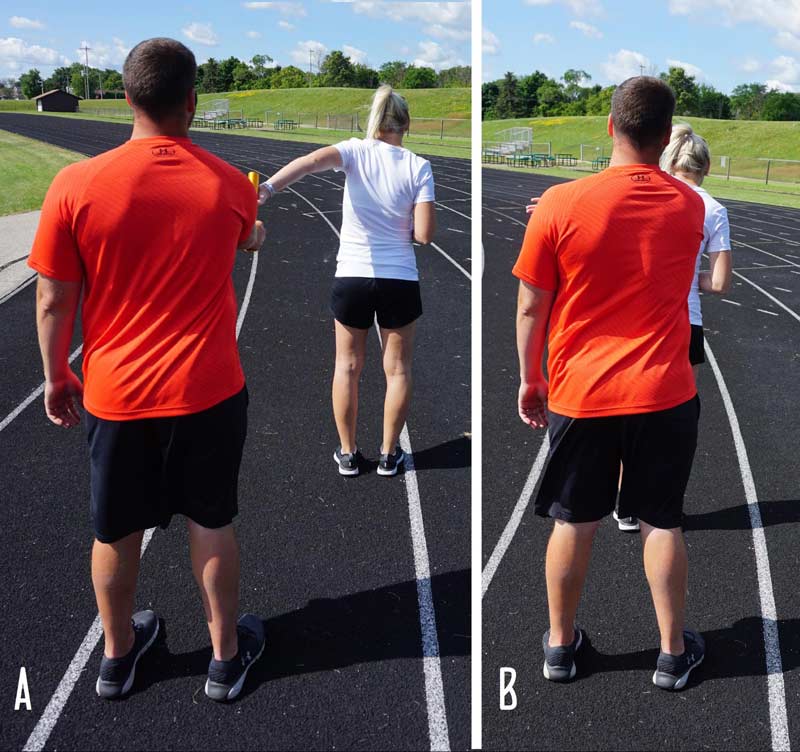
Video 3. Carly Fehler and Brad Fortney demonstrate four reach techniques for the sprint relays, including the push, flat, above, and swing techniques. With very few exceptions, athletes should use the push technique (also called candlestick). In no instances should any athlete use the above or swing techniques.
Many inexperienced athletes begin their reach before giving the Stick! command, and this is a mistake. Athletes should yell Stick!, then see the outgoing runner’s hand, and then begin their reach. The problem with starting the reach too early is that the outgoing runner could knock the baton out of the incoming runner’s hand, or the baton could end up on the outside of the arm. To eliminate these issues, the incoming runner should not begin the reach until the outgoing runner has already thrown their hand. Only when athletes become very familiar with one another should the incoming runner begin the reach before the outgoing runner throws their hand.
Another important note is that the incoming runner needs to keep running at top speed until they have handed off the baton. I discuss this in more depth later in the “Run Through the Zone” section.
6. Picking a Lineup
The art of the 4x100m relay comes into play when picking your lineup. While there are some general guidelines behind lineup orders, the ultimate decision rests with the relay coach. A standard guideline is to put your best starter on lead-off, a left-handed athlete on second leg, a great curve runner on third leg, and your fastest athlete on anchor leg. You can find a more detailed article on using time trials to select relay legs here.
Far too often in my coaching career, I’ve seen coaches put their fastest athlete on second leg because it’s the longest leg. Well, you can make the second leg the longest leg if you want, but you can also make it the shortest leg. Due to the 30-meter exchange zones, you can manipulate the exchanges to have any leg be the longest or shortest leg, though there is more flexibility with the two middle legs. With very few exceptions, however, each athlete will end up running between 95-105 meters.
Minimum and maximum distances for each 4x100m relay leg:
- 1st leg—80-110 meters
- 2nd leg—80-130 meters
- 3rd leg—80-130 meters
- 4th leg—90-120 meters
Our 2016 4x100m relay team at Lake Forest is a great example of how to pick an order that works. After running a 42.79 with four seniors to open the season, we knew we were in great shape to compete very well in Illinois. I decided to switch up the order for the next two meets to see if we could maximize our lineup.
Following traditional guidelines, I put our best starter (Chris Meng) on lead-off, our left-handed athlete (Jonathan DiValerio) on second leg, our best 200m runner (Quinn Julian) on third leg, and objectively our fastest kid based on 10m fly and 100m dash times (Matthew Mick) on anchor leg. Our next meet, we ran 42.9 hand-time, and although the handoffs were okay and we won against our biggest rival, Zion-Benton, Mick was noticeably getting reeled in on anchor leg. We tried the same lineup for one more meet and ran a disastrous 44.01 with terrible handoffs.
Upon further review, our original lineup of Mick-DiValerio-Meng-Julian was better, even though it did not fit the traditional guidelines. DiValerio was the only athlete who ran the same leg (second) on both lineups. He had run second leg on our top Frosh/Soph team as a sophomore, and second leg on our varsity team as a junior. Not only was he comfortable running with the baton in his left hand, but he offered a great target and was great at handoffs, so having him on second leg made perfect sense. Meng, a true student of the sport even though he was only in his second year on the track team, would have been great on any leg. The real decisive factors were Mick and Julian.
Mick was new to the 4x100m relay as a senior. He did not have much experience coming out of blocks and therefore was just average at the start. But Mick was a chaser, which is why lead-off was the perfect spot for him because he was guaranteed to have somebody in front of him to chase. When running with a lead, he was just not as good. Julian, on the other hand, scored 42 touchdowns as the running back on the Lake Forest football team and was very adept at running away from people and not being caught. Also, Julian had trouble leaving on time when he ran third leg. He said it had to do with perception because the go mark on third leg was placed on a straightaway instead of a corner, meaning the incoming runner did not appear to cross the tennis ball.
Don't be afraid to be unorthodox in your relay lineup. All that matters is the time at the end of the race, says @LFHStrack. #4x100mRelay Share on XWhen we switched back to our original lineup, we broke the county record, broke the conference record, won the Sectional Championship, earned All-State honors, and ran a best time of 42.15. Do not be afraid to be unorthodox in your relay lineup. All that really matters is the time at the end of the race.
Video 4. Running in lane five, Lake Forest High School breaks their own Lake County 4x100m relay record with a time of 42.45. Note how late in the zone most of the handoffs occur and how well the anchor leg, Quinn Julian, holds off an athlete with a 0.30-second advantage in the open 100m dash. As a two-time All-Conference running back, Julian was an expert in not letting people catch him.
Another important note for picking a lineup is that the easiest legs to replace are the lead-off and anchor legs. Ideally, you’d enter the outdoor season knowing which four athletes are going to be on your varsity 4x100m team, select an order, and keep those four all year. However, injuries and a variety of other factors make this a very difficult task. I suggest that you pick two fast, reliable, experienced athletes to handle the middle two legs. Switching up one of these legs would mean switching two handoffs instead of one.
Finally, consider what other events the athletes need to practice. You should ideally place athletes who also compete in the hurdles or field events on either lead-off or anchor. This means they’ll only practice one handoff instead of two, which will allow them more time and energy to devote to their specialty events.
IV. Odd and Ends
1. Run Through the Zone
The cardinal sin of relay running is slowing down while still holding the baton. I preach this to my athletes dozens and dozens of times, yet I still see it quite a bit, often when athletes slow down after giving the Stick! command. The main issue is that the outgoing runner rapidly picks up speed at this point, so any slowing down by the incoming runner will almost certainly jeopardize the exchange. You’ve undoubtedly seen this with your athletes in the 4x100m, 4x200m, 4x400m, and even 4x800m relays. You need to emphasize this with your athletes every single day that you practice handoffs! Even if the handoff is successful, remind your athletes not to slow down in the zone.
A great way to emphasize running through the zone in practice is to have the incoming runners continue running at top speed even after they’ve handed off the baton. If you have multiple athletes doing handoffs at the same time, start the incoming runners all at the same mark at the same time; the hurdle mark on the corner works great. And let them know there are two races going on: 1) the outgoing runner crossing the end of the exchange zone with the baton, and 2) the incoming runner crossing the end of the exchange zone. If you work on this early in the season, you should not have a problem with athletes failing to run through the zone in meets.
The two things I tell every member of my 4x100m relay team before every race are, “Leave on time and run through the zone.” If they all do that, we should be good.
2. Focus on the Mark, Not the Man
I give this advice to the outgoing runner who’s waiting in a proper stance for his teammate to hit the go mark. Rather than focusing on the incoming runner (a moving target), focus on the go mark (a stationary target). It’s easier to focus on a stationary target than a moving one. Teach your athletes to watch their mark rather than watching the incoming runner.
4x100m tip for the outgoing runner:
“See the MARK, not the man.”
Notice @usainbolt is focusing on the mark on the track, not the man coming in. Much easier to focus on a stationary target than a moving target. Focus on the mark and leave on time, every time. pic.twitter.com/tRQoBghGRt
— LFHS Track & Field (@LFHStrack) November 20, 2017
3. Distraction
Although simulating meet conditions in practice can be difficult, your sprinters need to know that not everything will go as planned in competition. Often, athletes only practice 4x100m handoffs one exchange at a time. This can be beneficial because the coach can focus on just that one team, but races are run with up to nine teams competing at once. There are many distractions you’ll have to prepare for in practice, so your team will know what to expect in competitions.
There is a team in our conference notorious for “butt interference” (see Image 5, stance C2). When we know we’re going to be one lane outside of them, we practice having an athlete purposely stick his butt into our lane. Another distraction strategy is to have athletes in accompanying lanes purposely leave early to try to throw off the outgoing runner.
Video 5. To create a subtle distraction, the outgoing runner on the inside lane leaves marginally before the outgoing runner on the outside lane should leave.
4. Relay Runs
A great method for teaching 4x100m handoffs without having the athletes worry about go marks or leaving on time are what I call Relay Runs. For Relay Runs, two athletes start on opposite sides of the lane about two arm-lengths apart. They both start running at top speed at the same time and exchange the baton at a given point.
Overall, Relay Runs mimic regular top speed handoffs as much as possible, but the athletes don’t have to worry about leaving on a mark. The outgoing runner still has to stay on the correct side of his lane, give a great target, receive the baton, and keep up his speed once he has the baton, etc. Everything about performing a top speed handoff is the same, with the exception that the athletes leave together, rather than having the outgoing runner worry about the delicate timing of leaving when the incoming runner hits a certain mark.
Relay Runs are also great for teaching athletes to run through the zone. When we do Relay Runs in practice, we expect the athletes to sprint a certain distance (usually 40-50 meters) regardless of whether they’re handing off or receiving the batons. You can find an in-depth look at Relay Runs here.
Video 6: Brandon Stryganek and Austin McIlvaine demonstrate a perfect Relay Run.
5. Racing Multiple Teams
Practicing 4x100m relay handoffs takes care and time. Many high school teams will have their varsity A team and maybe their top Frosh/Soph foursome practice 4x100m relay handoffs and leave everybody else to practice their field events or other specialties. That’s how I used to operate.
I encourage all of you to make sure everybody who at least has a shot of being on your top 4x100m relay teams gets a lot of practice and races throughout the season. Have a varsity B team work on handoffs in practice and compete either in dual meets or JV meets. Very few of us know exactly which four of our athletes will be on our A 4x100m relay meet at the end of the season, so giving as many athletes as much experience as possible on the relays can only be a benefit.
6. Drills
There are many drills you can do for the 4x100m relay, and plenty of them can be done indoors with little space. A good place to start is the wall drill, shown in Video 6. All you need is a wall. Athletes will stand one arm’s length away from the wall, pump their arms, and on command will reach back and touch the wall with their open hand. The drill mimics the stop sign hand placement shown in Images 7 and 8. It’s important to have your athletes pump their arms as if they’re in a race rather than just reaching their hand back from a motionless position.
Video 7. Carly Fehler demonstrates the 4x100m wall drill.
Other great drills are demonstrated in Video 7. The standing tap, standing catch, and jogging catch teach lane discipline, proper hand position, proper reaching motions, and proper commands if you wish. Since they are low speed, athletes can also work on them with eyes closed.
Video 8. Carly Fehler and Brad Fortney demonstrate the standing tap drill, standing catch drill, jogging catch drill, standing catch drill with eyes closed, and jogging catch drill with eyes closed.
V. Conclusion
The 4x100m relay is the most exciting race in track and field. By using the bang step, you’ll give your team a distinct advantage in speed, execution, and consistency. Remember that 4x100m handoffs take time, patience, and skill. As a coach, you must emphasize to your athletes that handoffs need to be taken very seriously in practices and competitions. Both speed and quality must be at 100% at all times. Now go win some races!
Did I miss something? Feel free to get a hold of me on Twitter at @LFHStrack. For more information on the bang step, you can locate and purchase a presentation Tony Holler gave on the topic here.
