
Coaching individual college athletes on nutrition can be extremely difficult; trying to give accurate and appropriate nutrition advice to an entire team can be even more challenging. College athletics is filled with remarkably picky eaters, poor breakfast choices, dehydration, struggles with gaining weight, and more. Meanwhile, strength and conditioning coaches often balance a lot of responsibilities, including wellness (sleep, mindset, recovery, mental health, etc.), physical development (strength, power, conditioning, etc.), and nutrition education (diet, supplementation, habit formation, etc.).
I have found a nutrition ‘belt level’ system works best with our athletes. This system can free up many hours on the front end when the work is put in on the back end. Share on XTo alleviate the stress in one of those areas, I have found a nutrition “belt level” system works best with our athletes. This system can free up many hours on the front end when the work is put in on the back end.
The Gracie Diet
The system that I use was inspired by two other systems. I first adopted the belt system from The Gracie Diet, a diet protocol created by Carlos Gracie and later broken down in a book by Rorion Gracie. The Gracie family includes a massive lineage of Brazilian jiu-jitsu (BBJ) and Mixed Martial Arts champions—along with their deep culture of training and competing in martial arts, they also swore by a rigid diet plan.
The diet is composed of groups of foods:
- Group A = vegetables, fats, and meats
- Group B = starches
- Group C = sweet fruits and cheese
- Group D = acidic fruits
- Group F = milk
The essence of the diet comes from a guide to follow on certain groups that can and cannot be combined during meals to ensure proper digestion and nutrient absorption. The Gracie Diet offers some interesting concepts, but it is probably not appropriate for the collegiate athlete population.
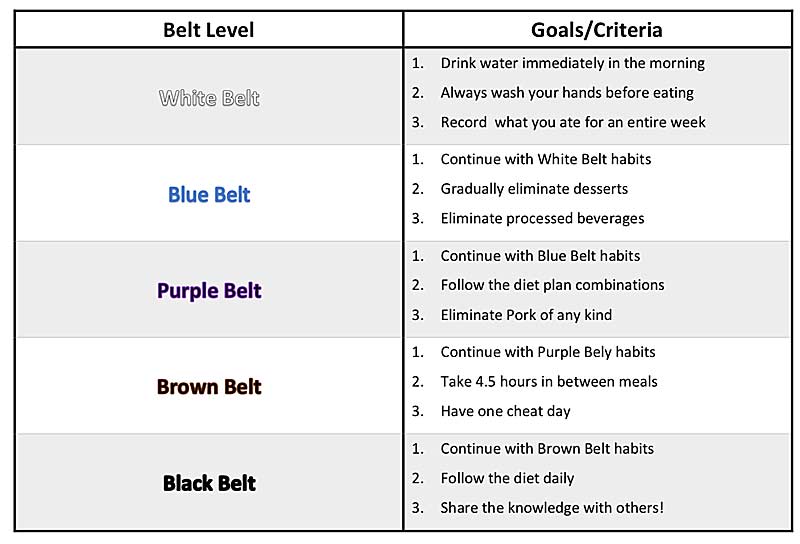
Along with the diet—and what I found extremely useful—is a progressive system that corresponds with the BJJ belt system (White, Blue, Purple, Brown, Black). There are goals and checklists included in each step. As with any quality system, the first level is very basic, and every subsequent level builds upon the previous one.
The concept with this is to master one step and move on to the next, just like in martial arts. Everyone begins at a White Belt until they meet the criteria to progress to a Blue Belt, and so on. Having a step-by-step system like this provides an incentive to improve and level up. This also gives the subject a challenge—something that fits very well in athletic populations, where competition and continued improvement are the norm!
Precision Nutrition
The second system I adapted is the Precision Nutrition level system for coaching. Precision Nutrition, founded by Dr. John Berardi and Phil Caravaggio, offers industry-leading information, certifications, and coaching. Put simply, their techniques are practical and offer great results. I often find myself referencing their online articles and information before giving my athletes any advice, as there is probably a technique that I am overlooking.
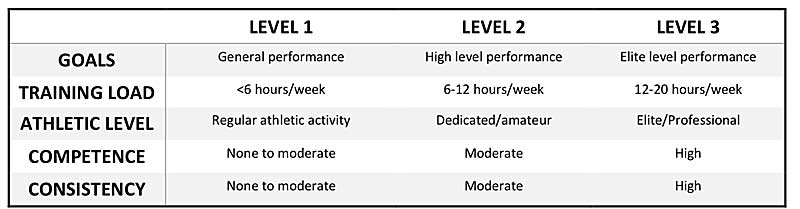
When it comes to coaching, one of their techniques is to group clients into levels. As in the previous system, the levels begin with the basics and progress upon one another. They offer three levels to divide people into:
- Level 1 includes athletes who have low nutrition knowledge, little nutrition experience, and very general athletic needs. This level of athlete will have a tough time with consistency and a long list of limiting factors.
- Level 2 includes higher-level athletes (potentially amateur level) with higher workloads, more knowledge, and more specific goals and needs. This level of athlete will be more competent and driven to accomplish their goals.
- Level 3 includes high-level athletes who have a nutritional base and very specific goals and needs. These athletes will likely have the resources, knowledge, and drive to conquer almost any goal or protocol you implement with them.
A multilevel system like this can make it easy to provide simultaneous goals and education.
Nutrition Belt Level System
When you combine these two, you get a three-level guide that I have used for years at Fordham University with great results from our athletic population:
- Level 1 = White Belt
- Level 2 = Purple Belt
- Level 3 = Black Belt
Everyone begins at White Belt, no matter their background, and then progresses based on experience, knowledge, and competency. I find that three levels are simple when it comes to grouping. Freshmen and transfers always start as White Belts. Then, a large population of sophomore–senior athletes stay in the middle at Purple Belt. Finally, the Black Belt level stays reserved for those top 1-percenters who either highly excel at their sport or plan on playing professionally after college.
This system also gives athletes an achievable goal, as most should be ready for the Purple Belt level within a semester or so. In that case, you can see the light at the end of the tunnel.
Finally, the belt colors give athletes a group to own and identify with. It is hard to explain, but it feels good to them to say they’re a Purple or Black Belt, as opposed to Level 2 or 3. Once your levels are locked in, you can start setting up educational opportunities.
White Belts
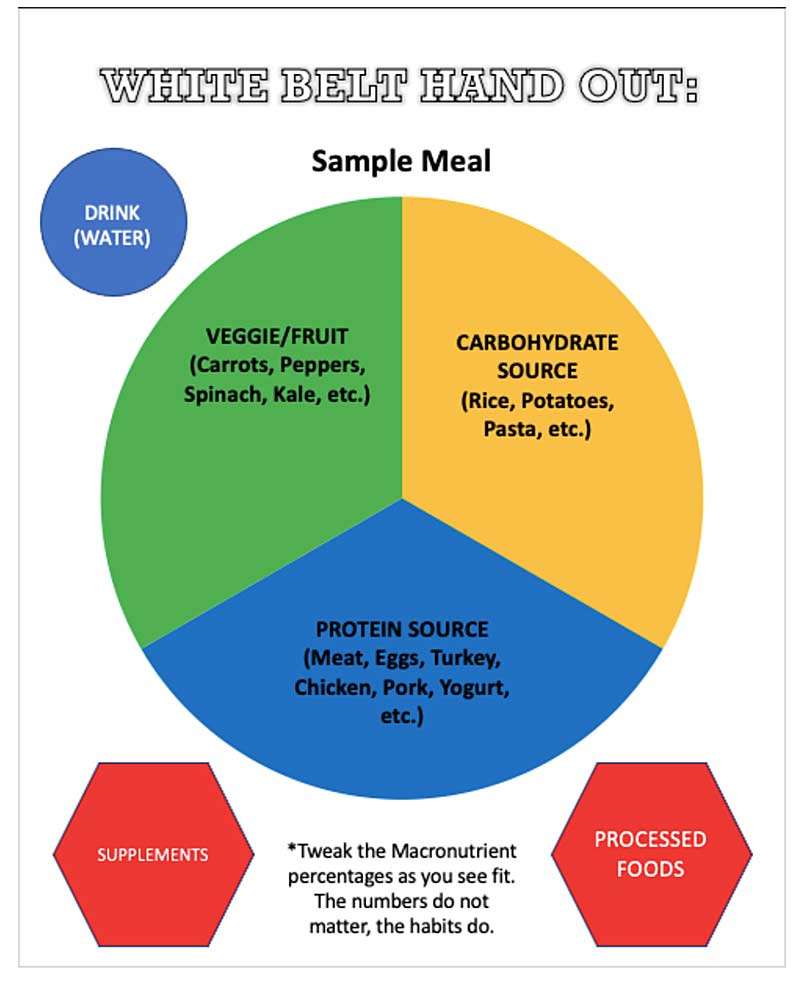
The system begins with White Belts. Very similar to Precision Nutrition, the goals are simple and general for this group. The task for this group is to put together 3–6 “meals” each day. In order for a meal to count, it must have a protein source, a carbohydrate source, and either a fruit or vegetable. I also ask that they have water with every meal.
For some athletes, this is remedial. For others, this is a culture shock. These athletes have only eaten meals that are already put together and have never thought about the components of these plates. For these reasons, I simply ask them to check each box.
At first, these meals may not make much sense in terms of organization or presentation. They also may not be truly optimal in terms of timing as it relates to exercise or a daily schedule. The main goal is to gain awareness of eating habits.
Finally, I do NOT recommend utilizing supplementation or meal plans during this stage. The goal is to hammer the basics first!
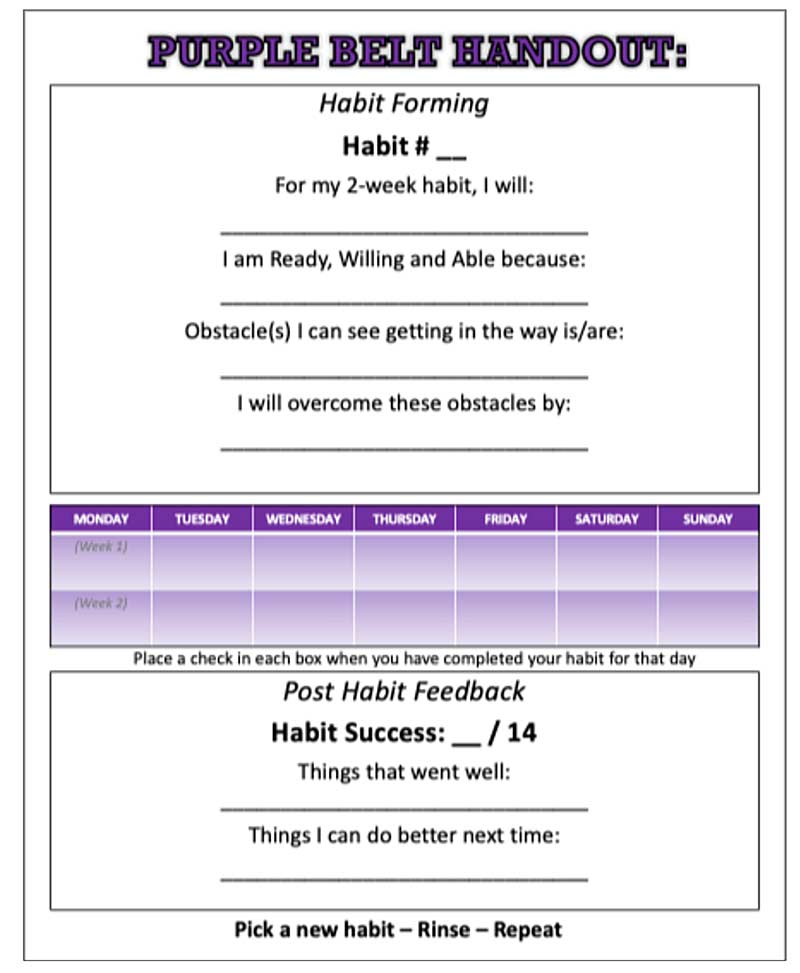
Purple Belts
The system then continues with Purple Belts. The goals get a little more specific and complex. This level is all about building habits and mastering them. The athlete and I will come up with and agree on an achievable daily task to perform consistently. This task is specific to the athlete and is completed until momentum is gained. This can be as short as two weeks or as long as 30 days. An example would be to eat a quality protein source (steak, chicken, lentils, etc.) at every meal.
When we feel like the habit is being done automatically, without cues or reminders, we can then choose a new habit or habit stack. Stacking your habits is done by picking a second, healthy habit to do in addition to, and surrounding, the initial habit. In this case, we can aim to take a 10-minute walk after every meal. If the initial habit of eating a quality protein source at every meal becomes automatic, it will be easier to implement the 10-minute walk habit.
This level will take a while to master, as you can really go in many different directions. Mastery of the Purple Belt level is shown by repeated success with long-term habits.
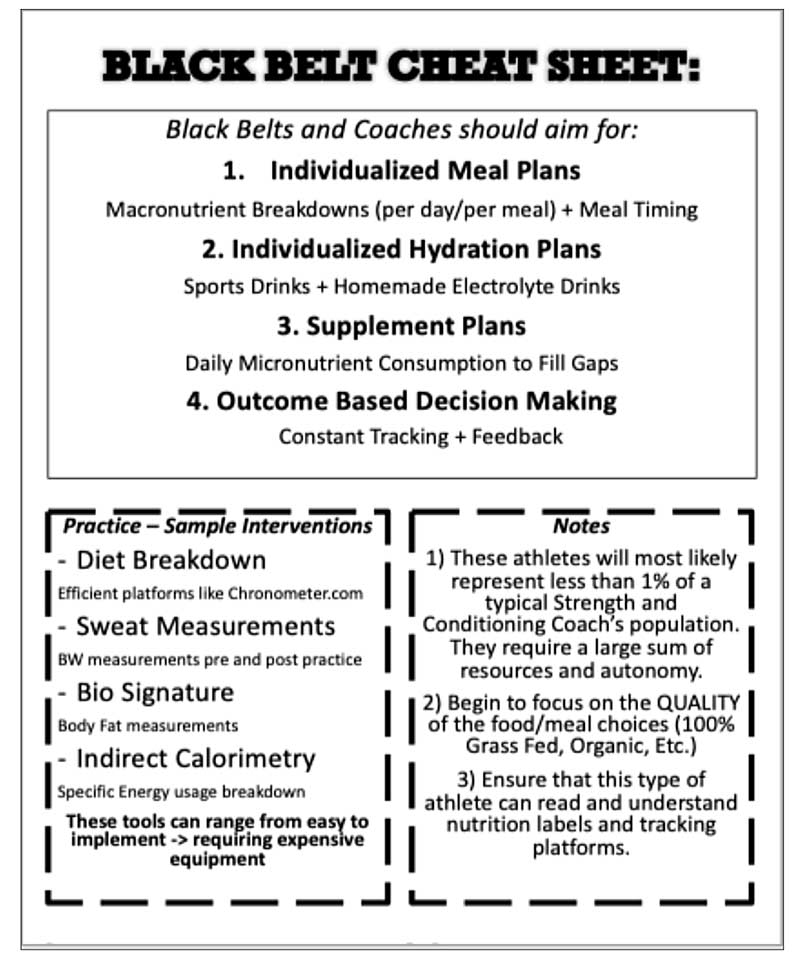
Black Belts
The system culminates with Black Belts. The goal at this level is to get as specific and complex as possible and really focus on performance. At this level, we can finally start to look at supplementation and strict meal plans. I typically begin this level with an assessment (diet recall, food frames, body fat percentage, etc.) in order to make better decisions.
The goal here is to look at daily caloric, macronutrient, and micronutrient requirements and try to optimize them. Some examples include pre-workout sodium consumption or daily/weekly Omega 3 consumption.
Finally, education and autonomy come into play here. I strive to teach these athletes how to read nutrition labels, track their nutrition, and understand the breakdown of their diet. The goal is to enhance their toolbox so that they can sustain their own progress.
Implementation
To prescribe nutrition education effectively, I do one of three types of presentations:
- Lift Debrief. This first type is the most common and frequent. Lift debriefs happen during the last five minutes of a one-hour lift session. They are extremely useful, due to the fact that you rarely have the entire team and their undivided attention. Use this time wisely!
-
I use these opportunities to cover one specific nutrition idea, level, or topic. I typically pick something relevant to the current semester, month, season, etc.—like breaking down the components of a pre- or post-workout plate during a pre-season period, for example. Another option would be to cover tips and tricks to master the White Belt level. The point is to have short, simple talks that culminate over time and result in a foundational knowledge of nutrition.
- Group Lecture. The second type of presentation happens a lot less frequently but is the best opportunity to teach and field questions that have built up over time. I allot time for a 20–30-minute presentation and allow plenty of time for the athletes to ask questions afterward. This is a good opportunity to discuss the entire system, to talk about each level in depth, and to explain how the system and progression work. From here, you should begin to delegate levels and get your athletes started on their habits.
- Small Group/Individual Chat. This final type can happen as frequently as you like. I use these times to talk to athletes in one specific level at a time. It can be either solo meetings or a few athletes together. The point is to meet only Purple Belts in order to answer specific questions and give better direction.
The Nutrition Belt Level system is just one way to attack group nutrition programming. It was created to make semi-personalized nutrition coaching more efficient. It is far from a perfect system, but it can provide a big improvement. There is also an art to navigating a system like this when it comes to troubleshooting the numerous issues that can and will arise—that will be unique to your situation and coaching style.
The Nutrition Belt Level system is just one way to attack group nutrition programming. It was created to make semi-personalized nutrition coaching more efficient. Share on XI believe nutrition to be the X factor. Many athletes overlook and undervalue it, but it is well worth the time and effort to address. The Nutrition Belt Level system might be a way for you to continue to develop your athletes further and drive better performance—I hope it does just that!
Since you’re here…
…we have a small favor to ask. More people are reading SimpliFaster than ever, and each week we bring you compelling content from coaches, sport scientists, and physiotherapists who are devoted to building better athletes. Please take a moment to share the articles on social media, engage the authors with questions and comments below, and link to articles when appropriate if you have a blog or participate on forums of related topics. — SF
References
Precision Nutrition. (2016). Working with Nutrition Levels.
Gracie R. (2010). The Gracie Diet. Gracie Publications.


 Steve Haggerty is a sports performance coach at Parkview Sports Medicine (PSM) in Fort Wayne, Indiana, and an NFL Draft Prep specialist at Bommarito Performance Systems (BPS) in Miami, Florida. He spent the last two years at BPS working with NFL Pro Bowlers as well as MLB and NHL All Stars in their off-season training. Haggerty took on the lead role of preparing college football players for the NFL Combine and Pro days. At PSM, he leads the youth “Edge” program with athletes from a variety of different ages and sports.