• Skip to content
  • Skip to primary sidebar
SimpliFaster

SimpliFaster

cart

Top Header Element

  • Facebook
  • Instagram
  • Twitter
  • YouTube
  • Login
  • cartCart
  • (925) 461-5990
  • Shop
  • Request a Quote
  • Blog
  • Buyer’s Guide
  • Freelap Friday Five
  • Podcast
  • Job Board
    • Candidate
    • Employer
    • Facebook
    • Instagram
    • Twitter
    • YouTube
You are here: Home / Blog

Blog

Coaches Eye

A Bias Toward Speed? Breaking Down the Sprinting Cycle

Blog| ByOwen McNally

Coaches Eye

By Owen McNally & Jonas Dodoo

This article will present how we at Speedworks break down the sprinting cycle and determine athletes’ biases based on what we see.

We take endless videos of our athletes from the sagittal view, which allows us to understand how and why an athlete moves in a certain manner. The sagittal view is a great introduction to the movement of the athlete, and we believe it presents the most information (initially).

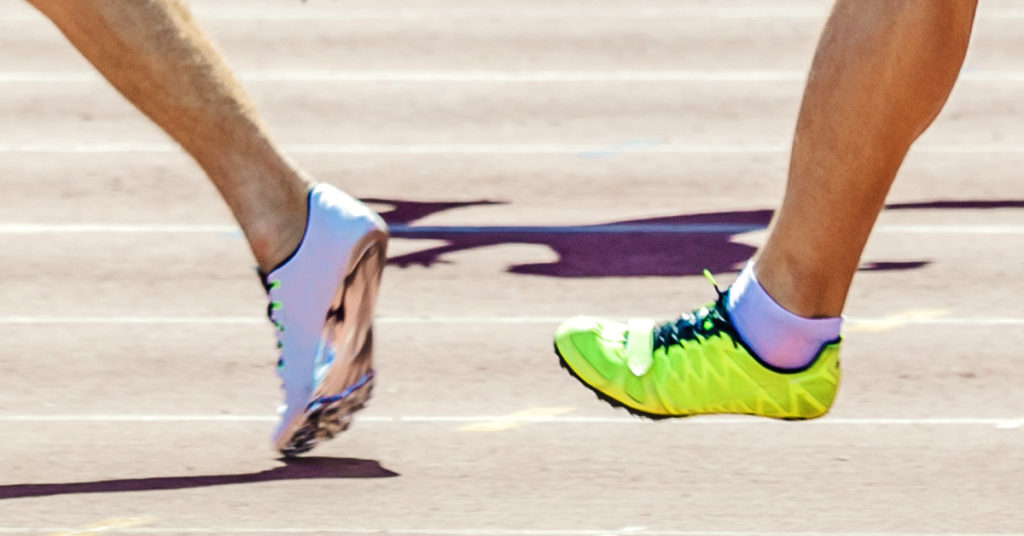
First, a very basic explanation of the sprinting cycle. The sprinting cycle can be broken down into two phases: ground and air. The ground phase starts at initial touchdown and ends at takeoff; the air phase starts at takeoff and ends at touchdown. The video below shows these two phases.


Video 1. The sprinting cycle consists of two phases: ground and air. Initial touchdown to takeoff is the ground phase and takeoff to touchdown is the air phase.

The Data

Athletes navigate ground and air phases in different manners. The drive index presents a ratio of these variables, which we regularly use when assessing performance.

Drive Index = Contact Time/Airtime

1a & 1b
Figures 1a & 1b. This data shows drive index scores from the men’s and women’s 100m final at the 2017 World Athletic Championships. (Data is on maximal velocity phase: 47.5m-55m.) When athletes vary their drive index scores, it varies the ground-to-air ratios.

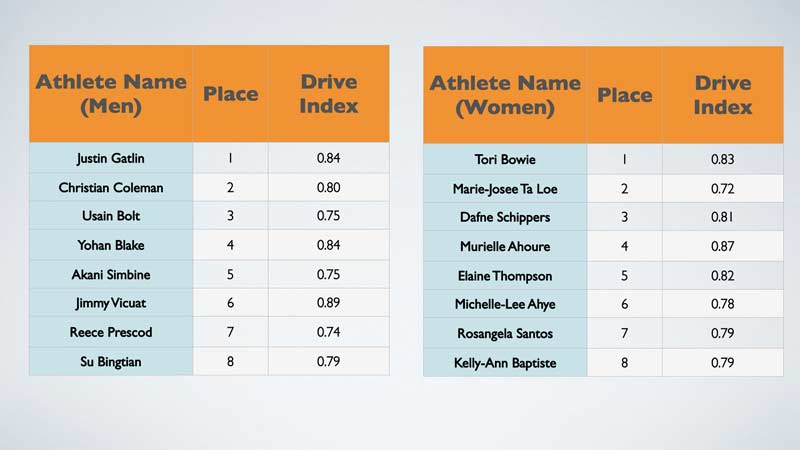
Figures 1a and 1b show that athletes vary their drive index scores, therefore varying the ground-to-air ratios. We can begin to understand their movement strategies by setting out guidelines for values. (I am avoiding the word “group” athletes, as this term is too harsh.) We can classify movement strategies as air-based (low drive index score), ground-based (high drive index score), or a neutral strategy (mid-point drive index value). What should be made immediately clear is that no strategy is the optimal strategy. Different strategies will benefit athletes differently.

Based on the data above, we theorize that for male sprinters, a drive index score of 0.75 represents a neutral strategy. Values above this represent a ground-based approach, and values below this represent an air-based approach. For female sprinters, a drive index range of 0.78-0.82 represents a neutral strategy. Values above and below represent ground- and air-based approaches, respectively.

The trend is that drive index starts high (in acceleration) and slowly decreases until maximum velocity. We are going to focus on the links between drive index at maximum velocity and hip extension/flexion ranges, and in doing so, link the data to what we see. (The classification of drive index values presented above are still rough and are based on athletes we have coached at Speedworks with a combination of World championship data.)

Frontside and Backside Mechanics

We can very basically break the hip cycle into frontside and backside mechanics. (Again, from the sagittal view.) What happens in front of the body is frontside mechanics; what happens behind the body is backside mechanics. Both incorporate ground and air phases. Both happen simultaneously, bilaterally.

Frontside Mechanics

Backside Mechanics
Images 1a & 1b. A sagittal view of frontside and backside mechanics. Both frontside and backside incorporate the ground and air phases.

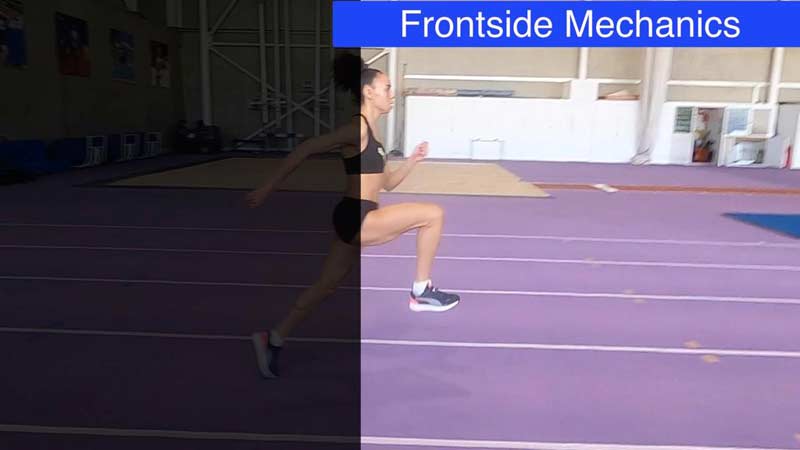
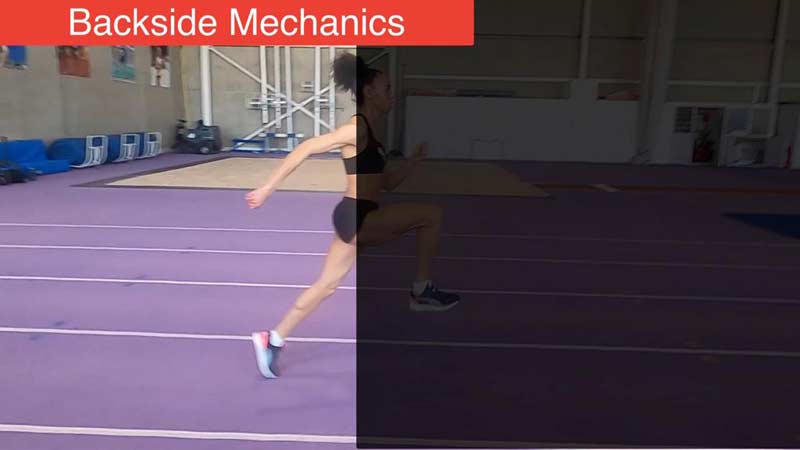
Athletes are commonly grouped by their biases toward either frontside or backside. Athletes termed “frontside” will exhibit large hip flexion ranges with limited hip extension ranges; whereas athletes termed “backside” will exhibit large hip extension ranges with limited hip flexion ranges. This is arguably an oversimplification of it, as speed (or better put, angular velocity) of hip flexions end extensions really contribute toward biases, but visually it is very easy to assess ranges.

Common coaching vocabulary would describe a ‘frontside bias’ as good and a ‘backside bias’ as bad. Why? Because it’s generally right, but not always. Share on X

Common coaching vocabulary would describe a “frontside bias” as good and a “backside bias” as bad. Why? Because it is generally right, but not always. The main difference between novice athletes and elite athletes will be the percentage of frontside mechanics. However, there are variances in biases at elite levels and higher performing levels. Below are tables showing hip extension and flexion angles at takeoff from the 2017 100m World Championships Finals.

Flexion Figures
Figures 2a & 2b. Data for athletes’ hip extension and flexion angles at takeoff from the 2017 100m World Championships Finals. Notice the ratio variation between extension and flexion.

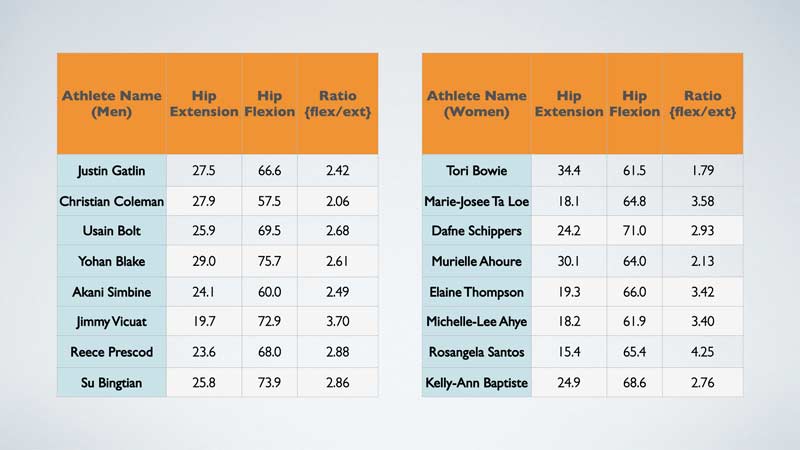
The purpose of presenting these tables is to show that hip flexion and extension ranges vary between athletes (implying that frontside and backside might also vary), and more specifically, the ratios between extension and flexion vary. What are the interesting things about this?

Womens Hip Sprint
Figure 3. A comparison of three female sprinters at the 2017 100m World Championships Finals. There is a large variation in the ratio of hip angles at takeoff.

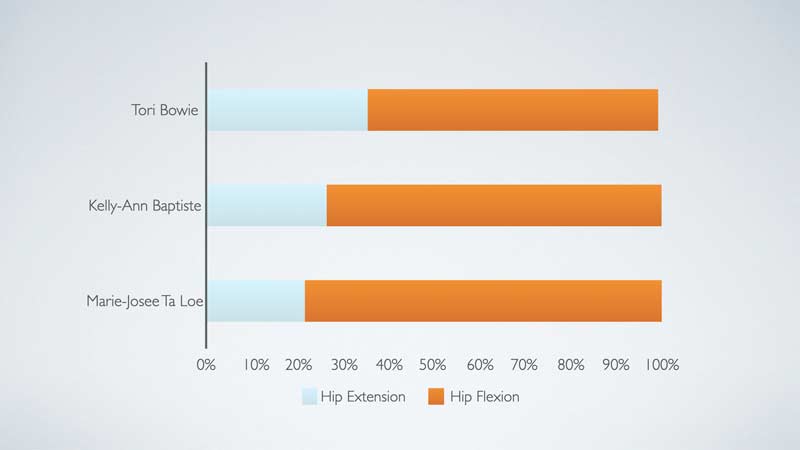
Compare Tori Bowie to Marie-Josee Ta Lou in the women’s 100m final. There is a large variation in the ratio of hip angles at takeoff. Bowie gets a much higher percentage in hip extension and also has a higher drive index value (0.83) compared to Ta Lou (0.72). Therefore, Bowie spends a larger portion of her cycle on the ground in relation to the air compared to Ta Lou, and in doing so creates more hip extension. It seems to make sense. Visually referring to hip mechanics, Bowie would exhibit a more backside approach. Kelly-Ann Baptiste shows hip angles sitting in the middle, and this is also accompanied by a neutral drive index score of 0.79.

Mens Hip Angles
Figure 4. A comparison of three male sprinters at the 2017 100m World Championships Finals. Notice the variation in the ratio of hip angles at takeoff.

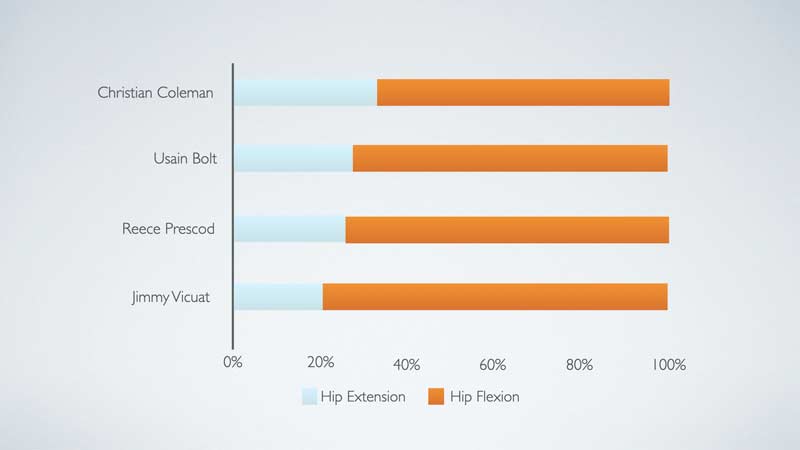
Figure 4 again shows differences in the ratio of hip angles at takeoff, with Coleman having a higher percentage of hip extension alongside a larger drive index (0.80) compared to Prescod (0.74). This shows an elite athlete who spends more of their cycle on the ground as a ratio and generates hip angles more biased toward hip extension compared to other athletes, who would appear visually more backsided. Usain Bolt shows hip angles sitting in the middle, and this is accompanied by a neutral drive index score of 0.75.

Neither of these comparisons are to show that what Bowie and Coleman did is more optimal than Ta Lou’s and Prescod’s strategies, but merely to highlight there are differences in strategy. Achieving a large drive index value and hip angles biased toward extension might be optimal for Coleman and Bowie. Prescod and Ta Lou might need to maximize what they are doing in hip flexion and not focus on increasing hip extension. Bolt and Baptiste may have higher degrees of range in the hips and therefore not need to emphasize one side over the other.


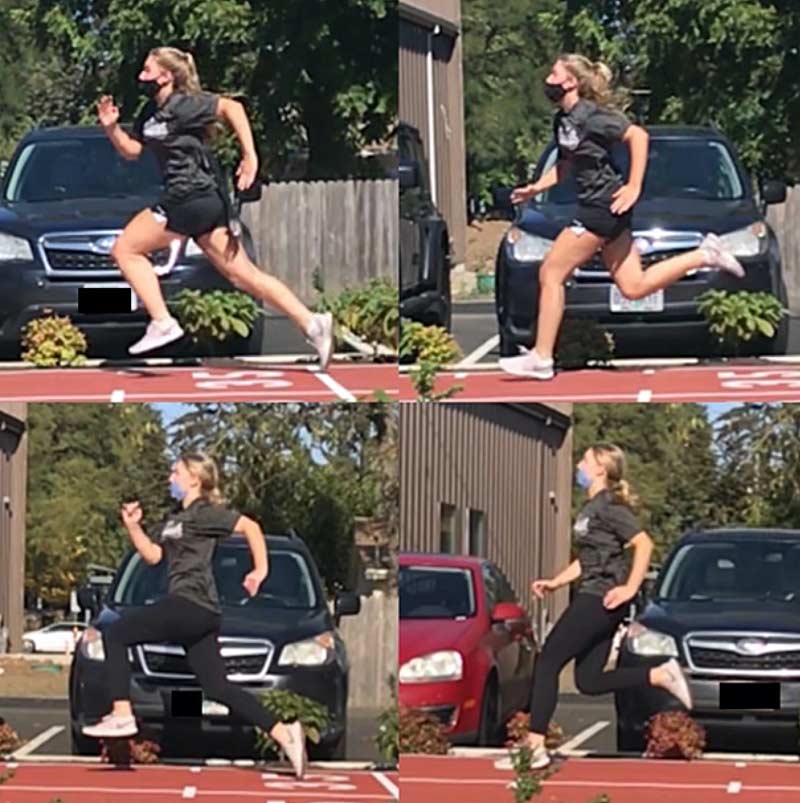
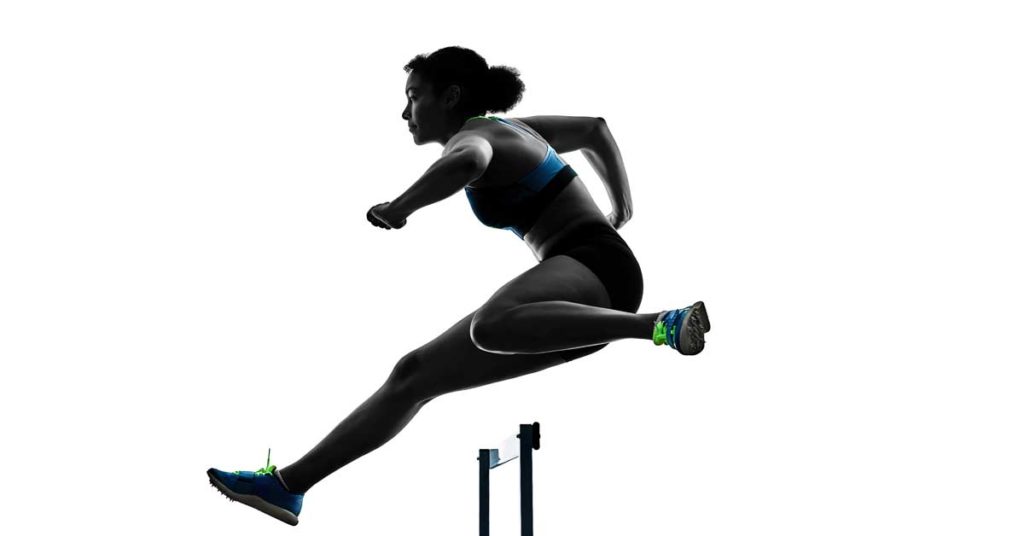
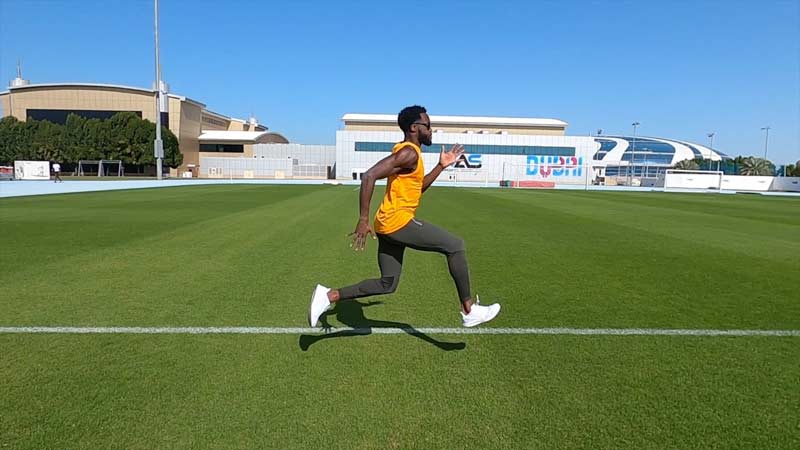
Video 2. Air-based sprint strategy with small hip extension and large hip flexion.

What Is Optimal?

The question of what is optimal is not one that anyone has the right answer for, but we can guess as best we can. First, we need to understand the main purposes of frontside and backside mechanics.

The goal of frontside mechanics is to prepare the leg for ground contact. This allows for stiffer landings and shorter ground contacts. Essentially, we take care of the vertical force required for support quicker by spiking the ground reaction force on initial contact. This will mean athletes need to spend less time on the ground. Pre-activation of muscles combined with the leg rapidly attacking into the ground will help generate these outcomes.

In order for the body to do this, an athlete must be able to tolerate very high loads in a short amount of time, turning eccentric into concentric rapidly. In summary, being very reactive! So, it would seem to make sense that if an athlete who is more frontside dominant is biased toward hip flexion angles, their drive index would be lower due to them maximizing their ability to minimize ground contact time.

The goal of backside mechanics is to propel the body forward. When the stance leg moves behind the hip (COM), propulsive horizontal force is generated. The goal is to create large propulsive forces rapidly. The larger the take-off angle (or even hip extension angles), the more force likely to be directed to moving the body forward. Concentric force production capabilities of the muscles will contribute toward this.

Force to propel the body to go forward is only created on the ground. If an athlete can generate large concentric forces and achieve hip angles biased toward hip extension—therefore becoming a more backside dominant runner—it would make sense that their drive index would be higher, maximizing time spent on the ground.

Frontside and backside aren’t mutually exclusive. Having effective frontside mechanics should benefit the effectiveness of backside mechanics, and vice versa. Share on X

Frontside and backside are not mutually exclusive. Having effective frontside mechanics should benefit the effectiveness of backside mechanics and vice versa. Yet, perhaps athletes feel more dominant in one than the other, and not all athletes should be expected to do everything the same.

Dodoo Hip Figure
Figure 5. Although Jimmy Vicaut is the most biased toward hip flexion of the four sprinters, he had the highest drive index score in the final (figure 1a). This means he spends the largest portion of his cycle on the ground compared to the other athlete but gets the least hip extension.

If we put Jimmy Vicaut into the comparison, it goes against the suggested trend or proposed strategies. Vicaut is the most biased toward hip flexion, with very limited hip extension (lowest absolute hip extension value in final). Yet he has the highest drive index score in the final (figures 1a & 1b)—0.89—meaning he spends the largest portion of his cycle on the ground compared to any other athlete in the final but gets the least hip extension. Interestingly, he had the lowest relative step length in the final as well (1.30). This suggests he is wasting time on the ground, as he is not generating enough propulsion. His hip mechanics suggest he has time or maybe space to create adequate pretension before ground contact, to minimize time spent on the ground, but he is unable to.

The questions we would pose are: Does his training focus too much on concentric force production and not enough on reactive capabilities? Or are his hip mechanics limiting his ability to produce propulsive horizontal force? Really, the question is: Why is he spending so much of the cycle on the ground and getting so little output?

We suggest that there are some rules of thumb. If an athlete visually appears “frontside dominant,” they need to maximize their reactive capabilities—spending a larger ratio of their cycle on the ground will be ineffective. So frontside should accompany a low drive index score. If an athlete visually appears more “backside dominant,” they need to maximize their concentric propulsive abilities—spending a larger ratio of their cycle in the air will be ineffective. So, backside should accompany a high drive index score. An athlete who has a neutral strategy visually perhaps must ensure they do not bias too much toward one side.

To make it clear, we are inferring:

  1. High drive index = Ground-based strategy = Backside dominant
  2. Mid-point drive index = Neutral strategy = Balanced
  3. Low drive index = Air-based strategy = Frontside dominant

Coaching ability comes into play when assessing these variables, as the main consideration concerns whether the athlete’s current method of sprinting defined by hip mechanics and drive index scores is optimal. When determining if the current strategy is optimal, we consider several things.

First, we take into account physiological makeup—whether it’s genetic or due to training history. There are athletes who naturally have more of an anterior pelvic tilt, but with super strong glutes and hamstrings, they can be extremely effective. But there are also athletes who come with lots of anterior tilt because they have not been taught/trained otherwise. There will be athletes forced into frontside dominance who shouldn’t be there, and there will be athletes who are frontside dominant who need reactive capabilities trained even more. It is a case of trial and error.


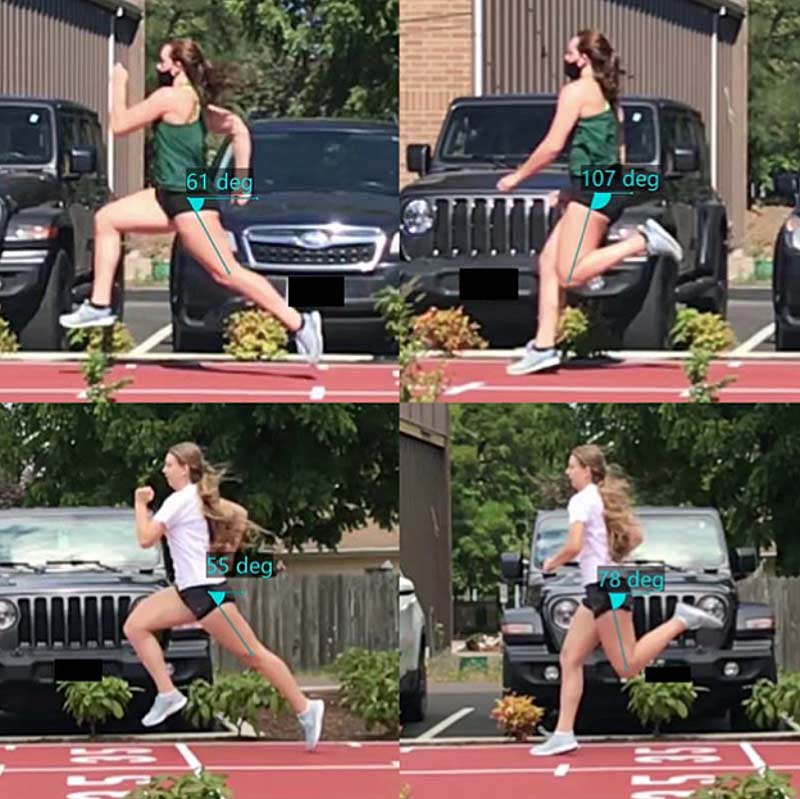
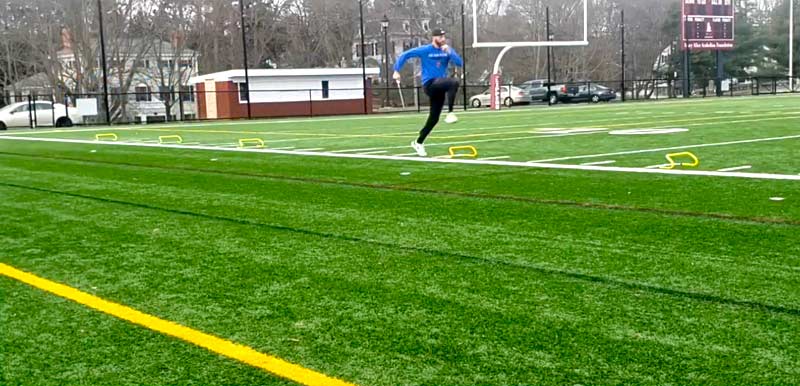
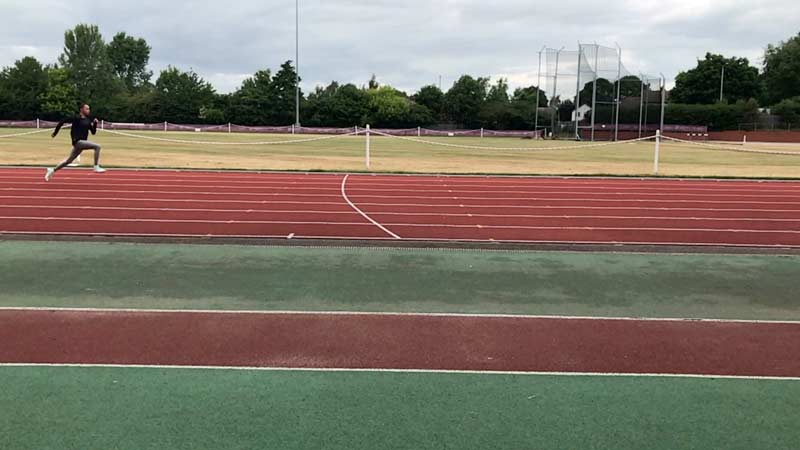
Video 3. Neutral Strategy, which has a mid-point drive index value.

Although this article has highlighted the differences, the similarities are arguably more important. Every successful athlete needs to be effective in the air (switching and creating pretension), have the ability to tolerate and create high forces in minimal time  (reactivity), and rapidly displace their bodies forward (projection). So, if an athlete exhibits more anterior pelvic tilt than what is considered normal but is effective in doing all the above, you have your answer. If they are not effective, they may simply lack the tools, and it is the coach’s job to provide them with the right tools. Or the tools could be wrong, and they need to be changed!

There is a lot of emerging research showing the importance of frontside mechanics and fixing backside mechanics or anterior pelvic tilt. This article does not disagree with this. We are looking at a more homogenous population (less variation).

Frontside mechanics is not always the answer. Some athletes can reach the very top by exhibiting backside dominance while still managing to be effective frontside. Share on X

Comparing the data obtained from world championships and advanced athletes at Speedworks to a more novice/untrained population would also lead us to draw the same general conclusions. But our conclusions differ when looking within a more homogenous population. Frontside mechanics is not always the answer. Some athletes can reach the very top by exhibiting backside dominance while still managing to be effective frontside. They must have the physiological makeup combined with the correct training stimulus to do so.

The simplest summary for me is this: Expect to change most athletes who come to you to a more frontside bias. Keep an eye out for the ones who are typically very strong accelerators and access anterior pelvic movement, as it might be their strength. Be aware of the elastic “freaks” who have access to large ranges on both sides; since their stability and strength draw from large ranges, biasing them to one side might be detrimental. For the athletes who come to you with a frontside bias, make them whack the ground harder—don’t give them slow hip extension.

Speedworks Case Studies

Below are visual representations of athletes who have trained with us at Speedworks effectively manipulating hip mechanics in different manners (ratios).

Air-Based Mechanics
Neutral Strategy

The Messy Stuff

It is of paramount importance when understanding athlete strategies through hip ranges and air and ground contact times that we refer to the ratios. These are the relationships between two opposing variables: flexion to extension and air to ground. A low drive index value does not necessarily mean an athlete spends less time on the ground than an athlete with a larger drive index. Other variables have an effect.

Taller athletes (or more specifically, athletes with certain length in specific limbs) typically have larger step lengths and lower step frequencies. Therefore, cycle time is typically higher. Reece Prescod achieves a lower drive index value than Christian Coleman but has higher ground contact times during maximum velocity. He also generates a larger step length, meaning he does not need to maximize his step frequency to the same degree as Coleman.

But height does not perfectly dictate (or even correlate) with step length or step frequency biases. This article has purposefully stayed clear of pinning step length and frequency to certain strategies, because it doesn’t work. It would be all too easy to say that the smallest athlete in the race with the lowest drive index (lowest portion of cycle spent on the ground) and a large frontside bias would demonstrate very high frequencies but a low step length. But Ta Lou is a great example of why this is a wrong assumption. Ta Lou had the highest relative step length in the final and the third highest absolute step length (during maximum velocity), but she is the smallest in stature.

This article has purposefully stayed clear of pinning step length and frequency to certain strategies, because it doesn’t work. Share on X

Air versus ground or backside versus frontside are just different methods to create force. Therefore, maximizing the reactive capabilities of a frontside sprinter to generate as much force as possible can result in big step lengths. Or it might not. Based on Ta Lou’s data—lowest drive index, hip flexion biased mechanics, small stature, large step length—we could throw out a guess that she is the most effective at creating pretension before ground contact, spiking the force quickest on initial touchdown. Perhaps she has figured something out.

Since you’re here…
…we have a small favor to ask. More people are reading SimpliFaster than ever, and each week we bring you compelling content from coaches, sport scientists, and physiotherapists who are devoted to building better athletes. Please take a moment to share the articles on social media, engage the authors with questions and comments below, and link to articles when appropriate if you have a blog or participate on forums of related topics. — SF

Jonas DodooJonas Tawiah-Dodoo is the head coach and founder of Speedworks. He was a part of the UK Athletics Apprentice Coach program in the four-year lead-up to the London 2012 Olympics, working with world-renowned coaches Dan Pfaff and Stuart McMillan. His experience in sport is not limited to athletics, as he has worked with rugby for several years.

Since graduating from the Apprentice Coach program, Jonas has worked closely with a number of talented young sprinters. His most recent prodigy is Reece Prescod, the 2018 European Champion 100m sprinter.

Power Clean Young Athlete

Youth Strength and Conditioning Concepts with Elisabeth Oehler

Freelap Friday Five| ByElisabeth Oehler

Power Clean Young Athlete

Elisabeth Oehler is a weightlifting and strength & conditioning coach and consultant who helps organizations to evolve and develop their athletic development programs. She also helps coaches and athletes from different sports (e.g., weightlifting, rugby, etc.) on a remote basis. Currently, Elisabeth works as an expert in long-term athletic development and youth sports at the école nationale de l’éducation physique et des sports, an executive department of the sports ministry in Luxemburg.

Oehler studied sport science with a focus on sports pedagogy at the University of Erlangen-Nürnberg, Germany, and is currently an MSc student in sport coaching at the University of Birmingham, U.K. From 2017 through the end of 2020, she worked as a full-time coach for the German Weightlifting Federation, first as a manager of the youth department and later as head of talent identification. Elisabeth is a licensed weightlifting coach (DOSB A-Licence High Performance) and specialized Youth Coach by the German Olympic Sports Confederation and has further qualifications in strength & conditioning.

Oehler has a huge passion for rugby and collision sports in general and has worked as a strength & conditioning coach with national team players leading to the Rugby European Championships 2019 (Germany 15s), professional rugby players in France, and youth rugby players on an individual basis. In 2019 and 2020, she interned with the Stormers (South Africa) and shadowed the coaching staff at Saracens (U.K.) and the Blitzboks (South Africa 7s).

Freelap USA: Young boys and girls can get a lot of confidence from weightlifting. Can you get into why starting weightlifting early is not only safe but beneficial in the long run? Many coaches see cleaning and snatching as advanced, but lots of young kids under the age of 10 look amazing!

Elisabeth Oehler: Teaching weightlifting techniques to kids should focus on developing strength training competencies and adding movements to the “toolbox.” Resistance training with kids does not have an impact on growth plates, but it improves bone density and intra- and intermuscular coordination. If a kid has learned correct techniques for exercises like the snatch, clean, or squat, S&C coaches have a much easier time applying training methods (e.g., hypertrophy) in an effective and safe way later.

Weightlifting is safe when kids can follow instructions, enjoy training, and are supervised by a coach who is aware of the motor & psychological development tasks of the different age groups. Share on X

Weightlifting is safe when children can follow instructions, enjoy training, and are supervised by a coach who is aware of the motor and psychological developmental tasks of the different age groups. Especially before peak height velocity (PHV), children still have balanced body proportions, which change with growth spurts and can also lead to coordination problems. Many kids under the age of 10 usually don’t deal with hip, ankle, or shoulder mobility issues (yet), and therefore it’s easier for them to, for example, get into a deep squat position.

From my experience, most kids do not “overthink” the process of learning a new technique or skill as much as older athletes do; they just naturally imitate movements they see and are curious about learning new skills. Teaching “advanced” and especially technical lifts like the clean or snatch during PHV when, for instance, the leg-to-body ratio is constantly changing makes it more difficult. Actually, during and especially after PHV, we as S&C coaches want to focus on developing strength or power and not start with teaching technique.

Freelap USA: Teaching horizontal jumps, hops, and bounds is important with some athletes. Can you explain how you progress an athlete who is talented but not skilled in plyometrics? Often great athletes are good at their sport, but when you take them out to a gym, sometimes they are less skilled. How do you train plyometrics with intermediate and advanced athletes?

Elisabeth Oehler: When I worked in talent identification for German Weightlifting, I mainly used the standing long jump as a functional test to assess leg power. This was an option to separate actually talented youth weightlifters from those who have advantages in the sport-specific tests only due to early specialization. If the athletes are not able to use the best possible technique for the long jump, I’m not really able to assess their true potential.

Furthermore, we assessed jumps, sprints, and throws in youth weightlifting competitions as a part of athletic development. Therefore, I had to train it, especially from a technical perspective. Athletes who are intermediate or advanced in their specific sport—in this case, weightlifting—have not automatically learned correct fundamentals. So, the focus was on learning or improving landing mechanics and then finding an ideal and effective takeoff angle for the standing long jump. I’ve done this as part of warm-ups or general preparation for lifting.

After mastering those, we can expose the athletes to different kinds of jumping exercises and add hurdles or boxes. The next step was adding intensity and volume and integrating jumps into the actual weightlifting program. The fundamentals, especially landing, can’t be trained too much, even with advanced athletes, to make plyometrics safe and effective.

Freelap USA: Rugby is obviously a collision sport. How do you prepare the body for taking hits outside of adding muscle mass? Do you do any neck training or similar?

Elisabeth Oehler: I had the chance to learn from some freestyle wrestling coaches and implemented wrestling drills into training sessions early on. Young rugby players especially don’t only gain a lot of physical benefits from wrestling, but also confidence and toughness for tackles, mauls, or rucks. Wrestling drills can help players understand in which positions they are most effective in collisions or where they are weak and therefore unsafe.

Being strong and muscular will not help a player if they don’t know how to approach contact situations, says @eo_performance. Share on X

Being strong and muscular will not help a player if they don’t know how to approach contact situations. Just because you have something like strength, it doesn’t mean you know how to use it. But you cannot use something you don’t have in the first place. This is not only a task of the rugby (defense) coach, but also of the S&C coach, who can combine wrestling drills with running intervals or use certain wrestling drills for developing core or neck strength.

I’ve programmed wrestling neck strength drills for all youth players, and I think it’s negligent to introduce them to scrums or tackles without having built a base first. (Unfortunately, I’ve seen that a couple of times in U12-U16 teams.) From the U18 level on, I’ve implemented mainly isometric extension, (lateral) flexion, and traps strengthening exercises like farmers walk for all players but especially for forwards. But for players who are not returning from injury, I prefer to do neck training in the rugby setting and not isolated in the gym.

Freelap USA: Return to play is a tough part of strength and conditioning, and mistakes are often made. What have you learned over the last few years regarding the psychology of injuries rather than the physiology and biomechanics of rehabilitation?

Elisabeth Oehler: In the past few years, I have seen quite a few serious injuries happen on the rugby field or the weightlifting competition stage, and I worked with athletes in the return to play/compete process. From a psychological perspective, I’ve experienced certain injuries actually ending a career early because the athlete was mentally unable to return to full resilience and readiness.

For example, in weightlifting I’ve experienced (not just once) a young athlete dislocating his elbow during a heavy snatch, and even after surgery, a long rehab, mental support, and quite some willpower to return to competition, there was a constant mental barrier when loads got heavier, and the athlete lacked confidence to pull under the bar. He wanted to, but that last bit of mental toughness and unconditional courage you need to compete successfully on the international stage wasn’t there anymore, even though the athlete was completely physically recovered and had the will and desire to compete again. After several attempts to bring the athlete back to competing, we recommended he not progress the elite pathway in Olympic weightlifting even though he was physically very talented.

From a coaching perspective, this experience showed me that there are psychological factors in the return to compete/play process to which I need to be sensitive, but that I also find difficult to influence. In the end we are still physical preparation coaches with, at best, some courses in sports psychology during our studies. However, we should be aware of our limitations and always seek support from qualified experts and provide holistic support, if possible.

Many players, especially young players, do not have the necessary patience in the rehab process because they are afraid of getting fewer chances to play, says @eo_performance. Share on X

This example also shows how difficult it is to apply psychological models (e.g., cognitive appraisal models) for sport injury rehabilitation in elite sport with very specific mental demands that only coaches with an in-depth understanding of the sport can define.

In rugby, it has been my experience that many players, especially young players, do not have the necessary patience in the rehab process, because they are afraid of getting fewer chances to play and missing out on opportunities. Many are not honest about how they feel about pain or their perceived progress. This is especially challenging if the sports coaches are not involved in the rehabilitation process to influence the player’s psychological response to the injury and the return to play process.

Freelap USA: Barbell path is important in weightlifting, but many strength coaches think it’s not important for regular athletes who are just trying to improve power. From the research, we know that having a great bar path will help load the body better and safer. How do you coach bar path during a training session?

Elisabeth Oehler: Strength coaches who implement weightlifting for power development and don’t care about the bar path miss opportunities to achieve the results they want. For example: If the bar path and the body movement of the athlete in the first pull of a clean are not technically sound, the athlete will lose velocity when transitioning to the second pull and therefore can’t achieve the best possible Vmax. There is no question about the safety aspects of having good form and a decent bar path.

I break down the Olympic lifts into key positions, where the athlete has to know what the bar does and what his body should do. The foundation is the starting position—if an athlete makes mistakes there, it’s difficult to fix the bar path during the next phases of the lift. The second position I teach is the end of the first pull with the bar slightly in front of the kneecap and transition to the second pull, where the athlete opens the hip angle for the first time. Third position is the bar touching the body for the first time (snatch: upper third of the thigh; clean: lower third of the thigh) and the triple extension is initiated. The turnover phase into the (half) squat position is the only position you can’t stop, so the fourth position ends when catching the bar.

The majority of mistakes happen in positions 1, 2, and 3, so I make sure my athletes know exactly how these positions should feel and where their body and the barbell should be. In my opinion, this is the easiest approach for coaching bar path, and coaches avoid trying to “fix” symptoms like jumping forward that occur because of mistakes made earlier in the lift.

Since you’re here…
…we have a small favor to ask. More people are reading SimpliFaster than ever, and each week we bring you compelling content from coaches, sport scientists, and physiotherapists who are devoted to building better athletes. Please take a moment to share the articles on social media, engage the authors with questions and comments below, and link to articles when appropriate if you have a blog or participate on forums of related topics. — SF


Podcast episode announcement for Just Fly Performance Podcast featuring special guests Jeremy Frisch and Calin Butterfield. Jeremy Frisch is the Owner and Director of Achieve Performance Training, and Calin Butterfield is High-Performance Manager at US Ski & Snowboard.

Episode 243: Jeremy Frisch & Calin Butterfield

Joel Smith: Just Fly Performance Podcast, Podcast| ByJoel Smith

Podcast episode announcement for Just Fly Performance Podcast featuring special guests Jeremy Frisch and Calin Butterfield. Jeremy Frisch is the Owner and Director of Achieve Performance Training, and Calin Butterfield is High-Performance Manager at US Ski & Snowboard.

Jeremy Frisch and Calin Butterfield are working together on concepts related to long-term development of ski and snowboard athletes.


Jeremy is the Owner and Director of Achieve Performance Training in Clinton, Massachusetts. Although he trains people of all ages and abilities, his main focus is on youth athletic development, physical education, and physical literacy. He is the former assistant strength and conditioning coach for the Holy Cross men’s basketball program. He also worked with at least eight other teams for the Crusaders. Prior to his time at Holy Cross, Frisch served as the sports performance director at Teamworks Sports Center in Acton (MA) and speed and strength coach for Athletes Edge Sports Training, and he did a strength and conditioning internship at Stanford University. Frisch is a 2007 graduate of Worcester State College, with a bachelor’s degree in health sciences and physical education. He is certified USA Weightlifting, USA Track and Field, and SFG 1. He was a member of the football and track teams during his days at Worcester State and Assumption College. 


Calin Butterfield is the High-Performance Manager at U.S. Ski & Snowboard. Calin has been with U.S. Ski & Snowboard for four years, where he works closely with the sports medicine team as an “athletic development” coach on long-term rehabs and return to performance cases. In his role he also leads the integration with U.S. Ski and Snowboard clubs/academies to support talent and athlete development pathways and leads business development and education with medical partners. He previously worked for EXOS for nearly eight years as a coach across all different locations, including Phoenix, Dallas, and San Francisco. Calin earned a B.S. in Exercise and Sports Science from Oregon State University. He is a Certified Strength and Conditioning Specialist (NSCA), Level 1 FMC, and a Level 2 Certified Coach with USAW. 


Jeremy and Calin talk about their collaboration on skiing, the use and progression of games with young athletes up to college level, plyometric progressions and advancing complexity, and how the natural warm-up process in ski and snowboard (terrain park) can give us ideas that we can port over into the way we prepare athletes for sport. They dive into the study of athletes in sports that demand fast reactions, impactful landings, high risk, and how rewards for creativity have a lot to offer when it comes to looking at our own training designs for the athletes we serve.


In this episode, Coach Jeremy Frisch, Calin Butterfield, and Joel Smith discuss:


  • How gameplay fits into a sport like skiing.


  • When people tend to peak in skiing and snowboarding, and how this fits into the proportion of game play at different ages.


  • The power in connecting to the outcome and having multiple avenues to get to that outcome.


  • The relationship between landing variability and chronic sport landing overload. 


  • Long-term development in skiing and supplementing with traditional land-based training. 

What it looks like to build up an athlete in high-adrenaline sport training.

Plyometric Training

Practical Methods for Designing Plyometric Progressions Based on RSI

Blog| ByAshton King

Plyometric Training

In order to train more explosive athletes, the approach that our staff at Total Motion Performance has found the most beneficial is an integrated program with weights, med balls, sprints, and plyometrics. Properly dialing in your plyometrics routine has a number of benefits. First, plyometrics are often a high-intensity exercise, and when executing these types of movements, it is critical that you have a proper progression in place. When performing exercises that tax the central nervous system, you only can perform a limited volume of work.

Knowing this, when training with plyometrics, coaches need to prescribe the correct exercises in the correct doses. Without the correct prescription and dose, in the best case the athletes will just fail to get better; in the worst case, they end up hurt. In this article, you will find a simple way to assess your athletes and deliver the plyometrics routine that will benefit them the most. I break down the movements into both unilateral and bilateral and also categorize them based on the reactive strength index (RSI) of an athlete.

Unilateral Bilateral Plyometrics
Figure 1. Real-world examples of the types of unilateral and bilateral plyometrics that athletes might perform in a training program.

Reactive Strength Index (RSI)

In a lab setting, RSI is calculated by dividing jump height by ground contact time. This gives the sports scientist or researcher insight into how well an athlete produces force. Athletes who produce force faster, with higher jump heights and lower contact times, show they are better at utilizing their stretch-shortening cycle (SSC). From the standpoint of training for performance, it is important for coaches to simply get an RSI to determine if an athlete needs to work on their stretch-shortening cycle or their concentric strength (CS).

Our staff has determined a different calculation for RSI and how it can be useful in programming plyometrics, says @kingashton1. Share on X

Knowing this about RSI, our staff has determined a different calculation for RSI and how it can be useful in programming plyometrics. The way we measure RSI is:

  • First, we have the athlete do a countermovement jump (CMJ) using a Just Jump pad.
  • Then, we have the same athlete perform a static vertical jump (SVJ). To get an SVJ, we have the athlete go down and pause at the bottom of their jump for three seconds before exploding upward. (To truly measure an SVJ with no countermovement, you would need force places. While our Just Jump pad is not 100% accurate, it is a good start in being able to better classify athletes.)

When measuring RSI, if an athlete tests well in the CMJ but not as well in the static vertical, this indicates that the athlete is utilizing their SSC well but is not utilizing their CS as effectively. Conversely, an athlete who has similar results on their CMJ and static vertical is not utilizing their SSC very well but is using their CS effectively.

Anecdotally, in the gym we often see that athletes who use their SSC well have less knee flexion in the CMJ. Athletes who aren’t utilizing their SSC well go into more knee flexion when performing their CMJ. Research shows that as knee flexion in the squat increases, muscle recruitment increases. Knowing this, athletes who are not utilizing their SSC as effectively may be aiming to recruit more muscle fibers by going into a deeper squat to make up for their lack of SSC involvement.

The main takeaway here is that whether an athlete utilizes their stretch-shortening cycle well or not, there are different types of training that you can give each respective athlete to maximize their potential.

Bilateral vs. Unilateral

Bilateral plyometrics focus on using two feet to produce force, while unilateral plyometrics use one foot. Traditionally, athletes can produce more force bilaterally than unilaterally. Knowing an athlete’s goals is very important for a coach when writing a plyometrics program.

When writing a plyometric program for an athlete who is aiming to improve their 40-yard dash, bilateral plyometrics would make the most sense for someone who struggles with their acceleration (the first half of the run). Knowing that acceleration is all about overcoming inertia, programming bilateral plyometrics makes more sense given they have the ability to create higher ground reaction force.

For an athlete needing max velocity work, however, it would make sense to program unilateral plyometrics such as bounding rather than box jumps. At max velocity, sprinting is about creating quality ground contacts to enhance flight time and preserve linear velocity. Bounds are a better way to train this, as opposed to a bilateral plyometric.

A coach must be aware of an athlete’s needs and do their best to enhance those needs through training—and a dialed-in plyometrics program will do that, says @kingashton1. Share on X

Sprinting is just one example of how a tailored plyometric routine could help benefit athletes more. Dr. Matt Rhea does a great job breaking down how to improve different segments of the run, if you want to dive more into that topic. Some further examples could be volleyball back row versus front row, basketball players going off one foot or two, and so many others. A coach must be aware of an athlete’s needs and do their best to enhance those needs through training—and a dialed-in plyometrics program will do that.

Bilateral Reactive Focus

Athletes falling into this category would have a low RSI, meaning they need to work on their SSC abilities. In this category, the goal is to improve ground contacts and vertical impulse. We do this by starting with extensive plyometric exercises that focus on creating a more robust SSC and then progressing them to more intensive exercises. A progression could look similar to the following.

Low RSI Progression
Figure 2. Athletes with a bilateral reactive focus would have a low RSI and need to work on their SSC abilities. A plyometric progression for them could look like this.


With the progression outlined above, athletes are able to create a robust foot-ankle complex before moving on to more intensive plyometrics that place more and more stress on the body. Rudiment hops start by teaching an athlete how to strike and interact with the ground, and the box drop is a progression of this. Depth/drop jumps then prepare the athlete to take the added force of falling from a box and turn it into usable energy on the following jump. Finally, the continuous hurdle hops challenge the athlete to not only get up high, but to also be quick off the ground in between hurdles.

Bilateral Strength Focus

When looking at an athlete who needs bilateral strength-based plyometrics, this athlete would test high in RSI—meaning they use their SSC well but lack concentric strength. The goal of this category is to create higher GRF to improve the ability to overcome inertia and accelerate more efficiently. First and foremost, athletes who are in this category often need foundational strength work (which is a topic for a different day). But for an athlete in this category, a sample plyometric progression could look like this:

High RSI Plyos
Figure 3. Athletes who would benefit from a bilateral strength focus would have a high RSI but need to work on their concentric strength. This plyometric progression would be beneficial to them.


Using a progression like the one above gives an athlete who needs more concentric strength the ability to do so without regressing their already good reactive abilities.

  • With the paused vertical jump, athletes have to pause at the bottom; however, there will still be a slight countermove, which is why it is the first exercise in the progression.
  • Next, the eccentric overload box jump forces an athlete to be slower during the eccentric phase of the countermove and go into more knee flexion.
  • Seated box jumps take the countermovement away and force the athlete to rely on their concentric strength.
  • Finally, the resisted vertical jumps take the countermovement away and overload the movement, forcing the athlete to really work hard to create a high take-off velocity.

The importance here is not to turn the overloaded movements into strength exercises—the dumbbells should be light on the overloaded box jumps and the bands should be light on the resisted vertical jumps.

Unilateral Reactive Focus

The reactive horizonal group is for those athletes who have a low RSI. To get the most out of their plyometrics program, these athletes first need to learn how to interact with the ground correctly, and then to create force rapidly upon ground contact. A sample plyometrics progression that we would give an athlete who falls into this category is as follows.

Horizontal Plyo Progression
Figure 4. Athletes categorized into the reactive horizontal group have a low RSI. This plyometrics progression would help them first learn to interact with the ground correctly and then to create force rapidly upon ground contact.


The RRLL hops start to teach an athlete how to prepare for ground contact and work on building a quality foot, ankle, and lower leg complex. Skips for distance teach an athlete to produce force while maintaining forward momentum. Bounds for distance do the same, but it is often more challenging for an athlete to bound rather than skip—hence, the skips before the bounds. Finally, the speed bound focuses on creating maximal forward velocity, while still emphasizing a good flight time by producing high GRF.

Unilateral Strength Focus

Athletes falling in this category will test high in the RSI, meaning they are reactive athletes. The goal of this category is to teach an athlete to create more GRF. Utilizing med ball throws in conjunction with plyometrics, hops, and jumps is another way to overload the movement and force an athlete to create more GRF.

Unilateral Progression
Figure 5. Athletes who need to focus on unilateral strength have a high RSI and need to learn to create more GRF. This possible plyometrics progression would be beneficial for them.


The push press starts the progression by teaching the athlete how to create basic GRF using both legs, which is vital in acceleration. Next, the hop overhead back throw adds a larger triphasic component, giving the athlete the chance to create even more GRF. After that, the “between the legs forward” allows the athlete to still work on the goal from the first two exercises but starts to let the athlete feel what is like to create a horizontal vector of force rather than purely vertical. Finally, the staggered-stance chest pass to sprint puts the athlete in a start position with the staggered stance and starts an athlete from a dynamic position on the sprint rather than a standstill.

Use for Better Insight

This rest/retest method can give coaches better insight into the weaknesses of an athlete and how to prescribe a plyometric program to improve their in-game performance, says @kingashton1. Share on X

Plyometrics are a great supplement to a well-thought-out training program. However, to get the most out of a plyometrics program, a coach much progress the exercises in the right manner to reduce injury risk and maximize adaptation. Coaches should first create a sound plyometric base in their athletes before aiming to implement more advanced plyometric progressions. Once the base is created, using this test/retest method can give coaches better insight into the weaknesses of an athlete and how to prescribe a plyometric program to improve their in-game performance.

Since you’re here…
…we have a small favor to ask. More people are reading SimpliFaster than ever, and each week we bring you compelling content from coaches, sport scientists, and physiotherapists who are devoted to building better athletes. Please take a moment to share the articles on social media, engage the authors with questions and comments below, and link to articles when appropriate if you have a blog or participate on forums of related topics. — SF


Parent Training

How to Become a Behind-the-Scenes Superhero

Blog| ByMark Hoover

Parent Training

While strength and conditioning coaches have most definitely come to the forefront in the world of athletics more than in the past, we are still oftentimes the coaches behind the scenes. Yes, we can point to examples of strength and conditioning professionals at all levels who are recognizable and out in front playing a more generally recognizable role. But I think we would agree that is not the norm in most situations.

If we are being honest, most die-hard fans of any team can almost certainly name and identify the head coach. Taking one level deeper, many times even the top assistants are well known to fans/parents and any others who closely follow any team at the high school level and up. The team or club’s strength and conditioning staff is oftentimes not so well known.

For many of us who work with individual or team sports, this has been a status that we embrace. There are often good reasons for it. Most mentions of a team’s strength and conditioning staff come in two forms: praise from the head coach after a win/winning season, or blame when a rash of injuries takes place. This relative anonymity is a fact that I myself have often thought to be one blessing of the job.

I remember well the years I spent coaching football, when parents/fans who were upset over one thing or another were simply bound to share their opinions on how we had not done our job as well as we could have. Not once since I stopped coaching a sport have I had a parent of an athlete storm my way in an angry stupor, upset because their child didn’t get to participate. Nor have I had to sit in a meeting with a parent and an administrator concerning an issue that has taken place.

Indeed, being Alfred the Butler to the sport coach’s Batman has some real benefits. Despite often having the most contact with athletes and very often carrying influence second only to the head coach, we spend most of our time in our figurative Bat Cave preparing the athletes for game night, much how Alfred prepares the Caped Crusader’s utensils for crime fighting: in the shadows.

My personal theory on why (particularly) parents of our student-athletes rarely have an issue with us is that we have no say in playing time, team roles, or strategy. Most of the issues that sport coaches have with parents stem from one of those three places. If we are noticed at all it is quite often in a positive light during the always hopeful off-season. We are the people helping their son or daughter prepare and, so long as the sport coaches don’t screw it up, they will win it all and grab that scholarship!

If we are noticed at all it is quite often in a positive light during the always hopeful off-season, says @YorkStrength17. Share on X

That leads to a mostly positive feeling towards us, whether we are known as “Coach so-and-so” or “The Weights Guy.” While the level of familiarity with what role we actually play may have some short-term advantages, is it really the optimal situation for our athletic development program?

Increasing Understanding

At first glance, those facts may seem like a reason for a career path adjustment. My personal thought process on this subject has most definitely evolved over the years. Maybe there is value in our role being more generally understood. I’m certainly not suggesting we look to seek out notoriety or the “fame” that comes with being the head coach and the face of a sport program; however, there may be some reasons to venture out of the cave.

With the aforementioned anonymity also comes a lack of relationships—not with the players or coaches obviously, but with parents. This relationship gap can lead to a lack of understanding that can disrupt the lines of communication between our program and the student-athlete’s home. While I am not suggesting we as strength and conditioning coaches in any way do anything out of the ordinary to get ourselves noticed, I am suggesting that if we can somehow work with our sport coaches, athletic directors, and administrators to do a more thorough job of connecting with parents, we could make our effectiveness level increase.

If we can help parents truly understand who we are and what we do, it could give us a tremendous advantage in maximizing our ability to optimally prepare our student-athletes for the rigors of sport. At the high school level, strength and conditioning is often seen as coach-to-athlete and coach-to-coach dependent. Making the parent-to-strength coach connection may seem unimportant at times, and avoiding it may help us avoid some of the pitfalls previously mentioned, but its absence leaves out probably the most important aspect of long-term success: parental support for the physical and mental development of their student-athlete.

If parents don’t know us, respect us, or truly understand our role in the athletic development of their children and the team, then we are leaving a very valuable tool on the table.

Our Roles as Specialists

I would venture to say most parents of most athletes probably see us as a football coach regardless of our role. The weight rooms in many situations are driven from a football perspective. In fact, most high school weight rooms can trace their lineage back to being originally built for use by the football program. While this may be an advantage with our football parents, it will most certainly hurt us with parents whose children play other sports.

As strength and conditioning professionals we need to increase awareness of exactly what we do. If we can put ourselves in a situation where parents understand our role, that we are qualified professionals, and that our focus is on using our knowledge as specialists in our field to make their son or daughter the best athlete and person they can be, it will be a force-multiplier for all involved. Particularly in situations where our role has us with many or even all the student-athletes in all the sports played at the school.

As strength and conditioning professionals we need to increase awareness of exactly what we do, says @YorkStrength17. Share on X

How can we step out of the shadows and show that we are not just an assistant sport coach or the person who teaches weightlifting class? How can we build the type of coach-parent relationship that helps not only us be recognized as a professional but also fosters the development of our student-athletes (and, in turn, athletic programs) by creating open lines of communication and understanding with parents? While there are probably as many ideas on that as there are strength coaches, I’d like to share my thoughts and opinions on the topic.

Fostering Parental Relationships

I believe one major factor in fostering the initial relationship with parents from a strength and conditioning perspective is communication. Regardless of who you are in the field or what experiences/education you have, to them you are just the person trying to explain too many concepts and ideas they don’t fully understand or even believe. Think about some of the concepts and topics that (given our educational and practical experience) we know to be best practice; now think back to what you were sure was true before we made physical preparation for athletics our career.

Remembering that the use of professional terms or “jargon” that may be second nature for us, could make a less knowledgeable parent feel insecure. This will drive a wedge between parent and coach that will be tough to break through. I have oftentimes been guilty—not just with parents but also with other sport coaches—of providing a level of information that is deeper than needed to achieve the goal desired.

To help them understand and accept what we believe or know to be true, it’s important to eliminate any potential threat they may see in an interaction with us. Taking them down a terminology rabbit hole will not be an effective tactic. Keep it simple and in terms that are universal.

Then once you establish that initial contact, maybe they have a greater knowledge base and the conversation can go deeper. Better to start off assuming the base level is low and build from there. Nobody likes a know-it-all. Trying to show how smart we are can backfire and slow down the process of building a positive relationship.

Trying to show how smart we are can backfire and slow down the process of building a positive relationship, says @YorkStrength17. Share on X

Working in any field leads to a perspective bias and S&C is no different. Looking through the lens of what we know and have learned is very natural. We have a great understanding of why we do what we do. Parents who don’t work within athletics (and even some that do) are influenced heavily by factors that don’t have many similarities to what we actually do.

Let’s face facts: there are still a good many people who would argue that strength training at an early age stunts growth. We can agree that when strength training with a qualified coach and using evidence-based techniques, training age level best practices are far from dangerous or unhealthy. One of the biggest complaints I’ve heard is that sports coaches are more influenced by what they did in high school or what other coaches told them was right than by the actual evidence. That disconnect can be exponentially bigger with parents who may have no experience or who know what “the guy at the gym” told them would be best.

How do we narrow that knowledge gap that can often be much, much larger for us than a sport coach? By building trust from our very first encounter and by making parents feel comfortable and relaxed. You would be better off not talking to the parents than inadvertently belittling them. We must put ourselves in a parent’s shoes. They absolutely want what is best for their children. As the strength and conditioning professionals, we need to use this to our advantage and educate our parents. Recognize that we will have a wide range of knowledge and preconceptions to work with.

Recognize that we will have a wide range of knowledge and preconceptions to work with, says @YorkStrength17. Share on X

Visibility and Understanding

Being visible and taking an active role in the athletic department’s parental contact/meeting process is crucial. Just as the athletic director, head sport coach, and the athletic training staff present themselves to the parents and explain their role, so must we. As the person/staff responsible for the athletic development of the athlete, we are simply not just another assistant. If we do not attend or do not explain our role, we will be seen in that light.

We need to take any opportunity we have to get in front of the parents as a group (or even individually) and explain why doing what we are asking will benefit their child. Working with our athletic departments to get time to speak to all parents on the most important topics is an important step; from there we can identify who our parents are and begin to expand our relationship individually.

Working with our athletic departments to get time to speak to all parents on the most important topics is an important step, says @YorkStrength17. Share on X

Using our positions in our schools to help make parents advocates for what we do is also an important piece. Many of us are also teachers and, in this case, we need to do what administrators have been telling classroom teachers to do for at least the 20+ years I’ve worked in schools: reach out and make positive parent contacts. If we call a parent when their student is about to get a report card to report a poor grade, their first question will likely be “Why didn’t you let me know sooner?” Maybe it would have made a difference, maybe not. It was still our obligation to let the parent know and work together to help the student.

Our role is the same. If we know a student-athlete is not sleeping or eating as they should be to perform, or if they are not giving effort, the two people who can probably modify behavior the most are the head sports coach and the parent. Reach out with a simple email or short conversation when their student has a good day so if any other type of conversation has to take place, the groundwork of mutual desire for well-being has been laid.

Starting every conversation (positive or negative) with a point that you know will be common ground (“I think we can both agree that Johnny is a great kid” for example) will set the parent at ease and lay the groundwork for whatever has to come next. With those more individual relationships will come trust; with trust will come confidence; with confidence will come support. Support from the parent will help you maximize training which in turn will help the team. Relationships with parents will be a force -multiplier.

Support from the parent will help you maximize training which in turn will help the team, says @YorkStrength17. Share on X

Building Value

While this article has been a very general overview of how I believe we can form a better strength coach/parent relationship, it’s also just one aspect in a multiple step process that can lead to general improvement in the high school S&C space. Most of the complaints and/or roadblocks we discuss in that space stem back to one issue: our perceived value. How we are compensated, how we are treated, the level of respect afforded our positions, our relationship with sport coaches, our facilities (and the list goes on) are all a reflection of the value placed on us as professionals by the decision-makers and stakeholders that we share our space with.

How can we as coaches help others by creating value for the field? There are obviously many routes to that. I see the process of fostering positive parent relationships and helping to build a general understanding of what a large role we can play in the success of their student-athletes as a giant step toward increasing that perceived value.

If we look at the athletic training world, it shows us how much that value can increase in a short time: 20 to 25 years ago many sport coaches were taping ankles, diagnosing concussions, and designing return to play protocols (if there were any) despite having little or no formal medical training. There were a few schools then that were ahead of the curve and understood the importance of a medical professional on staff. They valued it enough to make it happen for the safety and well-being of the student-athletes.

That situation has done a complete flip in that time. There may be a few places where a certified athletic trainer is not on staff or made available, but not many. Parents understanding the value of having them on staff undoubtedly helped drive that reversal. Can you imagine the outrage if that service was made unavailable? It wouldn’t be a good one because the athlete’s safety is a valued priority and most understand what’s needed to hold that value.

Today there is an ever-growing number of qualified and dedicated strength and conditioning professionals at the high school level—I would venture to say close to the same percentage that had certified athletic trainers on staff 20+ years ago. In the other schools we have sport coaches whose primary expertise is sport coaching, not designing and implementing strength training, conditioning, speed work, etc. with little or no professional training in athletic development. I believe whole-heartedly that a coach whose primary role is sport can be an outstanding strength coach as well. I also believe that is a separate specialty that needs a level of qualification above and beyond being a good sport coach. We must all admit that in many situations that level is not met.

Every situation takes a giant step forward when parents come to understand our value, says @YorkStrength17. Share on X

I also believe that one major reason those situations still exist is that the parents of the student-athletes in those programs don’t understand our role in providing not only increased performance but safety and injury mitigation.

Every situation takes a giant step forward when parents come to understand our value. Parents drive local education decisions and changes. Not embracing and pursuing that fact is holding back our particular branch of the athletic development world.

Since you’re here…
…we have a small favor to ask. More people are reading SimpliFaster than ever, and each week we bring you compelling content from coaches, sport scientists, and physiotherapists who are devoted to building better athletes. Please take a moment to share the articles on social media, engage the authors with questions and comments below, and link to articles when appropriate if you have a blog or participate on forums of related topics. — SF


Mental Toughness

Developing Mentally Tough Athletes

Blog| ByCody Hughes

Mental Toughness

Mental toughness is a popular topic, but also a fragile one. If there is one thing coaches across the country can agree on, it is that they want their athletes to be mentally tough. I have never heard a coach say they prefer a mentally fragile athlete. If we can all agree that mental toughness is a trait that is consistent with success and winning, then we also need to understand what it is, and what it is not, in order to cultivate it.

If we can all agree that mental toughness is a trait consistent with success & winning, then we also need to understand what it is and what it isn’t in order to cultivate it, says @clh_strength. Share on X

Mental toughness is a qualitative trait, which means that you cannot put a number on it to measure it. This is why it is difficult to identify in an objective manner. The first thing we must do to better understand mental toughness is define it. Without a definition, the identification of mental toughness traits comes down to individual interpretation.

The most holistic definition I have found comes from a study in the Journal of Applied Physiology written and conducted by Graham Jones in 2002. The study is titled “What is This Thing Called Mental Toughness? An Investigation of Elite Sport Performers.” Jones defines mental toughness as:

“Having the natural or developed psychological edge that enables you to: generally, cope better than your opponents with the demands placed on the performer. Specifically, be more consistent and better than your opponents in remaining determined, focused, and confident, and in control under pressure.” – Jones, 2002

In this study, Jones also conducts surveys to determine the top characteristics of the mentally tough. The results are interesting:

  1. Unshakable belief or confidence that you have the ability to succeed.
  2. The ability to believe you will bounce back after setbacks.
  3. An internalized drive and motivation to succeed.
  4. Thriving on the pressure from competition.
  5. Coping skills with competition anxiety.
  6. Not affected by the performance of others, good or bad.
  7. Fully focused on task regardless of personal life distractions.
  8. Remaining psychologically in control following something unexpected.

I recently surveyed Twitter to see how coaches would define mental toughness…

Tweets Toughness
Image 1. Various responses I received on Twitter when I asked coaches to define mental toughness.

At this point, I believe a large majority of coaches would agree with the points made thus far. So where is the disconnect on this topic? Why is this topic constantly being debated? It all comes down to this question: Can mental toughness be trained or developed?

I say yes, it can.

The fork in the road comes down to the execution: how to develop the mental toughness traits in your athletes. This is where coaches miss the boat. Let’s discuss how you can develop a plan to instill mental toughness in your athletes the right way, and the mechanisms that help create it.

Experience

I have been around multiple successful teams at different levels.

  • (D2) West Alabama Volleyball Program turnaround from 9-21 to 22-10 and a Regional Appearance
  • (D2) West Alabama Football Program 10-2 & Conference Champions
  • (D2) West Alabama Baseball 40 wins & one-win away from the World Series
  • (D1) McNeese State Football 9-2 season
  • (D1) McNeese State Softball 43-18 & Conference Champions
  • (HS) Madison Academy 2x 10-win seasons in three years

All of these teams have personnel, leadership, and behaviors in common that contributed to their success. Mentally tough individuals and teams require a unified approach from the entire staff: the sport coaches, strength coaches, and other support staff. If I had to simplify the characteristics of all of those team that had success, I would break it down into four factors:

  1. Talented players.
  2. Passionate coaches who can develop.
  3. Trust and buy-in.
  4. Willingness to work really hard.

The truth is that mental toughness can be a trait someone already has. At the college level, you can do your best to recruit this trait so that you are not left with as big of a task in developing it. Of course, this can cover up the poor attempts that coaches make in developing mental toughness because they recruit the right players, and they are talented and skilled at their sport.

Coaches have a hard time evaluating their development approach despite their success. It is easy for coaches to believe every piece of the puzzle is correct because the win column is high. This is not always the case. The best coaches I have been around do everything possible to refine their processes regardless of the win/loss column.

For example, the team may have won a state championship, but they had four Division 1 signees, and they were immensely more talented and skilled than the competition. The players were also naturally mentally tough due to a high individual motivation to succeed. The coach may look at that team and their approach to training, and think they’ve made all the right decisions to win and foster mental toughness, resilience, discipline, etc. This may not all be true. So, repeating that same approach with a different team may not work.

Let’s look at some common mistakes that coaches make when attempting to develop a mentally tough athlete and team.

Mistake #1: Mindless Conditioning

Mental toughness is not a simple 2+2=4 transaction. It cannot be seen as a simple equation of “hard things = tougher.” This shows a lack of critical thinking.

Blanket training programs will not yield the result you are looking for. Your athletes are not all exactly the same, so you should not approach their training in the same exact way.

Does this mean we should avoid doing hard things? Absolutely not. But we should pick and choose which hard things we want to invest our time and energy in and make sure they have transference to the task we want athletes to be tough in. Let me give you examples of low and high transference training:

Low Transference Example #1 – Baseball

When I was a college baseball player, we were required to pass a conditioning test every year when we came back from summer break. The conditioning test was to run a 1.5 mile in under 10 minutes (6:35ish-mile pace). If you did not complete this test, you had to run it every Wednesday morning in the fall at 6:00 a.m. until you passed.

This was the first event we completed as a new team. This expectation can play negatively on the leadership dynamic immediately. There is a problem with this test. Not just because I was not good at it, but because the transference was very low. Let me explain:

What good is a test when your best player can’t pass it and your worst player passes without preparation?

What good is a test when your best player can’t pass it and your worst player passes without preparation? asks @clh_strength. Share on X

We had guys who were naturally good distance runners. They could train all summer for other things that transferred to the game of baseball (skill development, power development, etc.). They would show up, knock out the 1.5 mile, and go about their day. On the outside, they appeared prepared and mentally tough to get through a task that was not easy to complete.

We also had guys who were a little bit bigger and more powerful than the others, but who were not skilled endurance runners. They would not pass the test and would be looked upon as unprepared and not mentally tough enough to complete the task. It was practically impossible for some of our biggest guys to pass this test. My junior year, we had a first baseman who set the conference record for home runs, but he never came within four minutes of passing the 1.5-mile test. These guys would just get through it, and their effort levels were not high.

Then you had the middle of the road guys like me. During the summer, it would take all 10-12 weeks of meticulous training just to give me a chance to pass that test. It took up a lot of my energy and focus and took away from the qualities and skills that would make me a better pitcher. I only passed the test once in four years, but I was the Friday night starter for three straight years. Can you see how this can be counterintuitive?

As a coach, you need to ask yourself if the task you are asking your athletes to complete will contribute to your team’s leadership dynamic and increase their ability to complete tasks in the game itself. If your test does not have transference to the ultimate goal of the team, then you need to find a new test.

If your test does not have transference to the ultimate goal of the team, then you need to find a new test, says @clh_strength. Share on X

Low Transference Example #2 – Football

Where I went to high school, football was king. The community counted on us to play at a high level every Friday night. We had an expectation to fulfill, both as players and from our coaches.

Our summer training sessions were tough. We would lift in the mornings and then go complete skill work and 7-on-7 right afterward. For the months of June and July, the plan made the most sense. Train hard in the weight room and simply practicing for 10 weeks will have us in shape.

Here is where things went wrong. During fall camp (two weeks for a high school team), when we were finally in pads, we would run multiple gassers after practice to “get into shape.” I personally know that many of us would save as much energy as possible to get through those gasser sessions. It took away from our focus on the actual practice. Especially for those who were not in great cardiovascular shape, aka ME.

The problem with this approach was that in the weeks directly before the season, we wasted energy on “getting into shape,” and we watered down practice reps. Practice itself should be planned to do that for you. Players save energy in practice for something at the end that will not help them win more games nearly as much as practice will. I understand, some coaches don’t know what they don’t know, but that is the entire point. Coaches need to be educated on these topics.

High Transference Example #1 – Football

I learned the most as a coach during my time spent at the University of West Alabama. Head Strength & Conditioning Coach Joseph Boyd is still one of my biggest mentors to this day. Due to the unique situation of Division 2 football, players could not stay during the summer. We would have our entire team back four weeks before fall camp started. In a nutshell, it was Coach Boyd’s job to make sure our guys had the capacity to practice well.

Coach Boyd would send home conditioning templates for the guys to do at home. They were progressive, and the program led up to the four weeks of being on campus before camp started. When the guys showed up on campus, we would complete a 20 half-gasser test. This test allowed Coach Boyd to see where the guys stood capacity-wise.

Why 20 half-gassers? This equates to about 1.2 miles total. These are similar mileages to what the majority of our skill and mid-skill players would approach in practice. Linemen had a shorter goal to reach. The test had adequate rest times, and we would chart how far the players made it into the test before they began to drop off. The data from this test allowed Coach Boyd to plan his next four weeks precisely before he handed the guys over to the head coach for fall camp.

This example has high transference. Is the test tough? Absolutely. But it is tailored to the capacity the players will be expected to have at practice and eventually in games.

High Transference Example #2 – High School Football

Every Friday morning during our off-season training, we complete team lunges in our own stadium. We lock arm-in-arm and ask our players to be in unison every single step. The goal is to complete 100 yards of team lunges to finish out the week. We encourage communication, adjustments, and accountability.

The guys understand that someone will get tired before the rest do. It is their opportunity to lift him up. The guys also understand that it is not always going to look perfect, but they must make adjustments along the way in order to get the job done. We do this on our home field every Friday morning to finish our week, and it paints a beautiful picture of what it takes to win as a team.

Field Lunges
Image 2. Every Friday morning in our off-season, athletes complete team lunges in our stadium. They lock arms, and we ask them to be in unison every single step. They lift one another up, and it paints a beautiful picture of what it takes to win as a team.


We don’t mention how hard it is. We just ask that they work together to complete the task. Week to week, we want to improve in our efficiency. We throw curveballs at them to adjust accordingly, similar to a bad call made by an official that you cannot control.

Mistake #2: Mishandling Punishment

Coaches believe in standards. There is not a single coach that does not believe that standards and expectations are important in their organization. The method of punishing those who miss the mark is where coaches miss the boat. There are multiple ways to approach accountability. The two most popular are:

  1. Loss of playing time.
  2. Physical punishment.

There are coaches who believe that physical punishment and exercise should not be used as punishment, as it dulls the athlete’s motivation when it is time to complete physical training. Other coaches believe that doing something really hard as a consequence of a bad decision will deter the athlete from making that same decision again. Both of these trains of thought can be appropriate. The magic question is for what? How do we choose which is most appropriate?

Be as specific as possible for mistakes that are tactical and consistent as possible for those that are non-tactical, says @clh_strength. Share on X

Be as specific as possible for mistakes that are tactical and consistent as possible for those that are non-tactical.

Tactical Mistakes 

  • Missed in-game free throws. Practice more free throws. Coach it up.
  • Fail to get the bunt down. Practice more bunting. Coach it up.
  • Missed assignment on defense. Go over mistakes thoroughly.

Non-Tactical Mistakes

  • Poor effort given on a play. Take away reps/playing time.
  • Showing up late to training/practice. Universal punishment to pay for one-time occurrence. Pattern results in harder punishment + talk about solving the issue.
  • Having a poor attitude/uncoachable. Take away reps/playing time.

Limitation: This gets to be really tough on a coach when your best player takes advantage of the knowledge that there is no one else skilled enough to replace them. This situation is unique and must be approached based on the coach’s knowledge and relationship with the player and understanding the current dynamic of the team. No advice can help you in this area, but you must make a plan to address it if you see it being a problem.

Mental Toughness Blueprint: Effective Solutions

Mental toughness is not an event. It is not a cog in the training program. It is not a section of the book that you pull out and check off your list. Mental toughness is the by-product and summation of every decision made in the entire organization. It is not just a “part” of the program—it is the entire program.

Mental toughness is the by-product and summation of every decision made in the entire organization. It is not just a ‘part’ of the program—it’s the entire program, says @clh_strength. Share on X

As I have heard multiple successful coaches say, tough athletes are bred from being smothered with standards and having a coach to guide them along the way. Nowhere to hide. No way to escape. I have 10 points that will get you headed in the right direction:

1. Know Your Players – Invest in Their Life and Build Trust

The best coaches get to know their players on an intimate level. Where do they come from? Who are their parents? What is their history? What drives them? What interests them?

When coaches have a full understanding of the psyche of each player, the picture becomes clear of how the machine is going to operate. When coaches invest in their players, it creates trust. Without trust, mental toughness will never be something that can be developed.

A common goal brings people together. When players understand that the coach’s goal is the same as the player’s goal, then ultimate trust can be achieved. The difficult part is understanding that the coach wants to win, and a lot of players want to win, but they also want to feel important. Coaches who make every role important have larger buy-in with their teams.

2. Have a High ROI on Time and Energy Investments

Coaches must be aware of where they invest their time and energy, and the return they get on those investments. One-rep maxes are a great example of this. Some coaches place a large stake in the 1RM and spend a lot of time on it. Can you determine how those 1RMs help your team win games? Is it worth the energy cost? What about the trade-offs?

You can apply these questions to everything, especially practice planning. Set yourself up to always ask yourself if the time and energy being invested is worth it and adjust along the way. It is a difficult moving target, but a necessary one.

3. Establish Standards – Be Unapologetically Demanding

Standards and expectations need to be set in order to orchestrate player growth. We do not want to be content with where we are, so we must challenge ourselves on where we want to go. Whether you are a team that has not made the playoffs in 10 years or the team that continues to win a high number of games but can’t get over the hump for a championship, taking the next step is relative. Standards must be something greater than a poster on the wall.

4. No Unclear Standards – When Mistakes Happen, Talk About Them

Coaches preach standards and may put them on a fancy graphic, but if they are vague, they will not be consistently met. For example, telling a team or a player that they need to get tougher, without explaining the context in which they are falling short, is a waste of breath. Players have responsibility in this, too. I have seen many players come to the sideline and ask, “Man, what did I do wrong?” Often, this is a cop-out for not taking responsibility.

Ignorance is the most common excuse I have heard from players. But sometimes, the player is not sure what went wrong. In that instance, players need to feel comfortable coming to coaches for clarity when things are not clear. This communication line is vital.

5. Uphold Standards Consistently – Love Them Harder Through It

Standards get lost in the weeds when they are not consistently upheld. In practice, if the standard is not being met, you need to address it immediately. Whether that is redoing a rep or having a player sit out momentarily because the effort level is not up to par for the day, action needs to be taken.

An open, honest conversation can be a powerful mental toughness tool, says @clh_strength. Share on X

Players need to know when they are not meeting the standard, and the communication needs to be open to help athletes meet that standard. If the standard is unrealistic, coaches will know as soon as they attempt to uphold it consistently. An open, honest conversation can be a powerful mental toughness tool. If players have agreed they want to be their best, and their actions do not reflect that, it needs to be communicated, often with consequence. The best consequence for an athlete is that they don’t get to participate until their actions reflect the goals of the team.

When players are upholding the standard, they also need to know that! Players get confused when communication is not present. This is the mantra “Coach them hard, love them harder” in action. Praise when done right, converse when done wrong. This cycle should happen over and over and over and over in every aspect of the program.

6. Be Intentional with Your Language – Promote Unity, Not Divisiveness

Language is where many coaches struggle with their communication. How many times have you heard a coach call a kid a piece of crap? Or tell them that they are a loser in a heated moment? I have seen multiple players take on this piece of advice: “Hear the message, not the tone.” Let me ask you this…does that also work in your marriage? Does that work anywhere else in life? That is such a poor excuse for terrible communication skills.

Your language needs to promote unity, not divisiveness. Coaching a player hard is not an excuse to make them feel unwanted or not a part of the team. Hard coaching needs to challenge players to get with the program, because we need them! Great cultures have players who uphold the standard because they will do anything to not let the team down. When addressing shortcomings, be intentional with your language.

7. Leave No Stone Unturned – Smother with Standards

We can’t just focus on practice performance and let everything else go. Athletes need to be smothered with standards in class, the community, the weight room, the film room, and the practice field/court. There must be a standard across the board, and coaches must have systems in place to hold players accountable.

Making players run more with zero substance will destroy trust. Give them resources and tools to be successful. Will the consequences have some physical punishment? Maybe. But the root of the problem must be addressed concurrently.

8. Your Players Are Not Stupid – Be Honest with Them

Players see through cliché bull crap. They will know when your standards are hollow and your words mean nothing. They may not say anything, but they know the difference. They see your actions every single day. Your words will not mean much if your actions are not in line with what you preach. Mental toughness starts with us as coaches. Players don’t buy into catchy phrases; they buy into people.

Mental toughness starts with us as coaches. Players don’t buy into catchy phrases; they buy into people, says @clh_strength. Share on X

9. Push Your Athletes – They Need to Know Their Edge

You will never know what a 10/10 feels like until you take it to 11. Resiliency is trained through repeated perseverance. This happens in the weight room. This happens at practice. This does not excuse poor programming or practice planning. The return on investment of energy must be high, and transference must be apparent.

Doing “death by squats” is not going to cut it. The kid who is your best squatter, but a bad player, will appear as “tough,” since toughness is revealed in specific tasks. What does this look like in the weight room? Tough sets. Not skipping reps. Details being met. Seeing effort on every rep asked. Turning in your sheet. Keeping your workstation neat as you leave. These are the qualities that will transfer to practice, not “death by squats.”

Mindless conditioning at the end of practice doesn’t cultivate this. Coaching really hard on reps that matter in practice does.

10. Be a Professional Failure

Kids are deathly afraid to fail. They do not want to be embarrassed and will go to great lengths to avoid it. Social media and the Internet allow for word to spread extra fast. Our head basketball coach said it best, “Our kids are most afraid of two things: getting dunked on or getting their shot blocked, and then posted on social media.”

Players today are more concerned with embarrassment than losing. Failing only hurts when an investment is made. When there is skin in the game, falling short hurts. Can you give your athletes a reason to invest and put skin in the game? Can you show them that failure is not as scary as it seems, but just a part of the growth process? If you can, you will see athletes attempt to run through brick walls for you and their teammates.

The Sum of Everything

Mental toughness is a characteristic trait that can happen organically or be manifested. It must be done with precision and consistency. Mental toughness is not an event, but a summation and result of all events that occur in the program.

Keep in mind that toughness is task specific, and that we can all look weak in certain situations. Conversations can be your most powerful tool if you use them properly. Always remember that players do not buy into programs, they buy into people.

Since you’re here…
…we have a small favor to ask. More people are reading SimpliFaster than ever, and each week we bring you compelling content from coaches, sport scientists, and physiotherapists who are devoted to building better athletes. Please take a moment to share the articles on social media, engage the authors with questions and comments below, and link to articles when appropriate if you have a blog or participate on forums of related topics. — SF


Pelvic Control Sprint

Better Pelvic Positioning for Better Sprinting

Blog| ByKyle Davey

Pelvic Control Sprint

Lumbopelvic control refers to the ability to control the position of your pelvis and low back in relationship to each other. There are times when an arch (lumbar extension) and a pelvic tilt are appropriate, and times when they are not.

As with all movements, the best-case scenario is when athletes have conscious control of and access to a wide range of movements through many degrees of freedom. I’m not saying we need to turn all our kids into Gumby or that all mobility is good mobility, but I don’t think anyone will argue against the notion that conscious control over an appropriate range of motion is an important quality for athletes to possess.

The pelvis and rib cage are of particular importance in sprinting, both from a performance and an injury prevention point of view.

Sprint kinematics are great that way. You don’t have to trade performance for health. Poor technique is slow and injurious, so as technique improves, the chances of getting hurt decrease AND you get faster. Win-win, and great selling points to parents and athletes alike.

You don't have to trade performance for health. Poor technique is slow and injurious, so as technique improves, the chances of getting hurt decrease AND you get faster, says @KD_KyleDavey. Share on X

Sprinters should focus on preventing an anterior pelvic tilt, specifically at max velocity. Tilting the pelvis anteriorly is thought to be a risk factor for hamstring injury, partly because it lengthens the hamstring group (since they originate at the ischial tuberosity, or the “sits bones”), and partly because of the negative effects the tilt has on kinematics downstream.

In my experience with youth athletes, anterior pelvic tilt is generally accompanied by greater horizontal displacement of the stance leg knee and less vertical displacement of the swing leg knee at toe off. In plain English: less knee drive from the swing leg, and the stance leg getting too far behind the athlete.

This is a pretty typical posture of backside mechanics, and most coaches agree backside mechanics are not ideal for developing or demonstrating speed. This movement strategy limits maximum velocity.

Most coaches agree backside mechanics are not ideal for developing or demonstrating speed. This movement strategy limits maximum velocity, says @KD_KyleDavey. Share on X

Pelvic Positioning
Image 1. Three runs each showing different positioning. Rows one and two are from the same session, demonstrating same-day change. Note the higher swing leg knee drive at toe-off and better femur position at touch-down in the second compared to the first row. The final row is from a session a few weeks later, continuing the progress.

Why Bother? Anterior Pelvic Tilt: A Linchpin

In my experience, anterior pelvic tilts are accompanied by all kinds of undesirable kinematic effects downstream. Perhaps most noticeable is a heel strike pattern.

I have heard coaches talking about athletes being over-rotated, but it took me a long time to realize what that meant.

The cycle of the swing leg is effectively cut short if athletes do not complete the rise to a nearly vertical posture at max velocity. Upright posture allows the knee to rise high, giving the foot time and space to swing through and then strike downwards at the ground rather than take a diagonal path from under the butt to the ground. The downward strike, in theory, generates the vertical forces necessary to sustain high running velocities, whereas the diagonal, signature backside mechanics foot path does not.

Without reaching the proper upright posture and pelvic position, it’s tough to get an appropriate knee drive, which compromises foot position and, in my opinion, flight time.

This is (what I think) is meant by the term “over-rotated.” The athlete is rotated forward, stuck in an acceleration posture.

Swing Leg
Image 2. Note the forward-rotated look of the top compared to the bottom images. Also note the difference in swing leg knee drive at toe off and swing leg femur position at touch down, yet again.


Another consequence of the foot hitting the ground prematurely, before it has had the chance to plantar flex, is a heel strike. The image above demonstrates this beautifully.

Heel striking used to be one of the first things I looked for when analyzing film. It still is, but now I recognize it as a symptom of a bigger problem rather than the problem itself.

More times than not, the heel strikes I see are the result of an incomplete rise, which is often (but not always) accompanied by an anterior pelvic tilt.

If you’re having trouble understanding why the tilt interferes with rising to a vertical posture, then stand up, tilt your pelvis as far forward as possible, and try and stand up straight. It ain’t comfy. Or natural feeling. And your low back will probably bark at you for a few moments after.

Once this is cleaned up and athletes are able to maintain a more neutral pelvis and reach a completely risen posture, these issues tend to evaporate away.

That’s when I point them out on film, and that’s when I get athlete buy-in. Up until that point I’m being nit-picky about what seems obscure to most kids—which way the waist is pointing—but once they see that they’re no longer heel striking and their knee is higher, and they feel how much smoother the run itself feels from this posture, they understand there’s a method to madness and I earn their trust.

Quantifying Backside Mechanics: The Kickback Method

In my opinion, measuring anterior pelvic tilt with any degree of validity and reliability requires advanced tech that most practitioners don’t have access to, like IMUs. While it’s fairly easy to spot improvements—i.e. a more neutral, less tilted pelvis—using the iPhone slo-mo film method, good luck accurately measuring pelvic tilt in degrees by using your still shots. And even for those of us who do have IMUs, analyzing the data costs us our most valuable asset: time.

Instead, we can use a proxy and quantify backside mechanics as a whole, understanding that pelvic position isn’t the only factor, but that it is a big one.

Backside mechanics are often discussed quite nebulously. Once you understand what they are, you can never un-see them, but quantifying and measuring them to track progress and have data to discuss hasn’t always been easy. For the analytical minded, this doesn’t sit well.

Here to save the day: the kickback method.

The kickback method provides a score for each stride. Higher scores indicate more frontside mechanics, lower scores indicate more backside mechanics.

To calculate this score, take the angle of the femur of the stance leg at toe off, then take the angle of the same leg at touch down, and add them together. I recommend computing the kickback score for a few strides on different runs so you understand if your athlete is fairly consistent or if there is a lot of variability from stride to stride.

Over time, you want to see your backside dominant athletes increase their kickback score, indicating they are transforming to a frontside mechanics sprint strategy.

Kickback Test
Image 3. The kickback score is calculated by adding the hip angles at touchdown and toe-off in the same leg. Higher scores indicate greater frontside mechanics. For instance, the athlete on the top half of the picture boasts a score of 168, while the athlete on the bottom scores 133.

It’s All in the Hips: The Jurdan Test and Range of Motion Prerequisites

Technique changes can happen in one session, but this assumes the athlete has the necessary hip and pelvic range of motion to enter these archetypal postures in the first place.

How can we screen for this? Enter: the Jurdan test.

Named for its creator, a Spanish physiotherapist named Jurdan Mendiguchia, the Jurdan test places the athlete into the proper max velocity pelvic position and tests range of motion of the swing leg knee and the stance leg hip in that position.

It’s easier to demonstrate than to explain.

Jurdan Test
Image 4. The Jurdan test. A score is calculated by subtracting the top leg shin angle by the bottom leg thigh angle. This athlete’s scores in this position is calculated as 53 – (-11) = 63. Note how similar the position looks to max velocity mechanics when rotated 90 degrees.


The setup here is important. The athlete needs to keep their lower back planted firmly into the table, ensuring the pelvis is not tilted anteriorly. From there, the front leg thigh is set at plumb-vertical (by you), and the back leg thigh is allowed to hang freely off the table. The athlete is instructed to extend the front knee as far as comfortable while allowing the bottom foot to passively reach for the floor as much as possible, all while keeping the low back pressed into the table (no pelvic tilt).

Snap a picture and save it for later analysis. This test is also quantifiable, using the formula explained in the caption.

If an athlete doesn’t have enough hip extension when the pelvis is neutral, then what do you think is going to happen when they sprint? Of course the thigh has to travel behind the center of mass when sprinting, so if there isn’t enough range of motion at the hip to allow that to happen while maintaining a neutral pelvis, then the pelvis has to tilt anteriorly.

If an athlete doesn't have enough hip extension when the pelvis is neutral, then what do you think is going to happen when they sprint?, asks @KD_KyleDavey. Share on X

This is the lower body version of the rib cage flaring during an overhead press due to limited shoulder range of motion. The body is going to figure out a way to get that arm up there, and if it can’t get enough motion from the shoulder, it will steal it from the thoracic spine to accomplish the goal.

This is important for you to understand as a practitioner, because asking an athlete to execute a movement they don’t even have the passive range of motion for is like asking an F-350 to have the turning radius of a Smart car—it just ain’t gonna happen.

In my experience, however, most youth athletes do have the mobility, they simply lack the motor control. They have the potential to move and control their pelvis, they just don’t know how yet.

Teaching Proper Positioning: A Two-step Process

The simple formula for getting a youth athlete to maintain a proper pelvic position while sprinting is to:

  1. Give the gift of basic motor control around the pelvis
  2. Develop strength and endurance in the proper position
  3. Challenge motor control in tasks of escalating demand

How long can you hold the posture? How much force/tension can you withstand before deviating from it?

Conceptualizing movement (or lack thereof, since we’re talking about preventing unwanted movement) in this way encapsulates both the muscular prerequisites and the motor control demands. Without both, the movement fails.

In the case of pelvic posture while sprinting, the question becomes: how fast can you run, and how much fatigue can you endure before your pelvis dumps forward and you revert to a backside mechanics strategy?

How fast can you run, and how much fatigue can you endure before your pelvis dumps forward and you revert to a backside mechanics strategy?, asks @KD_KyleDavey. Share on X

These are great questions, but the biggest question of all remains: how do you “fix” an anterior pelvic tilt apparent in a youth athlete sprinting?

Here’s the full progression I use to take a kid from no idea what a pelvis is to owning that bad boy at max speed. There’s four basic categories I believe are major players: thoracic dissociation, pelvic dissociation, strengthening the posture, and challenging motor control. The progression works its way through each of these categories sequentially. Hence, why the exercises are numbered: they’re ordered from least to most challenging within their category.

I’ll preface this further by saying not every athlete needs to start at the beginning of the progression. It all depends on their current motor awareness and what qualities they lack. But, you have to know the rules before you break the rules, and understanding why this list is ordered the way it is and why each category contributes to pelvic control is knowing the rules.

Thoracic Dissociation

In the world of human movement, dissociation means moving one part of your body without moving another. Thoracic dissociation, in this case, means moving the t-spine with minimal lumbar spine or pelvis movement. In other words, thoracic dissociation means holding the pelvis still—not tilting anteriorly—while the spine moves. These drills build the awareness necessary to do that.

1. Thoracic Anterior / Posterior Glides, seated
2. Thoracic Anterior / Posterior Glides, standing


Video 1. Thoracic Anterior / Posterior Glides, seated.

Video 2. Thoracic Anterior / Posterior Glides, standing.

The goal here is to achieve spinal movement in the sagittal plane, both forward and backward. Not just rounding and arching, but translation of the spinal column anteriorly and posteriorly. I don’t profess to be the best in the world at this, but you can see my spine moving in front of and behind my waistline as I go through these motions.

If you see the pelvis tilting anteriorly as the chest moves anteriorly, and vice versa, that’s no good. The pelvis should remain relatively motionless throughout this movement. Again, I’m not the greatest in the world, but not the worst, either. You get the idea.

Pelvic Dissociation

Pelvic dissociation means moving the pelvis without moving the spine. These drills bring awareness to what it feels like as well as the basic ability to consciously move the pelvis. You’d be surprised how many athletes can’t nail these simple movements the first time they try them.

Once they know what it feels like to tilt anteriorly, they can recognize when they are tilted anteriorly, and once they know how to control the pelvis and tilt it posteriorly, they have the groundwork laid to maintain a good pelvic position while sprinting.

3a. Pelvic Anterior/Posterior Tilts

3b. Pelvic Lateral Tilts


Video 3. Pelvic tilts.

I labeled the lateral tilts 3b rather than 4 because this movement isn’t required to control the pelvis in the sagittal plane, per se, but the more control over all degrees of freedom one has, the better.

Once an athlete has conscious motor control and sensory understanding of these movements, they are ready to move on to strengthening the posture, since they can actually get into the right posture now.

Strengthening the Posture

I love the deadbug progression. When executed well, it’s a great way to lead athletes towards owning pelvic position while sprinting.

The trick with the deadbug is to posteriorly tilt the pelvis as far as possible and depress the rib cage at the same time, essentially entering a hollow body position. If either of those two movements are not occurring, the athlete will not feel challenged at all. You’ll know this is happening if they’re looking up at you from the floor with a look that says “you’re crazy” or “I must be missing something.”

You’ll notice that exhales are the progression for each exercise. Don’t underestimate this part. Looks and sounds silly, I know. But if you exhale all the air you can and forcefully depress your ribcage at the same time, I guarantee your abs will light up.

Plus, the exhale helps the athlete depress the ribcage. Use it as a teaching tool when kids have trouble with that movement.

4. Deadbug Level 1: Feet on ground
5. Deadbug Level 2: Feet on ground, forceful exhales


Video 4. Deadbug Levels 1 & 2.

6. Deadbug Level 3: Hands + knees in air
7. Deadbug Level 4: Hands + knees in air, forceful exhales


Video 5. Deadbug Levels 3 & 4.

8. Deadbug Level 5: Marching
9. Deadbug Level 6: Marching with forceful exhales


Video 6. Deadbug Levels 5 & 6.

10. Hollow body holds


Video 7. Hollow body holds.

Challenging Motor Control

Now that your athletes know what a neutral pelvis feels like, how to get there, and has built some strength and endurance in that position (or at the very least, reinforced the motor pattern with strengthening exercises), now it’s time to put it to use. Now we move.

11. Ankle dribbles, walking 2x25m


Video 8. Ankle Dribbles.

12. Calf dribbles, walking 2x25m


Video 9. Calf dribbles.

13. Dribble runs, 2x25m


Video 10. Dribble runs.

14. Skips, 2x25m
15. Standing hop knee lifts, 2×12 reps
16. Standing hop knee lifts (traveling), 2x15m


Video 11. Standing hop knee lifts.


Video 12. Standing hop knee lifts (moving).

17. 30m buildup to ~70% top speed, 1 rep
18. 30m buildup to ~80% top speed, 1 rep
19. 30m buildup to ~90% top speed, 1 rep
20. 30m buildup to ~100% top speed, 1 rep

Considerations

This progression encourages the motor and sensory competencies necessary to maintain proper upright sprint postures and then challenges those postures in movements of ascending intensities clear up through buildup runs. It grabs an athlete by the hand and walks them along from basic mobility work to max velocity sprinting. The small, incremental increases in challenge is why it works.

As mentioned previously, no, I don’t take every athlete through all 20 drills on this list. Not all need that. For some, simply seeing the film and doing a few pelvic tilts and deadbugs to build sensory awareness has done the trick. For others, that hasn’t. This is where the art of coaching comes in.

You may consider making this progression an entire session, or at least the start of the session. Heck, you could integrate this into your warmup, or begin it after the warmup. Consider it an introduction to max velocity mechanics. You’d be laying a great foundation for growth in your kids by doing so. If you work with younger athletes—middle school or below—your primary job is to build a foundation anyways. Take the time to do it right.

Wickets are also an extraordinary drill. The self-organization they force often results in better pelvic positioning immediately. It’s beautiful when this happens: you don’t have to say anything, you just throw some obstacles on the track and bam, it happens.

Of course, it’s a little more calculated than that—but not by much. My bias is that the highest level of mastery comes with sensory awareness, so even if wickets do produce instant changes, I’d still seek to pair them with the sensory drills above. Nonetheless, this tiny paragraph doesn’t do wickets justice—know that many athletes respond well to them and they can thus be a powerful tool when implemented well.

Lastly: film, film, film. Know what to look for, and show the athletes so they see it. You need their buy-in. When they do get it right, they’ll say it feels smoother and less effortful, like they’re gliding over the ground.

That’s when you’ll know you’re doing great work.

Since you’re here…
…we have a small favor to ask. More people are reading SimpliFaster than ever, and each week we bring you compelling content from coaches, sport scientists, and physiotherapists who are devoted to building better athletes. Please take a moment to share the articles on social media, engage the authors with questions and comments below, and link to articles when appropriate if you have a blog or participate on forums of related topics. — SF


Horse Speed

Studying Animal Locomotion to Build Better Athletes with Céleste Wilkins

Freelap Friday Five| ByCéleste Wilkins

Horse Speed

Céleste Wilkins is finishing her Ph.D. looking at the dynamic technique of competitive equestrian dressage riders at Hartpury University in the U.K. Her research has applied new technology and dynamic analysis to the traditional sport of equestrian dressage. Outside of the Ph.D., she has collaborated on several horse and rider biomechanics projects and has coached riders to explore their unique technique.

Freelap USA: Low back pain is often due to fatigue and load tolerance. The uniqueness of saddle design, the skill of the rider, the hours on a horse—how does that all relate to the screening and other variables you have analyzed in your research? Low back pain in riders is common, and it’s a complex topic. What is your main strategy in reducing injury in equine sports?

Céleste Wilkins: You’re right—it’s a complex topic! The excellent work my collaborator Isabeau Deckers recently published showed that competitive riders are suffering from back pain, and you can identify its severity with screening tools.

Many riders really focus on keeping their horse at peak performance but neglect their own health. I think a lot of it has to do with riders’ self-perception—many don’t consider themselves an athlete, so they don’t necessarily consider their own training or employ strategies to reduce their own injury. We actually have a very small evidence base from which to train and treat riders, not even mentioning equipment design. To the untrained eye it may look like riders are all doing the same thing, but my Ph.D. research has shown that riders have distinctive strategies for how they absorb the horse’s movement.

It may look like riders are all doing the same thing, but my Ph.D. research has shown that riders have distinctive strategies for how they absorb the horse’s movement, says @misscwilkins. Share on X

In dressage we’ve assumed for many years that we should be aiming for a “neutral” pelvis to sync up with the horse and reduce back pain during riding, but my recent study showed that few riders actually achieve this. I think we need to zoom out and consider what the rider’s entire body is doing to sync up with the horse and go from there. Just like any other sport, I would say that the main strategy to reduce injury is to consider each horse-rider pair as an individual and do a really thorough assessment.

Freelap USA: Coaches struggle to analyze running mechanics with two legs, but four seems to be a bigger challenge. How do you look at the entire body to better understand locomotion? Is it as simple as watching the legs move or can coaches learn to see how the entire body works in harmony?

Céleste Wilkins: We have an amazing ability to perceive patterns as humans. Certainly coaches/judges/riders see more than just the legs in motion; they assess the whole horse and the effect of the rider, too. From a research perspective, we are learning more and more about how horses move and the factors, like head/neck position, back pain, or fatigue, that influence how the horse’s limbs move.

As we’re working with an animal, we also have to consider welfare: Is the horse ready to accept the weight of the rider, and how will that impact its gait? I’m excited because that is the topic of Isabeau Deckers’ Ph.D., so we will hopefully have some answers in the years to come.

Also, the rider’s skill can come into play: they can either regulate the horse’s gait or destabilize it. Judges can identify and agree on novice or poor performance, but when it comes to identifying the rider factors that detract from performance at the higher levels, judges can be equivocal. That’s because the problem is so complex—individual horses may tolerate higher levels of imbalance or react differently to the rider’s cues—so one horse may move differently ridden by one or another rider.

Intuitively, riding coaches can pick up on this, but I think the real challenge is identifying where changes can be made within that horse-rider pair to increase the performance and the impact of these changes, especially when we’re talking about marginal gains. We’re starting to see a lot more assessments of horses and riders using motion capture and sensors for performance and in conjunction with some of the analytical tools that I have used in my Ph.D. to find patterns in movement and quantify coordination. I see real potential to increase horse-rider performance but keep the horse’s welfare in mind.

Freelap USA: When analyzing locomotion, how do you look for possible errors in teaching versus movement expression? Often trainers have a personal style that may not be ideal for the horse. Do you see horses with any technique issues from trainers, or is it so ingrained they are able to rise above any artificial intervention? It seems that animals have less movement strategy variation than humans.

Céleste Wilkins: I think we must acknowledge how impressive horse training is in the first place. The rider sits on the animal, can’t see the horse, can’t give verbal instructions, and instead must use their hands, legs, and weight pressure to ask the horse to change its gait, bend in its body, etc., and instead of seeing the response, they must be so in tune with the horse that they can feel whether it’s right or not. It’s like coaching an athlete in a foreign language with your eyes closed. The only difference is that the horse’s flight instincts are so developed that, in the middle of your drill, they might see something that looks predatory and zoom off, potentially injuring you.

I think we must acknowledge how impressive horse training is in the first place…It’s like coaching an athlete in a foreign language with your eyes closed, says @misscwilkins. Share on X

The movement expression certainly underpins the performance, and horses are bred for their gaits. But the rider must train the horse to channel its movement into the elements of the test, such as side-stepping or variations within the gait. Intuitively, riders know when their personal style may not fit an individual horse, which is why we try a lot of horses when we go horse shopping.

One element of rider skill is certainly being able to stay on the horse, but the real skill is being able to adapt to an individual horse’s movement pattern and personality and understand its unique biomechanics to get the best performance out of it. A lot can go wrong—riders can rush the horse out of its rhythm or create tension—so that all-important “feel” is a real skill.

Freelap USA: Rider posture and pelvic position is another topic that relates to other sports. It seems that the static posture of riders doesn’t have a relationship to performance, yet you have seen movement screens in your other research show up as possible ways to flag poor capacity for movement. What is a good way to look at rider posture for health and performance? Just not worry about it?

Céleste Wilkins: I think we need to move away from “rider posture” to “rider technique.” Riders can sit a certain way in the saddle when the horse stands still but move drastically different once the horse gets moving. As riders use their hands, legs, and seat to cue the horse, their technique can be really specific to a type of movement or even a certain horse. I think this makes the rider’s capacity for movement even more important, and we should certainly be worrying about it, although it adds in a layer of complexity.

So, as difficult as it is, any assessment of the rider should be dynamic and reflect the rider’s own underlying biomechanics (with, for example, a functional movement screen) but also the combination of horse and rider. Additionally, just as in any sport, some riders can achieve the same goal (e.g., sitting trot) with what we would consider really suboptimal biomechanics—for example, a very anterior or posterior pelvis—but not suffer back pain or poor performance. It just works for them.

…watch the horse and rider in motion and assess the rider off-horse with a dynamic screening, but also consider the rider on an individual basis and go from there, says @misscwilkins. Share on X

Therefore, I think the best way to look at rider posture for health and performance is to watch the horse and rider in motion and assess the rider off-horse with a dynamic screening, but also consider the rider on an individual basis and go from there.

Freelap USA: How has the human sports world helped you become better? While coaches can learn so much from equine sports with regard to training and recovery, how has the world of bipeds helped you?

Céleste Wilkins: As equestrian rider biomechanics is a really developing field, everything that I have done in research and in practice has come from the world of human sports biomechanics and training. There are some amazing minds in sports biomechanics and strength and conditioning, and by describing the movement of the rider in conventional biomechanical terms, I’m hoping we can attract more interest to the equestrian sports to help riders develop as athletes.

On a personal level, I’ve pursued a lot of opportunities to learn about how the human body can be trained and its underlying structure and function. Pre-lockdown 2.0 (in the U.K.), I started learning the finer details of Olympic lifting, and I feel that these training opportunities have given me a lot of empathy for our horses. Sometimes we expect a lot out of our horses in training, without considering their motor development, fitness, or progression. I think all riders should try to pick up a complex new movement skill and engage with blocks of high-intensity strength or conditioning training, not only to become fitter and more resilient, but to understand the physical and psychological demands that they place on their horses during training and competition.

Since you’re here…
…we have a small favor to ask. More people are reading SimpliFaster than ever, and each week we bring you compelling content from coaches, sport scientists, and physiotherapists who are devoted to building better athletes. Please take a moment to share the articles on social media, engage the authors with questions and comments below, and link to articles when appropriate if you have a blog or participate on forums of related topics. — SF


Athlete Stiffness

Enhancing Speed with Plyometrics

Blog| ByBrendan Thompson

Athlete Stiffness

The recent surge in high-intensity training modalities such as sprinting, jumping, and other explosive activities has helped shift the training paradigm in a positive direction from a big-picture standpoint. More coaches are abandoning less useful training alternatives for maximal sprinting and plyometrics (plyos) in the pursuit of improving speed qualities. These qualities include stiffness, speed, power, reactive measures, and increasing the potential of the central nervous system (CNS) overall, among other important components. This is great, and I hope more coaches will continue to explore these effective, more applicable methods of training.

With this trend, we have also seen a sharp increase in teams doing “stuff” in pursuit of these favorable traits. By “stuff,” I refer to any array of various plyos grouped together with arbitrary doses, minimal precision, and little information as to what they’re being used for. Some coaches use them for active recovery, others use them to stimulate, and I’ve even heard some coaches say they just use them to fill time doing something athletic. Again, I’m extremely pleased that teams are using plyos more, and I hope that they will continue. However, as they continue using this approach to develop stiffness and other traits, I hope that coaches can become more tactful in what they choose to incorporate in their plyo programming as well as how to go about it.

It is one thing to throw random plyo activities together, and it is quite another to pick and choose very specific ballistic exercises to pursue various movement qualities in your athletes. Share on X

It is one thing to throw random plyo activities together, and it is quite another to pick and choose very specific ballistic exercises to pursue various movement qualities in your athletes. Additionally, being able to properly coach and assess the plyos you choose is vital to achieving the goals you’ve set. While it would be great if it was as simple as picking X exercises and having athletes perform arbitrarily for Y dosage, I personally believe that it is much more complex than that. The goal of this article is to provide insight into plyo prescriptions, how different types of plyos address different aspects of sprinting, and how you can be more thoughtful in making choices when implementing them in your programming.

What Are Plyometrics?

When I was in elementary school, I remember going out to recess to play any array of games on a given day. Sometimes it involved hopscotch, jump rope, kickball, tether ball, red rover, racing, catch, and much more. We used to climb all over the playground and jump from various heights to the ground. Children skipped around in all directions, played freeze tag, and did backflips out of the swings.

There is an unfathomable number of activities children perform at recess and during physical education that improve a variety of qualities related to development. All of these jumps, hops, skips, turns, throws, and other athletic feats would be considered by many to be plyometric activities.

While plyos are routinely referred to as jump training, the term “plyo” seems to encompass a broad spectrum of ballistic movements. The definition allows us to get a better understanding of the infinitely massive permutations of exercises we can string together to constitute a plyometric workout day. Coaches routinely use them all over the world to develop seemingly all facets of athleticism across sports and performance. Plyos are also often used as a substitute when athletes don’t have the physical capacity to fully participate in practice on a given day. The utility of plyos is endless, which is a good thing in most cases, but it can present problems when deciding which to include, which to leave out, how to coach each, and how to progress them appropriately.


Video 1. The biggest mistake with hurdle jumps is a lack of projection forward and up. Too high of a hurdle and too long a response time will render this exercise an optical illusion instead of a valuable means to gain explosive strength.

What Is Speed?

Speed is a conglomeration of performance qualities that cycle in and out during any given sprinting repetition. These traits may come from a genetic predisposition, environmental factors, positional habits, and/or tissue loading, along with other stresses and adaptations that may occur throughout an athlete’s lifespan and training experience. Not every stimulus positively correlates to enhancing the coveted qualities related to sprinting, but knowing what qualities you’re after may help you become more strategic with the way you choose training stimuli over time.

What Does It Take to Be Fast?

For an athlete to build up to and maintain max speed requires immense power, coordination, body awareness, endurance, and strength, among other things. Developing the components to produce force is one thing that many athletes do extremely well, whether by sprinting frequently, jumping, bounding, or lifting weights. While producing force is great, it is another thing for the body to be able to orient that force, withstand the force, and preserve it throughout any given sprint effort.

Elastic properties, tissue stiffness, the ability to contract and relax muscles in rhythmic sequences, and the loading capacity for structures in the body become pivotal in achieving mechanical success. As the foot strikes the ground with a downward force, a ground reaction force (GRF) of equal magnitude and opposing direction is imposed on the body through the foot. If the foot does not have a good balance of the characteristics listed above, it may collapse under the pressure, resulting in a suboptimal force transmission from the ground through the body. This presents a problem in withstanding and preserving forces over the course of sprinting.

What is more interesting is that this phenomenon is not limited to the foot and ankle, but also happens to the knee, hip, pelvis, spine, and more. Collapse may be attributed to a lack of any number of the qualities listed above and may be improved upon with strategic implementation of plyometric exercises.

This collapse is problematic because we get a fraction of the energy return on our initial investment to help propel us forward, upward, laterally, rotationally, and essentially any direction you can imagine. This decreased return means that we will have to work harder to move faster when sprinting, which again is an issue. The goal of sprinting is to get from A to B as fast as possible, which means we need to maximize efficiency in the A to B direction while minimizing energy bleed and consistently build momentum rather than stop it.


Video 2. Simple, repeated broad jumps and alternating bounds are excellent training and testing exercises because they don’t require any technology to show improvement. Plyometrics just “sprinkled” in or added without purpose are just as foolish as random lifting and sprinting programs.

Plyometrics as a Sprinting Solution

Okay, so now that I’ve presented these problems, it is time to circle back to plyos and the role they can play in sprinting development. Before I dive in, I want to preface this section by saying that nothing will replace max-velocity sprinting. Speed determines an athlete’s ceiling and directly influences speed reserve, a frequently visited topic. While plyos are an extremely effective training modality to complement various components related to sprinting, I do not believe they are as effective at improving max speed as sprinting itself. With that, I begin…

Stiffness

When an athlete sprints and they have prolonged ground contact times (GCTs), I would immediately check out some simple plyo drills to assess stiffness. Stiffness, to me, is the ability of the joint to withstand force eccentrically on ground contact and maximally transmit these forces (GRFs) in a meaningful direction. It is worth noting that I watch for these impairments throughout the warm-up and my never-ending assessment, but I understand that it is not always easy to catch on to these subtleties without video or in a large group setting.

When an athlete sprints and they have prolonged ground contact times (GCTs), I would immediately check out some simple plyo drills to assess stiffness, says @BrendanThompsn. Share on X

Ankle

Plyos that I’ve found useful in addressing ankle stiffness are typically instructed by me to minimize GCTs while maximizing vertical and/or horizontal displacement. An athlete who appears to spend a lot of time on the ground with these may benefit from smaller amplitude plyos initially and gradually begin to explore larger amplitude variations. An example of this would be to start with small ankle hops in place, progress to moving forward, backward, and laterally, and then graduate to medium ankle hops with similar progressions.


Video 3. Stiffness comes from controlling joints and creating projection. Moving up and down without the right coordination only helps so much in sport.

I have also had a lot of success with 6 to 12 o’clock line hops as well as 3 to 9 o’clock. With mastery of each exercise above, you can progress from two feet to one foot, small to large amplitude, different directions, variable patterns (right, right, left versus left, left, right), and more. The beauty of plyos, as previously stated, is that there are so many to choose from, but what is often undervalued is the degree with which you can vary any single exercise to continue raising the bar.

Knee and Hip

When we get to the knee and hip, I tend to attack with a similar strategy (low amplitude to high amplitude), with the eventual addition of exposure to higher velocity impacts. What I mean here is that, unlike ankle hops that rely on gravity to get you back to the ground, these knee- and hip-oriented plyos require active muscular acceleration of the limb into the ground in addition to gravity. I like variations of knee tuck jumps, rocket jumps, hop-hop-vertical continuous, hop-hop-vertical-pause, hurdle hops, depth jumps, incorporating hops into medicine ball throws, bounds for height, and more of the same.

Trunk

For low levels of trunk stiffness or a tendency to bend in the spine, I find it useful to incorporate various arm positions during the exercises to better recruit the paraspinals. Arms overhead during drills, sprints, wicket runs, etc. helps promote an upright posture without excessively cueing trunk extension. We want an optimal amount of recruitment, not to swing the issue in the other direction.

The difference with the paraspinals is that they do not inherently produce much movement and subsequent force, whereas the muscles surrounding the joints of the extremities do. This means it could be of greater benefit to additionally work these muscles in the weight room with back extensions emphasizing neutral spine versus extended spine. Ideally, this helps develop a higher level of tone, endurance, and capacity to transmit force through the spinal column that will again minimize energy bleed that may occur between each spinal segment.

Core development may be a good complement to the paraspinal work, as the body’s natural corset consists of a variety of muscles working together to stabilize the trunk during extremity movements. There is a general rule of movement that requires optimal proximal stability in order to achieve distal mobility. In other words, the better the core stability, the easier it will be to move the extremities.

Wrap Up Stiffness

It would be impossible for me to list every plyo that can address these insufficiencies, so these are just a few approaches and progression tips that I have had success with, in terms of addressing stiffness-related issues. Not all of these are practical to perform unilaterally, such as hurdle hops, which can be subbed out for wicket hops. Also, ensure that you begin with a lower volume of plyos initially, then increase plyo density over time. Many jumps and variable landings tend to aggravate the lower legs if overdone.

The beauty of plyos is that there are so many to choose from, but what is often undervalued is the degree with which you can vary any single exercise to continue raising the bar. Share on X

Extensive plyos are great, just be wary of how many you choose to implement and the way you implement them. Have sensible progressions that start with generally lower difficulty and gradually expose the athlete to higher plyo demands over time.

Power

Whether producing force vertically or horizontally, there is undoubtedly a demand for immense power during sprinting. Many athletes have high force development capacity, but the rate with which they recruit it is often too slow or the process is rushed. In my experience, this is most notably seen in the acceleration when athletes pitter-patter across the turf with choppy strides and relatively shorter GCTs. The problem is that, initially, acceleration actually demands longer GCTs in order to give the athlete time to produce more force and create displacement. So, knowing these things, we can look to reproduce those similar traits through plyos to address the issue.

Acceleration

The options are seemingly limitless, but here are a few things that I use frequently. It is worth noting that you can perform these with or without wearable or other external resistance to increase the force demands of the plyos. I like to use a variety of plyos for distance in a series consisting of broad jumps, triple broad jumps, continuous broad jumps, single leg bounds, alternating bounds, skips, medicine ball throw variations, resisted sprinting, and more.

If you do not have access to variable resistance, you can find a hill or stairs. The steeper the hill, the longer the GCTs typically, as athletes require much more force to perform successfully. As the athlete gets a general skill acquisition, it is important to revisit sprinting on flat ground without resistance to influence carryover. It will not always click right away, nor will they always carry over perfectly, but gradual exposure to activities that mimic the demands of acceleration may influence a shift in the right direction.


Video 4. Speed bounding is useful for athletes who want to merge horizontal speed and leg power. Limb velocity is a popular topic, but without actually challenging ground reaction forces moving fast may not get you faster.

Top Speed

Max-velocity sprinting requires forces to be oriented more vertically with faster GCTs while also generating lots of power. We went over plyos oriented toward developing stiffness that influences GCTs and efficiency above. Any combination of those plyos, in my experience, will improve various aspects of max-speed sprinting. Additionally, looking at a lot of the acceleration-oriented plyos, we see that the focuses are on horizontal displacement and long GCTs.

We can use an array of the same plyos and emphasize vertical displacement instead of horizontal to apply more specifically to max sprinting. I typically use a combination of various vertical jumps and throws, skips for height, bounds for height, etc. Another creative way to make the plyo velocities faster, particularly when stationary and in a safe environment, is to perform them with a band, partner, fence, or rail assist. This decreases the bodyweight demands for the activity and allows you to work a different aspect of the force-velocity curve.

Other

Plyometric creativity is not limited to sprinting, and I would argue that it is worth exploring in nonlinear activities as well. I’ve had success experimenting with lateral plyo work with baseball players to help their push leg with batting, throwing, fielding, base running, and stealing. I’ve had similar success combining aspects of lateral, rotational, and linear activities to help multidirectional components in ball sport athletes. While it is easy to look at an exercise as being one-directional or one-dimensional, there are plenty of ways you can alter it to make it applicable to a task the athlete needs to improve in.

Plyometric creativity is not limited to sprinting, and I would argue that it is worth exploring in nonlinear activities as well, says @BrendanThompsn. Share on X

Instead of “Stuff,” Be Strategic

When it comes to plyos in sports and performance, we often see coaches and athletes doing “stuff” rather than any goal-oriented activities. Coming up with “stuff” to do is easy; devising a strategic progression of plyos to target insufficiencies and sport demands is difficult.

First, you have to know what the sport or activity requires, as this will ultimately help you understand the options you have to address different components. Then, it helps to know what to look for when evaluating. This allows you to identify what component(s) you want to assess and begin the critical-thinking process. Next, make sure that you start the plyo at an appropriate level. While initially it may seem extremely basic and simple, it is better to test the lower levels out prior to progressing to upper level activities.

Lastly, don’t be afraid to get creative. No, I don’t mean our favorite NFL stars juggling colored sticks on a BOSU Ball creative. I mean that plyos have a seemingly infinite spectrum of variations that you may find useful both in isolation and in combination. Conversely, there is also beauty in simplicity and sticking to the basics. Start with your progressions, and based on what you see, you should feel comfortable branching out accordingly.

Since you’re here…
…we have a small favor to ask. More people are reading SimpliFaster than ever, and each week we bring you compelling content from coaches, sport scientists, and physiotherapists who are devoted to building better athletes. Please take a moment to share the articles on social media, engage the authors with questions and comments below, and link to articles when appropriate if you have a blog or participate on forums of related topics. — SF


High School Hurdles

Seven Training Considerations for High School High Hurdling

Blog| ByGraham Eaton

High School Hurdles

Running nearly full tilt over a row of 5 or 10 barriers is, without a doubt, one of the most challenging events in track and field and possibly all of athletics. It requires hours of extremely technical and specific training to address individual style and flaws. In spite of this, I believe the training for hurdles at the high school level still needs to be extremely varied, with multiple modes of training. It is also crucial to place the emphasis on creating a better athlete who develops an instinctive feel for the event in addition to their technical proficiency.

In this article, rather than rehash purely technical aspects of the hurdles, I want to highlight some training nuances and methods that can complement the skill of hurdling.

Hurdlers Are Sprinters First

Hurdlers might not always be top-rate sprinters, but they should not be a far cry from a 4x100m relay athlete either. I still see lots of hurdlers train in isolation from their open sprint teammates. This is fine with a hurdle coach on staff who weaves the two worlds together. Without a reserve of speed, a hurdler will not reach their potential.

Hurdlers might not always be top-rate sprinters, but they should not be a far cry from a 4x100m relay athlete either, says @grahamsprints. Share on X

Elites blaze down the track at speeds upward of 9 m/s! To achieve these speeds with truncated stride lengths means that these guys are pretty fast. I have seen charts (that I cannot seem to find anymore) placing 100m to 110m hurdle estimated conversions in the ballpark of:

Developing: +3.5 or greater

Advanced: (H.S.) +3.0

Elite: +2.5

For the 400-meter hurdles, Jimson Lee places the estimated conversion for a high school hurdler at about five seconds, and the personal bests of elites are even lower, in the 1.5- to 3-second range.

This means that high school state champion hurdlers are at least running in the low 11s and high 50s for the open races (and in some states, obviously much faster). Becoming faster and generally more coordinated begets improvements in the hurdles.

If the hurdler already has shown that they’re reasonably skilled, I see nothing wrong with putting the sticks aside and spending some time in the off-season/summer making speed the priority. Even in season I would suggest continuing to work acceleration and maximum velocity twice a week in conjunction with the hurdle work.

On some early season days, coaches can have hurdlers do half of the main sprint session with the sprinters, cut them early to do hurdle warm-ups/mobility, and then join them for a hurdle session. As the season wears on, you can let the hurdle work do the talking as the main course but give them a well-rounded menu of sprint work first.

Hurdle Mobility

There’s only so much hurdling a hurdler can do. Hurdle mobility, while boring and somewhat repetitive, is the base of the hurdler. If there is one thing a hurdler needs as much as speed and skill, it is durability. Most coaches have a circuit or exercises they use. You do not need a huge catalog of mobility drills, since you are trying to keep the athletes healthy and not necessarily entertained.

If you are trying to train specific ranges of motion, then athletes need to be held accountable for executing the drills correctly. I am not going to give a comprehensive list here because coaches may have their favorites.

If you are trying to train specific ranges of motion, then athletes need to be held accountable for executing the drills correctly, says @grahamsprints. Share on X

On things like basic “walkovers with hands,” the lead leg should have a cyclical recovery similar to the lead leg in actual hurdling. If an athlete swings their leg to the side, this is merely training a habit we don’t want to see. Remind them to lead with the knee “up,” which keeps them closer to a sprint motion. Oftentimes, the hurdle may just be set too high for an athlete, so they compensate by swinging outward.

On trail leg drills such as “0-1-2” or “trail leg slide,” cue the athlete to feel their trail leg behind them, which allows them to take advantage of the stretch reflex in the trail leg in the future. Look for them to move their trail leg “out, up, and through” with the toe dorsiflexed. This can help train good trail leg range of motion and high knee position coming off the hurdle. Athletes often execute these so poorly that the foot actually drops below the knee.

On drills like “can-cans,” continue with the reminders of “leading with the knee” and place an emphasis on tall posture, with a belt line that doesn’t dip due to poor pelvic positioning. This serves as a great reference point when discussing hurdle takeoff.

For a novice hurdler, mobility drills are nearly as much about learning how to move as they are about specific strength exercises. Including these on recovery or tempo days is an excellent way to introduce these drills while giving them the attention they deserve.

Perfect a Few Hurdle Drills

Drills address the skill of hurdling while discounts and spacing put it together in a race model.

I have a short list of drills that can be part of early season skill sessions or used as warm-ups on hurdle days. My purpose here isn’t to give a how-to for each drill (there are plenty of examples on the web), but to encourage coaches to understand sometimes less is more.

  1. Ross drill: Jog with hands at waist; every three steps take off and let the knees slap the hands, “pop-pop.”
  2. March and popover
  3. Cycle ladder
  4. Quickstep
  5. One step

I absolutely love these five drills. The first three drills teach the basics of driving the knee up at the hurdle and keeping stable and tall pelvic positioning with the accompanying forward lean. The Ross drill, which comes from Wilbur Ross, is a non-threatening introduction to hurdling and its rhythms. This sets up an athlete to understand the takeoff and cycling action required in the popovers and cycle ladder drill. The cycle ladder drill comes from Steve McGill and has been adapted a bit differently by Hector Cotto.

The quickstep is a great drill as a warm-up for an advanced hurdler or as a main session for a novice, as it puts the premium on both high frequency and reaction. The one-step drill is a bit more advanced and something I like to reserve for hurdlers who are already skilled. Like the quickstep, it can be a decent diagnostic tool since there is minimal time to prepare for each hurdle.

In Video 1 below, the hurdler pulls to the left off the first hurdle. You can see he jabs his hand forward and it crosses his body, creating a twist. Immediately, he corrects and stops the trail arm near his hip, which allows his lead arm to stay closer to a sprint motion in front of his chin.

On all of these drills, coaches must use their eye to nail down the spacings in the suggested range that best fits each athlete.


Video 1. Hurdling drills should be active and address some component of hurdling. Coaches don’t need to throw every drill in the book at the hurdler, but they can tailor them to address an issue that keeps popping up. 

Five-Step Hurdling

I used a lot of the five-step pattern between hurdles this fall, one day per week. This is not something I would do with a developing hurdler, as I think just jamming the three-step rhythm and drilling needs to be a priority.

The athlete I worked with started with five hurdles spaced at 11 yards (33 feet). The turf was an attractive setting, since the measurements are easier, and turf reduces strain while getting lots of hurdle reps. We utilized a 10-step high knee approach at this distance.

At 33 feet, the shuffle was slow, which gave the hurdler a lot of time to use a coaching cue and prepare for takeoff. While we didn’t approach Nehemiah levels of volume, we did routinely accrue between 75 and 100 hurdles in sets of 15-20. Takeoff was set at a range of 2.1-2.2 meters, and no additional hurdle work was done on this day.

I feel like this gives reasonably skilled hurdlers a chance to overcome the fear of hitting hurdles due to fatigue and makes the hurdles feel like nothing. Indeed, the hurdler in Video 2 below had an issue with “punting” his lead leg as a result of leading with his foot over the hurdle. After hundreds of repetitions, he was able to understand what picking the knee up and driving through the hurdle felt like.

Of course, as the pre-competitive season draws near, we are merely bumping the hurdles out to 12 yards (36 feet), using an eight-step standing start, and reducing the volume to 3-4 sets of 3-5. This leaves room on a second hurdle day for some standing starts from a five- or eight-step start at jammed spacings. Standing starts are an excellent way to make sure that the athlete is tall at takeoff and all repetitions are at prescribed takeoff distance based on height.

As we move even closer to the end of February, we will bump the five-step distance out a bit more and perhaps begin to combo some five- and three-step repetitions, depending on the weather.

I know sometimes coaches pattern the five-step distance on the step distance of the three-step distance the athlete is currently working on (minus takeoff and landing). I am not worried about a high school junior matching velocities and frequencies across workouts in the off-season yet. I am leaving something on the table to progress to while he learns to do each style of workout.

The final benefit of the five-step workout is that it is a great way to continue to train outdoors in the Northeast without fear of injury. As long as the athletes are able to endure the temperatures, we will continue to work this in different ways.


Video 2. Five-step hurdling allows more time to use a coaching cue and can be done on the turf. This prevents strain and breeds confidence in the athlete. 

Decision-Making and Technique Through Gallops

Prescribed takeoff and landing distances may be exact (or at least in a range), but in the heat of a race there almost always seems to be some slight deviation, even if it is a few centimeters. While professionals have the experience to get it near perfect (although it isn’t uncommon for them to foul up as well), developing hurdlers need to feel and explore different movements to anticipate the optimal attack. Letting them learn to navigate various spacings seems like a huge benefit in the long run.

Gallops are just way too good of a multipurpose tool to not continue to adapt them, and hurdles seem to be a natural fit for this exploration, says @grahamsprints. Share on X

There are other drills like single leg A-skips and single leg prances that are effective in teaching a tight lead leg, but I am going to beat the gallop drum here. Gallops over small banana hurdles are excellent for learning to navigate different spacings with rhythm and authentically teach a cut-step, especially if the foot contact is flat and the hips are kept high. This ensures the athlete isn’t overplanting and delivering a jarring heel-first strike.

Coaches can utilize a gallop and quickstep run combination to begin having the athletes crave a high hip and knee position at touchdown that lends itself to a reacceleration of sorts toward the next set of barriers.

Hurdle Gallop
Image 1. While I am a little more squatted than I would like a hurdle takeoff to be, it is clear that the heel recovers cyclically to attain a high knee position that is ideal at hurdle takeoff. The tight lead leg driven high is a key quality to train in a novice hurdler.


Gallops are just way too good of a multipurpose tool to not continue to adapt them, and hurdles seem to be a natural fit for this exploration. Use these on sprint days or as a pre-hurdle primer to bridge the gap from general to specific.


Video 3. I am not going to pretend that there are any bona fide rules here. Coaches should explore the event of hurdles and find gallop variations that seem to fit the need, whether it be posture, speed between the hurdles, or something else entirely. Athletes just have to figure out a way to make it work.

Fearless and Aggressive

The inspiration for this section comes from the hurdler who has been featured throughout this article. At the All-State meet during the last indoor season, he took a bad spill and ended up lacerating his kidney, which landed him in the hospital. I never trained him before his spill, but by his account, he wanted to get back to that “No Fear” zone.


Video 4. Whether new to the sport or recovering from a catastrophe, hurdlers need confidence and a willingness to flirt with disaster. This means steps that push the edge of their speed/frequency and a flight path that drives through the hurdles.

Sure, there are classics like Wilbur Ross’ overspeed zone drill, and the 12 hurdles spaced at 8.5 meters that can let an athlete with serious training under their belt go nuts, but it’s okay to table advanced concepts until their college years. We need to leave something loaded in the chamber for the future. In the meantime, we have worked and are working on several simpler strategies to get athletes to warrior status.

  • Discounted Heights: This is an obvious one, and I don’t think any height is too low. I have gone as low as 24 inches for females and 27 inches for males. Understand that takeoff distance will change, since the center of mass is raised less.

    When working with 36-inch hurdles, I put cones out at the prescribed takeoff distance for the height of the athlete as if they were 3 inches taller. So, if takeoff for a 6-foot athlete is 7’3”, I place cones at 7’1” instead. I am not sure this is entirely necessary, however. I have also only reduced the height of the first hurdle to set up the next hurdles, which remain at race height.
  • Red Training Hurdles or Velcro Tops: I have used a lot of the red training hurdles with collapsible tops in the past, and indeed, the athlete’s fear of really banging a hurdle decreases. One drawback is that the clatter can sometimes still unnerve an athlete, and setting it up over and over again becomes a chore. Carl Valle has suggested using Velcro hurdle tops and encouraging athletes to hit them. Although I didn’t splurge on the rocker training hurdles that come with Velcro attachments, I did find a pack of 15 feet of 2-inch Velcro strips that can be cut and adhered to the hurdle once you pop the existing hurdle top off. Flirt with disaster and run through the darn things.

  • 10-Step Start: The 10-step start creates trust for the hurdler while providing a seriously overspeed start. Utilize a standing start about 17.2 meters from the hurdle. Start with the height reduced as much as 6 inches, until the athlete trusts their step pattern. This is not for the extreme novice, as this is a precursor for doing some lightning-fast five-step reps. It could be nice to contrast a few of these reps with a few eight-step standing or block starts.
  • Five-Step Start: Although I do a lot of drills and two-point accelerations with each leg, five-step starts are still relatively new to me. Due to the abbreviated run up, the drive into the hurdle must be aggressive, and touchdown must have great positioning with positive foot speed. This takes a little experimenting for the start distance, but around 29-30 feet has worked for us.

I started adding hurdles by employing my tightest jammed spacing to date with this hurdler (26 feet), which further raised the intent. Another benefit of this for this athlete is that the starting foot is switched, which at the very least, introduces the ambidexterity necessary to change from an eight-step to a seven-step start in the future. It’s good to consider an option in the long term and not just make changes on a whim.

200m Training to Support

Training like a 200m runner during the rest of the week yields good results for high hurdlers. Both are fast races, where perhaps the last 20% (two hurdles in the hurdles, 40 meters in the 200m) becomes a challenge to stay together.

Training like a 200m runner during the rest of the week yields good results for high hurdlers. Both are fast races, where perhaps the last 20% becomes a challenge to stay together. Share on X

The training needs for the 200m runner also fill in a lot of gaps for the hurdler. For instance, 200m runners may spend a lot of time doing block curve into the curve and sustaining some fly reps deep into the curve. For the hurdlers (or all sprinters), exposure to different frequencies is helpful so, as Carl Valle says, “They aren’t painted into a corner later.” The curve work allows them to break stereotype and experience a different stimulus that may introduce a slightly higher frequency on the leg on the outside of the curve. Sprinting in both directions may reduce injuries and expose both legs to something novel in the way of stride frequency.

Longer reps such as 150 meters are often a staple in 200m training and are extremely versatile. At risk of hyperbole, from intensive tempo to special endurance or even 150-meter buildups, the 150-meter rep alone might be enough to discourage pace lock. To run the 150-meter distance regardless of what part of the speed curve you are surfing, it requires relaxed beauty, arm/leg rhythm, and postural maintenance. These are all traits that need to be present in the hurdles as well.

Other training items such as “ins and outs” sprint buildups are essentially motor learning drills on steroids. The 200m race model has an element of floating the curve that I think is useful for forcing the sprinter to consider the distribution of effort and applying it to other races. I acknowledged that hurdlers are sprinters first in beginning of this piece, and the menu of training options can really make the hurdler whole.

Freedom to Choose

Hurdling is a complex event, and coaches can weave in whatever modes of training they want and feel are appropriate. There is only so much hurdling an athlete can do in a session or week. Perhaps more than in any other event, coaches really need to shift the focus to long-term development.

Speed and hurdle mobility are the foundation of the hurdler. There is an abundance of drills out there, and a coach can do whichever ones they deem necessary and appropriate. Sometimes having fewer drills allows athletes to just get better at them and coaches to use them in more purposeful ways.

Obviously, the start and discounted hurdle work will be very important when it’s time, but with the right athlete, don’t rule out five-step work.

Without a base of general drills and coordination, hurdlers can simply lack the experience and context to respond to a cue. Gallops could be one of the best options to let hurdlers begin navigating space athletically and efficiently. The sky is the limit with the amount of exploring a coach can do.

The start and discounted hurdle work will be very important when it’s time, but with the right athlete, don’t rule out five-step work, says @grahamsprints. Share on X

There are numerous ways to bolster an athlete’s confidence and aggressiveness, and these are important things to consider in the hurdling events, as playing it safe and scared never ends well. Consistently complementing hurdle-specific training with 200m training and races could create the most complete sprinter there is and provide a better finish over hurdles 8, 9, and 10 without extra hurdling.

Of course, I can’t resist the chance to end with a hurdle pun, so I will leave you with this: Hurdle training is a lot to overcome, but with some careful planning, there are some big things ahead for your athletes.

Since you’re here…
…we have a small favor to ask. More people are reading SimpliFaster than ever, and each week we bring you compelling content from coaches, sport scientists, and physiotherapists who are devoted to building better athletes. Please take a moment to share the articles on social media, engage the authors with questions and comments below, and link to articles when appropriate if you have a blog or participate on forums of related topics. — SF


Serve Velocity Volleyball

Improving Serving Speed for the Volleyball Athlete

Blog| ByKeith Ferrara

Serve Velocity Volleyball

Although many KPIs can be debated from sport to sport, serving speed is one that truly matters in the sport of volleyball—and one that we can improve as coaches. When an athlete has a faster serving speed, it is more difficult for the opponent to control their passing and run their offense, therefore putting the team with the faster serve at a significant advantage. Rather than just looking to improve top speed, we must also aim to improve the repeatability of serving at higher speeds (same concept as sprinting and speed reserve), since being the faster-serving team is of little value without the ability to repeat it consistently. In this article I am going to describe the program that I utilized to improve our volleyball players serving speed in only eight weeks of training.

It is often debated which KPIs in sports have the greatest impact on player success. In my opinion, there are two that are the most important to determine the future success of an athlete:

    1. Skill level/genetics


  1. Health and injury history

That doesn’t mean there aren’t any other athletic traits that contribute, but when it comes to success in the sport itself, no one can argue that skill isn’t the most important factor. As sports performance coaches, we have control over the latter of the two biggest performance indicators as well as the task of improving those athletic qualities that will improve the physical level of the athlete. The whole point of our training program is to develop skills that we believe can elevate the level of our players.

The whole point of our training program is to develop skills that we believe can elevate the level of our players, says @bigk28. Share on X

The Results

First I would like to share with you the testing that we did in order to ensure consistent testing results. The following standards were implemented for each testing period:

    1. Each player performed a serve they were comfortable with and one they would use during competition (jump float, standing float, and jumping top spin).


    1. Each serve had to be in the court of play for it to count (there is little value in having the fastest serving speed that will cost you a point because it bounces off the back wall).


    1. We recorded five serves from each athlete.


    1. All recordings were taken from behind the serving player with a Pocket Radar.


  1. A total of 10 players participated in fall training.

Here were the results pre- and post-testing. We looked at three key metrics:

    1. Average serving speed.


    1. Top serving speed.


  1. Players above 40 mph.

Table of Results

As you can see from the table above, we had great improvements in serving speed in a very short period of time. There was an overall change in average serving speed of 4%, an increase in average top serving speed of 5.72%, and the entire team was serving at or over 40 mph post-testing, an increase from only half the team pre-testing. Our training only spanned a total of eight weeks, with the first three of those weeks being predominantly outside due to COVID training restrictions. Below, I will highlight the training we performed to elicit these improvements and the training you can implement easily with your volleyball team.

Overall Training Philosophy

We have to get away from the traditional thinking of focusing on muscular development when trying to garner specific athletic improvements. To keep it simple, our muscles are ‘dumb’; our nervous system controls everything we do. When we think about training, we must focus on nervous system demand and how we can improve its firing rate and efficiency.

We have to get away from the traditional thinking of focusing on muscular development when trying to garner specific athletic improvements, says @bigk28. Share on X

Hansen Graph

This is where my training has shifted since I got into collegiate athletics. Even when you perform an exercise that may primarily be an upper body movement, there is still demand on the entire system. Learning how to undulate throughout the week and balance high central nervous system (CNS) days with low CNS days will be critical in maximizing development of the athlete. Although many think in order to improve a quality such as serving speed that one must strictly put focus on upper body develop and put even more focus on muscular development of the deltoids, I am here to tell you that it is simply not the case. If you want your athlete to hit a harder serve, we must develop their nervous system to fire at a high rate.

The above graphic from Charlie Francis and Derek Hanson should give you a good outline on how to structure your high/low days. If you are looking for guidelines, start with this chart to structure your week—but always modify where necessary for your individual players.

Sprint Training in Volleyball

Volleyball is a really amazing sport to work with. In seven years of working with the sport, I have worked with teams that brought 100% to what we were doing and gave everything they had, both during their in-season and off-season training plans. I always knew that, in sports, we need to train speed and we need to train it year round. The residual for speed is five days with a two day window depending on the individual (three days on the short end and seven on the long end).

I always trained one day of speed with volleyball, but no timing was involved—a critical mistake I made that hindered speed development). I was lucky enough to hear Mike Boyle talk at the College Strength and Conditioning Conference Association in Missouri two years ago, where he spoke about the benefits of timing sprints on a frequent basis. Ever since then, I have been on the never-ending journey of learning how to improve speed and power. Since restrictions earlier in the year didn’t allow us in the weight room, we had a 100% speed-focused start for our eight-week plan (three weeks exactly).

Even in a sport dominated mostly by acceleration, we needed to develop an all-encompassing sprint plan that included max velocity work. I spoke in my previous article about the benefits of training max velocity as a stimulus. Max velocity training (any exercise that allows an athlete to reach their max speed) is more powerful than any other exercise that is used in the weight room and must be included on a weekly basis. These are just some of the tools I use for max velocity work:

    1. Fly 10s/20s/30s (varying build ups).


    1. In & outs.


  1. Any sprint greater than 30 m.
Max velocity training is more powerful than any other exercise that is used in the weight room and must be included on a weekly basis, says @bigk28. Share on X

There is nothing fancy here; in order to increase max velocity, you must sprint fast. Athletes will vary in the rate at which they hit their top speed, so I recommend experimenting with your build up. I have found that my athletes need a 25-30 yard build up when doing flying sprints.

Sprint Program

This was the breakdown of our week in regards to our sprint work on a three-day split of Monday/Wednesday/Friday:

MONDAY (MAX VELOCITY FOCUS)

Reflexive Performance Reset (10-20s each zone) 

  • Belly Breaths x10
  • Zone 1
  • Belly Breaths x10

Spring Ankle Drills (2×20-60s) (Cal Dietz & Chris Korfist)

  • Drill #1 and #2

Ignition Series (2×10 yards each)

  • A Series (March/Skip)
  • Quick Gallops
  • High Knees

Bounding Series (2×20 yards)

  • Speed Bounds
  • Bounds for height
  • Straight Leg Bounds

Speed Drill

  • 3x Wickets (10 with 6’ spacing)

Timed Sprint

  • Fly 10s

WEDNESDAY (ACCELERATION FOCUS)

Reflexive Performance Reset (10-20s each zone)

  • Belly Breaths x10
  • Zone 1
  • Belly Breaths x10

Spring Ankle Drills (2×20-60s)

  • Drill #3 and #4

MB Throws (3×4)

  • Underhand Behind Throws
  • Underhand Forward Throws

High Knees Ankle/Hip Action (2×10 yards)

  • Boom Switch Variation
  • Ankle Jumps
  • Crawl Variations

Acceleration Drills

  • Hill Sprints 10x for 20 yards

Timed Accelerations 

  • 3x Timed 10 yard sprints

FRIDAY (LATERAL MOVEMENT FOCUS)

Reflexive Performance Reset (10-20s each zone) 

  • Belly Breaths x10
  • Zone 1
  • Belly Breaths x10

Spring Ankle Drills (2×20-60s) 

  • Drill #5

Ignition Series (2×10 yards each)

  • A Series (March/Skip)
  • Quick Gallops
  • High Knees

Bounding Series (2×20 yards)

  • Lateral Bounds
  • Diagonal Bounds

Acceleration/Deceleration Series (2×20 yards in 5 yard increments)

  • Sprint
  • Side Shuffle L/R
  • Crossover run L/R
  • Backpedal

Timed Sprint

  • Fly 10s

I know what you are probably thinking: This is an article on improving serving speed, why is he talking about sprinting? Every single drill we implement and every single training day has a purpose in developing the nervous system. We are trying to improve the firing rate and synchronization of the nervous system. Have you ever seen someone who was serving a hard ball look uncoordinated and barely leave the ground? Didn’t think so. Serving speed is not just about upper body development, but rather total system development.

If you are going to be fast, explosive, powerful, strong, etc., then you must sprint and you must sprint often. We spent four weeks on this specific plan, but what I saw when we were able to transfer to the weight room was that there wasn’t much lost in the strength, power, and speed departments. With regards to sprint drills and workouts, they will also have to develop the lower body when it comes to the serving action in volleyball. How limited will an athlete be in serving if they lack the ability to transfer power from the lower to upper body?

If you are going to be fast, explosive, powerful, strong, etc., then you must sprint and you must sprint often, says @bigk28. Share on X

Remember, each day’s focus is to develop the nervous system. I like to treat two days with a max velocity emphasis because of how strong of a stimulus it is to run at full speed. When we sprint at max velocity we are also working on acceleration in order to get to top speed. I want to hammer home how important it is to sprint often and how nervous system development will get you the improvements in serving speed that we are looking for.

Sprint Program Breakdown

Every day starts with a reflexive performance reset to ensure proper nervous system firing. We all do zone 1 together, but if necessary athletes will do zone 2 drills on their own if they aren’t feeling ‘right’ for the day. Next we go into the spring ankle concepts I found through Cal Dietz and Chris Korfist. Remember what I said: Think of the body as a total system; if there is a kink in the armor, the whole system will falter. The body part that is in constant contact with the floor (and is the beginning of our armor) is our feet. We want to strengthen the foot-ankle complex to ensure the start of the system is firing properly. After that we begin our theme-based ignition series. Nothing special here but drills that teach us four main concepts:

    • Punch the ground.


    • Dorsiflexion of the foot.


    • Violent arm action.


  • Good upright torso position.

From there we move into bounding on our max velocity days; I don’t know if there is a better drill than bounding to teach an athlete power. I know a lot of my athletes struggled with this because it requires a high amount of force to do correctly, so don’t rush this. If I notice my athletes struggling, I slow them down and we break the movement down into separate parts. This might not be exactly what we are looking for, but regressions are necessary if the drills are not being done correctly. Then, depending on the day, we continue on to theme-based sprint drills and timing to correlate with the work we are doing. These are the average speed results we saw after eight weeks of training:

    • 10 yard sprint: 1.91 —> 1.85


    • 20 yard sprint: 3.30 —> 3.23


  • 10 yard fly: 1.31 —> 1.22 (15.59 —> 16.7 mph)

As you can see, we had some great results with our speed-focused work. I know our speed development played a huge role in the improvement of our serving speeds.

If I notice my athletes struggling, I slow them down and we break the movement down into separate parts, says @bigk28. Share on X

Lifting

I knew we did not have a lot of time left to spend on lifting for the semester (five weeks once we were able to lift again), so I took a slightly different approach. I kept the weight room extremely basic: matching high motor neuron recruitment exercises for the max velocity days, and lower motor recruitment (or exercises that have a higher impact on acceleration) on the acceleration days. This is how the lifting program broke down for the five-week training program:

MONDAY

TIER 1 – Olympic Lift

  • Clean From The Power Position 4×4

TIER 2 – Olympic Push

  • BB Push Press 4×5

If you are looking for the benefits of the Olympic lifts, Carl Valle did a great job in this article. Posterior chain development of the upper body is crucial here and will aid in improving serve speed. Overhead Olympic pushes are one of the most underrated exercises that a coach can use for power development. The progression I follow is usually BB push press to power jerk to split jerk.

There are so many benefits of the overhead Olympic lifts, including total synchronization of the entire kinetic chain from the lower body to the upper body to complete a successful lift. The triceps and deltoids are needed to push the bar overhead after power is generated from the lower body, then the upper body is forced to stabilize the load; the value is incredible. 

Overhead Olympic pushes are one of the most underrated exercises that a coach can use for power development, says @bigk28. Share on X

WEDNESDAY

TIER 1 – Squat Variation + Vertical Plyometric

  • Squat 5 RM
  • Paused Squat Jump (3 second pause at the bottom) 3×4
  • Trap Bar Jump 3×4

TIER 2 – Horizontal Press + Horizontal Pull

  • Bench 5 RM
  • Pendlay Row 4×5

Here we are looking to develop absolute strength (squatting is highly correlated with initial acceleration). A set of five reps at maximum weight lets the athlete calibrate how they feel for the day. If you want to work on different qualities in the weight room, you first must develop a base of strength. Since my athletes get a lot of horizontal force development throughout the week from sprint work, I decided to add a vertical plyometric series in on Wednesday with both exercises having a strength focus (paused and weighted).

Horizontal pressing is not only necessary in regards to stabilizing the shoulder in the overhead position, but it is a multi-joint movement involving both the deltoids and the triceps to lock out the movement. Pressing is a necessity for overhead athletes—don’t let anyone tell you differently. Any horizontal row will do, as again we are working on posterior development which is crucial when looking at improving serving speed. Any horizontal variation will do here, but I like how Pendlay rows force the athlete to strictly use their back to complete the movement.

FRIDAY

TIER 1 – Olympic Lift – Snatch Variation

  • Snatch From The Power Position 4×4

TIER 2 – Deadlift Variation + Horizontal Plyometric

  • Trap Bar Deadlift 4×5
  • Paused Broad Jump 3×4
  • Resisted Banded Broad Jump 3×4

TIER 3 – Bodyweight Push + Bodyweight Pull + Rear Deltoid

  • Pushups 3 x Sub-max
  • Weighted TRX Row 3×8
  • DB Reverse Fly 3×8

Yes, our volleyball athletes perform snatches. During my seven years of training volleyball, I have yet to have one shoulder injury. As long as you are teaching the correct technique, it is a huge tool for power development as well as for strengthening the posterior chain. Since I want to accumulate a little more volume on Fridays, we will add in a lower and upper body circuit.

Deadlift is a little less taxing on the nervous system due to the lower time under tension (TUT), and we are looking for some additional horizontal power development with our plyometric series. I think it’s important to be good at relative strength, so we include pushups every week in our programming. TRX rows and reverse flies are added in at the end of the week for some more posterior chain development.

We keep our post-workout really simple. We will finish with some thoracic mobility work and some guided breathing for five minutes to activate our parasympathetic nervous system. If you want to keep your athletes healthy, thoracic mobility work needs to be included frequently. In a normal year we would usually end workouts with a banded shoulder series including the following:

  • External/Internal Rotation
  • 90/90 ER/IR
  • Shoulder Extension

We pick and choose what exercises to add here but these are staples for us. I believe if we were able to add this in, it would have increased the improvements on our serving speed even more.

If you want to keep your athletes healthy, thoracic mobility work needs to be included frequently, says @bigk28. Share on X

Practice Serving

The last piece of the puzzle (and the most important) is the actual practice of serving with maximal intent and effort. This involves your volleyball coach being on board with the plan of trying to increase the serving speed of the players (not sure what type of coach wouldn’t be on board with this).

You can be the fastest, strongest, most explosive athlete out there, but if you aren’t practicing your serving then you aren’t going to see the improvements you want. The same concepts that apply to improving maximal speed in sprinting also apply to improving serving speed.

An Untraditional Approach

This article was about developing the nervous system to maximize speed and power in your athlete which will help develop their maximal serving speed. What you did not see were gimmicky weighted ball exercises and “sport specific” exercises to improve serving speed. I wanted to convey the message that you do not need every exercise under the sun to improve serving speed. We had little training time and limited resources, and we still saw great results. Obviously there were things I would love to have added, but you have to be able to deal with the situation at hand and adapt if you want to be a great sports performance coach.

Don’t think about improving serving speed as a singular quality that you need to be locked in on. Aim to improve the firing rate and synchronization of the nervous system by training all aspects of speed (acceleration, max velocity, and repeated sprint ability if necessary). If you train consecutive days, think about a high/low training system model that will optimize each day you have with your athletes and avoid nervous system burnout.

Aim to improve the firing rate and synchronization of the nervous system by training all aspects of speed, says @bigk28. Share on X

Make sure the message is relayed to your athletes and coaches that, when practicing their serves, they should be doing so with maximal effort and intent if they wish to see the desired result of improving their serving speed. You should individualize the program to your specific population and athlete, but using this type of outline should give you a great idea of how you can design a program to help improve the serving speed of your athletes.

Since you’re here…
…we have a small favor to ask. More people are reading SimpliFaster than ever, and each week we bring you compelling content from coaches, sport scientists, and physiotherapists who are devoted to building better athletes. Please take a moment to share the articles on social media, engage the authors with questions and comments below, and link to articles when appropriate if you have a blog or participate on forums of related topics. — SF

Baseball Science

The Structure of Sports Science Revolutions

Blog| ByCraig Pickering

Baseball Science

In 1962, the first edition of Thomas Kuhn’s seminal book, The Structure of Scientific Revolutions, was published. Since its initial publication, the book has been reissued numerous times, and it is now on its fourth edition. Kuhn’s book has been highly influential for his model of how science works.

The typical model of science suggests that scientific progress occurs as development through accumulation—that is, we gain small bits of knowledge that add to our current knowledge in an incremental, step-like manner. Kuhn, however, argues against this model. He suggests that scientific progress is episodic and stage-like: We have periods of stability where there are small increases in knowledge—Kuhn terms this stage normal science—which are then interrupted by periods of rapid accumulation of knowledge, termed revolutionary science.

One of the main drivers of this revolutionary science, during which we tend to have major breakthroughs, is the discovery of anomalies—parts of the current prevailing wisdom that don’t quite make sense or were not quite matched by real-world data. These anomalies lead to major breakthroughs, which then lead us to the next stable period of normal science. Kuhn defines each stable period of knowledge as a paradigm, and the major breakthroughs lead to what he termed a paradigm shift, taking us to a new way of viewing the world with data.

Taking a step back, we essentially view the world through one mental model and explain our new, incremental findings through the lens of that mental model—making small improvements—until a paradigm shift occurs, moving us to a markedly different mental model, after which the process repeats itself.

Transformations

Paradigm shifts are uncomfortable, as they challenge our view of the world. This leads to gatekeepers: people who are motivated to preserve the status quo. When the prevailing mental model—the normal science—was that the sun orbited the Earth, Galileo was put under house arrest for suggesting that the Earth, instead, orbited the sun.

Any time a paradigm shift occurs, there are people who fight against it, and overcoming this gatekeeping is crucial for scientific progress, says @craig100m. Share on X

Galileo had sufficient new observations to challenge the current paradigm; as this new paradigm directly contradicted the Church’s interpretation of the Bible, Galileo represented a challenge and was labeled a heretic. Other books espousing the sun as the center of the solar system model were banned, as the Church attempted to maintain their current paradigm, which best fit the story they wanted to tell. Any time a paradigm shift occurs, there are people who fight against it, and overcoming this gatekeeping is crucial for scientific progress.

Kuhn’s concept of “normal science” (i.e., the status quo) and paradigm shifts also applies to sport. Perhaps the most famous example of this is the Oakland A’s Moneyball approach, popularized in the book and film of the same name. Here, the Oakland As, an MLB baseball team, found themselves consistently unable to compete effectively against teams with bigger budgets—and consistently lost their best players to these teams. Growing frustrated with his team’s underperformance, General Manager Billy Beane turned to the use of data to identify relatively undervalued players. These players were undervalued because they didn’t fit the generally accepted paradigm of what successful MLB players looked like in terms of physical appearance, playing style, injury history, or performance in some perceived-to-be-important metric or measure.

By questioning the validity of these assumptions, and better understanding which statistics were indicative of successful performance, Beane and his new “data guy,” Paul DePodesta, recruited players who fit their model. As a result, the As had a hugely successful season, finishing first in the American League West and winning 20 consecutive games—at the time, a league record.

I recently read Swing Kings: The Inside Story of Baseball’s Home Run Revolution by Jared Diamond (not that Jared Diamond), which further demonstrates the concepts of normal science, paradigm shifts, and gatekeepers in elite sport, again in baseball. Swing Kings is the story of how, in recent seasons, the records for home runs have continually been broken. The narrative portrayed in the book is interesting; Diamond writes how there is (or, at least, was) a common method of coaching the hitting swing taught at all levels of baseball, from Little League through the minor leagues to MLB.

With the development of handheld video cameras and video analysis technologies, some coaches—most frequently those not involved in the professional realm of the sport—noticed that the best hitters in baseball typically did not demonstrate the technique that they were being coached to carry out. More interestingly, they also found that when they asked the players being filmed what they were doing, what the hitters thought they were doing—what they had been taught within the existing paradigm—did not match up to what was being seen on the video.

This is the classic first driver in Kuhn’s structure of revolutions: data that challenges the current paradigm. The best batters were not doing what they were actually being coached to do and were unaware of what they were actually doing.

Having had this brought to their attention, the major league clubs completely revamped their coaching practices and all the players bought into these new methods…right? Of course not—as anyone who has been involved in sport, and many other industries, can likely attest to, there is strong resistance to change in large organizations (“this is the way things have always been done”) and among gatekeepers. People who are not incentivized to make the change want to protect the current paradigm.

As anyone who has been involved in sport, and many other industries, can likely attest to, there is strong resistance to change in large organizations, says @craig100m. Share on X

If you’re a batting coach who has spent a career coaching off one model, it is understandable, and inherently human, to not believe conflicting data and fight against what you perceive to be an incorrect change. In addition, similar to most other sports, many coaches in elite baseball are former players—the current paradigm was all they had ever known, which causes gatekeeping to the highest extent.

Some entrepreneurial individuals, who noticed that the real-world data wasn’t matching with the current paradigm, began to drive this revolution. Typically, they existed outside “the system”—they weren’t professionally employed batting coaches or former elite players—and they had to work hard to gain credibility. Initially, they acted as private hitting coaches, relying on recruiting major league players who were in a slump at the plate. After changing the player’s technique—and then their fortunes—those coaches relied on word of mouth to build their business. However, the players they worked with then had a problem when they went back to their team and used the new swing they had honed during the off-season. Since it didn’t match with the technical model (or paradigm) of the employed hitting coach, they put pressure on the player to revert back to “normal.”

This created issues for the players—they didn’t want to be seen as uncoachable at a time when their professional livelihoods were at risk. However, they knew from their off-season practice that their new technique was far superior. As a result, the revolution was slow to gain momentum. Eventually, though, more and more players—and, eventually, more and more ball clubs and managers—recognized how successful this new technique was, leading to a complete shift toward this new model and paradigm. While there are, no doubt, still some old-school coaches acting as gatekeepers, many of the newer generation of coaches have embraced these methods.

Factors That Precipitate Change

The example portrayed in Swing Kings is of a revolution driven—or at least underpinned—by changes in technology that allowed for better identification of data that didn’t fit the current theory. Outside of technological innovation, paradigm shifts can also be driven by a number of other aspects, including rule changes. In The Mixer, Michael Cox outlines how a single rule change drove technical and tactical changes in the English Premier League.

Outside of technological innovation, paradigm shifts can also be driven by a number of other aspects, including rule changes, says @craig100m. Share on X

Prior to 1992, goalkeepers in soccer were able to pick up the ball in their penalty box, regardless of how it arrived there. This meant that teams could pass the ball back to their own goalkeeper, who could then pick it up and pass it—via throw or kick—or they could hold on to it for an extended time, often for the purpose of wasting time if they were winning. Teams became very cynical:

  • Defenders could pass the ball to their goalkeeper, who could stop it with his feet and stand stationary until an opposition attacker ran toward him, at which point he would pick it up.
  • If he wished, he could then pass to a close-by defender, who could then pass it directly back to him, repeating the process.

In 1992, however, FIFA introduced the “back-pass rule.” Now, goalkeepers could not use their hands to pick up a deliberate pass back to them from a teammate, unless it was from a header. This rule change turned goalkeepers from a somewhat non-technically skilled position—at least in terms of skill with their feet—to essentially an additional outfield player. As goalkeepers could no longer just pick up balls played to them, they had to become adept at passing with their feet.

The rule change then revolutionized team tactics: Teams became more likely to play out from the back and keep possession, as opposed to kicking long into the opposition half and hoping for a bit of luck. Perhaps most famously, this is demonstrated by the Barcelona tiki-taka style of continuous short passes and long periods of possession, which the Spanish National team then adopted. They won the 2010 World Cup and the European Championships in 2008 and 2012. As always, there were—and still are—coaches and players who wanted to maintain the status quo and failed to sufficiently adapt, but they are becoming less common in the modern game of soccer.

Paradigm Shifts and Periodization

A more contemporary—and athletics specific—example of a sports science revolution that we might currently be living through is that of periodization theory. As a (somewhat oversimplified) summary, periodization theory covers a method of planning the training and competition process of an athlete over a given time period. Generally, these periods are split into blocks; in strength training, for example, these blocks might be hypertrophy, maximum strength, power, and a taper. Each block is then further subdivided into smaller blocks, mesocycles (often 3-4 weeks in length), and microcycles (typically one week in length).

Using this paradigm of periodization, it’s tempting to think that:

  1. There is an inherent order in which things must be done.
  2. There is an inherent time period over which adaptations can occur.
  3. These adaptations can be somewhat predicted in advance; hence, the utility of the planning process.

Recent evidence from studies exploring concepts such as genetic variation and psychosocial stress demonstrates that the time course and order of adaptions to exercise are highly individual. As such, artificially fitting athletes into given “boxes” of training and planning changes in training far in advance are likely flawed, as identified by John Kiely in his influential articles on the topic. “Proving” that traditional models of periodization are effective is very difficult: If we were to take a randomized control trial in which one group undertook periodized training and one group didn’t, then we wouldn’t know whether the differences in adaptation or performance from the periodized group were due to periodization itself or merely variations in training stimulus—and the two aren’t the same.

The majority of studies purporting to demonstrate the effectiveness of periodization may just be demonstrating the effectiveness of a novel training stimulus, says @craig100m. Share on X

The majority of studies purporting to demonstrate the effectiveness of periodization may just be demonstrating the effectiveness of a novel training stimulus. Instead, we often see a position argued as, “Here’s loads of Russian literature [usually books, not peer-reviewed papers] demonstrating how they used periodization during a time of great success for them, therefore periodization works”…as if we can’t think of any confounding variables that may have been in play at that time.

In Swing Kings, the gatekeepers were batting coaches employed by professional teams, keen to keep the current paradigm of batting technique—in which they were experts—in vogue, despite the innovations in understanding and technique being driven by outside coaches. It was easy to dismiss those outside coaches; they typically weren’t previously players, which was viewed as a weakness—although, of course, it prevented them from being indoctrinated with the incorrect technical model. When it comes to periodization, there are also potential gatekeepers—those who are incentivized to maintain the status quo (a recent paper defending periodization theory illustrates this quite nicely).

For those of us involved in sport, there are plenty of steps to ensure we are ready for a paradigm shift:

  1. It’s useful to consider what our present mental model is: How do we think things work?
  2. We need to examine whether how we think things work actually matches up to the data: If, in our mental model, a certain type of training should bring about a certain type of improvement, does that always happen?
  3. We need to look for conflicting data: Do the performance statistics match what we think happens? Does training mimic competition? Do the results from biomechanical analysis match up with what we think is happening?

This matches the story of Swing Kings quite closely: What the hitters—and their coaches—thought was happening did not correspond with what the slow-motion video demonstrated was actually occurring, leading to a faulty mental model.

The next step is where the paradigm shift occurs: Can you change your mental model based on the real-world observations you have, and does it improve your outcomes? Finally, who are the key gatekeepers preventing scientific progress in your field? Who are those invested in not challenging the status quo? And are you sure it isn’t you?

Who are the key gatekeepers preventing scientific progress in your field? Who are those invested in not challenging the status quo? And are you sure it isn’t you? asks @craig100m. Share on X

Critical Thinking and an Open Mind

It’s common to develop communities with people who share the same beliefs as us—it’s good for our ego to gravitate toward those who think like we do. We all do this. I would label myself as politically left wing, and so I view news stories through this lens. I prefer to interact with others who are left wing, and I find myself with little time for those with right-wing views. This is, of course, dangerous, and it leads to the development of echo chambers—often resulting in the strengthening of the views of a small group, as opposed to critical and rational thinking.

In Swing Kings, the obvious example of this is two different communities: those who thought the bat moved backward during the initial part of the swing—and so coached this movement—and those who didn’t. Players were caught in the middle. As the prevailing technical paradigm was that the bat didn’t move backward, this was the mental model of those batting coaches employed by the MLB. If a player spent his off-season with a coach who worked with what the data suggested was happening—that is, the bat does move backward—he would then either have this coached out of him upon his return to the team by the gatekeepers, or risk being ostracized.

Perhaps the key lesson—particularly in the social media age—is to develop your critical thinking skills and have a broad base of knowledge, so that you can expose yourself to various different opinions without getting swept along by the tide of public opinion. By being able to absorb and understand information, we prepare ourselves to challenge the status quo where appropriate, make our own paradigm shifts, and gain a competitive advantage.

Since you’re here…
…we have a small favor to ask. More people are reading SimpliFaster than ever, and each week we bring you compelling content from coaches, sport scientists, and physiotherapists who are devoted to building better athletes. Please take a moment to share the articles on social media, engage the authors with questions and comments below, and link to articles when appropriate if you have a blog or participate on forums of related topics. — SF


  • « Go to Previous Page
  • Page 1
  • Interim pages omitted …
  • Page 66
  • Page 67
  • Page 68
  • Page 69
  • Page 70
  • Interim pages omitted …
  • Page 164
  • Go to Next Page »

Primary Sidebar

FEATURED

  • Using Speed and Power Data to Bucket and Train Faster Athletes
  • Plyometric Training Systems: Developmental vs. Progressive
  • 9 (Fun!) Games to Develop Movement Skills and Athleticism

Latest Posts

  • 1080 Sprint: Four Essential Tips You Won’t Find in the Manual
  • Running Through Time: An Athlete’s Story of Resilience and Recovery
  • Rapid Fire—Episode #14 Featuring Rodrigo Alvira Isla: Training Smarter in the NBA and G League

Topics

  • Adult training
  • App features
  • Artificial Intelligence
  • Athlete
  • Athlete performance
  • Baseball
  • Buyer's Guide
  • Career
  • Certifications
  • Changing with the Game
  • Coach
  • Coaching
  • Coaching workflows
  • Coching
  • College athlete
  • Course Reviews
  • Dasher
  • Data management
  • EMG
  • Force plates
  • Future innovations
  • Game On Series
  • Getting Started
  • Injury prevention
  • Misconceptions Series
  • Motion tracking
  • Out of My Lane Series
  • Performance technology
  • Physical education
  • Plyometric training
  • Pneumatic resistance
  • Power
  • Power development
  • Practice
  • Rapid Fire
  • Reflectorless timing system
  • Running
  • Speed
  • Sports
  • Sports technology
  • Sprinters
  • Strength and conditioning
  • Strength training
  • Summer School with Dan Mullins
  • The Croc Show
  • Track and field
  • Training
  • Training efficiency
  • Wave loading
  • What I've Added/What I've Dropped Series
  • Youth athletics
  • Youth coaching

Categories

  • Blog
  • Buyer's Guide
  • Freelap Friday Five
  • Podcasts

COMPANY

  • Contact Us
  • Write for SimpliFaster
  • Affiliate Program
  • Terms of Use
  • SimpliFaster Privacy Policy
  • DMCA Policy
  • Return and Refund Policy
  • Disclaimer

Coaches Resources

  • Shop Online
  • SimpliFaster Blog
  • Buyer’s Guide
  • Freelap Friday Five
  • Coaches Job Listing

CONTACT INFORMATION

13100 Tech City Circle Suite 200

Alachua, FL 32615

(925) 461-5990 (office)

(925) 461-5991 (fax)

(800) 634-5990 (toll free in US)

Logo of BuyBoard Purchasing Cooperative. The word Buy is yellow and shaped like a shopping cart, while Board and Purchasing Cooperative are in blue text.
  • Facebook
  • Instagram
  • Twitter
  • YouTube

SIGNUP FOR NEWSLETTER

Loading

Copyright © 2025 SimpliFaster. All Rights Reserved.