Prancing and Galloping – Two Under-Utilized Sprint Drills
Summary
Prancing and galloping exercises are a way to shift focus back to long-term athletic development in the speed world. While admittedly funny looking, the variety and long term development they provide build robust athletes and sprinters alike.
Sprinting is unique because it’s the greatest plyometric and motor skill around. I often see plyometrics and motor skill learning rushed or abandoned in favor of just running fast. Doing so cheats athletes of valuable time to train their nervous system and muscles to crave proper technique and speed. No doubt, an athlete must frequently run fast to lay the framework for moving swiftly. Still, motor learning is a necessary support that provides context and allows athletes to self-organize all movement. Sprinting is, after all, a hind-brain activity that occurs very quickly.
The more good movements we expose our athletes to, the more experience their brain has to draw from. Researchers at McGill University found that:
To learn a new motor skill, the brain makes an estimate of the expected sensory inflow that it should get from your sensory system, and the cerebellum uses this prediction to compute the difference between what you intended to do and what you actually did. Elite athletes are not only better at coordinating their movements, their brains are also better at making these kinds of rapid predictions and readjustments.
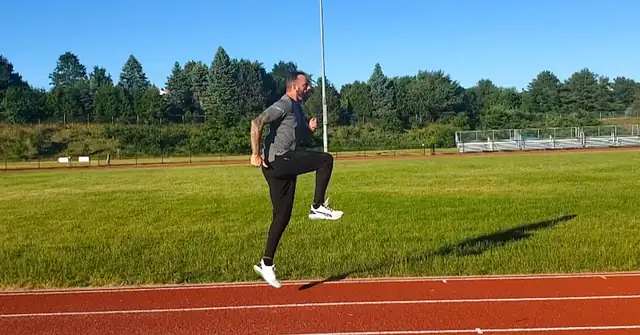
Two exercises we use a lot in our program that go a long way in helping our athletes learn are prancing and galloping. While admittedly funny looking, the variety and long term development they provide build robust athletes and sprinters alike.
Prancing Benefits
So what is prancing? Prancing is an exercise that requires tremendous amounts of coordination, rhythm, and ability to use the lower limbs and feet reflexively. It functions as a low level plyometric than can be used as an extensive option to build a base not just in volume but also in an athlete’s general motor skill learning. This movement is a needed precursor to true plyometrics and gives athletes a fighting chance to run well at peak velocity.
Prancing gives a reference point for plyometrics & teaches rhythm in upright sprinting to support running well at peak velocity, says @grahamsprints. Share on X
Prancing is a fun movement that appeals to athletes of all ages. However, it is not just fluff. It serves as a reference point for plyometrics and teaching rhythm in upright sprinting. Using prancing with my developmental athletes, I’ve seen marked improvements in all of the following:
1. Exploring and Finding Optimal Forward Lean with Great Posture
Studies have shown that the body’s lean while sprinting is between 2-4 degrees (Bruce, 1994; Hoskisson and Korchemny, 1991). Simply put, if an athlete is too upright or inclined too far forward, they will lack vertical force and appropriate dorsiflexion.
Try it: Stand upright. Now lean forward until you feel your Achilles get an elastic loading sensation. That’s how I cue my athletes. If you lean too far forward, you fall off-balance. Such is the balance of posture. It’s also a nice submax rehearsal of head position and gaze. If an athlete is not popping away from the ground, perhaps their posture is the issue, and it is much easier to correct here than at top speed. Make them feel the why behind “Posture, posture, posture.”
2. Teaching the Body Proper Co-Contractions and SSC Strategies
The prance is also great for allowing an athlete to find the sweet spot for proper foot strike with good GRF and loading ankles and Achilles like a spring for future plyometrics. Prancing creates enough air time for the athlete to prepare for the next ground contact. Using it in this manner makes it a great extensive plyometric with a maximum velocity theme. I call this pre-tensing, although I’m not sure if this is the correct terminology. When an athlete is having trouble with plyometrics, most times it’s not just a strength issue. They often have not learned how to load and unload properly.
3. Arms that Work Together and Contribute to Rhythm and Vertical Forces
My stance on arm action has always been that good arms help less than bad arm action hurts. Arms contribute about 10% to vertical force during sprinting. Not insignificant even in professionals. We often see high school athletes doing an array of things with their arms that often work against them.
When doing the prance, it’s critical that the timing of the arms is on point. Again, the elbow flexion, etc. of a prance is not the same as a max speed sprint. It is not as fast. What matters is that they’re optimizing it to learn and apply. I’ve had the best success cueing arms by saying, “elbows down and back.” This seems to create a contralateral action, or cross-extensor reflex with the leg to deliver an effective ground strike. The prance is a tremendous entry point for this. I often tell my prancing athletes to focus on “arms up” on one rep. On the next rep, “arms down.” What feels better? Whether the athlete is a pusher or puller, they get feedback here.
4. Acceleration Context
While having enough strength is important for acceleration, so is the ability to contract and relax (psoas and quads) and flex and extend opposite sides of the body. Even though prancing is done upright, it teaches general timing and provides context on thigh switching seen during a start with low heel recovery. Using the ground as a reference system, you can see the similarities in timing, but the differences in foot strike and horizontal projection don’t make this a guarantee.
How to Prance
The prance mixes a thigh drive with a “pogo bounce” off the ground as the reset position. The athlete must use each powerful thigh drive with the simultaneous pogo to be ready for the next ground contact before they get there. Some athletes can pick this up right away, and this may tell you something during the early season about who has lots of general movement experience to pull from. Doing a tough drill motivates young athletes, and prancing is something novel you can use in many ways during a practice. For the initial introduction, it’s best to teach it as part of a warmup, and within a week they should be ready to prance at a moment’s notice.
The following is a progression plan I usually roll with to push my athletes to prancing proficiency safely.
1. Fence Drill Foot Pop/Assisted Pogo
The athlete should land stiff and aim for where the back row of spikes would be to maximize the reflexes of the feet and ankles. This is the landing position when prancing. The ankle and Achilles must load and unload.
Video 1. Mastering the basics allows coaches the freedom to use variations later. Don’t skip the boring and simple but be confident to allow athletes to move quicker through progressions.
2. Unassisted Pogo
Same thing as above but now without the fence to help control the downward velocity. They must do the same thing as #1, but quicker. If an athlete does not dorsiflex or get their ankle to a neutral position, it’s not possible to prance.
Video 2. Pogos and Prancing go hand and hand. Learn to bounce first, then add alternating switches.
3. Paused Standing Thigh Drive with Double-Foot Pogo Landing
Drive one thigh up aggressively using the arms to split and rip. Immediately relax and get the ankles and feet in position for a stiff pogo position landing that includes an elastic rebound.
Video 3. The leg drive of prancing is moving quickly from relaxing what needs to shut off quickly. Prancing is quickness, not power, so don’t have athletes punch their knee too forcefully.
4. In-Place Prance
It gets harder here. Now we begin driving the thigh and executing a double-leg pogo upon landing into another thigh drive on the opposite leg. It has to occur simultaneously. I usually have my athletes focus on landing with both feet together. Getting the arms down and back is key for delivering enough force to pop away from the ground.
5. Alternating Prance (Rhythm)
Same thing as #4, but the thigh drive has to come up closer to parallel. This will start the horizontal locomotion. Place the premium on rhythm, slight forward lean, and good hard double-foot contacts close to midfoot. Feel the elastic reflex contribution.
Video 4. Rhythm is tricky, as you want to be even to the flow of the exercise but not get tight from being too strict. Use a beat that works for your athletes and foster rhythms that develop good positioning.
6. Alternate Prance (Quick + Long)
The thigh drive and arms control the length of time on the ground. To go quickly, the athlete will use short coupling times, small leg drive, and quick arm action at the expense of GRF. To prance long, the athlete will use a longer coupling time and slightly more horizontal orientation with powerful arms and thigh drive.
This progression could have huge value for field athletes and athletes who specialize in multiple events. Discovering how to manipulate ground contact length for quickness and power is a terrific learning experience.
Video 5. Experimenting with speed encourages athletes to find a landing pattern that suits them. Due to the low impact of the exercise, risks are low so feel free to push athletes to uncomfortable rates of speed.
Other Variations
1. Lateral 45-Degree Prance
This is performed like a traditional prance, but the leg closest to the dividing line drives out at a 45-degree angle. Again, both feet land together. The same variations of quick and long are possible here.
Video 6. Lateral prancing is awesome as it takes a simple exercise and makes it more exploratory without resorting to being silly. Lateral hops and lateral prancing are very similar, and should be mastered by all athletes.
2. Big and Small Asymmetrical Prance
This is the same as a regular prance, but I cue the athlete to go big on one side and use a smaller setup bounce on the other. The knee drive and arm action are more aggressive when going “big.” This helps you see imbalances.
3. Single-Leg Prance
This variation probably has the most aggressive thigh drive and knee punch of all. The power arm action contributes to the jump and is a great option for teaching “violence” during acceleration.
Video 7. Single-leg prancing sometimes is a rehab or regression, depending on the athlete. Coach Valle is a huge prancing fan for athletes who need to work on recovery mechanics (and actually commissioned this article).
Benefits of Galloping
The gallop is another staple movement in our track program. It’s essentially a series of repeated single-leg jumps using rolling or flat foot contacts. Like the prance, there are endless variations and applications if coaches don’t limit their imagination. There are many benefits to galloping, and it’s great to see coaches I respect like John Garrish, Rob Assise, and Carl Valle lobby for including gallops in programs.
1. Gallops Are Fun
Gallops might be one of the most fun motor skill activities to teach and progress. Gallops have an air of harmlessness about them that other drills, jumps, and plyos simply don’t have. If feeling elated were an exercise, this would be it. Often kids are afraid of being wrong or looking silly when sprinting or jumping, but this creates an atmosphere where fun movement is the foundation.
2. Perfect for Single-Leg Jumpers
Long jumpers, high jumpers, and athletes whose goal it is to dunk will have a lot of options here. The experimentation alone will make them more aware of their bodies. When I discuss variations in the upcoming section, you’ll see why. This is a great way to give athletes extensive submaximal repetitions. Single-leg jumping requires more horizontal braking than bounding, which has more of a vertical braking component. I think all jumpers have different solutions for expressing and redirecting force via speed (faster run, shorter GCT) or power jumping (slower run, longer GCT). Although the cliché “self-organization” feels like a lazy buzzword, gallops can help athletes and coaches decide how to maximize the single-leg takeoff and support with other plyometrics. The gallop checks a lot of boxes for the multi-event athlete, including some hurdling.
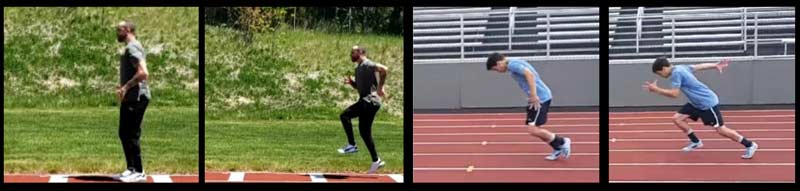
3. Training Maximum Velocity Postures
In examining two stills from one of my gallop videos, I can’t help but draw some similarities between the “toe-off” and “full support” positions of maximum velocity running. In the second image, the swing leg recovers high and tight to the glute and steps over the opposite knee while the stance leg lands close to under the center of mass. The posture involves a slight forward lean that allows for a fluid transition to the next gallop. I would say that the “figure 4” position without a gap between the knees slowly gives the athlete feedback on how to best position their limbs.
4. Varied and Easy to Teach in Large Groups
The best part is that you can do these anywhere. I can get kids galloping in one practice, and we can even do them on a grass field. I can have high jumpers do curvilinear gallops while long jumpers do distance gallops and hurdlers do hurdle gallops over wickets spaced 10 feet apart on the turf as a warmup before their main practice. You can gallop high, far, in a rhythm, and use single or double arms.
How to Gallop
In some videos below, I’m galloping on the track, which is not optimal because grass or turf limits pounding. I was merely using the facility available to me on a given day. Some of the progressions are slow and quite easy, and it’s up to you to decide where to start. I’ve started at the beginning with some, and some athletes can progress quite rapidly. I’m a single-arm galloper, but double arms can be used as well in any of the exercises.
1. Walking Rolling Contacts with and Without Arms
I start by teaching an athlete to walk while rolling through the heel and pushing off with the big toe joint. I then add arms and ask them to imagine a lifting sensation while getting one arm down and the other up simultaneously.
Video 8. Walking and rolling contacts are excellent for fundamental galloping and other locomotive methods. The speed of walking is much slower than running, so understand that much of the remedial drills don’t transfer until later variants are prescribed.
2. Horse Gallop
This is pretty silly. You can use a hurdle top or PVC. I have the athlete imagine they are a kid pretending to be a cowboy or cowgirl. I often add a “baddum, baddum…” noise for a rhythm. They execute with small, flat foot contacts. Occasionally with gallops, kids will perform an alternating left-right skip for distance. If they do this, I remind them to focus on one leg at a time and only to express force with that leg. The other leg is effectively a dummy, setup leg.
Video 9. Galloping is inspired by horses, so spend some time observing equine sports and nature. Galloping is not just used to add variety, it helps athletes problem-solve foreign motions that are sometimes improvements in movement quality.
3. Quick Gallop
I like starting with a quick gallop because it’s an easy way to let athletes feel the contributions of their arms. When galloping quickly, the elbows flex more, close less on the backswing, and block below the head level. I find it helpful to have the athletes pop their arm down and focus on that to set a quick rhythm. The low height of a quick gallop lets you do a more extensive volume of reps. I typically use more of a flat takeoff myself, since the takeoff is quick, and the shin drops less—like when preparing for a big horizontal displacement.
Video 10. Galloping quick is excellent for athletes who need to explore frontside mechanics. Teaching galloping doesn’t promise excellent frontside mechanics directly, but it could help athletes be aware of their frontside mechanics in general.
4. Gallop Buildup
I love using this variation to see who is ready for more intensive galloping and is beginning to change their speed and direction of force. I’m not what I’d call a speed jumper, so I typically start flat-footed with short contacts on the first gallop and progress to heel-toe takeoffs with longer ground contact. My arm blocks at about chest height on the first rep, and by the fifth rep, it’s up by my eyes and head.
Video 11. Building up speed or motion in different ways is valuable for LTAD and teaching. This video is useful for sprinting and other athletic tasks.
5. Gallop for Distance
Once the athlete has the quickness and rhythm down, we begin talking about going for distance. I cue them to be heel-toe or flat and experiment, ultimately paying attention to what feels better. I like them to think about accelerating and pushing off the joint under the big toe. When doing these, lots of athletes will begin to gather and rock and drop their hips excessively rather than patiently rolling through the foot. They need to keep their posture, which will put them in a better position for the next jump. I’m beginning to think about tracking galloping distances over five hurdles. In one of the videos, I’ve spaced five wickets at 12 feet. With any distance further than that, I was not able to complete the last wicket.
Video 12. Galloping for distance can turn ugly if you don’t look at landing positions, since technically it’s not similar to sprinting. Make sure the athlete is graceful, feels light, and doesn’t overwork their hamstrings.
6. Randomly Spaced Gallops
These are the holy grail of galloping. On each rep, I remove a wicket, adding or playing around with the distance of each. There is definitely an agility component here since every rep is a different set of distances, and the athlete has to organize on the fly to best complete the row of wickets via gallops. In one of the reps below, I have wickets spaced as close as five feet and as far as 15 feet. In another spacing, I gallop more like a hurdler who is one-stepping. The randomness leads to awesome results, especially when an athlete blows out of a quick gallop with a powerful gallop. Slowing it down on slow-motion video, you can see how an athlete uses varied foot contacts and arm blocks to get the job done.
Randomly spaced gallops have huge value for field sport & multi-event track athletes who need a variety of movement solutions to execute successfully. Share on XI’ve never had an athlete who could not do a successful rep as long as they were ready for this variation, and the spacings were not too ambitious. This holds tremendous value for field sport and multi-event track athletes (especially athletes who do all three jumps or hurdles) who will need a variety of movement solutions to execute successfully.
Video 13. Galloping with broken rhythms are necessary to improve the ability to create rhythms due to transition patterns. Here is a common example of the exercise used for all sports.
Other Variations
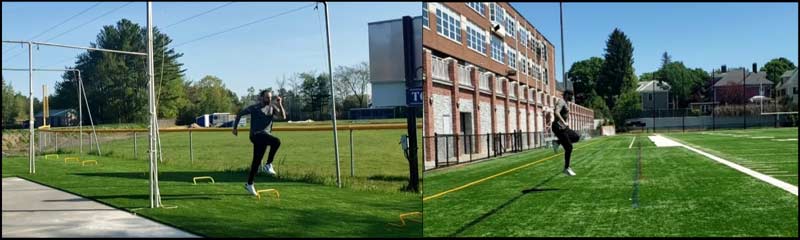
1. Hurdle Gallops
These essentially are an imaginary “one-step” hurdle drill. I cue the athletes with the traditional, “check the wallet and watch” cue, with the trailing arm stopping on the hip, and the lead arm blocking in front. I have them keep the slight downward lean (not just flexing at the waist) that would be seen over the top of the hurdle throughout the entire rep. This is an excellent way to teach an active lead leg that craves being back on the track without any interruption of flow between each push-off. Once they have a rhythm, I ask them to think about making their parabola slightly higher and more arced to clear a higher imaginary hurdle. This is great prep for a novice hurdler and provides more context as to why we don’t jump hurdles. They can take this with them as they progress to less hurdling discounts in both height and distance.
Video 14. Gallop hurdles are not just for long jumpers, they are for everyone who is on their feet. In addition to speeds, learn to play with spacings and heights to explore movement strategies.
2. Curve Gallops
Let me start by saying that turf fields have way too many curved lines and circles to not take advantage of them. Running and jumping on a curve is different than doing them linearly. The circle run is a high jump staple, but I don’t see many people doing curved gallops. It does feel a little awkward when using two arms since there is no actual bar to clear, and the body wants to rotate as such. This drill is a must to let the athlete understand that the lean during the “J” in the high jump comes from the inward rotation of the ankles and the feet using crossover steps. It’s important to cue the athlete to stay on the line during a curved gallop.
Video 15. Adding a curve to galloping breaks the monotony of linear galloping and creates variety with a purpose. Curved running is a skill that is great for enhancing other motor skills down the road.
3. Run-Run-Jumps/ Long Jump Gallops
We’ve all seen athletes barrel down the runway and throw their arms forward or leave them behind at take off. The run-run-jump with windmill arms helps athletes who use a “run in the air” to land with better orientation. Perhaps a run-run-jump with a conventional two-armed takeoff would be more suitable for a hang jumper. Either way, variability is a good thing. Adding the two runs between jumps adds a layer of complexity to the penultimate step, forcing the athlete to keep their posture through the two runs while rocking through the heel to the toe.
Video 16. The “Run-Run-Jump” drill is timeless. Coaches who use it will see improvements in jumping technique and reacceleration if coached properly.
Endless Options
Between prancing and galloping, a coach has many options when trying to help their athletes learn. On maximum velocity days, powerful prances with a big pop are more suited as a warmup tool or as an entry-level plyometric. Quick prances function almost as dribbles with a reduced ground reactive force to get reps in without the fatigue. As a whole, prancing goes a long way with teaching foot strike and proper postures.
Gallops help teach hurdling, jumping, and maximum velocity postures to large groups of athletes, says @grahamsprints. Share on XLikewise, gallops are a means to teach hurdling, jumping, and maximum velocity postures to large groups of athletes. My head is already swimming with ideas on how to use hurdle gallops as a part of a completion run rep with long hurdlers. Or maybe as a complex with a hurdler’s reduced spacing acceleration work between hurdles. I envision using gallops for distance as part of a jump complex with full approaches and gallop buildups on short approach days. The random-spaced gallops can shift motor learning into high gear by letting athletes, such as hurdlers, figure out where to be and how to get there.
Prancing & galloping, two funny looking exercises, can help shift focus back to long-term athletic development in the speed world, says @grahamsprints. Share on XWe see lots of jump testing, but I wonder if tracking gallop distance would be a refreshing way to motivate athletes without getting overly specific this summer. The athlete could use both static start reps in which they have to overcome inertia on acceleration-themed days and use a 5- to 10-yard run on maximum velocity days. Moving forward, I’ll be playing around with this. These two funny named and looking exercises are a way to shift the focus back to long-term athletic development in the speed world.
