Better Pelvic Positioning for Better Sprinting
In this Article
- Why Bother? Anterior Pelvic Tilt: A Linchpin
- Quantifying Backside Mechanics: The Kickback Method
- It's All in the Hips: The Jurdan Test and Range of Motion Prerequisites
- Teaching Proper Positioning: A Two-step Process
- Thoracic Dissociation
- Pelvic Dissociation
- Strengthening the Posture
- Challenging Motor Control
- Considerations

Summary
Speed coach Kyle Davey explores the causes and fixes of anterior pelvic tilt that saps speed and increases risk of injury among sprinters.
Lumbopelvic control refers to the ability to control the position of your pelvis and low back in relationship to each other. There are times when an arch (lumbar extension) and a pelvic tilt are appropriate, and times when they are not.
As with all movements, the best-case scenario is when athletes have conscious control of and access to a wide range of movements through many degrees of freedom. I’m not saying we need to turn all our kids into Gumby or that all mobility is good mobility, but I don’t think anyone will argue against the notion that conscious control over an appropriate range of motion is an important quality for athletes to possess.
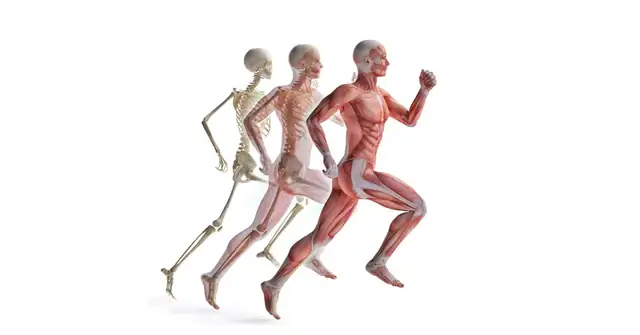
The pelvis and rib cage are of particular importance in sprinting, both from a performance and an injury prevention point of view.
Sprint kinematics are great that way. You don’t have to trade performance for health. Poor technique is slow and injurious, so as technique improves, the chances of getting hurt decrease AND you get faster. Win-win, and great selling points to parents and athletes alike.
You don't have to trade performance for health. Poor technique is slow and injurious, so as technique improves, the chances of getting hurt decrease AND you get faster, says @KD_KyleDavey. Share on XSprinters should focus on preventing an anterior pelvic tilt, specifically at max velocity. Tilting the pelvis anteriorly is thought to be a risk factor for hamstring injury, partly because it lengthens the hamstring group (since they originate at the ischial tuberosity, or the “sits bones”), and partly because of the negative effects the tilt has on kinematics downstream.
In my experience with youth athletes, anterior pelvic tilt is generally accompanied by greater horizontal displacement of the stance leg knee and less vertical displacement of the swing leg knee at toe off. In plain English: less knee drive from the swing leg, and the stance leg getting too far behind the athlete.
This is a pretty typical posture of backside mechanics, and most coaches agree backside mechanics are not ideal for developing or demonstrating speed. This movement strategy limits maximum velocity.
Most coaches agree backside mechanics are not ideal for developing or demonstrating speed. This movement strategy limits maximum velocity, says @KD_KyleDavey. Share on X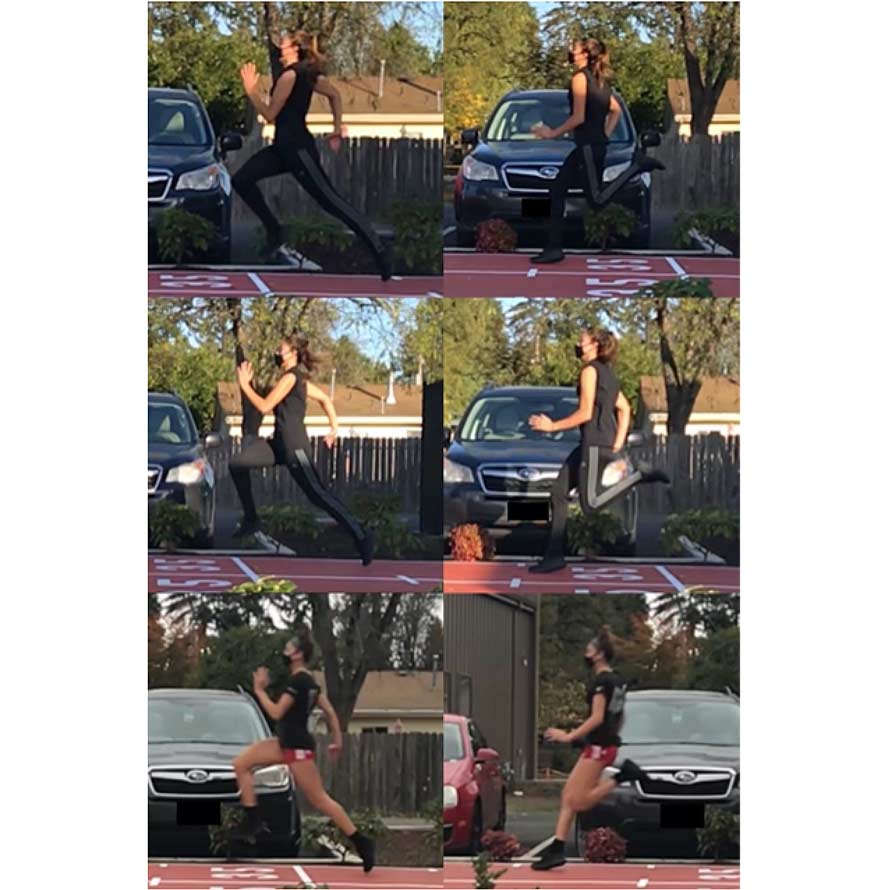
Why Bother? Anterior Pelvic Tilt: A Linchpin
In my experience, anterior pelvic tilts are accompanied by all kinds of undesirable kinematic effects downstream. Perhaps most noticeable is a heel strike pattern.
I have heard coaches talking about athletes being over-rotated, but it took me a long time to realize what that meant.
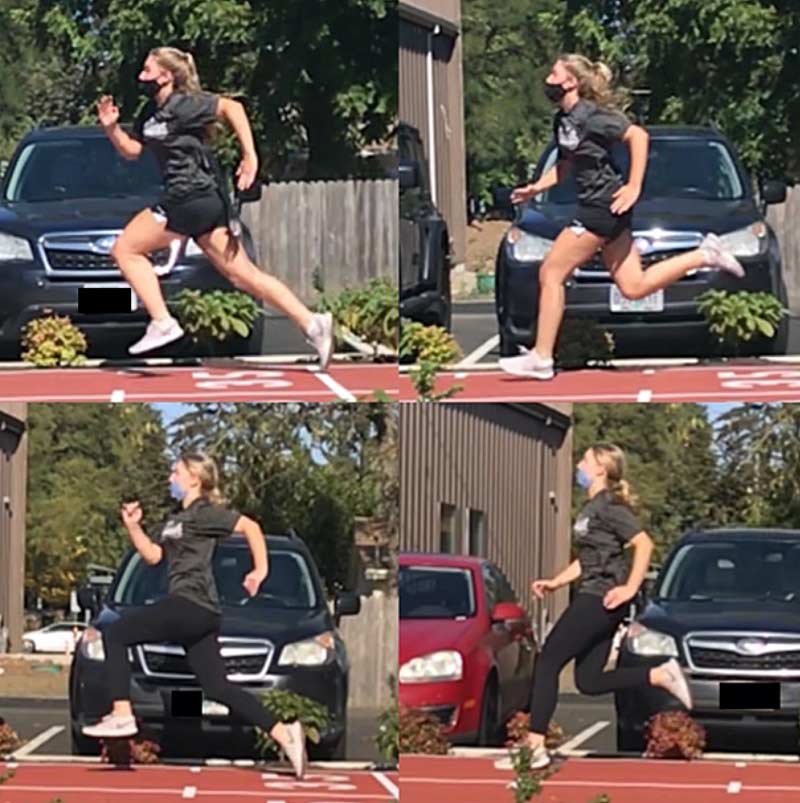
The cycle of the swing leg is effectively cut short if athletes do not complete the rise to a nearly vertical posture at max velocity. Upright posture allows the knee to rise high, giving the foot time and space to swing through and then strike downwards at the ground rather than take a diagonal path from under the butt to the ground. The downward strike, in theory, generates the vertical forces necessary to sustain high running velocities, whereas the diagonal, signature backside mechanics foot path does not.
Without reaching the proper upright posture and pelvic position, it’s tough to get an appropriate knee drive, which compromises foot position and, in my opinion, flight time.
This is (what I think) is meant by the term “over-rotated.” The athlete is rotated forward, stuck in an acceleration posture.
Another consequence of the foot hitting the ground prematurely, before it has had the chance to plantar flex, is a heel strike. The image above demonstrates this beautifully.
Heel striking used to be one of the first things I looked for when analyzing film. It still is, but now I recognize it as a symptom of a bigger problem rather than the problem itself.
More times than not, the heel strikes I see are the result of an incomplete rise, which is often (but not always) accompanied by an anterior pelvic tilt.
If you’re having trouble understanding why the tilt interferes with rising to a vertical posture, then stand up, tilt your pelvis as far forward as possible, and try and stand up straight. It ain’t comfy. Or natural feeling. And your low back will probably bark at you for a few moments after.
Once this is cleaned up and athletes are able to maintain a more neutral pelvis and reach a completely risen posture, these issues tend to evaporate away.
That’s when I point them out on film, and that’s when I get athlete buy-in. Up until that point I’m being nit-picky about what seems obscure to most kids—which way the waist is pointing—but once they see that they’re no longer heel striking and their knee is higher, and they feel how much smoother the run itself feels from this posture, they understand there’s a method to madness and I earn their trust.
Quantifying Backside Mechanics: The Kickback Method
In my opinion, measuring anterior pelvic tilt with any degree of validity and reliability requires advanced tech that most practitioners don’t have access to, like IMUs. While it’s fairly easy to spot improvements—i.e. a more neutral, less tilted pelvis—using the iPhone slo-mo film method, good luck accurately measuring pelvic tilt in degrees by using your still shots. And even for those of us who do have IMUs, analyzing the data costs us our most valuable asset: time.
Instead, we can use a proxy and quantify backside mechanics as a whole, understanding that pelvic position isn’t the only factor, but that it is a big one.
Backside mechanics are often discussed quite nebulously. Once you understand what they are, you can never un-see them, but quantifying and measuring them to track progress and have data to discuss hasn’t always been easy. For the analytical minded, this doesn’t sit well.
Here to save the day: the kickback method.
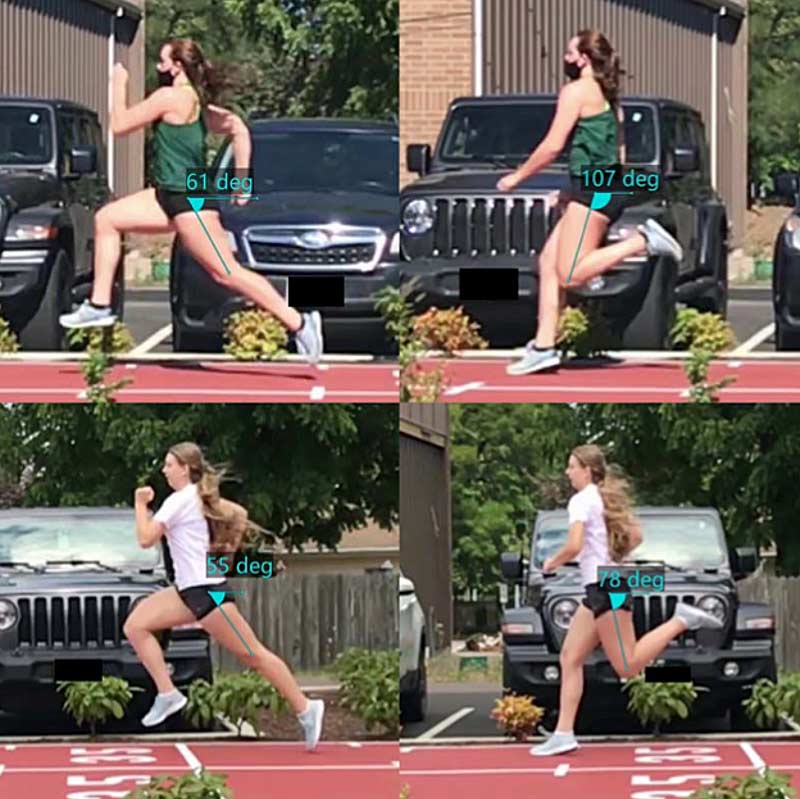
The kickback method provides a score for each stride. Higher scores indicate more frontside mechanics, lower scores indicate more backside mechanics.
To calculate this score, take the angle of the femur of the stance leg at toe off, then take the angle of the same leg at touch down, and add them together. I recommend computing the kickback score for a few strides on different runs so you understand if your athlete is fairly consistent or if there is a lot of variability from stride to stride.
Over time, you want to see your backside dominant athletes increase their kickback score, indicating they are transforming to a frontside mechanics sprint strategy.
It’s All in the Hips: The Jurdan Test and Range of Motion Prerequisites
Technique changes can happen in one session, but this assumes the athlete has the necessary hip and pelvic range of motion to enter these archetypal postures in the first place.
How can we screen for this? Enter: the Jurdan test.
Named for its creator, a Spanish physiotherapist named Jurdan Mendiguchia, the Jurdan test places the athlete into the proper max velocity pelvic position and tests range of motion of the swing leg knee and the stance leg hip in that position.
It’s easier to demonstrate than to explain.
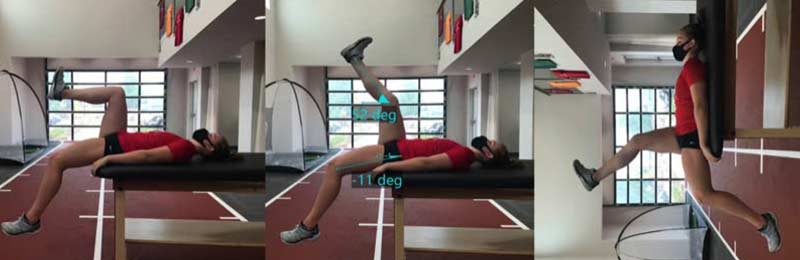
The setup here is important. The athlete needs to keep their lower back planted firmly into the table, ensuring the pelvis is not tilted anteriorly. From there, the front leg thigh is set at plumb-vertical (by you), and the back leg thigh is allowed to hang freely off the table. The athlete is instructed to extend the front knee as far as comfortable while allowing the bottom foot to passively reach for the floor as much as possible, all while keeping the low back pressed into the table (no pelvic tilt).
Snap a picture and save it for later analysis. This test is also quantifiable, using the formula explained in the caption.
If an athlete doesn’t have enough hip extension when the pelvis is neutral, then what do you think is going to happen when they sprint? Of course the thigh has to travel behind the center of mass when sprinting, so if there isn’t enough range of motion at the hip to allow that to happen while maintaining a neutral pelvis, then the pelvis has to tilt anteriorly.
If an athlete doesn't have enough hip extension when the pelvis is neutral, then what do you think is going to happen when they sprint?, asks @KD_KyleDavey. Share on XThis is the lower body version of the rib cage flaring during an overhead press due to limited shoulder range of motion. The body is going to figure out a way to get that arm up there, and if it can’t get enough motion from the shoulder, it will steal it from the thoracic spine to accomplish the goal.
This is important for you to understand as a practitioner, because asking an athlete to execute a movement they don’t even have the passive range of motion for is like asking an F-350 to have the turning radius of a Smart car—it just ain’t gonna happen.
In my experience, however, most youth athletes do have the mobility, they simply lack the motor control. They have the potential to move and control their pelvis, they just don’t know how yet.
Teaching Proper Positioning: A Two-step Process
The simple formula for getting a youth athlete to maintain a proper pelvic position while sprinting is to:
- Give the gift of basic motor control around the pelvis
- Develop strength and endurance in the proper position
- Challenge motor control in tasks of escalating demand
How long can you hold the posture? How much force/tension can you withstand before deviating from it?
Conceptualizing movement (or lack thereof, since we’re talking about preventing unwanted movement) in this way encapsulates both the muscular prerequisites and the motor control demands. Without both, the movement fails.
In the case of pelvic posture while sprinting, the question becomes: how fast can you run, and how much fatigue can you endure before your pelvis dumps forward and you revert to a backside mechanics strategy?
How fast can you run, and how much fatigue can you endure before your pelvis dumps forward and you revert to a backside mechanics strategy?, asks @KD_KyleDavey. Share on XThese are great questions, but the biggest question of all remains: how do you “fix” an anterior pelvic tilt apparent in a youth athlete sprinting?
Here’s the full progression I use to take a kid from no idea what a pelvis is to owning that bad boy at max speed. There’s four basic categories I believe are major players: thoracic dissociation, pelvic dissociation, strengthening the posture, and challenging motor control. The progression works its way through each of these categories sequentially. Hence, why the exercises are numbered: they’re ordered from least to most challenging within their category.
I’ll preface this further by saying not every athlete needs to start at the beginning of the progression. It all depends on their current motor awareness and what qualities they lack. But, you have to know the rules before you break the rules, and understanding why this list is ordered the way it is and why each category contributes to pelvic control is knowing the rules.
Thoracic Dissociation
In the world of human movement, dissociation means moving one part of your body without moving another. Thoracic dissociation, in this case, means moving the t-spine with minimal lumbar spine or pelvis movement. In other words, thoracic dissociation means holding the pelvis still—not tilting anteriorly—while the spine moves. These drills build the awareness necessary to do that.
1. Thoracic Anterior / Posterior Glides, seated
2. Thoracic Anterior / Posterior Glides, standing
Video 1. Thoracic Anterior / Posterior Glides, seated.
Video 2. Thoracic Anterior / Posterior Glides, standing.
The goal here is to achieve spinal movement in the sagittal plane, both forward and backward. Not just rounding and arching, but translation of the spinal column anteriorly and posteriorly. I don’t profess to be the best in the world at this, but you can see my spine moving in front of and behind my waistline as I go through these motions.
If you see the pelvis tilting anteriorly as the chest moves anteriorly, and vice versa, that’s no good. The pelvis should remain relatively motionless throughout this movement. Again, I’m not the greatest in the world, but not the worst, either. You get the idea.
Pelvic Dissociation
Pelvic dissociation means moving the pelvis without moving the spine. These drills bring awareness to what it feels like as well as the basic ability to consciously move the pelvis. You’d be surprised how many athletes can’t nail these simple movements the first time they try them.
Once they know what it feels like to tilt anteriorly, they can recognize when they are tilted anteriorly, and once they know how to control the pelvis and tilt it posteriorly, they have the groundwork laid to maintain a good pelvic position while sprinting.
3a. Pelvic Anterior/Posterior Tilts
3b. Pelvic Lateral Tilts
Video 3. Pelvic tilts.
I labeled the lateral tilts 3b rather than 4 because this movement isn’t required to control the pelvis in the sagittal plane, per se, but the more control over all degrees of freedom one has, the better.
Once an athlete has conscious motor control and sensory understanding of these movements, they are ready to move on to strengthening the posture, since they can actually get into the right posture now.
Strengthening the Posture
I love the deadbug progression. When executed well, it’s a great way to lead athletes towards owning pelvic position while sprinting.
The trick with the deadbug is to posteriorly tilt the pelvis as far as possible and depress the rib cage at the same time, essentially entering a hollow body position. If either of those two movements are not occurring, the athlete will not feel challenged at all. You’ll know this is happening if they’re looking up at you from the floor with a look that says “you’re crazy” or “I must be missing something.”
You’ll notice that exhales are the progression for each exercise. Don’t underestimate this part. Looks and sounds silly, I know. But if you exhale all the air you can and forcefully depress your ribcage at the same time, I guarantee your abs will light up.
Plus, the exhale helps the athlete depress the ribcage. Use it as a teaching tool when kids have trouble with that movement.
4. Deadbug Level 1: Feet on ground
5. Deadbug Level 2: Feet on ground, forceful exhales
Video 4. Deadbug Levels 1 & 2.
6. Deadbug Level 3: Hands + knees in air
7. Deadbug Level 4: Hands + knees in air, forceful exhales
Video 5. Deadbug Levels 3 & 4.
8. Deadbug Level 5: Marching
9. Deadbug Level 6: Marching with forceful exhales
Video 6. Deadbug Levels 5 & 6.
10. Hollow body holds
Video 7. Hollow body holds.
Challenging Motor Control
Now that your athletes know what a neutral pelvis feels like, how to get there, and has built some strength and endurance in that position (or at the very least, reinforced the motor pattern with strengthening exercises), now it’s time to put it to use. Now we move.
11. Ankle dribbles, walking 2x25m
Video 8. Ankle Dribbles.
12. Calf dribbles, walking 2x25m
Video 9. Calf dribbles.
13. Dribble runs, 2x25m
Video 10. Dribble runs.
14. Skips, 2x25m
15. Standing hop knee lifts, 2×12 reps
16. Standing hop knee lifts (traveling), 2x15m
Video 11. Standing hop knee lifts.
Video 12. Standing hop knee lifts (moving).
17. 30m buildup to ~70% top speed, 1 rep
18. 30m buildup to ~80% top speed, 1 rep
19. 30m buildup to ~90% top speed, 1 rep
20. 30m buildup to ~100% top speed, 1 rep
Considerations
This progression encourages the motor and sensory competencies necessary to maintain proper upright sprint postures and then challenges those postures in movements of ascending intensities clear up through buildup runs. It grabs an athlete by the hand and walks them along from basic mobility work to max velocity sprinting. The small, incremental increases in challenge is why it works.
As mentioned previously, no, I don’t take every athlete through all 20 drills on this list. Not all need that. For some, simply seeing the film and doing a few pelvic tilts and deadbugs to build sensory awareness has done the trick. For others, that hasn’t. This is where the art of coaching comes in.
You may consider making this progression an entire session, or at least the start of the session. Heck, you could integrate this into your warmup, or begin it after the warmup. Consider it an introduction to max velocity mechanics. You’d be laying a great foundation for growth in your kids by doing so. If you work with younger athletes—middle school or below—your primary job is to build a foundation anyways. Take the time to do it right.
Wickets are also an extraordinary drill. The self-organization they force often results in better pelvic positioning immediately. It’s beautiful when this happens: you don’t have to say anything, you just throw some obstacles on the track and bam, it happens.
Of course, it’s a little more calculated than that—but not by much. My bias is that the highest level of mastery comes with sensory awareness, so even if wickets do produce instant changes, I’d still seek to pair them with the sensory drills above. Nonetheless, this tiny paragraph doesn’t do wickets justice—know that many athletes respond well to them and they can thus be a powerful tool when implemented well.
Lastly: film, film, film. Know what to look for, and show the athletes so they see it. You need their buy-in. When they do get it right, they’ll say it feels smoother and less effortful, like they’re gliding over the ground.
That’s when you’ll know you’re doing great work.
