• Skip to content
  • Skip to primary sidebar
SimpliFaster

SimpliFaster

cart

Top Header Element

  • Facebook
  • Instagram
  • Twitter
  • YouTube
  • Login
  • cartCart
  • (925) 461-5990
  • Shop
  • Request a Quote
  • Blog
  • Buyer’s Guide
  • Freelap Friday Five
  • Podcast
  • Job Board
    • Candidate
    • Employer
    • Facebook
    • Instagram
    • Twitter
    • YouTube
You are here: Home / Blog

Blog

Bench Press Shoulders

Weight Room Exercise Modifications for the Post-Rehabilitated Athletic Shoulder

Blog| ByRobert Panariello

Bench Press Shoulders

Throughout my career, I’ve received numerous phone calls and had many discussions with strength and conditioning professionals and sport coaches who have inquired how to initiate training their post-rehabilitated shoulder athlete and the exercise modifications, if any, that are necessary to incorporate into the weight room program design. I have worked diligently over the past two decades to address this concern. These inquiries and discussions have led to this article, which provides some of the weight room strategies that have been successfully utilized over the years to assist in the post-rehabilitation athlete’s training to return to optimal athletic performance.

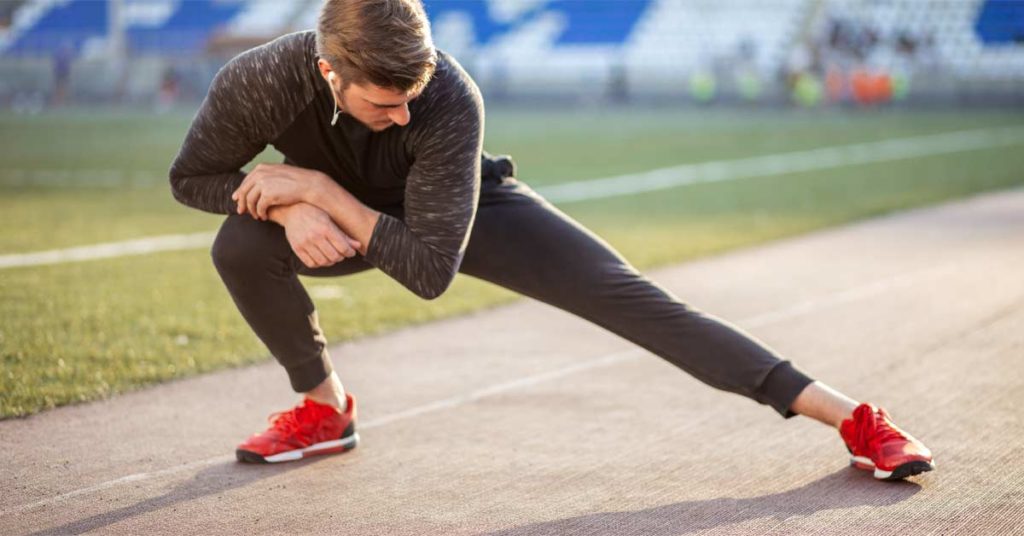
Participation in athletics requires a proficiency in both the physical qualities and sport skills for the achievement of the desired success. Unfortunately, participating in athletics also presents the risk of physical injury due to the requirements of repetitive high-velocity movement, physical contact, and other unexpected circumstances that may arise during the athlete’s training, sport practice sessions, and game day competition. No anatomical structure is immune from this threat of injury, as the consequences of athletic participation encompass the entire body from head (concussions, facial lacerations, etc.) to toe (sprained ankles, jones fractures, etc.).

Numerous athletic injuries may also include concomitant anatomical structures such as an anterior cruciate ligament (ACL) tear with a corresponding meniscal tear of the knee or a rotator cuff tear with an associated labral tear of the shoulder. Many of these injuries will require surgical intervention, and many will not. However, in each of these scenarios, the healing continuum of the body will lead to the formation of collagen fibers to produce strong scar tissue, which may subsequently lead to a reduction in joint range of motion (ROM). With specific regard to the shoulder, the joint topic of this discussion, some surgeons may elect to create a “tighter” shoulder at the time of surgery to reestablish strong joint integrity as well as an intentional loss of some end range of shoulder motion. This loss of shoulder ROM is executed to avoid the vulnerable extreme ROM positions of possible injury.

At the time of the athlete’s shoulder injury and possible corrective surgery, it is likely that they will participate in a sports rehabilitation program. At the conclusion of their rehabilitation, they will likely return to their performance enhancement training to prepare for their next competitive sport season. Many of these post-rehabilitated shoulder conditions will initially (and possibly permanently) have weight room contraindications or postoperative restrictions in their ROM requiring exercise modifications during the athlete’s training. These shoulder exercise modifications are implemented to protect the shoulder surgery, avoid an exacerbation of the athlete’s shoulder condition, and ensure optimal weight room outcomes.

This article will present some weight room modifications for the S&C professional and sport coach to consider when establishing the post-rehabilitation shoulder athlete’s training program design.

Prerequisites for the Athlete’s Weight Room Participation

Significant requirements for the post-rehab shoulder athlete are shoulder range of motion, scapulohumeral rhythm, the deltoid-rotator cuff force couple, and work capacity. Share on X

There are various physical prerequisites that athletes must achieve and demonstrate during their shoulder rehabilitation prior to their approved participation in a formal weight room training environment. For the purpose of this discussion, four of these significant requirements are:

  1. Shoulder Range of Motion – Full shoulder ROM in all planes of motion, including rotations, should be achieved unless shoulder ROM was purposely restricted during surgery. Attention is made to attain the required shoulder ROM that correlates specifically to the sport of participation. As an example, the throwing athlete does not have to demonstrate symmetrical internal and external ROM but is required to display a symmetrical total rotational arc of motion1.
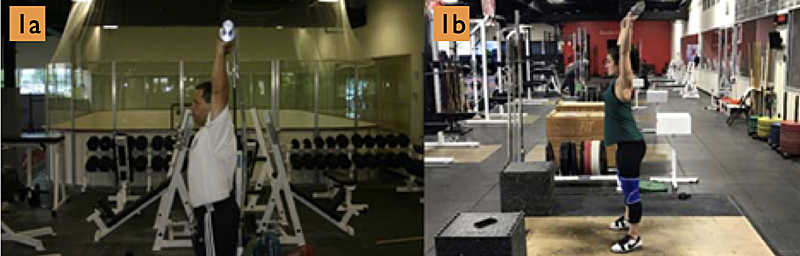
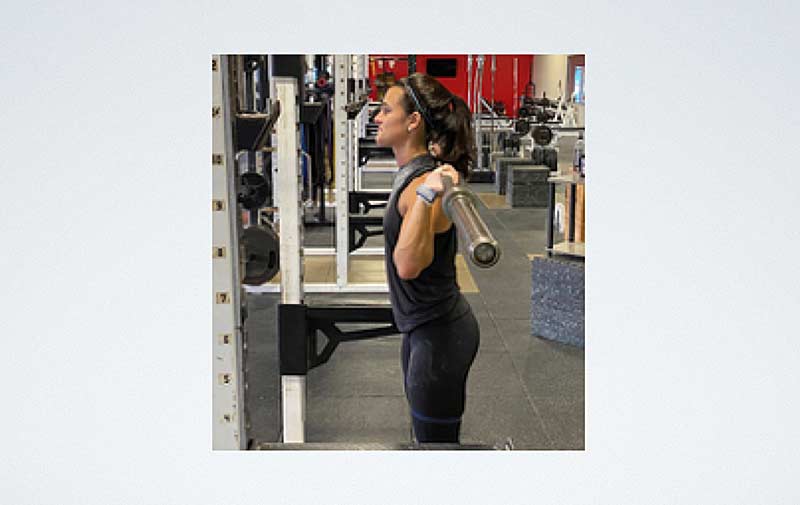
    The post-rehabilitated shoulder athlete will be expected to perform overhead resistance and conditioning exercises such as the bench press, overhead press, push press, jerks, med ball tempo, etc. during their training. Therefore, athletes without surgical ROM restrictions must achieve both passive and active full overhead arm elevation (figures 1a and 1b), which is confirmed by the olecranon of the elbow aligning with the ear. A lack of overhead shoulder ROM will result in increased stress to the shoulder and spinal compensatory extension during overhead exercise execution2, while comparative upper extremity elevated (shoulder flexion) deficits of as little as 5 degrees will increase the risk of elbow injury in throwers by almost threefold3.
Overhead Lifts
Figures 1a and 1b. Full overhead arm elevation
  1. Scapulohumeral Rhythm – The scapulohumeral rhythm of the shoulder is the ratio of glenohumeral to scapulothoracic motion that transpires during arm elevation. This ratio is determined by dividing the total amount of shoulder elevation (glenohumeral) by the scapular upward rotation (scapulothoracic). This ratio is 2:1 in unloaded shoulder elevation but adjusts to approximately 4.5:1 when lifting heavy loads overhead4. An athlete must display a reestablished unloaded scapulohumeral rhythm of 2:1 prior to attempting to lift weights overhead.
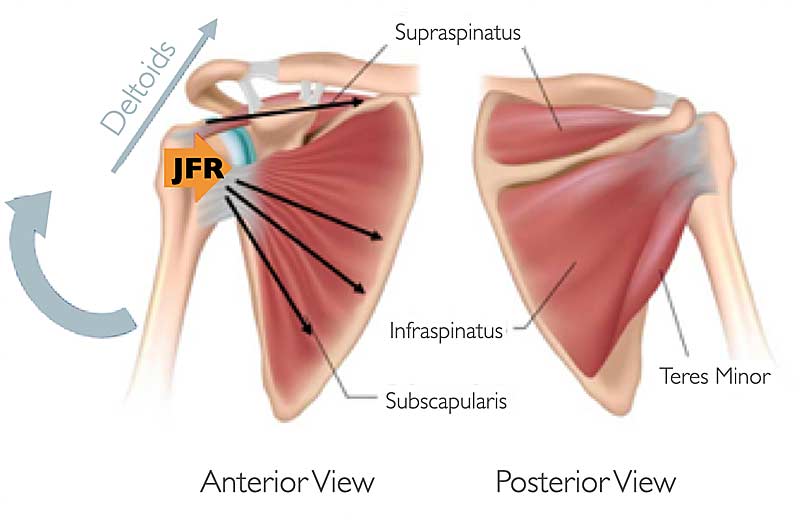
  2. The Deltoid-Rotator Cuff Force Couple – A joint force couple transpires when two equal but opposite directed forces act simultaneously on opposite sides of an axis to produce a rotation. During arm elevation, a glenohumeral force couple arises when the deltoid muscle group produces a superiorly directed force as the rotator cuff musculature produces both compressive (joint reaction force) and inferiorly directed forces (figure 2). The recommended rotator cuff strength would require the external rotators to be approximately 66% to 75% of the strength of the internal rotators to help ensure a suitable force couple.
Rotator Cuff
Figure 2. The rotator cuff muscles of the shoulder complex, the deltoid-rotator cuff force couple, and the glenohumeral joint reaction forces during arm elevation.
  1. Work Capacity – An appropriate work capacity ensures that strength, as well as the additional physical qualities established during the rehabilitation/training process, is produced repetitively over time, avoiding the onset of excessive shoulder complex and total body fatigue. With specific regard to the shoulder complex, a fatigued rotator cuff will be unable to offset the force produced by the deltoid muscle group, thereby disrupting the deltoid-rotator cuff force couple. This altered force couple results in a consequential superior and inferior migration of the humeral head in the glenoid fossa during arm elevation and with the arm resting at the side, respectively.

It is recognized that an attempted arm elevation with a fatigued rotator cuff mimics the same superior migration of the humeral head in the glenoid fossa that transpires during an attempted arm elevation with a torn rotator cuff. Shen-Kai5 has reported that induced fatigue in the rotator cuff musculature results in average increases in superior humeral head migration of 2.5 millimeters during arm elevation and average increases in inferior humeral head migration of 1.2 mm with the arm resting at the side (figure 3). It is also reported that at 0 degrees of shoulder abduction (arm at the side), the available subacromial space for rotator cuff “clearance” is approximately 11 mm, 5.7 mm at 90 degrees of abduction, and 4.8 mm at 120 degrees of abduction6. The fatigue factor of a 2.5 mm increase in superior humeral head migration potentially decreases the subacromial space by up to 52% at 120 degrees of arm elevation or higher.

Subacromial Space
Figure 3. The effect of rotator cuff fatigue on humeral head position in the glenoid fossa
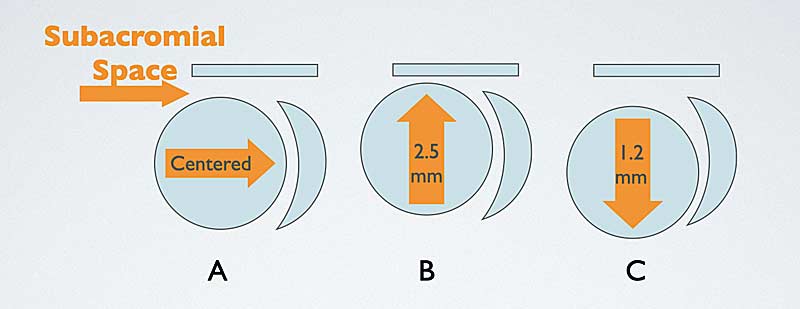
(A) normal humeral head centered alignment, (B) superior humeral head migration, and (C) inferior humeral head migration.


The scapula musculature also presents with concerns as a result of the shoulder complex muscle fatigue. During arm elevation with fatigued scapula musculature, the scapula will have a decreased poster tilt (or increased anterior tilt), increased protraction, and increased upward rotation with corresponding decreased lower trapezius muscle activity. This altered repositioning of the scapula also decreases the subacromial space. The altered combination of humeral head migration and scapula repositioning reduces the subacromial space of the shoulder, setting the stage for possible impingement pathology during repetitive overhead exercise performance. The consequential effect of fatigue on joint kinematics reinforces the significance of an appropriate training program design for the prevention of excessive muscle fatigue to ensure optimal training performance and provide ideal athlete recovery prior to their next training session.

The foundation for our modification of upper extremity weight room exercises was published in an article more than two decades ago by my good friends Tony Decker and Marty Fees7. These exercise modifications are still relevant to this day, as we have continued to advance and adapt them over the years in both the clinical and weight room settings. I present some of these exercise modifications and their justification below.

Bench Press Modifications for the Rotator Cuff and Impingement

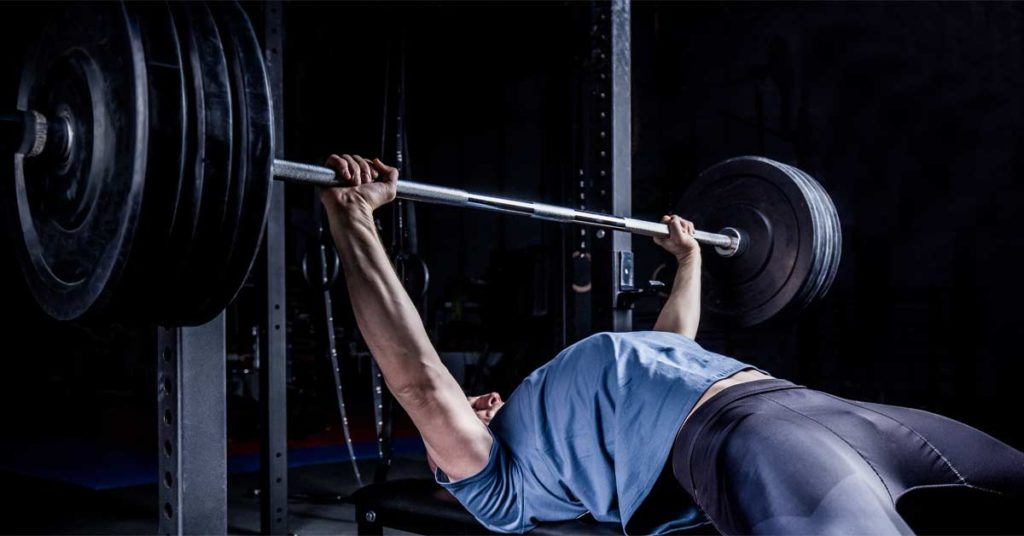
A common question asked by the athlete during their shoulder rehabilitation is “When can I start bench pressing?” It is also common to hear many high school athletes ask, “How much can you bench?” when comparing their strength levels to their peers. The bench press is a very popularly employed upper extremity strength exercise in the athlete’s training program design.

The traditional flat bench press involves a combination of motions in the sagittal (flexion/extension), coronal (abduction/adduction), and transverse (horizontal adduction/abduction) planes of the body. The bench press exercise places high levels of repetitive stress on the rotator cuff and the long head of the biceps, as well as compressive forces at the distal clavicle that can lead to the condition of osteolysis of the shoulder.

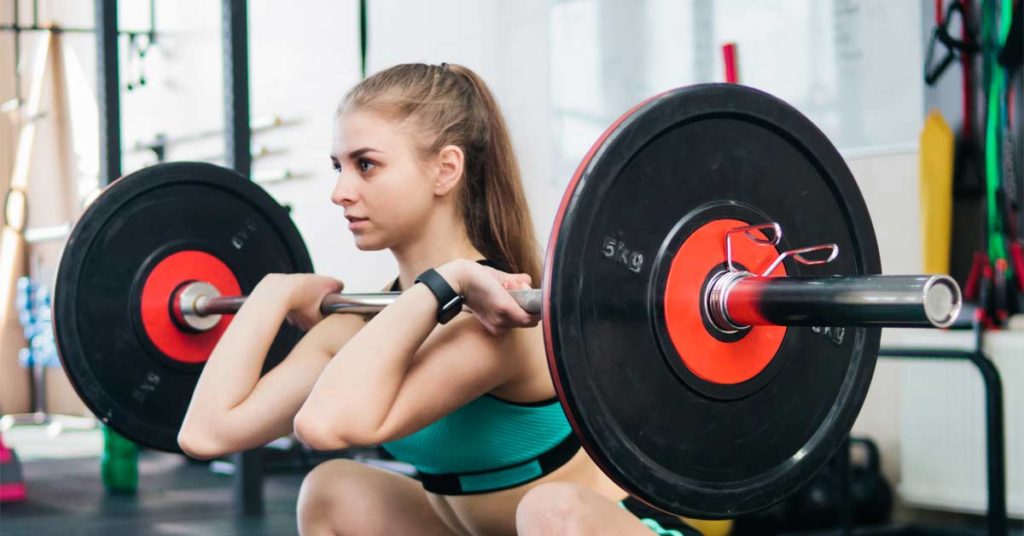
Post-rehabilitated shoulder athletes treated for rotator cuff and impingement pathology should limit their barbell hand spacing to no wider than 1.5x their bi-acromial width. Share on X

Post-rehabilitated shoulder athletes treated for rotator cuff and impingement pathology are prescribed specific barbell hand spacing and, if necessary, grip modifications for bench pressing. For these shoulder conditions, the athlete should limit their hand spacing to no wider than 1.5 times their bi-acromial width (figures 4a and 4b).

Barbell Spacing
Figure 4a. The bi-acromial width; Figure 4b. The 1.5x bi-acromial width barbell spacing for bench press exercise execution.


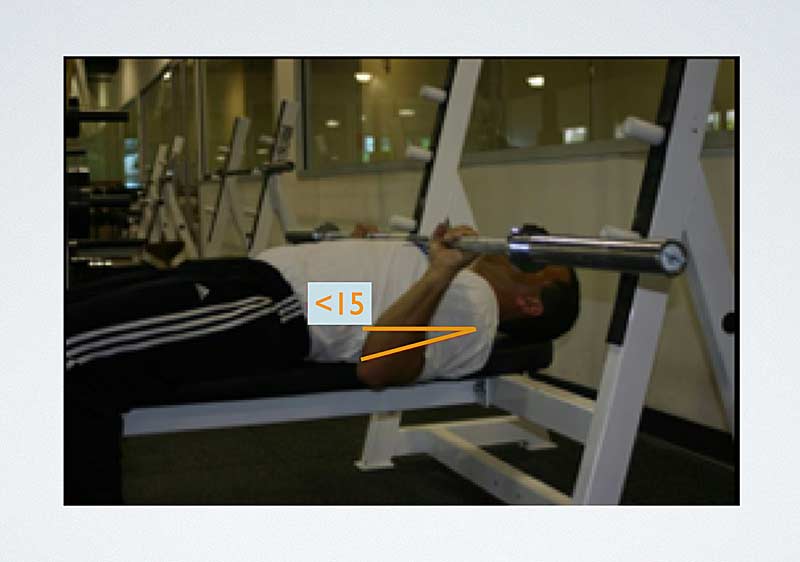
This narrow barbell hand spacing reduces rotator cuff and biceps tendon complex requirements for humeral head stabilization. This hand spacing also maintains shoulder abduction and extension at less than 45 degrees and 15 degrees, respectively, (figure 5) while aligning the clavicular border of the pectoralis major and the biceps muscles to a mechanically advantageous position to assist in shoulder flexion, decrease stress upon the long head of the biceps, and reduce compressive forces at the distal clavicle. This hand spacing also allows for a more superior barbell touch point to the xiphoid process, thus decreasing the net torque placed upon the shoulder.

Bench Rehab
Figure 5. The 1.5x bi-acromial barbell hand spacing limiting shoulder extension.

The barbell grip selection also influences the stresses placed upon the shoulder. The overhand grip of full pronation (figure 6a) and underhand grip of full supination (figure 6b) affect the biceps and supraspinatus musculotendon portion of the rotator cuff, respectively.

Shoulder Rehab Bench
Figure 6a. The overhand bench press grip; Figure 6b. The underhand bench press grip.


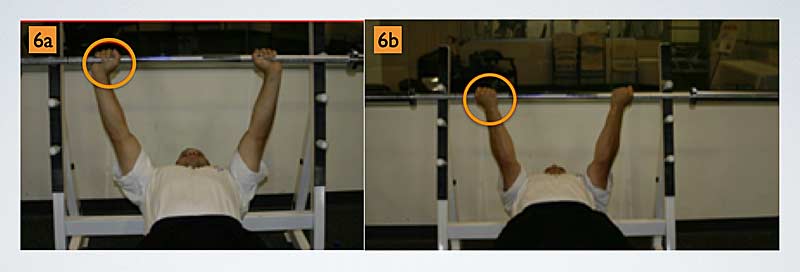
The overhand grip moves the biceps tendon from under the acromion via the internal rotation of the shoulder. However, this full pronation grip positions the supraspinatus muscle of the rotator cuff beneath the acromion. The underhand grip rotates the supraspinatus posteriorly away from the undersurface of the acromion, while the long head of the biceps is now positioned beneath the acromion.

For those athletes who present with supraspinatus pathology, initial flat bench press training with a supinated grip is a recommended consideration. As the athlete is monitored over time without reported exacerbation of their shoulder condition, you may then employ the traditional overhand grip during training.

Bench Press Modifications for Anterior Shoulder Instability and SLAP Lesions

When executing the flat bench press exercise, a mandatory training partner-assisted “liftoff” of the barbell from the supporting barbell stanchions should occur at all times. This will avoid the overhead shoulder flexion, abduction, and external rotation or “high five” shoulder and arm position that is very vulnerable to injury. The previously described 1.5 times or less bi-acromial barbell hand spacing maintains a shoulder position below 90 degrees of shoulder flexion and 45 degrees of shoulder abduction.

The athlete should avoid incline bench pressing for these shoulder conditions, as this exercise mimics the overhead “high five” vulnerable shoulder position. This is especially true for athletes who present with anterior and/or anteroinferior shoulder instability, as well as those who are post anterior-stabilization surgery. If you desire an alternative bench press exercise for a training variation, you can incorporate the decline bench press into this shoulder pathology classification program design.

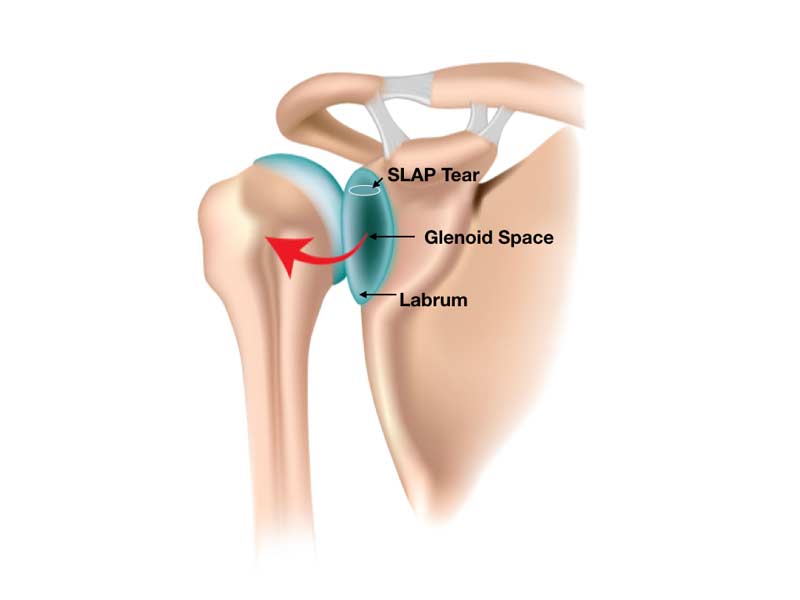
SLAP is an acronym for superior labrum anterior posterior, as these lesions occur at the glenoid labrum of the shoulder. The long head of the biceps attaches to the glenoid labrum at the 12 o’clock position (figure 7). SLAP lesion classifications include various levels of involvement of the long head of the biceps tendon, from fraying to various labral disorders with or without biceps anchor detachment.

SLAP Tear
Figure 7. The glenoid labrum, SLAP tear, and biceps tendon attachment.


It is recommended that athletes alternate the overhand and underhand grip variations on bench press training days to limit the accumulative microtrauma stress placed upon the long head of the biceps. I should note that a paradox exists with the use of these two barbell grips with regard to SLAP tears. The overhand grip removes the biceps from under the acromion; however, due to the grip’s full forearm pronation, the exercise performance stresses the attachment of the long head of the biceps. The underhand grip of full supination positions the long head of the biceps tendon under the acromion but decreases the stress on the biceps tendon during exercise performance.

Utilizing both the overhand and underhand barbell grip variations in the same training session is not recommended. Share on X

You may use the overhand and underhand barbell grip variations, along with the varying of programmed weight intensity (periodization), for training variety on alternate bench press training days. Utilizing both barbell grip variations in the same training session is not recommended.

Bench Press Modifications for Posterior Shoulder Instability

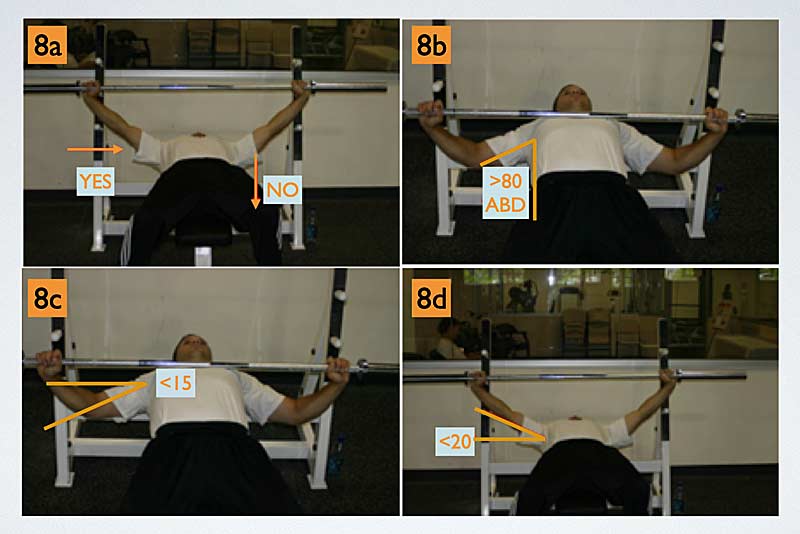
Posterior shoulder instability usually presents in athletes such as football offensive linemen. During the skill of pass blocking, high-velocity impact stresses are received by narrowly spaced and extended arms that transfer these forces to the posterior aspect of the shoulder. The previously described 1.5x bi-acromial (or less) barbell hand spacing is now contraindicated, as this hand spacing will increase the stress directly applied to the posterior aspect of the shoulder with the arms fully extended. Athletes presenting with or who have a history of posterior shoulder instability require a barbell hand spacing of greater than two times their bi-acromial width.

This wider hand spacing increases shoulder torque by 1.5 times compared to the narrower hand spacing; however, this wider hand spacing allows for a better structural approximation of the humeral head toward the center of the glenoid fossa. This improved shoulder joint structural approximation results in decreased strain upon the soft tissue structures at the posterior aspect of the shoulder (figure 8a). This increased barbell hand width position results in shoulder abduction at greater than 80 degrees (figure 8b), and horizontal abduction is greater than 15 degrees (figure 8c) at the initiation of the concentric phase of the lift. Shoulder horizontal adduction is less than 20 degrees (figure 8d) at the conclusion of the concentric phase of the exercise performance.

Shoulder Dos Don'ts
Figure 8a. Bench press glenohumeral joint forces for posterior shoulder instability; Figure 8b. Shoulder abduction; Figure 8c. Horizontal abduction; Figure 8d. Horizontal adduction with a barbell hand placement greater than two times bi-acromial width.

Bench Press Modifications for Pectoralis Muscle Tears

Pectoralis muscle tears occur in the weight room, during athletic competition, and during daily activity, with more than 200 reported cases in the literature. The pectoralis muscle consists of two heads, the clavicular and the sternocostal. Some authors continue to separate the sternocostal portion of the pectoralis muscle into a superior segment and an inferior segment (figure 9).

Muscle Man
Figure 9. The clavicular (red outline), superior sternocostal (yellow outline), and inferior sternocostal (green outline) pectoral segments.


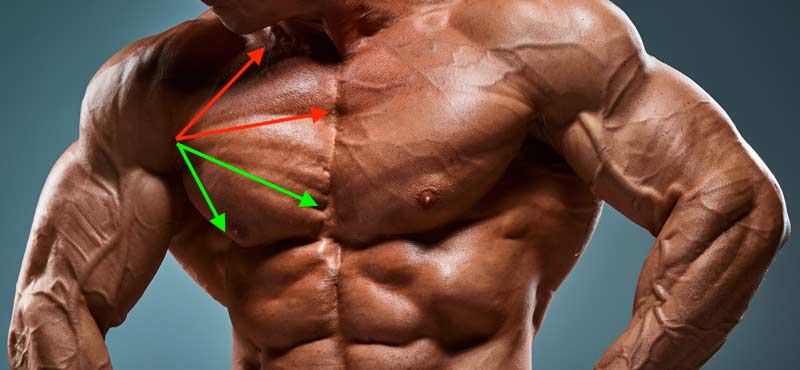
During the descent (eccentric contraction) of a heavy loaded barbell, the touch point position of shoulder extension, abduction, and external rotation can become the mechanism of pectoralis muscle injury. The clavicular and superior sternocostal segments of the pectorals are unipennate parallel muscle fibers, while the muscle fibers of the inferior sternocostal segment are multipennate. These multipennate fibers twist 180 degrees at their insertion on the humerus, placing this pectoral segment at a distinct mechanical disadvantage. This disadvantage results in a disproportionate lengthening of the inferior sternocostal muscle fibers at 30 degrees of shoulder extension, the final portion of the eccentric phase at the barbell touch point. The heavy loaded eccentric phase at touch point maximally stretches these muscle fibers, subjecting them to the “plastic range” on the stress-strain curve of musculotendinous soft tissue and exposing them to possible rupture/injury.

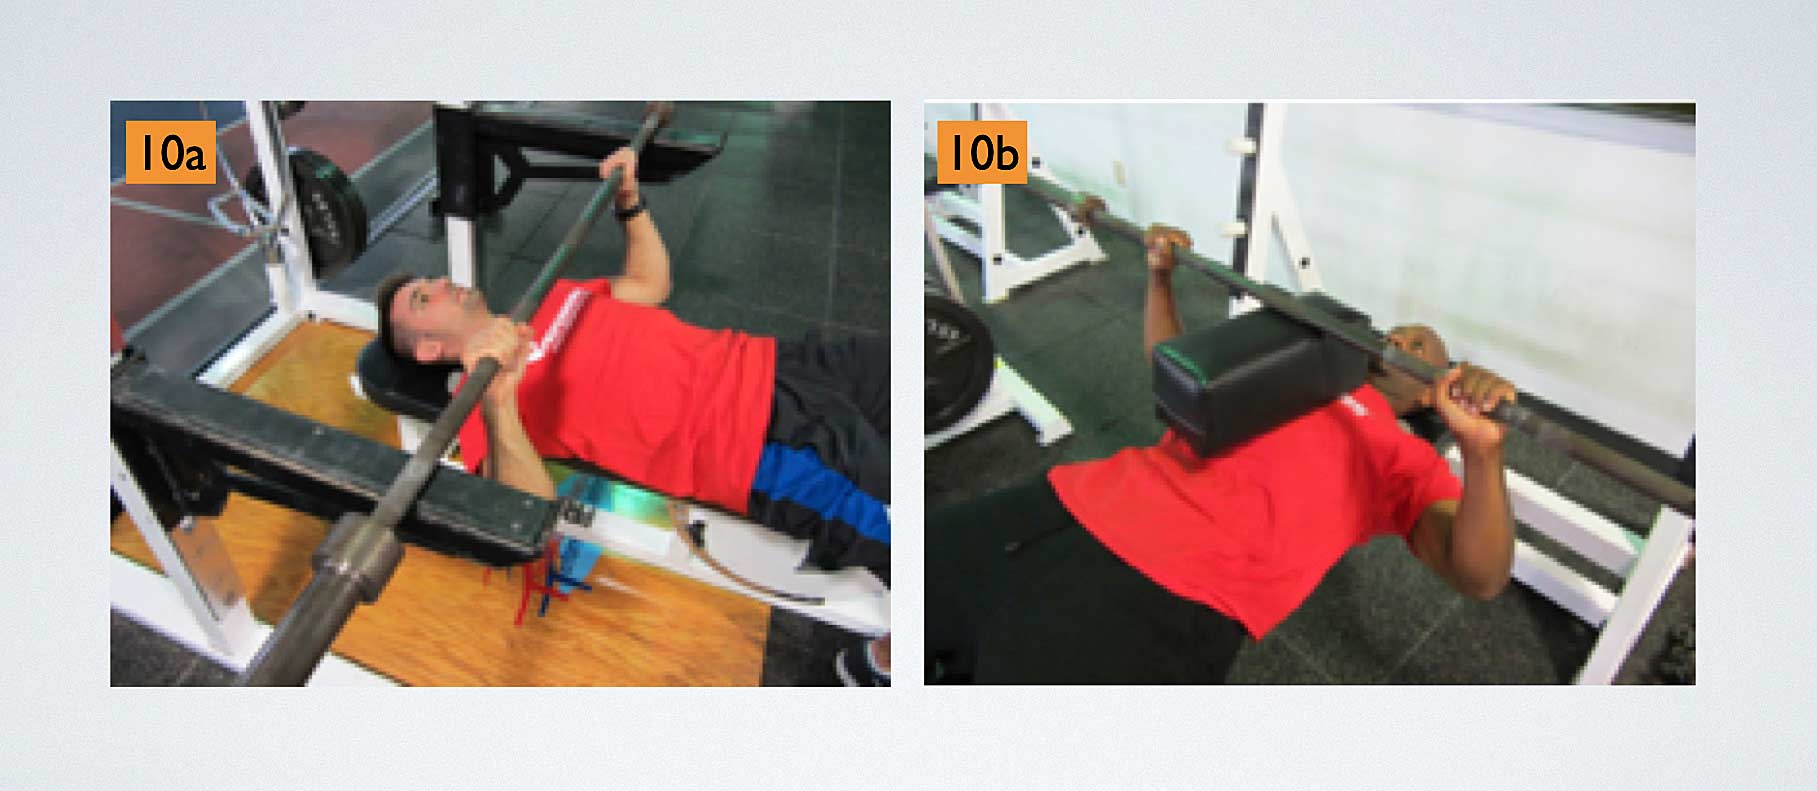
At the time of the post-rehabilitated pectoralis tear/surgical repair and the athlete’s reintroduction to the bench press exercise, a narrow barbell hand spacing of a bi-acromial width of 1.5x or less is recommended. You should incorporate rack starts (figure 10a), board presses (figure 10b), and floor presses to limit the athlete’s shoulder extension to 0 degrees (neutral) at the barbell touch point upon the chest. By limiting shoulder extension to 0 degrees, the sternocostal musculotendinous soft tissue avoids the plastic range on the stress-strain curve. When prescribing the board press modification, we prefer the use of a foam cushion (figure 10b) versus wooden boards to prohibit the athlete from relaxing and thus maintaining muscle “tension” during the barbell transition from the eccentric descent to touch point to concentric ascent.

A rack start is a bench press exercise modification where the barbell is placed on squat rack stanchions or power rack steel pins at or as close as possible to a pain-free and comfortable chest touch point position (figure 10a). The advantage of a rack start is the bench press exercise starts from or close to the barbell touch point, the most vulnerable position for pectoral injury. If the athlete feels pain or discomfort when initially attempting to raise the barbell from the rack position, the exercise immediately stops, as the barbell is safely supported.

During the traditional flat bench press exercise performance, once a successful barbell liftoff transpires, the athlete now “owns” the weight. If there is pain or discomfort during the eccentric descent or at the barbell touch point, it places the athlete in a very precarious position for injury, as they are now likely unable to return the barbell to the starting extended arm position.

Shoulder Rehab Press
Figure 10a. Bench press rack start; Figure 10b. Board press using a foam pad. Both techniques limit shoulder extension to zero degrees (neutral), avoiding the plastic range of the stress-strain curve.


The post-rehabilitation athlete who has had their pectoralis tear surgically repaired has likely not bench pressed in quite some time. Therefore, their previous personal best bench press performance and workout program weights should not be the standard for their returning program design. The athlete should not attempt to bench press prior to their six-month post-surgery date and without their surgeon and rehabilitation professional’s approval. When the athlete returns to their weight room training, the S&C professional will likely have to make a “guesstimate” of the athlete’s bench press abilities. Figure 11 presents postsurgical pectoralis repair bench press guidelines.

Repair chart
Figure 11. Postsurgical pectoralis repair bench press program guidelines.

Unloading the Barbell Intensity at the Bench Press Touch Point

Regardless of the athlete’s present or past condition or surgery, a very high level of stress is applied to the shoulder at the bench press barbell touch point. Therefore, it is certainly feasible to unload this barbell position at the time the athlete returns to training. Our preference for this unloading process is the application of chains versus rubber bands to the barbell.

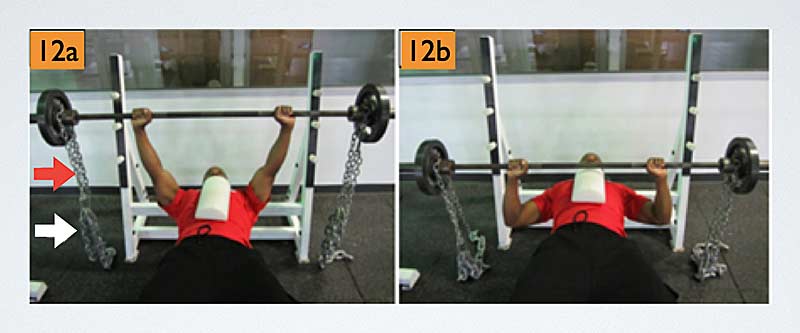
It is certainly feasible to unload the bench press barbell position when the athlete returns to training. For this unloading process, we prefer applying chains versus rubber bands to the barbell. Share on X

The rubber bands apply resistance via their attachment to either the bench or the floor, possibly affecting the barbell pathway during the bench press performance. Since chains are only attached to the barbell, the barbell pathway is determined by the exercising athlete. As the attached chain makes contact with the ground surface, the barbell weight intensity is progressively reduced until the time of the barbell touch point. During the barbell ascent, the chains “reload” the barbell, resulting in a gradual increase in the exercise weight intensity until the arms are fully extended. Our preferred method to apply chain resistance to the bench press exercise is with the use of leader chains.

Leader chains (figure 12a) allow for accuracy in determining specific loads at the initiation and touch point portions of the bench press exercise. The weight of the leader chains and the weight of the chains they support are added to the weight of the loaded barbell, providing the total weight of the exercise performance at barbell liftoff. During the barbell descent, the weight intensity progressively decreases until reaching the touch point on the athlete’s chest.

At this vulnerable barbell position for both the shoulder and pectorals, an accurate weight intensity is accounted for, since the previously measured barbell and leader chain weights apply resistance as the additional weighted chains have been unloaded and rest on the floor (figure 12b). This loading process is quite different when compared to the technique of simply hanging chains in the absence of leader chains, where the accurate weight of the barbell when achieving the touch point position is relatively unknown.

Bench Chains
Figure 12a. Leader chains (red arrow) and weighted chains (white arrow) with barbell chains loaded; Figure 12b. Barbell weighted chains unloaded.


The initial program design for the post-rehabilitation shoulder and pectoral athlete should be conservative in nature. An athlete, S&C professional, or sport coach who is too aggressive in their program design will increase the risk of rotator cuff, biceps, and pectoralis tendinitis and possible reinjury. The onset of a tendinitis will not only regress the athlete’s training, but it is a condition that may require an extended period of time to resolve.

The Shoulder Press

When appropriate, I am an advocate of the shoulder press exercise, and I previously wrote an article supporting overhead exercise performance on SimpliFaster. This article emphasized the overhead exercise performance with the barbell positioned in front of the neck with an exercise pathway in the plane of the scapula. The front-of-the-neck barbell position is the preferred overhead exercise if the post-rehabilitated athlete has met all of the physical prerequisites prior to attempting this exercise. This is especially true of the post-rehabilitated pectoral tear athlete, as it is highly unlikely that a subsequent injury or rupture of a pectoral muscle will transpire when lifting weights overhead.

An alternative overhead shoulder exercise is the behind-the-neck press. When prescribing exercises for athletes with present or past shoulder pathology, exercise caution with this barbell position. The behind-the-neck press involves motion in both the sagittal and coronal planes of the body. The starting exercise position places the barbell on the upper trapezius muscles at the level of the first thoracic vertebrae. This starting barbell position places the arms in abduction, and very often an external rotation of greater than 90 degrees (figure 13), as the scapula position also adjusts via retraction from the plane of the scapula to the coronal plane.

Unloaded Press
Figure 13. The behind-the-neck press shoulder abduction and external rotation position.


This repositioning of the scapula also adjusts the length-tension of the rotator cuff, resulting in a less-than-optimal force production from these muscles during exercise execution. The behind-the-neck shoulder dynamic external rotation range of motion has often been reported as greater than passive measurements2, thus increasing the risk of possible shoulder injury. Passive shoulder external rotation should match or exceed the dynamic external rotation exercise requirements prior to performing the behind-the-neck press barbell exercise.

Behind-the-neck exercise performance is required for athletes participating in Olympic weightlifting or who utilize the Olympic lifts or accessory exercises of the Olympic lifts during their performance enhancement training. Loaded shoulder abduction, external rotation, and high-five positions place stress upon the rotator cuff, inferior glenohumeral ligaments, anterior soft tissue and labral structures, SLAP lesions, and those athletes who present with shoulder impingement and anterior glenohumeral instability. When appropriately prescribed, it is recommended to initiate behind-the-neck exercises from a higher barbell position at the base of the skull at ear level. This higher barbell position will reduce the exercise range of motion and stress to the anterior and anteroinferior soft tissues structures of the shoulder.

The Clean and Power Clean

The clean and the power clean are commonly programmed exercises for the enhancement of the athlete’s power, rate of force production, and applied impulse. Both the clean and the power clean are total body exercises that require motions in both the sagittal and coronal planes of the body. The post-rehabilitation concerns that arise with these exercises, especially the clean, are with regard to anterior/anteroinferior soft tissue structures, and more specifically the biceps-labral complex, and SLAP lesions.

Large shoulder distraction forces are placed upon the biceps-labral complex, especially during the first pull, and then followed by the acceleration phase of these exercises. Therefore, the clean exercise is not recommended in the initial programming for the post-rehabilitated SLAP shoulder athlete due to the prolonged distraction forces that occur via the initiation of the exercise from the floor. For this reason, the power clean exercise performed from blocks is the preferred choice in this post-rehabilitation athletic population.

Additionally, the catching of the barbell requires both shoulder and elbow flexion, which applies stress to the biceps tendon. If the athlete reports discomfort with the catching of the barbell, the catch should be avoided and revisited after a period of training. Although various exercise adjustments may be necessary, along with the monitoring of an athlete’s tolerance to exercise performance, some specific modification guidelines are recommended for the post-rehabilitated SLAP athlete. These guidelines include the following:

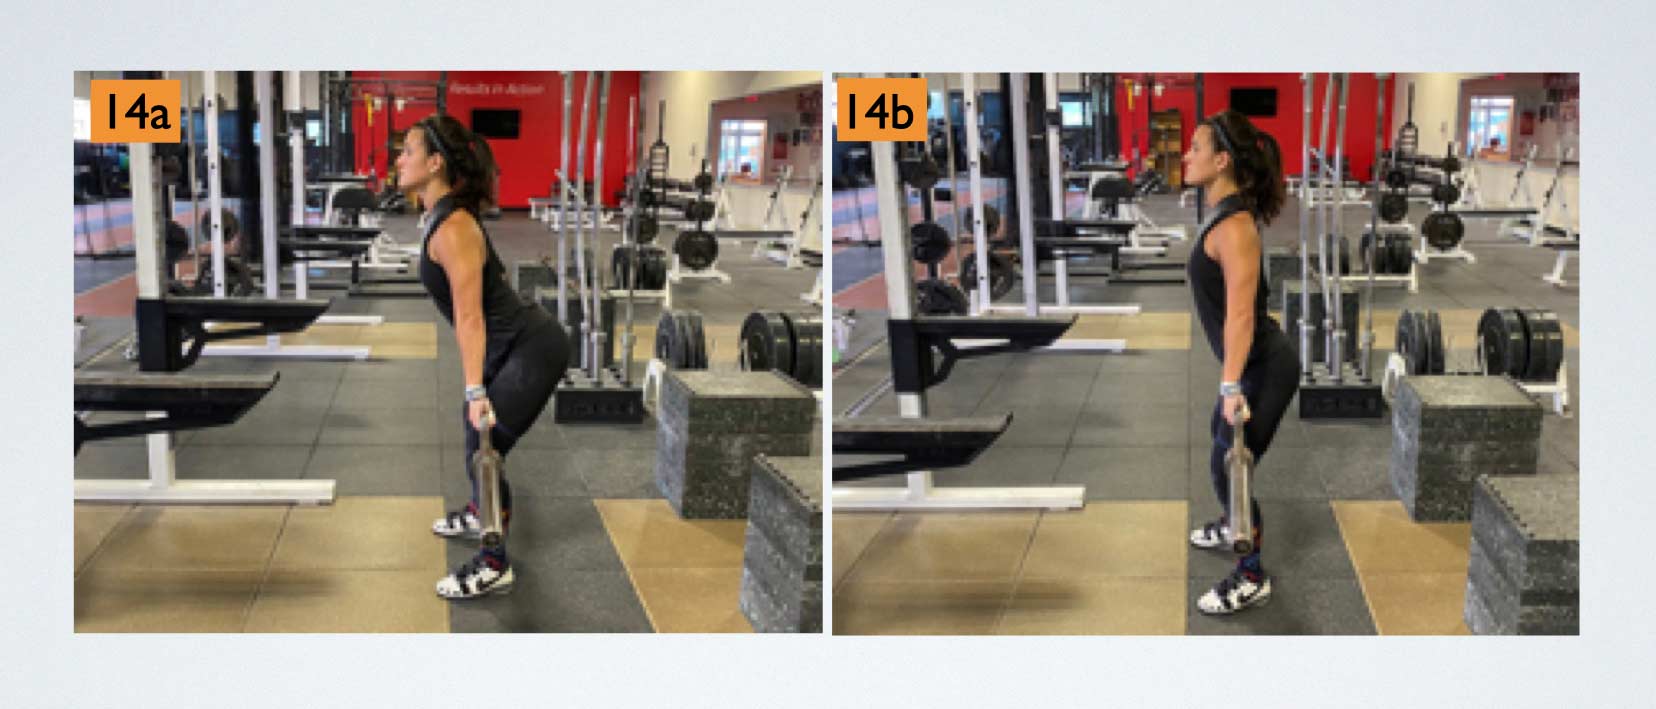
  • Initiate the power clean execution from blocks, thus eliminating the support of the weight of the barbell (distraction forces at the shoulder) with the arms extended.
  • Prescribe initial exercise execution with the barbell positioned at approximately above the knee to mid-thigh (figure 14a). The exercise may be appropriately advanced to an elevated barbell position at approximately the mid-thigh to the hips (figure 14b).
  • If the athlete reports shoulder discomfort during the catching of the barbell, clean pulls should replace the power clean in the athlete’s program design.
  • Utilize bumper weight plates, if available, during the exercise performance. This will allow the athlete to freely return (drop) the barbell to the blocks upon completion of each exercise repetition to avoid high distraction forces at the shoulder.
  • Initial exercise programming should include a velocity-based training philosophy utilizing lighter weight intensities executed at higher barbell velocities.
  • Barbell Position
    Figure 14a. The power clean/clean pull barbell position at above the knee to mid-thigh; Figure 14b. The barbell position at the position of the mid-thigh to hips.

    The Squat

    The squat exercise is a total body strength exercise incorporating both the lower and upper extremities. Athletes traditionally perform the exercise with the barbell across the back, so it is therefore known as the back squat. During the execution of the back squat, the upper extremities are involved in a combination of motions in the transverse (external rotation) and coronal (abduction) planes of the body. The concerns for loading an abducted and externally rotated shoulder have been previously described in the behind-the-neck press exercise section of this discussion. These same shoulder position concerns advocate for squat exercise modifications for the post-rehabilitated shoulder athlete’s program design.

    The first exercise modification includes the use of a safety squat bar during the athlete’s exercise performance. The safety squat bar places the shoulder in a less stressful position of shoulder flexion, adduction (adduction neutral), and internal rotation. When utilizing the safety squat bar, the athlete has the option to hold onto the bar or to incorporate a bilateral hand support technique with the squat rack.

    When opting for a bilateral hand support exercise technique, a “holding surface” on the squat rack at an initial height level equaling 60 degrees to 80 degrees of shoulder flexion is advised. Too low a holding height level may promote an increase in spinal flexion at the initiation and perhaps throughout the athlete’s squat exercise performance. At the conclusion of the squat descent, shoulder elevation should not exceed approximately 95 degrees to 100 degrees, the same shoulder ROM that occurs at the extended arm position during the bench press exercise. While the arms increase in elevation during the squat descent, the athlete should remain erect throughout the exercise performance.

    When using this technique, the hand placement occurs with the palms open to maintain balance yet prohibit pulling on the holding surface. The inability to pull on the holding surface will omit shoulder distraction forces that may transpire during the exercise execution with a closed hand grip. If at any time the athlete struggles during this open-handed bilateral support technique, they can quickly grasp the holding surface, as hand contact is always maintained to ensure a safe exercise performance. Lighter weight intensities are recommended until the time the athlete comfortably adapts to this exercise technique.

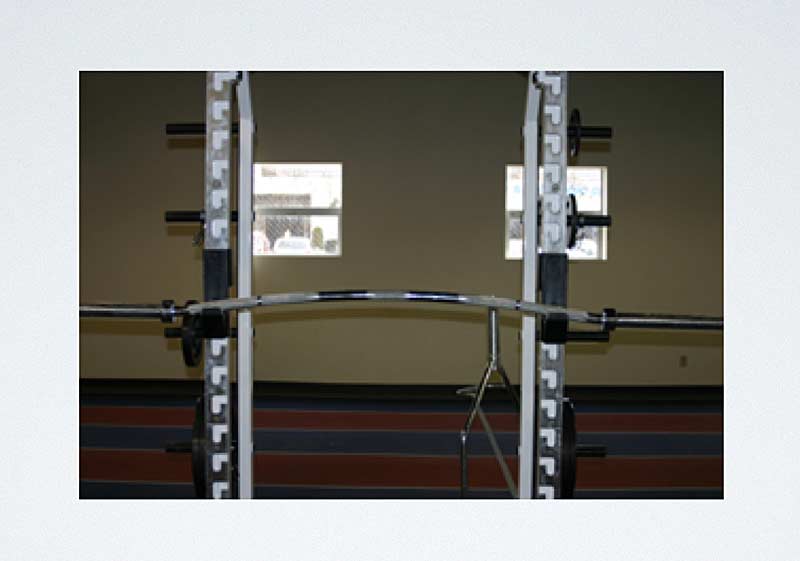
    Another option for the back squat is the utilization of the buffalo barbell (figure 15). The curved nature of the buffalo barbell allows for a wider hand placement at the lower curved barbell ends, which decreases the amount of required shoulder abduction and external rotation during the squat exercise performance.

    Buffalo Barbell
    Figure 15. The buffalo barbell.


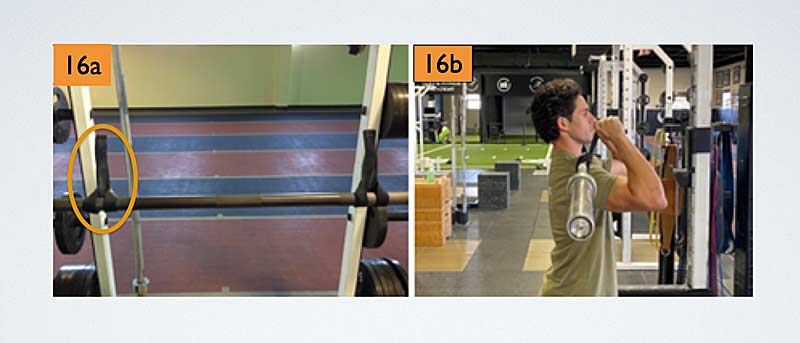
    If a safety squat bar and buffalo barbell are not available for the athlete’s training, a third modification/option is the front squat. The execution of the front squat exercise still stresses the lower extremity and hip muscles, as the barbell is now supported mainly by the anterior deltoids and balanced with the hands. The front squat positions the shoulder at 80 degrees to 90 degrees of flexion, less than 15 degrees of external rotation, and neutral abduction, a position preferred for the shoulder athlete’s squat exercise performance. If the athlete lacks the wrist, hand, and elbow flexibility to maintain the barbell during the front squat exercise, straps may be inverted and attached to the barbell (figure 16a) to assist in the front squat exercise execution (figure 16b).

    Barbell Strap Position
    Figure 16a. The barbell straps position. Figure 16b. Front squat exercise performance with straps.


    Initial programming of the front squat exercise intensity should be at levels of 50% to 60% of the athlete’s back squat capabilities. The S&C professional may increase the exercise intensity over time (up to approximately 80% of back squat capabilities) while they monitor and receive feedback from the athlete. The modified back squat and front squat may be alternated during the athlete’s training days. Additional lower extremity strength training options include the use of belt squats and the kBox flywheel with a harness. The belt squat and kBox flywheel allow for lower extremity strength enhancement with the exclusion of the upper extremities during the exercise performance.

    Summary

    The shoulder is the most mobile joint of the body when compared to the osseous stability and protection provided at the hip joint, the other ball and socket joint of the body. This mobility contributes to the shoulder’s vulnerability to injury. The athlete who presents with a shoulder injury may or may not require surgery; however, after injury/surgery rehabilitation followed by post-rehabilitation, performance enhancement training will likely occur.

    The shoulder is the most mobile joint of the body… This mobility contributes to the shoulder’s vulnerability to injury. Share on X

    This article has provided the S&C professional, as well as the sport coach, with a few exercise modifications for consideration in the weight room training of the post-rehabilitated shoulder athlete. These exercise modifications may be utilized during the athlete’s initial training and eventually discontinued as the athlete physically adapts over the course of their training. These exercise modifications may also play a permanent role in the athlete’s training due to prescribed shoulder exercise contraindications as well as intended postoperative ROM restrictions. The S&C professional should also maintain communication with their rehabilitation professionals, team physicians, and surgeons to determine the best post-shoulder rehabilitation training program design and program design progressions for their athlete.

    Since you’re here…
    …we have a small favor to ask. More people are reading SimpliFaster than ever, and each week we bring you compelling content from coaches, sport scientists, and physiotherapists who are devoted to building better athletes. Please take a moment to share the articles on social media, engage the authors with questions and comments below, and link to articles when appropriate if you have a blog or participate on forums of related topics. — SF


    References

    1. Wilk KE, Macrina LC, Fleisig GS, et al. “Correlation of Glenohumeral Internal Rotation Deficit and Total Rotational Motion to shoulder Injuries in Professional Baseball Pitchers.” American Journal of Sports Medicine. 2011;39(2):329-335.

    2. McKean MR and Burkett BJ. “Overhead shoulder press – In-front of the head or behind the head?” Journal of Sport and Health Science. 2015;4(3):250-257.

    3. Wilk KE, Macrina LC, Fleisig GS, et al. “Deficits in glenohumeral passive range of motion increase risk of elbow injury in professional baseball pitchers: a prospective study.” American Journal of Sports Medicine. 2014;42(9):2075-2081.

    4. McQuade KJ and Smidt GL. “Dynamic scapulohumeral rhythm: The effects of an external resistance during elevation of the arm in the scapula plane.” Journal of Orthopaedic & Sports Physical Therapy. 1998;27:125-133.

    5. Shen-Kai C, Simonian PT, Wickiewicz TL, Otis JC, and Warren RF. “Radiographic evaluation of glenohumeral kinematics: A muscle fatigue model.” Journal of Shoulder and Elbow Surgery. 1999;8(1):49-52.

    6. Soslowsky LJ, Flatow EL, Bigliani LU, and Mow VC. “Articular geometry of the glenohumeral joint.” Clinical Orthopaedics and Related Research. 1992;(285):181–190.

    7. Fees M, Decker T, Snyder-Mackler L, and Axe MJ. “Upper Extremity Weight-Training Modifications for the Injured Athlete.” American Journal of Sports Medicine. 1998;26(5):732-742.

Games Based Approach

How to Design and Coach Sessions in a Games-Based Model

Blog| ByNick Gies

Games Based Approach

Early in my coaching career, I made an observation: The best coaches seemed to be those who talked the least while still getting what they wanted out of a group of athletes. These coaches acted like facilitators, guiding athletes through a well-thought-out session plan while allowing room for exploration and mistakes to happen. This is in stark contrast to the brand of coaches who make themselves heard throughout the entirety of a session or attempt to correct every possible movement error with extensive dialogue.

…the best coaches acted like facilitators, guiding athletes through a well-thought-out session plan while allowing room for exploration and mistakes to happen, says @CoachGies. Share on X

Some of these coaches I observed didn’t necessarily have the most detailed knowledge of sport science, possess an endless library of drills to choose from, or concoct fabulously detailed technical explanations for every movement problem—but their athletes seemed to be very engaged, moved well, and succeeded in their sport. I soon realized that simply knowing all of the technical models and fixes to every drill or being the most vocal—while obviously useful at certain moments—is only one piece of a larger puzzle for improving athletic performance.

Based on my experience shadowing these coaches, I understood that I needed to learn how to engage athletes and improve their athletic abilities, while keeping my coaching feedback to the minimum necessary to push them forward.

From Beginner to Expert: How Do Athletes Become Great?

The ALTIS Virtual Apprentice Coach Program this past June was a fantastic learning experience. There were many great presenters, but Stu McMillan’s presentation on the “Art and Science of Speed for Team Sport” was particularly enlightening. He reminded me of some key models in motor learning that I had forgotten and introduced me to a few new ones. Some of these concepts included the Yerkes-Dodson Law, Newell’s three stages of learning, the challenge point framework, and how motor learning is embedded into our physical world. (For the sake of brevity, I will not dive into an explanation of each. However, I would encourage you to further explore these concepts.)

Now, in order for my simple brain to make sense of these concepts, I needed to come up with a straightforward way to view them. In essence, the previously mentioned motor learning models highlight what needs to happen as an athlete navigates the road toward expertise, or as I have conceptualized it, the Beginner-Expert Development Pathway (figure 1).

When learning a new skill, there need to be periods of stability to teach and solidify previous learning, as well as periods of chaos and uncertainty to challenge and expand learning. Share on X

When learning a new skill, there need to be periods of stability to teach and solidify previous learning, as well as periods of chaos and uncertainty to challenge and expand learning. As an athlete’s skill set improves (moving toward expertise), the relative challenge of training elements should increase to stretch their abilities, while slightly reducing the frequency of stable and predictive elements, as the stimulus they provide diminishes as an athlete improves. A novice or developmental athlete needs to constantly navigate between stability and chaos to develop the physical, technical, tactical, and mental capacities necessary to successfully execute a specific task in a given environment.

Beginner Expert Pathway
Figure 1. The Beginner-Expert Development Pathway. A developing athlete needs to constantly navigate between stability and chaos to develop the physical, technical, tactical, and mental capacities necessary to successfully execute a specific task in a given environment.


The following are five key pillars that must occur to ensure an athlete moves along this pathway successfully:

  • Pillar 1. If a drill is too comfortable, the athlete will become disengaged and no learning will take place. Conversely, if a drill is too challenging for their current abilities, the athlete will revert to what they are comfortable with and no exploration will take place. An optimal level of stimulation is needed so an athlete remains engaged while exploring new movement solutions.
  • Pillar 2. The athlete needs enough time and exposure with a movement skill before it becomes automated.
  • Pillar 3. Periodic manipulation of environmental constraints must occur to cause an athlete to adaptively detect and generate correct movement solutions.
  • Pillar 4. The appropriate difficulty for a beginner would be inappropriate for an expert, and vice versa.
  • Pillar 5. As an athlete gets better at perception-action (more stable), the task difficulty needs to increase (more chaotic).

My belief is that coaches who can implement these ideas effectively will be able to develop more skilled athletes in a wide variety of contexts…not just athletes proficient at a specific drill in training. These athletes will be able to successfully adapt and move in a wide variety of environments, which is ultimately what we want. However, I feel something gets lost in our profession among all of the articles and videos on new variations of drills, programming, and exercise selection: How do we actually coach an athlete through this process?

Coaching stable and predictable drills and exercises is fairly straightforward (notice I didn’t say easy!). Coaching the more chaotic elements while getting real development out of athletes, on the other hand, can be more difficult. This is what the coaches I was talking about at the beginning of this article did the best.

Fun and Games

In a previous article, I argued that a games-based approach (GBA) can be an effective tool in an S&C coach’s arsenal and explained how athletic development not only includes physical abilities, but tactical, technical, and mental components as well (i.e., the Four Coactive Model of Player Preparation from Dr. Fergus Connolly and Cameron Josse). The question now is: How the heck can I, an S&C coach, implement games to effectively drive athletic development? I don’t just want kids playing random games; I’ve got movement patterns to teach! And isn’t all that fluffy stuff the job of the sports coach?

Traditional vs. GBA
Figure 2. A traditional approach to technical development versus a games-based approach.

Understanding the Utility of GBAs

In traditional models of coaching,1 technique mastery is emphasized prior to game play. There is an emphasis on skill work in overly simplistic, pre-planned, and unpressurized situations that do not mimic the demands seen in a real game (sounds like some agility videos that go viral on social media). This will ultimately create a separation between technique and tactical knowledge, causing a disconnect between training and the game where players are not able to respond to relevant stimuli.


Video 1. “Partner Tag”: The pair needs to work together to get into position and pass the ball to get close enough to tag another player. (See Appendix below for full game rules.)

On the other hand, GBAs are an alternative means to contextualize learning within game-like activities (not to be confused with “free play,” although that can still be useful in certain instances). They were originally created to help PE teachers develop students’ tactical awareness to ultimately improve game performance. The coach acts more like a facilitator, using questions to promote player dialogue and reflection to guide the learning process….which was exactly what I saw in the best coaches I’ve observed!

The four common features of GBAs are:

  1. Design and manipulation of practice games/activities (emphasis added).
  2. Use of questioning.
  3. Opportunities of player dialogue.
  4. Building a supportive socio-moral environment.

The literature is also quite convincing in favor of GBAs, as highlighted by Kinnerk et al.’s review.1 It shows that in team sport environments, GBAs can improve tactical awareness and decision-making, while also increasing players’ affective domain development (the mental stuff, like emotions, feelings, and attitudes). If you’ve ever watched these types of games in action, you can see qualities such as anticipation, timing of runs, scanning, communication, energy system development, various starting positions, and short and long accelerations.

GBAs are fantastic opportunities to tie in multiple training elements for athletes to problem-solve, while increasing the transfer of your training programs to the sport itself.

Coaching GBAs

As we look at how to incorporate GBAs in an S&C setting, we should ask the question: What are we actually trying to achieve with our athletes?

In my opinion, we as performance coaches are trying to develop skilled athletes who can rapidly read and react to environmental triggers with the correct movement solution. We are looking to improve not only physical capacities, but the technical, tactical, and mental pieces that allow an athlete’s physical abilities to be used to full effect.

When deciding which games work best, there really are no hard and fast rules. There are endless possibilities, and I’d encourage you to just sit and think about tweaking classic games to incorporate specific skills you are trying to target. I try to come up with a new game, or at least slight rule changes to my favorite games, almost every week with my athletes. I am always assessing where my athletes are on the Beginner-Expert Development Pathway and determining whether I need to increase chaos or increase stability.

I’d encourage you to just sit and think about tweaking classic games to incorporate specific skills you are trying to target, says @CoachGies. Share on X

Variations of tag or ball games, with added twists or rule changes to target specific developmental areas, often produce the best results. These can be included at the beginning or end of sessions in 10-minute blocks as a fun warm-up or a way to tie in the technical components of the session. You can also use GBAs as a conditioning component or use a game as the entire training session…the possibilities are limitless.

Some examples of ways to alter traditional games include:

  • Team captains. When introducing a new game, designate team captains who are the only players you tell the rules to, and they then have to relay that information back to their respective teams. You can assess how good the athletes’ communication and listening skills are based on how well the teams are playing. If it isn’t very good, you can stop the game and chat about the importance of listening to instructions and then re-explain the rules to the captains. Usually the players are much more engaged the second time.
  • Limit who can speak. Sometimes I only allow certain players to speak during the game (or else risk a point deduction). If there is an athlete who you want to see develop their communication skills or get more involved, this one works great. Conversely, if you have a particularly disruptive athlete, getting them not to talk and focus on body language works wonders.
  • Unexpected points. As a game is being played, you can randomly award extra points for specific moves or skills, thereby causing kids to try those movements over and over. For example, three points instead of one if you score with your non-dominant leg during a small-sided soccer game.
  • Players choosing rules. Get an athlete to come up with a rule. This can be loads of fun because it even surprises you and can get the kids to really buy in because they are involved with the session on a deeper level.
  • Keeping track of your team’s points. This is a great one to make sure all players on a team are paying attention. A few minutes into a game, I’ll stop everyone and say “Everyone on Team A, shout out your score in 3, 2, 1!” and do the same for Team B. Often, several people won’t say anything (because they don’t know) or a few athletes will say different scores. Unless everyone on the team shouts the same score, I make them go back to zero. This gets the kids instantly tuned in because what kid wants to be the person costing the team all their points? As the game continues, players make sure they yell out the score and that their teammates are paying attention, and when I stop the game to ask the score again, they are discussing amongst themselves to ensure everyone is on the same page.
  • Superpowers. Give a particular player an extra ability during a game. This could be extra points if they score, they are the only person who can run or shoot, or something wildly different. This is a fantastic option for a quieter player to get them more involved, or for a new athlete to the group, because it gets them involved straight away and others need to engage and talk with them. It will also get the players creating strategies on the fly around that player’s superpower.
  • Special Bonuses. These are used as rewards to entice players to try new things. If they successfully execute a skill, they get a short-term bonus (e.g., point multiplier, run with the ball, etc.). You can also have it where if the team gets a certain number of points or passes, they get a particular superpower for a limited time (e.g., 20 seconds) before they lose it again. You can also use it for when an athlete successfully executes a particularly hard skill, the team gets a large amount of points or an automatic win (e.g., cross field kick in a rugby-style game).
  • Multiple Levels. For each game you implement, have progressions and regressions. Once athletes master a particular level (or at least improve their consistency), add a new layer that pushes them along the Beginner-Expert Development Pathway.

    • For example, if you are playing some sort of small-sided soccer game, you can add a level where if a player turns a ball over to the other team, they need to sprint 20 meters off the playing area to a randomly placed cone before they can enter the game again. This results in a few things: a momentary advantage for the other team to capitalize on, speed and fitness development for the player running to the cone and back (because they want to get back into the action), and more mental pressure on each player because they don’t want to turn the ball over so they need to improve their defensive skills and tactical abilities.

Notice how none of these examples center around how the athlete moves. Of course, you can address this when needed, but it is great to see athletes improve the way they move simply by changing the environmental constraints rather than through specific and direct coaching feedback. However, don’t simply add rules and leave it at that—to get the full effect from GBAs, we need to act as facilitators and use questioning and promote player dialogue. You need to ensure you step in at the right time and guide athletes to learn for themselves, while also stepping back and letting the athletes get on with it if you recognize they are being challenged appropriately.

It is great to see athletes improve the way they move simply by changing the environmental constraints rather than through specific and direct coaching feedback, says @CoachGies. Share on X

Similarly, you don’t need to over-coach and make the execution of the game “perfect,” as that could stunt the learning process. I try to stay as silent as possible (besides general encouragement) to see how athletes perform without constant coaching feedback. You’d be surprised how quickly an athlete improves simply through trial and error.


Video 2. “Cone Scramble” game. The player with the ball cannot step on a cone if another player is touching it. As they run around looking for free cones, the other players must work to cover up the cones. (See Appendix below for full game rules.)

When a rule is added, or you notice players struggling with a concept or skill, bring them in to talk about it. The key is to use open-ended questions and get players to guide their own learning process.

  • “Ok, what’s going well/what’s going wrong?”

  • “What do you think you could do differently to get a better result?”

  • “What if you tried this? Do you think that would help? What else could you try?”

  • “Johnny, you seemed to be getting frustrated. What’s the problem and what can we/you do about it?” 

  • “Jimmy, what are your thoughts/what do you think?”

  • “Did you notice what happened when you implemented X? That was great! What else can we do to improve that result?”

By making players part of the problem-solving process, you will get more engagement, and the athletes will get better at working together. Often, I don’t even give a solution or correct them when they come up with something themselves—we just go with it and re-assess. Sometimes you will have to help them along a little more, especially with younger or more developmental athletes, but kids tend to be cleverer than we think. You can then see which athletes are more natural leaders and which ones might need more help in this area. Similarly, you can see which kids get overly frustrated or take it out on other players—then, you can have a private word or encourage them to be a better teammate and search for a solution rather than complaining.

When working with a group, I often implement the idea of “Start fast, finish fast”…similar to the concept of Play-Practice-Play. I tend to start a training session with a fast-paced GBA to get kids dialed in right away, spend the middle portion working on more traditional training (drills, linear sprints/jumps), and finish with another fast-paced GBA to contextualize the technical components while making sure kids leave excited and beg their parents to come back next week. Based on the intended outcomes of the session or the needs of the particular athlete(s), the activities and games I select will help me create the environment needed to develop those particular goals. During the middle of a session, I can spend time doing drills and more technical pieces to reinforce what I want out of the games, but this is much easier to do when the kids are excited and having fun throughout the session because of a fast start.

The possibilities are endless in terms of the games you can implement, and the key is guiding your athletes along the Beginner-Expert Development Pathway, with the game as a tool to achieve this. Now that I’ve (hopefully) justified the utility of GBAs in an S&C context, I’d like to share a particularly fun game I use regularly.

Chesty Ball

I often come up with silly names for the games we play. The city I’m based out of, Chestermere (Alberta, Canada), is the inspiration for the name Chesty Ball. It is a variation of basketball and can be played either full court or half court (or even smaller), but it is especially good when played on the mini courts at middle schools. We play with a volleyball, but any ball will do.

There are several levels for scoring points:

  • One point for hitting any portion of the backboard
  • Two points for getting it in the net.
  • Five points for kicking it off the backboard.
  • Minus one point for hitting just the rim or missing the backboard completely.

We introduce this game initially with no running with the ball (just pivoting) and turnovers only if the ball is intercepted or goes out of bounds. Once athletes understand the basics, we introduce running with the ball and other rules to speed up decision-making and gameplay. This scoring system allows players of all abilities the chance to score and contribute to the team’s success, as well as offering high-reward scoring options, but the point penalty for missing ensures players will still be strategic and not just try to kick the ball endlessly. Awesome game, especially when you add new scoring options and other rules.

As you can see, this game incorporates physical (fitness, linear and multidirectional accelerations, jumping), technical (passing, catching, throwing, body control), tactical (coming up with game plan, reacting to your own players and opponents, responding to new rule changes), and mental elements (composure, communication). More importantly, you don’t need to coach any particular element too much. You set the parameters of the game, implement various rules, and let the athletes go. You then facilitate learning through targeted questioning to ensure the goals of the session are being achieved. To me, this seems like the optimal environment to develop actual athletes, not just kids who can perform in the weight room or repeat a drill.

Final Questions to Ask Yourself

This article is not an attack on current coaching practices. My goal is to have you reflect on your own session plans and coaching behaviors during those sessions and ask:

  • Do I include elements of GBAs?
  • Do I spend periods of time being silent and simply watching?
  • How often do I act as a facilitator?

Of course, you need to spend time breaking down skills and developing specific movement patterns in a controlled and stable environment. But by understanding the motor development process and how an athlete moves from a beginner to a skilled performer, you will understand the need for chaotic elements that challenge and stretch an athlete’s learning ability.

GBAs allow a coach to incorporate multiple components of athletic development while contextualizing learning into more realistic scenarios, says @CoachGies. Share on X

GBAs allow a coach to incorporate multiple components of athletic development while contextualizing learning into more realistic scenarios. By acting as a facilitator, you will foster reflection and learning on a deeper level, while creating a fun and enjoyable experience for your athletes.

Appendix: Game Rules & Setup

  1. Partner Tag
  • In a small box (8-10 meters per side), two players are working as a team to tag the rest of the players.
  • To get someone out, one tagger must touch a player with a ball (ball needs to be in hands and not thrown); however, the tagger is not allowed to run with the ball.
  • The pair needs to work together to get into position and pass the ball to get close enough to tag another player.
  • Benefits of Game
    • Communication and teamwork between the two taggers.
    • Evasion (less constrained than Spider’s Web).
    • Tactical abilities to target and home in on a player.
    • Hand-eye coordination, throwing accuracy to moving target, catching ability.
    • Scanning and awareness of surroundings.
    • Change of direction and short accelerations.
    • Anaerobic conditioning.
  1. Cone Scramble
  • This works best with a minimum of six players.
  • Randomly scatter cones down 1-3 meters apart (have one more cone laid down than the total number of people involved).
  • Place two pylons down, one 10 meters away from the playing area, and the other one 15 meters away from the playing area (more on this shortly).
  • Have the players circled up in the middle of the cones passing the ball quickly amongst themselves.
  • When the coach shouts “GO!”, the player holding the balls runs around the 15-meter cone, and the rest of the players run around the 10-meter cone.
  • The goal for the player with the ball is to step on two separate cones; the goal for the other players is to work as a team and prevent the player from stepping on two cones for as long as possible.
  • The player with the ball cannot step on a cone if another player is touching it. As they run around looking for free cones, the other players must work to cover up the cones.
  • Keeping a player from touching two cones for more than 30 seconds is incredibly challenging.
  • Benefits of Game
    • Communication between players to ensure cones are being covered (cannot cherry-pick a cone or else the player with the ball will win very quickly).
    • Scanning and awareness of surroundings.
    • Change of direction and short accelerations.

Since you’re here…
…we have a small favor to ask. More people are reading SimpliFaster than ever, and each week we bring you compelling content from coaches, sport scientists, and physiotherapists who are devoted to building better athletes. Please take a moment to share the articles on social media, engage the authors with questions and comments below, and link to articles when appropriate if you have a blog or participate on forums of related topics. — SF


References

Kinnerk, P., Harvey, S., MacDonncha, C., and Lyons, M. “A review of the game-based approaches to coaching literature in competitive team sport settings.” Quest. 2018;70(4):401-418.

Track-Pet-Peeves

The Pet Peeves of Track and Field

Blog| ByChris Parno

Track-Pet-Peeves

Track is back! After 300+ days away, starting pistols are once again firing at track facilities across the country. In the weeks prior, student-athletes and teams alike were consumed with returns to campus, uniform/gear disbursement, and the always-anticipated media days. There is something special about putting on your school’s uniform for the first time and making a final mirror check before going in front of the camera (more to come on this).

Recently on “Jeopardy,” there was a question that sent the track Twitterverse into a tizzy. The question asked for the metric race that is “just a bit shorter” than the mile. The three contestants answered with: the 10,000m, 10m, and 500m. Twitter outrage from the track community brewed as the 1500m race is the obvious answer. My reply on Twitter was “not going to lie, non-track folks who don’t use the metric system have no reason to know this…don’t be outraged track community.” Although these answers didn’t bug me as much as it did others, there are issues out there in the track and field world that do collectively frustrate.

All sports have their own set of quirks, yet track and field seems to be the quirkiest of them all, says @ChrisParno. Share on X

All sports have their own set of quirks—long sleeves under a basketball jersey, futbol (soccer) players dramatically falling at the touch of a finger, fist fights in hockey, and NFL scouts hand-timing 40’s—yet track and field seems to be the quirkiest of them all. The following repetitive and cliché characteristics turn into recurring annoyances that encompass our coaching lives:

  1. Always requesting the clap in the horizontal jumps.
  2. The monster phenomenon.
  3. Hurdle hoarding in the warm-up area.
  4. Embellished seed times.
  5. Embellished meet day warm-ups.
  6. Hamstrings as the scapegoat.
  7. Same arm same leg syndrome (SASLS).

We’ll take some time to unpack the first six and then spend a bit more time on the SASLS, as it has more recently been sweeping the nation.

1. Requesting the Clap

I love the horizontal jumps. In championship scenarios, the horizontal jumps can bring dramatic shifts as athletes repeatedly barrel down the runway. The lead can change numerous times within a round, and the encompassing energy can be infectious. As the jumper prepares for their path down the runway, they ready their stance and wonder, “Should I start the clap?”

As a rational sprints coach, I value the clap. We don’t need to talk about the times I have caught myself yelling cliché sprint coach lines such as “MOOOOVE, GET OUT, PUSH,” but for this section we are talking about the jumps. I value the importance of the clap, as it can truly heighten the mood and the readiness of the athlete in a championship scenario. The opposite side of this is completely anticlimactic… So jumpers, I implore you—if you call for it, you better back it up!

Follow me here. You (the coach) are down by the blocks watching a sprinter work on a beautiful meet day block start. Suddenly, out of the corner of your eye, you see a jumper on the runway signaling for “the clap.” These jumpers may signal by yelling out “oh yeah!” while they start their clap pattern or “come on” as they signal toward the crowd (or lack thereof in COVID-19 times). There is no going back at this point, as the expectation is that something special is about to happen.

As the clap initiates, the crowd gets excited, and the jumper eagerly progresses down the runway and hits the board perfectly, to the roar of the watching crowd. This is the perfect scenario that is far too often interrupted by another pet peeve to come.

Where the pet peeve portion of the clap comes into play is when the jumper’s effort is light years away from the heightened atmosphere of the initiated clap. Picture this—the clap starts, the athlete sprints down the runway, the crowd noise gains steam, and the athlete runs through the board, shaking their head. As a clap participant, this athlete moves to my “no clap list” and remains there for the indefinite future with no appeals.

As a spectator, it can be tough at times to know when to join in on the clap. Are we equal opportunity clappers? Does your clap follow the principles of a meritocracy? The following examples are when a spectator should steer clear of the clap:

  1. If the selected clap pattern is more complicated than the blueprints of the facility. In the jumper’s mind, it sounds great, but by the time they are halfway down the runway, the crowd has managed to turn it into a sound resembling hail hitting a metal roof.
  2. If the athlete is again calling for the clap after running through the board on the previous attempt (see above).
  3. If the athlete is calling for the clap and is not in the top five spots of the competition.

It is not hard to know when the clap is coming. If an athlete in the competition is wearing sunglasses indoors, a reversed generic Nike hat, tall socks (long jump only), and/or excessive amounts of jewelry/chains, etc., it’s coming. These athletes are large advocates for the clap, so be advised, folks.

2. The Monster Phenomenon (MP)

As a 6,100-point decathlete, I didn’t need imagination to know my long jump PR was completely average at 6.14 meters. I’d say a majority of my jumps were within a bandwidth of 30 centimeters, with a season average of 6 meters. After 11 years of coaching, I’ve discovered a horizontal jump phenomenon that would have instantly increased my street cred. This can be described as the “Monster Phenomenon.”

I had my fair share of fouls in my multi-event career. Knowing what I know now, I should have told others I was jumping monster 6.50-meter jumps all day but just could not get on the board. The illusion would then be in place that I was better than what I have put down for years leading up to those monsters left in the pit.

As a coach in the facility, you may overhear the MP played out in the following four ways:

  • Athlete says, “Well, I went 6.80 meters, but I fouled two MONSTER jumps over 7 meters.”
  • Coach holds up their thumb and pointer finger, showing how much their athlete fouled by, while saying “Get the foot down, you’ve got a monster in you!”
  • Athlete says, “I didn’t make the final, but I left some monster jumps in the pit…easily over 7 meters.”
  • Athlete says, “Coach couldn’t get me on the board, but all my jumps were over 7 meters.”

As seen by the above quotes, this phenomenon is more prevalent in male populations…many times, by the same sunglass-wearing, clap-initiating groups as in the previous section.

This has roots within the ego of the mind that finds embarrassment for some reason in not hitting the board. A consistent runway approach is a skill and needs to be practiced and rehearsed; fouling a jump every once in a while is part of a jumper’s life. The only other explanation is some sort of threshold response that initiates when a foul occurs, and the athlete’s body propels them multiple feet past their current PR, knowing it will never be measured and will be referred to as “the one that got away.”

Many times, coaches want these “monster” jumps measured as if the athlete’s entire shoe length foul doesn’t factor into the equation, says @ChrisParno. Share on X

Many times, coaches want these jumps measured as if the athlete’s entire shoe length foul doesn’t factor into the equation. At a meet, if you hear the words “measure it” being yelled from the horizontal jump area—you know a monster just got away.

3. Hurdle Hoarding in the Warm-Up Area

There are certainties in life: The sun rises each morning, and it sets every evening, and there will only be eight hurdles in the warm-up area of an NCAA championship. This may be an inclusion strategy by the host site, but it forces the hands of hurdles coaches across the nation. Do we send athletes into the warm-up area to stack their bags by a rack of hurdles? Move three hurdles by our athletic training table? Travel with school-owned hurdles to the meet?

There are certainties in life: The sun rises each morning, it sets every evening, and there will only be eight hurdles in the warm-up area of an NCAA championship, says @ChrisParno. Share on X

Our program started bringing foldable scissor hurdles to all big championships meets. This allows us flexibility and autonomy within the warm-up area and provides guaranteed equipment. Now, I am an equal opportunity hurdle warm-up type of coach; I have no issues setting up some basic one- and three-step drill patterns and allowing other athletes through before setting up for starts.

The hoarding-style hurdle coach (may be seen with Bluetooth earpiece) will undoubtedly be in the warm-up area the moment the facility opens; you may even see them running to the warm-up area. They will take at least four of the eight hurdles and squat on them like a bird on an egg.

These coaches’ athletes won’t actually warm up with these hurdles beforehand; they most likely will wait until everyone else is in the warm-up area before going through an obscure set of drills no one has ever seen before that involves a lot of grunting. These drills are set up purposely with spacing that allows for no other participants and delays the warm-up process. Throughout the warm-up time, other athletes will ask to use the hurdles, and these types of coaches will point toward their Bluetooth earpiece or wireless headphones and say they are on a call.

If this scenario happens in an outdoor warm-up space, good luck—the 8-10 provided hurdles will be in all different corners of the area. If these hurdles are within 8-10 feet of the school’s tent, there is an aura/forcefield that doesn’t allow for other schools to come use them.

In a world that calls for unity, hurdle coaches are not to be forgotten.

4. Seed Times

The meet entry process resembles a Black Friday TV sale, with limited units (lanes in fast heats) and a hoard of people (coaches) trying to secure these units/spots. The creation of the Track and Field Results Reporting System (TFRRS) website centralized results. With this, Direct Athletics’ entry system syncs previously performed results, simplifying the entry process. This new technology makes it difficult to enter a time outside of a current or recent performance. Many meets enforce marks from the current season for entry purposes and may not allow any sort of manually entered time.

Before this technological revolution, the entry process resembled the Wild West. In the early 2010s, we hosted a lot of meets using an online entry system that forced manual entry for all marks. No preloaded marks forced most coaches to open a separate browser to reference TFRRS or refer back to previous meet results (pre-TFRRS).

Undoubtedly, this opened the door for unbelievable/fake seed times. As a young coach, I was pulled in! Shoot, enter an outdoor PR here, a projected PR there, and man we are loading up the fast heats! Fast results rarely ever followed with these creative seed times, and I smartened up. In current times, embellished seed times come in three forms:

  1. Sneaking in outdoor PRs for indoor races.
  2. Older/postcollegiate athletes entering PRs that are 10-15 years removed from when they were attained.
  3. The “get better competition” entry that subsequently leads to intense gapping as the gun fires.

Heat sheets are gold in the coaching community. After 11 years of full-time coaching, I hold to our team motto from the 2015 season, “TFRRS, only results matter.” In the social media world, trends come and go, but the TFRRS time stamp is forever. If you want to be in a faster section, put yourself there by attaining a faster time!

5. Meet Day Warm-Ups

During fall training at Minnesota State, our sprint/hurdle program has 4-5 different styles of warm-ups based on the theme of that day. Acceleration days bring warm-up exercises that have more horizontal projection qualities, while recovery days involve more dynamic stretches and relaxation.

On meet day, the theme is competition. The warm-up should reflect ascending intensities that lead into the race or event. It doesn’t take long in the warm-up area to realize this is not always the case. At times, the stress/excitement around competition reprograms the brain of the athlete and tells them they need all sorts of new and never-done exercises.

Collegiate athletes spend roughly 15 weeks in the fall performing coach-led warm-ups every day, only to forget them all the moment a meet starts. When you don’t know what to do, improvise. A standard B skip turns in to a series of large swooping front kicks, preparing the athlete to repeatedly kick down a door. A basic walking calf stretch turns into something resembling rolling up a rug as fast as possible, and athletes start to do weird short bursts of explosive high knees like they are playing track and field on the original Nintendo (NES) track pad.

Collegiate athletes spend roughly 15 weeks in the fall performing coach-led warm-ups every day, only to forget them all the moment a meet starts, says @ChrisParno. Share on X

No one is safe from this odd meet day warm-up occurrence, but it can turn into a detriment, as excessive warm-ups eventually bring diminished returns. A watchful eye and consistent communication on the goal of warm-ups can help rid the track community of this pet peeve.

6. Hand on the Hamstring

There is nothing worse than a race/attempt not going as planned. The hand on the hamstring coincides many times with the excessive seed time information from above.

We’ve all seen it happen: The gun goes off in the 200m, and in a flash the stagger is made up on an athlete and you can see the shift begin. The poor soul who had the stagger made up on them fights for a bit, but inevitably shifts down into cruise mode. As they come down the home stretch with about 30 meters to go, the athlete starts grabbing at their hamstring as if it has whispered to them “I got you.” The athlete’s running gait doesn’t change, and there is zero initial wincing, but when the athlete crosses the line (sometimes to the gentle clap of the crowd), they connect eyes with the athletic trainer (definitely not their coach) and most likely say something like “It went” or “I heard a pop.”

This isn’t to say injuries don’t happen, but deep down every sprint coach knows what happens next. The athlete gingerly walks over to the athletic trainer’s table and, as the gun goes off for the next race, their hamstring miraculously improves. The athlete is off the hook as the crowd turns their focus to the next crop of athletes. The AT will usually say they don’t feel any abnormalities or see a difference in range of motion and the mood lightens. With a 10-pound bag of ice wrapped around their leg, the athlete walks over to the coach, says they are fine, and asks, “What do we have for practice tomorrow?”

This can also be seen in the horizontal jumps with those athletes who request the clap and run through the board. As they walk back from the pit, they gingerly grab at their hamstring as if to say, “My bad, guys. Hammy flared up,” then walk right back and request the clap on the next jump attempt.

Injuries can be a part of track, and hamstrings do pull, but I’m sure the hammy is tired of being the scapegoat.

7. Same Arm Same Leg Syndrome (SASLS)

The last and final pet peeve covered here hits close to home, as its prevalence is getting out of control.

Let’s use the example of an athlete coming back from an ACL injury. During the rehabilitation process, walking on the injured leg without crutches will be a milestone. When asked to walk in rehab, subconsciously the athlete steps forward and subsequently swing the opposite arm to balance the movement. This movement pattern would repeat as if it’s been rehearsed for years. If the next exercise was for the athlete to walk using the leg and arm on the same side of the body, there would probably be a slight pause as the athlete consciously steps forward with both the right arm and right leg or vice versa. It an awkward movement that takes volitional effort to perform repeatedly.

All track events involving sprinting (excluding the pole vault and javelin) will display the athletes’ arms and legs working in opposition; the patterning is subconscious and learned during the early stages of life. When college media day hits, the fancy backdrops, bright lights, and thrill of wearing the uniform before ever racing clouds this ability. The photographer instructs the athlete to jump in the air and hit a “runner pose,” and boom…the right leg drives forward as well as the right arm. The athlete has unknowingly been hit with same arm same leg syndrome. After the photo session, do these athletes leave the media day by taking a step and swinging the same side’s arm? Odds are they don’t, which complicates our understanding of the syndrome.

Orsippus of Megara was a famous Greek athlete who competed in foot races in the 15th Olympics (720 B.C.E). He’s most known for running these foot races without clothes, but early images of him show that SASL syndrome may have ancient roots. Orsippus is depicted on old ceramic pots and others of the sort running with the same arm/same leg combo. The artist most likely misrepresented what they saw while Orsippus actually ran with limbs in opposition, but those pots may be the first known case of the syndrome that still plagues use today.

Other known sources of the syndrome:

  1. Three-point starts: No matter what part of the season or level of sprint group, there will always be an athlete who routinely starts with the wrong hand down in a three-point stance. The syndrome clouds the hundreds of previous repetitions and the athletes often proclaim that the syndrome reps felt “weird.”
  2. Races without blocks: This is by no means an indictment of all distance runners, as there are plenty of thoughts going through their minds before toeing a waterfall start. With that being said, next time you’re at a meet, take a picture of the waterfall start after the starter yells “runners to your marks” and you’ll see the syndrome on full display.
  3. Non-track models doing photoshoots for various clothing lines or programs: Active wear advertisements are everywhere, with the goal clearly being to advertise the garments—not to be biomechanically correct. Whether its full plantar flexion at the height of a stride, extreme casting of the lower leg, or full-on SASLS syndrome, it’s hard at times to even see what company is doing the advertising when the syndrome is so noticeable. Even in the sport’s most prominent timing program, the syndrome is on full display.

There would never be promotional photos released on social media of a quarterback throwing the ball underhand, a tennis player in an athletic stance holding the racquet from the rim, or a swimmer pushing off the starting block backward…so why post these same arm/same leg syndrome photos for track and field?

There would never be promotional photos released on social media of a quarterback throwing the ball underhand, so why post same arm/same leg syndrome photos for track & field? Share on X

We can chalk it up to the media day atmosphere or some sort of odd camera inversion, but it’s safe to say a coach needs to be present at the media days and patrol their program’s social media posts. It’s contagious, but with diligent effort we can prevent it from being passed to future generations.

Part Funny, Part Not

Although I jest, this article is intended to showcase some of the pet peeves in our sport, help you correct them if you currently coach athletes, or at least give you a chuckle at your next track meet when you see something that I referenced here.

Each sport has its quirks, but track and field seems to take the cake, and you can likely make a list of your own on top of the seven presented above. All we can do as coaches, spectators, and fans is educate ourselves and not help embellish those quirks in the future!

Since you’re here…
…we have a small favor to ask. More people are reading SimpliFaster than ever, and each week we bring you compelling content from coaches, sport scientists, and physiotherapists who are devoted to building better athletes. Please take a moment to share the articles on social media, engage the authors with questions and comments below, and link to articles when appropriate if you have a blog or participate on forums of related topics. — SF


Sprinter-Masters-Injuries

Fighting the Injury Bug as a Sprinter

Blog| ByDavid Maris

Sprinter-Masters-Injuries

Not long ago, I put a poll on Twitter asking if injuries were always preventable or if, at some point, no matter how much caution and how many interventions are in place, injuries will occur in competitive athletes. The overwhelming opinion appeared to be that as a competitive sportsperson, injuries are likely par for the course and at some point, you have to accept you will probably have to deal with an injury of some magnitude. That being said, I believe we, as coaches and athletes, need to take a large degree of responsibility for mitigating the risk of injury with sensible programming and sound mechanics.

Maris Injuries
Image 1. Intelligent programming includes strategically dosing appropriate levels of stress. Working to exhaustion too frequently may heighten the injury risk


Due to the volume of injuries I have had to manage throughout my time as a competitive athlete, I have likely never been able to realize my full potential. While some of those injuries were less avoidable than others, for the most part, a large degree of the responsibility rested on my shoulders. I am sure there are other athletes and coaches that share the same frustration that I do with regards to injuries disrupting progress.

There is a saying that the best ability is availability, which is something that has resonated with me on a deeper level as I have gotten older and gained experience. Phillip Bennett, a master’s athlete from North Carolina, recently tweeted that he received the advice that it is better to go into a competition 70% “ready” but 100% healthy. This led me to consider programming decisions and the concept that if you cannot remain healthy on the ‘perfect program’ then it is not the perfect program.

More recently, I have come around to the idea that performance and injury are two sides of the same coin. Vern Gambetta often speaks about the misguided concept of having a separate rehabilitation and prehabilitation program, and that any well-rounded training set up should have these features built in; this is something I agree with. I am fairly vocal on social media about the need for a holistic approach when developing sprinters. This is another example where I see the need for an integrated approach, with all stakeholders working together in unison to prepare the athlete for the demands of the competition.

With all of the above in mind, if you want to maximize your athletic potential, it is likely that you will face an injury at some point or another. I will share my experiences regarding some of the injuries I have faced, what I was doing at the time they occurred, some of my ideas as to the cause, some of the strategies I used to get back to full training, and how long that took.

If you want to maximize your athletic potential, it is likely that you will face an injury at some point or another, says @davidmaris958. Share on X

I have a better understanding of some injuries more than others, so the degree of detail I am able to provide will vary greatly from injury to injury. This writing is by no means intended to be exhaustive, and there are subtle variations in the types of injuries that can occur in similar parts of the body, as well as different approaches in returning to play that may be more or less appropriate for different individuals and their circumstances.

Finally, as a disclaimer, I am not a medical professional, and anything I have written is not intended to be specific advice for somebody who believes they are experiencing a similar issue. It is merely a recount of some of the injury issues I have had and how I have gone about managing them, and in some cases, some of the things I would do differently should the issue arise again.

Achilles Tendinopathy

I’ll start with my Achilles, as this is something that in recent years has caused the most disruption to my training—coaches such as Dan Pfaff and Brendan Thompson have probably gotten tired of hearing me whine about it. In early 2012, I completed a block session with no problem, but when I was cooling down by completing some easy strides, I became aware of a discomfort in my right Achilles tendon.

I discontinued the strides and went home without thinking too much about it, as the pain was minimal. However, I returned to the track a couple of days later with some mild discomfort still present and at my first attempt of performing a stride, the tendon felt weak, like I was unable to apply much force through it. I continued to rest off the track and looked into strategies to manage the issue so that I could hopefully return to sprinting as soon as possible.

I noticed that the pain and discomfort improved in the presence of heat therapy. I had a pack that could be heated in the microwave, which I would apply a couple of times a day, and in the shower each morning I would place the shower head directly over my Achilles whilst running the water as hot as I could tolerate. The theory behind this is that tendons themselves have low capillary density. This means that the blood supply to the area is poor, and therefore it takes longer and is more challenging to remove waste products and supply fresh, nutrient-rich blood to the area, both of which can promote healing.

Heating an area causes blood vessels to dilate, increasing them in diameter, which allows a greater volume of blood to pass through, says @davidmaris958. Share on X

Heating an area causes blood vessels to dilate, increasing them in diameter, which allows a greater volume of blood to pass through. Therefore, by heating my Achilles I could promote blood flow to the area, hopefully stimulating the healing process. Additionally, one of the reasons we warm up is to encourage the tissues to become more pliable for the stress we are about to place on it. Heating the Achilles could potentially acutely increase the suppleness of the tissues, improving sensations of discomfort for the short term.

Heating the Achilles could potentially acutely increase the suppleness of the tissues, improving sensations of discomfort for the short term, says @davidmaris958. Share on X

I also saw a therapist, Liam George, based in Luton, England, who performed a cross friction technique which seemed to significantly help the issue. It has been suggested to me that this may have helped in reducing tendon thickness by stimulating the nerves in and around the area.

I was initially able to return to full training within about two months, but it is an issue I have had to manage ever since, and I have had to be careful regarding exercise selection in order to minimize the risk of subsequent flare ups. I found that activities that promoted repetitive or slow foot contacts aggravated my Achilles, therefore I opted against things such as jogging or slow tempo, and even short accelerations (my basis being the ground contacts were longer than they were in upright running).

My main choice of exercise, once able to return to running, was fly runs with an adjusted gait during early acceleration to decrease ground contact time whilst I transitioned into a more upright posture. With these, I gave myself ample recovery, so I was able to maintain good mechanics and crisp contacts whilst progressing in rep distances and volumes. Adjusting acceleration mechanics in this way may not be ideal in the long term, but in my opinion, it served its purpose by allowing me to perform sprints in some capacity and conditioning it by placing specific stress upon the tissue.

In May 2019, my Achilles issue returned, by which point I was living in the U.S. and had access to the U.S. healthcare system, and therefore sought the advice of a doctor who suggested that dry needling, in combination with prolotherapy, may be a viable strategy to get me back on the track. Hindsight is 20/20, as they say, and this is not an approach I would use again.

By the time I had the procedure, the tendon had already begun to improve slightly, but having already gotten the wheels in motion for the injection and needling, and with the hope it could prevent a return of future Achilles issues, I went ahead with the intervention. After the injection and needling, I was told not to jog for three weeks and by the time those three weeks had passed, there was no chance I would have been able to jog.

Four months post-procedure, I tried to jog but the discomfort was considerable and by the summer of 2020, having tried various anti-inflammatories, collagen, cold laser therapy, self-massage, rolling, and isometrics, I was able to return to the track. I am far from certain as to how much benefit any of these interventions provided and it is still an issue I need to be cognizant of, as I certainly do not want to have to take another year off from running to nurse another Achilles tendon issue.

Calves

Very possibly related to my Achilles, over the past few years I have had some issues with my calves. I use the term “calves” to encompass my gastrocnemius, soleus, and tibialis posterior. In mid-2015, I was running a 150-meter run at high intensity, and without warning I felt a sharp pain in the lower part of my left leg, forcing me to end the session early. The pain began to subside fairly quickly, and through some dry needling, which was extremely painful as the time, with a lot of twitching, the issue was resolved quickly and I was back into full training in about four weeks.

The most debilitating of these issues has been with the medial head of my right gastrocnemius. In late 2017, I was running a relatively fast 250-meter run, and after about 150 meters I felt a sudden sharp pain, again forcing me to stop and end the training session there. After resting for a couple of weeks and a session of dry needling, it felt like it had returned close to normal with just a little residual tightness. However, during a session of easy strides, I again felt a sudden pain and was forced to stop.

The aspect that I found most challenging with this issue is that I would not feel any real sensation to suggest there was a problem, yet running or drills would cause a reaction, so it required me to exercise more caution than had been necessary for most of my prior injuries. Through therapy, massage, and the way the tissue reacted to needling, it appeared the area was chronically tight, which took a while (four to five months) to dissipate to a point where I was able to return to consistent, high-intensity running.

Throughout returning to play I was extremely patient (not something I found easy as it is not a strength of mine) and progressive. Initially, I tried to get on the grass whenever possible, though because I was living in Dubai at the time, often I was not allowed to use it, so I substituted in artificial turf and performed short, sub-maximal accelerations in training flats.

An example would be two sets of four 30-meter runs with a walk back recovery between repetitions and four to five minutes between sets. I gradually increased the intensity of these and then the distance and volume of the runs, before moving to the track and performing similar sessions, then finally transitioning back into spikes as the distances stretched out far enough to be considered maximum velocity work.

One of the things I noticed since the onset of this issue was that it took a long time (several weeks of regular sprint training) before my calves appeared to be conditioned and resilient to the stress placed upon them—which could potentially be related to my age, as I was 35 at the time. During this period, each morning, particularly after I had run, I had a lot of soreness in my calves and for the first few minutes after waking. I would walk very flat footed, which really emphasized to me the concept of “use it or lose it.” With respect to managing and rehabbing these issues, I had to pay close attention to how my Achilles felt, as some activities recommended to prepare my calves for high intensity stress (such as jogging, skipping, and calf raises) had irritated that area in the past.

Hamstrings

It’s very likely that, when speaking to a sprinter about injuries, hamstrings will come up in the conversation. Throughout my twenties, if I had an injury it was usually related to my hamstrings. There was more than one occasion where I had felt in good shape and was performing at close to personal-best levels, when a hamstring issue would arise in training or in competition which would prevent me from running for a few weeks.

It’s very likely that, when speaking to a sprinter about injuries, hamstrings will come up in the conversation, says @davidmaris958. Share on X

Typically, any hamstring issue would occur during a maximum velocity or speed maintenance phase of running, as opposed to early acceleration. The occasion that stands out was in 2006 when I was 80 meters into a 200-meter race, having run personal best times over 100 and 200 meters three weeks earlier. Hamstring injuries are perhaps more likely to occur in maximum velocity mechanics due to the more compromising positions the hamstring can be placed in throughout this cycle.

The hamstring muscle group serves two purposes: operating as hip extensors and as knee flexors. At a point in the cycle of a stride, the hamstring is required to both extend the hip and to eccentrically control the opening of the knee, placing it under large magnitudes of stress with both these actions occurring nearly simultaneously with high forces and velocities.

The hamstring muscle group serves two purposes: operating as hip extensors and as knee flexors, says @davidmaris958. Share on X

It is worth considering that pain in hamstring issues, as often discussed and perhaps bastardised, may originate elsewhere in some cases. Therefore, ensuring that the tissue is moving freely elsewhere in the chain may help relieve some of the tension, and in my experience, manual therapy or use of a lacrosse ball around the lower back and gluteal muscles has offset some of the discomfort in my hamstrings, occasionally with an immediate and noticeable benefit.

For example, there are some suggestions that in most of the population the sciatic nerve passes underneath the piriformis muscle, but that in a small percentage of the population, the nerve passes through the muscle. If this were the case, then should the piriformis become excessively tight, then it could theoretically impinge upon the nerve causing a referred sensation further down the leg, and by releasing the piriformis, hamstring pain or tightness could be relieved.

A typical recovery timeline from this kind of issue was about six to eight weeks, but again it is imperative to avoid too much stress too early as I found the risk of re-injury to be significant. This meant that it could take up to twelve weeks before I was able to return to consistent, full sprinting. When returning to play I followed some of the protocols outlined in the Charlie Francis literature, with a very progressive ‘short to long’ approach to acceleration and speed work, starting with runs as short as five meters while also integrating some bike work and jogging as tolerated to help retain some of the more general fitness qualities.

My feelings are that when training, mitigating the risk of hamstring issues can generally be tackled from two perspectives. Firstly, sound mechanics can reduce the magnitude of undue stress placed upon the muscle group. By landing close to a point under the center of mass, the degree of ‘pulling’ throughout initial ground contact can be reduced, offsetting the load placed upon the hip extensors. To assist in making contact with the ground at a suitable location with respect to the hips, avoiding an excessively plantarflexed ankle and landing flat can reduce the extent of what may be termed a “pawing” action.

Secondly, as mentioned briefly in the introduction, appropriate management of the volumes, intensities, and densities of training, with sensible programming decisions, can help to offset the risk of hamstring issues (as it does with most or all other issues). Excessive volumes and frequencies of high intensity sprinting serve to increase the risk of injury and while there are guidelines of what is appropriate in terms of dosage, learning to understand your body or the bodies of your athletes can allow for a more targeted approach to managing these variables.

Appropriate management of the volumes, intensities, and densities of training, with sensible programming decisions, can help to offset the risk of hamstring issues, says @davidmaris958. Share on X

Back

In the summer of 2005, I was performing some relatively light cleans when I felt a strange popping sensation in my lower back. At the time, my father lived in Western Australia and I was flying out to visit him, and I remember that the movement in my back had become so restricted that I had to crawl out of the car on all fours when my mother dropped me at the airport. I was not looking forward to the next 20 hours sitting on a plane!

After returning from Australia (using heat patches throughout the flights) I had a couple of sessions of sports massage which did not seem to provide too much benefit, but I got back into training and was introduced to the concept of a chiropractic adjustment, which brought about an immediate and noticeable benefit. In the subsequent, similar issues in either the lumbar or thoracic regions, I have found that waiting a few days after the onset of the issue before seeing a chiropractor or osteopath has led to better results—perhaps because it allows the muscles in the area that may have spasmed to relax.

If a positive thing about an injury exists, it may be that in this case, the fix is relatively quick and easy, and a return to full training can be within a week or so. Chiropractic care is surrounded by some controversy as there is little evidence to suggest that an adjustment can move bones, and I have heard theories ranging from adjustments releasing pain-relieving hormones to a placebo effect explaining the mechanisms behind this kind of treatment. However, as an athlete, I am personally less interested in the reasons why we feel better than I am in the fact that we simply do feel better.

I am personally less interested in the reasons *why* we feel better than I am in the fact that we simply *do* feel better, says @davidmaris958. Share on X

There have been several occasions where I felt this type of treatment has benefitted me, so it is therefore something I have continued to use despite some of the negative perceptions surrounding it. Those with the negative opinions of adjustments can easily make the claim that, if they were that beneficial, I would not have repeat issues nor would I have to continue with this type of treatment. However, this is where I accept some of the responsibility for my injuries and appreciate that I may need to change some of my habits to avoid recurring injuries to the same area.

In order to reduce the incidence of these issues, I have modified and vastly reduced the volume of lifting I do, as I alluded to in my last article, “Training Volume, Intensity, and Density in a Masters Sprinter”, and I have noticed a significant improvement in how my back feels on a daily basis. As with anything, a risk versus reward analysis is required when deciding upon how to approach a resistance training program, and staying healthy and consistent in my training outweighs the potential performance increase I may get from performing regular heavy lifting.

In addition, I have increased my focus on simple back mobility exercises, rolling my back regularly, and have paid more attention to my sleeping position. In the past I often slept on my stomach and found that this seemed to compound any tightness in my back, while making a concerted effort to sleep on my side has left me waking up feeling more mobile early in the mornings.

In the past I often slept on my stomach and found that this seemed to compound any tightness in my back, says @davidmaris958. Share on X

Shoulder

In early 2003, I was very new to resistance training and was using a Pec Deck machine when the weights returned to the stack with enough violence it caused the pad of the machine to forcefully return to its resting position, partially dislocating my right shoulder. The ball felt like it was out of the socket for a split second before relocating itself and was painful for a week or two before I was able to stress the joint again in training.

Over the next few years, similar incidents would occur: once when squatting; once when performing punches whilst doing some boxing pad drills in a circuit training session; and most recently during a fall when doing hurdle hops. With each subsequent occasion, it appeared to take longer for the shoulder to relocate and the pain would last longer afterwards. For example, the most recent incident in 2015 (after the hurdle hop fail), the shoulder was dislocated for around 45 minutes and I was not comfortable maximally stressing the joint for five to six weeks afterwards.

In 2005, I had a shoulder arthroscopy which I was told found no abnormalities within the shoulder joint, but I have been aware for a long time that my shoulder strength and mobility appears to be poor—but perhaps within acceptable ranges. Fortunate for sprinters, there is little requirement to stress the shoulder joint with high loads, which perhaps raises an entirely different question about the need to perform certain actions in the weight room that are often staple exercises in many sprinters’ training programs. (Including my own! Perhaps a case of “we’ve always done it this way”?) Regardless, it meant that while I could not directly load the shoulder joint, I was able to run at fairly high intensities within a couple of weeks of hurting my shoulder.

My approach to overcoming and trying to prevent these events from recurring was to use light loads and perform movements whereby the shoulder joint would travel through a full range of motion. Rotation exercises using a TheraBand and dumbbell exercises that targeted the deltoids were my starting point in the progression, before building up to dips and heavier presses, always ensuring full ranges of movement.

Concluding Remarks

When injuries arise, my advice would be to seek professional help if you are in any way uncertain about how to approach returning to play. I am by no means qualified to advise you, nor am I attempting to, on what you should and should not do in the event that you do become injured. My own personal experience has taught me that injuries need to be respected and adequate time is required before starting on a progression, and adequate time is required throughout each stage of a progression.

When injuries arise, my advice would be to seek professional help if you are in any way uncertain about how to approach returning to play, says @davidmaris958. Share on X

In Ryan Banta’s new podcast, he interviewed Dan Pfaff in the first episode and something that resonated with me was a comment Dan made about the “rule of ten days,” essentially pointing out that time heals most ailments and things will start to feel better given adequate rest. This fell in line with a thought process I have had in the past regarding healing and the fact that perhaps it’s an arrogant mindset to believe that we know better than Mother Nature and can shortcut recovery processes that have been put in place over the course of thousands of years of evolution.

Time heals most ailments and things will start to feel better given adequate rest, says @davidmaris958. Share on X

Therefore, despite the fact that some injuries may be unpreventable, perhaps the most meaningful impact we can have, with regards to injury management, is having sound practices that help prevent their onset in the first place. Despite injuries being part and parcel of competitive sport, through appropriate loading and programming, and via optimizing mechanics, the risk can be mitigated.

Since you’re here…
…we have a small favor to ask. More people are reading SimpliFaster than ever, and each week we bring you compelling content from coaches, sport scientists, and physiotherapists who are devoted to building better athletes. Please take a moment to share the articles on social media, engage the authors with questions and comments below, and link to articles when appropriate if you have a blog or participate on forums of related topics. — SF


Knight Block Start

Getting Back on the Right Track with Bianca Knight

Freelap Friday Five| ByBianca Knight

Knight Block Start

Bianca Knight didn’t even know what the lanes were for when she went to her first track practice at the age of 12, but she beat everyone anyway. Before long, she dominated the Mississippi—and national—high school scene. By the time she graduated from Ridgeland High School in 2007, she had won 15 individual state titles at 100m, 200m, and 400m, among her 23 overall, including relays. Bianca would also own state high school records at 100m and 200m and be the first Mississippian to be named Gatorade National Girls Track & Field Athlete of the Year. And she is the 2005 World Youth Champion at 100m as well.

After a semester running for the University of Texas, which she still attends, Bianca broke Veronica Campbell-Brown’s collegiate record for 200m indoors when she won the national title in 22.40. Deciding to focus her full athletic attention on training for the 2008 Olympic team, Bianca turned pro, and in her professional debut, she ran 22.62 seconds to defeat Campbell-Brown at 200m in the Jamaica International Invitational. She set her 200m PB in winning the Reebok Grand Prix and lowered her 100m PB in the quarterfinals of the Olympic Trials.

Freelap USA: You obviously experienced international success as an athlete and are currently a world record holder. When did you believe that you would be an Olympian? Was this something you wanted but didn’t know was possible or were you convinced at an early age that this would be your destiny?

Bianca Knight: Most people find it hard to believe, but my dream of wanting to become an Olympian didn’t happen until 2007, the year before I went to college. The Beijing Olympics was coming up, and I thought “hey, that would be cool to represent Texas at the Olympics next year.” Before then, I never really thought much about it at all, even though I made my first international team at 15.

Being an Olympian became a reality for me after dominating the collegiate scene as a freshman. The transition from high school to college was seamless, and with the Olympics coming up, I believed that I was ready to move on to the next level and begin my Olympic campaign.

Everyone knows that Team USA is the hardest team to make, so given what I know now, while I believed I could become an Olympian, I had no idea how hard it actually is to achieve. I missed that team in 2008, and after that experience, I made up my mind not to miss the next one. And I didn’t. I made the London team and came back with a gold medal and a world record to match.

Freelap USA: Your app is literally designed to help ensure athletes are performing and have access to training advice. What is your goal and purpose with the app you recently launched?

Bianca Knight: Two of the main obstacles faced by young track and field athletes are lack of knowledge on how to improve and accessibility to that knowledge. BK Trackstars is designed to help coaches and athletes train more intuitively, and to use the workouts feature to build an algorithm that gets to know the individual athlete and the types of workouts that work well for them and those that may need adjusting. The app is designed to promote evidence-based training, rather than just training by trial and error.

The purpose of the app is to provide coaches and young athletes with the kind of tools and resources that have only been available to tier one athletes.

The purpose of my app is to provide coaches and young athletes with the kind of tools and resources that have only been available to tier one athletes, says @MsBiancaAK. Share on X

I have also created a web-based platform called E.L.I.T.E. Suite, which offers information about the sport, tips from elite athletes and coaches, training plans, and academic counseling, to work alongside the app. The two main resources of E.L.I.T.E. Suite are athlete development and college recruitment. I will be launching that soon.

The goal of the app is to give young athletes a greater opportunity to learn the process of becoming successful in track and field and a better chance of getting a college scholarship and degree using their talents. We want to level the playing field for kids all over the world.

Freelap USA: Injuries are part of the equation with sports. How have you communicated with young athletes in track and field to be patient when they may be struggling with a major or minor injury?

Bianca Knight: When speaking to kids about injuries, the first thing I stress to them is the importance of being hydrated and having functional warm-up routines. After that, it is honestly more about having a structured training program that incorporates injury prevention. A lot of times, the lack of structure and poor technique at the youth level is what causes injuries.

I encourage young athletes to understand when it is time to back off. Most young athletes have the mentality that they need to constantly push through pain, not realizing that in doing so, you increase your chances of turning minor injuries into major injuries. If you feel tightness and stiffness in certain places, don’t ignore that. Give yourself a little bit more time to stretch and warm up so that you can train and perform at your best.

Be proactive, not reactive. When you feel something, no matter how big or small, address it then. Don’t wait until something is hurting before you decide to do something about it. Also, doing small things at home can help prevent injuries and help heal the current ones.

Freelap USA: Share your experiences outside of track and field now that you are retired. With sports, everyone will retire early—has this caused unseen challenges with regrouping or was the transition easier than expected?

Bianca Knight: Initially, the transition was difficult. I spent a lot of time trying to figure out what to do next because I spent so much of my life doing this ONE thing. In the midst of figuring that out, I had my first child…and then my second. In between all of that, I did some public speaking events, volunteered at several high school track and field programs, and held track and field clinics. Doing that birthed the idea of my app and also showed me what my next “thing” would be: giving back to the sport that gave me so much. In essence, my transition out of the sport has been my transition back into the sport, to do the things that I am doing now.

I won’t say that this transition has been easy, but it has by far been the most rewarding. I enjoy being a mother, and I equally enjoy helping kids, along with their parents and coaches, to provide them with things that I wish I would have had coming up at the youth level.

I am so grateful for this opportunity to better the sport of track and field.

I enjoy helping kids, along with their parents and coaches, to provide them with things that I wish I would have had coming up at the youth level, says @MsBiancaAK. Share on X

Freelap USA: You have coached athletes as well, trying to make sure they are on a path to long-term success. What do you do to keep them engaged without resorting to just making things fun without a sound training program? Kids have more and more distractions now. What is your secret?

Bianca Knight: I wanted to meet today’s kids halfway. When I competed as an Olympian in 2012, I was designated the most social media savvy of the entire United States Olympic team. So, I am truly a member of today’s generation, a generation that has so many choices that it is hard to focus on just one.

Most people are unaware, but I’m also currently taking courses through the National Academy of Sports Medicine, so I can ensure that everything I do with kids is balanced between my experiences and my knowledge about the “what and why” I am asking them to do certain things.

Any of these kids whom I’ve had the pleasure of training would attest to the fact that they had lots of fun and they learned a lot, but we also worked really hard. I never made things super serious, but I did train them with a purpose and helped them understand why I wanted them to do certain things in a certain way. They didn’t always like it, but they enjoyed seeing the outcome on meet day. Working with kids was another motivating factor for certain features inside of my app.

The quality of some of today’s games and mobile devices and platforms is unreal. Dynamic, colorful, exciting, and multifaceted are just a few words that apply. Then you have the sport of track and field, where there are little to no frills. Literally, if you pick ’em up and put ’em down faster, throw further, or jump higher or further than the next athlete, you win, and they lose. Hardly as dynamic as what these kids see on their phone every day.

So, when I created the app, I decided to incorporate some of the fun and excitement these kids are used to into what they are already doing, which is competing. Now, as they compete, their athlete rating is used to create a virtual competition almost like fantasy football. At the end of the season, athletes will compete on the track and in the field for rewards in the virtual space. It’s going to be really fun and exciting, and I cannot wait to speak more about that later on.

Since you’re here…
…we have a small favor to ask. More people are reading SimpliFaster than ever, and each week we bring you compelling content from coaches, sport scientists, and physiotherapists who are devoted to building better athletes. Please take a moment to share the articles on social media, engage the authors with questions and comments below, and link to articles when appropriate if you have a blog or participate on forums of related topics. — SF


Podcast announcement for Just Fly Performance Podcast featuring returning guest Cal Dietz, Head Olympic Sport Strength and Conditioning at the University of Minnesota. Logo of a microphone and winged figure included.

Episode 244: Cal Dietz

Joel Smith: Just Fly Performance Podcast, Podcast| ByJoel Smith

Podcast announcement for Just Fly Performance Podcast featuring returning guest Cal Dietz, Head Olympic Sport Strength and Conditioning at the University of Minnesota. Logo of a microphone and winged figure included.

Cal Dietz is the Head Olympic Sport Strength and Conditioning Coach at the University of Minnesota. He has been with Minnesota since 2000. Prior to his current position, Cal served as the strength coordinator at the University of Findlay (OH) where he oversaw 26 men’s and women’s sports. Coach Dietz has consulted with various professional sports including the NHL, NFL, NBA, and MLB. He has also worked with various Olympic and world champions. He is a sought-after presenter and has co-authored the top selling book, Triphasic Training: A systematic approach to elite speed and explosive strength performance.


Dietz is a native of Shelby, Ohio, who earned a bachelor’s degree in physical education from the University of Findlay as well as a master’s in kinesiology from the University of Minnesota. He was an outstanding college athlete at Findley, winning three national championships in two different sports (football and wrestling). He was inducted into the Findley Hall of Fame in 2005. 


Cal gives us an in-depth look into his latest methods in complex training for improving sprint speed. He explains that even bilateral hurdle hops have the potential to “mess athletes up” neurologically, and so Cal goes into detail on how he adjusted his complex training sets to address that. His programming for the weight room is done with the primary purpose of improving sprint speed and sprint mechanics. From this perspective, he gives his take on block periodization, and how he utilizes 5-,10-, and 20-yard dash markers to help determine an athlete’s primary training emphasis for the next block of work.


In this podcast Coach Cal Dietz and Joel discuss:


  • Cal’s experience with various methods of training.
  • Using running and speed to assess athletes and creating the required adaptations.
  • Interpreting and discussing maximal velocity as a training linchpin.
  • Quad-dominant vs. posterior chain-dominant athlete assessments + Cal’s 5-10-20 tool.
  • The 5-10-20 tool simplified.
  • Programming for athletes in need of isometric strength training.
Soccer Goalkeeper

An Inside Look at Tactical Periodization in College Soccer

Blog| ByJuan Perez

Soccer Goalkeeper

In 2014, my mind was made up: I was going to be a basketball strength and conditioning coach. It was my favorite sport, and I had played through high school as well as club in college, so it was a no-brainer. Up until this point, I had followed that path and carefully planned every step to achieve my goal. Then, in the spring of 2017, my head strength and conditioning coach took another position at a different university and I was asked to take over our college’s soccer teams.

As strength and conditioning coaches, we pride ourselves on being able to work with virtually any sport, team, or individual. With court sports, I was in my element—tracking jumps, heart rates, GPS metrics, all of it. I was able to account for the rigors of practice and multiple factors and adjust the physical training program accordingly. Soccer, though, was a different game. I had been around field sports and assisted with them in the past, but now I was THE GUY.

Many performance coaches are in a situation where they may only be in charge of the weight room, while the sport coach takes care of the conditioning work—that, however, didn’t seem to be the best approach for me. I wanted it all. I wanted to seamlessly integrate the on-field work with the weight room work and be an extension of the coaching staff in the way that performance coaches operate at the pro level. My problem? I was in a mid-major Division I school with few resources—and even less time—to devote to the soccer programs in addition to my other teams.

I needed help.

I reached out to some generous and skilled coaches and was able to connect with Charles Burdick of the Portland Timbers, Damian Roden (then with the Seattle Sounders), Josh McAllister (then with Minnesota United), John Cone from Fit for 90, and Tony Jouaux with the New York Red Bulls. Through conversations with these coaches, as well as reading Raymond Verheijen’s work, I was able to learn about tactical periodization and a few of the different methods for implementing it in a soccer program.

Background: On the Pitch and in the Gym

The planning of soccer training ranges from highly complex and esoteric systems to far more simplistic (and outdated) approaches, and it most commonly falls between the two ends of the spectrum. For most universities, soccer is not a revenue-earning sport and therefore does not get the focused attention it deserves.

Typically, training programs have been separated into the “on-field practice” and the “in the weight room” development period. In fact, many soccer coaches cease all weight training during the season in order to maximize practice and recovery time while trying not to make the players “sore.” Although this outlook has some merit (the focus of soccer is to play better soccer, not to lift heavier weights), the implementation is largely flawed. If we spend a large portion of the off-season developing physical qualities in the weight room—such as strength, power, elasticity, etc.—then the qualities will last for the pre-season and perhaps at most for the early part of the regular season, based on what we know about the residuals of each of these training effects.

During the in-season phase, while we want to maintain the focus on actual play, we cannot neglect physical development and maintenance. Often, coaches will see sharp play with the team performing very well and then a notable drop-off that correlates to the cessation of weight training. At that point, injuries start to increase and resilience decreases, leaving the coach looking for someone to blame…with the strength coach often the scapegoat.

Enter Tactical Periodization

While most performance coaches have been at least exposed to the term “tactical periodization” and a great many have likely implemented a version of it, this article serves to lay out one particularly effective way to implement the concept. Essentially, tactical periodization is the preparation of team sport PLAYERS. This is an important distinction, because we are not solely working on athleticism—we are trying to develop players in relation to the game.

The focus of tactical periodization is on four moments: offense, transition to defense, defense, and transition to offense, says @JuanCTPerez. Share on X

The focus of tactical periodization is on four moments: offense, transition to defense, defense, and transition to offense. The whole training scheme is then organized around these qualities, but it also takes into account the physical qualities necessary to play at a high level by harmoniously combining the physical preparation with the technical and tactical qualities needed for in-game performance.

Organization of Training

When planning for optimal performance in sport, coaches should start with the destination in mind and work backward. For soccer programming, you will often see the equation match day +/-(x), with x being a number from 1-6. This is simply a way to plan out how many days there are before game day. For example, if the match is on Sunday and it is now Monday, it is match day -6. In the same circumstance, Tuesday would be match day -5 and so on until the actual day that the match day is played, which is match day 0. (The day after the match can also be referred to as match day +1, and so on.)

The goal of training, as always, is to be as rested as possible for game day, while still keeping the necessary training load. From my coaching experience working with men’s soccer, for example, the day after a match was a movement day. This allowed us to flush out the muscles and promote blood flow to help recovery, with the following day being the designated off day.

Moving forward through the week, we rotated technical and tactical days, with the tactical work being more of a difficult day and the technical day being more of a lighter day. We also matched that up with our physical training schedule, so our tactical (or harder) days were our weight training days. Our technical days during the season were more of a recovery day, where we could apply a stimulus such as some quality sprint work, but we decreased overall volume to a level that left the players feeling fresh. This doesn’t always work, but in a setting where everyone is on board, it provides for heavy loading when necessary but also optimizes on-field work and helps to promote readiness for match day.

Characteristics of Soccer Performance

During this planning phase, it is important to keep in mind the four moments, which can be condensed into three categories: attacking, transition, and defending. We take these categories into account by focusing on the “characteristics” of the sport, which are:

  • Performing better actions.
  • Performing more actions.
  • Maintaining good actions.
  • Maintaining many actions.

Better in this context means sharper/more explosive actions. What’s nice about this system is that you can almost tie these categories directly to certain physiological adaptations. For example, if you want better actions, then that will correlate with explosive training (more on that later).

Activation

Whether activation, pillar prep, or whatever else you would like to call it, this time is almost a “pre warm-up.” While it may sound redundant, splitting your prep time into activation and then warm-up can help keep your team much more organized, as well as provide for opportunities of leadership among the team itself.

For example, in our activation time, we would start on the ground with foam rolling and soft tissue prep. We would then move to prone, supine, and quadruped hip mobility and core stability, and conclude with some standing band activation work. Having this time when players could dial in on problem areas flowed into a smoother warm-up and duly served as a time to mentally prepare for the activity to come. Additionally, this was a sequence that the team could do on their own, so as to use their time wisely instead of standing around.

While there were many similarities between our activation and that of other sports, we spent a good portion of time focused on the musculature surrounding the hips, knees, and ankles. Additionally, one of the main differentiators that was almost a bridge movement right into our warm-up was how we trained the vestibular system and balance. In soccer there are many instances where a player may find themselves on the ground and have to reorient and reestablish their position. We aimed to focus in on this by incorporating starts from the ground (laying on chest or back) and rolling variations (front roll, back roll) into a run.

The Warm-Up

While warm-ups are often overlooked as a necessary evil, you can also program them thoughtfully to assist your training session and overall training load. By implementing key components into the warm-up, coaches can provide more exposure over time to that stimulus. Another point to keep in mind is that players CAN reach a point of diminishing returns with a warm-up, so it is helpful to adapt certain aspects over time.

When I say this, I don’t only mean physically—although this too is a factor—but more so mentally. When you implement different movements into the warm-up at key points (though never before a game, as you don’t want the player uselessly spending their mental resources at this point), engagement instantly increases, as the players are mentally stimulated by the change. By periodically progressing the warm-up, just as you would progress an exercise in the weight room, it will directly benefit the work that follows.

By periodically progressing the warm-up, just as you would progress an exercise in the weight room, it will directly benefit the work that follows, says @JuanCTPerez. Share on X

The focus of the warm-up can change with the focus of the week, in accordance with the characteristics. For example, in the pre-season, my weekly focus was on accumulating volume (perform more actions)—so in my warm-up, I implemented extensive endurance. To adapt my warm-up to this focus, I increased the distance of warm-up activities as compared to the intensive warm-up, which included more short burst and higher-intensity drills (perform better actions). If your focus is intensive endurance, you could include more repeated short sprint efforts (maintain good/more actions).

While the focus of the week may change, when working with team sport, we know that there will always be some sort of short burst included. One way I accounted for this was by including acceleration runs over shorter distances. We implemented this right before the main work was done, and at times it even preceded the on-field ball work during our extensive endurance weeks.

Another category I included in our warm-up was extensive interval training. To implement this, I used longer timed intervals, but also included longer timed rest.

If this is confusing to follow, a quick rule of thumb when categorizing is as follows:

  • Extensive endurance—incomplete rest, longer distance (perform more actions).
  • Intensive endurance—incomplete rest, shorter distance (perform more actions).
  • Extensive interval training—complete rest, longer intervals (time) (maintain more/better actions).
  • Longer acceleration runs (maintain better/more actions).
  • Repeat short sprint ability (maintain better actions).
  • Shorter acceleration runs (perform better actions).

*Keep in mind that this is how I correlated the runs to the characteristics. Additionally, I manipulated the characteristic I was targeting based on the rest. As you can see, I categorized some of the runs we did under multiple characteristics. This may look different for you.

In conjunction, we laid out the on-field work to go in a cycle of larger spaces to smaller spaces. This parallels our physical preparation and ensures that each quality gets the necessary stimulus to adapt.

We laid out the on-field work to go in a cycle of larger to smaller spaces. This parallels our physical preparation and ensures that each quality gets the necessary stimulus to adapt. Share on X

In practice, this would look like the first two weeks with larger spaces (think full field), whereas the next two weeks would be moderate-sized spaces (partial field), and the last two weeks would be even smaller spaces/small-sided games. With this implementation, the practice goes from longer, slower movements to much more fast-paced/rapid movements and sharpness of play.

While it may seem counterintuitive to have larger spaces for slower movements, it works very well—the reason for this is that in the larger spaces there are more players, so much more passing is involved. This decreases the number of shorter bursts, quick cuts, and eccentric load you may see when one player challenges another for possession in the smaller spaces. Though the players may reach a higher velocity in certain scenarios in bigger spaces, this is mitigated over time and by the conditioning level of each player. (Early on, players will likely not be in as good shape, so coaches can specifically encourage more of a passing game.)

You can keep the cycles for as long as you’d like, but from my own implementation, the two-week phase allows for more positive adaptation to the stimulus.

The Cooldown/Postgame

This part of the training program is often overlooked, maybe more so than the warm-up. Post game, it is HIGHLY important to:

  1. Refuel the player with proper nutrition.
  2. Help restore proper blood flow to the extremities.
  3. Jumpstart recovery: The team that recovers faster will naturally be in a better position to train during the week and play come next match day.

*A Note on Bench Players

While these steps are imperative for players in the regular rotation, players on the bench need a different approach. These traditionally overlooked players have essentially lost a training day, and so they NEED a stimulus to help maintain their readiness. This can be determined in different ways depending on your means (whether or not you have access to GPS or metrics), but the most essential part is that the player is exposed to some high-intensity intervals of some sort, much like they would be in the game. This too will fall under the characteristics of soccer performance I wanted to target, so for me, the stimulus changed depending on the week.

Results

There are many different approaches you can implement to be successful, and this is by no means the only way, but the results speak for themselves. That year I began, the team was comfortably over .500 through the regular season and earned a first-round bye in the Sunbelt Conference Tournament (this after ranking in the bottom of the conference and averaging more losses than wins just two seasons before). Most of the credit belongs with the phenomenal coaching, as well as a good job recruiting talented players. Having said that, though, most of our starting 11 consisted of returning players, so let that be food for thought.

After that season, my career took me in a different direction, so I didn’t spend as much time as I would have liked with the team—and shortly after my departure, the university unfortunately cut the program as a varsity sport. To truly confirm these results, I would have liked to work with the team for two to three more years, but I will forever value the time I had, and the results of the approach still shine through.

Since you’re here…
…we have a small favor to ask. More people are reading SimpliFaster than ever, and each week we bring you compelling content from coaches, sport scientists, and physiotherapists who are devoted to building better athletes. Please take a moment to share the articles on social media, engage the authors with questions and comments below, and link to articles when appropriate if you have a blog or participate on forums of related topics. — SF


Sports Tech Uses

Why High School Coaches Should Invest in Performance Tech

Blog| ByRyan Denton

Sports Tech Uses

If you’re a high school coach, chances are you didn’t study to be a software engineer or an IT specialist. But if you are someone who stays connected and pays attention, you’re probably aware that performance technology is becoming more prevalent and influential in athletics with each passing day. While I believe that we are fast approaching the tipping point where programs utilizing technology in their training becomes the rule rather than the exception, I recognize that there are plenty of folks out there resisting that trend for a variety of reasons.

If you or someone else in your sphere (your AD, head coach, etc.) needs a little help getting off the fence, I’ve written this article to address what I believe to be the three most common rationales for not investing in performance technology:

  • I don’t need technology in my program.
  • I don’t want to deal with the headaches.
  • We can’t afford the price tag.

Before diving in, I thought it important to give some background on myself. (Spoiler alert: I’m no IT specialist). This year marks my 15th in teaching and coaching at my alma mater, Richland County High School. RCHS resides in the town of Olney, a small rural community in southeastern Illinois. I have coached three different sports, but my primary responsibilities have become leading our boys track program and heading up a school-wide initiative we call “Get Quick,” which focuses on impacting every athlete in our school through plyometrics and speed/agility training.

While I’ve always had what most would consider a knack for technology and am currently in the process of transitioning from social studies teacher to instructional technology coach, I have no formal training outside a few “computer” classes back in college. Long story short, if I can do this, you can do it. So, proceed with an open mind!

I Don’t Need It

It’s likely there are folks reading this who either need to be convinced technology is worth the time and money, or who need help selling the idea to someone else (fellow coaches, administrators, trusts/foundations, etc.). Assuming that’s the case, we should address this area first. So, why do you need performance technology in your program?

While tech makes it possible to measure with incredible accuracy, what I most appreciate as a high school coach is the convenience and instantaneous feedback now available to my athletes and me. Share on X

We’ll start with the most obvious benefit and briefly touch on the time-tested adage, “What we measure, we improve.” Technology has the capacity to completely transform what is possible when it comes to measuring for athletic performance in your program. And while tech makes it possible to measure with incredible accuracy, what I most appreciate as a high school coach is the convenience and instantaneous feedback that are now available to my athletes and me.

Recently, I took Tony Holler’s advice and decided to add the Freelap timing system to our wicket drill, and those two benefits were on full display. Wickets are always our kids’ favorite drill of the week, but taking the extra 90 seconds to set up the timer made it competitive, ensured a constant level of effort, and proved to our kids that they were actually running faster at the end of the drill than they were at the beginning. If I’ve learned anything in my 15 years of coaching, it’s that those three things are priceless.

Wickets Freelap
Image 1. Technology has the ability to enhance what you already do. Adding the Freelap system to wickets completely changed the drill for our athletes.

But technology doesn’t just enhance what you were already doing—it has the potential to redefine what you do and create new possibilities. In other words, you now have the ability to measure things that you probably haven’t even imagined, on the field of play, and without disrupting your practice. Thanks to the guidance of guys like Coach Holler and Carl Valle, we’re using instruments like Freelap and the MuscleLab Contact Grid to tell kids how many miles per hour they are running and to score them on how well they “bounce.” Our ability to do this has given us the opportunity to train and celebrate our kids in ways that were never possible before.

Technology doesn’t just enhance what you were already doing—it has the potential to redefine what you do and create new possibilities, says @olneytigertrack. Share on X

Don’t underestimate the impact that this has on your program and the culture of your school. Every athlete who walks your halls, no matter what sport they play, can benefit from becoming a better athlete. Having the tools to get them there not only becomes an avenue for recruiting, it creates an inroad with other coaches and sports within your school. And once you get athletes and coaches interested, those same tools will provide you with the data to validate what you’re doing and keep them engaged.

Kenny Graham, Director of Player Development for the Detroit Tigers and a close friend, hammered the value of this concept home for me when we were discussing gamification in athletics: “These kids have grown up on things like Fortnite, etc., and their whole world is based around rankings and scores. It’s no longer an option: you’ve got to make it part of your culture.”


Video 1. Technology has the ability to create new possibilities. MuscleLab’s Contact Grid allows us to measure and score our kids’ elasticity, which is something most of them never even knew existed.

I Don’t Want to Deal with It

Some coaches might be attracted to the benefits above but may just not want to mess with it. Why? I can think of a few core reasons a coach might think this way.

If I had to guess, that first stumbling block is likely where the most coaches get stuck. I’ve heard so many fellow coaches and educators say something along the lines of “technology and I just don’t get along.” Some of us have just decided that we’re not good with technology, and we never will be.

The good news is that you don’t have to be an MIT grad to implement performance tech into your program. So many companies are racing to engineer state-of-the-art products that aren’t just for guys with doctorate degrees to use in a lab. This means things that work right out of the box, connect to smartphones via an app, and give immediate feedback that makes sense—technology that is durable, portable, and affordable.

But if you still believe that you won’t have the skills or time to implement something new, I can almost guarantee that you have access to someone who does. Chances are you have an assistant who’s fairly fluent with technology, and this could be a fantastic opportunity for them to take on a new level of ownership and responsibility within your program. In fact, getting that very opportunity within our football program has been one of the most crucial factors in my growth as a coach and an educator. I got to take something that I was good at and use it to help others get better. As a young man, that was life-changing for me.

Even if there’s no one on your staff who fits the bill, you’re still not out of options. Our football program purchased its first endzone camera about seven years ago. This is a piece of equipment that involves a decent amount of setup and know-how, and yet we’ve never had a coach, or even an adult, set it up or run it during a game. Instead, we’ve been able to involve intelligent, committed, hard-working students who wanted to be a part of our program. It’s a great opportunity for a kid who may not be an athlete to be part of something bigger by doing something they enjoy.

Plenty of coaches might also ask things like:

  • Are the benefits worth the extra time it takes to set up?
  • Does it disrupt the flow of practice?
  • What if I’m counting on it, and it decides not to work?

Whether it’s for personal use, in the classroom, or on the field/track, I’ve always thought that the ultimate goal of technology is to evolve to the point where you feel like you aren’t actually using technology. We want tools that make life better without distracting us from what we were trying to accomplish to begin with. Whatever the product is, it just needs to work, be dependable, and enhance the experience.

While much of my dedication to performance tech can be attributed to the benefits that my program has enjoyed, it’s also due to the fact that those benefits haven’t been more trouble than they’re worth. In addition to being a coach, I’m a father of four young children, and spend the hours between 8 a.m. and 3 p.m. teaching civics and history. Extra time simply isn’t a luxury that I have.

My investments in technology have saved me time, made going to practice almost as fun as the competitions, and given me feedback that has helped me be a better coach, says @olneytigertrack. Share on X

If a tool wastes my time, disrupts my practice, or can’t be counted on, I just won’t go back to it, no matter what the potential gains might be. But that hasn’t been the case. My investments in technology have saved me time, made going to practice almost as fun as the competitions, and given me feedback that has helped me be a better coach.


Video 2. Technology creates a culture of constant competition, and everyone benefits. In this clip, one of the best athletes we’ve ever had sets a new PR and ties his friend’s all-time best. He had a great career on the track for us, but I’m pretty sure I never heard him yell like this at a meet. (Turn your sound on for this one.)

Live Feedback from Tech
Image 2. Technology can create real, usable feedback for both you and your athletes. CoachMePlus takes all the data we are now able to collect and instantly presents it in a way that our coaches and kids can understand. Trends, growth, rankings, and more are at our fingertips.


We Can’t Afford It

If your biggest hang-up when it comes to adding technology to your program is a financial one, I can relate. I’m the head track coach in a small town with a population under 9,000 and a huge baseball tradition. Our equipment budget would barely cover the cost of a single pole vault pole, and fundraising enough to get us through the season is often a serious challenge.

For a long time, being able to invest in nonessential equipment that costs thousands of dollars seemed like a pipe dream, but I’ve learned a couple very valuable lessons over the last few years: People want to give, and they want their giving to impact as many kids as possible. Because of that mindset, we’ve been able to do some incredible things for our athletes, and shock some folks along the way.

I’ve been astounded at just how many people are out there who have the means and the desire to help, even in a small town. Needless to say, track and athletic training programs don’t pull in much at the gate or inspire people to create gridiron clubs (at least where I’m from), but they do go hand in hand with almost every other sport there is.

This mindset of impacting as many kids as possible has been powerful. When I go to people looking to support the youth in our community, I can truthfully tell them that their investment will benefit just about every athlete in the school at one point or another during the year. But the trick is to really mean it and commit to helping every athlete you can to become the best possible version of themselves.

When your goal is to help as many kids as possible, the benefits are numerous: The culture in your school and community improves, coaches and athletes from different sports build camaraderie, and more kids want to participate. (By the way, all this ultimately makes your team better in the process.) Taking all this into consideration, it’s not difficult to see why others would want to chip in.

The MuscleLab DSU can impact half of our student body through athletics, and it has the potential to touch even more students when we begin to utilize it in our anatomy and physics classrooms. Share on X

This past spring, we were fully funded for a MuscleLab Data Synchronization Unit (DSU) along with a full set of MuscleLab timing gates. It’s an amazing piece of equipment, but one that I feared most people would not be able to easily embrace or understand. What’s not difficult to understand, though, is that this piece of tech can impact half of our student body through athletics, and it has the potential to touch even more students when we begin to utilize it in our anatomy and physics classrooms. This will be our first attempt at venturing into the classroom with athletic technology, and I’m extremely excited to see what doors this will open and what new possibilities it will bring.

MuscleLab Kit
Image 3: People want to give, and they want their giving to impact as many kids as possible. Less than five years ago, being able to secure equipment like MuscleLab’s Data Synchronization Unit and Timing Gates seemed like fantasy. But contributions from the community and multiple athletic programs made it a reality for us.

Return vs. Investment

I’ll conclude with some lessons I’ve learned that I hope will minimize uncertainties and frustration for coaches who are just getting started.

First and foremost, do some scouting! The most certain way to avoid buyer’s remorse is to know as much as you can about what you are getting before you finalize that transaction. And luckily, there’s no shortage of resources if you are willing to pursue them. How-tos and demonstrations are all over YouTube. Experts like Carl Valle are reviewing sports tech on platforms like this blog almost every day.

But just as valuable are the reviews from your peers. If you’re looking into something, there’s likely a coach out there already using it and tweeting about it. I can’t recall a single time when I sent a direct message to a high school coach in the past five years seeking their counsel on a piece of equipment they were using that I didn’t receive a thoughtful and timely response. The truth is, anyone who has become proficient at something is probably standing on the shoulders of someone else, and that gratitude drives them to support others. After all, we’re all in this boat together.

Even after you’ve done your homework, it’s wise to start with smaller investments (both in terms of money and time) and see where they go. I really think this is beneficial for a number of reasons. Keeping the scale small obviously allows you to minimize any anxiety you might have about risk. But it also gives you time to build interest with others who may potentially want to invest and help you grow your operation while you build confidence in what you are doing.

Small successes breed a desire to learn and do more, while frustration and mishaps have a tendency to do the opposite. Often, people have a tendency to become overwhelmed with everything a piece of technology can do and all that they can do with it, and frustration and anxiety inevitably follow. Having the discipline to focus on small, simple, and specific goals is invaluable when learning a new technology.

Having the discipline to focus on small, simple, and specific goals is invaluable when learning a new technology, says @olneytigertrack. Share on X

To once again quote Carl Valle, “Focus on something you can master, work at it until you get bored with it, and then you can build on it.” This is advice I have repeated countless times when coaching teachers and coaches on technology. Rome wasn’t built in a day.

Lastly, as a high school coach, I’ve had to learn the importance of evaluating scale in regard to what a piece of technology will ultimately be capable of. Some systems have the capability to be impactful with large groups; some do not. Some have certain capabilities that translate to groups and others are only effective with individuals. (For instance, the MuscleLab Contact Grid has countless applications, but some just make more sense when I’m working with one athlete as opposed to 100.) And some systems may not make sense for groups at all, but the potential it possesses for individual athletes simply outweighs all other considerations.

It’s important to once again keep in mind that starting small is so important. Even if you have a piece of equipment that is capable of handling large groups, test drive it and experiment on individuals or very small groups first and then build from there. This may sound obvious, but I’ve found that the temptation to dive in headfirst is very real (and almost never beneficial).

Ultimately, any coach has to do a cost-benefit analysis on potential decisions that impact their program. Is investing in technology worth the time it takes to implement it? What about the potential distractions? Or the money? These are questions that you have to ask yourself.

But you also need to consider the cost of not acting. What are you and your athletes missing out on? Are the things standing in your way actual obstacles or just self-fulfilling prophecies? If you don’t take anything else from this article, I hope you see that these questions are worth asking, and there are plenty of folks out there willing to help you answer them.

Since you’re here…
…we have a small favor to ask. More people are reading SimpliFaster than ever, and each week we bring you compelling content from coaches, sport scientists, and physiotherapists who are devoted to building better athletes. Please take a moment to share the articles on social media, engage the authors with questions and comments below, and link to articles when appropriate if you have a blog or participate on forums of related topics. — SF

Gastroc Soleus Muscle

The Forgotten Plantar Flexor: Training the Soleus

Blog| ByBrandon Pigg

Gastroc Soleus Muscle

The soleus is one of the most neglected muscles in athletic training programs. Many coaches feel that due to the considerable amounts of force exerted on the calves during sprints, jumps (landings), and plyometrics, there is no need to further train the calves in the gym, since it’s unlikely we’ll be able to load them with anything near the 3-5x bodyweight level forces they experience in these movements. If any additional calf exercises are ever programmed, you can bet your lunch money that it’ll be some variation of a standing calf raise. While all of the aforementioned movements are all great, they fail to address one muscle group: the soleus.

I’ll give you a breakdown of some relevant literature, and then we’ll get into what most of you actually came here for (some new exercises to put in your toolbox). While the gastrocnemius (gastroc) and soleus are both synergists, as they share roles in plantar flexion, they are also anatomically unique in that the gastroc crosses both the knee and ankle joints while the soleus only crosses the ankle. This creates an interesting relationship between the two muscles.

Beyond this anatomical difference allowing the gastroc to function as both a plantar and knee flexor, the neural drive to the gastroc decreases as you enter deeper and deeper positions of knee flexion (Cresswell et al., 1995). Conversely, neural drive to the soleus remains the same regardless of joint angle at the knee. Lauber et al. (2014) found that at between 0 and 60 degrees of knee flexion, fascicle lengths of the soleus remain relatively unchanged, while the fascicle lengths of the gastroc progressively shorten 3.5 +/- 1.9 millimeters until around 21 degrees, and then remain around this length as you continue to go further into knee flexion. Further, they also found that motor units in the gastroc began to be de-recruited at a knee angle of 21.1 degrees when passively flexed.

These results are supported by Baumbach et al. (2014), who found that flexing the knee to a joint angle of 20 degrees removes any inhibition of the gastroc on ankle dorsiflexion. Interestingly, the same motor unit that was de-recruited at 21.1 degrees during passive flexion was re-recruited at a knee angle of 35.1 degrees while undergoing passive knee extension. They found activation levels of the gastroc and soleus actually switch at different joint angles and in accordance with gastroc fascicle length. Meaning, when the joint angle of the knee allows the fascicles of the gastroc to be at a length optimal for producing force, the gastroc will be the primarily activated calf muscle, and vice versa once the fascicles are in a shortened position.

These results suggest that the “bulk of the burden” of eccentric plantar flexion shifts onto the soleus at knee angles deeper than 20 degrees, and that the soleus will also be the primary plantar flexor of the two plantar flexors up until around a knee angle of 35 degrees when going back into knee extension. This supports the classical view that the soleus is more of an “eccentric muscle,” since it is primarily active throughout a larger percentage of knee flexion than knee extension.

I explain all of that to say: Your pogo hops, drop jumps, and calf raises aren’t doing jack squat for training the soleus. Sure, they’re great for the Achilles. They’re great for the gastroc. But the knee angles just aren’t deep enough to shift the bulk of the demands from the gastroc over to the soleus.

Your pogo hops, drop jumps, and calf raises aren’t doing jack squat for training the soleus. Sure, they’re great for the Achilles. They’re great for the gastroc…, says @Brandon_L_Pigg. Share on X

The question now moves to the ever important one: Does this even matter?

If you’re concerned with reducing knee injury risk among your athletes, well then, my answer would be “yes.”

Both Elias et al. (2003) and Mokhtarzadeh et al. (2013) found that the gastroc serves as an antagonist to the ACL ligament, and the soleus acts as an agonist for it. Elias went on to state that when only the soleus is activated, the tibia translates posteriorly in relation to the knee, but when just the gastroc or both the gastroc and soleus are active, the tibia translates anteriorly. In case it’s been a while since you took an anatomical kinesiology class, excessive anterior translation of the tibia in relation to the femur = bad.

It’s also worth noting that since strengthening the soleus theoretically would result in less anterior translation of the tibia during jump landings, it’s potentially possible that soleus training could assist in decreasing risk of patellar tendinitis. The two hypothetical mechanisms here would be: 1) the obvious one that increasing another muscle’s capacity to handle load during the jump landing would take some stress off the quad and patellar tendons; and 2) that decreasing anterior tibial translation would result in less of a stretch on the patellar tendon.

Training the Soleus

Alright, as promised, here are some exercises to add to your toolbox for soleus training. I’ll give you five different exercises with various outcome goals, as well as alternatives for movements that require special equipment. Since I tied injury prevention into the importance of lower leg training, I’ll throw in a more gastric-focused lift that may assist in these efforts as well. Many of these movements will be isometric in nature, which may be appreciated by anyone with Achilles issues who feels discomfort when training the ankle through dynamic ranges of motion.

Disclaimer: All of the above research was conducted by performing isometric plantar flexion, not ballistic movements. While I’m sure the dynamics change once the stretch-shortening cycle begins to play a role, we’re simply going to use the aforementioned research as a reference and assume things stay somewhat similar as we shift to dynamic movement.

Adding Bands to Target Function

As I mentioned earlier about how the soleus acts to pull the tibia posteriorly and as an agonist to the ACL, it would make sense to try and target that function in the gym. By anchoring a band anteriorly in relation to the body and looping it behind the back of the calf, you can create an anterior pull on the tibia for the soleus to work against. While it will be easier to add this variation to some exercises more than others, I think it’s a method worth checking out. I won’t count this as an exercise since you can apply this concept as a modification/progression to any of the following lifts that are performed while stationary.

Exercise 1: The Seated Calf Raise

I figured I would start this section by discussing the most well-known means of training the soleus: the seated calf raise. The seated calf raise is to the soleus as the standing calf raise is to the gastroc. It’s a golden age bodybuilding staple, but unfortunately, it’s just not as common in the training of athletes.

The seated calf raise is to the soleus as the standing calf raise is to the gastroc. It’s a golden age bodybuilding staple, but unfortunately, it’s just not as common in the training of athletes. Share on X

In conjunction with the stigmas against calf training that I mentioned at the beginning of this article, this exercise’s lack of popularity is also likely coupled with the simple fact that most normally budgeted training facilities won’t allot their funds (or dedicate space) to a piece of equipment that largely only has one function. Thankfully, I’m here to provide you with some alternatives that involve far more common equipment.

Seated Calf Raise Pros and Cons:

Pros:

  • Ease of use.
  • Able to load it heavily without much difficulty.
  • Allows for full range of motion training since most have an elevated bar to rest your forefoot on.

Cons:

  • A rare sight to see at most training gyms that don’t have a focus on bodybuilding.
  • Costly for coaches to add multiple units to their training facilities.
  • Takes up a considerable amount of space for a machine that’s largely a one-trick pony.

Alternative 1: The Safety Squat Bar Seated Calf Raise

The safety squat bar has gained a lot of popularity over the years and made its way into the big three of barbells (the Olympic straight bar and hex bar being the other two). This is good news for the sake of this article, because it is probably the best alternative to serve as a replacement for a seated calf raise machine. You can play around with where you seat the bar on the thigh, but I tend to prefer placing it toward the knee so that the load is closer to the ankle joint. In case you don’t have a safety squat bar, you could probably do these with a straight bar as well. I’d definitely recommend either using a pad or wrapping a towel around it, so you aren’t just setting a bare bar on your thigh.

Pros:

  • Safety squat bars are commonly found pieces of equipment.
  • Only being able to load one leg at a time forces you to train unilaterally.
  • Can have athletes at each rack go at the same time instead of rotating people onto a seated calf raise machine.

Cons:

  • Requires racking and un-racking the bar, plus seating it on the knee. Not a deal breaker, but certainly not as simple as the machine variant.
  • Due to the constraint listed above and increased instability, you won’t be able to load it as heavily as you would the machine.
  • Some athletes may find the bar being placed on their leg to be uncomfortable.

Alternative 2: Kettle Bells

This one will require a bit of jerry rigging, but I like to think all strength coaches are a bit of a MacGyver at heart. Essentially, you’re going to be suspending some kettle bells with some sort of a strap and then placing this strap over your thigh like you did with the safety squat bar variation. While I’m sure the possibilities are endless, here are the two methods I’ve tried.

The most common way would be using a dip/pull-up belt, where the belt is centered over the thigh, and then a kettle bell is suspended on both sides of the leg. The second is with my favorite exercise equipment: a combination of a $6 trailer carabiner and a $6-$9 pack of nylon tie-down straps that can be looped together. I’ll link one of my tweets here where I go into a whole host of uses for these bad boys. (I’m talking they can be used for anything from TRX straps, dip belts, and overcoming ISOs, to makeshift belt squats, Spanish squats—you name it.) But they can also be used for these kettle bell seated calf raises.

Pros:

  • If you don’t have a safety squat bar/don’t enjoy that variation, this is a very cheap alternative.
  • This same setup works great for hip thrusts. Just lay the straps/belt across your hips and suspend a kettle bell on either side. It’s far easier to balance than a barbell, which makes it my second favorite variation behind Smith machine hip thrusts.

Cons:

  • It allows for the least amount of load of the three methods listed.
  • The suspended kettle bells can, and likely will, smack into your leg/ankle if they start swaying.

Exercise 2: 90/90 Soleus ISO

Mock this exercise and call it wimpy at your own risk, because this will leave first-timers sore for three or more days. For anyone familiar with PRI, this exercise involves getting into a similar position as the 90/90 heel lift. The difference is that, instead of driving down through the heels, you’ll plantar flex onto the ball of your foot (first metatarsal head) and squeeze those calves as hard as you can. I’m a big fan of ISOs in three positions: 1) most shortened position, 2) most lengthened position, and 3) common joint angles experienced in sport/running/jumping.

This ISO is our most shortened position of the soleus, and I particularly like it for another reason: It allows us to target the soleus in full plantar flexion, says @Brandon_L_Pigg. Share on X

This one is our most shortened position of the soleus, and I particularly like it for another reason: It allows us to target the soleus in full plantar flexion. As stated in the section where I reviewed a few relevant literature sources, the gastroc usually will have already taken over as the main mover of the two calves by the time you enter the late ranges of plantar flexion. By being at a knee angle of 90 degrees in this exercise, we take the gastroc out of the equation and train the soleus in a position in which it’s especially weak.

Exercise 3: Seated Overcoming Calf Raise ISO

This one will probably be easiest using the safety squat bar setup mentioned earlier, but I suppose there are ways you could use the other two methods. Here, we’ll be getting our ISO at the most lengthened position of the soleus. You’ll perform this by setting up safety pins so that you’re barely able to plantar flex out of that dorsiflexed position.

Alternative: Single Leg Plantar Flexion ISO from Pronated Position

Yeah, I clearly don’t exactly have a catchy name for this one, but the exercise is still a worthwhile alternative for anyone who is without access to a gym due to COVID-19 or other circumstances. Although it still gets you into that lengthened position of the soleus, this one is a bit different because your knee angle will likely be at that tipping point where the primary mover shifts from gastroc to soleus, whereas the other exercises provided all take place at deeper ranges of knee flexion. That isn’t necessarily a bad thing, as this is a common position experienced in landings. All you do is perform a knee bend and get your knee out over your big toe while keeping a vertical torso.

Concentrate your weight onto the transverse arch of the foot, but still keep the heel in contact with the ground. From there, simply push the ground as hard as you can and try to plantar flex the ankle but stay in that knee bent position. This is an especially great movement to which to add the band variation I listed at the top of the exercise section. Since this is a position that you’ll experience in landings, it makes sense to train the soleus to pull posteriorly on the tibia to prevent excessive anterior tibial translation.

Exercise 4: Prowler Bounds

As we transition to some more power-focused movements with the prowler bounds, you’ll notice the movements become more full body in nature. You’ll want to cue delaying knee extension here to make sure you make ground contact with a nice bent knee. From there, you just bound. It’s almost like squatted bounding.

Alternative: 10-Yard Hill Sprint

If you don’t have access to a prowler sled, you can just head over to a reasonable hill and get some 10-yard sprints in. Since you aren’t reaching top-end sprint mechanics here, you’ll still have enough of a knee bend to give the soleus some love.

Exercise 5: Squatted Depth Jumps

In a normal depth jump, the first few moments of ground contact will feature knee joints and fascicle lengths that allow the gastroc to blunt the impact before the knee bends deeply enough for the focus to shift over to the soleus. By landing in a squatted position, we take the crutch away and force the soleus to be the primary eccentric plantar flexor from the start. This helps prepare athletes to later perform change of direction maneuvers that involve the foot making contact with the ground while the knee is already bent at or beyond 20 degrees. Since we’re using it as a preparatory movement for change of direction progressions, it would be logical to progress these to squatted lateral depth jumps to add a change of direction component to the movement.

Bonus Gastroc Exercise: Overcoming Standing Calf Raise ISO

As alluded to in exercise 5, the gastroc will be the primary muscle for plantar flexion during the first milliseconds of ground contact in most movements. Because of this, we can train these positions with overcoming isometrics to increase the gastroc’s ability to produce force and dampen the amount of forces that the body will need to produce up the chain to be able to overcome the force imposed by landing. I would train these in both full plantar flexion and full dorsiflexion, as the full plantar flexion position will help train the gastroc for jump landings, and the dorsiflexed position will help prepare it for ground contacts in sprints with top-end mechanics.

Training Below the Knee for Performance

While training the soleus probably isn’t the one secret missing ingredient…I do believe it to be another important element when training a well-rounded and robust athlete, says @Brandon_L_Pigg. Share on X

All calf training isn’t created equal, and hopefully I’ve helped you discover newfound value in training the calves beyond exclusively plyometric movements. While training the soleus probably isn’t the one secret missing ingredient that’s stood between your athletes and world record PRs or playing 10 years straight without sustaining an injury, I do believe it to be another important element to consider when training a well-rounded and robust athlete. With the 11 total calf training variations I just explained, I hope I’ve given you some juice and ideas to help make training the calves cool again.

Since you’re here…
…we have a small favor to ask. More people are reading SimpliFaster than ever, and each week we bring you compelling content from coaches, sport scientists, and physiotherapists who are devoted to building better athletes. Please take a moment to share the articles on social media, engage the authors with questions and comments below, and link to articles when appropriate if you have a blog or participate on forums of related topics. — SF


References

Cresswell, A.G., Löscher, W.N., and Thorstensson, A. “Influence of gastrocnemius muscle length on triceps surae torque development and electromyographic activity in man.” Experimental Brain Research. 1995;105(2):283-290.

Lauber, Benedikt, Lichtwark, G.A., and Cresswell, A.G. “Reciprocal activation of gastrocnemius and soleus motor units is associated with fascicle length change during knee flexion.” Physiological Reports. 2014;2(6):e12044.

Baumbach, S.F., Brumann, M., Binder, J., Mutschler, W., Regauer, M., and Polzer, H. “The influence of knee position on ankle dorsiflexion – A biometric study.” BMC Musculoskeletal Disorders. 2014;15(1):246.

Elias, J.J., Faust, A.F., Chu, Y-H., Chao, E.Y., and Cosgarea, A.J. “The soleus muscle acts as an agonist for the anterior cruciate ligament. An in vitro experimental study.” American Journal of Sports Medicine. 2003;31(2):241-246.

Mokhtarzadeh, H., Yeow, R.C-H., Goh, J., Oetomo, D., Malekipour, F., and Lee, P. “Contributions of the Soleus and Gastrocnemius muscles to the anterior cruciate ligament loading during single-leg landing.” Journal of Biomechanics. 2013;46(11):1913-1920.

Athlete Tempo

Running With Intent: 7 Reasons Why Tempo Work Supercharges an Athlete’s Ability to Sprint!

Blog| ByMike Whiteman

Athlete Tempo

Recent training fads in the speed world have been quick to dismiss the value of submaximal running in any context, favoring extremely polarized methodologies instead. While these types of development often can yield quick, tangible results, they are often not sustainable because of glaring omissions. What makes an all-or-nothing approach to training briefly effective is also its ultimate undoing.

The human body is incredibly resilient and, as the SAID principle states, will adapt to the specific demands imposed upon it. Continually exposing an athlete to the same extremely specific, typically highly stressful stimuli will work but it will not work forever, as the body will quickly respond and just as quickly become desensitized. Over-familiarity will lead to stagnation in progress or even worse: overuse and burnout-associated injuries.

Over-familiarity will lead to stagnation in progress or even worse: overuse and burnout-associated injuries, says @houndsspeed. Share on X

For greater sustainability a less aggressive, more well-rounded approach is optimal. Changing stimuli is necessary for continued growth. It is for precisely this reason that submaximal development can serve not just as a sturdy foundation but a potent means by which to improve max output demonstration. In this blog I will provide compelling arguments (beyond the more obvious conditioning effect) as to why timely, subtle investments in tempo work allow for greater max threshold sprint dividends in the future.

1. Not All Running Is Created Equal

Diversifying from the pursuit of one singular max output and allocating appropriate energy resources to pursue breadth instead of depth at critical times is an important concept when trying to elicit any type of adaptation. Athletic growth is never perfectly linear, and to maintain positive trends it is essential to be willing to move backwards and laterally at times to allow for even greater progress in the future. Constant inundation with the same stimuli over and over will quickly lead to diminishing returns and eventually stagnation altogether.

Sometimes it is as simple as changing the exercise or stimulus, and sometimes more nuance is needed for the same stressor. Subtle tweaks as opposed to massive reconstructions allow an athlete to stay on the most direct path to their end goal while ensuring constant growth. Being able to switch gears and “throttle down” to become skilled at different running speeds and intensities or tempos provides such opportunity.

Tempo work is typically only viewed as a means by which to condition and sadly this robs athletes from experiencing the true value they possess. Submaximal running does not have to equate to under recovered, highly stressful, glycolytic bombs that serve to derail max speed gains. If viewed more as a method to develop skillful, fluid, and relaxed running with quality ground contact and good frontside mechanics, tempo running becomes the most specific means by which to practice the art of sprinting without in fact sprinting and enduring the higher degrees of stress that accompany it. Less stress provides more opportunity to train and more training means stronger running and even better sprinting.

2. Less Drill, More Functional Skill

Technical work with positioning, marching, skipping, and form running will always have value regardless of how advanced an athlete becomes. Integrating these types of coordination drills can provide natural progressions in motor complexity and intensity which are great for a smooth intensification process during warmup. Despite the value these drills possess, tempo runs are a more practical developer of skill. Submaximal tempo work effectively bridges the gap from the low intensity drilling to the more intensive sprinting by providing a more specific way to rehearse going fast.

Good tempo work allows an athlete to feel position, cadence, and propulsion in a more realistic setting and providing the opportunity to accumulate quality ground contact without imposing too much additional stress. This is precisely why sufficient recovery is important even in submaximal, extensive settings. If approached from the angle of facilitating and then preserving quality first, volume will organically grow after repeated exposures over time.

3. Better Fuel Efficiency

As a result of the increased volume of good frontside mechanics and better ground striking capabilities, fitness will naturally improve. By framing tempo work within the parameters of good movement standards, it creates an environment in which max speed and high fitness can coexist harmoniously. Stopping a mile early as opposed to an inch late is always best practice as it relates to training, even if conditioning is part of the end goal. If submax sessions are terminated prior to complete exhaustion and degradation of motor skills, it will ensure the intensive sessions to follow will not be adversely affected.

When tempo work is used irresponsibly and volume is placed in front of quality, the athlete often can get stuck in a rut in which they are not really making progress developing their maximum thresholds as they are overly fatigued. Closely monitoring volume and timing both extensive and intensive efforts will go a long way to make sure the entire process trends in the proper direction. As the athlete becomes more proficient technically and their maximum sprint capabilities improve, their ability to conserve energy at submaximal speeds will increase as well.

Closely monitoring volume and timing both extensive and intensive efforts will go a long way to make sure the entire process trends in the proper direction, says @houndsspeed. Share on X

Increasing thresholds at the top end means a competitor must expend less energy at slower speeds. Becoming more efficient at managing energy resources is important for ball court athletes to ensure they can maintain quality throughout the duration of their competition, and for track athletes as it pertains to race modeling and strategy. Running relaxed is widely accepted as best practice for maximum speed, but how can relaxation be truly developed if never really practiced? Pace control and tempo teaches the skill of relaxation and allows the athlete to refine their specific approach to staying smooth and fluid.

4. Specific Armor Building

Nothing is as potent of an inoculant against soft tissue injury as appropriately controlled and prescribed doses of maximal sprinting. However, you do not magically progress from walking to sprinting without first ramping up. Extensive tempos gently condition the primary muscles used for sprinting: the hips, groin, glutes, and hamstrings.

Squats, deadlifts, RDLs, and Nordic hamstring curls are great for general strength development and are excellent at supplementing the more specific impact-intensive submaximal runs, but they cannot exclusively take the place of running. Tempo work is also important for preparing the tendons and connective tissue for more intensive efforts.

Muscles adapt and develop much faster than tendons so adopting a more holistic approach to speed by frequently varying intensities doubles nicely as a great form of prehab and ensuring the development process is not rushed. The best ability often is availability, and slow cooking adaptation will always be the safest. Diversity in pace and a mixed approach to developing different concepts or attributes within running can go a long way in keeping athletes highly prepared, healthy, and mentally engaged.

The best ability often is availability, and slow cooking adaptation will always be the safest, says @houndsspeed. Share on X

5. ‘Key’ to COVID Lockdown

Human beings are not robots and the mental aspect of training and preparing to compete cannot be overlooked. Lockdowns and restrictions due to the COVID-19 pandemic have greatly limited athletes’ abilities to train as they usually do by limiting access to facilities and coaches alike. For individuals that gravitate towards structure and routine this can become cause for anxiety, so having some form of effective stress relief is invaluable.

While it may not be the necessary mental reprieve for everyone, the less intensive, more relaxed nature of tempo work can serve to provide an opportunity just to get out and get some fresh air and quite simply move! Quality movement, some degree of freedom, and the feeling of accomplishment can really get the endorphins flowing—and that matters. Running requires little to no thought, no equipment, and (at submax pace) little emotional or sympathetic investment. As an easy and readily available option, sometimes it is just what an athlete needs.

Human beings are not robots and the mental aspect of training and preparing to compete cannot be overlooked, says @houndsspeed. Share on X

6. Mental Discipline

Developing high levels of performance means always doing what is necessary. Sometimes what is necessary is not convenient, fun, or comfortable. However, it is the pursuit of discomfort that drives change in any capacity. Without ever disrupting homeostasis, adaptation cannot occur. Tempo work often requires great discipline and an even greater sense of delayed gratification knowing that the investments made today will be able to be withdrawn with greater yields in the future.

It is the pursuit of discomfort that drives change in any capacity, says @houndsspeed. Share on X

It is easier to get up mentally and emotionally for short sprints with immediate, objective feedback but not so much for running hill repeats with a heart rate monitor dictating pace. Both are equally as important to holistic development and it is important that athletes approach each similarly regarding attention to detail and intent. Intent is not interchangeable with effort. Intent in a submax context can mean following prescribed rests, intensities, and rep schemes as they are intended.

Mental discipline is a skill that can be developed through practice and refinement just like any physical attribute. This goes beyond enduring uncomfortable physical training and can be demonstrated in an athlete’s diet, recovery habits, behavior towards others, and even in their outward appearance.

7. Body Composition

At the end of the day, you cannot run from physics and physiology. Athletes are constantly at odds with both inertia and gravity, so it is in a competitor’s best interest to try and “build the biggest engine while maintaining the smallest chassis.” Paul Fabritz, trainer to many NBA athletes and elite dunkers, states it best: “Fat don’t fly!” Mass-specific force represents the dynamic relationship between an athlete’s absolute and relative strength in the context of their weight (weight and mass interchangeable on earth).

Becoming as powerful as possible while staying lean and mean requires constant vigilance of strength and speed numbers as well as the scale. Tempo running can be an effective means of accumulating quality ground contact while burning some extra calories. This strategy may not be relevant to everyone (such as “hard gaining” ectomorphs who struggle to keep weight on), so knowing the specific needs and metabolism of each individual athlete is key.

Becoming as powerful as possible while staying lean and mean requires constant vigilance of strength and speed numbers as well as the scale, says @houndsspeed. Share on X

Patience is a Virtue

Long-term speed growth is best sustained with a diverse, holistic approach. Having the foresight and willingness to switch gears to maneuver either backwards or laterally at appropriate times throughout this process will go a long way in ensuring trends stay positive. This requires the patience to not fall prisoner to the moment.

Submaximal tempo work with varied intensities and distances can provide just enough subtle variation to the maturation of the total sprinting process to enhance prosperity; it can be so much more than just a blunt, simplistic conditioning tool. Like any tool, it is all in how it is used, so instead of being quick to vilify, start exploring the possibilities and make tempo running work for you!

Since you’re here…
…we have a small favor to ask. More people are reading SimpliFaster than ever, and each week we bring you compelling content from coaches, sport scientists, and physiotherapists who are devoted to building better athletes. Please take a moment to share the articles on social media, engage the authors with questions and comments below, and link to articles when appropriate if you have a blog or participate on forums of related topics. — SF


Coaches Eye

A Bias Toward Speed? Breaking Down the Sprinting Cycle

Blog| ByOwen McNally

Coaches Eye

By Owen McNally & Jonas Dodoo

This article will present how we at Speedworks break down the sprinting cycle and determine athletes’ biases based on what we see.

We take endless videos of our athletes from the sagittal view, which allows us to understand how and why an athlete moves in a certain manner. The sagittal view is a great introduction to the movement of the athlete, and we believe it presents the most information (initially).

First, a very basic explanation of the sprinting cycle. The sprinting cycle can be broken down into two phases: ground and air. The ground phase starts at initial touchdown and ends at takeoff; the air phase starts at takeoff and ends at touchdown. The video below shows these two phases.


Video 1. The sprinting cycle consists of two phases: ground and air. Initial touchdown to takeoff is the ground phase and takeoff to touchdown is the air phase.

The Data

Athletes navigate ground and air phases in different manners. The drive index presents a ratio of these variables, which we regularly use when assessing performance.

Drive Index = Contact Time/Airtime

1a & 1b
Figures 1a & 1b. This data shows drive index scores from the men’s and women’s 100m final at the 2017 World Athletic Championships. (Data is on maximal velocity phase: 47.5m-55m.) When athletes vary their drive index scores, it varies the ground-to-air ratios.

Figures 1a and 1b show that athletes vary their drive index scores, therefore varying the ground-to-air ratios. We can begin to understand their movement strategies by setting out guidelines for values. (I am avoiding the word “group” athletes, as this term is too harsh.) We can classify movement strategies as air-based (low drive index score), ground-based (high drive index score), or a neutral strategy (mid-point drive index value). What should be made immediately clear is that no strategy is the optimal strategy. Different strategies will benefit athletes differently.

Based on the data above, we theorize that for male sprinters, a drive index score of 0.75 represents a neutral strategy. Values above this represent a ground-based approach, and values below this represent an air-based approach. For female sprinters, a drive index range of 0.78-0.82 represents a neutral strategy. Values above and below represent ground- and air-based approaches, respectively.

The trend is that drive index starts high (in acceleration) and slowly decreases until maximum velocity. We are going to focus on the links between drive index at maximum velocity and hip extension/flexion ranges, and in doing so, link the data to what we see. (The classification of drive index values presented above are still rough and are based on athletes we have coached at Speedworks with a combination of World championship data.)

Frontside and Backside Mechanics

We can very basically break the hip cycle into frontside and backside mechanics. (Again, from the sagittal view.) What happens in front of the body is frontside mechanics; what happens behind the body is backside mechanics. Both incorporate ground and air phases. Both happen simultaneously, bilaterally.

Frontside Mechanics

Backside Mechanics
Images 1a & 1b. A sagittal view of frontside and backside mechanics. Both frontside and backside incorporate the ground and air phases.

Athletes are commonly grouped by their biases toward either frontside or backside. Athletes termed “frontside” will exhibit large hip flexion ranges with limited hip extension ranges; whereas athletes termed “backside” will exhibit large hip extension ranges with limited hip flexion ranges. This is arguably an oversimplification of it, as speed (or better put, angular velocity) of hip flexions end extensions really contribute toward biases, but visually it is very easy to assess ranges.

Common coaching vocabulary would describe a ‘frontside bias’ as good and a ‘backside bias’ as bad. Why? Because it’s generally right, but not always. Share on X

Common coaching vocabulary would describe a “frontside bias” as good and a “backside bias” as bad. Why? Because it is generally right, but not always. The main difference between novice athletes and elite athletes will be the percentage of frontside mechanics. However, there are variances in biases at elite levels and higher performing levels. Below are tables showing hip extension and flexion angles at takeoff from the 2017 100m World Championships Finals.

Flexion Figures
Figures 2a & 2b. Data for athletes’ hip extension and flexion angles at takeoff from the 2017 100m World Championships Finals. Notice the ratio variation between extension and flexion.

The purpose of presenting these tables is to show that hip flexion and extension ranges vary between athletes (implying that frontside and backside might also vary), and more specifically, the ratios between extension and flexion vary. What are the interesting things about this?

Womens Hip Sprint
Figure 3. A comparison of three female sprinters at the 2017 100m World Championships Finals. There is a large variation in the ratio of hip angles at takeoff.

Compare Tori Bowie to Marie-Josee Ta Lou in the women’s 100m final. There is a large variation in the ratio of hip angles at takeoff. Bowie gets a much higher percentage in hip extension and also has a higher drive index value (0.83) compared to Ta Lou (0.72). Therefore, Bowie spends a larger portion of her cycle on the ground in relation to the air compared to Ta Lou, and in doing so creates more hip extension. It seems to make sense. Visually referring to hip mechanics, Bowie would exhibit a more backside approach. Kelly-Ann Baptiste shows hip angles sitting in the middle, and this is also accompanied by a neutral drive index score of 0.79.

Mens Hip Angles
Figure 4. A comparison of three male sprinters at the 2017 100m World Championships Finals. Notice the variation in the ratio of hip angles at takeoff.

Figure 4 again shows differences in the ratio of hip angles at takeoff, with Coleman having a higher percentage of hip extension alongside a larger drive index (0.80) compared to Prescod (0.74). This shows an elite athlete who spends more of their cycle on the ground as a ratio and generates hip angles more biased toward hip extension compared to other athletes, who would appear visually more backsided. Usain Bolt shows hip angles sitting in the middle, and this is accompanied by a neutral drive index score of 0.75.

Neither of these comparisons are to show that what Bowie and Coleman did is more optimal than Ta Lou’s and Prescod’s strategies, but merely to highlight there are differences in strategy. Achieving a large drive index value and hip angles biased toward extension might be optimal for Coleman and Bowie. Prescod and Ta Lou might need to maximize what they are doing in hip flexion and not focus on increasing hip extension. Bolt and Baptiste may have higher degrees of range in the hips and therefore not need to emphasize one side over the other.


Video 2. Air-based sprint strategy with small hip extension and large hip flexion.

What Is Optimal?

The question of what is optimal is not one that anyone has the right answer for, but we can guess as best we can. First, we need to understand the main purposes of frontside and backside mechanics.

The goal of frontside mechanics is to prepare the leg for ground contact. This allows for stiffer landings and shorter ground contacts. Essentially, we take care of the vertical force required for support quicker by spiking the ground reaction force on initial contact. This will mean athletes need to spend less time on the ground. Pre-activation of muscles combined with the leg rapidly attacking into the ground will help generate these outcomes.

In order for the body to do this, an athlete must be able to tolerate very high loads in a short amount of time, turning eccentric into concentric rapidly. In summary, being very reactive! So, it would seem to make sense that if an athlete who is more frontside dominant is biased toward hip flexion angles, their drive index would be lower due to them maximizing their ability to minimize ground contact time.

The goal of backside mechanics is to propel the body forward. When the stance leg moves behind the hip (COM), propulsive horizontal force is generated. The goal is to create large propulsive forces rapidly. The larger the take-off angle (or even hip extension angles), the more force likely to be directed to moving the body forward. Concentric force production capabilities of the muscles will contribute toward this.

Force to propel the body to go forward is only created on the ground. If an athlete can generate large concentric forces and achieve hip angles biased toward hip extension—therefore becoming a more backside dominant runner—it would make sense that their drive index would be higher, maximizing time spent on the ground.

Frontside and backside aren’t mutually exclusive. Having effective frontside mechanics should benefit the effectiveness of backside mechanics, and vice versa. Share on X

Frontside and backside are not mutually exclusive. Having effective frontside mechanics should benefit the effectiveness of backside mechanics and vice versa. Yet, perhaps athletes feel more dominant in one than the other, and not all athletes should be expected to do everything the same.

Dodoo Hip Figure
Figure 5. Although Jimmy Vicaut is the most biased toward hip flexion of the four sprinters, he had the highest drive index score in the final (figure 1a). This means he spends the largest portion of his cycle on the ground compared to the other athlete but gets the least hip extension.

If we put Jimmy Vicaut into the comparison, it goes against the suggested trend or proposed strategies. Vicaut is the most biased toward hip flexion, with very limited hip extension (lowest absolute hip extension value in final). Yet he has the highest drive index score in the final (figures 1a & 1b)—0.89—meaning he spends the largest portion of his cycle on the ground compared to any other athlete in the final but gets the least hip extension. Interestingly, he had the lowest relative step length in the final as well (1.30). This suggests he is wasting time on the ground, as he is not generating enough propulsion. His hip mechanics suggest he has time or maybe space to create adequate pretension before ground contact, to minimize time spent on the ground, but he is unable to.

The questions we would pose are: Does his training focus too much on concentric force production and not enough on reactive capabilities? Or are his hip mechanics limiting his ability to produce propulsive horizontal force? Really, the question is: Why is he spending so much of the cycle on the ground and getting so little output?

We suggest that there are some rules of thumb. If an athlete visually appears “frontside dominant,” they need to maximize their reactive capabilities—spending a larger ratio of their cycle on the ground will be ineffective. So frontside should accompany a low drive index score. If an athlete visually appears more “backside dominant,” they need to maximize their concentric propulsive abilities—spending a larger ratio of their cycle in the air will be ineffective. So, backside should accompany a high drive index score. An athlete who has a neutral strategy visually perhaps must ensure they do not bias too much toward one side.

To make it clear, we are inferring:

  1. High drive index = Ground-based strategy = Backside dominant
  2. Mid-point drive index = Neutral strategy = Balanced
  3. Low drive index = Air-based strategy = Frontside dominant

Coaching ability comes into play when assessing these variables, as the main consideration concerns whether the athlete’s current method of sprinting defined by hip mechanics and drive index scores is optimal. When determining if the current strategy is optimal, we consider several things.

First, we take into account physiological makeup—whether it’s genetic or due to training history. There are athletes who naturally have more of an anterior pelvic tilt, but with super strong glutes and hamstrings, they can be extremely effective. But there are also athletes who come with lots of anterior tilt because they have not been taught/trained otherwise. There will be athletes forced into frontside dominance who shouldn’t be there, and there will be athletes who are frontside dominant who need reactive capabilities trained even more. It is a case of trial and error.


Video 3. Neutral Strategy, which has a mid-point drive index value.

Although this article has highlighted the differences, the similarities are arguably more important. Every successful athlete needs to be effective in the air (switching and creating pretension), have the ability to tolerate and create high forces in minimal time  (reactivity), and rapidly displace their bodies forward (projection). So, if an athlete exhibits more anterior pelvic tilt than what is considered normal but is effective in doing all the above, you have your answer. If they are not effective, they may simply lack the tools, and it is the coach’s job to provide them with the right tools. Or the tools could be wrong, and they need to be changed!

There is a lot of emerging research showing the importance of frontside mechanics and fixing backside mechanics or anterior pelvic tilt. This article does not disagree with this. We are looking at a more homogenous population (less variation).

Frontside mechanics is not always the answer. Some athletes can reach the very top by exhibiting backside dominance while still managing to be effective frontside. Share on X

Comparing the data obtained from world championships and advanced athletes at Speedworks to a more novice/untrained population would also lead us to draw the same general conclusions. But our conclusions differ when looking within a more homogenous population. Frontside mechanics is not always the answer. Some athletes can reach the very top by exhibiting backside dominance while still managing to be effective frontside. They must have the physiological makeup combined with the correct training stimulus to do so.

The simplest summary for me is this: Expect to change most athletes who come to you to a more frontside bias. Keep an eye out for the ones who are typically very strong accelerators and access anterior pelvic movement, as it might be their strength. Be aware of the elastic “freaks” who have access to large ranges on both sides; since their stability and strength draw from large ranges, biasing them to one side might be detrimental. For the athletes who come to you with a frontside bias, make them whack the ground harder—don’t give them slow hip extension.

Speedworks Case Studies

Below are visual representations of athletes who have trained with us at Speedworks effectively manipulating hip mechanics in different manners (ratios).

Air-Based Mechanics
Neutral Strategy

The Messy Stuff

It is of paramount importance when understanding athlete strategies through hip ranges and air and ground contact times that we refer to the ratios. These are the relationships between two opposing variables: flexion to extension and air to ground. A low drive index value does not necessarily mean an athlete spends less time on the ground than an athlete with a larger drive index. Other variables have an effect.

Taller athletes (or more specifically, athletes with certain length in specific limbs) typically have larger step lengths and lower step frequencies. Therefore, cycle time is typically higher. Reece Prescod achieves a lower drive index value than Christian Coleman but has higher ground contact times during maximum velocity. He also generates a larger step length, meaning he does not need to maximize his step frequency to the same degree as Coleman.

But height does not perfectly dictate (or even correlate) with step length or step frequency biases. This article has purposefully stayed clear of pinning step length and frequency to certain strategies, because it doesn’t work. It would be all too easy to say that the smallest athlete in the race with the lowest drive index (lowest portion of cycle spent on the ground) and a large frontside bias would demonstrate very high frequencies but a low step length. But Ta Lou is a great example of why this is a wrong assumption. Ta Lou had the highest relative step length in the final and the third highest absolute step length (during maximum velocity), but she is the smallest in stature.

This article has purposefully stayed clear of pinning step length and frequency to certain strategies, because it doesn’t work. Share on X

Air versus ground or backside versus frontside are just different methods to create force. Therefore, maximizing the reactive capabilities of a frontside sprinter to generate as much force as possible can result in big step lengths. Or it might not. Based on Ta Lou’s data—lowest drive index, hip flexion biased mechanics, small stature, large step length—we could throw out a guess that she is the most effective at creating pretension before ground contact, spiking the force quickest on initial touchdown. Perhaps she has figured something out.

Since you’re here…
…we have a small favor to ask. More people are reading SimpliFaster than ever, and each week we bring you compelling content from coaches, sport scientists, and physiotherapists who are devoted to building better athletes. Please take a moment to share the articles on social media, engage the authors with questions and comments below, and link to articles when appropriate if you have a blog or participate on forums of related topics. — SF

Jonas DodooJonas Tawiah-Dodoo is the head coach and founder of Speedworks. He was a part of the UK Athletics Apprentice Coach program in the four-year lead-up to the London 2012 Olympics, working with world-renowned coaches Dan Pfaff and Stuart McMillan. His experience in sport is not limited to athletics, as he has worked with rugby for several years.

Since graduating from the Apprentice Coach program, Jonas has worked closely with a number of talented young sprinters. His most recent prodigy is Reece Prescod, the 2018 European Champion 100m sprinter.

Power Clean Young Athlete

Youth Strength and Conditioning Concepts with Elisabeth Oehler

Freelap Friday Five| ByElisabeth Oehler

Power Clean Young Athlete

Elisabeth Oehler is a weightlifting and strength & conditioning coach and consultant who helps organizations to evolve and develop their athletic development programs. She also helps coaches and athletes from different sports (e.g., weightlifting, rugby, etc.) on a remote basis. Currently, Elisabeth works as an expert in long-term athletic development and youth sports at the école nationale de l’éducation physique et des sports, an executive department of the sports ministry in Luxemburg.

Oehler studied sport science with a focus on sports pedagogy at the University of Erlangen-Nürnberg, Germany, and is currently an MSc student in sport coaching at the University of Birmingham, U.K. From 2017 through the end of 2020, she worked as a full-time coach for the German Weightlifting Federation, first as a manager of the youth department and later as head of talent identification. Elisabeth is a licensed weightlifting coach (DOSB A-Licence High Performance) and specialized Youth Coach by the German Olympic Sports Confederation and has further qualifications in strength & conditioning.

Oehler has a huge passion for rugby and collision sports in general and has worked as a strength & conditioning coach with national team players leading to the Rugby European Championships 2019 (Germany 15s), professional rugby players in France, and youth rugby players on an individual basis. In 2019 and 2020, she interned with the Stormers (South Africa) and shadowed the coaching staff at Saracens (U.K.) and the Blitzboks (South Africa 7s).

Freelap USA: Young boys and girls can get a lot of confidence from weightlifting. Can you get into why starting weightlifting early is not only safe but beneficial in the long run? Many coaches see cleaning and snatching as advanced, but lots of young kids under the age of 10 look amazing!

Elisabeth Oehler: Teaching weightlifting techniques to kids should focus on developing strength training competencies and adding movements to the “toolbox.” Resistance training with kids does not have an impact on growth plates, but it improves bone density and intra- and intermuscular coordination. If a kid has learned correct techniques for exercises like the snatch, clean, or squat, S&C coaches have a much easier time applying training methods (e.g., hypertrophy) in an effective and safe way later.

Weightlifting is safe when kids can follow instructions, enjoy training, and are supervised by a coach who is aware of the motor & psychological development tasks of the different age groups. Share on X

Weightlifting is safe when children can follow instructions, enjoy training, and are supervised by a coach who is aware of the motor and psychological developmental tasks of the different age groups. Especially before peak height velocity (PHV), children still have balanced body proportions, which change with growth spurts and can also lead to coordination problems. Many kids under the age of 10 usually don’t deal with hip, ankle, or shoulder mobility issues (yet), and therefore it’s easier for them to, for example, get into a deep squat position.

From my experience, most kids do not “overthink” the process of learning a new technique or skill as much as older athletes do; they just naturally imitate movements they see and are curious about learning new skills. Teaching “advanced” and especially technical lifts like the clean or snatch during PHV when, for instance, the leg-to-body ratio is constantly changing makes it more difficult. Actually, during and especially after PHV, we as S&C coaches want to focus on developing strength or power and not start with teaching technique.

Freelap USA: Teaching horizontal jumps, hops, and bounds is important with some athletes. Can you explain how you progress an athlete who is talented but not skilled in plyometrics? Often great athletes are good at their sport, but when you take them out to a gym, sometimes they are less skilled. How do you train plyometrics with intermediate and advanced athletes?

Elisabeth Oehler: When I worked in talent identification for German Weightlifting, I mainly used the standing long jump as a functional test to assess leg power. This was an option to separate actually talented youth weightlifters from those who have advantages in the sport-specific tests only due to early specialization. If the athletes are not able to use the best possible technique for the long jump, I’m not really able to assess their true potential.

Furthermore, we assessed jumps, sprints, and throws in youth weightlifting competitions as a part of athletic development. Therefore, I had to train it, especially from a technical perspective. Athletes who are intermediate or advanced in their specific sport—in this case, weightlifting—have not automatically learned correct fundamentals. So, the focus was on learning or improving landing mechanics and then finding an ideal and effective takeoff angle for the standing long jump. I’ve done this as part of warm-ups or general preparation for lifting.

After mastering those, we can expose the athletes to different kinds of jumping exercises and add hurdles or boxes. The next step was adding intensity and volume and integrating jumps into the actual weightlifting program. The fundamentals, especially landing, can’t be trained too much, even with advanced athletes, to make plyometrics safe and effective.

Freelap USA: Rugby is obviously a collision sport. How do you prepare the body for taking hits outside of adding muscle mass? Do you do any neck training or similar?

Elisabeth Oehler: I had the chance to learn from some freestyle wrestling coaches and implemented wrestling drills into training sessions early on. Young rugby players especially don’t only gain a lot of physical benefits from wrestling, but also confidence and toughness for tackles, mauls, or rucks. Wrestling drills can help players understand in which positions they are most effective in collisions or where they are weak and therefore unsafe.

Being strong and muscular will not help a player if they don’t know how to approach contact situations, says @eo_performance. Share on X

Being strong and muscular will not help a player if they don’t know how to approach contact situations. Just because you have something like strength, it doesn’t mean you know how to use it. But you cannot use something you don’t have in the first place. This is not only a task of the rugby (defense) coach, but also of the S&C coach, who can combine wrestling drills with running intervals or use certain wrestling drills for developing core or neck strength.

I’ve programmed wrestling neck strength drills for all youth players, and I think it’s negligent to introduce them to scrums or tackles without having built a base first. (Unfortunately, I’ve seen that a couple of times in U12-U16 teams.) From the U18 level on, I’ve implemented mainly isometric extension, (lateral) flexion, and traps strengthening exercises like farmers walk for all players but especially for forwards. But for players who are not returning from injury, I prefer to do neck training in the rugby setting and not isolated in the gym.

Freelap USA: Return to play is a tough part of strength and conditioning, and mistakes are often made. What have you learned over the last few years regarding the psychology of injuries rather than the physiology and biomechanics of rehabilitation?

Elisabeth Oehler: In the past few years, I have seen quite a few serious injuries happen on the rugby field or the weightlifting competition stage, and I worked with athletes in the return to play/compete process. From a psychological perspective, I’ve experienced certain injuries actually ending a career early because the athlete was mentally unable to return to full resilience and readiness.

For example, in weightlifting I’ve experienced (not just once) a young athlete dislocating his elbow during a heavy snatch, and even after surgery, a long rehab, mental support, and quite some willpower to return to competition, there was a constant mental barrier when loads got heavier, and the athlete lacked confidence to pull under the bar. He wanted to, but that last bit of mental toughness and unconditional courage you need to compete successfully on the international stage wasn’t there anymore, even though the athlete was completely physically recovered and had the will and desire to compete again. After several attempts to bring the athlete back to competing, we recommended he not progress the elite pathway in Olympic weightlifting even though he was physically very talented.

From a coaching perspective, this experience showed me that there are psychological factors in the return to compete/play process to which I need to be sensitive, but that I also find difficult to influence. In the end we are still physical preparation coaches with, at best, some courses in sports psychology during our studies. However, we should be aware of our limitations and always seek support from qualified experts and provide holistic support, if possible.

Many players, especially young players, do not have the necessary patience in the rehab process because they are afraid of getting fewer chances to play, says @eo_performance. Share on X

This example also shows how difficult it is to apply psychological models (e.g., cognitive appraisal models) for sport injury rehabilitation in elite sport with very specific mental demands that only coaches with an in-depth understanding of the sport can define.

In rugby, it has been my experience that many players, especially young players, do not have the necessary patience in the rehab process, because they are afraid of getting fewer chances to play and missing out on opportunities. Many are not honest about how they feel about pain or their perceived progress. This is especially challenging if the sports coaches are not involved in the rehabilitation process to influence the player’s psychological response to the injury and the return to play process.

Freelap USA: Barbell path is important in weightlifting, but many strength coaches think it’s not important for regular athletes who are just trying to improve power. From the research, we know that having a great bar path will help load the body better and safer. How do you coach bar path during a training session?

Elisabeth Oehler: Strength coaches who implement weightlifting for power development and don’t care about the bar path miss opportunities to achieve the results they want. For example: If the bar path and the body movement of the athlete in the first pull of a clean are not technically sound, the athlete will lose velocity when transitioning to the second pull and therefore can’t achieve the best possible Vmax. There is no question about the safety aspects of having good form and a decent bar path.

I break down the Olympic lifts into key positions, where the athlete has to know what the bar does and what his body should do. The foundation is the starting position—if an athlete makes mistakes there, it’s difficult to fix the bar path during the next phases of the lift. The second position I teach is the end of the first pull with the bar slightly in front of the kneecap and transition to the second pull, where the athlete opens the hip angle for the first time. Third position is the bar touching the body for the first time (snatch: upper third of the thigh; clean: lower third of the thigh) and the triple extension is initiated. The turnover phase into the (half) squat position is the only position you can’t stop, so the fourth position ends when catching the bar.

The majority of mistakes happen in positions 1, 2, and 3, so I make sure my athletes know exactly how these positions should feel and where their body and the barbell should be. In my opinion, this is the easiest approach for coaching bar path, and coaches avoid trying to “fix” symptoms like jumping forward that occur because of mistakes made earlier in the lift.

Since you’re here…
…we have a small favor to ask. More people are reading SimpliFaster than ever, and each week we bring you compelling content from coaches, sport scientists, and physiotherapists who are devoted to building better athletes. Please take a moment to share the articles on social media, engage the authors with questions and comments below, and link to articles when appropriate if you have a blog or participate on forums of related topics. — SF


  • « Go to Previous Page
  • Page 1
  • Interim pages omitted …
  • Page 65
  • Page 66
  • Page 67
  • Page 68
  • Page 69
  • Interim pages omitted …
  • Page 163
  • Go to Next Page »

Primary Sidebar

FEATURED

  • Using Speed and Power Data to Bucket and Train Faster Athletes
  • Plyometric Training Systems: Developmental vs. Progressive
  • 9 (Fun!) Games to Develop Movement Skills and Athleticism

Latest Posts

  • Rapid Fire—Episode #14 Featuring Rodrigo Alvira Isla: Training Smarter in the NBA and G League
  • Maximizing Success in the Weight Room: A College Strength Coach’s Playbook
  • RTP Module #3: Force Plates and Decision Making—A Conversation with Brian Buck

Topics

  • Adult training
  • App features
  • Artificial Intelligence
  • Athlete
  • Athlete performance
  • Baseball
  • Buyer's Guide
  • Career
  • Certifications
  • Changing with the Game
  • Coach
  • Coaching
  • Coaching workflows
  • Coching
  • College athlete
  • Course Reviews
  • Dasher
  • Data management
  • EMG
  • Force plates
  • Future innovations
  • Game On Series
  • Getting Started
  • Injury prevention
  • Misconceptions Series
  • Motion tracking
  • Out of My Lane Series
  • Performance technology
  • Physical education
  • Plyometric training
  • Pneumatic resistance
  • Power
  • Power development
  • Practice
  • Rapid Fire
  • Reflectorless timing system
  • Running
  • Speed
  • Sports
  • Sports technology
  • Sprinters
  • Strength and conditioning
  • Strength training
  • Summer School with Dan Mullins
  • The Croc Show
  • Training
  • Training efficiency
  • Wave loading
  • What I've Added/What I've Dropped Series
  • Youth athletics
  • Youth coaching

Categories

  • Blog
  • Buyer's Guide
  • Freelap Friday Five
  • Podcasts

COMPANY

  • Contact Us
  • Write for SimpliFaster
  • Affiliate Program
  • Terms of Use
  • SimpliFaster Privacy Policy
  • DMCA Policy
  • Return and Refund Policy
  • Disclaimer

Coaches Resources

  • Shop Online
  • SimpliFaster Blog
  • Buyer’s Guide
  • Freelap Friday Five
  • Coaches Job Listing

CONTACT INFORMATION

13100 Tech City Circle Suite 200

Alachua, FL 32615

(925) 461-5990 (office)

(925) 461-5991 (fax)

(800) 634-5990 (toll free in US)

Logo of BuyBoard Purchasing Cooperative. The word Buy is yellow and shaped like a shopping cart, while Board and Purchasing Cooperative are in blue text.
  • Facebook
  • Instagram
  • Twitter
  • YouTube

SIGNUP FOR NEWSLETTER

Loading

Copyright © 2025 SimpliFaster. All Rights Reserved.