• Skip to content
  • Skip to primary sidebar
SimpliFaster

SimpliFaster

cart

Top Header Element

  • Facebook
  • Instagram
  • Twitter
  • YouTube
  • Login
  • cartCart
  • (925) 461-5990
  • Shop
  • Request a Quote
  • Blog
  • Buyer’s Guide
  • Freelap Friday Five
  • Podcast
  • Job Board
    • Candidate
    • Employer
    • Facebook
    • Instagram
    • Twitter
    • YouTube
You are here: Home / Blog

Blog

Offset Step-Up

Offset Training for Sports Performance

Blog| ByDanny Foley

Offset Step-Up

A few years back, based on training an athlete with unique and extremely challenging physical circumstances, I had a happenstance introduction to offset loading. Prior to this, I had only seen offset training practiced in very remote corners of strength and conditioning—and while I was intrigued by what I saw, I could never wrap my head around the method’s practicality.

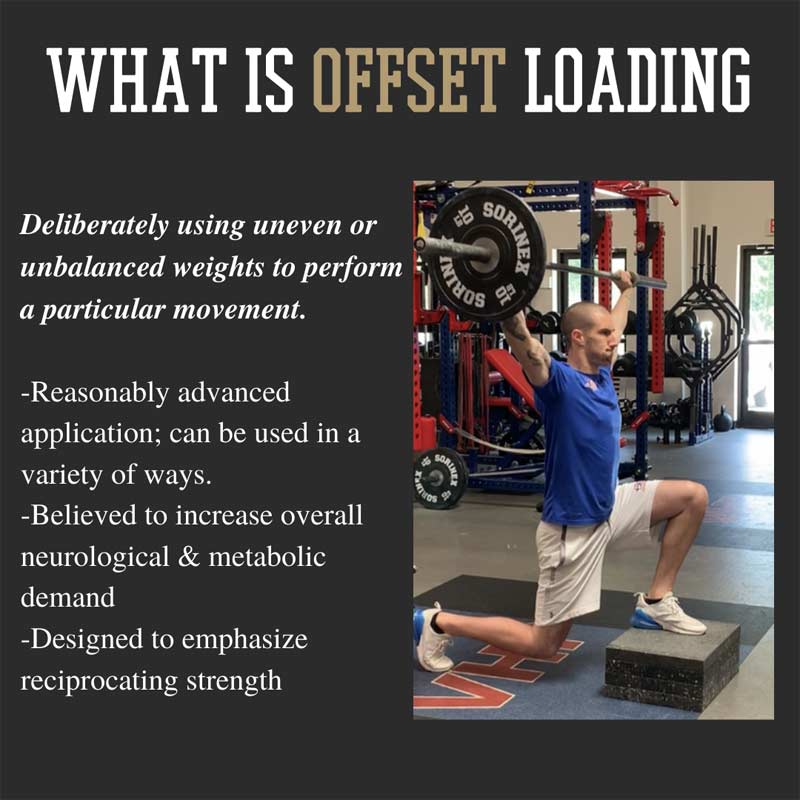
Offset loading is a somewhat unorthodox (or dare I say, nuanced) training application that can be performed in a variety of ways, but it most prominently involves intentionally loading each side of the barbell with moderately different weights. When progressively implemented and programmed appropriately, offset training can offer significant benefits to the right population.

What is Offset

For the sake of transparency and provisional safety, there are a few issues I want to quickly address:

  1. This article will exclusively include anecdotal evidence. In fairness, there is virtually no formal research to validate offset training. (This is one of the few formal studies I’m aware of.) So, for my sport science crowd and those coaches and practitioners who live and die by what the research says, I regret to inform you that this article may leave you uninspired at best.
  2. Although I’ve personally had success using this application, it’s important to understand this is not a form of training all individuals should utilize or all coaches should implement. There is a certain level of foundational strength and training proficiency (as well as coaching competency) that should be established prior to using offset loading.
  3. While I am writing this for conventional sports performance, I have personally only utilized these methods with high-level Special Ops/Special Forces athletes, so to an extent this will be somewhat of an outsider’s perspective.

With that all said, I am confident there are several ways offset work can be just as pragmatic for the sport world as I’ve recognized with the tactical realm.

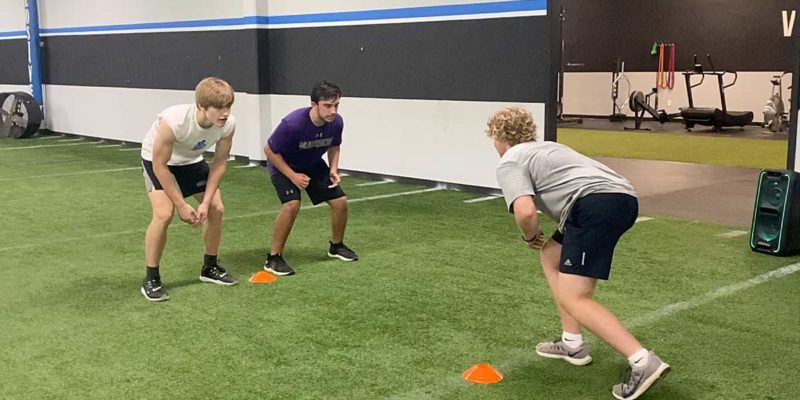
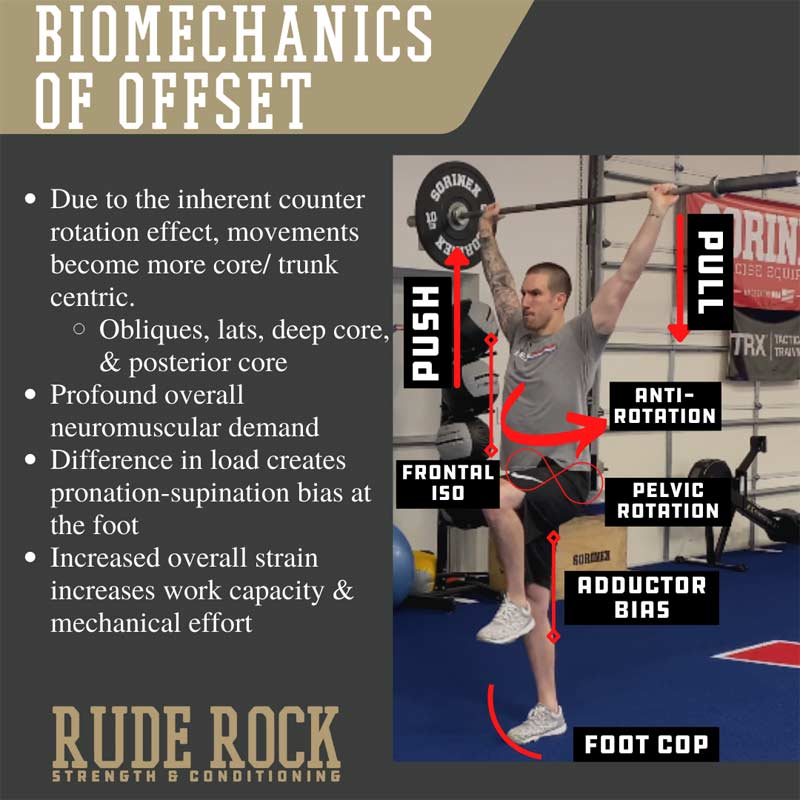
Over the last three years, I’ve been selectively implementing and investigating offset loading with a wide spectrum of individuals. In theory, the distinction with offset training is that it increases the overall demand on torque management (joints/ligaments) due to the inherent counter-rotation. The unbalanced load also puts a greater emphasis on trunk stability and deep core muscles.

By applying offset loading over the years with my athletes, I’ve seen significant improvements in hypertrophy, strength, general motor control, posture, and positional integrity, says @danmode_vhp. Share on X

Additionally, offset training is significantly demanding neurologically, so there is somewhat of a higher “bang for your buck” type of return. By applying offset loading over the years with my athletes, I’ve seen significant improvements in hypertrophy, strength, general motor control, posture, and positional integrity—results notable enough that I’m convinced the method isn’t just a novel gimmick performed for social media clout, but that there is absolutely something to this.

Biomechanics Offset

Offset Training 101

There are multiple ways you can apply offset loading, but my four primary applications are:

  1. Band offset.
  2. DB/KB uneven.
  3. BB static offset.
  4. BB dynamic offset.

I generally introduce and progress offset loading in that order, and each of these has its own nuances. But in addition to the benefits outlined above, I’ve found offset training to be highly effective for reducing the margin of difference between dominant and non-dominant sides (e.g., throwing athletes, athletes returning from extremity injury).


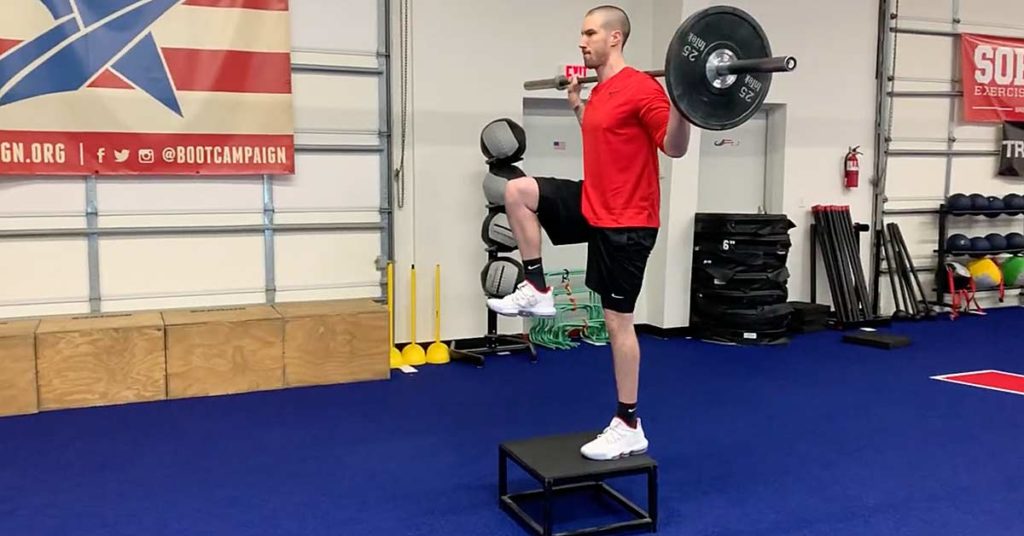
Video 1. Moving from an offset overhead march through a sequence of movements involving counter-rotation, with key coaching points and cues.

Offset training is very simple to work into your programming and can be highly effective for athletes once foundational strength has been developed. (For a full YouTube playlist of 55 offset loading exercises, click here.)

Offset Progression

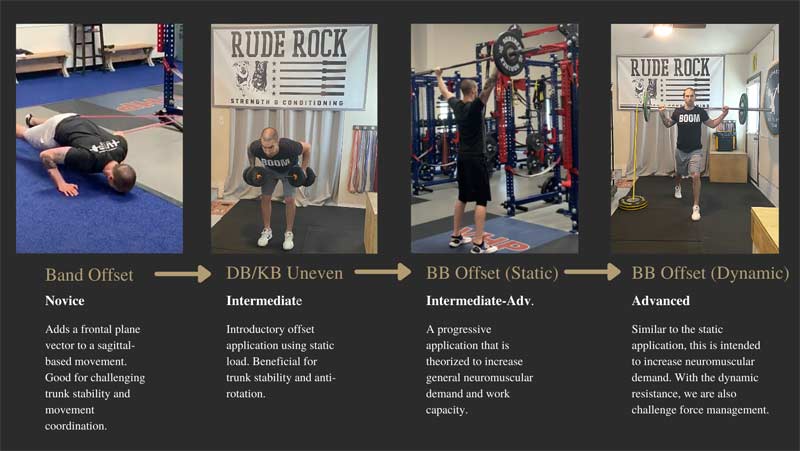
It should be clear that offset training is a modality that needs to be earned, especially the barbell applications. While the band offset and DB/KB uneven applications are reasonably low risk, I would not advise using the offset barbell applications until a robust foundation of strength has been established.

The main consideration with offset loading is the increased shearing stress it places on the spine and working joints, when compared to symmetrically loaded movements. Given the difference in weight between the left and right sides, the athlete will be required to fight the urge to be pulled out of position as they execute the movement (hence, counter-rotation).

The main consideration with offset loading is the increased shearing stress it places on the spine and working joints, when compared to symmetrically loaded movements, says @danmode_vhp. Share on X

Programming Factors

Offset loading is not something I would suggest as a mainstay, but more something that you can phase in and out throughout the calendar training year depending on your sport/population. From a macro view, I think using offset loading intermittently—but strategically—can greatly benefit athletes.

One such instance would be using a high-volume method during off-season/accumulation periods to drive overall work capacity/volume; another good opportunity would be for primary lifts during phases of the in-season period. In the latter case, the goal of offset loading would be to stimulate neuromuscular demand while not overtaxing the joints with heavy compressive loading. This can also be applied situationally, and sports that are more extreme in unilateral dominance may benefit from more offset programming.

Offset Blocks
Figure 1. Here is a sample for how I would apply offset across different training modes/focuses.

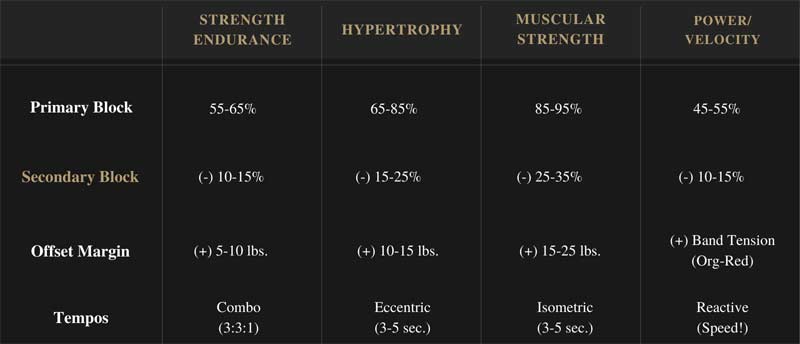
On a micro (daily) view, I normally get most of my offset work during the second block (see above). The most effective way I’ve found to program this is to perform the same lift that I had in the primary block (e.g., bench/squat/dead/push jerk), but reduce the intensity and rep count. I also typically apply tempos to offset work. The progressive overloading should be small and incremental. I would encourage you to increase the offset value (e.g., a 10 pounds offset to 15 pounds) first, then increase the total load. Obviously, the specific increases would be dependent on the specific exercise/athlete.

Given this article is directed more specifically toward the sport population, please check out a (free) recent webinar of mine that covers a more thorough explanation of the “101” for offset loading. But with that, let’s now pivot to some more sport-specific benefits.

Neuromuscular and Proprioceptive

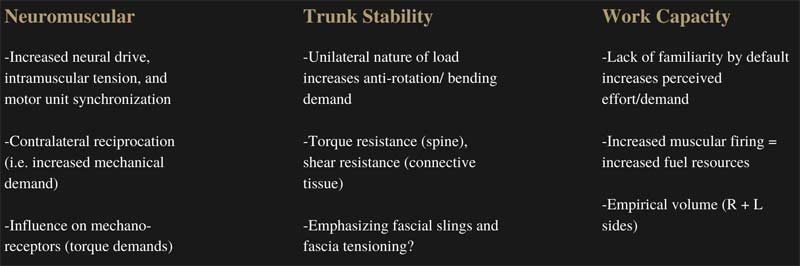
The first perceived benefit that comes to mind is the potent neurological stimulus created by offset loading. Due to the unbalanced external load, there is a significantly greater demand for intrinsic stability, as compared to evenly loaded movements. Indirectly, I believe this increases neural activation due to the demand for more co-contraction and, thus, overall muscular activation.

The demand for intermuscular coordination is high with offset loading, and simply put, more muscles being called to duty would theoretically suggest overall motor unit recruitment is increased as well: think of this as greater global force summation. This is certainly beneficial for all athletes, but especially those who are coming off injury (poor kinetic integration).

Offset Factors

An important caveat here is that the overall demand on the CNS with offset loading can be achieved at significantly lighter total loads when compared to the same movement bilaterally loaded, with the benefit then being that athletes can achieve similar neuromuscular efforts without as much compressive force being imposed. This can be specifically advantageous during in-season programming when time is limited and athletes are accumulating wear and tear from competition.

In and of itself, strength is very contextual and environmentally driven. While the importance of foundational strength by way of the conventional lifts is inarguable, I strongly believe we become overzealous with big numbers on big lifts while neglecting the variability of strength demonstrated in sport. Not only are pure strength and stability demands in sport almost entirely unilateral, but also much more reflexive and responsive by virtue.


Video 2. Barbell offset reverse lunge to step-up.

One of the best sports to illustrate this point is combat sports (e.g., MMA, Muay Thai, boxing). Think about the intricacies of striking, bending, and grappling, and how these athletes’ bodies maneuver around the cage. Constantly shifting center of pressure; always tracking and repositioning in accordance with their opponent. And, of course, the way in which forces are being applied and expressed when engaging their opponent. It doesn’t take much analyzing to observe the lack of symmetry in sport.

Offset loading promotes a general increased proprioceptive demand, as the body must heighten sensory systems to coordinate the movement and load application, says @danmode_vhp. Share on X

Rather than simply asking “how strong is strong enough,” the question really becomes: can you respond fast enough, orient your body accordingly, and then exert the requisite expression or resistance of force? As such, offset loading promotes a general increased proprioceptive demand, as the body must heighten sensory systems to coordinate the movement and load application. I would argue confidently that the proprioceptive demand is more applicable for most athletes than simply pursuing bigger numbers.

Torque Management

Due to the increased presence of torque, it would be reasonable to assume that the mechanoreceptors (joint receptors) are in a heightened state during offset loading. An increased torque demand means there is a stronger presence of shearing moments for working joints. If we examine injury reports across all major sports, we see some distinct similarities in both mechanism and types of injury. Among those similarities is a high rate of soft tissue injuries, particularly ligamentous injuries. Very bluntly, ligaments do not accommodate shearing stress well (rotational forces), as ligament injuries occur when the rate of external force is applied faster than the body’s ability to respond to it, or the force is applied in a manner or vector for which the body isn’t adequately prepared.

Remember, if it were as simple as an ACL tear being a consequence of insufficient force tolerance/expression, non-contact injuries would never occur and every athlete would just train like a powerlifter. But, as we know, this isn’t the case. Thus, I believe one of the most effective things strength coaches can do for their athletes is improve their ability to tolerate torque—and offset loading requires an inherent tolerance for managing shearing stress.


Video 3. Some fundamental differences between offset and bilateral loading in the same exercises.

Despite my belief in offset loading, it shouldn’t be misconstrued to say foundational (bilateral) strength isn’t very much a part of the recipe. Minimizing the likelihood of sustaining a soft tissue injury at a base level requires robust foundational strength. The same goes for pure speed and agility work—absolute sprinting is purely one of the best “soft tissue injury prevention” tools there is. My argument with the torque management is that conventional loading can become subject to diminishing returns for ligaments given the lack of torque demands, especially with more advanced/highly trained athletes.

One of the most effective things strength coaches can do for their athletes is improve their ability to tolerate torque—and offset loading requires an inherent tolerance for managing shearing stress. Share on X

Trunk Stability and Lateral Chain Strength

The emphasis on anti-rotation and resisting lateral bending is another marquee benefit of offset loading for athletes. Much of what we see in sport is an expression of fighting and resisting external forces/torques as much as it is producing forces (e.g., breaking a tackle, driving in for a dunk against contact, throwing a pitch). I perceive the spine and core musculature as an engine that functions predominantly off a reciprocating, coiling action in which one side is always working in concert with the other (this applies anterior-to-posterior as well).

Very rarely—if ever—is external load applied evenly, or muscular activation distributed evenly between left and right sides of the body, or the trunk in this manner. This reciprocity requires the ability to demonstrate stability at certain areas of the trunk while producing movement at others. This illustrates another element of offset loading that could be favorable for athletic populations—slightly different muscular activation patterns between the right and left sides that are also slightly changing throughout the course of movement.

Lineman Offset Power
Image 1. Washington Huskies lineman battles around Penn State blocker. (Photo by Kevin Abele/Icon Sportswire.)

I would also argue there is an increased engagement from deep core muscles during offset loading in an effort to maintain spinal and positional stability as the athlete executes the movement. Our deep core muscles—namely the multifidi, internal obliques, quadratus lumborum (QL), and transverse abdominis—all play quintessential roles in providing intrinsic stability and force summation. Moreover, the deep fascia, which is also at play here, is where it has now been suggested that a large portion of mechanical force is transferred through the body to achieve motion. In my belief, core training is fundamental to sport performance, and offset loading is a premier way to emphasize these regions. But don’t take it just from me, as Stu McGill has famously said, “proximal stiffness for distal speed.”
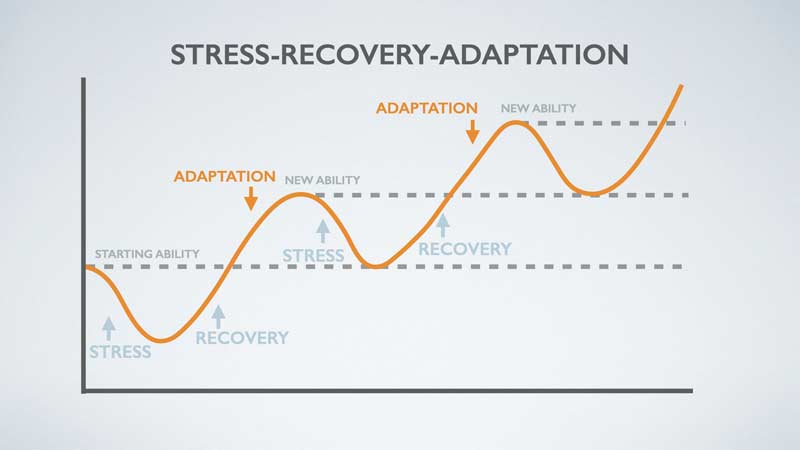
Safety

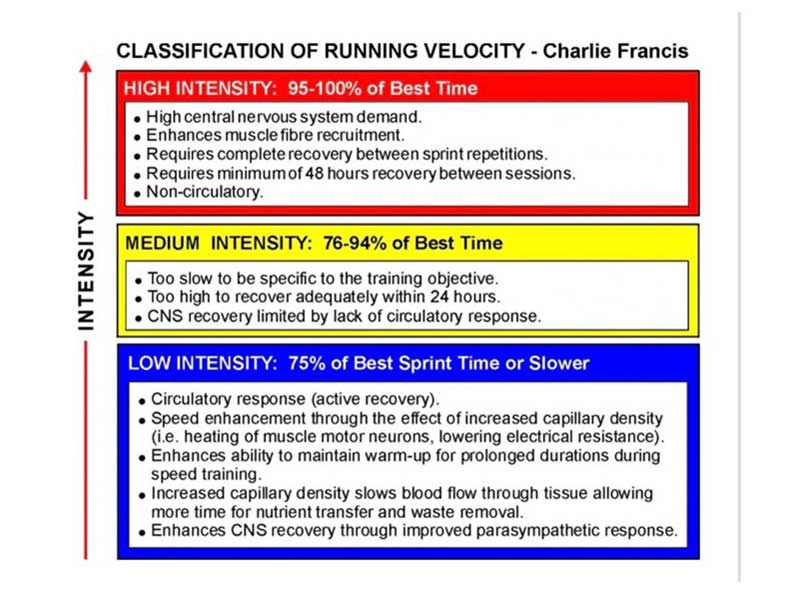
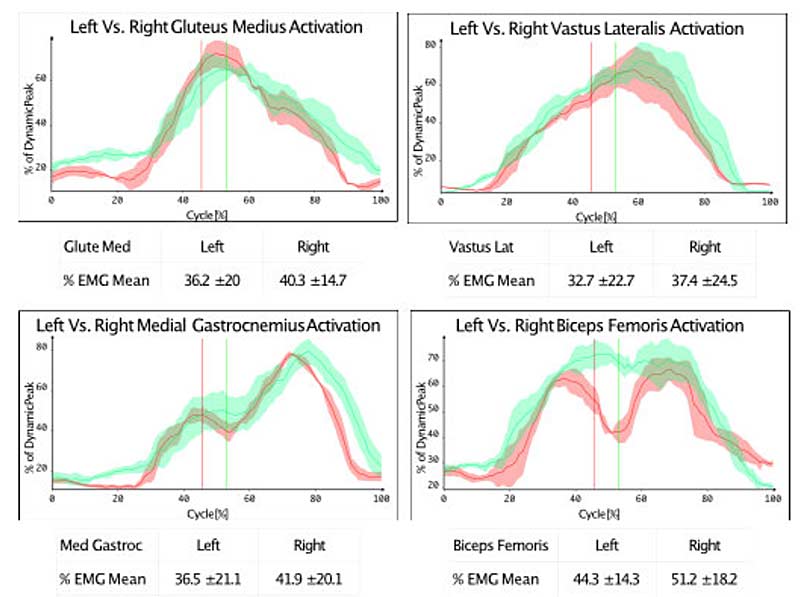
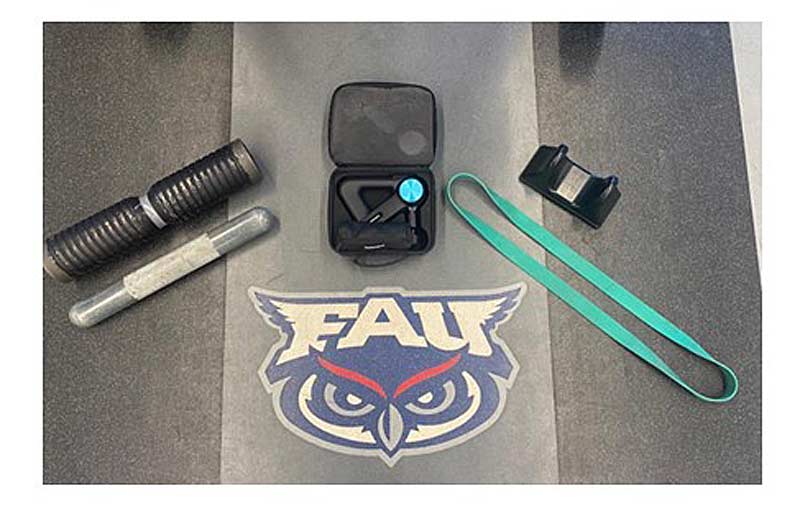
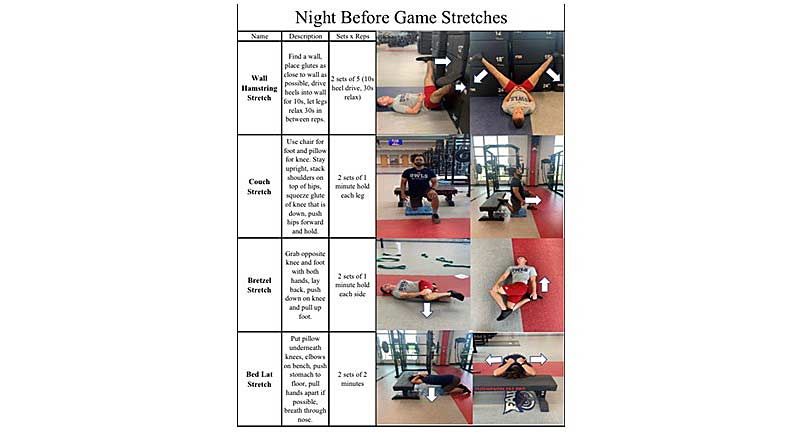
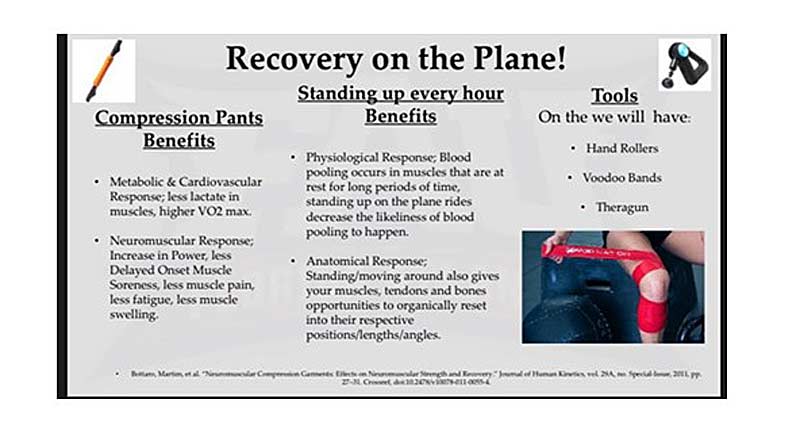
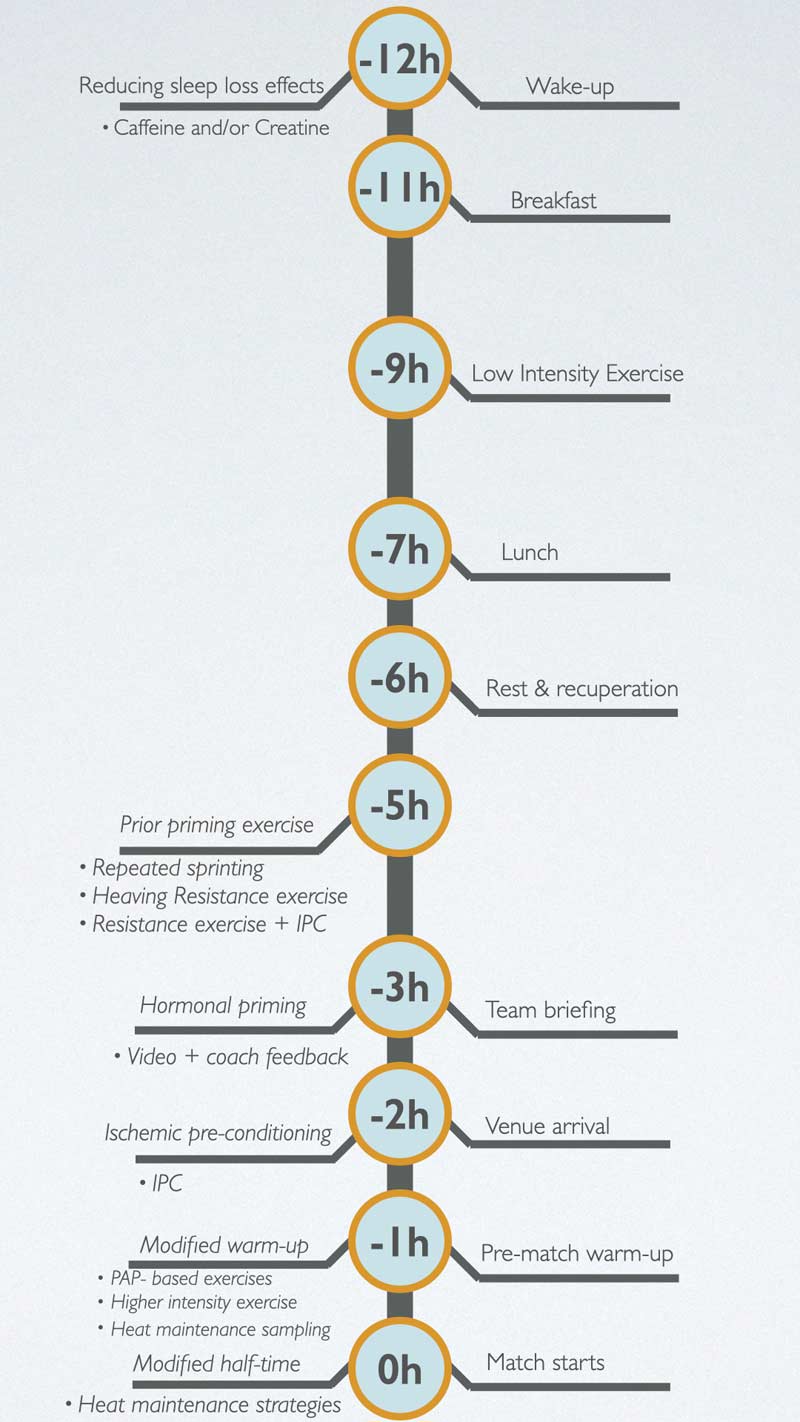
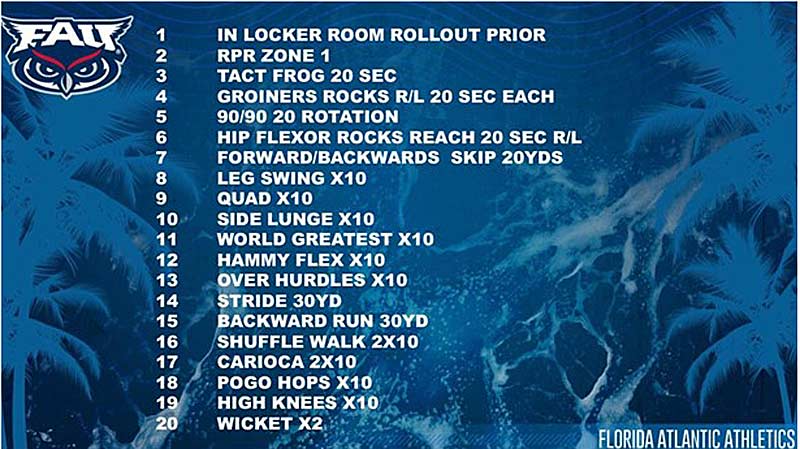
I can’t complete this article without highlighting some important risk and safety considerations, as this is an unorthodox style of training for most. It’s important that the athlete has developed a reasonably robust foundation with strength training, and equally important that the coach is familiar enough with this application to apply it safely and correctly. In addition, please see the graphic below:

Offset Loading

Takeaway Points

Some final quick hitter points regarding offset loading for the sport performance population:

  • Offset loading is a great option for increasing work capacity; athletes will be quick to recognize the mechanical and metabolic taxation that occurs during offset variations. I believe this is an ideal justification for early off-season work during GPP/reacclimating phases.
  • Given the presence of injuries with tactical athletes, I can say confidently that offset loading is a great option once formal physical therapy/rehab has been completed. I believe the neuromuscular benefits (inter- and intramuscular properties) outlined above are the primary advantage here.
  • Offset work can be advantageous for in-season training periods, as high CNS stimulation can be achieved without the demand for high absolute load. Augmenting CNS stimulation without a high magnitude of compressive forces is typically a win for most.
  • Cognitive stimulation is significantly higher during offset loading, effectively precluding the athlete from being able to go into “autopilot.” In my opinion, driving cognition during training is woefully underappreciated and can have tremendous return for the athlete.

Since you’re here…
…we have a small favor to ask. More people are reading SimpliFaster than ever, and each week we bring you compelling content from coaches, sport scientists, and physiotherapists who are devoted to building better athletes. Please take a moment to share the articles on social media, engage the authors with questions and comments below, and link to articles when appropriate if you have a blog or participate on forums of related topics. — SF


Hockey Players Racing

Assessing Neuromuscular Performance for Acceleration in Hockey

Blog| ByMike Croskery

Hockey Players Racing

Hockey is one of the fastest games in the world. Players rely on quick bursts of speed combined with highly developed motor skills to outmaneuver competitors and gain possession of the puck. The player who gets to the puck or into position first got there by converting high amounts of muscular force into acceleration. Although we know that stronger players are often faster players, using that strength efficiently by coordinating and activating their muscles efficiently can make the difference between teams scoring goals and teams trailing behind.

A multitude of field tests exist to assess power, force production, acceleration, speed, and rate of force production. These tests evaluate the sum of the muscle actions on the body to propel it through space and can be a valuable way to determine both if a training regimen is getting results and how an individual player compares to other players on the team. What is more difficult to tell from these tests, however, is how the athlete’s muscles are activating and coordinating to cause this movement—and if they are doing it efficiently to maximize their performance.

EMG analysis can show what field tests can’t—how the athlete’s muscles are activating and coordinating and if they are doing it efficiently to maximize the athlete’s performance. Share on X

For this purpose, EMG analysis can prove to be invaluable in helping pinpoint areas that need attention to increase the whole of the performance.

Assessment Methods

In this article, I assess an elite hockey player in a blue line to blue line all-out sprint (15.24 meters, to be exact). Doing this allows insight into how his muscles activate and coordinate during the test’s acceleration portion. We used a single inertial monitor (G-Sensor from BTS Bioengineering) attached at the S1 level to approximate the center of mass to measure his acceleration.

To gather muscle activation information, we used eight wireless EMG sensors (FREEEMG from BTS Bioengineering) secured to the gluteus medius (GMed), vastus lateralis (VL), medial gastrocnemius (gastroc), and biceps femoris (BF) on both the left and right sides. Since the G-Sensor measures acceleration in three dimensions (x, y, and z axes), it is necessary to take these three components and calculate the final 3D acceleration vector. We can get 3D acceleration, velocity, and distance from this initial calculation using the combined vertical, horizontal, and lateral movements. Because this calculation represents all up, down, and side-to-side movements, the final values can differ from pure linear measurements.

Velocity Distance Acceleration
Figure 1. These graphs show the mean 3D velocity, distance, and acceleration of the G-Sensor as attached at the S1 level for the three trials.

To reliably compare left and right sides, it was necessary to identify key movement indicators along with muscle activation cycles. Skating has two distinct movement phases:

  1. The initial strides are more like running, with higher ground reaction forces during the maximal accelerative component.
  2. The later strides incorporate a more prolonged glide phase, and these last strides result in lower ground reaction forces once the skater gets up to speed.

To help me determine the key points and kinematics of the skating stride, I consulted with Gabe Glasser, a biomechanical engineer who now works with Biomechanics Research and Testing. Gabe was invaluable in sharing his knowledge and insights in creating the final protocol.

To compare how muscle activation contributes to the performance during critical points in the skating stride, I used EMG readings combined with acceleration values. Share on X

To compare how muscle activation contributes to the performance during critical points in the skating stride, I decided to use the EMG readings combined with the acceleration values. As the propulsion phase begins, the foot is below the center of gravity and about halfway through the stride, where acceleration is just starting to turn positive. This time point also coincides with the muscle activation of the sum of the four muscles as it approaches peak activation. For the purpose of an accurate left and right comparison when looking at acceleration, I chose the first six full strides of the performance to examine, as muscle coordination and activation changes as the player approaches peak speed and moves more to a gliding phase. I did not include the initial push-off phase as this may have confounded the results in comparing the left and right sides.

Hockey Acceleration
Figure 2. Still photo of the athlete entering the propulsion phase of the skate stride, and two graphs representing both force and acceleration as these are directly related (F=ma) and combined muscle activity of the four muscles (gluteus medius, vastus lateralis, medial gastrocnemius, and biceps femoris). Red represents left side and green represents right side.

Looking at the charts, it may be intuitive that EMG activity would parallel movement, but remember it takes time for the electrical activity in the muscle to convert to force to cause motion. This effect is called electromechanical delay and can influence the interaction by approximately 50-100 milliseconds depending on the muscle that is being measured. To keep it simple, I have not considered this a significant trainable effect (although research has both supported and disputed this) that can contribute to acceleration in this case. Since electromechanical delay can influence interpretation, it is essential to remember that EMG activation that results in movement could happen up to 100 milliseconds before the actual movement occurs.

Assessment Results

After three maximal on-ice sprint trials, the left side showed a higher rate of EMG development and peak power (power was calculated as force x velocity every 1/100th of a second during the propulsion phase). In comparison, the right side showed a higher rate of force development (RFD was calculated by taking the derivative of the force curves), acceleration, and overall muscle activation during the sprints. Muscle coordination was more synchronous at the start of the propulsion stage on the right side (as shown by the line approaching the zero mark) than the left, suggesting a more asynchronous activation.

RFD Propulsion Stride
Figure 3. Coordination, rate of force development, and rate of EMG development during the skate stride. Vertical lines represent the start of the propulsion phase of the stride where acceleration increases beyond zero. The graph of propulsion power is from the start of the propulsion phase to the end of the stride. Red represents the left side and green represents the right side for all graphs.

Measuring median frequency (MDF) can also give us some insight into the motor units’ activity. Although somewhat controversial, MDF is more likely representative of the conduction velocity of the motor units. In general, larger and faster motor units tend to recruit at higher frequencies and conduction velocities and are also, on average, closer to the surface of the leg muscles. Many factors can affect MDF, such as fatigue, motor unit cross-sectional area, and depth of motor units from the electrodes. Although electrode placement can also affect MDF, the difference is not as sensitive or as large as amplitude measurements.

In this case, fatigue did not appear to be a factor, as the length of each sprint was close to three seconds and MDF frequency appeared relatively stable throughout the trials. The differences between the left and right GMed and BF frequencies were similar; however, the right VL and gastroc were higher by approximately 20%. This may suggest that the right VL and gastroc had greater overall motor unit conduction velocities that may have contributed to slightly higher acceleration and force generation on that side.

You would think a higher rate of EMG development (how quickly the muscle can activate to a certain level) would also result in a higher rate of force development (how quickly the body can develop a given force). Also, since the right side produced greater peak force at the beginning of the propulsion stage, you might surmise that it would also have greater power. Since power is force x velocity, you get higher powers by moving faster with higher forces. However, remember that the speed when the propulsive force is applied is also related to the last stride, so in this case, it might be difficult to tell if one side was more powerful than the other. We do know that the right side had a higher peak acceleration than the left, so it appears the right side transferred its force-generating capabilities better than the left.

Muscles Stride
Figure 4. Average median frequencies (in Hz) for the first three strides of the on-ice sprint.

Although the left side has a higher EMG development rate and higher peak power, the right side has a higher RFD, peak force, and acceleration, and better inter-and intramuscular coordination. Intramuscular coordination is how individual muscles recruit motor units and vary firing rates to produce more force. We know better intramuscular coordination occurs alongside a higher mean EMG activation and often with higher MDF frequencies. Inter-muscular coordination is how multiple muscles work together to cause movement. In the end, both types of coordination are essential.

Although there are a few ways to assess muscle coordination, I chose the more straightforward mathematical way by using a dispersion index as described in the article by Rejc et al. (2010). This approach looks at the sum of the differences between all the muscles together. As the graphed line approaches zero, the EMG activations levels are more similar since the difference between them becomes smaller. Farther away from zero indicates less similarity and less synchronous activity.

As you can see from the graph, the right side has good synchronous muscle coordination at the onset of the propulsion phase. In contrast, the left is becoming less synchronous, meaning the inter-muscle coordination is diverging, and the muscles are not contracting in a similar pattern as the right.

In a fluid movement, you want just the right amount of antagonist activity for joint stabilization, but not so much that it is resisting the action of the agonists. Share on X

In an ideal situation, you would want individual muscles firing precisely at the right time, along with high synchronous motor unit recruitment rates. Optimally activated individual muscles that contract at the wrong time result in lower performances, just as synchronous recruitment of multiple muscles with poor intramuscular coordination will not result in the best possible performance.

Even though we only looked at four muscles to get a snapshot of the whole picture, it is also good to know how antagonist muscle activity contributes. In a fluid movement, you want just the right amount of antagonist activity for joint stabilization, but not so much that it is resisting the action of the agonists. In our hockey player case, we focused primarily on agonist and synergist muscles while monitoring the activity of the BF. The BF is a double-jointed muscle that plays multiple roles in the skating stride. It can act as a knee stabilizer during eccentric knee extension, an antagonist and stabilizer during concentric knee extension, and a synergist during hip extension.

Gastroc Biceps
Figure 5. Left and right individual EMG activation during the skate stride as a percentage of the dynamic peak during the sprint. Vertical lines represent the onset of the propulsion phase. Red represents the left side and green represents the right side.

The other unique and exciting aspect of EMG analysis is sometimes you find things you didn’t set out to measure. Although the sum of the average activation of the four muscles is relatively close, when you break down the four muscle activations, there is a potential red flag. Typically, BF activation acts as a stabilizer while the knee extends and the quadriceps activate. This action helps protect the knee from an adverse movement that can stress the knee ligaments, such as the ACL.

The other unique and exciting aspect of EMG analysis is sometimes you find things you didn’t set out to measure. Share on X

In looking at the activation patterns of the four individual muscles of the left leg near the start of the propulsion stage, there is a noticeable drop inactivation of approximately 20% compared to the right side, where activation stays relatively consistent. Although you could argue that you would want deactivation of the BF during knee extension, this would also place the left knee at greater risk of injury due to the change in co-activation with the quadriceps, especially at high speeds. This type of activity is an additional individual factor that should be examined and possibly addressed during his off-ice training to help prevent future knee injury.

Training Recommendations

With the idea that we want good inter-muscular coordination with all the essential muscles firing simultaneously during the propulsion phase on both sides, we can address this issue by modifying the athlete’s training routine. Most research has found that muscle coordination patterns are generally individualized, especially in high-level elite athletes. The reasons for this can range from genetic factors such as bone, muscle, and tendon length to trainable factors such as early established neurologic movement patterns, the elasticity of tissues, and the force and rate of force capabilities of individual muscles.

There is a plethora of information on improving strength, power, muscle development, and speed through various training techniques. However, the research on improving unilateral muscle coordination through training is far from extensive and its importance is often mentioned more as an aside, unlike addressing it directly as is done for intramuscular coordination. With that said, some techniques DO NOT appear to help inter-muscle coordination and synchrony:

  • Bilateral movements (as athletes can unknowingly favor or weight one side over the other).
  • Fast, unweighted movements.
  • Lower-intensity resistance training.

Now that we know what probably won’t help this particular athlete, let’s examine what will.

Maximal Strength Training

To improve inter-muscular coordination, maximal resistance in the range of one to three reps per set has shown promising results. This type of high-intensity training should also include a comprehensive risk analysis that considers the athlete’s training history, fitness level, and time during the season.

To improve inter-muscular coordination, maximal resistance in the range of 1-3 reps per set has shown promising results. Share on X

The general rule of thumb is if the athlete can squat 1.5 to 2 times their body weight, we would focus on lower volume and higher intensity weights applied as unilateral exercises. Exercises such as a modified step-up or a single-leg squat might be good alternatives. If overall lower body strength were not as high, the focus would shift toward increasing overall strength. Current research suggests that improving strength, up to the previously mentioned level, affects acceleration more than applying specific techniques.

Resisted Ballistic Training Combined with Moving as Quickly as Possible

Notice I have used the word “resisted” (or added weight), as unweighted ballistic training has less of an effect on improving inter-muscular coordination. However, this can include plyometrics, which can also have a moderate impact on improving inter-muscular coordination. As there are substantial ground reaction forces during the first few strides, this is an appropriate method. However, around the sixth stride, there is a switch to a more gliding motion, which drastically reduces these ground reaction forces and renders plyometric training maybe not as relevant for overall speed.

During these exercises, there should be a purposeful intention to move the body as fast as possible regardless of whether there is a high level of speed. Remind the athlete to put their mind into the motion by getting them to focus on explosive movements. Drawing their attention to one side at a time will help train their neurological system to recruit as many muscles as possible at the same time. Exercises might include weighted, single-leg diagonal long jumps, unilateral sled work, or on-ice resisted drills.

Optimal power generation generally occurs at about 30% of maximum weight and should be performed separately from maximal resistance training.

General Notes

Additionally, keep the following in mind.

  • Train unfatigued. Fatigue has also been shown to change inter-muscular coordination, so it is best to perform this type of training first in the workout after an adequate warm-up. Different coordination patterns can emerge as other muscles try to take over from fatiguing muscles.
  • Improve flexibility at the end of the workout. Elastic properties of the connective tissue can also change muscle coordination patterns, so make sure both sides are equal in range of motion. Take an overall approach to making certain that flexibility is within a normal range by incorporating a mixture of static and dynamic stretches. Not only can this help improve skating technique, but it can also guard against potential injury. Since stretching can decrease activation, it is wise to do this at the end of the workout or separate it from coordination training.
  • Specificity. A classic principle applies here as it does to all types of training. Your movements should be as specific to the propulsion phase of the skating stride as possible to improve the necessary muscle activation timing. Generalized “gym training” appears to have very little to no effect on sport-specific muscle coordinative patterns. This statement reinforces the observation that despite the elite athlete gaining strength in the gym, there is often very little transfer to increasing performance. Acceptable approaches are machines and dry land multi-joint exercises that mimic the skating stride or on-ice resisted unilateral ballistic exercises.

Providing More Answers

To summarize, our hockey player has shown that the current left side inter-muscular coordination may not maximize his acceleration during an on-ice sprint. Even though the left side may activate faster and generate higher peak power values, the right side suggests better intra- and inter-muscular coordination, overall higher peak force and acceleration, and a higher rate of overall force development. To improve left side muscle coordination so that the muscles work together to produce a higher rate of acceleration, we would want to incorporate training for unilateral maximal strength combined with ballistic-type movements with added resistance.

Assessing muscle coordination can be a complex issue—muscle coordination patterns can be highly individualized, especially in elite athletes. Training for inter-muscular coordination is best for athletes above 16 who have also developed adequate strength levels. Using EMG analysis combined with inertial sensors can provide more answers to identifying, addressing, and resolving the issue and help to improve overall performance.

Since you’re here…
…we have a small favor to ask. More people are reading SimpliFaster than ever, and each week we bring you compelling content from coaches, sport scientists, and physiotherapists who are devoted to building better athletes. Please take a moment to share the articles on social media, engage the authors with questions and comments below, and link to articles when appropriate if you have a blog or participate on forums of related topics. — SF


References

Rejc, E., Lazzer, S., Antonutto, G., Isola, M., and di Prampero, P.E. “Bilateral deficit and EMG activity during explosive lower limb contractions against different overloads.” European Journal of Applied Physiology. 2010;108:157-165.

Shell, J., Robbins, S., Dixon, P., Renaud P., Turcotte, R., Wu, R., and Pearsall D. “Skating start propulsion: three-dimensional kinematic analysis of elite male and female ice hockey players.” Sports Biomechanics. 2017;16(3):313-324.

Renaud, P.J., Robbins, S., Dixon, P., Shell, J.R., Turcotte, R., and Pearsall, D. “Ice hockey skate starts: a comparison of high and low calibre skaters.” Sports Engineering. 2017;20:255-266.

Burnie, Louise Annabelle.“The effects of strength training on intermuscular coordination during maximal cycling.” Doctoral, Sheffield Hallam University, 2020.

Baseball Player Baserunning

The Climate of Training in Minor League Baseball with Ryan Orr

Freelap Friday Five| ByRyan Orr, ByCody Hughes

Baseball Player Baserunning

Ryan Orr is a minor league strength and conditioning coach in the New York Mets organization. He is going into his second season with the Mets and his fourth in professional baseball. Ryan is co-owner of Catalyst Performance, and he has his Master of Science in Exercise Science from the University of Arkansas. He is a Registered Strength and Conditioning Coach through the National Strength and Conditioning Association.

Freelap USA: Strength and conditioning for professional athletes poses many challenges. What challenges do you have to overcome in order to continue adequate training?

Ryan Orr: One challenge that most coaches can probably relate to is the misinformation that so many athletes receive from social media. There’s so much information out there, but it can be difficult for athletes to filter out poor information or to understand that many elite athletes are successful in spite of their training, not because of it.

Another challenge is that there have been stigmas around training in baseball for a long time. Although most of the old-school training philosophies are no longer in the game at the professional level, many players grew up playing for coaches who believed in these old-school practices. Therefore, it can be difficult for a pitcher to unlearn things taught to them at a young age, such as pitchers running poles. Many athletes will buy into every aspect of a training program but still have a hard time letting go of these practices and ways of thinking.

Time is always a challenge that you face during the season. Your available time is always dependent on things such as report time relative to the game, team practice schedules, and individual work. One way to address this challenge is to assess the amount of time each training will take to finish when writing an athlete’s program and try to make it as time efficient as you can while still getting the desired stimulus and adaptation.

Travel is also a constant challenge, as it takes up half of your season’s schedule. Each road trip brings its own challenges, whether its game times, double headers, facilities, or overall accessibility. Being adaptable and having a plan for any and all possibilities will help you be ready to face these.

By the time players reach the High-A level, they’ve probably had three other strength coaches and experience in high school/college, which means they’ve been exposed to multiple philosophies. Share on X

By the time players reach the High-A level, they’ve had probably a minimum of three other strength coaches, plus usually some sort of experience in high school and/or college—which means they’ve seen that same number of different philosophies. This is usually simply resolved by emphasizing relationships and educating players on the thought processes behind your programming. It’s very common for players to train with other coaches in the off-season as well, since they are spread throughout the country. This, again, most likely adds a different style of training for the athlete, so it can be very important to get this information from the athlete and attempt to build a connection with their off-season coach.

Freelap USA: Pitching rotations in professional baseball can vary. What approach do you take with training your starters, high-inning relievers, and low-inning relievers?

Ryan Orr: Starters are the most individualized based on their previous experiences and routines. For example, some guys prefer to throw their bullpen two days after their start instead of three days after. In my time in pro ball, I’ve seen players who enjoy doing some sort of potentiation lift before their start and others who perform a full lift after their start.

The main focus is pairing their heavy throwing days together and keeping high CNS days high and low CNS days low, so pairing their start and bullpen days with lifting as much as scheduling will allow. However, this can be dependent on factors like what day their bullpen day falls on and how many days between starts they will have. If they have more than five days between starts, that provides more opportunities for stimuli. The goal is to always work backward from their next start and optimize recovery for that day.

With guys who are getting frequent appearances, you need to manage stress and recovery as much as possible. Those are the players who need a high priority on managing their schedule to pair their lifting and outings together with minimal stimuli between outings. Typically, these players have less volume as the years go on and the innings pile up and only need a minimal stimulus on the S&C side. A huge part of managing their schedule is to collaborate with them and the ATC to create a recovery plan.

The fewer appearances a reliever has, the more important it is for them to get proper stimuli both in the weight room and on the conditioning side. It’s also important to maximize their preparation for their appearances, as you want them to be able to perform well when they’re given their opportunity. That goes into any mobility and stability work but also teaching them to prep their body in the warm-up to get hot before getting off a mound.

Probably the biggest piece of the puzzle to optimizing their health and performance is working alongside the ATC and pitching coaches to make sure that they keep their throwing load at a high enough level to be prepared for the game. Overall, communicating with the ATC and pitching coach is the most important piece of maintaining and improving health and performance in a pitching staff.

Overall, communicating with the ATC and pitching coach is the most important piece of maintaining and improving health and performance in a pitching staff, says @ryanorr24. Share on X

Freelap USA: Roster transactions can happen at any minute in the minor leagues. What challenges come with players getting moved up/down/traded?

Ryan Orr: The biggest challenge is not being able to see the implementation of your program all the way through. No matter how unified you are as a staff, every coach will have a slightly different eye for the movements or a slightly different approach to development. With the amount of time that we spend with each player, we become very passionate about their success, so it can be difficult to give up control of the long-term plan you have for that player. However, if a player gets moved up or even traded, it’s usually a sign that player has had success, so you must understand that it’s all part of their overall individual development.

A player coming up has its own challenges separate from the other two scenarios. Many of these are players that you have to get to know and build a relationship with. It can take some time to build that relationship while the player is trying to get comfortable with their new surroundings at a new affiliate. You are also coaching a program written by someone else, and as I previously said, you could be coaching it differently than the last coach. For these reasons, it’s very important to have great relationships with the other strength coaches so you have established communication with them and can help each other see one another’s visions.

Freelap USA: Baseball players are creatures of habit and routine. How do you differentiate training for athletes who prefer different styles of training?

Ryan Orr: I think this is where the art of coaching really becomes important. It’s important to be willing to meet players where they’re at and develop and educate them on your philosophies. The better your relationship is with that player, the more trust they will have in your program. A very underrated component of creating buy-in is simply to listen to the player on why they may think differently. Communication is a vital piece of the puzzle.

This is also where having a sound understanding of the mechanics and biomechanics of the exercises plays a factor. Maybe a player doesn’t like the trap bar deadlift and is willing to sub it out for a SSB box squat. He’s happy because he can avoid an undesirable exercise, and I’m happy because I’m still getting the same relative motion of the pelvis and can manipulate the box height to create the same joint angles. This is an easy example, but you can apply it to most exercises by thinking through shapes and joint movements.

Freelap USA: What strategies do you use to help the players in the off-season continue the progress that they made during the year? Do you attempt to collaborate with their private coach if they have one?

Ryan Orr: We’re assigned a list of players, usually guys that we have during the season, and we stay in constant contact with those players throughout the season. We send out off-season programs to them and communicate frequently to make sure that we stay on top of any changes that need to be made to account for their situation and equipment available. We’re able to identify their needs and deficiencies via testing throughout the season enough that it allows us to really individualize each player’s programs. As a coach, it is my responsibility to help them understand that the off-season is the best time for them to develop physically and to help them prioritize their goals.

For players who train with an off-season coach, collaboration and communication are incredibly important. It’s my job to attempt to build a relationship with that coach and align their goals with ours. From there, it is a continuous cycle of communication with both the coach and the player. The key is to put your ego aside and understand that, ultimately, all of us want the same thing: success for the player.

Since you’re here…
…we have a small favor to ask. More people are reading SimpliFaster than ever, and each week we bring you compelling content from coaches, sport scientists, and physiotherapists who are devoted to building better athletes. Please take a moment to share the articles on social media, engage the authors with questions and comments below, and link to articles when appropriate if you have a blog or participate on forums of related topics. — SF


Rec Soccer Players

7 Ways to Improve Your Recreational Soccer Practice

Blog| ByNathan Huffstutter

Rec Soccer Players

First of all, I get it—I’ve been there. Rushing straight from work to coach who knows how many players showing up at who knows what time. You’ve got the kid who moves like a cheetah and HAS to win every relay or 1v1 and the kid who hates recess and only smiles when you sub them off the field. There’s the kid with behavioral issues whose parents have run the numbers and figured out that recreational sports are a cost-effective form of childcare. There’s the kid who comes straggling up to the field five minutes after every game has kicked off, with the red-faced dad who sends angry emails to the league because his son has never been in the starting lineup. And there’s the kid with the polished first touch and passing skills who burned out on competitive soccer, and now it’s your responsibility to keep her from quitting the sport entirely.

These players are—or should be—the “grassroots” base of the developmental pyramid. There is no way of predicting at 7-8-9 years-old who will still be playing the game at 16-17-18, so that part of the base needs to be as wide and well-cared for as possible in order grow the game. But this crucial foundation tends to get forgotten when it comes to allocating time, coaching support, field space, equipment, and other resources. We consistently put the hardest coaching challenges in the hands of volunteers who have the best intentions but often limited experience.

We consistently put the hardest coaching challenges in the hands of volunteers who have the best intentions but often limited experience, says @CoachsVision. Share on X

Kicking off the fall season this year, I helped lead a coaching clinic for coaches who stepped up and volunteered on the recreational side of our club’s program. After a few weeks of watching the teams practicing out on our local fields, I realized that while I may have adequately demonstrated how to organize and execute a routine practice, I had failed to communicate a few crucial dos and don’ts that can really make a difference. With that end in mind, here are seven suggestions that will immediately improve a grassroots or recreational soccer practice (and like most things in life, I learned each of these by first doing them wrong myself).

Coaching Clinic
Image 1. Leading a field session for volunteer soccer coaches in Del Mar, California.

1. Begin Every Practice with a Game

I understand the desire to turn chaos into order and snap every practice into instant atten-SHUN with a show of military discipline. In the practice space to your left, the coach is fighting a losing battle with the telescoping arms of his pricey collapsible goals while the dozen boys on his team are throwing around a plastic water bottle and tackling each other in a game that’s equal parts rugby and Lord of the Flies. The coach in the space to your right hasn’t even showed up yet—a handful of players are there milling about on their phones while one teammate launches punts 50 feet straight up in the air, watching the kids on their phones scatter each time the ball hurtles back to earth.

In this moment, nothing shows you’re running a much tighter ship than your counterparts like organizing your players into lines for drills that are tightly choreographed, highly technical, or physically demanding, or maybe all three. That FIFA 11+ warm-up? That non-dominant-foot-only dribbling slalom? That “last-man-up” interval run around the field complex?

Trust me—let that temptation go.

Instead, start every practice in a way that lets your players know they’ve come to the right place—they’re going to play, have fun, and get better. Tony Holler has summed this up best: Make your practices the best part of a kid’s day.

Set up a large goal or opposing mini goals or just cones for goals and see what the players do as they arrive. If they start playing 2v1 or 3v2 or 4v4, amazing, stay out of their way for a bit. If they create a game shooting on goal, all good, let them play it. With younger players, they may not yet have the ability or imagination to start their own game and will need direction—help them organize a shooting challenge or a mini scrimmage, or you can take over entirely and start your practice right off the bat with Sharks and Minnows or Red Light Green Light or the Numbers Game or whatever game you usually use as the “fun” activity later in a practice.

This concept from the Play-Practice-Play model is brilliant in its simplicity, and it works—set the tone and energy of your practices by having the kids play the moment they get there. That 10-minute game will check most of the boxes of a proper warm-up—and all those players who perpetually show up 5–15 minutes late because, why not, they’re just missing laps or static stretches or cone dribbling? Now they’re motivated to get to the field on time because start time is game time.

Set the tone and energy of your practices by having the kids PLAY the moment they get there…Ideally, instead of YOU turning chaos into order, your players will begin to be the ones doing it. Share on X

This can require swallowing some ego, because to all outward appearances, this opening “play” phase may not look like you have the tightest handle on things. Ideally, however, instead of you turning chaos into order, your players will begin to be the ones doing it—which is what attacking sports are all about.

Here’s an example: my competitive team of sixth- and seventh-grade girls has developed its own pre-practice game where players blast shots from 18–25 yards out while others line the goal line and deflect the shots. This game began with zero input from me—naturally, those players more inclined to attacking roles generally self-select as the shooters and those more inclined to defensive roles choose to be the blockers. They crack off shots, make saves, talk trash, and actively play their way into each practice—the game usually gets underway 10 minutes before practice formally starts, and I tend to let it carry on five minutes into our set start time and then begin from there.

In a summer tournament match, our keeper got caught outside of the 18-yard box on a challenge and the opposing player crossed the ball centrally to their open striker and…what do you know? Several of our defenders posted up on the goal line just like in their pre-practice game. The first shot on frame was deflected with a knee, the rebound shot was deflected with a shin, and what would have been the decisive goal in tournament play was prevented thanks to a warm-up game I never would have created on my own.

2. Throw Away That Dry Erase Coaching Board (and the Whistle Too)

If you want your players to sit with rapt attention, shortly after that FIFA 11+ warm-up and complex set of drills, gather them in to sit while you draw up formations or indicate tactical movements with the teeny round magnets on your coaching whiteboard. During this strategic talk, all eyes will be on you, and it feels like this is where the magic happens: you’re Pep, you’re Pia, you’re Mourinho.

When kids get 75% of what you are saying, they will pepper you with comments and follow-up questions to get the final parts of the picture. Kids who get 0% of what you’re saying will nod seriously and sit in absolute silence, lest they let slip they haven’t understood a word.

Put yourself in their shoes—you’re drawing triangles and numbers and arrows or sliding those little M&M dots in ways that appear backward or upside down. Someone’s head is right in their way, or they may not be close enough to see in the first place, and by and large, they will not have the cognitive ability to appreciate a number or shape indicating a “player” and visualize themselves in those positions out in space.

The reason they are sitting so quietly is that they do not understand the words that are coming out of your mouth.

Sorry, Pep. Throw. That. Board. Away.

White Board Trash
Image 2. I once asked the teens on a competitive team how much of what I wrote on my coaching board they actually understood and could apply. The answer? “None of it.”

Disc cones are an effective tool to show your players your basic playing formation—even better if you have different colors to represent different position groups, so you can also describe the mindset and responsibilities of each role on the field. Unlike the coaching board, cones are interactive—you can have players move them based on shifts on the field, or you can spread the cones out and have the players stand at each position to see what their basic formation looks like.

Cone Formation Soccer
Image 3. Some players still won’t easily connect cones to spatial relationships on the field, but you should have more of those “Oh, wait—NOW I get it” moments, like when someone who’s been pretending to see the hidden image in a 3D painting actually DOES see the hidden image.

Dowels or PVC pipes are useful with younger age groups to demonstrate connections between cones/players: you can use a dowel to show that your left back and left wing are connected and should be able to see each other at most points of the game without being in each other’s shadows. Meanwhile, your left back and right wing are not connected. If your right wing realizes they are in high-five distance of your left back, something has gone wrong.

On a similar topic, that whistle hanging around your neck has a fun, retro PE teacher vibe and you don’t need to actually trash it—keep it in your bag, because someday the ref won’t show up, and you’ll need a whistle as you simultaneously referee the game and coach it. That is what whistles are for—refereeing. Teach your players to play to the referee’s whistle while you coach with your voice.

3. Be Early and Make Your Space a Field

Yes, you’re coming straight from the office and your players should be grateful you sucked it up and volunteered in the first place—and, besides, when you do roll in, there’s that one team dogpiling each other while their coach wrestles with his portable goals and another team dragging through some type of Navy SEAL hell-week run. All things considered, you’re golden.

Still, however much time you’re volunteering, plan to volunteer 20 more minutes of it before each practice.

This is when you turn chaos into order. Being early allows you to set your space—most likely, you will not have a full, lined field all to yourself for your recreational practice, so create your field of play. Soccer is a game of space, and it lacks the more well-defined landmarks of sports like softball, basketball, and football—spatial relationships on the soccer pitch are even harder for young players to grasp if the playing space itself lacks boundaries.

Set the rectangle that will be your practice field for the day. Spatial relationships on the soccer pitch are even harder for younger players to grasp if the playing space lacks boundaries. Share on X

So, set the rectangle that will be your practice field for the day. Depending on the space provided to you, the age of your players, and what you’re planning to do in that day’s practice, your space may be 40 x 30, 60 x 45, 70 x 55… who knows. At a minimum, use large cones or poles for the four corners and a different color of cones for the two midlines and set all of your activities within that defined field.

Plan-Map-Field
Image 4. If practice-design software isn’t efficient for your needs, it’s simple enough to write up, map, and then execute your plan. Consider the opening game you want your players to play on arrival and have any large or mini goals in place for that. Without impeding that opening game, set whatever cones, poles, PUGGs, hurdles, ladders, or anything else you’ll be utilizing in the next phases of your practice.

As the players arrive, if the field setup looks different and purposefully designed each day, that sets their imagination going and makes them wonder what activities you have planned for the session. Plus, the earlier you are there, the earlier parents will realize they can safely drop off their players—so you can get them into the routine of playing their opening game before practice begins and then the full span of practice is yours to utilize.

4. If Your Drill Requires Lines of More Than 3 or 4, Do Something Else

For real. If you take nothing else away from this article, please, let it be this.

No matter how useful or valid the skill you are trying to teach, no matter how expertly designed your layout of cones or poles or obstacles… three is about the max number of players you ever want in any single-file line. One player doing the drill, one just about to do the drill, and one who knows that in a moment they will be the next one about to do the drill.

Beyond that, the fourth, fifth, sixth in line will need to occupy themselves with something else while waiting for their turn to be close to their turn, and that something else will inevitably set them up for failure once their time finally does arrive.

You want to teach the “give and go” to your team of a dozen exuberant 7-year-olds, but you’re the only one who can actually deliver that effective wall-pass back? Do not, do not, do not have your 12 players line up single file and pass you the ball for a give and go drill—calculate how many minutes it will take for each player to get through that line six times to perform the skill and think of how many touches on the ball they could be getting in those 15 minutes rather than standing in line cloud-watching or doing cartwheels.

If the only way you can do the thing you want your players to do requires lines of 6-7-8 kids standing and waiting for a turn… Do something else. That something will be better, says @CoachsVision. Share on X

All lines are not the enemy. Some of your activities may be physically demanding and short lines are a good way for players to have a natural rest between repetitions. Also, from a modeling perspective, being next in line and watching their teammates perform a skill or drill may be the best way for some of your players to learn the skill or the flow of a pattern. But if the only way you can do the thing you want your players to do requires lines of 6-7-8 kids standing and waiting for a turn… Do something else. That something will be better.

5. Make Your Warm-Up Multi-Task (and 5-10 Minutes, Max)

If you start opening your practices with a game, ideally that will elevate your players’ heart rates and body temps, prep specific muscles and tissues that will be used during that training, and switch their mindset from school/home mode into active/athletic mode—which, in and of itself, should accomplish the goals of your warm-up in the first place.

There are, however, other valid goals you may want to achieve via a structured warm-up:

  • Team bonding and self-organization.
  • Introducing specific movements that you value (skips, backpedaling, hops and jumps, shuffling, etc.).
  • Introducing foundational ball skills (toe-taps, bells, sole-rolls, and other skills that are great for both proprioception and basic conditioning).
  • Preparing players for what an organized pre-game warm-up will entail should they continue to higher levels of the sport.
  • Setting foundations for resilience and injury mitigation.

Personally, I happen to think every kid needs to be able to jump and land forward and backward on a single leg, alternate from a backpedal to a sprint, skip, shuffle, and change directions, so I add those movements to warm-ups. I also like to continue competing directly out of our opening game, so relay races are a game-based way to multi-task and perform those movements with intent.

And if you really want to do that 20-minute, FIFA 11+ warm-up? Sure, introduce it one week; there’s genuine value in teaching your young players the what, how, and why of an extensive warm-up. Just make sure that a warm-up routine isn’t a routine way to kill the first 15 minutes of every practice—the longer and more repetitive the warm-up, the sloppier the movements get over time. So, use variety and multi-task your goals—the next practice after your extensive warm-up, have your players do a five-minute warm-up with the ball at their feet combined with jumps and plyos:

  • Toe-taps, then skater jumps over the ball.
  • Bells, then four-corner jumps over the ball.
  • Standing v’s, then bicycle jumps.
  • Start/stops with the ball and without.

And so on. Keep the intent high. Soccer is a complicated game, and your players have a lot to learn.

6. Do Not Jog Laps (Not as Fitness, Not as Punishment)

Maybe someone forwarded you an article from Runner’s World or maybe it was a Trivial Pursuit question or maybe you ran a Google search and came across a fun fact stating that soccer players can run 7+ miles in a match. Consequently, conditioning may seem like an important place to start in terms of preparing your players for the sport.

I do unequivocally believe that any healthy athlete between 8 and 18 years old should be able to crank out a 3K without collapsing. The ability to jog 1–2 miles is a basic physical KPI that ought to be viewed as no less a foundation than the ability to perform a push-up, land a broad jump, hold a plank position, do a bodyweight squat, etc.

However, just because your kids should be able to run a mile doesn’t mean it’s a good use of your limited practice time to have them run a mile.

Just because your kids should be able to run a mile doesn’t mean it’s a good use of your limited practice time to have them run a mile, says @CoachsVision. Share on X

Your more athletic players and those with a more advanced game understanding will run more during a game, and your less competitive players will run less. By and large, even if they are not “game fit,” that lack of fitness is not the limiting factor in their performance—if a player isn’t covering much ground, the issue is more likely they don’t know where to go, aren’t sure what they’d do if they got there, and may not be sure why they should care in the first place.

So, to have them cover more space, use your time to teach them where to go, what to do when they get there, and why they should care. Spending 12 minutes jogging around your field complex won’t help much with that, but your other practice activities will.

Though not time-effective in the context of a weekly practice, being able to run for longer stretches is helpful on the soccer field. Encourage your players to jog when those opportunities come up in school, whether it’s running instead of walking laps in PE, participating in running clubs or jogathons, or running a route at the park or around the neighborhood with their dog. That extra effort combined with purposeful warm-ups, races, activities with high repetitions, and the weekly game itself will improve their overall fitness.

On The Ball
Image 5. Ball skills, anticipation, and “want-to” are far bigger factors in a recreational soccer game than fitness, so direct as much energy as possible to improving those first.

And, if you have a need to discipline your players for any reason, find a way to do so that does not involve running. As mentioned, your better players will naturally run more on the field—“work rate” on the pitch is as much a key to the game as first touch, and you want your players to associate running with being better at the sport, not with being in trouble with their coach.

7. Always End with a Game

This is not a free license to spend the last 45 minutes of every practice scrimmaging just because those 45 minutes then require no planning or execution. Figure out how long your players can play their best version of the game and play that amount of time to wrap up every practice. The game teaches the game, that is and always will be.

Figure out how long your players can play their best version of the game and play that amount of time to wrap up every practice. The game teaches the game, always, says @CoachsVision. Share on X

Most often, recreational players under 12 can play, really play, for a stretch of 15–20 minutes. Any longer than that and diminishing returns kick in. Fatigue strikes and the quality of play sinks. One side will be outplaying the other, because perfectly even teams cannot be set, and the side being outplayed will concede to being outplayed and lose intensity. Teammates who are friends will use that waning intensity to socialize.

As the game teaches the game, don’t let the game teach bad habits. Figure out how long your players can play their best version of the game and play that amount of time to wrap up every practice, so the players know that as they move through the activities of your practice plan, they are always building to the game itself.

Make Them Want to Come Back

The 10- to 12-week span of the average recreational season goes by fast, and young players have the potential to learn an incredible amount in that short time. The season will have highs and lows, and the final measure of the year won’t be based on which team happened to get the phenom who could dribble circles around everyone en route to a weekly hat trick, or even that satisfying, 6–0 spanking you put on the dogpile team with the coach who dropped a grand on his own set of full-size goals.

The success of this year will be measured in the next.

One year from now, are the majority of the players you coached still playing the game? Sure, some will move on to other sports, some will move away, and some will stop playing soccer for reasons independent of anything relating to your team or how you coached it. But, if you can make your practices the best part of your players’ day, if you can keep them excited and involved in the sport for another year, you will have given back more than your time and made a true difference.

Since you’re here…
…we have a small favor to ask. More people are reading SimpliFaster than ever, and each week we bring you compelling content from coaches, sport scientists, and physiotherapists who are devoted to building better athletes. Please take a moment to share the articles on social media, engage the authors with questions and comments below, and link to articles when appropriate if you have a blog or participate on forums of related topics. — SF

In Season Performance

It Takes a Tribe: In-Season Strategies to Maximize Recovery and Performance

Blog| ByJoey Guarascio

In Season Performance

By Joey Guarascio, Autumn Bartlett, and Adam Bennett

In-season, planning football training exercises, prescribing the right amount of stress, and allowing the proper recovery periods are all essential for performance in games. Throughout the off-season, the strength and conditioning coaches calculate and prescribe workouts down to the pound or yard—this same precise approach must be taken in-season. The challenge, though, is whereas everything can be preemptive in planning in the off-season, the in-season is very much reactive due to the chaotic and unpredictable nature of the game.

Having all departments in the organization on the same page is a must, as there needs to be maximum communication throughout about the current state of the team and individual players. When your job is dependent on production, you cannot leave anything to chance. The football coaches, ATC, strength and conditioning coaches, and nutritionist all need to move information fluidly back and forth to manage stress and have proper planning for future practices.

Stress Recovery
Figure 1. Applying the right stress at the right time with the necessary recovery period is always the goal for performance and adaption. Considering the unpredictable nature of the game, support staff must be much more reactive in aiding the recovery process. (Image adapted from FYTT.)

Performance isn’t about how much stress a coach can impose on the athlete, but about how much volume of stress the athlete can recover from and adapt to, and then go and compete again. It is taking the science and data and turning it into usable and actionable means. Aiding this process with recovery resources, from percussive therapy tools to supplements and shakes to recovery training circuits, can take a lot of uncertainties out of the equation and helps mitigate issues as much as possible. Coaches can’t control everything, but we strive to aid in victory as much as possible—otherwise, what’s the alternative? Do we do nothing and allow 18- to 22-year-olds to fend for themselves? Or do we educate and teach proper habits that enhance general well-being and maximize recovery?

Performance isn’t about how much stress a coach can impose on the athlete, but about how much volume of stress the athlete can recover from and adapt to, and then go and compete again. Share on X

In this article, you will get perspectives from three different departments of FAU football:

  • Strength and Conditioning
  • Sports Nutrition
  • Athletic Training

These separate departments need to work as one to make sure we arrive on game day ready to perform. We provide a daily outline from Sunday (six days out) to Saturday (game day) with all the interventions we take.

Sunday: Six Days Out from Game Day

Following a Saturday game, players get to sleep in on Sunday morning. Our first required team activity on Sundays is a medical check-in, scheduled at noon. The check-in is mandatory for all participants in the game the night before. The ATC screens out any uninjured athletes first (as all participants are required to check in), before then addressing potential injured athletes.

The ATC starts with general questions surrounding the injury before engaging in further testing. The results of the medical check-in are communicated directly to the strength and conditioning staff, who prepare for any alterations of the day’s lift and practice. The ATC expresses the severity of the injury, limitations, mechanism, and potential time frame of future evaluations or rehab. They visit before the full staff meeting and run down the list of guys that have something going on that we need to be aware of.

When making alterations, we like to use plan B, which is the next-closest exercise that the athlete can accomplish given their limitations. An example would be if we prescribe a split squat, but the athlete has a foot injury, we could accomplish the same goal as the prescribed football training exercises with a rear-foot-elevated split squat or a pistol squat, which fits the lateralization of our split squat. This communication is key and is the lifeblood of any performance team.

When making alterations, we like to use plan B, which is the next-closest exercise that the athlete can accomplish given their limitations. Share on X

After the medical check-in, players proceed to brunch, as this is usually their first meal of the day—they typically sleep in until around 10-11 a.m. the morning after a game. At brunch, they check in with a nutritional intern to have their body weight checked. If there is a significant loss in BW (2%-4%), our nutritionist is alerted.

The first line of defense that the nutritionist takes is hydration intervention. The athlete is provided with a Right Stuff, a Liquid IV, and a 16-ounce Powerade bottle that they must drink. Each player has a custom plate assembled by the nutritional staff, depending on their nutritional goals (weight gain, weight loss, or maintain). The meal is carb-/protein-heavy to replenish what was burned the night before.

Players then report to the weight room, where they perform a 28-minute recovery circuit along with a light, regenerative lift that emphasizes restoring ROM back into the foundational movement patterns such as squat, hinge, press, and a pull. We are not trying to reinvent the wheel with the recovery circuit; we are looking to:

  • Decrease general soreness.
  • Increase ROM in primary movers.
  • Decrease muscle tone to avoid pulls or allow compensations to form.

We use several tools, such as Donnie Thompson’s tempering rollers, the Theragun, and the PainPill from Chris Duffin. The Theragun is an amazing product because it allows us to pinpoint some specific areas that cannot be reached with general rollers.

Recovery Tools
Image 1. These are several tools we use to help aid recovery through tissue manipulation—the body tempering rollers from Donnie Thompson and the Theragun have become necessary components of our program. (Photo credit, Bob Marco.)

Recovery Circuit – Seven-minute stations (athletes rotate through all four):

  1. Self myofascial release (SMR): body tempering, manual therapy, and Theragun to pinpoint sore spots.
  2. Hurdle mobility.
  3. Athlete yoga.
  4. Band stretch.

Once the players have run through the recovery circuit, they report to their assigned racks and begin the lift pictured below under the S&C coaches’ watch.

Recovery Exercises
Figure 2. The workout the day following the game is meant to stimulate recovery and regain ROM in foundational movement patterns.

Post-lift, the players are given a recovery shake high in carbs, protein, and anti-inflammatories such as cherry juice and berries. The players are also given a multivitamin and fish oil. The shakes are customized to fit the requirements of the athlete’s desired body comp goal.

Players go to meetings post-lift, followed by a correction-styled practice to clean up mistakes from the previous game (this lasts an hour in duration). We steal some more recovery with our pre-practice warm-up, utilizing some mobility exercises.

To finish out the day, our players get to (hopefully) eat a victory meal from our training table while watching NFL games. This is usually a specialty meal and allows for the players to decompress and enjoy each other’s company.

Monday: Five Days Out from Game Day

Monday is a mandatory off day where the players can catch up on sleep and handle academic work. We encourage SMR (body tempering, manual, Theragun), general stretching, and meathead work to maintain some body armor (back machine work, push-ups, arm farm, neck work). We also provide an at-home recovery plan if the player doesn’t want to come to the facility.

If the athlete chooses to come in voluntarily, it’s another opportunity for the athlete to be provided with nutritional resources. The weight room observes open hours from 8 a.m.-4 p.m. and the training room requires that two treatment times (8 a.m.-11 a.m., 1 p.m.-3 p.m.) are met. The treatment/rehab sessions are longer treatment session times to prep for the week. Any changes in a player’s injury status are discussed with the strength and conditioning staff as well as the football staff.

It’s great for the players to get away from the stress of competition and reset before the challenges of the next opponent are presented.

Tuesday: Four Days Out from Game Day

Tuesday is a workday! Tuesday starts with a mandatory breakfast that is carb-centered to fuel the players for the upcoming full-padded practice. At breakfast, the strength staff is present and taking general soreness questionnaires for our two deep. This info is relayed to the ATCs, and players with a rating of 4/10 are recommended to come get extra recovery or treatment on the specific troubled area. We utilize a 0 (no pain) to 10 (need to see a doctor) scale for this questionnaire.

AM treatments are performed concurrently while breakfast is open. AM treatments are focused on prepping athletes for practices. The main purpose is to enable heavier modalities and be soft-tissue-based. The pre-practice rehab design is to prep the body for work. Tools such as BFR Air Band Cuffs are prescribed with football training exercises to reduce stress on the joints and bring blood flow to specific issue areas. Activation exercises are also prescribed to maximize output for the day’s work.


Video 1. Tuesday is a great day to utilize a max-velocity-themed warm-up pre-practice. The use of pogo hops, dribbles, and skips allows the athlete to retain the reactive strength and speed mechanics that were developed over the off-season.

Pre-practice warm-up for Tuesday is max-velocity-themed to retain and touch on the reactive strength components and technical components that were developed throughout the off-season. Pogo hops, skips, and dribbles are all used to refresh the athletic qualities of speed and reactive strength that can be lost in less than seven days. In-season football training exercises—from a strength and conditioning coach’s perspective—are all about allowing the athletes to maintain and gain increases in the general athletic qualities that were developed during the off-season.

Direct reactive strength training is one that, through testing depth jumps in-season, was shown to be a detrained athletic quality as the season went on. Share on X

When the stimuli are provided through the sport, it isn’t necessary to compile the stress through training modalities. It’s extremely important to understand which boxes are being checked and which ones aren’t. Direct reactive strength training is one that, through testing depth jumps in-season, was shown to be a detrained athletic quality as the season went on. The intervention of reactive strength work in our warm-up on Tuesdays combatted this and led to higher max velocities on average in the practice.

Issurin Chart
Figure 3. Above is a chart created by Issurin that outlines how long athletes hold onto athletic qualities after the end of training those qualities. This is pivotal insight, as it’s easier to manipulate the training modalities when you know how long you can retain them.

The practice is around two hours and 15 minutes and is centered on first and 10 play options and is also special teams heavy. Due to the situational down and distance, Tuesday’s practice demands more overall volume and high-speed volume for the players. In this practice, we encourage our players to try and match or surpass their best padded max velocity.

Hitting a minimum 90% of max velocity twice a week is necessary to maintain speed in-season from the data we have collected. Speed interventions will be made if that is not being accomplished by having the athlete hit one fly-10 with a 30-yard build on Thursday. Monitoring max velocity and implementing a max velocity warm-up have really helped in the reduction of soft tissue injuries.

During the practice, right around the mid-point, the coach has a 10-minute period we call halftime—here, the players sit down under tents with fans, replenish glucose, and hydrate. We supply several different snacks that range from fruit to candy. We want to practice at a high level, which means having enough gas in the tank to accomplish that.

Monitoring max velocity and implementing a max velocity warm-up have really helped in the reduction of soft tissue injuries. Share on X

Post-practice, players are provided with a carb recovery shake immediately as they walk off the field. The players have 15 minutes to change and begin their post-practice lift. We try to maximize their time by stacking the lift and practice. The travel squad, which includes around 50 players, gets their main lift of the week post-practice on Tuesday. I am in favor of a post-practice lift as opposed to pre-practice lift for several reasons:

  • Practice the sport in a fresh state. (It’s football season—keep the main thing the main thing.)
  • Lifting is supportive.
  • Allows for more aggressive load prescription, knowing that players don’t have anything except classes afterward.
  • Allows for more autoregulation based on practice stress.
Lift Chart
Figure 4. Example of our main in-season lift for our travel squad. Intensity is far more important than volume in-season. Using a Vmaxpro allows coaches to be precise with load prescription, which increases autoregulation for athletes in-season.

Post-lift, a custom shake based on a weight gain, lose, or maintain distinction is waiting for the athlete with a high-carb and -protein lunch to go. Athletes who had high scores on their daily soreness charts have the option to come back in the afternoon to get extra treatment on specified areas. Athletes returning from long-term injuries come back in the afternoon for rehab.

We also encourage our athletes on Tuesday to take advantage of our cold and hot tubs.  Contrast bath modality is as follows:

  • 3-minute cold, 2-minute hot x 2 cycles + end with 3-minute cold.

Normatec recovery boots are also available to increase the recovery process—the recovery boots are a player favorite.

Wednesday: Three Days Out from Game Day

This day is an almost exact mirror of Tuesday, with just the practice structure being modified. Where Tuesday is longer, with an emphasis on max velocity, Wednesday’s practice is shorter in duration, and “short” areas dominate. The warm-up for this practice focuses on COD mechanics, which primes the players for the day. Shuffle reaction exercises, along with deceleration exercises, are prescribed in the warm-up to reinforce proper movement patterns.

The practice is just under 1 hour and 50 minutes and emphasizes third down and short yardage. This produces less total volume but a much higher IMA count. (IMA is explosive decelerations, accelerations, and changes of direction.) High-speed yardage on average drops between 15% and 25% from the previous day. Halftime is employed as it is on Tuesday, as well as the post-practice protocols. Non-travel guys lift post-practice, and instead of lifting, the travel squad can get to classes or rest earlier.

Athletes who had high scores on their daily soreness charts have the option to come back in the afternoon to get extra treatment on specified areas. Athletes returning from long-term injuries come back in the afternoon for rehab. Just like Tuesday, on Wednesday we encourage our athletes to take advantage of our cold and hot tubs, as well as the Normatec recovery boots, to increase the recovery process.

Thursday: Two Days Out from Game Day

Thursday morning follows the same flow as Wednesday, with treatment and breakfast. Before we get into our football meetings, players have a player-led meeting to lock in the focus of the team and provide clarity on what needs to happen to win the game.

Thursday’s practice is “helmet only,” lasting 1 hour 15 minutes. Thursday is a run-through, emphasizing focus and execution of the game plan. Post-practice we administer a mandatory recovery circuit like Sundays.

Recovery Circuit – Seven-minute stations:

  1. SMR: body tempering, manual therapy, and Theragun pinpoint sore spots.
  2. Hurdle mobility.
  3. Athlete yoga.

Custom recovery shakes are given to the players along with a to-go lunch. Athletes who had high scores on their daily soreness charts have the option to come back in the afternoon to get extra treatment on specified areas. Athletes returning from long-term injuries come back in the afternoon for rehab and meet with team physicians. Normatec recovery boots are again available along with the tubs to maximize recovery.

Friday: One Day Out from Game Day

Friday morning follows the same flow as the previous two days, with treatment and breakfast. Players have a one-hour walk-through to tighten up execution and assignments. Post-practice, we supply a specialty shake from Jamba Juice. If Saturday is a home game, the players have off until the afternoon, when we have a meeting before travel to the hotel—we stay at a hotel in town to ensure total focus is on the game and to stay in routine regardless of the venue of play.

Upon arrival at the hotel, players check into their rooms and then come down for another recovery session where the strength and conditioning staff roll out, stretch out, and administer soft tissue work on targeted problem areas with the Theragun. Dinner is a carb- and protein-heavy meal. Hydration strategies are in place, and water consumption is monitored. The players have downtime prior to a snack before bed check.

Athletes who need treatment receive it at the hotel in that downtime between dinner and snack. A chiropractor is available at the team hotel for home games to adjust and provide ART on athletes by request. Players are sent a stretching routine to do before bed if they choose. Again, we want to leave no stone unturned and nothing to chance—feeling fresh on game day is always the goal.

Stretches
Figure 5. These stretches are sent to the players the night before the game. They can choose to do them or not, but providing all available resources to make sure the athletes feel supported gives them a sense of total preparation and confidence.

For away games, post-practice we give players an hour to shower and prepare to check in for the flight. Players are given lunch as they board the plane. We require that the players take three water bottles on the plane with them, along with a custom snack bag. The schedule is the same once we arrive at the hotel.

Recovery-Plane
Figure 6. Using the Theragun and other tools like stick rollers on the flight has helped us take advantage of travel time to increase recovery leading into game day.
Altitude Nutrition
Figure 7. Graphic we provide our players on how we expect them to fuel during travel.

Saturday: Game Day

Game day is always different!

The excitement and anxiety of game day drives the intensity of the day. Players sleep until a reasonable time, trying to prevent any effects of sleep loss. As the players filter down for breakfast, they are handed a water bottle that they must drink.

Breakfast is a little looser in mood than the pregame meal, but it does feel distinctly more focused than the team dinner the night before. The meal is heavy carbs and protein-themed, as we want to fill that gas tank for performance later in the day. Post-breakfast, the players in their position groups do a walk and talk with their coaches around the hotel for around 15 minutes. The coaches go over tips and reminders during this time. If afforded by a later kickoff time, the athletes get around an hour break for downtime.

The players come back down roughly 7-8 hours prior to kickoff to watch tape and walk through for roughly an hour. Post walk-through, we do our game day priming workout. The workout duration is 15 minutes, consisting of a dynamic warm-up followed by three ballistic exercises:

  1. Plyo push-up 3×5 reps.
  2. Split squat jumps 3×3 each side.
  3. Seated start vertical jump 3×5.

“Ballistic activities might provide an alternative method of inducing a PAP response that is comparable in magnitude to that induced during heavy resistance exercise.” (Mark Russell, Natalie Williams, Liam P. Kilduff, Chapter 10: “Priming Match Day Performance,” Advanced Strength and Conditioning). We are trying to excite a PAP effect going into the game without inducing fatigue. This workout is performed 5-7 hours out of kickoff.

Once the priming workout is completed, the players are given a to-go meal. We encourage the players to take a hot shower and a 45-minute nap when they get back to their rooms. There is a two-hour gap between snack and the pregame meal. The pregame meal is four hours before kickoff. All players consume a Right Stuff with a Powerade. How much food they consume is up to each athlete, as they all have their own rituals leading up to kick.

Timing Game Day
Figure 8. Here is a model we follow leading up to game time. This model is taken out of the book “Advanced Strength and Conditioning: An Evidence-Based Approach.”

Following the meal, the team assembles for a special team callout followed by a briefing of what the head coach envisions for the game. Prior to loading the buses, the players watch a highlight tape, and then we leave the hotel for the stadium.

The aim is to get to the stadium around two hours prior to kick. Players arrive and immediately start pregame treatment or get taped in prep for the game. Heat is used pregame with heat pads, or if a home game, the hot tubs for no longer than five minutes. The chiropractor is available for pregame “tune-ups.” The strength staff is available for body tempering and targeted soft tissue work with the Theragun.

Around 1 hour 30 minutes out, players start to enter the field for position-specific warm-ups designed to dynamically warm up and prep the athlete for the game. Players are encouraged to keep headphones on and stay to themselves. Each strength coach is responsible for a position group and administers the warm-up. At 70 minutes prior to kick, the field is cleared, starting the football-specific buildup to kick.

Dynamic Warmup
Figure 9. Position-specific dynamic warm-ups allow the athletes to move at their own pace pregame and decrease unnecessary energy expenditure.

The football-specific warm-up lasts 35 minutes, and the field is then cleared with 23 minutes remaining on the countdown clock. Once reentering the locker room, the ATC and strength staff push fluid replenishment and hand out fast carb snacks such as gummies or candy. Any last-minute stretching (at the athlete’s request) is done prior to the coordinators’ briefing, followed by the head coach’s briefing. Once the head coach is finished addressing the team, they take the field.

During play, glucose and fluid replenishment is a priority. Our nutritionist aims to have our players consume 60-80 grams of carbs intra-game. We have exercise bikes on the sideline for players to stay warm during periods of inactivity, as well as the Theragun on the sideline for emergency soft tissue work. At halftime, each player has a custom snack bag with 60-80 grams of carbs coming in a variety of forms. The entire organization pushes hydration at halftime.

Coaches make their adjustments and players reenter the field for a general, dynamic warm-up comprised of six exercises. After the final whistle (and hopefully a victory), players are given a recovery shake and a carb-heavy meal to go.

The players enjoy the night, and the process starts over. Although a grind, this work week is extremely fulfilling and exciting. Watching the team compete while feeling prepared and confident gives all three departments a sense of accomplishment. Any issues or adjustments within the week due to logistical issues—or, as we call it, “sudden change”—are immediately briefed amongst the departments and handled.

We are always chasing perfection, trying to catch excellence along the way. Share on X

We are always self-auditing the week as we progress through it, so any changes that will lead to better performance will be discussed. At the end of the season, all three heads of the three departments meet with the head football coach and discuss future changes or suggestions based on notes throughout the season. We are always chasing perfection, trying to catch excellence along the way.

Since you’re here…
…we have a small favor to ask. More people are reading SimpliFaster than ever, and each week we bring you compelling content from coaches, sport scientists, and physiotherapists who are devoted to building better athletes. Please take a moment to share the articles on social media, engage the authors with questions and comments below, and link to articles when appropriate if you have a blog or participate on forums of related topics. — SF

Autumn BartlettAutumn Bartlett joined the Florida Atlantic University staff in August 2021 as the football sports nutritionist. She graduated from the University of Florida in May 2020 with a dual degree in dietetics and nutrition science and completed her dietetic internship at Wellness Workdays. 

Adam BennettAdam Bennett joined Florida Atlantic University as an assistant athletic trainer in April 2015, working primarily with football. He then went to Minnesota for the 2016 season and returned to FAU in 2017 as the head athletic trainer for football. Before his first stint at FAU, Bennett interned with the Tampa Bay Buccaneers Athletic Training Department for a year, assisting with the prevention and rehabilitation of acute athletic injuries. He spent two years at the University of Southern Mississippi as a graduate assistant athletic trainer for football and women’s tennis while earning a master’s degree in sport management. Bennett got his B.S. in Athletic Training from Florida State while working with women’s soccer, football, baseball, and men’s basketball.

He is a Florida State Licensed NATABOC Certified Athletic Trainer and a NSCA Certified Strength and Conditioning Specialist.

McGee Strength Team

Unified Competition in the Weight Room with Kade McGee

Freelap Friday Five| ByKade McGee, ByCody Hughes

McGee Strength Team

Kade McGee is the Director of Strength and Conditioning for American Christian Academy in Tuscaloosa, Alabama. Kade received his undergraduate degree from the University of Alabama, where he interned in the weight room working with various sports. He then went on to earn his master’s degree from Xavier University in Coaching and Athletic Development. Kade is a proud member of the NHSSCA and serves on the Alabama state advisory board.

Freelap USA: What sparked the idea of having “strength teams” in your high school performance classes?

Kade McGee: I originally saw the idea from Micah Kurtz a few years back before I even got to ACA, and I remember thinking it was something I would like to do once I found a job somewhere. I then forgot about the idea, and I was sitting around one day trying to come up with some ideas to motivate our kids and make our strength and conditioning classes more fun, and that idea about the strength teams came back to me.

I tried it out for the first time back in January 2020. We were rolling pretty well with it, and the kids were really excited about it, and then the pandemic hit. We continued to track points through the pandemic that spring semester, and it turned out to be really cool. I think the kids really enjoyed it, so we decided to keep doing it each year.

Freelap USA: Break down how you created your rubric for your teams and how they score points.

Kade McGee: Depending on class size, I divide the kids up into teams of 5-10 players. I came up with a variety of ways to earn points and lose points. This helped me come up with ways to not only motivate our kids and reward them for doing what I asked, but also hold them accountable for not living up to our standard or not complying with our program expectations.

We have five ways that you can lose points for your team and nine ways you can gain points. So, there are plenty of opportunities for each team to gain points throughout the week. I tally up the points each week and post the standings in the weight room and on our social media account for the kids to see.

Point Deductions:

  • Unexcused Absence = 2 points weekly deduction from team.
  • Unexcused Tardy = 2 points weekly deduction from team.
  • “Behavior” = 5-point deduction (being disrespectful toward Coach McGee or teammates; not doing correct weight or exercise; not following weight room rules).
  • Demerit = 10-point deduction from team.
  • Not Filling Out the Teambuildr Readiness Questionnaire = 2-point deduction from team.

Point Additions:

  • WIN Weekly Competition = 20 points.
  • BEAT Other Team in Class = 10 points.
  • Move up Blocks = 10 points for your team.
  • Personal Record = 10 points for your team.
  • Leadership = 10 points for your team.
  • Spiritual Training FCA = 10 points.
  • PERFECT DAY = 25 points (Each teammate attacking the workout for the day with relentless effort and positive enthusiasm. Teammates encouraging one another and pushing each other to be the best they can be. Each person on the team GAVE THEIR BEST THAT DAY.)
  • Post video to social media picking up trash anywhere around the school with the #CLEANACA = 2 points for team (must tag acastrength page on Instagram or Coach McGee on Twitter, Facebook).
  • Post video or picture to social media eating a healthy snack or staying hydrated with the #23 = 2 points for team (must tag acastrength page on Instagram or Coach McGee on Twitter, Facebook) .

Freelap USA: Are your strength teams coed? If so, what is unique about the team dynamics in a coed weight room?

Kade McGee: Yes, our strength teams are coed. Our strength and conditioning classes are also coed, so it made sense to make the teams coed as well. I am a big advocate for coed groups at the high school level. Although it produces its own unique challenges coaching-wise, it makes for a fun environment. It is cool to see other guys cheering on other girls during competitions for points and vice versa.

Our kids will have to learn to work together with all kinds of people one day, and coed strength teams gives them an opportunity to experience those challenges, says @kade_mcgee7. Share on X

The dynamics are unique in that any other teams our kids play on are not coed, so this gives them an opportunity to learn how to communicate and work with the opposite sex providing an opportunity for school cohesion and teamwork. Like I mentioned above, our kids are going to have to learn to work together with all kinds of people one day, and this gives them an opportunity to experience those challenges.

Freelap USA: How do you utilize social media to promote participation outside of the weight room?

Kade McGee: One of my favorite ways for our kids to gain points for their team is by posting a video to their social media account of them picking up trash anywhere on campus with the hashtag #CLEANACA. I love this because it teaches our students that no job is too big for them and that it is important to leave places better than you found them. Adding this incentive for points not only instills good habits of not walking past trash on the ground, but it is also teaching our students humility.

We are using positive reinforcement to reward good behavior, and by making them post it to their own social media account, it draws awareness for other students in our school who don’t participate in our program and shows kids from other schools that this is how we do things at ACA. We value picking up the trash because leaving places better than you found them is important to us.

Another way they can utilize social media for points is by posting a picture or video of them drinking or eating something healthy throughout the day and posting it to their own social media account with the hashtag #23. That 23 designates the nutrition education program that we use to teach our students basic nutrition that will help them make better decisions while they are outside of the weight room.

We preach to our students that it is not about the one hour they are in the weight room with me, but really the other 23 hours they are outside of the weight room. The choices they make outside of the weight room during those 23 hours is what will have the greatest impact on their development. So, we want to reinforce and reward those good behaviors. Our kids have fun with this and will send in countless pictures of water bottles that they are drinking, but if this is what it takes to make them think twice about grabbing a soda or a sugary snack, I take that as a major win!

Freelap USA: In what ways has this impacted your student-athletes?

Kade McGee: These teams have impacted our students greatly by reinforcing good behavior and punishing bad behavior. We lay out the rules and guidelines well in advance, so our students are clear on what gives them points for their teams and what deducts points from their team. We lay out the standards, and if they meet them, they are rewarded. If they don’t, their team will be penalized.

This teaches them accountability and to think about others before themselves. When you know that if you miss class unexcused, you will cost your team points, it makes you think twice about letting your teammates down. When you want to pick up a soda in the drink line in the lunchroom but decide to pick up a water instead so you can get points for your team, that is us instilling discipline into our athletes, and they don’t even realize it.

This system teaches them accountability and to think about others before themselves…it instills discipline into our athletes, and they don’t even realize it, says @kade_mcgee7. Share on X

This also teaches our students how to compete every day. Learning how to compete is a skill that I think is important for our kids to learn, especially when it involves other people on your team. Our students are going to always be a part of a team for the rest of their life. They need to learn that their actions don’t just impact themselves, but they impact others on their “team.”

At the end of the year, the team that wins receives a poster on the wall that I promise them will stay in the weight room forever. We get a professional photographer to come and take pictures for the poster. We really try to make it a big deal and make the kids feel special for winning.

That poster is special to them because they leave their mark on this school and this program. We always preach to our kids about leaving places and people better than you found them. They know that if they earn their face on the wall, they left our program better than the way they found it.

Since you’re here…
…we have a small favor to ask. More people are reading SimpliFaster than ever, and each week we bring you compelling content from coaches, sport scientists, and physiotherapists who are devoted to building better athletes. Please take a moment to share the articles on social media, engage the authors with questions and comments below, and link to articles when appropriate if you have a blog or participate on forums of related topics. — SF


Sprint Drill Progression

How to Develop a Sprint Technique Progression for Team Sport Athletes

Blog| ByJacob Williams

Sprint Drill Progression

For coaches, it can be easy to get caught using specific sprinting drills or techniques just to check off a box, all while hoping your athletes adapt to it the way you intend. Sometimes, ensuring your athletes improve can be fixed with just a little bit more attention to detail, but achieving that isn’t easy if you or your athlete don’t know where you are going to take it next.

From my experience working with team sport athletes, they like to have a goal and know what is coming next. So, just like in the weight room, you need to have a way to both categorize and progress what technique drills you choose. Taking this extra step will help you explain to your athletes the purpose of certain drills and how they will progress down the line.

You need to have a way to both categorize and progress what technique drills you choose, says @CoachJacobDubU. Share on X

Categorization

First, let’s tackle the categorization of technique drills. I am not sure if I have seen anyone else do it exactly this way, but I think it is a vital first step to understanding how and where to put certain drills in a progression. I split drills into three main categories, which helps me decide where and when to use them.

1. Posture/Position Drills

Regardless of the level of the athlete, this is always my starting point for technique drills. These are your base-level drills, where as the title implies, we are looking to establish proper posture and positioning. Posture I define as what happens with the torso in relation to the lower body, without the movement of the limbs. Positioning I define as what positions the limbs need to get into after establishing your posture. Examples of drills that fall into this category include:

  • Wall marches
  • Wall holds
  • Walks
  • Paused walks
  • Marches
  • Paused marches

With team sport athletes, this is your bread and butter. The majority of team sport athletes—unless they have a track background—will struggle at first getting these positions down. I have quite literally seen NBA athletes struggle with these concepts at first. Something as simple as dorsiflexion at the ankle can be something you find yourself yelling about all the time. But, forcing them to slow down and feel those positions will speed up that learning curve tremendously.


Video 1. The A-March, used to establish posture and positioning for sprinting.

2. Force Drills

You cannot talk about sprinting fast without talking about putting force into the ground—this is where the rubber meets the road. We take our posture and positioning and then attempt to apply force into the ground efficiently. A few examples of these would be:

  • Exchanges (single, double, triple)
  • Single side marches
  • Wall Exchanges (single, double, triple)

For team sport athletes, this is where you will start to see some breakdown of what you worked on in the earlier drills. But this time they have reference points and cues you have established with your posture drills. Especially for football players, once you tell them to do something with power, they will tense up. Constantly reference one or two points of emphasis from the posture drills and reinforce the necessity to maintain those positions.

You cannot talk about sprinting fast without talking about putting force into the ground, says @CoachJacobDubU. Share on X

Recalling and helping your athletes make that mental link is vital to bridging that mind–movement connection.


Video 2. The double-exchange drill, focusing on a violent switching action of the limbs.

3. Rhythm Drills

Finally, rhythm drills are where we add pace and varying rhythms to the postures and positions we established with our previous set of routines. Getting to a confident posture and position is one thing, but now you need to challenge your athletes to maintain it by adding or changing the rhythm.

Sprinting is a naturally rhythmic movement; therefore, we must address the ability to have some type of rhythm. If you can dance well, these will come a bit easier. Some basic rhythm drills are:

  • A-Skips
  • B-Skips
  • A-Runs/High Knees
  • Dribbles

All of these sprint progression drills will challenge your athlete’s ability to establish a rhythm and maintain their posture and positioning through that rhythm. So, be prepared to look for more breakdowns in posture or position when you progress to these drills. Their CNS is attempting to solve the more complex problem of how do I take all of the posture drills and start to translate them to sprinting.

Be prepared to look for more breakdowns in posture or position when you progress to rhythm drills, says @CoachJacobDubU. Share on X


Video 3. The A-Skip drill to improve rhythm and timing in sprint training.

This order is exactly how I progress my intra-session technique progression. Each session, I will touch on one or two of each of these drill-types, depending on the day’s goal. For example, an acceleration day early in the training cycle may feature two posture drills and two force drills. And on a max-velocity day, I may use two posture drills and two rhythm drills. By simply categorizing the drills, I can begin to create a fluid progression that builds on itself—this allows me to see what adaptations I need to prime for that day and pick my sprint progression drills accordingly.

Next, inter-session progression!

Progressing the Drills

There are three rules I will follow here, and I take zero credit for these—they are a combination of concepts I picked up from Hunter Charneski and one of my mentors, Adam Menner. These rules are simply ways to guide your thinking and see how things can start to fit together:

  • Slow to Fast (Pace and Rhythm)
  • Short to Long (Distance, Contacts, etc.)
  • Soft to Hard (GCT and Surface)

Again, these are guides not laws, so don’t take them as such. Also, make a note to treat these as relative terms and not absolutes. These can be followed for both your intra- and inter-session progression, so let’s break them down.

Slow to Fast

This is simply pace and rhythm, starting with your slower-paced and less complex drills and working to your faster-paced and more complex drills. Focus on slowing down the movement to allow your athletes to feel, correct, and understand their actions. This is exactly what we discussed in the above section. A sample intra-session progression could look something like this:

  1. Paused Wall A-Walk
  2. Wall A-March
  3. A-Skip
Focus on slowing down the movement to allow your athletes to feel, correct, and understand their actions, says @CoachJacobDubU. Share on X

Now, after doing that series for some time, you may look to progress to new exercises. Again, work off what you had and progress to a faster or more complex drill; however, don’t be afraid to progress laterally as well, as in the drill can go from a wall march to a stationary march. You still progressed, but are working on the same concepts. Your next progression may look like this.

  1. Wall A-March
  2. Single Exchange
  3. A-Run/High Knee

Relatively simple idea. The primary usage is being able to mentally and visually understand the placement and purpose of each drill within the context of sprint progression training as a whole.

Short to Long

This one is straightforward, but is often overlooked. Start with shorter distances and progress to longer distances—or, if you track ground contacts, fewer contacts to more contacts. The biggest benefit to following this rule is fatigue management. Fortunately (or unfortunately), I can confirm this as I have experimentally broken this rule. Because team sport athletes have to work so hard to understand and work on achieving the right positions, I have found it drains their CNS. This leaves them depleted by the time you start sprinting—no good.

Just like in lifting, start with a less volume and progressively overload it over time. This is that same concept, and you can get creative with how you choose to do that. Whether by contacts, distance, or time, adding a little bit here and there over time will build an ability to withstand fatigue. Mind you, I never do more than four drills in a day. As I said before, the mental focus team sport athletes need to put into these is draining enough, you only want to focus on a few concepts at a time. Here is an example of one of my go-to progressions for technique drills:

Progression Chart

Especially with technical work, I will always add volume with sets before distance. The reason being that it just gives your athletes time to rest a bit. Again, team sport athletes tend not to be accustomed to these movements if they haven’t done them elsewhere.

Especially with technical work, I will always add volume with sets before distance, says @CoachJacobDubU. Share on X

Soft to Hard

This rule references ground contact and the relative stress and force applied to each during a drill. For example, a walk or marching drill will have “softer” ground contacts than a skipping or running exercise. Again, the main reason for having this rule is to manage fatigue. Occasionally, we can underestimate the actual amount of stress that simply doing technique drills can have on an athlete. Especially if you look at all that is required to perform something as simple as a quality A-Skip—include the number of reps you can get in a 10-yard distance, and it adds up quickly.

Within a single session, this also acts as a way to prepare the tissues and tendons before they get to the actual work. Starting with walks and marches (which are a lot easier on the body) before getting into your skips will act as a warmup for the warmup. The benefits of progressive overload are well documented and can be applied for sprinting as well.

The benefits of progressive overload are well documented and can be applied for sprinting as well, says @CoachJacobDubU. Share on X

Putting it All Together

We have all been there: working something because we read “you gotta do these if we want to get our athletes better!” I have even caught myself working six to eight sprint drills in a session because “the kids need more exposure to get the technique down.” But that was not the issue—quite the opposite, in fact. I was overdoing it because I had not categorized and established the adaptations I was specifically looking to achieve. Once I implemented this strategy, my athletes and I began to work more in sync and understand the principles we were looking to accomplish.

When you start to put everything together, categorizing and having a few guidelines on how to progress makes programming an easier task. You can begin plugging in drills and asking yourself, where does it fit? Does it build on a previous adaptation? And so on. By doing so, you can take something that, initially, may have seemed overwhelming and make it far more digestible.

Since you’re here…
…we have a small favor to ask. More people are reading SimpliFaster than ever, and each week we bring you compelling content from coaches, sport scientists, and physiotherapists who are devoted to building better athletes. Please take a moment to share the articles on social media, engage the authors with questions and comments below, and link to articles when appropriate if you have a blog or participate on forums of related topics. — SF

Breast Stroke

Applying a High-Low Autoregulation Model for Swimming

Blog| ByRoss Garner

Breast Stroke

Swimming is a sport known for high yardage, two-a-day practices, and long hours in the pool. The grind of swimming is a source of pride, and if you’ve ever swum laps, you can appreciate the sport’s incredible difficulty. Holding your breath and exerting max effort is hard enough but doing both at the same time is a whole different ballgame.

For most swim coaches, the key to success is yardage and time in the pool, which has inspired coaches to use long yardage at submaximal efforts to train and develop swimmers. But when it comes to how the body adapts, this may not be the best approach for improving swim speed. Short distance swimmers are sprinters, and they need to swim as fast as possible for as long as possible. Fortunately, there are new approaches to make this happen.

What Is the High-Low Training Model?

Charlie Francis created “The High-Low Training Model” to develop world-class sprinters. This model divides training into high-intensity and low-intensity days while avoiding medium-intensity days. The goal of this model is to maximize speed and power adaptations on high days while increasing work capacity and recovery adaptations on low days.

Francis High Low Model
Figure 1: Charlie Francis’ High-Low Model zones and adaptations.

High-intensity days are anything greater than 95% of your best time, middle-intensity days are between 76% and 94%, and low-intensity days are less than 75% (as shown in the chart above). Personally, I believe we can use efforts over 90% for our high-intensity days because younger athletes will struggle with producing consistent efforts over 95%.

I believe we can use efforts over 90% for our high-intensity days because younger athletes will struggle with producing consistent efforts over 95%, says @coachrgarner. Share on X

If you’ve worked with athletes before, you know that speed and power can be hard to develop and that improving them requires allocating a significant amount of time. Speed must be trained constantly because it will start to detrain within 5 ± 3 days (See figure 2). This means we need to train speed at least twice a week to improve this quality. With this model, we will have three high and three low days during the week, with the seventh day being a rest day.

Training Residuals
Figure 2: Training residuals.

The key to running a high-low model is to make sure our highs are high, and our lows are low. When I talk about this model with coaches and watch them implement it, their highs are often not high enough, while their lows are not low enough. Instead, something closer to the middle ground occurs (76%-94% of a best time or measurement), which defeats the purpose of this model. We end up creating an environment where athletes accumulate stress that is too stressful to recover from within 24 hours, therefore inducing minimal improvements in performance.

When stressing the body, we want to send a clear message to the brain. On high-intensity days, we want the body to be fast and powerful. On low-intensity days, we want the body to recover and improve capacity. By doing this, the body can optimally adapt to the stress we place on it. If we work in the middle-intensity zone though, the body does not know if we want it to be fast, slow, or powerful.

When stressing the body, we want to send a clear message to the brain…If we work in the middle-intensity zone, the body doesn’t know if we want it to be fast, slow, or powerful, says @coachrgarner. Share on X

In addition, all athletes have a certain bandwidth in terms of their ability to handle this middle-intensity zone. Some handle it better than others, and this zone is not nearly as trainable as the high and low zones. As a result, adaptations from the middle-intensity zone are minimal, which wastes time. We want maximal adaptation to the stresses we place on athletes, and they want the same.

Swimming and Track Are Brothers in Sport

Swimming and track share a multitude of similarities. Both sports feature short- to long-distance events, and everything is timed. If swimming and track coaches wrote down how they prepared their athletes, the lists would be hard to tell apart. Coaches use a variety of technique drills and distances to improve technical ability, speed, and capacity. Athletes perform specific drills to improve skill transfer—think pull-ups for swimming or bounding for sprinting—and the list of comparisons goes on. If asked what their main goal of training is, I am willing to bet most coaches in both sports wouldn’t hesitate to say: “Improving speed.”

Track coaches typically fall into two philosophies: high-volume-based or high-intensity-based. High-volume coaches believe that running for longer distances will help their athletes run faster and win races. High-intensity coaches believe sprinting or running at high intensity for shorter distances will improve speed. More often than not, swim coaches fall into the category of high volume: they believe that if their swimmers can handle more yardage, their swimmers will be faster.

This leads to a critical question that I ask myself all the time: Are my athletes successful because of what I’m doing or in spite of what I’m doing?

Autoregulation: The Key to Consistent Adaptations over Time

Before getting into the details of high- and low-intensity days, we first need to understand autoregulation, which I first learned about from Dietrich Buchenholz’s (DB Hammer) The Best Sports Training Book Ever! and Cal Dietz’s Triphasic Training. Autoregulation means that we base training on how we feel each day. This could be based off perceived effort, time, or outputs such as jumps or bar speed. This works perfectly with swimming because it is a stopwatch-based sport. Everything is measured, which means we know exactly how an athlete is feeling.

Autoregulation works perfectly for swimming because it is a stopwatch-based sport. Everything is measured, which means we know exactly how an athlete is feeling, says @coachrgarner. Share on X

Coaches across the country disagree on the amount of volume swimmers need on a given day or week to cause positive adaptations. By autoregulating training, our swimmer’s daily performance determines the amount of volume they do day-to-day. This means our athletes get the exact amount of volume they need, as well as what they can handle, to push the adaptations we’re looking for.

Remember, the goal for our training is to make them faster in the future, not to make them tired just to be tired. Speed work can only be done when our swimmers are fresh and recovered from prior workouts. If we use too much volume at the beginning of the week, we will leave performance improvements on the table for later in the week. Worse yet, we will weaken their performance on race day.

How does autoregulation work? On each day, the coach determines the percent drop-off for the day. What does percent drop-off mean? This refers to how much our athletes can “drop off” or slow down before they are done training for the day. Normally, we want around a 5%-10% performance drop-off per training day. This equates to 90%-95% of their best time.

We may find that some athletes can handle larger drop-offs than others and be able to recover within 48 hours. For example, swimmer A can handle a 3% drop-off, while swimmer B can handle an 8% drop-off. Due to logistics, we may not be able to individualize our training, which is understandable, but we should still make some mental notes on how well our athletes handle specific drop-offs.

When we begin using autoregulation, it’s wise to start out using a 5% drop-off and see how our team responds. As previously stated, we may need to lower the percent drop-off depending on our team and training schedule. The more we practice, the lower the drop-off. The less we practice, the higher the drop-off.

Weekly Practice Layout

The weekly practice layout will alternate between high and low days. As strength and conditioning coaches, we should also align our high and low days with the practice plan. This puts a greater emphasis on each day but also sends a clear signal to the body that today is a high- or low-intensity day. Remember, we want the highs to be high and the lows to be low. On our high days, we should work on strength, power, or speed qualities. On low days, we should pursue aerobic or recovery-style training.

Below is an example of a six-day training week following the high-low model.

Timing
Figure 3. Six-day training week.

High-Intensity Days: The Details

The key to high-intensity days is performing sets that are greater than 90% of our best time with complete rest in between. As stated previously, I think 90% is useful for most athletes out there. If we want a higher-quality day, then we may want to use 95% instead. This all depends on our athletes, our situation, and what our goals are. See figure 4 for proper work-to-rest ratios based on our work interval.

Energy System Development
Figure 4: Energy system development.

What does 90% of a best time look like? If our athlete hits a PR for the day at 25 seconds, then they cannot swim times slower than 27.77 seconds. If we used 95%, then times would need to be under 26.23 seconds. However, if the swimmer sets a new PR later in the workout, then we now use that number as our drop-off. For example, if they swam 25 seconds on their second set and then 24.5 seconds on their fourth set, we would use 24.5 seconds as our new PR for the fifth set.

This can also be applied to a jump height or sprint time in a workout. If we are looking to individualize our swimming program, then each athlete would perform as many repetitions as they can until they miss their required time or until practice time expired. This means some athletes swim three reps while others hit eight.

Drop Off Formulas
Figure 5. Drop-off percentage formulas

As previously stated, we may not want to individualize it this much—if not, we can begin tracking our swimmer’s times to see where most of the team drops off. Once we find this number, we can simply assign a fixed number of sets for the day and proceed. For example, if we performed eight sets of 50-meter sprints and found that most of our team dropped below 90% of their PR time on the fifth set, for our next practice we could assign five sets and call it a day.

As a side note, in the weight room I regularly have athletes set PRs on their last set of jumps or sprints (we do 5–6 total sets each day). If I can, I like to have my athletes leave on a PR or close to it because it builds buy-in to the program.

The tricky part of these days is that our swimmers may not “feel” like these are hard days because they are not gasping for air or their muscles are not straining with each stroke. Most come from a background of high yardage, and that is all they know. Remember, high intensity is referring to nervous system stress, which is often a hard concept for athletes to grasp (think central versus peripheral fatigue). Make sure you take the time to explain the differences between high- and low-intensity training because this will help with buy-in.

High-Intensity Days: Time Brackets

I first read about time brackets from The Best Sports Training Book Ever! and Triphasic Training as well. These brackets refer to specific time zones where one of the three energy systems is predominately active. The body’s energy systems operate based on how long you are straining during a set.

The alactic system is used when training for 15 seconds or less. The glycolytic system works between 15 and 60 seconds. The aerobic system is trained when straining for 60 seconds or more. In other words, peak speed, power, and strength are trained under 15 seconds. The capacity to handle more speed, power, and strength is trained between 15 and 60 seconds. Your ability to recover and breath more efficiently improves when training more than 60 seconds.

Time brackets are a great way to organize training and provide variation day to day. Figure 6 is a chart that shows an example of 15-second time brackets that could be used for swimming. I use 15-second brackets because they are easy to manage and apply working constraints to.

Capacity
Figure 6: Time bracket intervals for speed, power, and strength work.

The key to high-intensity days is making sure our athletes are completely recovered between sets. As shown in figure 4, our athletes need a 1:10 work-to-rest ratio to be ready for max speed work. This means if they swim for 10 seconds, they need 100 seconds of rest to recover. Now, I believe resting around 60–90 seconds works fine, but the point is we need to give them ample time to recover. Otherwise, we begin entering the middle zone and building up lactate, which is what we are avoiding on speed days. I am not saying we can never go there, but for high-intensity speed days, we don’t want to live there.

When we use distances instead of time, we play a guessing game in terms of energy system development. Although we may not realize it, that is what we are doing when we assign distances: we assume “x” distance will train capacity or aerobic while “y” distance will train speed. By timing sets though, we know exactly what energy system is being stressed.

When we use distances instead of time, we play a guessing game in terms of energy system development, says @coachrgarner. Share on X

Low-Intensity Days: The Details

The goal of low-intensity days is to develop aerobic capacity, improve cardiovascular health, and enhance recovery. These days create a circulatory response within the body, which promotes blood flow and enhances the transfer of nutrients and waste products in the muscle, promoting and optimizing recovery. In addition, by improving cardiovascular health, we lower our resting heart rate. Why does this matter? When we lower our resting heart rate, our heart pumps more blood with each beat. This means our body can work less to accomplish more, creating a more efficient cardiovascular system. In swimming, this is vital.

On these days, we do not need new PRs but can instead reference the athlete’s PR for the week or year. If our swimmer’s PR is 25 seconds, then they must swim 33.33 seconds or slower for low-intensity days. We can also put a time on the clock and have them swim for 20+ minutes at a <75% pace. Within the weight room, this is where circuit training is useful: for example, I like using 20-minute one- to five-rep aerobic circuits.

The focus these days should be on pace and technique or, as many coaches like to say, “feel for the water.” When our swimmers execute these sessions, they should not be gasping for air. Yes, they will be breathing more than on high-intensity days, and their heart rates will be consistently higher, but these sessions should not be something our swimmers dread. The key is to make sure their heart rates do not shoot too high: our goal is 120–150 beats per minute.

Low-intensity days are also great opportunities to incorporate some dryland work. Practices can get monotonous, but dryland work can freshen things up and bring a new stimulus to the table. For example, we can have our swimmers perform 50-meter laps with whatever stroke they like, then get out of the water to perform five pull-ups, five lunges, and five medball slams. Repeat for 20 minutes and get in as many rounds as possible.

We can use whatever we want for dryland: the point is to stimulate our athletes. Remember, it’s all about the heart rate and time bracket. Within those constraints, we can do what we like.

Low-Intensity Days: Time Brackets

The time brackets for low-intensity days are typically greater than 60 seconds, but we can also do submaximal aerobic work for less than 60 seconds. As shown in the previous example, we can assign a 75% pace based on a PR of 25 seconds, because this is considered low-intensity work. As long as the effort is <75% intensity, we can go as short or long as we would like. Again, the key is to get the heart rate between 120 and 150 beats per minute.

Putting It All Together

Here’s an example of what our week can look like. As the coach, we need to decide the swimming events, drills, and variations we perform. We can use boards, paddles, fins, power towers, or whatever we can imagine to generate the adaptations we want.

  • Monday – High
    • Time Bracket = 15–30 seconds.
    • Physical Goal = power capacity.
    • Distance/Stroke = depends on swimmer and average time of event.
    • 5% Drop-Off.
    • Dryland = strength, power, or speed development.
  • Tuesday – Low
    • Time Bracket = 60+ seconds.
    • Physical Goal = aerobic capacity.
    • Workout = 75-second swim, rest until heart rate is below 120 bpm. Repeat for rounds.
    • Intensity = 70%
    • Dryland = aerobic circuit.
  • Wednesday – High
    • Time Bracket = 1–15 seconds.
    • Physical Goal = max speed.
    • Distance/Stroke = 25–50 meters and whatever stroke you want.
    • 5% Drop-Off.
    • Dryland = strength, power, or speed development.
  • Thursday – Low
    • Time Bracket = 45 minutes straight.
    • Physical Goal = aerobic capacity/fat oxidation.
    • Workout = 50-meter swim, 5 pull-ups, 5 lunges, 5 medball slams for rounds.
    • Intensity = 65%.
    • Dryland = aerobic circuit.
  • Friday – High
    • Time Bracket = 30–45 seconds.
    • Physical Goal = speed capacity.
    • Distance/Stroke = depends on swimmer and average time of event.
    • 10% Drop Off.
    • Dryland = strength, power, or speed development.
  • Saturday – Low
    • Time Bracket = 30 minutes straight.
    • Physical Goal = aerobic capacity/recovery.
    • Workout = 5-minute swim, 2.5-minute dryland x 4 rounds.
    • Intensity = 60%.
  • Sunday – Rest

This model is designed for short-distance swimmers to develop speed in the water and create a robust aerobic energy system. Every week we chase PRs, all while ensuring our athletes get the proper stimulus. If the swim coach and strength and conditioning coach are on the same page, this model sets teams up for elite and long-term success.

Author’s Note: I am a sports performance coach with experience training swimmers. I am not a swim coach, but I have developed a framework for coaches to apply the best way they see fit. This model has been implemented by Heath Grishaw and me at Liberty University. Coach Grishaw developed the daily swimming drills, while I implemented the dryland training. Please feel free to contact Coach Grishaw or me if you’re interested in learning more.

Since you’re here…
…we have a small favor to ask. More people are reading SimpliFaster than ever, and each week we bring you compelling content from coaches, sport scientists, and physiotherapists who are devoted to building better athletes. Please take a moment to share the articles on social media, engage the authors with questions and comments below, and link to articles when appropriate if you have a blog or participate on forums of related topics. — SF


Data Detective

High Performance Library – The Data Detective

Blog| ByCraig Pickering

Data Detective

There is an ever-increasing use of—and reliance on—data within sport. This primarily takes two forms:

  1. Coaches and practitioners collecting and analyzing data to inform their decision-making processes.
  2. Coaches and support staff using published (or even unpublished) research to guide their decisions.

This is largely a good thing. Being data-informed (as opposed to data-driven) often means that we can make better decisions, which in turn means that the athletes we work with perform better.

There is a dangerous flip side to this, however. As outlined in the now classic How to Lie with Statistics, we can often manipulate the numbers to support whichever message we desire. This is fine if we have the time and expertise to thoroughly vet the data we’re working with, but in today’s time-poor world, we’re often so rushed that we don’t have time to think—and unfortunately, critical thinking skills are in short supply.

Fortunately for us, Tim Harford of Undercover Economist and Cautionary Tales fame has written The Data Detective (published in Europe as How to Make the World Add Up). In this book, he strives to give us the confidence to use the information we gather to accurately scrutinize the world around us and make better decisions, while also escaping the flawed logic, cognitive biases, and emotions that poison our ability to think clearly. Harford does this through a number of key rules that, while designed for the real world, can be highly applicable to us in sport. Given the increased prevalence of data-derived and -informed approaches in sport, its publication could not have been timelier.

Search Your Feelings

In the Cautionary Tales episode “The Art Forger, the Nazi, and the Pope,” Harford tells us the story of Abraham Bredius. Bredius was a Dutch art collector and historian who was well established as an expert on the paintings of Johannes Vermeer; indeed, Bredius made his name in the 1880s by identifying works wrongly credited to Vermeer. Bredius was highly effective at spotting fake paintings, and in 1937, he published a book identifying 200 paintings incorrectly attributed to Rembrandt. Shortly afterward, Bredius was approached by a lawyer, who sought his opinion on a newly discovered painting called Christ at Emmaus, which was thought to be a Vermeer. Bredius had no doubts; he declared the painting the masterpiece of Vermeer, his best work ever.

Only, it wasn’t. The painting was a forgery, painted only a few months before. Bredius, however, wasn’t the only one who had been fooled; soon after he identified it as a Vermeer, the painting was purchased by a museum for the modern-day equivalent of £10 million. With the benefit of hindsight, art experts today can clearly see that Christ at Emmaus is not a Vermeer, but almost a century ago, Bredius—the pre-eminent art expert of his day—was easily fooled.

The key question to ask ourselves here is why? How can someone with so much expertise be so easily fooled? The answer, writes Harford, is because he almost wanted to be; he let his feelings get in the way of his analysis, making an impartial decision hard to come by.

The lesson here for all of us to heed is that when analyzing data or receiving information, we need to be wary of our current feelings and opinions on the subject at hand, says @craig100m. Share on X

The lesson here for all of us to heed is that when analyzing data or receiving information, we need to be wary of our current feelings and opinions on the subject at hand. Harford writes “we often find ways to dismiss evidence we don’t like. And the opposite is true, too.” This is something termed motivated reasoning; a phenomenon where we use emotionally biased reasoning to make the decision we most desire, as opposed to that which is supported by the evidence. In essence, we believe what we want to believe.

I’ve made this mistake myself. When I was doing bobsled, a common training and testing method was to push a roll-bob—a metal frame on wheels—over a set distance, comprised of a run-in and a timed 30-meter section. One day, training at Loughborough, I broke all the existing national push records, which made me wonder whether I had measured the run-in distance correctly. In my head, there were two competing explanations for my performance:

  1. I was in very good shape.
  2. I had measured the distance incorrectly.

I went with the former because it’s what I wanted to believe. Sadly, I was wrong—instead of the 10-meter run-in distance, I had actually set it up for 15 meters.

Harford suggests that it isn’t necessary to become an emotionless processor of the information we receive, but merely acknowledge the role emotions play in how we understand and filter the information and take it into account when making our decisions. When I hold an opinion, I often ask myself “what information would I need to see to make me change my mind?” Asking myself this before I get the information sets a target, and if that target is hit, I have to update my viewpoint. This doesn’t always mean that I change my mind, but perhaps I hold a given opinion less strongly or search for more information that might make me better informed.

And so, to Harford’s first key point—when presented with a new piece of information:

  • Stop and think.
  • Examine your emotions.
  • Notice if you’re straining toward a particular conclusion.

Ponder Your Personal Experience

Visualization is a common technique utilized by many athletes as a way of practicing performance. A recent meta-analysis demonstrated that across a number of studies exploring its effectiveness, visualization and practice enhanced performance to a greater extent than practice alone. Similar research was around when I was an athlete, so I started to utilize formal visualization training, setting aside a time each day to do so.

For me, it didn’t work—it just became another thing to add to the to-do list, and I found it really hard to get a positive outcome from the time I was spending.

Here, what I was experiencing as an individual was contrasting with what the research suggested I should experience.

This leads us to Harford’s second rule: we need to consider whether the information we’re receiving correlates with our personal experiences, and if it doesn’t, we can explore the underlying data more closely. It’s clear to see how this could be the case in sport; we collect a lot of data related to wellness, for example. Some of this data suggest that the athlete is in a state where they can train and perform optimally, but as the coach, we can see that they are struggling. We might find it hard to quantify why we feel this.

Potentially, it’s something in the way they’re moving in their warm-up, their overall mood and affect, or something they’ve said. This is the value of the coach’s eye, whereby we gain inherent knowledge through years of experience, allowing us to identify patterns and make decisions. This is in line with Harford’s suggestion: when our experiences don’t correlate with the data, we need to look for the underlying reasons why.

This becomes increasingly important when we consider Goodhart’s Law, which states that when a measure becomes a target, it ceases to be a good measure.

Again, I have plenty of examples of this from my own career. In 2010, I became increasingly concerned that my performances were beginning to regress, so I started to carry out much more testing within training. I insisted on using timing gates for everything and measuring bar speed in my major lifts. My belief was that if I performed well in these tests, I’d perform well on the track. I did perform well in these training tests. I did not perform well on the track, having my worst season since I was 17. And this wasn’t all that unexpected based on how I had been feeling; training was a struggle, and I was increasingly fatigued.

Had I placed more weight on my feelings than on the data, perhaps I’d have had more easy days and been more recovered. The flip of this is also true—many times before a personal best performance, I’ve had a bad training session which has been reflected in my testing data. Rather than focus on the measure, I was instead able to focus on my feelings and experience; I knew I was in good overall shape, so I wasn’t too concerned. The key point here is that any data we collect, outside of actual competition performance, is just a proxy—and so we should consider it as such.

The key point is that any data we collect, outside of actual competition performance, is just a proxy—and so we should consider it as such, says @craig100m. Share on X

If we understand the statistics, we actually understand little; we need to be curious about what we experience in the real world as opposed to just on a spreadsheet. Or, as Harford puts it, we need to combine the “bird’s-eye view” of data with the “worm’s-eye view” of experience.

Avoid Premature Enumeration

When we receive a piece of data, it’s crucial that we ask ourselves what it actually means. In my training data example, I was conflating performance in a single test of a single performance aspect with competition performance, which isn’t the case at all.

This becomes increasingly important when we work with data that could be considered binary. Take sports injuries as an example: either you’re injured or you’re not. But we can define “injury” differently. If I have a niggle that is affecting, but not stopping, my ability to train, I might not consider myself injured, while another athlete would.

This becomes important when we’re interpreting injury data between two athletes, training groups, or sporting teams: have they all defined the outcome in the same way or is there ambiguity in a given term? Similarly, the word injury is vague: an athlete who misses a day’s worth of training with a sore foot and an athlete who misses a whole year following surgery could both be said to have experienced an injury—but the magnitude of the differences is huge.

Harford terms this premature enumeration—where we rush to use numbers (or information) before we really understand what it’s supposed to mean. In the increasingly complex world of elite sport, it can often be difficult not just to quantify what is happening, but also to define it—paying attention to both things will make us better able to utilize the data we’re provided with.

Step Back and Enjoy the View

If we collected sprint testing data every training session, we would see a lot of variation between sessions. This could be linked to a variety of aspects: accumulated fatigue, normal daily variation, the presence of training partners, motivation on a given day—the list goes on. Within a given training block—such as a week—we might see a general trend emerging; perhaps we are getting faster or slower.

Regular collection of data encourages us to focus on micro-trends; we become fixated on what we’ve achieved that week. Sometimes, it might be better to take a longer view. If we view our sprint testing data over a year period, the trend is much less sensitive to small, day-to-day variations, giving us a truer overall sense of where we are. If our sprint time is typically tracking downward over this extended period, the training we’re doing is effective. As such, being able to take a step back and view the data collected within the overall context in which we’re operating (which, in athletics, is yearly seasons) likely yields more informative insights.

It’s easy to become hyper-focused on a single metric or a short time period, but sports performance is a long game, and viewing things through this lens enables better decisions to be made. Share on X

Upon getting information or data, Harford suggests taking a step back, adopting a wider lens of analysis, and attempting to put the information in the context of the bigger picture. It’s easy to become hyper-focused on a single metric or a short time period, but sports performance is a long game, and viewing things through this lens enables better decisions to be made.

Get the Back Story

If you toss a fair, standard coin, there is a 1 in 1,024 chance of getting 10 heads in a row. Here’s a video of Derren Brown, the British illusionist, achieving it. This isn’t a trick, per se; Brown does actually achieve the 10 consecutive heads from 10 tosses—it’s just that it took him nine hours of continuous coin tosses to achieve this run of 10. This is an important point: things that have a low probability can happen when you carry out the action many times. Something that has a one in a million probability of occurring likely will happen at some point during a million attempts.

Remembering this is very important when it comes to placing the results of scientific studies into context. I’ve written about this before, when I explored p-hacking and HARKing as drivers of the replication crisis. As a massive oversimplification, scientific researchers often use something called a p-value to determine whether a result is significant or not. What the p-value tells us is the probability of achieving a result this extreme and the null hypothesis being true—essentially, the probability of saying there is an effect when there isn’t.

The typical p-value cut off is 0.05, which means that if p = 0.05, there is a 5% chance of us getting the results we see and there actually being no effect. For any individual study, this is quite a low threshold, but 5% represents a 1 in 20 chance. That means that, for 20 studies in a given area, we would expect one study to report an effect being present when there actually isn’t one.

This is generally fine when there are lots of studies on a given topic; we can look at the overall literature base, see what most studies find, and then make up our minds. It becomes more of an issue when there are fewer studies in this area. If there are only two studies, with conflicting results, it can be hard to understand which study is “correct.”

This becomes even more of an issue when publication bias comes into play. Publication bias is where studies that report an effect are much more likely to be published than those that report no effect. This is problematic, because if we have 20 studies, 19 showing no effect, and 1 showing an effect, the 1 showing an effect may well be published, while the others wouldn’t be.

Harford presents an example that demonstrates the ridiculousness of this situation. In 2011, esteemed psychologist Daryl Bem published a paper that demonstrated humans could predict the future. This is very interesting but also highly implausible; you and I both know that humans cannot predict the future. Bem’s methods were replicated in other studies, all of which failed to demonstrate evidence for humans being able to predict the future.

However, the journal that published the original research refused to publish these studies, stating that it did not publish replications. There is no suggestion that Bem fabricated his results, merely that his findings were chance occurrences that we would expect to happen less than 5% of the time—but, of course, if you refuse to publish what normally happens, what happens 5% of the time looks true!

Ask Who Is Missing

One of the first articles I ever wrote, back in 2015, was on understanding sports science for coaches and trainers. In that article, I wrote “the results of a study are only applicable to the type of people recruited to the study.” A common goal of research is to find results that are generalizable: if we take the intervention used in a given study and apply it to the broader population, do we get the same results?

Within sports science, this is a bit trickier. Arguably, we don’t want generalizable results, because we don’t work with the general population—we work with elite athletes. Such athletes, by their very definition, are rare, and this creates a problem for sports science researchers: how do you convince an elite athlete to try something that might not make them better, just for your study? This is obviously very difficult (I speak from experience), which is why most sports performance research is either observational in nature, or if interventions are utilized, the participants are often either university students or recreational or sub-elite athletes. This is important to keep in mind when evaluating information—are the participants in the research you’re utilizing similar to the ones you’re working with?

This is important to keep in mind when evaluating information—are the participants in the research you’re utilizing similar to the ones you’re working with?, says @craig100m. Share on X

This is even more of an issue if you coach women. A 2019 paper identified that fewer than 20% of all sports science research papers included any female participants and fewer than 5% were comprised exclusively of females. Again, this causes us issues in taking the results of a given study into practice, because men and women are vastly different.

This is why Harford’s sixth rule—ask who is missing—is especially important within the sports performance research sphere, because the answer could well be the very people we’re most interested in. This doesn’t mean we have to discard all sports performance research, but as discussed above, we use science, and scientific research, as a method of informing our practice; it’s a starting point from which we experiment and adapt, as opposed to the answer to all our questions.

Demand Transparency When the Computer Says “No”

We live in the era of big data, and we use progressively more complex methods of analyzing this data to get answers that inform our decisions. An increasingly common approach is the use of machine learning, where we “teach” a computer to provide answers based on the information we put in. This creates an issue: we often get answers, but we don’t understand why the computer came up with these answers—which makes it very difficult for us to spot when a mistake has been made.

A great example of this comes from when researchers taught a machine learning model to differentiate between dogs and wolves in photographs. To do this, researchers show the computer a picture of either animal, allow it to guess, and then tell it whether it is right or wrong. Over time, the computer “learns” how to differentiate dogs from wolves.

In this case, the researchers could reverse-engineer how the computer was deciding between dog and wolf: if the picture had a white background (i.e., snow), the computer labelled the animal as a wolf; if it didn’t, it labelled it as a dog. This is a clever way of the computer being able to distinguish between dog and wolf when presented with photographs, but it’s obviously not very useful in the real world—the solution the computer comes up with is not broadly applicable, because what it has “learned” is essentially to cheat.

This is becoming an increasingly big problem in sports performance due to the use of “black box” algorithms in proprietary equipment/software, such as those that measure training load. As companies develop products that promise to predict certain outcomes, they naturally want to protect their invention—as such, they don’t let us know how their models come up with a given answer, or why. This means we can’t evaluate them for ourselves; we must either blindly trust the machine or ignore it.

For reasonably mundane decisions, such as whether an athlete should train today or not, that’s mostly fine—but you can see how this could become an issue when it comes to selection. How can you explain to a player why they’re not selected if you don’t understand it yourself? What if the computer is wrong?

This is the crux of Harford’s seventh rule: do not simply trust that algorithms do a better job than humans. But similarly, also recognize that humans have their own biases and mental shortcuts—just because an algorithm is flawed doesn’t mean a human would do better. The key here is to strike a middle ground—understand that both computers and humans have bias, keep an open mind, and try to critically appraise all information you receive before acting on it.

Remember That Misinformation Can Be Beautiful Too

One of my favorite books is Information is Beautiful, by the graphic journalist David McCandless. As per the title, information can be beautiful—but so can misinformation. A cleverly designed infographic or catchy framing of a piece of information can draw us in, even if the underlying data and facts are not accurate or are being misrepresented. The ease of sharing this information and infographics on social media, in turn, allows this misinformation or incorrect information to spread, and before we know it, the wrong message is being accepted.

A cleverly designed infographic or catchy framing of a piece of information can draw us in, even if the underlying data and facts are not accurate or are being misrepresented, says @craig100m. Share on X

Harford has some key guidelines for us to keep in mind when it comes to interpreting beautiful visualizations:

  1. Check our emotions: A well-designed graphic can invoke an emotional response, so acknowledging and being aware of this is crucial in our interpretation of what we’re seeing.
  2. Check we understand what the infographic purports to show. Is context being given? Can you access the source data?
  3. While it isn’t the case with many of the infographics used from those in sports performance, we must consider that someone might be trying to persuade us to think in a certain way, and given their meme-like qualities, infographics are almost uniquely effective at doing this. 

Keep an Open Mind

Changing our mind is uncomfortable, particularly if we have forcibly set out our stall (declared our intention) previously. But the best thinkers update their beliefs based on the evidence—academic and real world—that they receive. This links into the work of Phil Tetlock, popularized in Superforecasting (which is a High Performance Library topic for another day).

Tetlock’s research suggests there are two key types of people: hedgehogs and foxes. Hedgehogs typically have one big idea, which they use to explain the world around them. They are a specialist in that area of knowledge, are very confident in their predictions, don’t consider counterarguments, and don’t like to change their predictions once made. Foxes, on the other hand, tend to be multidisciplinary thinkers. They have broad knowledge of different areas, and they are more open to criticism or alternative views, more cautious in their predictions, and more likely to update their predictions as they get more information.

Harford writes that very often we make mistakes not because the information we need is not available, but because we refuse to change our mind based on this information, says @craig100m. Share on X

Foxes are much better at making predictions about the future because they’re consistently updating their mental model of the world as they receive new information. Being willing to change our mind, ultimately, makes us better thinkers. In summing up this chapter, Harford writes that very often we make mistakes not because the information we need is not available, but because we refuse to change our mind based on this information.

The Golden Rule – Be Curious

Harford’s final rule, the one that supersedes all his other “commandments,” is the golden one: Be curious. Look deeper and ask questions; undertake active inquiry as opposed to blind acceptance; seek out wider sources of information.

By following the key rules outlined by Harford in The Data Detective, we can all become more informed consumers of information and data, allowing us to make better-informed decisions to support the performance of the athletes and teams we work with. Given the abundance of information out there today, these are important lessons—and something we should all aim to get better at.

Since you’re here…
…we have a small favor to ask. More people are reading SimpliFaster than ever, and each week we bring you compelling content from coaches, sport scientists, and physiotherapists who are devoted to building better athletes. Please take a moment to share the articles on social media, engage the authors with questions and comments below, and link to articles when appropriate if you have a blog or participate on forums of related topics. — SF


Football Injury

On the Front Lines of Athlete Rehab with Mitch Gill

Freelap Friday Five| ByMitch Gill, ByCody Hughes

Football Injury

Mitch Gill has been an athletic trainer with Northside Hospital’s Sports Medicine program for Dacula High School in Dacula, Georgia, since 2013. He has experience at the college level as well, with time spent at Emory University, Austin Peay State University, and the University of New Orleans. Mitch is also a strength and conditioning coach in the private sector and has worked with athletes of all levels to prepare them for their respective sports, and he has worked with the baseball team and women’s basketball team in the weight room at Dacula HS.

Freelap USA: In what areas do you believe the athletic trainer can provide value for the athletic and physical development process?

Mitch Gill: One of the biggest areas the athletic trainer could provide value is in the evaluation process, both initially and throughout the entire progression. Whether that is helping with some sort of formal screening process with the strength and conditioning coach or when the screening throws up a red flag on an athlete or a group of athletes, they can help provide a one-on-one approach to help address these issues in the athletic training room or paired with the strength and conditioning program itself. It can be hard for a strength coach to individualize for each athlete, just because of the sheer number of athletes that may come through their weight room, especially at the high school level.

Athletic trainers are also on the front lines of the care for injuries, so they can see firsthand the trends that are occuring within each sport. Working side by side with the strength coach, they can assist the strength and conditioning coaches in developing a program that will hopefully keep the athletes on the field of play.

Freelap USA: In your experience with injuries, what implementations/strategies are needed to help mitigate the common injuries you see in your training room?

Mitch Gill: Monitoring of sleep, nutrition, and recovery would keep a lot of kids out of the athletic training room. These are the three areas that the young athlete neglects most often and that have been linked to increased injury rates.

Today’s athlete is bombarded from all sides with school, social, and home life stressors on top of the stress of preparing and participating in their sport. Often, things like sleep and nutrition are neglected for any number of reasons. A simple daily survey could help sport coaches, strength coaches, and athletic trainers keep an eye on their athletes and make sure they are provided with the education or support that they need but may not be getting elsewhere.

Monitoring of sleep, nutrition, and recovery would keep a lot of kids out of the athletic training room. These are the three areas that the young athlete neglects most often, says @mgill52. Share on X

Freelap USA: What tips would you give coaches on how to work harmoniously with an athletic trainer? 

Mitch Gill: Communication. It can be an integral part in getting the athletic trainer’s buy-in to your program.

Find ways to make them feel like they are a part of your program, and they will go to bat for you and often be your biggest cheerleader with the athletes you may work with.

Ultimately, you both want what’s good for the athletes, so why not work as a team to help provide that? It could be as simple as establishing some sort of process with the athletic trainer on injury reporting. This will help make sure that the athlete is doing what needs to be done to help the injury heal, as well as allow you as the strength coach to adjust your program for that athlete while they are in the early stages of rehab.

Freelap USA: In your experience, what are youth athletes most commonly lacking in development that can help reduce the chronic injuries and pains they are dealing with today?

At the high school level, we lack a baseline to set the initial goals or inform decisions on rehab for youth athletes who experience traumatic or chronic injury to return to play, says @mgill52. Share on X

Mitch Gill: We currently have a generation of youth athletes who lack a robust toolbox of movement skills. They have begun to specialize so early in sport and didn’t have the childhood of climbing trees or playing tag in the woods that earlier generations were afforded. These athletes have become really good at just one or two things and lack the range of human movement skills that would help them be a more resilient athlete. Some of my healthiest athletes at the high school level were the athletes playing multiple sports growing up and even into high school.

Freelap USA: What is missing in the “return to play” processes for youth athletes who experience traumatic or chronic injury?

Mitch Gill: At my level in a high school, it is the lack of a baseline. This baseline can help set the initial goals of rehab or inform decisions on rehab and programming based on compensations, imbalances, or weaknesses to help address any underlying reasons for why the injury may have occurred in the first place. 

This could be a project that the athletic trainer and strength coach could work together on to help build the buy-in I mentioned earlier. Athletic training and strength and conditioning should go hand in hand in the return to play process to help create the best outcomes possible for the athlete.

Since you’re here…
…we have a small favor to ask. More people are reading SimpliFaster than ever, and each week we bring you compelling content from coaches, sport scientists, and physiotherapists who are devoted to building better athletes. Please take a moment to share the articles on social media, engage the authors with questions and comments below, and link to articles when appropriate if you have a blog or participate on forums of related topics. — SF


Youth Speed Training

Coaching and Cueing Speed Training for Youth Athletes

Blog| ByBrandon Holder

Youth Speed Training

Coaching speed can seem like a complex task: the act of sprinting involves more muscular activation and mental stimulation than most exercises, and this is even before considering the tactile involvement of evasion and change of direction required by field-based sport athletes. To sprint optimally, the body needs to be in sync with the mind and both must be operating on all cylinders. With this heightened level of movement, it requires more than just the typical verbal or visual cue to get your message across. Speed needs to be developed primarily through tactile learning and performing.

Coaching sprinting and speed movements to younger athletes—those who have yet to fully develop mentally or physically—is a different challenge as well. Physically, the process is highly dependent on where the athlete is in terms of puberty and where they lie on the PHV chart. This will affect whether their nervous systems are even prepared to deliver the high-power outputs needed to run fast. Regardless, working with youth athletes is a wonderful opportunity because they should be exposed to general athletic movement patterns such as sprinting, jumping, skipping, throwing, change of direction movements, and more on a consistent basis.

So, while you may not be able to create the next junior Olympian, you can give the athlete a better chance of reaching their full athletic potential when the time does come.

The Building Blocks of Speed

There is no such thing as “perfect running mechanics”: coaching speed is not a one-size-fits-all scenario. As coaches, we need to stop putting athletes in boxes and labeling them with no apparent strategy in mind. We cannot create robots who only function under perfect conditions while we (and they) analyze every aspect of their movement.

There is no such thing as ‘perfect running mechanics’—coaching speed is not a one-size-fits-all scenario. Share on X

I have actually trained some of these types of robots—kids who were taught there is only one way to run and only one way to jump and land, and anything else is wrong. I also can honestly say that those kids did not win many races or games, especially those involving multidirectional movement, deceleration, and quick thinking.

I do, however, believe we should equip our athletes with the building blocks to successfully develop their speed. Traits such as relative body strength, coordination, rhythm, and timing should be a priority during this early development. We should also help set them up for success by putting them in movements and situations where they can get the most out of their training and see positive outcomes: movements they can navigate on their own, easy tasks given by their coaches, and tactile cues that help get those messages delivered (while also being fun!).


Video 1. The medicine ball punch run fits the above description perfectly. While the objective of the movement is to improve frontside running mechanics, you don’t have mention this to the athletes.

In the medicine ball punch run, simply explain to the athletes that they’re going to hold the medicine ball at their belly button and sprint down the field with the intent to have their knees driving toward the medicine ball.

Leave it at that, and then base the next step on how they perform the drill in real time.

As coaches, don’t go into a movement expecting an athlete to succeed or fail and don’t mention the difficulty beforehand. This is something I had to learn the hard way, as I would talk about how we were going to be doing a difficult movement before showing it. That put negative, preconceived thoughts into the athletes’ minds that it was going to be hard, and few had success. Now, I just teach those same movements and let the athletes find out on their own, which has resulted in a much higher success rate and less hesitation to perform.

As coaches, don’t go into a movement expecting an athlete to succeed or fail and don’t mention the difficulty beforehand. Share on X

Youth athletes don’t particularly care about the why of their training if that why is being defined with an anatomy textbook. It is important to provide logic and information instead, so you establish that you understand what you’re speaking about while explaining things in language they understand.

So, if you want an athlete to come out in a better position for acceleration, don’t tell them to come out of their sprint position at a 45-degree angle with their chin tucked while focusing on effective forward propulsion. Instead, I would say something simple like “explode out of your starting position like an arrow being shot out of a bow.” Then I would set them up in a drill such as a push-up or falling start where they would achieve the body positions that I’m preaching about with little to no difficulty.


Videos 2 & 3. For athletes working on better acceleration positions, in addition to cueing in terms they understand, I set them up in a drill such as a push-up or falling start. This ensures they achieve the body positions that I’m preaching about with little to no difficulty.

Over the years, I’ve discovered that the less I say during coaching, the better my athletes seem to do. Along with increasing my listening and observation of the athlete’s movements, I have made my coaching cues simpler, more direct, and delivered in a manner that’s appropriate to my audience. Limiting the noise and focusing on what is most important should be the first step when coaching the youth athlete. These kids are usually clouded in their minds already and adding to that is just going to make your job more difficult.

Limiting the noise and focusing on what is most important should be the first step when coaching the youth athlete. These kids are usually clouded in their minds already. Share on X

Communication via Cueing

If you’ve ever sprinted as hard as physically possible, you know how the world begins to close in around you. You can’t hear anything and are unable to make anything out visually other than the final target.

Now, imagine running as hard as physically possible and having someone screaming at you—screaming multiple complex motor tasks for you to fix while you’re sprinting at full speed.

KNEES UP! TORSO UPRIGHT! ARMS AT 90 DEGREES! CHIN TUCKED!

How do you think that would affect your results and end goal? Most likely, this added noise would create an increase in anxiety and doubt. Screaming more cues at our athletes leads to the opposite of success for the task they are trying to complete. The less we say, the more our message can be heard.

Instead, build this highly complex task of speed and sprinting by presenting information in chunks or using a block system of learning. Pick one aspect of sprinting for that session and execute movements to help enhance that single aspect. For example, if we decide to work on the starting position of the sprint, then we would specifically put our athletes in situations and movements to enhance aspects of the starting position (such as obtaining a positive shin angle and optimal push-off of the starting line).


Videos 4 & 5. Starting positions such as a deep bend or half kneeling position will help enhance the athlete’s abilities to obtain the shin angle we are cueing, and the athletes can also feel it. I always tell them to really exaggerate these starts because if they can successfully perform them, imagine how easy sprinting out of a standard two-point starting position will be!

Athletes in field-based sports—or sports that require them to perceive and read information rapidly, gather information about defenders, recognize where they are in space, and so much more—must constantly be playing that sport and be exposed to situational-based learning scenarios. This can also be presented in a block system.

When the athlete just needs to focus on one specific task, they can excel more at that single element. This method of learning is effective with kids because they are not being pulled in several different directions. Youth athletes are like sponges: they soak up information that we present to them; we just have to do so in a manner that allows them to get it. Also, many of the aspects of speed and sprinting are dependent upon one another. If an athlete doesn’t understand or can’t even get into an effective starting position to lead into a sprint, then why would other aspects such as arm mechanics matter?

Youth athletes are like sponges: they soak up information that we present to them; we just have to do so in a manner that allows them to get it. Share on X

Once a particular block of movement has been covered, when that movement is revisited, it is an easier and faster process for the athlete to review. Categorizing these blocks or clumps of information for sprinting will allow you to begin laying out a more manageable training structure.

Structuring a Program

Training will be dependent upon several variables—such as the length and time of the training as well as the current abilities of the athletes you have—but even so, training will follow a similar layout to allow clearer, more focused goals and teaching progressions.

The four sections of a training program we use are:

  1. Preparation.
  2. Technical movements.
  3. Application movements.
  4. Games.

1. Preparation
The preparation section should be structured loosely to allow freedom of several different movement patterns. If there is a highly specific day of training with a more experienced athlete, then you can begin incorporating more specific movements to meet the muscle action and needs of the session.


Video 6. Movements such as various skips, hops, crawls, rolls, and throws can be part of this preparation section.

2. Technical Movements

These movements are used to enhance the main focus or application of that session—they don’t refer to technical as being directly tied to running mechanics per se, but movements to better set up the athlete for that day.


Video 7. Applying drills that emphasize the session’s primary focus helps the athletes recognize how all speed training can be interconnected.

An example would be utilizing the lateral load and lift drill above before coaching athletes to do a speed movement involving curved running. Both involve force being produced through the outside edge of the foot and will put the body into particular positions involving aggressive knee angles. This first drill will help the athlete better feel the movement in a more controlled, stationary movement. Doing this helps with the cues because the athletes now feel what they are attempting to accomplish before they work to apply it.


Video 8. The forward low walk forces the knee to continuously roll into positive shin angles as the athlete walks down the field.

Another example of a technical movement would be utilizing the forward low walk (above) when working to develop acceleration. This would be a good movement to pair with the deep knee bend or half kneeling start sprints mentioned previously.

3. Application Movements

These movements are where we are trying to get the most bang for our buck by focusing on a single, specific task. This is where we implement the movements to set our athletes up for success: movements where they don’t have to think about execution, and where we almost trick them into doing it with limited cueing.

Using these movements accomplishes a great deal. It allows for a high success rate of performing the movement, as well as a high transfer rate. At the end of the day, we don’t want the athletes to get better at drills, we want them to get faster to increase their potential for sport…and have fun doing it!


Video 9. If the lateral wall drill was used to enhance the athlete’s abilities for the day, we would then want to utilize an application drill for the athletes to apply, like curve running. 

4. Games

The final portion of the session is going for a more realistic and competitive application through participation in games. Coach Nick DiMarco from Elon University has popularized these games throughout training by breaking them into categories to fit certain goals:

  • Chase.
  • Mirror.
  • Dodge.
  • Score.

Each category has its own unique objective for the athletes to excel. When getting kids to compete in these games, I have seen athletes who had previously shown little to no ability or enthusiasm during the session completely crush everyone during the game.

When athletes compete during the games, it requires no cueing whatsoever. This is their time to take the wheel and do what makes them most successful. As coaches, we should place our athletes in the appropriate situations to get the most out of them, whether this be by adding constraints to the games to make it more challenging for athletes who seem to have little struggle or to tip the scale in the favor of those athletes who can’t otherwise manage to win. We’re not just going to give them the victory but create a situation in which success is at least actually possible.


Videos 10-12. Multidirectional chase, 2v1 chase, and flag “wrestling” are examples of chase and dodge games.

Making It All Work

A couple of examples of full-speed sessions are:

1. Multidirectional-Focused Speed Session

Preparation:

Technical Drill: Lateral wall drill load and lift 2-3×5 each

Application Drill: S-curve sprints 4-6x 15-20 yards

Games: Multidirectional chase

2. Acceleration-Focused Speed Session

Preparation:

Technical Drill: Low forward walks 2-3×10-20 yards

Application Drill: Deep knee bend sprints 4-6x 10 yards

Games: 2v1 Chase (any linear chase drill)

Coaching youth athletes through a speed session should not only be a fun experience for them, but for you as well. Share on X

Coaching youth athletes through a speed session should not only be a fun experience for them, but for you as well. We must set our athletes up in movements and in a system where they can be successful, in which coaching is direct, simple, and done in an appropriate manner for the kids to comprehend. Feeling and performing will always trump the chalkboard talks, and while everything has its place when attention spans are fading, we have to communicate quickly and effectively to have more engaging, meaningful, and fun sessions!

Since you’re here…
…we have a small favor to ask. More people are reading SimpliFaster than ever, and each week we bring you compelling content from coaches, sport scientists, and physiotherapists who are devoted to building better athletes. Please take a moment to share the articles on social media, engage the authors with questions and comments below, and link to articles when appropriate if you have a blog or participate on forums of related topics. — SF


Long Jump Drills

Drills for the Win – An Individual Approach

Blog| ByRob Assise

Long Jump Drills

Coaching is the ultimate problem-solving activity. Each athlete is their own unique puzzle, but none is a standalone if the athlete is part of a team. Some puzzles are simple—the colors and patterns make it easy to see which pieces go together. Others are extremely complex, littered with shades of gray and chaotic patterns. To further add to this difficulty, we are dealing people, not stiff pieces of cardboard, so what happens when you feel you have pieces that should go together but they don’t quite fuse? What steps can you take to link physical output in training with physical performance in competition?

In the first part of this series, I outlined the new approach I used for our jumpers at Homewood-Flossmoor High School during the unique 2021 track and field season. Five drills were presented in detail, and links to additional drills addressed in previous articles were given.

Due to a shorter season length and a higher percentage of athletes being new to the jumping events, I decided to increase the frequency of these drills during “pre-practice” sessions—planning these two to three times per week with the hope of fast-tracking the learning curve of our athletes. The drills each athlete would complete were assigned individually, based primarily on what I found to be the most significant gaps in their technique. While it is the norm for athletes to improve upon their performances over the course of the season, I felt a portion of their improvement was due to what was being addressed by the drills—in other words, the specific part of a jump addressed by the drill was transferring to a full jump when it was performed.

If the appropriate drills are chosen for an athlete, improvements can occur, even if they are several generations removed from the actual event, says @HFJumps. Share on X

I would like to reiterate that I feel the most valuable learning occurs when athletes improve in activities that are as few generations (if any) as possible removed from the actual event. However, if the appropriate drills are chosen for an athlete, improvements can occur, even if they are seven generations removed. In this article, I will lay out the drills chosen for a specific athlete: while the previous piece addressed the why, what, and how of those drills in terms of the entire jumps crew, this post will take a similar approach but narrow it down to a single athlete.

Background

The athlete in question—Jamar McMillian—was a senior in 2021. During his four years in our program, he always tested well in comparison to his peers:

    • From 2018-2021, Jamar was always in the top 10 in our program (100+ athletes) in the countermovement jump (with arms). His best jump was 35.5 inches (via a Just Jump Mat).
    • In 2020 and 2021, one of our fun “sprinter challenges” was to see who could obtain the highest peak power utilizing a 1080 Sprint. Jamar was almost always at the top of this competition.
    • For the strength crowd, Jamar could deadlift more than three times his body weight. His isometric belt squat (crane scale) was almost twice as much as our other jumpers.
Progression Table
Figure 1: While bests are often the focus, the progression of the average often tells a more complete story.

Although many of these numbers indicate an opportunity for elite performance at the high school level, I struggled to get Jamar’s ability to shine through in the jumping events. He was always a significant contributor, but his performances in competition did not match the outputs he had during testing. His bests of 1.11, 1.06, and 1.03 during his freshman through junior years correlate with an ability to jump well over 20 feet, which did not happen. Here is his four-year long jump progression:

Jump Progression
Figure 2: Jamar participated in the sprints during all four years in both opens and relays. He triple-jumped prior to high school and had the most opportunities to compete in that early in his career. This, coupled with a brief flirtation with high jump, is why the number of long jump marks was low during his freshman and sophomore years.
    • Jamar started off the 2021 season strong, with a 19-9.75 on a chilly day (April 24). While he continued to progress, I was not convinced that he could be a state qualifier in long jump (22-2) until May 15, when he jumped 21-5.75 in wet, mid-50° F conditions. He continued to participate in long and triple jump through our conference meet, as I was hopeful for a big PR in triple. Unfortunately, that did not transpire, but sometimes having it all means not having it all at once!

After conference, we decided not to pursue triple jump any further. Jamar’s individual physical plan was divided into two categories: gait correction and take-off correction. I will not discuss the items that were only specific to triple jump.

Gait Correction

Most of a jump attempt occurs on the runway, and if an athlete is not maximizing their ability through quality acceleration and upright mechanics, they will hit a false ceiling in the actual jump. Jamar was a tough case to crack. As seen in the video below, his feet rotate externally prior to ground contact.


Video 1. While slight external rotation is common in sprinters, in Jamar’s case it was definitely excessive. Chris Korfist used the analogy of his feet looking like oars turning over in water. This video was taken in the summer of 2020.

External Rotation
Image 1. Excessive external rotation of the foot.

Before getting into specifics, I should point out that the gait correction strategies I use are highly influenced by Chris Korfist. Living in the Chicago area has allowed me to see him present more than 40 times, through Track Football Consortium, Reflexive Performance Reset, and ITCCCA.

I have also made numerous trips to his legendary basement: in 2020 (Jamar’s junior year), Chris became a part of our track and field staff, which made every day a learning experience. His ability to see issues in sprinting in real time and create correction measures is incredible.

Gait Correction #1: Ankle Rocker

During Jamar’s freshman and sophomore years, one item given to him for “homework” were ankle rocker exercises. Ankle rockers are where the shank rotates forward, resulting in dorsiflexion to help propel the body forward. Dr. Shawn Allen of The Gait Guys gives six compensation patterns for people who are unable to reach the needed amount of ankle rocker in this video. Jamar’s compensation was the second compensation addressed (external rotation of the foot).

The main exercises given to Jamar were ankle rocker shuffle and moonwalks, ankle rocker single leg squats, and ankle rocker jumps. Unfortunately, despite thousands of repetitions, this did not solve the issue of excessive external rotation of the foot prior to contact.

Gait Correction #2: Low Lunge Walks

Fast forward to Jamar’s junior year. Chris Korfist was now on our staff, and we began the season with A LOT of time devoted to low lunge walks. I have sung the praises of this exercise in multiple pieces, and I’m going to do it again. The benefit of this drill is that it takes the athlete through all four phases of rocker (heel, ankle, forefoot, toe) in gait. I truly believe this was the missing link for Jamar.

A common thought here would be: Was all the time spent on ankle rocker his first two seasons a waste? Could one just fast forward to this exercise? My assumption is that the ankle rocker work set the table for him being able to transfer the low lunge work to his running gait. So, it definitely was not a waste. That being said, if I could hop into a DeLorean with a flux capacitor, I would have Jamar perform ankle rocker exercises and low lunge walks concurrently.

If you watch an athlete perform the low lunge walk, the way they initiate and lose contact with the ground is the same way they do it in running gait. It tells the story before the story is told. Share on X

Another side note of the low lunge walk: If you watch an athlete perform the exercise, the way they initiate and lose contact with the ground is the same way they do it in running gait. It tells the story before the story is told. I am still waiting for a case where this is not true. This exercise has been an absolute game-changer in gait assessment and correction.

Gait Correction #3: Spring Ankle

Chris Korfist and Cal Dietz partnered to create the Triphasic Speed Training Manual, and a big part of it was what they termed the “spring ankle model.” The lower leg and foot are often overlooked in training, which is probably the strangest aspect of sport training since almost all locomotion is formed from the foot contacting the ground. The spring ankle model involves yielding isometrics, which can eventually progress into overcoming isometrics and other variations. The goal is to get the foot and ankle to be able to handle the forces generated from the whip of the hip. For Jamar, an additional benefit was to get his brain comfortable with the position of pressure on the ball of the big toe without excessive external rotation.

As a side note, I think overcoming isometrics are a training menu item that should be used with care due to their high intensity. However, I feel that the foot and ankle being able to handle load is so important that I would be comfortable using the spring-ankle exercises in an overcoming isometric style with most populations after time spent in the yielding style.

Gait Correction #4: Wickets with Arms Across the Chest

Many coaches use wickets to help improve running technique. A subset uses wickets with various arm positions. Another subset is able to dial in those variations based upon what the athlete presents in gait.

Because the arms act as a counterbalance, we eliminated them (arms across the chest) during wickets to present a greater challenge to the foot, says @HFJumps. Share on X

Jamar received a steady diet of “hugs” (arms across the chest) during wickets and other plyometric type activities. The reason he was given this specific variation was that by eliminating the arms, a greater challenge is presented to the foot. This is because the arms act as a counterbalance. When the athlete is at toe-off on the right foot, the left arm is back and the right arm is forward, making it easier for the right foot to roll through to the ball of the big toe. Taking away the counterbalance poses a more difficult task for where the issue lies.


Video 2. While different arm positions can be used for all athletes, knowing the why behind them makes them even more valuable.

Gait Correction #5: Exer-Genie with Diagonal Resistance

A by-product of Jamar’s excessive external rotation was periodic toe-offs where he would exit the ground off the fourth and fifth toes as opposed to the first and second. To assist with this “finishing ability” to go along with his improvement in not externally rotating the foot as much, we added exercises (sprints and bounding complexes) with diagonal resistance. This was stolen from Chris Meng via a Track-Football Consortium question and answer.

I really like this variation because it begins with a huge amount of lateral resistance on the left foot. As Jamar gets further away from the Exer-Genie, the lateral load becomes biased to sagittal. The enhanced load puts him into the pattern we are looking for, and then he is able to maintain that pattern in a more realistic setting.


Video 3. The exercise becomes more “realistic” the further he goes.

Gait Correction #6: 1080 Sprint Assistance

Seeing Chris Korfist present and working with him has caused me to view assisted sprints and jump complexes as more of a technical correction tool as opposed to just a training stimulus. Simply put, the assistance causes the body to move faster, which makes the brain feel threatened and have a desire to get the foot on the ground as soon and as safely as possible.

The result for Jamar?

Not enough time to externally rotate the foot prior to contact. This can be seen in the video below during a bound complex (it should be noted that I hypothesize this was even more effective because of all the foundational items mentioned above). Video 5 shows the same exercise with resistance. I included it because it shows that even when Jamar did not feel threatened, external rotation was small. For clarity, while watching videos 4 and 5, focus on the leg interacting with the ground.


Video 4. Assisted bound complex using the 1080 Sprint.


Video 5. Resisted bound complex using the 1080 Sprint.

By the end of the 2021 season, Jamar looked like a different runner—still room for improvement, of course, but much more efficient overall. Here is a video of him during the last few weeks of the season, running in socks. What sticks out to me compared to the 2020 video is his reactivity off the ground.


Video 6. Jamar from the front near the end of the 2021 season.

Take-Off Correction: Anti-Penultimate Box

The anti-penultimate box drill was discussed in the previous article, and it was one Jamar completed multiple times per week. Jamar’s biggest issue in the actual jumping part of long jump had always been too low of a take-off angle. Unfortunately, it is nearly impossible to get quality and consistent jump video at a high school track competition; however, I think the videos below show his improvement in this regard.

Positive change is rarely due to one component, and there are certainly many factors which led to huge improvement for Jamar. Improved sprint speed and sprint technique and an increase in strength certainly played a big role. So did his flight style (free leg extending down instead of forward—a product of thousands of gallops and run-run-jumps). Furthermore, his landing improved because his flight improved because his take-off improved because he was more efficient on the runway. All this being said, I do think that the anti-penultimate box drill allowed him to dial in the feeling of what needed to happen to project himself into the air.


Video 7. Jamar long jumping in 2018.


Video 8: Jamar long jumping in 2021.

Additional Parts of the Equation

Reflexive Performance Reset (RPR): In the fall of 2019, I was invited to preview the beta version of RPR Level 3 Training. My partner was Neuqua Valley’s brilliant head coach, Mike Kennedy. When we were instructed on “the back 5,” Mike mentioned that he felt this method helped Neuqua’s jumpers’ performances skyrocket in 2018. I witnessed this incredible improvement firsthand as Neuqua’s jumpers performed incredibly well down the stretch and were a big reason why they edged us 52-48 in the 2018 state team competition.

Jamar had back issues throughout his career, and toward the end of this past season, they started to flare up again. I had a flashback in a dream of Mike telling me about “the back five,” and we started implementing those specific tests and reset techniques into Jamar’s plan. As so often is the case with RPR, Jamar felt a big difference (his phrase was “I feel like a new man”).

RPR is often a hot topic for debate in the social media world, but at the end of the day, I will take an athlete who feels “like a new man” on the runway over one who feels like an old man every day of the week and twice on Sunday. Whether it is correlation or causation that Jamar’s best jumps happened once we started this could be debated and ultimately never settled, but it certainly did not hurt!

Whether it is correlation or causation that Jamar’s best jumps happened once we started RPR could be debated and ultimately never settled, but it certainly did not hurt, says @HFJumps. Share on X

It would also be wrong of me to not include the fantastic job our athletic training staff (Brad Kleine and Danni Werner) did with Jamar. A basketball player can be 80% and still put up 30 points. In many cases, a track and field athlete at 80% might as well be at 2%. It often takes a village to help get an athlete to the finish line, and we are very fortunate to have a great village!

Maturity: One of the best parts about coaching track and field is that I am able to coach athletes for their entire high school track career. It is extremely rewarding to witness the growth athletes undergo, not only as athletes, but even more so as people. Jamar was always a dedicated athlete. When given specific “homework,” I could trust that he would do it. When given a task to complete during practice that I may not have been able to oversee because I had to work with high jumpers, I was always confident that Jamar would take care of business.

Jamar’s dedication to his craft allowed me to navigate what was and was not working with his training. The truth is, during his four years, I had more misses than makes in his programming, but because I could trust his adherence to the program, it allowed me to identify the misses earlier and make adjustments. Jamar was the driving force behind the interventions resulting in improvement in performance, and all credit should be directed toward him.

A by-product of Jamar’s dedication was the disappointment that came along with not achieving desired results. During Jamar’s first three seasons, if his first event did not go well, it was a significant challenge for him to put it behind him. This often snowballed into him struggling in the other events in which he competed that day. This was also seen during a series of jumps: If his first two jumps did not go well, it was probable that the remaining jumps would not go well either.

In 2021, there were multiple times where Jamar showcased the ability to put what he deemed a bad attempt or subpar performance in the rearview mirror and not let it impact what he did moving forward. While I had many conversations with him during the tough times, the most credit in this area should be given to his mother, who was a constant source of support. While the incredible improvement in long jump was a pleasure to watch, Jamar’s improvement in being able to effectively deal with adversity was, without question, my favorite part of the 2021 season.

Jamar does not know this, but during our sectional competition, he was well short of the state qualifying standard after his first two attempts. I texted our coaching staff and said, “not looking good for Jamar.” In previous years, Jamar would have let the first two attempts send him into a downward spiral; however, Jamar was able to keep his poise and exceed the qualifying mark on his third attempt.

I was never happier to eat my words than the ones I had sent in that text to our coaching staff!

Since you’re here…
…we have a small favor to ask. More people are reading SimpliFaster than ever, and each week we bring you compelling content from coaches, sport scientists, and physiotherapists who are devoted to building better athletes. Please take a moment to share the articles on social media, engage the authors with questions and comments below, and link to articles when appropriate if you have a blog or participate on forums of related topics. — SF

  • « Go to Previous Page
  • Page 1
  • Interim pages omitted …
  • Page 51
  • Page 52
  • Page 53
  • Page 54
  • Page 55
  • Interim pages omitted …
  • Page 164
  • Go to Next Page »

Primary Sidebar

Latest Posts

  • Building a Better High Jump: A Review of Stride Patterns
  • How We Got Our First Sprint Relays to State in Program History
  • Science, Dogma, and Effective Practice in S&C

Topics

  • Changing with the Game
  • Game On Series
  • Getting Started
  • high jump
  • Misconceptions Series
  • Out of My Lane Series
  • Rapid Fire
  • Summer School with Dan Mullins
  • The Croc Show
  • track and field
  • What I've Added/What I've Dropped Series

Categories

  • Blog
  • Buyer's Guide
  • Freelap Friday Five
  • Podcasts

COMPANY

  • Contact Us
  • Write for SimpliFaster
  • Affiliate Program
  • Terms of Use
  • SimpliFaster Privacy Policy
  • DMCA Policy
  • Return and Refund Policy
  • Disclaimer

Coaches Resources

  • Shop Online
  • SimpliFaster Blog
  • Buyer’s Guide
  • Freelap Friday Five
  • Coaches Job Listing

CONTACT INFORMATION

13100 Tech City Circle Suite 200

Alachua, FL 32615

(925) 461-5990 (office)

(925) 461-5991 (fax)

(800) 634-5990 (toll free in US)

Logo of BuyBoard Purchasing Cooperative. The word Buy is yellow and shaped like a shopping cart, while Board and Purchasing Cooperative are in blue text.
  • Facebook
  • Instagram
  • Twitter
  • YouTube

SIGNUP FOR NEWSLETTER

Loading

Copyright © 2025 SimpliFaster. All Rights Reserved.