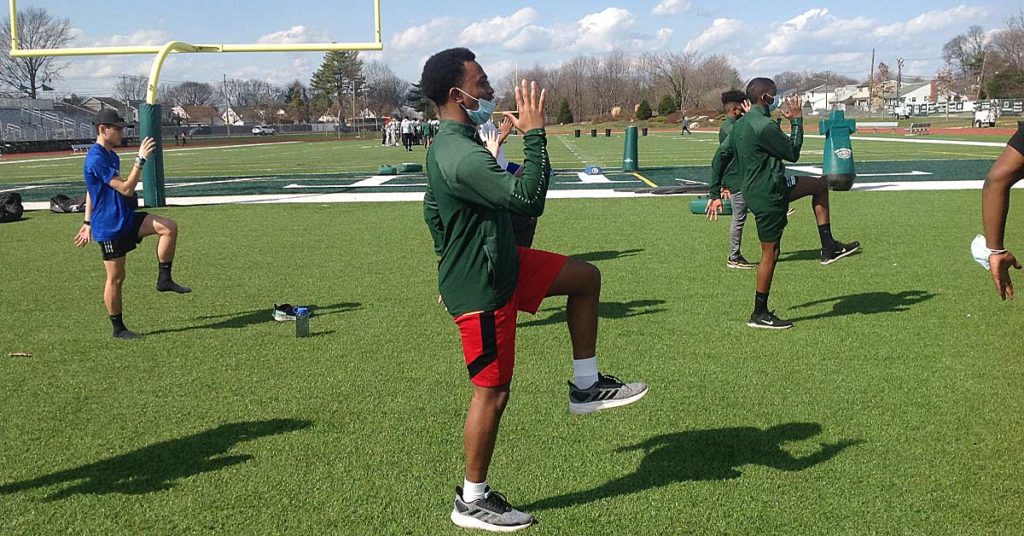
As a high school track and field coach, my greatest challenge is creating understanding. Sprinting, when done well, looks effortless; explaining how to make it look that way, however, is much harder. In this article, I’m going to name and explain five of my favorite coaching cues from Dr. Ken Clark, a leading authority on speed training.
I recently attended a Ken Clark Speed Clinic—for those unfamiliar, Clark is an Associate Professor in the Department of Kinesiology at West Chester University in Pennsylvania and is a sought-after consultant for many elite athletes and performance organizations. I’d read his research and articles, plus listened to his lectures, but this was my first time observing him coaching athletes in real time.
What did I learn? That your coaching is only as good as your cueing.
This is especially true in speed training. If you’re a track coach, you know that if an athlete can understand and perform a drill, they’re more likely to apply those mechanics when they’re hauling down the track. Drills don’t make you fast, but they are a reference point—when they are executed with purpose and quality, they will lead to mastery of a skill and consistent, high-level performance.
Drills don’t make you fast, but they are a reference point—when they are executed with purpose and quality, they will lead to mastery of a skill and consistent, high-level performance. Share on XMy Five Favorite Cues from Dr. Ken Clark
How can you help athletes improve in executing drills? Provide them with stronger, more relatable cues.
1. Arm Switch: “From Eye Socket to Hip Pocket”
Less is more when it comes to coaching drills for arm drive. The next time you’re drilling arms, ask your athletes to stand, eyes forward, with their right hand at their eye socket and their left hand at their hip pocket. On your command, they switch from eye socket to hip pocket while driving the elbow back. Put this drill in before you start the dynamic drills, or any time the athletes need a reminder of arm mechanics.
Begin with 10 command reps on each side, then progress to five seconds of continuous switching. This is a great drill to include in the warm-up.

2. Three-Bucket Pose: “Don’t Spill the Water”
Teaching an athlete correct body posture while sprinting can be challenging, especially at the high school level. Why is correct sprint posture important? When a sprinter can maintain this posture, it allows for proper and efficient force application, by decreasing collapsing at ground contact, of the ankles, knees, and hips. Applying optimal force with good posture translates into fast times on the track.
What is good sprint posture? It is when the athlete stands upright and tall with the head, neck, and shoulders directly on top of the hips with a neutral pelvis. The problem with trying to coach this position is that athletes tend to flare their ribcage and arch their low back in an effort to get “tall.” They may feel like they are in a good position, but they aren’t. When the athletes maintain this posture during training, it may result in injury over time and slower speeds.
What’s the solution? The three-bucket pose with the cue, “Don’t spill the water.” Using this drill in the warm-up gives the athlete a reference point without having to over-explain. I implement this drill after mobility and activation and before dynamic drills.
Where do we start?
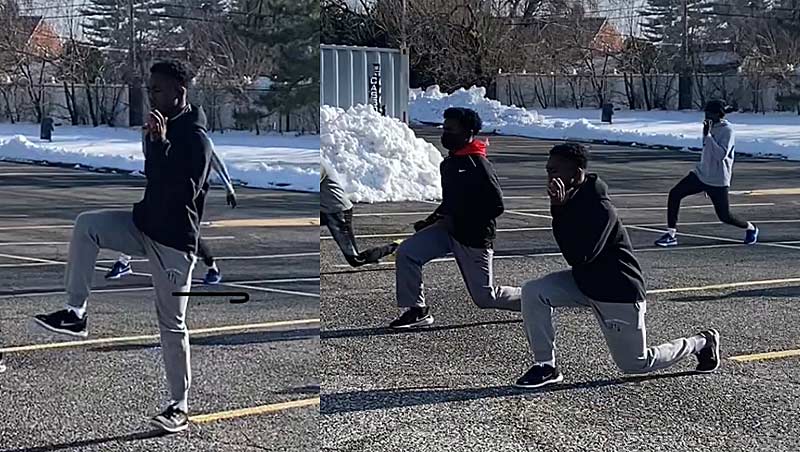
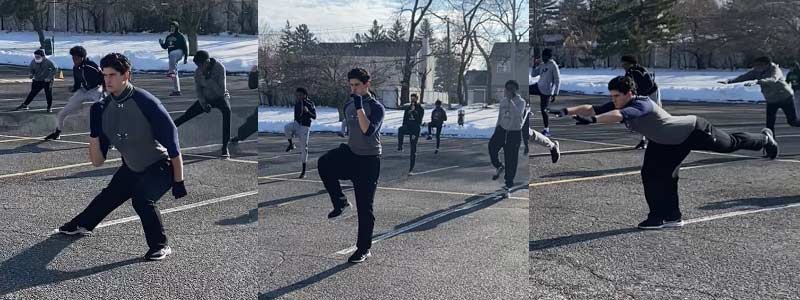
Have your athletes stand in rows facing forward, with arms bent and elbows about 90 degrees. With the right hand about eye level and left hand by the hip, have them stand on a stiff left leg with the right leg bent at 90 degrees. Tell them to imagine they have one bucket of water on their head, one on the knee that is bent, and a third hanging by the handle on the foot. Once in position, cue the athlete to stand tall and “Don’t spill the water.”
This pose forces the athlete to feel a strong sprint posture. If you have an experienced sprinter in your group, use them to demo: One picture is worth one thousand words!
Progressions: If your athletes are new to this drill, have them begin practicing 10-second holds on each leg. When that’s no longer challenging, have them hold the pose with their eyes closed. You can progress this further by adding:
- Front lunges.
- Reverse lunges.
- Lateral lunges.
- Sprinter-skydivers for three reps on each leg.
(Always exploding back into the three-bucket sprint pose.)
3. A-March: “PUNCH the Ground”
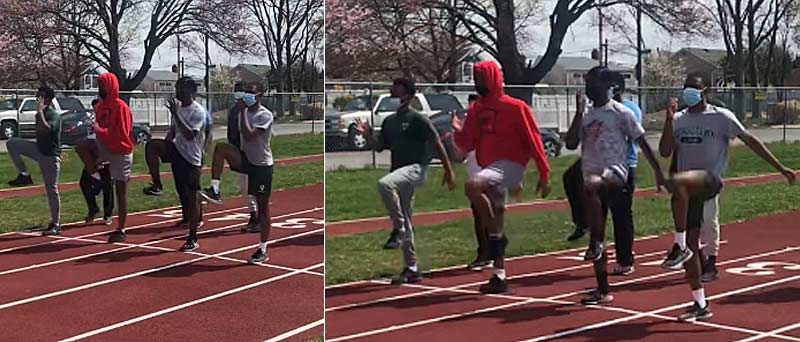
The A-march is a fundamental drill that teaches proper sprint mechanics. When performed correctly, it keeps the body in a straight line from the bottom of the foot through the top of the head, referred to as a post position. The drill reinforces for athletes the need to keep the knee up, the heel pulled up beneath the knee, and the toe pulled up into dorsiflexion. As the athlete begins to march, they must strike the ground with force. Slowing this drill down and focusing on mechanics can lead to better sprinting and faster times.
The problem most coaches experience is that once the drill becomes more dynamic as speeds increase, form is sacrificed—and when the form is lost, so is the purpose of the drill. Consistency with cues and form is key. Cue the athlete to “PUNCH the ground” with their foot strike: Punching implies force without much more explanation.
Where do we start?
Begin with the basics and have the athlete standing in the post position (a post is straight up and down and another good cue):
- Neutral pelvis.
- Hip in line with the ankle.
- Keep the head, neck, and shoulders relaxed.
Sprinting is running as fast as you can upright and relaxed—not an easy concept to convey—and the more it’s reinforced in drills, the more reference points an athlete will have.
Sprinting is running as fast as you can upright and relaxed—not an easy concept to convey—and the more it’s reinforced in drills, the more reference points an athlete will have. Share on XGuide them to march in place while maintaining this position (see image 4). Their arms should move in a one-stroke movement, forward to back, with relaxed hands and working in harmony with their legs. Each time the marching leg goes down, cue them to “PUNCH the ground” with the part of their foot where the spike plate would be.
Start with 10 reps in place, followed immediately by a 10-meter march. Repeat this twice. When the athlete can easily perform this drill, progress into:
- A-skip for 10 meters x 2.
- A-run for 10 meters x 2.
Continue to reinforce striking or punching the ground with an upright posture.
4. Thigh Switch: “Smash the Glass”
How do we cue knee drive for effective and productive acceleration? What is acceleration?
Acceleration is about applying force down and back into the ground for the first 20-30 meters of a sprint race. For high school athletes, I use the example putting your foot on the gas and getting up to speed or taking off like a jet plane (it is a gradual rise of the hips as the athlete comes out of the start.) The knee drive must be forceful in order to drive down into the ground with force to propel forward with speed.
At the start of the sprint, the athlete is in a four-point or block start at about 45 degrees. Coming out of the start into the acceleration requires not only horizontal but also vertical force relative to body weight. Explosive hip action, hip flexion, and extension are key in acceleration. High school athletes sometimes have a difficult time with forceful knee drive coming out of the start, which will lead to a poor acceleration phase.
Where do we start?
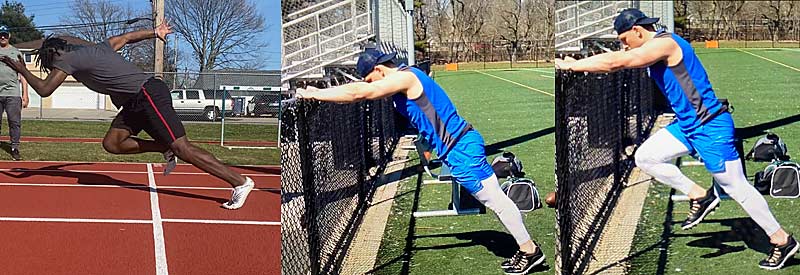
I love the thigh switch drill and use it on the acceleration-focused days—the exercise gets the athlete in a position where they can better understand knee drive and explosive hip flexion. To start, have the athlete push into a wall with their body at a 45-degree angle (see image 5). This will be the position for the set command. There should be a straight line from the head and shoulders through the hips and down to the ankle. The athlete’s arms are extended into the wall like they are trying to push it down. Now they have an understanding of body position for acceleration!
Next, on the go command or a clap, have them bring their right knee up at a 90-degree angle to the torso and cue“smash the glass” (the leg of the knee that is up should have the look of a “Z” in this position, and often they will have the foot cast out in front of the knee). Instantly, they will understand it takes force to smash glass, which is knee drive and also hip flexion.
Start with isometric holds for 10 seconds each leg. Once they understand the concept and can hold the correct body position, progress to:
- One-leg drive x 5 each leg.
- Wall scissor drill x 5 each leg.
5. Sprint Top End Speed: “Strike”
Now that the prep work is done, the body is primed to get moving fast! Technical build-ups are a perfect way to segue into quality work safely and effectively. We want the athletes to understand that to move fast, they have to apply maximum force into the ground to reach top end speed.
What is a technical build-up, and how do we cue it?
Set up three 20-meter zones on the track with visible cones for a total of 60 meters. Before the athlete runs, explain how fast you want them to run each 20-meter segment:
- 1st: 20-meter acceleration (60%-75%).
- 2nd: 20-meter fly zone (90% +).
- 3rd: 20-meter deceleration.
A good way to explain to the athlete how fast you want them to run in the second (or fly) zone is to tell them close to all out, but not 100%.
This is where athletes should start to understand that when the body is in optimal sprint posture with prop alignment, more force can be applied, just like striking a nail on the head. Share on XCue the athlete during the fly zone to “strike” the ground like a hammer hits a nail on the head. Use the example when you hit it dead on it goes right in the wood—if you hit it from an angle, it takes a few more strikes. This is where they should start to understand that when the body is in optimal sprint posture with proper alignment, more force can be applied, just like striking a nail on the head! You want the athlete to understand that when they strike the ground during sprinting, it must be an aggressive, stiff ground contact to maximize rate of force.
To get the most out of your cues, work on one at a time—for example, during the technical build-ups, repeat the drill 3-4 times and have the athlete focus on only one thing at a time as listed below. Sometimes you have to slow things down first in order to sprint fast.
With each rep, have athletes work on one cue.
- Rep 1: Familiarize drill.
- Rep 2: Posture.
- Rep 3: Front-side mechanics.
- Rep 4: Foot strike.
Making Your Sprint Drills Work for Your Athletes
Drills don’t make athletes fast, but the way we cue them can make a world of difference in the way athletes perform each movement. Cues serve as a reference point for proper sprinting technique and mechanics, which are key to faster times and reducing injury. Since teaching is a part of coaching, learning how to cue drills is a skill.
Drills don’t make athletes fast, but the way we cue them can make a world of difference in the way athletes perform each movement. Share on XWhen an athlete relates to and remembers the cues, it will have a lasting impression on their movement and performance. When you tell the athlete, “strike” the ground, they understand you mean force; when you say, “smash the glass,” they understand knee drive. We should all speak the same coaching language and learn to be efficient with our time and our words. Dr. Clark is a master at this: Use cues athletes can relate to and understand to help them reach the end goal of SPRINTING FAST!
Since you’re here…
…we have a small favor to ask. More people are reading SimpliFaster than ever, and each week we bring you compelling content from coaches, sport scientists, and physiotherapists who are devoted to building better athletes. Please take a moment to share the articles on social media, engage the authors with questions and comments below, and link to articles when appropriate if you have a blog or participate on forums of related topics. — SF


Love the cueing talk/discussion!
How do you distinguish between technique and skill (or do you)? And then the follow up- can skill only be related to the context it emerges in? Like does skill observed in a drill transfer to the full exercize/sport-race or what are the next steps to achieve it?
Sorry for all the questions!