• Skip to content
  • Skip to primary sidebar
SimpliFaster

SimpliFaster

cart

Top Header Element

  • Facebook
  • Instagram
  • Twitter
  • YouTube
  • Login
  • cartCart
  • (925) 461-5990
  • Shop
  • Request a Quote
  • Blog
  • Buyer’s Guide
  • Freelap Friday Five
  • Podcast
  • Job Board
    • Candidate
    • Employer
    • Facebook
    • Instagram
    • Twitter
    • YouTube
You are here: Home / Blog

Blog

Juggling Skill

Juggling: One Skill All Athletes Can Benefit From

Blog| ByJustin Ochoa

Juggling Skill

It’s extremely rare that I’ll make a claim like this one skill can help ALL athletes improve because just saying it out loud sounds like clickbait. But here we are…

I’ll get right to the point. Juggling. Yes, juggling is the one skill that all athletes can benefit from.

There is no one-size-fits-all approach when it comes to the methods with which we train our athletes. Athletes are too different for there to be one best way to do things. This is why I said it’s very rare for me to claim that this one thing can help all athletes. But in the case of juggling, it is actually one of the exceptions.

Before we dive deep into the key benefits—hand-eye coordination, brain development, sport specificity, and motor learning—we must look at the big picture from a 30,000-foot view.

It’s universally accepted that the #1 job of a strength coach is to do NO harm. So, our job is to implement whatever strategies we feel are appropriate to elicit a training response with no harm done to our athletes. This means we must constantly evaluate the risk versus reward of our program.

Juggling is, by far, one of the most harmless training modalities I’ve ever come across, with a significant upside and potential for positive outcomes, says @JustinOchoa317. Share on X

Juggling is, by far, one of the most harmless training modalities I’ve ever come across, with a significant upside and potential for positive outcomes. This is why I feel so confident in saying that, literally, all athletes can benefit from learning this task.

How It All Began

This all started in the gym when one of my athletes randomly started juggling between his sets of deadlifts. I thought to myself, “That’s actually a really good idea.”

In the past, I have played around with vestibular and cognitive challenges as a rest period between sets:

View this post on Instagram

A post shared by Justin Ochoa (@justinochoa317)

One of my favorites was to have the athlete close their eyes, and then throw them two different balls and shout out the name of a color. The challenge was to open their eyes when they heard the color, track the ball, and catch it. I found that these small games had multifaceted benefits.

First, you obviously get the visual and cognitive benefits. But you also get an excellent fatigue monitoring system built into the games. When athletes are more fatigued, their vestibular system won’t be as sharp. They often fumble or drop the ball. As they recover from the set, they start to improve their performance. This indicates that the system is restored and ready for the next set.

Juggling in this context never crossed my mind. Why? Because I couldn’t juggle and had never even attempted to. But something about how easy my athlete made it look that day and how much fun he was having doing it made me want to try.

I tried. And I sucked.

When I try new things and suck at them, you can basically guarantee that I will become obsessed with whatever that thing is until I figure it out. So, I did.

I learned how to juggle, practiced, and eventually got pretty good. And then, my wheels started to turn with ideas on how juggling could be beneficial given some general background of the known benefits. Here are four of those benefits.

1. Hand-Eye Coordination

The most apparent benefit of juggling is the improvement in hand-eye coordination. This also has the most significant impact on sports performance. You’d have to look far to find a sport where improving hand-eye coordination wouldn’t be a benefit.

The most apparent benefit of juggling is the improvement in hand-eye coordination. This also has the most significant impact on sports performance, says @JustinOchoa317. Share on X

Also, beyond sports, improving hand-eye coordination is never a bad idea. This could help with daily tasks such as driving, multitasking, and even using the handheld devices that are such a big part of our society today.

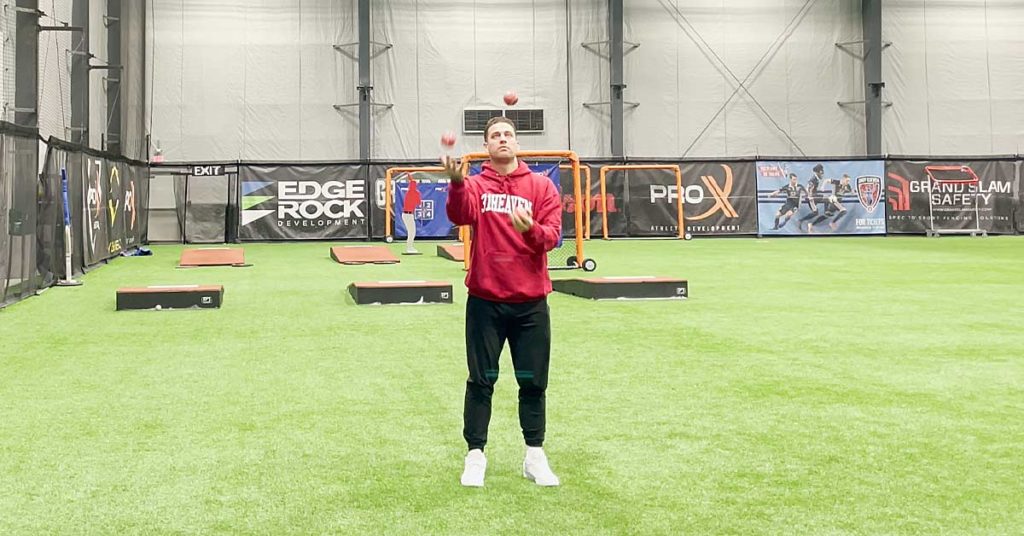
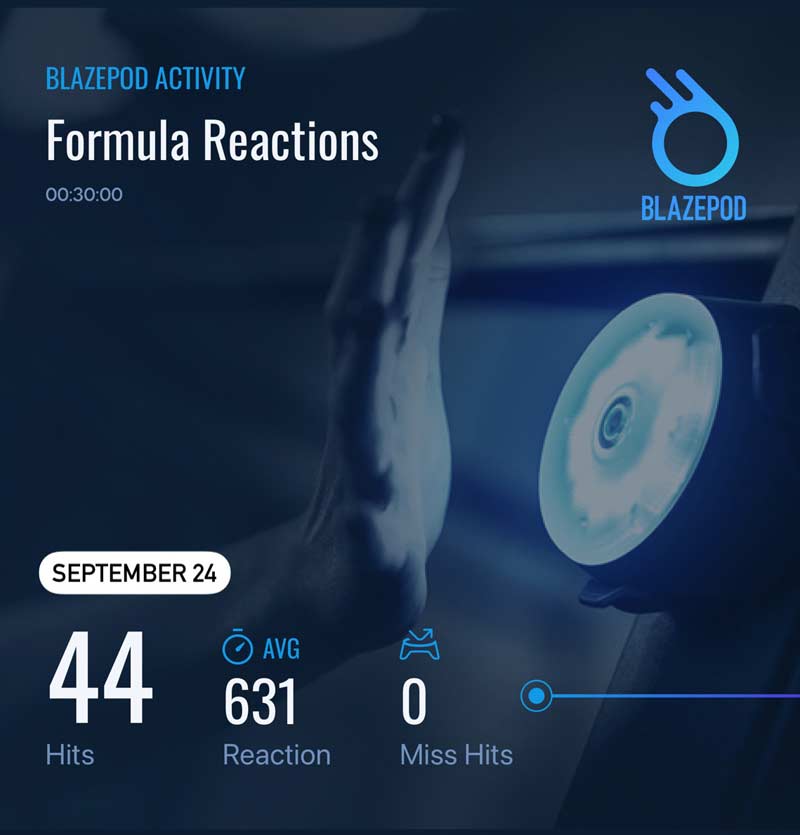
The first day I tried to juggle and failed, I decided to make myself into a case study. I used the Blaze Pod light reaction system to test my hand-eye coordination. This was my report on that day.

Blaze First
Image 1. This is a preset test within the Blaze Pod system. You set up five reaction lights on the wall, and it randomly lights up one light at a time for 30 seconds. When the light illuminates, you hit it as quickly as possible, then another light comes on, and you repeat. The goal is to get as many hits as possible in 30 seconds. This was my score on day 1.

I practiced juggling for 10 minutes a day for one month and then retested. Not only did my juggling skills improve significantly, but so did my hand-eye coordination. I changed nothing else about my life or my training than the fact that I introduced juggling.

Blaze Improvement
Image 2. After 30 days, my score improved from 44 to 50 hits in 30 seconds. My average reaction time dropped from .631 seconds to .559 seconds.

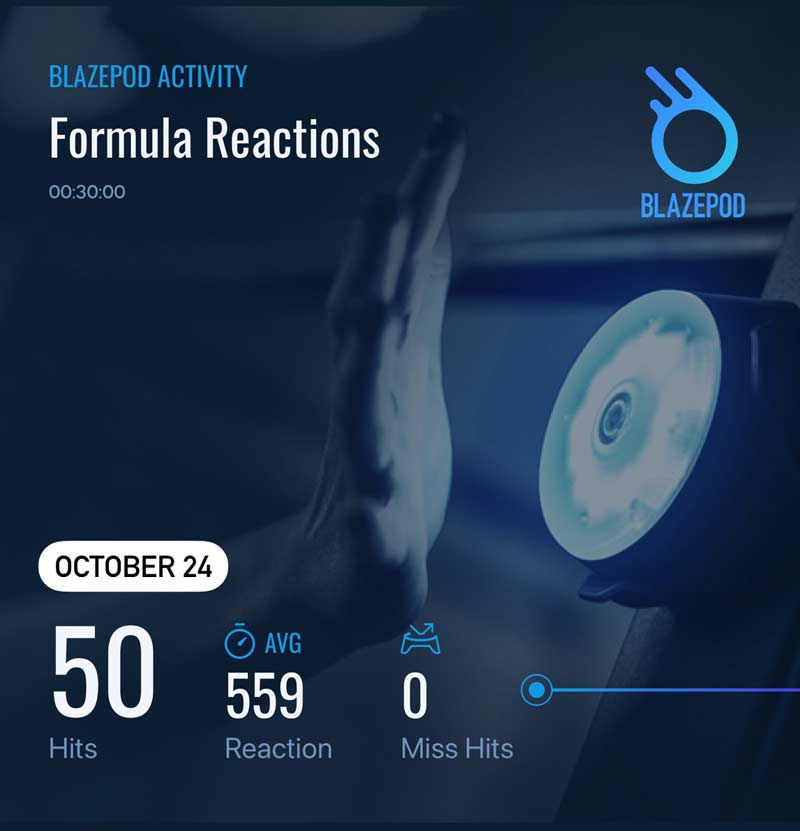
This wasn’t performed in a lab, nor is it a published research project, but it tells me pretty clearly that juggling has positive effects on hand-eye coordination.

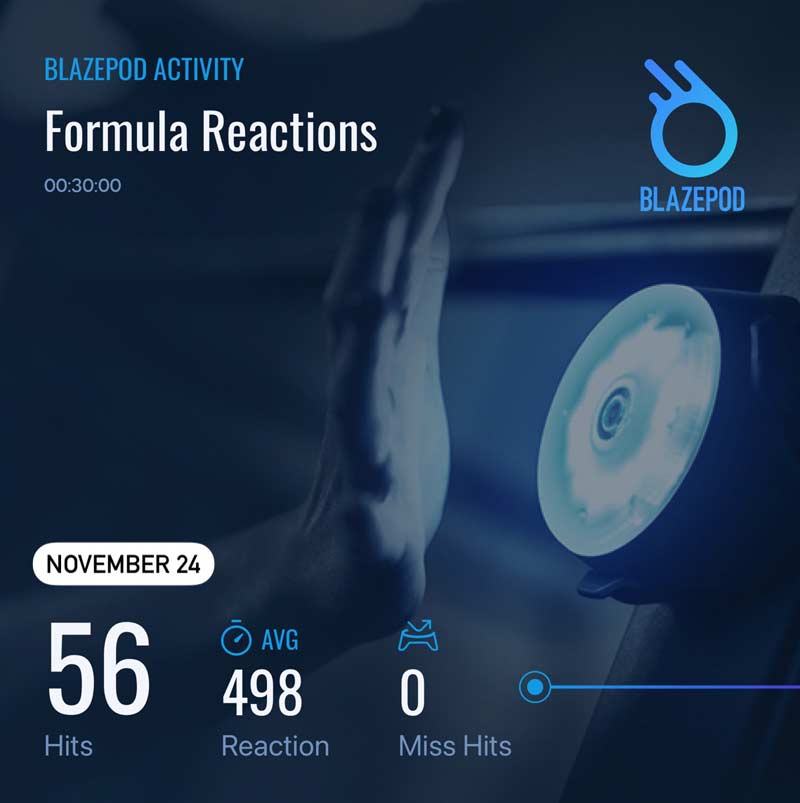
And, just to make sure it wasn’t all newbie gains, I went ahead and went one more month and did another test. Sure enough, I kept improving. This time, my score improved to 56 hits and an average reaction time of .498 seconds.

Blaze Max
Image 3. After eight weeks of juggling 10 minutes per day, my test results improved from 44 hits to 56 hits, a 24% improvement. And my average reaction time went from .631 to .498, which displays a 23.5% improvement in reaction speed. This was very consistent with the progress in total lights hit.

In just 10 minutes a day, accumulating absolute zero fatigue, soreness, or injury risk, I was able to improve a universally sport-specific attribute. As discussed in the introduction, if you don’t have 10 minutes to spare, you can simply work it in between sets or throughout the day.

In just 10 minutes a day, accumulating absolute zero fatigue, soreness, or injury risk, I was able to improve a universally sport-specific attribute, says @JustinOchoa317. Share on X

Furthermore, even though I am a washed-up coach now, I still play basketball at a pretty high level 1–2 times per week with a solid group of ex-college and pro players. Anecdotally, I have noticed myself making much better reads and passes with my nondominant hand—something that truly stands out because I had been dealing with a broken finger on that hand.

This gave me the ultimate confidence to implement this with all my athletes, regardless of sport or age. And they’re all seeing similar results. Many of the skill development specialists in our facility—such as wide receiver coaches and hitting instructors—are also implementing juggling and noticing the same improvements with their clients.

2. Brain Development

The deeper science and research on juggling and its effects on brain development are genuinely fascinating. My case study above was me just being curious and operating on a hunch—once I realized there were positive results, I started to dig up actual research in this realm and was really blown away by the findings.

Many studies on brain development revolve around gray matter, which has proven links to our memory and focus. Gray matter is made of neuronal cell bodies and conducts and processes information to send to other body areas.

Although gray matter is thought to be fully formed by our twenties, we can still enhance it after that age, as proven by a brain study performed in 2008.1 Researchers tested 20 participants with an average age of 26.5 years old to investigate the nervous system’s adaptive behavior to learning a new skill.

That skill? Juggling.

The researchers were able to confirm training-induced gray matter changes in the brain. They found a significant increase in brain gray matter during the exercise and in the short term after the study. There was no conclusive data for what happens to this grey matter after three months or after the skill is forgotten. Nonetheless, participants grew their brain’s gray matter, which unlocks a ton of potential for other motor learning tasks.

Researchers found a significant increase in participants’ brain gray matter during juggling and in the short term after the study, says @JustinOchoa317. Share on X

Amazing right?

What’s even more impressive is that researchers in a different study found the first-ever evidence of training-related changes of white matter in the human brain just a year later.2 White matter constitutes the other “matter” of our brain. Made of axons and myelin, white matter is found in the much deeper tissues of the brain compared to gray matter. White matter interprets sensory information and has not been studied at the level that gray matter has.

In this study, juggling was again used as the training methodology. Researchers provided juggling materials to 24 participants, who were to practice for 30 minutes per day, and they had a control group of 24 participants who did not juggle. Both groups had MRI scans before and after the experiment.

After six weeks, the non-juggling group did not show any changes in the brain’s white matter. However, the juggling group showed growth in the white matter area of the brain, especially in areas related to vision and movement. What’s also interesting is that even the jugglers who had not yet mastered the task still saw the same benefits simply from trying to learn the new task.

I am no brain specialist by any means. Still, the positive changes that the actual brain experts are seeing in their studies—and the fact that they’re using juggling as a means of training—should speak volumes to just how impactful juggling can be for our brain development at any age.

3. No Limitations

Another great benefit of juggling with our athletes is that there are truly none of the limitations that exist in other aspects of sport. Height doesn’t matter. Speed doesn’t matter. Experience in sports doesn’t matter. It’s only limited by the time you put into it. A prime example is Casey Boehmer, a world-renowned juggler who only has one arm.

I really like this aspect of juggling because it’s an excellent tool for teaching confidence to athletes who may need some small victories of their own. For example, you could teach a below-average athlete who lacks confidence to juggle. They can learn the skill, outdo the “better” athletes in the group, and immediately gain confidence from that small personal victory. That could lead to more and more gains in other aspects of their game and training. Confidence has a unique snowball effect.

Because juggling has none of the limitations that exist in other aspects of sport, it’s an excellent tool for teaching confidence to athletes who may need some small victories of their own. Share on X

Although juggling is not a sport skill that appears in any sport, it enhances the qualities we use in several sports. This is the same as juggling with everything but your hands in the soccer world. All great soccer players master juggling the ball; it showcases rhythm, coordination, first touch, and body control. But it will never happen in a game, and that’s okay. It builds qualities that will occur in a game.

The same goes for dribbling tricks in basketball. Athletes don’t practice complicated trick dribbling routines to use the exact routine in a game but to challenge their hand-eye coordination, balance, rhythm, and ball control, so the simple moves they use in-game are maximally efficient.

Perhaps the example that drives the point home the most is a boxer using a speed bag. Have you ever seen Mike Tyson punch another human like he punches a speed bag? No, never. Tiny punches with the back of your fist aren’t going to knock anyone out, but the speed bag builds up the hand-eye coordination, hand speed, and upper body endurance that are crucial for fighters.

As coaches, we need to understand that not all training will look precisely like the sport. But as long as the result of the training will enhance our sports performance while doing no harm to the athlete, the juice is worth the squeeze.

4. Rhythm and Coordination

Finally, the rhythm and coordination that you experience with juggling can greatly carry over to other training modalities or sports. One of the keys to juggling that I’ve had success with is making it a whole-body motion. I find that when I get my knees and ankles bouncing with the rhythm of my catches and throws, I feel the most locked-in.

It’s no different than a basketball player using rhythm to change their pace on a drive to the basket or a marathon runner finding a good pace and rhythm during their run. So much of athleticism is based highly on rhythm and coordination, and this is a really simple way athletes can enhance that quality.

All the things covered so far—hand-eye coordination, brain development, confidence, coordination, and rhythm—are universally sport-specific.

Juggling will not make you better at your sport. The benefits that athletes achieve through juggling can help enhance their ability to perform the skill of their sport at a higher level.

This could lead to improved passing, ball handling, or defensive outputs for basketball. For a wide receiver in football, this could lead to better ball tracking and catching ability because that is precisely what juggling is—it’s just a different ball. For baseball/softball, we could see an improvement in hitting and fielding.

As I said, it would be challenging to try to name a sport where these neural improvements aren’t worth 10–30 minutes a day of non-fatiguing training like juggling.

Lastly, tennis balls and lacrosse balls have become very common in the sports performance world as reactionary tools. These are tools we all have lying around the gym.

A simple drill I love is the ball-drop exercise, where a coach drops the ball to start the drill, and an athlete sprints to catch the ball to complete the movement. Or the coach drops two balls and calls out a command for which one to catch. These are great reaction, speed, and agility drills. While the balls are out, why not juggle them to recover between sets?

These drills work all aspects of the system and genuinely get the most from our time with the athlete.

How to Juggle

All these benefits are fantastic, but the question remains…how the heck do you juggle?

I am by no means an expert juggler or juggling instructor, but I managed to teach myself in just a few days. At first, it was a rough learning curve, but I eventually got to a point where I could manage to do some tricks and juggle for long durations with no drops. Below is how I learned and how I’ve been teaching my athletes, broken down into very simple steps.

Tip: Start with a solid, moderately weighted ball about palm size like a baseball, bean bag, or hacky sack. I don’t recommend using tennis balls to start.

Step 1: Two-Throw Exchange


Video 1. Step 1 is what I call a two-throw exchange. This will involve two throws and a controlled catch, repeated over and over.

Start with two balls in your dominant hand and one ball in the other. With your dominant hand, toss one ball into the air. While that ball is airborne, toss the ball in the nondominant hand to free up that hand to catch the first ball thrown. Catch the first ball in the nondominant hand and then the second in the dominant hand. You should end up right back at square one, with two balls in one hand and one in the other.

This will build your general timing and get the pattern down for eventually juggling. Throw, throw, catch, catch, and then reset. Do not rush between reps. Treat each one as a single rep to get a feel for how hard and high you need to throw the balls.

Step 2: Three-Throw Exchange


Video 2. Building onto our two-throw exchange, you can progress into a three-throw exchange. This starts the same as step 1, but you’ll add an extra throw and then again end with a controlled catch.

So, you’ll throw the dominant hand, nondominant, then dominant hand again and catch the balls. Now, you should end up with two balls in the nondominant hand and one in the dominant hand. If you want, you can start the next rep from this scenario, flipped from how you started, or reset all the balls and go again. Personal preference.

Step 2 is a complete cycle of ball movement and the exact movement you’ll need to master to move on to step 3.

Step 3: Time Goals


Video 3. You repeat the three-throw exchange in this step but never catch the balls. Just keep the cycle going.

A simple rule that helped me put it all together is that you have to throw one to catch one. There will always be a ball in the air, and to catch it, you must toss one up to make room in that hand. If you just adhere to this simple rule, it will all come together for you in step 3.

The purpose of step 3 is to achieve time goals. I started with 15 seconds with no drops. That’s a major milestone. After that, 30 seconds with no drops is the next milestone. These are not easy tasks.

It’s frustrating. I once practiced for 30 minutes straight without getting a 30-second unbroken streak. But the reps add up, and one day it will click for the athlete.

Step 4: Space Goals

The final step is adding a space goal or a space constraint. Sometimes, you have to chase the balls around to keep them in flight, especially when trying to reach a time goal. This is more survival mode than juggling.

Adding a space constraint forces the juggler to focus on ball control and body awareness. The smaller the space, the harder it is.

You can start with a designated area using tape or cones to provide out-of-bounds lines, then move to tighter spaces like standing inside a tractor tire or hula hoop.

I’ve even been experimenting with long-duration isometric holds while juggling, says @JustinOchoa317. Share on X

I’ve even been experimenting with long-duration isometric holds while juggling. Holding a split squat or wall sit or balancing on one leg is a different ballgame when you’re also trying to successfully juggle for minutes at a time.

Bringing It to Your Facility

I realize that this article may not be for everyone—we all coach in different environments and have our own situational challenges in our setting.

With that said, I highly recommend introducing juggling, if at all possible. The benefits we’ve seen in a short time have been extremely impressive. Not to mention, it’s such a fun activity—even if you’re not good, it’s oddly satisfying just to continue to try.

We see a lot of circus tricks these days from trainers on social media, but this circus trick is actually a beneficial one.

Since you’re here…
…we have a small favor to ask. More people are reading SimpliFaster than ever, and each week we bring you compelling content from coaches, sport scientists, and physiotherapists who are devoted to building better athletes. Please take a moment to share the articles on social media, engage the authors with questions and comments below, and link to articles when appropriate if you have a blog or participate on forums of related topics. — SF


References

1. Driemeyer J, Boyke J, Gaser C, Büchel C, and May A. “Changes in Gray Matter Induced by Learning—Revisited.” PLoS ONE. 2008;3(7):e2669.

2. Scholz J, Klein M, Behrens TEJ, and Johansen-Berg H. “Training induces changes in white-matter architecture.” Nature Neuroscience. 2009;12:1370–1371.

Assise Cleather Force

A Review of Force: The Biomechanics of Training by Dan Cleather

Blog, Book Reviews| ByRob Assise

Assise Cleather Force

As a high school math teacher, I have heard the phrase “I am not a math person” more times than I would like to count. The truth is, being human qualifies us all as being “math people”—it is just a choice of whether or not we embrace it. At the core of mathematics lies the ability to reason. We all can recognize patterns and form a conclusion (inductive reasoning) or apply previously learned facts to a situation to form a conclusion (deductive reasoning). We can try to run from mathematics or pretend it doesn’t exist, but the reality is that it is omnipresent.

“But Rob, that’s not the kind of math I’m talking about!” Yes, I get it. Formulas, numbers, and wild symbols can be extremely intimidating and cause a person to go into shutdown mode. So, what are you to do when faced with this complexity? Like anything else, find a master teacher who can take complicated ideas and reduce them to digestible pieces.

Dr. Dan Cleather is a person who falls into this category. I was first introduced to his work when his Little Black Book of Training Wisdom was for sale on Amazon for one dollar. I figured I had nothing to lose with the purchase, and it will always remain near the top of my “best bang for the buck” list when it comes to books. I immediately took to his writing style: eliminate fluff, do not talk over the reader, emphasize clarity above all else. So, I was extremely excited when Force: The Biomechanics of Training came out earlier this year.

Force is a 152-page book divided into 26 short chapters. I viewed each chapter as a mini-lesson. While the book could easily be read in a single two- to four-hour sitting, I found value in taking my time. Beginning the book coincided with the installation of a sauna in my basement—over the course of 20 days, I read a chapter or two upon entering the sauna (10 minutes of reading) and then sat and thought about what I’d read (10 more minutes). After exiting the sauna and showering, I wrote down my thoughts. This process allowed the content to “stick” much more than a normal read.

In this review, I will cover seven topics:

  1. Force
  2. Impulse
  3. Maximizing impulse
  4. Power
  5. Force vector theory
  6. Debunking the force-velocity curve
  7. Force absorption?

I chose these because they either had the most impact on me or I believe they are essential for you to get a feel for the content presented. While I found having a math background helpful in reading, it is 100% NOT a prerequisite! Dr. Cleather does a great job of explaining everything the reader needs to know, and he provides the mathematical explanation behind it in footnotes for those who are interested in “nerding out.”

1. Force

Not surprisingly, Cleather opens with a discussion of force and how it is the cause of change in velocity. One of the issues we find in human movement is that force isn’t applied consistently. This example of a countermovement jump gives an overlay of the force-time curve during the process of the jump. The inconsistent force applied during the movement makes it challenging to calculate the total force applied.

This is where calculus comes in to save the day—and the good news is we do not need to understand the nitty-gritty part of the calculus, just the concept! Figure 1 shows a hypothetical force-time curve during a countermovement jump. The total force applied is the area underneath the curve, called the impulse.

Impulse
Figure 1. Region A represents the area underneath the curve bounded by the dashed horizontal line (weight of the athlete) and the blue graph. Region A’s area represents the total force applied over the time interval, or the impulse. For those interested, region A is a combination of the braking and propulsive phases in a countermovement jump. The shift from braking to propulsion occurs where the center of mass is the lowest, coinciding near the peak force.

2. Impulse

Cleather points out that impulse (total force) and change in velocity are directly proportional to one another. In other words, if impulse increases, so does the change in velocity. Cleather emphasizes that an issue he sees in training circles is a lack of focus on impulse. He states, “In many cases, we can explain differences in explosive physical performances in terms of impulse generation.” Instead, he sees coaches more interested in peak power or peak force—more on both of these later.

Cleather emphasizes that an issue he sees in training circles is a lack of focus on impulse…he sees coaches more interested in peak power or peak force, says @HFJumps. Share on X

3. Maximizing Impulse

If impulse is such a big deal, how can we go about improving the amount applied during a movement? Again, if the area underneath a force-time curve represents an impulse, Dr. Cleather identifies three ways in which the area can be increased:

    1. Increase the amount of time the force is applied.

• This creates a greater “width” for the area.

    1. Increase the peak force applied over the same time interval.

• This creates a greater “height” for the area.

    1. Increase the rate of force development over the same time interval.

• This increases the slope of the curve, which allows for a greater area underneath. In other words, the athlete reaches higher force faster.

This section probably caused the most significant amount of reflection for me, and it will never be finished. As a track coach who truly enjoys the process of developing more efficient and explosive sprinters, optimizing impulse is something that is always on my mind.

In general, as running speed increases, ground contact time decreases. To make up for the loss of time on the ground, the force applied has to increase so the runner can move faster. A simple way to think of this is if the base of a rectangle decreases (less ground contact time), then the height (force) must increase by more than the base decreases to create a greater impulse (area of the rectangle).

In order to optimize impulse, a coach must consider two parameters: force and time. However, it is not just about optimizing impulse; it is doing so within the limits of the task at hand. If we are discussing sprinting at maximum velocity, there is a spectrum of ground contact times that are deemed acceptable based on the level of the athlete. In general:

  • Shorter ground contact times are great. The athlete has an opportunity to get to the finish line faster. However, there could be an athlete who is unable to showcase their gift of exerting force in the shorter time interval. This could lead to slower times!
  • More force is great if it can be applied in the same or shorter time interval. If the athlete spends too much time on the ground to achieve higher forces, the impulse does go up. However, the race clock is still ticking, and the greater impulse may not make up for the excessive time on the ground (or the possible extended time in flight thereafter).

4. Power

Before discussing power, we first need to define work. Remember, the area under a force-time curve is the impulse. If we change the x-axis to represent position (creating a different-looking curve), the area under the force-position curve would be the work; or, as Cleather states, “total force with respect to distance moved.”

This relates to power because power is the rate of doing work. In other words, power equals work divided by time. As stated earlier, power is often a metric that coaches focus on. Cleather feels this is misguided:

“For many explosive sports skills, the change in velocity during the movement is one of the most important performance variables. This is why impulse is so important for us—impulse accrued is directly proportional to the velocity change. Unfortunately, there isn’t the same type of direct link between power and change in velocity, and so it is less useful for qualifying explosive sports performance.”

If the “direct link” does not click here, think of it this way: Impulse is the area under a force-time curve. To calculate power, work must first be accrued, and then it needs to be divided by time. Cleather goes on to say,

“There is, however, an indirect link between power and change in velocity. This means that power will still tend to be well correlated with explosive performances like vertical jumping or weightlifting. These correlations lead coaches to believe that power is the most important variable and are sometimes used to justify their interest in it.”

I will say that this section on power was one that I had to revisit multiple times. Categorizing items as “over an interval” versus “instantaneous” was helpful for me. Regardless, it has caused me to rethink tests to capture power as a metric.

This section on power was one that I had to revisit multiple times…It has caused me to rethink tests to capture power as a metric, says @HFJumps. Share on X

5. Force-Vector Theory

This was one of my favorite sections, partly because of Cleather’s humor when pointing out that the name is silly (force is a vector), but mostly due to the elegance he used to break down a body-fixed coordinate system versus a world-fixed coordinate system and the implications when they are misused.

Cleather begins with a straightforward example: If an athlete were to run into a jump off a single leg and try to jump as high as possible, the ground reaction force would be directed vertically (think directed through the body and out of the head). The body-fixed and world-fixed coordinate systems would be the same in this example. If an athlete were to perform a block start, the ground reaction force would have a horizontal component in relation to the world-fixed coordinate system (maybe forming a 50-degree angle with the horizontal). However, the ground reaction force would still be directed through the body and out of the head in reference to the body-fixed coordinate system.

GRF Angles
Figure 2. The GRF in a single leg vertical jump versus the GRF during a block start. While the GRF is different in the world-fixed coordinate system, it is directed in the same direction in relation to the athlete’s body.

Cleather then provides an example where this concept shows an issue with a claim. The barbell hip thrust is a popular exercise, and some advocate for its use due to a “horizontal component” to the movement like the one found when an athlete accelerates. However, the reality is that the ground reaction force in the exercise is directed vertically to the world-fixed coordinated system and NOT through the athlete’s body and out of their head as it is in acceleration. This does not mean that the exercise is pointless; it just means that the “horizontal component” argument should not be used.

GRF Block Start
Figure 3. The finishing point of a barbell hip thrust. Note that the GRF is directed differently in reference to the athlete’s body when compared to the GRF found in acceleration.

6. Debunking the Force-Velocity Curve

The force-velocity curve has always bothered me. As a track coach, I have a bias about the importance of sprinting, which would be placed at the far right of the curve, signifying high velocity but low force. This never sat well with me, as I know sprinters have a vertical ground reaction force of 3+ times their body weight…on a single leg. In many cases, the force of a sprint during a single contact would be similar to that found within a rep of a 90% of 1RM back squat. The 90% of 1RM back squat falls on the far left of the curve, signifying high force but low velocity.

If there is a similar force, does it make sense to place the activities on different parts of the spectrum?

Cleather does a wonderful job of explaining this issue… and clarifies what the curve should be called: the load-velocity curve. If force is replaced with load, the relationship works. Share on X

Cleather does a wonderful job explaining this issue with specific examples and clarifies what the curve should be called: the load-velocity curve. If force is replaced with load, the relationship works.

The velocity is low if the load is high (heavy back squats). The velocity will be high if the load is low (bodyweight). Language matters, and I am 100% on board with this change. Load and force are two different entities. Cleather states, “We don’t necessarily require a large load to express high forces, and in sport we are often most interested in increasing the force that an athlete can apply against a fixed load—their own body weight.”

7. Force Absorption?

A common phrase utilized in strength and conditioning is “absorbing force.” I have certainly used it in the past; however, I stopped once I read a thread from Dr. Cleather on social media. Again, language matters, and we need to be sure we strive to deliver messages as clearly and accurately as possible. Precise language eliminates ambiguity.

It is why I do not allow students to call the denominator “the bottom” in my math class. There are cases where “the bottom” would not be specific enough. It is why I do not let my children say they did “stuff” at school. Anyone who has seen the “Yada Yada” episode of Seinfeld knows the danger of allowing ambiguity.

Many readers will probably say that hairs are being split here, but I will side with Dr. Cleather on this one. The thread linked above does a wonderful job of explaining the reasoning, but in the book, Cleather provides the foundation as to why a force cannot be absorbed: “This is a direct consequence of Newton’s 3rd Law. If an object exerts a force upon us, we in turn exert the same force back on it. We do this by producing, not absorbing, forces.” The eccentric portion of a movement is where the “force absorption” is believed to exist. The correct terminology is “ability to express force eccentrically.”

Cleather does state that elastic energy can be stored and reused, but he identifies that it does come with specific criteria:

  • The shift in movement must be rapid. Think short ground contact times such as in sprinting and particular jumping. A movement is often said to be a “true plyometric” if the contact time is below 250 milliseconds.
  • Stiffer tendons are more efficient in storing elastic energy. “However, in order to stretch a stiffer tendon, the athlete will need to be stronger.”

The Verdict

A perk of teaching AP Calculus is that it overlaps nicely with concepts that most of my students are dealing with in AP Physics. A few days ago, they asked me if I thought I could teach physics. My response was, “At the moment, no—physics is hard.” What I meant by that is that while I understand a good portion of the mathematics behind the physics, I would need to spend more time with the concepts to teach them effectively.

Dr. Cleather has done a fantastic job of taking complex material and making it digestible for all, and this review only scratches the surface. Outstanding chapters on hot strength and conditioning topics such as velocity-based training, dynamic correspondence, dynamic systems theory, and force-velocity profiling will undoubtedly challenge readers’ thoughts.

Physics may not be everyone’s favorite, but a baseline understanding by anyone in athletics would help eliminate some of the “interesting” claims, methods, and beliefs displayed on social media. Share on X

Physics (and math) may not be everyone’s favorite content. Still, a baseline understanding by anyone involved in athletics would help eliminate some of the “interesting” claims, methods, and beliefs regularly displayed on social media. Invest a few hours in Dr. Cleather’s book and an understanding of force will always be with you.

Since you’re here…
…we have a small favor to ask. More people are reading SimpliFaster than ever, and each week we bring you compelling content from coaches, sport scientists, and physiotherapists who are devoted to building better athletes. Please take a moment to share the articles on social media, engage the authors with questions and comments below, and link to articles when appropriate if you have a blog or participate on forums of related topics. — SF

Free Throw Practice

Mastering Your Mindset with Mental Wellness Coach Derick Grant

Freelap Friday Five| ByDerick Grant, ByJustin Ochoa

Free Throw Practice

Derick Grant has experienced challenging moments in his life. These moments caused him to stumble and sometimes start over. But he knew these were the defining moments by which his most significant victories would be measured. He reflects on the fact that his belief and focus on his dreams were what helped him through challenging times. As a former professional athlete for the Harlem Globetrotters, Derick understands what is needed to perform at a high level.

In his TEDx speech “Minding Your Mind: What the Great Ones Don’t Tell You,” Derick spoke about the importance of cultivating your mindset as much as you develop your skill set. He is now living through his passion, helping people realize their hidden potential. He has a successful coaching firm that helps people gain an elite-level mindset, and his mentorship has produced professional athletes, corporate executives, and many others.

As one of the most sought-after performance mindset coaches in the world, Derick lives by the motto, “You will always only ever be whatever you think you are,” teaching people to first believe in themselves, and then they will see the results. Some of his current clients include Kyle Guy of the Sacramento Kings (NBA), Joe Reed of the Los Angeles Chargers (NFL), and Tyasha Harris of the Dallas Wings (WNBA).

Freelap USA: In the sports world, it’s extremely common for athletes to have skills trainers, strength coaches, dieticians, nutritionists, chefs, massage therapists, and all kinds of “coaches” to address their physical well-being. Why do you think it’s not as common for athletes to hire professionals who handle their mental well-being? And why do you think this disconnect exists?

Derick Grant: I think there are two reasons. Number one is the stigma behind mental health. Because of old paradigms and beliefs, we regard mental health as a sign of weakness, and that goes against our whole view on athletics. We don’t want to be perceived as weak, so we don’t talk about it. I think it’s more of society as a whole, but the micro will embody the macro.

Second, I think it’s because all of coaches’ and athletes’ physical qualities are things that can be seen or perceived by the five senses. An outsider cannot see someone’s mental health, so we ignore the signs of deterioration.

In reality, your mental health determines whether or not you operate at your full potential in terms of skill set. LIFE IS MENTAL!

Freelap USA: I’ve heard you speak many times about how the adversity in your life—often your lowest rock-bottom moments—led to you being the professional that you are today. It helped you find your true calling and passion. How do you think today’s young athletes mishandle failures and adversity? What principles do you instill in your athletes to help them use imperfect moments for growth?

Derick Grant: I think athletes today believe that there is such a thing as failure. If we think of adversity as simply a test to teach us a lesson that increases our internal growth and development, we won’t view it negatively.

Derick Grant

I like to view life as a weight room. The heavier the weight, the more resistance my muscles will endure. From the added resistance, my muscle’s development will increase. Life is no different.

Adversity is needed to strengthen you at your core, mentally. You experience adversity to find out about a part of yourself that you didn’t know existed in order to help you evolve and grow. Your ability to prosper will be determined by your ability to shift your perspective and how you view adversity.

Freelap USA: You’ve worked with clients in the NBA, NFL, and WNBA, and with many other individual professional athletes. Of course, those athletes are physically gifted, but what are you noticing about their mentality and non-physical attributes that could have played a role in them getting to the elite level of their sport? How can younger athletes adapt these attributes early in their sports career?

Derick Grant: Here’s something I noticed from working with professional athletes: All of them have a belief in their abilities that transcends anyone else’s confidence in them. It’s almost like they’re borderline delusional. But it’s because they believe in their abilities so much.

Here’s something I noticed from working with professional athletes: All of them have a belief in their abilities that transcends anyone else’s confidence in them, says @Dgmindset. Share on X

The rest of the world might think they’re crazy if people knew how they view themselves. All this means is that what you believe about yourself and your abilities will be what you carry out. So, with athletes today—especially young athletes—I teach them to believe in themselves and what they’re capable of, regardless of what anyone else will say about them. You can only be whatever you think you are.

Freelap USA: Can you tell a story that illustrates some of your coaching principles in action and what an optimal mindset can do for an athlete’s performance in both their sport and life?

Derick Grant: A story that comes to mind is about one of my current NBA clients, Kyle Guy. In 2018, at the University of Virginia, he struggled with anxiety and depression, and we spent a great deal of the off-season working to restore and rebuild his mindset.

This was coming off the Cavaliers’ incredible regular season and eventual loss to a 16-seed in the first round of the NCAA tournament. It was the first time in history a 16-seed beat a 1-seed.  A year later—his junior year—he was at the free-throw line in the 2019 NCAA Final Four. At the end of the game, Kyle needed to make two to tie and three to win.

We always focus on being present, in the current moment, and not allowing our minds to go to the future to create stress or anxiety. So, when Kyle stepped up there, you may have noticed he took deep breaths before he sank those clutch free throws.

We always focus on being present, in the current moment, and not allowing our minds to go to the future to create stress or anxiety, says @Dgmindset. Share on X

We have consciously worked on following our breathing to ensure that our minds stay in the present moment. Kyle stepped up there and knocked down all three free throws. The University of Virginia won a national championship, and he was named Final Four Most Outstanding Player.

Freelap USA: What are some actionable takeaways that coaches can implement or share with their athletes today to help them plant the seeds of growing a better mindset?

Derick Grant: I think teaching your athletes how to be present will have the biggest impact. You can only live life wherever your feet are, but minds are so powerful we can mentally go into the future or back to the past.

So, teaching your athletes to keep their minds where their feet are and focus on the present moment where life is being lived and the game is being played will help them build the foundation of a bulletproof mindset.

Athletes can obtain presence by doing breathing exercises and meditation. Before a workout, I have my athletes do 15 minutes of breathing exercises where they consciously track their breath in and out. This can center their mind and keep them in the present moment. All athletes will perform best when their mind is where their feet are—the present moment.

Since you’re here…
…we have a small favor to ask. More people are reading SimpliFaster than ever, and each week we bring you compelling content from coaches, sport scientists, and physiotherapists who are devoted to building better athletes. Please take a moment to share the articles on social media, engage the authors with questions and comments below, and link to articles when appropriate if you have a blog or participate on forums of related topics. — SF


Softball Pitch

3 Mistakes Softball Players Make in the Weight Room That Affect Power

Blog| ByAnna Woods

Softball Pitch

The most common issues I find in the weight room with softball players seem to revolve around three limitations of movement1. The same movement limitations I see in the lifts we do also show up as restrictions to demonstrating accuracy, power, and speed on the field.

Because swinging, throwing, and pitching are very technical aspects of softball—due to the need for accuracy with each rep—patterning in quality movement reps in the weight room is even more crucial for athletes involved in these elements of the game. When an athlete completes reps of a movement 10-20x per session, 2-3x a week, the faults of their lifting patterns will also show up in the sport. These faults can affect accuracy, limit power, and promote the risk of injury.

When an athlete completes reps of a movement 10-20x per session, 2-3x a week, the faults of their lifting patterns will also show up in the sport, says @shestrength. Share on X

As coaches, trainers, and parents, paying attention to even the smallest details in our girls’ lifts can have the biggest impact on their performance in the sport of softball.

Problem #1: Curve or “C” in the Back with Heavy Lifting1

I most commonly see this error in the weight room, with squatting, deadlifting, and overhead pushing/pulling movements. This subtle issue places the load of the weight onto the spine and off of the muscles of the glutes/core and legs.

C In Back

On the field, I most often see this movement error in swinging a bat and/or pitching. This error prevents the athlete from accessing the oblique sling and the core as a connector between the lower body and upper body, leading to a loss of power and the athlete only using the upper body as a driving force to rotate.


Video 1. An example of power loss at contact through the core using the Core360 belt. In this video, the athlete loses her core stiffness at the desired contact point by bending her torso to the side leading with her head tilt. This loss is noted by the drop in the blue lines measured by the sensor at the same desired point of contact. Power loss is a common issue when an athlete cannot rotate correctly.


Video 2. An example of power increase at contact through the core using the Core360 belt. In this video, the athlete maintains core stiffness and does not swing with a “C” bend in her back. This is noted by the increase in core pressure at the desired point of contact in her swing.

Solution: Flatten out the low back by creating core stiffness.

In the weight room, I place athletes in positions for lifting that force the C out of their low back as much as possible, hoping that it eventually creates the correct patterns in sport. These are lifts such as landmine squats and landmine pressing, side planks, elevated boxes to deadlift from, and foot support (using a bench or box) for overhead pulling movements such as chin-ups. We also implement specific warm-up drills to help create core stiffness and pelvis control. These include slow and controlled exercises like deadbugs, bird dogs, side planks on knees and elbows, crawling patterns, rolling, and anti-rotation ISO holds using bands and a partner.


Video 3. A demonstration of the crawling core stiffness drill in warm-ups. The shoe helps the athlete have a tactile cue to keep her hips from swaying and her spine extending/ compressing as she crawls.


Video 4. A demonstration of a core stiffness drill with bird dogs and bands. This drill is a step up in difficulty from the drill in video 3; now, the athlete must maintain core stiffness in an offset loaded variant of the bird dog using a band and lateral resistance.

Problem #2: Stabilize Through the Neck

I commonly see an athlete tighten her shoulders, traps, jaw, and neck when doing rotation and anti-rotation exercises, ab exercises, and most pulling exercises. This removes the core as the stabilizing mechanism and places the power source in the neck, jaw, and shoulders. These are not designed to bear the load of that much power and weight. This issue also reduces the ability of the legs and core to get stronger.

Neck Stabilizer

On the field, we most often see this in pitchers who push off the mound headfirst. It also shows up in sprinting between bases and swinging a bat (pulling the head off the ball). This common error causes the same troubles for the body in sport as it does in the weight room—it forces the joints to take the brunt of the work instead of the muscles. This leads to a loss of power and speed because the legs are not the main drivers. And in hitting, this issue pulls the eyes off the ball, making it hard to connect with a pitch.

Using the neck as a stabilizer causes the same troubles for the body in sport as it does in the weight room—it forces the joints to take the brunt of the work instead of the muscles. Share on X

Solution: Use the feet and legs.

Most girls struggle with using their legs for strength and instead want to overpower a lift with their upper body. Cueing an athlete to find her feet, or push the floor away with her feet, or drive her legs/feet into the floor in almost any lift can help.

She has it figured out when she feels her legs begin to shake and her core fire up, releasing the neck from stabilizing the load being lifted. The idea is that feeling this in the weight room will allow an athlete to find her front leg both in a pitch and swinging a bat. This will provide a stable stance base for the body to rotate through. It also allows the ground force production from the foot to travel up through the core and out the hands.


Video 5. A demonstration of removing the neck as a stabilizer in pulling exercises. I use different strategies to help an athlete “feel” how to use their core and feet as stabilizers, NOT their neck. I hold a PVC pipe along the athlete’s spine and ask her to keep her entire spine aligned with the “fake spine” (PVC pipe) as she pulls the band back and down.


Video 6. A demonstration of using J-cups to help the athlete find their foot load. I flip the J-cups over and place the barbell under them, get into a squat position, and press up and into the J-cups using my feet. This elicits the feeling of active foot loading and creates core pressure if the athlete is in correct alignment from their ribs to hips.

Problem #3: Using ONLY the Arms for Rotation

In the weight room, I often see an athlete try to avoid true rotation through the core by bending or extending/flexing through her shoulders, arms, and wrists as compensation. I see this happen with anti-rotation and rotational ab exercises, rotational pulling, and pushing movements.

The arms and wrists can only provide so much power disconnected from the core and the lower half of the body. When the athlete avoids rotation by bending her elbows and arms/wrists, the core is bypassed as a source of strength. The old saying “when the joint ends, power ends” applies here. An athlete will eventually reach a ceiling in their strength progressions in the weight room because the upper body can only sustain certain compensations for so long.

Arms Only

On the field, we most commonly see athletes swing, throw, or pitch using only their arms and upper body. As in the weight room, this absence of the core connecting the lower body to the upper body leads to a loss of power.

Solution: Use the oblique sling connecting the feet, hips, core, and arms through rotation.

Learning what access to the oblique sling “feels” like is critical for athletes to know how to access it for strength and power.

Learning what access to the oblique sling ‘feels’ like is critical for athletes to know how to access it for strength and power, says @shestrength. Share on X

In the videos below, I demonstrate several ways to incorporate “feeling” the oblique sling to create core connectedness using bands and dumbbells.


Video 7. A demonstration of an anti-rotation exercise using bands.

Video 8. A demonstration of oblique sling presses using dumbbells.

Video 9. A demonstration of oblique sling separation using medicine balls.

Results on the Field

After addressing these three issues with athletes and spending consistent time working to break down old movement patterns, athletes can feel and see added power in their swings. We retest using the Core360 belt every 6-8 weeks to assess where athletes are in the positioning of their swings and how it translates to core power. I also constantly quiz my athletes and their coaches on what they see and feel in practices and games.

In addition to more power, many athletes report less low back and shoulder pain with their lifting. The last determining factor of measurement I use is athletes reporting new soreness in the specific muscles we are targeting because we have removed overcompensations. Now we are focused on true muscle activation and growth.

Special thanks to Allie Stipsits, sheStrength intern and Hutchinson Community College softball athlete, for her contributions and serving as the model for the infographics.

Attribution

  1. I’ve learned many of these principles from chiropractors such as Dr. Jared Shoemaker (inmotionsmj.com), physical therapists, and other professionals mentored by doctors, neurologists, etc., in a new rehabilitation technique called Dynamic Neuromuscular Stability (DNS). These neurological techniques are based on clinical protocols to restore and stabilize locomotor function. From these techniques, I’ve found ways to creatively incorporate strength and motor function into workouts our softball players complete weekly to help rebuild better movement patterns for their sport.

Since you’re here…
…we have a small favor to ask. More people are reading SimpliFaster than ever, and each week we bring you compelling content from coaches, sport scientists, and physiotherapists who are devoted to building better athletes. Please take a moment to share the articles on social media, engage the authors with questions and comments below, and link to articles when appropriate if you have a blog or participate on forums of related topics. — SF


A man in gym attire performs a squat inside a blue power rack, facing a barbell, with a bench nearby. The gym has various weightlifting equipment in the background.

Training the Feet

Blog| ByBrandon Holder

A man in gym attire performs a squat inside a blue power rack, facing a barbell, with a bench nearby. The gym has various weightlifting equipment in the background.

The feet can easily be labeled as the most important body part when considering human performance. In addition to being the literal base of support for the body, they play a major role and are typically the limiting factor when examining dynamic movements such as sprinting, jumping, and cutting.

Additionally, the feet are also responsible for contributing sensory information that provides biofeedback of the world around us. If the feet are suffering from any issues, it will eventually work its way up the chain and become present in other areas, such as the hips and knees.

If the feet are suffering from any issues, it will eventually work its way up the chain and become present in other areas, such as the hips and knees. Share on X

I claim no specific expertise in this subject—people devote their entire body of work to the feet and podiatry—but I do have experience in taking the training and development of the feet a step further than the average strength and conditioning coach. In this article, I’ll cover some of the methods I use.

Barefoot Training

For simple, everyday foot care, it is optimal to be barefoot as much as possible. Shoes—especially fashionable high tops—imprison the ankles and foot, preventing many natural movements of development in the foot from occurring.

This is connected to the first step in proper foot strengthening and works to increase the mobility of the foot. While I do recommend barefoot training—or at minimum performing the warmup or certain exercises without the restrictions of shoes—too much of this can be dangerous.

Whenever a new athlete, especially those who are untrained, begin with the program they will typically go 2-4 weeks performing the warmup or exercises still in their shoes before exposing them to any barefoot movements. If this isn’t done gradually, it could create the perfect recipe for overuse injuries such as shin splints, or potentially cause structural damage to the feet!

Exposing the athletes to barefoot training, when appropriate, is a step in the right direction for training the feet.

Exposing the athletes to barefoot training, when appropriate, is a step in the right direction for training the feet. Share on X

Self Massage

Another area of focus is self-massage (though many rely on this too much). While it can be beneficial, just rolling your foot out on a lacrosse ball will not solve all of your problems. Performing self-massage exercises will, however, help initially increase range of motion for that day. This is important because, over time, increasing range of motion for the other exercises that day will help enhance the progression of the training.

The lacrosse ball is the most common self-massage tool for the feet; other tools such as foam rollers, massage sticks, and hard rubber medicine balls can be used on the other important muscles of the lower leg, the calves, shins, and perennials.


Video 1. Lacrosse ball foot rollout.

When beginning to roll out the feet, it is important to work the entire foot. Roll out the toes, the edges of the foot, and of course spend additional time on any tender areas. I will tell athletes rolling the foot out for the first time that there is no right or wrong when performing self-massage, that it is more just self-discovery and finding where they need the work.

There is no right or wrong when performing self-massage, it is more just self-discovery and finding where they need the work. Share on X


Video 2. Manual self-massage, lacrosse ball.

When massaging the lower leg, it’s important to hit it from all angles. Simply turning the foot in or out when rolling will adjust the musculature of the lower leg. This area is extremely tight so typically not much pressure is needed. Starting with a lacrosse ball or a massage stick and performing manual massage would be the least amount of pressure since you can better dictate the pressure being applied, then progress to a foam roller to roll out the areas before moving on to the medicine ball.


Video 3. Medicine ball rollout, lower leg.

The medicine ball works fantastic because it is basically a giant lacrosse ball and is easy to flow throughout the areas. Perform anywhere between 30 seconds to 2 minutes depending on the time available and what is necessary for the individual.

Mobilization

Following self-massage, mobilization of the foot and its surrounding structures of the big toe and ankle will be the necessary requisites to begin strengthening the feet.

Big Toe

If you have ever injured or even just stubbed your big toe, then you have firsthand experience in the importance of this seemingly small and insignificant body part. The big toe plays a major role in helping to maintain balance, arch support, and push off when sprinting, jumping, and even just walking.

If you have ever injured or even just stubbed your big toe, then you have firsthand experience in the importance of this seemingly small and insignificant body part. Share on X

Here are a couple exercises to develop this forgotten part of the foot.


Video 4. Big toe mobilization stretch.

For this stretch it is best to perform it with a yoga block or plyometric box. Start by jamming your foot up against the object, crunching your toes back as if they were going to touch your shin. Continue driving the knee over the foot throughout the stretch as you open the toes up and stretch the fascia of the bottom of the foot. Hold for 30-60 seconds each side.

Big toe lift offs: Big toe lift offs seem silly when performing them for the first time, but you feel helpless once you realize it is easier said than done. For this exercise you’re going to lift the big toe off the ground while keeping the remaining four toes glued to the floor.

If you can easily do this, attempt to lift each toe up in its own individual manner.

Perform 10-20 reps. While not the best, this is something you can do with shoes…you could even do it right now while reading this article.

Ankle

Moving up the chain from the big toe, we reach the ankle. The ankle is important because if it’s immobile, then the foot will be limited in its ability to move and produce force (as well as potentially causing issues in the hips and knees in the future). An applicable example of this is that many athletes in the weight room suffer from poor squatting patterns due to poor ankle mobility, hindering them from getting into those proper patterns. This is an easy sell to your athletes who want to squat a house but slack on the smaller, less exciting exercises.

The ankle is important because if it’s immobile, then the foot will be limited in its ability to move and produce force. Share on X

Here are some exercises that can help improve the ankle mobility.


Video 5. Seated ankle CARs.

Taken from Functional Range of Conditioning protocols, ankle CARs are a focused approach to the ankle circle. When many athletes perform ankle circles, there is unnecessary movement from the leg; performing them instead from a seated position and holding the shin in place will allow you to completely isolate the ankle and focus on each portion of the rotation.

Perform slowly for 3-5 circles each way.


Video 6. Supported ankle rolls.

This is an advanced movement and great for mobility of the ankle. Holding on for support, you will drop into a low squat position, then begin driving the knees forward as you roll onto your toes as far as possible. Once that range is met, slowly roll out of the position and repeat.

Perform slowly for 5-10 reps—keep this for athletes who it is appropriate for.


Video 7. Slant Board Exercises.

The slant board is such a diverse tool that can be used for stationary exercises and more dynamic movements to intensify an athlete’s landing. It’s a relatively new tool for my programming, but I have seen great improvements and confidence given to my athletes thus far. This is particularly true for athletes in sports like basketball and soccer, where ankle injuries are common and the foot gets contoured in odd positions. Performing some stabilization bounds with the slant board can better prepare them for when situations are less than ideal.

Foundational Foot Strength

Once the surrounding structures of the foot become more mobile, then more load can be placed through those ranges.

Stress the importance of training the feet to your athletes. Even in the weight room, having weak feet can lead to poor knee and foot position in compound movements like the squat and deadlift. Not correcting the issue just continuously reinforces these poor movement patterns and compensations throughout time, so not only are the athletes not getting as much benefit out of the movements, but you’re also putting them in a poor environment that could lead to issues later.

Here are some exercises to help create a solid foundation of foot strength. Many of these exercises will have an isometric counterpart, single leg counterpart, and can be progressed through the addition of load or by increasing the total work that is being completed. Before progressing, though, make sure each movement is performed with control throughout the entirety of the range.

When loading these exercises, I personally like using a belt squat machine or a safety squat bar set up with support, so balance is not an issue. They can also be performed with dumbbells or other means, but the more that balance gets challenged, the less the athlete can actually focus on perfecting the exercise at the foot.

The more that balance gets challenged, the less the athlete can actually focus on perfecting the exercise at the foot. Share on X

Heel Toe Rocks: Heel toe rocks focus on transitioning between plantar and dorsiflexion. When performing, keep the knees extended and have full control at each end range. The most common flaw of this movement is the athlete pushing their butt back while raising the toes off of the ground, taking the emphasis off of the feet.

Perform these reps slowly, between 5-10 reps.


Video 8. Heel to Toe Walks

Taking it a step further from stationary heel toe rocks, performing the heel to toe walks will have you moving down the field. Focus on an exaggerated walk, initially striking with the heel before rolling the foot flat and finishing by pushing through the toes and getting as much lift off of the ground as possible.

Perform for 10-20 yards.


Video 9. Heel Walks & Toe Walks

These walks will isolate one specific movement, so either walking fully on the toes or on the heels. Either way, ensure that the knees stay extended and keep the feet straight when performing.

When walking on the toes, I cue athletes to imagine as if they were trying to spread their toes out like their fingers of their hands. For heel walks, I cue to take the toes and pull them up to their shins.

Perform these walks for 10-20 yards.


Video 10. Calf Marching

Marching on the toes is beneficial for building more endurance in the feet. Athletes should focus on avoiding their heels from collapsing down and touching the ground if possible.

You can also perform these movements in a single leg isometric march position, flexing the hip up and holding for time.

Perform for 5-10 reps per side or timed sets of varying amounts from 20-60 seconds.


Video 11. Sled Calf Push

This is one of my favorite exercises to get athletes to feel muscles of their feet that they didn’t even know existed. Pushing even an empty sled down the field while up on the toes will torch the toes and feet. Though normal sled pushing or pulling also effectively trains the feet, this variation is more direct because it places such a high emphasis and isolates the foot in the exercise.

Perform for 10-40 yards.


Video 12. Supported Calf Raises (DL, SL, Straight, Bent Leg)

Calf raises are the standard lower leg exercise—if you were only performing one of the exercises on this list today, it would probably be the calf raise.

Don’t get me wrong, I love the calf raise. It should be varied, though, and given more focus as far as modifying:

  • The foot position;
  • The time held; and
  • Whether it is bent leg or straight leg.

This will ensure total development from this staple exercise.

When performing these calf raise variations, be strict about going slowly through each phase: the raising, the hold at top, the lowering, and the stretch at the bottom.

When performing these calf raise variations, be strict about going slowly through each phase. Share on X

Perform for 10-20 reps, but this will vary depending on the variation selected.


Video 13. Ankle Spring Series (from Cal Dietz)

I first read about the ankle spring series from Cal Dietz on his YouTube page, so if you want more information on this exercise, you can go research it from the man who invented it.

After first performing the series myself and feeling the weakness in my feet, I began implementing it with our college athletes who were home over summer break.

What I liked about it initially is that the athletes feel the intensity and “burn” immediately. When prescribing most foot exercises, athletes aren’t as involved since it doesn’t feel as tough as cranking out 100 pushups.

When prescribing most foot exercises, athletes aren’t as involved since it doesn’t feel as tough as cranking out 100 pushups. Share on X

Not the case for the ankle spring series.

The athletes dreaded doing it throughout the weeks, but got much stronger as the weeks progressed in the various positions. If I have limited resources when programming for a new athlete and can’t do many exercises, I always make sure that this series is a part of that program one way or another.

Start slow, only holding each position for 10 seconds and performing it with bodyweight only and begin progressing time from there.


Video 14. Split Squat Iso with Heel Lift

Performing the split squat isometric hold with a heel lift can be done for reps or total time. When going through the exercise drive through the toes as if you were trying to crush the ground beneath you.

Perform for reps ranging from 5-20 and time held from 10-60 seconds. This is a broad range because if the athletes are just using their bodyweight, then the higher end of the range can be done; on the other hand, if they’re loading it heavy, then they will be working in the bottom range.


Video 15. Ankle Inversion / Eversion Hold

Wince we’re examining the actions of the foot, we also need to look at inversion and eversion (or the ability of the foot to withstand or restrict rolling in this case). Performing these holds off of a board is great to begin building the resiliency of the edges of the feet.

Start by placing the inside or outside edge of the foot on the board. You want to get as close to being off of the board without actually falling off. Once held for the desired time, switch sides.

Perform for 10-30 seconds each side.

Earlier I spoke about how if there was one exercise you were probably performing from this list then it would be the calf raises. If there is an exercise or muscle action that you probably aren’t performing is their opposite, dorsiflexion raises, or toe raises.

Similar to the idea of having a healthy ratio of pulling to pushing exercises in a program for shoulder health, you want to make sure to implement a dose of toe raises to focus on health of the shins and feet.

Many of my athletes—especially in track, basketball, and football—love performing these exercises because they feel it immediate burn through their lower shin. They also will typically claim they feel better after performing. Whether that has any merit or not, placebos are real and how they “think” they feel is also important to me.


Video 16. Wall Toe Raises

Performing toe raises off of the wall is a great starting point because there is no equipment needed and they can even do this exercise at home.

Start performing these for sets of higher reps, 15-25, and begin progressing by either taking the feet out farther from the wall or increasing the reps.


Video 17. Seated KB Dorsiflexion

The next progression will be adding some load; this can be done by placing a kettlebell around the foot to perform the exercise. Make sure that the athlete has most of their leg on the bench and they focus on just isolating the foot. The common mistakes are too much knee involvement, and shin rotation when raising up.

Perform for 10-15 reps, increase reps before attempting a heavier kettlebell.

For athletes who are new to this training, they will typically experience soreness in their calves and typically be surprised by the lack of controllable range they possess when performing some of the basic exercises like the heel to toe rocks or heel walks.

Dynamic Foot Strength

It is great to train the foot complex with these isometric holds, and slow, controlled exercises for strength. This is done to prepare them for more high-speed exercises that better resemble the demands of athletic actions.

It is great to train the foot complex with these isometric holds, and slow, controlled exercises for strength. Share on X

On the athletic field, everything is performed at full speed. The actions of change of direction, acceleration, and deceleration are performed maximally, and the feet must be conditioned to deal with these stressors. Exposing the feet to more aggressive and high-speed training must be a gradual process that is monitored closely.

Here are some exercises that can help raise the foot’s threshold and ability to handle high speeds.


Video 18. Pogo hop series.

Pogo jumps are submaximal jumps being performed through the ankle and knee. These are done to help build up that threshold in the feet to withstand force and should be built up gradually.

These jumps can be performed though various directions, stationary or moving, various body positions, and off of either double or single leg positions. Take it one step farther by performing them off an incline or step.


Video 19. Stair hop series.

With younger athletes, just getting them to jump rope is a great athletic building exercise which is often forgotten.


Video 20. Assisted pogo jumps

Once a base has been built through unassisted pogo jumps, adding some assistance to create an overspeed effect can be done through band assistance or by getting support on a racked barbell.

Perform jumps for timed sets between 5-10 seconds, or total reps 5-10. This can be raised of course as time goes on but initially less is more.

The feet are responsible for so much regarding athletic performance and overall health. Prioritizing them in our training programs is a must. Share on X

Final Thoughts

The feet are responsible for so much regarding athletic performance and overall health. Prioritizing them in our training programs is a must. It’s not a bad start to get out of our shoes and perform self-massage. Following that, begin to mobilize the surrounding structures. Then, once you begin focusing on strengthening them, move from a foundational base of isometrics and slow movements to more applicable high speed, dynamic actions.

These exercises can be easily placed in the beginning preparation of the workout or ending post exercises. Since there is so much that you can cover with training the feet, I would recommend sprinkling exercises of different focus throughout the training week and focus on building those specific exercises that you select.

Since you’re here…
…we have a small favor to ask. More people are reading SimpliFaster than ever, and each week we bring you compelling content from coaches, sport scientists, and physiotherapists who are devoted to building better athletes. Please take a moment to share the articles on social media, engage the authors with questions and comments below, and link to articles when appropriate if you have a blog or participate on forums of related topics. — SF


Basketball Speed

Misconceptions on Training Speed in Court-Based Athletes

Blog| ByKeith Ferrara

Basketball Speed

There is no question that coaches understand how important speed is to the success of team sport athletes. However, when most people think of speed and its effects on performance, field sports are usually the first that come to mind (football being the most popular of all). They don’t always understand that speed and the development of speed also play critical roles in success for court-based sports such as basketball and volleyball.

In this article, I will shatter four myths that minimize the value of training speed in court-based athletes and cover why training speed is so necessary to the success of players and their overall athletic development.

1. Because of the Size of the Court, Speed Doesn’t Matter

Due to the more compact size of the court, people think that speed doesn’t matter that much for volleyball and basketball. Speed, however, becomes an even more significant factor in the success of court-based sports. The margin of error becomes even smaller when the space gets tighter, so speed is a huge factor in the success of the athlete.

The margin of error becomes even smaller when the space gets tighter, so speed is a huge factor in the success of court sport athletes, says @bigk28. Share on X

It is easy to see why acceleration is the biggest contributor to athletic success in court sports. In a sport like volleyball, players rarely take more than a few steps when completing one of the following movements:

  • Defense
  • Setting
  • Transition
  • Blocking

All are force- and power-based movements that happen very quickly, never allowing the athlete to come close to reaching their top speed. Basketball is a little different, as players may travel anywhere from 25-30 meters full court in a transition from defense to offense or vice versa, and they may hit top speed—but these situations are highly unlikely. If athletes can’t produce both force and acceleration in either sport, they will struggle to compete at an elite level.

2. Court Sport Athletes Already Sprint Enough in Practice, So You Don’t Need to Dedicate Time to Speed Development

When I talk to others about court-based sports, there is a common misconception that players accelerate enough in practice, and it is unnecessary to train speed in designated sports performance sessions. From what I have seen training speed over the years, this couldn’t be any further than the truth.

First, it is important to define what qualities of speed matter for athletic performance. For me, it boils down to three qualities in court-based sports:

  1. Peak force
  2. Peak power
  3. Peak velocity

Peak force is the initial amount of force put into the ground, breaking inertia to propel the athlete’s body forward. Peak force happens instantaneously and is paramount for athletic success and strong acceleration abilities. Peak power is the highest amount of power that happens in the sprint; this usually occurs within the first second of a horizontal movement. Once again, because of how quickly it happens, powerful athletes have a distinct advantage over their opponents. That is why there should be dedicated parts in your training to develop each quality.

Athletes may sprint a lot in practice, but it may not have the same intent or address the same stimulus as it would in a designated speed training session, says @bigk28. Share on X

Now, coaches will ask why do I have to train sprinting if they are sprinting in practice? While some people may find it to be overkill, I do not. Sure, athletes may sprint a lot in practice, but it may not have the same intent or address the same stimulus as it would in a designated speed training session. Resisted sprints are one of the best stimuli for creating change in both force and power production. My favorite tools to use are:

  1. Hills
  2. Sled sprints
  3. Chained sprints
  4. Banded marches

All of these will teach athletes how to put force into the ground, resulting in higher outputs. I believe that getting in a particular volume of sprints (200-300 meters) is necessary to create change, and a combination of resisted and unresisted sprints will make that change even more significant than using unresisted sprints alone. Sprinting in practice alone will not help you accomplish that.


Video 1. Resisted sprints are an effective stimulus for eliciting improvements in acceleration. Whether for force or power development, resisted sprints are a staple in our acceleration training.

Another big factor in why I believe athletes should train sprints in a designated sports performance session is the ability to time them. Timing sprints plays a major role in speed development—there is no question that timing sprints improves effort levels. Not only are outputs better, but athletes are held accountable for every rep and receive immediate feedback when going through a speed session.

It is important to recognize that athletes will not set a personal record every time they sprint. You should reiterate this to your athletes, as expecting to hit a personal best every time they sprint sets your athletes up for failure. We are looking for trends in progression or regression, not speeds based on singular workouts. This is the biggest reason for me why training speed throughout the entire season isn’t just a good idea; it is necessary.

We all know there is a reduction in training velocity and volume once in-season. In this situation, athletes may never truly accelerate with 100% intensity; therefore, they won’t hit the necessary velocities to create change. The residual training effect for speed is five days, plus or minus three days. Knowing this fact, it is easy for there to be a decline in sprinting abilities. I have seen it firsthand in-season with our volleyball program, with the following changes from the first week compared to the last week of our regular season:

    Peak Force (N/kg): 7.05 → 7.31 (3.64% improvement)

    Peak Power (W/kg): 13.09 → 13.83 (5.62% improvement)

    Peak Velocity (m/s): 7.26 → 7.41 (1.99% improvement)

3. Since Players Don’t Reach Peak Velocity, Max Velocity Training Has No Place in the Development of Court-Based Athletes

This is probably the biggest misconception of them all. Training velocity is paramount for all court-based athletes, but not for the reasons you may think.

In sports like basketball and volleyball, athletes rarely hit top speed; therefore, many coaches think there is no need to train athletes at peak velocity. This, however, couldn’t be any further from the truth. Peak velocity is a stimulus like any other and must be treated as a crucial tool in your exercise database instead of an exercise that is “sports specific.”

Peak velocity is a stimulus like any other and must be treated as a crucial tool in your exercises database instead an exercise that is ‘sports specific’, says @bigk28. Share on X

Peak velocity is the top speed an athlete hits during a sprint. Dr. Ken Clark has done research on this topic, and I have seen with my own athletes that team sports athletes hit peak velocity at the 25- to 30-meter mark, on average. I love peak velocity training for the following reasons:

  • Has force output unlike anything you could ever do in the weight room (anywhere from 3-5x force output on ground strike).
  • Bulletproofs the hamstrings from injury.
  • Requires rapid contraction and relaxation.
  • Involves coordination, rhythm, and balance.
  • Raises the ceiling on other sprinting outputs.

The fact that you produce that much force at high speed is the main reason why you should be training the stimulus. You will not find another exercise that can match those types of outputs.

On top of that, we see hamstring injuries happen all the time in sport, so why not use a stimulus that you know will help reduce the incidence of injury with your athletes? The last two reasons are big for me: all sports require rapid acceleration then deceleration in a coordinated manner to perform at a high level. It is tough to mimic this movement in the weight room, but having your athletes perform movements at top speed makes their bodies have no choice but to coordinate themselves to move swiftly and efficiently.

Speed reserve is another big factor regarding the benefits of training peak velocity. If I raise my athletes’ top speeds at, say, 25 meters, I will be improving their speeds at shorter distances as well. I don’t think this necessarily means they will instantly become better accelerators by training top speed, but there should be higher speeds happening as distances get closer to their top speed.

Different types of exercises to use to train the peak velocity stimulus:

  • Flys
  • In and Outs
  • Drive Floats
  • Curved Sprints
  • Max Effort Sprints up to 40 meters

These are all variations I love for my court-based athletes. Flys with various run-ins are probably my favorite because they don’t stress the athlete to hit top speed at a moment’s notice. The athlete can build progressively until they feel comfortable enough to turn it up another notch to hit top speed.


Video 2. Flying sprints are a great way to address the peak velocity stimulus among court-based athletes. Most athletes hit top speed anywhere around 25 meters, so a run-in zone of 20 meters with a 10-meter fly zone is a safe and effective way to train the stimulus. 

4. Speed Training Could Put Players at Risk of Injury

I would argue that the lack of speed training could increase the risk of injury for athletes.

Both basketball and volleyball athletes are in a constant state of acceleration and deceleration. They must learn how to produce force in an instant and be able to decelerate to react to make a play.

I would argue that the LACK of speed training could increase the risk of injury for athletes, says @bigk28. Share on X

Not training those stimuli is dangerous for the athletes and could lead to increased injuries. Injuries happen when there is a lack of exposure to a stimulus; if the only time athletes sprint at maximal effort levels is during competition, you are putting your athletes at an increased risk of injury.

Training Speed Matters for Court Sports

I have seen firsthand the benefits of training all types of speed in my court-based athletes. What is done in practice isn’t necessarily what I would define as high-effort speed work. There are qualities that we must focus on to develop speed, including both acceleration-based and peak velocity type training. By training both ends of the spectrum, you develop your athletes across many different stimuli and build an overall resilient athlete.

For both volleyball and basketball, I start each one of my workouts with some type of speed work: one acceleration day, one peak velocity day, and one combo day. Not only have we seen increases in speed across all our athletes, but we have seen development in multiple areas that contribute to athletic performance in their particular sport.

The goal is longer-term athletic development with our athletes, and if you wish to make the best, most resilient athlete by the time they leave your program, then speed must be at the center of your sports performance training. As long as you constantly assess your athletes, you will find out what type of speed work is best for them and what changes you need to make for each athlete. Speed wins in all sports, so don’t leave it up to chance that your athletes will improve. Take speed development into your own hands.

Since you’re here…
…we have a small favor to ask. More people are reading SimpliFaster than ever, and each week we bring you compelling content from coaches, sport scientists, and physiotherapists who are devoted to building better athletes. Please take a moment to share the articles on social media, engage the authors with questions and comments below, and link to articles when appropriate if you have a blog or participate on forums of related topics. — SF


Yin Yang Contrasts

Yin and Yang: The Contrast of Training

Blog| ByAustin McClinton

Yin Yang Contrasts

Whether in training, a profession, or in life itself, balance is a key piece to sustained longevity. The pendulum can’t swing too far in one direction or else it leaves us susceptible to unfavorable outcomes (injuries, burnout, chronic stress, cognitive bias, etc.). For us coaches that train team sport athletes, balance is a major concept on which we hang our hats. A really solid team sport athlete is typically a Swiss army knife throughout their development. They are solid at just about everything, from both a physical and mental standpoint: they are simply what used to be called “athletic.”

For us coaches that train team sport athletes, balance is a major concept on which we hang our hats. Share on X

This athleticism is built through many sports, activities, and life experiences that have left them with a diverse toolbox to pull from in terms of movement solutions. As coaches, understanding this contrast can vastly improve the quality of athletes in our communities, along with the way we shape the development of these athletes from adolescence to their adult years.

Yin and Yang

Dating back to 3rd century BCE (or even earlier), Yin and Yang was a fundamental concept found throughout Chinese philosophy. The principle of Yin and Yang is that all things exist as inseparable and contradictory opposites, for example:

  • female-male
  • dark-light
  • old-young

The pairs of equal opposites attract and complement each other. Neither Yin nor Yang is considered to be superior to its counterpart; instead, a correct balance must be struck between the two in order to achieve harmony. I posit that as physical preparation coaches, the most powerful fundamental understanding to have is that of finding the contrast and applying the contrast within your programs.

Yin Yang Complementary

Organization of training

My decision to start the Common Sense Training podcast was partly influenced by my desire to highlight great coaches from all over the world. These coaches have had continued success and longevity over decades of working with athletes. One coach that I wish I could have had the opportunity to speak with was the late Charlie Francis. Charlie’s approach was unique in that it was applicable across any sporting activity and could be adapted easily by us coaches.

One of the hallmarks of Charlie’s coaching philosophy was his high-low approach to program design. In this polarized design, intensities would work in a contrasting manner in order to support the natural stress-adaptation rhythms of the human body. Some examples of the high intensity elements would include:

  • maximal sprinting
  • plyometrics
  • medicine ball throws
  • heavy strength training
  • sport practice
  • competitions

Low intensity elements would include:

  • tempo runs
  • aerobic activities
  • strength circuits
  • abdominal work

When utilizing this approach, it doesn’t mean that there aren’t certain forms of moderate intensity elements added in when needed.

Some reasons why contrasting intensities for athletes might be favorable are:

  • If athletes are performing quality high intensity efforts, sustainability of those outputs must be preserved.
  • Too much high intensity and volume can lead to excess fatigue, injury, burnout, etc.
  • In terms of resource allocation, athletes only have a finite amount of energy which should be spent on the stimuli that can get them the biggest bang for their buck.
    • Low intensity elements can be general in nature which can be used as a low cost means to build strength, lean mass, work capacity, etc. (doesn’t empty the “cup”).
  • Athletes need to recover in order to adapt. Low intensity provides that buffer and assists in the adaptation process.
    • Low intensity promotes recovery, resets tone, and helps rebound from high intensity sessions.

If athletes are performing quality high intensity efforts, sustainability of those outputs must be preserved. Share on X
High Low

In a recent conversation with coach Joel Jamieson, he talked about his recovery-driven process to training. Obviously, as coaches we have to give our athletes something to recover from in training. However, Joel makes a great point in saying an athlete can only get to a higher level of performance based on the status of their recovery from previous stressors.

Let’s use arbitrary numbers to work this out. Say an athlete has a readiness score of 100. They do a high intensity session and it brings that number down to 60. After a true high intensity session, an athlete might need 48-72 hours to fully recover (athlete depending). So, let’s say after 48 hours they have a recovery score of 80. They do another high intensity session and it drops them down the same 40 points as last time. This time, however, they started in a deficit—so now their readiness sits at a 40. You see where I’m going with this.

Yes, human beings aren’t so simple as a number on a page, but if you dig yourself deep enough into the rabbit hole of recovery, bad things tend to follow. We didn’t even take into account mental stress and how lifestyle choices affect the body’s ability to function. There is a point of diminishing returns. More is not always better. Having contrast in a program might help offset that if done properly.

Where We See Contrast in The Trenches

Contrast is present in many of our programs, even if we don’t realize it. Let’s take a look at some common forms of contrast that we may see in a physical preparation program.
Contrast Chart

Simple-Complex

In the words of legendary coach Boo Schexnayder “you can either be fancy or you can be intense.” The simple tools in training, like maximal sprints, jumps, tempo runs, squats, deadlifts, presses, chin ups, and many others, are fantastic ways to allocate your training resources. These menu items are simple to teach and oftentimes feel innate to athletes if they had appropriate exposure during their development.

Simple training can be used for all qualifications of athletes. If you are lucky enough to work with elite athletes, the simple training elements are ways to get in training while not zapping precious energy resources that are needed for their sport. Simple doesn’t necessarily mean easy. Simple means making training cut and dried enough where athletes can focus on execution and outputs.

Training Components

Two major forms of simple and complex are home base-diversity and general physical preparedness-specific physical preparedness. Home base is your simple, yet effective training modalities that are present throughout the entire program. If you know the vertical integration concept popularized by Charlie Francis, these would be the major components that are threaded block to block.

Every once in a while, diversity is needed in a program. Diversity can break up training staleness or be the trump card needed to drive a favorable adaptation. An example might be acceleration and max velocity. In team sports, acceleration training would be the home base. However, on a frequent basis you would want to sprinkle max velocity sprints to aid in top speed and to inoculate against soft tissue injury.

Diversity can break up training staleness or be the trump card needed to drive a favorable adaptation. Share on X

Home Base

The other form that us coaches should all be familiar with is GPP-SPP. How this fits into the simple-complex framework is in the specificity of work. GPP will consist of general training aimed to boost general qualities. Typically, GPP work will be far away from the sporting actions, although it may hit on a specific quality like regime of muscular work or energy system development. The goal of GPP is to prepare the body for SPP.

SPP is what it sounds like. On the sliding scale of training, athletes will now begin training more concentrated activities and abilities that hopefully will transfer over to successful sporting outcomes. The distribution of GPP to SPP will be different for every level of athlete. Striking that balance of what needs to happen will take shape after a detailed needs analysis.

An easy example of a GPP exercise for a football lineman is a squat variation. It strengthens and prepares the hip and knee extensors. A squat variation can then transfer into a heavy prowler push in SPP. A coach can then match the sets, reps, distance, and rest intervals to match that of a football game. The exercise still focuses on the lower body, but in a more specific manner. It is important to note that true specificity is found in the sport itself—anything done in the weight room or during S&C drills is relatively still general in its application.

It is important to note that true specificity is found in the sport itself—anything done in the weight room or during S&C drills is relatively still general in its application. Share on X

Acute-Chronic

The sport science sector has begun to peel away some of the layers that relate to player loading and potential for injury. One area that has received a lot of interest is that of acute versus chronic stress. Acute simply means short term. Chronic would then be a long-term view of the stressors applied. It is important for us coaches to begin with the end in mind when it comes to preparing our athletes for their sport.

ACWR Sweet Spot
I recently recorded a podcast episode with coach Aaron Wellman where he explained the importance of gradually building up workloads as opposed to acute ramp-ups like we see in many training camp environments. Aaron uses the phrase “callous don’t blister” when talking with coaches. We also talked about the role of sport science in physical preparation. The goal of collecting data isn’t to give our athletes more time off or less work; the goal is to properly progress them in a safe manner that allows them to do more work over time.

The goal for collecting data is to properly progress them in a safe manner that allows them to do more work over time. Share on X

That is the ideal situation. Having enough to slow cook athletes and nudge the needle to a place where they are hopefully prepared for the sport. It is important to remember that the first week of training camp is often the most intense period that an athlete will face all year due to the abrupt spike in stressors.

Another important area that Aaron believes to play a huge role in athletic performance is the accumulation of life stress. Training is just one spoke of the wheel. The sport they play is another. Mental stress, emotional stress, social stress, and lifestyle choices are all additional spokes to the performance and wellness wheel.

Visualize a full cup of water. The cup is our capacity to handle stress. Water is our energy. As we get stressed, we dump some of the water out. What happens when it’s all gone? Performance tanks, our bodies lose their ability to function optimally, we could get sick or run down, our resiliency is diminished, etc. Having that awareness as a coach will put us in a better place in terms of loading and having conversations with our players.

One small example for me personally is training my athletes during finals week. From a mental standpoint they are shot, but I have this wonderfully periodized plan and it is a high intensity day. Well, something has to change on my end. Not drastically though. Remember plan B is as close to plan A as possible. There is time where we can make some of this up; it doesn’t, however, have to be today. There’s a quote I like that says: “The intensity doesn’t come from the sheet of paper, it comes from the athlete.”

The intensity doesn’t come from the sheet of paper, it comes from the athlete. Share on X

Fast-Slow

There are many training modalities that come to mind when I think of fast and slow. My initial thought goes to a broad brush of what many team sport athletes might need: alactic power/capacity and aerobic capacity. Where these qualities may appear to be on opposite ends of the spectrum, you can adapt training to include both.

Alactic efforts are those that are very intense and brief in nature. Think maximal sprints, jumps, lifts, etc. Aerobic endeavours are best served at lower intensities with varying durations. The building or maintenance of aerobic capacities will support alactic outputs and allow for a condensed recovery period between repeated bouts. Aerobically driven activities are also non-competitive to the main alactic stimulus if programmed properly.

To paint a picture, think of training for sprinting-based activities. Our fast actions will include hard accelerations and maximal velocity sprints—these are meant to raise the ceiling of performance. But they also come at a high cost. To counterbalance our fast work, I will use “slow” training means. By slow, I am thinking of smooth tempo runs or running drills done extensively. Both serve as an important stimulus if dosed appropriately.

Positional Power

Another example of fast and slow could involve muscular actions—more specifically, eccentric and concentric. Both of these muscle actions are crucial in sports and movement in general. Eccentric muscle actions are typically done through lengthening and are fairly damaging compared to other muscle actions. Eccentrics are often referenced when we talk about “force absorption.” Concentric muscle actions are typically done through muscle shortening.

The concentric action is most commonly thought of as “force production.” There is growing interest in the eccentric portion of movement and its role in injury and performance. Something I hear frequently from coaches is that an athlete can only produce as much force as they can absorb—when that balance is too asymmetrical, that’s when injury risk creeps up.

There is growing interest in the eccentric portion of movement and its role in injury and performance. Share on X

The weight room is an obvious place to implement fast and slow movements. A good example could be shown with the squat exercise. To make a squat fast, you need to reduce load. Dynamic effort squats are done with 40-70% of your 1RM, using a controlled eccentric and a high intensity, fast concentric. This helps in the recruitment of motor neurons.

To slow the squat down, we can add a rep tempo. The rep tempo would bias towards a fairly slow descent; maybe like 4-8 seconds depending on load. This style of squat is often called eccentric training. Loading could be around 70-90% of 1RM and could even go as high as 120% of 1RM in qualified athletes.

Another form of fast and slow is French Contrast training. French Contrast utilizes varying loads and velocities in an attempt to hit each major landmark along the force-velocity curve. Two major differences in French Contrast worth noting are that heavier loads are used without a slow eccentric. The heavy load itself will slow the movement down. The second difference is the use of assisted movements. These assisted movements help velocities reach a level that wouldn’t otherwise be hit. Here is a basic template of what a French contrast series might look like for the lower body.

French Contrast

Short-Long

Charlie Francis would often use a short-to-long or long-to-short approach with athletes. The basic premise was to manipulate sprint volumes in order to properly progress training in an effort to avoid “too much, too soon.” For team sport athletes, the short‑to‑long approach seems to make sense based on the running demands.

In many sports, the furthest an athlete might run unabated might only be about 50 yards. That number generally seems to be much less than 50 yards, but my recommendation is to train those longer distances for the “break glass in case of emergency” situations so the athletes don’t get injured. The two major variables to consider in a short-to-long program are volume and intensity. In sprint training, depending on the level of athlete, I’ve seen average volumes hover between 200-500 yards per session.

Developing athletes are able to handle higher volumes because they have less horsepower and won’t do as much damage as an elite athlete. The higher volumes also allow for more repetitions to develop proper motor patterns and sprint postures.

Developing athletes are able to handle higher volumes of sprint training because they have less horsepower and won’t do as much damage as an elite athlete. Share on X

Intensity relates to the velocity achieved during sprints. Maximal velocity typically means anything over 90% of an athlete’s fastest time. It has been said many times, but in most cases, to get fast you have to train fast. That comes with increased risks—especially if the athlete is not prepared. Where the art of coaching comes in is how you manipulate each variable. Developing constraints or intensity limiters are a great way to program sprint training. You can do this by utilizing:

  • Timed sprints (record performance drop-offs)
  • Build up sprints
  • Resisted or hill sprints
  • Yardage limiters (athlete is asked to do a 40 yard-sprint and is told that the 20‑yard mark is where they can no longer accelerate past; whatever speed they built up to in that initial 20 yards is what they maintain for the second 20 yards)
  • Play with complete and incomplete recoveries (rest intervals)

The key here is to slow cook progress and to not overlook technique. Running fast is much more than force production and rate of contraction-relaxation.

One other form of short-long that many of us coaches use is during ground contact times for plyometrics. Shorter ground contact times are found in movements like sprinting, depth jumps, hurdle hops, jumping rope, and other forms of extensive hopping. Longer ground contacts can be found during weighted jumps, broad jumps, and any jumps that aim to generate force over a longer time scale. Both are very important when it comes to training for general athleticism. A big push in the strength and conditioning field is using data to quantify if an athlete is force dominant or velocity dominant. Depending on what you find, training can then be specific to the needs of that athlete.

A coach that does a great job at this is Aaron Wellman. Aaron has found a way to seamlessly introduce data collection into his training sessions. Each athlete might be doing a jump exercise, but the emphasis area will differ for each group. One group might be doing a hurdle hop with jump mats. Another group might be doing weighted box jumps. This is just a small example of using short-long ground contacts within a session.

Stiffness-Compliance

The emergence of tendon research has brought this next form of contrast front and center: stiffness and compliance. I think a well-rounded approach to training muscles and tendons will serve your athletes better than simply focusing on one. Commonly, in a tendon-muscle relationship, there is both stiffness and compliance. Where the muscle meets the tendon, there must be some pliability there; where the tendon meets the bone calls for more stiffness. How these are trained will differ a bit.

If we have strong muscles but not enough tendon integrity, we can see injuries in these connective tissues. For increased stiffness, think dynamic movement. Dynamic in the form of sprinting, jumping, cutting, etc. This fast coupling is what builds cross links in the tendon, making it stiffer. As it turns out, inactivity also increases stiffness, but not in a positive way. Keith Baar has shown that tendons don’t need much more than 10 minutes of loading to see benefits.

If we have strong muscles but not enough tendon integrity, we can see injuries in these connective tissues. Share on X

This has interesting implications in the return-to-play world. From what I’ve gathered, it also seems that female athletes may be predisposed to tendon/ligament injuries because of an interaction with hormones and the development of cross links within connective tissues.

Compliance is another, equally important aspect of tendon-muscle training. If we make a tendon stiffer than a muscle is strong, muscle pulls can happen. An example of this might be observed during mini-camps in the NFL. Players are primarily doing fast, dynamic movements that increase stiffness. The weight room is often one of the first things to go. Without slower strength work, the muscle-tendon junction may be vulnerable to soft tissue pulls. The general recommendation to balance out stiffness with compliance is slow movements.

Heavy weight training can be applied as one means. Another is the use of isometrics. Holding an isometric for 30-40 seconds can be enough loading in the tendon to break cross links and build compliance. Again, Keith Baar is an excellent resource on all things tendons. A good rule of thumb for coaches is:

  • First, prepare the athlete’s tendons and tissues to match what they will experience in their sport.
  • Next, give the athletes what they aren’t getting in their sport.

If they are basketball players and are jumping all the time, plug in exercises for tendon health and compliance. A balance of the two seems to be a good starting point.

Lifestyle

It is often said that in life we need to find balance. While that holds true for a majority of situations, there are however some instances where contrast plays itself out in our lives.

The first example of that is in the contrast between sleeping states and states of wakefulness. Sleep and its importance in performance and health has been a big topic of conversation over the past few years. Matthew Walker has done a wonderful job of laying out actionable information for the layperson. Sleep is a vital aspect of our lives and, if possible, shouldn’t be compromised.

Sleep is a vital aspect of our lives and, if possible, shouldn’t be compromised. Share on X

On the other side of sleep—and an area that offers an interesting point—is the state of wakefulness. Wakefulness is exactly as it sounds. How we spend our day, more specifically our early and late hours, will either support or hinder the quality of sleep we receive each night. Our bodies are programmed to follow a certain cycle or rhythm. The basic term that represents this cycle or clock is called the “circadian rhythm.” This clock dictates specific functions and actions of our bodies that are important.

As we wake up, we need natural light exposure in our eyes. This light exposure helps initiate our clock and sets the stage for sleepiness to occur some 12-16 hours later. Without adequate light exposure we experience a delay or lag in wakefulness. We also need some natural light exposure in the early evening hours. Seeing the sun at a low position in the sky is useful for the body and its preparation for sleep.

It is important to get light in both the early and later parts of the day. A common recommendation is to get 10-15 minutes of exposure at both times. Depending on how much light is available in your area, that threshold will expand out to get sufficient lux.

Another way we can “hack” the body’s current state is through breathing. Breathing is another vital part of life and is something that has a massive impact on our quality of life. It seems that a more optimal form of breathing should be more or less reflexive and heavily involve the diaphragm. Breath is a way to use our physiology to shift into what is required of us in that specific context.

How we cadence and perform each breath can place us into a more sympathetic- or parasympathetic-dominant state. Generally speaking, sympathetic is our body’s “fight or flight” mode and parasympathetic is more of our “rest and digest” mode. Both are very important.

If we want to heighten our arousal levels, focusing on the inhalation portion of each breath will help us achieve this. A popular technique known as the Wim Hof method, uses a fast cadence in order to hyperoxygenate our bodies. This leads to a more “alive” feeling.

We can also use breath to down-regulate ourselves, which is very much needed in the high-stress environments that we all face in today’s society. To shift ourselves into a more parasympathetic state, our focus then slides to the side of exhalation. By extending and slowing down the rate at which we exhale, we tend to offload more carbon dioxide.

We can also use breath to down-regulate ourselves, which is very much needed in the high-stress environments that we all face in today’s society. Share on X

Stanford neuroscientist Andrew Huberman explained a specific action for dampening the stress response known as the physiological sigh. A physiological sigh is a pattern of breathing in which two inhales through the nose are followed by an extended exhale through the mouth. Huberman explained that the double inhale portion of the physiological sigh pops the air sacks (called alveoli) open, allowing oxygen in and enabling you to offload carbon dioxide in the long-exhaled sigh out. These are just a few examples of how contrasting our breath can alter our current status.

Finding Contrast In Your Life

Contrast exists in most dimensions of life. Without it, we have little context for comparison in our perceptual field. Our goal as coaches is to leverage contrast and use it most effectively with our athletes. These are only a few examples. I challenge you to find more within your programs and develop a fundamental understanding of how to apply them.

“The greater the contrast, the greater the potential. Great energy only comes from a correspondingly great tension of opposites.” – Carl Jung

Since you’re here…
…we have a small favor to ask. More people are reading SimpliFaster than ever, and each week we bring you compelling content from coaches, sport scientists, and physiotherapists who are devoted to building better athletes. Please take a moment to share the articles on social media, engage the authors with questions and comments below, and link to articles when appropriate if you have a blog or participate on forums of related topics. — SF


Hex Bar Deadlift

Using the Vmaxpro in High School with William Fly

Freelap Friday Five| ByWilliam Fly, ByCody Hughes

Hex Bar Deadlift

William Fly is currently the Head Strength and Conditioning Coach at Northwest Cabarrus High School in Concord, NC. He is also the Assistant Head Football Coach/Offensive Line Coach for the Trojan football program and the Assistant Track and Field Coach. Coach Fly was named 2020 NHSSCA North Carolina State Coach of the Year. He also serves on the NHSSCA State Advisory Board for North Carolina and as the Cabarrus County School’s PLC Lead for High School Strength and Conditioning.

Freelap USA: What led to you using Vmaxpro?

William Fly: Throughout my journey as a high school strength coach, I always worried whether we were training what I intended and whether my athletes/students were getting the adaptation I wanted. I previously used an APRE system, and I felt it was the best approach to answer that question. For some situations, APRE was exactly what we needed. However, going into my new position, I knew I wanted to better provide for my students/athletes. Using APRE alone in my new situation simply didn’t deliver what we needed.


Video 1. An athlete performs reps with live feedback from Vmaxpro.

This thought led me down the “rabbit hole” of velocity-based training. From reading articles on SimpliFaster, online courses, and listening to well-respected speakers/presenters, I knew that this technology could greatly benefit our students/athletes here at Northwest Cabarrus. Once I knew I wanted to invest in VBT units for our program, I tested Vmaxpro and Push. We allowed our students to try both products. After a 30-day period, I asked my students which one was easier to navigate, set up, and use. Their feedback led us to go with Vmaxpro.

After a 30-day period, I asked my students which one was easier to navigate, set up, and use. Their feedback led us to go with Vmaxpro, says @FlyCoach_68. Share on X

Freelap USA: Do you currently use Vmaxpro in a team setting? What are the pros/cons of using it in that setting?

William Fly: Yes, we currently use Vmaxpro in a team setting. Almost every student in every class uses our Vmaxpro units. One of the advantages of using Vmaxpro in a team setting is that we can run eight racks/eight Vmaxpro units off four iPads. Two racks share an iPad attached to the wall between them: one rack is labeled “Station 1” and the other as “Station 2.” It was much easier to get four iPads from our technology department than eight.

Vmaxpro Station
Image 1. We use one iPad with two Vmaxpro units/two racks by labeling one rack “Station 1” and the other “Station 2” and attaching the iPad to the wall between them.

Another advantage is the navigation of the “Multi Station” feature of Vmaxpro. Our students/athletes can easily tap to the next person and modify the weight/load listed on the iPad. They can also see feedback on both sides of the screen and use both sides without blocking the rack next to them.

Unfortunately, one of the disadvantages we have found is simple user error. We have had situations where one person “accidentally” closed the app or did something that not only affected them and their rack but the other rack next to them as well. Then, one person’s slip-up impacts 7-8 other students. We understand there is a learning curve, though, which comes with any applied technology.

Freelap USA: What metrics do you find most useful?

William Fly: The velocity measurement is the first metric that is valuable for us. That metric alone has done wonders for our program. We can now quantify effort and intent for our barbell movements. Students/athletes can see if they are moving the bar at the prescribed speed.

The velocity measurement is the first metric that is valuable for us. That metric alone has done wonders for our program. We can now quantify effort and intent for our barbell movements. Share on X

Another plus for velocity is the creation of competition throughout the entire room. Students are consistently trying to “beat their score” or “beat the score” of someone next to them.

The bar path feature has been a tremendous asset to our program. Kids can see on the spot if they are moving the bar in an appropriate path given the movement. This is especially valuable with our clean progressions. It shows whether they are pulling the bar tight enough to their body and eliminates guessing what went right or wrong with a particular rep.

The distance metric has been a blessing in disguise. We now use our Vmaxpro units and the ankle straps to measure vertical jump, and we can measure a class of 40 in 15-20 minutes.

Vmaxpro Metrics
Image 2. The Vmaxpro’s ability to measure velocity has done wonders for our program. We can now quantify effort and intent for our barbell movements.

Freelap USA: What stands out about the Vmaxpro to you?

William Fly: The ease of use and setup is the biggest reason why we picked Vmaxpro over other units. The longest part of the experience is the “syncing” of the devices for the first class/group. Once that is done, you are set for the entire school day. Once it’s set up, I know (for the most part, given human error) it will capture/detect/record every rep completed by a student/athlete.

One of the most significant and remarkable things that stands out with Vmaxpro is its customer service. Because it’s a company based in a different country, I braced myself for a long response time if I were to ever have an issue. However, whenever I had a problem, they always got back to me in a very reasonable time (given that we are in different time zones). They have always found a solution to whatever problem I was having.

Freelap USA: Why should any coach invest in Vmaxpro?

William Fly: As a strength and conditioning coach who must coach multiple sports, I have to depend on systems to make sure I can fulfill all the requirements of my job. I rely on programs like TeamBuildr to streamline our programming for all our classes and teams. I now use Vmaxpro as a simple way to track all our 1RMs.

I know that I can rely on these devices to do their job. Realizing that I can’t watch every student complete every rep, I can now pull up everything done on a particular day on my iPhone/iPad and make adjustments for the next day.

Vmaxpro Team
Image 3. The Vmaxpro team system.

Vmaxpro breeds competition for each rep and set. You will begin to hear students/athletes yelling out their speeds in the weight room in excitement. Coaches always are looking for ways for athletes to compete in the weight room setting, and Vmaxpro helps them do that.

Vmaxpro breeds competition for each rep and set. You will begin to hear students/athletes yelling out their speeds in the weight room in excitement, says @FlyCoach_68. Share on X

Vmaxpro ensures that you are training what needs to be trained at all times. It provides load recommendations according to your training goal for the day/session. Lastly, Vmaxpro serves as an assistant coach on the floor, providing real-time feedback on speed, power, velocity drop, and bar path.

Since you’re here…
…we have a small favor to ask. More people are reading SimpliFaster than ever, and each week we bring you compelling content from coaches, sport scientists, and physiotherapists who are devoted to building better athletes. Please take a moment to share the articles on social media, engage the authors with questions and comments below, and link to articles when appropriate if you have a blog or participate on forums of related topics. — SF


Charles Poliquin

The Life and Strong Times of Legendary Strength Coach Charles Poliquin

Blog| ByKim Goss

Charles Poliquin

German Volume Training, German Body Comp, and four-digit strength training tempo prescriptions are training methods commonly practiced today. What do they all have in common? Charles Poliquin, a Canadian strength coach who introduced these ideas and many others to the athletic and physical fitness communities.

For those new to the Iron Game, Poliquin coached Olympians in two dozen sports and hundreds of elite athletes in other sports. In track and field, he worked with 2004 gold medal winners Dwight Phillips (long jump) and Adam Nelson (shot put), and in 1999 worked with Jamaican hurdler Michelle Freeman, an Olympian who now coaches at the University of Virginia. But we’re getting ahead of ourselves. As a strength coach, Poliquin “talked the walk” and, spouting 19+ inch bone-crushing pythons for arms, “walked the talk!”

In contrast to today’s abundance of strength coaching and personal training organizations offering journals edited by PhDs, muscle magazines were one of the primary sources of training information in the early days of strength coaching. Flex, Iron Man, Muscular Development, and Muscle Media 2000 were among those publications treasured by strength coaches responsible for getting their athletes competition ready. Poliquin became one of the most popular writers for these magazines, and in 1997 assembled his best writings into his classic, The Poliquin Principles.

(Lead photo by Miloš Šarčev.)

Poliquin Principles
Image 1. Published in 1997, “The Poliquin Principles” introduced Charles Poliquin’s training methods to the bodybuilding and strength coaching communities.
Charles Poliquin distinguished himself from his colleagues with the use of precisely controlled ‘loading parameters.’ Share on X

Poliquin distinguished himself from his colleagues with the use of precisely controlled “loading parameters.” Loading parameters include training variables such as reps, sets, tempo (lifting speed during all phases of an exercise, a system he modified from a three-digit formula developed by Australian strength coach Ian King), and rest. For example, an exercise prescription for the upper body might look like this:

    A. Dumbbell Bench Press, 45-Degree Incline, Pronated Grip, 5 x 6-8, 3101, rest 45 seconds

This formula would tell you the exercise order, name of the exercise and type of resistance, body position, grip, sets, repetition range, speed of muscular contractions (eccentric, isometric, and concentric), time under tension, and rest period. For example, here is a leg workout Poliquin wrote for Phillips, the gold medal winner he started training in February 2004.

    A. Power Clean from Above Kneecap, 4 x 4-6, 40X0, rest 120 seconds
    – Make sure shoulders are ahead of the bar at the start
    B. Telemark Inertia Quarter Squat, 4 x 4-6, 40X0, rest 120 seconds
    – Go to ankle flexibility
    C1. 1 ¼ Front Squat, 4 x 4-6, 40X0, rest 120 seconds
    – Quarter rep in the bottom position
    C2. Atlantis Kneeling Leg Curl, Neutral, 4 x 4-6, 40X0, rest 120 seconds
    – Foot is pointing away and neutral

Before writing an athlete’s workout, Poliquin performed a muscular balance assessment, a system inspired by the training programs of European weightlifters. Poliquin believed that to achieve optimal performance with minimal risk of injury, you must address specific ratios of strength imbalances between muscle groups.

Poliquin believed that to achieve optimal performance with minimal risk of injury, you must address specific ratios of strength imbalances between muscle groups. Share on X

Consider the bench press: Poliquin found that if the muscles that externally rotate the shoulders were weak, this imbalance could affect bench press performance and increase the risk of injury. When pro hockey player Jim McKenzie met Poliquin, he could lift 280 pounds in the close-grip bench press (hands about 14 inches apart). That result is quite remarkable for a hockey player, but Poliquin wasn’t impressed.

During his assessment, Poliquin found that McKenzie’s rotator cuff strength was especially weak. As a result, for the next three months, McKenzie did not bench press; instead, Poliquin had him focus on improving his rotator cuff strength. However, at the end of this training period, McKenzie bench pressed 331 pounds; again, no bench pressing. At this point, Poliquin reintroduced bench pressing, and six weeks later, McKenzie close-grip bench pressed 380 pounds!

Included in Poliquin’s assessment are what could be considered “functional tests.” Upon his initial assessments for long jumper Phillips, Poliquin found a muscular imbalance between his hamstrings and a quadriceps muscle called the vastus medialis oblique. Before prescribing exercises to help Phillips run faster and jump higher, he began with corrective exercises to address these imbalances.

I first saw Poliquin demonstrate several of these tests at a seminar I attended in the early ’90s in California. One of the critical tests for the lower body he taught was an expanded version of a knee stability test developed by Lois Klatt, Ph.D.

The Klatt test is performed barefoot. Standing on the edge of a low platform, Poliquin had the trainee extend one leg at a 15-degree angle, then hop off. How the trainee lands determines what muscles are weak and what corrective exercise should be prescribed. For example, leaning forward as they land could suggest a weakness in the gluteus maximus; corrective exercises could be reverse hypers or good mornings. Hopping forward could suggest a weakness in the hamstrings; corrective exercises could be leg curls or Romanian deadlifts.

Assessing Imbalances
Image 2. Assessing muscular imbalances was an integral part of Coach Poliquin’s athletic training program. (Photo courtesy BFS magazine.)

Before getting into some of Poliquin’s most popular workouts, let’s explore how he became a strength coach.

The Education of a Strength Coach

As an athlete, Poliquin dedicated himself to learning the martial arts, and at age 14, he became the second-youngest athlete in Canada to earn a black belt. His sensei was Web Corcoran.

Poliquin took the bus to the dojo. During one snowstorm, the buses were not running, so he walked. However, no other students showed up. Rather than conducting a private lesson, Corcoran invited the future strength coach to lift weights with him. Poliquin was hooked and set out to pack on muscle and become as strong as he looked.

It was only natural for Poliquin to major in exercise physiology in college. For his master’s thesis, he examined the optimal loading variables for developing strength. During his studies, Poliquin discovered that the best research on resistance training could be found in European sports science journals, particularly those from Germany. Unfortunately, only the abstracts of these studies were published in English and French, so his passion for knowledge led him to learn German.

His education didn’t end there.

Not only would Poliquin travel the world to attend seminars, but he would also seek out experts in fields he was interested in and offer to pay them for personal consultations. Share on X

Not only would Poliquin travel the world to attend seminars, but he would also seek out experts in fields he was interested in and offer to pay them for personal consultations. For example, twice I recommended he consult with athletic fitness experts I knew, and he flew to both ends of the United States to see and learn from them. I should also note that Poliquin was also a voracious reader, often devoting one full day each week to study (advice he gives to his students, explaining that “Learners are earners!).

With what could be considered a photographic memory and a mastery of speed-reading techniques, Poliquin read and retained the knowledge of hundreds of books each year. During question-and-answer sessions at seminars, Poliquin often looked upward and off to the left—which he said was the side of the brain that held memories—to recite specific passages from research studies. He also hired graduate students and colleagues to collect research papers, and he would read them during long flights. I met one of these helpers at an NSCA convention, and he showed me a foot-high stack of documents he collected for Poliquin.

From Theory to Practice

While attending the university and lifting weights, a volleyball player was impressed with Poliquin’s strength and asked Poliquin to write a workout for him. He quickly became the team’s strongest athlete, so other athletes asked Poliquin for workouts. Word spread, resulting in Poliquin being hired as the official strength coach for the national team to help them prepare for the 1984 Olympics.

Athletes and coaches from other Olympic sports in Canada learned of Poliquin’s abilities. Of the 118 Canadian athletes who competed in the 1992 Olympic, he coached 78, and five won medals. Two years later, seven of his athletes won medals at the 1994 Olympics. By then, the Canadian government pressured him to become a full-time civil servant. To keep his revenue stream growing, he looked for an opportunity to move to the United States.

On one of his visits to Colorado Springs, I introduced Poliquin to Dr. Mike Leahy, a chiropractor who developed the popular soft tissue treatment called Active Release Techniques (ART). Poliquin set out to master ART, which led to him eventually leaving Canada to work out of Leahy’s sports medicine facility. Also working out of that facility was Tim Patterson, best known for the popular website Testosterone.

Poliquin eventually decided that although Colorado Springs was a good place to work, Phoenix, Arizona, was better (although he seriously considered Las Vegas). The reason was that the airport was convenient for his national and international clients, along with the many pro athletes who lived in the area. So Poliquin set up his training gym a few miles from the airport in a quiet business district. I should mention that it was a private gym: no sign out front, just a number; so, if you didn’t know that number, you would never find it. One concern Poliquin had with the sports celebrities that trained there was that he didn’t want them distracted by fans.

The way clients would work with Poliquin was distance, but the difference was you had to fly out to see him twice a year for an assessment. Thus, you would fly out to his facility and  go through testing that often included lab testing. One beneficiary of this testing was Adam Nelson. After his eventual gold in the 2004 Olympic Games, Nelson visited Poliquin in Arizona.

Nelson always had an issue gaining muscle, so Poliquin had Nelson submit to lab testing. The testing revealed that Nelson had a bacterium affecting his ability to assimilate protein, so he had his doctors treat this problem. Within three months, Nelson gained 25 pounds of solid muscle and decreased his body fat by 5%! Poliquin also found that Nelson had a shoulder injury that affected his pressing ability. He treated that with ART, and Nelson made dramatic strength improvements immediately.

Track Field
Image 3. 2004 Olympic Champion Adam Nelson was one of the many track and field athletes who benefited from Coach Poliquin’s approach to helping athletes fulfill their physical potential.

Of course, Poliquin could only train so many athletes—so, to expand his audience, he focused on writing articles and books and giving seminars worldwide. In 1994, he told me he earned enough frequent flyer miles to travel around the world twice!

Of course, Poliquin could only train so many athletes—so, to expand his audience, he focused on writing articles and books and giving seminars worldwide. Share on X

I met Poliquin at a strength coaching seminar in 1988. I was a strength coach at the Air Force Academy at the time, responsible for writing and supervising the workouts for all the major varsity sports. To give my athletes an edge, I did extensive research at the Olympic Training Center Library in Colorado Springs to find everything Poliquin ever wrote and began calling him weekly.

Over the next two years, my long-distance bill to Canada equaled a month’s salary! But this investment was worth it, as I wanted to thoroughly understand what he did with athletes and why he did it. Further, with an athlete base that expanded to 875 athletes during my final year, I could effectively assess the effectiveness of Poliquin’s training methods. Two of these methods were the German Volume Training (GVT) and German Body Comp (GBC) programs.

The German Connection

Shortly after I started consulting with Poliquin, I spoke to him about a minor league hockey player, Craig Shepherd, who wanted to bulk up to market himself as an enforcer. Poliquin told me about a program he called German Volume Training. It involved executing a few “best bang for your buck” exercises, such as squats and bench presses, and performing them for 10 sets of 10 reps.

In less than three months, my hockey player gained more than 40 pounds of body weight, power cleaned 285 pounds, and bench pressed 400 pounds! Interestingly, later in his career he lost all that weight and got recruited to play for Moscow Dynamo in Russia. After that, he became a professional skater in pairs competition, teaming up with 1992 Olympic champion Natalia Mishkutionok.

The next German-inspired program was called German Body Comp. I had called Poliquin about the female figure skaters I was working with who needed to lose body fat. He told me about a program using short rest intervals designed to lose body fat quickly without compromising strength or muscle mass. In 10 weeks, without significantly changing her diet (in fact, we increased her calorie intake significantly), one skater went from 148 pounds to 104 pounds. I wrote an article about the program for Skating magazine and a mainstream fitness magazine (although I called it the German Body Shaping System), and later Poliquin and I teamed up to produce an article for Muscle Media 2000.

Poliquin’s books and seminars were financially successful and influenced countless coaches and athletes. For three decades, I was Poliquin’s primary editor. I helped him write articles, books, training courses, and countless question-and-answer columns. I’ve lost track of how much material we produced (much that was never published), but I’d estimate it was north of a quarter of a million words. We parted ways in 2013 when he started a new company called Strength Sensei, Inc., but Poliquin continued producing written material, particularly with Testosterone and former Muscle Media 2000 editor T.C. Luoma.

Throughout our three decades together, Poliquin championed other programs that many strength coaches or personal trainers were unaware of, including the 1-6 Method, the Patient Lifter Method, cluster training, and the Modified Hepburn Method. He also wrote and lectured extensively about lifestyle, nutritional supplements, and how to use body fat testing to assess hormonal balance. Poliquin left us on September 26, 2018, passing his company to his daughter Krystal.

Charles Poliquin’s pioneering training methods and commitment to teaching helped shape the modern world of strength and conditioning. Share on X

Poliquin “talked the walk” and “walked the talk” in the world of physical fitness and athletic fitness training. It’s been said that “legends never die,” and in the case of this remarkable strength coach, it’s true. Charles Poliquin’s pioneering training methods and commitment to teaching helped shape the modern world of strength and conditioning.

Since you’re here…
…we have a small favor to ask. More people are reading SimpliFaster than ever, and each week we bring you compelling content from coaches, sport scientists, and physiotherapists who are devoted to building better athletes. Please take a moment to share the articles on social media, engage the authors with questions and comments below, and link to articles when appropriate if you have a blog or participate on forums of related topics. — SF


Urbandale Weight Room

Facility Finders: Urbandale High School

Blog| ByJohn Delf-Montgomery

Urbandale Weight Room

In this new series, I will be reaching out to coaches all over the country to see what it takes to go from having an idea for your facility design to making that idea a reality. Spanning full designs from scratch to larger remodels, we will cover facilities from all over the profession: colleges, high schools, private, tactical, and even home gyms.

All facility designs come with questions and decisions to be made, such as:

  • How big can or will the space be?
  • What type of equipment do I need to purchase?
  • Which brands, purveyors, and manufacturers should I choose?

I want to highlight how to answer those questions and many more during the design process. First, join me in looking at how and why those decisions were made at Urbandale High School in Urbandale, Iowa.

Facility Finders reached out to Urbandale Director of Strength and Conditioning, Pete Traynor, because his space is rare—especially at the high school level. I also wanted to spotlight the unique relationship his facility shares with the school board, which was consulted before the hiring of Coach Traynor to have the facility constructed in a way that would serve the needs of both the strength and conditioning department and the greater community.


Video 1. An inside look at the Urbandale High School performance facility.

Facility Decisions

Among the most time-consuming tasks of designing a new facility is figuring out how to pay for everything. For Coach Traynor, that was made possible by a school district-wide building/remodeling plan that included their weight room at Urbandale H.S. and updates across the districts, which also encompassed building two new elementary schools. Once the school board decided on the budget and what the project entailed, Coach Traynor needed to prioritize his needs. He determined the top three considerations were:

  1. Quality of equipment
  2. Branding capabilities
  3. Costs

“We know that this is a once-in-a-25-plus-years type of project, so we had to ensure that the equipment we purchased was of the highest quality,” said Traynor.

Among the most time-consuming tasks of designing a new facility is figuring out how to pay for everything, says @johndelf99. Share on X

Because this is a community project, customized district branding—for example, the high school’s logos—was used to help separate the spaces to be utilized mainly by the public, like the studio connected to the facility, and keep people out of the high school weight room. At Urbandale, Coach Traynor works with more than 75 athletes at a time, which requires space to flow properly and efficiently.

Urbandale Weight Room
Images 1a-c. 1a) Showcasing the utility storage, which houses kettlebells, plates, bars, and slam balls, and turf space outfitted by Dynamic Fitness & Strength. 1b) A close-up of the customized utility storage options from Dynamic, which includes the logo of Urbandale H.S. on the dumbbells. 1c) Urbandale’s plate-loaded belt squat designed by Dynamic with customized colors.

Some of the specialty equipment that Traynor uses daily with his athletes are the belt squat station from Dynamic Fitness & Strength and flywheels from Exxentric. He believes both are useful pieces of equipment for intro-level athletes learning how to move.

“Having another joint-friendly option that works all three types of muscle contractions helps us in multiple areas of our programming,” Coach Traynor says about their two Exxentric kBoxes.

The belt squat is a piece of equipment that allows any athletes with upper-body injuries to still be able to squat. It is also a safe tool for beginner athletes. Some exercises that use both the kBox and the belt squat are eccentric-focused squats, RDLs, bent-over rows, and biceps/upper back work.

Racks kBox
Images 2a & b. 2a) The layout of Urbandale H.S. designed by Dynamic Fitness & Strength.
2b) Among the facility’s specialty equipment is Exxentric’s kBox flywheel.

Take a Look Around

The biggest piece of advice Traynor offered for coaches undertaking a design project or remodel was to tour other facilities and meet with coaches who have been in your shoes—they can tell you about all the mistakes they wish they’d never made! Urbandale High School ended up purchasing from Dynamic Fitness & Strength, which Coach Traynor never even knew existed (shoutout to Coach Joe “Big House Power” Kenn).

Coaches undertaking a design project or remodel should tour other facilities and meet with coaches who have been in their shoes. Share on X

This company is based out of Eau Claire, Wisconsin. Traynor mentioned that the quality of equipment and their ability to customize the space ultimately led to Dynamic winning the job over their competitors. When all was said and done, Coach Traynor visited 39 separate facilities before his facility was finished, and if it wasn’t for all of those facilities, he never would’ve heard about Dynamic Fitness & Strength.

“Visiting so many different weight rooms allowed me to truly get an idea of how we were going to train our students here at Urbandale,” Traynor said when asked about his key takeaways from those tours. “Being able to see how other coaches were utilizing their space, along with different methods being used, allowed me to zero in on what methods we would be able to utilize at Urbandale to train the most efficiently and keep our students engaged. The flow of the room, safety, efficiency, and student-athlete engagement and participation were some key factors in how we wanted to design our room.”

Reverse Hypers Turf
Images 3a-c. 3a) Urbandale includes strength equipment other than a rack. This is where the athletes perform reverse hyperextension/GHD and lat pull down cables. 3b) Close up of the customized racks with storage and branding for Urbandale. 3c) This turf space designed by Dynamic allows for plyometrics, sprinting, sleds, and warm-ups.

A Dream in the Making

This endeavor with SimpliFaster is something that has been a dream of mine for a while, and now that I am involved in a capital project at my school designing a facility, this series is a way for me to learn alongside our readers. This dream stems from working alongside SimpliFaster, which provides the best information for coaches by coaches—and while I do this firsthand, I can learn from and educate other coaches at the same time. I also want to make a positive contribution to the profession and that means going out and meeting new coaches to see how their personal training style can be matched with an incredible facility.

Right now, I am meeting with companies and suppliers—quality of equipment is the top priority—while I also establish the new construction and budget for the project. I have used software called SketchUp to roughly design my plans to help the “non-athletic department” people see the vision and the need for this space.

Please comment below with other questions y’all would like answered or facilities you’d like to know more about in our future episodes.

Since you’re here…
…we have a small favor to ask. More people are reading SimpliFaster than ever, and each week we bring you compelling content from coaches, sport scientists, and physiotherapists who are devoted to building better athletes. Please take a moment to share the articles on social media, engage the authors with questions and comments below, and link to articles when appropriate if you have a blog or participate on forums of related topics. — SF


Triathlete HRV

5 Common Misconceptions About HRV Data

Blog| ByAlan Couzens

Triathlete HRV

With the rapid increase in the use and development of wearables, heart rate variability measurement is experiencing a significant boost of late. However, it’s also becoming harder than ever to discern the actual value of HRV monitoring from marketing hype and pin down the key factors to consider to ensure that you get good, accurate, and actionable data from your HRV monitoring routine.

As a coach who has been monitoring HRV for more than a decade now, here are the top 5 misconceptions about HRV that I see circulating.

1. A High HRV Reading Is Always Good and Indicative of Readiness to Work

Many apps put high HRV readings in the “green” to indicate that athletes are ready for work. However, we should view unusually high HRV numbers with similar caution as unusually low ones, especially when they occur in concert with other key fatigue indicators.

We should view unusually high HRV numbers with similar caution as unusually low ones, especially when they occur in concert with other key fatigue indicators, says @alan_couzens. Share on X

A very common pattern, especially for endurance athletes under high load, is to show unusually high HRV numbers after a big training block. A very low resting heart rate and general tiredness/fatigue generally accompany this. It is worth remembering that when we measure HRV, we measure the strength of the parasympathetic nervous system—the body’s recovery system. It makes sense that this system is very activated after a big load as our body runs all of the rest and repair processes essential to recovering from that big load. This doesn’t, however, indicate that our body is ready for more load at that point.

In practice, tracking your HRV along with another metric that also indicates the strength of your “let’s do work” system—like heart rate—can add very useful additional context. Ithlete, for example, utilizes an RHR/HRV matrix that helps bring context to unusually high HRV numbers.

2. HRV Should Always Track with How I Feel

Thinking again that HRV is a marker of the strength of your recovery systems, it won’t always track with your general levels of energy. Many athletes will feel very energetic at times when HRV is low. This is due to the fact that our energy-producing system—the sympathetic nervous system—runs, to some extent, in opposition to the parasympathetic nervous system, the recovery system that our HRV tracks.

At times of high energetic output (e.g., a training camp), the athlete will often feel really good for the first few days despite low HRV and accumulating, but unrecognized, fatigue. This is due to the fatigue being masked by a very active sympathetic nervous system. HRV can be very useful during these times to give us a more honest assessment of the strength of the recovery systems to handle a given stress.

The other element of this—and one that I think confuses a lot of athletes when they first start tracking HRV—is that it won’t *always* line up perfectly with how you feel, both during the morning when you take the test and during the training session. HRV adds some, but not complete, information about the athlete’s current state: i.e., it answers a percentage of the question How tired is this athlete? For the best results, you should view it in that way and not take it as the only point to consider when determining training load.

For example, if my athlete’s HRV score is in the bottom 25%, but their wellness questionnaire scores are in the top 75%, I will view the athlete’s state differently than if both scores are in the bottom 25%. Despite not being a perfect predictor, each piece provides some valuable additional context. It is very much a situation where the whole is greater than the sum of its parts.

3. All Apps/Wearables Will Give Me the Same Measurement

It should go without saying that accurate heart rate variability calculations are, first and foremost, dependent on the accurate measurement of heartbeats!

In our desire for more and more convenience, HRV wearables are moving further and further away from the direct measurement of the electrical activity of the heart (provided by a high-quality heart rate strap) toward inferring heartbeats from measuring the way light changes as blood pulses through our blood vessels—either the blood vessels of the wrist (in the case of a watch/band wearable) or the finger (in the case of a “ring” wearable or your phone camera).

I always recommend sticking with one particular app/wearable combo and strong recommend using a heart rate strap, says @alan_couzens. Share on X

Because these distant cousins of the heart rate strap use light to infer heartbeats, they are subject to interference from other sources that might affect the light hitting your wearable receiver. Consequently, many of the algorithms that calculate HRV are filtered more aggressively than those that calculate HRV from a heart rate strap. This combination of added interference coupled with more aggressive filters can lead to differences in the measurement. For this reason, I always recommend sticking with one particular app/wearable combo and strongly recommend using a heart rate strap.

On a related note, many apps are now starting to move away from direct, validated measures of HRV such as RMSSD (the root-mean of successive squared differences) to their own proprietary “readiness” scores. While I have no major objection to composite metrics, I do object when the athlete is given no visibility as to what comprises these metrics, or even if/how they’re changing over time.

To compare apples to apples over the long term, I highly recommend sticking with known, validated metrics such as RMSSD or the lnRMSSD numbers provided by some of the major apps (such as ithlete or HRV4Training).

4. All Day Measurement of HRV Is More Useful Than a Single Test

On a related note, wearing something throughout the whole day/night that collects data may seem convenient and make it possible to generate a 24/7 data stream of your heart rate variability. Tempting as this may be, in my experience, you will find far better and more easily interpreted value in sticking with a single heart rate variability test: each morning, at the same time, under the same conditions.

An important thing to note about HRV is that it scales negatively and nonlinearly with heart rate. For example, if my resting heart rate is 30 bpm (i.e., an average of two seconds between beats) and yours is 60 bpm (an average of one second between beats), there is much more room for higher time variability between the beats for me than you. This is even more true for periods of increased heart rate due to exercise or stress—when heart rate variability can effectively decrease to zero due to the impact of the sympathetic nervous system.

It is challenging to interpret all-day HRV meaningfully. It is far better to have a controlled, resting test where your heart rate is relatively similar to assess significant changes in HRV. Share on X

With all of these influences and how heart rate changes throughout the day, it is challenging to interpret all-day HRV in any meaningful way. It is far better to have a controlled, resting test where your heart rate is relatively similar to assess significant changes in HRV.

5. HRV Measurement Is Only for Those Elite Athletes Looking to Get That Final 1%

The real strength of HRV is in its ability to quantify non-training stress. HRV may be less useful in conditions where the athlete has limited non-training stress and most of the fluctuations in adaptation reserves are related to training load—e.g., an elite living 24/7 at a National Training Center. This is because we have far better visibility into the stress that the athlete is experiencing.

In the “real world,” however, training stress typically only makes up a portion—and for amateur athletes, a tiny portion—of their total stress load. Therefore, HRV offers a way to quantify the impact of all the other stressors: the baby crying through the night, the pressure from your boss to meet a deadline, the relationship issues that you’re having with your significant other, etc.

Having a very clear window into the impact of those other stressors on the recreational athlete’s system can be a considerable advantage in balancing training with life to ensure consistent improvement and prevent injuries, illness, and general burnout. By taking an HRV-guided approach, your app will likely support that sleep-in on days you are particularly stressed out. It will similarly challenge you to get out the door on those days that all systems look good. This real-time flexibility and adaptability to the athlete’s greater life make HRV-guided training especially applicable to athletes with “real lives” to factor into the stress equation…meaning 99.99% of us!

Since you’re here…
…we have a small favor to ask. More people are reading SimpliFaster than ever, and each week we bring you compelling content from coaches, sport scientists, and physiotherapists who are devoted to building better athletes. Please take a moment to share the articles on social media, engage the authors with questions and comments below, and link to articles when appropriate if you have a blog or participate on forums of related topics. — SF


Athlete Jumping

Foundational Jump Development for All Levels

Blog| ByRoss Garner

Athlete Jumping

When I entered the strength and conditioning field, I was told the best way to improve the vertical jump is to squat. If our squat numbers improved, our verticals would follow—and, up to a point, this is absolutely true. For athletes who are relatively weak or relatively young, developing stronger legs (along with a heightened nervous system) will lead to better jumps.

Over time, though, I found this wasn’t always the right solution. Athletes would increase their squat, but their jumps would flatline. These athetes were strong in the squat, so why weren’t they jumping higher? I saw this play out time and time again. Once my athletes obtained certain strength levels, jumping ceased to improve.

On top of that, I used to only measure jumps every 8-12 weeks. If jumping is considered a key performance indicator (KPI) in our program, why wait three months to see if it improved? What if their best day was actually three weeks into the program? What if the athletes had a bad week and that’s when we tested?

I want to know how we’re performing every week and if my program is doing what I say it’s doing.

I want to know how we’re performing every week and if my program is doing what I say it’s doing, says @coachrgarner. Share on X

Eventually, this led me to the works of Joel Smith, Cal Dietz, and Chris Korfist. These coaches drastically influenced my thought process on jump development because they were the first coaches that said heavy squats aren’t the only way to develop the jump. Instead, they discussed a variety of techniques, biomechanical and physiological differences, and key movements needed to be a successful jumper.

In my eyes, this shifted jump development from strictly a strength issue to a multi-faceted problem requiring multiple solutions. If you want to learn more about jump development and technique, I highly recommend “Vertical Foundations” by Joel Smith.

Improving the Vertical: This Should be Easy, Right?

In sports performance, the two hardest skills to improve are sprinting and jumping. These are also the most important skills to master for on-field success. Skill is defined as “the ability to do something that comes from training, experience, or practice.” For any skill, it takes substantial time, effort, and technical knowledge to create long-lasting change.

The difficulty in training these skills stems from the fact that athletes have been running or jumping their entire lives. This means techniques, habits, and neural pathways are engrained long before coaching interventions occur (which can be a good thing). In my experience, the average male and female will jump 23-25 inches and 18-20 inches respectively. Once they reach this point, we’ll see a stall in progress if we’re not training with a purpose.

For jumping-based sports like volleyball, an athlete’s technique and habits will be reinforced countless times in practice and games. An outside hitter can jump up to 120 times a match, and for players on the club circuit who play six games over a weekend, that’s 720 jumps. This further ingrains neural pathways and solidifies jumping technique and outputs. On top of that, the majority of these jumps will be submaximal, which may decrease their vertical over time. If the athlete doesn’t have a strong foundation of strength and technique, this could lead to problems down the road.

For jumping-based sports like volleyball, an athlete’s technique and habits will be reinforced countless times in practice and games, says @coachrgarner. Share on X

In most cases, the responsibility of increasing the vertical jump falls on the shoulders of sports performance coaches because jumping is typically viewed as an outputs (force) issue. Although this is a factor, it does not fully encapsulate jump development. There are a variety of strategies which can be employed to train jumping (such as techniques specific to muscle- versus tendon‑driven athletes), and it becomes even more complex as we dive into standing versus approach jumps.

Within the weight room, I believe the coach’s focus should be on developing the standing vertical, as this is the floor of jumping potential while the approach jump is the ceiling. The approach jump is a technical-driven skill which requires significant time and effort to improve. Meanwhile, the standing vertical has a lower technical barrier and is a reflection of raw power which makes it a useful tool to measure the impact of a training program.

This leads us to our main question: How do we improve a skill that has been performed thousands of times?

We refine technique, strengthen key muscles and joints, practice jumping skills, and measure jumps regularly.

Refining Technique for Takeoff

Technique is the most influential factor in improving jump height. No matter how powerful our athletes become, they cannot out-jump poor technique. The same goes for any skill in sport. When we clean up technique, athletes automatically jump higher.

When we clean up technique, athletes automatically jump higher, says @coachrgarner. Share on X

Maximizing jump height begins with refining technique at the bottom of the jump. By optimizing this position, our athletes have better chances to be successful on takeoff. The goal is to have the torso and shins at the same angle at the bottom before pushing upward, as shown in Figure 1. I learned this concept from Chris Korfist, and now it’s the first thing I notice when watching jumps.

Torso Shins
Figure 1: Matching Torso and Shin Angles.

When athletes jump, particuarly poor to average jumpers, typically their torso is bent over while their shins are more upright (see Figure 2). Instead, we want to see their torso and shin angles matching, knees over toes, and a push from the ball of their foot into takeoff. The most explosive actions in sport are the result of knees over toes and force from the balls of the foot.

Why is this important to jump height?

By syncing the torso and shin angles at the bottom, the athlete is setting up for a syncronized takeoff, which makes them leave the ground faster and ultimately get to the point of attack faster. If they are bent over, then the torso has to travel further upward before the legs begin extending, leading to an inefficient and slower takeoff. In sports, we want to improve our ability to display power quickly by limiting the amount of time it takes to complete explosive movements.

In sports, we want to improve our ability to display power quickly by limiting the amount of time it takes to complete explosive movements, says @coachrgarner. Share on X
Jump Angles
Figure 2: Unsynced vs Synced Torso and Shin Angles.

Once we establish a solid bottom position, we need to shift our focus to the takeoff. The key to an explosive takeoff is syncing up the torso, arms, and legs when leaving the ground. All of the athlete’s body parts should be fully extended as they are jumping. By doing so, all of the body’s energy will be unleashed at the same time.

The arms play a significant role in aiding the jump. Their main job is to make the body “lighter” as we’re driving up. Think of the arms as serving the same purpose bands do for band-assisted jumps. The momentum of the arms allows the legs to uncoil faster than they would normally. However, if the legs extend before the torso and arms, then the athlete’s feet will leave the ground before they are finished applying all their potential momentum. This is why an athlete’s jump dramatically improves when they start jumping regularly. As they get a feel for it, they’ll begin syncing up their arms, torso, and legs upon take off, leading to higher and faster jumps.

Note: When measuring standing verticals, athletes tend to over-exagerrate the dip, which can lead to an extremely bent over torso as shown in Video 1. However, they can still have an incredible jump. The athlete in the video has a standing vertical of over 40”, but is spending more time on the ground than what is available in sport. This is useful in terms of total-body development, but not for specifc sport application—something to consider when developing the jump.


Video 1. This is a 40+” vertical on a Just Jump Mat. As you can see, he over exaggerates the dip, but still jumps well.

Isometrics Set the Floor

One of my mentors always says that “eccentrics and isometrics develop and concentrics express.” If we’re not training all three phases of the muscle contraction, then we’re not developing our athletes optimally. Eccentrics increase strength potential and the ability to absorb force. Isometrics improve the body’s ability to withstand and reapply force, and recruit more muscle fibers at once. Isometrics provide a powerful stimulus with two significant benefits to jump development:

  1. Isometrics raise the work capacity that our tendons and muscles can handle. With standard repetitions, we’re training the weakest position of the movement for a split second. After several reps, there’s only a few seconds of full tension at the weakest point. This means the amount of capacity developed is limited. With isometrics, we’re placing constant tension on the muscles and tendons, meaning every second spent in the position is causing a training effect while raising capacity.
  1. Isometrics improve the structure and function of tendons leading to healthier athletes.1 When we hold positions, our muscles are continuously contracting; as they’re contracting, the muscles are shortening, but the tendons are lenghtening. The slow lengthening repairs the tendon’s structure, leading to improved function and longevity. This is opposite of what explosive actions do to tendons, as they improve stiffness (which leads to higher jumps). As sports performance coaches, we must balance between explosive movements and isometrics in order to keep our athletes healthy over the long run.

Key Isometric Movements

We have three isometrics that are staples in our program:

  • Spring ankle series
  • Split squats
  • Mid-thigh pulls

The spring ankle series, developed by Chris Korfist and Cal Dietz, strengthens the feet, ankles, and knees while teaching the proper bottom, middle, and full extension positions of the jump. Studies have found that isometric holds strengthen the joints 10 degrees above or below the given angle. By using various heights, the spring ankle series develops the entire spectrum of jump depths and joint angles needed to be a successful jumper.


Video 2. Spring Ankle Series Position 1 & 2. Notice how the shin and torso angles are matching. This reinforces the bottom position we want to see in the jump.

The key to implementing this series is matching the torso and shin angles, further engraining proper positioning and strengthening the muscles and tendons at the specific joint angles. We have to coach this up every day because athletes will struggle to maintain posture or keep the knee over the toe. Posture equals power. When introducing this:

  • Start with 3-5 sets of 10 seconds, which keeps movement quality high.
  • Each week, add 5 seconds until you reach 30 seconds.
  • Once they’re able to hold the position for multiple 30-second sets, start over at 10 seconds and add load.

Isometric split squats provide a high return on investment because they train several areas at once. Depending on your goal, these can be performed as yielding, overcoming, or oscillating isometrics. Yielding is the preferred method for teaching positioning and posture. For maximal effort, overcoming is the way to go. My suggestion is to perform yielding isometrics until the athletes have mastered the position, and then introduce the overcoming variation.

Isometric split squats provide a high return on investment because they train several areas at once, says @coachrgarner. Share on X

In our program, we perform isometric split squats with the front heel elevated so the athletes are strengthening their feet, ankles, and calves. They are also actively pulling in their front foot to contract the hamstrings, which improves their strength and capacity. For the rear leg, they are stretching their hip flexors while driving the big toe into the ground, leading to improved mobility. We work up to holding this position for 60 seconds, and then we can add load and shorten the time. If I use this as a warm-up, we’ll hold the position for 30-60 seconds with just bodyweight. If this is part of the workout, we’ll add load and hold for 10 seconds or less.

Isometric Split Squat
Image 2: Isometric Split Squat with Barbell.

Mid-thigh pulls are a powerful overcoming isometric. This movement creates a total body training effect and elevates the nervous system. Before implementing this movement, make sure the athletes have strong foundations in posterior chain development and can maintain good posture when applying maximal effort. Remember, posture equals power. The last thing we want is for their backs and shoulders to be too round while they are pulling against the bar.

Although this isn’t a variation I use often, I’ll go through phases where athletes perform this once a week within a circuit. My suggestion is to perform 3-5 second pulls with a 3-second build up. This means athletes will slowly build up to max effort over 3 seconds and then pull as hard as they can for 3-5 seconds.

Concentrics Raise the Ceiling

Concentric movements refine the nervous system and display max outputs. Concentric actions need to be smooth as they’re what are the most visible in the end. For concentric power and strength of the quads and glutes, there are countless movements and strategies to use. As the coaches, it’s our job to determine what the best method is for our athletes. We’ve heard coaches say “the best method to use is the one you believe in” and the same applies here.

The main lower body movements in our program are the split squat and trap bar deadlift. I believe these movements are the best options to train the lower body, because we’re using both unilateral and bilateral positions. Unilateral positions are arguably more athletic in nature, but bilateral positions may transfer to the jump more effectively. By using both, we make sure our athletes are getting a well-rounded program.

Unilateral positions are arguably more athletic in nature, but bilateral positions may transfer to the jump more effectively, says @coachrgarner. Share on X

In our program, the split squat is considered our strength movement due to the time under tension and the amount of load our athletes can handle in this movement. I predominately load split squats in the strength zone (>80% relative intensity or RI) for 1-5 repetitions, but we’ll also use lighter loads for power development.

I prefer split squats because it takes the low back out of the equation, and I’ve never had an athlete be unable to perform them due to mobility issues. The learning curve is minimal and most athletes are able to handle more weight in a unilateral squat versus bilateral squat. In addition, we can implement a floating heel which further strengthens the feet, ankles, and calves.

Most athletes are able to handle more weight in a unilateral squat versus bilateral squat, says @coachrgarner. Share on X

For trap bar deadlift, we typically perform sets in the power zone (60-80% RI), but we’ll also use loads greater than 80% RI for 1-5 repetitions to train strength qualities and potentiate the nervous sytem. If we’re training heavy squats during the week, we’ll keep our deadlift lighter and vice versa.

Due to the high handles on the bar, most athletes will be in a half or quarter squat position, which is exactly what we want. The bottom position of the jump will be around these depths. By using the trap bar, we’re training the body to produce high levels of force at joint angles that align with jumping.

Measure and Track Jumps

In any training program, we must measure and track what we deem important. What we measure is what improves. With technology like the Just Jump Mat available, jumps are easier than ever to track. In our program, we use the Jump Mat almost every day, and we can quickly measure a room of 30-40 athletes without any disruption in training. This data shows us how our program is impacting our athletes, but also tracks the readiness of each individual.

What we measure is what improves, says @coachrgarner. Share on X

We can use this data to guide our programming decisions as well—the more data points we have, the more informed our decisions can be. If we’re seeing a downward trend in jump height, do we need to switch up modalities or are the athletes just tired? As numbers rise, we know what we’re doing is working and we don’t need to make any changes until we see stagnation or regression.

As previously stated, jumping is a skill; we need to let athletes practice and train this reguarly. Our athletes will perform either broad or vertical jumps every workout as part of a circuit or superset. This gives us 5-8 high quality jumps every session, with each one being measured. By incorporating the jumps into a circuit or superset, we’re potentiating the nervous system which leads to better performance over time.

At the end of the day, what’s the best way for athletes to improve their jump? Let them jump frequently, measure every jump you can, and progress accordingly.

Since you’re here…
…we have a small favor to ask. More people are reading SimpliFaster than ever, and each week we bring you compelling content from coaches, sport scientists, and physiotherapists who are devoted to building better athletes. Please take a moment to share the articles on social media, engage the authors with questions and comments below, and link to articles when appropriate if you have a blog or participate on forums of related topics. — SF


Resources

1. Oranchuk DJ, Storey AG, Nelson AR, Cronin JB. Isometric training and long-term adaptations: Effects of muscle length, intensity, and intent: A systematic review. Scand J Med Sci Sports. 2019

  • « Go to Previous Page
  • Page 1
  • Interim pages omitted …
  • Page 48
  • Page 49
  • Page 50
  • Page 51
  • Page 52
  • Interim pages omitted …
  • Page 164
  • Go to Next Page »

Primary Sidebar

Latest Posts

  • Building a Better High Jump: A Review of Stride Patterns
  • How We Got Our First Sprint Relays to State in Program History
  • Science, Dogma, and Effective Practice in S&C

Topics

  • Changing with the Game
  • Game On Series
  • Getting Started
  • high jump
  • Misconceptions Series
  • Out of My Lane Series
  • Rapid Fire
  • Summer School with Dan Mullins
  • The Croc Show
  • track and field
  • What I've Added/What I've Dropped Series

Categories

  • Blog
  • Buyer's Guide
  • Freelap Friday Five
  • Podcasts

COMPANY

  • Contact Us
  • Write for SimpliFaster
  • Affiliate Program
  • Terms of Use
  • SimpliFaster Privacy Policy
  • DMCA Policy
  • Return and Refund Policy
  • Disclaimer

Coaches Resources

  • Shop Online
  • SimpliFaster Blog
  • Buyer’s Guide
  • Freelap Friday Five
  • Coaches Job Listing

CONTACT INFORMATION

13100 Tech City Circle Suite 200

Alachua, FL 32615

(925) 461-5990 (office)

(925) 461-5991 (fax)

(800) 634-5990 (toll free in US)

Logo of BuyBoard Purchasing Cooperative. The word Buy is yellow and shaped like a shopping cart, while Board and Purchasing Cooperative are in blue text.
  • Facebook
  • Instagram
  • Twitter
  • YouTube

SIGNUP FOR NEWSLETTER

Loading

Copyright © 2025 SimpliFaster. All Rights Reserved.