• Skip to content
  • Skip to primary sidebar
SimpliFaster

SimpliFaster

cart

Top Header Element

  • Facebook
  • Instagram
  • Twitter
  • YouTube
  • Login
  • cartCart
  • (925) 461-5990
  • Shop
  • Request a Quote
  • Blog
  • Buyer’s Guide
  • Freelap Friday Five
  • Podcast
  • Job Board
    • Candidate
    • Employer
    • Facebook
    • Instagram
    • Twitter
    • YouTube
You are here: Home / Blog

Blog

Coach Laurent Meuwly

Flyers & Diesels: Training Speed & Endurance Athletes with Laurent Meuwly

Freelap Friday Five| ByLaurent Meuwly, ByDavid Maris

Coach Laurent Meuwly

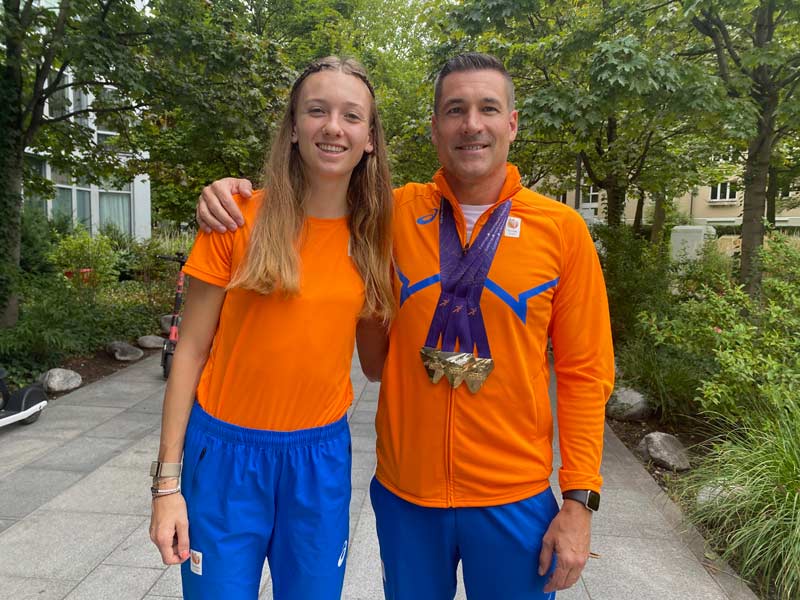
Laurent Meuwly is the Head Coach for sprint/hurdles and relays for the Netherlands. Before this, he held the same position in Switzerland for 10 years. He has been named Coach of the Year by the European Athletics Coaches Association. He is presently coaching the new 400m indoor world record holder, Femke Bol, and other world-class athletes such as Ajla Del Ponte, Lieke Klaver, Nadine Visser, Liemarvin Bonevacia, Anna Kielbasinska, Viktoriia Tkachuk, and the Dutch 4×100 and 4×400 relay teams (silver in Tokyo and in Eugene). Laurent had his first international success with Lea Sprunger (two-time European Champion and fourth in Doha).

Freelap USA: Dutch sprinting is in a very healthy state right now. What do you see as being some of the reasons for the success we’re seeing in the Netherlands in these events at the moment?

Laurent Meuwly: I think the success in the Netherlands is multifaceted.

My approach when I started in 2019 was to base the development strategy around the relays. For example, in Yokohama at the 2019 World Relay Championships, the women’s 4x400m team gained qualification for the World Championships in Doha later that year, where they went on to make the final. During 2020, the men worked hard and were rewarded with a silver medal in the 4x400m at the Olympic Games in Tokyo, where the women’s 4x400m team also made the final, and the mixed 4x400m relay team finished fourth.

This gave individual athletes their first opportunity to run in major finals on the global stage in the relays. When you’re at a global championship as part of a relay team, the pressure is less than it would be if you were there as an individual athlete. This allows the athletes to become more gradually exposed to the pressure of representing their country in an individual event in a major championship environment.

When they’re at a global championship as part of a relay team…it allows the athletes to be more gradually exposed to the pressure of representing their country, says @laurentmeuwly. Share on X

I think an additional benefit of the setup being based around the relays is that it brought the majority of the best athletes in the country to come and train together. This creates a competitive training environment, helping to bring the best out of everyone in the group. When I started in the Netherlands, I had three athletes, and now I have 14 quarter-milers in the group. This was made easier because the Netherlands is a small country, but it was still important to create an attractive enough setting to have the athletes want to come and train in the same group. I think that the growth of the setup is in part due to the success of the relay program, but we also have a great support system in place with resources like doctors, physiotherapists, sports scientists, etc.—a combination that is attractive to the athletes.

In 2014, Switzerland hosted the European Championships, and Kariem Hussein won the 400m hurdles. I think this perhaps helped other Swiss athletes believe that this kind of success was possible for them, and subsequently, there’s been a lot more sprinting and hurdling success with the likes of Lea Sprunger, Ajla Del Ponte, and Mujinga Kambundji. I think a similar thing happened in the Netherlands when, in 2015, Dafne Schippers became World Champion and broke the European record.

Laurent Meuwly and Athlete

In my opinion, this had the same impact on Dutch athletes and made them realize it was possible to be competitive on the world stage instead of simply participating while the Caribbean or American athletes were taking the medals. The next cycle of the same thing is beginning to happen now, and Femke Bol’s performances are having the same impact on the current crop of European 400m hurdlers entering the senior ranks.

Freelap USA: How much do you use sports technology? Do you use resisted/assisted sprinting? Are you using technology to track metrics to help you assess whether or not an athlete is progressing as you would like? 

Laurent Meuwly: I use quite a lot of technology with my athletes. We use Kistler blocks, which are big blocks that appear similar to the Omega ones used in the Diamond League. However, these blocks measure the force, direction, and speed from the moment of reaction to block exit, power, and contribution of the left versus the right foot. We also use OptoJump to measure stride length, stride frequency, and ground contact times and to, again, observe differences between the left and right sides. This has been helpful with athletes returning from injury—to see when conditioning levels are adequate enough for a return to maximal sprinting. We also combine the Kistler blocks and the OptoJump to get acceleration profiles for the athletes to help determine the optimal block settings.

We have a 1080 Sprint, which we use in both resisted and assisted sprints. This allows us to measure power for athletes at different resistances, and we can track progress as far as overspeed implementation goes. We also use laser measurements to provide instantaneous velocities during acceleration and maximum velocity development.

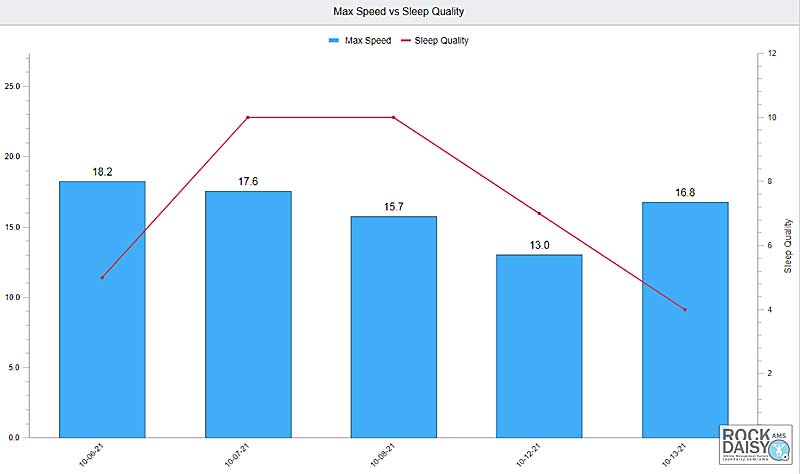
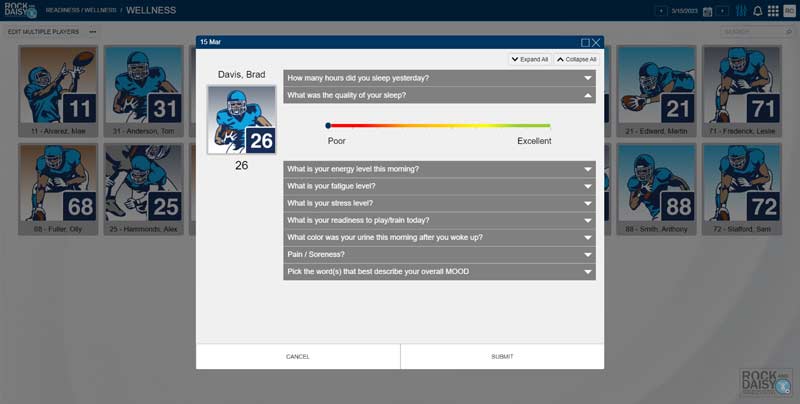
About 70% of the athletes I coach use a Whoop band. The data—such as sleep, heart rate variability, and resting heart rate—is automatically synced every morning to a database so the appropriate support staff can monitor the recovery status of the athletes. This data has allowed quite a few athletes to spot a virus a couple of days before they become symptomatic and therefore implement an intervention strategy, such as supplementing with vitamin C and zinc, etc., in an attempt to reduce the impact of the infection.

Freelap USA: You have spoken about classifying your athletes as diesels and flyers. Can you explain how you establish which athlete is which and how you may train them accordingly?

Laurent Meuwly: Very basically, this is a way to classify athletes who are more speed-based 400m runners, the flyers, and more endurance-based 400m runners, the diesels. A good example of each from my group of athletes would be Lieke Klaver, who is fairly speed-based, and Femke Bol, who is a lot more endurance-based.

A speed-based athlete needs to have their speed and strength at a high level to perform and to have the right cards to play when they compete. Likewise, an endurance-based athlete needs to be very efficient and have excellent speed endurance. It’s not possible to perform at a very high level if you have your strengths, but everything else is very weak, so a goal is also to limit the weaknesses. If your speed is a limitation, or your strength, or your endurance, we need to bring this parameter to a high enough level to allow for world-class performances, so we approach this with the strategy of maximizing the strengths and minimizing the weaknesses no matter if the athlete is a flyer or a diesel.

It’s not possible to perform at a very high level if you have your strengths, but everything else is very weak, so a goal is also to limit the weaknesses, says @laurentmeuwly. Share on X

So how do we do this?

We focus a lot on the strengths of the athlete, so we make sure the flyers are performing well in their speed training, race pace training, and strength training, and the diesels need to focus on their endurance, speed endurance, and efficiency. This being the case, the sessions sometimes look slightly different depending on the athlete’s classification.

Sometimes it is just the volume that is different. For example, while a flyer should shine in maximum speed work, they will do more of this, but if a diesel does too much speed work in one session, it might kill their nervous system for the rest of the week. Therefore, recovery times are something that must be considered when prescribing similar workouts to athletes from different classifications.

I think these classifications can be valid for short-sprint athletes as well. You have the very fast twitch athletes who have to train, recover, train, recover, and so on, and you need to be careful how much tempo these athletes do because they really rely on their fast twitch capacities, and these need to be recovered enough for them to perform well enough in training to get the adaptations we want. These athletes are really the 60m and 100m sprinters. Then you have the more 200m-dominant athletes who need to be good at speed endurance, and they need good general endurance to be able to afford the general training load and recover adequately from the training sessions.

Coaching

Freelap USA: Can you outline a typical training week during the specific preparation phase for your athletes and maybe give some examples of where this may vary for your diesels versus your flyers?

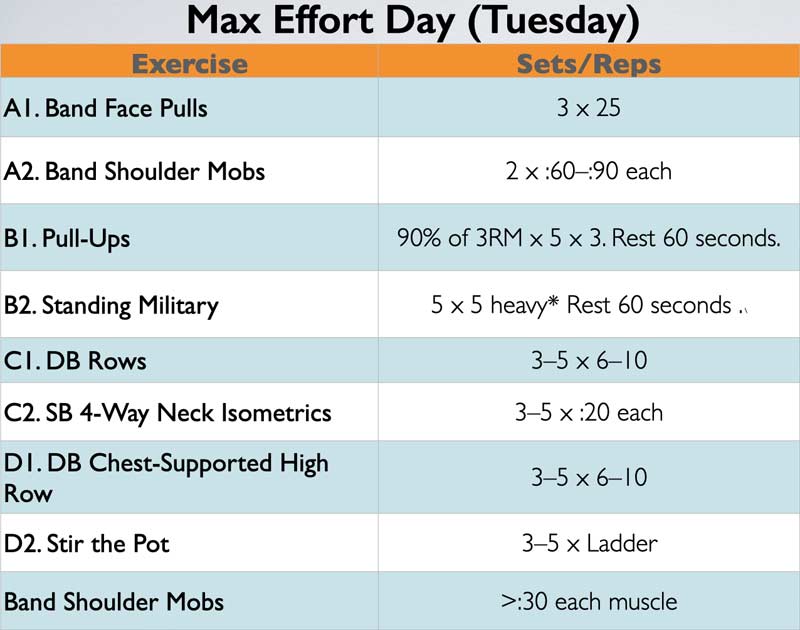
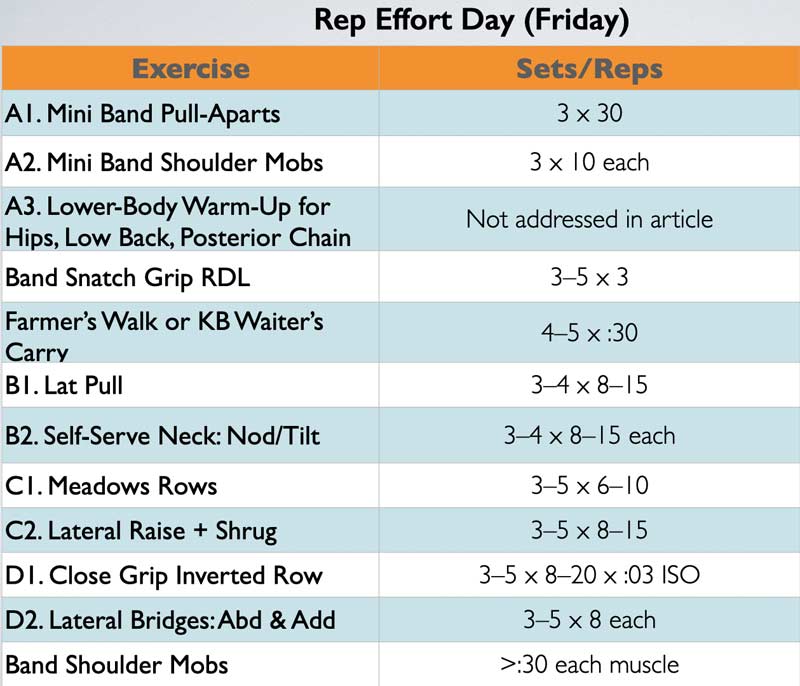
Laurent Meuwly: In our preparation phase, we normally have nine weekly training sessions based on a rhythm of 2, 1, 2, 1, 2, 1, 0. So that is two sessions on Monday, one on Tuesday, and so on, with Sunday being a day of complete rest.

Monday: Nervous system day.

  • Morning – Speed. In a maximum speed session, the flyers may do 5x70m with 9–10 minutes rest, while the diesels do 3x70m with the same rest period but follow that up with 4x60m at 90%–95% with two minutes rest. This is because if a diesel and a flyer are at the same performance level, the diesel will never be able to hit as high a velocity, but they do need to be able to maintain a velocity at around their peak for longer. Therefore, this session becomes a mix of maximum speed and speed endurance work.
  • Afternoon – Strength (compound lifts).

Tuesday: Aerobic endurance.

In the aerobic sessions, the flyers typically run more 200m or 250m reps, while the diesels do more 300m and 400m reps, which means they do greater total volumes. By doing longer rep distances, diesels play to their strength of being able to maintain their mechanics for longer than the flyers.


Wednesday:

  • Morning – Speed endurance/race pace. We may do flying 100s, aiming for the time they would run for 100–200 meters in a 400m race. The flyers may do two sets of three reps, while the diesels may do two sets of four reps because their speed is a little bit lower and easier for them to repeat. Additionally, as mentioned before, they need to be able to maintain this speed for longer to finish the same 400m time as a flyer of the equivalent standard. For example, a flyer may have to cover that race segment in 11.2 seconds, while a diesel may only need to cover this section in 11.6 seconds.
  • Afternoon – Strength-specific circuits, focusing on hip flexors and hip extensors (glutes, hamstrings). This is done with light weights or body weight with a lot of repetitions. For example, we may do two sets of 30 seconds of work with 20 seconds of rest between them and then rest for 90 seconds before moving on to the next exercise.

Thursday: Aerobic endurance.

Short sprinters use the bike for this session to save tendons, etc., but the 400m athletes generally run, depending on their health status. If, say, an athlete has Achilles issues, you need to measure the risk versus the benefit of what you’re doing. It may make sense to save those tendons for the most important sessions, and obviously, that’s the specific speed sessions and not the endurance part, so we can substitute in a bike, pool, or cross-trainer session for the endurance work.

A caveat to this is that the cause of the Achilles issues needs to be considered. This is because some athletes struggle with the general load, and these athletes tend to be okay with sprinting because, although the ground contacts are hard, they’re very short. You also have athletes who don’t feel anything when they’re in flats with elevated soles, but when they’re in spikes that don’t have a heel drop, they feel more pressure on the Achilles.

Very quickly, you realize it’s possible to transfer all this work from sprinting or running to another modality, and the athlete can maintain the same training rhythm, says @laurentmeuwly. Share on X

By substituting in the bike, pool, cross-trainer, and even the AlterG treadmill, many injured athletes can train every day. So on Monday, for the speed workout, they can be on the Wattbike; for the endurance session on Tuesday, they can be on the cross-trainer; on Wednesday, they can again be on the bike, doing 20–30-second efforts with 90 seconds of rest; and back on the bike or cross-trainer on Thursday; and so on. Very quickly, you realize it’s possible to transfer all this work from sprinting or running to another modality, and the athlete can maintain the same training rhythm.

You can also use this time to work on some weaknesses, whereby that wouldn’t be the emphasis if the athlete were healthy, and you can sometimes end up with an athlete coming off injury better than they were before!

Friday:

  • Morning – Acceleration while the hurdlers hurdle.
  • Afternoon – Strength (compound lifts).

Saturday: Hills/special endurance (lactic capacity > lactic power).

Freelap USA: You include a good amount of over-distance and aerobic volume in your training. Can you outline what you see as being the benefits of this?

Laurent Meuwly: I think this is a big difference between our program and many other programs because we do a lot of aerobic work. For example, the 400m athletes may have some sessions where they run 8–9 kilometers by the time warmups and cooldowns are accounted for. The athletes may start with three sets of three minutes of progressive jogging with 90 seconds to two minutes rest, followed by mobility and activation exercises, which may be followed by some kind of stair running. Then they may do 12x300m with 45 seconds of rest, and this kind of session can take place twice a week. Work similar to this is also something we maintain in our program throughout the season.

Good aerobic development allows for capillarization and enhanced blood flow and recovery, enabling the athletes to make it through the season and recover between competitions, says @laurentmeuwly. Share on X

Good aerobic development allows for capillarization and enhanced blood flow and recovery, not only between sessions but also to enable the athletes to make it through the season and recover between competitions. Good endurance is a part of general conditioning and is required to be prepared for large training loads. You cannot just sprint and strength train and think this is enough if, in a championship, you need to complete three 200m races in three days. This kind of work, on its own, will not prepare you enough to perform optimally.

In addition, I also believe there are benefits with regard to the efficiency of running and ensuring that soft tissues such as tendons and ligaments are adequately prepared.

Since you’re here…
…we have a small favor to ask. More people are reading SimpliFaster than ever, and each week we bring you compelling content from coaches, sport scientists, and physiotherapists who are devoted to building better athletes. Please take a moment to share the articles on social media, engage the authors with questions and comments below, and link to articles when appropriate if you have a blog or participate on forums of related topics. — SF


Pool Training

Aquakinetics: How and Why to Integrate Pool Training

Blog| ByMatt Cooper

Pool Training

If the first thing that comes to mind when you hear about pool training is older adults working out at the YMCA, I can’t say I blame you.

I think I can speak for all of us when I say that our first introduction to using the water for physical fitness is either in older populations or youth swimming lessons—and that’s fair. Pool training (or aquakinetics, as it’s sometimes known) is a fantastic tool for improving strength and maintaining movement qualities as we age. It’s also a great (and potentially life-saving) activity for kids to get involved in, regardless of their athletic aspirations.

I believe we’re really leaving an uncut gem on the table if we don’t give aquakinetics a second glance for both fitness and sports performance, says @rewirehp. Share on X

All of this being said, I believe that we’re really leaving an uncut gem on the table if we don’t give aquakinetics a second glance for both fitness and sports performance.

What Qualities Does It Help Develop for Sport?

Let’s kick off with credit where it’s due—I first learned about the concept of using pool training for performance from strength and conditioning pioneer Marv Marinovich. I remember always being amazed at the level of results he would get in his athletes, in both a performance and rehab context—and the pool was a massive part of his programming.

After diving in (sorry, I had to) and integrating pool training in my own programming over the years, I’ve seen it check a number of athletic development boxes. These include speed, agility, movement economy, durability, and reciprocal inhibition/contract and relax cycles (the ability to turn on and off or “twitch” in lay terms).

How Does It Work, and How Do I Think About It in a Programming Context?

Wilt Chamberlain was one of the first mainstream athletes to integrate aquatic resistance exercise. First introduced to it through rehab, Chamberlain later used it supplementally for performance.

The concept of pool training is actually fairly simple once you understand the mechanisms of action. The first is omnidirectional resistance. This is the part that’s really challenging (if not impossible) to replicate without aquakinetics. It essentially refers to the water’s ability to load the body in all planes of motion, which allows athletes to load entire movement patterns in a more integrated capacity (as opposed to more isolated muscle groups). Obviously, there’s a place for both, but this really helps develop coordination in a drop-dead simple capacity.

You can have athletes perform underwater sprints, trunk and pelvis dissociations, jumps, throws, punches, and much more in a way that allows you to load the entire pattern with the intent to move fast for strength, power, and speed development. The water essentially acts as a global feedback mechanism, so your body rotates, adducts, abducts, pushes, and pulls against it concurrently in whatever pattern you want to train.


Video 1. A full-body movement in pool training.

In my experience, outside of the basics, more complex speed ladder and agility drills often don’t produce the intended adaptations. A lot of them end up looking like highly choreographed movements that athletes have to overly think about, and many may limit velocity (maximal expression of the nervous system in this context) in doing so. You know what I’m talking about—we’ve all seen the ladder drills that look like tap dancing. In contrast, the pool provides simple kinesthetic feedback to all parts of the body to help coordinate movements that athletes can perform using max intent.

The pool provides simple kinesthetic feedback to all parts of the body to help coordinate movements that athletes can perform using max intent, says @rewirehp. Share on X

That said, you can also isolate certain micro-movements. More on that later.

Speaking of resistance, the second concept is what’s known as drag resistance. This refers to the water resisting the surface area of your body to create load. The more force the athlete inputs into the water, the more force the water gives back. In that sense, the water is a form of adaptive resistance similar to isokinetics. This also helps make it a highly effective training modality for older populations and in return-to-play rehab scenarios.

If a rehabbing athlete can only produce 70% of their previous capacity, the resistance will only match their current output abilities. It’s also great for taxing tissues without joint load due to the ability to remove gravity from the situation. The lack of gravity-based load can also help decompress the body, and well-designed movements can help hydrate the fascia as well.

The aforementioned coordinative abilities also mean more integrated movements, which means the forces an athlete encounters are more likely to be distributed throughout the kinetic chain (as opposed to excessively being “absorbed” in one or more joints in compensation). This means the resistance is adequate for all levels—therefore, as the athlete’s power and speed progress, so does the resistance stimulus.

Although you can absolutely train without equipment (outside of needing the pool, of course), the best results I’ve seen come from pairing the pool work with aquatic ankle fins, hand bells, and drag resistance “barbells.” These increase the surface area the water resists to create an even greater stimulus for more strength, power, and velocity development. There are several companies in the space, but I’ve found the best results using Aqualogix’s hand training bells and fins (your baseline set) and rotating in the Hydro-Tone bells for more resistance. That’s our bread and butter, with the Hydro-Tone barbell or Hydro Revolution aquatic swing trainer being great options for push-pull and/or rotational movements and sports.


Video 2. Punch movement performed with hand bells.

The next unique feature of pool training is the dual concentric resistance, similar to certain dual concentric isokinetic machines. Whereas traditional strength training generally features concentric load followed by eccentric resistance (in a bracing capacity), pool work is a little different in that athletes will have concentric resistance followed (or preceded) by intentional yielding or pulling on what would be the “eccentric portion” of the movement.

The next unique feature of pool training is the dual concentric resistance, similar to certain dual concentric isokinetic machines, says @rewirehp. Share on X

For example, if I’m performing an alternating row press underwater, one arm is pushing concentrically while the other is simultaneously rowing concentrically. This is huge for developing reciprocal inhibition of tissue groups and helping train athletes to turn muscles on and off at appropriate times in a contract-relax capacity. Many athletes who perform too much excessive eccentric bracing without a requisite training balance could dampen their neurological abilities in these key areas.

This also dovetails back to the coordination piece. Let’s say I want to improve running gait for durability and speed purposes. One major piece is improving my athletes’ contralateral reciprocation abilities: this refers to the rotational qualities of the kinetic chain, wherein one side of the body has a certain posterior chain engagement while the opposing side sees certain anterior chain behavior simultaneously taking place in a reciprocating fashion.

For a simple example, let’s isolate the lower body in this context. On one side, you’d see dramatic hip flexion and knee elevation while, simultaneously, the rear trail leg exhibits dramatic hip flexion. The pool can be a way to develop this reciprocating frontside and backside mechanics action by stimulating the appropriate muscle and fascial tissues involved in a coordinated capacity.

This last bit isn’t so much exclusive to the pool, but the water does provide a unique way to develop conditioning abilities through the aforementioned movement pattern loading, as well. I’ve often recommended this for combat sports athletes in camp, as per Sports Lab and Coach Nick Curson of Speed of Sport.

What Kinds of Exercises Do I Generally Prescribe?

Like Marv, I keep things relatively simple and general across all sports.

Underwater sprint and jump variations are a staple, as are reciprocal row-press or rotational torque movements that improve the relationship between the pelvis and thorax. In fact, these exercises check both performance and corrective boxes simultaneously and can even out kinetic asymmetries. Thus, you may be able to cut down on some time spent doing corrective exercises.


Video 3. Underwater sprint variation.

For forward locomotive sports, I may have athletes perform coordinative movements for agility, such as loaded pelvis-rib cage dissociations, as seen in basketball and football. Depending on the group size, I usually use the Aqualogix and Hydro-Tone training bell and fin combos here.

Speaking of, explosive underwater suplexes (think a medball suplex) using the aforementioned Hydro-Tone Barbell are a staple for posterior chain development, as are underwater “kettlebell” swings using the hand bells.

That’s the bulk of it as far as upper-drives-lower forward locomotive sports go. As far as lower-drives-upper rotational sports, like baseball and combat sports, some of these general movements, plus underwater swings, throws, and shadow boxing, can be beneficial and deserve consideration.

For more isolated corrective movements, simple push-pull actions at various joints can be really useful. Some examples include hip abduction-adduction twitches, hamstring curl-knee extensions, and chest fly-rear delt fly combos (remember, the dual concentric makes these combo exercises).

I recommend aquatic ankle fins, hand bells, and drag resistance ‘barbells’ to progress pool exercises…. The upside is that pool cross-training equipment is highly cost-effects and lasts forever. Share on X

If possible, I do recommend the basic set of equipment I mentioned earlier to progress exercises in a meaningful way. The upside is that pool cross-training equipment is highly cost-effective and lasts forever.

What Are the Drawbacks?

Let’s start by saying the obvious—not everyone will have access to a pool.

In this case, the best solution is to find a school, public, or private pool where you can host drop-in days for athletes to supplement their weight-room, speed, and plyometric work with pool training. We’ve done this on and off over the years, depending on availability and interest.

Another suggestion here would be for coaches to prescribe supplemental “homework” to athletes who may have access to a pool on their own if they can perform the exercises safely. That’s what we’ve historically done for both in-person and remote athletes.

It should go without saying that youth athletes and people who don’t feel comfortable in the water need appropriate supervision from qualified professionals. That said, all of our pool work involves the water only going up to chest or shoulder level at a maximum—many hot tubs may suffice, too. The pool training I’m referring to is not meant to include some of the pool training you’ll see where people do long-duration breath holds underwater or carry loads across the bottom of a pool—that’s a different conversation from a safety perspective.


Video 4. Pool training where the head and shoulders are above water minimizes particular safety concerns.

This isn’t so much a downside but more just adding context: athletes still need to get in their other training modalities for strength, speed, and the like. I just feel like I have to add that context since some people see things in stark black and white. That said, I do think a training diet comprised of more pool training can absolutely suffice in older adult populations as well as in the case of certain neurological conditions.

All in all, finding a location (even if it’s not part of a weekly training cycle) will be the biggest hurdle for coaches and athletes. Even then, that’s a fairly minor deterrent that goes away once you take the time to find an accommodating situation.

I should also note that this is an area of training that’s relatively immature when it comes to research looking at outcomes of aquatic resistance exercise in athletes. A lot of research is understandably overfocused on older populations, and some looks to compare outcomes from land versus aquatic training when an either/or approach is not what I’m recommending here.

That said, some very encouraging research exists, and there are many case studies or observational instances of aquatic training having benefits in athletic populations. Moving forward, there needs to be more direct research observing some of these specific resistance exercise interventions in athlete populations.

All You Need Is a Pool

The real takeaway here should be that a simple yet brilliant addition to our training has been hidden in plain sight all these years. In an era of increasingly complex equipment, training concepts, corrective exercise strategies, and nuanced ideologies, one simple (and natural) addition can be a unifying modality that checks so many boxes across all these things.

The real takeaway here should be that a simple yet brilliant addition to our training has been hidden in plain sight all these years, says @rewirehp. Share on X

Outside of getting set up with a pool, it’s insanely easy to integrate. It also enables us to train durability and performance at the same time.

I suggest that athletes and coaches give it a shot and see if it moves the needle in their movements and athletic ability. If you’re rehabbing or helping recondition an athlete, it’s a no-brainer that can support almost every rehab scenario I can conceive.

Since you’re here…
…we have a small favor to ask. More people are reading SimpliFaster than ever, and each week we bring you compelling content from coaches, sport scientists, and physiotherapists who are devoted to building better athletes. Please take a moment to share the articles on social media, engage the authors with questions and comments below, and link to articles when appropriate if you have a blog or participate on forums of related topics. — SF


References

Becker, BE. “Biophysiologic aspects of hydrotherapy.” In: Comprehensive Aquatic Therapy (2nd ed.). Cole, AJ and Becker, BE, eds. Philadelphia, PA: Elsevier, Inc., 2004. pp. 19–56.

Colado JC, Garcia-Masso X, Rogers ME, Tella V, Benavent J, and Dantas EH. “Effects of aquatic and dry land resistance training devices on body composition and physical capacity in postmenopausal women.” Journal of Human Kinetics. 2012;32:185­–95. doi: 10.2478/v10078-012-0035-3. Epub 2012 May 30. PMID: 23487349; PMCID: PMC3590866.

Eckerson J and Anderson T. “Physiological response to water aerobics.” Journal of Sports Medicine & Physical Fitness. 1992;32:255–261.

Faíl LB, Marinho DA, Marques EA, et al. “Benefits of aquatic exercise in adults with and without chronic disease-A systematic review with meta-analysis.” Scandinavian Journal of Medicine & Science in Sports. 2022;32(3):465–486. doi: 10.1111/sms.14112. Epub 2021 Dec 24. PMID: 34913530.

Farinha C, Teixeira AM, Serrano J, et al. “Impact of Different Aquatic Exercise Programs on Body Composition, Functional Fitness and Cognitive Function of Non-Institutionalized Elderly Adults: A Randomized Controlled Trial.” International Journal of Environmental Research and Public Health. 2021;18(17):8963. doi: 10.3390/ijerph18178963. PMID: 34501553; PMCID: PMC8430467.

Gulick DT, Libert C, O’Melia M, and Taylor L. “Comparison of Aquatic and Land Plyometric Training on Strength, Power and Agility.” Journal of Aquatic Physical Therapy. 2007;15(1):11–18.

Martel GF, Harmer ML, Logan JM, and Parker CB. “Aquatic plyometric training increases vertical jump in female volleyball players.” Medicine & Science in Sports & Exercise. 2005;37:1814–1819.

Melzer I, Elbar O, Tsedek I, and Oddsson LIe. “A water-based training program that include perturbation exercises to improve stepping responses in older adults: study protocol for a randomized controlled cross-over trial.” BMC Geriatrics. 2008;8:19. doi: 10.1186/1471-2318-8-19. PMID: 18706103; PMCID: PMC2532994.

Nagle EF, Sanders ME, and Franklin BA. “Aquatic High Intensity Interval Training for Cardiometabolic Health: Benefits and Training Design.” American Journal of Lifestyle Medicine. 2016;11(1):64–76. doi: 10.1177/1559827615583640. PMID: 30202315; PMCID: PMC6124844.

Payton, S. “Brief Review of Beneficial Properties of Aquatic Exercise.” International Journal of Complementary & Alternative Medicine. 2017;7(4). 10.15406/ijcam.2017.07.00229.

Peng M, Wang R, Wang Y, et al. “Efficacy of Therapeutic Aquatic Exercise vs Physical Therapy Modalities for Patients With Chronic Low Back Pain: A Randomized Clinical Trial.” JAMA Network Open. 2022;5(1):e2142069. doi:10.1001/jamanetworkopen.2021.42069

Poyhonen T, Sipila S, Keskinen KL, Hautala A, Savolainen J, and Malkia E. “Effects of aquatic resistance training on neuromuscular performance in healthy women.” Medicine & Science in Sports & Exercise. 2002;34:2103–2109.

Robinson LE, Devor ST, Merrick MA, and Buckworth J. “The effects of land vs. aquatic plyometrics on power, torque, velocity, and muscle soreness in women.” Journal of Strength and Conditioning Research. 2004;18:84–91.

Thein JM and Brody LT. “Aquatic-based rehabilitation and training for the elite athlete.” Journal of Orthopaedic & Sports Physical Therapy. 1998;27(1):32–41. doi: 10.2519/jospt.1998.27.1.32. PMID: 9440039.

Wilder RP and Brennan DK. “Physiological responses to deep water running in athletes.” Sports Medicine. 1993;16:374–380.

Brody and Geigle. Aquatic Training Programs Benefit Injured Athletes.

Gregory Haff. Aquatic Cross Training for Athletes: Part II.

Elite Athlete Pull-Ups

How Elite Athletes Perform Better Pull-Ups

Blog| ByRob Schwartz

Elite Athlete Pull-Ups

Pull-ups, and the accompanying performance gains, have been an area of specialization for me over the past couple of decades. I am the Director of Human Performance for a Special Warfare Squadron. I’ve also spent four years as the Head Strength and Conditioning Coach for Team USA Gymnastics, Wrestling, Boxing, and Judo, all sports that require tremendous upper back muscular development and pulling strength.

Working with so many elite performers who utilize pull-ups as a mainstay of their development, I’ve tried a variety of methods. This article will highlight the safest and most effective ones I’ve found. The program will help you improve, whether you are trying to do your very first pull-up or reach an elite performance level.        

This pull-up program will help you improve, whether you are trying to do your very first pull-up or reach an elite performance level, says @CoachSchwartz8. Share on X

This is a program you can incorporate into your regular training. Although you can use it as a pull-up specialization program, it certainly doesn’t need to be. However, the main goal is to increase strength, so it will work best if used during a strength phase for your other body parts.

Always remember, strength gain is an adaptation that requires recovery. If the body doesn’t have enough fuel, such as during a fat-loss phase, it becomes increasingly difficult to gain strength. It’s not impossible—elite athletes in weight-class sports do it all the time—but it takes a tremendous level of commitment, time, and resources.

Before we get into the program, it’s important to pick the lowest-hanging fruit. Whenever someone has hit a plateau in training, the first thing I look at is their technique.

Technical Issues

Obviously, the lats are bigger and have greater strength capabilities than the biceps. However, a lot of people have a hard time recruiting their lats. If you struggle to feel the lats working during a set, here are a few things to try.

      1. Think of your hands like hooks. Get the bar deep in the hand so you’re gripping with more than just your fingers. Grip the bar hard, but put your mental focus on driving the elbows down as opposed to thinking about pulling your body up.


      1. Squeeze the shoulder blades (scapula) down and toward the opposite hip. This is especially important at the top of the movement and will help you get your collarbone above the bar. If you have trouble using your back, the first few times you do this will result in an incredible pump or even cramping. This is great feedback that your technique is improving, and any discomfort will subside.


    1. Following up on the last point, in training, we want to pull as high as possible to finish the rep. Try to get your sternum to the bar. As we fatigue, it’s common to let the chest sink in. This is the opposite of what we want. If the chest sinks in, we are now using all arm and have taken our strongest muscles of the upper back out of it. Additionally, this ability to finish with a big chest will develop the muscles that support the shoulder so we can stay healthy and train harder for longer.
As we fatigue, it’s common to let the chest sink in. This is the opposite of what we want. If the chest sinks in, we now use all arm and have taken our strongest muscles of the upper back out of it. Share on X
  1. Once you feel like you’ve mastered the ability to use your back, go ahead and start doing pull-ups in a way that feels more natural. These points are simply skills to be learned and now incorporated into your way of moving.
    *Whenever you learn a new technique, expect it to feel weird or for performance to decrease temporarily. This will all lead to new personal record levels of performance as long as you are disciplined and have a perseverance mindset.

Primary Limiting Factors

To find a solution, we need to assess the problem accurately. Once technique is solid, we start looking at the ability to produce force in large amounts and for a long time. Pull-ups measure strength relative to body weight. So, the stronger we are, the easier it is to lift ourselves each rep. In the same light, the less weight we have—let’s say, hanging on us—the easier each rep.

In the world of elite performers, athletes, and operators, we have conditioning tests. It’s very common to see someone who struggles in pull-ups also struggle in their conditioning test. If you fall into this category, you may get a better return on investment by working on your conditioning and nutrition rather than ONLY doing a pull-up-specific plan. Just being honest.

If body composition is a problem, clean up your nutrition, bolster conditioning, and hammer the program in the next section.

We find the importance of max strength for improving pull-up reps by looking at simple math. If someone weighs 200 pounds and can do a pull-up with significant weight hanging from a dip belt, then each rep at body weight is a smaller percentage of their capability.

For example:

    • 200-pound athlete using a dip belt with 100 pounds = 300-pound 1RM

200 pounds of body weight is now 66% of max strength

vs.

200-pound athlete using dip belt with 20 pounds = 220-pound 1RM

200 pounds of body weight is now 90.9% of max strength

It stands to reason that if we’re pulling a lower percentage of our capability, we’ll be able to do more reps. Additionally, if we’re pulling a lower percentage, we’ll be able to pull it faster. (I’ll explain how that helps next.) Admittedly, these are oversimplified explanations, but they work.

Whenever a challenge is done for time or max reps, most people burn out by the 45-second mark. Knowing this, we attack it from two angles. As mentioned above, we want to be able to pull ourselves up faster to get more reps in before fatigue becomes a factor.

On the other end of the equation, we want to increase our capacity to delay fatigue as long as possible. If you’re already at a level where you have high work output for 45 seconds, there may not be much potential for improvement here—some, but probably not much. However, if you start to struggle before 45 seconds, the window of opportunity is open. I address this in the next section with eccentric chins, inverted rows, and 60-second farmer’s walks.

Starting Point

For the purposes of this article, I’m using our USAF SPECWAR OFT standard for men and the Marines PFT standard for women to determine where you should start in this program. If you can’t do 11 pull-ups (men) or three pull-ups (women), then your base exercises are eccentric chins, inverted rows, and farmer’s walks (as outlined next). If you are above these standards, your initial phase will begin in the section Max Strength, but it’s good to read over these explanations for reference.

Day 1

    • : Eccentric Chin 3 x :60 (lowering your body)


    • Farmer’s Walk 3 x :20 as heavy as possible

Allow 72 hours of rest for your back, biceps, and grip. Ex: Day 1 = Mon, Day 2 = Thur

Day 2: Inverted Rows 3 x 1RIR
Farmer’s Walk 3 x :60

Eccentric Chins Technique


Video 1. You are up to 40% stronger when lowering your body than when lifting—we use eccentric chins to take advantage of this.

If you are using the rest-pause technique, let’s cap your total attempts at three each rep, so a total of nine over the session.

Whenever someone has hit a plateau in training, the first thing I look at is their technique, says @CoachSchwartz8. Share on X

Farmer’s Walk Technique

Posture is paramount! Keep the head up and the cervical spine in neutral.


Video 2. With basic variations or these advanced farmer’s walks, we’re looking at posture, cueing the athlete to walk as if they have a book on top of their head.

We hit the farmer’s walks each day with a different emphasis. On day one, we target max strength for the grip, and on day two, more strength endurance. In the pull-up, once the grip starts to slip, energy transfer becomes less efficient, and some of your arm/lat forces are leaked out at the hands. We must have a solid base of contact to maximize our efforts.

Inverted Row Technique


Video 3. Hold a pause at the top of each rep to double down on the effectiveness of these inverted rows.

RIR means reps in reserve. We want to take each set one rep from failing. We do this so we have a little energy left for recovery.

Programming and Moving Forward

Use these exercises as your main work on back/pulling days. Continue reading to see the rest of the program, particularly the sections Builder Exercises and after.

Once you can do eccentric chins for 60 seconds for all three sets or a rock-solid set of 25 inverted rows, go ahead and retest your pull-ups. I would encourage you to give your back, arms, and grip at least 72 hours of recovery before testing so that fatigue doesn’t mask any performance gains. When you hit your standards, move on to the next part of the program.

Max Strength

As mentioned above, increasing max strength increases pull-up performance by making your body weight a lower percentage of your max. Additionally, when we layer in the density of that new strength, we can now add reps to our pull-up test.

Start your program by testing your 3RM in pull-ups. Essentially, do three reps, add a little weight to a dip belt, and do three more. Keep going in this manner until you find the heaviest weight you can successfully do three times with excellent technique. For overall athleticism, I generally keep rest periods approximately 90 seconds long. If you are solely focused on improving pull-ups, then you can rest for up to three minutes.

At this point, you will train to improve your max strength pull-ups one day a week. This is known in the program as our Max Effort Day. One week following your test, warm up to 90% of your 3RM and perform five sets of three.

But there’s a kicker. In the section Technical Issues, we talked about the importance of strength and stability in the scapular region. So, to enhance these qualities, we superset with some form of standing military exercise. It can be with a barbell or dumbbell—dealer’s choice, as long as it’s strict. No leg drive, no arching the back, look straight forward, and finish with the bar directly over the head when the arms are fully extended.

The additional work of the standing military provides support for the pull-ups and specifically the shoulder joint by strengthening the mid and low traps. Healthy shoulders pull harder! The superset may challenge your work capacity and limit your output at first. Over time, your work capacity will increase and help you crank out more pull-ups.

Below is a straightforward but effective protocol. Typically, we incorporate percentages and vary the exercises more frequently to fit our overall program. For a direct impact on pull-ups, this progression works very well.

Max Effort Day

A1. Pull-ups at 90% of 3RM x 5 x 3. Rest 60 seconds.

A2. Standing military 5 x 5 heavy* Rest 60 seconds.

    *Heavy means you can do all five and maybe a sixth with strict form.

We will keep this setup until all five sets of three with 90% of 3RM become easy for two weeks in a row. Easy means you could definitely do a fourth rep in all five sets. Please don’t do the extra rep, however. We want to leave some gas in the tank for recovery. We preach Train, Recover, Adapt! It is recovery from training that leads to the adaptation of strength gain.

Leave some gas in the tank for recovery. We preach Train, Recover, Adapt! It is recovery from training that leads to the adaptation of strength gain, says @CoachSchwartz8. Share on X

We use the same weight the following week and perform pull-ups 5 x 5. It is very normal not to be able to complete five sets getting all five reps at first. No worries. Get what you can with great technique in each of the five sets. Don’t chase the overall 25 reps. If the first week you get 19, that’s still an increase of more than 20% from the 5×3 work, so you’re on your way!

Once the 5 x 5 becomes easy for two weeks, progress to 5 x 6. Once those become easy, retest your 3RM and start over at 90% of 3RM x 5 x 3. At this point, I suggest changing the grip from a traditional overhand to neutral or supinated for the next cycle.

Pull-Up Builder Exercises

Rows, rows, and more rows! I really don’t care what variation you use, just hit the points made about the scapula in Technical Issues. After your max effort superset, hit 1–2 row variations for 3–5 sets of 6–10 each and take all sets 1–2 RIR.

We also use band face pulls or mini band pull-aparts for 3–4 sets of 25–30 reps. You may do one of these before your pull-up and military superset to really prime the upper back and the other as your last exercise of the day. There’s some freedom of choice here; just get ’em in.

We also use the snatch grip RDL to strengthen the grip and mid and low traps. If you have a setup where you can pull against bands, even better. Sometimes we have this in the program as the exercise before the max effort superset. Other times we have this as the primary exercise on our second pulling day, known as Rep Effort Day.

We perform rep effort 72 hours after the Max Effort Day. Where we place the snatch grip RDL really depends on the overall goal of that training cycle, but both setups work very well. So again, we have some freedom in the program design.

Rep Effort Day

A staple of the Rep Effort Day is heavy farmer’s walks or KB bottom-up waiter’s carries. We’re trying to develop an iron grip to get the most out of our pulling force from the upper back and arms.

The benefit of the farmer’s walk is the loading provided to the upper back and core. The benefit of the waiter’s carry is that the fingers and wrist must dynamically respond to the subtle changes of balancing the kettlebell upside down while walking. This forces us to crush the handle rather than just hang on, which provides a nice stimulus for grip strength. Additionally, the shoulder and core must also dynamically stabilize, which provides several benefits outside the scope of an article about pull-ups, but they’re very important nonetheless.

I like to use “Training Challenges” with our athletes/operators, and a bodyweight farmer’s walk for time is a favorite, says @CoachSchwartz8. Share on X

I like to use “Training Challenges” with our athletes/operators, and a bodyweight farmer’s walk for time is a favorite. A 200-pound athlete will hold a 100-pound dumbbell in each hand and go for a walk as described in the section Starting Point. In my experience, completing one minute is a sign that the athlete is fairly strong. However, everyone on our current Top 5 board is over two minutes, with strict posture.

After the farmer’s walks or waiter’s carries, we perform some variation of overhead pulling that differs from the variation used on Max Effort Day. These may include underhand or neutral grip pull-ups, lat pulls with slightly different hand spacing than pull-ups, machines, or cables. Typical workloads are 3–4 sets x 8–15 reps with 1–2 RIR. Then we repeat the same row volumes from Max Effort Day, just using a different row variation. As long as progress is going well with the pull-up work, we finish with some high reps on rear delts, 2-3 x 25–30. If progress is struggling, we eliminate this extra isolation of a smaller muscle group at the end. 

Biceps Isolation: Friend or Foe?

I see this as an IF-THEN question. If you’ve been doing a lot of direct biceps work, and you’re not happy with your pull-ups, then you would probably benefit from giving your biceps more recovery to get stronger. A 4–8-week cycle of prioritizing your upper back with no direct biceps or rear delt work may be just the stimulus you need to add reps on the pull-up bar.

If you haven’t been doing a lot of direct biceps work and you’re not happy with your pull-ups, then you may benefit by adding some reverse curls, hammer curls, or KB hammer curls with the bell out. Pick 1–2 exercises and perform 2–3 sets of 5–10 reps.

I can’t stress this enough: I find it rare that someone (especially men) has undertrained biceps. For that reason, I recommend always ending biceps sets with 2 reps in reserve, says @CoachSchwartz8. Share on X

I can’t stress this enough: I find it rare that someone (especially men) has undertrained biceps. Just my experience, but for that reason, I recommend always ending biceps sets with two RIR. Whenever in doubt, we choose to keep the direct biceps volume low, which worked nicely for us.

Shoulder Pain

It is not uncommon for athletes pursuing more pull-ups to experience some shoulder pain, especially in the front delt area. This is often caused by biceps tendonitis. We recommend a few different approaches to this problem:

      1. Seek out a sports doctor. People tend to push through pain until something is intolerable and then seek help. Doing this only delays our progress.


      1. Perform band shoulder mobilities. Pre-workout, we do them dynamically, hitting a stretch for three seconds and moving on to another with the option of returning to the most-needed stretches as often as we feel like. The pre-session lasts 60–90 seconds per arm, with the option for more if the mobility is really poor. Post-workout, we stretch statically for 30–60 seconds in each position. Ensure you hit all the major muscles and pay particular attention to the pecs and biceps.


      1. Be sure to change your grip between overhand, underhand, and neutral throughout different exercises during the week.


    1. Change your grip width during the week as well. Even moving one hand width will change the stressor. The pain may be a sign that you’re doing the same thing the same way too often.

Training Template

For those of you who skipped ahead to see the meat and potatoes, here you go. Just know that we’ve gone over a lot of context critical to our mid-stream decision-making during training.

Max Effort Pull-Ups
*Heavy means you can do all five and maybe a sixth with strict form.
Rep Effort Day
*You may notice that each training session begins with a heavy lift right after the A-series. Regardless of the training cycle goals, I like to start with a power, speed, or strength stimulus. These methods also include plyometrics, Olympic lifts, MB throws, acceleration, or agility.

Safe and Effective Methods

I’ve used many methods to increase pull-ups. These are the ones I find safe and effective and deliver the quickest results. You may notice that a few common strategies are missing.

I’ve used many methods to increase pull-ups. These are the ones I find safe and effective and deliver the quickest results, says @CoachSchwartz8. Share on X

I’ve tried band- or machine-assisted. They’re okay, but I find their results come slower than the methods I’ve outlined.

Some people like kipping to cheat and get a few more reps. Kipping is a gymnastics skill that takes a lot of dedicated work under the direction of a qualified gymnastics coach. This is generally taught when athletes are 6–8 years old, and it uses many progressions.

For the purposes of increasing pull-ups, I do not teach the kip. The risk of shoulder injury far outweighs the benefits of a few extra reps. I find our methods are safer and more effective. As a matter of fact, I don’t teach kipping for muscle-ups either, but that’s a story for another time.

Please feel free to contact me with any questions or leave comments.

Since you’re here…
…we have a small favor to ask. More people are reading SimpliFaster than ever, and each week we bring you compelling content from coaches, sport scientists, and physiotherapists who are devoted to building better athletes. Please take a moment to share the articles on social media, engage the authors with questions and comments below, and link to articles when appropriate if you have a blog or participate on forums of related topics. — SF

GPS Football

Five GPS Metrics That Matter (and How to Fill Buckets and Filter Outliers)

Blog| ByChris Tanck

GPS Football

Working in the NFL gave me an opportunity to delve deeply into the vast array of data in the game of football. I worked with data across the entire business of the sport, including the Salary Cap, game stats and contract analysis, electronic medical records, and player performance information. I learned the importance of capturing and connecting every bit of information because it very likely would become a valuable asset to the organization.

I co-founded RockDaisy AMS to deliver value from data by making complex information easily accessible and understandable—one of our key targets is athletes and their supporting organizations. Athletes produce a wide array of performance, fitness, and effort information. This article discusses a small segment of what can be accomplished by collecting wearable GPS data, layering in conditional formatting to spot outliers, and connecting it with the broader base of data accumulated for every athlete.

Key GPS Metrics

The Global Positioning System (GPS) is a satellite-based navigation system that provides location and time information in all weather conditions. It is important because GPS devices are relied on to track athlete movement and physical activity accurately. GPS data can help coaches and trainers monitor their performance, recovery, and injury risk.1,2

There are five key metrics that all GPS vendors make sure their devices track. These specific metrics are essential because they cover three separate areas of training: volume, intensity, and speed.

    1. Total distance covered: Provides information about the amount of ground covered by the athlete during a training session or game. It helps the coach determine the athlete’s intensity and workload and adjust their training program appropriately.3


    1. High-speed running distance: Measures the distance covered by an athlete at high speeds and provides information about the athlete’s explosive power, acceleration, and deceleration.4


    1. Accels/Decels: Both accelerations and decelerations can contribute significantly to a player’s load and are useful indicators of external load; therefore, their value within athlete monitoring seems to be gaining importance.5


    1. Sprint count: Measures the number of times an athlete exerted an effort that was above a defined speed threshold.


  1. Maximum velocity: Provides information about the highest speed reached by an athlete during a training session or game and helps to determine their overall speed and agility.1
A coach should be concerned if certain GPS metrics for a training session go above or below a certain threshold, as it can indicate a potential problem with the athlete’s performance or health. Share on X

A coach should be concerned if certain GPS metrics for a training session go above or below a certain threshold, as it can indicate a potential problem with the athlete’s performance or health. The specific thresholds for each GPS metric can vary depending on a number of factors, including the sport, the athlete’s position, and their individual characteristics. For example, a soccer player’s average speed during a game might be expected to be around 5–7 meters per second, while a sprinter’s maximum velocity might be expected to be about 10–12 meters per second.

However, some general guidelines are given below:

    1. Total distance covered: A decrease in total distance covered could indicate fatigue or injury, while an increase could indicate improved endurance.


    1. High-speed running distance: A decrease in the high-speed running distance could indicate a decrease in explosive power or an increased risk of injury, while an increase could indicate improved conditioning and reduced injury risk.


    1. Accels/Decels: A decrease in accels/decels could indicate fatigue or injury, while an increase could indicate improved conditioning and reduced injury risk.


    1. Sprint count: A decrease in sprint count could indicate a decrease in speed and agility, while an increase could indicate improved explosive power.


  1. Maximum velocity: A decrease in maximum velocity could indicate a decrease in speed and agility, while an increase could indicate improved explosive power.

Comparing an athlete’s performance across two different periods is an effective way to see performance trends. For example, the RockDaisy Athlete Management System includes a Performance Comparison Date Range filter. The Performance Comparison Date Range filter can be set with a start and end date (e.g., the beginning and end of a season) to compare against daily data. This filter allows you to compare an athlete’s performance for a particular metric against their average for a season (or a comparison time frame you select).

The Performance Comparison Date Range filter also enables users to set standard deviation thresholds to understand a significant increase or decrease in an athlete’s performance.

This can be seen in the color coding of this Daily GPS Report (dashboard design provided by Benjamin Creamer, @coachbencreamer, Director of Sports Science at University of Washington).

Daily GPS
Figure 1. Color coding is based on athlete data for October 12, 2022, compared against the athlete’s average data for  September 2022 thru January 2023 (in-season).

The In-Season Average is key because it drives the functionality of the legend. If an athlete is within a certain standard deviation of their average, their data will be colored on the bucket they fall in. For example, if an athlete goes two standard deviations above their average for the season, that metric for the athlete will have a red background and be considered a “very hard” day.

It is important to note that these are general guidelines, and the specific thresholds for concern will depend on the individual athlete and their sport. Moreover, several other data sources can be useful to overlay with sports GPS data to get a complete picture of an athlete’s performance.6–11

Other suggested metrics that can be overlayed with GPS data:

    • Heart rate data: By overlaying heart rate data with GPS data, coaches can better understand the athlete’s physiological response to exercise and determine if they are working at the appropriate intensity.


    • Biomechanical data: By overlaying biomechanical data such as joint angles and muscle activation patterns with GPS data, coaches can better understand the athlete’s movement patterns and identify any areas of movement that may be contributing to injury risk.


    • Nutrition data: By overlaying nutrition data with GPS data, coaches can better understand the impact of diet on the athlete’s performance and recovery.


    • Video analysis: By overlaying video analysis with GPS data, coaches can better understand the athlete’s technique and movement patterns and identify areas for improvement.


  • Sleep data: By overlaying sleep data with GPS data, coaches can better understand the impact of sleep on the athlete’s performance and recovery.
Sleep Speed Overlay
Figure 2. Users can overlay sleep and wellness data with GPS metrics to see if there are any correlations.

Additional metrics can easily be imported from spreadsheets, from third-party APIs, or by leveraging customizable data collection forms. These metrics can then be easily overlayed with GPS data.

Wellness data
Figure 3. Collect wellness data to be later combined with GPS metrics to see if there are any correlations.

By combining GPS data with other data sources, coaches can understand the athlete’s performance more comprehensively and make more informed decisions about their training and injury prevention strategies.

By combining GPS data with other data sources, coaches can better understand an athlete’s performance and make more informed decisions about their training and injury prevention strategies. Share on X

RockDaisy has worked with multiple GPS vendors, and we understand the key performance indicators that are recorded during a training session. Our GPS report pack is a collection of GPS reports that are ready to use and/or can be customized to your needs. With our unique data visualization tools, we provide insight into your data outside of just the raw numbers. Feel free to contact us for more information.

Since you’re here…
…we have a small favor to ask. More people are reading SimpliFaster than ever, and each week we bring you compelling content from coaches, sport scientists, and physiotherapists who are devoted to building better athletes. Please take a moment to share the articles on social media, engage the authors with questions and comments below, and link to articles when appropriate if you have a blog or participate on forums of related topics. — SF

References

1. Cummins C, Orr R, O’Connor H, and West C. “Global positioning systems (GPS) and microtechnology sensors in team sports: a systematic review.” Sports Medicine. 2012;43:1025–1042.

2. Theodoropoulos JS, Bettle J, and Kosy JD. “The use of GPS and inertial devices for player monitoring in team sports: A review of current and future applications” Orthopedic Reviews. 2020;12(1).

3. Aughey RJ. “Applications of GPS technologies to field sports.” International Journal of Sports Physiology and Performance. 2011;6(3):295–310.

4. Rampinini E, Alberti G, Fiorenza M, et al. “Accuracy of GPS devices for measuring high-intensity running in field-based team sports.” International Journal of Sports Medicine. 2015;36(01):49–53.

5. Wing C. “Monitoring Athlete Load: Data Collection Methods and Practical Recommendations.” Strength & Conditioning Journal. 2018;40(4):26–39.

6. Backhouse SH, Whitaker L, Patterson L, Erickson K, and McKenna J. “Social psychology of doping in sport: A mixed studies narrative synthesis.” Prepared for the World Anti-Doping Agency. 2016.

7. Backhouse SH and McKenna J. “Doping in sport: A review of medical practitioners’ knowledge, attitudes and beliefs.” International Journal of Drug Policy. 2011;22(3):198–202.

8. Bădescu D, Zaharie N, Stoian I, Bădescu M., and Stanciu C. “A Narrative Review of the Link between Sport and Technology.” Sustainability. 2022;14(23):16265.

9. Halson SL. “Monitoring training load to understand fatigue in athletes.” Sports Medicine. 2014;44(Suppl 2):139–147.

10. Seshadri DR, Drummond G, Craker J, Rowbottom, JR, and Voos JE. “Wearable devices for sports: new integrated technologies allow coaches, physicians, and trainers to better understand the physical demands of athletes in real time.” IEEE Pulse. 2017;8(1):38–43.

11. Wilkes JR, Walter AE, Chang A-M, et al. “Effects of sleep disturbance on functional and physiological outcomes in collegiate athletes: a scoping review.” Sleep Medicine. 2021;81:8–19.

12. Wisbey B, Montgomery PG, Pyne DB, and Rattray B. “Quantifying movement demands of AFL football using GPS tracking.” Journal of Science and Medicine in Sport. 2010;13(5):531–536.

13. GPS Dashboard image (Figure 1). Dashboard design provided by Benjamin Creamer, Director of Sports Science at University of Washington.

Netball Analysis

The Collaboration Between Analysis and S&C Coaches with Jenna Bam

Freelap Friday Five| ByJenna Bam, ByElisabeth Oehler

Netball Analysis

Jenna Bam received her undergraduate degree in sport science and honors degree in high performance at Stellenbosch University, after which she went on to intern with the Stormers (a professional rugby team in South Africa). This internship taught her a lot about strength and conditioning and helped her build many connections. Jenna continued her studies with a master’s in exercise science at the University of Cape Town, where she did her thesis on subjective load monitoring from a skill perspective and its variability between different training sessions and playing positions in rugby union. After that, she worked as a performance analyst for a local university’s rugby side.

Jenna learned a lot about video and GPS analysis through connections, and she began doing the analysis and load monitoring for the rugby team. She initially used Catapult but has since moved to Statsport. She uses Hudl Sportscode for analysis and Phaseplay for load monitoring. Jenna recently joined the South African Netball team as a video analyst in their campaign leading up to the Netball World Cup.

Freelap USA: You’re a performance analyst and sport scientist working in university rugby and international netball. Netball is a very popular sport in the Southern Hemisphere, with the Women’s Netball World Cup just around the corner. Can you explain the physical and tactical demands of netball?

Jenna Bam: I recently joined the world of netball. I knew the sport growing up and knew that it was big in the Southern Hemisphere, but I didn’t fully understand the impact that it has in South Africa. I am amazed at the support our national team has and the amount of effort and hard work that the players put in. I always joke when I go back to my rugby team in between camps and tell the players how much harder the netball players work and that they wouldn’t last one minute on the court. Although netball is a non-contact sport, those players need to be built tough.

Netball requires a diverse set of skills from the players and demands a lot from their bodies. They are agile and fast, unpredictable and focused, and are always completely aware of their surroundings. Netball consists of jumping, sprinting, catching, shooting, and throwing. There is no beginning or end to a movement, as multiple movements could take place in a single bout. The opposition can capitalize on your mistakes within seconds, and the game can change so quickly.

When analyzing rugby, which has an 80-minute match duration, there are roughly only between 30 and 35 minutes of the ball in play. In netball (which has a 60-minute match duration), the ball-in-play percentage is almost double. There is very little time to rest, and players are constantly moving into open spaces. This makes analyzing the game slightly more difficult. It is also a much faster sport and has challenged me and made me a better analyst.

Freelap USA: During the Women’s Netball World Cup, you will be the analyst for the South African national team. Can you guide us through your data collection and analysis process for a training session?

Jenna Bam: Each training session is filmed and coded so that players can go back and look at specific drills they perhaps didn’t grasp or reflect on errors they may have made. I try to get more than one angle of the training session. For passing skills and footwork, I go down onto the court and use my phone to get some up-close (and slow-motion) footage while still leaving one camera (at a high vantage point) running and capturing a wide angle. I find phone cameras to be just as good these days, as well as easy to carry around/put away.

After training, players will do a self-analysis of the training session, which is uploaded immediately to Hudl. I split the training footage into the drills so that if players would like to refer to a specific drill, they do not have to sift through all the training footage to find it. Players are often discouraged when they open training footage and it is an hour long; therefore, analysts need to get creative in motivating players to watch. On the other hand, some players will happily watch two hours of footage straight after training, so you need to find a balance.

There are databases where footage is kept and can be referred to at a later stage. I make an iPad accessible for the players during camp so that if they do not have a device to watch the footage on (e.g., a laptop), they can come and get an iPad and do their own analysis, or they can go do analysis in groups. Coaches can then hold one-on-ones where they identify strengths and weaknesses that need addressing.

Freelap USA: How do you provide your findings and reports to the coaches, and what does the communication between you and them look like?

Jenna Bam: In all environments and sports, analysis can take place visually or verbally. I like to display my reports in a visual manner that will start a verbal discussion. I believe analysis (both GPS and video) is there to allow coaches to make informed decisions on tactics, team selection, and opposition profiling. It is not necessarily the analyst’s responsibility to make those technical/tactical decisions but rather to ensure that the coaches are fully and accurately informed.

Analysts need to have a close relationship with the coaches because it is imperative to know and understand what the coach wants from the analysis. Share on X

Analysts need to have a close relationship with the coaches because it is imperative to know and understand what the coach wants from the analysis. The data must be tailored to the coach’s needs for it to be effective and meaningful. There is so much data that an analyst can generate, but if it is of no use to the coach, there are more efficient ways to spend our time. There should always be an open communication channel between the analyst and coaches, as the game is constantly changing.

What analysts look at these days is completely different from that of 10 years ago. Sport is forever changing, and it is up to us to keep moving forward with it.

Freelap USA: You switched from being a strength and conditioning coach to being a performance analyst. What made you transition to this new role, and how did you expand your skill set?

Jenna Bam: I was very set on pursuing a career as a strength and conditioning coach in rugby but being a woman in a very male-dominated role led to a lot of setbacks. In the last five years, however, there has been massive progress in the development of females in sporting roles.

When I got the job at the University of Western Cape, Paul Treu (the rugby head coach) introduced me to Dr. Michele van Rooyen, who taught me everything I needed to know about sports code and analysis. He also introduced me to Dr. Wayne Lombard, who taught me how to use the GPS software and how to monitor players’ training loads (both physically and subjectively). I then found myself drawing up the on-field conditioning programs based on my data collection from video and GPS analysis. I was still connected to the conditioning side, just in a different way.

Video analysis was not a path I had ever considered, but I have absolutely loved merging video analysis, GPS analysis, and load monitoring. It was the best path I could have taken, and I’m happy with how things turned out. I feel so fortunate to have learned from some of the best in the industry, and I hope one day I can mentor someone the way they all mentored me. In this industry, it is so important to be willing to share knowledge. It does not happen often, but when it does, it is a beautiful thing!

It is so important to keep learning and expanding your skill set. This keeps your mind activated and forces you to look at data more critically rather than doing the same thing every day. It is so easy for performance analysts to go through the same mundane routine and just perform the data collection—we need to think critically and constantly ask ourselves how we can do better.

Freelap USA: Can you give any recommendations or tips to someone starting a new role as a performance analyst in team sports or transitioning from strength and conditioning to it?

Jenna Bam: Performance analysis is becoming, or has already become, an extremely sought-after position. These days, there is very little setting teams apart, and it comes down to the finer details—the 1% here and there. This makes analysis an integral part of any team’s setup. The job involves long and late hours, but it is all very worth it in the end.

These days, there is very little setting teams apart, and it comes down to the finer details—the 1% here and there. This makes analysis an integral part of any team’s setup. Share on X

If you want to pursue a career in analysis, I believe that video analysis is not meant to be looked at independently. If you are an S&C coach wishing to learn more about it or go into analysis, you do not have to give up S&C completely. The two go hand in hand. Once we, as sports scientists, start merging all the data, the picture will become much clearer.

Most people think that analysts are just the people behind the camera—the people who sit behind a computer and monitor statistics. While this is true, we are also so much more. We can connect with players and show them how and where to improve. We can tell coaches if their outcomes are being reached or their tactics need tweaking. Just because we are the people behind the lens does not always mean we are restricted to that space. At the end of the day, every coach is an analyst, and every analyst is a coach. We need to work as one.

Lead Photo by Steven Markham/Icon Sportswire.

Since you’re here…
…we have a small favor to ask. More people are reading SimpliFaster than ever, and each week we bring you compelling content from coaches, sport scientists, and physiotherapists who are devoted to building better athletes. Please take a moment to share the articles on social media, engage the authors with questions and comments below, and link to articles when appropriate if you have a blog or participate on forums of related topics. — SF


Youth Sprint Form

How the Youth Development Model Can Inform High-Performance Speed Training

Blog| ByMike Sullivan

Youth Sprint Form

Training in the private sector of sports performance exposes coaches to athletes in every age range. This comes as a surprise to no one; however, it can reveal a coach’s biases that can negatively affect certain segments of that age spectrum.

Having spent most of my time coaching in college athletics, working with younger athletes (middle and high school) wasn’t something I was accustomed to. As Coach Matt Tometz spoke about previously, I’ve quickly found out that youth athletes are not small adults. Treating and training them as such is more detrimental than it is elevating—in every sense, but in this context specifically, with regard to speed development.

Oftentimes, we hear coaches talk about the need for sprinters to be able to produce high levels of force. Force and strength are highly important to speed. Want to run faster? Train to produce higher amounts of force.

There is an amount of truth to this thought process: the ability to produce force is important. What happens to this foundational truth of speed development, however, when the athlete you are training is 13 years old? Is their ability to run faster still predicated on their ability to produce force? Not many 13-year-olds in the Chicago area have reached the strength level that many of these coaches say is a prerequisite to running fast. It seems that if force cannot be the differentiating factor in speed development, we have to search for answers elsewhere.

Therefore, every other corner of speed development must be explored before turning to force output: stride frequency (thigh velocity), ankle stiffness, rhythm and timing, the direction of force application, etc. All of these factors are more important qualities when training a younger athlete compared to total force output. Their ability to produce force will grow as they do. Now, if their ability to produce force grows in conjunction with their ability to orient their limbs through space quickly and in a coordinated fashion, then the application of that force will help.

A Missing Piece

Speed development for high-performance athletes can mirror that of the youth model to an interesting extent. Typically, when a collegiate athlete walks into our facility for the first time, it is on the back end of a collegiate career, and they are looking to continue playing at the next level (such as college football players coming to train for their Pro Days or soccer players with contracts to play overseas). One of the things that stands out about these athletes is a lack of the same qualities that we hammer away at with the younger population.

Many of these college/post-collegiate athletes are coming in after three or four (sometimes five-plus) years of training in college S&C programs that emphasized their ability to produce maximal force and deemphasized the qualities we try to capture with our youth athletes.

It seems that qualities like stiffness, frequency, rhythm and timing, etc. fall out of the athletic spectrum once strength and force output become an overriding emphasis of training. Share on X

To be clear, this is not an article on college S&C versus private sector performance. This is a review of the training qualities I’ve noticed as I’ve interacted with athletes of many ages and abilities. However, it seems that the qualities we have already talked about—stiffness, frequency, rhythm and timing, etc.—are the qualities that fall out of the athletic spectrum once strength and force output become an overriding emphasis of training.

While youth athletes are unable to rely on their limited ability to produce force for their speed development, the inverse is true for high-performance athletes. The force component has been trained SO much that it is relied on completely to “muscle” through speed workouts. To paint a mental picture of what this type of runner may look like: think strained, pulling, not bouncy off the ground, legs moving in slow motion, etc. (Not to say that it’s impossible to “muscle” your way to a fast run—it certainly is.) With many older athletes coming in at this point of training, the “non-force stuff” becomes an integral part of their training.

Of course, the ability to produce force is not completely ignored. Again, it is important. However, rarely have I found that the reason a high-level athlete is not fast is because they are not strong enough. They are, typically, plenty strong. They fall short because their ankles collapse on ground contact, their thigh velocity is slow, their rhythm in sprinting is awkward, and they fail to apply their strength in the right direction.

Recognizing problems is valuable, but solving problems is significantly more so. Here are five of the most common ways that I try and rectify the “not enough of anything except for force” situation:

1. Ankle Stiffness Variations


Video 1. A few common ankle-jump variations for building ankle stiffness: angled (light prowler in front to help maintain angle), forward and backward, alternating single leg. Ankle stiffness supports every phase of sprinting!

Interestingly, one of the populations of youth athletes that do come in physically prepared to sprint is basketball players. The stiffness and spring in their lower bodies compared to, say, their baseball counterparts is striking. Obviously, they need coaching on the technical aspects of sprinting, but physically, they have qualities that sprint coaches desire. Trying to build that spring in other athletes is a necessity. Unfortunately, years of bilateral strength work tend to loosen those springs.

2. A-Run Variations


Video 2. Two examples of the many possibilities of A-runs: banded in place A-run and ascending A-run.

3. A-Switch Variations


Video 3. A-switches have a near-infinite number of possibilities. Demonstrated here are an in-place A-switch, double A-switch, triple A-switch, and triple A-switch with bounce.

Getting the lower body to move quickly is a quality that is, again, built into “springier” athletes. Thigh velocity is an essential part of sprinting. Often, one of the issues for athletes with long training histories in the weight room is their inability to quickly “switch” the position of their legs while running.

A-switch and A-run variations are great tools for youth athletes because the drills train their ability to coordinate high-speed limb movements quickly and consciously. This is a great challenge for youth athletes, especially as they fight the awkwardness that puberty can bring. While higher-level athletes are not fighting the battles of puberty, we do want them to re-establish an emphasis on thigh velocity that may have been lost over the previous few years.

4. Single Leg Hurdle Step-Over Drill


Video 4. Progression used for single leg stepovers: walking single leg with hurdles, shuffling single leg with hurdles, shuffling single leg (no hurdles), shuffling single leg to bleed out.

5. Bounding Variations


Video 5. Again, there are many variations of bounding. Here are two I commonly use: sled bound and speed bound.

How do you objectively measure rhythm? It’s difficult. Still, I would venture to say that most coaches would agree that it’s important. Have you ever seen an athlete try to bound and then start to skip—or an athlete try to skip and then start bounding? Was that athlete fast? Probably not. Lack of rhythm? Maybe. Similar to the rest of this article—the athletes who tend to struggle with that rhythm are typically the more “force-driven” group.

Variations of all these drills are commonplace in our speed development workouts from youth through professional (of course, this is just a sample of those drills). None of them have any emphasis on higher force production.

It’s a Balancing Act

High-level athletes are high-level athletes for a reason. This seems obvious. Every successful athlete has physical qualities that make them successful. For some athletes, their ability to produce force sets them apart from their competitors. This, though, is not the superpower of every athlete.

The ability of some athletes to produce force sets them apart from their competitors, but this isn’t the superpower of every athlete. Many coaches are intent on training their athletes as if it is. Share on X

It seems that many coaches are intent on training all of their athletes as if it is. However, this training style can lead to adaptations that take away from the qualities that may make another, less force-dominant, athlete successful. It can act, instead, as their kryptonite. So, let’s lean into the superpowers of the athletes we work with (the qualities that make them fast!), and be mindful that not everyone is the same. Treating them as such is detrimental. Train a 13-year-old. See how well they do when you cue them to push the ground away further and harder (probably not well).

It’s interesting how funneled our thinking can get when we are only exposed to a specific population of athletes and how we create these truths about athletic development in our minds because every athlete we encounter comes from such a similar athletic playbook. But when one of those fundamental truths gets removed from the equation? How does that make you rethink the fundamental truths that no longer seem so fundamental?

Since you’re here…
…we have a small favor to ask. More people are reading SimpliFaster than ever, and each week we bring you compelling content from coaches, sport scientists, and physiotherapists who are devoted to building better athletes. Please take a moment to share the articles on social media, engage the authors with questions and comments below, and link to articles when appropriate if you have a blog or participate on forums of related topics. — SF


Speed Endurance

Chase Speed. Gain Endurance.

Blog| ByDillon Martinez

Speed Endurance

For the past seven years, the month of March has brought the same fundamental problem: how do I take a group of high school track and field athletes and get them as fast as possible before that key first weekend in June? With this question, a few subordinate questions follow: What is the right balance of speed and endurance training? Is it worth sacrificing speed days to focus on building my athletes’ endurance, or is building speed the only thing that truly matters? And will the endurance part take care of itself as the season progresses?

These are the questions every sprint coach faces at the start of the season. But what are the strategies coaches use to find the answers to these questions? Truthfully, until this year, my strategy has been “listen to coaches who are more successful than I am and copy what they say,”—which is a tried-and-true coaching method. But sooner or later, every coach must decide what works for them, why it works for them, and if there is more than just anecdotal evidence to support these notions. More succinctly—as coaches, we must be prepared to give an answer for why we do what we do.

There are far too many athletes who exhibit symptoms of overtraining and are told to power through it in the name of getting better, says @DillonMartinez. Share on X

There are far too many athletes who exhibit symptoms of overtraining and are told to power through it in the name of getting better. It is even more concerning that many of these athletes are sprinters. Symptoms of overtraining include prolonged general fatigue, inability to relax, poor sleep, and a pervasive feeling of tension or depression. These symptoms increase when an over-worked athlete also has poor nutrition and inadequate sleep.

Overtraining can lead to various types of injuries in high school athletes, depending on the sport and the individual’s training regimen. Some of the common injuries that may result from overtraining in high school athletes include:

  1. Stress fractures: Overtraining can cause repetitive stress on the bones, leading to tiny cracks known as stress fractures. This injury is common in athletes who participate in high-impact sports like basketball, soccer, and track and field.
  2. Muscle strains: Overuse of muscles can lead to muscle strains, which can cause pain and weakness in the affected muscle. Athletes who participate in sports that require repetitive motions—such as baseball, tennis, and swimming—are particularly prone to muscle strains.
  3. Tendinitis: Overtraining can cause inflammation of the tendons, leading to tendinitis. This injury is common in athletes who participate in sports that require repetitive movements, such as running, jumping, and throwing.
  4. Joint pain: Overtraining can put excessive stress on the joints, leading to joint pain and inflammation. This injury is common in athletes who participate in sports that require a lot of jumping, such as basketball and volleyball.
  5. Decreased immune function: Overtraining can weaken the immune system, making athletes more susceptible to illnesses and infections.
  6. Mental and emotional fatigue: Overtraining can also cause mental and emotional fatigue, leading to decreased motivation, mood changes, and even depression.

As a result, it is crucial to prioritize balance in training routines by incorporating rest and recovery measures.

My purpose with this article is to give speed coaches tangible ideas for programming to increase endurance while also increasing max velocity. To achieve this balance, it is critical to explore alternative approaches to exposing athletes to the necessary levels of aerobic training. This approach should prioritize the athletes’ safety and overall health as they prepare for upcoming competitions.

Furthermore, it’s an added bonus if the training regimen can also enhance the athletes’ maximum velocities. By taking a holistic approach to training—not focusing just on endurance or just on speed development—coaches can ensure that their athletes not only perform at their best but also maintain their overall well-being.

My purpose with this article is to give speed coaches tangible ideas for programming to increase endurance while also increasing max velocity, says @DillonMartinez. Share on X

As I am working through my doctorate focusing on speed development and coaching, I decided it was time to see what the research says in this regard. The results of my personal lit review have impacted how I coach, but more importantly, I can now give evidence-backed reasons as to why I format our sprinting program the way I do. Diving into this type of research can be intimidating, as many of the words used in the articles can look like they’re from a different language, but once it is sifted through, the knowledge gained will be meaningful and impactful to any program.

The Dosage Debate

My research question centered around the idea of “minimal effective dosage” as it concerns cardiovascular endurance. This is a popular buzz term in the sprinting community as it pertains to speed development, but I was curious as to its relevance to the conditioning aspect of training as well. This question led to a 2012 article in the Journal of Physiology by Martin Gibala (et al.,) the Chair of the Department of Kinesiology at McMaster University. This work, titled “Physiological Adaptations to Low-Volume, High-Intensity Interval Training in Health and Disease,” became the foundation for my training methodologies.

This study compared the effects of high-intensity, low-volume training to a more traditional steady-state, endurance-style modality (see table 1).

Study Chart
Table 1. The training protocols used in the study.

These training styles are very different. Group 1’s workout only had 2–3 minutes of work time, or time under tension, which is the traditional mark of how much work has been done. By contrast, group 2 had a total work time of 40–60 minutes a day! They did the same amount of work in a day that the high-intensity group did in the whole six-week study, for a cumulative 200–300 minutes of time under tension a week. This idea of time under tension is a derivative of the weightlifting and bodybuilding sect, and it has migrated into the heads of speed coaches.

Those who want to build lean muscle know that the more time under tension a muscle experiences, the more micro tears are created—and when those tears heal, it results in a larger muscle mass. This is a micro-trauma that induces a desired adaptation in the body. The point of this type of training is inflammation and muscle tears, both things we should aim to avoid in speed training.

Traditional thinking would say that because they did significantly more work, the second group would have better results than the high-intensity group. Surprisingly, this was not the case.

In the high-intensity group, which completed 90% less volume and spent 67% less time training, it was found that there were still “training induced markers of skeletal muscle and cardiovascular adaptations….” These adaptations included:

  • Increased resting glucose levels in the blood.
  • A reduced rate of glycogen use and lactate production during matched-work exercise.
  • An increased capacity for whole body and skeletal lipid oxidation.
  • Enhanced peripheral vascular structure and function.
  • Improved exercise performance as measured by time to exhaustion tests.
  • Increased maximal oxygen uptake.

These are significant findings, but are they corroborated by other studies looking at the same issue? The short answer is yes. These findings are supported by Burgomaster et al., 2005, 2008; Gibala et al., 2006; and Rakobowchuk et al., 2008. Furthermore, this type of training was shown to specifically improve athletic performance in competition, as proven using cycling time trial studies (Gibala et al., 2006; Little et al., 2010).

But ultimately, my question was, what is the “minimal effective dosage” as it pertains to cardiovascular endurance? This study, as well as another conducted by Burgomaster et al. in 2008 titled “Similar Metabolic Adaptations During Exercise After Low Volume Sprint Interval and Traditional Endurance Training in Humans,” both found that this training protocol increased max VO2 to the same extent as “traditional endurance training despite a markedly reduced time commitment and total training volume.” And if that wasn’t enough, Psilander et al. (2010) found that a single bout of low-volume, high-intensity training (7×30 seconds, 4 minutes rest) stimulated an increase in “mitochondrial gene expression that [was] comparable to or greater than the changes after more prolonged bouts (3 x 20 min at 67% of max VO2) of endurance exercise in well trained athletes.”

What Does This All Mean to Us as Coaches?

This all means we can chase speed, and as a result, our team will also become more conditioned. But the key is the intent; each rep conducted in these studies was done at max effort. This is the key to optimizing this training strategy for conditioning, and, conveniently enough, that is also how max velocity is increased.

This means we can chase speed, and as a result, our team will become more conditioned. But the key is the intent; each rep conducted in these studies was done at max effort, says @DillonMartinez. Share on X

The only way to get fast is to run fast. Our central nervous system (CNS) can only adapt to stimuli it has been exposed to in the case of speed development. You cannot get faster in any type of meaningful way if you are not training at max velocity, with max intent. How convenient that this type of training is also proven to increase VO2 max capacity in athletes!

Tangible Programming Ideas

What would a program look like that employs this type of training? In my programs, I don’t have any five-day cycle with more than two of these types of workouts, especially in the late portions of the season. Here is an example of how I set up a season.

Weekly Season Chart

Things to note from this setup.

  • I count meet days as both speed and endurance days.
  • I focus significantly more time on speed than I do on endurance. “The last 100 meters of a 400 are always going to hurt,” as Coach Tony Holler says.
  • I place a very high priority on technique work. Having shorter workouts has resulted in significantly more time to focus on correcting form errors and developing good habits in my athletes’ running form.

In the past, I would have dedicated almost the first three weeks of the season to submaximal endurance work to “lay the foundation” of endurance for the late season. This is wrong on a few levels.

  1. If my athletes lack speed, it won’t matter how in shape they are. I am training sprinters, not distance runners.
  2. Emphasizing submaximal endurance work at the beginning of the season may not be the most efficient use of training time and resources. This is because submaximal endurance work tends to improve aerobic fitness, which may not be the limiting factor for sprinting performance and my athletes’ success on the track.
  3. Focusing too much on endurance work early on in the season may lead to detraining of other important physical qualities such as power, strength, and speed, which are critical for sprinting performance. This could ultimately hinder an athlete’s ability to perform at their best during competitions later in the season.
Focusing too much on endurance work early in the season may lead to detraining of other important physical qualities such as power, strength, and speed, which are critical for sprinting performance. Share on X

Using speed work as a means to also train endurance has been a key method for success in my training programs.

Other Considerations

The beauty of less work is that there is less physical stress on the body. As track coaches, we are all too familiar with the plague of shin splints. Shin splints result from too much volume, too soon, with improper form. It has been shown that when runners land with a heel-first pattern, there is a higher propensity for shin splints to develop. When we are running submaximally, the likelihood that the heel strikes first also goes up.

Conversely, when athletes sprint, if they employ proper form, they land on the ball of their foot, reducing stress on the anterior tibialis and the risk of shin splints altogether. Also, the less time spent on training endurance, the more time open to focus on honing approaches, block starts, and other field event work. When your team is gearing up for a state run, all events must receive the appropriate amount of focus because every point matters!

Final Thoughts

In any type of training, we need to keep in mind the intended adaptations we are hoping to elicit. If we run submaximally, we can expect our bodies to become proficient at submaximal running. If we sprint at full speed, we can expect our body to understand that its needs to make the necessary adjustments to become proficient in that type of movement.

Make sure that when you program, what you select as a training modality will serve to further the goal of the adaptation you hope to target, says @DillonMartinez. Share on X

Make sure that when you program, what you select as a training modality will serve to further the goal of the adaptation you hope to target. For our purposes, you can be confident that if you focus on maximal exertion, you can expect also to see a growth in endurance in your athletes.

Chase speed. Gain endurance.

Since you’re here…
…we have a small favor to ask. More people are reading SimpliFaster than ever, and each week we bring you compelling content from coaches, sport scientists, and physiotherapists who are devoted to building better athletes. Please take a moment to share the articles on social media, engage the authors with questions and comments below, and link to articles when appropriate if you have a blog or participate on forums of related topics. — SF


References

Burgomaster KA, Howarth KR, Phillips SM, et al. “Similar metabolic adaptations during exercise after low volume sprint interval and traditional endurance training in humans.” Journal of Physiology. 2008;586:151–160.

Gibala MJ, Little JP, van Essen M, et al. “Short-term sprint interval versus traditional endurance training: similar initial adaptations in human skeletal muscle and exercise performance.” Journal of Physiology. 2006;575:901–911.

Gibala MJ and McGee SL. “Metabolic adaptations to short-term high-intensity interval training: a little pain for a lot of gain?” Exercise and Sport Sciences Reviews. 2008;36:58–63.

Gibala MJ, Little JP, Macdonald MJ, and Hawley JA. “Physiological Adaptations to Low-Volume, High-Intensity Interval Training in Health and Disease.” Journal of Physiology. 2012;590(12):1077–1084.

Little JP, Safdar A, Wilkin GP, Tarnopolsky MA, and Gibala MJ. “A practical model of low-volume high-intensity interval training induces mitochondrial biogenesis in human skeletal muscle: potential mechanisms.” Journal of Physiology. 2010b;588:1011–1022.

Psilander N, Wang L, Westergren J, Tonkonogi M, and Sahlin K. “Mitochondrial gene expression in elite cyclists: effects of high-intensity interval exercise.” European Journal of Applied Physiology. 2010;110:597–606.

Rakobowchuk M, Tanguay S, Burgomaster KA, Howarth KR, Gibala MJ, and MacDonald MJ. “Sprint interval and traditional endurance training induce similar improvements in peripheral arterial stiffness and flow-mediated dilation in healthy humans.” American Journal of Physiology-Regulatory Integrative and Comparative Physiology. 2008;295:R236–R242.

Brrrn Hockey

The 90’s Workout That Moved the Fitness Industry in a New Direction

Blog| ByJimmy T. Martin

Brrrn Hockey

Following the Jane Fonda era of at-home workouts (shout out to “Physical” on Apple TV), the ’90s introduced a new wave of fitness trends in the United States: Billy Blanks’ “Tae Bo,” Tony Little’s “Gazelle,” and Susan Sommers’ “Thighmaster”—just to name a few.

It wasn’t hard to notice fitness infomercials flooding the airwaves, all promising a slimmer figure to eager customers who yearned to remove the “work” from working out.

But amidst all the noise, one particular trend was actually offering sound advice. This upstart trend had a unique selling point: encouraging people to work out in a completely new direction—specifically, with exercises focused on the frontal plane (aka side-to-side movements), which was unlike any style of training currently marketed by traditional fitness brands.

Enter the slide board.

Now, if you were a comedy nerd like me, you might remember the 1995 Judd Apatow-penned cult comedy “Heavyweights,” which starred Ben Stiller and then up-and-coming actor Kenan Thompson. To this day, comedy cinephiles continue to echo the movie’s most famous tagline—“I’m feeling skinny, Tony!”—a response uttered by one of the blindly loyal disciples of Tony Perkis, the notorious, fat camp coach (played by Stiller) who was on a mission to slide pounds off his feeble camp counselors through painfully watchable slide board workouts.

But before slide boards got their big break on the big screen, the lateral movement was already underway two decades earlier—in a much cooler arena. (Trust me—the pun will make sense soon.)

From the Farmhouse to the Podium

The first slide boards actually date back to the 19th century, when Dutch speed skaters used wax-coated barn doors to practice their skating motions. But their impact in the U.S. wouldn’t emerge until centuries later, beginning in the 1970s with Eric Heiden—the former Olympic gold medalist speed skater who was the first to win gold medals in all five events (500m, 1,000m, 1,500m, 5,000m, and 10,000m).

Eric Heiden noticed a need for speed skaters to improve their performance on the ice through a dryland training tool that mimicked the lateral push movement relevant to the sport, says @JimmyTMartin. Share on X

After retiring from the sport, Heiden studied medicine, later becoming an orthopedic surgeon. He noticed a need for speed skaters to improve their performance on the ice through a dryland training tool that mimicked the lateral push movement relevant to the sport. So, with two wood bumpers, a slick plastic surface, and hospital-like booties to put over your sneakers, Heiden created “The Heiden Board” (go figure!), pioneering the movement of slide board use in the USA.

Apolo Ohno
Image 1. Speed skaters were among the first to apply slide boards in performance training. Eight-time Olympic medalist Apolo Ohno is pictured above on the Brrrn Board.

In the late ’80s, the success of the Heiden Board amongst the speed skating community soon inspired Dr. Louis Keppler—a former speed skater and fellow orthopedic surgeon—to follow in Heiden’s footsteps. While working as a team physician for the Cleveland Indians (now Guardians), Keppler began to notice an abundance of ACL and patellofemoral injuries in his athletic patients. This led Keppler to develop his own slide board training protocol called “The Keppler Method” (noticing a pattern here?). Keppler later patented his slide board, called “Euroglide” (never mind), and soon his method began to greatly impact the use case for slide boards in the rehabilitation space. Jeff Markland, a former NFL tight end for the Pittsburgh Steelers, used Keppler’s method to mend his career-ending knee injury.

The “Keppler Method” utilized a slide board for knee rehabilitation and provided patients with a specialized exercise program designed to help them recover from knee injuries or surgery. The program simulated skating motions and exercises that strengthen the muscles around the knee joint, improve range of motion, and promote healing.

Seeing firsthand the healing powers of Keppler’s method, Markland sought to find a way to bring this miracle rehab tool to the masses. This mission prompted him to partner with Reebok University’s Program Developer, Kathy Stevens, who was tasked with creating a successor program to their wildly popular “Step Reebok” series.

And in 1994, just a year before “Heavyweights” debuted, Slide Reebok introduced slide boards into the greater fitness community. These were the industry’s first roll-up board, paired with “slide aerobics” workouts that could be done both at home via VHS tape and in a group fitness setting at your local gym.

This wave of excitement for slide boards soon inspired a new cast of celebrity-backed workouts from the likes of Denise Austin, Kathy Ireland, and Cheryl Ladd, all leading slide aerobics exercises on the new lightweight, roll-up model of slide boards. But despite Markland and Stevens’ best efforts to inspire the next generation of lighter-weight slide boards and aerobics-inspired workouts, users outside of the step aerobics crowd weren’t getting on board (pun intended). Additionally, the roll-up design—though convenient to move and store—lacked the durability and stability needed to convince customers to get on board day in and day out.

Soon after, Reebok pulled its funding for the program, and the end of the ’90s saw the end of the once-thriving slide aerobics era. But, as the buzzy ’90s trend was slowly losing its steam, a Northwestern University grad named Barry Slotnick was slowly reengineering a custom-made slide board that carried more weight (quite literally) and served the demographic that initially put slide boards on the map: athletes.

Brrrn Storage
Image 2. The new generation of slide boards is intended to be more durable for athletic performance than previous roll-up designs

A native of Illinois, Slotnick built his first slide board in 1992 in his off-campus apartment as a cross-training tool for cyclists. His board soon caught the interest of the Northwestern tennis team, which was searching for a frontal-plane-dominant training tool to help players perform better while reducing the risk of knee injuries (meaning: side-to-side exercises). A year later, Slotnick received a call from the Chicago Bulls, requesting longer slide boards built for their taller athletes.

Slotnick’s board caught the interest of the Northwestern tennis team, which was searching for a frontal-plane-dominant training tool to help players perform better while reducing knee injury risk. Share on X

This opportunity prompted Slotnick to form his company, Varisport, and he began his journey as the American-made manufacturer of the UltraSlide Board—the fitness industry’s first eco-friendly, 8–10-foot slide board made for high school to Olympic athletes, as well as rehabilitation centers all across the country. But it wasn’t until 2004—just a decade later—that I would glide across (sorry—couldn’t help myself) Slotnick’s 10-foot UltraSlide board.

While training as a Division I college athlete on George Mason University’s wrestling team, I noticed this long white board on the floor of our strength and conditioning room.

“What’s this?” I asked.

“The most important piece of equipment in this room,” the trainer replied.

After only 10 minutes of continuous effort, I realized that this simply made product was not only one of the most versatile pieces of equipment I had ever used, but it actually packed a punch that I had never felt before as a high-caliber athlete. We did abdominal work, unilateral leg strength exercises, sliding push-ups, and sprinter slides—which instantly turned me into a sweaty and sore human.

Following the workout, I asked the trainer what he meant by this being the “most important piece of equipment in the room.” He proceeded to explain how most sports are multidirectional in nature. And given the historical pitfalls of most modern-day equipment—which primarily focus on sagittal plane exercises (aka forward and backward movements) on equipment such as treadmills, rowing machines, and bikes—it wasn’t surprising to him that athletes were experiencing a rise in muscular imbalances and injuries, specifically to their hips, groin, and knees, as a result of their bodies not being capable of moving in all directions.

These imbalances and injuries could have been avoided if there was a greater emphasis on adding frontal plane training to the equation—which is where the slide board comes in, says @JimmyTMartin. Share on X

Personally, I saw this firsthand with our school’s baseball, volleyball, tennis, and basketball players who had suffered a variety of hip and knee injuries while pivoting in action. And to my trainer’s point, these imbalances and injuries could have been avoided if there was a greater emphasis on adding frontal plane training to the equation—which is where the slide board comes in. Simply put: if athletes want to improve their odds of enjoying an injury-free career and train smarter for their sport, the slide board needs to be front and center with training.

And from that point forward, it was hard not to find a slide board under the feet of any athlete when walking through our training room doors.

Next Slide, Please

Fast forward to 12 years later, when I was creating the concept for Brrrn with Johnny Adamic to launch the world’s first and only cool temperature (50°F) fitness experience in New York City. We both knew that we needed a workout that would give people goosebumps but in a different way. Johnny and I saw not just a need to change the conversation about temperature when it came to exercise but also the conversation about the direction that we move when we exercise.

I spoke about my experience using a slide board as an athlete and with my personal training clients and the value it brought to the health of our bodies. In my opinion, the key selling point of the slide board was how it offered the right balance of being fun and challenging. It offered the user a way to experience a novel movement that would keep their interest in real time while also raising their heart rate, increasing muscular fatigue, and flooding their skin with sweat in such a short period.

Brrrn Studio
Image 3. Incorporating slide board training into the studio fitness experience in New York City.

From that point on, we sought to redesign the slide board so that it could not only stand the test of time but also wow customers of all ages and abilities in the heart of fitness in New York City. So, when it came to finding the right person to help us design our Brrrn Board, only one name came to mind: Barry Slotnick of UltraSlide. Through this collaboration, Johnny and I were able to celebrate the past in real time by designing our signature product with an industry leader who would be threading his legacy through our brand.

From our launch in 2018 until March 2020, we had more than 23,000 customers through our studio doors and received press from The New York Times, “Live with Kelly and Ryan,” “Good Morning America,” and Bloomberg TV and Radio (and many, many more) for putting slide boards back on the map. And given the overwhelming interest from our customers, we were prompted to develop a Peloton-inspired at-home fitness workout built around the unique programming we had done thousands of times in our studio. After brainstorming ways to develop this fitness experience, Slotnick eventually became an investor in our company.

As fate would have it, however, the pandemic forced our company to make a “lateral move” and focus our entire efforts on creating a direct-to-consumer business inspiring users to get on board with lateral movement training. After a few months of redirecting our efforts, filming hundreds of classes with 20+ instructors, and building an e-commerce platform from scratch, we proudly launched our on-demand fitness platform built around our newly made 5–6-foot adjustable Brrrn Board.

To date, we’ve received investments from the likes of Apolo Ohno (8x Olympic medalist and the most decorated U.S. winter athlete of all time), been featured on “The Today Show,” and received awards from Men’s Health, Women’s Health, Good Housekeeping, and Rolling Stone Magazine. We also created the industry’s first and only accredited slide board training certification (recognized by NASM, ACE, and NCSF), which educates health and fitness professionals about properly applying slide-board-based exercises for one-on-one training as well as small and larger group fitness classes.

We’ve also become an instrumental training tool for youth and adult athletes in sports like hockey, baseball, wrestling, and pickleball. We’ve helped physical therapists help their patients rehab their knee and hip injuries post-surgery. We also increased attendance and retention for many boutique and big box studios by creating impactful programming through Brrrn’s unique slide board training methodology.

As an innovator, I believe you have a responsibility to improve the systems of your predecessors. And with the Brrrn Board, we’ve distilled the best qualities from the slide board these past few decades to create an inimitable fitness experience that can serve every body.

I would argue that you won’t find a more multipurpose, multidirectional training tool that offers a rehabilitative yet competitive experience than a slide board. Fun fact: our Brrrn branded “taps” slide (below) can allow your body to access all three planes of motion in just one movement.

Taps Workout
Image 4. Training with the Brrn Board.

Most importantly, in a world where we are dodging in and out of the way of obstacles and threats to move closer to our desired goals, the slide board serves as the most underrated longevity tool in the fitness industry. By preparing you to move in any direction that life may take you, the slide board can allow you to do the things you love for longer by providing a well-rounded fitness experience that is enjoyable and accessible—both in price and in use.

The slide board can allow you to do the things you love for longer by providing a well-rounded fitness experience that is enjoyable and accessible—both in price and in use, says @JimmyTMartin. Share on X

So, whether your clients are youth athletes (hockey coaches), fitness enthusiasts (personal trainers or studio owners), or older adults (physical therapists), I can’t recommend the benefits of slide board training enough when it comes to improving balance, coordination, upper/lower body strength, core stability, and overall athletic performance.

Hopefully, you can look forward to lateral movement training as much as I do and are open to sliding this incredible training tool into your weekly workout routine!

Since you’re here…
…we have a small favor to ask. More people are reading SimpliFaster than ever, and each week we bring you compelling content from coaches, sport scientists, and physiotherapists who are devoted to building better athletes. Please take a moment to share the articles on social media, engage the authors with questions and comments below, and link to articles when appropriate if you have a blog or participate on forums of related topics. — SF


Skating Speed

Understanding the Basics of Skating Biomechanics with Sami Kaartinen

Freelap Friday Five| BySami Kaartinen, ByNick Gies

Skating Speed

Sami Kaartinen is a former professional ice hockey player (1998–2015), a doctoral student at the University of Eastern Finland (Sports and Exercise Medicine), and an S&C coach at KalPa Hockey (an elite league in Finland), where he is also in charge of skating coaching. Sami is the co-founder and chairman of Pro Prospect, which offers services to optimize the performance of individual athletes, mainly ice hockey players. He is studying skating biomechanics to offer tools to players and knowledge to coaches to help them improve their roles.

Sami has worked with all levels of hockey players, from very young beginners and junior World Championship athletes to Olympic athletes and professional hockey players in top European leagues and the NHL, helping them become better athletes and skaters. He has also had the opportunity to share his skating knowledge with coaches all over Europe.

Freelap USA: Your academic research has focused on ice skating biomechanics. Can you explain some of the major biomechanical differences between faster and slower skaters?

Sami Kaartinen: When talking about fast skaters, I like to divide them based on players with a good ability to accelerate and/or players with high maximal velocity. If you are good at accelerating, it doesn’t automatically mean you have a high maximal velocity or vice versa. Based on my own and previous studies of skating in ice hockey, it seems that there are kinematic elements that increase acceleration rates and maximal skating speeds.

The available knowledge on skating acceleration shows that “running” types of acceleration techniques would be the most efficient way to accelerate in ice hockey—meaning that faster skaters seem to have higher striding rates and shorter contact times (no gliding phase during the skating cycle), with sufficient hip external rotation to offer proper grip on the ice. To support previous components of “running start” acceleration, a higher center of mass (COM) has been reported during first steps. The players with higher acceleration rates have also reported a larger range of motion (ROM) of the hip joint. From my own experience, movement of the hip is one of the key elements driving acceleration.

I often see players having slow hip flexion, which limits:

  1. The amount of hip flexion during the recovery phase, causing too much hip flexion during initial ice contact and thus negatively affecting fast force production (“kicking” the ice, as I describe the phenomenon).
  2. There is some evidence that significant forward lean and skate placement straight under the hip, rather than in front of the body, are beneficial for a higher rate of acceleration.
When it comes to the maximal skating phase, greater knee flexion and ROM, together with sufficient hip adduction in the recovery phase, have been observed from the faster skaters. Share on X

When it comes to the maximal skating phase, greater knee flexion and ROM, together with sufficient hip adduction in the recovery phase, have been observed from the faster skaters. It has also been reported that faster skaters flex their hips more rapidly during the recovery phase. To support this finding, I found in my own study that lower muscle activity of the gluteus maximus (antagonist of the hip flexors) predicts higher skating speed. Furthermore, greater external rotation of the lower limb, together with high extension and abduction velocity, have also been reported to be favorable elements for achieving higher maximal skating speed.

In summary, I would say that during the first 3–4 steps (acceleration), the skate should not glide at all during the ice contact, while during initial ice contact, the lower limb should be significantly extended and contact time fairly short. During the maximal skating phase, great ROM of the hip, knee, and ankle with a quick recovery phase are the basic elements behind greater maximal skating speed.

Freelap USA: When designing an S&C program for a hockey player, what are the key areas coaches should focus on to help improve skating speed? 

Sami Kaartinen: Because I am deeply interested in the skating side of ice hockey, my S&C philosophy is based on that. Therefore, I see knowledge of skating biomechanics as the first step—skating might not be a movement the human body was made for. Skating is fast motion and includes movement in all planes (sagittal, frontal, and transversal), in maximal ROM, over a very thin skate blade, on a surface where minimal friction exists. Therefore, it is very important to understand the basics of skating biomechanics.

Even though skating includes different types of speed (e.g., reaction times, stops, and starts) with different kinds of skating techniques (crossovers, backward skating, turns, pivots, etc.), maximal forward skating speed is the simplest and the most analyzed speed in ice hockey. One forward skating stride (or cycle) is already quite a complicated movement pattern that sets high demands on the neuromuscular system.

I want to explain how I see the forward skating stride during the maximal skating phase and which elements and phases are involved when discussing skating speed. The initial part of the propulsion phase, called the gliding phase, is where the most joint flexion of the lower limb joints occurs (“deepest position”) during the skating cycle. During the gliding phase, most muscles of the gliding leg seem to work isometrically (vertical force production) to hold the proper skating position and steer the movement (straight forward versus Z skating) created by opposite limb extension. From these quite deep joint angles, extension of the limb begins, and a lot of power needs to be produced horizontally.

Based on relevant research, it seems that ROM of the lower limb is the main factor behind higher maximal skating speed. Consequently, it is important that an S&C program includes exercises that support force production from quite deep joint angles to the complete extension of the limb. Even though maximal extension velocity is essential, the contact time in skating is quite long (0.35 seconds) compared to sprinting (0.1–0.15 seconds), which coaches should also take into account when deciding on exercises and their intensity.

It is important that an S&C program for an ice hockey player includes exercises that support force production from quite deep joint angles to the complete extension of the limb. Share on X

Following powerful extension and abduction (concentric contraction), the player should have suitable capacity to stop the extension motion with eccentric muscle force of the lower limb flexors and adductor muscles. This is the part of the skating cycle where I see a lot of problems and limitations and which causes a lot of injuries to the hip/groin area. A lack of eccentric contraction force in the flexors and adductors makes it very difficult to stop the extension/adduction quickly without limiting the ROM of the extension. Just based on my own experience, I would recommend adding two lower limb flexor exercises per one extension exercise in most cases. In contrast, to return the skate back under the body, extremely fast flexion of the lower limb (concentric work of the flexors and adductors) is a vital element. This enables a new propulsion phase to start as soon as possible.

Of course, there also have to be physiological changes to improve skating speed, but as it is not my core knowledge, I’ll keep this part shorter. In general, increasing speed in ice hockey is based on the same exercise physiology facts as in other sports, where increased muscle force production with enhanced neural drive makes players move faster. Analysis should be done to establish this rate of force development (RFD). I prefer RFD analysis in sport-specific circumstances (on the ice in ice hockey), and there are already methods that could be used to make such analysis on the ice. Of course, off-ice analysis is very useful as well.

Depending on RFD analysis, a decision can be to focus on force production or/and neural drive parts. It should also be decided whether the main target is to develop skating acceleration or maximal skating speed because force-time characteristics are different (0.25 seconds versus 0.35 seconds). Based on these facts, coaches can decide which methods, exercises, intensity, periodization, etc., would work the best.

Freelap USA: In your research, you found that the recovery phase played an important role in achieving a faster skating speed. How would you go about training and improving this quality off-ice? 

Sami Kaartinen: I like to say that the recovery phase is a totally underrated and insufficiently focused part of the skating cycle—hence, including significant elements to increase skating speed. It can make a huge difference between skaters since the recovery phase covers approximately 40% of the skating cycle duration. If a player can execute it well, it significantly impacts their skating speed; in contrast, it could limit their skating speed and break their skating rhythm when done poorly. There are numerous ways a poor recovery phase disturbs skating (e.g., short ROM, improper skate position, duration of the phase is too long) and limits skating speed.

The recovery phrase is a totally underrated and insufficiently focused part of the skating cycle—hence, including significant elements to increase skating speed. Share on X

The recovery phase includes two main points:

  1. The “change of direction” point, where the direction of the motion should be changed as fast as possible. To be able to execute this phase efficiently, the lower limb flexor muscles need to produce a lot of eccentric force. The first physiological thing that could limit performance is the excessive imbalance between lower limb extensor/abductor muscles, concentric force production, and eccentric force production of the flexor/adductor muscles. To minimize the imbalance, many specific exercises for lower limb flexors should be done because most “traditional” strength exercises don’t offer the needed load for this motion (two flexion per one extension).
    Assisted band exercises work well here—in these, the concentric phase (flexion) is done against the band (as quickly as possible with maximal ROM). During the eccentric phase (extension), the rubber band is pulled by other players to create more resistance during leg extension (eccentric force). Similar results could also be reached with flywheel devices.
  1. Another important action during the recovery phase is quick hip flexion. I have used “overspeed” methods and exercises to improve this phase. The principle behind the method is to create circumstances where the flexion movement is executed faster than it could be done voluntarily. Different exercises with Bosu balls or other equipment that can create a bounce effect are suitable, including an exercise where an athlete “kicks” the Bosu (which is set on the floor behind the athlete), and the Bosu flings the leg to flexion motion.

Freelap USA: There seems to be a debate among hockey strength coaches on the merits of strength training on one versus two legs, for example, rear foot elevated split squats versus barbell back squats. What are your thoughts on lower-body strength development for hockey players as it relates to skating speed?

Sami Kaartinen: I think both are useful, and it is not an “either/or” thing. In all cases, regardless of the exercise, good technique is the first target, and we, as coaches, should choose the exercises that the athlete can execute with good technique. I also think it’s more what we want to achieve from the exercises than which exercise we use.

Concerning unilateral versus bilateral exercises, more demands on the synergist muscles are needed to control the motion in unilateral exercises. In my opinion, it is easier to create more exercise variations and aim the exercise more specifically to support skating when utilizing unilateral exercises. I also prefer to use unilateral exercises when less overall physical load exists. Bilateral exercise might work better in heavy resistance training during the hockey season to avoid overload of the stabilizer muscles and reduce the risk of injuries. Of course, it is not so simple, but to address the topic, such a guideline could work.

I also like to use unilateral exercises more regularly in all types of strength training when a player has achieved a decent strength level, when they have sufficient ability to control unilateral exercises (fast motion or heavy load), and/or when there are clear target muscle groups (weak link) that should especially be improved. I also prefer exercises where the force production is clearly horizontal.

To work horizontally, all lower limb joints are involved to produce a motion. Both rear foot elevated split squats and barbell back squats (vertical direction movements) activate the movement of the ankle joint a little. My own experience is that the ankle joint is very often the weak link (strength or mobility of the ankle); thus, exercises that offer horizontal force production are recommended.

Bilateral exercises quite often produce linear motion, but as mentioned earlier, with leg extension during the forward skating stride, external rotation exists (demands of the lower limb abductors and other stabilizer muscles) to offer the proper grip on the ice, making such exercises also necessary. Without suitable support from the stabilizer muscles, the force production of the quadriceps and glutes is not fully delivered to the ice; thus, optimal performance will not be achieved.

To summarize my answer, both unilateral and bilateral exercises are helpful in developing strength capacity. In addition, a very useful tool to develop skating-specific strength is to do it on the ice. When possible, I always prefer to use the method of skating against resistance (e.g., a band) on the ice. I have found it also a critical part of an on-ice rehab program after injuries to get players to return to the games in optimal shape.

Freelap USA: Many S&C coaches implement sprint training in their athletes’ off-ice programs. Can you explain the biomechanical similarities and/or differences between the skating stride and linear sprinting? Moreover, do you think sprint training can have a beneficial impact on on-ice skating performance?

Sami Kaartinen: I think—and studies have shown—that if you are a fast runner, you are likely also a fast skater. But improving skating speed by running may not be straightforward. The reason comes down to the differences in muscle actions and neural control required by the two actions.

Ground contact time (GCT) during sprinting acceleration is about 0.18 seconds, and it decreases close to 0.1 seconds or less during the subsequent steps. Meanwhile, in ice hockey, the contact time moves in the opposite direction, starting from 0.25 seconds while accelerating and being about 0.35 seconds at the maximal skating phase. The short contact time in running allows for the storage and utilization of elastic energy and using that energy to power the running. In contrast, stride GCT lasts longer during ice hockey, which limits the potential of elastic energy utilization and requires power to be generated with concentric muscle contraction. These differences are reflected in the effective training strategies that, in running, include more plyometric training, and in skating, include more exercises to improve concentric force generation ability.

There are also noticeable differences in kinematics while sprinting and skating. First, the lower limb range of motion during ground contact is generally significantly greater while skating. Additionally, in skating, the hip and knee ROM increase, going from the acceleration phase to maximal speed skating, whereas in sprinting, the opposite change occurs.

So, to answer the question, I find linear sprinting a valuable method to develop skating speed. But I use short sprints (0–10/15 meters)—basically the phase before the maximal sprinting phase—because short sprints better mimic the maximal skating phase kinematics in shorter GCT as on the ice. To better match the GCT and kinematics seen in skating, I often use either uphill sprints or resisted sprints. These are methods that I have also found very safe for hockey players.

To better match the GCT and kinematics seen in skating, I often use either uphill or resisted sprints. These are methods I have also found very safe for hockey players. Share on X

Sprint training is a useful tool to develop skating speed, but it has to be well-designed as part of training, and the purpose of the training needs to be clear. To avoid unnecessary injuries, I would be careful about making ice hockey players run full-speed sprints where maximal sprinting biomechanics occur, as there are more safe methods to use that are more linked to skating performance and biomechanics.

Since you’re here…
…we have a small favor to ask. More people are reading SimpliFaster than ever, and each week we bring you compelling content from coaches, sport scientists, and physiotherapists who are devoted to building better athletes. Please take a moment to share the articles on social media, engage the authors with questions and comments below, and link to articles when appropriate if you have a blog or participate on forums of related topics. — SF


K-Push Handheld Dynamometer

Kinvent K-Push Review: An Impressive New Handheld Dynamometer

Blog| ByVien Vu

K-Push Handheld Dynamometer

The handheld dynamometer (HHD) market has exploded as strength coaches and rehab professionals have adapted the evidence from taking objective measurements to use for the monitoring and safe return to sport. Not only have sales of classic dynamometers such as the MicroFET and Lafyette HHD increased, but newly developed app-based dynamometers have emerged (figure 1 below). One of the new arrivals is Kinvent’s K-Push.

Kinvent sells a separate K-Pull pull-type dynamometer, and readers should also check out this article to determine what HHD to purchase. This particular review only focuses on the K-Push.

Technical Specifications

Push dynamometers generally have less load capacity than pull dynamometers, and the K-Push is advertised with a 90-kilogram load capacity. However, its true load capacity is 135 kilograms, and users can feel confident consistently hitting that threshold. This makes it ideal for testing the common muscle groups, such as the hip complex, hamstrings, shoulders, quadriceps, and neck.

Rate of force development (RFD) at different time points has been a metric that users increasingly want, but accurate RFD requires a high sampling rate. The device is the top in the market with 1,000 Hz, which is recommended for RFD testing. This means the device records 1,000 data points per second.

The K-Push’s advertised sampling rate is 250 Hz, and the default is set at 125 Hz in-app, but users can go into the app to select the 1,000 Hz option if they want to acquire more accurate RFD metrics. Share on X

The K-Push’s advertised sampling rate is 250 Hz, and the default sampling rate is set at 125 Hz in-app, but users can go into the app to select the 1,000 Hz option if they want to begin acquiring more accurate RFD metrics. The engineers state that the sensors can handle up to 2,000 Hz, but at this time, the settings only allow it to be set to 1,000 Hz. As a reference, gold-standard isokinetic dynamometers, such as the HUMAC Norm, have sampling rates up to 2,500 Hz.1

Handheld Dynamometer Market
Figure 1. Comparison of select app-based push dynamometers.

As with many of Kinvent’s products, the K-Push’s battery life is very impressive, and its charge time remains short. With multiple uses per work hour, the tested device only required charging twice over the four months I used it. It also utilizes USB type C to charge, which is convenient since that is what charges most devices nowadays—no excessive cords around the office/desk. Connectivity issues have been reported in Kinvent’s smaller K-Force force plates; however, those issues are not present with the K-Push. The device quickly synced every time within seconds.

Hardware

The entire hardware and design have received updates from its second-generation iteration. The silicon pad is robust, flexible, and comfortable, whereas the generation 2 pad was flimsy and connected by weak magnets (figure 2). The cover has resisted drops, punctures, and any kind of damage over heavy usage (and a few drops—whoops!).

K-Push Silicone
Figure 2. The silicon pad attached to the K-Push is flexible, durable, and comfortable to push against during testing. You can easily remove the pad to clean it.

The most welcome change is the addition of a strong magnet on the back. Gone is a slide-and-click attachment system, replaced by a magnet that mounts to useful attachments such as handles, straps, clamps, and anything metal (figure 3). This makes standardizing and choosing good fixation easy and accessible (figure 4).

The addition of a strong magnet on the back is easily the best feature of the Kinvent K-Push, as fixation is often challenging yet so important for accuracy and reliability, says @MuyVienDPT. Share on X

The magnet itself is strong. It took 20 pounds of force before I pulled it off. (Yes, I tested it five times with a pull dynamometer.) This is easily the best feature of the device, as fixation is often challenging yet so important in accuracy and reliability.

K-Push Attachments
Figure 3. Available attachments for the K-Push.
k-Push Magnet
Figure 4. The ease and versatility of fixation with the K-Push magnet. Users will find it easy to set up fixation as long as there are metal objects around. The possibilities are endless.

Lastly, the rigid button has been replaced with a rubberized one. Although it lacks the tactile stiffness of the generation 2 K-Push, it is more responsive than the buttons on other Kinvent gen 3 devices.

There is now also a “button start” feature: once the test is set up, users do not need to push “Start” on the app but can just press the button on the device to begin the test. This change was made to save users time, but it doesn’t improve user experience as it just avoids one extra button push. Additionally, the button push function does not also work as a “Next” function: this would be an extremely useful add when clinicians are going through protocols of bundle tests. It’s a great idea but not fully utilized, given where the software is currently.

Overall, the generation 2 K-Push was impressive and great to use, and the engineers somehow improved the hardware even more.

The Software

A short time before the generation 3 release, Kinvent released the K-Physio app and discontinued support for their K-Force app. The K-Physio app is a significant upgrade, and it’s what all users will want. This K-Physio app now gives users access to a lot more data, such as RFD, impulse, and fatigue (figure 6).

The visualization is great and defaults with peak force symmetry as the main metric displayed. It also gives you the average peak force of each rep as you scroll farther, but it does not give you the average of the three. Some people may want the average symmetry, but I think peak force among all reps is the way to go. Users can also delete the reps they do not want to keep. Lastly, a recent update now publishes normative data with standard deviations for popular tests.

Not only can users make any test they want with their own custom picture and description, but they can also build their own protocols, says @MuyVienDPT. Share on X

Another great feature of the software is its customization. Not only can users make any test they want with their own custom picture and description, but they can also build their own protocols. For example, users can string together eight different hip tests to efficiently analyze the hip complex without manually selecting each test separately. This saves an incredible amount of time, especially when the actual tester memorizes the sequence. For the pre-programmed assortment of tests, you can customize many settings, such as the number of reps, length of tests, and prep time between reps. The number of limbs can also be customized (figure 5).

Standard Testing Parameters
Figure 5. Users can customize a host of parameters to standardize prep, test, and rest times.

PDF reports can be customized and generated on the app, which can then be directly emailed to patients and stakeholders.

As I mentioned in other reviews, Kinvent has a desktop platform—however, it is lacking (figure 7). Users who access their data on their desktop computer will miss out on 90% of the mobile app’s functionality. Among the missing features on the desktop app at the time of this review are the ability to:

  • Delete test sessions.
  • Edit users.
  • See advanced metrics (for jumps).
  • Customize reports.
  • Make/sort groups.
  • Administer a test (the most important one).

The desktop app does not pick up or allow you to enter the demographic info of participants. For rehab specialists who need to document and multi-task on their laptop, this hinders their daily operations.

As usual, Kinvent’s training modes are what makes their software great. These are really simple games that include Karl the Kangaroo scuba, catching fruit, and playing bubble blaster (see figure 8). As the level gets more challenging, users have to use more force and power to accomplish their goal. There’s also more feedback-driven training, such as isometric training that users can precisely set for 1RM-based force (figure 8).

Most people who only have the dynamometer will do well with the $350 starter package (tables 1 and 2), but those who also have the Kinvent force plate should upgrade to the Premium or Excellence packages.

Software Features
Table 1. Features based on the software package purchased.
Reporting Features
Table 2. Reporting features based on package purchased.
Advanced Metrics
Figure 6. Advanced metrics viewable on the tablet/mobile app. For squat and push-up analysis, the visuals and resulting data are identical.
Testing Visualizations
Figure 7. Strength testing visualization differences on the mobile versus desktop app.
Training Games
Figure 8. Training modes and customizable parameters.

Overall Score

Score: 9.5/10

Kinvent K-Push is the best handheld dynamometer on the market, with a slick mobile app and top-of-the-line technical specs. The build quality, easy fixation, customizability, battery, training modes, and visualizations will make people want to use it often for testing and as an intervention. If an updated desktop application comes out, consider this a 10/10.

Since you’re here…
…we have a small favor to ask. More people are reading SimpliFaster than ever, and each week we bring you compelling content from coaches, sport scientists, and physiotherapists who are devoted to building better athletes. Please take a moment to share the articles on social media, engage the authors with questions and comments below, and link to articles when appropriate if you have a blog or participate on forums of related topics. — SF


References

1. Maffiuletti NA, Aagaard P, Blazevich AJ, Folland J, Tillin N, and Duchateau J. “Rate of force development: physiological and methodological considerations.” European Journal of Applied Physiology. 2016 Jun;116(6):1091–116. doi: 10.1007/s00421-016-3346-6. Epub 2016 Mar 3. PMID: 26941023; PMCID: PMC4875063.

Core Dilemmas

Hold on a Minute: 3 Dilemmas in Our Understanding of Core Stability

Blog| ByNick Gies

Core Dilemmas

Despite the popularity of core training in fitness, rehab, and performance spheres, I have a sneaking suspicion that we aren’t all talking about the same thing. I’m not even sure we all agree on what the core even is, and maybe more importantly, how to best monitor and train it to reduce injuries or improve performance.

Let me explain.

You often hear coaches talk about training the “core,” but what does that even mean? I liken it to someone saying they trained their “legs.” What specifically did you train? What muscle groups? What contraction types and speeds? Endurance, max strength, or power? Which planes of motion? It’s such a vague descriptor that it’s essentially meaningless.

I’m not even sure we all agree on what the core even is, and maybe more importantly, how to best monitor and train it to reduce injuries or improve performance, says @CoachGies. Share on X

The term “core training” is often used as a catch-all for low-intensity exercises that isolate certain trunk muscles, but not always. Coaches will lump together rotational medicine ball throws, crawls, carries, loaded trunk movements, and other exercises under the singular banner of core stability.

Despite decades of related research on the topic, three distinct dilemmas have emerged that I believe are holding back our industry’s understanding and implementation of core training in both the S&C and rehab professions:

  1. No universal understanding of what core stability even is.
  2. Inadequate testing methods.
  3. No clear training framework.

But before we explore my justification for this hot take, it would be worthwhile to review how people can hold such differing opinions from one another. There are two cognitive biases that may help illuminate these problems (they might also help you understand the never-ending source of S&C Twitter conflicts):

  1. The Anchoring Bias.
  2. The False Consensus Effect.

The anchoring bias is the tendency to be overly influenced by the first piece of information we hear (for example, “Core training can prevent back injuries” or “The best core training involves anti-extension/rotation exercises”). All future information is then processed through this reference point rather than being objectively viewed.

It’s also very difficult to counteract this bias if you aren’t actively trying to challenge your priors (echo chambers, anyone?). Think of it this way: if you are a young intern and the facility you begin your career at is adamant that barbell squats and deadlifts are all an athlete needs for core development, you will view all future core stability information through that lens. Similarly, if you are a physiotherapy student and are told every patient needs isolated motor control exercises to engage the core properly, you are more likely to continue with those views going forward.

The false consensus effect is the tendency to overestimate how much others agree with your beliefs, behaviors, attitudes, and values. You overestimate the number of individuals that think like you and believe the vast majority of people share your training beliefs. Most coaches likely believe the rest of the industry thinks like them, and those who disagree are just outliers (or idiots). If you think most people think like you, you will be less likely to seek out differing opinions to challenge your beliefs because, well, why would you if you’ve got things figured out?

In an industry that loves to dichotomize anything and everything, core training is no exception. Some coaches preach the need to include isolated and specific exercises to target the core, or else this area will become underdeveloped and expose you to injury or poor performance. Others are confident that no direct training is needed and that barbell exercises and athletic movements will train the core just fine. Some think the spine shouldn’t move and be trained in static positions or with bodyweight movements only; others believe the spine should move freely and be loaded, sometimes in extreme positions.

It seems that many coaches hold strong beliefs on this topic, with many believing their views on core training are right while others are wrong.

The Three Dilemmas Holding Us Back

As I present the rest of the article, try to keep both the anchoring bias and false consensus effect in mind. Perhaps you will start to reflect on how you’ve fallen for both of these, not just around core training but with other training concepts as well.

1. The Definition Dilemma

In 1964, Justice Potter Stewart was famously quoted as saying, “I know it when I see it” when attempting to define pornography. The same could be said about the core and core training. Most people would largely know what those terms mean and what a core exercise is if they saw one performed.

But does everyone have the same understanding of what the core or core training is despite using the same terms?

Are we really speaking the same language?

The muscles attaching to the spine are often referred to as the “core”; however, the exact anatomical makeup of the core is not unanimously agreed upon among coaches and researchers.1 The functional capacity of these muscles is often termed “core stability” and has been the subject of extensive scientific investigation over the last 30 years. However, despite extensive research, there is still considerable confusion as to the exact definition of core stability.2–4

Without clear definitions in place, the interpretation of research data depends on the reader’s CURRENT conceptual understanding of core stability. We see this play out all the time on social media. Share on X

Without a clear series of definitions in place, the interpretation of research data is dependent on the reader’s current conceptual understanding of core stability. We see this play out all the time on social media. A study comes out, and there are wildly different interpretations of the results and conclusions, which leads to extensive debates, name-calling, and confused bystanders. As such, several researchers have highlighted that research cannot advance on this topic unless there is some definitional consensus.3–5

Many of the definitions in use today are too broad or too vague to provide much practical worth. They do little to inform coaches on which physiological qualities to address. Researchers have suggested that the diversity of definitions in the literature hampers the ability to summarize research findings and draw clear conclusions.6 Some of the definitional differences could be due to the context in which they are viewed.3 For example, in rehabilitation sectors, where treatment goals revolve around decreasing pain and returning to function, the concept of core stability and how to train it may look different than in S&C circles, where the priority is improving highly dynamic sporting movements.

Broadly speaking, there are three common terms used in the literature:7

  1. Core endurance: The ability to maintain a position for an extended period or perform multiple reps.
  2. Core strength: The ability to produce muscular force or intra-abdominal pressure.
  3. Core stability: The capacity of the stabilizing system to maintain intervertebral neutral zones during various activities.

What causes confusion is that these terms are often used interchangeably in the literature. Similarly, there is no agreement on the appropriate use of these terms in practical circles.1

Another term that is becoming more prevalent is “lumbopelvic control” (LPC)—or some variation of this—which is defined as “the ability to actively mobilize or stabilize the lumbopelvic region in response to internally or externally generated perturbations.”8 Other terms commonly used to describe the core include trunk, torso, and fascial slings. Without a clear agreement on what the definitions are and when to best use the terms, it ultimately boils down to the coach’s interpretation and previous experience with using those terms.

2. The Testing Dilemma

There are many established and validated testing procedures that help assess a wide range of functional and athletic capacities. These include muscular strength, muscular endurance, specific energy systems, power, and linear and multidirectional speed. In regard to testing core stability, there seem to be no validated tests capable of assessing the full spectrum of functional capacities of the core.9

For instance, the most commonly used tests for assessing the core consist of timed isometric holds (e.g., prone plank). Although these muscular endurance tests are reliable,10 they do not reflect the force and velocity demands seen during sporting activities and are likely to be inappropriate for athletic populations.9 It’s important to note that many of the most common core stability assessments were originally developed for individuals with low back pain (LBP).11 These tests would obviously be performed at a slower speed or be isometric in nature, rather than generating rapid muscular contractions, yet have seemed to permeate performance spheres and athletic testing batteries.

It’s important to note that many of the most common core stability assessments were originally developed for individuals with low back pain, says @CoachGies. Share on X

Similarly, there are currently no practically viable or validated methods available to assess maximal core strength for S&C coaches, although this quality appears relevant to athletic populations.12,13 Critically, it remains unknown whether—or how—coaches are monitoring core stability in practice. This is an important point because core stability training is a widely used tool in our industry, with nearly every coach implementing some sort of protocol to enhance this area. Yet, without established and validated tests to assess distinct physical qualities associated with core stability (e.g., strength versus endurance versus power), it’s impossible to discern the practical value of various core stability training programs and protocols.

3. The Training Dilemma

There are many widely accepted and validated training frameworks to develop either global physiological capacities (e.g., maximum strength or peak power) or specific morphological adaptations (e.g., eccentric training to increase muscle fascicle length). The same doesn’t seem to be true regarding training the core, as there is no broadly accepted training framework. To make matters worse, most coaches believe their way of training the core is superior or believe most coaches are doing what they are doing already (refer back to the Cognitive Biases section).

As with testing methods, many of the core stability training recommendations in the literature have been developed from research examining rehabilitation methods for chronic LBP.14 These exercises have since spread to training programs designed for athletes but have been heavily criticized as inappropriate for improving physical performance in healthy athletic populations.15 You can see how these rehab-based recommendations have seeped into the industry, as most coaches have at least heard concepts relating to “activate your core” prior to doing some sort of movement or even, more popularly, Dr. Stuart McGill’s “Big 3” exercises to prevent LBP.

Due to the absence of clear and robust training frameworks, current practical applications seem to vary extensively.1 There is considerable debate as to whether core stability should be trained using isolated exercises, classical barbell movements, and/or athletic movement drills.4,15,16 I’m sure every coach has heard people debate the merits of specific exercises or methods for developing the core.

Several attempts at creating more complete and well-rounded training frameworks have been proposed in the literature.3,17 However, whether these models improve performance or prevent injury has not been rigorously tested or validated. This bears repeating: There are currently no validated—or thoroughly tested—training frameworks for developing the core.

This bears repeating: There are currently no validated—or thoroughly tested—training frameworks for developing the core, says @CoachGies. Share on X

Either the science is sparse or inadequate (e.g., training interventions with too few subjects or too short a duration), or the programs are based more on theory or practical coaching experience. This is not to say training methods designed from coaching experience aren’t valid or useful, but we may need to temper the strength of our beliefs if the scientific backing just isn’t there. This lack of guidance, coupled with opposing opinions on best practices, leaves S&C coaches with a confusing diversity of mixed messages.

So, What Do We Do Now?

While it’s beyond the scope of this article to solve any of these dilemmas, that doesn’t mean all is lost. There are two areas of improvement that we can work on from both a scientific and practical perspective.

1. Say What You Mean, and Mean What You Say!

First, there needs to be an alignment of terminology. Precision of speech is critical if we are to effectively convey our thoughts to athletes and other coaches. Using similar-sounding—yet fundamentally different—terms does little to advance our understanding or application of core training.

Look, I get it; when talking to an athlete or someone who isn’t a coach, using some terms interchangeably might not make much difference in the quality of training received. But as a profession, the more precise and aligned we can be in our terminology, the better. I would urge you—the reader—to be aware of how these terms are being used in both academic and practical contexts.

Academically

When reading a paper on core stability training, dig into the methods section and see how the authors actually define these terms and what exercise interventions they use. I bet you’d be surprised at what you find!

Many research papers that assess or implement “core strength” methods (as specified by their titles, introductions, and conclusions) often use muscle endurance exercises and protocols (e.g., planks, sit-ups, or other high-rep bodyweight exercises). For argument’s sake, this would be akin to a research paper examining “lower body strength training” and concluding it doesn’t have an impact on vertical jump ability in high school athletes. But if the training intervention only utilized wall sits as their strength training exercise, I’m sure many coaches would take issue with people saying that lower-body strength training isn’t useful for athletes because this doesn’t look at the whole spectrum of lower-body strength training exercises or methods.

I would also assume that wall sits weren’t the first exercise you thought of when you read “lower body strength training.” You would probably define it as a muscular endurance exercise or a long-duration-yielding isometric, and that’s my point. From a methodology standpoint, understanding precisely what a research paper is investigating will allow you to determine the merits of the exercises investigated rather than assuming their worth based on the general terms used by the authors had you not dug a little deeper.

Practically

Nearly all coaches will have assumptions and personal preferences about what constitutes “core training.” It’s almost so general of a term as not to really mean much. If a coach says they did core training with an athlete, you might have an assumption of what they did, but you really have no idea what exercises were used or what physical qualities were developed. Some coaches might be more biased toward dynamic spinal movements with external loads, some might only implement isometric bodyweight holds, and others might view the classical barbell exercises as sufficient.

Consider how Alex Natera has improved our practical understanding of isometric training by breaking the concept into several distinct categories to target specific qualities for field sport and track athletes. Or how Lachlan Wilmot’s Plyometric Continuum caught fire because it categorized jump-based exercises into distinct and specific categories to improve exercise selection. Rather than falling back on umbrella terms like “isometric training” or “plyometrics,” they expanded those concepts and brought specific terminology to the forefront so everyone spoke a similar language.

Without a clear set of terms to describe the complexity of core training, it will be tough to determine exactly what other coaches mean when they say ‘core training,’ says @CoachGies. Share on X

Without a clear set of terms to describe the complexity of core training, it will be tough to determine exactly what other coaches mean when they say “core training.” Again, I would urge you to think deeply about which terms you use and if they make the most sense for the physiological adaptations you are looking to develop or the phase of training for the athlete. A non-exhaustive list of possible terms you can use to describe core exercises more precisely includes:

  • Core strength (e.g., 5–8RM weighted decline sit-up)
  • Core endurance (e.g., bodyweight sit-ups to volitional exhaustion)
  • Core power (e.g., split stance rotational medball throw)
  • Trunk flexion (e.g., sit-up), hip flexion (e.g., hanging leg raise), lateral trunk flexion (e.g., side bend), trunk/hip extension (e.g., 45° back extension), trunk rotation (e.g., Russian twist)
  • Prone (e.g., front plank) or supine (e.g., deadbug)
  • Dynamic (pro-movement, e.g., sit-up) or static (anti-movement, e.g., Pallof hold)
  • Isolated (e.g., crunch or side plank) or global (e.g., back squat or Turkish get-up)
  • Low load (e.g., bodyweight front plank for max time) or high load (e.g., front plank with 45-pound plate on hips for 20 seconds)
  • Lumbopelvic stability (e.g., bird dog with minimal movement in the lumbopelvic region)

The more precise your terminology, the more easily coaches can understand what you are actually implementing. You will also be able to assess whether your “core training” program checks off all the boxes you want it to or if there is a quality you might be neglecting.

2. Utilize a More Comprehensive Core Training Framework

Finally, the development of a more comprehensive core training framework for athletic performance is needed.  Often, core training can be an afterthought, programmed haphazardly at the end of sessions or, even worse, utilized as a “filler” to check a box.

Like many coaches, I was intrigued by Lachlan Wilmot’s Plyometric Continuum, as it opened my eyes to how poorly I was prescribing jump training with my athletes. I decided the way I implemented core training could benefit from a similar framework of simple and clear progressions for the beginner to the advanced athlete. This way, I could more easily slot an athlete into the progression streams that make the most sense or select the best exercises for the sport or time of year.

Thus was born my version of a Core Training Continuum.

Core Continuum
Figure 1. Core Training Continuum.
This Core Training Continuum breaks down core training into the big rocks coaches need to consider when progressing athletes or selecting the most appropriate stimulus for the time of the year. Share on X

This breaks down core training into what I feel are the big rocks coaches need to consider when progressing athletes or selecting the most appropriate stimulus for the time of the year. It also provides guidelines on how to prescribe the volume and loading for each category to ensure the actual adaptation you are after is properly developed. The key categories I identified in regard to developing a well-rounded trunk consist of:

  1. Endurance – Static (long-duration submaximal holds)
  2. Endurance – Dynamic (high-repetition submaximal movements)
  3. Strength – Static (short-duration maximal holds)
  4. Strength – Dynamic (low-repetition maximal movements)
  5. Power (high rate of force development movements)

All five of these categories are further divided into four subcategories pertaining to the location of the torso being trained.

  1. Anterior trunk (trunk/hip flexion or anti-extension, prone or supine)
  2. Lateral trunk (lateral flexion or anti-lateral flexion)
  3. Posterior trunk (extension or anti-flexion)
  4. Rotational (rotation or anti-rotation)

Core Examples
Figure 2. Core Training Continuum—Exercise Examples.*

*Notes:

  • Strength – Dynamic – Posterior could be lumped into the hip extension movement category rather than a specific core training category.
  • Power – Lateral trunk would likely be too difficult to perform; the Rotational category would likely be sufficient.
  • Power – Anterior and Posterior trunk may be considered full-body power drills and not strictly a core training category.

Nearly all core exercises can be categorized under this framework to create a menu of possible training options when programming for specific athletes. This continuum can have applications in long-term athlete development, rehabilitation, or performance settings and be used to select individual exercises based on the needs of an athlete or to create core circuits targeting a specific quality in several torso locations.

The problem with making a training model like this too detailed or all-encompassing is that it becomes too rigid to work in the real world, says @CoachGies. Share on X

I made this framework as simple and straightforward as possible. The problem with making a training model like this too detailed or all-encompassing is that it becomes too rigid to work in the real world. Obviously, these guidelines can be broken in the right context, but these guidelines will be suitable for the majority of situations.

Is it perfect? No. But no training model is. The more coaches can implement similar types of frameworks for implementing core training, while using clear terminology on what they are doing, the more effective their training interventions will be.

Final Thoughts

Outliers aside, there doesn’t seem to be a widely accepted method for developing all facets of core function over the long term. Some facilities or coaches may have developed systems like this in isolation, but to move our industry forward, these ideas need to reach a broader audience, with more rigorous and long-term studies performed to improve our confidence in their worth.

The goal is that this article helps shine a light on some of the dilemmas surrounding our industry’s current assumptions on core training, as well as some of the underlying cognitive biases responsible. Finally, it’s my hope that the Core Training Continuum can help coaches develop their own framework for developing better core training programs.

The preceding article is based on Nick’s master’s thesis, “Current Perspectives around Core Stability Training in the Sports Performance Domain.” To read the full text, click here.

Since you’re here…
…we have a small favor to ask. More people are reading SimpliFaster than ever, and each week we bring you compelling content from coaches, sport scientists, and physiotherapists who are devoted to building better athletes. Please take a moment to share the articles on social media, engage the authors with questions and comments below, and link to articles when appropriate if you have a blog or participate on forums of related topics. — SF


References

1. Clark DR, Lambert MI, and Hunter AM. “Contemporary perspectives of core stability training for dynamic athletic performance: A survey of athletes, coaches, sports science and sports medicine practitioners.” Sports Medicine – Open. 2018;4(1):32.

2. Borghuis J, Hof AL, and Lemmink KAPM. “The Importance of Sensory-Motor Control in Providing Core Stability.” Sports Medicine. 2008;38(11):893–916.

3. Hibbs AE, Thompson KG, French D, Wrigley A, and Spears I. “Optimizing performance by improving core stability and core strength.” Sports Medicine. 2008;38(12):995–1008.

4. Wirth K, Hartmann H, Mickel C, Szilvas E, Keiner M, and Sander A. “Core Stability in Athletes: A Critical Analysis of Current Guidelines.” Sports Medicine. 2017;47(3);401–414.

5. Martuscello JM, Nuzzo JL, Ashley CD, Campbell BI, Orriola JJ, and Mayer JM. “Systematic review of core muscle activity during physical fitness exercises.” Journal of Strength and Conditioning Research/National Strength & Conditioning Association. 2013;27(6):1684–1698.

6. Silfies SP, Ebaugh D, Pontillo M, and Butowicz CM. “Critical review of the impact of core stability on upper extremity athletic injury and performance.” Brazilian Journal of Physical Therapy. 2015;19(5):360–368.

7. Saeterbakken AH. “Muscle activity, and the association between core strength, core endurance and core stability.” Journal of Novel Physiotherapy and Physical Rehabilitation.” 2015;2(2):028–034.

8. Chaudhari AMW, McKenzie CS, Pan X, and Oñate JA. “Lumbopelvic control and days missed because of injury in professional baseball pitchers.” The American Journal of Sports Medicine. 2014;42(11):2734–2740.

9. Prieske O, Muehlbauer T, and Granacher U. “The Role of Trunk Muscle Strength for Physical Fitness and Athletic Performance in Trained Individuals: A Systematic Review and Meta-Analysis.” Sports Medicine. 2016;46(3):401–419.

10. Waldhelm A and Li L. “Endurance tests are the most reliable core stability related measurements.” Journal of Sport and Health Science. 2012;1(2):121–128.

11. Shinkle J, Nesser TW, Demchak TJ, and McMannus DM. “Effect of core strength on the measure of power in the extremities.” Journal of Strength and Conditioning Research/National Strength & Conditioning Association. 2012;26(2):373–380.

12. Park J-H, Kim J-E, Yoo J-I, Kim Y-P, Kim E-H, and Seo T-B. “Comparison of maximum muscle strength and isokinetic knee and core muscle functions according to pedaling power difference of racing cyclist candidates.” Journal of Exercise Rehabilitation. 2019;15(3):401–406.

13. Raschner C, Platzer H-P, Patterson C, Werner I, Huber R, and Hildebrandt C. “The relationship between ACL injuries and physical fitness in young competitive ski racers: a 10-year longitudinal study.” British Journal of Sports Medicine. 2012;46(15):1065–1071.

14. Huxel Bliven KC and Anderson BE. “Core stability training for injury prevention.” Sports Health. 2013;5(6):514–522.

15. Lederman E. “The myth of core stability.” Journal of Bodywork and Movement Therapies. 2010;14(1):84–98.

16. Behm DG, Drinkwater EJ, Willardson JM, and Cowley PM. “The use of instability to train the core musculature.” Applied Physiology, Nutrition, and Metabolism. 2010;35(1):91–108.

17. McGill S. “Core Training: Evidence Translating to Better Performance and Injury Prevention.” Strength & Conditioning Journal. 2010;32(3):33.

Gainesville High School Building

Facility Finders: Gainesville High School

Blog| ByJohn Delf-Montgomery

Gainesville High School Building

The state of Georgia has joined the nationwide surge of high schools investing in strength and conditioning and their athletes. Gainesville High School is the first location in Georgia I have seen in this new era of high school strength and conditioning, and it will be tough to beat! This facility is overseen by Taylor Williams, Director of Strength and Conditioning, and Nate Mathis, Director of Optimal Performance/Wellness. The duo is implementing training for injury rehabilitation (Mathis) all the way to training the potential next Heisman trophy winner (Williams) for the Red Elephants.


Video 1. Virtual tour of the Gainesville High School weight room.

Garage Door Access
Image 1. The garage door access point from the new weight room to the field/track at Gainesville High School.

Design

Coach Williams—who was at Gainesville during the renovation of the 10,000-square-foot facility—mentioned there were a lot of things that needed to change with the new $1.5 million space. Before that, the space held 32 racks and felt very cramped, so they decided to switch to 28 racks to allow for a better flow and spacing for their room.

One unique element is the garage door addition for the program and the facility, which I love.

“One of the major renovations to this room consisted of adding two garage doors, which are functional,” Williams said. “This allows our athletes to quickly transition from being inside the weight room to continuing their training sessions outside on the track/turf field area.”

I have said this many times; space is king, and especially for a high school strength coach, it’s everything. Gainesville chose Rogers and Pendulum Strength equipment because of their knowledge of using Rogers football equipment. I think this was the first time I had ever heard that Rogers made weight room equipment—the logo is burned into my brain after years of pushing a five-man sled as an offensive lineman, so I was also surprised to see that same brand on incredible weight room equipment.

I think a “new generation” shift between coaches choosing a full, high-density flooring throughout the space over the wood overlay is something that will stay, and it really does allow for a sharp-looking room. The space has a large middle opening with seven double-sided racks on each side. Coach Williams has the room split up into three areas:

  • Lower body
  • Upper body
  • Explosive/plyometric area

Like many Division I football weight rooms, you see the adoption of the “pod rack method” here at Gainesville. The pod method creates an all-in-one-area training space for the athletes to come and complete the entire lift in that pod.

Power Racks
Image 2. A view of the racks and all of the attachments.

Purchasing

The hardest part of a weight room renovation project is deciding between all the best companies in the world to pick which one should outfit your place. The smallest detail can be what makes or breaks it for one company or another. The biggest decision-making factor for Gainesville was their familiarity with Rogers/Pendulum products, as well as the vision that the coaches needed to best outfit their athletes—small things like the bumper plates being suspended in a trough-type setup (instead of the traditional weight pegs) and the fact that the DC Blocks they bought can be stored under the racks to save space.

The hardest part of a weight room renovation project is deciding between all the best companies in the world to pick which one should outfit your place, says @johndelf99. Share on X

These are the tiny details that schools, facilities, and home gyms look for when purchasing, and I find it fascinating.

Another piece for Coach Williams was that the companies were trusted by places he trusted. “Their work speaks for itself,” Williams said. “Some of their best projects include Arkansas baseball and Michigan football.”

For all things sports science and wellness, Coach Mathis is in charge. The Gainesville weight room has it all, including:

  • Massive TV screens to help with the delivery of the program.
  • Perch VBT system for their racks to help track bar speed and bar path during lifting.
  • Catapult, which they use for GPS data during field sessions or practice.

Seeing a high school invest not only in the equipment but also in the two coaches heading this charge is truly impressive. I know I’m just the facility and equipment guy, but I also wanted to highlight how special these two coaches are in this whole process. I always find it interesting to look deeper at incredible facilities, but full-time leaders in those spaces are what makes the equipment really special.

“The technology helps drive decision-making to ensure our athletes are provided with training that fits their individual needs and is transferable to their sport,” Coach Mathis said when I asked him why they wanted to include all the sports science tools in this project instead of buying more benches, bars, bands, etc.

Open Space
Image 3. The open space splits the 14 racks into seven on each side of the room.

Specialty Equipment

What else can you add to a place that has already thought of everything?

Coach Williams mentions some cool extra pieces they bought to really take their training to the next level. These pieces include DC Blocks, safety bars, neutral bars, flywheels, and finally, the nutrition station. I like to include DC Blocks in the specialty category because of how versatile they can be, and as a strength coach, that’s what we demand. How many different ways can I use this piece of equipment? Coach Williams does just that with them, between step-ups, block cleans, and injury prevention tools.

The specialty bar category is near and dear to my heart because I am such an advocate for them, especially for special population athletes and injured folks. Safety bars can be beneficial for upper extremity injured athletes to be able to do more than just leg press all day, every day. The trap bar is a staple for me because of all the uses a coach can get out of it; most importantly, it’s the safest and best way mechanically to deadlift.

They also designed a cardio/rehab area in the weight room that the coach can use to service the recovering athletes before they are released back into the herd…of Red Elephants. Finally, a key “specialty” piece—especially at the high school level—is the awesome nutrition station (seen in the virtual tour video).

The nutrition station will be the differentiator for what makes the Gainesville H.S. facility probably a top 10 facility in the state, no matter the sector—high school, college, pro, or private. Share on X

This is another piece that Coach Mathis oversees, and it’s really going to be the differentiator for what makes the Gainesville High School facility probably a top 10 facility in the state, no matter the sector—high school, college, pro, or private. This has been the first facility in this series with a comprehensive station to fuel and refuel athletes pre/post practice or workout. Coach Mathis uses it to start the conversation about how nutrition is a lifelong skill that these athletes will be learning from 14 years old and on, which is really special.

Coaches
Image 4. The guys making use of this incredible facility (Coach Williams on the left and Coach Mathis on the right).

Coaches’ Tips

Coaches Williams and Mathis did a great job deciding on the pieces that would drive training at Gainesville High School for decades to come, not leaving a single rock unturned, from the flooring and space-saving decisions to the extra pieces and flair. I didn’t mention enough about branding for the place because of how much else was important—but they truly have their brand and culture installed with every new screw and bolt.

The last thoughts will be from both Coach Williams and Coach Mathis when asked about their tips for coaches looking for equipment.

“I would say establishing your goals for the renovation is the most important part,” Coach Williams replied. “Once those are set, then you can begin to reach out to the company that you would like to partner with for the project.”

“When deciding on technology equipment, it is important to consider the program that will be implemented,” Coach Mathis added. “We considered the exercise selection, grouping, transitioning, time, etc. The equipment needs to be user-friendly and easy to navigate for players and assistant coaches. We also looked for companies that provide not only reliable data but also relevant data that can be used to better program training for our athletes.”

Since you’re here…
…we have a small favor to ask. More people are reading SimpliFaster than ever, and each week we bring you compelling content from coaches, sport scientists, and physiotherapists who are devoted to building better athletes. Please take a moment to share the articles on social media, engage the authors with questions and comments below, and link to articles when appropriate if you have a blog or participate on forums of related topics. — SF


  • « Go to Previous Page
  • Page 1
  • Interim pages omitted …
  • Page 26
  • Page 27
  • Page 28
  • Page 29
  • Page 30
  • Interim pages omitted …
  • Page 164
  • Go to Next Page »

Primary Sidebar

FEATURED

  • Using Speed and Power Data to Bucket and Train Faster Athletes
  • Plyometric Training Systems: Developmental vs. Progressive
  • 9 (Fun!) Games to Develop Movement Skills and Athleticism

Latest Posts

  • Rapid Fire—Episode #15 Featuring Kyle Brown: What is Universal Speed Rating (USR)?
  • Why We Don’t Perform Hang Cleans
  • 1080 Sprint: Four Essential Tips You Won’t Find in the Manual

Topics

  • Adult training
  • App features
  • Artificial Intelligence
  • Athlete
  • Athlete performance
  • Baseball
  • Buyer's Guide
  • Career
  • Certifications
  • Changing with the Game
  • Coach
  • Coaching
  • Coaching workflows
  • Coching
  • College athlete
  • Course Reviews
  • Dasher
  • Data management
  • EMG
  • Force plates
  • Future innovations
  • Game On Series
  • Getting Started
  • Injury prevention
  • Misconceptions Series
  • Motion tracking
  • Out of My Lane Series
  • Performance technology
  • Physical education
  • Plyometric training
  • Pneumatic resistance
  • Power
  • Power development
  • Practice
  • Rapid Fire
  • Reflectorless timing system
  • Running
  • Speed
  • Sports
  • Sports technology
  • Sprinters
  • Strength and conditioning
  • Strength training
  • Summer School with Dan Mullins
  • The Croc Show
  • Track and field
  • Training
  • Training efficiency
  • Wave loading
  • What I've Added/What I've Dropped Series
  • Youth athletics
  • Youth coaching

Categories

  • Blog
  • Buyer's Guide
  • Freelap Friday Five
  • Podcasts

COMPANY

  • Contact Us
  • Write for SimpliFaster
  • Affiliate Program
  • Terms of Use
  • SimpliFaster Privacy Policy
  • DMCA Policy
  • Return and Refund Policy
  • Disclaimer

Coaches Resources

  • Shop Online
  • SimpliFaster Blog
  • Buyer’s Guide
  • Freelap Friday Five
  • Coaches Job Listing

CONTACT INFORMATION

13100 Tech City Circle Suite 200

Alachua, FL 32615

(925) 461-5990 (office)

(925) 461-5991 (fax)

(800) 634-5990 (toll free in US)

Logo of BuyBoard Purchasing Cooperative. The word Buy is yellow and shaped like a shopping cart, while Board and Purchasing Cooperative are in blue text.
  • Facebook
  • Instagram
  • Twitter
  • YouTube

SIGNUP FOR NEWSLETTER

Loading

Copyright © 2025 SimpliFaster. All Rights Reserved.