5 Specialty Bars That Are Worth the Investment

Summary
Specialty bars aren’t intended to replace the weight room stalwarts, but rather to enhance the adaptations you may be looking for with your athletes. While not all specialty bars are worth buying, Coach Justin Ochoa believes these five definitely are.
The best products are the ones that you use daily and experience that A-ha! moment with, where you think: “Wow, I can’t believe I didn’t invent this. This is such a great idea.” Inventions provide solutions to common problems or upgrade solutions currently in place. Whether it be in the weight room or in day-to-day life, the products we use the most are the ones that help us more efficiently accomplish the task at hand.
In the weight room, our main products are barbells, dumbbells, weight plates, and benches. With those four things, you can honestly run a high-performance program. Would it be ideal? Probably not. But would it be enough? Definitely.
While there’s nothing wrong with the basic tools, we live in an era of innovation and not considering new solutions would be flat out irresponsible. As a coach, for me to not consider utilizing new, advanced equipment such as specialty bars would be like using Alexander Graham Bell’s original 1876 telephone design instead of at least checking out the new iPhone.
For me, to not consider utilizing new, advanced equipment such as specialty bars would be like using Bell’s original 1876 telephone design instead of at least checking out the new iPhone. Share on XSpecialty bars are exactly what they sound like. Special. They provide a specialty. They aren’t meant to replace all of our basics, but rather to enhance the adaptations we may be looking for when using them.
Whether it’s tall athletes deadlifting with a trap bar for better biomechanics, coaches utilizing a safety squat bar to allow for hand-assisted lifts, or athletes following a return-to-play protocol by lifting with an Earthquake bar, specialty bars can help us fill voids that we may not be able to fill with our standard equipment.
This article will highlight five of my favorite specialty bars, which I can confidently say are well worth the investment for you as a coach and for your athletes.
1. Earthquake Bar
The Earthquake bar by BandBell is a bar that I never knew I needed until I got my hands on one. I dismissed this bar for years, thinking it was a circus trick for Instagram likes and follows. Boy, was I wrong.
Shame on me for not doing my due diligence and research, because I probably could have helped a lot more athletes by implementing this in our programming earlier. BandBell was started by Jim Seitzer (a founding member of Westside Barbell), and his goal was to help find ways to train big movements without pain.
What started as a broomstick with mini bands and kettlebells attached to it has now turned into several different specialty bars, my favorite being the Earthquake bar.
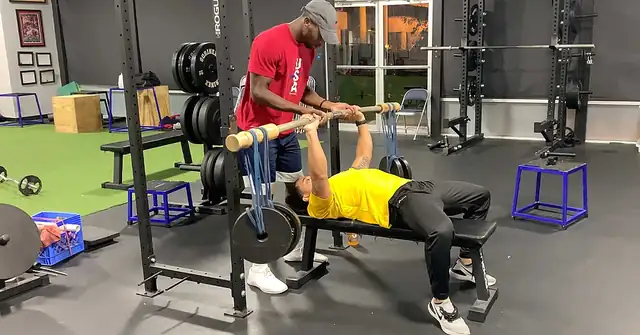
At just about 6.5 pounds in weight and 1.5 inches in diameter, this bar is capable of handling 300 pounds of external load. Unlike a normal bar, the weight is not loaded directly onto the sleeve but rather hung from bands at the ends of the bar. This setup is what creates the unique benefits of O.K.E.
Oscillating Kinetic Energy
O.K.E., or oscillating kinetic energy if you want to sound super smart, is not a new concept but one that has been truly mastered by the use of this specialty bar. Using O.K.E. is great for both rehab and training goals because the stimulus comes from the oscillations, pulses, and perturbations that create varied levels of multiplanar instability. At different loads and kinetic energy levels, we can alter these exercises based on the desired adaptation.
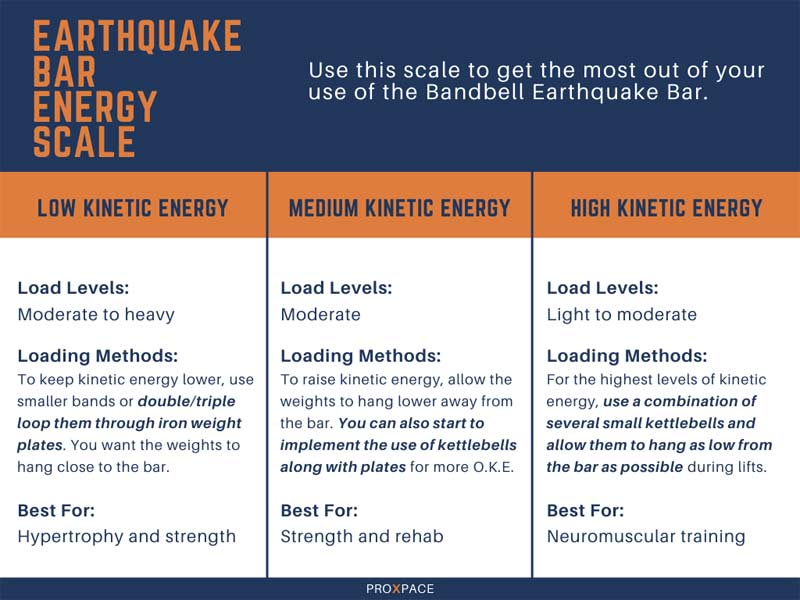
For example, if you want an athlete to really wake up their central nervous system and tap into all those stabilizing muscles, it would be wise to use a setup with tons of kinetic energy. By hanging several lightweight kettlebells from the bar via bands, you can create the instability you’re looking for. I’ve had a lot of success introducing this early into programming when athletes return from an upper body injury or have high pain levels with traditional upper body lifts.
On the other hand, if an athlete is aiming for a good pump, you can hang heavier weight plates from the bar and even decrease the amount of band slack to make it more stable. Now you can move some pretty good weight with low levels of O.K.E. and work more of the prime movers of the lift without as much stress on the joint. This setup is really good for hypertrophy work on seasoned athletes who may want to avoid any undue joint stress or discomfort.
There are so many variables and customizations you can make with this bar. It’s much more than creating the chaos training effect. You can really fit lifts to each athlete’s needs in a truly beneficial and safe way.
How We Use It
While there are several ways to use this bar in a clinical setting, that’s not the field I’m in. If I were a physical therapist, this would be one of my go-to tools for rehabbing shoulders, elbows, hips, knees, and ankles. Instead, on the performance side of the business, I really love using the bar as a dynamic coordination tool. We’ll often operate in that medium kinetic energy range to get a little bit of the benefits from each end of the spectrum.
On the performance side of the business, I really love using the Earthquake bar as a dynamic coordination tool, says @JustinOchoa317. Share on XThe Earthquake bench press is great for athletes looking to find ways to press without pain, due to the lower overall load being used and the bar’s slightly thicker handle, but it’s also really helpful as a recovery and autoregulation tool.
On days when we might have some sort of bench press variation programmed, but the athlete comes in with a really low level of readiness, we can easily swap that out for the Earthquake bar. Maybe they’re sick, maybe they’re tired from practice/games, maybe they’re hurt, maybe their significant other dumped them, maybe they slept poorly. Those things can affect an athlete’s mental state, physical state, and overall ability to perform. Sometimes coaches have to recognize that and make the proper adjustments.
The benefits of this programming menu are twofold. As coaches, we’re able to alter an athlete’s workout to fit their level of readiness, which can help them ultimately reduce the risk of weight room injuries or the waste of having a lousy session that doesn’t benefit them. Secondly, we can possibly boost their morale with the introduction of something a little bit more unique and stimulating.
By giving the athlete something they might find fun and enjoyable, there is potential that their previously poor mental state and readiness can improve a bit mid-session, and they can finish off on a strong note with some normally programmed work.
Another really valuable exercise we’ve implemented into our speed development programming is the Earthquake split squat. We typically will use this on days when athletes are doing resisted sprints as a way to prime the nervous system without taxing it. The lift itself really challenges the lower extremity stability, which also translates over to their sprint work—especially if they’re working against any type of resistance.
When we first started using the 1080 Sprint, we noticed a lot of athletes would try to drive so hard and stay so low that they would sometimes stumble forward in acceleration. Anecdotally, we believe that the use of the Earthquake split squat before resisted sprints has helped athletes lock into their positions because of their increased single leg stability.
Anecdotally, we think using the Earthquake split squat before resisted sprints has helped athletes lock into their positions due to their increased single leg stability, says @JustinOchoa317. Share on XAt around $250, the Earthquake bar is a bargain. As I said, it’s more than just hanging bands from a bar for Instagram likes. There is so much you can accomplish with this bar, whether it’s sports performance, physique competition, or powerlifting, the bar is worth its weight in gold. If you are in a setting where you work with a lot of professional athletes or in small group or personal sessions, this would probably suit you very well.
2. Trap Bar
The trap bar, sometimes referred to as a hex bar, is a very common specialty bar that you may already have a lot of experience with—of the five bars listed in this article, the trap bar is probably the most widely used and well-known. And with prices starting around $150, it’s a low-cost, no-brainer investment.
This is a versatile bar, especially for deadlift, loaded jump, and loaded carry variations. You can get wildly creative with this bar, but that’s not really my thing. I like to keep it simple and stick to what I know helps our athletes.
Neutral Grip
When it comes to the benefits of a trap bar, I believe one of the keys is the use of a neutral grip. I am a huge fan of neutral grip exercises—whether it be upper or lower body, I think a neutral grip can really make a positive impact on our athletes’ results.
Oftentimes, grip can be a limiting factor in a deadlift. I have no issue with athletes working on their grip strength, but depending on the time of year or what their training schedule looks like, it may not be the best use of our time. Introducing a neutral grip can instantly take this issue away. Grip no longer becomes the limiting factor. As long as that athlete is in a field, track, or court sport and not a barbell sport, then it doesn’t negatively impact their results in any way.
Not only that, but switching from a mixed grip or a pronated grip to a neutral grip allows athletes to get a little bit better shoulder joint centration and shoulder blade retraction, two major cues that can also instantly improve their deadlift.
Center of Mass
Another really unique benefit of a trap bar is that the athlete actually stands inside the bar, rather than behind it. This puts the external load in a much different position relative to the athlete’s center of mass.
This can help athletes avoid lower back pain, injury, or discomfort because the load is in a much more advantageous position. Plus, with the benefits of a neutral grip, their lats and upper back are more engaged and less likely to lose positioning during straining points of the lift.
Traditional barbell deadlifts are amazing but might not be the best fit for everyone. Clean variations are great but might not be for everyone. Implementing a trap bar on jumps or deadlifts can give athletes a hybrid approach that allows them to find a better position to work from.
How We Use It
We use the trap bar in two very simple and effective ways: deadlift it and jump with it.
The trap bar deadlift is one of our main movements in terms of hip-dominant strength options. It has completely replaced the barbell deadlift in our programming. I love to program this lift to help athletes build up a heavy deadlift and strong posterior chain.
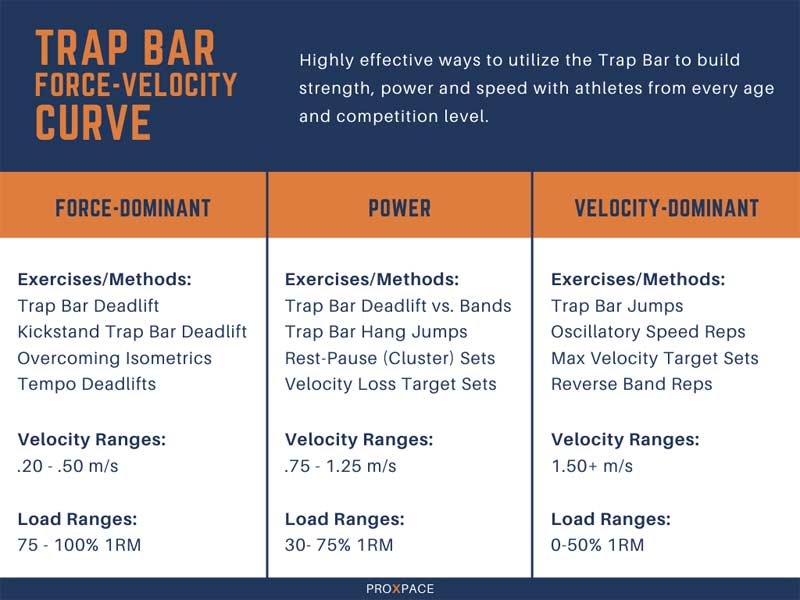
The trap bar deadlift is our force-driven exercise selection along the force-velocity curve. We sometimes go against bands or chains to increase velocity a little bit but still focus on heavier loads.
On the opposite end of the continuum, our velocity-driven selection is a trap bar jump. You can either choose to go all-out on velocity with much lighter loads and peak velocities in the 3.0 m/s range or focus more on power output with speeds more in the .85–1.25 m/s range. Both options definitely have their place.
Something that I’ve always found interesting is that the trap bar jump (from hang) allows us to put out more power and faster bar speed, at identical loads, compared to a hang power clean. Why?
- Possibly due to better leverages.
- Possibly due to a much easier learning curve.
- Less technique requirements could also be a factor.
In the end, it’s definitely food for thought as to which may be a better choice for programming. At this point, I’m *this close* to calling the trap bar a standard must-have for all strength coaches. It’s just too versatile and valuable to not capitalize on.
3. Safety Squat Bar
The safety squat bar (SSB), sometimes called a yoke bar, is a unique bar with a wide array of benefits. Unlike the trap bar, which powerlifters kind of frowned upon, powerlifters popularized the SSB as a great training tool. And it is…for all types of athletes.
The unique design of the SSB, which rests on the athlete’s back and has a neutral grip handle at chest height and cambered ends, provides lifters with several key benefits that their body structures may not allow them to experience naturally.
Limits Shoulder Demands
One of the most important differences between a barbell and the SSB is the change in hand placement. Take, as an example, the traditional back squat: With a barbell, the athlete must place their hands on the bar to secure it throughout the lift. This is not easy for many athletes because of the demands of shoulder mobility. Similar to throwing a ball, achieving this position takes decent levels of shoulder abduction and external rotation. Not only do athletes need the mobility to reach this position, but also the strength and stability in that position to be able to support the bar.
With the SSB, the athlete can use the handles to secure the bar without any significant limitations at the shoulder. In rare cases, athletes may have a history of joint damage in the shoulder region that could be irritated by how the bar rests on their collarbone area. For the most part, though, using the SSB is like night and day for athletes who normally struggle to back squat.
Squats with the SSB and with a barbell do have slightly different levels of activation when it comes to muscle groups, but not enough to deem one better than the other. The two can work synergistically, or you can choose your favorite and probably not miss out on much from the other.
Hand-Assisted Lifts
Hand placement on the bar is a benefit, but my absolute favorite perk of the SSB is the hand placement off the bar. I am a huge fan of hand-assisted lifts using the SSB, often referred to as Hatfield variations. Implementing Hatfield SSB split squats, rear-foot-elevated split squats, and tempo squats has been one of the most game-changing decisions I’ve made over the last 10 years.
With the SSB, the athlete technically does not even need their hands to be on the bar because of how it is designed to rest right over the collarbones. This frees up the hands to perform hand-assisted lifting. Most of the time, racks will have mounted pegs/handles for these, but you could also rig up this setup by using an extra barbell against the rack.
You can choose to use the hand assistance for supramaximal load or supramaximal speed. Both have amazing neural benefits that can supercharge your athletes’ results.
How We Use It
As I alluded to earlier, Hatfield squat variations are the go-to for us with the SSB. There are so many ways to incorporate it for general strength, special strength, power, and speed.
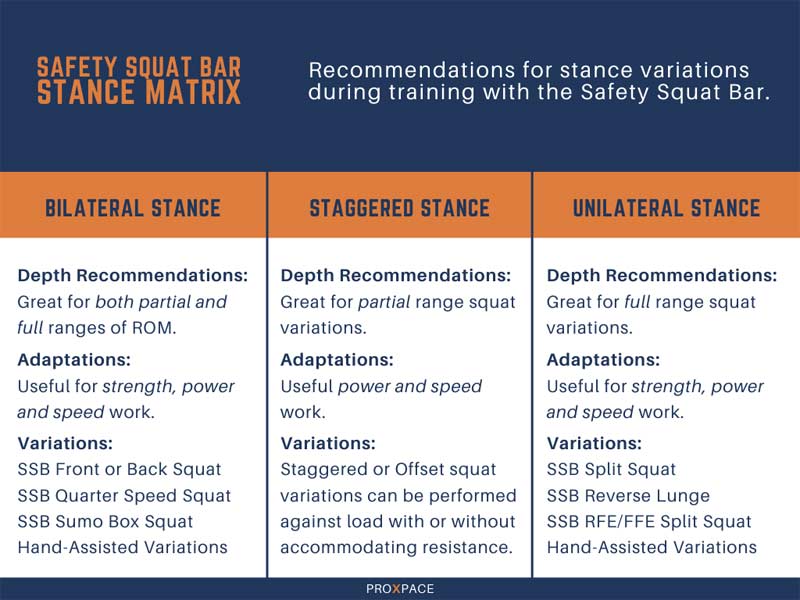
I’ve been amazed watching athletes crush this lift for 2-3 times their body weight. No, we can’t really measure the hand assistance, but it’s still wildly impressive for athletes to single leg squat this amount of relative load.
You can get a high-quality safety squat bar for under $400. Buying dozens of these in a team setting would not be a bad investment, but I totally understand if the funds aren’t available. In the private sector, having one is plenty to get the job done, as you can get enough bang for your buck out of just having it available.
4. Swiss Bar
The Swiss bar, or football bar, is a multi-grip bar often used for pressing exercises. The bar designs vary, and all of them are extremely useful. Most Swiss bars feature at least three neutral grip options at various widths. More high-end bars may incorporate those neutral grips along with angled grips, also at different widths.
For presses, the Swiss bar is one of the most versatile tools coaches can use to help athletes find their optimal grip and posture, says @JustinOchoa317. Share on XAthletes can press vertically or horizontally with the Swiss bar, performing the exercise standing, supine, or seated. For presses, this is one of the most versatile tools coaches can use to help athletes find their optimal grip and posture.
Grip Options
I’ve talked about the benefits of a neutral grip with the trap bar deadlift, and neutral grip alignment can also benefit our presses for the same reasons: better shoulder joint centration, better stability through the range of motion, and a more pain-free comfort level.
A neutral grip and/or altered grip width can also change the muscles emphasized throughout different points of a lift. The Swiss bar allows athletes access to multiple grip widths, something I’m a huge fan of when having athletes perform press-oriented lifts.
It’s extremely important for athletes to train in all zones along the force-velocity curve, spending time working on strength, power, and speed, respectively.
In the Westside Barbell speed bench (dynamic effort) method, they are very adamant that athletes train with at least three different grips during their dynamic bench press days. Those following Louie Simmons’ methods typically use a barbell and go narrow, normal, and then wide grip. Taking that concept, you can actually determine if a non-barbell bench press would be a better fit for the athlete and incorporate the same principles with different neutral or angled grips at other angles. Of course, this helps hit the muscle groups targeted at multiple angles and ranges, but also helps the athlete press pain-free and safely.
How We Use It
Staying on the topic of pressing, the Swiss bar is an elite option for doing just that. One of the most underrated aspects of improving sports performance is having an explosive and powerful upper body.
This is where I think a lot of coaches miss out on crucial gains. Many view the bench press only as an upper body strength exercise, and something that doesn’t transfer to certain sports. My outlook is different. I think the bench press is an amazing option to train in the power and speed ranges, and it transfers over to every sport.
Sprinting and jumping are two of the most athletic actions you can do, no matter the sport. Sprinting and jumping are both full body movements, and the upper body plays a crucial role in both. By incorporating speed bench press variations, you can improve your athlete’s upper body explosiveness, which can then transfer to better arm action during their jumps and sprints.
The Swiss bar is not only for presses, you can also use it for the same benefits with row variations such as seal rows or even use it as a varied-grip pull-up bar laid over the top of a power rack. For around $250, I think this can be one of the more valuable bars in any gym. If you work with a lot of overhead athletes, this would probably be a high-priority investment both in the team and private setting.
If you work with a lot of overhead athletes, the Swiss bar would probably be a high-priority investment both in the team and private setting, says @JustinOchoa317. Share on X5. PVC Pipe
Last, but definitely not least, is PVC pipe. I realize this is a little out of left field but hear me out. PVC pipe may not be a strength training tool, but at a price point of around $2, it delivers a massive bang for your buck.
You can get plastic pipe at any local hardware store in various shapes and sizes. I’ve seen coaches make hurdles out of PVC pipes, make their own vertical jump testing system out of PVC, and even make water-based slosh pipes with it.
PVC pipes are also a great tool for technique enhancement for beginners to prep their movement patterns in a warm-up routine.
How We Use It
All of those innovations mentioned are great uses for PVC, but I’d like to really showcase how this simple tool can help your athlete’s speed development.
Overhead PVC runs, or fixed arm runs, really help the athlete utilize their hips more optimally in sprints and sprinting drills. In addition to faster and more powerful hips, it also forces the athlete to maintain great posture and integrity during drills.
PVC sprint drills can allow us to uncover breakdowns in an athlete’s techniques, especially in the lateral chain. Although perfect symmetry is usually not attainable, it is important to help get athletes as balanced as they can be whether it’s in the weight room or on the field, court, or track.
Evaluating ROI
All of these bars would be great to have, but there’s this little thing called money, and it doesn’t exactly grow on trees. Understanding program budgeting, finances, and ROI is something that most of our formal preparation for the strength and conditioning industry does not prepare us for.
When it comes to investing in a new piece of equipment, whether it’s $20 or $20,000, there are three simple questions that I ask myself to determine if this is a smart investment.
1. Does this product solve a problem? It doesn’t matter if it solves a single person’s problem or 20 problems at once. If it solves a problem, we can ask question number 2. If it doesn’t provide a solution to a clear-cut issue that you are experiencing as a coach, it’s not necessary. It may not be worth it at the moment.
If a product doesn’t provide a solution to a clear-cut issue that you are experiencing as a coach, it’s not necessary. It may not be worth it at the moment, says @JustinOchoa317. Share on XI have always wanted wearable EMG garments. I’ve tried so hard to come up with a justification to get some. But they simply don’t solve a problem for me. In my setting, it’s not filling a true void.
2. Can I afford this product? Aside from starting up a new business where you may take on some debt or loans, this is a great question to ask yourself before any major purchase. If you want a $450 trap bar, but you don’t have $450 cash available at the snap of a finger, it may not be the right time.
That’s not to say definitely don’t pull the trigger, though. There are solutions. Maybe you can find a similar model for a lower cost. Maybe you can find a used bar for much cheaper. Maybe you can use a credit card with 0% interest for 12 months and pay it off monthly, if you’re in a position to do so. Or, as I mentioned earlier, maybe this is rolled into a start-up loan with a new business. Not having cash is not automatically a no, but it can help you dig deeper into the logistics.
When I started training, I was in a commercial setting and did not have any influence on the equipment available. I ran into a situation where I needed a trap bar. I had a client who experienced a lot of lower back pain during hinge-based exercises and I knew from personal experience that a trap bar would probably be a great move for him.
I went out and bought one for $200, kept it in my trunk, and brought it into the gym with me whenever I needed it. Sadly, I did not have $200 to my name at the time. I was living paycheck to paycheck. But I knew that if I got one, that client would provide me with revenue that exceeded $200 every month, so it ended up paying for itself in one month and turned out to be a fantastic investment. This is just an example of how you might still be able to pull it off even if it appears you can’t afford it.
3. Do I know how to use it? Lastly, are you ready to rock when you get this product? Hopefully, after reading this article about these bars, the answer is yes. But going back to the EMG wearables, even if I did get some, I’m not even sure if I’d know how to interpret the data, best practices on usage, etc.
Do your due diligence on the product. Make sure you do research and get the exact brand and model that suits your program the best. Read reviews, good and bad. Bad reviews are telling because you can see if someone else’s displeasure may have to do with the same reason you are thinking about purchasing. A one-star review for poor customer service and slow shipping? Eh. I can deal with that. A one-star review because the quality feels cheap and it rusted out in one year? Okay, that means something.
Seeing how other coaches use the product, and even what athletes think about it, will also be great feedback for any purchase you’re thinking about.
All of the above listed bars bring their own unique value and purpose to a training program. While they certainly aren’t necessary to get great work in, it’s hard for me to imagine our program without them. Equipment doesn’t make us better coaches, but if we leverage it correctly, we can definitely help our athletes find an edge in their training with special equipment.
