• Skip to content
  • Skip to primary sidebar
SimpliFaster

SimpliFaster

cart

Top Header Element

  • Facebook
  • Instagram
  • Twitter
  • YouTube
  • Login
  • cartCart
  • (925) 461-5990
  • Shop
  • Request a Quote
  • Blog
  • Buyer’s Guide
  • Freelap Friday Five
  • Podcast
  • Job Board
    • Candidate
    • Employer
    • Facebook
    • Instagram
    • Twitter
    • YouTube
You are here: Home / Blog

Blog

Summer Training

Summer Training for High School Strength and Conditioning Coaches

Blog| ByMark Hoover

Summer Training

The last day of school is a very special day for non-coaching teachers and students who are not involved in athletics. It signals a long rest. A time for both faculty and students to have 8-10 weeks of relaxation. At the very least, they have that amount of time to enjoy not having to think about being at school.

Coaches and student-athletes also look forward to that special day. As we know, however, it’s not because of anticipated long stretches of relaxation. Instead, it signals the beginning of summer practices, camps, tournaments, and strength and conditioning workouts. This is an enjoyable time for most. It’s also a busy time for all.

The Most Fertile Training Period

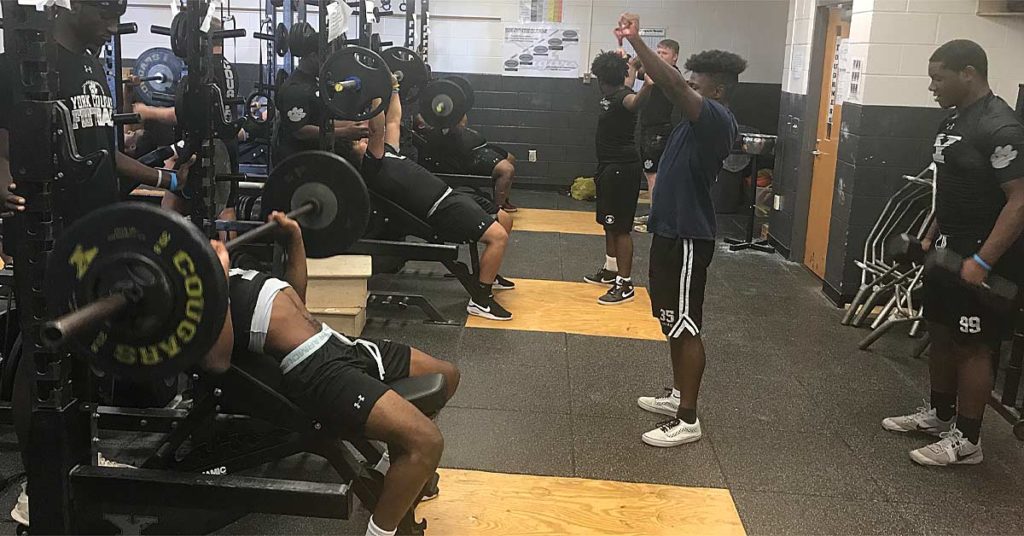
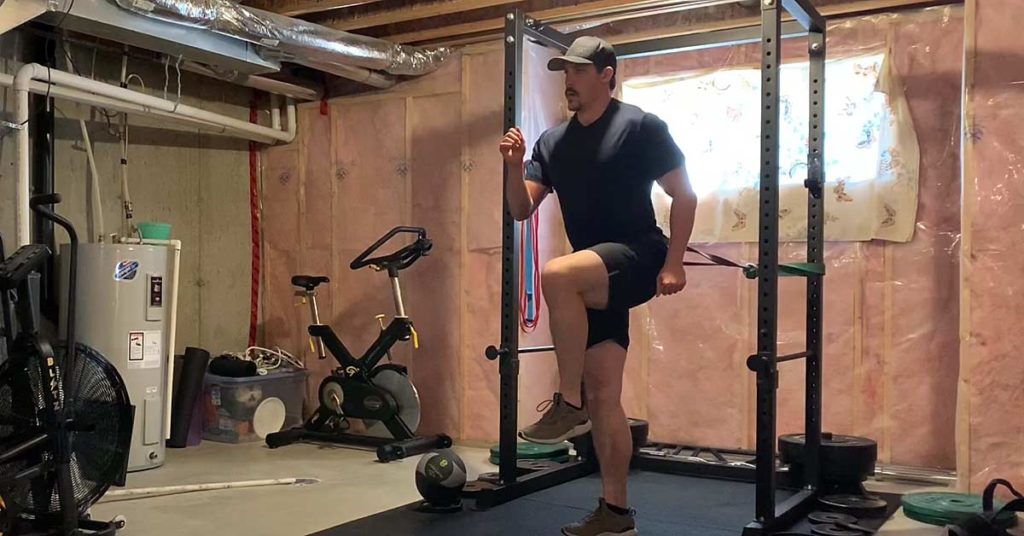
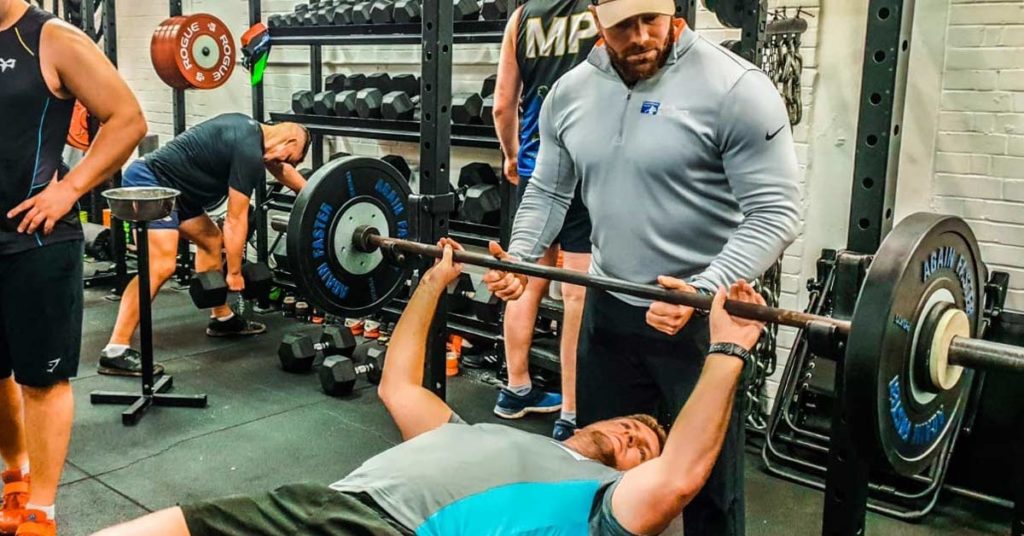
No coach spends more time on campus during the summer than the strength and conditioning coach. Most sports have a two- or maybe three-hour block during the day 3-4 times a week when they work with athletes. If you work with multiple sports, your day could last six, eight, or even 12 hours. At York Comprehensive High School, my day runs from 7:30 a.m. to 1:15 p.m., which is close to what a full work day runs during the school year, in terms of total hours. It may be more because there is no break during that time. We just roll one group after the other.

While we do look forward to and enjoy this time of year, it doesn’t come without its unique challenges. For me, it’s a great time. While we don’t have the time off other educators get, we get the opportunity to do what we love year-round. The time, while enjoyable and productive, presents us with obstacles that make us think outside the box.

This article will discuss some of the situations I have experienced and how we have worked around them the best we could. Things we don’t have to deal with during the school year are now issues. Sports teams from all three seasons will now have practices and strength and conditioning needs. Compounding this is the need to share multisport athletes.

Most sport coaches will talk a good game about “sharing,” but won’t always demonstrate actions that coincide with that. While we may not coach a sport, that situation will inevitably drag us into a Pandora’s Box. Add in the next layer to that issue: middle school athletes. Some states bar joint workouts with middle school and high school students. My state allows it.

Getting a talented, rising seventh grade athlete who has a training age of zero and plays three sports can present a multitude of problems during the summer “free for all.” If you also “block” your athletes, as I and many others do, you may end up with six or eight different variations of a session going on, all at once. On the other end of the seventh-grade athlete issue is the training age zero rising senior. How do we encourage that initial foray into high school athletics when the athlete’s teammates are years ahead on the training age spectrum?

In the summer, athletes often miss days or even weeks of training and practice. How do we account for that within the training calendar? These issues highlight the obstacles strength coaches face once summer “vacation” begins.

Scheduling Sessions – A Solution to the Nightmare

Scheduling sessions is the first hurdle we must cross in the journey to creating and implementing a successful summer workout plan. The main factor that needs to be navigated before any scheduling decisions can be made is whether to schedule as “sport” groups, male and female athletes, or some combination of the two. I’ve done a little bit of all three over the years. One thing that always stays consistent is putting football on its own. The pure numbers make it difficult to share the room.

My process begins with nailing down the exact times that ninth grade, JV, and varsity football will need me. That’s the easy part. I can’t speak for every situation, obviously, but in my experience, football is the only group that the vast majority of the athletes and coaches show up for year-round. This group gets priority scheduling because of that year-round effort, right or wrong.

After football gets slotted in, the next decision is male and female groups or sports teams. This is where the aforementioned “Pandora’s Box” situation comes into play. If we select sports teams, that presents us with a couple problems.

Scheduling summer S&C sessions gets tricky when dealing with the various sports coaches who expect the multisport athletes to attend their training sessions, says @YorkStrength17. Share on X

One is having enough time to get all the teams in individually. The other is how to deal with the many multisport athletes we have and navigate the sometimes-fragile relationship between various sports coaches who expect those athletes to attend their session. Often, the multisport athlete is one of the better players for both teams, and sometimes a leader on both or even three teams. I have done it both ways in different situations. However, if you have more than 2-3 teams of female or male non-football athletes, it gets tricky fast.

At YCHS, we have decided to go away from individual team sessions, even as far as our classes go. We are in the process of switching from sport classes to male and female. Neither way is totally ideal. This summer, for example, our female athletes are with me from 8-9:15 a.m. and our male non-football group from noon to 1:15 p.m. In the past, we have gone later, from 11-12:15, because most of our female teams held summer practice from 9-11 am. Our 8 a.m. slot had been male, non-football.

This year, we had one female team move their practice time to 6-8 a.m. So we had one team early and the rest at 9:15 a.m. My solution was to move our female weight room time to 8 a.m. That puts the single sport athlete on campus four days a week for about three hours. For our multisport female athletes, that may cause them to be on campus from 6-11:30 those four days. That will be an issue for sleep and recovery, as it would be for any teenager.

There is no perfect solution. As strength and conditioning coaches, all we can do is find the best scenario possible and monitor the athlete the best we can. If we see any issue, we can adjust the workload on our end. In our situation, I find it best not to encourage “team” training. Our program is unified, and I see no reason to get involved in the division of sports teams.

Middle School Athletes – Consider Biological and Training Ages

When I coached in North Carolina, the issue of training the middle school athlete was simplified by state-mandated rules. It was simply stated that no student enrolled in the middle school or below for the following school year was permitted to take part in any practice or training session involving high school students. I hosted a summer camp in the evening and ran a speed and quickness program through the recreation department.

In South Carolina, it’s not that simple. Middle school athletes can and often do attend our after-school and summer programs. In fact, eighth graders can play at the junior varsity level. That throws a pretty big wrench into the situation.

I have had both seventh and eighth grade females show up to summer sessions, along with rising freshmen and 10th-12th grade athletes. It gets complicated fast. This is where I lean on our sport coaches for support. Without their attendance and help, I would be forced to turn those students away or add a session that would either be hours before or hours after their practice sessions.

This situation requires us to be masters of multitasking and not get flustered easily. I work directly with this group with the help of one other coach. I still run our clock, coach on the run, etc., but I have to count on my sport coaches to be strong assistants and help with the coaching and supervision of the older, more experienced athletes in the group.

While training our young group to be prepared for the high school level is extremely important, I make sure to remember that my priority is our current athletes, says @YorkStrength17. Share on X

Making sure the coaches you know will be there are educated on how you do things is imperative. One thing I make sure to remember is that my priority is our current athletes. While training our young group to be prepared for the high school level is extremely important (which is why I do it myself), there are times when my focus must be on our older group. I explain that to our coaches and athletes.

At that time, it is important to have the sport coach who helps you with the middle school group be well-versed enough in your Block “0” protocols to take over the group when needed. As is a common theme in many of my articles, we must take the time to properly train and educate sports coaches in the nuances of what we do. They can and will be invaluable to you if they are prepared to jump in when needed with more than the most basic coaching.

Blocked Athletes – A Simple Solution to a Complex Problem

I have always believed that the best-case scenario for grouping athletes is by training age or blocking. Imagine if we had the ability to have all athletes within the same block within a session? Even two blocks combined, as long as they are concurrent, would be extremely helpful. I have never been in a situation where that was feasible. The closest I get is having the varsity football team in the same class during the school year.

In the summer, it can get pretty far in the opposite direction. In addition to the middle school athletes I spoke of, I have all levels of training age blocks from one (new lifter) through four (elite). To make the situation even more complicated, every summer I get the inevitable athlete or two who are juniors or seniors but have never played a sport or taken part in our strength program. Essentially, they are block ½, or at best 1 ½, athletes. Most have a basic knowledge of working out, but very little in the way of technique or how to perform what our higher block athletes in those grades can perform.

I have always believed that the best-case scenario for grouping athletes is by training age or blocking, says @YorkStrength17. Share on X

The first part of this potentially difficult equation is to make sure we have “slow cooked” our athletes. If we have progressed each of our older athletes as we should have, we have a leg up. It’s vital that you have a process to teach slowly and with great attention to detail. That makes things much easier when you get to a situation with many levels training at once. Our program motto is “Master the Ordinary.” If both our higher block athletes and sport coaches are educated and willing to make sure that the ordinary, basic things in our program are done right, it allows me to spend extra time teaching those things to our lower block athletes.

The second aspect is program organization. CoachMePlus is the tool we use for this. I have also organized the program in the past with Excel sheets, but it’s much more time-consuming to prepare. Using CoachMePlus, we create micro groups that are put together by block. Therefore, we may have five different blocks training, using five different variations of the workout, but each has their own assigned areas. This allows us to monitor and coach at the group level.

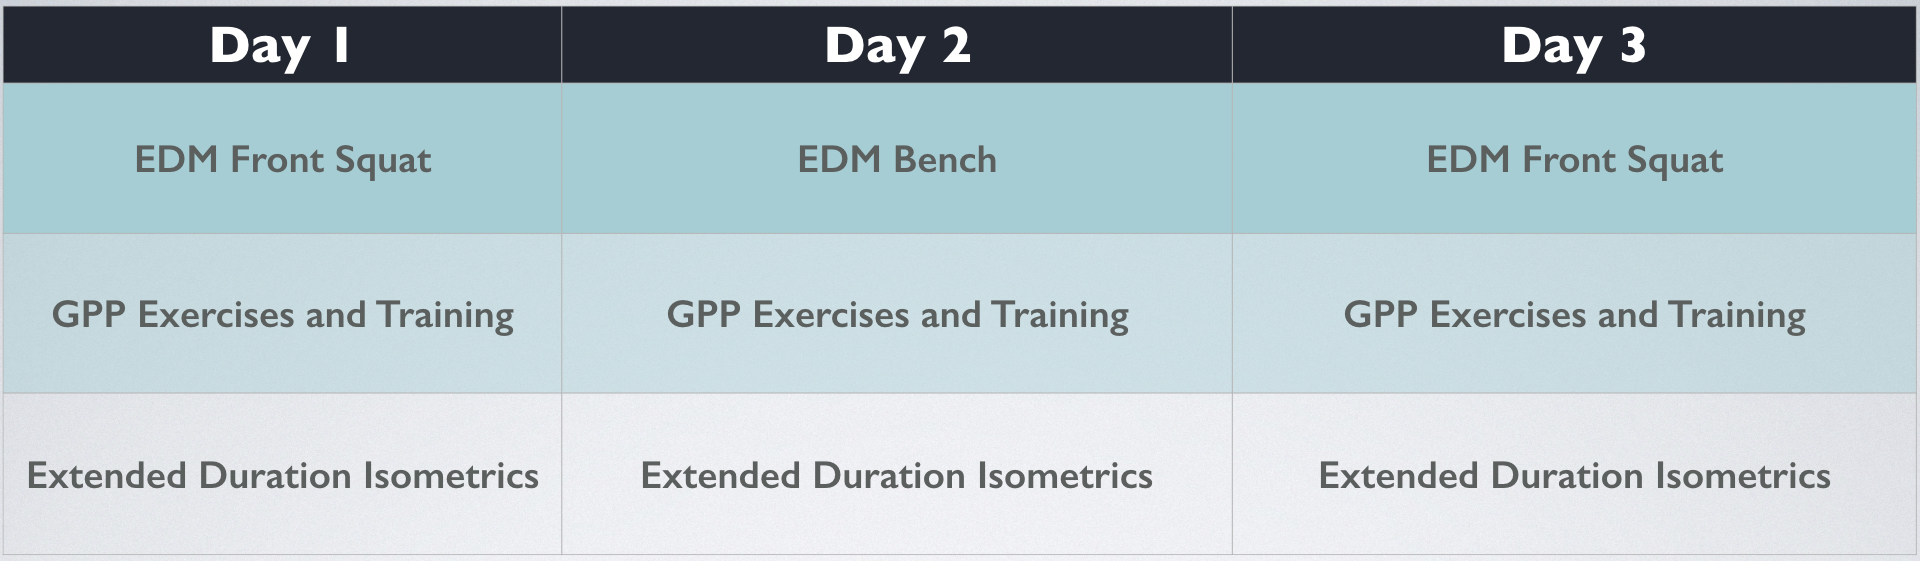
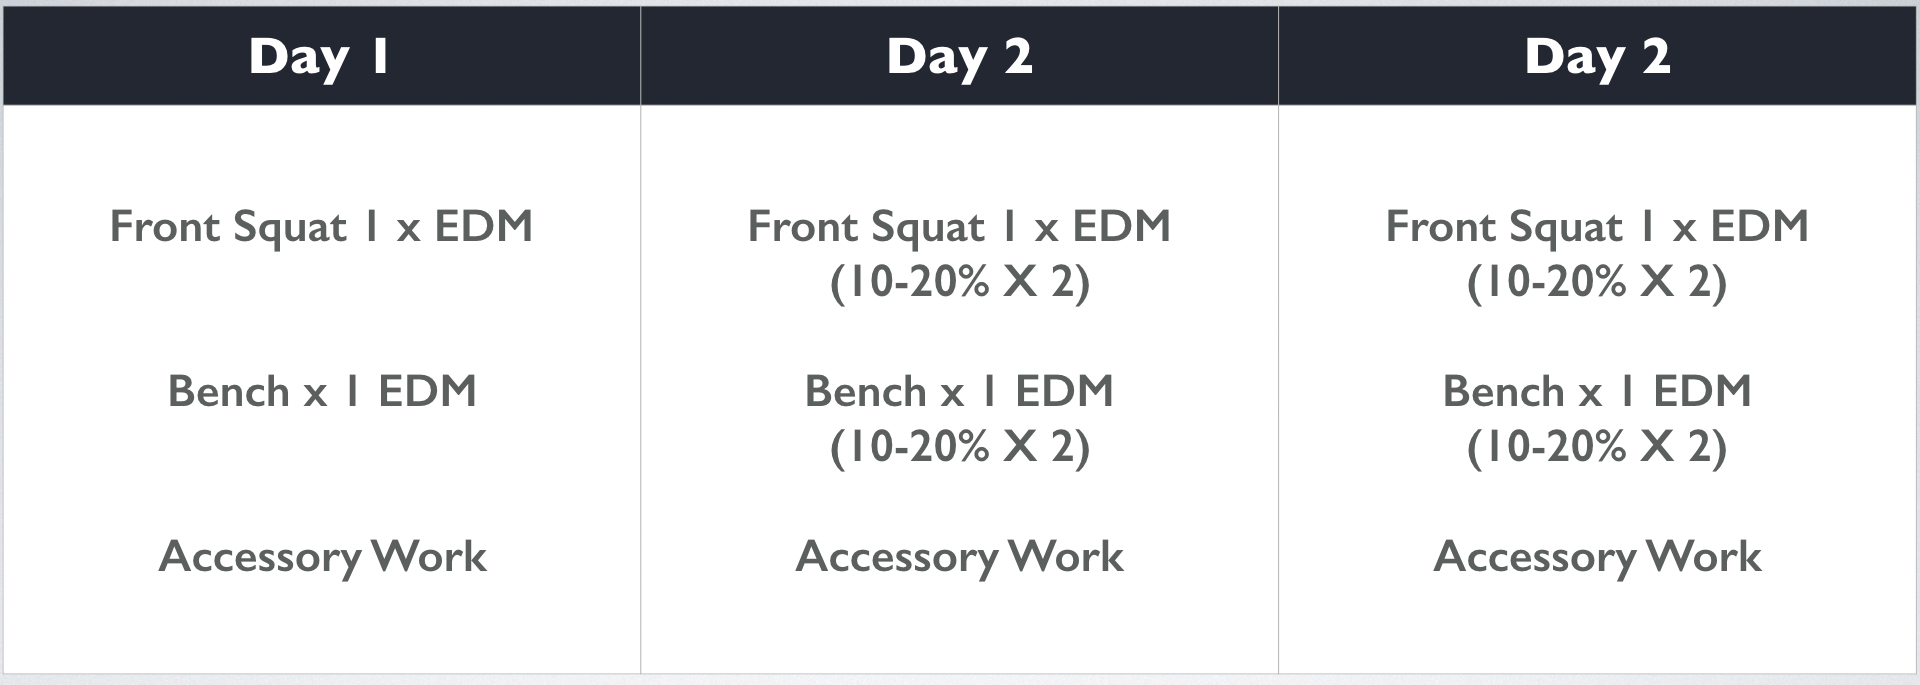
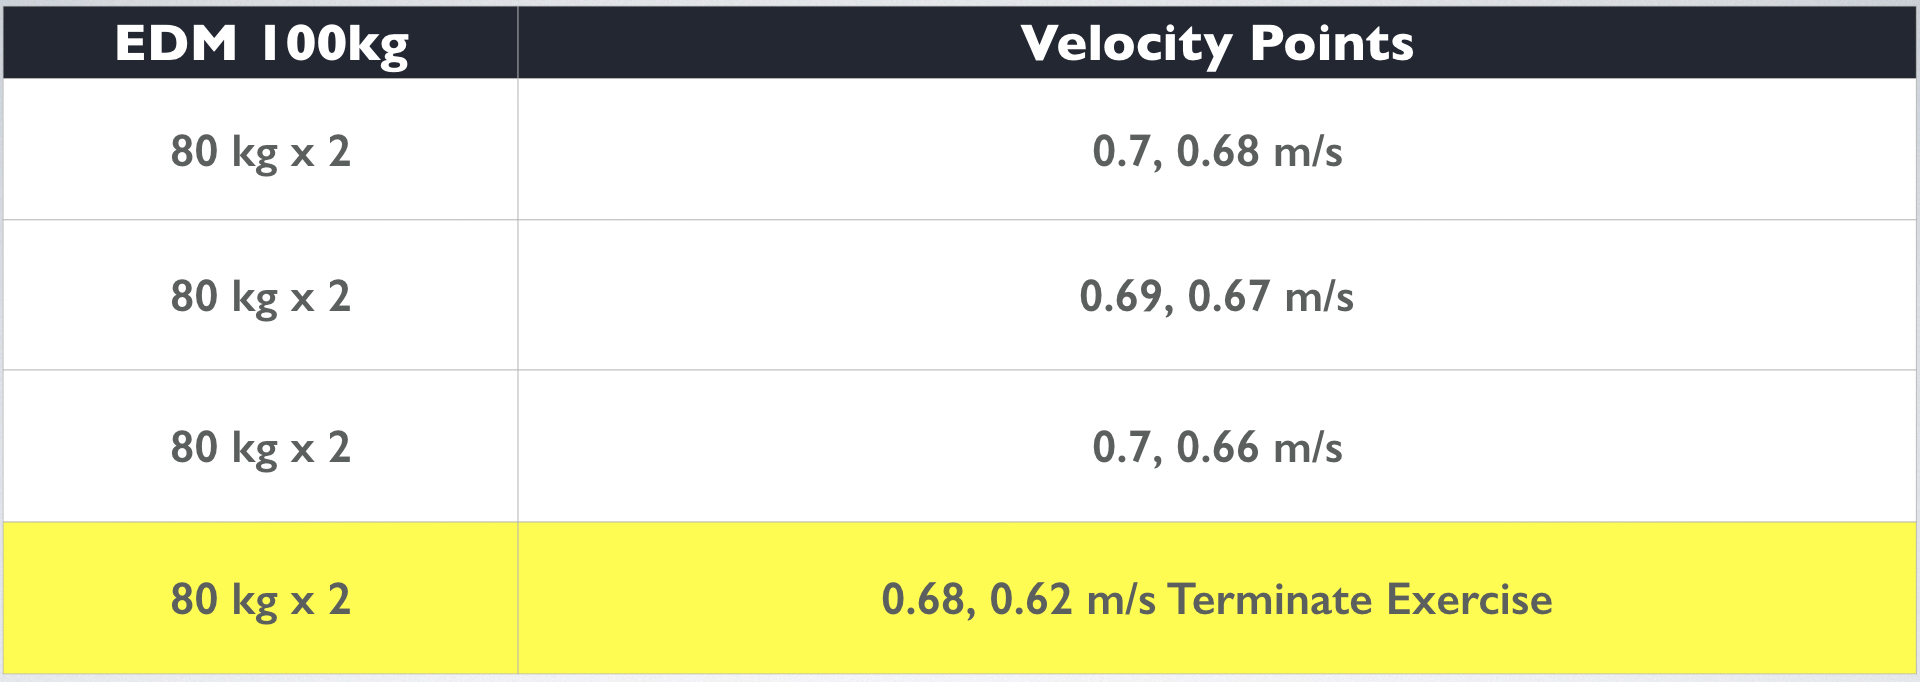
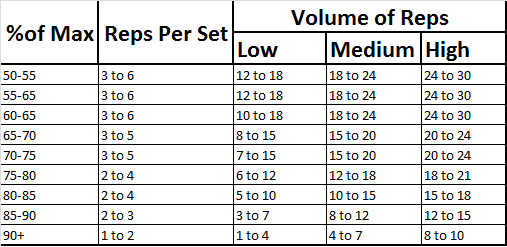
Another important factor in this is the use of a unified program. Below is a chart that lists several of our main movements and how we differentiate them by block. By using a unified program within our modified tier system, we can have each block doing a training-age-appropriate movement, but within the same movement family as all the other blocks.

Summer Blocks
Table 1. This lists several of our main movements and how we differentiate them by block. Using a unified program within our modified tier system enables us to have each block doing a training-age-appropriate movement, but within the same movement family as all the other blocks.


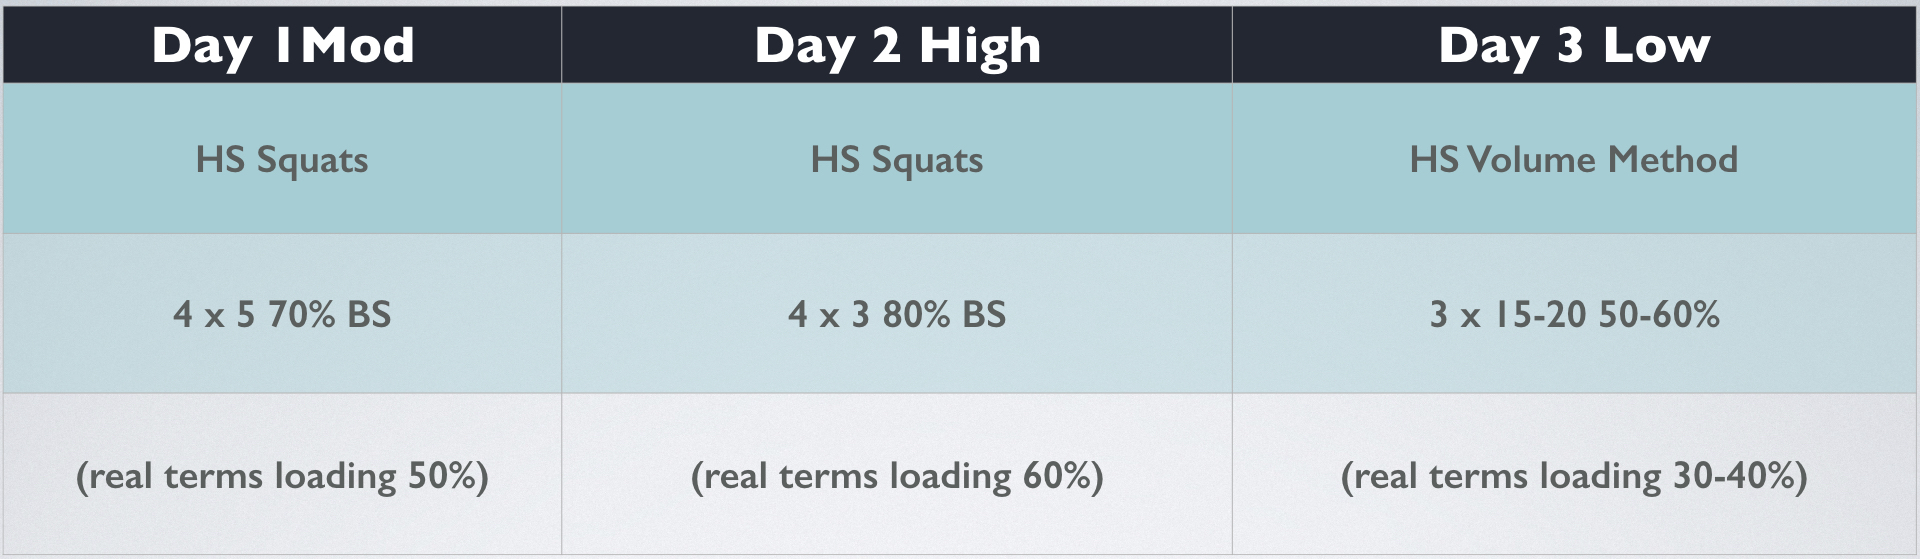
So, for example, on a squat day in our max strength Tier 2, everyone in the room will know they will do a variation of the squat (within our progression), as well as whatever hamstring/glute movement and mobility/flexibility movement are in each set in the tier for that day. While we still have a lot going on, I and the other coaches all know what basic movement each athlete is doing. It allows mass teaching and coaching to run as smoothly as possible.

Below is an actual example taken from one of our recent workouts.

Summer Lifting
Table 2. Example of a Tier 2 Squat Day. Everyone does a variation of the squat (within our progression), as well as whatever hamstring/glute movement and mobility/flexibility movement are in each set in the tier for that day.


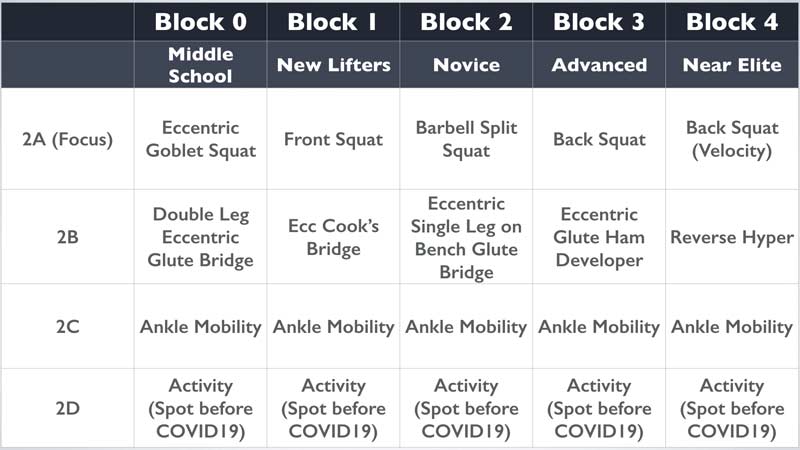
We use this basic model for all our programming from Block 0 to Block 4. Our athletes and coaches will have an idea about what movements they will be doing each session from day 1 to graduation. We also do not change what we do in the weight room based on a sport-specific thought process. Our goals are the same for all athletes and we use a consistent and unified program to develop and achieve those goals.

We don’t do sport-specific weight training. Our goals are the same for all athletes and we use a consistent and unified program to develop and achieve those goals, says @YorkStrength17. Share on X

This also helps me during the busy summer months by ensuring that all our coaches and athletes are on the same page. My softball coach can assist me with our basketball, volleyball, or even football athletes, if the need arises.

Summer Vacation – The Curveball We Know Is Coming

The final summer-specific issue I will discuss is something all coaches have to contend with. The last day of school is likely the final time any coach will have all their sport’s athletes present at the same session until mandatory practices begin in August. It’s something that can frustrate coaches, but we can’t do much about it.

While we all have athletes who plan their entire schedule around the sport’s schedule, most do not. Vacations, camps, and distractions can lead to the loss of training days. My advice to all our athletes is “do your best to be here.” If it’s important to them or their parents, they will figure it out. As we all know, it’s not as important to most as it is to us. We have to have a plan. Mine is not complicated.

Again, I go back to having an online-based program as an advantage. For us, it’s CoachMePlus. The athletes get an email every day with a link to the workout. In all likelihood, the sport coach will not give them credit for “distance training,” but at least they have the opportunity.

I have no illusions that many of our athletes take advantage of this, but the opportunity is there. If they just do the main scheduled movements, they will not fall far behind. When I was Excel-based, I would supply them with a sheet if they asked (they never actually did, though).

Overall, I don’t let myself get too stressed about the vacation situation. Teenagers are resilient. We’ll catch them up as needed. The bulk of our training is done outside of summer anyway.

I don’t let myself get too stressed about the vacation situation. Teenagers are resilient. We’ll catch them up as needed, explains @YorkStrength17. Share on X

In South Carolina, we basically have six weeks between graduation and the start of fall practice. This includes two “dead weeks.” I won’t worry about an athlete until they have missed a couple weeks in a row. I have no magic solution for this age-old situation. Like everyone else, we just try to offer opportunities and help our athletes make great decisions.

Get the Most out of Your Summer Months

I hope this piece has given you a small insight into how we do things at YCHS. I am grateful for the opportunity to assist you and thankful that you took the time to read this article. I hope you can take any part of this that interested you and use it to your advantage. Feel free to contact me to expand on this or any other topic I can be of assistance with. I wish you a happy and productive summer.

Editor’s Note: Block Zero and other tier concepts from Joe Kenn have been referenced in past articles and is considered mainstream. See How to Introduce Youth Athletes to Strength Training for an explanation of how this works.

Since you’re here…
…we have a small favor to ask. More people are reading SimpliFaster than ever, and each week we bring you compelling content from coaches, sport scientists, and physiotherapists who are devoted to building better athletes. Please take a moment to share the articles on social media, engage the authors with questions and comments below, and link to articles when appropriate if you have a blog or participate on forums of related topics. — SF


Tramp Jump

Connect the Weight Room to the Field with Matt Siniscalchi

Freelap Friday Five| ByMatt Siniscalchi

Tramp Jump

Matt Siniscalchi is an athletic development/reconditioning coach and instructor at Knowles Athletic in Philadelphia, where he works with many of the world’s top athletes. He came to Knowles after serving as head strength coach of the Philadelphia Union (Major League Soccer) for two years. Prior to that, Siniscalchi first worked with Bill Knowles at the Philadelphia Union Academy—which they still consult with—and helped program and recondition Olympic and professional athletes at HP Sports.

Freelap USA: Obviously, tumbling and rolling are part of your return to play program. Your extended series of excursions was posted on SimpliFaster, and coaches really valued the ability to roll and perform what are considered light gymnastics activities. Can you explain the key points that coaches should know to make sure they are on the right path?

Matt Siniscalchi: Over the past few years, one of the more influential conversations Bill Knowles and I had was how athletes need to be able to create “shapes.” These are the questions we consistently ask ourselves:

  • What shapes do athletes need to make (positions on the field, court, ice, etc.)?
  • Do they have the requisite ability or range to get into those shapes (mobility)?
  • Can they get in and out of those shapes with precision, style, and grace (varying degrees of movement competency or skill execution)?
  • Can they get in and out of those shapes with load, speed, and other demands (strength, power, etc.)?
  • Can they get in and out of those shapes specifically and continuously with regard to the needs of the sport (capacity and/or the sport-specific demands)?

Falling, rolling, and tumbling fall under the category of whether the athletes have the requisite ability or range to get into those shapes. There is also a highly coordinative effect that, while not necessarily realized by the athlete, and if they are injured, “pulls the athlete out of their injury.” This means the athlete builds confidence to move without necessarily thinking about their injury or lack of confidence within particular positions.

The video that showed an extensive array of light gymnastic movements is the culmination of learning and becoming competent in each movement first. Essentially, many of these movements simply demonstrate whether the athlete can bend, extend, rotate, roll, dissociate, segment, brace, and coordinate throughout the entire body or in the proper sequences (sounds a lot like athletic movement and executing skills).

The key thing to remember when watching any video is to understand the context. These types of sessions and movements are a result of intensive athletic development or reconditioning camps that help serve as coordinative, fun/stimulating (brain), engaging, and off-loading to the athlete in order to help the athletic build confidence for more specific athletic movements in the future.

Freelap USA: Pool training is a vital part of training and return to play. Can you get into some of the concepts and programming essential to aquatic training and rehabilitation? Many programs address active recovery, but your system is far more extensive.

Matt Siniscalchi: Getting in the water is one primary strategy to utilize soon after surgery in order to decrease athlete’s swelling and improve function. Flotation devices/equipment such as whole-body suits, ankle cuffs, and hand cuffs help athletes to learn movement and thus dramatically improve movement. In order to restore movement resulting from stiffness/fatigue after injury and/or surgery, athletes use the water to work on their walking gait, cycling action of the ankle/knee/hip, marching, skipping, squatting, lunging, and range of motion. Water helps athletes perceive these actions as “less of a threat” due to the hydrostatic pressure. Essentially, athletes feel less hindered in their movements because of the water’s support of the body.

All the movements that a healthy athlete needs to do on land, an injured athlete can do in the water early on in order to seamlessly transfer those movements earlier, says @MattSiniscalchi. Share on X

In essence, all the movements that a healthy athlete needs to do on land (squatting, lunging, running, etc.), an injured athlete can do in the water early on in order to seamlessly transfer those movements earlier. The water is also a place where more coordinated conditioning can take place, as they would not be able to do this on land due to the injury. This involves underwater crawling, breath holding, pool core movements, and the use of specialized equipment for the legs.

Freelap USA: Conditioning, specifically aerobic fitness, seems to be forgotten today or is overly complicated. Do you have some wisdom on how much fitness is enough to be ready for a season? What about long-term development of fitness over the course of an athlete’s playing career?

Matt Siniscalchi: Since reaching out to coaches who are heavily involved with Dr. Yessis, I think my thought process has become clearer. The hard questions have been easier to answer, although the questions have never stopped. Results speak for themselves, but it’s understanding at what cost we achieve results that matters to me. Can we achieve similar or greater results by doing less for the athlete?

Results speak for themselves, but it’s understanding at what cost we achieve results that matters to me, says @MattSiniscalchi. Share on X

Consequently, I believe athletes should have more time/energy to spend on the things that matter (performance on the field). Much of strength, power, speed, and aerobic/anaerobic fitness improvements come down to starting with the lowest amount necessary and building from there. If we can identify more precisely how much an athlete needs, we can see better results not just in 4-, 8-, or 12-week blocks, but gradual improvements over the course of years.

Aerobic fitness improvements are no different in this thought process. I’ve seen athletes who had off-season training packets with more than 10 different types of runs in order to be prepared for their season. They may have improved, but at what cost?

If we use a soccer player example, many of their KPIs for conditioning can be seen from a test like the beep test, 30:15, Yo-Yo IR 1 or 2, etc. I’ve utilized a long-to-short program that I learned from Yosef and Jeff, who learned from Doc with great success with professional and college athletes. Twice a week the athlete runs the mile until they can no longer progress, and at that time we shorten the distance. An example is this:

  • 1600m
  • 1200m
  • 800m
  • 2 x 400m

Something as simple and as low a dose as this progression has seen athletes dramatically improve and beat their previous best Yo-Yo, beep, or 30:15 scores heading into the season. How is that possible when these are athletes who compete at the highest levels? It’s probably due to the fact that we are finding that’s all they need and building from there.

Long-term development requires consistent gradual improvements, not giant spikes, says @MattSiniscalchi. Share on X

During much of my years spent coaching, I’ve looked at improving athlete KPIs for that particular upcoming season. However, now that I’ve see how little we need to do in order to improve, we can make longer-term improvements, and I’d argue that the appropriate improvements will lead to greater gains in their future. Long-term development requires consistent gradual improvement, not giant spikes. We achieve that through a better and more precise understanding of how much we are giving the athlete and consistently observing in what direction our KPIs are going.

Freelap USA: Obviously, maximal strength and speed are essential in developing an athlete but change of direction is less clear. What do you do differently besides plyometrics, strength training, and general movement technique to enhance this quality? I am sure you have specific methods that can help keep athletes safer and perform better with agility and change of direction ability.

Matt Siniscalchi: All of those qualities listed in the question (strength, plyos, technique) are essential to improve the ability to execute change of direction. However, more specific exercises (specialized) or slightly more specific angles and positions are needed to continue to make progress. Working on various cutting angles with the outside and inside foot at walking, jogging, and running speeds is often overlooked.

Again, I am becoming more heavily influenced by Dr. Yessis and Bill in these regards, due to the elegant simplicity in their approach to using specialized exercises with resistance bands for change of direction. We prepare for change of direction; we do not simply do drills to improve change of direction. Although there is no right or wrong, I do think we need to prepare and strengthen the physical abilities for the joint actions (shapes!) required for the skills we are trying to improve. Cutting, sprinting, and jumping are skills, and general strengthening will help, but our transition to more specific means should not be overlooked as it helps the athlete to understand and “feel” the positions they need to be in to execute the skill.

Our transition to more specific means should not be overlooked as it helps the athlete to understand and “feel” the positions they need to be in to execute the skill, says @MattSiniscalchi. Share on X

Freelap USA: Knowles Athletic offers consulting and athlete camps. Can you explain what those two services are and why elite teams are so willing to send athletes to an external service? Who is a good fit for your offerings?

Matt Siniscalchi: The athlete camps that Bill and I provide are one-on-one sessions for 3-5 hours/day, 2x/day for 5-6 days/week. These camps can last for days, weeks, or months based on what the athlete or team wants. These are intensive learning camps for the athlete to better identify, be educated on, and improve their physical abilities and needs. These also range from as early as immediately postoperative to the healthy athlete looking to get results to improve in their sport and stay healthy.

These camps drastically improve athletes through a change of environment, time and dedication (2x/day), elite-level coaching, and consistent analysis of improved results. These are constantly communicated back to the team, agent, and GMs to show progress, and at the conclusion of camp we provide recommendations for the process when they return. We also have a unique gym facility that offers varying gym floor surfaces (track trampoline, gymnastics floor) that can help athletes advance faster from injury and transfer to their sport through decreased joint loading while not compromising the movements needed in order to execute the skills in their sport.

We also provide consulting and staff education to teams and/or athletes via online video or in person. These consultations include assessments, recommendations, and strategies for post-injury scenarios and athletic development.

Since you’re here…
…we have a small favor to ask. More people are reading SimpliFaster than ever, and each week we bring you compelling content from coaches, sport scientists, and physiotherapists who are devoted to building better athletes. Please take a moment to share the articles on social media, engage the authors with questions and comments below, and link to articles when appropriate if you have a blog or participate on forums of related topics. — SF


Female Pushup

Where Do We Start ’Em? Beginning GPP with the 1×20 (Plus Crawls, Carries, and Drags)

Blog| ByPete Arroyo

Female Pushup

As coaches, we’re often inundated with information on the Next Big Thing. Speed program X, Strength Program Y, or whatever Pro Athlete Z is doing seem to catch interest among coaches and parents alike. In my younger days, I was no different in my pursuit of “advanced knowledge” and even more eager to apply it.

During nearly twenty years in the industry, I’ve seen trends come, go, then come back again—sometimes repackaged, recycled, and watered down. But one trend that has steadily grown (if you can call it growth) is the lack of baseline skills coupled with a dwindling physicality in the developmental population. This has made the answer to the question, “Where do we start ’em”‘ one that has regressed congruently over the years.

Some may argue that today’s training landscape (and to an extent, physical education in general) is ridden with a lack of behavioral and physical standards. This is bred by the tolerance of low efforts while over-celebrating the equivalent of basic hygiene with over-expectant results. This may seem like a loaded statement to some. Still, we can examine the country’s youth obesity rate1 along with the prevalence of injury in young athletes2 to see how this philosophically may fit. Layer this with well-meaning but misinformed parents who ask you about the Westside Barbell Program for their twelve-year-old (true story), and you have the recipe for a ticking time bomb of premature injury and burnout.

I don’t mean to go on a rant about how kids are soft, and their parents are crazy but recognize that invoking standards, celebrating success, and building culture takes some ingenuity. This also helps us traverse the murky waters of athletic development in our pursuit to prepare these trainees for their next level.

So, where do we start ’em?

Drive Engagement, Embrace the Basics, and Celebrate Success

The short answer is a blend of general physical preparation (GPP) that employs a progressive loading and movement system during which our young athletes can see where they’re at and know where they’re going. The key is in how we make the general basics attractive enough so that our young ones embrace them.

The following model is a blend of ideas from various GPP methods, inspired in part by social media posts from Jay DeMayo several months ago. The crux of the program includes basic movement patterns for the upper and lower body paired with resisted crawling, carrying, and dragging patterns. Execution involves interspersing a crawl, carry, or sled drag in between sets of your chosen 1×20 exercise. You can see the GPP influences here, ranging from Yessis (1×20) to Dan John (crawls and carries) to Louie Simmons (sled dragging). I’ve run variations of this program for one to three months, depending on the progression of the individual involved.

In this system, we realize progression in a few ways.

  1. The 1×20 parameter allows our athletes to progress in two ways: by increasing load upon hitting the 20 or by increasing repetitions with the same load. The wonderful thing about this is that the visual of “more weight on bar” or “more reps per session” is empowering, as momentum and confidence build over time.

  1. Each movement has a progression where young athletes earn the next level by hitting a target load for an assigned repetition range. For kids and parents who want the barbell right away, I explain we must earn our way by displaying impeccable control of our bodyweight before loading with external resistance. Some of the exercises progress a level or two within the month, while others take a while. In this way, individualizing a program has a direct purpose and grows with them. I term this auto-regulatory progression.

  1. As work capacity improves, time to completion compresses. Over time, these kids become beasts. And as this portion of the session becomes easier, we allow them to add in stuff they like. In other words, they earn their way to fun by taking ownership of their progress. We can’t ignore the significance of this subjective progress, as the perception of “getting in shape” creates a motivated, internal mental environment that allows young athletes to approach each day with the best effort they can give us. For coaches, this is an important tool.

Be warned, though, that this implementation makes for a bit of a smoker—initially, athletes breathe hard and often report DOMS (delayed onset muscle soreness). Trust me, when I say we do not chase this, it’s a result of the lack of acute work capacity. Athletes quickly adapt to these demands, as bi-weekly personal bests become a regular occurrence. Another psychological caveat of the single set program is the urgency factor. Athletes get one chance to do their best. No do-overs! No second chances! No sandbagging! Whatever happens, happens right here and right now!

It’s a built-in culture-builder within a pragmatic system.

The Basic Template

Here is the skeleton layout of the system.

Block I: Lower Body Emphasis

A1) Squat: variation based on progression

A2) Forward/backward bear crawl

A3) Hinge: variation based on progression

A4) Lateral bear crawl

A5) Single-leg variation: left

A6) Rotisserie crawl-bear to crab to bear; repeat

A7) Single-leg variation: right

A8) Forward and backward bear crawl

A9) Trunk/hip flexion

A10) Lateral bear crawl


Video 1. Forward and backward bear crawls.

Block I emphasizes the lower body, where we work three of the five basic movement patterns (squat, hinge, single leg). Some will disagree with having two squat exercises in the block, but the way I see it, you can use the single leg in different planes, as in a lateral lunge or rotational lateral lunge.3 I also include a basic trunk drill (I don’t call it core) involving hip flexion or anterior chain stability.

We determine the beginning exercises during an evaluation. Progressions for the hinge range from the old school waiter’s bow to the barbell RDL. For the bilateral squat, we begin loading with a dumbbell (goblet style) and progress to the barbell. Single leg is an interesting case, as I’ve used a similar progression to the squat but have found loading with a weighted vest is better because it lessens the complexity. Keep in mind, complexity is another layer of loading (especially on one leg) that may not be the best option initially. The crawls serve as “focused filler” work that prepares the upper limbs for Block II without directly interfering with lower body fatigue (not to mention all the great things the cross-crawl pattern does for the brain).4

Block II: Upper Body Emphasis

A1) Horizontal/vertical push

A2) Forward sled drag/carry variation

A3) Trunk lateral flexion

A4) Backward sled drag/carry variation

A5) Horizontal/vertical pull

A6) Lateral sled drag: right/one-arm carry variation

A7) Trunk rotation

A8) Lateral sled drag: left/one-arm carry variation

A9) Trunk extension

A10) Drag/carry variation

Block II is upper body dominant, initially applying one multi-joint push and pull movement along with hitting the other movements of the trunk (flexion and rotation extension). The multi-joint push and pull is enough for most young athletes at this stage, but you can layer in single-joint drills as trunk work becomes too easy. Again, the reason behind putting a drag or carry here is that it won’t directly interfere with the strength drills. One can argue the trunk is getting worked in the carry—which I agree with, but from an isometric standpoint. The simple beauty of the carries and drags lies in their resemblance to hard work. As stated earlier, having young athletes perceive work as hard is important in building standards of behavior in the overall culture.

Remember how I told you this session is a bit of a smoker? Well, here’s how we accomplish this: we go on the clock. My experience in working with the swim community forced me to learn a certain vernacular to understand how aquatic athletes practice. A common swim set may be ten one hundreds on the one-thirty, meaning they swim 100 yards every one minute and thirty seconds ten times—your basic interval-based training here. Organizing the swim dryland workouts in this fashion allowed a connection to their language and culture while keeping effort and compliance honest. After researching articles on how to condition in the weight room, I figured I would apply that to the above structure.

In the early going, for a few reasons, I space out the intervals a bit with an E202 (every two minutes on the two minutes).

  • We aren’t out to destroy these kids, as they’re walking in our doors with low work capacity and low training age.
  • There is more space to coach in. If movement quality means as much to you as it does me, you’ll appreciate the time to coach the proper technique.

As each athlete improves in movement progression, strength levels, and stamina, you can compress the interval to challenge them. The most compressed interval I’ve used is the EMOM (every minute on the minute) structure—a challenge to the aerobic pathways given a set of 20 will last about 25-35 seconds.

Troubleshooting the Carries, Crawls, and Drags

The next question becomes, how do we apply the carries, crawls, and drags? Take a simple inventory of what you have in terms of implements and space.

Things you need to crawl:

  1. Your body
  2. Space 5-10 yards

Things you need for carries:

  1. Kettlebell, dumbbells, barbell, or farmers’ walk handle
  2. Space 15- 20 yards
  • If you don’t have anything from number 1, you can use loaded buckets
  • If you don’t have space, you can march in place

Things you need for drags:

  1. Loadable sled with strapping, ropes, or chains
  2. Space 15- 20 yards
  • If you don’t have a sled, you can make one from an old tire with a 2×6 piece of wood as a base inside the tire. Load up anything of weight inside.
  • If you have a treadmill, you can turn off the motor, and the belt will provide resistance. This has come in handy during our current state as everyone is homebound.


Video 2. Off-Set Backward Sled Drag

Here’s the quick and dirty application.

If you have the allotted space: crawl for 10 yards and carry/ drag for 15-20 yards.

If you have less space: crawl in 5-yard increments, carry in a shortened area (or march for thirty seconds), drag, or work the treadmill for thirty seconds. This is a scenario where, if you lack a training partner or the coach is with a group, you can set an interval time (SIT Timer in the App Store) for :30on/:30off and commence exercise on the beeps.

This system covers total body strength and work capacity while leaving room for technical work for sprinting, jumping, cutting, and landing. Share on X

One great caveat about this model is how it fits into the minimal effective dose and bang for your buck philosophies. The entirety of an E202 session will be forty minutes for each block and compresses to twenty minutes in an EMOM. Total body strength and work capacity are covered, while leaving room for technical work for sprinting, jumping, cutting, and landing. Applying remedial dynamic means in congruence with this system is no problem, as you can increase the volume and repertoire of jumps, throws, and tumbling as the workouts become more time-efficient.


Video 3. Carioca Sled Drag

Which Brings Me to Other Variations I’ve Applied!

Let’s say you have a kid who comes in, and mom and dad tell you they only have 30 minutes today because they have an ACT tutor coming. I’m sure my fellow private sector coaches have dealt with this (or comparable) often enough. If we need to compress the overall daily structure to include our dynamic work, we can simply insert extensive jumps or throws into the series.

Block I: Lower Body Emphasis —No Contrast

A1) Squat: variation based on progression

A2) Med ball chest pass vs. floor or wall

A3) Hinge: variation based on progression

A4) Overhead throw vs. wall

A5) Single-leg variation: left

A6) Sideways/shot put throw vs. wall

A7) Single-leg variation: right

A8) Twist throw vs. wall

A9) Trunk/hip flexion

A10) Slam variation

Block II: Upper Body Emphasis—No Contrast

A1) Horizontal/vertical push

A2) Low box jumps

A3) Trunk lateral flexion

A4) Low hurdle hops with forward displacement

A5) Horizontal/vertical pull

A6) Zig zag jumps with two legs or skater style

A7) Trunk rotation

A8) Split jumps

A9) Trunk extension

A10) Single-leg hopping LLRR

Make sure you put these on the minute and keep the jumps and throws to no more than ten total per exercise. If you want a contrast effect, just simply perform the jumps during the lower body emphasis and the throws during the upper body emphasis.

A Slightly More Advanced Model

Here is yet another variation I’ve applied with contact sport, cheer, and gymnastic athletes. You can compress it or extend it in a couple of ways.

Base model

Block I: Lower Body Emphasis + Somersault

A1) Squat: variation based on progression

A2) Forward somersault

A3) Hinge: variation based on progression

A4) Backward somersault

A5) Single-leg variation: left

A6) Forward somersault

A7) Single-leg variation: right

A8) Backward somersault

A9) Trunk/hip flexion

A10) Forward somersault

Block II Upper Emphasis + Rolling

A1) Horizontal/vertical push

A2) Shoulder or log rolling

A3) Trunk lateral flexion

A4) Shoulder or log rolling

A5) Horizontal/vertical pull

A6) Shoulder or log rolling

A7) Trunk rotation

A8) Shoulder or log rolling

A9) Trunk extension

A10) Shoulder or log rolling

Extension

A1) Squat: variation based on progression

A2) Forward somersault

A3) Hinge: variation based on progression

A4) Backward somersault

A5) Single-leg variation: left

A6) Forward somersault

A7) Single-leg variation: right

A8) Backward somersault

A9) Trunk/hip flexion

A10) Forward somersault

A11) Horizontal/vertical push

A12) Shoulder or log rolling

A13) Trunk lateral flexion

A14) Shoulder or log rolling

A15) Horizontal/vertical pull

A16) Shoulder or log rolling

A17) Trunk rotation

A18) Shoulder or log rolling

A19) Trunk extension

A20) Shoulder or log rolling

Compression

A1) Squat: variation based on progression

A2) Pick somersault or roll

A3) Horizontal/vertical push

A4) Pick somersault or roll

A5) Hinge variation

A6) Pick somersault or roll

A7) Horizontal/vertical pull

A8) Pick somersault or roll

A9) Trunk drill of choice

A10) Pick somersault or roll

Anyone who has followed Dan John over the years can see his influence here. And let me tell you from experience, the stress on the vestibular and circulatory system is tremendous. An EMOM clock here works best and keeps you honest while you’re trying to figure out which end of the room is which when you’re getting up from the rolls.

By no means is this system a be-all and end-all, nor is this anything you must do in perpetuity. As your athletes progress through the ranks, they will require more intensive means. But you can revisit this system during rest cycles or the “curve balls” life may throw at you. You can make the adjustments suggested above when time, equipment, or space become an issue—which happens to be the case for some of us currently.

In this system, our young athletes learn to embrace the basics, drive work ethic, engage their efforts, and catalyze improvement. Share on X

The marriage of simple GPP modalities, along with a systematic approach to strength and conditioning, has allowed me to plug and play variations that fit the current and evolving needs of my athletes, along with daily fluctuations in performance and logistics. And all the while, we’re getting them to embrace the basics, drive work ethic, engage their efforts, and catalyze improvement. The simple stuff is sexy when it delivers.

Since you’re here…
…we have a small favor to ask. More people are reading SimpliFaster than ever, and each week we bring you compelling content from coaches, sport scientists, and physiotherapists who are devoted to building better athletes. Please take a moment to share the articles on social media, engage the authors with questions and comments below, and link to articles when appropriate if you have a blog or participate on forums of related topics. — SF


References

1. “Childhood Obesity Facts,” Centers for Disease Control and Prevention.

  • “The prevalence of obesity…affected about 13.7 million children and adolescents.”
  • “Obesity prevalence was 13.9% among 2- to 5-year-olds, 18.4% among 6- to 11-year-olds, and 20.6% among 12- to 19-year-olds.”

2. Youth Sports Injury Statistics,” Stop Sports Injuries, American Orthopedic Society for Sports Medicine.

3. Nick Garcia, “Creating and Implementing Template Based Training,” Garcia Performance (blog), October 17, 2018.

4. Dan Fichter, “Neuro Based Training,” Presentation TFC 8.

Tethered Running

Tethered Running: Not the Tool We Deserve, but a Tool We Need

Blog| ByNick Gies

Tethered Running

Being a coach in Calgary, Alberta, my year-round training options are at the mercy of the weather. Long winters, frigid temperatures, and endless snow keep us captive indoors many months of the year. We do not have the luxury of being outside on a field or on the track to properly train speed in a year-round fashion, particularly maximum velocity. Granted, Calgary is much warmer than the place I grew up three hours further north (lovingly called Deadmonton), but the winter conditions can seriously impact the long-term speed development of many athletes.

Comparably, with the recent worldwide pandemic, many athletes are relegated to their homes and must train in basements or small spaces. This means many promising and high-level athletes are not training properly (if at all), and speed training is surely the most neglected quality.

Where space and weather are limiting factors, tools that can help develop and build speed qualities are greatly needed. Luckily, one such option exists, and it can be extremely valuable in the pursuit of speed: tethered running.

What Is Tethered Running?

I am a pirate; meaning I rarely create anything of value myself, but instead steal ideas and tools from all the great coaches out there doing great things. Tethered running—which I stole from fellow Canadian Derek Hansen, and which he started experimenting with circa 2000—is simply putting a rope or band around your hips and anchoring it to something sturdy (or held by a partner). This then allows the athlete to do a multitude of training options indoors and without much more than a few square meters.

The placement of the rope allows for a much more natural feel than simply doing the same exercise in place without the tether. The little bit of resistance provided by the rope (my personal preference is my 1-inch purple resistance band) affords the athlete the ability to lean in slightly and strike the ground in a manner more akin to upright running, creating a more realistic muscle sequencing pattern. The external resistance also means the athlete has to maintain good postural control and develop body awareness. Tethered running is also a great option when you have a bit more space and a partner handy, because they can hold the band and slowly walk forward, allowing the athlete to get more posterior chain involvement.

The little bit of resistance provided by the rope allows the athlete to lean in slightly and strike the ground in a manner more akin to upright running, says @CoachGies. Share on X

Is tethered running a substitute for actual sprint training? A resounding NO! But as a tool to develop (some) speed qualities when weather and space eliminate any possibility of performing quality sprint work? Absolutely.

Think of it this way: If an athlete can’t run but still wants to train, what are they going to do? Likely weight training and bodyweight circuits training, which are fine and definitely have their place, but on their own will not develop the neurological or stiffness qualities required for sprinting. If an athlete is sitting around (like during quarantine…) then they are essentially detraining. If they are training but not doing speed-related work, they are detraining speed! This can lead to poor performances and an increased risk of soft tissue injuries once they ramp back up their training volumes (i.e., better weather or no more quarantine). Tethered running is a great adjunct to get quality speed training when the situation calls for it.

Here is an incomplete list of many of the capacities and physical qualities needed for efficient sprinting. Properly implemented tethered run training can also focus on, maintain, and even develop these areas:

  • Posture
  • Coordination/patterning (developing front side mechanics)
  • Arm mechanics
  • Rhythm, relaxation, and timing
  • Frequency
  • Elasticity/reactivity of the lower leg/foot
  • Leg and trunk stiffness (vertical displacement of center of mass)
  • Contact time
  • Specific strength (hips, ankle, etc.)
  • Foot/calf conditioning
  • Vertical force development

Will these capacities get developed better than with sprinting? Unlikely. Will they be developed to a higher degree than if not sprinting at all? Yes!

In that effort, we’ll focus on three primary applications: speed development, extensive tempo running, and return to play.

1. Speed Development

To get fast, you need to sprint. However, tethered running is a fantastic means to work on various sprint drills, low-intensity plyometrics, and other coordination drills. If you subscribe to the “Feed the Cats” training style, these could also be great additions to the X-Factor days.

Tethered running is a fantastic means to work on various sprint drills, low-intensity plyometrics, and other coordination drills, says @CoachGies. Share on X

Sprint Drills

Even though a sprint drill doesn’t necessarily make someone fast, it creates context for an athlete and can develop specific postural strength, rhythm, and relaxation. When used in a tethered fashion (as opposed to in-place with no tether), the athlete can use the resistance of the band to adopt a more leaned-in body angle. This much more natural feeling position will also cause the athlete to strike the ground in a more favorable manner (under the hips) as they try to push away from the anchor point. This increases posterior chain involvement and improves foot placement.

The “Big 3” to start with are marches, skips, and runs (See Video 1 below). The sets/reps can be either repetition-based or time-based. For example, with the Tethered March you can do 2-5 sets for 10-30 seconds with 20-50 foot contacts. I’ve found multiple sets of lower repetitions for these drills work best to keep fatigue at bay and movement quality high.


Video 1. Marches, skips, and runs are a great introduction to tethered running and lay the foundation for other variations.

Other drills include (see Video 2):

  • In and Out Skips
  • Unilateral Skips
  • Ankle/Skin/Knee Dribbles
  • Booms
  • Multi Boom series
  • Arm Action Drills
  • Power Skips
  • Scissor Runs
  • Snowball Runs


Video 2. In addition to these tethered running drill variations, you can try whatever your imagination comes up with!

You can also increase the intensity of each drill by altering arm position (i.e., overhead holding a dowel) or introducing some light external resistance, like a medicine ball, as the second half of Video 1 shows. This introduces novelty, movement variability/challenge, and overload without needing to design a new drill.

Low-Intensity Plyometrics

Pogo Hops, or Stiffness Jumps, are a great tool to develop elastic-reactive qualities of the lower leg, preactivation (i.e., dorsiflexion), and leg stiffness. When space is limited, adding the tether is a fantastic way to get more work out of these drills.

With the athlete now getting resistance from the tether, the recruitment strategy is different compared to simply jumping vertically on the same spot. It requires more calf involvement, and the ground reaction force will be angled slightly forward rather than straight up. Similarly, you can increase the intensity with light external resistance in front or to the side of the body (i.e., medicine ball). Repetitions would be anywhere from 8-20 seconds depending on whether you want to emphasize contact time or power or 20-45 seconds for more of a conditioning effect. Sets can range from 1-6 reps.

Great options include (see Video 3):

  • 2-Foot Pogo
  • 3 Mini + 1 Big (Different Amplitudes)
  • Single-Leg Pogo
  • Shuffles
  • Mummy Shuffle
  • Astride Jumps


Video 3. Tethered low-intensity plyometrics, including Pogo Hops and Shuffles.

Max Effort Drills

Obviously, the neuromuscular component of sprinting can’t be matched without actually hitting the track, and we don’t want to solely perform submax drills and jumps. We will still need to address the CNS component even if we are confined to our homes. A variety of max-effort drills can be performed with the tether. These should generally be done in short bursts (around 6-8 seconds or 3-5 reps, depending on drill) to ensure maximal outputs and high movement quality. Some of these drills take some getting used to in terms of feel and coordination, but what are you going to do…not train speed?

Drills include (see Video 4):

  • Sprint Arms
  • High Knees/Power Runs
  • 2-Point, 3-Point, 4-Point Starts
  • Kneeling Start
  • Broad Jumps
  • SL Jump to DL Landing


Video 4. Tethered max effort drills include arm movements and resisted jumps.

2. Extensive Tempo Running

Used by many great sprint coaches, tempo running is a fantastic tool in a coach’s toolbox. Particularly if you subscribe to the high/low model of structuring weekly training, it is a great way to get a lower intensity session to improve aerobic qualities and overall blood flow without the impact or CNS load. Increasing chronic running volumes and improving the efficiency of the aerobic engine will make the athlete more robust and able to handle higher training loads year after year, thus improving the quality of training and reducing injury risk.1,2 With limited space or limited access to quality facilities, this could be a massive component missed by athletes.

Fear not, tethered running is here to help.

Hunter Charneski wrote a great article detailing tethered tempo runs. To perform them, you run in place against the tether for a designated period of time, in an interval fashion. In terms of the sets and reps, I believe Carl Valle summarizes it nicely in this article: “The density of work has to be high enough that the body is in a constant state of deficit but not too hard that the aerobic strain can be felt at the muscular and tendon level.”

The aerobic system needs to be challenged and should be the limiting factor, not the tissues. Tempos are typically performed around 70% intensity. So, during tethered tempos, it should be a steady pace where you feel you are working, but never to the point you need to slow down due to fatigue—though you will get sweaty and your calves/hip flexors will be tired the first few times!

There are endless combinations, but I tend to defer to 25-45 seconds of work, with a 1:1-1.5 work-to-rest ratio (the athletes’ fitness levels will determine the ratios). Similar to other forms of tempo, the level of intensity is not the key, but the total volume. Thus, you should default to lengthening the duration of the run, shortening the rest periods, or increasing sets/reps rather than making the athlete move quicker. In Charneski’s article, he details approximate sets/reps to correspond with actual track distances, and session volumes for various sports and positions (refer to that article for more detail).

True, you could do this in-place without a tether, but the more natural position afforded by the band makes it much more enjoyable and easy to maintain a steady rhythm. I should note that due to the limitations of tethered running compared to running over the track or grass, I find the hip flexors get more fatigued. So, you may need to modify sets/reps/rest for particular athletes.

You could do tempo running in-place without a tether, but the more natural position afforded by the band makes it much more enjoyable, and easy to maintain a steady rhythm, says @CoachGies. Share on X

In terms of technique, I find a slightly lower knee lift, somewhere around one-third to one-half of max knee height, works well. This way you can still work on rhythm, arm action, crisp foot contacts, and relaxed shoulders. You can even perform this on a thin exercise mat for a more compliant surface to dissipate some of the forces going through the lower leg.

Another great way to extend the aerobic challenge—without adding more running—is to incorporate medicine ball exercises, flexibility circuits, or low-volume calisthenics before, during, or after the workout. This would be more than adequate as a low-intensity session for an athlete at home or in a small facility during the Canadian winter.

A great initial session I do with athletes, either on a lower intensity day or for an at-home session, is the following:

  • 30” on/30” rest x 4-5 reps x 2 sets
  • **1-3 minutes between sets depending on athlete fitness levels

Here is an example of a pyramid tempo workout:

  • 30”+30”++
  • 45”+45”++
  • 60”+60”++
  • 45”+45”++
  • 30”+30”
  • + = 30” rest

And an adapted tethered workout based off Charlie Francis’s “Big Circuit”:

  • 30”+30”+30”++
  • 30”+30”+45”+30”++
  • 30”+45”+45”+30”++
  • 30”+45”+30”+30”++
  • 30”+30”+30”
  • + = 30” rest

3. Return to Play (RTP)

The applications for tethered running aren’t just performance-based, as tethered running also has a very real place in rehabilitation because it increases tissue tolerance in RTP scenarios. After an acute or chronic overuse injury, part of the RTP process is to gradually reintroduce graded training stimuli to improve tissue remodeling and tolerance without exacerbating symptoms. This generally begins with low-intensity/low-volume interventions, and then gradually both of those criteria are increased based on athlete tolerance, until the athlete can handle full training.

Tethered running also has a very real place in rehabilitation because it increases tissue tolerance in return-to-play scenarios, says @CoachGies. Share on X

In the case of a sprinter or field sport athlete RTP scenario, this generally means progressing to some sort of full-effort running. Not exposing an athlete to the types of speed and external forces that they will experience in their sport during the RTP process is a surefire way to increase the likelihood of flare-ups and reinjury. Additionally, specificity is key, so for athletes who need to run, intelligently designed running progressions will provide an adequate means for progressing tissue tolerance and specific strength.

Tethered running is a great way to recondition an athlete’s lower half after an acute injury (e.g., ankle roll, hip flexor strain, pulled hamstring) or overuse injury (e.g., shin splints, plantar fasciitis), or for other injured body parts that can’t handle the load of full-effort sprints (e.g., strained erectors, rotator cuff surgery). This modality can even be useful when adequate space is available, but a modification in volume and intensity is required during the rehab process.

Let’s take an acute ankle sprain as an example. Once preliminary examinations/imaging are performed, initial therapies to restore functional ranges of motion and strength are incorporated, and the athlete is more or less able to bear weight (though full weight-bearing is not required to begin), then we can introduce tethered rehab strategies. Like any rehab situation, you will want to find an “entry point” where the athlete can perform some amount of training without substantially increasing symptoms (i.e., pain, swelling, inappropriate movement strategies, etc.). In the case of an acute ankle sprain, this entry point would likely be the standard March Drill.

The following flowchart shows how a coach can increase the training demands over time, thus improving adaptation, by progressing the dynamic effort, external load, or volume of the drill.

Tethered Running Ankle Progression
Table 1. Acute ankle sprain rehabilitation progression showing how a coach can increase training demands over time. This will improve adaptation by progressing the dynamic effort, external load, or volume of the drill.


Notes:

  • Ensure athlete demonstrates proper dorsiflexion and pre-activation before advancing a drill.
  • Sets/reps can be anywhere from 1-4+ sets depending on severity of the injury.
  • Allow full recovery periods to prevent fatigue from being the limiting factor in technical execution.
  • Can be partner-assisted to allow the athlete to travel forward at a slow pace.

A safe way to progress each drill is to start with what the athlete can handle. For example, use the March Drill for two sets of 10 seconds, then increase the sets to three and then to four sets of 10 seconds. If the athlete responds well, drop the sets back down to three and increase the duration to 20 seconds and progress back to four sets. When the athlete is accustomed to this workload, drop back down to three sets of 20 seconds, but introduce external resistance like a medicine ball, and similarly build up to four sets. Once this is not an issue, you would then introduce the next most dynamic drill (i.e., Low Skip), start at a low volume, and progress in a similar fashion.

Whichever route you take will depend on what the athlete can handle and how they respond, but ultimately you will want them performing the most difficult drills prior to clearing them to resume regular training (or at least reincorporate portions of regular training).

This logical progression of low intensity/low volume to high intensity/moderate volume will improve muscular strength, tendon/ligament stiffness, proprioception, and endurance qualities of the lower leg, which would surely have regressed during the initial stages of rehab. Additionally, the athlete’s tolerance to training will be somewhat reinstated, allowing them to handle higher volumes of sport-specific training sooner than if no run training had been performed. Similarly, they will have developed overall coordination, rhythm, relaxation, and fitness qualities, allowing for a more global training effect—rather than simply focusing on the ankle—and leading to a more optimal RTP scenario.

Not a Replacement, but a Good Addition

In terms of true speed development, if the training modality isn’t flat-out linear sprinting, then there will obviously be limitations and drawbacks. Though tethered running has many benefits, especially for our confined athletes, it is not a replacement. It will not replicate the ground reaction forces or vertical force development seen in upright running. It will not produce as much tension or load through the posterior chain, particularly the hamstrings. It will not reproduce identical motor patterns (i.e., foot strike, heel recovery), flight times, or stride lengths. It will also not replicate the neural drive seen at higher speeds.

Though tethered running has many benefits, especially for confined athletes, it is not a replacement for flat-out linear sprinting. But it’s a good adjunct to proper sprint training, says @CoachGies. Share on X

However, this should not discourage its use as an adjunct to proper sprint training, especially if the other option is to do no form of sprint training at all.

Moving Onward

My hope with this article was, first, to inspire coaches in similar situations as myself, who may not have adequate facilities to sprint year-round or who are relegated to coaching in small spaces for many months due to poor weather. Secondly, my goal was to shine a light on the many useful applications tethered running can have, especially because it is a low-cost and easily accessible form of training. It can be a useful means to develop (or at least maintain) several speed qualities through specific sprint drills and low-intensity plyometrics, and aerobic qualities through tempo running, and it can be a valuable training tool in RTP protocols.

Now grab a band and get moving!

Since you’re here…
…we have a small favor to ask. More people are reading SimpliFaster than ever, and each week we bring you compelling content from coaches, sport scientists, and physiotherapists who are devoted to building better athletes. Please take a moment to share the articles on social media, engage the authors with questions and comments below, and link to articles when appropriate if you have a blog or participate on forums of related topics. — SF


References

Malone S., Roe M., Doran D.A., Gabbett T.J., and Collins K.D. “Protection Against Spikes in Workload with Aerobic Fitness and Playing Experience: The Role of the Acute:Chronic Workload Ratio on Injury Risk in Elite Gaelic Football.” International Journal of Sports Physiology and Performance. 2017;12(3):393–401.

Malone S., Owen A., Mendes B., Hughes B., Collins K., and Gabbett T.J. “High-Speed Running and Sprinting as an Injury Risk Factor in Soccer: Can Well-Developed Physical Qualities Reduce the Risk?” Journal of Science and Medicine in Sport. 2018;21(3):257–262.

Self-Spotter

3 Psychological Advantages of Weight Lifting with a Self-Spotter

Blog| ByBrady Poppinga

Self-Spotter

It’s one of the most helpless feelings in weightlifting—when the mind is willing, but the body won’t respond. Fatigue has set in and, all of a sudden, a weight that seconds ago seemed manageable is now immovable. In this case, the lifter hopes their spotter is paying attention and can save them from getting pinned under the weight of the loaded bar. It’s one of those scary moments of pure dependency on the spotter.

Everyone who has lifted weights has been in this position (or will be soon enough). Getting pinned or stuck under a barbell doesn’t only happen to inexperienced lifters. Even the most skilled lifters have to face the reality that, when lifting a loaded barbell suspended in the air, a lot can go wrong—fast. Fatigue, muscle cramps, loss of balance, or the bar slipping out of the lifter’s hands are always part of the inherent risks. Even though skilled and experienced spotters are present and fully focused on assisting the athlete at the right time, things can happen so fast that human reaction times can’t save the lifter from a loaded bar falling uncontrollably and putting them in harm’s way.

This experience can result in either a scary (but short-lived) injury or a potentially life-threatening injury. In some extreme cases, fatalities have occurred when the bar fell on a lifter surrounded by skilled and focused spotters. To fully understand what can go wrong when lifting with free weights, run a Google or YouTube search for “Gym Fails.” Sure, many of the clips show very inexperienced or reckless lifters who put themselves in vulnerable positions. But there are also many cases of very skilled and experienced lifters who end up falling victim to the dangers and risks of weightlifting (as you can see in the example here, viewer warning).

The Intimidation Factor

No matter how much risk tolerance a lifter has, anyone who places themselves under a loaded bar is subject to inherent risks. The National Electronic Injury Surveillance System (NEISS), operated by the U.S. Consumer Product Safety Commission, provided data over 18 years (1990-2007) relating to injuries that occurred while lifting weights. Researchers then used this information in a study to shed light on how truly risky or dangerous weightlifting is. It showed that during the 18 years, almost one million people were injured seriously enough to be taken to hospital emergency departments. Of those weightlifting-related injuries:

  • 65% were due to the weights dropping on a person
  • Ages 13-24 had the highest amount of cases of injury than any other age group
  • Only 2% of those injuries required hospitalization
  • There were 114 fatalities

Suffice it to say, free weightlifting isn’t an activity where we’re putting our lives on the line every time we get under a loaded bar. However, there is enough of a possibility of something going terribly wrong that it does detrimentally affect us—even without consciously realizing it.

When we go under the bar, there's enough chance of something going terribly wrong that it detrimentally affects us without consciously knowing it, says @BradyPoppinga. Share on X

While acknowledging the risk of injury while lifting, it is healthy for a lifter to feel differing degrees of intimidation—you can call it respect—for the loaded bar. Hence, the standard operating procedure is always to have a spotter present. And even with a spotter, giving up control when fatigue sets in and one can no longer lift the bar only intensifies the intimidation factor. It’s like flying in a plane or riding on a bus: many people feel uneasy because they’re not the one driving. They have to give up control and trust that the pilot or driver will pay attention and is skilled enough to get them safely from point A to point B. The same goes for a lifter who gives control of their wellbeing to a spotter.

Although this state of mind is healthy, it can be limiting in the context of weight training. Muscle adaptations affecting such things as strength, speed, power, and hypertrophy are some of the main objectives of weight lifting. The way by which muscles adapt is through placement under strategic stressors relative to the desired effect. If the muscles aren’t stressed enough, they don’t adapt. And if they don’t adapt, the desired result is unattainable.

Knowing the risks of weight training can trigger subconscious efforts to hold back in critical moments of stressing the muscles for adaptation, says @BradyPoppinga. Share on X

Weight training with a clear understanding of its risks can trigger a subconscious effort to “hold back” in critical moments of stressing the muscles for adaptation. This includes the willingness to do one more rep or place more weight on the bar or how much effort to give in moving the bar with speed and power.

Our instinctive, self-preservation mechanism is wonderful at keeping us healthy and out of harm’s way. Still, it can have a limiting influence on pushing our muscles to new states of adaptation. This leads to training plateaus and can limit the payoff from the effort invested in the weight room.

Benefits of Using a Self-Spotter

Think of some of the most adventurous and extreme activities that bring an intense adrenaline rush that’s almost like being high on a drug (or so I’m told): skydiving, heli-skiing, bungee jumping, base jumping, cliff diving, and jumping the Grand Canyon on a motorcycle. What if we could almost eliminate the risk and downside of these activities but preserve the rush? Would you be willing to try them? I would imagine there would be a lot more people who would participate if this were the case. I know I would.

Lifting weights with a self-spotting mechanism is like that. All the upside of free weight lifting without the same level of risk. When I say “self-spotting mechanism,” a Smith machine that has a fixed linear path isn’t what I have in mind. The self-spotter connects to a bar that swivels in unlimited planes. It has to be actively stabilized by the lifter, which gives the muscles the same feel as a traditional free bar would but without the risks. The best one I’ve come across is the XPT Trainer. Here are how it works and its advantages.

Advantage 1. Lifter Has Full Control of the Bar at All Times

The self-spotting mechanism on the XPT puts the lifter in the driver’s seat. The athlete has full control over when to start and stop the bar at any time (see Image 1 for how it works). Having complete control of the bar empowers the lifter to lift more weight, attempt more reps, and fight fatigue longer. It doesn’t take a genius to predict that, if one lifts more weight and tries more reps, they will experience more frequent and consistent muscle adaptations.

Handle Grip
Image 1. The XPT Trainer gives the lifter full control over the bar, fueling consistent muscle adaptations.

Having full control of the bar is very convenient in the following ways:

  1. When doing cluster sets, there’s no need to rack the bar on and off hooks after each cluster set, which saves energy the lifter can focus on training.
  2. It’s easy to work from varying points along the range of motion, such as doing lockout benches (see Video 1) and ¾ squats.
  3. It’s seamless starting and finishing a lift from the hole.
  4. Changing from squats to bench and bench back to squats is effortless. There’s no need to detach and reattach hooks and safety spotters. It’s also perfect for super setting or lifting with a partner who’s doing a different lift or has a different starting point.


Video 1. Lifting with the XPT Trainer lets the athlete work from various points along a lift’s range of motion. In this video, the athlete performs bench press lockouts.

Advantage 2. Failing Safely When It Is Unexpected

Failing when lifting weights is very common—and necessary—to see results. Ideally, the lifter can anticipate when they’re reaching the max level of fatigue and on the verge of failing. At this point, preparations can be made to protect the lifter so they’re not crushed or pinned under the bar. But what happens in moments of failure that are unexpected, such as the bar slipping out of the lifter’s hand while bench pressing? Or debilitating muscle cramps? Or fainting due to lack of oxygen to the brain?

The beauty of using a self-spotter is that the lifter will fail safely in unexpected moments of failure, says @BradyPoppinga. Share on X

All are very dangerous situations since the lifter is unable to brace themselves and is extremely vulnerable to serious injury. The beauty of using a self-spotter even in these unexpected moments of failure is that the lifter will fail safely. The spotting mechanism is controlled by two brake-lever handles that work like a motorcycle clutch—the bar is free to move only when the lifter clamps down the handles. As soon as an athlete releases just one of the two levers, the spotting mechanism engages and stops the bar. Take the scenario where the bar slips out of the hands during a bench press—the bar will stop completely as soon as it leaves the lifter’s hands. The same thing happens if the athlete faints, falls, or just lets go of the levers altogether—the bar will safely stop where the levers were released.

Advantage 3. Trainers Can Be Full-Time Trainers

Many performance coaches—along with personal trainers—have spent years studying and acquiring knowledge about the science behind training. Unfortunately, they have to divide their time in the field between training and spotting. The problem with this is the ideal spotting position (usually behind the lifter) isn’t an optimal place to observe and evaluate proper technique and form. Trying to split time between training and spotting limits the trainer from using the valuable knowledge gained over time to most benefit the athlete or client.

With a self-spotting mechanism, the trainer can position themselves in an ideal spot to assess technique and form properly, says @BradyPoppinga. Share on X

With a self-spotting mechanism, the trainer can move around and position themselves in an ideal position to assess technique and form properly. Moving out from behind the lifter also eliminates the lifter’s temptation to rely too heavily on the spotter. With the safety spotter, if the athlete reaches a sticking point, they can fight through it without the spotter intervening. Or, they can rack the bar exactly at that sticking point, take a 10- to 20-second rest, and finish out the rep themselves, essentially converting that last rep into two cluster sets.


Video 2. If the bar slips out of the lifter’s hand, the self-spotters engage, saving the athlete from a free-falling bar.

Conclusion

Feeling uneasy, intimidated, or wasting mental energy wondering if we’re safe and protected will always work against achieving optimal results. Lifting weights is no different. The efficiency of energy transfer through the body has such a small margin of error that a tiny “leakage” of that energy could be the difference between having enough grit stored to perform one more rep despite fatigue or missing the rep because the fatigue was too much.

Clearing the clutter and tunneling all of the mind, body, and spirit’s focus and energy on moving the loaded bar will lead to top-notch results. Using a safety spotter puts the mind at ease and gives the lifter full control over when to start or stop the bar, resulting in feeling empowered to take chances while going for one more rep or attempting to place more weight on the bar. It also doesn’t hurt that the safety spotter will enhance the effect of the strength coach’s or trainer’s influence, giving them the ideal vantage points to evaluate proper form and to provide real-time and relevant coaching points. At the very least, a self-spotter will make weightlifting safer without taking away its fantastic upside.

Since you’re here…
…we have a small favor to ask. More people are reading SimpliFaster than ever, and each week we bring you compelling content from coaches, sport scientists, and physiotherapists who are devoted to building better athletes. Please take a moment to share the articles on social media, engage the authors with questions and comments below, and link to articles when appropriate if you have a blog or participate on forums of related topics. — SF

Assise Jumps

How to Nurture Jumping Skills and Athletic Abilities with Rob Assise

Freelap Friday Five| ByRob Assise

Assise Jumps

Rob Assise has 16 years of experience teaching mathematics and coaching track and field at Homewood-Flossmoor High School. He has also coached football and cross country. You can find his additional writings at Track Football Consortium, Just Fly Sports, and ITCCCA.

Freelap USA: Speed is great for nearly all sports, but the ability to control it is another story. Do you feel that jumpers, specifically horizontal jumpers, have more awareness because of runway work and takeoff adjustments? How can this possibly help other sports beyond track and field?

Rob Assise: We know one of the key factors in success in the horizontal jumps is velocity at takeoff. While the ability to reach high maximum velocity is the main aspect I look for when assessing athletes and their fit for the horizontal jumps, there is not always a direct correlation between speed and horizontal jump performance. For an athlete to maximize their ability on the runway, they need to be able to coordinate movement at a high percentage of their maximum velocity.

I have had 7-meter long jumpers who could not break 1.05 seconds in a 10-meter fly. In comparison, I have had sub-1.0 second 10-meter fly athletes who couldn’t jump more than 6 meters. Although many factors come into play, the main piece I could see is the 7-meter jumper was faster on the runway than the faster athlete.

The jumps are certainly not as chaotic as a field or court sport, but that does not mean the coordination demands are low. The difficulty for an athlete to attain a speed around 90% of their maximum velocity, coordinate specific movements while at a fast velocity as they near the board, and hit the board accurately all while the conditions vary from attempt to attempt (wind, rain, temperature, pressure of competition, etc.) is extremely underappreciated by those outside of track and field.

One of my favorite quotes to cite in presentations is from legendary long jumper Dwight Phillips: “Learning how to interpret space is paramount to the development of jumpers. Luckily, basketball taught me how to do so.” The quote implies that skills developed playing a court sport transfer to the long jump. I agree 100% and would say the converse is also true.

Track and field offers a variety of specific demands within a broad spectrum of events, all of which can lead to an athlete operating more efficiently. Because of this, I feel track and field events nicely complement the chaos found in field and court sports. Exposure to a wide range of activities from youth through adolescence gives an athlete a wider coordination pool to draw from in early adulthood and beyond, allowing for the possibility of reaching a higher athletic ceiling.

Freelap USA: The high jump is very unique because of the curve. How do you develop bend running beyond grass circle runs? Can you get more into the physical demands of preparing a slight frame for the rigors of centripetal force on the ankle joint?

Rob Assise: The curve complicates the event, and it also makes the training to prepare for it more difficult. Grass or field turf curve runs are phenomenal, but we also regularly perform various jump drills on the curve or through a serpentine course, or those that have a frontal plane emphasis. Beyond that, sprinting on a bend or through multiple bends on the track (ideally, spiked up) is a way to increase the intensity, especially if athletes are being timed or racing/chasing.

Another option that I think holds great promise is the use of Polish boxes. I had personal experience with them as an athlete and found they addressed the demands found in the high jump. Since my move to focusing on coaching the jumps five years ago, they have worked their way to the top of my “must have” list.

At the very least, standard frontal and transverse plane movements should be present in a strength program tailored to high jumpers, says @HFJumps. Share on X

It is difficult to address the angles found in high jump due to the curve with traditional weight room work. That does not mean there isn’t value in traditional strength training for a high jumper, but I think it is worthwhile for coaches to get creative. I have begun to explore the use of a wall to incorporate overcoming isometrics that have a frontal plane emphasis. At the very least, standard frontal and transverse plane movements should be present in a strength program tailored to high jumpers.

Freelap USA: You have used the MuscleLab contact grid by Ergotest for jump training. While most coaches have used jump testing for vertical information, how do you see it being used for horizontal performance in training?

Rob Assise: Until COVID-19 hit, our jumpers were using the contact grid once or twice a week. Its use was a definite game-changer on many levels. For one, it brought instant intent. Athletes would get excited when they saw the grid being set up (which is really simple to do). Knowing athletes are going to bring their best without me even having to say anything makes the grid more than worth its weight in gold.

As it was my first year with the MuscleLab product, I chose to focus on two tests: the Scandinavian rebound jump test (repeat vertical bouncing) and a horizontal double-armed power bound. The metric we focused on for the horizontal bounding was the power of each contact, which the grid calculates automatically. It was similar to how we use electronic timing when sprinting, where we often let the device do the coaching for us.

Here, athletes will experiment with different strategies to obtain a faster fly time, and we encourage this experimentation as it allows them to develop better awareness of their body. Obviously, we may give direct instruction when we feel it is necessary, but we have found better conversations are had when asking an athlete what they tried and what they noticed versus just giving direction. What I found via bounding with the grid was athletes became more engaged with how they were interacting with the ground.

We know one of the ways power can increase is by lowering ground contact time (also captured by the grid), but each athlete still needs time to apply force. If our season had continued, I think by season’s end we would have had athletes who were more “educated” bounders than years past, and I do think there would have been a strong correlation with enhanced event performance.

The grid is even more powerful when coupled with video, as it makes it much easier to sync the outputs collected with a specific ground contact. Here, a coach can identify discrepancies between the right and left legs. While most athletes will not be perfectly symmetrical, and I don’t think we should chase absolute symmetry, it can help us answer which leg should be used for jumping or if a possible issue may be on the horizon due to decreased power output. It can also be a tool for workout readiness or return to play scenarios.

Measurement is a wonderful tool to drive athlete motivation, says @HFJumps. Share on X

What may be the most important part of capturing data on each contact is it allows a coach to easily determine when a workout should be stopped. If you are chasing maximum power, why do additional repetitions well below maximum power? In the words of Steffan Jones, “Assess don’t guess.”

Finally, establishing and testing key metrics allows for talent identification and creates a database for athlete comparison. I look forward to the day when I will be able to tell a young sophomore, “Athlete X was a state champion in triple jump and produced a power level of 35 watts in this exercise as a senior. You are currently at 31 watts—what do you think you can become?” Measurement is a wonderful tool to drive athlete motivation.

Freelap USA: The weight room seems like an afterthought with many coaches now that speed is front and center. Can you tell us how you take advantage of the weight room to get the most out of athletes without forcing unnecessary training on them?

Rob Assise: I know I have felt overwhelmed over the course of my career trying to ensure all boxes in training were checked during a track season. Finding time for sprinting, plyometrics, technical work (especially athletes who compete in a number of events), and weight room activity can certainly be a challenge. I know coaches who have had great success without ever setting foot in a weight room during the season, and ones who have three or four weight room sessions per week.

As a “champion for sprinting,” I often come across as being anti-weight room. I am not. I think strength is a trait that should be sought after by all humans. My concern as a track coach is ensuring that as strength is improved, the coordination needed to use it to produce higher levels of speed/jumping comes along for the ride.

My concern as a track coach is ensuring that as strength is improved, the coordination needed to use it to produce higher levels of speed/jumping comes along for the ride, says @HFJumps. Share on X

My advice to coaches at the high school level (and, in many cases, beyond) is to use methods to improve strength during the actual sport practice outside of the weight room as much as possible. Some options are isometrics, catching a falling weight, grappling, crawling, or bringing equipment out to the track. I think we forget that a hex bar doesn’t have to be used for loaded carries—athletes can carry each other, or a coach can make sandbags of various weights on the cheap. Medicine balls can be made from a rubber basketball filled with water via an air-water adapter kit.

Oftentimes, high schools and colleges do not have an ideal athletic facility setup. Practice time is valuable and making the transition to the weight room is dead time. If a program can take care of some strength work during their practice, it may reduce the number of times they need to visit the weight room each week. For a track athlete, this could mean an additional half hour of time working on their event each week. With strength being addressed in practice, it allows for weight room sessions where the focus can be on the big-ticket items, thereby eliminating unnecessary training.

The dilemma I often find with the weight room as a track coach is it coming at the expense of event technique work. I know that if I am dealing with a young high school athlete, developing a foundation of strength will pay dividends down the road, so choosing strength is usually the right choice. However, if we are at the end of the season and the athlete is close to making a technical break-through that will pay dividends during the championship season, we will spend time chasing the break-through. Ultimately, coaches need to be able to adapt and showcase creativity to ensure the strength needs of athletes are being met.

For coaches who choose not to utilize the weight room in-season, I think there needs to be an understanding that some athletes will find time to lift on their own (typically squat, bench, and curls for high school males). Open communication is important between the coach and athlete in this scenario. The coach can either give an athlete a program to follow on their own time or educate the athlete to make sure they partake in a balanced program that does not conflict with what is being done in practice. For a simple example, a coach can say, “If you are going to squat, bench, and curl, please make sure you add in some pull-ups, an RDL variation, and a triceps movement.”

Freelap USA: Regarding nontraditional plyometrics, what exercises do you think high school jumpers and non-track athletes can benefit from? Outside of bounds, hops, and jumps, are there any out-of-the-box exercises for building elastic strength you think are missing from typical programs?

Rob Assise: Besides the exercises you listed, the jumpers I coach get a steady diet of skipping, galloping, and run-run-jump variations. Ironically, I have a resource available on those three exercises through Field Focus, titled “Jump Drills for All Athletes.” What I enjoy about these three are the number of variations that athletes can do with each. The exercises have contact patterns that are found in all land-based sports, so they can be a nice way to prepare the body for activity. Also, you can constantly challenge coordination by having the athlete focus on different contact patterns/times, arm movement, and drill focus (i.e., skip for height/distance).

Another thing I encourage is to get out of sagittal plane dominance when it comes to plyometrics. Adding in movements that incorporate more of the frontal and transverse planes helps create a more resilient athlete. This can be done by doing plyometrics on a bend or serpentine course, as well as directing forces laterally or medially.

Finally, I think there has been a push against the use of boxes for plyometrics through the use of drop and depth jumps. While I understand coaches want to keep athletes healthy, I think their view of these as dangerous is misguided. If you go to a park, you will find children jumping on and off objects all the time. Currently, the favorite activity of my 3- and 5-year-olds is how far they can jump off our couch. Why do we freak out when a teenager is asked to drop off a 50-centimeter box?

Here are a few suggestions to keep in mind when utilizing this type of training:

  • To keep things simple, the terminology I use is “altitude drops” and “rebounds” à la Jay Schroeder. Altitude drops are when an athlete falls and sticks the landing. Rebounds are when they hit the ground and perform a jump. Whether the rebound falls in the traditional drop or depth category will be determined by the box height and contact time focus (traditional drop jumps have a GCT target of .22 seconds or less and a depth of .4 seconds or less).
  • Just because athletes drop from the same height does not mean force is dispersed in the same manner. I think even the untrained eye can easily see this, but it is often overlooked. An athlete who consistently looks like a bag of sand when they hit the ground is most certainly overshooting their abilities. While athletes always want to drop from the highest box, it is the job of the coach to communicate the necessity of a proper landing—for both exercise effectiveness and safety. If an athlete is adamant that they are doing it properly, filming and then comparing them with someone who actually is doing a good job will guide them to seeing the light.
  • A good place to start in regard to box height is having an accurate vertical jump measurement. If an athlete can fall from their vertical jump height, they should be able to do the same from a box of the same height. Here are standard parameters:
      • Altitude drops at a height 75% of vertical jump height. Regress if landings are poor; progress to, and eventually beyond, 100% if landings are solid.
      • Rebounds at 50% of vertical jump height. Regress if time spent on the ground is excessive, progress if parameters are being met.
      • Another factor to consider is the amount of knee and hip flexion desired in the landing. In general, higher heights can be used when there is greater flexion, and lower heights when there is less. I like to pair “high flexion landings” with acceleration themed days and “low flexion landings” with maximum velocity themed days.

    Since you’re here…
    …we have a small favor to ask. More people are reading SimpliFaster than ever, and each week we bring you compelling content from coaches, sport scientists, and physiotherapists who are devoted to building better athletes. Please take a moment to share the articles on social media, engage the authors with questions and comments below, and link to articles when appropriate if you have a blog or participate on forums of related topics. — SF


Football Interception

3 Steps for Using KPIs to Train With Intent

Blog| ByJacob Williams

Football Interception

Every athlete has different needs and areas they can improve, and using key performance indicators will give you an easy guide for how you need to train your athletes. Here at Varsity House Gym—given the different sports, ages, and ability levels of the athletes who come to us—we have established different KPIs or testing standards that we track for each age group. These allow us to establish where an athlete is and help guide us on what they can improve on going forward.

Working closely with high school football players, many of whom have been with us for some time now, making sure they are still improving requires us to be more detailed in our tracking of their training progress. By establishing a base of qualities to focus on improving—factors I know will transfer on the field—I can then design a program that improves upon those abilities. If my KPIs are accurate and they improve, I can say with confidence that the athlete is getting better as well. But the process does not stop here, you can dive even deeper into selecting performance indicators based off of individual athletes as well.

By establishing a base of qualities to focus on improving—factors I know will transfer on the field—I can then design a program that improves upon those abilities. Share on X

In this article, we will break down the what, how, and why of using key performance indicators in your performance program.

What is a KPI?

A “Key Performance Indicator” is a concept taken from the field of finance, where it is simply a metric used to decide the effectiveness of a strategy. What does that look like in the context of strength and conditioning? Simple—any combine test can be considered a KPI (but we all know not all combine tests transfer to the sport they are designed for). So our goal here is to find a better way to evaluate what will transfer from the training space to the field of play.

Understand Your Athlete

For strength and conditioning coaches, the starting point is understanding the sport each athlete plays. Here is a list of questions that need to be answered to begin the process of identifying good KPIs for your athletes:

  1. What energy system does the athlete primarily use?
  2. How much recovery time does the athlete get between bouts?
  3. Does the athlete need to change direction? How frequently?
  4. What speeds does the athlete work at? Acceleration? Top speed? If it is a blend, which does the athlete need to improve more?
  5. Does the athlete physically engage with other athletes or objects? Do they need to be more physically dominant? How frequently?
  6. What systems/space do you have at your disposal to test and track efficiently?

Once you’ve answered these questions, you can see what you need to focus on to help your athletes get better. You can start by breaking things down into segments: if your athlete needs to be maximally strong, you may need to implement a performance indicator for maximal strength. Does your athlete change direction constantly, like a tennis player? You may need to look at a lateral shuttle test to track their progress.

Ability-KPI
Figure 1. 10 examples of athletic abilities and potential KPIs coaches can use.


Recognizing what your athlete needs in their sport and then selecting a few testable movements to track throughout their training will dramatically improve the focus of your training.

In my time as a strength and conditioning coach, I have worked with many defensive backs in football and have developed my own KPIs that I use to track and test my athletes. Most of the guys I work with are not strangers to hard-work, so guiding them on where to focus to help them improve the most is a big part of what I do. Having KPIs to give them a focus point helps tremendously in guiding their work ethic.  Note that these are what work for me with the space and equipment I have to effectively and efficiently track and test my guys. What you use may differ depending on what you are able to facilitate in your space, based on equipment, space, and a range of factors.

DB KPI's
Figure 2. Key Performance Indicators for athletes playing the defensive back position in football.

How to Integrate and Use your KPIs

Once KPIs are established, we need to use them and apply them to the athletes. No, a pre-test and post-test are not enough to say “We used these KPIs and look at our results.” If you have acknowledged that these things are needed to improve the athlete, they need to be at the forefront of training at all times. This means that we need to be working on improving at least one KPI per training session throughout the week. At Varsity House, we have up to 5 training days for our HS athletes: Upper Lift, Linear Speed, Lower Lift, Change of Direction, and Recovery days to ensure each athlete is touching on each part of their training needs.

If you have acknowledged that these things are needed to improve the athlete, they need to be at the forefront of training at all times. Share on X

My approach is a 3 step process to take each KPI and decide what weight room movement will translate and how to implement that movement. I personally like seeing examples, so I am going to use an example of improving the vertical jump (from the above chart of KPIs) and take you through the process of programming for that KPI.

Step 1: KPI to Main Lift/Movement

The first thing to establish once you have identified your KPIs is what weight room movements will transfer to each KPI. The main thing I would look to mimic here would be the force-vector of the KPI—obviously, with a vertical jump, we would need to apply force in a vertical direction. Deciding what vector your KPI is in and then selecting a main lift or movement that matches that to some extent is a good way to get started on what movements to use.

If the force-vector does not narrow it down enough, from there I would look at the muscular demands of the movement—what muscles are the main movers? A sprint may fall in this category of hard-to-define vectors, so you would identify your main muscular demands. Using the KPI table for defensive backs, a movement I may do to improve vertical jump ability could be a front squat.

After you have identified the main movement, you would identify the muscular demands of that movement and the KPI to help select any supplemental work. Using that knowledge, you need to then identify any weak points your athlete may have within those movements and select a supplemental lift accordingly. For example, if I have an athlete that has weak glutes and struggles getting out of the hole, I may put him with a weighted hip thrust as a supplement to work on that. As you can see, this allows you to personalize the program for each athlete you work with.

Step 2: Force-Velocity Curve

Next, we need to identify where on the force-velocity curve the KPI ranks and how we can stimulate a similar response with our strength movement. Continuing with the example above, we know with a vertical jump that the velocity will be upwards of 1m/s and be on the “speed-strength” end of the spectrum. With that being said, we also know what we need to improve with our strength movement. Ideally this would be done with some form of bar velocity tracker to guide us, even if it is just a phone app.

VBT Zones
Figure 3. Velocity zones commonly applied in velocity based training.


One thing to note: since I may want to get an athlete to perform at a certain percentage at a certain velocity—again to work backwards—obviously improving absolute ability/strength will also help us get there. But, keeping in mind my KPIs, I may not want to stray too far down that rabbit hole depending on where that athlete falls in their training age. I may want to improve a novice athlete’s absolute strength; contrarily, with an intermediate or advanced athlete, I may want to improve power output instead.

Step 3: Energy Systems & Volume

To recap, we have established what movements we will use and what velocities we need to work at and improve upon. Now, our next step is energy system development—which can be worked on both in the weight room and on the field. Knowing the average length of a play for a defensive back is 7-10 seconds, and that they will get anywhere from 30-45 seconds rest between plays, I have my layout for my reps and rest laid out for me already.

How do we decide volume? Personally, I have had a lot of success using Prilepin’s chart to guide my volume parameters for the main lifts (which you can find a copy of HERE). If you look at the chart, you can estimate that 7-10 seconds of work can be 3-5 reps per set, and I know my percentages from my velocity curve so it is now simple plug and play.

I tend to look at the 70-75% and 75-80% ranges as the main ranges you will be working in for my main lifts. So to add to our example, I may program:

  • Front Squat 5×3@75% with 45s Rest

I am hitting my velocity requirements, my percentage requirements, and finally my energy system requirements to help improve the performance indicator and energy system development.

As a bonus, HERE is a chart of metabolic pathways to use to help you decide what may be best for your athletes. By observing the athlete’s sport, you can see how long a bout may be and then time how long their rest is to find out where on the chart they fall.

One thing to note: I am not ignoring the fact that athletes can benefit from different conditioning/metabolic abilities, I am simply focusing on the main metabolic component of a specific sport and/or position. I have found that training in this manner helps athletes improve in the specific metabolic pathway of their sport and position.

Why KPIs?

The number one reason I would suggest using a KPI for your athletes is it allows for you to train specifically for a general adaptation. To use our example from throughout this article, if I know that I want to improve an athlete’s vertical jump because that will transfer on the field, I know what movements and percentages to work at. If I know the energy system my athlete will be playing in, I can decide what work-to-rest ratio they should be working in.

If I know the energy system my athlete will be playing in, I can decide what work-to-rest ratio they should be working in. Share on X

In addition to using KPIs to guide programming decisions, as strength and conditioning coaches, creating buy-in from our athletes is one of the most important pieces of running a successful program. We need to make sure we are delivering on everything we say we are—if you preach results, you must get results. In order to show those results to your athletes, you must have a system in place to identify how you are going to deliver the goods. In closing I will leave you with a quote from Maya Angelou that I think best sums up why KPIs are essential:

“If you don’t know where you’ve come from, you don’t know where you’re going.” — Maya Angelou

Since you’re here…
…we have a small favor to ask. More people are reading SimpliFaster than ever, and each week we bring you compelling content from coaches, sport scientists, and physiotherapists who are devoted to building better athletes. Please take a moment to share the articles on social media, engage the authors with questions and comments below, and link to articles when appropriate if you have a blog or participate on forums of related topics. — SF


Podcast cover for Just Fly Performance Podcast featuring special guest Chris Chase, Director of Performance for the Memphis Grizzlies. The design includes a microphone icon and a winged logo on a black background.

Episode 127: Chris Chase

Joel Smith: Just Fly Performance Podcast, Podcast| ByMark Hoover

Podcast cover for Just Fly Performance Podcast featuring special guest Chris Chase, Director of Performance for the Memphis Grizzlies. The design includes a microphone icon and a winged logo on a black background.

Chris Chase is in his third season as the Director of Performance for the Memphis Grizzlies of the National Basketball Association. Chris has previously served in similar roles with the NBA’s Atlanta Hawks. Prior to his time in the NBA, he was a strength and conditioning coach at the University of Southern California and the University of Rhode Island, where he worked with a variety of Olympic sports.

Chase holds a Bachelor of Science degree in Exercise Science from the University of Connecticut and a Master of Science degree in Strength and Conditioning from Springfield College, and he is certified by the National Strength and Conditioning Association as a Certified Strength and Conditioning Specialist.

Chris gives us an overview of how an NBA performance coach must develop a system for the needs of each individual athlete. He delves into his go-to training methods and means for keeping his NBA players as healthy as possible while minimizing their risk of injury. He discusses how the Postural Restoration Institute has influenced his squat progressions as well as his approach to speed and movement programming.

In this podcast, Coach Chris Chase and Joel discuss:

  • How the role of a strength coach varies in the professional level from the college level and below.
  • Barbell training at the NBA level.
  • The menu of exercises he has developed for use with NBA players.
  • Weighing health concerns of the athlete versus KPIs.
  • How the machines he uses are specific for his athletic population.

Podcast total run time is 1:07:20.

Keywords: NBA, basketball performance, PRI, professional sports


Stationary Biking

10 Creative and Fun Recovery Day Sessions for Track Athletes

Blog| ByNoah Kaminsky

Stationary Biking


Recovery practices are a necessity in any well-planned program, but coaching them can often be incredibly hard. Sprinters want to get out and race, distance runners always have more gas in the tank, jumpers want one more jump, and throwers want to best their previous mark. As coaches, we have to admire their love for training. But we also have to be the person to say that’s enough, practice is over.

Coaches have a responsibility to educate their athletes on the importance of recovery. High intensity or high volume practices days before a competition do not prepare athletes for great performances. Without adequate recovery from their toughest workouts, athletes will continue to fall short of expectations. Athletic programming must create time and space for the central nervous system to recover after high intensity or high volume work.

From a coaching standpoint, I find recovery workouts challenging, too, because their reputation precedes them: the sessions are known for being either too easy or too short. If they’re too easy, athletes often disengage or give less effort than required. If they’re too short, athletes may not even bother to show up. The next day they might reconcile this decision by telling you that they had a lot of homework, and this may even be true—but it does not excuse skipping a recovery practice.

Before you judge young athletes for their values, it might be a worthier pursuit to first reflect on your practice designs.

Turning Less into More

If you expect athletes to do what you say because you’re their coach, I suggest taking a step back and rethinking your approach. Athletes are complex, multidimensional individuals—not just warm bodies. When you treat them as complex individuals, coaching gets easier, not harder. Coaching has always included your ability to develop athlete buy-in in addition to cultivating great performances. If you want to read more about how to develop buy-in from multidimensional athletes, Brett Bartholomew’s book Conscious Coaching is a good place to start. It was the first coaching book that challenged me to consider my own attitude, tone, and expectations.

Any coach can design an easier workout. That doesn’t mean their athletes will understand the value of reduction. To the young athlete, fewer drills, slower speed, or fewer attempts sound like worthless practice. We know that recovery isn’t worthless, but athletes may not understand our motivations or reasoning. When they ask for the first time, just tell them they won’t want to miss out. When they get really inquisitive, you can explain why doing less work on one day produces better results and higher quality on another. Coaching is and always has been an obligation to education—for athletes, for their families, and for ourselves.

With less work to get done in a recovery session, there's more opportunity to embed fun into training. Share on X

I don’t view recovery as a limitation but instead as a liberation. With less work to get done, there’s more opportunity to embed fun into training. Whether your recovery session encompasses technique, flexibility, or fitness, you’ll never overcome too easy or too short unless your session is fun.

Here are ten engaging recovery workouts that I use.

1. Throw & Go!

For sprint recovery, instead of 6x200m at 75% pace, play Throw & Go on your school track. Give a pair of athletes a harmless foam ball. Instruct them to take turns throwing the ball and sprinting to retrieve it. Then they can throw for their partner, repeat the sprint. This is a great activity on a very windy day because lightweight balls will roll all over the place. Just remember to wear proper clothing for a windy day, and don’t let the throwers practice that day! Sprints should be paced appropriately for recovery.

2. Calisthenics Hide & Seek

Why not embed a calisthenics strength circuit into a game of walking Hide & Seek within your school building? It’s different and oddly fun. Split your team into halves. Seekers should complete two circuits while their teammates hide; when found, all athletes complete two more circuits and the roles switch. You can iron out the finer details based on the space available or create your own variations. You can use isometric or plyometric exercises for the circuit as well.

3. Shotty Hoopla

For a thrower’s technical recovery session, spread hula hoops on the ground at moderate distances and assign point values to each hoop. Let your throwers compete for points, not the farthest throw. This game will support their coordination and reduce stress. I suggest limiting the number of throws taken in a single round. Again, you can change the rules however you think meets the needs of your athletes—just be mindful that your hula hoops will get a bit beat up.

4. Formation Running

Formation running is a great way to support your distance runners with strategy for a cross country race or the 3k. Identify a few shapes, like an arrow, circle, or square, and have your distance runners make these formations while they go on a long slow run. Silly formations are welcome, too. Coordinated formations are a great way to box out the best opponents in the early part of a race. If it can be done at slower paces, it should be possible at race pace as well. Formation running has both aerobic and strategic value.

5. Normal Yoga or Silly Yoga

Host a yoga session—you can find plenty of instructional videos on YouTube, or maybe your school has a certified instructor on staff. Use whatever resources are available. Yoga de-stresses and offers athletes an opportunity to test their limits safely. If you want to make it more interesting, do yoga with funny faces. Adolescent athletes will inevitably laugh at their own inflexibility. Let the first athlete who laughs take over leading the session until the next person laughs. For silly yoga, I suggest establishing the rules ahead of time; otherwise, it might seem punitive, which is not the intention.

Funny Yoga
Image 1. Yoga lessens stress and lets athletes test their limits safely. To make it more fun, do the poses with silly faces.

6. Cycle TV

If you have the space and the equipment, put everyone on a 20-minute easy bike ride in your fitness center and show them your favorite distance race from a previous World Championships or Olympic Games. Show your athletes any of your favorite athletic performances.

7. Isometric Connect Four

Play Connect Four with isometric holds, like wall-sits, planks, or kettlebell carries. Split your athletes up into two teams and set the time to 60 seconds initially. For kettlebell carries, begin with 30 meters. Add time or distance for each subsequent set. If someone loses their hold or drops the weight, they do not place a piece on the Connect Four board. Play until one team wins!

8. Tag (or any variation)

For a sprint recovery practice, play tag or any of its variations. I like Everybody’s It or walking tag. We always forget how fun tag is until we play it again, and you only need 10-15 minutes total.

9. Cone-Flipping Game

Scatter plastic cones across an open space, like a multi-purpose classroom or a field. Turn half of them upside-down. Assign upside-down to one athlete and right-side-up to another athlete. Give them three minutes to see who can orient more cones according to their assignment. You can do this with as few as two or as many as six athletes. Be careful to avoid knocking heads.

10. Bridges Run

Send your athletes on a long, slow run. They can’t return until they’ve crossed ten bridges in the local area. If that’s too challenging, then reduce the number of bridges, or change the task. Collect a leaf from five different tree species, get a drink from five public water fountains in the park where you run, etc. Whatever task you assign, make sure they can do it in a reasonable amount of time.

Every Sport Requires Recovery

These workouts apply to other sports, too. I’ve seen too many basketball and soccer teams flop on the big day—my own soccer team included—because they didn’t know how to back off and plan rest into their schedule. Recovery workouts provide an opportunity for athletes to access techniques without burning out their CNS or surpassing their minimum effective volume.

By now, I hope it’s clear how many possibilities are available to increase engagement among your athletes on the days that used to be a drag. Whether your recovery session encompasses technique, flexibility, or fitness, you’ll never overcome too easy or too short unless your session is fun. Track and Field, though we love it, isn’t always the most exciting day to day. Fun practices build buy-in and keep athletes on the path to better performances.

Fun recovery practices build buy-in and keep athletes on the path to better performances. Share on X

In “Fun and Games? Myths Surrounding the Role of Youth Sports in Developing Olympic Champions,” Daniel Gould and Sarah Carson state that “children need coaches who are trained to be positive and encouraging” because “young athletes who play for such positive and encouraging coaches” demonstrate “higher motivation, enhanced self-esteem, lower anxiety, and lower dropout rates than children who play for coaches without these qualities.” As our training theories emerge from the dark ages of pushing through fatigue, we must adapt our practices to emphasize the athlete’s experience. Gould and Carson make our mandate pretty clear. The greatest thing a coach can transfer to their athletes is not success in performance: it is love of sport. Everything else falls out of that.

My new programmatic feature for recovery day is fun. What’s yours?

Since you’re here…
…we have a small favor to ask. More people are reading SimpliFaster than ever, and each week we bring you compelling content from coaches, sport scientists, and physiotherapists who are devoted to building better athletes. Please take a moment to share the articles on social media, engage the authors with questions and comments below, and link to articles when appropriate if you have a blog or participate on forums of related topics. — SF


References

Daniel Gould and Sarah Carson, “Fun and Games? Myths Surrounding the Role of Youth Sports in Developing Olympic Champions,” Youth Studies Australia 23, no.1 (2004).

Athletes in Weightroom

A Case for Olympic Lifting in High School Athletics

Blog| ByJuwan Griffith

Athletes in Weightroom

Speed, strength, power, and performance—these facets of sports are the foundation and root of athletic development. As a strength and conditioning coach, my goal is not only to make our athletes bigger, faster, and stronger, but to also make them better movers in time and space.

With many of the high school athletes I work with—predominantly football players—a common trend I see in sprint mechanics is the inability to reach triple extension during the acceleration phase. In order to become better movers, athletes need to learn and understand their own bodies: how what feels good and what does not will respond with their bodies. This concept was further emphasized in a podcast with a coach I respect, Cam Davidson (Director of Performance Enhancement at Penn State). He and Mark Watts from EliteFTS were discussing how Davidson’s approach to training athletes is based off making the athlete “feel” everything, such as feeling that weight at the bottom of a 3-second pause squat or feeling the eccentric load on a bench press.

In some capacity, we all coach our athletes to have a feel for the game. I believe we can apply that same concept in weightlifting that Davidson demonstrates in his training methodology.

In some capacity, we all coach our athletes to have a *feel for the game.* I believe we can apply that same concept in weightlifting, says @debadJuJu. Share on X

Transfer to Performance

Whether jumping repeatedly for a rebound in basketball or taking that penultimate step into a spike in volleyball, athletes across different sports need to be explosive. The question becomes: what is the most effective way to train explosiveness in the weight room? The answer must keep in mind that what we do in the weight room also needs to translate to the athlete’s specific sport.

Varsity House
Image 1. The Varsity House facility in Orangeburg, New York.


For high school athletes, many coaches use sprints, jumps, and throws to build explosiveness. While jumping, sprinting and throwing are all vital movements, I would argue that—done correctly—Olympic lifts can also play an effective role in improving a high school athlete’s peak force, rate of force production, and explosiveness.

Most young athletes do not begin Olympic Lifting until college, but the benefits are incomparable. At West Point, Coach Tim Caron (also co-founder of Allegiate Gym in Redondo Beach, CA) was my first collegiate Head Strength Coach. Coach Caron’s summer manual for incoming athletes at West Point included basic Olympic lifting movements, such as snatch pulls and block cleans. In 2013, the first time I saw Coach Caron’s manual, I told myself if you want to be great, you need to hone these skills.

In line with that affirmation, many of us on the Army football team who were great lifters also understood how to translate that power to the field. We had players snatch 250+ and clean 300+ with great form and technique, and I eventually became one of them. Coach Caron’s ability to create a self-correcting environment every time we hit the platform bred a team culture where we all continued to refine our lifting technique, which in turn made me a better Olympic lifter.

Relative to sport, Olympic lifting has the ability to train bracing ability and force development, while at the same time promoting neurological adaptations and creating novelty in programming, says @debadJuJu. Share on X

Relative to sport, Olympic lifting has the ability to train bracing ability and force development, while at the same time promoting neurological adaptations and creating novelty in programming. All of these are avenues worth pursuing in developing high school athletes.

Bracing Ability

Bracing is one of the most important skills to hone in athletics. Knowing when to brace and when to relax through a lift or in sprint builds coordination within the body. Diaphragmic breathing is key when learning how to brace. The ability to fill the diaphragm and create tension within the body will stabilize it when handling heavy loads.

On the set up of a clean, for example, an athlete creates tension on the bar by filling their belly with air. Performing a clean requires the athlete to:

  • Move from a tight position
  • Gradually increase speed on the bar
  • Explode and catch the bar in a front rack position

From the floor to the moment before the athlete performs the clean, the athlete is constantly tight while keeping tension within their body and contracting their muscles. The moment the athlete cleans, their body cannot be completely rigid and in a contracted state on the catch because the athlete:

  1. Will not have enough relaxation to catch the weight with heavier loads
  2. Will lose bar whip on preparation for the jerk

This is where, at the split-second the clean occurs, the athlete has to allow the body to relax in order to allow the body to give on the catch in the front squat position and then contract again when performing the front squat. The catch portion of the clean is where bracing development occurs, because the body has to be in a strong position to receive the weight of the barbell. The timing of the back and forth between contraction and relaxation during the clean makes those neurological connections of when to brace and when to relax.

The ability to rapidly undergo extension and flexion will allow athletes to improve their agility  (which can be defined as the ability to accelerate and decelerate constantly). Athletes in cutting sports, such as football and basketball, often need to run to a spot at full speed and decelerate quickly to then move to the next spot. The same concept can be applied in a clean and a snatch. The transition from accelerating the bar from the floor to decelerating the bar on the catch, to then accelerating the bar on a jerk demands coordination from the brain to the body and the muscles needed to complete the lift. This coordination also emphasizes where exercises performed in the weight room translate to their actual athletic performance.

Force Development

Force is a factor in every sport, such as the amount of force an athlete can produce to hit another player on a football field or how much force they can produce to smack a baseball out of the park. One of the seven power development factors is rate of force development (RFD), which, according to Owen Walker, is a measure of explosive strength and how fast an athlete can produce force.

The ability to create force under load at rapid speeds allows for the athlete to improve the other abilities needed in their sport, says @debadJuJu. Share on X

The ability to create force under load at rapid speeds allows for the athlete to improve the other abilities needed in their sport. Most well-trained athletes that incorporate Olympic lifting into their programming yield better results on their jumps, sprints, and throws. Olympic lifting tends to create more explosive force in comparison to other bilateral lifts, such as a back squat or a deadlift due to the ballistic speed on the bar.

Force Velocity Curve
Figure 1. The force-velocity curve (FVC): Where force is high, velocity is low, and vice versa.


Now, as strength and conditioning coaches, we all know that building the perfect athlete is near impossible. It is our role to evaluate our athletes and then strengthen their strengths and correct their weaknesses so that they have the abilities needed to perform at a high level.

As an example of this process, I am going to use one of my athletes and some of the factors I considered to determine whether or not he was ready to learn how to snatch. Aidan is a 5’11”, 170 pound, 16-year-old soccer player at Don Bosco Prep. One of the first steps for his evaluation to see if he’s ready to snatch or clean is based off the same evaluation test USA Weightlifting uses, which is the ability to:

  • Front Squat
  • Overhead Squat
  • Snatch Deadlift
  • Overhead Press

When I first started training the athlete, he had little to no thoracic mobility in his upper back, which I knew would be an issue. Aiden did, however, naturally understand a skill that I believe is one of the most difficult patterns to teach a high school athlete: how to hinge. Hinging in the snatch is key to ensure not only explosiveness throughout the lift, but safety from injury. At first, I was not inclined to train him in Olympic lifting, but after doing specific work and corrective exercises to free his upper back, I slowly began teaching him how to snatch.

After an 8-week progression of snatching (along with other compound lifts), Aidan was able to comfortably power snatch 95 pounds without failure. That he can snatch is an accomplishment in itself, but more importantly, his sport coaches have noticed an increase in his burst and explosion during sprints. His ability to put force in the ground has directly translated from the platform to the soccer field.

The force-velocity curve is a physical representation of the inverse relationship between force and velocity, and how both factors intertwine. When evaluating Olympic lifting and programming for high school athletes, the goal is to complement their movements with the exercise done in the weight room. For an outside linebacker in football, my mindset would be to program upwards on the strength-speed spectrum, whereas for a triple jumper I would program more with speed-strength in mind.

Neurological Adaptations Through Timing

As I briefly mentioned earlier, the timing and technique portion of Olympic lifting requires a cognitive connection from the brain to the applied muscle groups. According to Joel Smith, the qualities of a fast athlete are to be strong, elastic, coordinated, twitchy, extensible, and fast-twitch dominant.

To build upon this, Olympic lifting allows for the development of powerful rhythm, which correlates to acceleration or jumping. In order to build the rhythm necessary to jump, sprint, or lift, athletes need to make the neurological connections within their body to allow for optimal performance. The ability to escalate force is critical in performing smooth, coordinated lifting movements. The timing built into performing a clean builds upon the aspect of developing the brain from the first pull, to the second pull, to the catch.

The timing built into performing a clean builds upon the aspect of developing the brain from the first pull, to the second pull, to the catch, says @debadJuJu. Share on X

One of my football athletes, Leo, began cleaning prior to when I started training him. The biggest issue Leo had was exploding from the hips and into the catch. Because his hip contact was too low, the bar would move away from him and he was not able to perform heavier cleans. To correct his timing issues, I had to go back to refine his technique by performing high hang clean pulls. By emphasizing the pulls, I was able to ingrain in Leo’s mind when to make contact with the bar to properly perform a clean. Once again, my goal is to translate weight room qualities to the field. Leo’s ability to refine his timing on a clean has helped him be more explosive as a defensive lineman, allowing him to explode through the hips and drive more force into the ground for a more powerful push versus his opponents.

What is the Point?

A lot of science, technical terms, and concepts have been thrown at you, and perhaps you are asking yourself what’s the point? Most high school athletes have never seen the inside of a weight room prior to their freshman year. They are at a very young training age, and to me, that is an amazing opportunity to develop good training habits to build upon.

I want to reiterate, I am not saying that Olympic lifting is the end all, be all and I truly believe in jumping, sprinting, and throwing. However, my case is that adding Olympic lifts into the training programs for high school athletes will improve their sports performance on the field.

Furthermore, I believe that exposure creates experience and to not shy away from the inevitable. Most high school athletes that move to the next level in their sport will, more likely than not, have to Olympic lift. Why not coach and train those movements and patterns at a young training age over the course of four years in high school to provide the best movements in our athletes? As coaches, we need to stop using the excuse that “it’s too time consuming” and “it’s too technical to teach” as pivotal points for not coaching Olympic lifts. We are strength and conditioning coaches, in this field by choice, and if there is a consideration to improve our athletes at the high school level, then we need to exercise that autonomy and use our knowledge to complement their programming by adding Olympic lifts.

Teaching a young athlete how to clean or snatch demonstrates your ability as a strength and conditioning coach to actually coach rather than be a drill coach and put your athletes through cone drills.

Final Thoughts

High school sports are arguably the best time in an athlete’s career to build proper habits. It makes sense to me as a coach to provide my athletes with the tools needed so that they are capable of being better movers on the field. I want to provide the athletes I coach with programs that build upon the basic levels of movement for their given sport, whether that is sprinting a 100m dash or breaking a cut for a touchdown. Athletes that incorporate a new stimulus and variety of lifting (Olympic lifting) will be able to build their athletic base to propel them for better performance in their jumps, sprints, and throws, which in turn will increase their overall performance.

Since you’re here…
…we have a small favor to ask. More people are reading SimpliFaster than ever, and each week we bring you compelling content from coaches, sport scientists, and physiotherapists who are devoted to building better athletes. Please take a moment to share the articles on social media, engage the authors with questions and comments below, and link to articles when appropriate if you have a blog or participate on forums of related topics. — SF


References

Ratelle, Will. “A Case for Training Olympic Lifts in College Athletics.” SimpliFaster.

Walker, Owen. “Olympic Weightlifting.” Science For Sport.

Smith, Joel. Speed Strength.

Larsen, Amber. “The Neurological Benefits of Clean and Snatch Complexes.” Breaking Muscle.

Barbell Training Wayland

Why We Need Barbell Training More than Ever

Blog| ByWilliam Wayland

Barbell Training Wayland

Barbell training matters more than ever.

When gyms reopen and things go back to “normal,” the barbell will summarily return to prominence. A steady diet of bodyweight workouts, 5K runs, and anything that can be done with a kettlebell or dumbbell that’s appropriate in a confined living space will have athletes and the general population running back to the rack. Why? Because athletes need stress to grow, and we haven’t found better ways to apply stress. If we had, we’d be using them by now.

It’s easy to promote research about how training cessation of two, four, and nine weeks don’t affect maximum strength levels. But this is a simple, small-world comparison. Strength, while important, is not wholly about decelerative qualities, coordination, and tissue robustness. I’ve found cessation of training and the subsequent detraining to be a rather idiosyncratic process. Some athletes seem marginally unaffected, while others see pretty rapid decreases in only a short space of time. What this current time off from training means to athletes varies on a case by case basis.

I recall Dan John writing, “Off the top of my head, I would suggest that a hard training individual take about six weeks off a year. And, I mean off: no basketball tournaments, no aerobics classes, nothing. Now, the sad thing is this, basically, those of you who do not train hard just decided to take the next six weeks off. Those who train hard will take those six weeks off when they are dead. I never understood taking time off until far too late in my career. ”

The inability to train is a nightmarish ordeal for most athletes. They will want to lift, so what is the plan or the strategy, asks @WSWayland. Share on X

For most athletes, the idea of training cessation is a nightmarish ordeal when one’s identity is wrapped up in being an athlete. Having research that tells them they won’t get “much” weaker is little solace when facing something emotive like training status. Athletes will want to lift, so what is the plan or the strategy? Well, prudence tells us one thing. It’s better to underestimate an athlete’s physical preparedness by a lot than overestimate by a little (Mladen Jovanovic).

Prudence tells us one thing: it's better to underestimate an athlete's physical preparedness by a lot than overestimate by a little, says @WSWayland. Share on X

The payoff is not symmetrical. To paraphrase Kier Wenham Flatt, those who go in hard at week one will probably end up sipping on “sappucinos” the rest of the season. We know sudden spikes in training load increase injury risk, and that chronic dosing protects against it. It’s equivalent to a fighter feeling out his opponent rather than rushing in and catching a flying knee. We need to get athletes to a point where they can do the dance of training once more.

There will be an understandable situation of potential weight room stratification between the haves and have nots of the home training world. We’ve seen plenty of social media evidence that some athletes have beautiful home gym set-ups. This is all well and good for a multimillionaire athlete, but not much help to an amateur Olympian living in a central city apartment. In individual sports like golf and combat sports, I deal with athletes on a case by case basis. When my local rugby team steps back into the facility, I know it will be better to take Mladen’s overcautious approach.

Methods to Get Athletes Back in the Rack

I was going to write an article covering my general physical preparation (GPP) approach, but Jacob James of Crusader Strength posted an article that’s pretty close to my own Cal Dietz-inspired twist on this set-up. Also worth checking out is Rachel Hayes’ post covering the intent of GPP even in specialized athletes. My aim is not to write another GPP article. Athletes will want to resume barbell work, especially those who trust it and understand its value in their efforts to return to strength.

Athletes will want to resume barbell work, especially those who understand its value in their efforts to return to strength, says @WSWayland. Share on X

The first step will be to get the measure of the individual. It’s simple to assume weakness, but surely a better approach is to measure it. I suggest two key strategies that I plan to employ. First is some sort of max strength testing with nearly no technical overhead. Something simple like an isometric mid-thigh pull belt squat iso that Carl Valle has demonstrated on Twitter would be ideal. If we can get the measure of an athlete in a time-efficient manner, we can plan accordingly. This test, however, is somewhat redundant if you don’t have decent pre-training cessation measures, but it will still act as a baseline.

Second, use VBT to monitor submaximal testing of some variety on your preferred KPIs. The beauty of this approach is that velocities dictate loading rather than using loading alone as a performance measure. You can then keep using VBT measures over the acute introduction to training into the chronic training phase.

Stimulate—Do Not Annihilate

I plan to employ the GPP Sandwich, which involves working to an everyday maximum (EDM). What is EDM, and what is it not?

Competition Maximum (CM) is a level of performance achieved under a major arousal of the competition. For some athletes this arousal might be too much, so the CM can be lower than Training Maximum. But generally, CM is the highest level of performance, in this case 1RM.

Training Maximum (TM) is a level of performance that can be achieved in training conditions. It still needs some arousal, but not as much as in competition. This is the level of performance when you put your favorite death metal track, ask for assistance and cheering from your lifting partners, ask for hot chicks to watch and slap yourself few times. It is “balls to wall” as it can be achieved in training conditions.

Every Day Maximum (EDM) is a level of performance that you can achieve without any major arousal, music or hot girls in the gym. Something you can lift by just walking to the gym, and listening to Mozart. Hence the name “every day maximum.”—Mladen Jovanovic

EDM speaks to the idea of “raising the floor”—that most of the progress you make will come from submaximal training at submaximal intensities rather than aiming for regular training spikes. How do we apply this in a gym setting? Simply get the athlete to work a single maximum on any KPI lift. There should be no arousal intensification strategies, no triple espresso, no thrash metal, and no back-slapping. The athlete then moves on to whatever GPP strategy you had planned.

The everyday maximum approach gives athletes the freedom to show they can push themselves and be constrained, says @WSWayland. Share on X

The strategy has two purposes: safe working maximums to give you something to work off and something the athlete can chew on that isn’t just GPP. Making athletes feel strong is a useful tool in training resumption. The key is keeping athletes on a tight leash while treating them like grownups. Much of the conversation that’s surrounded athletes’ return to sport treats them like training automatons. The EDM approach gives them the freedom to show they can push themselves and be constrained.

GPP Sandwich
Table 1. General physical preparation sandwich using the everyday maximum approach.


Finishing sessions with extended yielding isometrics is a great way to encourage muscle growth and tendon health. I took this method from Christian Thibadeau: “2-3 sets of 45-75 seconds at the position where you can create the most tension in the target muscle. Don’t just hold the weight, flex the muscle as hard as you can.” The mixture of loaded stretching and yielding isometrics at the end of a session leave the trainee feeling worked but with minimal blowback. The mechanisms Christian suggests are:

  • It’s effective at activating mTOR, which triggers protein synthesis.
  • It’s (with occlusion training) the best way to increase the release of local growth factors because it combines muscle hypoxia (lack of oxygen) due to the constant tension and stretch (both reduce blood flow and oxygen entry into the muscle) and large lactate accumulation.
  • When used for the proper duration (45-75 seconds) or at the end of a set, it creates significant muscle fiber fatigue.

Hand-Supported Squatting

You would not expect an article from me without mention of hand-supported movements. Submaximal hand-supported squatting is one of the return to play (RTP) protocols I use with injured athletes, and it definitely fits the bill here. Cam Josse once described it as “a great way to feel strong again.” Generally, the hand-supported squat tacks at about 120-125% of your back squat maximum. The RTP protocol I use is to program hand-supported maximum the same as 100% of the back squat. The athlete gets to move load and train in what feels like a normal loading arrangement. We get lower loading in real terms, but we get to groove the squat pattern, allowing the athlete to “feel” load for a few weeks before moving on to conventional barbell work.

Hand-supported squats let athletes groove the squat pattern & *feel* load for a few weeks before resuming conventional barbell work, says @WSWayland. Share on X

Hand-supported squats also reintroduce compressive forces that may have been missing for a while—something you won’t find doing bodyweight squats or overhead squats with a mop. Another approach is a volume and range method. Use moderate loads, usually 50-60% of HSS max, and perform 15-20 reps of full range of motion squats allowing for full hand assist on the way up and down.

Wayland Hand Supported
Table 2. Hand-supported squat program for return to play.

EDM and Walk Away

Another acute approach I like after a training break is building volume into the EDM concept. Linearity gets a bad rap—for acute training, it can serve as a smooth slide into conventional training. The athlete performs an EDM single and, on subsequent days, builds volume via back-off sets. In subsequent sessions, you perform back-off sets from your EDM, taking off 10-20% and perform a double and linearly build volume over just two weeks before moving to a more conventional approach. This somewhat borrows from an old Dan John approach I once used performing 1-2 sets of double on my front squat at 80% for two weeks.

Also, try front squatting at the start of EVERY workout for a week or two. Nothing crazy, maybe two sets of two, with around 80%, then a single at some higher weight. Some of us need the “Nervous System Stimulation.” I just invented that, but it seems to help. The way to learn a language is to immerse yourself into it, perhaps you need to immerse yourself in your legs.—Dan John

Nervous system stimulation is right, as the idea is to groove the squat at reasonable load but without exhaustive levels of loading. We can apply the same principle to any lift. The ethos running behind this is: stimulate do not annihilate. I suggest building up to no more than 3-4 sets in the 2 weeks. Alternatively, use a velocity measure to track drop off on the back-off sets—something like a 5-10% threshold should do it, using the best rep as the baseline.

Wayland Volume RTP
Table 3. Building volume into the everyday maximum approach.

Wayland VBT
Table 4. Using velocity measurements to track drop off on the back-off sets.


Since you’re here…
…we have a small favor to ask. More people are reading SimpliFaster than ever, and each week we bring you compelling content from coaches, sport scientists, and physiotherapists who are devoted to building better athletes. Please take a moment to share the articles on social media, engage the authors with questions and comments below, and link to articles when appropriate if you have a blog or participate on forums of related topics. — SF


References

1. Fabio Sarto, et al., “Impact of potential physiological changes due to COVID-19 home confinement on athlete health protection in elite sports: a call for awareness in sports programming,” SportRxiv Preprints, April 22, 2020.

2. Dan John, “The Front Squat,” (blog).

Womens Volleyball Players

Beyond ‘Go’: Adding Sensory Cues to Train Agility in Team Sports

Blog| ByWill Ratelle

Womens Volleyball Players

As strength and conditioning coaches, our job is to prepare the athletes we work with for the demands of their sport. We do this by loading their musculoskeletal systems in the weight room and by training their neuromuscular systems to be efficient in communicating from the brain to the spinal cord and out to the motor neurons controlling movement. I work with volleyball, basketball, and tennis players who need to be fast in getting from point A to point B, and then from point B to point C—but Point B continually changes, and point C continually changes as well.

Athletes can’t make a decision about how to get to each point without having an ability to adjust on the fly and change their path, says @will_ratelle. Share on X

Therefore, these athletes can’t make a decision about how to get to each point without having an ability to adjust on the fly and change their path. Their path will most likely change with every step they take. Not only will the direction change, but the speed at which they move will change, the angle in which they push off of their toes will change, the height of their center of mass will change, and many other aspects of their movement will change.

Choosing Open vs. Closed Agility Drills

Sometimes athletes need to train with closed agility drills to get the basic motor patterns down, and sometimes athletes need to train in open environments and self-organize to find a way to succeed—when a real competition starts, that’s all that really matters.

The context will always matter when we make decisions about training an athlete, with questions like:

  • How old are they?
  • What is their training age?
  • What level of participation are they at for their sport or sports?
  • What are their goals?
  • Does their sport involve interactions with other humans? With a ball? With Both? Or other implements?

The answers to these points will affect the drills we utilize and whether we choose closed drills or open drills. The differences between the two types exist on a spectrum: closed drills involve completing a task within predictable and fixed settings, while open agility drills involve completing a task in a chaotic and dynamic environment. As coaches, we can always manipulate different variables within a drill or put constraints on drills to shift it toward one side of the spectrum or the other. We just have to make sure we do our job and choose wisely.

During competitions, athletes chase opponents, chase the ball, sift through traffic, avoid referees in the field of play, execute their own technical strategies, adjust to the opposing team’s tactics, and so on. During a standard agility drill such as the pro-agility, athletes start in the same position each rep and learn to develop the best strategy to achieve the best time possible. This is not to say that the pro-agility is wrong in any way; it just is a different stimulus, and it has its place.

So, when should a coach use a closed agility drill such as the pro-agility or t-test? The following are some contexts in which using a closed drill is appropriate:

  • Learning new movement patterns.
  • Emphasizing a specific quality of a movement pattern (technique, power output, application of force).
  • During a de-loading week that is not meant to be high-stress.

If there is a skill or a movement pattern in which an athlete needs to become competent, it is probably a good idea to practice that movement pattern without external factors disrupting the learning process.

If there is a skill or movement pattern in which an athlete needs to become competent, it is probably a good idea to practice it without external factors disrupting the learning process. Share on X

When and why to use an open drill:

  • Fun/novelty/engaging
  • More challenging
  • Include “game like” stimulus

Different Stimuli to Practice Open Speed and Agility Work

Our body gives us feedback by utilizing the five basic senses: sight, hearing, touch, taste, and smell. Theses senses allow us to react to our environment in ways that we see fit. Most sports require athletes to respond to visual stimuli, auditory stimuli, and touch stimuli. I’m not sure that many sports involve smell or taste (possibly, but I don’t know). Since athletes are required to react to their environment and these senses, it’s important to practice this in training.

1. Auditory Stimulus

In real life, athletes have to interpret some sort of call, whether it comes from an opponent or a teammate/coach, telling them where to go on the field or court. The auditory stimulus lets the athlete know how fast to run, where to run, whether to run at all or just stay put, or if they need to turn around or dive.

Since there are so many different ways that athletes need to react to this primary input, most training programs already incorporate an auditory stimulus with their athletes. At the beginning of many drills, there is a “go” call or some variation that their athletes respond to. I think if we can take this further, it isn’t difficult to come up with more sophisticated ways to give an auditory stimulus. It’s basically a verbal command to dictate a task to the athletes.

Simple enough: The following are just some of the ways I like to do it with my athletes. We can use these verbal commands consecutively throughout the repetition of the drill, so the athlete needs to be aware of their direction/path/angle the entire time.


Video 1. North/South Call. This is one of countless possible ways to add an auditory stimulus to an agility drill.

North/South—In Grand Forks, ND, it seems like everyone knows which direction is north. So when my athletes train outside, calling out “north” or “south” is a fun way to change up from the typical “right” or “left” call to begin a drill.

City/State—Instead of giving a direction or location for where an athlete should go, you can call out “Kansas” or another state, and based on that call, they have to understand where they need to go for their task. This is very similar to a lot of team sports that run set plays.

Numbers—This is probably a pretty common one. Odd numbers, for example, can mean going to one landmark while even numbers mean going to another. Coaches can obviously play around with this one as much as possible.

Colors—If you use colored landmarks like cones, you can call out the color of whatever cones you want your athletes to go to.

Names of athletes—If you do a drill that involves chasing/evading/racing, you can call out certain names of the athletes to “lead” the drill or become the “chaser,” which is a fun way to get your athletes engaged. This is also great for any version of the mirror drill, during which the athletes trade off who is the lead and who is the chaser.


Video 2. Acceleration drill with athletes responding to auditory, directional command.

2. Visual Stimulus

Vision is probably the dominant sense in sports, and in my opinion, the most important one to incorporate into drills. We read and react with our eyes more than with any other organ—we could play sports with a limited amount of hearing ability, but we couldn’t play in the same way with a limited visual capacity. Visual stimuli play a huge role in understanding where we are in space, where we need to go, where our teammates are going, where our opponents are going, and where the ball in play is going.

There are two major visual cues that athletes need to be able to read and make adjustments to:

  1. Other humans
  2. The ball/puck/other implements

Since team sports are only played with one ball in play and typically several other humans, you should include human interaction as much as possible while performing drills. Theoretically, the transfer in training will be much higher when athletes are forced to see and adjust to the environment rather than just running to a marked location that is pre-planned before the task has begun.

Since team sports are only played with one ball in play and typically several other humans, you should include human interaction as much as possible while performing drills, says @will_ratelle. Share on X

A typical form of visual stimulus given to athletes in drills is a coach standing in line and pointing in a direction for the athletes to go. Another is a coach standing in front of the athletes and just taking one hard step for the athletes to react to. While this isn’t by any means bad or wrong, it probably should be taken a step further. Research suggests that a real, live human interaction may have greater transfer to sports performance compared to an athlete reacting to a point or another non-sports-relevant visual stimulus such as a flashing light.1


Video 3. Cat and mouse games of chase add an open, reactive element to standard sprint drills.

Sprints can incorporate a visual stimulus by using cat/mouse games. Both athletes work on acceleration qualities, and one individual is at an advantage and one is at a disadvantage, all based on the constraints of the environment.

Mirror drills also seem to be effective for athletes across a range of levels and sports. A great thing about mirror drills is that you can add so many different variations and twists to make them more challenging.

  1. Basic mirror drill
  2. Mirror drill with limited visual capacity
    1. Using other humans
    2. Using implements
    3. The chaser facing away from the opponents
  3. 3-dimensional mirror drill
  4. Mirror drill through traffic
  5. Mirror drill with an end zone


Video 4. Mirror drill with chaser facing opposite.

Any competitive drill that has an offensive and defensive player has this visual stimulus. One example, with a higher level of difficulty, is a basic mirror drill but with more than two athletes performing it at once in the same space. This is especially good for defensive volleyball players, because to get into position to make digs, they need to read through a lot of traffic: teammates who are in front of them, fellow defensive players who are beside them and in their peripheral, and their opponents hitting the ball through the block of their teammates.

Basketball players are in a similar situation when trying to defend their man who is running through screens to receive the ball. In very little time, they need to recognize and understand whether to go over the top of the screen, to go underneath the screen, to switch the screen, etc. You can’t quantify how much information athletes are receiving in order to properly execute their responsibilities in any given situation.

3. Touch Stimulus

By now, it should be pretty easy to understand that the exact drills may vary from coach to coach, but you can still incorporate athletes having to feel out their space to understand where they need to position themselves. A drill you design that allows for a 2-on-1 or 3-on-2 situation can be great for incorporating touch. The advantaged group (with more players) can feel each other to cover the area they need to achieve success while the disadvantaged group (with fewer players) can do the exact opposite.

The exact drills may vary from coach to coach, but you can still incorporate athletes having to feel out their space to understand where they need to position themselves, says @will_ratelle. Share on X

An example of this could be two defensive players holding back an offensive player from getting up and running a sprint. The offensive player might start on the ground in a prone position, and when the drill begins they attempt to get up and sprint through a given area while the defensive players attempt to prevent them from getting up and running. This touch stimulus can be very powerful, contributing to the development of skills involving contact in sports such as football, basketball, hockey, rugby, and more.

Putting It All Together

If you can incorporate all three senses into drills, your athletes will benefit in the long run. This might only be undesirable for athletes whose reactions are too slow and so it becomes information overload, with the cognitive demand becoming too high (in which case they probably are not very good when it comes to playing their sport). And, on the other hand, if they aren’t very good at utilizing these senses to help them make decisions, they could probably benefit even more from practicing it in a deliberate way.

In many contexts, regressing athletes to where they only do the types of closed drills that don’t challenge their senses can actually make them worse. I don’t think athletes need to spend 3-4 weeks (or shorter or longer) performing closed agility drills before they are prepared to perform open agility drills. Do youth athletes need to wait until they perform at a certain level before they should train in open environments? Kids play dodgeball in gym class and jump off of jungle gyms during recess. They are already prepared for chaotic environments.

If you can incorporate the senses of sight, hearing, and touch into drills, your athletes will benefit in the long run, says @will_ratelle. Share on X

I think this is especially true for higher-level athletes in college and beyond. I do not think athletes need to be at a certain level of performance before they do drills in a chaotic environment, just like I do not think kids need to wait until they are at certain strength levels to perform plyometrics. If you watch kids at an elementary school recess, you’ll see they already do these things, including one of the most intensive plyometrics—depth drops from excessive heights off of a jungle gym. That in itself is an open drill, masked as a game that is fun for kids. Chances are kids are more robust, and their musculoskeletal system can handle these movements just fine and even recover from them much faster than college athletes and adults can.

My position isn’t that you should never use closed speed and agility drills in any situation. I think they have a place, absolutely. Closed speed and agility drills can be a great way to train speed and agility qualities during a de-loading period when we don’t want the athletes to accumulate too much stress and central fatigue. During a de-loading period, athletes can still get the benefits of technique and improving shin angles coming out of a cut, and they can improve on other specific qualities such as muscular power output because they have less to think about. Ultimately, most athletes could likely benefit from both closed and open drills—context and intent matter.

Since you’re here…
…we have a small favor to ask. More people are reading SimpliFaster than ever, and each week we bring you compelling content from coaches, sport scientists, and physiotherapists who are devoted to building better athletes. Please take a moment to share the articles on social media, engage the authors with questions and comments below, and link to articles when appropriate if you have a blog or participate on forums of related topics. — SF


References

1. Young, W. and Farrow, D. “The Importance of a Sport-Specific Stimulus for Training Agility,” Strength and Conditioning Journal. 2013;35(2):39–43.

2. McGarry, T., O’Donoghue, P., and Sampaio, J. Routledge Handbook of Sports Performance Analysis. 2015. Taylor & Francis Ltd.

3. Sheppard, J. M. and Young, W. B. “Agility literature review: Classifications, training and testing.” Journal of Sports Sciences. 2006;24(9):919–932. doi: 10.1080/02640410500457109

  • « Go to Previous Page
  • Page 1
  • Interim pages omitted …
  • Page 83
  • Page 84
  • Page 85
  • Page 86
  • Page 87
  • Interim pages omitted …
  • Page 164
  • Go to Next Page »

Primary Sidebar

FEATURED

  • Using Speed and Power Data to Bucket and Train Faster Athletes
  • Plyometric Training Systems: Developmental vs. Progressive
  • 9 (Fun!) Games to Develop Movement Skills and Athleticism

Latest Posts

  • Rapid Fire—Episode #15 Featuring Kyle Brown: What is Universal Speed Rating (USR)?
  • Why We Don’t Perform Hang Cleans
  • 1080 Sprint: Four Essential Tips You Won’t Find in the Manual

Topics

  • Adult training
  • App features
  • Artificial Intelligence
  • Athlete
  • Athlete performance
  • Baseball
  • Buyer's Guide
  • Career
  • Certifications
  • Changing with the Game
  • Coach
  • Coaching
  • Coaching workflows
  • Coching
  • College athlete
  • Course Reviews
  • Dasher
  • Data management
  • EMG
  • Force plates
  • Future innovations
  • Game On Series
  • Getting Started
  • Injury prevention
  • Misconceptions Series
  • Motion tracking
  • Out of My Lane Series
  • Performance technology
  • Physical education
  • Plyometric training
  • Pneumatic resistance
  • Power
  • Power development
  • Practice
  • Rapid Fire
  • Reflectorless timing system
  • Running
  • Speed
  • Sports
  • Sports technology
  • Sprinters
  • Strength and conditioning
  • Strength training
  • Summer School with Dan Mullins
  • The Croc Show
  • Track and field
  • Training
  • Training efficiency
  • Wave loading
  • What I've Added/What I've Dropped Series
  • Youth athletics
  • Youth coaching

Categories

  • Blog
  • Buyer's Guide
  • Freelap Friday Five
  • Podcasts

COMPANY

  • Contact Us
  • Write for SimpliFaster
  • Affiliate Program
  • Terms of Use
  • SimpliFaster Privacy Policy
  • DMCA Policy
  • Return and Refund Policy
  • Disclaimer

Coaches Resources

  • Shop Online
  • SimpliFaster Blog
  • Buyer’s Guide
  • Freelap Friday Five
  • Coaches Job Listing

CONTACT INFORMATION

13100 Tech City Circle Suite 200

Alachua, FL 32615

(925) 461-5990 (office)

(925) 461-5991 (fax)

(800) 634-5990 (toll free in US)

Logo of BuyBoard Purchasing Cooperative. The word Buy is yellow and shaped like a shopping cart, while Board and Purchasing Cooperative are in blue text.
  • Facebook
  • Instagram
  • Twitter
  • YouTube

SIGNUP FOR NEWSLETTER

Loading

Copyright © 2025 SimpliFaster. All Rights Reserved.