It’s no secret that acceleration capabilities and sprint speed are sought-after qualities for many field- and court-based sports. Since it seems to be so highly regarded by coaches and management (teams), we must develop a multi-pronged approach to develop speed. Many classical approaches in team sport have attempted to address speed improvements in the weight room, specifically through strength improvements. While strength can assist with relatively underdeveloped athletes and more force-end-of-the-spectrum athletes, this approach will only get you so far. Beyond initial strength improvements for the underdeveloped athlete, searching for speed improvements through strength gains may be futile.
The use of more potent methods in the weight room and during training is necessary for the continued development of acceleration and speed. To do this, it vital to understand what makes people fast, physiologically and technically.
The use of more potent methods in the weight room and during training is necessary for the continued development of acceleration and speed, says @john_r_grace. Share on XElite sprinters don’t sprint faster than team sport athletes by chance. Of course, things like genetics and specificity of training come into play. No one is really arguing that. It’s tough to max out one single physical quality like speed when many skills and physical qualities are at play in team sport success. Simply recognizing what makes the elite fast can have a trickle-down effect for team sport athletes.
Newton doesn’t care if you compete in soccer, basketball, football, or track. How you run fast is how you run fast.
Now, before everyone gets up in arms about this comment, there are other considerations and game situations that put constraints on the ability to execute speed with model technique. Spatial constraints can change the sprint technique the athlete has to adopt. The proximity of an athlete to an opponent or teammate, the need to change body position based on another’s movement, sprinting while simultaneously trying to put the body in a position to defend, etc.—these all can change the athlete’s sprint technique from model technique to a potentially more successful technique for that given situation. These ideas, though, are beyond the scope of this article.
Acceleration and Max Velocity Characteristics
The qualities that make an athlete a great accelerator are quite different than those that make a great top-speed sprinter. There is some carryover of acceleration qualities to maximal velocity sprinting, and vice versa, as sufficient levels of vertical force production are needed throughout an entire sprint. Additionally, longer, more efficient accelerations typically yield higher maximal velocities, but the physical and technical qualities needed to remain at maximal velocity are at separate ends of the same spectrum.
To start to put the sprinting puzzle together, take a look at the sprint characteristics of the elite sprinting population.
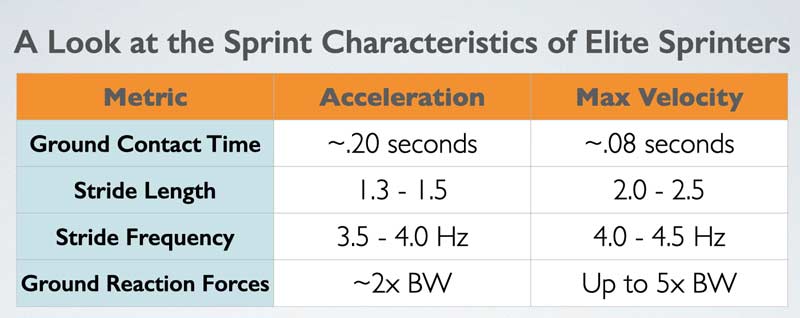
While sub-elite and team sport athletes don’t typically exhibit these elite characteristics, this table does give a glimpse into how the elite sprint fast.
Since we know that speed is the product of stride length and stride frequency, our initial assumption may be to dissect those two characteristics and aim to train those fairly directly.
On the surface, this equation leads us to believe that increasing stride length, stride frequency, or both simultaneously would be the surefire way to increase speed. From a purely mathematical standpoint this would be true. What we sometimes fail to recognize is that when we speak about increasing stride length or frequency, there is an underlying reason these elites have the stride parameters that allow them to sprint as fast as they do.
If we view stride length and frequency as the main drivers of speed and try to directly increase either one of them in an attempt to sprint faster, we could actually be turning an average sprinter into a bad sprinter.
Increasing stride length without a thought of its effect on the rest of technique will result in inefficient ground contact in front of the center of mass, says @john_r_grace. Share on XIncreasing stride length without a thought of its effect on the rest of technique will result in inefficient ground contact in front of the center of mass. Planting well in front of the center of mass will very likely decrease performances in speed, as well as put the athlete at a greater risk of injury (more on this later). This is also true when coaches and athletes increase stride frequency without consideration to other technical sprint characteristics. Think of the cartoon roadrunner spinning his (her?) wheels—super high frequency but going nowhere, and as a result, stride length deteriorates as a result of suboptimal force application.
There is an interplay between the two, but typically, when an athlete tries to increase one without regard to the other, the potential gain from doing so is negated by the drop-off of the opposing value. Oftentimes, the decrease in the opposing value is greater than any potential increase created. This means that when we attempt to increase one parameter, the athlete will often become slower.
So, where does this leave us?
When we look at other characteristics like ground contact times and force production, we also see elites exhibit seemingly impossible values. This leads us to the cause of speed and, in fact, successive improvements in stride length and stride frequency parameters. Rather than viewing stride length and frequency as two separate entities, we must look at how to improve one or both of these qualities without the other deteriorating significantly.
The most effective way to do this is to apply a large amount of force in the appropriate time constraints and in the appropriate directions.
With this in mind, increasing speed comes down to two main factors:
- Increasing technical proficiency in sprinting.
- Increasing physical qualities related to acceleration and maximal velocity sprinting.
Governing Principles and Sprinting Commonalities
There are commonalities in technique among the best at anything. It’s no coincidence that the best athletes exhibit similar technical execution in sprinting. Because technique is not the only thing to come into play, and genetics is another major factor in success, someone with suboptimal technique and superior genetics can still be faster than a technical wizard with suboptimal genetics. While you generally need a combination of genetics and great technique at the highest level, there are athletes with some major quirks who are anomalies.
It is important that we don’t look at the anomalies as an example, but rather, a range of competitors. The anomalies are always the ones who get mentioned when it comes to debating how important technique really is or what it should really look like. Many times, the technical quirk does not make them great (although it may); it is that their genetics and other physical qualities are great enough to overshadow the quirk.
Great sprinters all exhibit the same basic technique and then develop individual styles around their anatomical and physical constraints. This should be no different from team sport athletes.
Great sprinters all exhibit the same basic technique and then develop individual styles around their anatomical and physical constraints. This should be no different from team sport athletes. Share on XWhile the following are general hallmarks of good sprinting, it does matter what is happening in between them. Plus, if the athlete does not have requisite physical qualities, there may be deviations within these examples.
Governing Technical Principles of Acceleration:
General Leg Action: Piston-like. On first steps, at ground contact the opposite knee will punch forward with minimal cyclical action. The free leg thigh will block perpendicular or near perpendicular to the body, and the shin should be parallel or near parallel to the body. With each subsequent step the foot should “cycle” higher relative to the previous step.
General Arm Swing: Powerful through large ranges of motion. Front arm angle decreases and hand finishes near the eyeline as rear arm angle increases to near full extension and finishes above the body.
Posture: Once the initial push is complete, you should see a near straight line from the shoulder to ankle. Minimal to no folding at the hip. Forcing or cueing the athlete to “lean” or “stay low” may directly impact other technical elements such as placement of foot on touchdown.
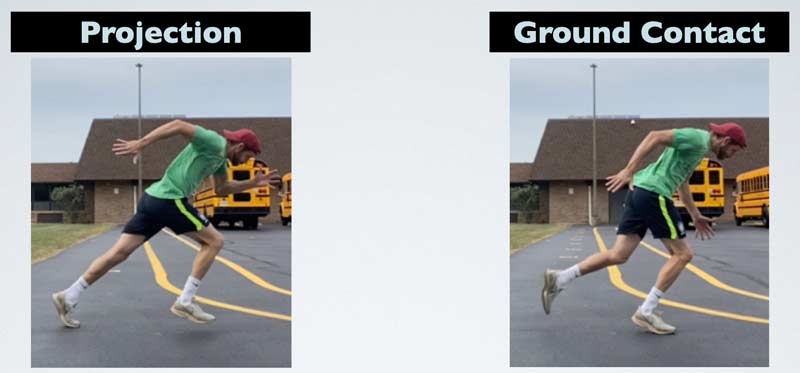
Projection: Projection ties into posture a bit, but they are different from one another. You should give the athlete guidance as to how projection should feel and look but chasing specific projection angles shouldn’t be the goal. Forcing the athlete to push out at a specific angle that is beyond their current strength abilities can create stumbling out of acceleration and/or inefficient ground contacts in front of COM. As specific strength increases, the ability to project horizontally should as well. As long as you see steps that gradually progress from the athlete pushing to upright, you’re in the right ballpark.
Ground Contact: Underneath/behind center of mass. This is paramount to appropriate force application. Touching down in front of the COM may elicit higher ground contact times and improper force application in relation to the rest of the body.

Full Support: Support leg continues to push away to near extension while free leg punches to the front side of the body as fast as possible. Intentionally pushing the stance leg to maximal extension may yield worse sprint results due to greater ground contact times. I will cover this potential error in more detail below.
Toe-Off: See the posture and projection sections above.
Governing Technical Principles of Maximum Velocity
Posture: Upright and tall.
General Leg Action: Leg action should move to more cyclical with minimal backside mechanics.
General Arm Swing: Rhythmic and relaxed but pumping hard. The arms should open and close with a smaller angle at the elbow exhibited in the front-side arm and a larger angle at the elbow to the back-side arm. The arms should not stay locked at 90 degrees.

Initial Ground Contact: Foot contacts ground slightly in front of COM. While it’s best to teach athletes to contact under the hip, this actually doesn’t happen in efficient sprinting, as they would fall over forward if it did. The foot, though, should not contact excessively in front of the COM as it would cause excessive braking forces. The free leg thigh will be in line with the stance leg thigh. If the knee is behind the stance leg thigh, this may be excessive backside mechanics.
Full Support: Leg is directly under the hip with as minimal amortization at the knee as possible (this aspect ties into the physical attributes of the athlete). The free leg’s knee should be slightly in front of the support leg’s thigh with the foot continuing to “step over the opposite knee.” If the athlete exhibits appropriate technique, this will look like a “number 4” from a side view.
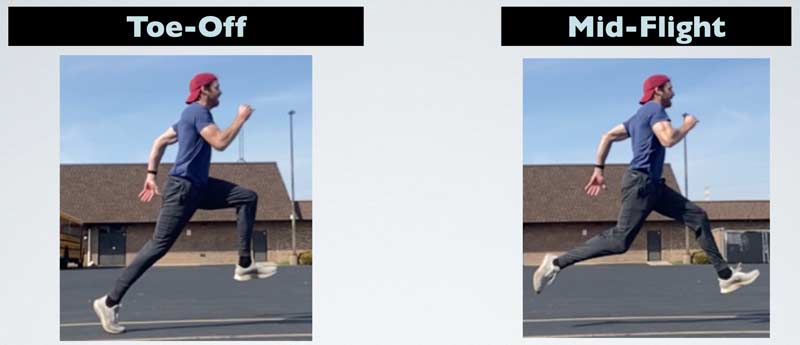
Toe-Off: On toe-off, the athlete should exhibit near full extension during push-off. Full extension at toe-off is not necessary though. This will increase ground contact time. Achieving full extension in a contrived manner in an attempt to increase vertical or horizontal force production is a fool’s errand, as the peak force application is already completed, and any excess time spent on the ground will deteriorate speed.
Mid-Flight: Maintenance of a generally neutral pelvis is of great importance (not just in flight, but throughout the entire sprint as well). In flight, the shoulder joint to the knee joint should be in a relatively straight line with no major curvature in the spine. The most common backside mechanic problem in team sport is butt kicking.
If you were to draw a vertical line from the shoulder through the hip, the knee would be significantly behind if butt kicking were to occur. Butt kicking puts a huge stretch on the rectus femoris and may cause the pelvis to rotate anteriorly. Without high levels of flexibility in the quad and hip, this will typically put the low back into lordosis, putting the hamstring on greater stretch during the late swing phase and ground contact. This also typically reduces the likelihood of subsequent knee lift, which can limit force application upon ground contact.
Moving Toward a Technical Model
To make any concerted effort at changing sprint technique, we have to first understand what we’re looking at and what deviations we’re looking for. Following a model and developing a coaching eye allow us to do this. The general principles outlined above are the major technical commonalities in successful sprinting. I do believe we need to move team sport athletes closer to that model, but there may be a point when moving closer and closer to a technical model or searching to change finer and finer detail, especially in team sport, can become detrimental.
There may be a point when moving closer and closer to a technical model or searching to change finer and finer detail, especially in team sport, can become detrimental, says @john_r_grace. Share on XTeam sport competition offers many other ways for the athlete and team to be successful than just the physical. Technical and tactical elements will often win and lose games more often than physical elements. Individuals in the NBA may be able to jump out of the gym, but if the team’s jumper is off for the night, they may lose the game. In soccer, if the tactical element is not addressed through training and video, the team may not be prepared well enough to be successful against an opponent. But when all you have are technical skills to rely on, that gives you less chance to be successful than if you also had some physical abilities to fall back on.
Stealing time from sport technical training in the hope of changing a few degrees of arm swing or achieving another inch of knee lift in upright sprinting because “that’s what puts us closer to the model” is probably not worth it. We really need to think about how all the elements of being a successful athlete interact, not just the physical.
Once the foundational concepts are in place and learned, the athlete can and will gravitate to a more individualized style based on anthropometry and personal restrictions and limitations.
As a side note, just because an athlete has sprinted with poor technique their entire career does not mean that we can use the cop-out that this is their “individual style.” This poor technique came about because they have never been taught how to sprint efficiently. Much of their youth was probably spent developing technical sport skill with little development on the technical performance side.
Injury Considerations
Hamstring injuries in sport are not going away, and there is some evidence to say these modifiable and nonmodifiable risk factors play a role:
- Previous injury
- Knee flexor strength
- Muscular properties (fascicle length)
- Age
- Exposure to relatively high sprint speeds
- Technical execution of sprinting*
There are certainly more considerations than these, and injuries never come down to just one thing. We must balance all of these and more to mitigate hamstring or any other soft tissue injury risk. Additionally, some of these risk factors bleed into one another, meaning that increased knee flexor strength as well as exposure to sprint speeds can enhance fascicle length.
We’ll tackle the two that deal specifically with speed:
- Technical execution
- Exposure to maximal velocity
Modifying Sprint Technique
Sprint technique should be addressed as a way to reduce risk of injury. Even if research does not fully support this idea yet, I believe it will. Many strength and conditioning coaches agree that performing weight room exercises under great load with suboptimal technique has a higher injury risk when compared to that same exercise and load completed with closer to optimal technique for that individual. Sprinting is no different than this idea—it’s a high-force, high-velocity exercise that demands technical execution.
Sprint technique should be addressed as a way to reduce risk of injury. Even if research does not fully support this idea yet, I believe it will, says @john_r_grace. Share on XMost sprint coaches would agree there would be some increased risk of injury if their 11 m/s athlete started to sprint with major backside mechanics or plant significantly in front of the center of mass, as some team sport athletes do. Just as important to injury risk is performance—that 11 m/s athlete would not be an 11 m/s athlete anymore if these things were to occur. If anything, the bigger picture reason may be decreased performance and sprint speed.
If the best sprint coaches and researchers believe there is a relatively clear definition of optimal and suboptimal technique, why are some technical issues not always viewed as suboptimal in other sports?
Once we understand the governing principles, we can start to take inventory of what we potentially want to change in certain athletes. Don’t expect to change every technical flaw either. Trying to perform a complete overhaul of technique to mimic these governing principles in one fell swoop may cause issues. We’re better off fixing the big rocks first. Big errors, when fixed, can sometimes clean up the little errors.
Generally, work from big flaw to small flaw, biggest performance gainer to smallest performance gainer, and/or biggest injury risk to smallest injury risk. It is crucial to understand the “big rock” components of the model and recognize how far away technically the athlete is currently. I think there are a few key considerations when looking to change sprinting technique for a team sport athlete:
- Does their current technique put them at a higher risk for injury? This points to the idea of how far away they are from the technical model. Assuming there is a connection between technical execution and injury risk, this becomes one of the most important considerations.
- If you were successful at changing a specific aspect of sprint technique, are you confident this change will improve performance or reduce injury risk? If not, it may not be worth the time investment.
- What is that athlete’s injury history? If the athlete’s injury history is clean, you may be a bit more aggressive in your approach than what you may do with an athlete who has had a rash of hamstring strains or soft tissue injuries.
- If the athlete does have a clean injury history, where are they in your bandwidth of technical acceptability? This brings us back to consideration #1.
Spending significant time to modify a few degrees of arm swing or trying to get an athlete’s knee up another inch might not be worth it. Greater performance gains in team sport might be seen by spending that time working on technical and tactical elements of sport.
Another important consideration is the athlete’s age. Do we spend as much time on a 30+ year-old athlete as we do a 20-year-old athlete? It’s not that we can’t improve older athletes, but they’ve had significantly more time engraining their current sprint technique than a 20-year-old. This may make the 30-year-old a bigger project, and it can potentially be more time-consuming to pull them out their bad habits. This scenario also brings us back to the considerations above.
Dose and Frequency
Many coaches now tout maximal velocity sprinting as a protective mechanism for the hamstring. I am no different. I do believe that exposure to intense sprinting is quite important. If an athlete is not prepared to perform intense work or the tissue is not capable of effectively handling high levels of tension, there is an increased risk of injury. Intense preparation is imperative for intense competition.
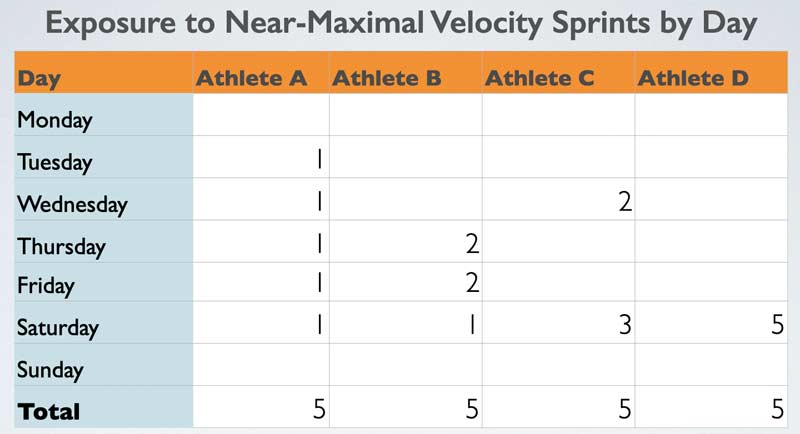
Intense preparation is imperative for intense competition, says @john_r_grace. Share on XThere are research studies that show there is a “sweet spot” of speed exposure to reduce injuries. One, in particular, shows the U-shaped curve, and the lowest incidence of injury is between 5 and 11 maximal velocity speed reps per week. While great conceptually, this does not account for the frequency at which it is dosed within the week (and based on anecdotal evidence, I think the number of reps may be overzealous).
We must think about the frequency at which we expose athletes to this high-intensity work. Is the athlete being exposed to this volume of sprinting 2-3 days in a row, twice a week with a day or two between, once every seven days? Completing five near-maximal velocity sprints in one training session or game is not the same as completing one near-maximal sprint five days in a row. I’m not suggesting anyone is actually doing the latter, but this is an illustration to show that it is not only the count of sprints at the end of the week that matters, but the frequency of exposure as well as the quality of movement matter more.
I’ve tracked velocities >90% in training and matches for a few years now, and I’m not convinced it needs to be as frequent or in as relatively a high volume as the research would indicate. If an athlete missed a seven-day rolling window of sprinting at high velocity, I never forced them to make it up immediately. My step-in point was usually between 14 and 21 days, as I thought this would be the point that tissue preparedness would start to decrease. I have no hard evidence on that 14- to 21-day window, but I know tissue preparedness does not wane from Friday to Monday. Forcing an athlete to “make up” maximal velocity work without a thought on where it should be placed can actually cause problems in itself.
If you neglect where you place maximal velocity sprinting and just check the box to check the box, you could easily blow an athlete up. Maybe not on that particular day, but a few days down the road is possible. If this does happen, the temptation is then usually to blame it on lack of exposure and that the athlete needed more. In reality, it could have had nothing to do with lack of exposure and actually been the placement of the stimulus that did it—sprinting at an inappropriate time can be just as harmful as not sprinting.
Ability
You shouldn’t treat your speed-power studs like your donkeys. Sprinting and plyometric activities are largely self-intensifying. In other words, as the athlete jumps farther and higher, and as sprinting speeds become faster, the tension generated within the muscles and tendons is greater, in turn creating a greater stress response. A 10 m/s team sport athlete may not be able to handle the speed volume of work that an 8.5 m/s athlete can.
A common thought is that the speed-power stud needs to do more to raise the ceiling or can handle more because they have a more robust set of physical qualities, but in fact it is quite the opposite. The speed-power stud typically shouldn’t do more because of the additional stress incurred from working at higher intensities. For this reason, there is little need to progress volumes over the course of the year, as long as the exercises chosen allow the athlete to express high levels of intensity, and the athlete’s physical qualities are improving.
Anecdotally, slower, less powerful athletes have fewer muscular injuries simply because they don’t have the engine to produce the intensities needed to actually injure themselves.
Acceleration and Speed Development Is Not Just Acceleration and Speed Development
Strength and conditioning coaches often don’t view sprint training as “strength” work.
Why?
Take a couple steps back and think about what strength is. Rather than thinking of strength as how much you lift, think of strength as a neural quality that requires the muscles and tendons to produce appropriate levels of tension to complete a task. If we adopt this definition of strength, exposing an athlete to sprinting is one of the, if not the, highest tensions a muscle and tendon complex will ever be exposed to.
Rather than thinking of strength as how much you lift, think of strength as a neural quality that requires the muscles and tendons to produce appropriate levels of tension to complete a task. Share on XIs acceleration and speed training “strength” work? Yes. Sprinting has the ability to improve tissue capacity due to the high levels of tension just like traditional strength work does. I don’t necessarily think they are an equal trade-off and wouldn’t ditch the traditional strength work in the weight room, but this does put sprinting as a means of strength/neural training in a new or different light, especially when a weight room is not available. We don’t have to revert to bodyweight lunges and squats that are largely fluff and fillers to make it look like we’re doing something. Sprinting, jumping, and throwing are a viable maintenance strategy during the competition season.
Traditional strength training largely carries over to speed because of the neural adaptations, not necessarily because the muscle was able to produce more tension or force. Maximal intensity sprinting produces the highest tension in the shortest amount of time out of any exercise that you can do. It’s not a one-sided connection in that strength improves speed. It’s reciprocal, as there is a connection between these two qualities. Strength training can enhance sprinting from a neural stimulation standpoint, whereas sprinting can enhance strength and power from a neural and tension standpoint.
Outside of actual transfer of speed to the field and court, this is the reason sprinting as a means of training to maintain and/or develop other physical qualities is useful. Maximal intensity acceleration and speed training is such a potent stimulus. The qualities developed from sprinting can carry over to sports that don’t necessarily need speed to be successful, such as volleyball or tennis.
Complementary Training Components to Acceleration and Speed
Training elements need to be complementary to the end goal. In this case we’re specifically dealing with the abilities to accelerate and sprint faster. It is important to note that these complementary training elements are also applicable to other sporting movements, as the goal is to largely enhance specific aspects such as improving motor unit recruitment, rate coding, and motor unit synchronization. Of course, these suggestions are not exhaustive and are most likely more of a representation of the philosophy I have adopted though the years.
There are certain exercises that lend themselves much better to acceleration than others. Training elements that can be complementary to acceleration development:
- Speed: Heavy and light resisted sprints, hill sprints, accelerations
- Plyometric/Jumps: Horizontal and vertical jumping with relatively longer GCT, basic bounding, static medicine ball throws, skipping variants, etc.
- Resistance Training: moderate to heavy Olympic lifts and pulling variants, squats, deadlifts, lunges
Note: Be careful with heavy sled pushes to assist here. The benefits of any joint angle-specific loading can be washed away with flat-footed contacts and a hunched-over torso. On top of this, a sled push requires the arms to hold the sled handles, which takes away from specificity as well. I’m also skeptical that heavy sled pushes have similar neuromuscular coordination characteristics as something like heavy back squats.
There are also certain exercises that lend themselves much better to maximal velocity. Training elements that can be complementary to speed development:
- Speed: Flys, sprint float sprint type, maximal sprinting
- Plyometric/Jumps: Hurdle hopping, depth jumping, vertical emphasis bounding variants, dynamic/elastic medicine ball throws, assisted jumping, etc.
- Resistance Training: Light to heavy Olympic lifts and pulling variants, quarter/half squats, shorter ROM step-ups, etc.
Note: Assisted sprinting is sometimes a popular method to employ, but this can backfire easily. Assisted sprinting leads one to believe it is working because it looks faster and because of the end result of faster sprint times when performing the exercise. These faster sprint times are largely due to covering more distance during flight. In fact, assisted sprinting may result in longer ground contact times due to the athlete needing to place the foot down farther in front of COM to stay balanced. This the exact opposite of the characteristics needed to sprint fast.
Interconnected Qualities and Techniques
Each one of these topics could certainly be an article in itself, and while I initially wanted to write a few thoughts about sprint technique, it’s hard to mention only one of these topics on its own without the others since they are all quite connected.
Since you’re here…
…we have a small favor to ask. More people are reading SimpliFaster than ever, and each week we bring you compelling content from coaches, sport scientists, and physiotherapists who are devoted to building better athletes. Please take a moment to share the articles on social media, engage the authors with questions and comments below, and link to articles when appropriate if you have a blog or participate on forums of related topics. — SF