• Skip to content
  • Skip to primary sidebar
SimpliFaster

SimpliFaster

cart

Top Header Element

  • Facebook
  • Instagram
  • Twitter
  • YouTube
  • Login
  • cartCart
  • (925) 461-5990
  • Shop
  • Request a Quote
  • Blog
  • Buyer’s Guide
  • Freelap Friday Five
  • Podcast
  • Job Board
    • Candidate
    • Employer
    • Facebook
    • Instagram
    • Twitter
    • YouTube
You are here: Home / Blog

Blog

Artur Pacek Presentation

Strength Training Through the In-Season with Artur Pacek

Freelap Friday Five| ByArtur Pacek, ByKim Goss

Artur Pacek Presentation

Like most Europeans, Artur Pacek started playing soccer about the time he could walk. His athletic journey took a different path in elementary school when he fell in love with basketball. Pacek continued shooting hoops through college, and he extended his passion for sports by becoming a strength coach.

Today, Pacek is the head strength and conditioning coach for BM Stal Ostrów Wielkopolski, Poland’s best elite-level basketball team. He has also trained athletes from Australia, Czechoslovakia, Lithuania, Serbia, Sweden, Turkey, and Ukraine.

Pacek holds a graduate degree in physical education from the Academy for Physical Education in Gorzów, Wielkopolski. In 2011, he continued his education by accepting a six-month internship with Tim Grover at the ATTACK Athletics Center in Chicago, Illinois. Grover was the personal trainer of NBA legends Michael Jordan, Kobe Bryant, and Dwyane Wade. Pacek hopes to work in the NBA eventually.

Freelap USA: What are the major differences between basketball played in Europe and the U.S., and what is your general approach to training these athletes?

Artur Pacek: The pace of the game in the U.S. is faster and more intense. In Europe, teams play fewer games per week. The average number of games per week in the NBA is 3.3. The average in the EuroLeague is 2.4, and in Poland, 1.6.

U.S. players are more athletic than most European players, but many of our players, such as Luka Dončić and Nikola Jokić, are technically well-trained. These skills give them a competitive advantage.

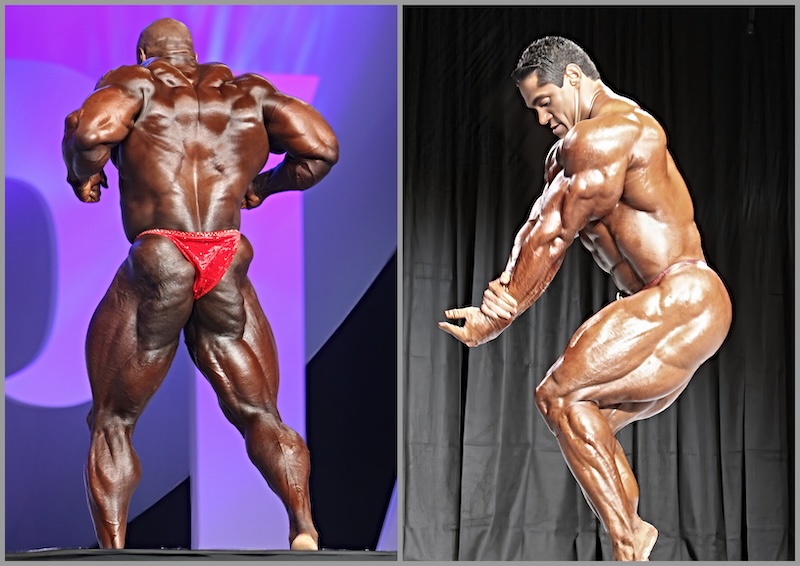
Basketball is a game of specific joint angles that cause the development and underdevelopment of individual muscle groups. These structural imbalances lead to overload and injuries. Therefore, my main task with these athletes is to maintain their strength, muscle mass, and structural balance to keep them performing at a high level.

A strength coach needs the biggest training toolbox possible and must use the right training method at the right place, at the right time, and with the right person. It’s all about adaptation and progressive overloading of the body so that we can use many tools. My approach with a new tool is to learn it, try it on myself, consult with other trainers, and only then will I add it to my toolbox. If I don’t study an exercise or training method in detail or understand it, I don’t use it.

Basketball workouts are often long and monotonous but rarely at a high intensity, so I try to provide the body with high-quality stimuli. As Coach Bob Alejo says, “Never sacrifice intensity!”

Freelap USA: How do you approach periodization?

Artur Pacek: The periodization model I use depends on how long the period lasts and who I’m working with. These models include linear, undulating, conjugate using the classic strength training model, and the quad-current programming using three types of muscle contractions that Ben Prentiss promotes. I believe 80% of basketball players are undertrained in eccentric and isometric muscle contractions, negatively affecting acceleration, deceleration, and direction changes during a game.

I believe 80% of basketball players are undertrained in eccentric and isometric muscle contractions, negatively affecting acceleration, deceleration, and direction changes during a game. Share on X

I divide the off-season into general and special physical preparation phases, alternately focusing on volume and intensity.

When training for volume, I emphasize the following:

  • Longer range of motion exercises (tension in stretched/deep positions).
  • Low impact on joints.
  • Low complexity.
  • Strengthen weak areas.

When training for intensity, my focus changes as follows:

  • Shortened range of motion.
  • Higher impact of joints/tissue acceptable.
  • More complexity.
  • Externally stabilized loads.
  • Advantageous positions based on body type.
  • Utilize the stretch reflex.

Freelap USA: What is your annual approach to training?

Artur Pacek: I divide the annual plan into four main blocks: post-season, off-season, pre-season, and in-season.

The post-season is a reconditioning phase that focuses on tissue re-education. It is not a performance model but a preparation phase to prepare the tissues for more advanced training methods.

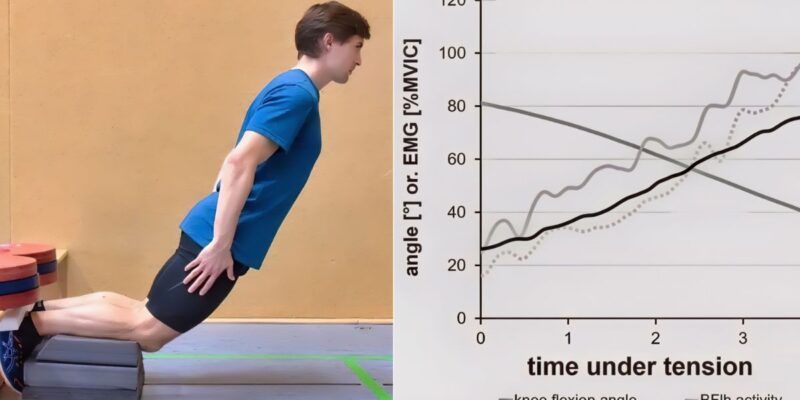
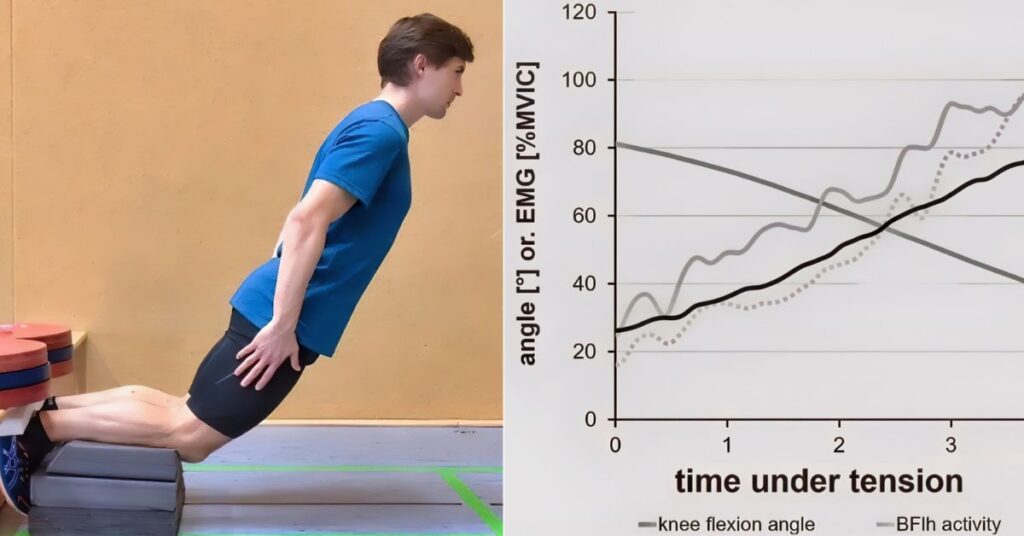
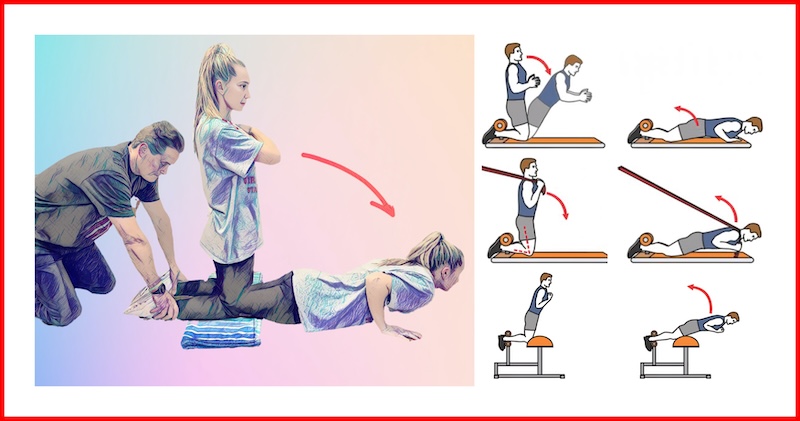
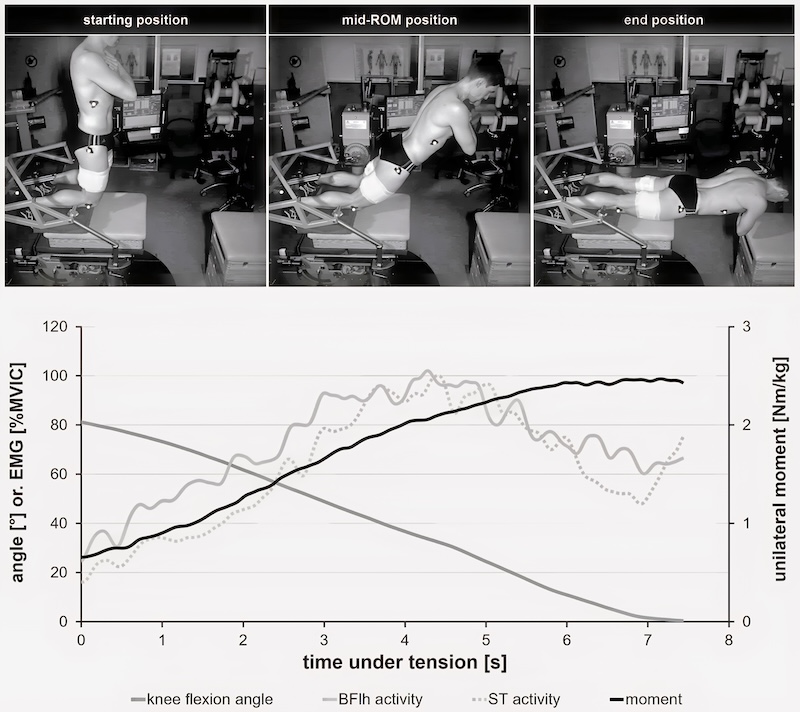
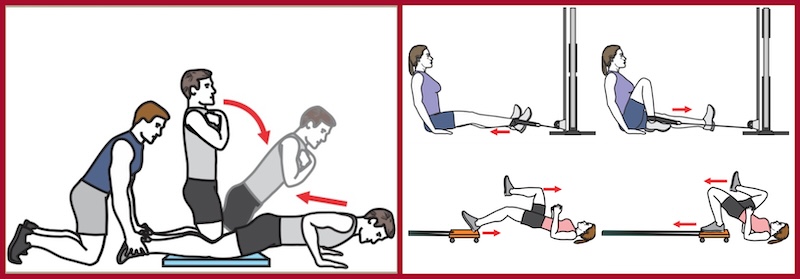
After 8–9 months of playing basketball, the focus should be on improving weak links to restore homeostasis, muscle balance, and fascial lines. During this phase, I use yielding isometric elements in extended and shortened positions. I also like using extended eccentric contractions during this phase.

As a strength and conditioning coach, the off-season is especially important. The strength training frequency is higher than the in-season, so the body has more time to adapt, and it allows me to use more demanding methods to send a stronger signal to the body.

The pre-season is the most intense training period. Frequency, volume, and intensity are at very high levels. It is a transition phase where we try to convert what we have developed in previous periods. Due to the mix of a very large number of basketball practices and strength training workouts, my approach is individualized.

The in-season is the longest block in the annual cycle, lasting 8–9 months. In the NBA, most coaches focus on maintaining their results from the off-season and pre-season phases. Many of them use the quadrant system, popularized by Daniel Bove. My approach is individualized and influenced by how they look and their playing time, but we strength train at least twice a week. My goal is not to decrease a strength level by more than 10%–15% because a decrease in strength and muscle mass increases the risk of injury.

My goal is not to decrease strength level by more than 10%–15% because a decrease in strength and muscle mass increases injury risk. Despite what most people think, you can build during the season. Share on X

Despite what most people think, you can build during the season. One athlete joined my team weighing 119 kilos at 207 cm tall (262 pounds, 6 feet 9 inches), with 19% body fat. He could not do a single bodyweight chin-up. After six months, his weight dropped to 112 kilos (246 pounds) and his body fat to 10%, and he could perform three chin-ups with an additional 25 kilos (55 pounds).

Flywheel Train
Image 1. Flywheel training is a key component of Coach Pacek’s training. He is shown here with Damian Kulig, a former Polish National Basketball Team member.

Freelap USA: When were you introduced to flywheel training, and what are its advantages?

Artur Pacek: In 2009. My first mentor on flywheel training was Ben Prentiss at the Prentiss Hockey Performance Center in Stamford, Connecticut.

I am working on my doctorate with Mariusz Naczk, one of the world leaders in scientific publications related to isoinertial training. Professor Naczk believes that through greater antagonist activity, flywheel improves inter-muscular coordination better than classical resistance training.

Flywheel training is unique in that it strengthens the limbs through the entire range of motion and matches the strength curves of the muscle. Further, it has a greater transfer to sports because sports consist of rhythmic motions. The flywheel teaches us to keep a rhythm, which does not occur during classical strength training. Also, the level of soreness is lower than in the classical approach, which is a benefit in-season.

From an athletic performance perspective, flywheel training bridges the gap between classical and fast eccentric training. There is an inverse relationship between force and velocity in eccentric contraction compared to concentric work. This means the slower the eccentric contraction, the lower the force you produce; the faster the eccentric contraction, the bigger the force you produce.

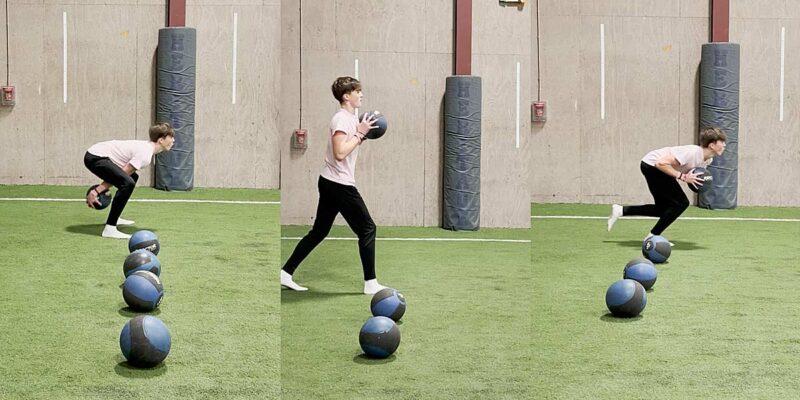
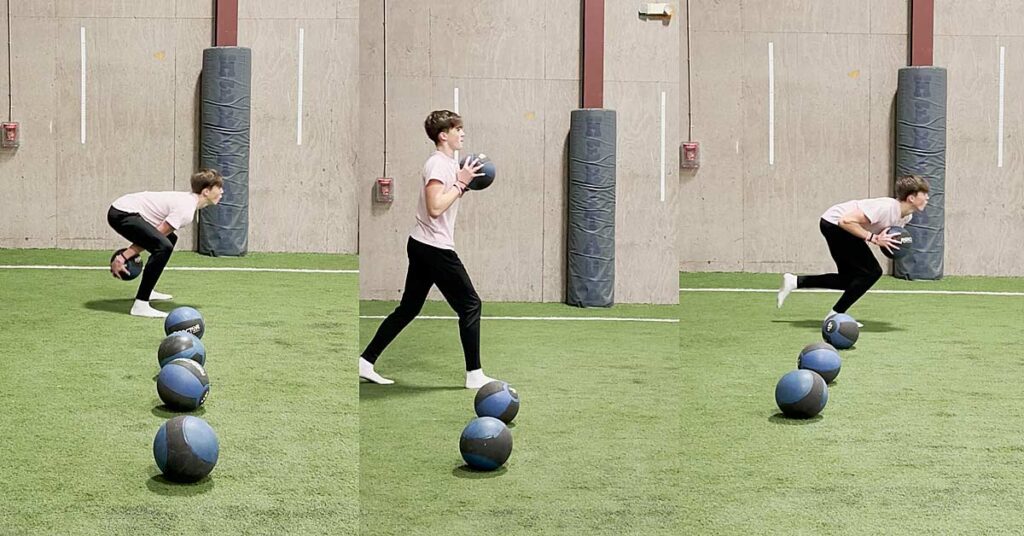
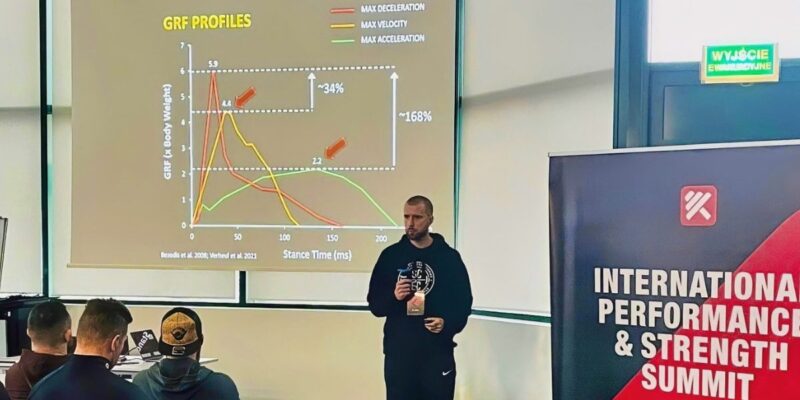
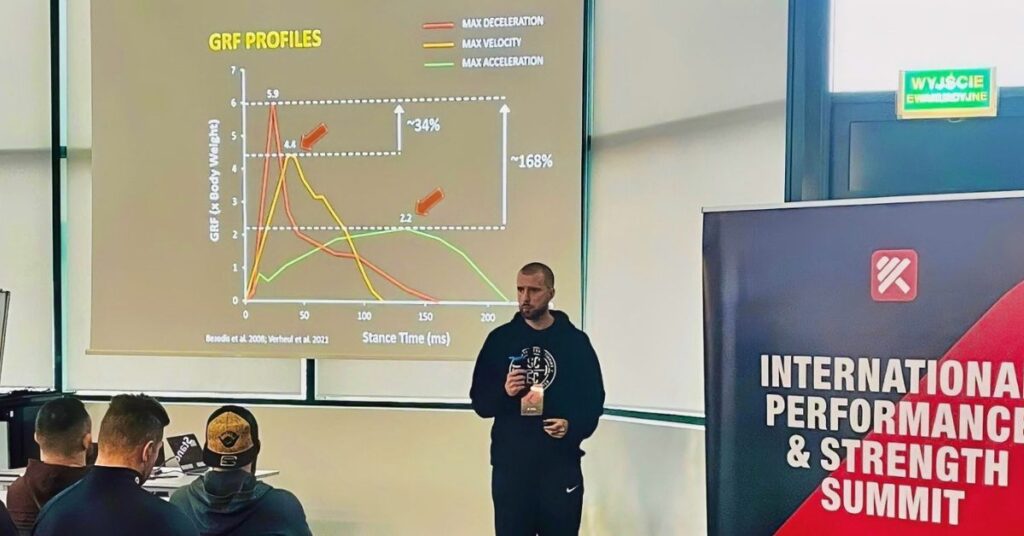
Basketball involves a lot of deceleration, acceleration, and changes of direction. During deceleration, which studies have shown can produce a force reaching 5.9 times body weight, athletes’ quadriceps need enough eccentric strength to control their posture. If not, it will take longer to decelerate, and they can strain their muscles. Flywheel training improves eccentric rate force development through fast eccentric overload. Exercises I use with the flywheel to strengthen the quadriceps and improve deceleration include the squat, split squat, and Poliquin step-up.

Freelap USA: How do you incorporate flywheel training in your workouts?

Artur Pacek: Flywheel training methodology still needs to be clarified, and it is difficult to compare it with repetitions using the classic training approach. The large wheel allows you to develop more force but at a lower velocity, whereas the small wheel does the opposite. I use both of them year-round. Here are a few examples of my workouts:

  • Phase 1 – Back squat, extended eccentric
    4 sets x 5 reps, tempo 60×0, 120 seconds rest
  • Phase 2 – Back squat, overload eccentric, eccentric hooks
    4 sets x 1+1+1, tempo 40×0, 180 seconds rest

    100/70

    100% = bar + hooks

    70% = bar

  • Phase 3 – flywheel squat, fast eccentric
    3–4 sets x 6 reps, / – / tempo, 120 seconds rest
  • Phase 4 – drop jumps from a box
    3–4 sets x 5 reps, / – / tempo, 120 seconds rest

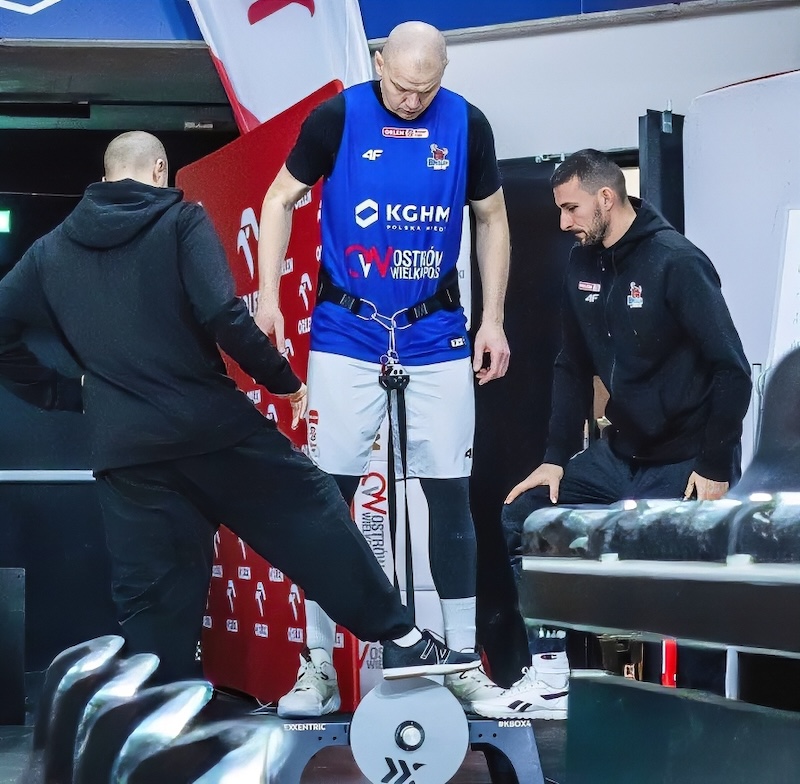
For the flywheel squat, I have the athletes support themselves by holding onto a bar in the concentric phase to increase force development. I also use the flywheel on game day as a great potentiating tool, such as 1­–2 sets of 4–6 repetitions of fast, dynamic movements. There are many possibilities. Remember that the flywheel is a closed circuit, so the more power you generate in the concentric phase, the more power you will get in the eccentric phase.

Remember that the flywheel is a closed circuit, so the more power you generate in the concentric phase, the more power you will get in the eccentric phase, says @ArturGetBetter. Share on X

I use the brand Exxentric kBox, but consider that each company has different designations for the size of the load measured in inertia in units of kgm2. I have three sizes: M–Medium, L–Large, and XL–Extra Large. When I want to develop more force, I use the larger wheels. When I want to develop greater velocity, such as on game days, I use the smallest wheel.

I want to conclude by saying that I love my job, particularly working with athletic teams. I want my players to be healthy and perform at the highest possible level. This approach helps us win!

Since you’re here…
…we have a small favor to ask. More people are reading SimpliFaster than ever, and each week we bring you compelling content from coaches, sport scientists, and physiotherapists who are devoted to building better athletes. Please take a moment to share the articles on social media, engage the authors with questions and comments below, and link to articles when appropriate if you have a blog or participate on forums of related topics. — SF


FTC SoCal Korfist

3 Takeaways from “Feed The Cats” SoCal for Coaches in Any Sport

Blog| ByNathan Huffstutter

FTC SoCal Korfist

“When it’s your time to make a difference in a kid’s life, are you going to be courageous enough to do it?”

During his opening presentation for Feed The Cats Southern California at Crean Lutheran High School, just up the road from The Great Park in Irvine, Tony Holler challenged the attendees to consider this simple question. In that moment, on the big screen Holler replayed an iconic clip of Portland Trailblazers Coach Mo Cheeks stepping in to help a young singer get back on track after she stumbled over the words in the National Anthem, providing her just enough support so that she could right herself and carry the song through to a rousing finish.

Not all coaching moments will have that public or profound of an impact, but as self-professed essentialist, Holler’s point cuts to the core of coaching: are you willing to make a difference?

Not all coaching moments will have that public or profound of an impact, but as self-professed essentialist, @pntrack’s point cuts to the core of coaching: are you willing to make a difference? Share on X

Easy enough, right? But it’s not—because a difference is, by definition, not the same. The same is easy—it’s known, it’s repeatable, it’s low-risk. Across 14 presentations and two days, Tony Holler, Chris Korfist, and JT Ayers took different angles on that essential question: given the chance, are you going to do what it takes to make a difference in a kid’s life?

Though the audience was largely a three-way split amongst track coaches, football coaches, and S&C coaches, Holler and Korfist delivered a range of insights that apply equally to coaches in any sport. More importantly, those points were ones that might not get made in sport-specific seminars—as in, not the same.

Been to a softball coaching clinic? Just show us new infield and outfield drills, my kids are bored to tears with all of mine!

Been to a soccer coaching course? Just show us which formation to play so we can stop getting hammered in the midfield!

When the time comes, here are three takeaways from Holler and Korfist to make difference.

1. Start with Joy

Start With Joy FTC
Image 1. Tony Holler debating whether this principle should be #2 or in fact #1.

When crafting his core principles, Holler says he wanted to create value statements he considered broadly inarguable—who would oppose or vigorously dispute “make practice the best part of a kid’s day”? And yet, day-in and day-out on the field, this simple notion is tacitly challenged by coaches whose practices are, in design and execution, entirely joy-less and a part of the day that the players grind through.

For youth sport coaches, whose athletes are coming to training from a long day of school and likely looking at a pile of homework to finish when they leave, more work is not the best value you can offer for their crunched time.

Start with joy.

Why not? Well, happiness is hard. It takes risk. It takes opening yourself up to judgment. It takes trying new and different things, some of which completely flop—and if you coach groups of teenage girls like I do, you know they have a sharp side-eye for adult missteps, flaws, and failures.

You can do the same warm-up, the same conditioning, the same drills and you won’t risk judgment for it because, hey, it may be miserable and boring but it’s the same, we’ve been doing it forever and will not outwardly fail.

But the days when you walk off the training ground and your athletes are sweating and breathing hard with that live bounding electricity in their eyes and exclaiming to each other “that was fun,” you know you are on to something. Instead of having players who find excuses to miss your practices, you’ll have players who will make excuses to miss other commitments in order to make your practices.

When it’s your time to make a difference in a kid’s life, are you going to be courageous enough to do it?

My 17-year-old is a two-sport varsity athlete and across the past four club/travel/high school seasons of soccer and softball she has played for nine head soccer coaches and five head softball coaches and in some of those seasons, the phrase “that was fun” has not only never been spoken…I doubt it ever crossed the players’ minds.

Because it never crossed the coach’s mind either—that this is a game, these are kids, and it should be fun.

Endless Feedback Loop
Image 2. The FTC Endless Feedback Loop, so simple it just might work.

Holler’s “FTC Endless Feedback Loop” is another simple and self-evident reality that longtime sport coaches will recognize as a truth…but may need a jolt and spark to initiate in their own settings.

What happens when you make practice the best part of a kid’s day? They are happy and excited. What happens when your players are happy and excited? You as a coach are inspired to do the best coaching job you can to turn that energy and motivation into success. What happens when you as a coach are inspired to bring your A-game every training session? Your players are happy and excited…and so it goes.

And, equally, the opposite is true.

When a coach loses sight of joy, the kids start looking at the calendar and playing out the string. And once the kids are just riding out the season, then the coach is just riding it out. Which, if you’ve been there—can’t this season just end, already?—tends to be miserable all around.

“I think joy creates winning,” Holler said. “I don’t think misery does.”

2. Where the Rubber Meets the Road Is More than a Business Cliché

Korfist Spring Ankle
Image 3. Chris Korfist on the spring ankle series he developed with Cal Dietz.

Whether loading for a swing or planting for a shot, with both my softball and soccer players I frequently cue “force comes from the ground up” and in those moments I’m generally speaking to intent—to deliver force you have to want to drive off of something.

Okay, super—so now what exactly does that interaction between the studs of a cleat and the turf or dirt actually look like, and how can you better train the foot to execute that critical athletic function?

Yep, got me there.

And not just me—former Air Force star quarterback Beau Morgan attended the seminar with a pair of his former teammates, and as I was chatting with him he readily whipped off a shoe to show a wrecked foot. Morgan mentioned how if he’d had a coach who understood how to train the feet when he was younger, he would have had an even better high school track career and then the cup of coffee he had with the Cowboys in the NFL may have been more than just that quick hot sip.

Korfist Balance Demo
Image 4. Chris Korfist leading a single-leg balance demo with the FTC attendees.

Korfist discussed how to put pressure on “the tripod” of the foot and, even more interestingly, how the foot would find a different (and less effective) tripod if the full foot wasn’t consistently accessed. Where the foot becomes a fulcrum in acceleration, how the fastest athletes tend to land slightly open-footed on the outside of their foot, and ways he trains foot positioning with slant board jumps and prime times were thought-provoking points that apply across all sports.

“Whatever your foot doesn’t do, the rest of your body will do.”

Visualize that for a moment. For softball coaches, volleyball coaches, and basketball coaches, how often have you heard a player described as having “bad feet” as a catchall phrase for the fact that they just don’t look very athletic when executing certain skills?

Whatever your foot doesn’t do, the rest of your body will do, says @korfist. Share on X

The rest of their body is trying to do something their feet need to be trained to do first. One of Korfist’s entire slides was nothing more than a black and white quote from Swiss physiotherapist and researcher Romain Tourillon:

    “Many practitioners understand that the human foot complex is the underestimated link of the kinetic chain, and can be the limiting factor in explosive tasks such as sprinting, cutting, or jumping.”


Video 1. Chris Korfist demonstrates wall drills he performs with his athletes to improve the quality and direction of force from the ground.

3. Ask Yourself: Are We Practicing What We Want to Get Better At?

Why So Much On The Foot?
Image 5. Why so much on the foot? Because it’s a focus area for improvement.

Describing early-season training with his sprint group, Korfist noted that they had been beginning every session on the wall working on foot progressions, knee drive, and other keys to improving speed—in some cases, spending the better part of the session on these movements.

Joy does not have to look like recess—learning and mastering something new and challenging that makes them better at the sport they care about is one of the ways your best athletes have fun.

This was what Korfist wants his athletes to get better at, so he makes it a focus of his training—for coaches in all sports, there’s that basic question: are you practicing what you want to get better at?

A couple years ago, when I was taking the US Soccer C-License course, as an icebreaker the instructor asked us to go around the room and say why we were there in the first place. One of the sharpest coaches in the group, Jake, said that he’d signed up because he’d hit a point where he knew he could roll up any time, any place, and execute a perfectly adequate training session. Needed no planning or effort, maybe jot a note or two on a Post-It, maybe just wing it, didn’t matter—he could lead players through 90 minutes that looked, felt, and functioned like a practice.

Except, he realized those rote sessions weren’t accomplishing anything but clocking time—so he was there to learn new ways to be purposeful and design training sessions that matched how he wanted his team to play in games.

Similar to Korfist, Holler gears his training to the qualities he wants his athletes to be good at. Not surprisingly, he keeps that simple:

  • Sprint Fast
  • Jump High/Jump Far
  • Lift Heavy
  • Bounce


Video 2. Tony Holler showing a few of the “X-Factor” workouts his athletes do to jump high, jump far, and bounce.

As a coach, looking at your training sessions, you can ask yourself if you’re getting better at what you want to get better at or if you’re just getting better at knocking out the same, seamless 90 minutes on the field.

And, then, you can ask yourself again: When it’s your time to make a difference in a kid’s life, are you going to be courageous enough to do it?

Since you’re here…
…we have a small favor to ask. More people are reading SimpliFaster than ever, and each week we bring you compelling content from coaches, sport scientists, and physiotherapists who are devoted to building better athletes. Please take a moment to share the articles on social media, engage the authors with questions and comments below, and link to articles when appropriate if you have a blog or participate on forums of related topics. — SF


Sprint Start

The Standing Start and Training for a Fast 40-Yard Dash

Blog| ByJohn Makell III

Sprint Start

An effective start and initial acceleration can set the table for the rest of the run. Optimizing force application, the switching of limbs, and maximizing momentum early on can allow a seamless transition to max velocity (top speed) and an optimal balance between stride length and stride frequency.

Improving skills in these areas when using a standing start can provide valuable stepping stones to success with other starting positions: i.e., three-point, four-point without starting blocks, and four-point with blocks.

Caution

I know it can be tempting for athletes to want to try out new things that are learned, but if they’re not in sufficient condition, intense sprinting can result in injury. There are many fine programs out there that feature a variety of exercises and methods to prepare the body for the rigors of sprinting, and it goes without saying that paying sufficient attention to proper warm-ups, stretching, and cooling down is vital. After the next section, however, the focus of this blog post will be on technique.

A Word About Physical Development and Strength Training

In our society, we can get away with not having to do very much physical labor and exercise. Contrast this with our ancestors, whose survival included a necessity to perform manual labor, walking, etc.—this obviously provided our forefathers with a better fitness base than we typically have today. I like to keep this in mind when I advise and train athletes in strength training. My thoughts go toward contributing to their general fitness base and letting it benefit sprinting as it will.

Having said that, I also believe it is valuable to be aware of the muscles that are more directly related to sprinting success and give them the attention they are due. Admittedly, since I coach middle school and high school athletes, strength work is addressed mainly with bodyweight exercises, medicine balls, lifting tires, and doing hills in various ways.

Lastly, learning to recruit the glutes effectively is universally understood as a key aspect. This glute recruitment video is worth looking at, as it references external and internal pelvic rotation and the big toe being in contact with the ground—aspects that relate to various exercises used in training, as well as to sprinting. In addition, the book Running by Frans Bosch and Ronald Klomp also details how the glutes work with the quads, hamstrings, and calf muscles through each stage of the sprint.

Learning and Teaching

This blog article is directed toward coaches, as well as athletes who are mature enough to receive instruction on technique and effectively apply it. The ways that athletes receive information and apply it may differ. Coaches and athletes need to realize this.

Stu McMillan made a great observation of the types of cues his athletes benefited from. He said, “Athletes generally fit into two categories, ones that can feel the foot on the ground really well, as opposed to the ones that feel the limbs in space really well.” So, for upright running, some may respond better to cues similar to “pushing down into the ground,” while others relate better to “driving the thigh into space or their hand up into space.” So the cue, “drive the hand up up up up, and that may bring the entire system up,” may work for some athletes, while “feel the foot go straight down, straight down, step down, recover up, straight down,” may work better for others.

Athletes trying to focus on cues they aren’t good at receiving can disrupt their rhythm and timing. In short, it’s important to choose words carefully, says @TheYouthTrainer. Share on X

There are also athletes who, at top speed, feel their feet on the ground and others who don’t. Rhythm and timing are important parts of sprinting, and athletes trying to focus on cues they aren’t good at receiving can disrupt their rhythm and timing. In short, it’s important to choose words carefully—ALTIS coaches even talk about how “mood words can significantly enhance outcomes for coaches and athletes alike.”

Power Perceived

The following quote is from a course I took with ALTIS, and speaks to much of what I’ve said to this point and what I’ll be saying afterward: “As it relates to our key words as an efficient retrieval of a technical concept, power is important only during early acceleration—when time on the ground is in excess of time in the air. Once flight time exceeds ground contact time (in most elite sprinters, somewhere around the sixth to ninth step), the word ‘power’ is no longer effective, and we should move on to words that more accurately describe our technical objective for the remainder of the run. However, because the speed reached in the initial steps highly correlates with the speed reached at maximum velocity, it is important that the athlete maximize this portion of the run. Power is a word that resonates with most athletes, and when they have the time required to feel a horizontal push during initial acceleration, power is most useful in reminding the athlete of the specific objective and feel.”

I also think something easily relatable to athletes is Jonas Dodoo’s statement describing the section of the race where the feeling of power is more prevalent: “Most of the effort is at the end of the push.” However, as described earlier, some athletes may be more aware of the pump of the knees during this time.

The Start Defined

In his book, The Mechanics of Sprinting and Hurdling, Ralph Mann said the start consists of three steps. In the context of using starting blocks, he refers to the start as “Block Clearance,” “Step One,” and “Step Two.”

I like to refer to the start as part of “Getting Out,” with the understanding that a big enough force and big enough movements will be used and directed up the track (explained later).

Starting Progression

Since I believe that the performances and skills demonstrated out of a standing start can be looked at as a prerequisite to success with other starting positions, as well as having carry-over value, I get pretty detailed in my approach. I believe standing start practice has particular value when wearing training shoes or racing flats on a surface that offers a reasonable degree of traction. Obviously, wet grass and sand on a track are not good choices.

With a standing start and without spikes, the athlete must use a high level of skill to master body positioning, balancing strategies, force application, and directions of force to be able to start explosively and effectively move up the track. “Effectively moving up the track” includes success in dealing with the landing forces associated with the standing start, which, in my opinion, won’t be as great as those encountered from aggressive three- and four-point starts and those with starting blocks. In my mind, this constitutes a step in the process of developing eccentric strength, as well as improving coordination, timing, balance, etc.

A fundamental element of sprinting is establishing and maintaining a large split at the knees during acceleration, as you can see in this Carmelita Jeter video. Addressing hip mobility and strength supports this. The large split is also an essential part of the “knee lift motor pattern,” which is necessary to produce the powerful vertical force into the track, a key to max velocity (explained later). Once again, standing starts provide the ultimate specific “lead-up” activity.

Ideally, at the end of the day, this progression will lead to how world-renowned sprint coach John Smith described the start and initial portion of a sprint: “It isn’t about thrust as much as it is about balance—about each step being so perfectly placed that it sets the stage for optimizing the power of the next step.”

Standing Start Basics

While positioning the body to get out to a good start, it is important to assume a starting stance at an appropriate position in relation to the starting line. Novices often assume a position where their center of mass is too much to the rear of the starting line.

For the “set” position in the standing start, there should be a hip hinge movement at some point, where the torso goes forward, the hips move back some, and the back is straight. Ideally, bending skillfully and being poised to start explosively include preparing the glutes to be recruited in anticipation of taking the body forward and upward during the starting action.

Ideally, bending skillfully and being poised to start explosively includes preparing the glutes to be recruited in anticipation of taking the body forward and upward during the starting action. Share on X

The head should be ahead of the starting line, and the shoulders should at least be up to the line but probably ahead of the line to some extent. The hips should feel close enough to the line, with the feet aligned with the knees and hips. The knee and shin of the forward leg in the starting stance should feel close enough to the line, with the body bent to some degree while anticipating the push-off. About two-thirds of the weight is centered over the position of the front leg in the starting stance.

Standing Start

FYI—I do not like the standing start method of “stand up straight with little or no bend at the knees, lean forward, then collapse at the joints” in response to the starting command. This will not serve as an effective lead-up to other starts, as trying to simulate this with three- and four-point starts can—as Dan Pfaff points out—result in projection angles that are too low and balance issues that athletes try to correct with zigzag running.

There is a quote related to standing starts from the article “What is the Drive Phase in Sprinting, Part 3” that may also be helpful: “You can’t push from your toes as toes are meant to grip. The gripping toes create stability for the push off. This is the key to force application and push mechanics when starting from a standstill (traction).”

Soft Standing Starts 

To lessen the wear and tear on the legs during warm-up runs and many training runs, I often allow athletes to do “soft starts.” This means the athletes are allowed to move to the line and roll, skip, and otherwise move into the starts as they wish. Requiring the athletes to be completely stationary before starting can be pretty stressful for the legs. Stu McMillan of ALTIS also explains and shows athletes moving into starts in this video.

Decelerate Properly

When running any distance, it is important to pay attention to how to slow down. If the athlete simply turns off their concentration and lets gravity slow the body down after crossing the finish line, injuries can occur—i.e., hamstring injuries. This video does a great job of explaining this.

Overcoming Inertia

Inertia is a quality that lets something stay still if it is still or keeps it moving if it is moving. In the context of a race, the starter/official wants the athletes to be still when in the “Set” position so as not to gain an unfair advantage, but as you see very often, sprinters get away with subtle movements before the gun.

Overcoming inertia requires applying a force, but in a race, it is also important to be able to apply the force quickly to get out with or ahead of the competition. So, one of the challenges in starting is to come up with a way to be ready both to react quickly and begin moving powerfully up the track.

There are numerous ways to be effective, related to being coiled and ready to uncoil like a spring, along with the athlete focusing on how the body or body part will move in response to the gun rather than focusing on the starter’s gun. It is no different when using a standing start, although certain details will be specific to that particular starting position.

Shin Angles

When in the standing start position, typically, the shin of the front leg is not angled forward in any noticeable way. During the starting action after being required to be stationary, however, there is a subtle movement of the front foot off its spot, and a forward shin angle occurs as the front leg joins the rear leg for the push-off as the body moves forward. Note that in this video below (this is also clearly evident in football wide receivers).


For three- and four-point starts, where the movement of the front foot off of the spot does not occur, and the front shin is already at a forward angle when in the “Set” position, 45 degrees to the ground is suggested; this is closely related to the departure trajectory.

In my mind, an athlete, recognizing these differences, can increase body awareness, coordination, and timing by learning how to achieve an optimal level of power for the push-off for each starting position.

Although the shin is angled at the intended departure trajectory for three- and four-point starts, there is at least a little reduction in the angle between the shin and the ground during the push-off. This is evident in this slow-motion start video; however, a sprinter with good leg stiffness qualities should not exhibit much of a reduction in shin angle during three- and four-point starts. The slow-motion start video features former world record holder Asafa Powell. He obviously has good leg stiffness, and you can see that his shin angle doesn’t reduce very much.

More on Standing Start Footwork

A foot movement that is not acceptable is one in which the rear foot steps backward to initiate the push-off. I believe this is often done when the feet are not sufficiently spread initially, but also if the athlete just isn’t aware of what I described above or is not able to effectively pull it off. Regardless, I feel that this negatively affects hip height, among other things.

A foot movement that is not acceptable is one in which the rear foot steps backward to initiate the push-off, says @TheYouthTrainer. Share on X

When athletes doing a standing start are allowed to roll or fall into the start, the subtle movement of the front foot off the spot typically won’t occur since the rolling forward creates the forward shin angle. Note this when watching this athlete subtly roll into his start.

Three-Point and Four-Point Starts

So that this blog article isn’t overly long, I won’t give step-by-step details about three-point and four-point starts, but I will first point to a few vital considerations and then to specific areas where standing start skills can carry over.

Vital Considerations

When using blocks, having sufficient spacing for the positions of the pedals, as well as allowing part of each foot to be on the track, are important aspects benefiting from the learning progression I’m describing. Some high-level athletes may be able to be effective with their feet off the track and up on the block pedals, but this isn’t suggested for most athletes.

The suggested spacing for starting blocks—two shoes from the line for the front block and three shoes from the line for the back block—is too far from the starting line for four-point starts without blocks. Conversely, many high schoolers who are not allowed to use blocks during prelims in a track meet, but do have good spacing for the feet without blocks, try to use the same foot placements when they are allowed to use blocks during the finals. The result is a position that is too close to the line and cramped.

The bottom line is that when doing standing starts, it is pretty easy to figure out how to be positioned at the line, including how to space the feet, so that obstacle is easily negotiated, and the focus can be on improving body positioning, balance, etc. However, when trying to do three- and four-point starts, if the feet are not in a good position, the start will never be a great one, and a lot of practice will be in vain. Another important starting block basic element is described in #3 below.

Six Areas Where Standing Start Excellence Can Carry Over

  1. Being in the right position in relation to the starting line.
  2. Properly centering weight over the position of the front leg.
  3. An athlete able to position, balance, and explode out of a standing start position should be able to do so from a three- and four-point stance without it being a strain on the hands and arms. Often, the athlete will need to learn how to skillfully rise from the “On Your Marks” position, letting the hips go up and back some at an angle so that too much weight won’t be on the hands. Having said this, the athlete has to be careful not to have the hips move backward in such a way as to have the momentum going backward when ready to respond to the gun.
  4. A major aim is to be able to aggressively and powerfully project up the track into a high post with the first step, as seen in the photo below. There should be a punching-type knee action, with the first stride being completed by dropping/pulling the leg back down aggressively as the body moves forward and the trailing leg called into action rapidly and as linearly as possible. Again, pulling this off from the standing start position provides a great stepping stone toward the future.
  5. With great starting skill, a goal should be, as Maurice Greene said, to “use as much power as possible, but use as little energy as possible.”
  6. Seamless transition to max velocity, with a great balance of stride length and stride frequency

High Post
(Photo Courtesy of ALTIS)

Important Arm Movement Detail of the Three- and Four-Point Starts

To properly involve the arms during the start, instead of just picking the hand(s) off the track, the arms should make a sweeping motion through a good range of motion, with the hand opposite the front leg sweeping back and up. This is demonstrated at about the 2-minute 20-second mark of this video, featuring Olympic gold medalist Justin Gatlin and Coach Brooks Johnson.

For three-point starts, the same goes for the action of the hand that is on the ground; the only difference is that the hand going forward comes from a different position.

If the arms don’t move properly in coordination with the legs, the push may be shortened or premature. Arm action needs to continue to be in sync with the legs and general running movements to maximize performance.

Importance of Max Velocity

Although the start and initial acceleration are important, the crucial aspect for sprinters to develop is max velocity (top speed). What we covered previously helps put the athlete in a position to maximize max velocity, and each detail explained below relates strongly to max velocity development.

Max Velocity Sprint
(Photo by Daniel A. Anderson/ZUMA Wire/Icon Sportswire)

Linear and Rotational Aspects of Sprinting

Although there are definitely linear aspects to sprinting—i.e., the athlete is trying to travel a straight line up the track from point A to point B—and side sway running actions are inefficient, it is important to understand that running features rotational actions that counterbalance one another. Dan Pfaff explains in this video how the hips and shoulders coordinate in this way. Again, relating to the athletes, how they feel the rotation is key and an essential part of their ability to continue to effectively apply force as the feet spend less and less time on the ground.

Go to the 27-minute and 40-second point of this video for a nice description by Jonas Dodoo about force application during upright sprinting at high speeds. When you have time, I suggest checking out the whole video.

Understanding the Effects of Horizontal and Vertical Ground Forces 

Sprinting is a combination of horizontal and vertical ground forces. Mann states, “The amount of Vertical force produced during the Block portion of the start, as well as the next two steps, is actually virtually the same as the Horizontal force.” This may sound surprising to many coaches who equate vertical force with “popping up.”

It is important to keep in mind that the objective is to direct the combined forces at an ideal trajectory. Sometimes, it takes watching film to see how close an athlete came to the suggested “High Post” position with the first step, again, shown in the image from ALTIS above.

Critical First 10 Meters

After the first three steps, Mann states, “The Mechanics of the Sprint begin a transition from a powerful Horizontally directed drive to a more Vertically directed effort seen in the Maximum Velocity Sprint Mechanics.” This is not, however, to minimize the importance of horizontal forces. Alluding to the first 10 meters, Mann states this is where “the production of Horizontal ground force is of critical importance.”

Although this should have the effect of having the athlete move through space in a relatively low-to-the-ground, leaning-forward posture, it is a mistake to tell the athlete to try to stay low.

The hips and torso should rise together, and there are different cues to help the athlete rise correctly. Dan Pfaff likes to say “hips climbing” and some may say “rise through the hips” since one effect is that the legs will exhibit less bend at the knees as the hips rise. Two of John Smith’s drive phase cues that I got from some of his materials are “simulate running downhill” and “Keep arms in front (reach out—don’t overdo it though).”

After the First 10 Meters Through Maximum Velocity

As the athlete continues to accelerate, and once again, with vertical forces becoming more and more primary, there will come a time to transition into what I like to refer to as a “pelvic repositioning” and the “top speed gear.” In the book Running, Bosch and Klomp describe this by stating, “At the moment when velocity is nearly maximum, the trunk is then directed more upright while the pelvis is pushed farther forward.” Again, I also refer you back to the “knee lift motor pattern” as being essential for powerful vertical force production.

Mann adds, “The maximum velocity that the athlete can produce is dependent upon how long productive Horizontal forces can be applied. Once Maximum Velocity is reached, the goal must be to produce the large level of Vertical force required to maintain proper Mechanics while continuing to produce the small amount of positive Horizontal force needed to maintain Maximum Velocity.”

In other words, there is a bounciness that has the athlete moving forward at top speed. During the bounciness, the feet are pushing up, not lifting the head and chest. Describing the posture, Lorenes Seagrav likes to say, “tummy tight, back flat, hips facing up (butt tucked).” John Smith likes the cue “chin down.” I also like the cue of “imagining that there is a string from the sky attached to the top of the head, pulling upward.”

Important Max Velocity Technical Aspects

When transitioning into the top speed gear, B skip drill dynamics become more of a part of the strides. This awesome video explains critical do’s and don’ts for the strides during this phase. The whole video is great, but you can forward to the 27-minute, 30-second mark for what I’m specifically referencing.

I also like Usain Bolt’s max velocity cues, “shoulders down and knees up, swinging from the hips.”

Applied to the 40-Yard Dash

Unlike a 100-meter dash, for the 40-yard dash, it is possible to accelerate from the starting line all the way through the finish line without any deceleration. In fact, the acceleration phases are abbreviated to try to arrive at top speed more quickly and take that top speed to the finish line. This means that the rhythm of running a 40-yard dash should be a little quicker than the rhythm of running a 100-meter dash.

Unlike a 100-meter dash, for the 40-yard dash, it is possible to accelerate from the starting line all the way through the finish line without any deceleration, says @TheYouthTrainer. Share on X

The Standing Start Is a Skill

Although I don’t believe it necessary for the athlete to feel that they have perfected the standing start before moving on to other positions, I do feel it helpful that the athlete recognizes attempts to be skillful with the standing start can give them a deeper understanding of how to utilize the early portions of the race to maximize performance.

Since you’re here…
…we have a small favor to ask. More people are reading SimpliFaster than ever, and each week we bring you compelling content from coaches, sport scientists, and physiotherapists who are devoted to building better athletes. Please take a moment to share the articles on social media, engage the authors with questions and comments below, and link to articles when appropriate if you have a blog or participate on forums of related topics. — SF


Skyhook Jump

Skyhook Contact Mat: A Review & Training Guide

Blog| ByBrandon Holder

Skyhook Jump

The Skyhook contact mat is a wireless jump mat that can be used to assess an assortment of jumps. The mat connects to a free training application that captures and tracks data over time, allowing you to upload your team rosters and track your jumps through indicators such as jump height, airtime, and ground contact time. It can also calculate an individual’s reactive strength index (RSI). There is really no limit on the assessments that can be performed since it allows you to create your own jumping assessments in a custom protocols option.

The objective of this review is to give my personal experience with the product, explain what it is and how it works, and examine three major factors when comparing it to similar products:

  1. Functionality
  2. Durability
  3. Pricing

This product has vastly improved our testing efficiency and saved us precious amounts of time in doing so. This article is meant to help other coaches better decide if the Skyhook contact mat is right for them and whether it could similarly benefit those they work with.

What Is the Skyhook Contact Mat?

The Skyhook mat resembles a battle shield, with a jumping surface area of 31 inches by 31 inches and a weight of almost 30 pounds. Its solidity stood out to me immediately when I first received the mat. I’m told the mat is made from a secret, proprietary polyurethane blend, and I have no doubt that this mat will last, seeing as how I’ve tried to break it multiple times with no success. The package also includes the charger and battery to power the mat, along with a digital setup guide.

I’m told the Skyhook contact mat is made from a proprietary polyurethane blend, and I have no doubt this mat will last, seeing as I’ve tried to break it multiple times with no success. Share on X

While not a tangible piece of equipment, the training application that comes with the mat takes the product up a level. The ability to connect to the mat via Bluetooth and use it to evaluate an array of assessments online or offline is a powerful capability. The data gets saved into a cloud-based storage system that you can access to show trends in training, improvements, averages, and more.

Skyhook Jump Mat
Image 1. The Skyhook contact mat.


Video 1: Skyhook app walkthrough.

How to Set Up the Skyhook Contact Mat

When setting up the Skyhook mat, the first thing you’ll need to do is download the Skyhook application on your phone or tablet. The app is compatible with both iPhone and Android and comes with the purchase of the mat. There isn’t a subscription fee, which was nice to see and rare with a cloud-based training software.

Once the app is downloaded, it will walk you through creating a profile via email to log in, and you can then begin utilizing the mat to its full capabilities. This entire process will take you a few minutes at most.

When logged in, you first need to start using the mat to connect to Bluetooth via your phone or tablet. The mat does disconnect and go into sleep mode if there is a long break during its use.

The sleep mode helps preserve battery life (and it took an entire week of use until I needed to charge my mat for the first time). The charging guidelines from Skyhook state that the battery will last 2–4 hours with consistent use over multiple hours and can last up to 7–10 hours for less consistent use over 1–2 days. I can vouch for this with my sporadic use matching the latter pattern.

The battery takes 12 hours to charge fully—while that is quite a long time, I recommend just charging it after each use, and you should never have a dead battery on your hands.

Skyhook Mat Training Use

When beginning to go through the app, it can initially seem like a lot—I recommend just playing around with the app and discovering options for yourself. The app even has a setting called “Playground,” which is essentially a demo-mode option for this exact purpose and does not save any of the collected info.

The Skyhook’s app has a customization option that walks you through creating your own jump assessments specific to your athletes. Share on X

The Skyhook contact mat can be used to test several preprogrammed jump assessments, and it also has a customization option where it will walk you through creating your own jump assessments specific to your athletes.


Video 2. How to create custom jump protocols in the Skyhook app.

The app does briefly explain the assessments to the user, giving a short description of how to perform the test and what it’s testing. I think this could be improved by including more information, such as why you would want to perform the assessment and, if possible, even a brief video of the assessment.

To some extent, having so many options can be a bad thing since it floods coaches with information and assessments that may not be relevant to their situation. Giving the why and videos could potentially make it clearer to the user what jump assessments would be most appropriate for their athletes and situation.

Exercise Description
Image 2. Exercise description.

How the Skyhook Mat Has Worked for Me

The Skyhook mat has saved me considerable time when performing vertical jump assessments and collecting the data. I primarily work on the tactical side of strength and conditioning, occasionally working within athletics on a small scale. I was initially concerned that the Skyhook mat would be overkill for my situation—like trying to kill a fly with a shotgun—since I do not and cannot perform many of the jump assessments with the police officers I work with.

I have still found significant value in the product, and it makes the jumping assessments that we use with our police recruits easier to execute. Much of my job isn’t at a set location, so I feel comfortable moving the mat and using it with a variety of locations and surfaces, and even outside!

We had performed most of our previous vertical jump testing with a Just Jump mat, so there was an initial concern about the change in data since the Skyhook mat does not function off the Just Jump formula. This would render our previous information worthless if the Skyhook mat were used in the future; it wasn’t a major issue but a large inconvenience. Skyhook, however, created a Just Jump Adjustment that you can enable in the settings to make your data points comparable to those tested in the past with a Just Jump mat.

Skyhook created a Just Jump Adjustment that you can enable in the settings to make your data points comparable to those tested in the past with a Just Jump mat. Share on X

Something that I haven’t done yet with the Skyhook mat, but that I’ve done in the past with other products and plan to do moving forward, is use the vertical jump as an assessment for readiness. (I discuss this in a prior article, “Four Low-Cost Athlete Readiness Tools  to Enhance Your Program.”) Having the app show trends throughout the jump and being able to identify specific points—such as the average, median, max, and minimum of various jumps and metrics—would make it easier to quickly gauge the vertical jump as a readiness assessment within any size group.

How It Compares

When comparing the Skyhook mat to other products that assess jumping, there are two that immediately come to mind: the Just Jump mat and stick-based alternatives, such as the Jump USA Vertec (and clearly, the Just Jump mat is what coaches will find most comparable to Skyhook).

I considered three major factors when comparing these products: functionality, durability, and price.

1. Functionality

I find the Skyhook mat to be superior in functionality for a few reasons, the first being that it can perform multiple jump assessments and includes the ability to create your own assessments with little to no limitations.

I understand that the other options allow you to perform more than just a standard vertical jump, but the Vertec and similar stick options only give you the height jumped. They don’t include things such as hang time, ground contact time, and RSI.

The Skyhook training app enables you to track and save all your athlete’s information, which enhances the user’s experience and can aid in the training process by offering information to make better programming decisions. Neither comparable product can do this.

2. Durability

The durability of the Skyhook mat is something that I find to be of extreme value. I’ve used comparable products in every other location I’ve worked, and those haven’t always stood the test of time when put through the wringer.

I’ve used comparable products (to the Skyhook contact mat) in every other location I’ve worked, and those haven’t always stood the test of time when put through the wringer. Share on X

Whether it be the cords of the mats getting stepped on and torn by high school students or sticks breaking off from college athletes swatting too hard, the durability of these pieces has created headaches over extended periods. I prefer to purchase training equipment one time only, then use and abuse it for its lifetime.

My primary concern with the Skyhook mat was its charging cord, which connects the battery. This is its weak point and the only thing likely to break or wear on the product. It also isn’t very easy to fit the battery into the mat unless you get the wire to push it in just right.

Diving deeper into the product, though, I discovered that Skyhook recently corrected this on their newest generation model. (I have an older model.) The newly upgraded model removed the wire and is now connected through a magnet on the port and battery instead.

Charging Port
Image 3. New charging port.

This is important, not only because SkyHook corrected a potential weak spot on the product but also because it shows the company continues to improve upon its product, something that we should be able to expect from all companies.

3. Price

With all of that said, the price point on the Skyhook mat matches its quality. The Skyhook contact mat costs $1,389. This is higher than comparable products, with the Just Jump mat priced between $790 and $893 and the Vertec at $925. (And other similar companies sell their stick vertical jump testers for even less.) These prices don’t include shipping, taxes, etc.

While the price for Skyhook is higher, I find the product to be worth the extra cost if you plan to utilize jump assessments on even a semi-routine basis. This is due to the previously discussed increased functionality and durability.

Ultimately, coaches will have to make this decision based on what is best for them and their situation.

Exercises, Setting, and Demos

Free Jump

The Free Jump setting is not necessarily meant to be the Vertical Jump setting, although I’m sure many, like me, will use it as such. Instead, the Free Jump is described as “jumping with no limits”—basically, you can do whatever on the mat, and it will measure the jump height.

You can go into the jump settings and edit this function, which will help prevent common double jump mishaps, and even change its name, or you can create your own vertical jump testing assessment.


Video 3. Vertical jump on Skyhook.

Single Depth Jump – Height

This assessment starts with the athlete off the Skyhook mat—they will essentially perform a hop, drop onto the mat and use it as a springboard to jump as high as possible, and then land back on the mat. This is a more advanced test for lower-body power and jumping ability since the individual lands and rebounds into the jump.

The assessment measures height from the single jump, and this can be made more specific by using the custom creator and performing it off specific box heights.


Video 4. Single-depth jump for height.


Video 5. Single-depth jump from a 6-inch box.

4/2 RSI

The RSI assessment with the Skyhook mat begins with the individual off the mat. From there, they will jump onto the mat and perform four jumps. While it will measure all four jumps, only the best two will be evaluated.

Finding an athlete’s RSI is beneficial because it demonstrates how well someone can utilize the stretch-shortening cycle, moving from an eccentric to concentric muscle contraction—essentially what we see in the world of sport or when high operators need to execute their jobs at high outputs.


Video 6. Completing four jumps for the RSI test on Skyhook.

10-Second Ground Time

The 10-second ground time jump assessment examines the total ground contact time during the period. The ability to produce force quickly and minimize contact time is a crucial trait for many in athletics, and this assessment is great for teaching athletes to be freer, more fluid, and more reactive when it comes to jumping. 


Video 7. Using duration to assess ground contact time.

Five-Jump Air Time

The five-jump assessment is the only preprogrammed assessment measuring air time. For this assessment, you will do exactly as it sounds, performing five continuous back-to-back jumps on the mat, and it will calculate your time spent in the air.

This test could be utilized with individuals who need to maintain their power for a particular amount of time, even if it doesn’t line up perfectly; a basketball player would probably not get five back-to-back chances in the same series to get a rebound, but it still helps broaden their abilities and provides a fun challenge.


Video 8. A five-jump test measuring time in the air.

Single Hurdle Jump

Another jump to assess ground contact time is the single hurdle jump. Starting off the mat, with a hurdle between you and the mat, you will perform a hop over the hurdle. Upon landing, you want to explode back up like you touched hot lava and land off the mat.

I chose to use a smaller hurdle of 6 inches, but this could be modified for more advanced individuals at larger heights: 8 inches, 10 inches, 12 inches, etc.


Video 9. Single hurdle jump test to assess GCT.

Custom Options

Weighted Jumps

One of the first custom jump options I created was a weighted vertical jump. I found value in this because most of the individuals we work with can make the connection of performing tasks with weight greater than their body weight, and it is still a valid test to demonstrate the ability to produce force.

When utilizing this protocol, I chose to use 10% of the individual’s body weight; for example, a 200-pound individual would hold a pair of 10-pound dumbbells for 20 pounds total.


Video 10. Using Skyhook’s custom jump protocols, a weighted jump performed with two dumbbells.

Paused Jumps

One could dive deep down the rabbit hole of vertical jump variations. Things such as where you place your hands, the angled position of the hips, and other small details can all affect the athlete’s vertical jump and be of value to a coach in certain circumstances.

I like having a paused training option when working with athletes because it can give some information on whether an athlete is more force- or velocity-dominant. Share on X

I like having a paused training option when working with athletes because it can give some information on whether an athlete is more force- or velocity-dominant. I know there are other ways to find this, and the coach’s eye can give you a great idea, but this is another option that will not cost you a lot of time.

Have athletes hold the bottom position of the jump for a three-count before taking off—just be mindful of them dropping down too quickly and the mat attributing that as the jump. You can edit the jump recorded through the custom options to prevent this.


Video 11. Holding the bottom position in a pause jump.

Single-Leg Vertical Jump

While not as common, performing single-leg vertical jumps can be great in sports where jumping is a main facet, such as basketball, volleyball, and track. It is also helpful to show any large imbalances between limbs that could provide some value and just get your athletes more comfortable performing max effort jumps from a single leg.

I’ve personally used the single-leg vertical jump tests in the past with track athletes and programs. It can create a lot of clutter when tracking, something the Skyhook would have helped with all those years ago.


Video 12. Single-leg vertical jump to two-footed landing.

Be Creative, Have Fun

The strength of the Skyhook mat is that the custom options are only limited by the coach’s ability and creativity. I think this is crucial for a product designed to measure jump performance because jumps really have no limitations.

The Skyhook mat’s custom options are only limited by the coach’s ability and creativity. This is crucial for a product designed to measure jump performance because jumps really have no limitations. Share on X

Use assessments in warm-ups to perform multidirectional jumps, use the mat to perform jumps in the lateral plane, and/or have jumping competitions of all different metrics—be creative and have fun.


Video 13. A wide range of jumps can be performed on the Skyhook and tracked in the custom protocols.

Final Take

Overall, the Skyhook contact mat is a fantastic product that can help improve a coach’s ability to assess jumping metrics and collect that information in an organized fashion. The addition of the training application greatly improves its functionality, and the brute durability of the product helps me justify its value regardless of its higher price point.

Coaches should assess where their values lie with using training tech, but I have no doubts that this product offers a significant amount of value.

Since you’re here…
…we have a small favor to ask. More people are reading SimpliFaster than ever, and each week we bring you compelling content from coaches, sport scientists, and physiotherapists who are devoted to building better athletes. Please take a moment to share the articles on social media, engage the authors with questions and comments below, and link to articles when appropriate if you have a blog or participate on forums of related topics. — SF

Jump Landings

Jump Landing Mechanics & Injury Prevention in Athletes (The LESS Test)

Blog| ByJim Wittstrom

Jump Landings

In the world of strength and conditioning, athletes often perform hundreds or even thousands of jump-based exercises or movements throughout their annual training cycle as a means to develop explosive power and athletic performance. For these athletes, jumping is only part of the equation; landing safely from each jump in a manner that minimizes risk of knee injury bears immeasurable importance.

While strength and conditioning coaches often spend much of their time instructing their athletes on the mechanics of maximizing jump performance and explosive power (and rightfully so), not as much instruction or time is typically given towards landing safely or efficiently.

This is problematic since poor landing mechanics can significantly increase injury potential to the athlete, notably to the knee. Over 25% of all athletes who experience an ACL tear will not return to their previous activity levels even with successful surgery and rehabilitation, and athletes who undergo ACL reconstruction are 15 times more likely to re-rupture than those without history of ACL rupture.1,2

Over 25% of all athletes who experience an ACL tear will not return to their previous activity levels even with successful surgery and rehabilitation. Share on X

While training for maximal jumping ability is critical to optimizing an athlete’s performance, optimal vertical jump performance doesn’t mean much if an athlete sustains an injury upon landing. As such, optimal biomechanics when landing from a jump task are just as critical to develop as when executing the jump itself.

Why Look at Jump Landing Mechanics?

While contact-based knee injuries within sport are essentially non-preventable, non-contact knee injuries should be of particular interest to strength coaches and clinicians due to the largely modifiable neuromuscular factors that can be implemented to reduce or eliminate their occurrence.3

Non-contact knee injuries are prevalent within sport, with approximately 18% of these injuries arising within game play and 37% arising within practice or training sessions.4 Biomechanical errors involving knee valgus and stiff landings, among other such faults, are associated with increased injury risk to the athlete.

While numerous movement screening protocols have been designed to identify potential injury risks and aberrant movement patterns, many of these screens do not analyze an athlete’s jump-landing mechanics—an integral sport-specific task for many athletes. This is not to say that other screening protocols should be discouraged; rather that the coach or clinician must account for all facets of the athlete’s sport and implement movement screening protocols in line with their sporting tasks, including landing from a vertical jump.

The coach or clinician must account for all facets of the athlete’s sport and implement movement screening protocols in line with their sporting tasks. Share on X

As an example, Everard et al. conducted a research study to identify the relationship between the Functional Movement Screen (FMS) and the Landing Error Scoring System (LESS). While both systems have been shown in numerous studies to be reliable and valid, the results from Everard et al. found that performing well on one screen did not indicate an athlete would perform well on the other.5

As such, screening for, and revealing, biomechanical flaws within an athlete’s movement should include both generalized movement patterns as well as sporting-specific tasks to maximize the athlete’s overall safety and wellbeing. In the case of athletes whose sporting tasks involve jumping (basketball, volleyball, etc.), ensuring optimal biomechanics when landing should not be overlooked.

How any identified biomechanical issues are corrected will depend on multiple factors, including the particular faults identified, needs of the athlete, and scope of practice for the coach or clinician. As such, it is important to realize that there is no universal approach for how jump landing mechanics should be rectified.

As a result, the following is a discussion of the Landing Error Scoring System as it pertains to screening for non-contact knee injury risks in athletes, but it does not offer specific insight regarding corrective intervention. An individualized approach should always be taken for each athlete.

The LESS Test

The LESS is a screening tool developed to identify the risk of potential non-contact knee injury in athletes, notably for ACL injury (though associated risk such as meniscal and MCL injuries can also be factored). The premise of the system is that identification of biomechanical (body position-based) errors present within the lower extremities during jump-landing can lead to reduction of injury risk via corrective interventions, such as hip and knee strengthening, improving proprioceptive awareness, and overall landing technique.

The premise of LESS is that identification of biomechanical errors present within the lower extremities during jump-landing can lead to reduction of injury risk via corrective interventions. Share on X

The jump-landing task is recorded via video from two different cameras—one recording the sagittal plane (recording the athlete from the side) while the other records the frontal plane (recording the athlete from the front). Each camera is placed 3 meters away from the landing zone at a height of 1 meter above the floor.

The system works by evaluating 17 different biomechanical occurrences that take place throughout the body during the jump-landing task (also termed a drop-vertical jump). The examination for scoring can be divided into three categories:

  1. Jump-landing technique as it relates to position of the trunk and lower extremity position upon connecting with the ground.
  2. The scoring of faults involving foot position between initial ground contact and maximal knee flexion.
  3. Movements of the trunk and lower extremities that occur between initial ground contact and maximal knee flexion.

Scoring for the 17 items uses a dichotomous scoring rubric for the first 15 items (see the scoring sheet below), noting either the presence or absence of a movement error; a score of 0 indicates an absence of error while 1 denotes the presence of an error. Item 16 (joint displacement) and 17 (overall impression) can be scored with three potential outcomes (see scoring list below). The analysis and subsequent scoring are done manually by a trained individual upon analyzing the recorded video at a later point in time.

LESS Scoring table
A higher overall score of the test indicates a greater number of movement errors arising during the jump-landing task and therefore correlates with higher risk for potential non-contact knee injury for the athlete.

Testing Procedures

To perform the test, the athlete stands on a 30-centimeter jump box. Then, when given verbal command, the athlete jumps forward off the box with both feet, lands at a pre-measured distance of 50% their body height in front of the box, and immediately performs a vertical jump with maximal effort.

LESS Jump
Image 1. A four-panel sequence of the LESS test when observed from the side.
LESS Diagram
Figure 1. A schematic of the overall setup for the LESS Test. (Schematic adapted from Padua et al.)

Validity and Reliability of the LESS Test

Any strength coach or clinician incorporating standardized tests into their athletes’ testing—be it performance-based or prevention-based—should ensure the test is valid and reliable (validity assesses if the test measures what it claims to measure, and reliability assesses if the test is able to consistently measure results).

Any strength coach or clinician incorporating standardized tests into their athletes’ testing—be it performance-based or prevention-based—should ensure the test is valid and reliable. Share on X

The LESS test has been shown to be both valid and reliable for the assessment of jump-landing biomechanics as it pertains to injury risk within athletes.6,7 The test also exhibits excellent expert vs novice interrater reliability when assessing 3D kinematic motion patterns utilized for scoring of the LESS.8

Strengths & Weaknesses of the LESS Test

As with any test or system, inherent strengths and weaknesses can be found within the LESS. The extent of each respective strength and weakness will largely be determined by the coach or clinician regarding their own unique situations, resources, etc.

Strengths of the Landing Error Scoring System

Naturally, the inherent strength of the LESS is its repeated scientific-backing to be a valid and reliable screening tool toward the risk of non-contact knee injury in athletes.6,9,10,11 One could argue that identifying and preventing ACL and other associated non-contact knee injuries through appropriate intervention is the ultimate strength of any screening system. As a result, any inherent weaknesses of the system (discussed below) might be seen as more of an inconvenience, as injury prevention is worth its weight in gold.

Of notable interest, the LESS has been shown to be valid and reliable for various populations and has been shown to identify risk of re-injury in athletes having undergone ACL reconstruction, making it a noteworthy system for directing areas of focus for the athlete’s rehabilitation and eventual return to sport.12 Additionally, within the ACL reconstruction population, the LESS has shown to reveal greater extent of landing errors for female populations when compared to their male counterparts.13

The LESS has been shown to be valid and reliable for various populations and has been shown to identify risk of re-injury in athletes having undergone ACL reconstruction. Share on X

Limitations & Practical Considerations

The requirement of dedicated video equipment to capture and thereafter analyze jump-landing mechanics in athletes has been seen as an impediment by many clinicians and coaches, particularly for organizations with a modest budget or for professionals who must record and thereafter manually analyze high volumes of athletes at a later point in time. Understandably, the need for a coach or clinician to acquire video equipment, establish a testing area, set-up equipment, and watch recorded videos is often seen as a barrier to implementing LESS screening into athlete testing.

Additionally, when testing large groups of athletes, the need to account for different landing positions with each athlete (landing distance is determined by the athlete’s height), can create an additional inconvenience by moving any visual landing target for each athlete. Interestingly, different landing distances are often reported within literature, though some authors have concluded that landing distance should be kept at a standardized distance of 50% the athlete’s height since different landing distances can produce different biomechanical results, leading to different scoring and subsequent categorization of errors.14

Real-Time Analysis: Modifications to the LESS

In an attempt to overcome any perceived issues involving practicality of the LESS, modifications to the system have been developed, allowing for real-time analysis to be performed either by an examiner or through dedicated software designed to capture, analyze, and interpret jump-landing mechanics in real-time.

In the case of real-time scoring being performed by a trained coach or clinician, the modified LESS is used. For real-time analysis and scoring performed by dedicated software, the traditional LESS is utilized.

The Modified LESS

With the modified LESS, a 10-characteristic jump-landing rubric is used in place of the traditional 17-point rubric. This allows for simplification of the test so a trained examiner can observe and score the athlete’s performance in real-time, negating the need for video capture and later analysis. The tester watches the athlete perform two drop-jumps from the front and two more from the side. All other metrics (box height, jump distance, etc.) remain the same.

This modified version has been shown to have high levels of interrater reliability, making it a practical and reliable screening tool for professionals working with the athlete.7
LESS Adjusted

Computerized real-time analysis

With the advancement of modern technology, research has been undertaken to determine if computerized real-time video analysis can be a valid and reliable means to performing the LESS assessment. If the ability exists for dedicated software to perform such an immediate analysis, the LESS could become a much more efficient and practical system to incorporate for coaches and professionals working with teams and large numbers of athletes.

With the advancement of modern technology, research has been undertaken to determine if computerized real-time video analysis can be a valid and reliable means to performing the LESS assessment. Share on X

Currently, researchers have examined the ability to automate traditional (i.e., non-modified scoring) LESS scoring through dedicated software and found doing so to be valid and reliable. One study by Mauntel et al. found a real-time markerless motion capture software to have the same reliability in identifying biomechanical errors as expert raters.15 When using these particular systems, it should be noted that different software programs exist; however, many of these software applications rely on using 3D motion analysis or depth sensor cameras, which may still be cost prohibitive for some coaches or organizations.

Another study by Hébert-Losier et al. looked at automating the LESS through deep learning software from 2D video when combined with machine learning methods, which eliminates the need for depth sensor cameras, allowing for analysis through traditional video recording. Results were favorable, with the authors noting that deep learning software will allow reliable scoring interpretation using smartphone cameras and a subsequent app, paving the way to great accessibility for coaches, teams, and clinicians looking to incorporate the LESS into their athlete assessments.16

It should be noted that the authors of this study mention that further study of these software systems and programs will be required to further enhance the scoring agreement between the automated system and manual scoring done by coaches or clinicians beyond their current levels.

Final thoughts

If jumping is all about performance, landing is all about safety. A dedicated effort should be made by strength coaches, clinicians, and other professionals to deliberately assess, identify, and correct jump-landing errors in their athletes to reduce the risk of non-contact knee injuries. The LESS provides a reliable and valid means to do so.

Since you’re here…
…we have a small favor to ask. More people are reading SimpliFaster than ever, and each week we bring you compelling content from coaches, sport scientists, and physiotherapists who are devoted to building better athletes. Please take a moment to share the articles on social media, engage the authors with questions and comments below, and link to articles when appropriate if you have a blog or participate on forums of related topics. — SF


References

1. Brophy RH, Schmitz L, Wright RW, et al. “Return to Play and Future ACL Injury Risk After ACL Reconstruction in Soccer Athletes From the Multicenter Orthopaedic Outcomes Network (MOON) Group.” Am J Sports Med. 2012;40(11):2517-2522. doi:10.1177/0363546512459476

2. Paterno MV, Rauh MJ, Schmitt LC, Ford KR, Hewett TE. “Incidence of contralateral and ipsilateral anterior cruciate ligament (ACL) injury after primary ACL reconstruction and return to sport.” Clin J Sport Med Off J Can Acad Sport Med. 2012;22(2):116.

3. Emery CA, Roy TO, Whittaker JL, Nettel-Aguirre A, Van Mechelen W. “Neuromuscular training injury prevention strategies in youth sport: a systematic review and meta-analysis.” Br J Sports Med. 2015;49(13):865-870.

4. Hootman JM, Dick R, Agel J. “Epidemiology of collegiate injuries for 15 sports: summary and recommendations for injury prevention initiatives.” J Athl Train. 2007;42(2):311.

5. Everard EM, Harrison AJ, Lyons M. “Examining the relationship between the functional movement screen and the landing error scoring system in an active, male collegiate population.” J Strength Cond Res. 2017;31(5):1265-1272.

6. Hanzlíková I, Hébert-Losier K. “Is the Landing Error Scoring System Reliable and Valid? A Systematic Review.” Sports Health Multidiscip Approach. 2020;12(2):181-188. doi:10.1177/1941738119886593

7. Padua DA, Boling MC, DiStefano LJ, Onate JA, Beutler AI, Marshall SW. “Reliability of the landing error scoring system-real time, a clinical assessment tool of jump-landing biomechanics.” J Sport Rehabil. 2011;20(2):145-156.

8. Onate J, Cortes N, Welch C, Van Lunen B. “Expert versus novice interrater reliability and criterion validity of the landing error scoring system.” J Sport Rehabil. 2010;19(1):41-56.

9. Everard E, Lyons M, Harrison AJ. “Examining the reliability of the Landing Error Scoring System with raters using the standardized instructions and scoring sheet.” J Sport Rehabil. 2019;29(4):519-525.

10. Ramang DS. “The landing error scoring system as a tool for assessing anterior cruciate ligament injury.” Adv Sci Lett. 2017;23(7):6694-6696.

11. Padua DA, Marshall SW, Boling MC, Thigpen CA, Garrett WE, Beutler AI. “The Landing Error Scoring System (LESS) Is a Valid and Reliable Clinical Assessment Tool of Jump-Landing Biomechanics: The JUMP-ACL Study.” Am J Sports Med. 2009;37(10):1996-2002. doi:10.1177/0363546509343200

12. Bell DR, Smith MD, Pennuto AP, Stiffler MR, Olson ME. “Jump-landing mechanics after anterior cruciate ligament reconstruction: a landing error scoring system study.” J Athl Train. 2014;49(4):435-441.

13. Kuenze CM, Trigsted S, Lisee C, Post E, Bell DR. “Sex differences on the landing error scoring system among individuals with anterior cruciate ligament reconstruction.” J Athl Train. 2018;53(9):837-843.

14. Hanzlíková I, Hébert-Losier K. “Clinical implications of landing distance on landing error scoring system scores.” J Athl Train. 2021;56(6):572-577.

15. Mauntel TC, Padua DA, Stanley LE, et al. “Automated quantification of the landing error scoring system with a markerless motion-capture system.” J Athl Train. 2017;52(11):1002-1009.

16. Hebert-Losier K, Hanzlikova I, Zheng C, Streeter L, Mayo M. “The ‘DEEP’landing error scoring system.” Appl Sci. 2020;10(3):892.

Med Ball Series

Improving Your Athletes’ Nervous System Function with Tyler Rathke

Freelap Friday Five| ByTyler Rathke, ByRob Assise

Med Ball Series

Tyler Rathke is a physical education teacher at Rogers Heritage High School in Rogers, Arkansas, where he coaches track and field and specializes in the throwing events. Coach Rathke has a passion for and specializes in neurological-based practices. He holds a USATF L2 certification in throws, a Reflexive Performance Reset Level 3 certification, and a Square One System Level 2 certification. Coach Rathke has been through the Pinnacle Performance Biomechanics program as well as the Functional Movement Screen Level 1.

Freelap USA: You have experience implementing a wide range of neurological concepts within a strength and conditioning setting—what are some low-hanging fruits that coaches can implement to improve nervous system function and positions with their athletes?

Tyler Rathke: It wasn’t long ago that I had no concept of how to maximize nervous system function and change posture with simple sensory inputs and reflex response options.

Reflexive Performance Reset (RPR) changed my life and led me to a neurological-focused approach. The low-hanging fruit that I’ve found starts with RPR Zone 1 prior to any session. The reason the hip flexion and extension reset points create immediate change in how the athlete feels and moves is that, within our primitive brain, much of what we need for survival stems from our ability to evade predators and hunt prey using those two patterns. The simple gait-related movement is necessary for us in everything we do.

When we activate our psoas and glutes with the RPR system, it gives our athletes an immediate shift in the way they feel and move. Another system that quickly changes the way the athlete feels in specific joint actions is Total Motion Release. We use a variety of those techniques on an individual basis, depending on the needs of the session or activity, to remove gross asymmetries and allow for greater ranges of motion.

Once we have reset our most integral patterns, we then move into a sensory input regimen aimed to maximize motor outputs up and down the flexion and extension chains. A simple approach to changing posture and maximizing performance is through the eyes. Each of our eye movement routines targets one of three cranial nerves found in our brain that innervate one of our six extraocular muscles.

A simple approach to changing posture and maximizing performance is through the eyes…. Expanding an athlete’s peripheral vision is imperative to ensure quality movement, says @Coach_Rathke. Share on X

It’s common for athletes to have an eye movement compensation in one of the cardinal directions, partly because so much of today’s athletes’ time is spent staring at a screen. The distance from a student’s eyes to a phone or computer, coupled with the amount of time spent on each every day (6+ hours), can wreak havoc on an athlete’s vision. Expanding an athlete’s peripheral vision is imperative to ensure quality movement.

The simplest sensory assessment is what I call a “pencil push-up.” Assessing the convergence and divergence of the eyes will tell you a lot about an athlete’s sensory input.


Freelap USA: What tests do you utilize to identify potential weak links in the nervous system?

Tyler Rathke: So much of performance is about assessing threats within the nervous system. You can identify threats through unilateral assessments like grip strength in the upper body and single-leg vertical jump performance in the lower body—the difference from left to right or anterior to posterior identifies a compensation pattern in the body.

I also take my assessment a little further through a variety of nervous system response tests after a given stimulus. This allows me to focus in on specific joint actions in the body that may be intolerant of load or find sensory inputs that may promote a threat response from the brain. I learned this more specific assessment protocol after going through Square 1 System Level 1 and Level 2.

It is difficult to understand how the brain demonstrates a threat response until you’ve felt or tested it. Most of the compensatory patterns in the body do not reveal themselves to the naked eye. If you want to find out what is affecting performance within the nervous system, you have to get the specific answers you seek. The Square 1 System has changed my ability to ask the right questions.

Freelap USA: What systems or methods do you have in place to address weakness in the nervous system?

Tyler Rathke: I have had great results by combining RPR and Square 1 to improve weaknesses in the nervous system through the reduction of threats. In addition, isometrics are a simple way to reduce threats and strengthen weaknesses due to their enormous impact on the nervous system. For example, when using an eye convergence test, there may be a discrepancy in the convergence ability of each eye. In this case, I would start by covering the efficient eye and forcing the athlete to use the eye that is not converging as well. The athlete would perform 4–5 reps of a single-eye convergence isometric.

The brain is unable to restrict the eye movement when it is isolated, and by spending time in the isometric, we retrain the nervous system to accept this pattern as normal and safe. The process of addressing weakness is all about creating an environment in which the brain perceives safety. This can be accomplished in a number of ways with exercise.

The process of addressing weakness is all about creating an environment in which the brain perceives safety, says @Coach_Rathke. Share on X

Isometric patterns performed above or below the restricted range in a squat or a press can strengthen the pattern around the limiting factor. In time, the brain will allow you to move into the previously restricted position as you have strengthened the area around which you could not previously move well. Isometrics and isolation practices are a huge part of what anyone could do to remove asymmetry, compensation, and threat.

Notice the movement of my left eye in the first video as it tries to converge. Does the movement of the left and right eyes look symmetrical to you as they converge? I could not feel the difference but noticed after watching the video that the left eye seems to lack the same ability to converge that the right eye possesses.

In the second video, you’ll see me cover the right eye and force the left eye into convergence through isolation. After doing so on several reps, I use a square one technique to remove the threat that my nervous system originally perceived during the first pencil push-up. This significantly improves my symmetry in the left eye’s convergence as I return to the pencil push-up assessment at the end of the second video (below). Without knowledge of the Square One System, you could simply perform the isolated convergence in an isometric hold and reset the nervous system over time that way.


Freelap USA: How do you utilize breathing patterns to help enhance musculoskeletal output?

Tyler Rathke: Breathing is the foundation of everything we do. It’s talked about all the time; however, I believe it’s under-coached. The athletes we see take 20,000–25,000 breaths a day, and almost all of them don’t understand how to make their breathing more efficient. We follow a pretty simple process to teach our athletes the importance of proper breathing:

Step 1 – How to breathe when not moving.

  • We usually perform these breathing drills prior to and after intensive activity. If an athlete cannot perform proper diaphragmatic breathing while lying down, we have a problem. What I tend to see is athletes pushing a majority of their air into their chest and shoulders. This is problematic in its response and trigger of the sympathetic nervous system. I believe coaches would be shocked at the number of athletes they coach who cannot effectively breathe in a lying position, with or without cueing.
I believe coaches would be shocked at the number of athletes they coach who cannot effectively breathe in a lying position, with or without cueing, says @Coach_Rathke. Share on X

Step 2 – Learning how to breathe while moving during exercise.

  • I teach athletes to breathe in with their nose on the lowering or lengthening phase (also referred to as the eccentric movement). I teach athletes to breathe out through their nose or mouth during the raising, shortening, or lifting phase (also referred to as concentric movement). Sit to stand, push-ups, and other foundational bodyweight movements are great vehicles to teach the athlete how to use breathing techniques to maximize output and increase speed of the bar or movement.

Step 3 – Learning how to relax under stress with breathing and how to stimulate the recovery process.

  • This is a two-part process. During a workout, there are times when we spike our heart rate in response to stress or stimulus. The faster we can lower our heart rate in times of stress, the better we will be able to repeat similar outputs.
  • The other part of this step is that the accumulation of an entire workout can cause a great deal of stress. This sympathetic response can be similar in theory to a bright light or annoying loud sound—without successfully returning the body to a parasympathetic state, you’ll continue to live in the bright-light, loud-sound world. The longer we spend in a sympathetic state, the more at risk we are for injury. The quicker we can shift our body into a parasympathetic state, the sooner we can begin the recovery process.

I explain it to my students in terms of light. We want to get the lights bright during our workout period, and when we are done, it is essential to turn them off or dim them before we move on throughout the rest of our day. We do this through a process of box breathing and other focused breathing techniques post activity or exercise.

Consistency is a crucial element of this process. I believe we can immediately start the recovery process through intentional breathing techniques. Box breathing, shown below, is a four-second inhale, four-second breath hold, four-second exhale, and four-second shallow breath hold. Repeat over five minutes.


Freelap USA: What are the most important items a sprint coach could learn from a throws coach?

Tyler Rathke: I think a sprint coach could learn that the training should not look a whole lot different. Throwers spend 1–8 seconds accelerating their body in preparation for an optimal throw. Whether we are discussing shot put, discus, javelin, or hammer, each involves accelerating and reaching an optimal velocity prior to an impact that sends the implement into orbit. Similarly, sprinters accelerate to an optimal speed over long periods yet still require much of the same aspects that throwers do for the beginning of the sprint.

Because of this, our throwers, sprinters, and jumpers all throw implements for power development. I train my throws, jumps, and short sprint groups together for everything but the technical event work during the entire off-season phase. We lift three days a week and have two days where we focus on either vertical force production or horizontal force production. All of my athletes complete the same activities, and the only thing we may modify is the volume of any given activity. For example, my throwers measured a 10m fly all fall, whereas the sprinters and jumpers all measured a 30m fly.

My challenge to sprint coaches would be to include more throws from a variety of non-specific and specific sprint-like positions. I believe power development can best be safely taught, learned, and expressed in throwing actions using medicine balls. I’ve included some of my favorite sprint power development exercises, from general to most specific.

My challenge to sprint coaches would be to include more throws from a variety of non-specific and specific sprint-like positions, says @Coach_Rathke. Share on X

I work from a bilateral stance to a split or staggered stance and finish with a single-leg stance. Vertical and horizontal force production is emphasized in each exercise using the constraints provided. We use medicine balls between 6 and 12 pounds throughout the season. In the videos below, a sophomore pole vaulter with a PR of 13 feet demonstrates the MB throws for height and distance.


I could almost certainly predict your best sprinters, jumpers, hurdlers, and vaulters all have the best throwing distances among their peers. Power is power in sprinting and throwing. The better you get at expressing it, the more you can utilize it in your performance!

Since you’re here…
…we have a small favor to ask. More people are reading SimpliFaster than ever, and each week we bring you compelling content from coaches, sport scientists, and physiotherapists who are devoted to building better athletes. Please take a moment to share the articles on social media, engage the authors with questions and comments below, and link to articles when appropriate if you have a blog or participate on forums of related topics. — SF


Croc Show Episode 2

Thunderbird Is the Word: The Croc Show Episode 2 Featuring Howard Jackson

Blog| ByElton Crochran

Croc Show Episode 2

“We have twelve racks here and each rack is equipped with a barbell, additional barbell, and bands…and one of the main things I love to utilize is the landmine. We use these every day for rows, push press, we do side lunges, and a whole variety of things.”

Coach Howard Jackson begins Episode 2 of the Croc Show by providing a full facility tour of the weight room at Wagner High School in San Antonio, Texas, walking through the racks, PowerBlock stations, and Olympic lifting space.

Coach Jackson spent over seven years working at San Antonio Christian School as a coach for football, PE, and strength and conditioning. When the Judson Independent School District began hiring full time strength coaches, Coach Jackson took the opportunity to become Wagner High School’s first ever Head S&C Coach. Going into his second year in the public education sector, Coach Jackson uses this experience to share his insights about misconceptions regarding private schools versus public schools. The episode also focuses on the challenges and rewards of coaching, with Coach Jackson detailing specific ways to maintain a healthy work-life balance while being the best possible husband and father.

“You have to teach people how to treat you,” Coach Jackson says, discussing the importance of coaches having a mutual respect for each other’s time in a functioning program. “I wish I’d learned that at an earlier age.”


Video 1. Episode 2 of The Croc Show featuring Coach Howard Jackson.

Since you’re here…
…we have a small favor to ask. More people are reading SimpliFaster than ever, and each week we bring you compelling content from coaches, sport scientists, and physiotherapists who are devoted to building better athletes. Please take a moment to share the articles on social media, engage the authors with questions and comments below, and link to articles when appropriate if you have a blog or participate on forums of related topics. — SF


Squat Cues

Lining Up the Cue: Expanding Options for Foundational Movements

Blog| ByTate Tobiason

Squat Cues

Coaching, like teaching, is the art of helping someone achieve something they previously couldn’t do. When it’s just you and the athlete on the platform, and they can’t seem to figure out how to best pull the bar off the floor without their hips rising too fast, knowing how to coach them through this moment is what separates the good and the great.

Any coach can point out incorrect technique, and many can demonstrate correct technique…but how many coaches can talk an athlete through a sticking point, using cues and instruction to help communicate the task’s end goal? Even more importantly, how do you coach them through a sticking point when what you usually do is not working?

Do you blame the athlete? Get frustrated? Blame yourself? Give up?

If the athlete isn’t getting one cue, stop and try another. You can’t fit a square peg through a round hole, says @Tate_Tobiason. Share on X

Every athlete is different and will respond to different cues. A coach can’t keep yelling “CHEST UP!” for the fourth week in a row if their athlete is not responding to it and their chest keeps collapsing as their hips shoot back. At this point, it may be time to explore different cueing options, such as “drive with your quads.” If the athlete is not getting one cue, stop and try another. You can’t fit a square peg through a round hole.

Broadening Your Coaching Capacity

So, let’s take the time to expand our cueing options and help our athletes become the best versions of themselves. The following is my attempt at expanding cueing options for common technique issues I have seen in the gym for three foundational movement patterns.

1. Squat

The squat is a staple in nearly every training program. Whether bilateral or unilateral, athletes find numerous benefits from the king of movement patterns; as coaches, we should be ready to help them do it safely and efficiently.

Cue: “Open your hips.”

When squatting, many lifters struggle with shifting their weight forward as they descend into the squat. Their knees are pushed forward, and once ankle mobility runs out, they end up on their toes, compromising safety and efficiency. Coaches commonly instruct their athletes to push their knees out in hopes of the athlete drifting forward. While this cue correctly identifies what needs to happen, I don’t believe it effectively cues the athlete to fix the issue. Early in my coaching career, I used this cue all the time, but it only resulted in athletes pushing their knees so far apart that their feet would begin to supinate as they continued shifting their knees forward.

One day, while attending a lifting seminar, I heard powerlifting legend Ed Coan coaching up a volunteer, and he talked about how lifters needed to “open their hips” so they could descend straight down into the squat. He used more colorful language for his cue, but the concept remained the same, and I took it back to my athletes, telling them to “open your hips,” as I demonstrated while descending into a squat. Suddenly, it started clicking for them. Their chests stayed more upright, their knees did not shoot excessively forward, their squat numbers went up, and most importantly, their confidence improved.

Cue: “Root your foot” or “Three points of pressure.”

In any squatting movement, whether bilateral or unilateral, a good lift starts with solid feet. Some lifters struggle to balance their weight throughout their foot, resulting in unstable weight shifts and risky working sets once the weight increases.

To remedy balance issues, I tell my athletes to ‘root your foot’ or ‘3 points of pressure,’ explaining how to distribute pressure between 3 points of contact in our feet: big toe, pinky toe, and heel. Share on X

It’s not good enough to tell the athlete in front of us to find their balance or steady themselves. They need something more. To remedy balance issues, I tell my athletes to “root your foot” or “three points of pressure,” explaining how we should distribute pressure between three points of contact in our feet: big toe, pinky toe, and heel. This is what I call “rooting the foot.” I’ve found this cue helps athletes better stabilize themselves, and whenever I say “root your foot” in a session, they immediately know what I’m talking about.


Video 1. Root the foot—To produce good force into the ground, you must have a stable foot base.

Cue: “Drive through the front of your heel.”

Building on foot pressure in any squatting movement, when ascending from the squat, many athletes shift forward onto their forefoot. This is neither safe nor optimal for performance. To remedy this, some coaches tell their athletes to drive through their heels or, when in the lift, “heels, heels, heels!” However, I find this cue to be ineffective.

In my experience, athletes shift their weight too far back, opening themselves to a new host of problems. I like instructing my athletes to drive through the front part of their heel instead. This cue helps them understand that they need to shift their weight back—but not too far back—allowing them to effectively balance and apply force effectively through their lower body.

Cue: “Squeeze your glutes and let your feet naturally rotate out.”

While this isn’t necessarily a cue, it’s a good tip to help your athletes find their optimal toe angle while squatting, compared with the common instruction of “turn your feet out 45 degrees.” You can either use this on day one with athletes or pull it out of the toolbox when you notice an athlete struggling to find their stance.

Simply have the athlete stand on the platform in their socks, in a shoulder-width stance. Starting with their toes pointing forward, instruct them to squeeze their glutes, allowing their hips/legs to rotate out naturally. The results should place the athlete in a good toe angle for squatting with their individual anatomy. This process is not foolproof, so coaching discernment will be required. Use your best judgment.


Video 2. Finding the right starting point for the feet in a squat.

2. Hip Hinge

The hip hinge is arguably the hardest movement to teach in the gym. When performing a hinge, I’ve seen athletes do everything but hinge at the hips. This movement takes a while to click for some, and as coaches, we should be ready with a wide array of cueing options.

The hip hinge is arguably the hardest movement to teach in the gym. It takes a while to click for some, and as coaches, we should be ready with a wide array of cueing options, says @Tate_Tobiason. Share on X

Cue: “Shave your legs with the bar.”

What do most of us coaches tell our athletes when they let the barbell drift away from their legs during the hip hinge? Keep the bar close! Okay, but what does close mean? Many athletes may believe that 2 inches away is close. If I were 2 inches away from your face, you’d think I was pretty close. Thus, many miss the point of the cue.

I have found success with the cue “shave your legs with the bar” or simply “shave your legs,” as it communicates to the athletes how close to their legs they need the bar. Obviously, they don’t need to truly drag the bar up their legs, but this helps get the point across in a fun and unorthodox way.

Cue: “Brace like you’re about to get gut-punched.”

Many athletes struggle with proper core bracing during weight training, especially in the hip hinge. Some look like a flamingo with an overly arched spine, while others could pass as the Hunchback of Notre Dame. Rather than simply tell the athlete to brace their core, which normally results in them flexing their abs and not bracing them, I go a bit further and tell them to do it as if they are about to be gut-punched.

Sometimes, to help illustrate the point, I slowly bring my fist toward the athlete’s gut. It then clicks in their head how they need to brace outwardly, bringing their rib cage slightly down to protect themselves. This cue has worked wonders for me in optimizing bracing technique and, in turn, has resulted in better hip hinges.

3. Bench

While the bench press may not be considered the most functional lift, it is still a staple across many programs. Regardless of your opinion on the movement itself, many coaches still program some horizontal press variation, which many of these cues can be used for interchangeably.

Cue: “Row the bar to your chest.”

If you do any powerlifting or train to maximize your bench press, you quickly understand how important stability and tightness are to the lift. However, many athletes do not achieve or even maintain tightness in the bench press due to how they lower the bar. In their minds, the goal is to simply get the bar back up. Who cares about how it goes down, am I right?

This mindset leads to sloppy bench press reps and an eventual plateau in strength. Rather than reminding my athletes to “stay tight,” I like to cue them to “row the bar to your chest.” This cue helps them slow down the lift and be purposeful throughout the movement. In addition, when I explain that they should row the bar, I go on to instruct them to actually flex their lats. The resulting stability and confidence are immediately noticeable.

Cue: “Turn your knuckles white.”

When I begin to see athletes plateau in the bench press, I look at two things: their hands and their legs. Many athletes passively hold the bar in their hands without any (or with very little) muscular engagement in their forearms. Now, I don’t currently have a fancy study to back this up, but I do believe that when you grip the bench bar tightly, your CNS is better engaged; with that, your body enters into a more optimal fight response, allowing you to lift more. A tighter grip on the bar is also safer for the spotter and lifter.

When I begin to see athletes plateau in the bench press, I look at two things: their hands and their legs. Many athletes passively hold the bar in their hands, says @Tate_Tobiason. Share on X

Cue: “Make it a full body lift.”

The bench press can and should be a full-body lift. This means the legs should be involved. The athlete should plant their feet into the ground, and once the bar touches the chest, their quadriceps should flex violently. This drives force up into the upper body, helping the athlete push heavier weight while providing added stability. This is a great cue for the athletes whose legs look like they are dancing mid-lift.

It Will All Start to Click

While not an exhaustive list, I hope these cues expand your toolbox and help you become a better communicator on the gym floor. Remember that coaching is an art, and simply plugging these cues in does not guarantee success. Use your discernment and find what clicks for the athlete in front of you. Watch their body language, ask them if what you just said made any sense, or even ask them to coach it back to you.

Take the time to work with them, trying multiple cues, and once it begins clicking, you’ll know it. Their face will light up, and the weights will start moving better. Take this time to celebrate with them; it’s one of the best feelings in coaching.

Since you’re here…
…we have a small favor to ask. More people are reading SimpliFaster than ever, and each week we bring you compelling content from coaches, sport scientists, and physiotherapists who are devoted to building better athletes. Please take a moment to share the articles on social media, engage the authors with questions and comments below, and link to articles when appropriate if you have a blog or participate on forums of related topics. — SF


Triple Jump

Choosing the Right Board for Triple Jump

Blog| ByRob Assise

Triple Jump

Scene: The triple jump competition at a high school near you. 

An athlete prepares to take his third triple jump attempt. His previous jumps were fouls. He needs to meet or better his personal record to get an additional three jumps in finals. He raises his hands and begins a slow clap. The crowd complies. The jumper begins his acceleration down the runway, building speed. He takes off at the 40-foot board. The hop looks good. The step is solid. And the jump…leaves him short of the sand. The crowd reacts with a gasp at the awkward landing on his right foot. His leg crumbles, and he rotates forward. The result is a faceplant in the sand. 

I have been to more than 400 track competitions in my lifetime, and finishing a triple jump short of the pit is something that happens at the vast majority of them. As an “event official,” I have regularly observed triple jumpers “fouling out”—not due to being over the foul line at take-off, but because they fail to reach the sand. This unpleasant and embarrassing event, which could result in an injury, simply does not have to happen as often as it does.

What could have preceded what occurred in the scenario above? Let’s say that the jumper had a personal record of 42 feet that he attained at the previous meet, where he took off from the 36-foot board (which he had been doing all season). Before that, his typical performance at competitions was between 39 and 41 feet. After his PR performance of 42 feet, he finally felt like he “graduated” to being able to go from the 40-foot board.

Why do high school jumpers have a desire to go from a longer board? The answer is simple: status. I equate it to a similar occurrence in the weight room.

Why do high school jumpers have a desire to go from a longer board? The answer is simple: status, says @HFJumps. Share on X

I remember the first time I could bench press 135 pounds in a workout. The sets were 120, 125, 130, 135. Even though it would have been simpler to just add a 10 to each side for the final set, I made sure to strip the bar and throw on 45s. I wanted to showcase that I was capable of handling them.

The difference in this situation is 135 pounds is 135 pounds. There is no additional risk in getting to 135 pounds with the 35/10 combo or a single 45. There is additional risk when one chooses to take off from a further board, as the example clearly shows. If you have witnessed the failure of a jumper to enter the pit in their third phase, you know that it often looks (and is) painful. In an event where there is already an extreme amount of force, there is no need to add to what an athlete needs to deal with, especially when it is unnecessary.

Pit Drawing
Image 1. An example of a common runway/board system at the high school level.

By the Numbers

The best male triple jumpers in the world have performances close to 60 feet, and the board they often jump from is 42.65 feet (13 meters). If the world-class triple jumper jumps 58 feet, the pit penetration of their jump (amount of the jump that is over the sand) is 15.35 feet (58 feet – 42.65 feet). The percentage of the jump that is over the sand can be found by dividing the pit penetration by their performance. In this case, 15.35 feet/58 feet = 26.47%.

The table below shows common board lengths, performances, pit penetration, and percentage of jump in the pit at various levels.

Board Chart
Table 1. Board lengths at competition may vary at the host facility. The suggested board length for NCAA competition is 12.5 meters (41.01 feet) for males, although it is often 13 meters, which would decrease the percentage of jump in the pit by approximately 3%. 

The outlier in the table above is High School Athlete 1, with 4.76% of his jump occurring over the pit. In my experience, this situation is a regular occurrence at high school meets and invitationals. To be honest, I think if an athlete consistently performs below 10% of pit penetration, the coach is being irresponsible, or the athlete is blatantly ignoring the coach’s advice.

Of course, there are exceptions to every situation. Years ago, I had an athlete who was undergoing a stretch of bad competitions. He was consistently underperforming and getting really down on himself. We were in our last competition of the indoor season, and his first three attempts were under 40 feet from the 36-foot board.

He and I had battled as to which board he should use for most of the indoor season, and we compromised on the 36-foot board even though I would have preferred the 32-foot board, with his previous personal record being just over 40 feet. For his last attempt, he requested to jump from the 40-foot board. I conceded because I felt the danger of him being mentally damaged heading into the outdoor season was greater than the potential of physical damage. He needed a win, and I was out of other options. To my surprise, he ended up jumping a season best by nearly 2 feet on his final attempt.

The positives from this situation were that he left the competition in a positive state of mind for the first time in six weeks, and it strengthened the trust he had in me as his coach. (I listened to his request.) The negative was that the technique he utilized to get into the pit was not sustainable.

The threat of not making it into the pit can certainly cause an athlete to access temporary “superhero” abilities, but many times, it comes at a cost. In this case, there was excessive reaching coming off the step phase into the jump, creating an excessive amount of braking force (the foot contacts the ground too far in front of the center of mass). This is common when an athlete is faced with the threat of not landing in the pit, probably due to the brain telling them to do whatever is possible to get closer to the sand.

So, while he did not pay the cost of landing short of the pit, there was still a cost of dealing with too much force between phase two and phase three. If he were to continue to perform in this manner, eventually, the body would break down. Just because a person can eat a diet of tater tots and Swedish fish every day does not mean they should. There will be a price to pay at some point.

Action Steps

I like to keep things simple. Instead of me or my athletes calculating the numbers in the table above, I have athletes do some incredibly simple subtraction. Note that I use feet in this situation because that is typically what triple jump board systems are at the high school level in Illinois, even though event results are metric. In general, I prefer pit penetration to be between 6 feet and 10 feet.

The average performance can be data built over the year (we usually ignore the inches in calculating the average). I am generally more interested in the average over time than the athlete’s personal record. Utilizing the personal record can lead to the situation outlined at the beginning of the article.

  • I instruct the athletes to perform the following arithmetic to attain a range of values:
    • Average performance (in feet) – 6 feet
    • Average performance (in feet) – 8 feet
    • Average performance (in feet) – 10 feet

Example:

  • Athlete’s performance over two competitions:
    • 41-6, 40-5, 39-7, 40-0
    • 42-0, 40-11, 40-3, 43-6
  • Average Performance:
    • (41 + 40 + 39 + 40 + 42 + 40 + 40 + 43)/8 = 40.625
  • Average Performance – Pit Penetration = Board Possibility
    • 40.625 – 6 = 34.625
    • 40.625 – 8 = 32.625
    • 40.625 – 10 = 30.625

Heading into the next meet, I would still advise this athlete to utilize the 32-foot board. In my opinion, despite a definite improvement, there is not enough data to support moving to the 36-foot board. If he continued to progress and add more data with jumps that were 42 feet and above, we would progress to the 36-foot board.

Coaches should also be aware of the conditions in which results occur. I may throw out data from a meet that occurred in extreme weather or facility conditions (cold, wind, rain, heat, and/or a pit with sand 8 inches below the runway are all on the table here). In general, be conservative heading into a meet with poor weather conditions (maybe go down a board) and be consistent in a meet with ideal weather conditions (use the board you typically use).

In general, be conservative heading into a meet with poor weather conditions (maybe go down a board) and consistent in a meet with ideal weather conditions (use the board you typically use). Share on X

This also connects to another important point. While athletes may prefer a particular triple jump board, they need to be adaptable. In Illinois, the standard board system is 24/28/32/36/40. However, not all facilities have this setup (or the condition of one or more of the boards may not be safe to take off from). Early in my career, I heard athletes say something like, “I would have jumped better, but they did not have a 40-foot board, so I had to jump from a 38-foot board.” While my initial thought was to say, “You need to be more athletic than that,” I held my tongue. I realized that I needed to create situations and deliver messages to enhance their adaptability.

First, I change up take-off positions during short approach work throughout the year and emphasize that board distance does not impact our ability to do the job. From there, if I know we are going to head to a meet that has a different board setup than ours (I keep extensive notes of each facility we visit), I say something simple like: “Their board system is different than ours, but we have practiced executing from a range of take-off positions all year. You are ready.” In conjunction with this, I may also try to replicate what they will see at a facility to the best of my ability. Athletes who are comfortable tend to perform better.

I change up take-off positions during short approach work throughout the year and emphasize that board distance does not impact our ability to do the job, says @HFJumps. Share on X

Finish in the Pit!

In Illinois in 2023, there were 1,860 athletes with a triple jump mark. One hundred forty of them were 42 feet or farther. Could some of the 1,720 under 42 feet go from a board longer than 32 feet? Sure. Do they need to? No!

One common ratio for triple jump phases is 35%–30%–35% (percentage of the total jump distance for phase 1–phase 2–phase 3). If we combine the first two phases’ percentages (65%) and multiply that by a 42-foot performance, we get 27.3 feet. So, if a 42-foot triple jumper took off from a 32-foot board, they would be 4.7 feet (32-27.3) from the start of the pit heading into their final phase.

This jumper could consistently jump from the 36-foot board but does not need to—there probably is not much of a chance that they would land in the sand coming off their second phase from the 32-foot board. In my opinion, this jumper should not consistently jump from the 40-foot board. The risk is not worth the reward.

Since you’re here…
…we have a small favor to ask. More people are reading SimpliFaster than ever, and each week we bring you compelling content from coaches, sport scientists, and physiotherapists who are devoted to building better athletes. Please take a moment to share the articles on social media, engage the authors with questions and comments below, and link to articles when appropriate if you have a blog or participate on forums of related topics. — SF


Sandbag Squat

No Age Limit: Optimizing Performance as a Senior Athlete

Blog| ByJack Shaw

Sandbag Squat

Maintaining physical fitness becomes paramount to enjoying a vibrant and active lifestyle as we age. While aging is inevitable, it doesn’t mean everyone must become slower and weaker the older they get. Contrary to common misconceptions, age shouldn’t prevent athletes from pursuing their goals. There are ways for seniors to overcome obstacles and live healthy and active lifestyles.

Challenges Facing Senior Athletes

Continuing an athletic journey later in life brings about a new set of challenges. While the benefits of staying active are abundant, aging bodies may encounter hurdles that require thoughtful consideration and can often be a barrier to reaching these goals.

Aging is often associated with a natural decline in muscle mass and strength, a phenomenon known as sarcopenia. Even the most physically active older adults lose muscle over time. More specifically, the proportion of type-II muscle fibers decreases while type-I fiber proportions increase. Type–II fibers are responsible for fast-twitch movements that sit at the foundation of high-level athletics.

As a result of sarcopenia, senior athletes naturally struggle to maintain the same level of strength and power they had in their younger years. Seniors also experience a noteworthy decline in speed, which means powerlifters and runners alike aren’t immune to the effects. All of the movements that are essential for peak performance—push, pull, squat, lunge, hinge, rotation, gait, the list goes on—start to deteriorate.

Aging can also lead to joint stiffness and decreased flexibility, making it more difficult for senior athletes to move with the same range of motion. Seniors may be more susceptible to injuries due to changes in bone density, joint health, and muscle elasticity. The risk of fractures, sprains, and strains may be higher, necessitating a more cautious approach to training.

Osteoporosis, or weakened bones, affects approximately 20% of women aged 50 and older and almost 5% of men aged 50 and older. This condition can make individuals more prone to falls, increasing the risk of fractures.

Aging can also impact cardiovascular health, affecting endurance and the ability to sustain high-intensity exercise. Senior athletes may need to adjust their training routines to accommodate changes in cardiovascular fitness and avoid pushing their bodies beyond healthy limits.

HIRT Is the Key Ingredient

Based on the aforementioned challenges that older adults face, the key ingredient to optimizing performance as a senior athlete is clear—high-intensity interval training (HIIT). HIIT can simultaneously mitigate the effects of sarcopenia, weakened bones, loss of agility, and declining aerobic capacity.

High-intensity interval training (HIIT) can simultaneously mitigate the effects of sarcopenia, weakened bones, loss of agility, and declining aerobic capacity for older adults. Share on X

The Harvard School of Public Health describes HIIT as an interval training method including several rounds of alternating high-intensity movements—also known as “supersets”—to increase the heart rate to at least 80% of one’s maximum heart rate, followed by periods of rest or lower-intensity movements. This low-intensity stage should be three to five times longer.

The positive effects of HIIT aren’t well studied in older adults, but a growing body of evidence is showing that HIIT can be the ideal training style for senior athletes—particularly those over 65 years old. A comprehensive analysis of 69 studies from the Journal of Sports Medicine found that HIIT may even be more effective for older adults than moderate or steady-state exercise.

The findings from this analysis included improved muscle strength and endurance within the 65+ age group, as well as a decrease in body fat percentages. The well-documented positive effects of HIIT on cardiovascular health also apply to older adults. HIIT is the perfect training style to delay the body’s aging process and allow senior athletes to compete at a high level.

Aside from the positive physical effects, HIIT has also been shown to improve cognitive functioning in older adults. This aspect of peak athletic performance often gets overlooked, but an athlete’s ability to assess risks, solve problems, and develop strategies is just as important as their physical characteristics.

HIIT is the most effective for senior athletes when combined with a strength training program—also known as high-intensity resistance training (HIRT). Athletes must continue to lift weights as they age to maintain bone density, joint flexibility, and the presence of both type-I and type-II muscle fibers. Seniors who lift weights also have a significantly lower risk of falling and injuring themselves than their sedentary counterparts.

HIRT also allows senior athletes to set more observable, measurable goals to ensure progressive overload. Progressive overload in weight training comes in many forms—improved exercise technique, higher maximum weight, greater number of repetitions, shorter rest periods between sets, and, of course, more muscle mass.

Moreover, senior athletes don’t respond as rapidly to training stimuli as younger athletes do. They need a training program that keeps them engaged and motivated when the progress isn’t as noticeable as it used to be. Organizing each workout into short intervals rather than long excursions allows for more consistent and detailed performance tracking.

Creating the Optimal HIRT Program

One of the great things about HIRT-style training is that participants can use a variety of equipment or none at all. Free weights, machines, resistance bands, and bodyweight exercises are all on the table. This level of flexibility makes it easier to create an individualized program that addresses every weakness.

The first step in creating any new training program is to evaluate the athlete’s long-term goals. If they are trying to gain strength and muscle, they should devote at least four to six months to the same program. If their goal is to lose weight, they should only require about two to four months. Gaining muscle is a longer process than burning body fat.

One of the great things about HIRT-style training is that participants can use a variety of equipment or none at all. This level of flexibility makes it easier to create an individualized program. Share on X

When choosing specific exercises, it mostly comes down to personal preference. However, senior athletes may benefit from using more machines and resistance bands over free weights to reduce the risk of injury. A key aspect of HIRT is maintaining a high-intensity level while developing sport-specific techniques.

Senior runners can incorporate strength training into their regimen to enhance muscular strength and stability in their cores, quadriceps, hamstrings, glutes, and calf muscles.

Over time, HIRT focused on these critical muscle groups can improve the runner’s form, help them generate more power with each step, and lower the risk of common running injuries, such as patellofemoral syndrome (runner’s knee), Achilles tendonitis, and plantar fasciitis.

Perhaps the most challenging aspect of creating an HIRT program is determining each exercise’s time interval. Remember—HIRT is a form of interval training. It doesn’t always go by the number of repetitions like traditional resistance training. With this provision in mind, senior athletes may benefit from starting with a simple interval structure.

The most common HIRT structure is a 4×4 “box” approach that has proven to elevate heart rates with great effectiveness. This structure starts with a 10-minute warm-up, followed by a one- to four-minute period of intense exercise to bring the heart rate to at least 85% maximal heart rate.

Next, the athlete switches to a lower-intensity movement for three minutes to bring the pulse down to 70% max heart rate. After a total of four to seven minutes of uninterrupted exercise, the athlete rests for five minutes and repeats the cycle again. Starting with a basic 4×4 structure, trainers of senior athletes can substitute different exercises based on the athlete’s unique goals.

Take, for example, an elite runner: their exercises will focus on developing lower-body strength and stability. This particular athlete’s 4×4 structure might include a light jog to warm up, then a squatting session and leg extensions to isolate the quads. After resting for five minutes, they repeat the process but substitute leg extensions for another isolation movement.

In any case, the program should target each major muscle group for about 10–20 working sets every week to achieve enough stimulation. That means the athlete will likely have to train each muscle group twice a week on a reasonable schedule.

Tracking Progress

Senior athletes should be able to track their progress for each movement by the numbers. The numerical improvements can widely vary, though. Younger athletes with some weightlifting experience often increase their bench press by 10–15 pounds within one month. For senior athletes, that number may be slightly lower.

Another viable performance-tracking strategy for senior athletes is to compare their HIRT numbers to the average weightlifter. The average squat weight is 287 pounds for a male lifter and 161 pounds for a female lifter. Staying above the median ensures that senior athletes are at least on par with younger people in that specific exercise.

If the athlete wants to build muscle, they should aim to add .5–2 pounds every month. Senior athletes may be closer to .5 pounds due to the effects of sarcopenia. Weight loss is more difficult to put a monthly number on, but it shouldn’t exceed more than 5% of total body weight every month. Sudden weight loss can be detrimental to older adults, so it needs to be gradual.

Whatever the sport, senior athletes can gradually optimize their performance through HIRT by setting these achievable short-term goals. It not only fights against the mental and physical aging process, but it also seamlessly adapts to any athletic pursuit. It might take more daily monitoring, but the extra effort is necessary for older athletes.

Injury Prevention Strategies

After incorporating HIRT, the next key ingredient to a senior athlete’s optimal training program is a heightened focus on injury prevention. It’s no secret that athletes past their physical prime are more prone to injuries. Some effective injury prevention strategies include dynamic warm-ups, balancing exercises, and static stretching movements that improve agility.

After incorporating high-intensity resistance training, the next key ingredient to a senior athlete’s optimal training program is a heightened focus on injury prevention. Share on X

It’s vital for coaches to include dynamic warm-ups in senior athletes’ training programs. Begin training sessions with standing and balancing exercises, such as single-leg stands and leg swings, along with walking stretches like walking lunges and hip circles. These exercises are perfect for filling in the 10-minute warm-up stage in the 4×4 HIRT structure mentioned earlier.

Activities promoting balance, such as yoga and Pilates, greatly improve stability. Stretching exercises, like neck rotations and ankle circles, enhance flexibility, making movements smoother. Both practices emphasize controlled movements and mindful breathing, promoting mental focus—an essential skill in competitive sports.

The core serves as the body’s central support system, and a strong lower back, pelvis, and abdominal muscles can further improve proprioception. A strong core stabilizes the spine and trunk during sports while maximizing leg balance and performance. Athletes can strengthen their core through targeted movements like planks, leg raises, and rotational movements.

Recovery

The body’s ability to recover from intense physical activity decreases with age. Seniors may need more time between workouts to allow their bodies to recover fully, reducing the frequency or intensity of their training sessions. For most older adults, it takes around 72 hours to fully recover from a workout.

Extended rest is an option to ensure complete recovery, but it’s not always ideal. In fact, it could lead to detraining. Studies have shown that even highly trained athletes can experience an endurance decline of 4% to 25% after just three to four weeks of inactivity. With these numbers in mind, advanced recovery methods should be explored.

Safety should be a top priority for senior athletes outside of their competitive fields as well. They should devote at least two to three times a week to promote full recovery and improve flexibility. Athletes should use suitable equipment, such as appropriate exercise gear and supportive footwear, to minimize the risk of accidents.

It’s Never Too Late to Progress

Seniors can defy age-related stereotypes by embracing an athletic lifestyle that promotes physical well-being and longevity. It’s never too late to start. Seniors can prioritize their fitness to relish each moment and reap the benefits of a well-maintained and resilient body.

Since you’re here…
…we have a small favor to ask. More people are reading SimpliFaster than ever, and each week we bring you compelling content from coaches, sport scientists, and physiotherapists who are devoted to building better athletes. Please take a moment to share the articles on social media, engage the authors with questions and comments below, and link to articles when appropriate if you have a blog or participate on forums of related topics. — SF


Sprint Form

Individualizing Your Sprint Programming with Steve Fudge

Freelap Friday Five| BySteve Fudge, ByDavid Maris

Sprint Form

Steve Fudge is the Head Coach of FudgeLdnProject, a professional sprints group located at the Lee Valley Athletics Center in London. He specializes in individualized track coaching complemented by world-class therapy and physical preparation. With a career spanning more than 15 years as a sprint coach, Steve has guided athletes to impressive milestones, including Sub 10, Sub 20, Olympic, Paralympic, World, European, Asian, and Commonwealth medals. Beyond coaching, Steve actively contributes to the coaching community by providing mentorship to aspiring coaches worldwide.

Freelap USA: You entered sprint coaching from a more general strength and conditioning background. What did that experience provide you with that you may otherwise have missed?

Steve Fudge: As a strength and conditioning coach, you learn anatomy, programming, how to teach different groups, etc., all as part of a multidisciplinary team working with the sport-specific coach and the medical team, among others. This experience allowed me to learn what kind of setting I wanted to work in, and I learned that I preferred working with smaller groups and in individual sports. As an S&C coach, I felt my job was essentially to develop athletes who were resilient and had the capacity to carry out the sport-specific head coach’s programming.

As an S&C coach, I felt my job was essentially to develop athletes who were resilient and had the capacity to carry out the sport-specific head coach’s programming. Share on X

I think this experience demonstrated to me that it was the sport-specific coach who would make or break the athlete in terms of success, and therefore, their programming needs to be absolutely right! The S&C coach supports this by developing athletes who are able to carry out higher-quality sport-specific practice reps and do more of them. Aspects such as strength around the hips and an anatomy that allows the athlete to maintain the correct posture can serve to elevate the efficacy of the sport-specific training.

I learned the value of building a strong relationship with the sport-specific coach, so I could understand what was needed from me as an S&C coach and how best to work with the athletes. A specific example of this might be that, as an S&C coach, I found my sequencing from general to specific needed to take place a bit earlier than it did for the sport-specific training.

Essentially, I was preparing the athletes for the upcoming phase of sports-specific training, so I had to provide them with some exposure to the kind of stimulus they may expect in their upcoming training block and set them up with the qualities they needed so that they could take advantage of the sport-specific work. For example, if I know the athletes are about to enter a six- to eight-week block where high-velocity sprinting is the main focus, I want to make sure I have developed their power and elasticity prior to that so they can maximize the benefit from the high-velocity training block.


Video 1. British sprinter Eugene Amo Dadzie training in an outdoor session.

Additionally, as an S&C coach, you want to ensure that there’s no interference between the work you’re prescribing the athlete and the sport-specific work they’re doing. If they’re doing particularly neurally demanding work on the track, then any neurally demanding work in the weight room would likely need to be limited.

Freelap USA: You’re quite well known for teaching technical concepts to your sprinters. I’m sure the methods you use to guide the athletes toward the positions you want to see vary, but what concepts and positions do you see as integral to a high level of sprint performance? 

Steve Fudge: What I’m looking for in a 100-meter sprinter is an athlete who moves down the track in or around 45 steps. Within each of those steps, they need to have a lengthening moment and a folding moment, and this sequence needs to be performed in such a way that it doesn’t disrupt their momentum. Therefore, each ground contact needs to be impactful, but after that contact, the athlete needs to rearrange their positions so their next ground contact can also be impactful.


Video 2. Eugene Amo Dadzie’s acceleration posture.

One of the biggest challenges is that the athlete needs to strike the ground hard, and there needs to be a moment where the hip, knee, and ankle all violently extend. However, to keep momentum, the athlete can’t spend too long lengthening, as it will slow things down by potentially bringing the shoulders back and forcing a landing that generates higher braking forces.

One of the things I think the best ‘top-end’ sprinters do well is consistently keep the action in the space just in front of them. Share on X

This can have a knock-on effect of disrupting the rhythm and causing the athlete to force frequency. Therefore, there is the need to get the leg back in front, almost a triple-flexion moment, in preparation for the next step. One of the things I think the best “top-end” sprinters do well is consistently keep the action in the space just in front of them. It appears the best have the ability to pre-program their posture to ensure that each step is relevant, and they do an excellent job of rearranging their shapes after the previous contact to ensure they are ready for the next.

Sprinting is very much a balancing act and needs to be harmonic. Elite sprinters have high velocities because they have high frequencies, which is what happens in the air, and they have high velocities because they have long stride lengths, which is a result of what happens on the ground. As a sprinter, we want both those metrics to be high, and it can be somewhat paradoxical because emphasizing one will rob the other.

One of the things I look for to ensure that frequency isn’t rushed and there’s enough time for stride length to be generated is that when the foot is on the ground, the pelvis must pass over the foot. After this point, the job is already done, and the athlete can recover the leg, “move to the front,” and set up for the next contact. If there’s too much emphasis on extension, the athlete can find themselves in a situation where they don’t have enough time at the front to set up the next step, and the rhythm can break.

Freelap USA: Technology is becoming more and more accessible to sprint coaches to both develop and track performance. What technologies do you use when preparing your sprinters?

Steve Fudge: As coaches, we adapt to our situation, whether that be with or without much access to technology. I’ve gone through one stage of my career where I had good access to technology, and we got good results. When I was based in Loughborough and working for British Athletics, we had access to OptoJump and Laveg—both tools that could provide instant feedback throughout the sprint session.

The information could be used to reinforce what I saw, and I tried to combine the metrics with mechanics and the coach’s eye, which is where I see the implementation of technology as being most valuable. For example, I may detect a change in rhythm at “x” meters into a run, and the data may show that there was a change in stride length and stride frequency at that same point as well, or there was a plateau in acceleration. This, therefore, helped to guide the process and enabled us to be more confident about which point in the run we needed to work on.

We would use the Laveg as a way to guide and assess the session objective. For example, I could ask an athlete to build to a top speed at 65 meters, and the Laveg would help us determine whether that objective was met. It also allowed the athlete to equate what successful completion of the exercise felt like.

However, in my current situation—a private, independent group with no federation support or sponsorship— we have very little technology but still get good results. I currently use a whistle, a stopwatch, an overspeed band, and the camera app on my iPhone!


Video 3. British 100m sprinter Ojie Edoburun sprints from the whistle.

Technology is only as good as the practitioner, and as with many things, the information is only as valuable as your interpretation. Therefore, I think technology can enhance good coaching, but without that and effective programming, I don’t think technology alone can do the best job.

Technology is only as good as the practitioner, and as with many things, the information is only as valuable as your interpretation… I worry that too much data may interfere with my intuition. Share on X

I think there’s a risk in implementing technology you don’t consistently have access to because it only provides a snapshot of the whole picture. This may cause you to panic unnecessarily based upon what is essentially an anomaly, but you’re unable to see that without the presence of consistent data. The risk is that now the coach overhauls the program and starts heading in a different metaphorical direction.

Data can be useful, but there’s a risk that too much data can interfere with my intuition or cause me to overthink things. Now, I don’t think this is the case for every coach, so it’s important for a coach to decide which pieces of information they believe to be important. Then, they need to go about ensuring they can access that information to guide their decision-making. Ultimately, much as every athlete is different, every coach is different, and they need to spend time developing their own way of doing things.

As coaches, we need to make lots of decisions, and sometimes in high-pressure scenarios. Therefore, it’s important to build a system that athletes have trust in and not just copy what someone else does, as they may not have faced the same situation that you’re in currently.

Freelap USA: I’ve heard you talk about a “health first” approach when coaching your athletes. Can you elaborate on the practical applications of this in your day-to-day practice? Can you provide an example of individualizing your programming to promote this philosophy? 

Steve Fudge: You must get the programming right! We have the events we need to prepare for, and we have the individuals in front of us. It can be a challenge because you need to look at the person, then look at the “perfect” program you would implement to prepare someone to run that event, and then figure out a way to marry the two together.

If you want to stay healthy (which you should!), you need to pick the right type of training for that individual, then pace and progress it appropriately. As I said, fundamentally, the programming needs to be appropriate.

If I have a 60–100-meter type athlete, I sit down and map out the type of work, sessions, and progressions I think they need to do through general prep, specific prep, and into the competitive phase. I then look at the athlete and decide what I need to make that program work. Where does the program need to be trimmed or edited so it is still that program but now fits the individual?

It can almost be a case of fitting a round peg into a square hole, so it’s challenging! This can be assisted by having regular access to a good therapist and a good team to assist with prehab and rehab, but if the programming is off, none of that really matters.

London Project
Image 1. L-R: S&C Coach Jermaine Olasan, Eugene Amo-Dadzie, Steve Fudge, and osteopath Rob Hill.

We then need to keep in mind what must be done on a daily basis to remain on that pathway. If you end up in a situation where what you have planned for a given day no longer seems appropriate, you need to be flexible and make a good decision, and this requires discipline. It could be something like the athlete didn’t sleep well or a family issue has arisen, and it’s important to know that the whole plan won’t fall apart because this session isn’t done on a particular day.

Staying on the path, perhaps paradoxically, requires you to be open-minded and change the plan as you go in some cases. I think it was Mike Tyson who said that everyone has a plan until they get punched in the face, and as coaches, we all have plans until we meet our athletes and realize they’re human beings, not robots!

Freelap USA: As we’ve mentioned, your programming can be quite individualized based on what you see from the athlete. Can you provide a general guideline of how you set out your training week and a couple of examples to demonstrate what this looks like in practice?

Steve Fudge: In my experience, within general prep, sessions generally fit a nice, tidy arrangement, but once we get to specific prep, things get more chaotic, and I need to be more adaptable.

In general prep, though, we’ll have four technical units, four tempo units, and four gym units within each week. While the details may vary quite significantly depending on multiple factors such as time of year, health status, athlete profiling, etc., this is an example of what some sessions may look like for an athlete.


Video 4. Indoor training session with Eugene Amo Dadzie.

Monday:

Acceleration – 6–8×20–30m from various stances, such as starting from one block pedal.

Short tempo – 4x2x50m back-to-backs, 1–2 minutes’ rest.

Gym – Conditioning and capacity (less neurally intense; focused on movement patterns and conditioning).

Tuesday:

Transition – 4–6×35–50m over cones with about a 10-meter run-in. (I want six steps before the athlete reaches the first cone.).

Long tempo – 220m+110m, 200m+110m, 150m+110m.

Gym – Force and general strength (traditional strength, power, and elastic work).

Wednesday:

Off

Thursday:

Acceleration – Similar to Monday.

General fitness tempo – Individualized depending on what I think that athlete needs.

Gym – Conditioning and capacity (see Monday).

Friday:

Upright running – 2–4x55m over cones with an 18-meter run-in.

Medium tempo – 180m, rest 6 minutes, 150m, rest 5 minutes, 3×120 with 4 minutes’ rest.

Gym – Force and general strength (see Tuesday).

For more information on the gym units, please see the Freelap Friday Five interview with Jermaine Olason.

Since you’re here…
…we have a small favor to ask. More people are reading SimpliFaster than ever, and each week we bring you compelling content from coaches, sport scientists, and physiotherapists who are devoted to building better athletes. Please take a moment to share the articles on social media, engage the authors with questions and comments below, and link to articles when appropriate if you have a blog or participate on forums of related topics. — SF


Nordic Curl

The Case Against the Nordic Curl: Why This Popular Exercise May Do More Harm Than Good

Blog| ByKim Goss

Nordic Curl

The strength coaching profession loves experimenting with fads that promise to give athletes an edge. We transitioned through Nautilus machines in the ’70s, jump shoes in the ’80s, slideboards in the ’90s…and now we have the Nordic curl. Finally, the answer to preventing hamstring pulls, particularly in sprinters.

Not so fast.

Don Chu, PhD, an accomplished jump coach and one of the foremost experts on plyometrics, introduced me to Nordic curls in the early ’80s during his weight training class. The exercise recently got a powerful jumpstart in the general fitness population when Ben “Kneesovertoesguy” Patrick began promoting it as part of his knee rehab program. Patrick has built a huge following, with more than 1.3 million YouTube subscribers and an appearance on the Joe Rogan show.

The basic Nordic curl starts with you kneeling on the floor/ground with a training partner anchoring your feet (see image 1 below). You should place a towel or pad under your knees for comfort. One suggestion I learned from German sports scientist Dr. Tobias Alt is to extend your knees over the edge of the pad to permit the patella to glide easily (see lead photo at top). You can place your hands across your chest or at your sides, but the best way is with your arms bent in a push-up position. This position makes it easier to catch yourself at the bottom and maintain high hamstring activation at the end of the movement.

With your upper legs perpendicular to the floor and your torso upright, slowly lower your legs and torso as a unit, catching yourself with your hands when you can no longer control the movement. When your hands touch the floor, immediately straighten your arms explosively (such as with a push-up) to return to the start.

The Nordic curl’s resistance curve is such that it’s rare for an athlete who has not trained on it for an extended period to perform it without collapsing at the midway point. Share on X

The exercise’s resistance curve is such that it’s rare for an athlete who has not trained on it for an extended period to perform it without collapsing at the midway point, much less return to the start without assistance. In Dr. Chu’s weight training class, one elite male long jumper could do it, and an elite female discus thrower who became a national weightlifting champion and American record holder got close.

To progress in the exercise, you can place a low platform in front of you to decrease your range of motion, reducing the height of the platform as you get stronger. There are also ways to modify the resistance curve to match your strength curve, such as using an elastic band, as shown in image 1. As the band stretches, it provides assistance at the end range.

For weight rooms with a healthy budget, plate-loaded Nordic curl machines adjust to your strength curve to permit a smoother motion. The best known is the Westside Inverse Curl machine®, patented and promoted by powerlifting legend Louie Simmons. The machine’s counterbalanced arm has a padded bar that rests in front of the chest, allowing you to increase the weight incrementally to make the movement easier.

At the advanced level, resistance can be increased by holding a weight plate across the chest or wearing a weighted vest. Because the exercise is so challenging, at first, additional resistance might only be used during the lowering phase (and then released during the concentric phase).

Nordic-Drawing
Image 1. The basic Nordic curl (left) is performed with a training partner anchoring the feet. At right are three popular variations: 1) using a sit-up board to anchor the feet, 2) holding an elastic band to make the exercise easier at the end range, and 3) performing the exercise on a curved, padded bench to make the exercise more comfortable. (Drawings by Sylvain Lemaire, Hexfit.com)

Before discussing some of the peer-reviewed research on the Nordic curl, let’s look at one theory about why the exercise can adversely affect sprinting ability and increase the risk of hamstring injuries.

Nordic Curls and the Speed Trap

One of the most outspoken critics of the Nordic curl is weightlifting sports scientist Andrew “Bud” Charniga. Charniga says that although the exercise may have value for bodybuilding purposes, athletes shouldn’t do it. His central argument is based on the anatomy of the calves and their function.

The two primary calf muscles are the gastrocnemius (upper calf) and soleus (lower calf). Charniga says the gastrocnemius should be considered a thigh muscle because it overlaps the knee and contributes to knee flexion. These factors have implications for getting more out of stretching and muscle-building workouts. Let me explain.

For stretching, in the early ’90s, I attended a hands-on seminar by Bob Anderson in Colorado Springs. Anderson is the author of Stretching, which sold more than 33 million copies. Anderson told us that tightness in the calves is one of the limiting factors to stretching the hamstrings. Therefore, it makes sense to stretch the calves before stretching the hamstrings.

For muscle building, Canadian strength coach Charles Poliquin would use this knowledge of functional anatomy to increase the work of the hamstrings during leg curls.

Because you can lower more weight than you can lift in leg curls, the exercise’s eccentric (lowering) phase is not loaded maximally. To get around this limitation, Coach Poliquin would have you lift the weight with your feet dorsiflexed (toes pulled up) to enable the gastrocnemius to assist with knee flexion. Then, you would lower it with your feet plantarflexed (feet pointed down) to decrease the work of the calves and increase the work of the hamstrings.

As shown by these two examples, understanding the anatomical structure of the calves can improve your ability to stretch and strengthen the hamstrings. However, from a motor learning perspective, Charniga contends that the Nordic curl is a horrific exercise for sprinters.

Charniga says most hamstring injuries in sprinting occur during the late swing phase when your front leg is extended and just about to touch the ground. At this point, the long head of the biceps femoris completes the longest stretch of the three hamstring muscles (the others being the semitendinosus and semimembranosus). How can the hamstrings relax to extend the knee when the calves contract to produce the opposite effect? It can’t—something must give, and that’s usually the hamstrings.

WSU Sprinter
Image 2. The late swing phase in sprinting is when most hamstring injuries occur. During this phase, the gastrocnemius must be relaxed when the front leg extends to avoid injury. The sprinter is Mason Lawyer, a Washington State student coached by Gabriel Mvumvure. She is a school record holder in the 4x100m and the fourth fastest in three sprint events. (Lawyer photo courtesy Washington State Athletics; drawing by Sylvain Lemaire, Hexfit.com)
There’s probably no harm in occasionally performing the Nordic curl as a novelty challenge. However, its risks versus rewards may not be acceptable, especially for high-level athletes. Share on X

There is probably no harm in occasionally performing the Nordic curl as a novelty challenge, such as with my experience in Dr. Chu’s class. However, the risks versus rewards of this exercise may not be acceptable, especially for high-level athletes. Let’s look at some research.

The Age of Misinformation

Many internet influencers have made extraordinary claims about the benefits of the Nordic curl, backing their claims with research studies. However, let’s read beyond the abstracts, starting with a meta-analysis on soccer injuries and the Nordic curl, which had this brain-teasing title: “Effect of Injury Prevention Programs that Include the Nordic Hamstring Exercise on Hamstring Injury Rates in Soccer Players: A Systematic Review and Meta-Analysis.”

A meta-analysis makes the study on a topic easier for the reader by reviewing the results of numerous studies. The researchers of this study concluded: “Teams using injury prevention programs that included the NH (Nordic hamstring) exercise reduced hamstring injury rates up to 51% in the long term compared with the teams that did not use any injury prevention measures.” Impressive, but questions arise when you look closely at the Methods section.

Only five studies met the researcher’s requirements of the study, and in only one was the Nordic curl the only intervention (so, not so “meta”). Here is an example of the intervention protocol in one of the studies accepted for their review:

Hamstring Intervention Workout

Initial Running Drills               

    Jog

    Hip-In

    Hip-Out

    Circle Partner

    Shoulder Contact

    Cut up and Back

Exercises

    Plank

    Side Plank

Eccentric Hamstring (Nordic Curl)

    Single-Legged Balance

    Squats

    Jumps

Final Running Drills

    Sprint

    Bounding

    Cut Side-to-Side

With so many exercises, how can anyone conclude that Nordic curls made a difference? Perhaps a reduction in injuries occurred despite doing the Nordic curl, a concern pointed out in the researcher’s comments: “Because we did not quantify physiologic variables, we cannot adequately determine the mechanism of decreased injury risk or identify the most effective part of the intervention program.” As for the single study where the Nordic curl was the only additional variable, the results were underwhelming because the researchers found that the Nordic curl “does not reduce hamstring injury severity.”

Many other studies on the Nordic curl have been performed, but some need to be looked at with skepticism. According to a 2022 review by Dr. Alt, “assessments and interventions suffered from imprecise reporting or lacking information regarding NHE (Nordic Hamstring Exercise) execution modalities and subsequent analyses.”

I asked Dr. Alt to expand on his opinion of the Nordic curl, and he replied, “The conventional Nordic curl does not evoke the full potential the way most people perform it, as only 30 percent of generated impulse is allocated to the first 45 degrees of knee extension…Alternatively, extended knee angles should be addressed with high intensity for suitable performance enhancement and effective injury prevention via assistance or guidance.”

Another factor to consider is that even though most strength coaches know about the Nordic curl exercise (and many are familiar with the research supporting it), where are real-world success stories?

Even though most strength coaches know about the Nordic curl exercise (and many are familiar with the research supporting it), where are the real-world success stories? Share on X

In soccer, consider the results of a 2022 study involving 3,909 soccer players from 54 teams in 20 European countries from 2001 to 2022. Rather than decreasing, the researchers found that hamstring injuries doubled during this period and that during the last eight seasons, “hamstring injury rates have increased both in training and match play.”

In American football, why haven’t hamstring injuries decreased in the NFL over the past decade? On average, about two dozen NFL players are sidelined every week in-season due to hamstring injuries. For example, 43 football players were sidelined with hamstring injuries before the start of the 2019 season, and between the 2018 and 2019 seasons, about 25 athletes could not play each week due to hamstring injuries. This trend continues today; for example, Charniga discovered that during one week in October 2023, 48 NFL players were sidelined with hamstring injuries.

But It Works…or Does It?

Again, with all the glowing testimonies about the Nordic curl being able to bulletproof the hamstrings against injury, why are hamstring injuries so prevalent and increasing in some sports? If you need more convincing with “evidenced-based practice” arguments, here are five more variables to reconsider the value of the Nordic curl:

1. Biomechanics

Gestalt is the theory that the sum of the parts is not as great as its organized whole, and in sports, gestalt may translate into “everything is connected.”

The Nordic curl isolates one function of the hamstrings: knee flexion. This may be great if you’re a bodybuilder, but it’s not how the legs work in sprinting. Share on X

The Nordic curl isolates one function of the hamstrings: knee flexion. This may be great if you’re a bodybuilder, but it’s not how the legs work in sprinting. As confirmed by researchers in one 2018 Special Communication in Medicine and Science in Sports and Exercise, “Accordingly, the hamstrings are stretched at both the knee and the hip joints during sprinting, but they are only stretched at the knee joint during NHE.”

As with the leg extension that isolates knee extension, the rigid knee flexion motion is not duplicated in sports, as concluded by one research 2019 study on Australian Rules Football (ARF). “The [NHE] movement does not replicate what is needed in the real world for ARF” and should be “included in a hamstring injury prevention program in this code with caution.” I would add that the fixed nature of the exercise immobilizes the muscles of the ankle used in running and jumping.

2. Force Production

The Nordic curl is performed slowly, so even though muscle mass can be increased, the elastic properties of the connective tissues are not used to increase force production. The prolonged time under tension that occurs during the exercise changes the organization of the contractile components of muscle fibers (pennation angle), reducing a muscle’s ability to produce force quickly.

In high-velocity movements such as sprinting, force is produced briefly, followed by a prolonged period of relaxation. “Sprinters are elastic, pulsating athletes. The fastest sprinters are the fastest relaxers, meaning they get their muscles to fire up quickly and then relax quickly,” says spine biomechanics expert Dr. Stuart McGill. “The same goes for weightlifters. Russian sports scientist Leonid Medvedev showed that the muscles of elite weightlifters relax six times faster than the average Muscovite walking around the street.”

For these reasons, the Nordic curl should be regarded primarily as a bodybuilding exercise, not an exercise to develop athletic fitness. Let’s look at some research.

Bodybuilder Hamstrings
Image 3. Bodybuilders often display impressive hamstring development, but such extreme levels of muscle mass may not transfer to the athletic field, especially to sprinting. (Photos by Miloš Šarčev)

Force is measured by the equation: Force = Mass x Acceleration, and peak forces in sprinting can reach 8x body weight. Although the Nordic curl is prescribed to deal with the high-velocity forces that occur in sprinting, researchers who evaluated the Nordic curl concluded in a 2021 study, “Overall, peak hamstring force during NHE (Nordic Hamstring Exercise) was not comparable to the peak hamstring force during sprinting.” There’s more.

One 2019 study examined how the Nordic curl affected sprint performance. The researchers concluded, “The NHE group reported trivial improvements in sprint performance,” and “sprint training also produced greater perceptions of soreness than the NHE.” Then there’s a 2017 study where researchers found that a six-week Nordic curl intervention program increased muscle mass but “did not significantly increase eccentric hamstring strength as expected.” In other words, the NHE does not improve sprint performance or develop eccentric strength as well as sprinting does. Besides sprinting, sprinting, and sprinting some more (which can be impractical in cold-weather environments), one alternative is flywheel training.

In other words, the Nordic curl doesn’t improve sprint performance or develop eccentric strength as well as sprinting does. Share on X
Nordic Lab
Image 4. Many carefully controlled studies have assessed the force production and muscle activation of the Nordic curl. (Tobias Alt photo)

Because eccentric contractions produce the highest muscle contractions, a flywheel device can provide eccentric overload to achieve these peak forces by multiplying the force achieved during the concentric contraction. Video 1 shows a kBox being used to produce eccentric overload rapidly, one performed without assistance and the other with assistance. Artur Pacek, MS, CSCS, PhD candidate, an elite strength coach from Poland who has worked extensively with Knox and his athletes, produced the videos and the data.

What’s unique about these two videos is they show how improving stability—in this case, holding onto a barbell—can increase force production. The non-supported version could be considered more sport-specific, as the stability would transfer better to lateral movements, but the supported version would produce more force. Thus, a workout to do both could begin with unsupported squats and finish with supported squats to increase force production.


Video 1. Flywheel resistance training devices can provide high levels of an eccentric load to deal with the high forces that occur in sprinting. This analysis shows that higher force levels can be achieved in the squat when athletes increase their stability by holding onto a sturdy object. (Videos courtesy Artur Pacek, MS, CSCS, PhD candidate)

3. Range of Motion

Some internet fitness influencers claim the Nordic curl strengthens the hamstrings through a full range of motion. It can’t. The Nordic curl starts with your thighs perpendicular to the floor, so it cannot work the biceps femoris through a complete range of motion.

Some internet fitness influencers claim the Nordic curl strengthens the hamstrings through a full range of motion. It can’t. Share on X

In contrast, consider the supine leg curl with cables and roller boards that enable the heel to touch the glutes in the peak contracted position shown in image 5: exercises that can also be performed with flywheel units. One advantage of these variations is the working leg can be rotated internally and externally rather than being held rigid in one movement pattern as with the Nordic curl. Changing the lines of pull allows for more complete muscular development. They also don’t restrict the movement of the patella as occurs with the conventional Nordic curl.

Also, because gravity applies force vertically downward, there is no resistance until several degrees of motion are achieved. If you observe the training of elite bodybuilders, it is often characterized by partial-range exercises. Partial-range exercises, popular with bodybuilders to overload all points of an athlete’s strength curve, also change the pennation angle, affecting the ability of the hamstrings to exert force.

Alternate Exercises
Image 5. The Nordic curl only strengthens the biceps femoris through a partial range of motion because it begins with the upper thighs perpendicular to the floor with no resistance. In contrast, the hamstring exercises at right performed with a pulley system permit a fuller range of motion and provide resistance throughout the entire range. (Drawings by Sylvain Lemaire, Hexfit.com)

4. Athletic Testing

The Nordic curl is occasionally used to test strength, but what muscles does the exercise test? Is the exercise testing the strength of the calves or the hamstrings, and what are the contributions of each? Further, in what athletic movements is this motion duplicated? What sport is performed from a kneeling position with the lower limbs and ankles immobilized—kayaking?

5. Knee Stress

Compared to multi-joint exercises where stress is distributed over many structures, the Nordic curl is an isolation exercise focusing on a single structure. Strength coach and posturologist Paul Gagné addresses this topic. Gagné has trained more than 500 NHL players and worked with Dr. Guy Voyer, a famous osteopath who gave seminars on knee injuries (which I attended), and he is not a fan of Nordic curls.

“The popliteus (a major muscle involved in knee stability) gets really hammered, especially at the bottom position where the knee has no give,” says Gagné. “I’ve rarely seen people with good technique. They lack control at the bottom of the movement—it’s dangerous.” He adds that the Nordic curl places a high level of stress on the meniscus and a chronic inflammation condition called Housemaid’s Knee (prepatellar bursitis).

Don’t Buy What They’re Selling

Social media has given us access to considerable information about athletic fitness training, but the downside is that some of what we read, see, and hear is misinformation. It’s one thing for a popular internet influencer (and even a research study) to suggest that an exercise will produce remarkable results in athletic performance and reduce injury, but then there’s reality. Such is the case with the bill of goods we’ve been sold with the Nordic curl.

Since you’re here…
…we have a small favor to ask. More people are reading SimpliFaster than ever, and each week we bring you compelling content from coaches, sport scientists, and physiotherapists who are devoted to building better athletes. Please take a moment to share the articles on social media, engage the authors with questions and comments below, and link to articles when appropriate if you have a blog or participate on forums of related topics. — SF


References

Alt T, Personal Communication, 1/4/24.

Charniga B. “Hamstring Injury: Prophylaxis Fallacies in Sport,” Sportivnypress.com, 6/29/21.

Al Attar WSA, et al. “Effect of Injury Prevention Programs that Include the Nordic Hamstring Exercise on Hamstring Injury Rates in Soccer Players: A Systematic Review and Meta-Analysis. Sports Medicine. May 2017;47(5):907–916.

Alt T, et al. “Quo Vadis Nordic Hamstring Exercise-Related Research? – A Scoping Review Revealing the Need for Improved Methodology and Reporting.” International Journal of Environmental Research in Public Health. September 7, 2022;19(18).

Ekstrand J. “Hamstring injury rates have increased during recent seasons and now constitute 24% of all injuries in men’s professional football: the UEFA Elite Club Injury Study from 2001/03 to 2021/22. British Journal of Sports Medicine. December 6, 2022;57:292–298.

Afonso J, et al. The Hamstrings: Anatomic and Physiologic Variations and Their Potential Relationships With Injury Risk. Frontiers in Physiology. July 7, 2021;12.

Charniga B, Personal Communication, 1/3/24.

Li Li and Ruan M. “Nordic Exercise Should Not Be Used for Predictive Modeling of Hamstring Injuries,” Special Communication. Medicine and Science in Sports and Exercise. December 2018;50(12).

Milanese S, et al. “Hamstring injuries and Australian Rules football: over-reliance on Nordic hamstring exercises as a preventive measure?” Journal of Sports Medicine. July 23, 2019;10:99–105.

McGill S. “An Approach to Pain-Free Training for Track Athletes with Stuart McGill.” SimpliFaster. 1 December 2023.

Ruan M, et al. “The Relationship Between the Contact Force at the Ankle Hook and the Hamstring Muscle Force During the Nordic Hamstring Exercise. Frontiers in Physiology. March 9, 2021;12.

Freeman BW, et al. “The effects of sprint training and the Nordic hamstring exercise on eccentric hamstring strength and sprint performance in adolescent athletes.” Journal of Sports Medicine and Physical Fitness. July 2019;59(7):1119–1125.

Alt T, et al. “What Are We Aiming for in Eccentric Hamstring Training: Angle-Specific Control or Supramaximal Stimulus?” Journal of Sport Rehabilitation. June 20, 2023;32(7):782–789.

Pacek A. Personal Communication. 12/20/23.

Gagné P. Personal Communication. 12/15/23.

  • « Go to Previous Page
  • Page 1
  • Interim pages omitted …
  • Page 15
  • Page 16
  • Page 17
  • Page 18
  • Page 19
  • Interim pages omitted …
  • Page 164
  • Go to Next Page »

Primary Sidebar

Latest Posts

  • Building a Better High Jump: A Review of Stride Patterns
  • How We Got Our First Sprint Relays to State in Program History
  • Science, Dogma, and Effective Practice in S&C

Topics

  • Changing with the Game
  • Game On Series
  • Getting Started
  • high jump
  • Misconceptions Series
  • Out of My Lane Series
  • Rapid Fire
  • Summer School with Dan Mullins
  • The Croc Show
  • track and field
  • What I've Added/What I've Dropped Series

Categories

  • Blog
  • Buyer's Guide
  • Freelap Friday Five
  • Podcasts

COMPANY

  • Contact Us
  • Write for SimpliFaster
  • Affiliate Program
  • Terms of Use
  • SimpliFaster Privacy Policy
  • DMCA Policy
  • Return and Refund Policy
  • Disclaimer

Coaches Resources

  • Shop Online
  • SimpliFaster Blog
  • Buyer’s Guide
  • Freelap Friday Five
  • Coaches Job Listing

CONTACT INFORMATION

13100 Tech City Circle Suite 200

Alachua, FL 32615

(925) 461-5990 (office)

(925) 461-5991 (fax)

(800) 634-5990 (toll free in US)

Logo of BuyBoard Purchasing Cooperative. The word Buy is yellow and shaped like a shopping cart, while Board and Purchasing Cooperative are in blue text.
  • Facebook
  • Instagram
  • Twitter
  • YouTube

SIGNUP FOR NEWSLETTER

Loading

Copyright © 2025 SimpliFaster. All Rights Reserved.