Getting Creative with Long Jump Training Indoors

Summary
There are many reasons why coaches and jump athletes may not have access to a sand pit, runway, or board. Coach Kevin Consoles explains how you can still effectively train jumpers indoors using some creativity and common gym items.
Too often, when I go to high school track meets, I see horizontal jumpers fouling their attempts, jumping off the wrong leg, and having out-of-control flight and landing mechanics. Much of this is due to coaches and athletes not having access to a runway, board, or sandpit. If you coach the horizontal jumps, you know how important it is to be able to train with all three of these.
Unfortunately, many coaches don’t have that ability for an assortment of reasons. The most common of these are:
- The track is under construction.
- It is indoor track season.
- It is too cold outside and/or there is snow on the ground.
- The school doesn’t have a track.
If you coach the long jump and don’t have access to a runway, board, and/or sandpit for whatever reason, you can still train for success. Be creative. This article will provide solutions and actionable ideas to make the most of your situation.
If you coach the long jump and don’t have access to a runway, board, and/or sandpit for whatever reason, you can still train for success. Be creative, says @KCPerformance_. Share on XIt is obvious why athletes need a proper training environment to succeed in the horizontal jumps. I coach in Rhode Island, where we have indoor track season in the winter and outdoor track season in the spring. This means that during the indoor season, I can’t use the track for most of the season because it is cold, and we have plenty of snowfall. I don’t let this get in the way of our expectations to develop proficient jumpers. I have an athlete who jumped 22 feet 4 inches and never practiced on a regulation long jump runway with a board or sand pit. It can be done.
Make Your Own Board
A board is important. Jumpers need to practice their steering abilities and approach to the board. I created a board using white athletic tape, though there are a variety of other tapes you can use. I always have athletic tape on hand, and it’s relatively easy to see. I’ve also used chalk in the past to draw a board.
When you measure out the board, it is essential to use the exact standard measurements. This means the length of the board should be 1.2 meters, and the width of the board should be 20 centimeters. The tape may become worn, especially if you use it frequently, so it is essential to replace the tape as needed throughout the season.
If you have wide-enough space, you can even tape down multiple boards to create multiple runways. I like to have multiple boards since it allows me to dedicate a runway to beginner jumpers and more advanced jumpers. Plus, when you tape a board, it means it’s portable. So, if you tape a board and realize it is not in the most appropriate spot, you can always move it.
Video 1. Example of an athlete using a makeshift runway and taped board on an inside track.
Set Up a Runway
There’s nothing groundbreaking in this paragraph, but I do need to point out a few things. The most important part of the makeshift runway is to give the jumpers an appropriate and safe space to approach and then decelerate in. I am lucky that my school has an indoor 150-meter track, which means I have enough space to dedicate to a long jump runway.
The runway and board should be two very different colors so the jumper can clearly see the board and steer toward it as needed. Make sure your team knows which lane or space is dedicated to jumpers. Depending on where you’re making a runway (e.g., a hallway), you can mark it off with cones, chalk, or other landmarks.
Do not place the board in an area with heavy foot traffic because that will distract the jumper. Give them their space; the last thing anybody wants is the jumpers worried that somebody might run into their area while they are in the middle of their approach.
Create a Safe Pit
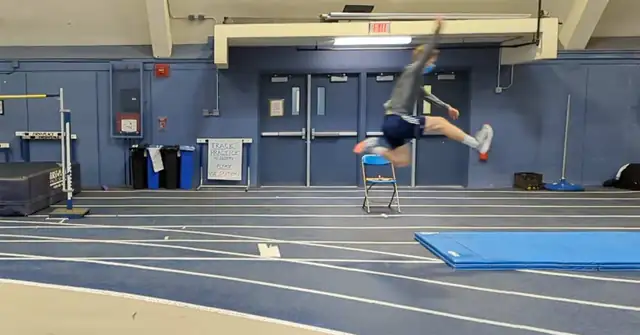
Jumping without sand is not ideal since sand helps to reduce impact and cushion landing forces. I have two alternatives that I use during the indoor season. One is a high jump landing pit that is safely connected as it would be during the high jumping event at a track and field meet. The other consists of gymnastics mats stacked on each other, creating about a foot of padding between the floor and the top of the mat. Both options have their pros and cons.
The great thing about connecting a few high jump mats is that we create a large surface area on which we can practice competition-type landings. The downside is that the pit is about 3 feet off the ground, so we have to do our take-offs off a 4–6-inch box. We really only use this type of setup if we want to practice our flight and landing mechanics. We also never make full approaches with this setup. For an 18-step long jumper, the farthest we jump from is a 12-step approach. We do not use this type of setup too often because I feel that doing most of your training off a box can create bad habits.
Safety is the number one priority here. If there is somebody who I feel can’t safely perform this type of jump off a box onto a high jump pit, then I simply don’t have them do it. I haven’t had any issues with this setup so far.
Stacking gymnastics mats on top of one another is a good option for practicing approach mechanics, steering abilities, the penultimate step to takeoff technique, and the beginnings of the in-air technique. Again, with this option, like the last, we never do competition approach lengths. It is simply unsafe, and if we are working on technique, I like to slow things down while we are learning.
Stacking gymnastics mats is a good option for practicing approach mechanics, steering abilities, the penultimate step to takeoff technique, and the beginnings of the in-air technique. Share on XThis type of setup works well for shorter approach lengths, skipping drills, run-run-jumps, etc. This is how we perform most of our long jump practice. It is important to give plenty of space past the “pit” for the jumpers to decelerate safely without harming themselves. The longer the approach, the more room they need to decelerate. Approach lengths usually vary from 6–12 steps.
Video 2. Stacked gymnastics mats stand in for a sand pit to enable athletes to practice approach mechanics, penultimate step to takeoff technique, and steering indoors.
The Important Stuff
The approach work and what happens on the ground are the most critical aspects of the long jump. If an athlete has poor approach mechanics, penultimate, and takeoff, then we don’t need to practice our flight mechanics or landings just yet. Good landing and flight mechanics are side effects of technically sound approaches. Within this setup, I instruct the jumpers to extend the swing leg after takeoff and land on the opposite foot they took off from. This teaches them the motion of the hang and hitch-kick without them even realizing it.
What happens on the runway and on the board is far more important than what happens in the air and on the landing. This is because everything that happens in the air is set up and created by what happens before it. What comes before the in-air stuff? The takeoff, penultimate step, approach run, and starting position. Without these four things in good shape, everything happening in the air and on the landing will be flawed anyway. An optimal landing does not occur without an optimal takeoff and approach run.
This is a challenging idea for kids to understand. They want to do competition-length approaches, jumps, and competition landings into a sandpit all the time and usually don’t like settling for anything less. The best advice I can give regarding this is to provide athletes with the best logical and sound rationale as to why you train them this way and how they can become very proficient at the long jump event without ever touching a sand pit during training.
Explain rationally to athletes why you train them this way and how they can become very proficient at the long jump event without ever touching a sand pit during training, says @KCPerformance_. Share on XGet Better Results
This is the setup I have used, and it has worked very nicely. We have seen significant performance improvements and school records being broken while using this setup. Being creative and resourceful as a high school coach is always important, especially if your budget and facilities are less than ideal.
I would begin implementing this setup as soon as possible so your jumpers can safely improve their performance. None of these things guarantee that your jumpers will be better—just like anything else, it comes down to the coaching. Make sure you use these recommendations wisely and safely; as always, make sure they work for your situation and the athletes in front of you.
