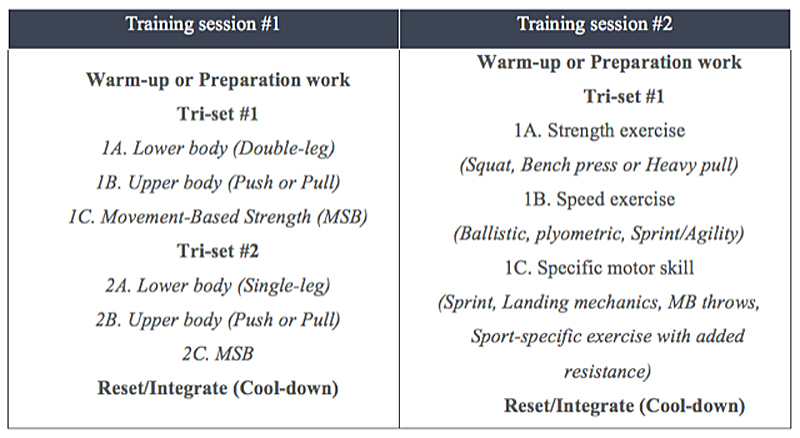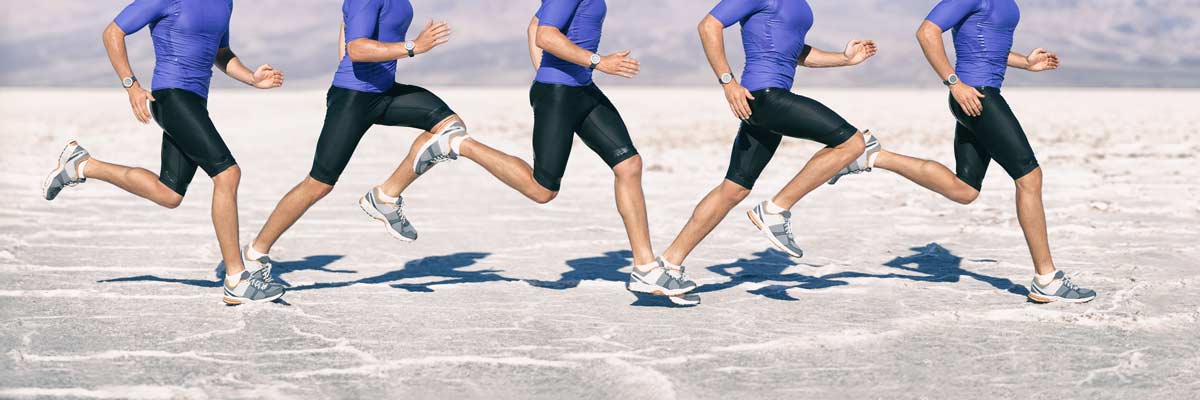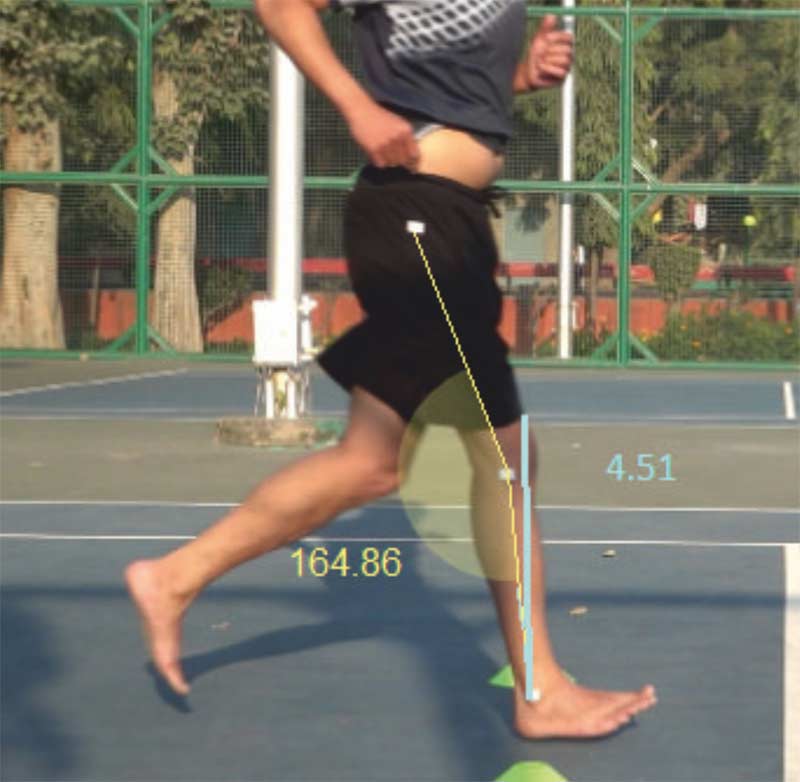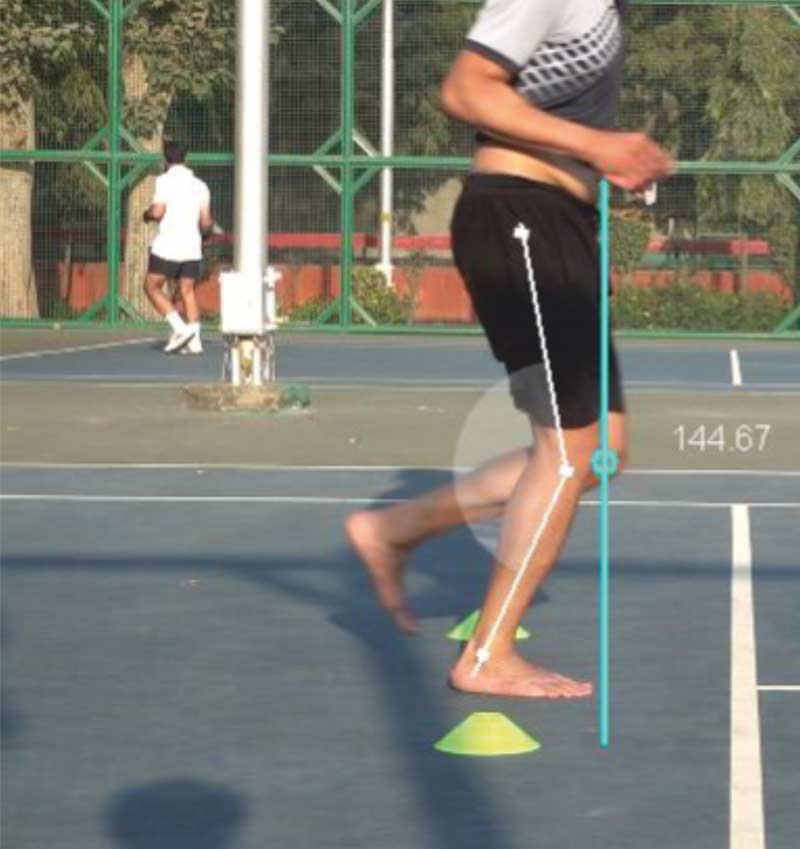
Speed is the game breaker.
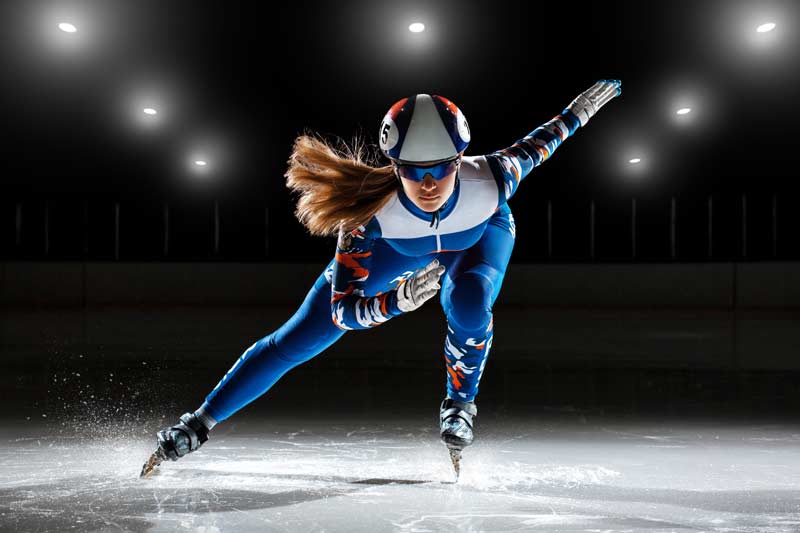
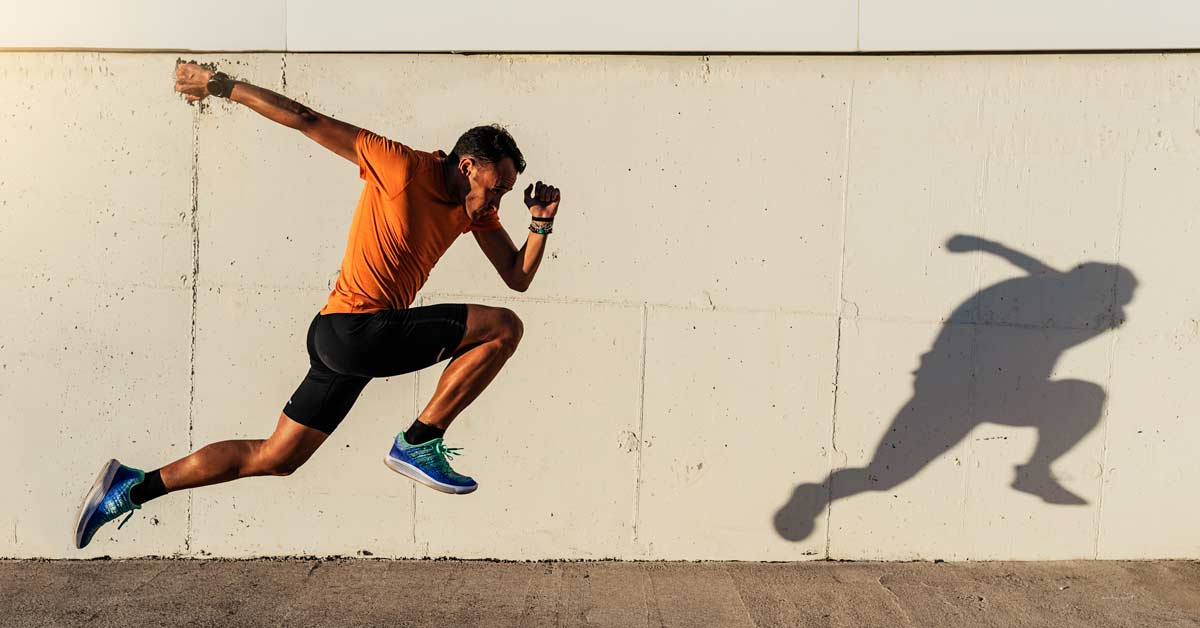
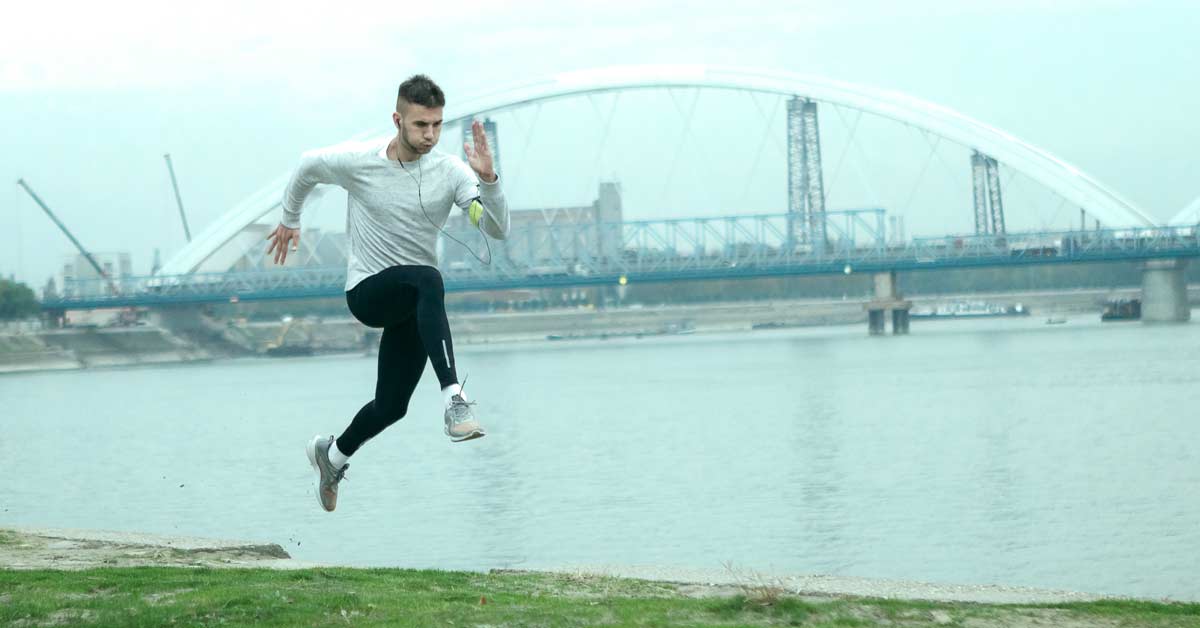
We’re all familiar with the notion that speed is king. Sport science research has revealed that the fastest athletes sign bigger contracts and score more often than their slower peers.1,2There is no substitute for raw speed—it decides the moments that matter.3Seeing an athlete at full stride leaving the opposition in their wake is a sight to behold and the holy grail of sports performance. Coaches will pay millions for it and the good news is, with proper programming, anyone can develop their sprint speed.
I always ask my athletes what’s more important: making the break, or capitalizing on it? If you don’t end up with points on the board after working hard to evade defenders, it was all for nothing. Opportunities that aren’t capitalized upon are worthless. With this in mind, as a coach, I place a huge emphasis on developing maximal linear sprint speed in my field sport athletes. When one of my athletes makes a break, I expect them to outrun their opposite number.
Furthermore, maximal sprint speed has a trickle-down effect and can positively influence both multi-directional qualities and general running capacity. While the required deceleration and postural skills, along with the perceptual-cognitive abilities of agility, are not developed unless trained more specifically, the development of nervous system capacity to power out of good positions and run around a defender are undoubtedly linked with top-end speed. In addition, an increase in maximal outputs will reduce the relative intensity of all other sub-maximal work, reducing reliance on anaerobic energy provisions for general movements on the field and, thus, improving overall fitness.
I don’t believe that speed is inherent and can’t be coached, and have the numbers to back me up, says @nathankiely1992. Share on XSome coaches argue that speed is inherent and cannot be coached. Most will pay a fortune to recruit speed, but dedicate little time to developing it within their existing athletes. I disagree with this notion and have the numbers to back it up. I work with athletes who have reduced their 40-meter sprint time by as much as 1.35 seconds. This would not have come about without proper coaching and programming.
All athletes can get faster than they already are, but like a tree from a seedling, it takes time to grow. While I have never seen a slow athlete become a fast athlete, there is always room for improvement, and that may be the difference between making and not making that game-breaking play.
Misconceptions About Speed
First, team sport is not all acceleration-based. The moments that matter most often require athletes to hit, or very nearly hit, absolute maximal sprint speed.3For example, in the sport I work in—rugby league—a quarter of all sprints are more than 20 meters and half are entirely linear in nature.4Ignoring the importance of straight line sprinting over longer distances can be costly, both in opportunities missed and injuries sustained. While many plays require short acceleration bursts, it’s the game-breaking plays—runaway tries or rundowns—that will require maximal outputs.
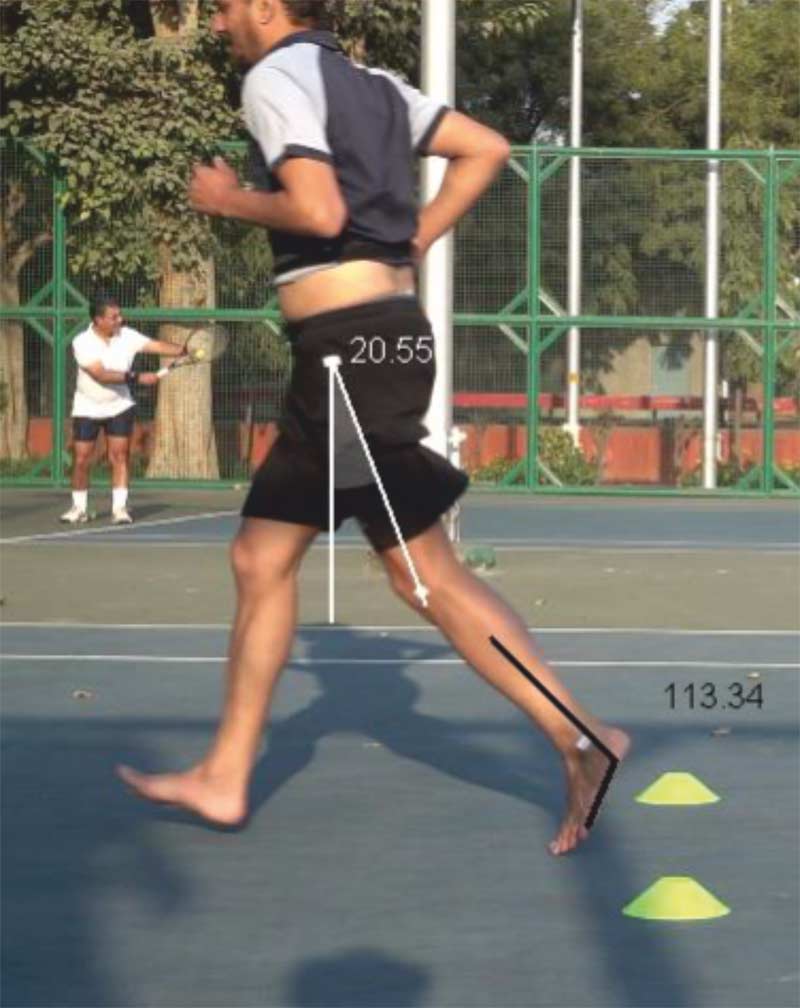
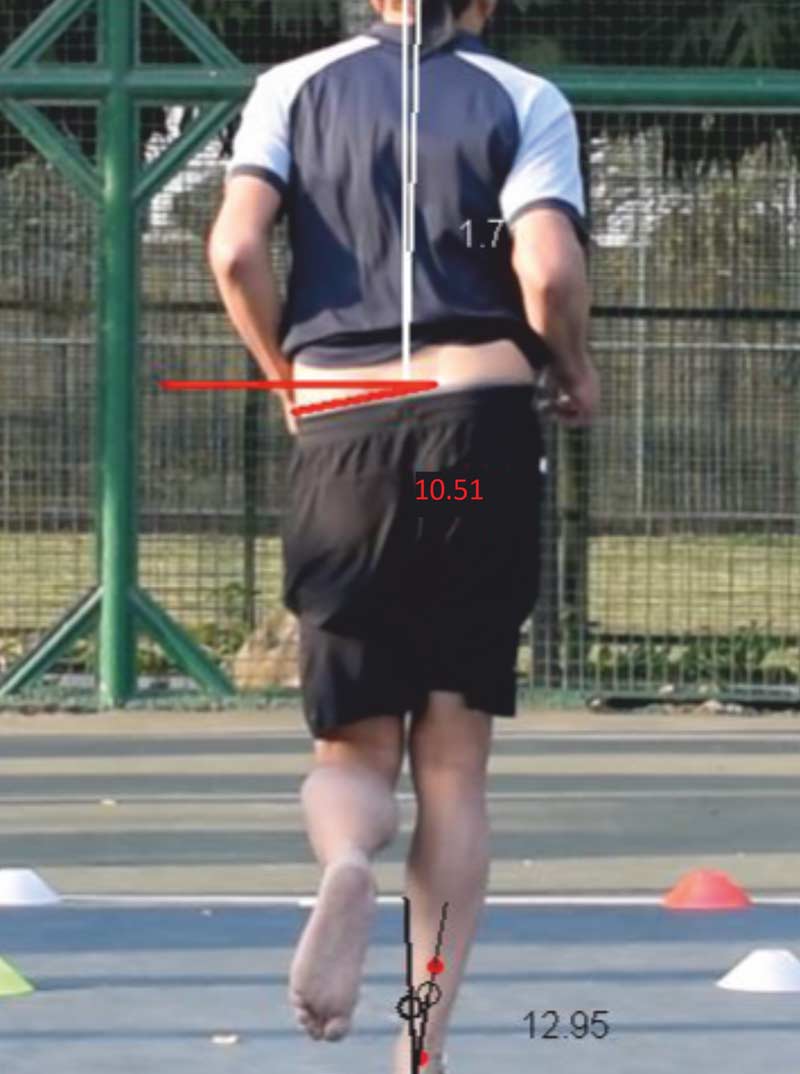
Next, sprint training isn’t necessarily any riskier than doing no sprint training. It doesn’t automatically lead to more hamstring or calf injuries. A properly designed and coached speed program will, in fact, address technique issues related to increased hamstring injury risk (overstriding), and build work capacity and robustness in your athletes by allowing them to adapt and become accustomed to high-speed running through a progressively overloaded program.5,6You can do all the Nordic hamstring curls and Romanian deadlifts in the world, but if you have faulty sprint mechanics, you will always be at an increased risk of hamstring injury.
If you have faulty sprint mechanics, you will always be at an increased risk of #hamstring injury, says @nathankiely1992. Share on XThe athletes who pull hamstrings in speed sessions are the same ones who would have done so at the most critical moment in a game anyway. So rather than allow it to happen on the field, leaving you a player short, diagnose and treat those at risk with a well-designed program. This is where a technical, rather than outcomes-based, approach becomes so important. After all, prevention is better than cure.
Lastly, repeated sprints aren’t speed training, they’re conditioning. To develop sprint speed, the legendary Canadian sprint coach Charlie Francis advised that each effort must be—at a bare minimum—above 95% of the athlete’s maximum. For this to then work, sufficient recovery periods must be in place. Otherwise, accumulated fatigue will lead to sub-maximal outputs and change your speed session into a conditioning workout.
Remember, rest is essential to the process of speed development. Team sports coaches often struggle to cope with the sight of athletes standing around during a rest period, and so I’ve developed a couple of sneaky tricks to ensure the session always looks busy enough to keep them off your back. More on this later.
I use a simple formula to prescribe rest periods with team sport athletes adapted from Dr. Mike Young at Athletic Lab. For every 10 meters of sprinting completed in any given rep, I aim for 30-60 seconds of rest. For example, a 40-meter sprint should be followed by a minimum of two minutes’ rest and ideally up to four minutes. The longer the better (so long as they don’t get cold in between reps).
Many coaches don’t know which speed qualities are the real game breakers and how to train for them, says @nathankiely1992. Share on XWhile the importance of speed is well-established, many coaches don’t know exactly which qualities are the real game breakers and how they should be trained. Numerous myths are perpetuated without the scientific evidence to support them and dispelling these misnomers is essential to better training.
Principles of Speed
So, how do I build my speed program for the best results? All my speed training is based upon four basic principles:
- Exposure
- Minimal effective dose
- Bang for your buck drills
- A KISS technical model
These principles guide my periodization, session design, workout flow, and instruction. Without these basic tenets, there is no speed program, so understanding what they are and how they work is essential to better outcomes.
Exposure
Exposure is a simple concept: To get better at something, you must practice it frequently. There’s no use throwing a speed session in every four to six weeks and expecting to make progress. Pushing a prowler and doing a hip lock drill in the weight room doesn’t address speed sufficiently either. You’ll end up repeating the same session and never progress either the technical components or the intensity of the training.
Exposure is a simple concept: To get better at something, you must practice it frequently, says @nathankiely1992. Share on XI expect all my athletes to touch or very nearly touch top speed at least twice per week, with an eye on getting it three times if possible.5,6,7Consistent exposures throughout a season allows for maximal development, as well as an increase in work capacity and robustness—thus reducing injury risk.
Another way to approach exposure is through what Derek Hansen calls micro-dosing. I’m no expert on the topic and I’d suggest looking into Hansen’s work for more detail. However, the key philosophy behind micro-dosing is that the total weekly training volume is broken up into smaller, more frequent chunks. These chunks are then spread out, allowing for maximal intensity to be reached without accumulating too much fatigue in any one training session. For example, I have implemented “speed injections,” adapted from my time as an intern with the Australian Rugby Sevens program, and will “top up” my athletes with 40-meter sprint efforts when I am concerned that we may be underdone on our very high speed running volume.
Finally, on exposure, I use technical drills as often as possible. Maintaining consistent drilling themes throughout the season allows for repeated learning and progression of technical attractors. Having athletes think about hip lock, toe up, arm drive, and rhythm two to three times per week for a season guarantees greater long-term motor learning and skill acquisition.
Low-level sprint skill drills can be used in place of a generic warm-up that may otherwise include sumo squats, grass sweeps, and lunge and twists. Make warm-ups contextual and create specific themes that create positive adaptation. Every movement should have rhyme and reason and not be implemented “just because.”
Minimal Effective Dose
Minimal effective dose is all about volume. What is the smallest amount of quality work needed to drive adaptation? Dr. Mike Young advises that team sport athletes should complete 200-300 meters of total sprint volume in a dedicated sprint session.
I’m a big fan of the “less is more” approach and take it a step further by knowing I can “top up” sprint volume across multiple sessions in a week. Thus, I use a simple formula to devise my total sprint volume for my one dedicated speed session of the week. I aim for just half of Dr. Young’s suggestion and build the rest up on other days. We typically complete 120-150 meters of total maximal sprinting (excluding stride throughs) in any one given team sprint session, which takes 15-20 minutes from walking in cold to completion.
Understand the importance of a ‘less is more’ approach for developing speed in team sport athletes, says @nathankiely1992. Share on XIt’s essential to understand the importance of a less-is-more approach for developing speed in team sport athletes. Total stress to the system can be immense for a field sport athlete, especially in season. Regular team trainings can include heavy contact, wrestling, high-intensity intervals, and lactate laden small-sided games. In addition, it is not uncommon to have two heavy lower-body weight sessions in a week. All these factors mean the fatigue/recovery glass can often be teetering on empty. Therefore, it’s essential we do the least we can get away with whenever we want to add any other additional training.
Furthermore, a low volume starting point has two benefits. First, it allows for greater long-term growth. If we start with a high volume of sprint training, we quickly realize the downside of the principle of diminishing returns. There are two rules true of all training.
- Everything works, and
- Everything will eventually stop working.
If we know that everything will eventually stop working, we should make sure to save the most advanced and hardest training for as late in the athletic development program as possible. If we start with a high volume of sprint training, we will leave ourselves no room for additional volume to be added when we reach an inevitable plateau. Start small and build up slowly.
Second, acute spikes in high-speed running are associated with increased risk of injury. Earn the right to use high volumes by building up appropriately.
Drills
A question I get asked frequently is: “Which drills are best for developing speed?” Well, first, let’s address a slightly different question. Do drills develop speed at all? My answer would have to be “no.”
Rather, based on experience I have come to the belief that drills provide a neural priming effect and context to establish positions and orient force production at lower speeds than in all-out sprinting. When sprinting at 10m/s, it can be quite difficult to execute various fundamental technical positions. Thus, the practice of sprint-specific drills can help athletes to develop an understanding of the technical elements required to sprint in the most efficient manner. Exposure to maximal sprint speed is what develops speed, but we can only optimize this and reduce the risk of injury after we establish good technique.
So, how does a coach decide which drills to use? I have the less-is-more approach. All my drills are either specific strength or hip, trunk, and foot strike orientation drills. This is the biggest thing I have seen my athletes struggle to execute and which I see as having the greatest return on time invested.
Running fast is peripheral to the overall goal of being a good player in the sport in question, says @nathankiely1992. Share on XI’m always looking to create gradually more complex “A” series progressions. I do not typically use B-skips or dribbling drills. This is because I believe we get our posterior chain development from our prime times and I find dribbling drills reinforce the short, choppy steps that are often already a technical issue for my athletes. Remember, running fast is peripheral to the overall goal of being a good player in the sport in question, so using as few drills as possible to address the basics should be paramount. That’s not to say these drills have no place, just that their place isn’t at the starting point of my program.
Therefore, I have a set of six simple main drills with appropriate progressions for each:
- Lunge pattern
- A-pop
- A-skip
- High knees
- Prime times
- Acceleration bounds
I do use other drills (and by no means do I claim these are the only ones that work—this is just what I’ve found to work for me) in a corrective manner with individuals who I believe could benefit from a specific drill. However, in general, these are all that I will use. I see drills 5 and 6 as “special strength” exercises aimed at developing explosive strength and I’ll use one or the other to complement the physiological response targeted through the particular training block we’re in.
Technical Model
My technical model is built around the “keep it simple, stupid”(KISS) principle. If I can create a system so simple that every athlete in my squad can know the key aspects by the end of pre-season, then I am already ahead of the ball. Remember, we’re not working with track sprinters here. An understanding of the intricate details of optimal sprint technique is very low on your athlete’s list of interests. Being able to get some key points across in as few words as possible will reduce confusion and increase buy-in from your athletes.
There are other great models out there, such as rhythm, projection, and rise or PAL, and I do use concepts from these in my own system. My model (PARF) consists of four key components: Posture, Alignment, Range of movement, and Force orientation.
- Posture is inclusive of the following areas: In acceleration, “head to heel, strong as steel,” with aggressive shin and torso angles using gravity to help you “fall forward.” At top speed, running tall with shoulders back and down, big proud chest with head and eyes up at the target, and hips remaining high and neutral (imagine being pulled up by a rope attached to your head).
- Next, alignment revolves around the limbs, hips, and shoulders. Arms and legs should drive directly at—not across—the target, and the hips and shoulder should remain square (brace abs to deflect a punch to keep core engaged).
- Then we focus on range of movement, I ask athletes to aim for a parallel thigh at terminal knee drive and hands working “face cheek to butt cheek,” or “from your eyes past your hip pocket.” Arms work from the shoulders, not the elbows.
- Finally, force orientation. Research shows that it’s not how much force you can produce, but how fast and accurately you can apply and orient it, that determines sprint performance.8,9During acceleration, it is essential that we drive back and away to “spin the earth” or “push the ground away.”
In upright running I take a leaf out of Ken Clark’s coaching cues and ask my athletes to “cock the hammer and strike the nail” or “make the ground pop.”10A powerful and stiff foot strike from above to under the hips is essential during upright running conditions and is key to creating robust and versatile maximal velocity sprint technique.
Underpinning all programming decisions with these four principles ensures field sport athletes will get greater development and retention of maximal velocity sprint speed. The moments that matter in a match rely on game-breaking speed, and a simplified framework or training system gives all coaches and their athletes access to this attribute.
In Practice
Game-breaking speed is what wins or loses matches. All athletes have the potential to develop greater maximal outputs. Now I would like to explore more deeply and reveal the specific details of what this looks like in practice.
Game-breaking speed is what wins or loses matches, says @nathankiely1992. Share on XMy solution is one dedicated 20-minute speed training block per week and at least one additional exposure to very high speed running during training. If possible, a third exposure may occur in the game itself. However, if it does not, then it falls upon the coach to utilize a “speed injection” to top up the athletes.
This process may be made far easier by using wearable technology, such as GPS, that can identify peak sprint speed—albeit with some degree of error—during a session or game. When using this type of technology, I look for peak sprint speeds to reach at least 90% of maximum; this is somewhat contradictory to the 95% rule of Francis (mentioned earlier). However, with so many other stress variables in play, along with the error associated with GPS units, it’s hard to tell what a true maximum on any given day for your particular athlete may be.
Planning Training
Initially, I always start with a four-week block of maximum-velocity focused sprint work. I use a long to short program—but short to long can work just as well—because of the typical postural nature of most sprints in field sports. Gabbett highlights that nearly 60% of rugby league sprints occur from a walking, jogging, or striding start.4Therefore, aggressive acceleration postures are, in fact, less common than you may think. This is why I like to teach “upright” mechanics first, before layering more explosive acceleration work on top later.
Following our maximum velocity block, the focus shifts to the technical aspects of acceleration. We never stray too far away from one end of the velocity spectrum. A vertical integration approach means we will always train both top speed and acceleration, it’s just that the focal point will shift from block to block. Remember, there are many other aspects involved in the training of field sport athletes, so keeping a consistent theme in speed training will allow for long-term steady progression in outcomes. In acceleration, we execute our drills sometimes using partnered band resistance to potentiate and reinforce positive postural lean.
Session Design
My dedicated speed sessions involve three components: warm-up, specific exercise, and sprint work.
Warm-Up
The specific technical warm-up consists of drills with gradually increasing movement velocity interspersed with short, sharp “stride throughs” that bleed technique from drills into gross motor movement patterns. These drills are typically some variation of a lunge pattern/A-march, an A-pop, an A-skip, a high knees, and a bounding drill (with the variation dependent on session goal—acceleration or maximum velocity). Each drill is usually completed for just one or two 10m repetitions followed by a 10-meter walk-in stride through at 80%, 85%, 90%, and 95% relative intensity.
To create buy-in during the sometimes monotonous “warm-up,” I create competition among my athletes. Athletes perform their drills in waves of four athletes at a time, allowing me to observe and correct technique without having too many athletes going at once. We then rank each wave of four athletes based upon the quality of their drill execution, with winners praised and losers ridiculed (in a light-hearted manner). Any time there is competition in training, athletes naturally want to perform. For those who have not previously taken our drill component seriously, I’ve found this leads to immediate changes in our session quality.
Do not sacrifice drill quality—this is where the learning occurs, so ensure it is done well, says @nathankiely1992. Share on XI’m a huge fan of breezing through the warm-up as quickly as possible. The athletes want to train, and that’s where they’ll develop the most. But do not sacrifice drill quality—this is where the learning occurs, so ensure it is done well.
Specific Exercises
Following the A series drills and bounding in our warm-up, we enter a constraints-based sprint exercise. Environmental factors are manipulated to create tasks where the only way to successfully complete the drill is by optimizing technique. If technique is faulty, the athlete fails.
The selection of this exercise is entirely dependent upon the training block and, again, KISS rules all else here. During maximum velocity blocks, the constraints-based exercise will be a wickets or mini hurdle run drill, and during acceleration a resisted or incline sprint will be used.11Both these drills have endless variations, so subtle ongoing progression can occur throughout the season within the context of the specific drill itself.
For example, the wickets drill can be progressed by crossing the arms; holding a dowel on the shoulders or overhead; running with a ball in one arm, switching the ball-carrying arm mid-rep or making or receiving a pass on the fly; or by competing with a teammate or against the clock. Likewise, in acceleration, progressions could include heavy prowler pushes (Joe DeFranco style), grandstand or hill sprints, three- or four-point start sled sprints (progression in velocity from ~50% up to 90%), and band-resisted sprints, with competitive and non-competitive variations.11
I have selected these two key exercises because of the way they enable the athlete to explore the perceptual motor landscape and find movement solutions without active verbal cueing from the coach. When dealing with 40 athletes, it can be a godsend to just stand back and observe rather than actively coaching every single rep. The wickets drill forces athletes to find good posture and front side mechanics all on their own. Likewise, resisted sprints are a must, not only for developing aggressive acceleration posture and horizontal force production, but also for developing highly movement-specific strength in athletes.
Sprint Work
After our drills and constraints-based exercise we enter the fun part: live sprinting. From my experience, competition is the key to getting the most out of this area of training. Whether it is competition with oneself via the stopwatch, or among peers running side by side, there must be a win or loss component to drive intensity. Typically, I utilize “heats” of three or four athletes pitted against one another.
It’s important to ensure these races are going to be as competitive as possible—for instance, in rugby do not match your prop with your fullback, or if they’re running against one another, create a handicap by giving the slower athlete up to a 10% head start so both athletes will need to run hard all the way through. I’ve found handicaps particularly useful in addressing the common phenomenon where faster athletes “turn it on” for only a fraction of the rep (enough to develop a lead) and slower ones give up quickly once left behind. This setup allows for a good mix between intensity, walk-back recovery time, and session flow.
Rumpf et al. demonstrate that for the best results, sprint training should be completed over distances greater than 30 meters.7This fits excellently with Dr. Young’s suggestion that team sport athletes should complete repetitions that fall between 30 and 60 meters in distance. For these reasons, I follow a linear distance regression throughout my training blocks, starting at longer distances with few repetitions and finishing with shorter distances for a greater number of reps. Total sprint volume remains consistent across all sessions. Table 1 shows an example of a four-week training block.
WEEK | SESSION | RECOVERY |
1 | 2 x 60m linear sprint – non-competitive in block 1 | 3 mins |
2 | 2-3 x 50m S run race | 2.5 mins |
3 | 3 x 40m linear sprint race | 2 mins |
4 | 4 x 30m tag (various start positions) | 1.5 mins |
|
Table 1.An example of my four-week training block. I follow a linear distance regression throughout my training blocks, starting at longer distances with few repetitions and finishing with shorter distances for a greater number of reps. Total sprint volume remains consistent across all sessions.
Our speed work is progressed through varied starts (prone, supine, half kneeling, drop and roll, or chase). This mixes chaos into the equation to link the pure linear speed we’re aiming to develop with the realities of field sports. Curvilinear runs may be introduced later in the program to create greater specificity in our workouts. However, I never stray too far from the pure maximal outputs that can only be achieved with more focused sessions. Introducing too much chaos just serves to add more of what a field sport athlete already gets in their regular training. The only way to create real development of sprint speed is by “filling the gaps” with more pure training sessions.
Previously, I mentioned having some sneaky tricks up your sleeve to create the illusion of busyness within your speed sessions. This can be a lifesaver if, like me, you’ve worked in scenarios where coaches become skeptical of training that involves any standing around.
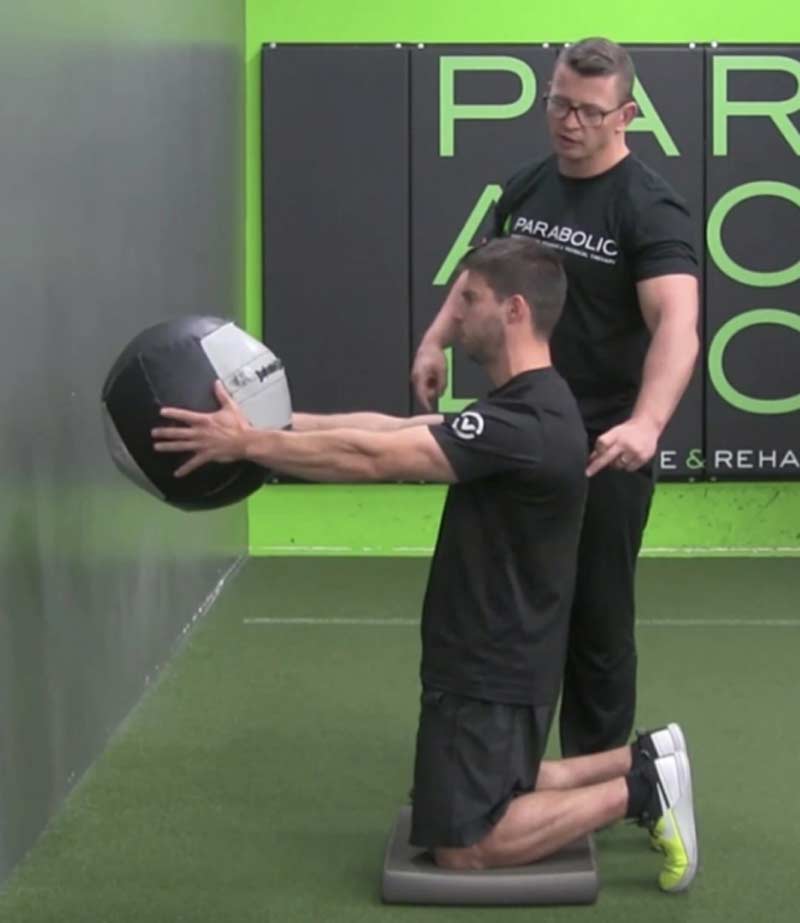
The trick to this is to superset or complex a series of extensive or low-level plyometrics, medicine ball throws, ball skills, or core exercise after each repetition of your sprint workout. Some simple throws against a brick wall or lateral hurdle hops can add a physiological benefit to the development of your athlete and create a better flow to the session. Consider working your plyometric exercises on the field rather than in the weight room to fill this void and build a greater holistic approach to training.
Speed Injections
In my experience, it is hard to ask for anything more than one 20-minute block of dedicated speed work per week. As physical preparation coaches, we still need to fit multi-directional work, energy system development, and strength work into our programs. Therefore, it is essential we are cognizant of all the factors that need to be addressed, particularly in season when coaches rightfully need more time to work on the technical and tactical elements of the sport. Thus, finding ways to “top up” our exposures to maximal velocity sprinting can be tricky, yet very important.
The ideal scenario is one where athletes reach top speed in regular training. Manipulating existing training drills to include some small elements whereby athletes are required to really turn it on is the gold standard of tactical periodization—where all essential elements are addressed through intelligent and integrated training design. However, if this can’t happen, it becomes imperative that we find another way to expose our athletes to top speed.
It is imperative that we find a way to expose our athletes to top speed, says @nathankiely1992. Share on XOne way of doing this is by using the same warm-up regularly and building towards one maximal effort before moving into team skills. Alternatively, Leicester City FC demonstrated during their remarkable 2016 Premier League victory season that speed top-ups could be effectively implemented at the conclusion of a training session. I have never done this, but it may be worth considering if you have no other options. If you do this, be very wary of volume and ensure athletes who really aren’t up to it after a hard training session are identified and pulled out.
What I typically do instead is ask my athletes to give me one or two maximal efforts of either 40m or a simple 10m fly at the conclusion of our multi-directional work. I do this then because I know they will be warm, but also fresh. Therefore, without consuming much time, I believe this is the best place for this work to be done.
Having various options open to you for alternative means of topping up exposure to maximal velocity sprinting is the best way to go about it. Having an agile mindset will allow you to fill the gaps in whatever manner is the most appropriate, given the sometimes unpredictable week-to-week grind that is often associated with in-season training.
A Foundation for Speed Training
There is no substitute for raw speed in field sports. Understanding how, when, and what training modalities are best used for developing this game-breaking quality is the cornerstone of overall athletic development. Establishing a clear and simple model built on strong fundamental principles removes doubt from the decision-making process for physical preparation coaches and allows for optimal outcomes over the long term. I hope the examples I’ve presented in this article give other coaches some starting points or ideas from which to build into or upon their own ideas on speed training for their athletes.
Since you’re here…
…we have a small favor to ask. More people are reading SimpliFaster than ever, and each week we bring you compelling content from coaches, sport scientists, and physiotherapists who are devoted to building better athletes. Please take a moment to share the articles on social media, engage the authors with questions and comments below, and link to articles when appropriate if you have a blog or participate on forums of related topics. — SF
References
- Treme, J. and Allen, S.K., 2009. “Widely received: Payoffs to player attributes in the NFL.” Economics Bulletin, 29(3), pp.1631-1643.
- Gabbett, T.J., Jenkins, D.G. and Abernethy, B., 2011. “Relationships between physiological, anthropometric, and skill qualities and playing performance in professional rugby league players.” Journal of Sports Sciences, 29(15), pp.1655-1664.
- Faude, O., Koch, T. and Meyer, T., 2012. “Straight sprinting is the most frequent action in goal situations in professional football.” Journal of Sports Sciences, 30(7), pp.625-631.
- Gabbett, T.J., 2012. “Sprinting patterns of national rugby league competition.” The Journal of Strength & Conditioning Research, 26(1), pp.121-130.
- Colby, M.J., Dawson, B., Peeling, P., Heasman, J., Rogalski, B., Drew, M.K. and Stares, J., 2018. “Repeated exposure to established high risk workload scenarios improves non-contact injury prediction in elite Australian footballers.” International Journal of Sports Physiology and Performance, pp.1-22.
- Malone, S., Roe, M., Doran, D.A., Gabbett, T.J. and Collins, K., 2017. “High chronic training loads and exposure to bouts of maximal velocity running reduce injury risk in elite Gaelic football.” Journal of Science and Medicine in Sport, 20(3), pp.250-254.
- Rumpf, M.C., Lockie, R.G., Cronin, J.B. and Jalilvand, F., 2016. “Effect of different sprint training methods on sprint performance over various distances: A brief review.” Journal of Strength and Conditioning Research, 30(6), pp.1767-1785.
- Morin, J.B., Edouard, P. and Samozino, P., 2011. “Technical ability of force application as a determinant factor of sprint performance.” Medicine and Science in Sports and Exercise, 43(9), pp.1680-1688.
- Morin, J.B., Bourdin, M., Edouard, P., Peyrot, N., Samozino, P. and Lacour, J.R., 2012. “Mechanical determinants of 100-m sprint running performance.” European Journal of Applied Physiology, 112(11), pp.3921-3930.
- Clark, K.P., Rieger, R.H., Bruno, R.F. and Stearne, D.J., 2017. “The NFL Combine 40-yard Dash: How Important is Maximum Velocity?” Journal of Strength and Conditioning Research.doi: 10.1519/JSC.0000000000002081.
- Petrakos, G., Morin, J.B. and Egan, B., 2016. “Resisted sled sprint training to improve sprint performance: A systematic review.” Sports Medicine, 46(3), pp.381-400.
Sprint Kinetics, Kinematics, and Training Application with Ken Clark
Dr. Ken Clark is an assistant professor in the Department of Kinesiology at West Chester University. Dr. Clark teaches biomechanics and kinetic anatomy at the undergraduate level, and motor learning at both the undergraduate and graduate levels.
In addition to teaching and conducting research, Dr. Clark has more than a decade of strength and conditioning coaching experience. He has coached in the private sector (Summit Sports and CES Performance), the high school level (Jesuit Prep in Dallas, TX), and the collegiate setting (Dickinson College, Haverford College, Villanova University).
Freelap USA: What is responsible for good vertical force production in top-end sprinting? What are some training considerations with this in mind?
Ken Clark: From a biomechanical standpoint, recent research suggests that maximal vertical force production during top-end sprinting is a result of a rapid acceleration of the swing limb into the ground, followed by an immediate deceleration of the limb upon ground contact. This research comes from Peter Weyand’s SMU Locomotor Lab, which I was lucky to be a part of for five years. Our Two Mass Model1,2suggests that a faster lower limb velocity into the ground, combined with a more rapid deceleration of the lower limb after initial touchdown, will increase the impact forces applied during the first half of ground contact, and allow for greater overall force application during briefer ground contact times.
From a coaching standpoint, greater magnitudes of vertical force can be achieved by following this technique checklist:
- Upright posture with the torso and the hips neutral.
- Minimal swing of the thigh behind the body after toe-off.
- Maximal lift of the thigh in front of the body during the forward recovery phase.
- Aggressive strike towards the ground at the end of the swing phase.
- Stiff ground contact on the ball of the foot.
At touchdown, the lower limb needs to immediately decelerate upon initial impact, and the remainder of the stance limb and body needs to stay relatively rigid, yielding little from the ground all the way up the rest of the kinetic chain. The body has to remain stiff in all three planes, as too much compliance at the ankle and knee (sagittal plane) or hip/pelvis (frontal plane) is not optimal.
With regard to training, I think there are some specific recommendations that can be made. Unilateral plyometrics, and especially hops, should focus on a stiff contact on the ball of the foot with a minimal give or collapse when the foot hits the ground. Any collapse throughout the foot-ankle complex will prolong ground contact time, decrease stiffness, and generally not provide the desired training benefit.
With regard to warm-up exercises and sprint training drills, all reps should be completed with a specific focus on the technical checklist mentioned above. With this in mind, I especially like the A-march and A-skip, straight-leg runs/bound, and the triple-flexion thigh-switch drill (“boom-booms”). Although none of these drills are novel or revolutionary, I like them because they provide great context for working on posture, aggressive ground contact underneath the hips, and stiff strike on the ball of the foot.
Freelap USA: Looking at the factors that dictate good sprinting, what are some recommended special strength exercises (i.e., heavy sleds, overspeed, etc.)?
Ken Clark: I think the concept underlying accelerations with heavy resistance may have value. It forces the athlete to stay in a forward body lean longer than they would during a light or un-resisted acceleration. Furthermore, it may be effective for developing unilateral leg extensor strength in a closed-kinetic chain body position, which could have good transfer to the first phase of a sprint.
I think #AssistedSprinting has the potential for the maximum velocity phase of the sprint, says @KenClarkSpeed. Share on XOn the flip side of that, I think assisted sprinting also has potential for the maximum velocity phase of the sprint. With some of the new cable motorized technologies that have recently been developed for assisted running, I think it is much easier to precisely control the velocity of the runner, which enhances the safety of this modality compared to prior methods such as bungee cords, etc. The key to effective assisted running is enhancing the runner’s velocity through decreased ground contact times (which could present a beneficial neural stimulus), and with minimal disruption to other aspects of the runner’s natural gait.
I should point out that further research needs to be completed on both of these modalities. Although the acute effects of resisted sprint training have been researched to a large degree, the longitudinal effects of training with very heavy resistance still remain to be determined. Furthermore, both the acute and longitudinal effects of assisted sprinting are largely unknown at this point, and further research is clearly necessary.
Freelap USA: What are some similarities and differences between the vertical forces in reactive vertical hopping and maximal velocity sprinting?
Ken Clark: I think the major similarity is the goal during both movements—i.e., to apply as much vertical force down into the ground as possible, in as brief a ground contact time as possible, while staying as stiff as possible all the way up the kinetic chain. Because of this over-arching similarity, I believe that reactive vertical hopping exercises are excellent for top-speed development.
I believe that reactive vertical hopping exercises are excellent for top-speed development, says @KenClarkSpeed. Share on XHowever, I think there are a few differences. First, the magnitude of vertical force is not necessarily the same between sprinting and reactive hopping plyometrics. During each ground contact when running at top speed, competitive athletes generally apply average vertical forces of 2.0-2.5x body weight and peak vertical forces of 3.0-5.0x body weight. Certain plyometrics may have vertical force magnitudes that are either smaller or greater than these values, depending on the athlete’s capability, the type of plyometric drill, and the height achieved during the hop/jump.
Perhaps more importantly, another difference is the ground contact time during maximal velocity sprinting versus certain vertical hopping exercises. Ground contact times during maximal velocity sprinting generally range from 0.08s (elite sprinter) to 0.12s (team sport athlete). To my knowledge, there are no plyometric drills that can match the short ground contact duration that is observed in maximum velocity sprinting. This is why sprinting is often described as the ultimate plyometric, and I would generally agree with this statement.
This is not to discourage other plyometrics at all, as plyometrics like reactive vertical hopping are obviously still extremely useful for developing speed, improving stiffness, and reducing injury risk factors.
Freelap USA: You’ve talked about the similarities between acceleration and top-end sprinting speed. What is similar here, but also, what are the key differences?
Ken Clark: I think there are more similarities than is often realized. With regard to force application, during both phases of the race, the runner should apply as much force as possible, as fast as possible, in the correct direction. Achieving this requires a strong posture with neutral alignment of head-trunk-hips, minimal thigh swing behind the body, an aggressive strike of the ground with the foot aiming to contact underneath the center of mass, and a stiff ground contact phase. The best sprinters can execute these technical goals from the first to last step in a race.
The sprinter should apply as much force as possible, as fast as possible, in the correct direction, says @KenClarkSpeed. Share on XAlthough there are many similarities, there are some clear differences, including kinetics, body position, ground contact times, and leg mechanics. During acceleration, the two major force requirements are: 1) apply sufficient vertical force to support body weight and rebound the center of mass into the next step, and 2) apply the rest of available force backwards to propel the center of mass forwards.3
To apply net horizontal propulsive forces during acceleration, the runner obviously leans forward and positions the center of mass in front of the foot for the majority of ground contact. As the runner continues to accelerate and approaches top speed, the body becomes upright and the majority of the forces are directed vertically down into the ground. Furthermore, ground contact times decrease in proportion to running velocity. Therefore, during initial acceleration, the ground contact times are relatively longer (~0.15-0.20s); but as the runner approaches top speed, the ground contact times are much shorter (0.08-0.12s, depending on the runner’s ability).
This implies that during acceleration, the key kinetic determinants are the ability to apply larger mass-specific horizontal propulsive forces during relatively longer ground contact times4,5while still applying enough vertical impulse to support body weight.3At top speed, the key determinants are the ability to apply large mass-specific vertical forces during relatively shorter ground contacts.6,7,8
Freelap USA: What are your thoughts on short speed endurance, and how fatigue begins to occur? How can we get athletes to hold their maximal velocity longer from a training perspective, and what factors are at play?
Ken Clark: Perhaps the best construct for understanding neuromuscular fatigue and short speed endurance is the force-application framework known as the Speed Reserve Model (previously termed the Anaerobic Speed Reserve). This framework has been developed and refined over the last 15 years by Peter Weyand and Matt Bundle.9-12These researchers determined that average velocity during maximal-effort runs of 3 to 240 seconds can be accurately predicted from only two variables: the athlete’s maximum velocity sprinting speed and the athlete’s running speed at VO2max.9(See Figure 1 in Bundle and Weyand, 2012.)
In addition to providing an excellent predictive algorithm for researchers and practitioners, this framework provides insight into the mechanisms underlying fatigue during short sprints. Namely, “as efforts extend from a few seconds to a few minutes, the fractional reliance on anaerobic metabolism progressively impairs whole-body musculoskeletal performance and does so with a rapid and remarkably consistent time course. In this respect, the sprint portion of the performance duration curve predominantly represents, not a limit on the rates of energy resupply, but the progressive impairment of skeletal muscle force production that results from a reliance on anaerobic metabolism to fuel intense sequential contractions” (Bundle and Weyand, 2012, p. 181).
From a coaching perspective, this implies that the best way to improve short speed endurance is to simultaneously train the ceiling and the floor. In other words, a primary factor in short speed endurance is simply the athlete’s maximum velocity (i.e., the ceiling). If top speed can be enhanced through training, speed endurance will improve along with the improvement in top speed. Improving maximal velocity can be accomplished by focusing on the techniques mentioned above in the first question, reactive plyometrics, and simply sprinting fast (Fly 10s, etc.). In shorter sprints of 200 meters or less, almost all the enhancement in speed endurance comes from raising the ceiling.
If top speed can be enhanced through training, #SpeedEndurance will improve along with it, says @KenClarkSpeed. Share on XWith regards to improving “the floor,” it may be difficult to suggest only one methodology, as many prior methods have been effective. However, I am partial to methods that emphasize maximal or near-maximal efforts with relatively full recovery. These include 250s, 350s, 450s etc., or time-based drills such as the 23/27-second drill from coaches like Tony Holler and Chris Korfist.
Since you’re here…
…we have a small favor to ask. More people are reading SimpliFaster than ever, and each week we bring you compelling content from coaches, sport scientists, and physiotherapists who are devoted to building better athletes. Please take a moment to share the articles on social media, engage the authors with questions and comments below, and link to articles when appropriate if you have a blog or participate on forums of related topics. — SF
References
- Clark, K. P., Ryan, L. J., & Weyand, P. G. (2014). “Foot speed, foot-strike and footwear: linking gait mechanics and running ground reaction forces.” Journal of Experimental Biology, 217(12), 2037-2040.
- Clark, K. P., Ryan, L. J., & Weyand, P. G. (2017). “A general relationship links gait mechanics and running ground reaction forces.” Journal of Experimental Biology, 220(2), 247-258.
- Clark, K. P., & Weyand, P. G. (2015). “Sprint running research speeds up: A first look at the mechanics of elite acceleration.” Scandinavian Journal of Medicine & Science in Sports, 25(5), 581-582.
- Rabita, G., Dorel, S., Slawinski, J., Sàez‐de‐Villarreal, E., Couturier, A., Samozino, P., & Morin, J. B. (2015). “Sprint mechanics in world‐class athletes: a new insight into the limits of human locomotion.” Scandinavian Journal of Medicine & Science in Sports, 25(5), 583-594.
- Morin, J. B., Slawinski, J., Dorel, S., Couturier, A., Samozino, P., Brughelli, M., & Rabita, G. (2015). “Acceleration capability in elite sprinters and ground impulse: Push more, brake less?” Journal of Biomechanics, 48(12), 3149-3154.
- Weyand, P. G., Sternlight, D. B., Bellizzi, M. J., & Wright, S. (2000). “Faster top running speeds are achieved with greater ground forces not more rapid leg movements.” Journal of Applied Physiology, 89(5), 1991-1999.
- Weyand, P. G., Sandell, R. F., Prime, D. N., & Bundle, M. W. (2010). “The biological limits to running speed are imposed from the ground up.”Journal of Applied Physiology, 108(4), 950-961.
- Clark, K. P., & Weyand, P. G. (2014). “Are running speeds maximized with simple-spring stance mechanics?” Journal of Applied Physiology, 117(6), 604-615.
- Bundle, M. W., Hoyt, R. W., & Weyand, P. G. (2003). “High-speed running performance: a new approach to assessment and prediction.” Journal of Applied Physiology, 95(5), 1955-1962.
- Weyand, P. G., & Bundle, M. W. (2005). “Energetics of high-speed running: integrating classical theory and contemporary observations.”American Journal of Physiology-Regulatory, Integrative and Comparative Physiology, 288(4), R956-R965.
- Weyand, P. G., Lin, J. E., & Bundle, M. W. (2006). “Sprint performance-duration relationships are set by the fractional duration of external force application.” American Journal of Physiology-Regulatory, Integrative and Comparative Physiology, 290(3), R758-R765.
- Bundle, M. W., & Weyand, P. G. (2012). “Sprint exercise performance: does metabolic power matter?” Exercise and Sport Sciences Reviews, 40(3), 174-182.
How to Plan the Off-Season in Canadian University Football Part 1: Winter Training
Athletes who are bigger, stronger, and faster have been the goal of athletic development for American football players for many years. Just north of the border, Canadian football also seeks players who are bigger, stronger, and faster. Due to differences in the sport, however, Canadian football teams cannot blindly copy the training programs from some of the most popular football programs in the United States, especially at the college level.
This is the first of two articles providing insight into the off-season athletic development program of a Canadian university football team.
Key Differences in Canadian and American Football
Much like American football, Canadian football is an intermittent collision sport where players require well-developed physical qualities such as strength, power, speed, agility, and anaerobic endurance. However, there are major differences between both sports that make Canadian football a very different game.
- The size of the field is longer (150 yards) and wider (65 yards) with end zones 20 yards deep and 110 yards separating both end zones.
- Canadian football is a 3-down game while American football is 4, which puts more emphasis on the Canadian passing game.
- All offensive backfield players except the quarterback may move in any direction to confuse the defense as long as they are behind the line of scrimmage at the snap.
- One yard separates the offensive and defensive line before the snap of the ball, which provides more opportunities for coaches to implement stunts and various movements on the defensive side of the ball. This creates additional requirements for change of direction and agility.
- While special team players often run the most during NFL games, Canadian special team players are required to run even more at both the college and professional levels.
U Sports 2017 Football season | |
Game #1 | 38 |
Game #2 | 42 |
Game #3 | 37 |
Game #4 | 34 |
Game #5 | 37 |
Game #6 | 46 |
Game #7 | 39 |
Game #8 | 45 |
Game #9 | 34 |
Average number of ST plays per game | 39 |
Total number of ST plays during the season | 352 |
It’s also worth mentioning that, because the goal posts are placed directly above the end zones, a missed field goal may give the special teams an opportunity to take the ball and return it for a touchdown. This can’t happen in American football because the goal posts stand at the back of the end zones. Here is an example of a 129-yard missed field goal return touchdown.
Different rules and play increase the running demands of #CanadianFootball compared to the US game, says @xrperformance. Share on XThese differences in rules and play increase the running demands in Canadian football, and we need to take them into account when planning the off-season program. One research study, for example, found the total distance traveled during a game by non-linemen (WR, DB, LB) was about 4,141.3 meters.4 For pre-season practices, however, another study reported distances of only 2,573 ± 489 meters for these positions.2 We did our own research using GPS during eight games in the 2016 season and nine games in the 2017 season and found the WR and RB covered total distances of 6,321± 917 meters and 6,155 ± 509 meters, respectively.
With a better understanding of the demands of these positions, we had to adjust our training program so we could better prepare our student-athletes to meet the game’s requirements.
Preparing During the Winter Semester: Focusing on the Weight Room
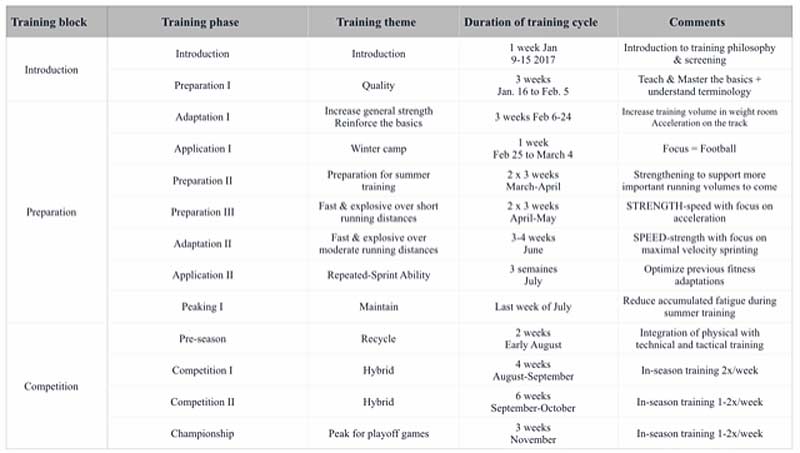
The off-season program usually starts the first week of January when the players get back on campus. At this time of the year, there are about 90-100 players on the team. The first week has very few training activities scheduled since players meet with their coaches for team meetings and attend class. For some recruits, the first week can be a little stressful as they transition from CEGEP to university. From an athletic development perspective, it’s a perfect opportunity to introduce the philosophy and goals of the training program and perform any movement screening. Training usually resumes during the second week of January.
While I was Head Strength & Conditioning coach for a Canadian university football team, we divided winter training into four 3-week cycles. The first two 3-week cycles introduced the student-athletes to the philosophy behind the athletic development program and the different exercises they would perform. We also made sure that they executed the exercises properly.
The main training themes for the winter semester, right before the training camp, were:
- Teaching and mastering the basic movements and understanding the terminology used
- Progressively increasing training volume in the weight room
On the track, we began by focusing on proper running mechanics and postures and working on starts and accelerations using a short-to-long approach. Training was also needed to prepare the athletes for the increased demands of the winter training camp, which usually took place only weeks later during March break.
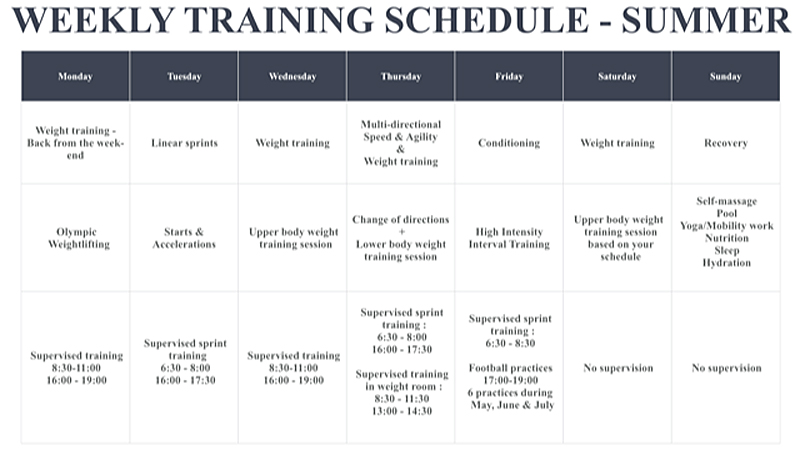
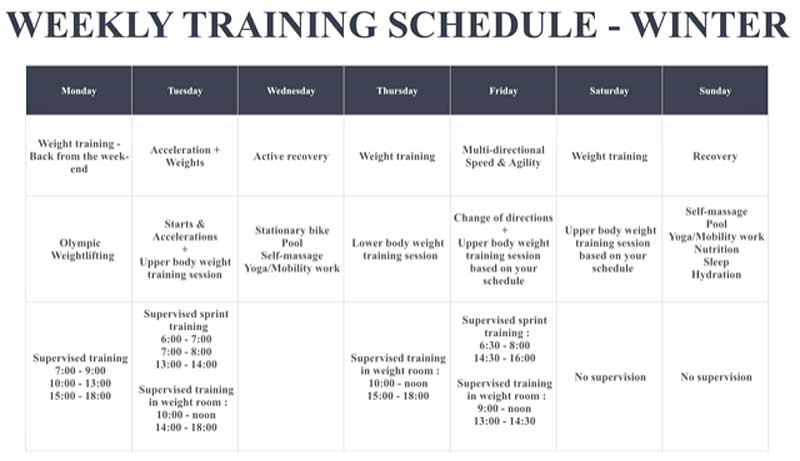
A training week during the winter semester was divided into four weight training sessions and two running sessions on the track. Student-athletes trained in the weight room on Monday. On Tuesday, they had two training sessions, one on the track and another in the weight room. They got Wednesday off to perform technical work with their position coach or participated in active recovery (stretching, pool, stationary bike). We repeated the same pattern for Thursday and Friday, with the athletes having the option to perform the last weight training session on Friday or Saturday.
This last training session mostly focused on upper body muscle hypertrophy because college football rules involve more collisions than professional Canadian football teams; professional teams are contractually obliged to minimize the amount of contact per training week thus restricting practices to helmets only.
After the winter training camp, the team benefited from a week off before resuming the last two 3-week cycles, which would lead them to the start of winter semester exams. The training themes during this time built on the previous training phases and prepared the players for the increased sprinting and running demands associated with summer training. Despite the need to prepare for these increased demands, the volume of sprinting on the track varied little, and overall volumes were kept quite low.
One of the challenges in Canadian university football during the winter is that we never know when we’ll have access to the outdoor football field because of the snow and cold temperatures. Also, increasing the sprinting distances and volumes on the track can lead to a lot of sore ankles, sore knees, and shin splints. During the exam period, we reduced the number of training activities so they could focus on school work.
Individualization for 100+ Athletes
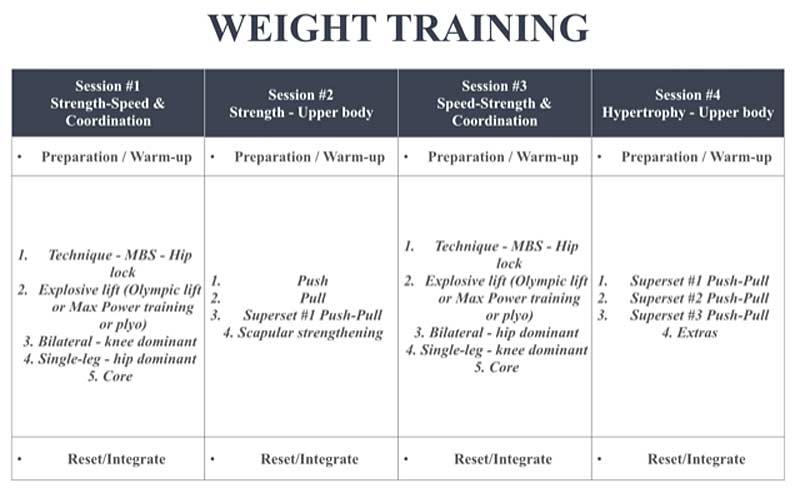
At this point, training was in full swing with large groups of athletes training at the same time. Athletes performed various movements found in most athletic development programs for football, namely variations of the Olympic lifts like cleans and snatches, squats, lunges, presses, pulls, and various exercises targeting the core musculature.
Even though individualizing the training program to fit the needs of each athlete is an important principle, it’s virtually impossible to individualize the training for over 100 student-athletes when they do most activities in small groups. An interesting way to program training at this point is to use general exercise categories and allow the athlete and the strength and conditioning coach to choose exercises based on the athlete’s needs. Examples include:
- Movement-based strength exercises like various progressions of the hip lock using only body weight, elastic bands, or weight plates
- Explosive lifts (classical Olympic lifts or variations like dumbbell or barbell jump shrug), jump squat, dumbbell snatches, and plyometrics
- Bilateral exercises such as squats and deadlifts and variations including the Hex bar deadlift, barbell front squats, kettlebell squats, and Romanian deadlift
- Single-leg lower body exercises like lunges, step-ups, single-leg squats, and single-leg deadlifts
- Pushing exercises, including bench press, overhead press, and push-ups
- Pulling exercises like chin-ups, inverted rows, and dumbbell rows
- Core exercises such as various planks, Pallof press variations, landmine work, and medicine ball work
We chose exercises that best fit the goals of the session based on:
- The athlete’s needs, training experience, position, and injury history
- The theme of the current session
- The requirements of that athlete’s position
- What the athlete would do on the track the following day—exercise selection would be different if the focus of the running session was going to be on acceleration or change of direction
A Few Words on Sprinting and Change of Direction
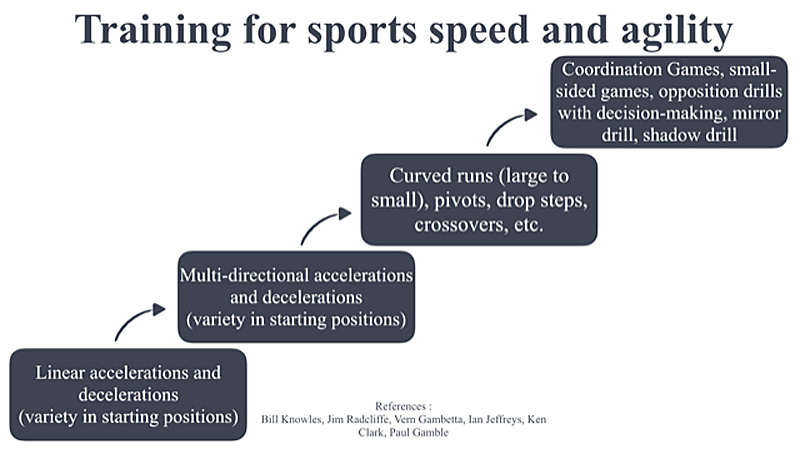
As mentioned previously, most of the training on the track during the winter semester focused on starts and accelerations. On Tuesday, we focused on linear starts and acceleration work. On Friday, the focus was on starts and acceleration again but from a multidirectional perspective. Rarely would we run sprints above 20 or 30 meters because of the indoor track.
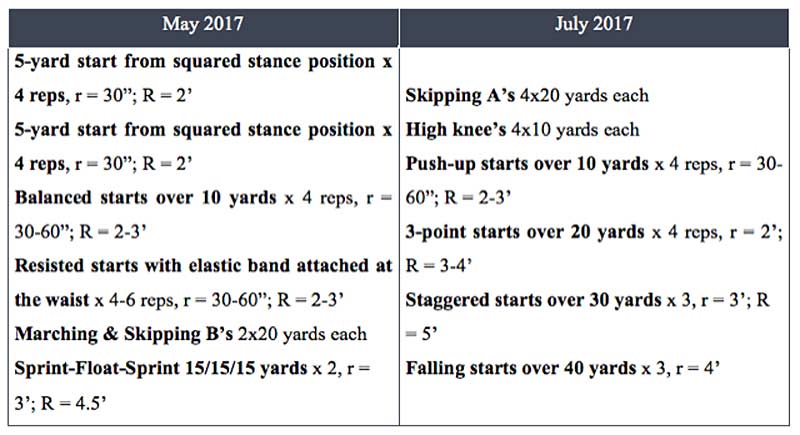
Here is an example of a training session focused on linear acceleration during the 3-week cycle preceding winter training camp.
- Exercise 1. Technique/Arm action—Big to small arm swings x 1-2 sets
- Exercise 2. Technique/Posture—Marching A’s 1 x 2-4 x 10 meters
- Exercise 3. Technique/Posture—Skipping A’s 1 x 4 x 20 meters
- Exercise Technique/Posture—High knees 1 x 4 x 20 meters
- Exercise 5. Acceleration 0-10 meters—Push-up starts 1 x 4 x 10 meters
- Exercise 6. Acceleration 0-10 meters—Half-kneeling starts 1 x 4 x 10 meters
- Exercise 7. Acceleration 0-20 meters—3-point starts 1 x 3 x 20 meters
When we felt the need to break the routine and provide a bit of novelty to the training, we booked the dancing studio where we could roll out the gymnastic mats. During those sessions, we performed various movements such as stick mobility exercises, a modified version of Josh Hingst’s barefoot jump rope routine, various plyometrics, and tumbling movements. We finished the training session with a “Competitive Coordination Game” à la Bill Knowles. We had these training sessions about once a month during the winter semester.
Conclusion
This article provides a glimpse of a Canadian university football team’s off-season training program. There are major differences between Canadian and American college football programs that we need to address when examining a Canadian team’s training program. We also have to design a program around the different activities that make up the life of a student-athlete including the specific demands of the sport, human and financial resources, academic environment, and weather.
In Part 2, we’ll look at the summer training we performed to better prepare the athletes for the increased running and conditioning demands of Canadian football.
Since you’re here…
…we have a small favor to ask. More people are reading SimpliFaster than ever, and each week we bring you compelling content from coaches, sport scientists, and physiotherapists who are devoted to building better athletes. Please take a moment to share the articles on social media, engage the authors with questions and comments below, and link to articles when appropriate if you have a blog or participate on forums of related topics. — SF
References
- Camiré, M., & Trudel, P. (2013). Using High School Football to promote Life Skills and Student Engagement: Perspectives from Canadian Coaches and Students. World Journal of Education, 3(3), 40‑ http://doi.org/10.5430/wje.v3n3p40.
- DeMartini, J., Martschinske, J., Casa, D., Lopez, R., Ganio, M., Walz, S., & Coris, E. (2011). Physical demands of National Collegiate Athletic Association Division I football players during preseason training in the heat. Journal of Strength and Conditioning Research,25(11), 2935‑doi: 10.1519/JSC.0b013e318231a643.
- Réseau du sport étudiant du Québec (2014). Rapport annuel 2013-2014. Consulté à l’adresse http://rseq.ca/lerseq/rseqrapportsannuels/.
- Wellman, A. D., Coad, S. C., Goulet, G. C., & McLellan, C. P. (2016). Quantification of Competitive Game Demands of NCAA Division I College Football Players Using Global Positioning Systems. Journal of Strength and Conditioning Research, 30(1), 11-19. http://doi.org/10.1519/JSC.0000000000001206.
Strength and Conditioning Advice When Training Golfers
If there was ever a failure to communicate between a sub-discipline and a sport, it would be strength and conditioning and golf. When athletes in top-flight sports reveal their supplementary work, we often see explosions in fad diets, gadgets, training methods, and workouts—such is the desire to emulate and imitate other players. No other sport’s athletes receive criticism and hostility for expressing involvement in supplementary gym work like the golfer does, and it’s usually from other golfers or pundits.
Some Impressive Performance Changes in Professional Golf
I’ve worked predominantly with collision athletes in the past; collision athletes “get” strength and conditioning. Its utility is apparent as soon as you lay hands on an opponent. To them it seems self-evident.
I’ve had conversations with athletes involved in other sports who are bemused when the subject turns to my work in golf; the idea of the hyper-fragile golfers throwing around iron is apparently a novel one. This trend persists even now, and it is spectacularly misinformed. Due to the physical culture surrounding golf being a traditionally sedate one, it’s seen as an activity for retirees and business executives.
This is not to say strength and conditioning isn’t over-emphasized in other sports; physicality, while important, is obviously not the be-all and end-all. But there is little risk in golf of a S&C takeover—such is the nature of technical primacy. This technical primacy, this “otherness” in golf, means that strength and conditioning orthodoxy is overlooked for more novel “golfish” approaches.
Much is sold on the back of this to well-meaning coaches and athletes looking for any edge. The onus may lay with golf coaches unwilling to explore territory unfamiliar to them. To quote Jordan Peterson, “…the thing you most need is always to be found where you least want to look.”
The demand for increased physicality in #golf is becoming increasingly evident, says @WSWayland. Share on XWe see the writing on the wall when we note that the master’s course distance was 7,435 yards in 2016 versus 6,985 yards in 2000: As a result of (and excuse the cliche) “Tiger-proofing,” golfers now have to hit farther with more regularity. The golf press is full of complaints about how long golf courses are now. In 1980, Dan Pohl had the tour driving average at 274 yards; in 2016, Dustin Johnson had it at 313 yards. Pohl’s career was later ravaged by back problems. The demand for increased physicality in golf is becoming increasingly evident.
My colleagues at the European Tour Performance Institute are doing excellent work trying to meet this demand with both information and intervention at an elite level. There are also those working at a grassroots level to inform coaches, athletes, and parents. These tips are not exhaustive but cover some of the main concerns I’ve heard from touring professionals and coaches.
Strength and Conditioning and the Golf Athlete
The point of strength training is not just to hit the ball further.
You need to get stronger! Strength is the basis for preliminary athletic improvement for all sports, even golf. Strength is a raw material and its use is manifest in many forms of force expression further along the velocity curve. Being stronger has a correlation to club head speed (CHS) and yardage. At a minimum, a strength program is a long-term robustness strategy.
Strength is the basis for preliminary athletic improvement for all sports—even golf, says @WSWayland. Share on XBeing stronger allows you to decelerate and accelerate effectively; this equals efficiency, which means more effortless golf. Once you are strong, you can employ specific and advanced training methods to improve performance: Fundamentals before abstraction.
Eighty percent of golf injuries are overuse-related. With this in mind, many golfers’ first port of call in supplementary training is a well-meaning physiotherapist who will often deal with the issue at hand, but not steel the athlete against its reoccurrence. Physiotherapy’s dominance in the sport can be witnessed when a golfer’s go-to piece of equipment after their clubs is their foam roller.
This has come from what I see as a twofold issue: a culture of golfers leaning on a physiotherapist to inform their performance-related training and golfers’ flawed perceptions of strength and conditioning orthodoxy. This is because many athletes only take supplementary work on board once they have been injured, and not before. But many therapists are now exploring strength and conditioning as an avenue for injury reduction, especially when evidence dictates that these overuse injuries can be reduced by half with strength training.
Speaking in the broadest sense, strength and conditioning and physiotherapy have similar concerns but different focuses.
The strength coach’s priorities, in order, are:
- Improved ability to reduce and produce force that improves play
- Increased ability to express explosive power
- Increased joint stability
- Significant contribution to injury prevention and rehabilitation
The physiotherapist’s priorities, in order, are:
- Injury diagnosis, prevention, and rehabilitation
- Increased joint stability
- Improved ability to reduce and produce force in a manner that allows play
This is the reason that much of what is presented as golf strength and conditioning has a very therapy-focused bent. Tools such as Swiss balls and Bosu balls are ostensibly used as rehab tools, but divorced from their original rehabilitative intent. They are pushed onto the golf populace as performance tools despite present research suggesting that they just don’t work.
I always take it as a good sign if a physiotherapist values the #barbell as part of their practice, says @WSWayland. Share on XThis excellent post on instability training by Bob Alejo discusses why in more detail. So please, no swinging a golf club on a Bosu ball. To quote Coach Alejo: “Coaches [are] implementing unstable strategies with higher-level athletes, expecting outcomes that just won’t happen.” I always take it as good sign if a physio values the barbell as part of their approach to their practice.
Less In-Gym Rotation, More Bracing
Following on the above point, golf strength and conditioning greatly overemphasizes core training and we should question its efficacy, especially in well-trained individuals. Rotation training dominates golf S&C: If someone spends thousands and thousands of reps rotating through one movement, is the best thing doing more rotation? Recall that 80% of injuries are from overuse and the most commonly injured area is the lower back.
Golf is conceptually like track and field throwing events, baseball, and martial arts—the body uses a sling effect to project force into an implement or a fist. However, the purpose of S&C is general strength applications before specific ones; being stronger will allow for even greater rate of force development later on. Learning to squat will probably do you more good than more cable chops. This is the same mistake MMA fighters make; trying to emulate on-field movements in the gym never ends well. It’s all one-leg balance, pelvic tilt, and rotating cable exercises… oh-so-many rotating cable exercises.
So, what alternatives do we have? Much has been done with anti-rotation, anti-extension training, with sports such as baseball leading the way.
Overhead Throwing
Video 1. The ability to perform an overhead throw while rotating is crucial to link force transfer from the floor to an implement held in the hands. Athletes can do this kneeling or standing.
Stoping the rib cage from flipping open like a trash can lid is an underrated ability of the core. Also, the movement is keenly felt when someone throws a soccer ball overhead for the first time in years, especially if they have an Instagram-worthy hip tilt. The ability to do this while rotating is crucial to link force transfer from the floor to an implement held in the hands. Athletes can do this while kneeling or standing.
Anti-Rotation Chops
Video 2. The anti-rotation chops exercise is one of the best orienting movements for how anti-rotation is supposed to “feel.” The wide stance increasingly limits contribution from the legs.
I first “stole” anti-rotation chops off Eric Cressey years ago, when delving into the world of anti-rotation exercises. I still find it one of the best orienting exercises for how anti-rotation is supposed to “feel.” The wide stance increasingly limits contribution from the legs.
Farmer’s Walks
Video 3. The Farmer’s Walk is useful for athletes who carry clubs and walk a lot as part of their sport. I employ offset and single arm to encourage lateral stability.
The Farmer’s Walk is a classic that is, thankfully, a weight room stalwart these days. I employ offset and single arm largely to encourage lateral stability. It’s useful for athletes that carry clubs and walk a lot as part of their sport.
Pallof Pressing
Video 4. Pallof presses are a classic anti-rotation exercise that also involve the hip and shoulder positions.
Pallof presses are the classic standing anti-rotation exercise we are all familiar with. They are not only anti-rotation, but both the hip and shoulder positions are thrown into the challenge as well.
Lifting Heavy, Specificity, and the Golfer
I usually suggest one to three reps, and probably no more than five, with varying loads depending on whether you want to achieve maximum velocity, power, or strength. Why? The golf swing is a very short duration, high-power, explosive activity clocking in at around 7,500N in a full swing. (Keep in mind this force measurement is from a 1990 study, so it may be higher still.)
In the gym, training occurs at much lower velocities than it does during an actual sport. The average punch is around 10 m/s (a movement I understand well), whereas the average dynamic effort bench press may only reach 0.8-1 m/s. A golf swing (a movement I’m working to understand better) of a club travelling at 100 mph will be 44 m/s. The theory of dynamic correspondence suggests that as we approach a competition, velocity must increase to make the nervous system more specific in the way it produces force. Strength work for golf has often put the figurative cart before the horse.
As strength coaches, we know the attainment of general physical qualities can enhance sport performance in some individuals—particularly beginners—but training modalities focused on more specific exercises may in fact be needed for the continuing improvement of optimal transfer to more advanced athletes. This is where the athlete or coach using high-velocity peaking can be particularly useful, turning gym time into real-world performance statements. I am not a golf coach: My athletes don’t come into the gym to practice golf—they come to build physical capacities that transfer well to golf.
The In-Season Dilemma and Manipulating the Residual
Golfers have varying times between golf competitions, plus travel time, which makes training with regularity difficult but, if planned properly, very possible. I encourage golfers to have some sort of off-season, especially as juniors, so that they can work on gross strength qualities during the winter months. This works well with developing players. It means that as they grow up, they will have a good strength base and can make the most of training residuals to plan training around travel schedules.
Golfers need an off-season so they can work on gross strength qualities during the winter months, says @WSWayland. Share on XTraining residuals are the amounts of time it takes to see qualities start to diminish from an established set point. The residuals vary, but give us a rough idea of how long athletes might have to work on certain qualities. I have known athletes to take very long breaks and see only small decrements and others take short breaks and see big regressions. What is important is that once a quality is trained, it is easily regained. Stronger athletes have to do less to keep their strength levels at an acceptable standard in season than athletes who might be trying to retroactively attain strength during the season.
Travel itself can add a lot of stress to the athlete: dehydration; nutrition challenges, especially when visiting more exotic locations; changes in time zones; and disrupted sleep due to these changes. This can lead to lethargic athletes who have little desire to visit a weight room or hotel gym. Players often travel on a Sunday/Monday to try and settle into some semblance of normality before starting practice sessions or a tournament.
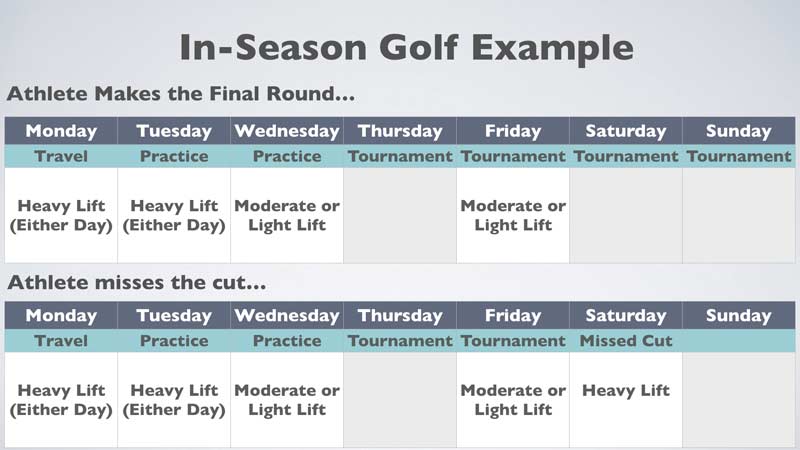
After a long flight to an event, I often suggest that an athlete head to the hotel gym and have a simple wake-up workout or “move around.” To counter the detrimental effects of travel, we need more than a few minutes on a foam roller. There is no reason such work can’t be performed outside or in a hotel room, if needed.
A playing week will usually start on a Thursday and end on a Sunday, if the athlete makes all subsequent cuts. Generally, I suggest an athlete lifts on a Monday or Tuesday. Golf athletes need to learn that lifting in and around tournaments, when habitual, will only enhance performance in the long run. Athletes who avoid lifting will be rewarded with fragility.
A cut in the field will occur generally after Day 2. Missed cuts are not an opportunity to lick wounds; instead, use the time to prepare physically and get in a heavy session in order to keep related physical qualities in good order before the next tournament.
Hotel Gym Navigation
The hotel/golf club gym represents a challenge in and of itself. Those of you who have experienced the delights of such training venues will be familiar with the usual half-baked investment most hoteliers make in their gym facilities. Rather than write it off because it lacks any one piece of equipment or doesn’t have a rack, I encourage athletes to be pragmatic and creative when it comes to Plan B or Plan C workouts.
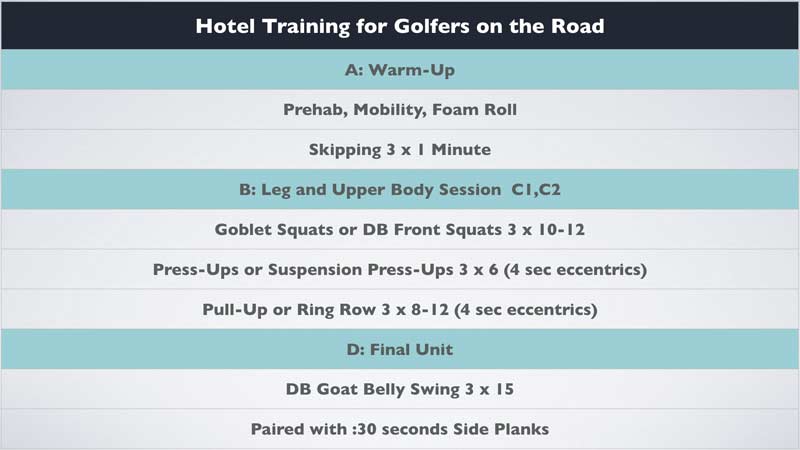
For instance, here’s a simple hotel gym workout. I encourage athletes to take bands, suspension straps, and a skipping rope with them, as these take up very little luggage space.
Warm-up: Prehab, mobilize, foam roll, etc.
A) Skipping: 3 x 1:00
B) Goblet squats or DB front squats: 3 x 10-12
C1) Press-up or suspension press-up: 3 x 6 4-sec eccentrics
C2) Pull-up or ring row:3 x 8-12 4-sec eccentrics
D) DB goat belly swing: 3 x 15 paired with :30 side planks
While social media keeps me contactable, I consider 10:00 p.m. calls from co-dependent athletes unsure how to get on with a 20kg dumbbell set and no squat rack somewhat infantile. The key is for the athlete to keep the intent the same despite a change of exercise selection. You can achieve a lot with supplementary bodyweight training, an understanding of tempo training, bands brought in a suitcase, and knowing your way around a dumbbell rack.
I often encourage athletes to scout the surrounding area for suitable gyms as strength and conditioning gyms are easier to find now than ever and CrossFit boxes are common the world over. These places usually welcome a traveling athlete, often charging a nominal drop-in fee or even no fee in exchange for some social media promotion.
Get Bigger!
A continual concern I hear from both coaches and athletes is the notion of the “muscle bound” or “stiff” athlete. I tell them that “golfers shouldn’t do bicep curls as it will shorten their swing.” The nuanced nature of the golf swing means that specific notions of “feel” trump everything else, movement variability is derided, and anything affecting that delicate equilibrium is often discouraged.
Additional stress like lifting will obviously impact “feel,” at least initially, and this is enough to distress some coaches and athletes. Hence, the gravitation towards fluff and “golfish” gym movements that don’t offer much in the way of stress or real change. Once an athlete is lifting habitually, this concern is quickly overcome; however, just getting them to this point in the first place can be tricky.
Presently, the biggest swingers are in the sub-discipline of long-drive competitions, with club head speeds at around 150mph—25-40mph faster than their PGA counterparts—and ball speeds of nearly double the average golfer. Mass has a strong association with increased club head speed, so it’s no surprise that the average long-drive field is filled with bigger men and women, despite no formal analysis.
Golfers have little to fear from adding mass: It helps them get more distance and adds robustness, says @WSWayland. Share on XComing back to professional golf, a lesson from this is that there is little to fear from adding mass. It’s probably one of the best weapons I’ve used in helping undersized athletes turning pro to get more distance to match their taller compatriots. It also adds a robustness factor, as mass can be protective and confidence-building. I’m not suggesting that anyone undertake German volume training or anything extreme, but increased calories, appropriate rep prescription, and the use of tempo-based lifting for a quiet period on a tour schedule can help add much-needed size.
Moving Forward with a Golf Strength and Conditioning Culture
Golf has a disparate strength and conditioning culture, which varies based on the national governing body amateur program, coach predilection, and conjecture, hearsay, and misconception. Many of the young golfers I meet who have studied and been part of American university golf programs or come through countries that have comprehensive NGB input usually have a handle on appropriate strength and conditioning. On the other hand, many golf coaches, even at high levels, still hold perplexing ideas on the subject. This article reflects the topics I’m asked about most often; I hope we can make the coming culture shift in golf S&C smoother.
Since you’re here…
…we have a small favor to ask. More people are reading SimpliFaster than ever, and each week we bring you compelling content from coaches, sport scientists, and physiotherapists who are devoted to building better athletes. Please take a moment to share the articles on social media, engage the authors with questions and comments below, and link to articles when appropriate if you have a blog or participate on forums of related topics. — SF
References
Gosheger, G., Liem, D., Ludwig, K., Greshake, O. & Winkelmann, W. “Injuries and overuse syndromes in golf.” American Journal of Sports Medicine. 2003. 31(3): 438-443.
Lauersen, J.B., Bertelsen, D.M. & Andersen, L.M. “The effectiveness of exercise interventions to prevent sports injuries: a systematic review and meta-analysis of randomised controlled trials.” British Journal of Sports Medicine. 2013.
Prieske, O., Muehlbauer, T. & Granacher, U. “The Role of Trunk Muscle Strength for Physical Fitness and Athletic Performance in Trained Individuals: A Systematic Review and Meta-Analysis.” Sports Medicine. 2016. 46(3): 401-419.
Plyometric Push-Ups and Progressions for Power Development
Push-ups are one of the most commonly used exercises among fitness buffs and elite-level athletes. As a closed-chained exercise that targets the chest and upper body musculature, push-ups are highly effective for improving upper body pushing strength and endurance, and can be done with no equipment. There are plenty of regressions, progressions, and variations to pick from, making push-ups useful for athletes of all types. From bodyweight push-ups to loaded isometric push-ups, there are also various ways to load and challenge the movement.
Because push-ups can be regressed, progressed, and varied, they are useful for all types of athlete. Share on XThis article will specifically go over several plyometric push-up exercises, their progressions, and ways to utilize them to improve upper body plyometric ability and power development.
Plyometrics for Upper Body Power
There is no doubt that strength and power are cornerstones of physical development when it comes to developing elite athletes such as martial artists, football players, and rugby players. Being able to produce large amounts of force, and produce it quickly, is crucial for advancing a position, warding off a defender, or landing a knockout punch.
One of the most effective ways to improve power is through the use of plyometrics. Plyometric training involves a movement that has a quick turnaround between the eccentric and concentric phases of a muscle action. An athlete that can reduce the time of the turnaround (called the amortization phase) has a greater ability to use the stretch-shortening cycle (SSC) of their muscles and tendons, resulting in faster, more explosive movement.
When the topic of plyometric training comes up, many people immediately think of depth jumps, bounding, and lower body training. Utilizing plyometrics for upper body training is just as effective and must not be forgotten. My goal in this article is to offer some creative push-up variations and methods to improve upper body power.
Push-Up Basics
Before I dive into plyometric push-up variations, let me reiterate some push-up basics for a safe and efficient press. Here are some pointers and principles to perform the push-up with great technique, regardless of the variation.
- Your body forms a straight line from head to toe. Tuck in your rib cage and engage your core to keep a neutral back and the whole body moving as one unit.
- Head/neck position should be neutral to promote a long and tall back.
- Hand placement and width should be comfortably outside shoulder’s width, but can be altered to emphasize different muscles and pushing patterns (wide grip—more chest contribution, close grip—more tricep contribution).
- The push-up is a closed-chain movement, meaning the hands are stationary, while the shoulder joint and shoulder blades can move freely.

Assisted/Accelerated Plyometrics
Accelerated plyometrics, sometimes called overspeed training, is one of many ways to add variation into your plyometric training. Accelerated plyometrics operate on the opposite principle of weighted plyometrics: weighted/loaded plyometrics consist of exercises like depth jumps with a weighted vest to further increase the difficulty and intensity of the exercise, whereas accelerated plyometrics commonly use a band to unload a percentage of an athlete’s body weight. This makes plyometric exercises more feasible for heavier athletes or athletes with lower max-strength, while still allowing them to produce force in an explosive manner.
Unloaded plyometric training has several benefits:
- It acts as a regression, allowing heavier or weaker athletes to perform the same plyometric exercise with technical proficiency.
- It allows some plyometric exercises to be done extensively, meaning athletes can perform them for a longer duration or for a higher amount of repetitions.
- Extensive plyometrics can be beneficial for building the skill of plyometric muscle action and developing rhythm and fluidity, as well as for tendon health.
- Unloading a percentage of bodyweight means less weight to move, allowing for a quicker amortization phase/SSC.
Band-Assisted Plyometric Push-Up Variations
The video below shows three different band-assisted plyometric push-up variations, each with its own application.
- Low Height – Quarter Extensions are small plyometric hops used to build and improve rhythm, an important principle for repeated plyometric training. This is particularly great as a warm-up for more powerful movements later.
- Medium Height–Full Extensions are used to further improve the timing of the landing and transition phase.
- Full Height – Full Extensions are the main variation used to improve power development. Push with full intent on each rep while keeping the core engaged. Try to minimize the time spent touching the bench and stay explosive. The bench is lava!!
Video 1. This video shows three different band-assisted plyometric push-up variations, each with its own application.
You’ll notice I perform these banded push-ups elevated, on a bench. This makes the exercise easier to perform. To increase the difficulty, you can do these on the floor and use a thinner band. The band I’m using provides about 25-40lbs of tension when I anchor it up 5.5-6 feet off the ground (attached to a barbell in the video).
Advanced Variation: Depth Drop Plyometric Push-Ups
For more advanced athletes who want to further challenge and develop their plyometric ability, here’s a plyometric push-up variation that accentuates the SSC. To perform this exercise, start in your regular push-up position, making sure to engage the core and maintain tension throughout the entire body. Quickly lift your hands, allowing your body to drop towards the bench/ground, catching yourself and performing an explosive push-up. You can draw some similarities between this exercise and the commonly used depth jump off a box.
Video 2. The depth drop plyometric push-up accentuates the stretch-shortening cycle. More advanced athletes looking to further challenge and develop their plyometric ability should try this, using open hands or closed fists, depending on shoulder girdle stability.
This exercise gives athletes a shorter window of opportunity to catch themselves on the eccentric and redirect that force. The objective here again is to minimize the amortization phase for better plyometric development.
Push-ups performed with a closed first are beneficial for wrist resilience and forearm development. Share on XIn the second part of the video, you can see that I perform these depth drop plyometric push-ups with closed fists—this is optional. As a martial artist myself, and a coach who trains martial artists, I’ve found push-ups performed with a closed fist beneficial for wrist resilience, forearm development, and transference to punching specific plyometric ability. Depending on the athlete, using a closed fist may or may not affect the stability of the shoulder girdle when performing these exercises, so I’ll leave that for you to experiment with.
Reactive Plyometric Push-Up
For the last variation, a reactive component is added to the plyometric push-ups. The reactive component can be any external auditory or visual stimulus that requires the athlete to alter their push-up direction, depth, or grip width in a timely fashion.
Video 3. The reactive plyometric push-up has a reactive component that requires the athlete to alter their push-up direction, depth, or grip width. This adds higher cognitive effort and time-stress into the exercise, which may hone fast decision-making skills that transfer to sport performance.
Adding a reactive component to plyometrics incorporates higher cognitive effort and time-stress into the exercise, which may be beneficial for fast decision-making skills that will transfer to sport performance. As for many, if not all, reactive drills, this is best done with a partner or coach. In the video above, I’m changing my push-up grip width in response to my training partner’s visual cues. You can also use bands here for assistance.
Programming and Application
Learning the different variations of push-ups and how to biomechanically perform them with proficiency is only the first step. In order to fully reap the benefits, a coach must know where these exercises fit in a periodized plan and how to apply them in the daily high performance setting. This section will outline the variables that can be manipulated in order to drive the adaptations we want to see in our athletes.
Movement Pattern
At its core, the plyometric push-up is a full-body horizontal pressing movement, performed in an explosive manner. Plyometric push-ups can therefore replace or be used in conjunction with other horizontal plyometric push exercises like medicine ball chest tosses while standing, if the goal is to improve the SSC of the upper body and upper body pressing/pushing power.
Periodization
Within Training Session
Since the plyometric push-up is performed at a relatively high velocity compared to strength-based compound movements, the plyometric push-up should be placed high up in the exercise order of any training session. The general guideline for power- and plyometric-based exercises is that they should be done in a fresh, non-fatigued state so that the athlete can focus on absorbing and producing the most force possible, as quickly as possible. The power output and velocities achieved with power and plyometric exercises will be compromised if athletes perform them after strength-based compound lifts and auxiliary exercises. The exception for this is using plyometric exercises in conjunction with post activation potentiation. More on this later.
Within the Meso and Macrocycles
It’s hard to offer concrete guidelines on how to program these in the mesocycle/macrocycle level without knowledge of the athlete and the nature of the sport. Generally speaking, I’m a proponent of performing exercises extensively before moving on to more intensive programming. For team sports and mixed athletes that require a high amount of power output, this means gradually increasing intensity of the plyometric push-ups (and decreasing volume) as the competition season nears, or keeping intensity high during the in-season to maintain power output qualities.
Programming and Prescription
Extensive plyometrics and intensive plyometrics have slightly different objectives; therefore, they should be programmed and prescribed differently.
Extensive Plyometrics
- Multiple sets of high(er) repetition (10-30 reps+).
- Used to build rhythm, develop timing, increase technical proficiency.
- Can be used as a conditioning tool since the goal is not maximal power output.
- Can be used in conjunction with/be prescribed using work-to-rest ratios.
Keep in mind the goal of using plyometrics extensively is to build rhythm and fluidity, and create muscle-tendon adaptations that will lead to better performance when it comes time to perform max effort, intensive power, and plyometric exercises. We are not looking for maximum power output or the shortest contact times.
Intensive Plyometrics
- Multiple sets of low(er) repetitions (3-10 reps).
- Can be used in conjunction with velocity-based training (VBT).
- Establish a velocity cut-off for the concentric phase; keep on performing repetitions with maximal effort until the cut-off is met or is no longer in the desired range.
- Establish a power output cut-off; keep on performing repetitions with maximal effort until power decreases significantly or is no longer in the desired range.
- Establish a contact time cut off for the amortization phase; keep on performing repetitions with intent to minimize contact time on the floor/bench.
- Quality over quantity!!!
Post Activation Potentiation, Complex Sets, and the French Contrast Method
Plyometrics, along with other power and ballistic exercises, can be paired with potentiation loading methods (post activation potential or PAP) such as complex sets and French Contrast Method (FCM) to further increase the rate of power development.
Pair plyometrics with potentiation loading methods to further increase rate of power development. Share on XPAP is a phenomenon where neuromuscular contraction is acutely increased after performing a bout of heavy compound movements. In practice, the heavy compound movement, commonly called the “potentiating exercise,” is paired with a lower load power/plyometric/ballistic exercise in order to acutely improve power production.
Complex Sets/Contrast Training
The general guidelines for the “potentiating exercise” are as follows: They should be performed with near maximal effort (85-100% of 1RM) and should resemble some of the traits seen in the power movement being potentiated. Whether this is the same movement pattern or similar joint angles, the more biomechanically similar the two movements, the better the potentiating effect.
Following these guidelines, the best exercises to potentiate higher power outputs in the plyometric push-ups should possess some of these characteristics:
- A horizontal pushing/pressing pattern.
- Involve the chest, front delts, and triceps as the primary movers.
- Performed with near maximal effort, 85-100% of 1RM, for a 1-5 rep max, or at least done until a RIR of 1 (reps in reserve)/RPE of 8 or 9.
- Can be an open-chained or close-chained exercise (more examples later).
- Supramaximal loading such as eccentric-only exercises with 100%+ of 1RM can also be experimented with.
- Rest times depend on the intensity and volume of both exercises, as well as the training mesocycle. Improvements can be seen from a wide range of 3-12 minutes of rest in between exercise. More here: Science For Sport and NSCA Guidelines
Example #1:
Potentiating Exercise: Barbell Floor Press – 3 reps @ 90% of 1RM
Potentiated Exercise: Banded Plyometric Drop Push-Up on Bench Press – for Reps or Based on Velocity/Contact Time
Example #2:
Potentiating Exercise: Weighted Push-Up – 5 reps @ 85% of 1RM
Potentiated Exercise: Banded Reactive Push-Ups – for Reps or Based on Velocity/Contact Time
Example #3:
Potentiating Exercise: Jammer Press – 5 Reps @ 85% of 1RM
Potentiated Exercise: Banded Plyometric Push-Up on Bench Press – for Reps or Based on Velocity/Contact Time
Example #4
Potentiating Exercise: Supramaximal Weighted Dips – 3 reps @ 105% of 1RM (3-4 second Eccentrics ONLY)
Potentiated Exercise: Banded Plyometric Close Grip Push-Up – for Reps or Based on Velocity/Contact Time
French Contrast Method
The French Contrast Method is the bigger brother of complex sets, consisting of a larger variation of exercises, performed in a circuit to drive power and power-endurance power adaptations. The FCM is similar to complex/contrast training in the sense that it uses a heavy compound exercise to potentiate the nervous system and acutely increase motor unit recruitment. However, because the FCM consists of more exercises, some of which may require a high degree of technical proficiency, FCM should be reserved for advanced athletes.
Beginners and intermediates can improve strength and power simply by developing proper foundational biomechanics of movement and strategic exercise selection, whereas advanced athletes might need a little bump to reach the next level. The FCM is considered that little bump in the realm of power training.
The FCM template is as follows:
- A maximal strength movement (heavy compound exercise using 85-100% of 1RM, eccentric-only exercises can be viable as well).
- A force-focused plyometric exercise (can be bodyweight, or loaded).
- A speed-strength movement (anywhere from 30-60% of 1RM, with intentions to move it fast).
- A speed-focused plyometric exercise (usually assisted).
As you can see, the FCM consists of four exercises done in a circuit fashion. Rest should be minimal in between exercises (~15-20 seconds, just enough for you to get to the other exercise), and longer in between sets (no less than three minutes, five minutes and up is preferred).
Example of the FCM applied to horizontal pushing power development:
#1 Max Strength Exercise: Barbell Bench Press – 3 Reps @ 90% of 1RM
#2 Force Plyometric Exercise: Bodyweight Reactive Plyometric Push-Ups – for Reps or Based on Force Drop-Off
#3 Speed-Strength Movement: Jammer Press – Perform Reps @ 40% of 1RM
#4 Speed Plyometric Exercise: Band-Assisted Plyometric Push-Ups – for Reps or Based on Velocity/Contact Time
More combinations of exercises can be built using the template provided above. The FCM is a method usually reserved for the peaking phases of an athlete’s competition schedule, and not to be done weekly, year-round.
The Biggest Takeaways
Extensive and intensive plyometrics, contrast sets, and the FCM: These methods can be overwhelming all together, but no coach is expected to apply all of these in their training, especially all at the same time. This article was written simply to dive into the possible training methods that coaches can use.
Coaches shouldn’t apply all loading methods in their training—assess what each athlete needs. Share on XIf an athlete has trouble with their push-up biomechanics, more advanced loading methods like the FCM are out of the question. Assess the current level of the athlete(s) you’re working with, where they are currently in their competition season or athletic career, and prescribe these methods accordingly. That should be the biggest takeaway from this article.
And there you have it—a guide on how I implement push-ups for power development, using various pieces of equipment around the gym, as well as several loading methods suitable for athletes of all types.
Since you’re here…
…we have a small favor to ask. More people are reading SimpliFaster than ever, and each week we bring you compelling content from coaches, sport scientists, and physiotherapists who are devoted to building better athletes. Please take a moment to share the articles on social media, engage the authors with questions and comments below, and link to articles when appropriate if you have a blog or participate on forums of related topics. — SF
Integrating Technology into Athletic Speed Development and Injury Prevention with Rick Franzblau
Rick Franzblau is in his first year as the director of Olympic sports strength and conditioning at Clemson. During the previous three years, he served in the capacity of assistant director of Olympic sports strength and conditioning. He is responsible for the supervision of the assistant strength coaches, graduate assistants, and volunteer interns. Rick oversees strength and conditioning for the 14 Olympic sports that train in the Jervey weight room. He is directly responsible for the strength and conditioning efforts of the baseball, men’s soccer, and track and field teams.
Freelap USA: What is your approach to hamstring injury risk aversion? What are some things you see show up in athletes who tend to have problems with hamstring pulls?
Rick Franzblau: Hamstring injury aversion is ultimately attributed to well-planned training on the physical preparation end, but also on the technical end. There are a number of factors that play an integral role, including sequencing of training, load management, biomechanics, eccentric strength, and general and specific work capacity, among others. Ultimately, all of these components are important and all impact one another to a certain degree.
Sequencing of training is paramount. Movement and technical sessions should always be planned first with strength sessions falling in line. Sprint sessions should be paired with intense hamstring training on the same day to allow for recovery between sessions. This also applies to sport practices, particularly for field sports. For instance, a soccer practice with larger volumes of high-speed running and more full-field type work will be paired with hamstring intensive work in the weight room. Conversely, a lot of small-sided games should be paired with more pushing or quadriceps dominant movements in the weight room.
Biomechanics is another critical component that is relevant for sprinters and field sport athletes. Dangerous sprinting mechanics include excessive backside mechanics, oftentimes driven by anterior pelvic tilt and excessive plantar flexion, which can further drive the backside mechanics. To help with excessive backside mechanics, we use wicket drills with our field sport athletes, which helps them understand the positions they should be in. To be able to hold these positions under fatigue, they must also build up some specific capacity. Tempo running helps teach our athletes how to hold appropriate pelvic tilt, and by building up volumes of tempo running, they are getting “practice” at submaximal intensities.
Ultimately, #postural issues drive a lot of mechanical issues in sprinting, says @FranzblauRick. Share on XCueing and drilling are helpful and drive some kinesthetic awareness, but ultimately, postural issues drive a lot of mechanical issues in sprinting. Breathing mechanics and excessive rib flare, particularly bilaterally, drive a lot of the excessively lordotic postures seen in sprinting. Improving breathing biomechanics by getting more internal oblique and transverse abdominal activation allows the diaphragm to operate in its respiratory role instead of compensating as a postural muscle. We follow progressions and drills proposed by the Postural Restoration Institute to help with this. Once the IOs and TAs can help create a zone of apposition, proper breathing mechanics can follow, preventing excessive lordosis and promoting thoracic flexion.
Hamstring strength plays a critical role in posture as well. The hamstrings, with their longer lever arm, are able to exert a much greater influence on posterior pelvic tilt than the glutes. Rewind the clock back eight to ten years and glute activation was the buzzword to help improve posterior pelvic tilt. With proper breathing mechanics and strong abdominals and hamstrings, you will have fewer posture-driven biomechanical breakdowns in sprinting.
Hamstring strength obviously plays a critical role in the avoidance of injuries. In particular, we focus on and test eccentric knee flexor strength via the Nordbord. While it is not a perfect test and people refute its specificity due to its low velocity and it being exclusively knee flexion, we have found it to be a useful strategy in mitigating hamstring issue risk. For our teams at Clemson, we have developed relative averages for each team and “red flag” individuals who fall below 15% of this mark.
Relative measures are imperative; bodyweight will allow you to leverage greater force in the sensors and it would be erroneous to simply set baseline outputs for male and female athletes. We also look at asymmetries left versus right, but these values are highly sensitive to fatigue and, if testing during a loading week or phase, this must be taken into consideration before adding strength parameters to a deficient side. We have seen changes of almost 15% week to week based on fluctuations in the volume of practice and training.
In terms of training for eccentric hamstring strength, we use a multi-layered progression with an end goal of performing heavy weighted eccentric Nordics. Through research and discussions with Vald Performance, we found that continuing to load Nordics eccentrically had greater benefits than adding the concentric portion and therefore making the eccentric component submaximal. These heavy Nordics are very helpful for increasing fascicle length of the biceps femoris, which is negatively correlated with hamstring strain.
Continuing to load #Nordics eccentrically had greater benefits than adding the concentric portion, says @FranzblauRick. Share on XIn general, we try to do one knee-dominant and one hip-dominant hamstring exercise a week. Hip-dominant hamstring exercises tend to isolate the biceps femoris a little more effectively and are integral to a program. We do many versions of hip hinging patterns, including split stance RDLs, barbell RDLs, and most recently, a kBox deadlift into an RDL to provide eccentric overload. In certain phases, we also do some Bosch-inspired isometric work at length. Our go-to exercises are usually the single leg back extension with an isometric hold and the straight leg hip lift (heel on box).
As mentioned earlier, fatigue plays a significant role in imbalances and that is where our focus on acute to chronic ratios of high-speed running becomes integral, particularly for our field sports. We use a 7:21 day approach for our soccer programs. In regard to hamstring injuries, we look at high-speed running distances and how we incrementally build these loads.
Tim Gabbett’s research has been instrumental in providing guidelines for building incremental loads and knowing when appropriate spikes are necessary. Generally speaking, acute to chronic ratios over 1.5 become dangerous. We have previously used a rolling method of measuring acute to chronic, but will experiment with moving to an exponentially weighted model where the previous week carries more weight than the data from three weeks ago.
Obviously, accruing high-speed running volumes is critical to preparing field sport athletes, but so is exposure to maximal velocity sprinting. Exposure to max velocity sprinting provides specific strength and coordination to the hamstrings that cannot be replicated by any other type of movement. This is particularly critical with reserve players who may not be getting exposure through matches and will need the stimulus in training.
Freelap USA: What are some of your favorite protocols to build strength (and specifically targeting fast-twitch fibers) using VBT? What are some techniques to build mass with the same VBT monitoring and what is the rationale behind it?
Rick Franzblau: When looking at selective hypertrophy of certain muscle fibers, we use fatigue percentages to more precisely stress targeted fibers. This is a more advanced programming method and is only used with our athletes that have at least a year of training age in our program.
Selectively targeting fast-twitch fibers is imperative when dealing with athletes who can’t afford to gain any more appreciable amounts of body mass, but need to continue to develop their explosive strength. This applies to some of our older and more developed position players in baseball and a large majority of our sprinters, jumpers, and hurdlers in track and field. Occasionally, a soccer or tennis athlete may fit into this category, but they generally do not spend enough time strength training to be concerned about excessive hypertrophy.
When applying these principles, we use fatigue percentages around 10% to selectively target fast-twitch fibers. When fatigue grows beyond 10%, Type IIa and Type I fibers start to pick up the slack. The athlete’s fatigue percentage consists of the percentage drop-off from their fastest rep to their slowest rep in a given set.
For example, a fastest rep of 0.5 m/s and a slowest rep of 0.45 m/s would be a fatigue percentage of 10%. We use open and closed sets to prescribe these methods. For instance, if we are training at 80%, we may do four sets of three reps with this group. In the closed set protocol, their fatigue percentage will determine how they adjust their weight for the next set. If they fatigue more than 10%, they will drop weight; if they fatigue less, they can make increases in their weight.
If we are doing open sets, the athlete will perform as many reps as they can before they fatigue the desired percent. To use the 80% example, if they did more than three reps then they would be able to increase their weight for their following set. When using this method it is also important to set minimum thresholds for velocity so the athletes are not becoming rep “grinders.” In other words, they must also keep all of their reps above a certain velocity. An 80% squat will be around 0.5 m/sec (give or take, based on fiber type percentage), so we cannot have them hit reps of 0.40, 0.38., 0.37—this just means that they were excellent at grinding out multiple reps. These minimum thresholds are essential for implementing these protocols.
It is also important to understand that you can fatigue to greater percentages at lower intensities because of the higher starting velocity. For example, at 70% on a back squat you may use a fatigue percentage of 40% for your mass group, but if you are training them at 90% of their max you may use a fatigue percentage of 25%. The fatigue percentages are also lift-dependent. The velocity of bench presses are slower than squats at identical intensities, so you also have to adjust to smaller fatigue percentages on the bench versus the squat.
Freelap USA: What are your acceleration and resisted sprint protocols for athletes? How does the 1080 Sprint factor into this?
Rick Franzblau: Our acceleration progression and resisted sprint protocols are multifaceted. We are deliberate and patient with our athletes as we progress through the development of this coordinated skill. There are movement competency issues that have to be addressed with incoming freshmen, but there are almost always significant physical limitations that prevent athletes from achieving the positions we desire in their acceleration mechanics.
This is where drilling and skipping are very helpful in developing the lower leg, hip, and core strength necessary to develop appropriate acceleration mechanics. Drilling often gets a bad rap, and I agree for intermediate to advanced athletes, but for a field sport athlete learning proper sprint mechanics it is very helpful. Rudimentary series hops, ankling, A skips, and limb exchange drills are all staples in our program to help give our athletes the general qualities needed.
Drilling gets a bad rap, but it’s helpful for field sport athletes learning proper sprint mechanics, says @FranzblauRick. Share on XTo address the movement competencies, we progress through a series of drills on the prowler sled combined with some low-incline hill running. On the prowler, we start with an isometric hold to teach the athletes the key body positions in acceleration. The primary focuses are hips forward, knee forward, neutral ankle, and horizontal push on the back leg.
From there we progress to prowler marches, where athletes can begin to feel postures with slow deliberate limb exchange. Next, we move to prowler bounds: postural demand is increased as limb exchange is now forceful and the athletes must learn to pretense the ankle complex. Lastly, we move to a prowler shove, which begins to teach the athletes the concept of hip projection. In this maneuver, they basically drive the prowler as far as they can for five steps.
While progressing through the prowler series we also have our athletes perform low-incline sprints on a grass hill. The low incline helps facilitate hip position, appropriate force vectors, and low heel recovery. We start very short with these progressions (five steps) and progress to about 15 yards. Once achieving proficiency in these movements, we move to flat ground accelerations and eventually bleed them into our wicket progressions, eventually progressing to full sprints of 30 meters or more.
Freelap USA: How do you utilize data from the 1080 Sprint, force plate, and contact grid to alter plyometric prescriptions for athletes?
Rick Franzblau: This will be our first year looking at information from the contact grid in tandem with the force plate and 1080. For most of our sports outside of volleyball, sprint speed trumps vertical jumping ability (explosive strength) in terms of favored biomotor ability. With that said, we look closely at our load-velocity profile on the 1080 and compare it with our RSI numbers from the contact grid. The load velocity profile on the 1080 gives us a theoretical max velocity and max force for each athlete over a 20-meter run.
For non-collision sports, we prioritize theoretical max velocity. Now having tested dozens of athletes on the 1080, we are beginning to establish ranges for which athletes need more force-dominant work or more velocity-dominant work. In field sport athletes, we expect RSI numbers to correlate with theoretical max velocity.
In field sport athletes, we expect #RSI numbers to correlate with theoretical max velocity, says @FranzblauRick. Share on XAthletes that need more high-velocity sprint work usually test lower on RSI also and need more elastic and multi-jump drills focusing on minimal contact time. An athlete needing force-dominant sprint work is also likely to test well on RSI and will require more high force jump drills with longer contact times (broad jumps up hill, heavy squat jumps, etc.) For track sprinters, the correlation is not as significant and RSI will be used more for an evaluation of readiness.
Freelap USA: How do you teach and monitor athlete recovery in your program?
Rick Franzblau: Recovery is an integral part of our introductory performance and wellness education program for our incoming athletes. This is an eight-series program that gives our student athletes a foundational understanding of all performance-related concepts. It is a multidisciplinary effort and can be summed up in one of the four core values of our weight room: Dominate the other 20 hours of the day.
Our sports psychology, strength and conditioning, athletic training, and nutrition staff all play an important and integrated role in promoting recovery. At the end of the day, one of our most important roles as a performance team is to manage the stress loads of the athlete while simultaneously building their resilience to physical, mental, and social stressors.
One of the most important roles of a performance team is to manage the stress loads of an athlete, says @FranzblauRick. Share on XOur sports psych staff works with our athletes on techniques to promote proper breathing habits, mindfulness, and concepts that promote parasympathetic tone throughout the course of the day. Our nutrition staff educates our student athletes on nutrient timing and macronutrients, and on the use of specific recovery items such as tart cherry drinks. Athletic training and strength and conditioning work in tandem to assign appropriate use of specific modalities such as foam rolling, cold water immersion, Normatec, or active aerobic work.
Underlying all these ideas and concepts, and a critical component of our freshman educational program, is our focus on sleep. Sleep drives all the other factors that I have mentioned: improved carbohydrate metabolism, decreased perception of pain, improved parasympathetic tone, etc. We spend considerable time educating our student athletes on the importance of sleep and the sleep hygiene goals to shoot for. We combine this with objective measuring of sleep quantity and quality through our use of fatigue science Readibands.
Our collection and analysis of this data is again multifaceted, and all members of the performance team for each sport have access to this information. If we have athletes struggling with sleep, we can approach from a multidisciplinary standpoint and see if there are nutritional, psychological, academic, or sleep hygiene interventions that are necessary to aid them. Our objective sleep measures, in conjunction with our subjective wellness questionnaires, evaluation of internal and external training loads, and readiness testing (any combination of morning resting HR, contact grid RSI test, and groin squeeze), give us an overall sense of the recovery status of the student athlete. Evaluations of the athlete through velocity-based training and heart rate training will also help identify anything that could have been missed through the aforementioned measures.
Since you’re here…
…we have a small favor to ask. More people are reading SimpliFaster than ever, and each week we bring you compelling content from coaches, sport scientists, and physiotherapists who are devoted to building better athletes. Please take a moment to share the articles on social media, engage the authors with questions and comments below, and link to articles when appropriate if you have a blog or participate on forums of related topics. — SF
The Reverse Lunge: Building a Foundation for Athletes
Virtually everyone knows the importance of leg strength in pitchers. Training the lower half of the body usually focuses on the big movements like squats and deadlifts. They dominate the landscape for most athletes, and rightly so. When you look at a pitching motion, the majority of the actual motion from leg pickup to release is performed through an interplay of single leg motion. That interplay could fill a novel, but the main concept is that each leg individually plays an important role in pitching.
Before our athletes ever do a #deadlift, we teach and train the weighted barbell reverse lunge, says @ZachDechant. Share on XBuilding lower half strength with our younger athletes may deviate from the common thought. The reverse lunge is a staple in our program for incoming collegiate pitchers. Before our athletes ever dive into a deadlift, we teach and train the weighted barbell reverse lunge. Not only is it beneficial for creating strength in a split stance, but anecdotal and empirical research suggests it has a correlation to performance as well as injury prevention. For us, getting strong in a single leg movement outweighs the use of multiple double leg movements throughout a weekly mesocycle.
Performance and Lunge Strength Transfer
The first place to start with the lunge and its relationship to performance is to simply create more leg strength and motor control in the lower half. It has been well documented that leg strength can play a crucial factor in pitching velocity. The true transfer of a lunge movement to pitching is based upon several factors, with training age and the current level of the athlete potentially the most important. The lower the level of the athlete, the more transfer the lunge will have. As an athlete’s ability increases to a high or an elite level, you will find less transfer. Regardless, the lunge can be very beneficial along the path of development for many athletes.
A study by Matsuo in 2001 documented four common patterns (A, B, C, D) in pitchers’ landing legs. Categorizing pitchers by either high velocity or low velocity, Matsuo found that the amount of flexion and/or extension of the front knee varied by how hard each group threw. He classified A and B patterns as more knee extension dominant, and C and D patterns as more flexion dominant.
Groups A and B landed flexed, but drove the knee back hard into extension at ball release. The C and D patterns essentially stayed flexed on the knee through ball release. The results showed that 83% of the high-velocity group displayed a front leg moving from flexion into extension over the course of front foot contact to ball release.
Another study done in 2015 by McNally showed that stride leg ground reaction forces were strongly correlated with ball velocity as well. While the study was done with 18 former competitive baseball players, the ability to decelerate on the front leg and apply force opposite the direction of the throw was significant.
Both studies illustrate the importance of the front leg and the ability to brace and apply force. Again, the athlete’s level matters here in terms of specificity, but building a large base of strength can clearly assist athletes.
Addressing Weaknesses
A new athlete entering a program cannot hide their weaknesses. One of the most common weaknesses that I find in incoming athletes is single leg strength. Many have rarely done anything in the realm of a single leg movement. If they have, it has often been solely with high-rep bodyweight lunges.
One of the most common weaknesses that I find in incoming athletes is single leg strength, says @ZachDechant. Share on XThere are many reasons that single leg work may be a weakness. One reason may simply be the time availability at the high school level. Many programs have limited time, and therefore coaches may choose to focus on large movements that athletes can do quickly. Single leg work may get lost in that mix or may not rank high enough on the scale of importance for the time available.
Athletes that do train in high school are often thrown into a one-size-fits-all basic program. Even if time is not an issue, programs are commonly built around the big basics such as squat and/or deadlift. Numbers are often important to coaches, and the reverse lunge isn’t a numbers lift. Therefore, it often gets looked over in the grand scheme of programming. Single leg movements aren’t sexy and don’t get the social media views that a big-time squat or deadlift does.
The Lumbar Spine
The prioritization of single leg movements over bilateral through our developmental phase is due to the large rise in back issues with incoming athletes. Pars fractures, and even disc injuries, dominate the landscape of high school/junior college baseball due to the high volume of skill work and low or nonexistent volume of training. Deficiencies in core strength and/or pelvic control, hip mobility issues, faulty movement patterns, and even the mechanics of how an athlete rotates all factor into the equation for a lumbar stress fracture.
Due to increased back issues w/ incoming athletes, we prioritize single leg movements over bilateral, says @ZachDechant. Share on XThe same muscles responsible for transferring rotational force through the body are also responsible for the deceleration of those same movements to protect the spine from injury. The spine undergoes large extension and rotation forces in any rotational movement. Athletes who cannot control end ranges of motion will end up ramming bony anatomy together while decelerating rotational movements. The result are stress fractures in the lumbar spine.
The first step is to eliminate movements that put large forces through the lumbar spine in the form of extension-based patterns. Squats, deadlifts, and RDLs are usually no-no’s for rehabilitating stress fractures. These bilateral movements often put athletes through large ranges of flexion and extension, and put huge forces through the vertebrae, causing once-dormant problems to again rear their head. Stress fractures that are asymptomatic will often stay hidden until they aren’t. If you want to find one, start putting athletes who are largely extended under load and see what happens.
Injury Prevention Benefits
The role of the kinetic chain in any rotational movement, especially that of pitching, cannot be overlooked. The legs, pelvis, and core all play fundamentally important roles in the buildup and transmission of energy. Weaknesses and/or breakdowns in the chain of a throwing athlete can transfer stress distally to the shoulder and elbow.
A 2013 study done by the Ben Hogan Sports Medicine clinic back found interesting results with UCL injuries and single leg testing. It looked at 60 baseball athletes, 30 healthy and 30 recently diagnosed with UCL tears. Players with UCL tears scored significantly lower on the Y Balance Test for both stance (P<.001) and lead (P<.001) lower extremities, compared to the non-injured athletes.
The Y Balance Test requires motor control of the lower half, transfer of body weight to each leg, core control, balance, and mobility to complete. The finished test looks for asymmetries. A deficiency in any of the above, or huge imbalances, could be a red flag for pitchers.
While you should view every study with a bit of skepticism, the findings of this data suggest there could be a potential association between impaired single leg ability and UCL tears in high school and collegiate baseball players.
Josh Heenan, strength coach, and president of Advanced Therapy and Performance in Omaha, Nebraska, has found similar results with the weighted reverse lunge. Based on data from more than 1,400 athletes, he and his colleagues view the reverse lunge as an important movement for pitchers for its correlation to velocity, as well as injury. They have created the “90mph formula” based on years of research with their athletes.
The formula is a roadmap, based on five training metrics, that they have found to be consistent with pitchers that can throw over 90 mph. Being strong in the reverse lunge is one metric in the formula. Those that do throw 90 mph or harder, yet can’t hit all the training metrics in the formula, are exponentially more prone to injury. While not published research yet, Josh and those at ATP have seen and shown the importance of the reverse lunge on lower body strength, and specifically on single leg strength in pitchers.
Progression to the Reverse Lunge
Progressing into the barbell reverse lunge often depends on the level of the athlete. The most common progression we take with our incoming athletes goes from static to dynamic. We work from unloaded to loaded through both those steps.
Static
- ISO Lunge – Unweighted
- The ISO lunge teaches body positioning and the creation of tension.
- Low-level athletes will start at 15 seconds each leg with a 10-second rest between legs. We add time over the course of the progression, up to 30 seconds.
- ISO Lunge – Weighted
- When the athlete can maintain 30 seconds, we add weight to the movement in the form of holding a plate in the front.
- Start back at 15 seconds each leg.
- Build to 30 seconds again.
- Note: You can use larger time frames here, but I find that 15- to 30-second sets fit well within the overall program as far as difficulty, ability to maintain posture, and training time are concerned.
- When the athlete can maintain 30 seconds, we add weight to the movement in the form of holding a plate in the front.
Dynamic
- Single Arm DB Reverse Lunge
- Athletes hold one DB in the hand opposite of their front leg.
- This achieves two things:
- Only holding one DB means a lighter overall load is used and movement efficacy can be prioritized.
- The single arm hold challenges the core musculature to a higher degree than holding two dumbbells does. It specifically emphasizes the all-important quadratus lumborum and obliques. Both are incredibly important muscles in back health and pelvic control.
- Reps are usually done in the 5-10 per leg range.
- Athletes perform all reps on one side before switching.
- Barbell Reverse Lunge
- We prefer the front squat variation.
- Athletes must be familiar with the front squat grip before undertaking this movement. The ability to hold the bar correctly sets up the rest of the entire movement.
- Athletes alternate lunges in this variation: Right leg then left leg until they complete all reps.
- Load the barbell up.
- Train this pattern to be strong.
- We prefer the front squat variation.
Just because athletes are performing a lunge movement doesn’t mean they can’t use low reps with high loads. Many coaches are nervous to train single leg patterns heavy with the barbell. In many cases they are right, as it is often difficult to maintain balance and/or dump a barbell if something goes wrong during the movement.
Just because athletes perform a #lunge movement doesn’t mean they can’t use low reps with high loads, says @ZachDechant. Share on XThat is one reason I prefer the front squat grip variation over the back squat. Holding and dumping the barbell becomes fairly easy and inconsequential when in front. The same can’t be said when the bar is on the back.
Parting Thoughts on Coaching the Reverse Lunge
Coaches also think of lunges as an assistance movement and pigeonhole it to be used only for higher reps and lighter weight. This couldn’t be further from the truth. The use of heavy loads has given us phenomenal gains in the past. Moving through the listed progressions wisely should set athletes up for success with the loaded barbell.
Athletes must show competence to use the weights early on. However, they will often shock you with how strong they really are in single leg patterns. It’s not uncommon for our pitchers, after a full training block, to reach upwards of 80-100% of their front squat max for heavy singles to triples on the reverse lunge.
Don’t be afraid to train with sets in the same zones as you would on other big compound movements, says @ZachDechant. Share on XDon’t be afraid to train with sets in the same zones as you would on other big compound movements. The use of one to five reps per side can be incredibly effective in building a big and strong lower half. Heavy reverse lunges can be an asset in any program.
Since you’re here…
…we have a small favor to ask. More people are reading SimpliFaster than ever, and each week we bring you compelling content from coaches, sport scientists, and physiotherapists who are devoted to building better athletes. Please take a moment to share the articles on social media, engage the authors with questions and comments below, and link to articles when appropriate if you have a blog or participate on forums of related topics. — SF
References
Bohannon, Richard W., et al. “Relationship of Pelvic and Thigh Motions During Unilateral and Bilateral Hip Flexion.” Physical Therapy. 1985: 65(1); 1501–1504. doi:10.1093/ptj/65.10.1501
Garrison, J. Craig, et al. “Baseball Players Diagnosed with Ulnar Collateral Ligament Tears Demonstrate Decreased Balance Compared to Healthy Controls.” Journal of Orthopaedic & Sports Physical Therapy. 2013: 43(10); 752-758. doi:10.2519/jospt.2013.4680
MacWilliams, Bruce A., et al. “Characteristic Ground-Reaction Forces in Baseball Pitching.” The American Journal of Sports Medicine. 1998: 26(1); 66–71. doi:10.1177/03635465980260014101
Matsuo, T., et al. “Comparison of kinematic and temporal parameters between different pitch velocity groups.” Journal of Applied Biomechanics. 2001: 17(1); 1-13.
McNally, Michael P., et al. “Stride Leg Ground Reaction Forces Predict Throwing Velocity in Adult Recreational Baseball Pitchers.” Journal of Strength and Conditioning Research. 2015: 29(10); 2708–2715. doi:10.1519/jsc.0000000000000937
Making the Most of Your Stint at Altitude
Living and training at altitude has a number of beneficial effects for endurance athletes. Many high-level endurance athletes, across many different sports, live at altitude full-time, or use periods of altitude training to enhance their performance.
At the 2017 NCAA Cross Country Championships, in Divisions I and II, both the Men’s and Women’s team champions were from schools located at altitude. In Division I on the men’s side, Northern Arizona University, located in Flagstaff at 6,910 feet above sea level, won its second team title. On the women’s side, the University of New Mexico, located in Albuquerque at 5,312 feet, also won its second team title. In Division II, Adams State University, located in Alamosa, Colorado at 7,544 feet, won both the men’s and women’s team races for its 44th and 45th cross country team titles.
Additionally, a survey of medalists from the 2004 Athens Olympics found that 80% utilized altitude training in some form during their preparations.
The difficult questions, when using periods of altitude training rather than living at altitude, are when to go, for how long, and what to do while there in order to make the most of it. Before we can answer these questions, we need to look at the physiological adaptations to altitude to understand why it is beneficial.
How Much Does Altitude Improve Performance?
Altitude training increases aerobic ability by increasing the volume of red blood cells in the body, as well as the density of mitochondria and capillaries. The result is the ability to run faster for the same distance, or further at the same pace, improving endurance performance.
According to the USATF, 4 weeks at altitude can improve performance by 1-2%, and even up to 5%. Share on XAccording to the USATF, a 28-day stint at altitude can improve performance by 1-2%, and some athletes have improved up to 5%. That doesn’t sound like much, but for a 31:00 10K runner, that is an improvement of 18-37 seconds, and up to 93 seconds.
Physiological Adaptations to Altitude
Living at altitude results in an increase in naturally occurring erythropoietin. Erythropoietin, abbreviated as EPO, is a hormone produced in the kidneys that stimulates the production of red blood cells. Artificial EPO—synthetic or taken from human or animal sources—was originally developed for cancer patients to increase their red blood cell count, but it has become notorious for its use as a performance-enhancing drug, to exceed the levels naturally and safely produced by the body.
This increased red blood cell production depends on the altitude at which you live, and for how long you live there. Higher altitudes and longer residences result in the production of greater amounts of red blood cells.
In addition to greater oxygen availability as a result of more red blood cells, the efficiency of oxygen use also increases, as a result of the increase in bisphosphoglyceric acid, or BPG. BPG stabilizes deoxygenated red blood cells, allowing for greater oxygen removal from the cells to the working muscles.
Training at Altitude Variations
In order to maximize the effects of altitude, there are different ways an athlete can choose to live and train in a high-altitude environment.
Live High Train Low
Live high train low (LHTL) gives the benefits of altitude without as many of the negatives. The athlete still gains the physiological effects of living at altitude, while maintaining the ability to run sea level paces or sea level workouts. This is only possible in a few locations in the U.S., where there is easy access to both high and low altitudes within a short travel distance.
You can also simulate this type of training at sea level with the use of expensive altitude tents or altitude chambers. Altitude tents simulate the effects of altitude by increasing the percentage of nitrogen in the air, which decreases the percentage of oxygen.
Most altitude training, especially when athletes do short periods of it, will be live high train high (LHTH).
Live High Train High
When training at altitude, it is not always easy to travel to sea level or even lower altitudes. In these circumstances, living and training at the same or similar altitudes are employed. This format allows for the physiological changes to occur, but does require some adjustments to be made to training to accommodate the demands of altitude.
Adjusting Your Training
The reduced availability of oxygen essentially results in a reduced ability to run, as well as a reduced ability to recover from hard efforts, especially before adaptations have occurred.
Running slower, especially on easy days, is necessary to allow for proper recovery. This is because not only does living at altitude affect the acute ability to perform work, but the chronic effect slows down the recovery process.
At altitude, run for the same number of minutes a typical run for mileage would take at sea level. Share on XRunning for minutes, rather than miles, will result in the effect of running at sea level, without the psychological pressure to hit a certain mileage goal. Running for the same number of minutes a typical run for mileage would take at sea level is a good goal to shoot for. For example, instead of running for 10 miles at a 6:30 pace, at altitude you should just run for 65 minutes.
This same principle can be applied to tempo runs—running at a given effort for the same amount of time rather than a particular distance. This requires some discipline, because it is tempting to run too fast, in an attempt to run sea level pace or what you think altitude pace should be, especially when wearing a GPS watch. However, just like at sea level, when you run your tempo runs too fast, too much lactate is produced and the purpose of the workout is lost.
When performing interval workouts, you can modify them in three different ways for a given workout. If that given workout would be 6×1600 @ 5:00 with 2:30 rest at sea level, here are three examples to modify that.
-
- The first, and simplest, modification would be to perform the same distance, with the same rest, but at a slower pace to accommodate the altitude. Given an altitude of 7,500 feet, this would result in a workout of 6×1600 @ 5:18 with 2:30 rest. The problem with this workout is that when you go back to sea level and try to race at a 5:00 pace, it will feel challenging neuromuscularly. You will not be efficient at that pace because you have not run it, despite being aerobically fit from the altitude training. This type of modification is good, but it should also be matched with workouts that will neuromuscularly prepare you for the pace of sea level racing.
-
- The second strategy, to accommodate sea level pace, would be to increase the recovery between the intervals, in order to run them at the same pace. This would result in a workout of 6×1600 @ 5:00 with perhaps 3:00 or 3:30 rest. However, this begins to change the physiological effect of the workout, as the rests become very long between intervals, and the pace is faster than a 10K effort, at the current altitude.
- Finally, you can break the intervals into shorter bouts to increase total rest so that you can run faster paces. A possible permutation of this workout would be 6x4x400 @ 75 with 60 seconds’ rest between reps, and the original 2:30 rest between sets. This modification approximates the results of a sea level workout, allows for sea level paces to be run, and keeps the recovery short enough to continually stimulate the proper energy system. The repetitions are also short enough that the altitude will not affect you as much as it would in longer repetitions.
Other Factors
When you train at altitude, there are a few other things you should know about to stay as healthy as possible.
When you live/train at altitude, take iron supplements, get more sleep, hydrate & dress in layers. Share on XIron Supplements
Athletes training at altitude should take iron supplements, as iron is a necessary component of red blood cell production. There are two different types of supplemental iron that can be taken: liquid and pill form. The liquid form is superior because it has a much higher absorption rate, relatively, than pill form. However, it is also more likely to upset your stomach. The recommendation would be to try the liquid form, and if you can’t handle it, take the pill form instead.
Many manufacturers recommend that their iron supplements be taken with food. This will reduce the likelihood of stomach upset, but will also severely impede absorption. To maximize the already low absorption rates, do not take iron within an hour before or after eating, and only pair it with a high vitamin C liquid. Avoid calcium in this period, because it especially impedes iron absorption.
Take iron for a few weeks before the start of altitude training, to build up the ferratin stores that are used when creating new red blood cells. If ferratin stores are too low to create new red blood cells, spending a few weeks at altitude will not have the hoped-for beneficial effects.
Sleep
While living and training at altitude, it is important to get more sleep, for two reasons. The first is that sleep quality can be worse while at altitude, so spending more time in bed to get the same number of REM cycles and quality becomes necessary. The second is that altitude is an additional stressor on the body, which requires extra recovery.
Dehydration
Most altitude locations have very low humidity. When this is combined with the higher respiration rate at altitude, there is a greater loss of water through expiration and sweating. In order to replace this, it is necessary to drink extra water frequently, and in larger volumes than usual, the whole time you are at altitude.
Temperature Changes
Because of the elevation, temperature changes are much greater at higher elevations, compared to lower elevations. Keep this in mind when you plan to spend more than a few hours outside. If you are planning on increasing elevation, be prepared for a decrease of anywhere from 3-6 degrees Fahrenheit, depending on conditions, per 1,000 feet of elevation gain. Dress in layers that you can add or remove as necessary.
Altitude Sickness
Altitude sickness is a reaction to increasing altitude too quickly. It usually occurs above 10,000 feet; however, it can occur at any point. The symptoms include a headache, nausea, loss of appetite, shortness of breath, fast heart rate, and fatigue. The only remedy is to reduce your elevation, or take supplemental oxygen. You can preempt altitude sickness by taking iron ahead of time, hydrating properly and adequately, and increasing your altitude a little at a time.
How High to Live
For short stints at altitude, the best elevation seems to be between 7,000 and 8,000 feet. One study suggested that, during a short stint, only athletes that lived and trained in this range had measurable increases in Vo2 max, as well as improvements in 3,000-meter race performances.
The comfort of a lower elevation may balance out the larger emotional stress of a higher altitude. Share on XAny elevation above 3,000 feet is considered altitude, with increasing physiological response as altitude increases, up to about 9,000 or 10,000 feet. The comfort and convenience of a lower elevation might also balance out the extra physiological effects but increased emotional stress of a higher altitude location. Especially with your first trip to altitude, making it an easy and comfortable experience outweighs trying to get as high as possible, or trying for some optimal altitude.
The Optimal Length of Stay at Altitude
There is a clear increase in red blood cells after just one week at altitude, but the increases are exponential for each additional week. This is especially true in the three- to four-week range.
A stay of 3-4 weeks will result in the best ratio of red blood cell production to time at altitude. Share on XAny time spent at altitude will result in some improvement in red blood cell production, but a stay of three to four weeks will result in the best ratio of red blood cell production, compared to time spent at altitude.
References
Chapman, Robert & Wilber, Randy. “Altitude Training for Sea Level Performance: Best Practices and Timing for Championships.” Handout for 2011 IAAF Athletic Championships, Daegu, South Korea.
Since you’re here…
…we have a small favor to ask. More people are reading SimpliFaster than ever, and each week we bring you compelling content from coaches, sport scientists, and physiotherapists who are devoted to building better athletes. Please take a moment to share the articles on social media, engage the authors with questions and comments below, and link to articles when appropriate if you have a blog or participate on forums of related topics. — SF
The Stress Scale for Athletes: A New Method to Monitor Athlete Performance
Because nothing in life is perfect, daily stressors inevitably will inhibit our ability to train optimally. I knew I couldn’t manage the external stressors that my athletes experienced, but I decided I could create something that would account for their level of readiness on any given day.
The Stress Scale for Athletes dramatically changed the way I train athletes. The scale allows me to apply the appropriate training load for a session based on an athlete’s readiness that day despite any stresses they’re dealing with outside the gym. I’ve used it for the past eight months, and it has served us surprisingly well with significant results.
The information I present is a culmination of existing concepts, including the Prilepin’s Chart, the rate of perceived exertion (RPE) scale, and fatigue management concepts I’ve put together based on “in the trenches” empirical data. I’ve recorded hundreds, if not thousands, of different numbers in my ten notebooks that I carry with me daily. I hope this information helps you well in your training and coaching.
Recognizing the Stress Problem
We all experience stress. Stress manifests itself in many ways, both acutely and chronically. Furthermore, all stressors are not created equal—to an extent. However, both types of stress have a large effect on our training and the ability to recover from each training session.
A training session consisting of 4×10 volume squats puts significant stress on the body and will cause fatigue in most of us. Emotional pain is a stressor as well, for example a break up with a significant other. One physical, one physiological, both cause systemic stress on the body that will inhibit optimal subsequent training sessions.
When thinking about stress, it’s useful to start with the General Adaptation Syndrome. Very small amounts of stress won’t provoke a very robust adaptive response, while more stress increases adaptation. Too much stress—to the point where we can’t cope physically or psychologically— decreases the rate of adaptation.
Keep in mind that, while our bodies don’t differentiate types of stress to a great degree, the specific adaptations to various stressors (lifting weights, a car crash, and tight work deadlines, for example) will differ. Also, the body’s general response to any stressor is very similar regardless of the specific stressor we encounter.
This means that all the stressors in life pool together and dip into the same reservoir of “adaptive reserves” available for recovering from those stressors. This allows us to adapt so we’ll be better equipped to handle them next time. With strength training, this means bigger and stronger muscles, more resilient tendons and connective tissue, and bones that can handle heavier loading.
Our bodies need a certain amount of stress to function normally. If we remove all the stressors from our lives, our bodies begin to deteriorate. For example, if we were to win the lottery and spend a year lying on the couch watching reality TV, facing no stressors that challenge us physically or mentally, we’d be much weaker and in much worse health than we are now with some baseline level of physical and psychological stress.
When stress levels exceed our adaptive reserve threshold, additional stress has negative effects. Share on XPast that baseline level, additional stress causes beneficial adaptation with diminishing returns and eventually negative returns. The first input of any stress causes the largest beneficial adaptation. More stress will have an additive effect, though each additional unit of stress doesn’t add as much benefit as the first. Once the total amount of physical and psychological stress exceeds the threshold of what our adaptive reserves can handle, any additional stress will cause negative effects.
My Challenge as a Coach
It’s nearly impossible to monitor an athlete’s stress levels since we have little control over the external things that happen to them outside the weight room. In most cases, we see our athletes no more than 8-10 hours a week. There are 168 hours in the week. That leaves athletes with at least 158 hours experiencing other external and internal stressors.
As coaches, our job is to ensure our athletes feel good, are ready to perform, and can sustain a healthy lifestyle that is conducive to sport success. Because we cannot control everything that happens outside the gym, we must create training programs that will most benefit our athletes no matter what’s going on in their lives.
Coaches must create training programs that most benefit athletes despite their life stresses. Share on XMy professional athletes are always ready to go because they’ve dedicated their entire lives to training. They take the necessary steps to put themselves in the best position to succeed. I don’t train many professional athletes at a time, however, because of their busy schedules.
Like most coaches, the bulk of my athletes consist of high school and collegiate athletes, ranging from 14-22 years old. Thisis where things get tricky. We all know what amazing things happen during those years: partying, late nights, relationships, breakups, school work, and the daily stress of home life. These may seem small to us now, but we all remember how much they influenced us at that age and how we felt on a daily basis.
One week my athletes came in, and the weights were moving. They were hitting numbers 25-30lbs over what we prescribed for the day. The problem with this happened during the following weeks of training. They did not even come close to the numbers they were supposed to hit based on their performances the previous week. As always, I asked them how they felt, what they ate, how they slept, and how their weekends were. The answers always changed. “I didn’t sleep well” or “I had a rough weekend” or “I didn’t have time to eat.”
This was when I knew I couldn’t keep prescribing the same thing week after week with minor tweaks here and there. I needed a holistic training program overhaul.
Concrete Steps Toward a Solution: Stress Scale for Athletes
Since I couldn’t manage the external stressors my athletes experienced, I created a method to account for their level of readiness on any given day. Below are outlines of two tables you may have seen before.
As the reps increase, the perceived intensity of each load decreases. Obviously a 5RM should be at a lower percentage than a 1-2RM, which is why 5 reps @ RPE 5 would be about 60-65% and a single rep @ RPE 5 would be around 80%. Volume work around 80% of your 1RM could fall anywhere between 3-6 reps, so an 80% single would be no problem, thus an RPE 5 on the RPE Scale.
At this point, I had Prilepin’s Chart and an RPE table with estimated percentages that closely resembled Prilepin’s Chart. I now needed to account for how the athletes felt, how much volume they could handle, and how much they could recover from each training session.
When looking at the Stress Scale for Athletes, keep in mind these key definitions:
- Training Effect (TE)—the training objective and desired effect for the day.
- Percentage of 1RM—based on Prilepin’s Chart, the objective of each percentage.
- RPE—a number value based on effort and associated with a given percentage of your 1RM.
- Fatigue Management Levels (FML)—how fatigued you are, based on your RPE.
- Minimum Effective Dose (MED)—the minimum amount of volume to get the desired outcome and training effect for that training session, based on Prilepin’s Chart.
- Maximum Recoverable Volume (MRV)—the most amount of volume an athlete can handle during a particular training session to recover and progress in the subsequent training session. This concept was brought to me by Dr. Mike Israetel of Renaissance Periodization and has been extremely useful in training my athletes.
How to Start with Your Athletes
Here’s how to use the Stress Scale with your athletes. Start by asking them how each set felt, starting with warm-ups up to their working sets. Use the chart to compare and contrast your data. From here, you can modify the training plan based on how your athletes feel that day. I left room for flexibility because everyone is going to perceive certain training loads differently. This allows more flexibility in your coaching program as well.
Based on all of the information in the table, here is an example of how I would use the Stress Scale with my athletes.
Example of the Stress Scale for Athletes
1RM Squat = 315
Work for the Day = Squat 3×5 @ RPE 7 | 70-75% = 240
- Bar x 10
- 135 x 10 @ RPE 4 | 50% x 10
- 185 x 5-8 @ RPE 5 | 60% x 8
- 225 x 5 @ RPE 7.5-8 | 70% x 5
- 240 is the target range for the day but 70% (225) felt like an 8 RPE according to the Stress Scale; 70% should be an RPE 6-7 at the most. This would put your fatigue level at 3 vs. 1-2 according to the Stress Scale.
You now have two options:
1. Option A. Cut back to 225 @ RPE 7 (70%) and hit your MED—15 reps.
2. Option B. Go up to 240 @ RPE 8 but cut back your volume to 6-14 reps total (MED for that range).
- FML represents how fatigued the athlete is for that particular day or possibly week. It’s not perfect, but it is a very strong representation of the athlete’s output for that training session. Overall intensity does not always create the most stress. Overall volume can cause significant stress for an athlete as well.
Observations and Results
I’ve been using the Stress Scale for eight months. During this time, my athletes have hit numerous PRs. More importantly, they’re always working within the appropriate ranges for the day as opposed to trying to hit percentages or numbers based on what they did last week. They’ve progressed week to week without overexerting themselves, which protects against getting hurt.
The Stress Scale also allows the athletes to take ownership of their bodies and how they feel. Our job as coaches is not only to lay out a plan and guide our athletes, but to teach them how to take care of their bodies, how to train properly, and how to live a healthy lifestyle. The Stress Scale helps give ownership and accountability to my athletes.
Final Thoughts
Training athletes is about health, progression, and longevity. There is a time and place for heavy metal, ammonia caps, and yelling. However, the day in and day out grind will not always provide these energy levels. We need a way to improve our athletes every single time they step foot in the facility. I hope this becomes a useful tool that you can use in training yourself and your athletes.
Since you’re here…
…we have a small favor to ask. More people are reading SimpliFaster than ever, and each week we bring you compelling content from coaches, sport scientists, and physiotherapists who are devoted to building better athletes. Please take a moment to share the articles on social media, engage the authors with questions and comments below, and link to articles when appropriate if you have a blog or participate on forums of related topics. — SF
Lifting Intensity and the 1×20 System with Matt Thome
Matt Thome began his role as the Head Strength and Conditioning Coach at Michigan Tech in August 2012. In August 2015, his responsibilities shifted to a 50/50 split appointment between Athletics and the Kinesiology and Integrative Physiology Department. He is currently responsible for the preparation of the football and men’s basketball teams and teaches several courses throughout the year.
Freelap USA: How has your utilization of the 1×20 system (Phase 1: 1×20 reps; Phase 2: 1×14 reps; Phase 3: 1×8 reps) evolved over the years, or do you use it the same way as when you started?
Matt Thome: For me, it’s mostly been a refining process with the 1×20 progression over the years. The general concepts/principles have always been there as Dr. Yessis laid them out, but my implementation has gotten better with my understanding of the nuances within the program. For example, when and how you change the general exercises and recognizing that a team needs to make a change, experimenting with different general exercises, progressing athletes from phase to phase and progressions year to year, etc.
I think this is the same with any training system. You could almost say that once you have a good understanding of the “rules,” you are able to experiment to get more creative with stretching them a bit.
Freelap USA: What is your approach to making adjustments for athletes in a large group based on individual responses to a program?
Matt Thome: When working with a large group, I think the No. 1 thing you can do is educate your athletes. Once the athletes know what they’re doing, the majority of the “individualization” is pretty easy. Basically, you teach them how to autoregulate—when to keep the weight the same, when to increase, when to drop down, etc. Now, for a while this means telling them exactly what to do and why they are doing it, but you will gradually be able to allow them more freedom.
When working with a large group, I think the No. 1 thing you can do is educate your athletes, says @matt_thome. Share on XIn terms of individualizing exercises and progressing intensities, that’s something I do on a case-by-case basis. Sometimes this means modifying an exercise or selecting a better exercise for that athlete on the fly; sometimes it may mean programming something completely different (within means) for several athletes depending on their needs. I also might progress an exercise or the intensity (for example, from 1×20 to 1×14) for an individual athlete or group of athletes who are ready to do so before the rest of the team. I generally organize training groups (Gold, Black, White, Grey) by class, but will shift people around (up or down) as needed.
Freelap USA: What is the heaviest, relative to maximal intensity, you will go for a standard strength set? How often do you test maximal strength on a yearly basis?
Matt Thome: The heaviest I have gone with athletes for quite a few years is about 80% or 1×8 RM. With only going up to one set at about 80% or so, we’ve still had three to six football players every year able to hit 500lbs or more for 8+ reps in a back squat. It seems to me that you can get “strong enough” by using only one set at an 80-85% load two days per week. Now, I’m not at all saying that max effort work is useless. It’s a powerful stimulus and can be useful for phase potentiation or post activation potentiation even if there is no goal to further increase strength.
I believe you can get ‘strong enough’ by using only one set at an 80-85% load two days per week, says @matt_thome. Share on XI don’t test max strength at all. Like I said, max effort work is a powerful stimulus and should be treated as such. Throwing in a week of maxing out is going to have an effect on everything you do for several weeks following. Not that this is always a bad thing either, but with the 1×20 progression it just seems pretty pointless to test strength. We record the weights and reps they hit every training session; if I want to know how strong someone is, I just look at what weights they’re hitting.
That being said, I think it’s a good practice to make sure you document some of those numbers (from training) periodically. Maybe one to two times per year, depending on the sport and what makes sense in their yearly calendar.
Freelap USA: How are you making use of barbell speed monitoring for your athletes, and what training phases does this happen in?
Matt Thome: I was using a pretty inexpensive accelerometer to measure peak and average velocities for a while. It was great to determine a load for dynamic effort work and then to “re-test” (or just throw the accelerometer on the bar during training) every three to four weeks to adjust the weight. However, the device we used was inconsistent as to whether it actually worked that day or not, so it wasn’t great for autoregulation and it ended up being more trouble than it was worth.
If I had a better tool for monitoring barbell velocity, I would use it once we get to the point where athletes use higher velocity dynamic effort work and also for Olympic lifts. I’ve seen that some people use it with strength work but this doesn’t seem to be necessary to me, especially within the 1×20 paradigm.
In terms of monitoring velocity with dynamic effort lifts, I see two primary modes of progression: maintain a constant velocity range and progress the weight (most common) or maintain a constant weight and shoot to increase the velocity. I’ve played around with a mixture of both. I don’t think there’s a right or wrong way to do it, just a different means of introducing novelty.
Freelap USA: What are some modes of injury prevention that you feel are unique to your training and methodology?
Matt Thome: I did a short write-up and a follow-up podcast with Jay DeMayo on cvasps.com a few years ago on this. I think we tend to overcomplicate this issue, or at least over-think it. If we deconstruct the issue, it’s much simpler then it appears.
You can categorize almost all injuries as being a result of too much stress and/or poor technique. Poor technique is pretty self-explanatory—an acute or chronic injury could occur due to poor technique in the sport or in the weight room. Technical breakdown could also be caused by inappropriate training load relative to the athlete. “Too much stress” is relative to that particular injured tissue. You could also say that this particular tissue has too little strength (or force-absorbing capabilities, etc.) relative to the specific demands imposed in competition, practice, etc.
First build up general strength in each joint, then gradually increase specificity, says @matt_thome. Share on XThus, we need to develop athletes to withstand these specific demands. I think if you take a good look at Verkhoshansky’s “dynamic correspondence,” that will help quite a bit (same muscle groups, ROM, emphasis portion of the ROM, type of muscular contraction, and speed/force of movement). In other words, first build up general strength in each joint, then gradually increase specificity. When put this way, injury prevention is primarily intelligent training.
Since you’re here…
…we have a small favor to ask. More people are reading SimpliFaster than ever, and each week we bring you compelling content from coaches, sport scientists, and physiotherapists who are devoted to building better athletes. Please take a moment to share the articles on social media, engage the authors with questions and comments below, and link to articles when appropriate if you have a blog or participate on forums of related topics. — SF
An Objective Biomechanics Model for Better Program Design
Exercise program design is an applied solution for the inherently complex task of strategically manipulating the biological expression of the human life form. The degree of complexity and depth to human physiology is one of the most daunting puzzles facing scientists. Long story short, we as coaches and sports scientists are trying to understand and manipulate a system that the best and brightest minds of all time couldn’t and cannot fully grasp.
This is really hard stuff, and it is my belief that the best we can do is create inaccurate models that are rooted in basic science and simple rules that maximize utility and reproducible numerical results. It is also my belief that the only way you can actually design a comprehensible and comprehensive training system is to design it around biomechanics rather than physiological principles. You will ultimately affect appropriate physiological pathways as a by-product of training the relevant and appropriate domains within a biomechanics model.
The only way to design a comprehensive training system is around biomechanics, not physiology. Share on XIf you can work your way through this article and grasp the central tenets of the fundamental principles here, I think you’ll see that this is perhaps the most useful model currently in existence for designing fitness programs.
A New Training Model – Designing with Biology
Biology, as a single coherent discipline, is said to have begun in the 19th century. Biology traces its roots to ancient times, and is heavily influenced by medicine, botany, and zoology; however, we can say that it is still relatively young compared to things like mathematics. Exercise science falls under the umbrella of biology, and is essentially in its infancy from the timeline perspective of scientific inquiry.
Whenever there is a young scientific realm, one of the first things that needs to be done is a taxonomy of the phenomena within that domain. The most famous scientific taxonomy is the one constructed for life forms (Systema Naturae) that was put together by Carolus Linnaeus. You can effectively classify any form of life on the planet by going through the hierarchical arrangement of Linnaeus’ taxonomy.
In my mind, the world of exercise is not very different from the world of life. Life on planet Earth is incredibly diverse, with what seems to be an infinite number of variations on each type of creature, plant, or fungi. Some forms of life are so bizarre that it is hard to believe they exist. From our perspective, many animals don’t seem to make any sense at all; however, each living thing on this planet makes perfect sense in the environmental niche that it has come to occupy and take advantage of.
In the world of exercise, there are so many ways that humans choose to move that it seems to defy all possible logic. Some methods of physical exertion look ridiculous—bordering on comedic, dangerous, or misguided—yet they exist, and will probably continue to exist for a long time. Those of us who work in the world of exercise and gravitate towards a scientific perspective are often mortified by what we perceive to be stupid approaches to training, but this is likely due to the perspective we take from the lens we have been taught to view things through.
Fear not for your sanity though, my empirically minded brethren, for I would like to present to you a model you can use to classify and categorize all forms of exercise, along with a model you can use to grade the degree to which the movement you are witnessing represents optimal. To accomplish such a feat, I believe that you must take a biomechanics path rather than a physiological path.
The six levels of biomechanics hierarchy are pattern, stance, plane, load, velocity, and duration. Share on XThe biomechanics model I present here is based on the idea that biomechanics is divided into two primary domains: kinematics and kinetics. Kinematics describes the quality of the shapes that life can assume and move through, and kinetics provides quantitative information on movement. In my model, I divide kinematics into three sections: pattern, stance, and plane. I also divide kinetics into three sections: load, velocity, and duration. It is my belief that you can arrive at any exercise you could fathom by describing it via the six levels of this biomechanics hierarchy.
Getting Started with Key Movement Patterns
The topic of movement patterns has a large amount of ambiguity, and you should feel free to come up with different patterns than what I have here. Ian King was one of the first to begin thinking along the lines of creating an exercise taxonomy, and many of us gravitate back towards his list of primary resistance training patterns whenever we think about designing a training plan for athletes.
Great coaches like Boyle and Verstegen were wise to begin thinking of designing training days based on concepts such as linear and multidirectional movement directions/patterns. However, it’s time to upgrade and expand these models, and make them more objective. Having said that, here are the patterns that I use in this section of the Exercise Taxonomy.
When I talk about stance, I mean the arrangement of the feet relative to each other and relative to the center of mass of the axial skeleton. I divide stance into three realms: bilateral symmetrical, asymmetrical front/back, and asymmetrical lateral.
Bilateral symmetrical stances are common in life and sport, and involve the two feet being next to each other and bearing equal weight from the skeleton above. The bilateral symmetrical stance is often a ready position in sports (pre-snap linebackers, pre-pitch baseball players, free throw position in basketball, etc.), and is the position from which certain athletic movements take place, such as two-foot vertical jumping. In the world of exercise, the bilateral symmetrical stance is essentially the place we find ourselves in when performing nearly every weight room movement imaginable.
The asymmetrical front/back stance can most easily be thought of as a lunge position; however, in this model it would be any instance where one foot is in front of the other foot. The asymmetrical front/back staggered position of feet is ubiquitous within athletics, as it is the only way to run. It is how we create first steps, jab steps in basketball, and shots in wrestling, to name a few.
The asymmetrical lateral staggered stance is where one foot remains under the center of mass of the axial skeleton, and the other foot is kicked out to the side like a kickstand and resides outside the axial skeleton. In the world of exercise, the lateral lunge is the easiest way to think of the presentation of this stance. Kettlebell lifting is also an exercise where this stance is used with some frequency, as movements like the Turkish Get-Up and the windmill both feature this foot arrangement throughout or in part of the movement. The asymmetrical lateral stance displays itself in sport mostly in movements featuring change of direction, such as cutting, but also in throwing motions, and is seemingly the only way to ice skate.
The Essence of the Planes of Motion
You will probably be introduced to the three anatomical cardinal planes of motion in one of the first three chapters of any anatomy textbook. Rather than belaboring the identification and definitions of these planes that we should all know, I would like to share what I perceive as the essence of each plane for humans.
The sagittal plane is your anti-gravity plane. Mastering the sagittal plane allows you to avoid falling on your face or your back. The frontal plane is the plane you have to regulate to ultimately create forward propulsion. Optimal forward propulsion occurs when a center of mass shifts side to side (truly in a sigmoidal pathway), but stays within the boundaries of the base of support (inside the feet). Those who display aberrant frontal plane mechanics stagger back and forth like they’re drunk, and lose energy that should be contributing towards moving forward. The transverse plane allows us to coil and uncoil for high rate of force development striking and throwing maneuvers.
Do what you will with this paragraph, because it is speculative; however, I do not see enough people asking appropriate questions, such as what the purpose of the cardinal planes of movement are from an overarching perspective, so I’m putting the discussion forward. My statements here regarding the purposes and essences of these planes guide me through the way that I coach exercises that I believe target a specific plane of motion. My confirmation that an exercise targeted a specific plane is the individual I am coaching reporting that they feel a muscle corresponding to an appropriate plane.
When attempting to train the sagittal plane, the affected muscles should be flexors and extensors. When targeting the frontal plane, individuals should feel adductors and abductors, and when going after the transverse plane, rotator muscles should be working. The specifics of knowing that an activity represents competency within a specific plane of motion will be covered in Part 2 of this article series.
Kinetic Zones and Individualizing Training
As we move into the kinetics side of the discussion, I would like to start out by saying that I have created my own arbitrary differentiations for what will constitute different levels of load, velocity, and duration. With all three of the kinetics variables, I try to keep things simple and divide them into three zones. If you want to create your own system with more levels or fewer levels that’s on you, and that’s fine.
I divide load into activities that use high load, moderate load, and low load. I divide velocity into high velocity, moderate velocity, and low velocity. I divide duration into long duration, moderate duration, and short duration. To provide some level of numerical bumpers to these three levels of load, velocity, and duration, the following may be useful to people.
So now that I have introduced you to all the factors at play, let’s discuss how a coach would go about utilizing this information. I would start with the kinematics information. First, what movement pattern are you trying to train? Once you have identified the pattern, what stance are you going to put the athlete in? Now that you have a pattern and a stance, what plane of motion do you want them to move in?
Now we shift our attention to the kinetics variables. How much load do you want to provide? What velocity do you want the load moved at? How long would you like this movement to take place for? Once you have provided an answer for all of these questions, you choose your tool (e.g., barbell, medicine ball, etc.) and you arrive at an exercise.
Start with the kinematics information, decide on the kinetics variables, and then pick your tool. Share on XFor the most part, the first thing you want to do with athletes at the beginning of a session is to “warm them up.” How would I use the model being presented here? As a very simple example, I’ll choose the locomotion pattern in the asymmetrical front/back staggered stance performed in the sagittal plane, performed with low load, low velocity, and moderate duration. What is that? Jogging the length of a football field.
Maybe you are a coach who bases things on FMS principles, and you’re of the belief that you can improve the mobility and/or stability of an athlete with a prescribed activity. You choose knee dominant, bilateral symmetrical stance, sagittal plane, low load, low velocity, and moderate duration, and you come up with an activity like a squat to stand. I could list countless examples, but warm-up is generally a time of low-load, low-velocity, and short- to moderate-duration activities that can try to either mimic the activities you want to train or attempt to improve the overall movement capabilities of the individual you are coaching.
As training sessions move beyond warm-ups, I would likely next do activities with low load, high velocity, and short duration (aka, speed, agility, plyometrics, or medicine ball throwing), and I would arrive at the activity by defining it from a kinematics perspective. Change of direction with a lateral asymmetrical stance in the frontal plane in this circumstance would be a 5-10-5. Throwing from a bilateral symmetrical stance in the transverse plane would be rotational med ball throws facing towards a wall. Triple extension from an asymmetrical front/back stance in the sagittal plane would be a split squat jump.
The Weight Room – Loading Smarter
Following low-load, high-velocity, short-duration activities, it is very likely that I would next proceed to the weight room with the athlete. The first weight room activities would most likely be lifts with high load, high velocity, and short duration. The most obvious example that fits into this category is Olympic lifts. Cleans and snatches, and their derivatives, are generally triple extension, bilateral symmetrical stance, sagittal activities. Split jerks would feature a transition into an asymmetrical front/back staggered stance.
Outside of Olympic lifts, it becomes difficult to think of activities that fall into this kinetics category; however, the sport of Strongman may provide some alternatives. Stone loading and tire flipping provide alternative triple extension, bilateral symmetrical, sagittal plane activities that require very little coaching. Tire flipping also features the transition into the asymmetrical front/back stance similar to split jerks.
The sport of Strongman may provide some alternative but similar kinetic activities as Olympic lifts. Share on XAn activity that lives in this kinetics category and also features a transverse plane element is the circus dumbbell clean and press. To be able to clean the dumbbell, the athlete needs to bring the bell up to only one shoulder, which requires rotation to accomplish the task. Outside of the circus dumbbell, which many strength and conditioning coaches likely are not versed in performing or coaching, it is difficult to think of other activities in this kinetic realm that feature moving in any other plane but sagittal.
After performing high-load, high-velocity, short-duration lifts, the most likely next kinetics realm that we would move to would be high-load, low-velocity, short- to moderate-duration activities. Classic examples of movements in this category would be deadlifts, squats, presses, rows, and pull-ups. Most of the activities in this realm are going to be bilateral symmetrical, sagittal plane activities, as these seem to be the stance and plane that lend themselves most to developing strength.
Generally speaking, most coaches attempt to put an activity from the major lifting categories somewhere in their weekly training programs. At some point, athletes will perform a hip-dominant, knee-dominant, horizontal push/pull, and vertical push/pull activity from this kinetics domain at least once a week in their program.
The next component of training in a standard model would be assistance lifts. This could have some movement pattern bleed over from the previous category, but could also feature movements from categories such as locomotion (loaded carries and sled work), and throwing (Turkish Get-Ups and windmills—I consider these to be the same pattern), along with core exercises focusing on the pelvis (Nordics) and ribs (planks). These activities would generally be classified as moderate load, moderate velocity, and moderate duration from a kinetics perspective.
The activities coming from hip dominant, knee dominant, horizontal push/pull, and vertical push/pull would often be unilateral choices once we’ve reached this component of training. Prior to creating this training/programming matrix, I really struggled with knowing where to put the kettlebell grind lifts. I simply did not have a bucket to know where those kinds of things belonged, other than putting them in as assistance activities after the main lift.
Describing these activities biomechanically has helped me fit them into a program more accurately. Share on XNow I understand that a Turkish get-up for three reps each hand fits into the previously mentioned kinetics domain, and is a throwing activity performed from an asymmetrical lateral stance focusing on the transverse plane. I also understand that farmer’s walk for 100 feet is moderate- to high-load locomotion at moderate to slow velocity for moderate duration with an asymmetrical front/back stance in the sagittal plane. This ability to describe these activities has led me to think about where they would fit into a program much more accurately.
The last piece of a very simple training day would be some kind of conditioning exercise. Conditioning in this case is low-load, low-velocity, long-duration kinetic activity. I usually try to think of cyclic activities for this kinetic domain. Common weight room conditioning activities include jogging, stationary bikes, Jacob’s Ladder, VersaClimber, slide board, and rowers.
Jogging is asymmetrical front/back stance sagittal locomotion. A spin bike is locomotion (this is questionable—you’re free to disagree) from an asymmetrical front/back stance in a sagittal direction, but if you use an arm and leg bike, that would add transverse plane to the equation because the movements of the arms would rotate the trunk. Jacob’s Ladder is also locomotion in an asymmetrical front/back stance in the sagittal plane, and is a great option for individuals who need impact removed from their training.
The VersaClimber is locomotion in an asymmetrical front/back stance, but is a frontal plane dominant movement, as individuals move like upright salamanders while using this piece of equipment. The slide board is change of direction in a lateral asymmetrical stance with the movement taking place in the frontal plane. Rowers feature a combination of knee-dominant and horizontal pulling (hard to categorize), and are bilateral symmetrical stance sagittal tools.
To help the reader conceptualize the whole puzzle, here are three tables that visually demonstrate the taxonomy concept for specific exercises.
The easiest example that I can think of involving grossly imbalanced movers and a high degree of injury is CrossFit. When analyzing the types of movements done in CrossFit, almost all take place in a bilateral symmetrical stance, and move in the sagittal plane. CrossFitters warm up in this stance and plane, they lift in this stance and plane, and they even condition in this stance and plane (burpees, wall-balls, rowers, high-rep Olympic lifts, etc.). Other stances and planes of movement are largely neglected. With CrossFit, you also see times when the athletes are forced to do unpredictable, random events at competitions. You’ll see an inability to cope with certain new events, as well as high rates of injuries in those new events (swimming and peg board are two classic examples).
CrossFit is an easy example of involving grossly imbalanced movers and a high degree of injury. Share on XIt is my opinion that different stances and planes are distinct biomechanic realms with limited carryover to other stances and planes of movement. The accurate assessment of strength, speed, and fitness in specific stances and planes featuring various patterns executed with different loading schemes, velocity presentations, and durations will become a critical task for coaches moving into the future of the sports performance coaching.
Parting Thoughts on Biomechanics and Program Design
Every sport features levels of dominance in terms of what stances athletes assume, what planes they move through, what patterns they execute, what kinds of loads they encounter, what sorts of velocities they need to be able to produce, and what kinds of durations they need to continue to move through. Targeting those kinematic and kinetic realms is a great way to provide fairly specific stimuli in the training process.
Beyond specificity of training, athletes also seem to benefit from the performance of training movements that target antagonist tissues to their sports moves, as this is believed to have injury prevention elements. We should begin to try to quantify the number of movements that athletes perform in specific kinematic and kinetic realms.
We should quantify the number of movements athletes do in specific kinematic and kinetic realms. Share on XSuch an endeavor, using the taxonomy and tables that I have provided here, would be an enormous undertaking, and would require computer systems to accurately model out how much movement an athlete actually performs in a specific pattern, stance, and plane at specific loads, velocities, and durations. If we could see the total quantity of movement in these biomechanical domains, we may get a glimpse into the likelihood of injury potential for an individual, and possibly see that there is a movement rate-limiting factor preventing further progress towards sport-specific goals.
Since you’re here…
…we have a small favor to ask. More people are reading SimpliFaster than ever, and each week we bring you compelling content from coaches, sport scientists, and physiotherapists who are devoted to building better athletes. Please take a moment to share the articles on social media, engage the authors with questions and comments below, and link to articles when appropriate if you have a blog or participate on forums of related topics. — SF
How to Build Speed Hurdles for the Wicket Drill
Coaching is expensive. It consumes your personal time and bank account. We get paid in personal satisfaction, passion, happiness, competitiveness, and growth. However, our bank statements only reflect withdrawals for expenses and tiny amounts of monetary deposits for work. If you break down a coach’s stipend and divide it by the amount of hours spent on work, it most likely averages to pennies on the hour. Coaching is a labor of love. Increasingly, budgets are being reduced, particularly in sports like track and field.
If this situation describes you, you have to be creative with spending. Speed Hurdles are not cheap. A new set of six can cost as much as $40. Adjustable ones are even more costly. We tried using small cones or disc cones, but they didn’t have the same benefit as actual wickets. The solution: build your own wickets. This article serves as a practical guide in creating wickets in a frugal and simple manner. It outlines how we created 20 wickets for less than $2.00 apiece. You can change the dimensions to create wickets for whatever purpose is desired.
The next article, Part 2, discusses how we use the wickets, with special emphasis on the different spacing according to the skill levels of your athletes and the time of season. In the meantime, grab the spare change in your savings jar and build your first wicket!
Video 1. How to build speed hurdles for the wicket drill.
Total Materials
- Five 10-foot-long PVC pipes, half-inch width (5x$2.18 each pipe = $10.90).
- Forty 90-degree half-inch elbows (40×22 cents per elbow = $8.80).
- 40 half-inch PVC insert fitting Ts (40×48 cents apiece = $19.20).
Materials for Each Wicket
- One 14-inch length PVC pipe
- Two 6-inch lengths PVC pipe
- Two PVC T fittings
- Two 90-degree PVC elbows
Construction
- Cut one 14-inch piece of PVC pipe to use as the crossbar (top) of each wicket. Next, cut 19 more equal pieces, using the first length as a model. This accounts for 280 inches of the 10 PVC pipes, leaving 420 inches.
- Cut one 6-inch pipe segment to serve as a guide for the posts (sides) of each wicket. Then cut 39 more equal pieces. This uses another 240 inches of the PVC pipe. That leaves 80 inches of unused PVC pipe, which you may be able to use elsewhere.
- Use two elbows, one at each end of the 14-inch crossbars, to join the crossbars with the 6-inch posts and form the top and sides of the wickets.
- Insert a T at the bottom of each post to serve as the base of the wicket.


After building the first set, we created 40 more wickets so we could have three different settings to accommodate all skill levels within our program. It added slightly to the overall cost but the added benefits are invaluable.
Since you’re here…
…we have a small favor to ask. More people are reading SimpliFaster than ever, and each week we bring you compelling content from coaches, sport scientists, and physiotherapists who are devoted to building better athletes. Please take a moment to share the articles on social media, engage the authors with questions and comments below, and link to articles when appropriate if you have a blog or participate on forums of related topics. — SF