• Skip to content
  • Skip to primary sidebar
SimpliFaster

SimpliFaster

cart

Top Header Element

  • Facebook
  • Instagram
  • Twitter
  • YouTube
  • Login
  • cartCart
  • (925) 461-5990
  • Shop
  • Request a Quote
  • Blog
  • Buyer’s Guide
  • Freelap Friday Five
  • Podcast
  • Job Board
    • Candidate
    • Employer
    • Facebook
    • Instagram
    • Twitter
    • YouTube
You are here: Home / Blog

Blog

Female Pole Vaulter

Critical Indicators for Pole Vault II: Cueing Hip Movement by Model

Blog| ByNoah Kaminsky

Female Pole Vaulter

All vaulters subscribe to one of a few technical models or methods that address pole vault differently. The goal to clear a bar is always the same, but each model emphasizes its own subtleties, and employs strikingly different coaching cues. If you want to compare these models, the best place to observe a difference is in the movement of the athlete’s hips as the hips represent the vaulter’s center of mass.

For example, the Champion Model allows hip deceleration to occur for the benefit of greater pole bend. Alternatively, the 640 Model emphasizes upward acceleration of the hips after takeoff, and views pole bend as a by-product of runway speed. Other technical models for pole vault exist, but they derive from the Champion Model or the 640 Model: These are the archetypes used by the pole vault community, and the two models I use to analyze hip movement.

Many athletic events have different technical models and coaching philosophies. Long jump has at least three models for leg movement during flight: hang, stride jump, or hitch kick.1 When you compare these styles to the shot put spin versus shot put glide, the differences in the long jump seem extremely subtle. That’s because the spin and the glide are entirely different models for the shot put preparation phase, which is analogous to the approach in long jump.

In the shot put delivery phase, which is comparable to the long jump flight phase, both the spin and the glide are essentially the same. Thus, regardless of preparation phase, glide, or spin, a shot putter seeks an excellent power position for the delivery of their implement. This is different than the long jump because the flight style (delivery) differs and the approach (preparation) remains the same. Pole vault bears resemblance to long jump because there’s no difference in the run (approach) between the Champion Model and the 640 Model. Again, like long jump, pole vault technical models differ in how they address takeoff and air mechanics.

Hip Movement

For all vault models, hip movement is a critical indicator for takeoff and air mechanics because hip movement shows how proficiently the athlete creates pole speed. Ideally, an athlete’s hips never slow down after takeoff.

For all vault models, hip movement is a critical indicator for takeoff and air mechanics. Share on X

Elite vaulters, like Sergei Bubka or Yelena Isinbayeva, demonstrate that even the Champion Model can achieve upward hip motion with very minimal deceleration. Unfortunately, for a successful Champion Model jump with minimal hip deceleration, the necessary strength and speed requirements are exorbitant. For that reason alone, many Champion Model vaulters find themselves shut out from higher bars once they’ve maxed out their grip and pole, if they remain at the same level of strength and speed. Again, this argues in favor of teaching the 640 Model to new vaulters. Nevertheless, the widely used Champion Model deserves analysis. 

Coaching Hip Movement in the Champion Model

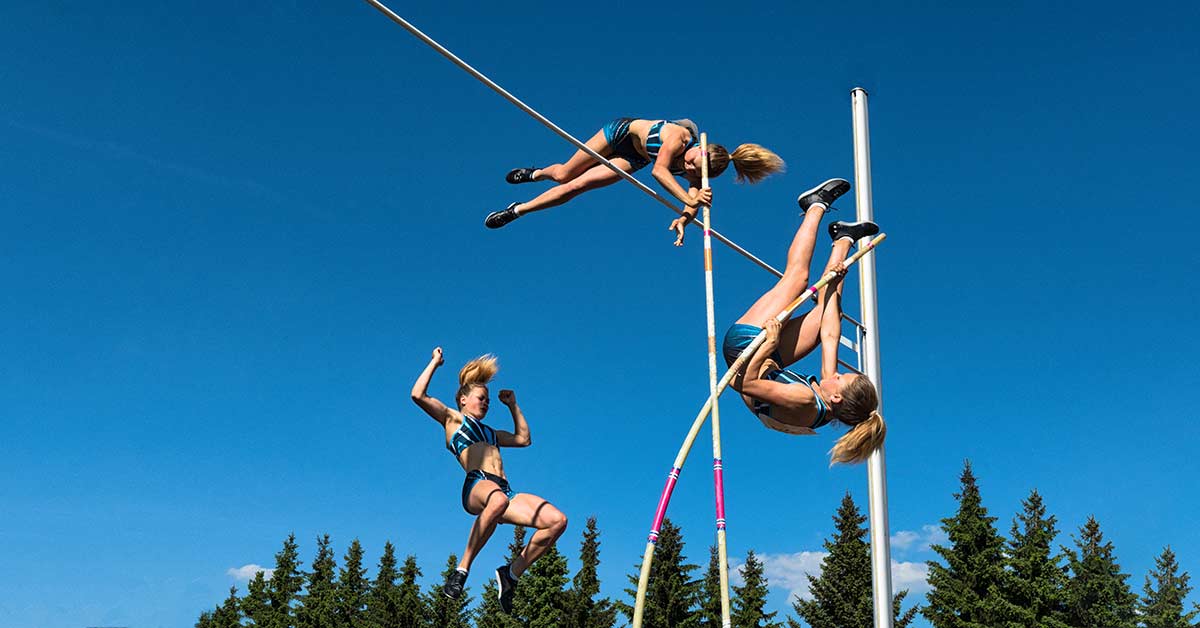
Consider Lilly, a Champion Model vaulter, who focuses on bending the pole by letting her hips decelerate after takeoff. When she is under the pole with arms pressing up high (aka blocking out), she initiates her swing with arm and core strength so that she can invert, meet the unbending pole, and slingshot herself over the bar. When you watch Lilly’s hips, they accelerate from her free takeoff, decelerate as she transfers mechanical energy into the pole, and then finally accelerate again as she brings her body to inversion.

When Lilly attempts a personal best, her coach might increase her grip or pole size. Here are the possible results of these adjustments:

  1. Lilly increases the height of her grip on the pole. The pole bends more, but her hips decelerate so extremely that her runway speed becomes irrelevant. The remainder of her air mechanics rely on her arm and core strength. If Lilly is not strong enough to control the pole with her higher grip, then she will get stood up by the pole somewhere above the plant box, which is dangerous. Grip Lilly back down and tell her to keep her speed up.
  2. Same adjustment as Scenario One. Lilly grips up. If Lilly is really strong, then she rows through easily and completes the jump successfully. Her hips decelerate minimally. Keep everything the same for the next jump.
  3. Lilly switches out her pole for a longer or heavier pole. The new pole does not bend as much as before and her jump becomes more like a straight pole drill. If Lilly is not fast enough to jump on this pole, her hips will decelerate completely as she gets stood up by the pole, or worse, rejected from the pit back onto the runway. Either Lilly should not be on such a heavy pole, or she should grip down and treat the next attempt as a straight pole drill. Lilly should initiate her swing sooner.
  4. Same adjustment as Scenario Three. Lilly goes up a pole. If Lilly has sufficient runway speed, then she moves the pole to vertical and relies on her strength to execute the jump. In this case, her hips move fluidly upward, above her grip, and she clears the bar. Keep everything the same for the next jump.
  5. Lilly goes up a grip and switches out for a heavier pole. Lilly is faster and stronger because she’s committed herself to speed work and weight training. It’s been a while since her last competition and she’s a different athlete since last time. She nails the jump, her hips decelerating slightly and then moving upward again. She clears a higher bar for a new personal best. She should go up another grip and move back a half foot on the runway for her next jump. Go Lilly!

Although the scenarios above offer coaches simple cues and adequate feedback based on hip motion, the Champion Model has problematic limitations. Young athletes who are new to pole vault may not have the strength or speed to achieve sufficient pole bend—even on a small pole. On the other extreme, nobody can grip up indefinitely because the hips will decelerate, and the athlete will get stood up. At some point, the height of the grip becomes too high for even the strongest and fastest vaulters.

With the Champion Model, the height of the grip eventually gets too high for even strong vaulters. Share on X

The widely accepted notion that you can load a pole with energy from the approach only works if you don’t lose that energy when you plant the pole. When the grip is too high or the pole is too heavy, the forward transfer of energy into the pole will go right back into the athlete in the opposite direction. Last I checked, the opposite of forward is backward, and definitely not upward. This is the reason the hips sink or decelerate in the Champion Model.

Coaching Hip Movement in the 640 Model

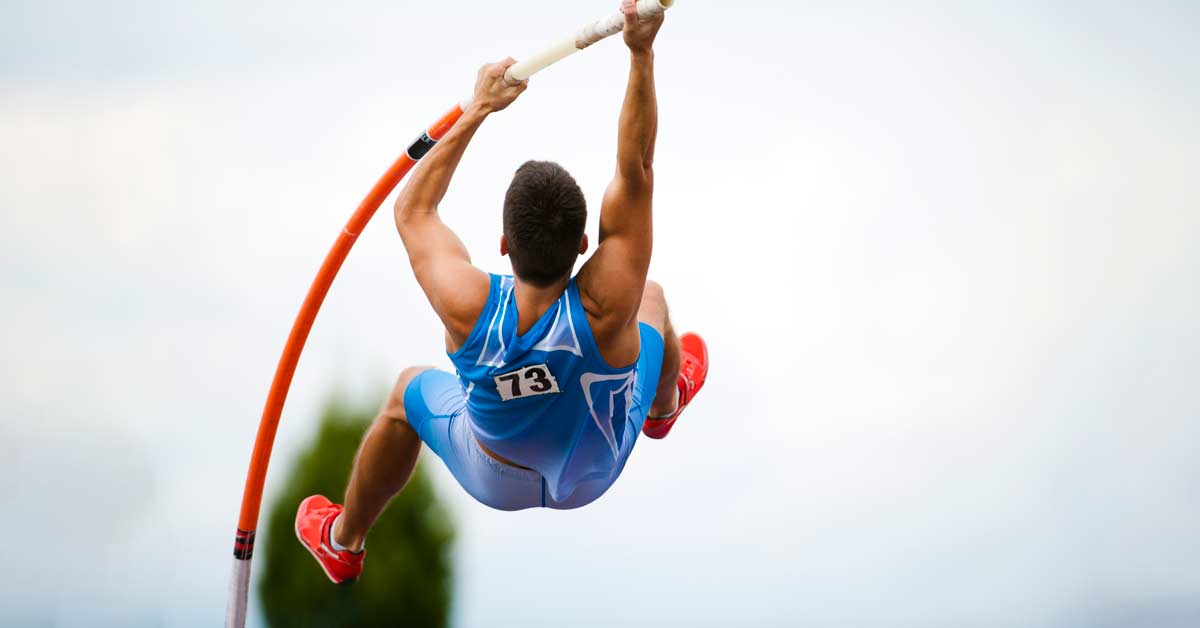
In the 640 Model, the hips should continuously move upward, without any deceleration. A 640 Model vaulter takes off farther out from the box, and they begin pulling on the pole immediately with the extended bottom arm. A big jump up, active pull, and good trail leg swing bring the hips upward to meet an unbending pole. As usual, speed and strength are crucial to the success of this model, like any model, but the emphasis is different. 640 Model vaulters focus on achieving maximum pole speed (how fast the pole moves from plant to vertical) and view pole bend as a by-product of a well-executed jump.

With hip movement tied to pole speed, it’s absolutely critical that 640 Model vaulters actively pull on the pole from takeoff so that the hips never decelerate. 640 Model vaulters get off their poles sooner than Champion Model vaulters because the emphasis is always on pole speed. Sam Kendricks is a good example of a vaulter who moves through the jump incredibly fast and has great pole speed. His hips never decelerate. Kendricks may not strictly subscribe to the 640 Model, but he’s a lot closer to the 640 than the Champion Model.

Another measure of pole speed is the end position of the pole. A 640 Model jump typically ends with the pole at 85-95 degrees, whereas a successful Champion Model jump ends with the pole past vertical at 95-120 degrees. This is why Champion Model vaulters tend to push their standards farther back than 640 Model vaulters.

The hips should not decelerate in the 640 Model because the energy from runway speed transfers less into the pole and more into the vertical motion of the vaulter. If the athlete does not continue to add energy into their ascent by pulling on the pole, then their hips would decelerate or sink after takeoff because they are not active with their arms. Forget what you’ve heard about the total energy after takeoff. You can add energy to the system once you’re in the air! An athlete may not be able to bend the pole more than their runway speed allows, but that grilled chicken and salad they ate for lunch provides enough energy to pull on the pole and elevate the hips!

When you observe a 640 Model vaulter decelerate their hips or lose pole speed, there are a variety of factors that may cause this result. Let’s consider Billy, a seasoned collegiate 640 vaulter who’s not having a great practice session. Billy’s approach on the runway is excellent. He hits the right mid-mark and he always sets up a good free takeoff. Unfortunately, Billy has been struggling with his takeoff and air mechanics today. His hip movement and pole speed are critical indicators for feedback after each jump. Here are some scenarios to address:

  1. Billy’s hips rise slower than usual, his pole speed is slow, and his left arm collapses. He definitely does not have the hip height to wrap the bungee he usually wraps with ease from his three-step approach. Billy was flat. He needs to jump up more at takeoff, which should correct for the collapse of his left arm, too.
  2. Billy’s hips rise initially, but they decelerate once he’s in the air. His pole speed was adequate, but not as good as his best jumps. Billy had a good jump up at takeoff. There are a few possibilities to explain this jump:
    • If Billy did not pull on the pole immediately after a good takeoff, then he pushed too much on the pole and could not bring his hips upward easily. Pushing on the pole results in landing off to the side in the pit.
    • If Billy’s step was tight because he overstrided on his last step, then his left arm collapses and he cannot pull on the pole proficiently. He almost gets hit by the pole after takeoff and he cannot follow through to begin the turn at inversion. Again, his hips decelerate in this situation. Billy can either go back a half foot on the runway or correct his last two steps before takeoff. His last four strides should be stride-stride-long-short.
    • If Billy collapses the left arm in his pole plant, then he needs to extend more. This is not a significant adjustment, but it’s enough to keep his hips accelerating upward and achieve higher clearance.
  3. Billy jumps up well at takeoff, pulls proficiently, and his hips rise continuously. He has great pole speed and lands deep in the pit. Awesome! Billy can either add resistance by increasing his grip by 3 inches or move back 6 inches on the runway. If Billy bends the pole too much, then he should switch poles for a stiffer one. The next jump should look good. If it doesn’t, then he did not execute the jump similarly to the previous one. Revisit scenarios One and Two above.
Your observation of hip motion is critical to assessing the jump and providing feedback to athletes. Share on X

Regardless of the model that you follow, your observation of hip motion is critical for assessing the jump and providing feedback to your athletes. I only addressed the Champion and 640 models because other pole vault models are either derivatives or variants of these models. For example, the Traditional Model, utilized by Polish vaulter Władysław Kozakiewicz, spawned the widely used Champion Model, but is not a common technical model anymore. The Innovative Model, practiced by high school record holder Mondo Duplantis, derives from the Champion Model and involves a double leg tuck instead of a single leg drive and swing. Again, the masters of each model demonstrate very minimal hip deceleration.

Switching Technical Models

For one athlete, switching technical models is a challenging process. If you’re a coach, switching models can be excruciatingly painful because you have to transition all of your athletes together. Don’t be surprised if some athletes just quit. There are some events in which it’s easy to switch models, but not pole vault.

It’s always easier to switch models that differ in the preparation (approach) rather than in the delivery (takeoff). In shot put, the switch from glide to spin, or vice-versa, doesn’t have to be a painfully slow transition, because the preparation phases differ. In pole vault, the switch from Champion to 640 can be detrimental to the athlete because takeoff has entirely opposite blocking cues. Champion Model coaches say, “Push!” 640 Model coaches say, “Pull!”

A vaulter may find greater success with a new technical model, but patience is absolutely necessary. Share on X

It might take years before a Champion Model vaulter can shed their old habits and become successful with the 640 Model. An athlete may find greater success with a new technical model, but patience is absolutely necessary. You can’t rush skill development because, as the saying goes, old habits die hard.

Comparing Technical Models

The jury is still out on which technique is most effective for all these events, and that’s okay! Most of the pole vault community uses the Champion Model, or some variation thereof. Mike Powell broke the long jump world record with a hitch kick, but when I went to college, I saw mostly hang style and stride jump. Long jumpers rely on all three fairly equally.

The shot put spin became popular among American throwers back in the ’80s because many shorter, less explosive throwers discovered they could generate more impulse with less force than their larger, more explosive opponents. In international competition, the glide is more popular, but the men’s world record is a spin. The women’s world record is a glide. It’s hard to say what’s best. Sometimes, what fits your athlete’s abilities and needs is really the best model to use.2

Maybe, but not necessarily. Experimental support for one model over another would rely heavily on historical records and mostly subjective evidence. This doesn’t mean that one model isn’t absolutely better than another. It’s certainly possible. Rather, it’s just very difficult to prove it beyond reasonable doubt. At Apex Vaulting Club, we use the 640 Model. We have a good coaching system in place and I have confidence in our head coach.

The only argument for one model over another is based empirically on safety. In my observations and experience jumping with both models, the 640 Model offers athletes a safer recovery after takeoff. Even with good coaching, Champion Model vaulters seem to get stood up by the pole more often, which decreases the likelihood of landing safely in the pit. This can result in a dangerous recovery, like landing on your feet, landing in the box, rolling an ankle, or being rejected by the pole back onto the runway. Of course, this is also possible with the 640 Model, but in my observations, not to the same degree as with the Champion Model.

I’m more confident in the 640 Model as it’s safer and more accessible for less-experienced athletes. Share on X

When I compare my vaulting experiences, I recall 40-50% of all Champion Model practice jumps resulted in being stood up, whereas that result was about 5-10% for all 640 Model jumps. Overall, I have greater confidence in the 640 Model because it’s safer and more accessible to younger, less-experienced athletes. Those are the individuals that matter most in our sport—not the elites. If we want pole vault to grow and become more popular as a sport, then we must make it more approachable to the average athlete. The 640 Model supports this idea.

Integrating Hip Movement into the Coaching Sequence

When you see deceleration in the hips, or slow pole speed, you must consider the factors that produced this result. If your athlete clears a bar with poor hip motion, then positive feedback is good, but it is not enough. Your athlete still needs to jump again. By observing hip motion and isolating these factors, you will reinforce better habits and improve performances more sustainably. Furthermore, you will promote your athlete’s confidence in practice sessions, which will carry over to their ability and demeanor at meets.

Hip movement is one of three critical indicators for coaching pole vault, but it only addresses two components of the jump—takeoff and air mechanics. In my last article about mid-marks, I emphasized the sequence in which coaches should analyze proficiency.

  1. Pole carry
  2. Run
  3. Plant
  4. Takeoff
  5. Air mechanics

So far, in this article and the last, I have covered numbers 2-5. In my last article, I discussed how mid-marks provide more data for a coach to measure speed on the runway and predict the quality of takeoff. In my next article, I will address drill proficiency, the final critical indicator for successful pole vault coaching. The best vaulters are highly skilled individuals within their coaching systems, regardless of their technical model. I’ll discuss how component-specific drills reinforce skills and improve long-term performance.

References

  1. Linthorne, N.P. (2008). “Biomechanics of the long jump.” In R. Bartlett & Y. Hong, Handbook of Biomechanics and Human Movement Science(pp. 340-353). Routledge.
  2. Aikens, Jim. “Teaching the Glide Shot Put Drill Sequence.” SimpliFaster blog. Spring 2018. Accessed August 18, 2018.

Since you’re here…
…we have a small favor to ask. More people are reading SimpliFaster than ever, and each week we bring you compelling content from coaches, sport scientists, and physiotherapists who are devoted to building better athletes. Please take a moment to share the articles on social media, engage the authors with questions and comments below, and link to articles when appropriate if you have a blog or participate on forums of related topics. — SF
Athlete Stress

Stress, Recover, Adapt: Strategies to Mitigate Performance Decrements

Blog| ByDr. Jarred Boyd

Athlete Stress

Athletes at the collegiate, professional, and Olympic levels are training harder than ever before to gain a competitive advantage over their opponents. Even at the youth level, if you visit any large or small town, you’ll witness athletes dedicated to improving their physical abilities in pursuit of reaching the next level. This is great for the world of sports, as it cultivates a higher level of competition.

The increased attention to physical preparation, however, brings with it a greater need to recognize that there should remain a balance for optimizing athlete recovery. It is imperative to remain conscious of this concept; otherwise, the expression of the physiological and biological systems will not meet the demands of an athlete’s environment.

Generally speaking, a physical preparation coach’s ultimate goal is to reduce the potential for injury by prioritizing fundamentals and enhancing the development of biomotor qualities (strength, power, and speed), which will simultaneously aid performance. One of the main goals for a sports physical therapist, on the other hand, is to facilitate the mitigation of pain while improving comprehensive capacity.

Ultimately, the objective of both professions is similar: to increase the longevity of each athlete’s capacity to express their highest potential while remaining durable. To accomplish these goals, we need to have a basic understanding of stress, so we can develop resilience and prepare players for the physical demands of competition.

This article highlights three practical methods to facilitate a shift to recovery and promote the positive adaptation to training loads. With this information, all parties involved in the athletic development process, especially physical preparation coaches and practitioners, can further assist athletes in displaying high physical capacities while mitigating their susceptibility to injury.

I don’t intend to create a narrative that training load, which is indeed a stressor, is the injury instigator and performance detractor in and of itself. Instead, quite the opposite is true. We should view physical training as a prophylactic and antidote to injury, which occurs only if we establish an accumulation of training load, or steady-chronic exposure, as opposed to sudden and abrupt, acute exposures.

For this to occur, an athlete must be prepared to accept their next bout of training. Athletes acquire this readiness from inter-session recovery, which discourages maladaptive disturbances in the system and encourages adaptive responses.

Recovery Strategies

The purpose of stress recovery adaptation is to place the nervous system in a state that’s ready to act and react efficiently within an ever-changing environment, both physiologically and psychologically.

1. Positional Breathing

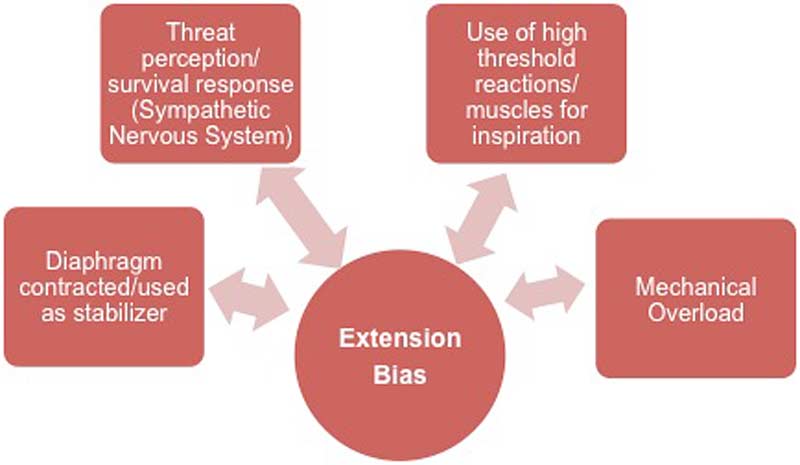
First it’s important to understand that when we endure stress, especially from training (dependent on exercise selection, of course), our system typically results in rigidity or extension bias. This position is beneficial for force production and performance, but if it’s sustained during low-level daily activities, it can result in decreased variability, adaptability, and consequently recoverability.

Extension Bias
Image 1. Higher threshold exercise activates the brain’s perception of fatigue and threat, preventing a real opportunity to recover.

When a stressor is introduced, your body undergoes primitive reactive patterns that limit degrees of freedom, or available options. If you think about it, your position is a subconscious physical manifestation of your emotions and the state of your autonomic nervous system, or simply put—dynamic outputs reflecting dynamic inputs. This can self-perpetuate and increase sympathetic drive that creates a vicious CNS dysregulation cycle and alters sensory feedback to the brain.

In simpler terms, the perception of fatigue and threat is more readily activated with higher threshold exercise so you never get a real opportunity to recover.

Many athletes experience a heightened perception of soreness and tightness from this position and will hammer away at a joint by doing aggressive mobility and stretching techniques. Sometimes those mobility restrictions and areas of tension are present simply because their brain does not deem it safe to allow the body to access certain positions. Controlled breathing, especially while reaching and pushing, can mitigate these sensations and set athletes up to recover.

To drive your system into recovery mode, perform two rounds of five exhalations in a circuit. Share on X

We can access these tough and restricted positions by performing diaphragmatic breathing with long slow exhales. The breathing encourages better input and creates awareness to reference the position consistently while also establishing time under tension. Conscious breathing stimulates vagal tone so that the parasympathetic nervous system is more pronounced and also provides an opportunity to be at ease with the earlier unpleasant sensations. Performing two rounds of five exhalations, completed as a circuit, can be a great way to drive your system into recovery mode.


Video 1. The athlete demonstrates the All Fours Bear Hold with proper breathing technique.


Video 2. The athlete performs a lat hang with a strong exhale followed by a five-second held breath and then a soft inhale.


Video 3. The athlete shows how to do downward dog toe reaches and when to inhale and exhale.


Video 4. The athlete performs a 90-90 hip lift with a shift while breathing deeply.

2. Aerobic

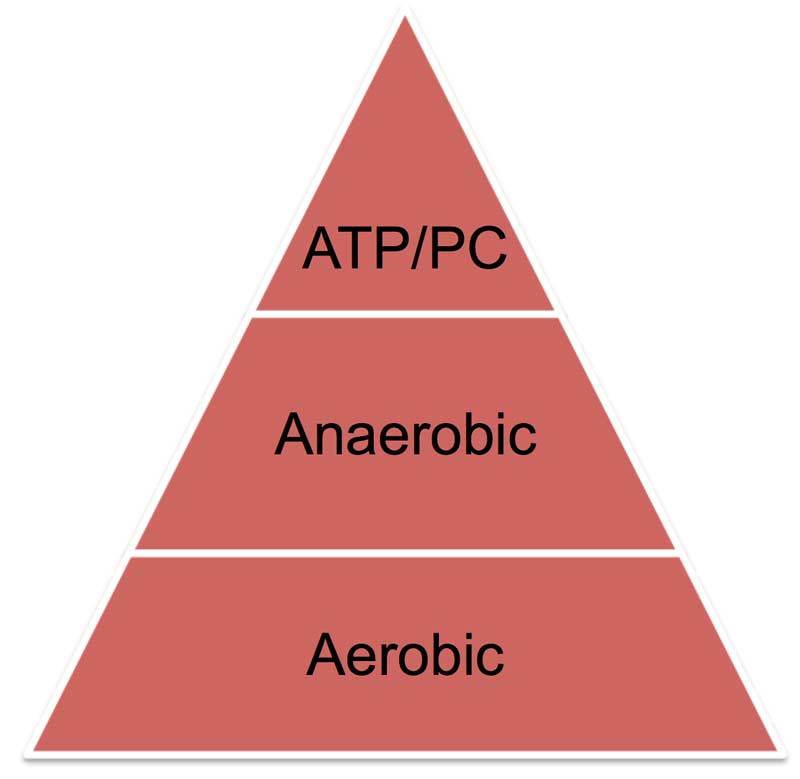
The aerobic system is another area where we can optimize recovery. Why? It is the most largely adaptable energy system and can mitigate the perception of fatigue and threat. Remember, when we encounter a stressor, we become more sympathetic and rely less on the aerobic system and more on the alactic and lactic systems. When running from a bear, we need immediate energy that promotes high biological and mechanical output, and the aerobic system doesn’t cut it.

The aerobic system instead prioritizes a long-term supply of energy during low-level intensity outputs and ensures that movement variability remains high. With low variability comes a decreased capacity to adapt as we lack the options necessary to meet the environmental conditions.

Targeting the aerobic system will promote not only post-session recovery but also intra-session recovery during intense training days by resynthesizing energy currencies and delaying the onset of fatigue-encouraging energy systems.

The Aerobic System is the Most Largely Adaptable Energy System:

  • Increases mitochondrial density (more ATP)
  • Improves capillary density and circulation
  • Increases aerobic enzymes
  • Decreases resting HR
  • Decreases sympathetic dominance
  • Increases left ventricle/stroke volume
Aerobic pyramid
Image 2. Aerobically fit individuals may experience a smaller sympathetic response when a stressor is present. Individuals who improve significantly in their aerobic fitness experience stress-buffering effects during stress exposure and during recovery from stress.

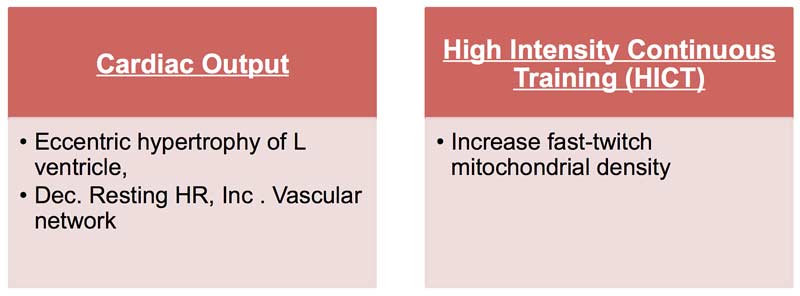
Two methods for aerobic recovery that I’ve found helpful (with credit to Joel Jamieson of Ultimate MMA Conditioning) are cardiac output and high-intensity continuous training.

  • For cardiac output, the mode and load should be HR 120-150, 30-90 minutes of continuous activity (biking, swimming, jump rope).
  • For high-intensity continuous training: max resistance, HR 130-150, 10-20 minutes, low speed (spin bike, lunges uphill, step-ups), potentially performing two rounds.

I prefer these strategies because they are low impact and reduce the stress and strain on contractile and non-contractile tissues, especially tendons. Performing this 1-2x per week—dependent on exercise load, exercise selection, and athlete level—can be very impactful.

Aerobic Chart
Image 3. Cardiac output and high-intensity continuous training are two preferred methods for aerobic recovery to mitigate the perception of fatigue and threat.

3. Soft Tissue

Contrary to popular belief, no amount of pressure you apply to soft tissue will break up any scar tissue nor will it break through adhesions and lengthen tissues. It’s important to understand that you cannot rub yourself flexible. That does not mean that foam rolling is not a valuable part of the recovery process. Foam rolling is a great way to modulate unpleasant symptoms (soreness) and decrease the sensitivity of heightened tissues.

It's counterproductive for athletes to beat themselves up by foam rolling aggressively. Share on X

It’s counterproductive to have your athletes beat themselves up by foam rolling aggressively to the point of tears, grimacing, and breath-holding. This strategy will simply increase sympathetic tone throughout the body. As a result, they’ll feel like they need to roll even harder next time, continuing the cycle.

Instead, breathe to decrease tension and tone and give a relaxation effect via the parasympathetic nervous system. Although this is a more subjective than objective strategy, it is just as critical. Remember that our perception highly influences a stress reaction, and we must take into consideration the internal load of training.

Internal loading provides insight into the athlete’s perception of effort-fatigue and psychological reflection. Integrating soft tissue can alter this internal loading, specifically the psychological response to the external loading or work completed.


Video 5. The athlete demonstrates foam rolling for the hip flexor.


Video 6. The athlete performs the two-step process for glute foam rolling.


Video 7. The athlete shows us how to foam roll the mid- to upper back.

To further grasp the reasoning and rationale of these strategies, it is imperative to establish a basic understanding of stress, from its ramifications to its manifestations.

General Adaptation Syndrome

One of the first to give a scientific explanation for biological stress was Hungarian endocrinologist Dr. Hans Selye. He called his stress model, based on physiology and psychobiology, the General Adaptation Syndrome (GAS). The model states that any event, real or perceived, that threatens an organism’s well-being (a stressor) leads to a three-stage bodily response.

Stage 1: Alarm

  • Fight-or-flight response and sympathetic nervous system are activated
  • Resources are mobilized

Stage 2: Resistance

  • The parasympathetic nervous system returns functions to normal
  • Resources are focused against the stressor
  • HR, BP, RR increase, and body remains on red alert

Stage 3: Exhaustion

  • Continued stress exhausts resources and causes fatigue and system failure

We must understand that physical training is a stressor, though controlled, that initiates this cascade of events. The goal is to remain outside of exhaustion, commonly referred to as overtraining in the performance world. Exhaustion may lead to performance decrements and can have serious physical ramifications systemically. One may ask, how is training a stressor if I don’t feel stressed afterward?

Physical training is a stressor, causing a cascade of neuroendocrine and physiological events. Share on X

Essentially, stress is stress is stress and is created equal. However, it may not appear to be at first. Whether we’re running from a lion, watching a horror movie, or facing upcoming deadlines, our system typically results in the same general neuroendocrine and physiological cascade of events initiated at the hypothalamic-pituitary axis. But we may have varying levels of subjective perceptions of stress (physical, biological, psychological, emotional, etc.) because our cognitive appraisal varies, which alters our perception of the stressor.

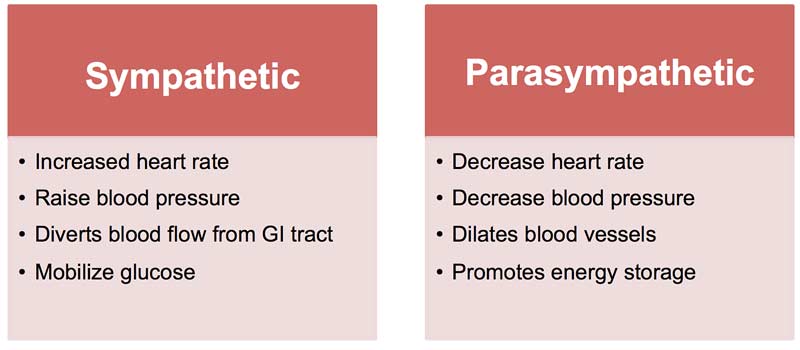
The stress response triggers the sympathetic nervous system, which is not innately bad. Issues arise if we remain in this sympathetic state during everyday low-threshold activities and don’t shift to our parasympathetic branch to promote recovery, regulation, and regeneration.

Sympathetic Chart
Image 4. This chart depicts the responses that transpire from activating the sympathetic and parasympathetic branches of the autonomic nervous system. It’s is easy to see how parasympathetic encourages down-regulation on many bodily systems, which is the focus for recovery.


Stress Is a Necessity

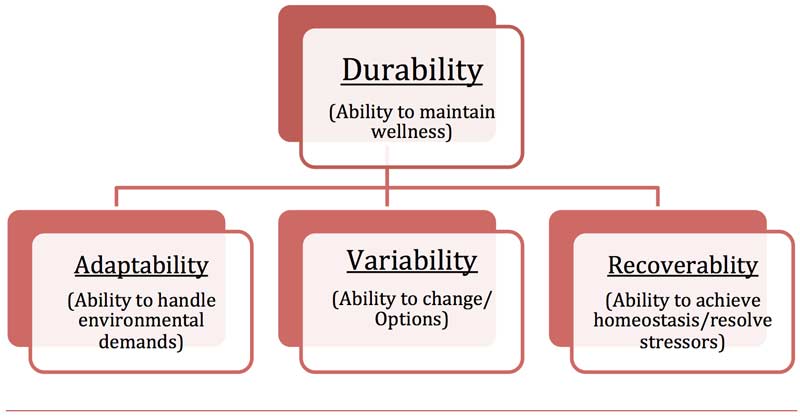
Realize that stress is not a synonym for bad. Stress is vital and necessary for life, and without it, our evolutionary advantages would not exist. The diagram below depicts why stress is necessary. With controlled stress, we can manipulate variables to suit our current capacity and future requirements. The ultimate outcome is maintaining resiliency and health as long as possible.

The only way to create durability is to refine the system, and the only way to refine the system is to disrupt homeostasis temporarily, instigating change. This yields adaptation and a system that is neither underdeveloped nor overdeveloped but robustly efficient.

Durability Chart
Image 5. Controlled stress is necessary to maintain resiliency and health for as long as possible.

With constant, repetitive, high-input stressors—specifically rigorous training for this article—an athlete may be posed with a threat. The threat itself is not an issue since we subject ourselves to threat (a stressor) each time we train. Regarding physical and physiological qualities that a person wishes to obtain, there has to be a stressor applied. If you want to be bigger, faster, or to lift heavier, the system has to experience a stimulus strong enough to warrant a shift.

Issues occur when you continue to have withdrawals (stressors) without making deposits (recovery). That’s called an overdraft. No one wants an overdraft. To up your deposit game, you must shift your system to a state where recovery can occur and not focus on speeding up recovery. When we emphasize speeding up recovery, we impede the body’s three natural processes.

Think of it this way: we have to acquire money before we purchase material things. We have to do the same with the body and focus on recovery, restoration, and energy resources before attempting to purchase physical and physiological assets.

Contrary to common belief, physical training—whether running and conditioning or strength-oriented—does not promote homeostasis. It disrupts homeostasis. Essentially, this means that at the moment you are training, you are not getting stronger, bigger, or faster. Instead you are (or should be) challenging the tissues of all your systems.

For this adaptation to be positive, we need to promote adequate recovery. Without recovery—which includes nutrition, hydration, sleep, and often forgotten sympathetic mitigation—we may have poor outcomes leading to maladaptation. This leads many athletes to train even harder or run even farther, the complete opposite of what their system needs.

If you train to recover like you train to adapt, you improve your ability to restore homeostasis. Share on X

If you train to recover like you train to adapt, you can improve your ability to restore homeostasis. Your body does not care about making you stronger or faster if you are constantly in a recovery deficit. Instead, all resources and energy are used to handle daily hassle stressors and the demands of excessive intense physical activity on the body. We want to ensure there are enough resources and energy available for tissue repair and stress recovery adaptation.

Stress Overload

As we know, neurological, physiological, and biological processes, which yield performance, are all outputs from the brain—it is the governor. Every time an athlete steps into the weight room, let alone the field of play, there are endless inputs (afferent information) and outputs (efferent information) that attempt to elicit the most efficient reflexes and reactions. As a result, the brain, which is the central nervous system, has to recover to function at its highest capabilities otherwise acquisition is impacted negatively.

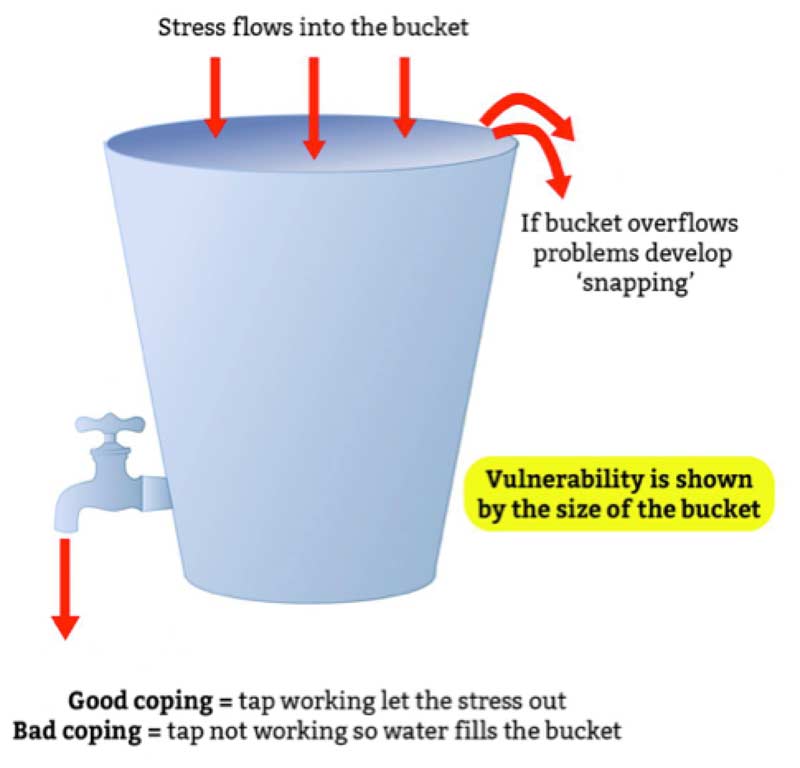
Stress Bucket
Image 6. The stress bucket shows how we have a certain degree of propensity to endure stressors. If we fail to allocate time to recover from training, we risk an overflow and experience performance decrements.

The body’s limited resources and energy for coping with stressful situations mean that GAS has evolved to be only useful for short-term animal survival. The harder we train without recovery, the less variable this system becomes as the sympathetic state dominates, leading to difficulty with down-regulation and adaptation to environmental demands. This accumulates to cause poor adaptation, disrupted sleep patterns, fatigue, and ultimately poor performance.

The stress bucket is a great depiction of how we all have a certain degree of propensity to endure stressors, including:

  • Significant life change: marriage, children
  • Catastrophic: unpredictable large-scale events
  • Daily hassles: seemingly minor negative events—long store lines, losing car keys
  • Ambient: globally integrated into the background of the environment—noise, crowding
  • Physical: exercise, physical activity, and training

If we fail to allocate time to recover from training, which is a very controllable input, then we run the risk of overflow and performance decrements. While there is a myriad of strategies to encourage recovery, the three suggestions provided earlier in the article are all effective and efficient methods to use in an athlete’s programming.

Assessment Strategies

Determining when we need to prioritize recovery strategies throughout the athletic preparation and competition continuum requires consistent monitoring of key indicators. Although measurements from biochemical, hormonal, and immunological perspectives do exist, they are not easy to implement since they’re typically more invasive and require more time allocation.

Ideally, load monitoring involves measuring both external and internal loads, where measurement tools range from general to sports-specific and are either objective or subjective. Measuring the external load typically involves quantifying an athlete’s training or competition load, such as hours of training, distance ran, weight lifted, or the number of games played. Other external factors, however, such as life events, daily hassles, or travel may be equally important.

We can measure internal load by assessing the internal biological, physiological, and psychological responses to the external load such as heart rate (physiological/objective) and rating of perceived exertion (psychological/subjective).

It’s critical to implement mixed methods when monitoring an athlete’s response to training load. There is no unanimous method to determine the overall effect of stress from training load on performance, fatigue, and injury because there are numerous factors that influence an athlete’s actual response to load. Take, for example, an overweight middle-aged male who will have very different physiological and perceptual responses (internal load) to an 800m run than a trained runner. Although the external training load is identical, the internal training load will be much higher in the older unfit individual.

We can gain an understanding of an athlete’s perception of load by consistently providing subjective questionnaires. Several researchers have investigated the use of subjective monitoring and found it to be a sensitive and consistent way to determine acute and chronic changes in an athlete’s well-being in relation to load.

Subjective Assessments

Subjective assessment measures include the Recovery Stress Questionnaire for Athletes (REST-Q-Sport), Daily Analysis of Life Demands for Athletes (DALDA), and Profile of Mood States (POMS). Rather than administering the entire questionnaire, it may be more time efficient to review questions that elicit tangible responses. Simple inquiries before training can be extremely valuable for detecting unplanned fatigue.

Heart Rate Variability and Rating of Perceived Exertion

There’s been hype recently over assessing heart rate variability (HRV), which is the measure of variation in time intervals between heartbeats. Essentially, by assessing HRV, we can gain a physiological indication of the autonomic nervous system’s (ANS) state. The ANS, which regulates heart rate, blood pressure, breathing, digestion, etc., will reveal less variation during higher sympathetic activity. The problem is that measuring HRV is not always feasible. Instead, session rating of perceived exertion (RPE) can be a quick and easy way to measure an athlete’s internal response to the training session’s intensity.

Range of Motion and Flexibility

Joint range of motion and flexibility also provide insight into stress and load accumulation. In team sports, a strength coach may not be able to assess athletes individually. An efficient approach I’ve found effective is gauging the toe touch and split squat. By assessing these two movements, we have a glimpse of the outward reflection of the autonomic nervous system’s variability.

Both movements will reveal the ability to offset the extension bias. Each movement may indicate potential structural fatigue to contractile tissue (toe touch) and sensorimotor fatigue due to the coordination required between upper and lower extremities in an asymmetrical pattern. We should not use these as a stand-alone, and and we should establish a baseline quality (split squat) and quantity (toe touch) before future assessments.

Toe Touch Split Squat
Image 7. Assessing the toe touch and split squat will reveal an athlete’s ability to offset extension bias.

No matter which assessments you choose, the ultimate goal is to answer two basic questions: How is the athlete tolerating and adapting to the physical stressors, and is the athlete prepared for the next exposure?

Conclusion

Remember the primary goal of training is to create controlled stress that will stimulate a change in the efficiency and effectiveness of each system throughout the body. Before this stress adaptation can occur, however, an athlete must be in a recovery state. It should not be the intention of a performance coach, skill coach, or therapist to speed up recovery and limit the body’s natural processes. Instead, our goal is to ensure athletes are in a state ready to recover.

“If you train too hard on your easy days, soon you will be training too easy on your hard days.”—Keijo Hakkinen

Since you’re here…
…we have a small favor to ask. More people are reading SimpliFaster than ever, and each week we bring you compelling content from coaches, sport scientists, and physiotherapists who are devoted to building better athletes. Please take a moment to share the articles on social media, engage the authors with questions and comments below, and link to articles when appropriate if you have a blog or participate on forums of related topics. — SF

Relevant Reading and Resources

Sapolsky, Robert M. Why Zebras Don’t Get Ulcers: An Updated Guide to Stress, Stress-Related Diseases, and Coping. W.H. Freeman, 2001.

Wingo, Mary K. The Impact of the Human Stress Response: The Biologic Origins of Human Stress. Roxwell Waterhouse, 2016.

Schulkin, Jay. Allostasis, Homeostasis and the Costs of Physiological Adaptation. Cambridge Univ. Press, 2012.

Halson, Shona L. “Monitoring Training Load to Understand Fatigue in Athletes.” Sports Medicine, 2014; 44(2): 139-147.

Budgett, R. “Fatigue and Underperformance in Athletes: The Overtraining Syndrome.” British Journal of Sports Medicine, 1998; 32(2): 107-110.

Thorpe, R. T. (Robin), et al. “Monitoring Fatigue Status in Elite Team SportAthletes: Implications for Practice.” International Journal of Sports Physiology and Performance, 2017; 12(2): S2-27-S2-S35.

Everly, George S., and Jeffrey M. Lating. “The Anatomy and Physiology of the Human Stress Response.” In: A Clinical Guide to the Treatment of the Human Stress Response. Springer, New York, 1970.

Taylor, et al. “Fatigue Monitoring in High PerformanceSport: A Survey of Current Trends.”Journal of Australian Strength and Conditioning, 2012; 20(1): 12-23.

Schwellnus M., Soligard, T., Alonso J., et al. “How much is too much? (Part 2) International Olympic Committee consensus statement on load in sport and risk of illness.” British Journal of Sports Medicine, 2016; 50(17): 1043-1052.

Gabbett, T.J. “The training-injury prevention paradox: should athletes be training smarter and harder?”British Journal of Sports Medicine,2016; 50(5): 273-280.

Basketball Player Layup

Training Loads and Physical Preparation in the NBA with Dr. Ramsey Nijem

Freelap Friday Five| ByDr. Ramsey Nijem

Basketball Player Layup

Ramsey Nijem DSc, is entering his fourth season with the Sacramento Kings, his second as the team’s head strength and conditioning coach. Responsible for all aspects of sport performance, Nijem spent the last two seasons as the Kings assistant strength and conditioning coach. Before joining the Kings, Nijem was the head strength and conditioning coach at Santa Barbara City College, and prior to that he was an assistant strength and conditioning coach at UC Santa Barbara.

Freelap USA: Can you explain your approach to monitoring the training loads of your players? How has this impacted their health, as well as how you continue to program work in the weight room?

Ramsey Nijem: Monitoring training loads is critical for prescribing appropriate loads. Understanding how much the athletes have done (considered the external workload) and how they are responding (considered the internal workload) provides a measure of readiness and serves as a compass to guide loading parameters. We monitor game loads in the NBA with a camera system positioned above the court in every arena, which provides GPS-like data such as distance, speeds, and frequency of accelerations and decelerations. In practice, we use a wearable to quantify loading demands.

We also collect subjective wellness data to understand how our athletes are handling not only the demands of the game, but also the stressors of the season—travel being the biggest non-basketball stress. With 82 games in six months, half of which are played on the road, there is no shortage of stress influencing the athlete’s ability to recover and perform.

This data is used to generally estimate levels of risk: whether an athlete has an increased, decreased, or neutral risk of injury. The fitness-fatigue model proposed by Bannister in the 1980s has recently been rebranded and computed as the acute:chronic workload ratio. This ratio provides a measure of how much the athlete has done relative to what they have prepared for.

Typically, the acute period is quantified as the sum of load in a given week, while the chronic period is quantified as the rolling average of the previous month. Take, for example, an athlete who has run 12 miles in the past week. If this athlete has run 40 miles over the past month, then on average they have prepared for 10 miles per week. Taking the acute load of 12 miles and dividing by the average chronic load of 10 miles gives a ratio of 1.2 (12/10 = 1.2). The literature to date suggests that ratios between 0.8 and 1.3 are protective against injury. While many limitations exist, the use of 0.8-1.3 as a safe zone is popular in the sport science community and provides a nice rule of thumb for practitioners to begin monitoring training loads.

The fitness-fatigue model proposed by Bannister in the 1980s has recently been rebranded and computed as the acute:chronic workload ratio, says @DrRamseyNijem. Share on X

While we do not necessarily subscribe to a hard and fast range of 0.8-1.3, when we do suspect an athlete has taken on loads that elevate their injury risk, we adjust our training prescriptions on the court and in the weight room to manage the risk latency (i.e., the time following the initial elevation of risk). Occasionally, a conversation occurs with all stakeholders to limit the basketball load, but more frequently we adjust our weight room loading and increase our efforts on the recovery front.

The nuances of training load are beyond the scope of today’s conversation, but it’s worth noting that what we know regarding loading and injury risk is minimal, as the relationship between loading and injury is complex. I have recently completed a dissertation in this space—specifically loading in the NBA and injury risk—and while I cannot share our results, it is safe to say that a single number to quantify injury risk is closer to magical than medical.

Freelap USA: What is your approach to maximal strength levels and development with NBA-caliber players? How much absolute strength is needed for durability through a full season?

Ramsey Nijem: We love lifting heavy as much as any other strength and conditioning coaches. Given our population, however, we have to appreciate the risk involved with training heavy and the loads that our guys are already dealing with. We’ll take isometric mid-thigh pulls to get maximal force output measures and can track that over time with little concern for injury risk, as it’s isometric and the output is under the players’ voluntary control. We do not do 1-repetition maximum (RM) tests with our players; we do, however, take 3RMs of lifts such as the trap bar deadlift. Those types of lifts are a safe option, lend themselves well to the levers of NBA players, and provide a dynamic measure of maximal strength.

We also use an isokinetic squat machine to test speed-strength qualities, which is of course not maximal strength, but provides valuable insight into the athlete’s ability to generate force. We frequently will program sets of 2-5 repetitions so that we are touching above 85% of 1RM during the season, providing us with maintenance exposures so we are not losing strength in-season.

As far as how much strength is needed for durability, I’d say that if an athlete can squat 327 lbs or more, then they have the minimum absolute strength to avoid injury. Now of course I’m being sarcastic there… I cannot say precisely what level of strength is adequate for a player to make it through the grueling NBA season unscathed. While I could give a general rule of thumb—such as squat 1.5 bodyweight and deadlift 2x bodyweight—these numbers are quite arbitrary, nor do I have confidence in them as injury prevention thresholds.

When I get asked questions such as “how strong is strong enough?” I like to reply with the following question: “how can cats jump so high?” As a thought experiment, I challenge readers to research an answer. It’s a question that demonstrates how complex strength is, and therefore how difficult it is to quantify the levels of strength that would reduce risk of injury. If you do find the answer, please send your answer my way on twitter @DrRamseyNijem (shameless twitter plug).

Freelap USA: What are some of your favorite means, other than barbell and dumbbell resistance, to train your players?

Ramsey Nijem: While we are big fans of traditional barbell and dumbbell resistance training, we love to mix it up with the various implements. Our approach is focused more on the movements we desire, rather than the means, so we can expose our athletes to variety within our consistent patterning. So, in addition to the barbells and dumbbells, we use center mass bells, medicine balls, cables, suspension trainers, sleds, and the athlete’s bodyweight to change the loading parameters and motor constraints. In addition to providing novel stimuli, various training means provide variety, which aligns with my thoughts on developing resilient athletes.

An added benefit to using various means to achieve our desired outcomes is the avoidance of monotony. If we were to stick to dumbbells and barbells exclusively, our players would get bored and their training experience would take a hit. That’s not to say we consider enjoyment over the athlete’s needs, but if we can achieve our desired training goals and maintain a fun training environment, then I am all for it.

If we were to stick to #dumbbells and #barbells exclusively, our players would get bored and their training experience would take a hit, says @DrRamseyNijem. Share on X

Freelap USA: What are some common deficiencies or weak points you see in your incoming players? How can these athletes be better prepared for their time in the NBA?

Ramsey Nijem: The biggest “deficiency” we see is a general lack of strength. Many athletes are entering the NBA after just one year in college, meaning they get to us with little-to-no training background. While most of these guys are quite impressive athletically, the systems they need to maintain these qualities are absent. While I enjoy a 40+ inch vertical as much as the next guy, we are more concerned with the ability to land from that—does the athlete have the motor control to land efficiently from a biomechanical standpoint? Does the athlete have the strength—specifically eccentric strength—to absorb the landing forces? Can they turn that load around for a second jump? Can they do these things in the 4th quarter? The answers to these questions are what we seek in the weight room for our young players.

While I enjoy a 40+ inch vertical as much as the next guy, we are more concerned with the ability to land from that, says @DrRamseyNijem. Share on X

Athletes can better prepare for their time in the NBA by developing a sound movement library before they get here. Learning how to squat, hinge, lunge, bridge, push, and press with proper trunk control and mechanics are critical to building robustness, and the ability to do these things will accelerate that process. While an NBA player does not need world class powerlifting strength—nor do they need to move like a ballet dancer—the ability to load and control movement is critical to developing strength along the strength-speed continuum, which ultimately leads to stronger, faster, more durable athletes.

In addition to having a sound movement foundation, I’d also add that proper rehab of injuries from earlier in an athlete’s career would prove beneficial later in their career, as re-injury or new injuries occur. While it is tough to quantify objectively, lack of proper return to play could elevate future injury risk. The best way to achieve success in any sport is to maintain healthy status, and in turn the ability to consistently train for the sport.

Freelap USA: What is an area that you see being the future of NBA player development and physical preparation?

Ramsey Nijem: The future of NBA player development is exciting. A paucity of literature exists on the demands of the NBA game, which limits our ability to physically prepare athletes. My hope is that over the next 5-10 years, more data will come out that provides insights for practitioners to better prepare NBA players and prospects. While there are many barriers to the systematic investigation of NBA players and game demands, as the NBA sport science field progresses, collaboration and openness will begin to overcome some of the obstacles limiting our understanding.

Since you’re here…
…we have a small favor to ask. More people are reading SimpliFaster than ever, and each week we bring you compelling content from coaches, sport scientists, and physiotherapists who are devoted to building better athletes. Please take a moment to share the articles on social media, engage the authors with questions and comments below, and link to articles when appropriate if you have a blog or participate on forums of related topics. — SF


Olympic Lifting

A Case for Training Olympic Lifts in College Athletics

Blog| ByWill Ratelle

Olympic Lifting

In most sports, we not only want to move ourselves but also want to have the ability to move exterior objects—opponents, baseball bats, hockey sticks, rackets, etc. Pulling the bar in Olympic lifts not only trains the triple extension at the hip, knee, and ankle but also force production, proximally to distally into the ground with our feet, to transmit that force into the barbell to drive it up and then it reverses back onto us in the catch position. Based on this information alone, we can see the superiority of the pulling component of the Olympic lifts compared to only jumps.

And what about the catch? Is it necessary for athletes? Consider the speed it takes to drop under a heavily loaded barbell to catch a clean. Going from the pull’s tall, triple extended position to the bottom of a full squat in milliseconds must be worth looking into.

A common argument against training the Olympic lifts is that we don’t need to teach athletes to catch the bar. The detractors argue that the catch doesn’t add any extra physiological benefits to athletes who are not Olympic weightlifters. There are even studies that suggest athletes would benefit more from performing only clean and snatch pulls due to the concentric-only movement, which eliminates the need to decelerate and transition under the bar and, therefore, produces more force at the top of the pull.

The accuracy of these claims is questionable, however, because we never know how technically proficient the athletes are in the studies who perform such complex movements as the snatch and the clean and jerk. If an athlete cannot perform a technically sound clean, of course they will not benefit fully from the exercise.

Critics also argue that the primary goal of the Olympic lifts is to achieve triple extension at the hip, knee, and ankle. Why choose such complex movements to achieve that goal when we can use jumping variations and medicine ball throws, which get the same result?

The peak force of a 250 lb. clean surpasses both jumps and medicine ball throws, says @will_ratelle. Share on X

The Olympic lifts are much more than those two components. When an athlete performs Olympic lifts, consider the forces placed on them compared to trap bar jumps or 20 lb. medicine ball scoop throws. The peak force of a 250 lb. clean surpasses both the jump and the throws. One study compared the differences between a clean pull and a counter movement jump, showing peak force nearly doubled in the clean pull and time-to-peak force was 36% faster in the clean pull. Think of Newton’s 3rd law: for every action, there is an equal and opposite reaction.

Olympic Lifts and Agility

Agility, a major component of athletic competition in just about every sport, is commonly defined as the ability to accelerate, decelerate, and accelerate again. I argue that accelerating a barbell as fast as possible and then decelerating and getting under the bar and then accelerating the bar back from a full squat checks the box of training agility as well.

The acceleration and deceleration demands of #OlympicLifts check the box of agility training, says @will_ratelle. Share on X

Compare Olympic lifts to medicine ball throws. With a medicine ball throw, we completely unload the body after we project the ball into the air or wherever we throw the ball. Olympic lifts require us to exert near maximal force onto the bar and then train the motor ability to reabsorb that force on the catch, which we can do by power cleaning/snatching or full cleaning/snatching.

Don't neglect the #eccentric strength required to catch the bar during an Olympic lift, says @will_ratelle. Share on X

To take full advantage of the bar’s peak force, we must drop into a squat position to catch it. I understand that the initial “explosive” action of a pull or a jump or a throw attracts most coaches, but it’s important not to neglect the eccentric strength required to catch that bar as well.

Olympic lifts also train athletes to brace quickly. They need to brace when they begin their first pull, to keep a rigid, tight back. And they need to brace as they rack the bar as they catch. It’s a very quick transition between the second pull and the rack position.

Developing Resilience

Specificity is always a muggy topic in the strength and conditioning field because coaches have different definitions for specificity and point to different methods for specific training. But in football, hockey, and basketball, there is contact and that contact can continue to occur over and over again in a matter of seconds.

For example, a defensive end may rush the edge and make contact with an offensive tackle to find himself getting chipped by a running back a split second later and then hit again by the same offensive tackle. The defensive end must be able to brace, or they will get the wind knocked out of them. And being able to rack a clean might be one of the best ways to prepare the athlete for that level of contact. Not only because of the bracing, but also because of the amount of force needed to withstand a heavy clean or snatch.

Racking a clean may be one of the best ways to prepare athletes for high levels of contact, says @will_ratelle. Share on X

If our athletes only perform pulls, throws, and jumps (which I believe are extremely beneficial), they only expose themselves once to that high level of force. But if they include the catch, they expose themselves to that high level of force twice. Now take that 2:1 ratio and apply it over the course of a typical four-year college career. What would you rather do? All things being equal with exercise selection, which athletes will be more prepared to get hit in football or hockey? Which athletes will be more prepared to finish at the rim through contact in basketball? Which athletes will have the potential to hit the ball harder in tennis or baseball?

The evidence points to the Olympic lifts as one of the more effective modalities we can use to best prepare our athletes for competition.

Timing and Technique

Of course, it’s going to take time to teach athletes the proper technique, and there might be situations where there’s no time to go through the progressions. Maybe you have a transfer student who only has one season and has never cleaned or snatched before and the season starts four weeks after they arrive on campus.

In that situation, I get it. I spent some time as a player in the NFL and CFL, and the most we ever did was hang cleans. This was probably appropriate given that there’s such a rapid turnover of players, and it would be a logistical nightmare getting guys to clean with great technique when you may only have some guys for a week. That, combined with the fact that the athletes’ job is to play football—not train— puts a coach in a position where what’s best for the long-term may not work in the short run, and a coach does not want to hear concern from the front office.

At the University of North Dakota, however, we redshirt almost every freshman football player, and they train three days a week during the season without any other team in the weight room. It would be a disservice to them if they didn’t start learning the Olympic lifts in those initial autumn months to prepare for the winter season training. We have the time, so we do not need to rush anyone through the progressions. Because there have been so many articles written about the neurological benefits of the Olympic lifts and the development of motor skills and grip strength, etc., I wanted to touch on these other areas that are often left out of the discussion.

Getting buy-in from the athletes and the coaching staff can be challenging. Athletes get embarrassed and discouraged when they perform the lifts without good technique. I had one football player, for example, who was lagging behind when we were cleaning from the floor as a group, and he probably wasn’t ready for that. He would shoot his hips up first, causing the bar to drift away, which caused an imbalance in the barbell-skeletal system. This then caused a jerking second pull and a very inconsistent catch position.

He got frustrated with the program, so we modified his program for the day by having him complete one rep of a segmented clean deadlift, followed by a clean pull, followed by a power clean. The sequence slowed it all down and allowed him to concentrate on each piece of the lift without the complex progressions. He performed that for another couple training days until he felt competent to complete a set of all power/full cleans. This worked since we didn’t have to set him back at all, and he was able to get his work in without feeling like he was being singled out.

Final Thoughts

It makes the most sense to me that we should train our athletes to perform these movements. Sure, it may take some time for them to develop the technique and the timing of it all, but when they’re able to put it together, they can really improve their performance in their sport. Athletes who can clean heavy and snatch heavy give themselves great potential to hit harder, run faster, and jump higher. And what seems to be the least appreciated, their ability to brace through contact (eccentric strength) may give them an edge over their competition.

Since you’re here…
…we have a small favor to ask. More people are reading SimpliFaster than ever, and each week we bring you compelling content from coaches, sport scientists, and physiotherapists who are devoted to building better athletes. Please take a moment to share the articles on social media, engage the authors with questions and comments below, and link to articles when appropriate if you have a blog or participate on forums of related topics. — SF


Team Celebration

5 Reasons to Adopt an Athlete-Centered Model of Training

Blog| ByXavier Roy

Team Celebration

While effective training develops physical qualities such as strength, speed, power, endurance, and other technical, tactical, and psychological elements that are essential for performance, competitive sports offer a separate and unique set of motivational and inspirational factors.

Playing the game offers freedom of movement, thought-free expressions of physical talent and skill execution to achieve a desired result. Players get competition, the challenge of besting a worthy opponent, and the chance to test their ability. The game gives instant feedback—each play, each set of downs, each inning, each half, there is always a precise marker of what the athlete’s efforts have produced to that point. Sports are also unpredictable: Players keep playing because no two games, no two matches, no two races are ever exactly the same.

Players keep playing because no two games, no two matches, no two races are ever exactly the same, says @xrperformance. Share on X

With that in mind, let’s consider for a moment the number of hours your players actually play versus the number of hours they train in order to play. It takes an incredible amount of repetition to induce automation in the execution of a skill or develop the physiological adaptations that lead to increased physical performance. However, how many of those training hours replicate and distort what really happens during the game?

Is there an ongoing element of competition during training or is it a check-marked system of completing sets and reps? Is there freedom of movement, expression, and decision-making from the players, or are drills closed and movements directed? Is there immediate feedback or are gains entirely long-term in nature? Are the sessions planned and predictable?

Transitioning from a Coach-Centered to an Athlete-Centered Approach

During game play, the coach wants the athletes to be active problem-solvers, to correctly assess what is occurring during the game, and to respond with the appropriate decisions and skills. However, it is often the coach who is responsible for all the elements of training, with the athletes having limited input in the training process. This approach is termed a coach-centered approach (CCA).

On the other hand, a player-centered approach (PCA) uses various strategies to enhance autonomy and empowerment, and provides athletes with tools and strategies to manipulate and manage the training process.1,2This article will look at five reasons to consider transitioning from a coach-centered approach to a player-centered approach, as well as how to implement autonomy-supportive behaviors in your practice.

One

Improve Performance During Competition

Performance in sports relies on the interaction of physical, technical, tactical, and psychological/social factors under complex and dynamic circumstances. During games, players need to not only demonstrate their movement skills, but also make appropriate decisions under pressure. When working with team sport athletes, for example, the first objective of the coach is to establish their style of play or Mental Model. This ideal or “alpha version”—as defined by Richards, Collins, and Mascarenhas3—represents the perfect execution of a skill or play as if it were picked from the pages of a textbook.

But coaches are not the ones playing the game. Therefore, the players’ contributions in reshaping the coach’s vision and making it a Shared Mental Model are crucial. Through team meetings, team debriefs, conditioned or small-sided games, reflection, and questioning, players can take control of their learning. The performance vision offered by the coach and further developed by the players is then shaped by information on the court, on the field, or on the ice. This is only possible if you allow players to provide their input.

Coaches aren’t the ones playing the game. Therefore, you need to allow players to give their input, says @xrperformance. Share on X

For example, players can now anticipate future playing situations based on the Shared Mental Model and/or respond to new challenges as they arise during training. Individual players are now able to coordinate their actions with those of their teammates under various different scenarios. Finally, players can make appropriate decisions during the game and further discuss the new performance vision with their teammates and coaches for the upcoming match. Overall, this approach enables athletes to develop the tactical awareness and understanding to make informed decisions during games.

Two

Improve Feedback from Athletes

In a coach-centered approach, the coach has knowledge of the game and they transmit this knowledge to players. The coach therefore instructs players on the skills and tactics to use during training and games under x and y circumstances. In a player-centered approach, however, the relationship that you create and foster with the athletes that you work with will have a profound impact on their motivation and, therefore, their performance.

Communication between players and coaches is crucial if you are to adopt a player-centered model in your coaching. First, the coach needs to provide a safe environment for players to provide input. During team meetings, for example, this means providing equal opportunities for every player to participate in the team discussion and guarding against one or several players dominating the dialogue. For some issues, this may involve implementing procedures to ensure confidentiality, such as telling players not to include their name on feedback sheets or placing a box or envelope near your office where players can turn in any assignments, feedback sheets, or notes.

A player-centered coaching model relies on the involvement of all players, not just the vocal ones, says @xrperformance. Share on X

During meetings and training sessions, you should use questioning to get players’ input. By asking a question and providing the athletes with time to answer it, the coach presents an opportunity for the athletes to be active learners and improve their understanding of the task at hand as it relates to the game model.

You can ask two types of questions: low-order questions and high-order questions. Low-order questions support technical development and focus mainly on the what, when, and where. High-order questions are designed to stimulate critical thinking and are mostly about the why and the how.

The implementation of questioning takes time and may be uncomfortable at first. The athletes that you work with may not be used to answering such questions and may be reluctant and intimidated, especially if they need to answer those questions in front of their teammates. The best option for coaches is to plan which questions to ask, and when during a training session they can use questioning.

I would suggest that you start with basic questions and provide athletes with opportunities to answer these questions in a small group. Then, gradually introduce more high-order questions first during meetings and later during team training sessions.

Three

Enhance Motor Learning

I am a firm believer that getting athletes involved in understanding the why is very important for the sports and S&C coaches. In terms of motor learning, I mostly refer to the relatively permanent changes in behavior or knowledge that support long-term retention and transfer.4 When athletes understand why they are performing a specific exercise or why the training program is structured a certain way, they are more likely to understand the concepts leading to performance enhancement.

Involving athletes in understanding the WHY is very important for sports and S&C coaches, says @xrperformance. Share on X

The use of questioning fits nicely in this situation. You can use simple low-order questions (what and where), such as asking the athletes what the acronym PAL means when working on acceleration mechanics (Posture, Arm action, and Leg action) or having them tell you the coaching cues needed to perform a hang power clean (hips back, shoulders over the bar, jump up, and punch the elbows). External coaching cues, such as push the ground behind you (acceleration), punch the ground from above (top speed mechanics) or reach for the cookie jar (shooting a free throw in basketball), are a good way to reinforce transfer of training and learning.

On the other hand, asking high-order questions about techniques and tactics related to their sport or requesting that athletes self-evaluate their performance can also be helpful. Look specifically at the why and the how, and evaluate whether the sessions you planned as a coach ensure the long-term retention of the different concepts the athletes were exposed to in training.

Four

Individualize Training

Once the athletes under your supervision understand the why, you can start to implement different autonomy-supportive strategies. Being autonomy-supportive means that the coach must understand the athlete’s perspective, acknowledge their feelings, and provide pertinent information and opportunities for choice, while minimizing the use of pressure and demands.5 Put simply, that means providing choices, explaining the reason to perform a specific exercise or drill, letting athletes show initiative, and providing positive feedback based on competence and performance.

Traditionally, athletic development coaches or S&C coaches like to use strict training protocols, loads based on %1RM, or repetitions ranges to target many of the different physical qualities required in sports. You can consider this prescriptive style of coaching—where the coach dictates the exercises being done and determines the loading parameters—a coach-centered approach.

In a player-centered model, coaches provide choices based on the athlete’s level of experience. Share on X

In opposition, in a player-centered approach, the coach could look at any of the four recommendations provided by Halperin, et al.6 You could:

  1. Select the number of choices based on the athlete’s level of experience.
  2. Provide a range of options to choose from.
  3. Determine if the choices provided are relevant to the task or not.
  4. Consider your relationship with the athlete when deciding on the variables described above.

If you use Olympic weightlifting movements in your programming, a good idea could be to outline the different movement progressions that the athletes can perform based on their training experience and technique. If an incoming freshman has little or no experience with Olympic movements, using DB high pulls, DB RDLs, and DB jump shrugs can serve as a proper foundation for that particular athlete. A senior can go ahead and perform more advanced variations, like a power clean from the hang or different pulls.

Another example could be to select a few different exercises that athletes can perform during the in-season, when you don’t know how their body will feel after a game. For instance, a football lineman could choose a bilateral back squat, a single-leg squat, or a leg press as his main lower body exercise for his first weight training session of the week, roughly 48-72 hours’ post-game.

Finally, there are some athletes that you get to know on an individual basis as your relationship with them grows. For example, one student-athlete I worked with in the past two years had a history of knee injuries. His condition was so bad at first that he could only participate in the special teams’ segment of football practices if he wanted to play the game on the weekend. After these 15-20 minutes of special teams, he would pretty much sit out the rest of practice.

Two years later—and after many modifications to his training program—we would have daily discussions before training sessions to assess how he was doing and whether he could perform the training sessions. We often alternated lower and upper body sessions when he felt his knees needed more rest, or limited squats in favor of unilateral posterior chain work.

Five

Increase Adherence to Training Programs

Let’s face it: For some athletes, training to develop physical qualities such as strength, speed, power, and endurance can become quite repetitive, if not boring. You might think that you can only use this approach with fairly advanced or elite athletes. However, you can implement an autonomy-supportive environment with younger athletes as well.

You can implement an autonomy-supportive environment with younger athletes, not just the elite, says @xrperformance. Share on X

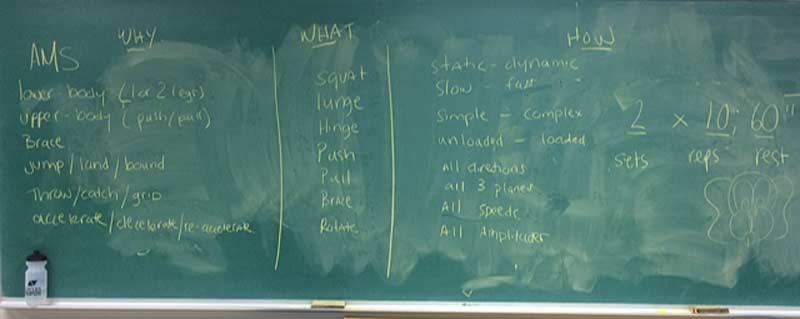
While working with a high school soccer concentration program, I tried such strategies with grade 7 soccer players—both boys and girls. During one of their soccer classes in the weight room, they had to design their own training program for that session. They had to choose between different athletic movement skill (AMS) competencies, then select the movements (squatting, lunging, hinging, pushing, pulling, bracing, and rotating) and the movement progressions.

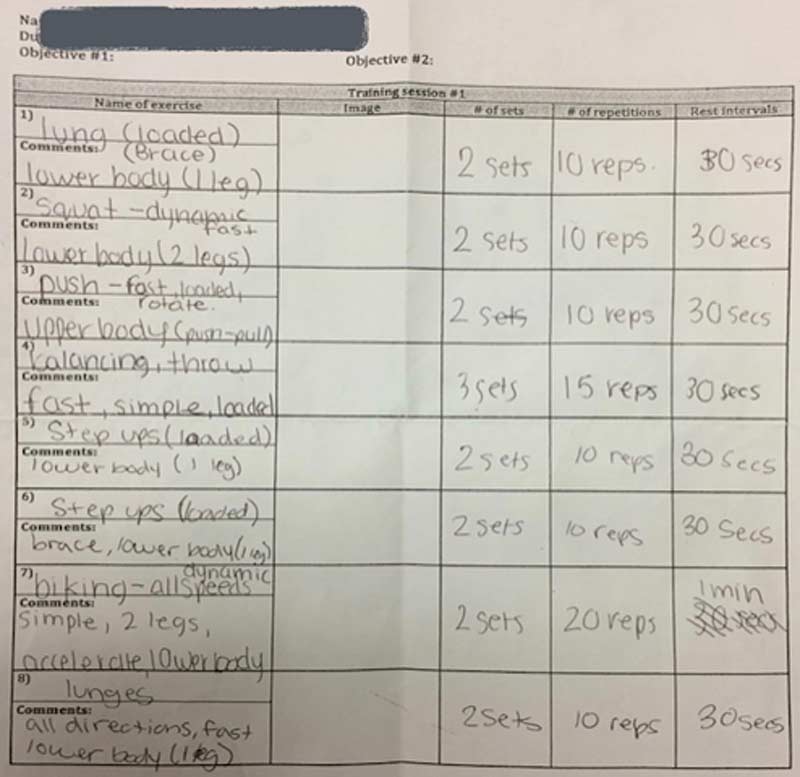
I was very pleased with the different training sessions these young players came up with. Keep in mind that there were no right or wrong answers, and that I was more interested in their thinking process and their ability to make a link between athletic development in the weight room and their sport of soccer.

Autonomy Choices
Image 1. During a grade 7 soccer group’s class in the weight room, I had them design their own training session. They had to choose between different athletic movement skill (AMS) competencies, then select the movements (squatting, lunging, hinging, pushing, pulling, bracing, and rotating) and the movement progressions.


Autonomous Training Program
Image 2. Example of a training session designed by two young grade 7 soccer players. Keep in mind that there were no right or wrong answers.


Providing young athletes with choices can be as simple as letting them decide whether they want to sprint on a flat surface or on a short ramp, or whether they want to use stairs instead of boxes of various heights to perform plyometric exercises. Telling them to set up an obstacle course using various pieces of equipment and different stations that emphasize footwork, change of directions, jumping/landing mechanics, and running is also fun, and allows them to be creative and involved in the design of the session. Basically, you give them guidance in setting up the exercise based on the theme, skills, or physical qualities you would like them to improve.

Give Them Choice and a Voice

When working with athletes, the role of the coach is to plan, organize, monitor, and respond to the different circumstances that evolve around the training process. At the beginning, this certainly entails providing more guidance and more direction on the different aspects of the training. However, as your relationships with your athletes grow—and they mature and gain a better understanding of themselves, their needs, and their sport—your role as coach is not to tell athletes what to do, but to set up learning opportunities that enable them to figure it out themselves.7

Giving athletes choice and a voice is an important starting point for their enjoyment of the game, says @xrperformance. Share on X

Providing athletes with choices and a voice in the training process can therefore serve as an important starting point for the athletes that you work with to realize the beautiful joy of the game.

Since you’re here…
…we have a small favor to ask. More people are reading SimpliFaster than ever, and each week we bring you compelling content from coaches, sport scientists, and physiotherapists who are devoted to building better athletes. Please take a moment to share the articles on social media, engage the authors with questions and comments below, and link to articles when appropriate if you have a blog or participate on forums of related topics. — SF
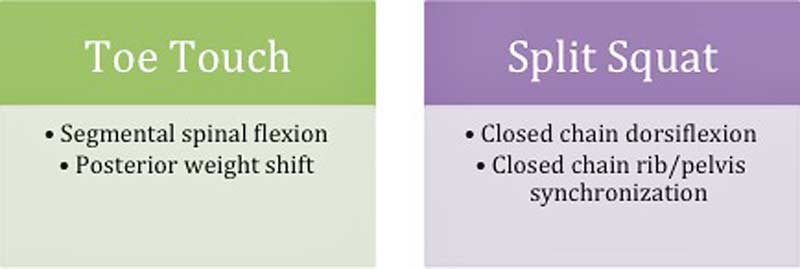


References

  1. Kidman, L. (2005). Athlete-centred Coaching: Developing Inspired and Inspiring People. (T. Tremewan, Ed.). Christchurch, New Zealand: Innovative Print Communications Ltd.
  2. Sheridan, M. P. (2009). “Coaches Empowering Athletes … Using an ‘Athlete-Centered’ Approach.” Podium Sports Journal.
  3. Richards, P., Collins, D. & Mascarenhas, D. R. D. (2012). “Developing rapid high-pressure team decision-making skills. The integration of slow deliberate reflective learning within the competitive performance environment: A case study of elite netball.” Reflective Practice: International and Multidisciplinary Perspectives, 1-18.
  4. Soderstrom, N. C. & Bjork, R. A. (2015). “Learning Versus Performance: An Integrative Review.” Perspectives on Psychological Science, 10(2), 176-199.
  5. Mageau, G. A & Vallerand, R. J. (2003). “The coach-athlete relationship: a motivational model.” Journal of Sports Sciences, 21(11), 883-904.
  6. Halperin, I., Wulf, G., Vigotsky, A. D., Schoenfeld, B. J. & Behm, D. G. (2018). “Autonomy: A missing ingredient of a successful program?” Strength and Conditioning Journal, (February).
  7. Kidman, L. & Lombardo, B. J. (Ed.). (2010). Athlete-centred Coaching : Developing Decision Makers. Worcester, UK: Innovative Print Communications Ltd.

Team Nutrition Planning

Power Lift Roundtable: Athlete Nutrition and Creatine Supplementation

Uncategorized| ByBob Alejo


Power Lift Sport Science Education

Team Nutrition Planning

A pair of great experts in the field of nutrition science, Shawn Arent, Ph.D., and Doug Kalman, Ph.D.—both members of Power Lift’s Sport Science Educational Board—tackle two huge questions in the athletic performance arena.

Sports nutrition in professional organizations and collegiate institutions is becoming more and more commonplace. However, the degree to which the dietary offerings can fill the need for the competitive athlete is very different financially for the “haves” versus the “have nots.” So, while nutritional timing is very important for recovery and adaptation, sometimes those feedings are untimely and infrequent because of the expense. Regardless of the economics, the question still remains: Which meal/feeding provides the best bang for the buck physiologically and financially, and what would be the macro-nutrient makeup of that intake?

Separately, we look at concussions, which I believe are the injury focus these days, both due to severity (short-term and long-term) and incidence (concussions don’t discriminate by gender or sport). Safety precautions have been taken—as we see equipment updated for preventative measures—but what about other factors for prevention, and how about the recovery process? Creatine could be one such factor, as there is compelling evidence that creatine may have the capability to help minimize the impact of a concussion and perhaps help during the healing and recovery process.

Q: While schools know the value of sports nutrition, some find it a challenge to fully fund comprehensive nutritional offerings. At the same time, I’m not sure nutrition plans have a priority as to when feedings are optimal, either practically or physiologically. If there was only one time to feed per day (budget realities) or one feeding to emphasize over others, when should that be and what should be the makeup of that feeding (pro, carb, fats)?

Douglas Kalman: This is a great question and really hits home, especially when looking at the collegiate sport sector of physical activities and nutrition. Let me expand, as there are many colleges and universities, and there are also many levels within that construct. In sports, we have Division I, II, and III schools, along with independents and others. Depending upon your singular university and the division you may be in, the ability of the athletic department to have financial support for the optimization of all its athletes is greatly affected.

Typically, a successful (in sports) D-I school will have a larger athletic budget (which includes money for staffing and food and fueling stations) than a D-III university or a junior college. On top of this, each coach of a fielded team also receives a specific budget for the year to use for the players, teams, and supportive needs.

If a university can only provide one meal to its athletes, it should include a recovery beverage. Share on X

I have personally experienced coaches deciding on which players they wanted to receive extra nutrition counseling and product support, versus supporting the whole team (constrained by budget). At a minimum, if the university can provide at least one meal to the athletes, I prefer it to be a useful one, such as a post-exercise, post-training combination of a recovery beverage (to help rehydration, muscle recovery, and sport recovery) and a food meal.

These food meals should include carbohydrate and protein, and go a little lighter on the fats. Visually, we shoot for this meal’s plate to be at least one-half carbohydrates, one-quarter protein, and the remainder filled with colorful vegetables. Healthy fats should be worked into the recipes or added to the meal where possible.

Shawn Arent: I agree with Doug, and I think these are all really good points. If I approach it more from the standpoint of the athletes we work with at the D-I level, I would certainly emphasize the post-workout refueling, especially because they often have to train (or compete) again the next day, and some even train a second time that same day.

That being said, I consider that “meal” to just be part of the training program. I think there are some really economical ways to provide a protein and carbohydrate drink after the training session. Even a few years back, when funds were very limited for one of our teams, they used whey protein and a couple scoops of powdered Kool-Aid for their post-training shakes! I think it came out to about $1 per serving the way we did it.

The important thing to recognize is that many of these athletes will head off to class right after training. If we don’t get SOMETHING into them before they leave the locker room, it is not uncommon for them to go many more hours before ever eating anything.

Because many athletes go to class after training, the meal I’d want schools to provide is breakfast. Share on X

But, again, I consider this part of the session in many ways. If I had to pick one particular meal to provide, I would have to say breakfast. Many athletes get up and run out of their dorms or houses without ever eating before a training session. Also, there is recent evidence to suggest that in athletes, skipping breakfast can impact performance even much later in the day.

When we work with teams that train in the morning or even around noon, this becomes pretty important. In this case, I’d aim for at least 20-40g of protein and 40-80g of carbs (or more, depending on whether the training session is a heavy or light session that day).

Q: Can you give a short summary of the protective effect of creatine in regard to concussions and recovery? 

Douglas Kalman: Creatine is in the early stages of being thought of as potentially protective of the brain—for how the brain works, as well as how well the brain deals with trauma, such as a concussion. We have seen early data showing that creatine helps with oxygenation of the brain (important!) and preserving brain activity in the face of an oxygen shortage, as well as reducing inflammation (also important in the event of a potential TBI).

Further, creatine, which can be used daily and at low doses (such as 1-3 gm a day) has demonstrated the ability to improve the energetics of the brain (may relate to efficiency), while also having a positive impact on mood states. (It has even been researched as an adjunct for depression.)

This mounting, exciting research demonstrates the potential utility of creatine to help minimize the impact of a concussion and possibly be used in the management and recovery from one. As creatine is known as safe, if you are involved with a contact sport and want an extra layer of potential protection, using creatine to support brain health may not be a bad idea.

Shawn Arent: Again, I agree with Doug and don’t have a lot to add, especially regarding the mechanisms. I believe the evidence is compelling enough to warrant using creatine as both a potential prophylactic and post-event treatment. There is interesting evidence for its efficacy with children who suffered a TBI. The benefits of using it far outweigh the risks, in my opinion. Of course, that’s also because there is scant evidence that there are risks!

The evidence merits using creatine as a potential prophylactic and post-event treatment for TBI. Share on X

If the main concern is that the supplement may be tainted, then use a brand that has third-party testing behind it. I’m always left a little confused about the concerns expressed by some related to creatine supplementation. When it comes to concussions, the ability to provide ATP for restoration of brain energetics may be crucial, and that’s one area where creatine shows promise. Coupled with omega-3 supplementation, I think this is an area that really warrants some serious consideration for implementation.

Power Lift Educational Board

Since you’re here…
…we have a small favor to ask. More people are reading SimpliFaster than ever, and each week we bring you compelling content from coaches, sport scientists, and physiotherapists who are devoted to building better athletes. Please take a moment to share the articles on social media, engage the authors with questions and comments below, and link to articles when appropriate if you have a blog or participate on forums of related topics. — SF



References and Study Links for “Creatine and Brain Health”

  1. Improves brain performance in young vegetarians
  2. Creatine and brain creatine levels
  3. Creatine and inborn error of metabolism
  4. Creatine and brain energy levels
  5. Creatine and mood states (depression)
  6. Creatine as an add-on therapy for depression
  7. Creatine and inflammation – interventional study
  8. Creatine reduces muscle damage and inflammation after intense exercise
  9. Potential role for creatine intervention when concussion exists
  10. Creatine as a brain booster – a review paper
  11. Creatine supports better mental performance after environmental stress
  12. Creatine protects the brain during oxygen debt
  13. Creatine improves brain energy levels
  14. Prophylactic creatine, to reduce brain injury chances

Just Jump

How Coaches Can Maximize Their Just Jump System

Blog| ByShane Davenport

Just Jump

Although the popularity of, and excitement over, force plates and contact grids is palpable, the Just Jump contact mat still has plenty of value. Coaches who have the Just Jump system or don’t have a budget for higher-priced equipment can still get a lot of value from the contact mat.

This overview covers what the Just Jump system can and can’t do. In addition to the pros and cons of the equipment, I give some pointers for using the contact mat and suggest what population to best use it for. No matter what jump assessment tool you rely on, you will benefit from the information provided in this article.

About the Just Jump System

The Just Jump testing system is a contact mat that collects air and contact times. Most coaches that use the testing device measure air time when testing vertical jumps. You can also use the equipment for sprint and shuttle tests, but for most coaches, it’s a handy tool for estimating vertical jumps.

The #JustJump tests quickly, and helps us make straightforward decisions for our younger athletes, @ShaneDavs. Share on X

The Just Jump is not a force plate; it’s a mat that knows when an athlete is on it and when an athlete is in the air, but it’s still useful for coaches who want to see changes in their training program. At our facility, we have used the Just Jump System for years to help drive straightforward decisions with younger athletes, and the convenience of quick testing is a perfect fit for us.

Just Jump System Kit
Image 1. A Just Jump system comes with a mat, handheld computer, and, if you need it, a specialized chip for plyometrics. Due to its simplicity and price, coaches still buy and use the Just Jump because they trust the core promise of the equipment.

For the last 20 years, the Just Jump system has been researched for validity and reliability in testing jumps compared to a gold standard. The results are clear—the product is useful for estimating jumping ability, but it’s not the same as a force plate.

Recently, sport scientists conjured up a correction formula to improve the data, and that is especially useful to determine a true jump score. I care about improvement and watch technique carefully to ensure that improvement is coming from the legs getting more explosive, not the athlete cheating by landing with a deep squat. At our facility, we allow a soft landing, but it’s “soft and shallow,” not low and hard.

What the Just Jump Can and Can’t Do

When you buy a system, it’s for ease of use and estimating change in a training program. We use both a contact grid and a force plate with our athletes now, but when we have a mob of athletes and little time for testing, we will use the Just Jump. We also have a Vertec because we want athletes to be familiar with jumping up and reaching, not just performing the strict tests recommended by the scientists.

When we have a mob of athletes and little time for testing, we use the Just Jump, says @ShaneDavs. Share on X

You can calculate the power and forces from a contact mat, but the device doesn’t measure those scores directly. Additionally, you can’t acquire the differences between right and left legs, so if you are doing rehab like us, that will be a major drawback. The Just Jump is also not a tool for horizontal jumping and bounding, and the system has a set amount of jumps it can collect with canned tests such as the 4-jump test. Lastly, the system can’t detect if an athlete is rolling, rocking, or dipping when doing a non-countermovement jump.

A great coach will see it if an athlete is not strict, but automated sensors do help and that’s why force plates are great for detecting a quiet phase. When training in a group, athletes watching strict techniques is helpful not only for jump testing, but any training that requires a pause or isometric contraction.

NFL Combine Vertical Testing

Conventional vertical jump testing is not as valid as jumping with hands on hips or hands holding a rod, but we still like to look at those numbers because they’re more real to athletes trying to rob a home run in baseball or block a shot in basketball. We still do jump tests with more “lab-like” mechanics, but to connect an athlete to testing when they are young, it is important to include a vertical jump with arms. With our Combine athletes, we test using a Vertec and Just Jump at the same time, as it adds a layer of confidence in the training data and prepares athletes for the actual testing they will do on Pro Day.


Video 1. Vertical jumping with arms is a standard test in the NFL, and other organizations using this form of test often include a Vertec. Because the movement has higher variability from the torso and arms, the test is not as reliable as those without arm contribution, but is good to add to a jump testing battery.

We have had plenty of athletes go on to play Division I football, hockey, and volleyball, and some of them have gone to programs that test with force plates. We know that the tests will show data that is very hard to satisfy an uneducated ego, but after testing with different jumping styles, they know that without the arms and a countermovement, their heights will be lower. As with electronic timing and hand times, you should educate the athlete on the differences because they always want the better score to represent what they can do. We are upfront in explaining the differences in technology so nothing is fudged or inflated.

Elastic Rebound Testing

The 4-jump test is popular because it is fast and indicates if an athlete has a good bounce; meaning they are able to use stored energy from their legs. We can tell a lot from this test, but it requires some practice for athletes. We used the 4-jump test to spitball an athlete’s ability to perform plyometric motions, but the test can’t do much more than estimate rebound jump height.

Scores on the 4-jump test will be lower than a contact grid because the mat size is smaller, forcing an athlete to focus on steering just as much as maximal jumping. We like having a restricted space, as it demonstrates a standard form of body control.

Young athletes tend to be a great fit with the 4-jump test, mainly because they are less skilled and less elastic. The power-to-weight ratio factor does make interpretation of the information difficult, as some athletes tend to get bigger and stronger before their ability to store and use elastic energy develops. We like testing more frequently to ensure we are vigilant with the long-term development process, because speed and eccentric abilities are so important. When we see a big discrepancy between the concentric and eccentric scores on the kMeter and with the jump tests, we know that some athletes need special attention paid to elastic development.

The eccentric utilization ratio (EUR) is a solid metric for identifying changes in a season, or whether an athlete needs more plyometrics in their training program. Like the rest of the jump numbers, this calculation is more of a flag than anything else. If we see poor absolute numbers we don’t worry too much about what the athlete needs, as poor power is obvious, but for athletes who have trained for a while, we want to know that both starting speed and deceleration abilities are developed. Athletes with poor eccentric abilities that are fast tend to be talented but underdeveloped. We close the gap by making sure the EUR is solid after putting in the work over a few months.

Universal Jump Tests

You can perform Bosco tests, specifically jumping without arms with and without countermovement, with the Just Jump system. In order to get the most out of the test, the athlete needs to land with a nearly straight leg because the air time starts when the feet no longer apply weight on the mat, and that is near toe-off. When landing, an athlete has to look very similar to the way they looked when they started the jump, otherwise the scores are going to be artificially inflated.

Field-ready reliability is the key to the Just Jump mat, and we like to see real progress in inches, says @ShaneDavs. Share on X

Field-ready reliability is the key to the Just Jump mat, and we like to see real progress in inches, not fractions of an inch. If you want laser precision, actual force is needed, not jump height. Still, a firm protocol and tough coaching will ensure that contact mat numbers are solid enough to make programming decisions. As long as a coach doesn’t cave in, a contact mat like the Just Jump is enough to see obvious development; when it becomes too close to call, other tests are needed.

UML Weight Room
Image 2. Editor’s Note: One of the best users of Just Jump is Devan McConnell from UMass Lowell. He constantly utilizes the reactivity of athletes to ensure his program develops athletes at a steady pace, and he is one of the most resourceful coaches in college athletics.


What is useful with contact mat jumping is speed of testing. Wearables are fine with small groups and unlimited time, but with larger groups like entire teams, it breaks down. With three or four stations, an entire team can test in a few minutes, and this is necessary for in-season training. Some teams have less than an hour to fully train—sometimes less than 30 minutes—so data collection that takes long can defeat the purpose of capturing it in the first place. If you don’t have time to train because you are testing, then the numbers are meaningless because you can’t do anything to intervene.

Test numbers are worthless if you have no time to train, because you can’t do anything to intervene, says @ShaneDavs. Share on X

Reactive Jumping with the Chip

You can assess for Reactive Strength Index (RSI) with force plates and contact grids, but you can also enhance the Just Jump with an external chip that is roughly $70 and needs to be specially ordered. If you are trying to get the RSI, you can use a box about 12-18 inches high and place a hurdle on the other side of the mat. The hurdle encourages an athlete to be both reactive and propulsive, as the small barrier cues the athlete to think about projection and speed off the mat.

We like to see 0.2 seconds or faster, and understand the precision doesn’t need to be perfect to be useful. As long as the athlete performs the task effectively, the contact time is useful. Landing on the mat instead of on the ground beyond the hurdle can get air time, but we like using the hurdles because the movement is better and the athletes look athletic and elastic.

Just Jump Chip
Image 3. Editor’s Note: You can enhance the Just Jump System with a chip change so that additional testing is possible with legacy models. The current system uses a battery and is wired directly to the mat.


Due to the sensitivity of jump testing, fatigue is difficult to discern with jump tests alone, especially when athletes are not motivated to perform their best when the numbers are not part of a reward process. Like screening, fatigue monitoring requires more than just one number alone to determine risk, so we think asking how athletes feel when the numbers are clearly compromised is better than just assuming jump tests are representative of their readiness to lift or sprint.

Further Recommendations

SimpliFaster has published several articles on jump testing and jump training, and a few buyer’s guides on contact grids and force plates are also available. The most important factors for investing in testing are the time involved and the information you receive, not the cost of the equipment.

The most important reason to invest in testing is the info you receive, not the equipment’s cost, says @ShaneDavs. Share on X

Jump testing or any type of testing requires a plan for what to do when you receive the information, and simple testing and a decision tree is a great start. The Just Jump system is a great entry tool for coaches wanting to get data that is both practical and reliable, but you need to know what to do with the data and what the limits of the system are.

Since you’re here…
…we have a small favor to ask. More people are reading SimpliFaster than ever, and each week we bring you compelling content from coaches, sport scientists, and physiotherapists who are devoted to building better athletes. Please take a moment to share the articles on social media, engage the authors with questions and comments below, and link to articles when appropriate if you have a blog or participate on forums of related topics. — SF
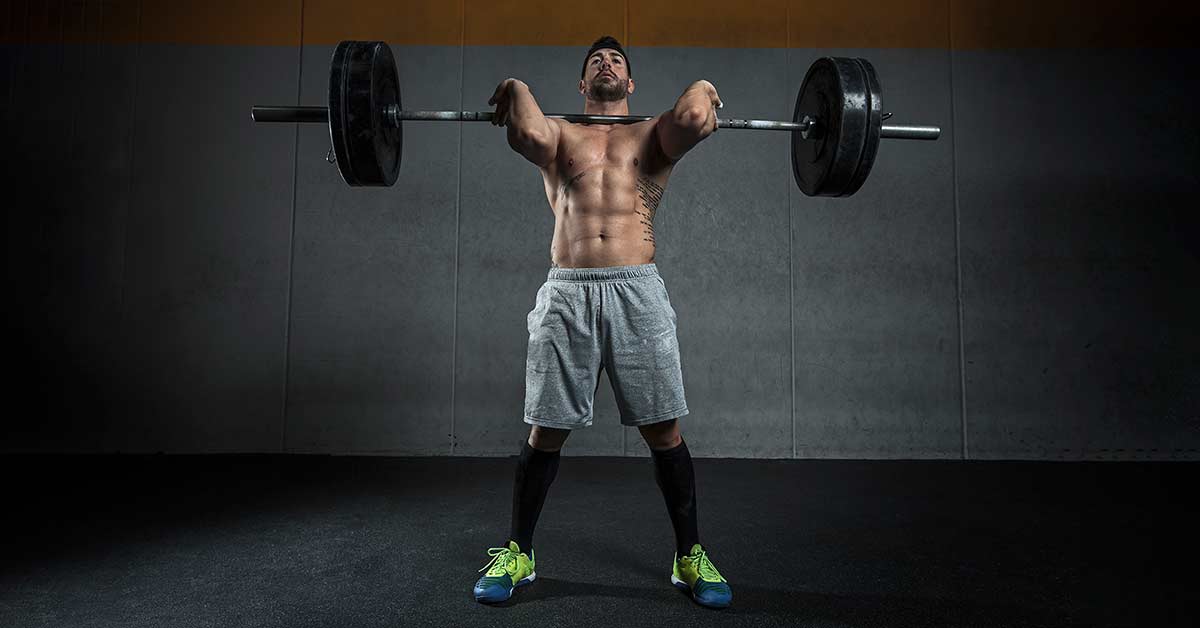


Muscle Growth

Muscle Growth and Strength Training for Sports: How Much and for How Long?

Blog| ByCraig Pickering

Muscle Growth

Increasing muscle mass is an important aspect of training for many sports, especially early in an athlete’s development. Some recent studies, however, have cast some doubt on the legitimacy of earlier research about the importance of hypertrophy, suggesting we might need to examine some of our long-held beliefs in this area.

There’s a very real possibility that increases in muscle size are not particularly well correlated with increases in muscle strength. If true, this could mean that the standard hypertrophy phase of training is less important and may not even need to be programmed in sports where hypertrophy itself is not crucial.

Developing Hypertrophy

In the early stages of athlete development, a coach typically looks for general training-based improvements, the majority of which are often a function of muscle hypertrophy. As such, there is a natural focus on the best type of training required to drive hypertrophy optimally in athletes.

Over the years, it’s become clear that there are a plethora of ways by which we can stimulate skeletal muscle hypertrophy. We can lift heavy loads (>75% 1RM). We can lift light loads (~30% 1RM), provided we get close to muscle failure. We can lift loads in the middle of this range. We can restrict the blood flow to the muscle, allowing us to promote hypertrophy with lower loads, which is crucial during rehabilitation from an injury where higher loads come with an increased risk of re-injury. We can use different contraction types: isometric, eccentric, and concentric. We can lift quickly or slowly. We can alter the frequency, volume, and intensity of training sessions. Provided that the load is sufficient, we can promote muscle hypertrophy.

To Infinity and Beyond: Hypertrophy Timelines and Plateaus

Typically, we think of muscle hypertrophy as a slow process, which is why we believe that the majority of early improvements in strength and hypertrophy programs are due to neural adaptations. But is this actually the case? This is where a recent review—with the Toy Story-inspired title “Muscle Growth: To Infinity and Beyond?”—comes in. It’s yet another paper born from collaborations with various researchers, including Jeremy Loenneke from the University of Mississippi.

These recent papers have been really interesting because they question the underlying assumptions on which training theory is formed—such as Selye’s General Adaptation Syndrome—and bear similarities to the work of my Prof Doc supervisor, John Kiely. “To Infinity” is a review of studies of adult humans using at least three muscle size measurements over time.

Upper Arm and Chest Muscles. The researchers found eight papers that measured changes in the biceps muscle size at multiple time points. Taken together, it appears that muscle size increases after about four weeks of training. In older females or untrained subjects, though, this may take longer. For the triceps, the amount of time appears to be longer, about six weeks. For the chest, muscle size increases after three to six weeks of training.

Leg Muscles. For the quadriceps, muscle growth is often seen after one to three weeks of training. For the older adults, though, some studies show no increases in muscle size after three months; fortunately this is not a common finding in the research and may be related to the methodology used in those particular studies. The same is true for the hamstrings, with significant increases in size reported by the first week of training.

Plateaus. Plateaus—the point where further improvements in muscle size are not seen—varied between the upper and the lower body. For the upper body, a set point in time could not be determined, in part due to studies’ shorter time periods. For the lower body, further increases in muscle size do not occur after 12 weeks of training. Again, there is a dearth of studies that explore longer-term adaptations in muscle size because it’s hard to get participants to adhere to the exercise guidelines for long periods of time.

Increases in muscle size are likely to slow down after twelve weeks, says @craig100m. Share on X

The main findings, then, are that muscle growth plateaus tend to occur after about 12 weeks (although this could be due to methodology) and that skeletal muscle hypertrophy can occur sooner than commonly thought. Both challenge current beliefs and, as such, make this review potentially very important.

Key Variables to Consider

Obviously, we need to examine variations in methodology among the studies here, as the authors point out. As mentioned, many studies simply don’t last for long periods of time, making it difficult to fully understand how muscle hypertrophy may vary over time. There is the possibility—although I’m purely speculating here—that a second, slower, more sustained period of muscle hypertrophy may occur following the initial, rapid, and acute skeletal muscle hypertrophy in reported in shorter studies.

Gender and Age. Additionally, the people participating in the study impact the results. From the research cited in this review, apparently muscle size increases more rapidly in males, potentially due to the greater amount of anabolic hormones. But they also plateau more rapidly when compared to females. It seems age also is a significant modifying factor, with older adults tending to exhibit slower and, in some cases, no improvements in muscle size compared to younger people.

Diet and Emotional State. We also need to consider inter-individual variation, which is a drum I continually like to bang. The diet of the people participating in these studies may limit how much muscle they can grow and how long the process will occur. Are they consuming sufficient protein and calories? Their psycho-emotional state will also impact their adaptations. It’s now well established that non-training stress, such as university exams, can negatively impact adaptations following resistance training. Might these factors come into play here?

Genetics. Genetics is another variable to bear in mind. There are many genes (more precisely, single nucleotide polymorphisms, or SNPs) that can impact both the time course and magnitude of increases in muscle size. It’s a fairly safe assumption that SNPs associated with greater levels of muscle mass may be more prevalent in athletes who are successful in sports and events where increased muscle mass is important. As such, can elite athletes undergo faster levels of muscle growth or extend their muscle growth for longer periods of time without plateauing?

It seems logical that they can. Professional bodybuilders are huge, and it seems unlikely that all this hypertrophy occurred within the first three months of their training. Ok, they’re possibly doped up to their eyeballs, but “natural” bodybuilders (note the quotation marks) are still highly muscular. On a purely anecdotal level, I gained about 7kgs of mass when I transitioned from track to bobsleigh, despite being a well-trained, genetically gifted athlete with a 9-year resistance training background. While I have no doubt this was not all muscle, I know at least some of it was.

Conclusions

So where does this leave us? “To Infinity” is certainly an interesting and very important review. The main take-home is that, despite popular beliefs, skeletal muscle hypertrophy can occur pretty quickly during the first three weeks following the start of a resistance training program. A second consideration is that these increases in muscle size tend to plateau after about twelve weeks. Given the points I made above, we can take this with a pinch of salt.

Nevertheless, it’s certainly true that increases in muscle size are likely to slow down after twelve weeks while increases in strength do not. Anecdotally again, I added 90kgs to my power clean personal best after my first three months of training—although it did take seven years to achieve this. Also, given that the power clean is a highly technical lift, many of these increases in “strength” may have been technical.

As athletes develop, we may want to deemphasize or omit muscular #hypertrophy-based training, says @craig100m. Share on X

Given this new information, as an athlete develops, we might wish to place less—or indeed no—emphasis on specific muscular hypertrophy-based training. Instead we could focus on aspects that are more likely to lead to performance enhancements, including exercises with increased transfer to the competitive movement and special strength exercises. By selecting these exercises, coaches may be able to drive further improvements in well-trained athletes that would not occur when following traditional hypertrophy-centered training.

Since you’re here…
…we have a small favor to ask. More people are reading SimpliFaster than ever, and each week we bring you compelling content from coaches, sport scientists, and physiotherapists who are devoted to building better athletes. Please take a moment to share the articles on social media, engage the authors with questions and comments below, and link to articles when appropriate if you have a blog or participate on forums of related topics. — SF


Iron Neck Athlete

A Neck Training ‘Revolution’ with Iron Neck

Blog| ByMatt Schmit

Iron Neck Athlete

Neck training certainly isn’t a new idea: It’s been in practice for hundreds of years among medical professionals and athletes alike. Applications and methods have varied though, as we’ve gained access to better tools and more information about the human body. Training the neck is instrumental to reducing the rate and severity of sports concussions, but it’s about improving performance as well. In this article, we will share a brief history of neck training and how it relates to athlete health and well-being.

Training the neck is instrumental to reducing the rate and severity of sports concussions. Share on X

The very first neck-strengthening device, “The Head Lifting Machine,” was invented in 1890 by the director of physical training at Harvard University’s Hemenway Gymnasium, Dr. Dudley Allen Sargent. He developed a variety of complex machines to fill gaps left by conventional exercise equipment of the late 1800s.

The next major evolution in neck strengthening came in the 1970s, spurred by Arthur Allen Jones, founder of Nautilus and MedX. Over the course of two decades, Jones released a long line of fitness equipment, including the Nautilus Rotary Neck Machine. Regarded as the godfather of high-intensity training, Jones made resistance training more appealing to the general public and helped fuel the fitness boom of the ’70s and ’80s. Soon afterward, Hammer Strength (founded by Gary Jones, Arthur’s son) and Rogers Athletic Company released their own line of neck training equipment, the most popular of which were their four-way neck machines. Head harnesses also started to become more popular during this time.

The latest innovation in neck training—Iron Neck—was released in 2012, as research studies began to link increased neck strength to decreased risk for concussions. Iron Neck was invented by Mike Jolly, a former football player and wrestler at UCLA. It combines linear and rotational resistance for a more functional way to train the neck and core.

Rehabilitation

More than half a billion people in the world suffer from chronic neck or back pain, accounting for $90B in annual spending in the U.S. alone. These major health issues aren’t going away any time soon. Some common types of injuries that lead to neck pain include: whiplash (motor vehicle accidents, contact sports), repetitive strain (poor posture, tech neck, text neck), nerve pinch injury (neck stinger), disk injury (bulge, herniation), vertebral fracture, and spinal cord damage.

The Academy of Orthopaedic Physical Therapy recently released neck pain guidelines with four classification categories:

  • Neck Pain with Mobility Deficits
  • Neck Pain with Radiating Pain (Radicular)
  • Neck Pain with Movement Coordination Impairments (WAD)
  • Neck Pain with Headache (Cervicogenic)

The purpose of this classification system is to direct intervention toward optimal treatment, based on the individual’s presentation of symptoms. Types of treatment could include stretching, mobilization, manipulation, range of motion (ROM) exercises, stabilization exercises, isometric strengthening, vestibular rehabilitation, eye-head-neck coordination, traction, and transcutaneous electrical nerve stimulation (TENS). More information about the differences in diagnosis and proposed treatments for each classification can be found here.

Injury Prevention

Football players, wrestlers, and boxers have been the most active neck-strengthening participants (among athletes) over the past several decades, though each is motivated by a different reason. The primary concern in football (and hockey and rugby, as well) has been to reduce neck stingers and other cervical spine injuries. For wrestlers, it can often be the difference between winning and losing. A player can leverage a strong neck as an extra joint to gain position against an opponent, facilitate take-downs, and reduce risk of choke. The focus for boxers has been to reduce whiplash, concussion risk, and traumatic brain injury (TBI), such as chronic traumatic encephalopathy (CTE).

Originally termed “punch drunk syndrome” due to its association with boxers, then later dementia pugilistica, CTE is a form of neurodegeneration believed to result from repeated head injuries. The movie Concussion highlighted the resurgence of CTE after Dr. Bennet Omalu identified the disease in Mike Webster, a former offensive lineman for the Pittsburgh Steelers, during his autopsy. Since 2005, more than 300 cases of CTE have been discovered; most are reported to have come from tackle football.

Concussion
Image 1. Traumatic brain injury (TBI) is a real problem in many sports, even at youth levels. While American football is an especially high-risk game, all sports should consider neck training.

The number of reported concussions has doubled since 2002, with nearly four million sports-related concussions occurring in the U.S. every year. This, coupled with the long-term risk of CTE, has garnered increased attention in the media and scientific community. Research around concussion diagnosis, treatment, and prevention is increasingly popular. Several studies over the past decade have shown an inverse relationship between neck strength and concussion incidents.

Nearly 4 million sports-related concussions occur in the U.S. every year. Share on X

In 2014, the Journal of Primary Prevention published a study that tracked 6,700 high school athletes in boys’ and girls’ soccer, basketball, and lacrosse over a 2.5-year period. Researchers captured anthropometric measurements, athletic exposure data, and concussion incidents. After adjusting for gender and sport, neck strength remained a significant predictor of concussion (p = 0.004). For every 1-pound increase in neck strength, odds of concussion decreased by 5%. (Collins et al., 2014)

Note: This study did not incorporate neck strengthening to see how increased neck strength impacts concussion risk. Rather, it looked at the neck size and strength of a large group of high school athletes and retrospectively analyzed that data based on the occurrence of concussions.

Rotational Acceleration

Digging deeper, rotational forces have been revealed as an important, yet often overlooked, aspect of concussions. One of the lead researchers in the 2014 study, Dawn Comstock, clearly explains the neck’s involvement in reducing concussive forces that reach the brain:

“As the head rocks back and forth, it’s also twisting a little on the brain stem, and it’s those accelerative and rotational forces as the brain is impacting inside the skull that are really what’s causing these concussions. A stronger neck means you’re reducing those accelerative and rotational forces.”

Consequently, the National Operating Committee on Standards for Athletic Equipment (NOCSAE) is implementing a new helmet standard that goes into effect in November 2018. The new test will incorporate a “neck” that allows the head in the test to twist and move in all directions, whereas the old helmet test only measured the linear force experienced by the head. Dr. Robert Cantu, renowned neuroscientist and NOCSAE Vice President notes, “If you take a blow to the side of the head, you are going to spin the head on the neck. It’s the type of injuries that lead to concussions.”

Iron Neck

Mike Jolly invented Iron Neck as a response to the impact CTE had on former teammates and the rise of concussions in young athletes. Jolly began investigating ways to prevent concussions and focused on two growing areas of research:

  1. Neck training as a proactive measure to reduce concussion risk.
  2. The increased threat of rotational forces on the brain.

He reasoned that if an athlete could train the neck to slow head acceleration upon impact (i.e., reduce whiplash), that would reduce the risk of a concussion. As a certified trainer, strength coach, and former fitness gym owner, Jolly also knew the importance of making the training functional and dynamic.

Many neck training modalities are effective at creating strength through concentric training, but only in four linear directions. Iron Neck’s unique design allows coaches and athletes to increase neck strength dynamically in every position so they’re better prepared for the unpredictability of contact sports.

Iron Neck’s design allows athletes to increase their neck strength dynamically in every position. Share on X

The Iron Neck machine is worn on the head and has a proprietary fitting system that includes an inflation system and adjustable head strap to hold it in place. It works through two forms of resistance, linear and rotational. Linear resistance can be applied via a resistance band (increasing in difficulty as the band is stretched out), cable pulley machine, performance trainer, or flywheel training device. Rotational resistance is applied through a disc-braking system (fully adjustable on the Iron Neck Pro model), which creates a very dynamic and functional way to strengthen the neck.

Iron Neck System
Image 2. The Iron Neck machine prepares the neck to be both responsive and resilient to forces from multiple directions. Training with the Iron Neck is simple, effective, and challenging for athletes.

There are three models to choose from: Pro (adjustable rotational resistance), Varsity (low, fixed rotational resistance), and Home (no rotational resistance). Each is available in Standard (fits up to 80th percentile) or Large size options. It’s completely portable and attaches to existing equipment or infrastructure, so there’s no additional footprint in the gym.

An added benefit of Iron Neck is the ability to engage the core throughout the training. Since the lever point is at the top of the head, the entire kinetic chain is constantly engaged, increasing balance, stability, and coordination. For advanced training, you can add a medicine ball, kettlebells, or band pull-aparts to target additional muscle groups.

An added benefit of Iron Neck is the ability to engage the core throughout the training. Share on X

While Iron Neck originally started at $1,000 and 13 pounds, it is now half that price, weighs just 3 pounds, and is comfortable enough for 60-somethings to use at home or in physical therapy clinics. “The technology is the same but the product has been completely redesigned. What we have been really good at these past six years is listening to our customers and improving the product based on their needs and their ideas. Improving the fitting system to be more comfortable on the head has also made female athletes more interested and open to introducing it into their training programs,” says Jolly.

Being Responsible Means Taking Action

There are still many unknowns about CTE, including its exact relationship with concussions and its prevalence across different sports. However, one thing is certain: Reducing whiplash and head acceleration (both linear and rotational) reduces damage to the brain. The best way to diminish whiplash and head acceleration is to develop a stronger neck, the body’s built-in shock absorber for the brain.

Female Athlete Neck Training
Image 3. Female athletes should have the same top-quality injury resilience programs as male athletes. Concussions with female athletes are a major problem in team sports, specifically soccer.

The first time someone is introduced to neck strengthening is often for rehabilitation after an injury, whether that’s from repetitive strain or whiplash/concussion. The majority of athletes aren’t doing anything to strengthen their necks. An intervention is desperately needed, particularly for female and youth athletes. Studies have identified thinner, weaker necks as a reason these athletes sustain higher concussion rates. On average, females have half the neck strength as males and suffer almost double the number of concussions in comparable sports.

Most athletes aren’t doing anything to strengthen their necks—an intervention is desperately needed. Share on X

SimpliFaster: Iron Neck is currently being used by hundreds of professional teams, schools, MMA gyms, first responders, military pilots, race car drivers, and physical therapy facilities, across 25 countries. Take advantage of Iron Neck’s “Back to School” sale for up to 25% off your order. The promotion ends September 15, 2018.

(Athlete photos credited to Robert Sherman)

Since you’re here…
…we have a small favor to ask. More people are reading SimpliFaster than ever, and each week we bring you compelling content from coaches, sport scientists, and physiotherapists who are devoted to building better athletes. Please take a moment to share the articles on social media, engage the authors with questions and comments below, and link to articles when appropriate if you have a blog or participate on forums of related topics. — SF


Hockey Players

Load Monitoring and Empowering Change with Justin Roethlingshoefer

Freelap Friday Five| ByJustin Roethlingshoefer

Hockey Players

In addition to operating The Hockey Summit, Justin Roethlingshoefer is currently the strength and performance coach for the San Diego Gulls of the American Hockey League. He supervises the club’s strength and conditioning program for all players. He also conducts all the fatigue and data management for the Anaheim Ducks of the NHL and sends reporting to the head strength coach, Mark Fitzgerald. Previously, Justin has worked with the Edmonton Oilers, Columbus Blue Jackets, Hockey Canada, University of Louisville, and Miami University.

Freelap USA: How do you apply the concept of “develop and educate” with your athletes at The Hockey Summit, and how does the educational component of your core philosophy push those athletes to take greater ownership of their long-term training and performance goals?

Justin Roethlingshoefer: The biggest thing I focus on right from the get-go with all my athletes is getting them past the thought that technology or feedback is meant as a punishment, or something other than just wanting to hold them accountable and help them buy in to what we’re doing. A lot of my philosophy is based on quantifiable feedback, so it’s a lot of data, a lot of tracking, a lot of monitoring, a lot of being able to compare. Not just video, but also power numbers, force numbers, those types of things.

I focus right away on getting athletes past the thought that technology or feedback is a punishment. Share on X

Being able to quantifiably see and compare where guys were and where they’re going is, again, something that I think really helps with the buy-in factor. That helps them become autonomous and make those wiser, better, healthier decisions that over time will help them with their long-term development.

I always assume that each athlete I work with is doing this because they want to and not because they have to. At this level, the kids I work with don’t have to be with me. They don’t have to come and train. Obviously, they know it’s what they need to do for their careers, but I hope they want to do it for themselves, too. Ultimately, the more information they have helps them make a living at the game they love.

Freelap USA: In terms of producing measurable results, how do you apply technological tools and data to drive and support decision-making, rather than simply collecting data for the sake of collecting it?

Justin Roethlingshoefer: What we do is start every day with a resting heart rate, a Wattbike six-second sprint, and a long jump with the 1080. So, from both the Wattbike and the 1080, we get peak power numbers. On top of the resting heart rate, we also get the lowest heart score over the course of that time.

We do it at the same time every day, usually around 8:30 a.m., and what we get from it is a series and set of data that we can now look at in terms of CNS function and firing, as well as the autonomic nervous system. By being able to look at those two factors, we can see: a) where we’re at from a recovery standpoint; and b) whether we’re becoming more or less powerful, or whether we’re entering a fatigue state that we need to back off of.

From Monday to Tuesday, it’s not uncommon for us to see a dip in peak power. Why? We’re fatigued from Monday still. No problem. Wednesday is always our recovery day; a day we focus on getting guys on the table, the NormaTecs, we’re focused on what we need to do to help the guys recover. Steam room, sauna, massages—that type of stuff. If, on Thursday, we come back and the numbers are still down, that starts to be a bit of a red flag that we watch. We don’t necessarily change anything, because we’re not going to make decisions based on a knee-jerk reaction.

By Friday, hopefully we’ve stabilized because we’ve got one more day underneath us. If we come back the following Monday and the numbers are still down? Okay, now we need to change something with this individual.

Over the course of 8 weeks, we’re turning our guys into much stronger and more powerful athletes. Share on X

Is our volume too high? Is the intensity that we drive with this individual too high? Do we need to back off in certain areas with certain sets and exercises? Or, are we just not focused on the right things? Should we have a strength focus with them instead of some of the power work that we do? Do we need to change up something we’re doing in a different realm, on the ice or off the ice, playing with the balance part of it?

Theoretically, we should get a dip from Monday to Tuesday, Wednesday is a recovery day, we should be able to come back with our baseline levels from the previous week on Thursday, with maybe a slight dip Friday. On Monday, we’re supercompensated and should be higher than we were the previous Monday. So, over the course of eight weeks, we’re seeing increases every single week, week to week to week, and we’re turning our guys into much stronger and more powerful athletes.

Freelap USA: Another important concept in your coaching is to “empower change.” How does emphasizing this goal drive your athletes to transcend the status quo and pave the way for growth and results?

Justin Roethlingshoefer: A lot of it is the culture that we situate them in. Down here at The Hockey Summit in Florida, the culture when you step in with the group of players that I have, even when new guys come in…it’s amazing how much culture aids in what we’re striving to do.

A perfect example of this is that I’ve had three or four guys come in just this past week and say: “I can’t get over how every single guy comes in in the morning, throws their heart rate monitor on, makes their protein shake, eats breakfast, gets on the table and works with a therapist, all on their own!” I don’t have to say a thing. I’ve laid out where everything is for them, and the guys just use it.

Why? It’s not because I told them they have to. It’s because the culture that we’ve created here is all about them. It’s all about what can we do for them as a player to help get them to the next level, to help get them that next contract, to help get them another two to three years out of their career, and really help drive that development.

We’ve got kids as young as 18 who were just drafted and players as old as 36 who have four kids and a wife and are hoping to play another year or two. So, we have a large spectrum of players who are each on their own individual programs and all come from different walks of life, and they’ve developed this culture based on us meeting what they individually need.

Freelap USA: How do you adapt your core philosophies to match the needs of athletes in different phases and situations, whether they are private clients training with you in the off-season, athletes hoping to secure a roster spot in pre-season, or professionals trying to round into playing shape?

Justin Roethlingshoefer: The philosophies don’t change. The philosophies stay with a quantifiable, measurable feedback model, where everything is based off power metrics, heart rate metrics, survey metrics, and recovery heart rate metrics, and what we then do is take a look at that person as an individual and what they need. Obviously, their training age comes into account, their injury history comes into account, any movement dysfunctions that we find out from their 3D image body scan comes into account, and from there, we train them as an athlete.

No matter the athlete, our philosophies stay with a quantifiable, measurable feedback model. Share on X

We’re not training them as a hockey player; we’re training them as an athlete. We need them to move better, we need them to be stable, we need them to be able to absorb force. And those philosophies don’t change whether you’re 18, 25, or 35. Those are all the same things. However, the way we accomplish that goal changes based upon their limitations and their individual needs.

Freelap USA: What was your inspiration for launching The Hockey Summit? How do your coaching philosophies, programming methods, and holistic approach to nutrition, recovery, and more all come together under that umbrella?

Justin Roethlingshoefer: The biggest issue from my own playing days was identifying and ultimately getting it set up where I had everything—on-ice, off-ice, nutrition, recovery—kind of laid out for me. During my time at Miami, I had a group of players who were going on to play in the NHL and they said, “Can you put something together for us?” So, The Hockey Summit was kind of born out of that.

I wanted to make a holistic, all-inclusive environment where I look after their housing, I look after their cars, we do a DNA nutritional analysis, and we have concierge meals set up for all the guys so that they have meals according to what the DNA analysis says. We have the on-ice looked after with skills and skating. We have the weight room looked after with all the technology and tracking data that I use to administer tracking both before lifts, as we talked about, and within lifts, from heart-rate monitoring to bar speed analysis to force plates to the 1080 Sprint.

From the recovery aspect, we do yoga twice a week. We have massage therapists, chiropractors, and dry needling guys there every single day for these guys. There are NormaTec recovery lounges for the guys. There are infrared light beds, steam rooms, and saunas, fully at their disposal. Having that all-inclusive environment is something I would have killed for.

We take care of the timing, schedule, and running around so athletes get to really rest and recover. Share on X

Also, making sure that they get all their work done in the morning by 1:00 or 1:30 p.m., so the guys can golf, go to the beach, sit at the pool—wherever helps them actually rest and recover. Because, mentally, that’s one of the biggest grinds: juggling the timing and schedule and running around. Mentally, you get to the end of the summer and you’re like, “Oh my God, I’m feeling like it’s been an absolute grind.”

I’ve got guys down here that are with me for five, six, seven, eight, nine weeks, and at the end of it they’re like: “I am ready to go. I feel absolutely phenomenal. I feel fresh. I don’t feel like I’ve been training all summer, but I’m in absolutely the best shape and as best prepared as I’ve been.”

Since you’re here…
…we have a small favor to ask. More people are reading SimpliFaster than ever, and each week we bring you compelling content from coaches, sport scientists, and physiotherapists who are devoted to building better athletes. Please take a moment to share the articles on social media, engage the authors with questions and comments below, and link to articles when appropriate if you have a blog or participate on forums of related topics. — SF


Athlete Concussion

Concussion Confusion in Youth Sports: A No-Brainer?

Blog| ByDr. Steve Horwitz

Athlete Concussion

Concussions are THE safety issue in sports today. Set up a Google Alert for “concussion” and your inbox will soon fill with articles like my inbox does every day. These articles discuss everything from research, laws, foundations, and new technology to professional sports concussion protocols, injuries to athletes, CTE, and the ongoing and contentious debate about youth tackle football. There are vocal advocacy groups on each side of the fence and they frequently support their points of view with incomplete information at best, and misinformation and frank denial at worst.

We have all watched professional athletes get injured. How many times have you seen a player get hit hard and not move (for at least a few moments), then grab his/her head, and though wobbly and clearly “out of it,” that player is allowed back into the game?

Most recently, in 2018 World Cup play, Nordin Amrabat collided hard with another player. His left shoulder was hit and this wobbled his head. His face clearly impacted the turf and he immediately exhibited the fencing response (concussive convulsion). He was dazed and stayed down for over 10 seconds. He was then helped up and was so wobbly that he braced himself on the trainer. He was “out of it.” Unfortunately, he was then slapped in the face by the trainer and an athlete sprayed water on him (from his water bottle).

To make matters worse, he returned to full play only five days later, wearing a headband that he only wore briefly and then removed.

Watching how these “concussions” or “possible concussions” are managed at the professional level leaves us with more questions than answers. The management of these injuries at even the highest levels of sports is fraught with indecision and poor decision-making. Concussion protocols differ from sport to sport and non-compliance with a sport’s own protocols is a frequent occurrence.

The way possible #concussions get managed at the pro level results in more questions than answers, says @DrHorwitz. Share on X

On top of this mismanagement, the reports of these injuries feature sensational headlines and a spiderweb of confusing and inaccurate terminology. So, let’s make sense out of this. Let’s say you are a youth coach with no medical personnel on the sidelines. What do you do?

Policies, Protocols, Pamphlets, and Laws Are Not Enough

Medical papers on concussions discuss protocols for remove from play and return to play. These are important because all kids must be removed from play if a concussion is suspected—“if in doubt, take them out”—and not returned to play until properly examined and given medical clearance. However, a review of the multitude of youth concussion lawsuits and discussions with the attorneys, expert witnesses, and legal professors involved all make one word very clear: Communication.

The Case of Robert Back

I will use the case of Robert Back, a 16-year-old football player from Montana, to illustrate both the medical and legal aspects of proper concussion management.

Robert lived with his father and stepmother, and attended Belt High School, where he was on the football team. The team had an athletic trainer (AT) provided by a local hospital system.

The Montana Concussion Law was signed in 2013, before Robert got hurt. It is named for Dylan Steigers, a 21-year old East Oregon University football player who died in a scrimmage. After an impact, he walked off the field and vomited. An ambulance was called and he died a day later. Like most concussion laws, the Montana law stipulates:

  1. Educational material must be provided to parents and athletes, and must be signed.
  2. Coaches must take a concussion course annually (this differs from state to state).
  3. If a concussion is suspected, the athlete must be removed from play.
  4. The athlete cannot return without a doctor’s clearance to play note.

The Montana High School Athletic Association and Belt High School concussion policies both followed the Montana State Concussion Law.

Sometime before September 2014, the Back family received the concussion education sheet and the elder Mr. Back signed it. He later stated that he did not read the sheet.

Sept. 5, 2014 (Friday): Robert Back played in an away high school football game and sustained a concussion. He did not report any symptoms to anyone.

Sept. 6-7, 2014 (Saturday-Sunday): Robert experienced nausea and headaches and was brought to the ER that evening by his stepmother. He was diagnosed with a “minor closed head injury.” He was sent home with discharge papers saying he should refrain from playing football until cleared by a physician. His father did not read the discharge papers. Robert continued to be symptomatic on Sunday.

Sept. 8, 2014 (Monday): Robert called his father at work to tell him he did not feel well. He vomited while in the shower. His father called the school and told them Robert would not be in attendance.

Sept. 9, 2014 (Tuesday): Robert went to school but did not go to practice.

Sept. 10, 2014 (Wednesday): Robert’s father took him to see a clinic doctor. The doctor verbally told his father that Robert was not to play football until Sept. 15. The doctor gave him a note saying the same, but the father denied reading it. The doctor stated that each school has its own return to play policy. The Back family said Robert went to school and gave the note to the coach, but the coaches denied receiving the note. It was the family’s understanding that Robert would not play in the upcoming Sept. 12th game.

The AT told the head coach to give Robert an ImPACT test. The coach administered a “pre” test.

Sept. 11, 2014: Robert participated in a non-contact practice, during which he reportedly exhibited confusion and disorientation.

Later that day, the AT reviewed the ImPACT test results and emailed the head coach, stating that Robert “looked OK concussion wise.” The coach interpreted that statement to mean that Robert was cleared to play.

Sept. 12, 2014: Robert was cleared by the coach/trainer to play in that night’s game. He played in the game, and his father was in attendance. Robert “did not sustain any big hits,” yet he collapsed on the sidelines after halftime. An ambulance took him to the hospital, where he had an emergency craniotomy. He is now a quadriplegic who needs 24/7 care.

TeamSafe™ Sports: A Youth Sports Safety System

When examining the timeline of the Robert Back case, you can see the breakdowns in documentation, communication, and oversight. The goal of a system is to address each of these breakdown points with an actionable tool. Enter TeamSafe™ Sports.

The TeamSafe™ Sports platform addresses each point as follows:

  1. The parent registers his/her athlete(s) and must report any prior concussions and baseline testing.
  2. The parent is provided with the most up-to-date concussion education sheet and must attest to reading it and sharing it with their child. The organization now has this documented and no administrative work is required.
  3. The head coach must create an emergency action plan for his/her team following an easy template that assigns each duty to a coach and/or parent.
  4. The organization administrator may add any required education courses to a web portal. The course information with a “complete by” date is emailed to the coach and there is an in-app notification as well. The TeamSafe™ coach certification course covers brain injury, as well as topics like sudden cardiac arrest, heat injuries, anaphylaxis, asthma, seizures, skin infections, bleeding, broken bones, and more.
  5. The coach can see a roster of his/her team(s) and if any athlete has a medical issue or prior concussion, or is taking any medications, a medical alert is highlighted.
  6. If there is a suspected concussion (impact plus one sign/symptom), all signs and symptoms can be quickly toggled and the coach can tap “remove from play.” An immediate text and email is sent to all stakeholders. This notification states that the athlete was removed from play and must be carefully observed for the next 72 hours. “What to do next” information is provided as well, and is reviewed below. A concussion report is generated and placed in the athlete’s profile, with the date, time, person who removed the athlete, and documented signs/symptoms.
  7. The athlete’s roster entry is highlighted in bright yellow with the words REMOVED FROM PLAY.
  8. It is then the parent’s responsibility to bring their child to the doctor to get examined. When the doctor provides a note, an image of the note can be taken and uploaded into the system. Another immediate text/email is generated, which states that the athlete has seen the doctor and lists the date on the note. If there is no “return” note, the notification states that the athlete must return to the doctor for follow-up. The athlete’s roster entry is changed with this information. The concussion report is updated with the doctor’s note and return date. The platform even has a suggested doctor’s note template based on all 50 states’ (and the District of Columbia’s) high school concussion return notes. This note simplifies the process for the parent, administrators, and doctor.
  9. The administrator can follow each step of this protocol from the web portal and view the note to confirm the date and authenticity of the note. (Yes, authenticity is a big issue in youth sports.)
  10. Once the administrator verifies that all the information is valid, he/she provides the final “clearance.” The athlete roster is once again updated to note the clearance date, and this is not removed until the date of the clearance. Another notification stating that the administrator has cleared the athlete is sent.

Risk Management

Many attorneys were consulted during the development of TeamSafe™ Sports. One recently explained, you “can’t change the liability by not adopting standards – it’s there whether they want it or not. If I’m looking at the case and they don’t have any procedures or protocols it’s going to make them look worse. They’re going to be bound by what’s out there anyway for why didn’t they take the time to show they cared and they wanted safety procedures and policies.”

The purpose of any risk management policy is to provide a consistent and effective approach to addressing risk, and make all attempts to avoid harm, protect the organization, and protect the athletes.

Risk assessment questions to consider carefully are:

  • What could go wrong?
  • What is the likelihood that each identified risk will occur?
  • What can reasonably be done to reduce the severity, likelihood, or impact of these risks?
  • If something goes wrong, how do you respond?
  • What is the effect on the organization if a loss occurs (financial, reputation, future viability, etc.)?

Emergency Signs and Symptoms

Know how to identify a problem. These signs and symptoms require immediate medical attention.

  • One pupil larger than the other.
  • Drowsiness or inability to wake up.
  • A headache that gets worse and does not go away.
  • Slurred speech.
  • Weakness, numbness, or decreased coordination in arms and legs.
  • Neck pain or tenderness.
  • Dizziness.
  • Repeated vomiting or nausea.
  • Convulsions or seizures (shaking or twitching).
  • Change in behavior.
  • Increased confusion, restlessness, agitation, irritability, or combativeness.
  • Unable to recognize people or places.
  • Less responsiveness than usual.
  • Will not stop crying and cannot be consoled.
  • Loss of consciousness (passed out/knocked out). Even a brief (~1 second) loss is an emergency.

Return to Play Guidelines

After a possible concussion, the return to play decision should be made very carefully and with the help of a “return team” that includes the athlete, parents, coaches, administrators, and medical professionals. The consensus statement on concussion in sport—from the 5th international conference on concussion in sport—has the most recent guidelines for sports concussion management and explains the return process.

For youth athletes, the return process includes Return to Learn (School) and Return to Play (Sport). Each of these is a multi-step process that is best overseen and reviewed by the entire return team. Both sets of protocols have similar instructions:

  • Move forward to the next stage only when symptom-free for 24 hours. If symptoms re-appear, go back to the previous stage and make sure symptoms vanish. Contact your physician or seek medical help immediately if symptoms worsen.

Return to Learn Stages

Stage 1: No School

  • No television, video games, computer use, phone, texting or loud music.

Stage 2: School Part-Time – Maximum Adjustments

  • Half-day attendance with appropriate academic adjustments.
  • No homework or testing.

Stage 3: School Part-Time – Moderate Adjustments

  • Full-day attendance with appropriate academic adjustments.
  • Limited homework (does not cause symptoms to return) and no testing.

Stage 4: School Part-Time – Minor Adjustments

  • Full-day attendance with no academic adjustments.

Stage 5: Full-Time School with no special accommodations

Return to Play Stages

Stage 1

  • Aim: Symptom-limited activity.
  • Activity: Daily activities that do not provoke symptoms.
  • Goal: Gradual reintroduction of work/school activities.

Stage 2

  • Aim: Light aerobic exercise.
  • Activity: Walking or stationary cycling at slow-to-medium pace. No resistance training.
  • Goal: Increased heart rate.

Stage 3

  • Aim: Sport-specific exercise.
  • Activity: Running or skating drills. No head impact activities.
  • Goal: Add movement.

Stage 4

  • Aim: Non-contact training drills.
  • Activity: Harder training drills; e.g., passing drills. May start progressive resistance training.
  • Goal: Exercise, coordination/thinking.

Stage 5

  • Aim: Full contact practice.
  • Activity: Following medical clearance, participate in normal training activities.
  • Goal: Restore confidence and assessment of functional skills by coaching staff.

Stage 6

  • Aim: Return to sport.
  • Activity: Normal game play.

Supervision and Oversight

If you do not have medical staff to supervise the stages, the parent can do it by using the appropriate Concussion Symptom Evaluation form each day of each protocol. As long as the score does not go up after the initial 24- to 48-hour period, the athlete can advance to the next stage.

In the school environment, the athletic director/principal will have oversight, but the medical staff guides the return process and decision. In the league/club world (no medical staff), we provide the administrator with full oversight (validity and meaning of date on the doctor’s notes) and final clearance approval.

Addendum 1: A Note on Baseline Testing

A 2018 paper looking at the validity of baseline testing found a “growing concern about the validity of baseline test results — meaning there’s concern over the degree to which the scores on these baseline tests actually reflect an athlete’s true cognitive ability…These findings suggest that the rates of invalid performance on baseline testing may be alarmingly high.”

Dr. Douglas Comeau, an assistant professor at Boston University School of Medicine, summed it up by saying, “PCPs [primary care providers] need to know that the younger a patient is, the less valid the results may be.”

“There were multiple points of failure through this whole case, but there were so many opportunities to do this right.” ~ Dr. Michael Collins (Director of the sports medicine concussion program at University of Pittsburgh Schools of the Health Sciences.)

This case makes it clear that sports organizations must have well-defined policies and provide education to coaches and parents. Yet, without a system of real-time communication and administrative oversight, even the best policies can fail.

Back up well-defined policies with a system of real-time communication and administrative oversight, says @DrHorwitz. Share on X

System-wide failures occurred at many points, but the key areas revolve around both doctor’s notes. If these notes were immediately documented and stored (via a simple picture) and immediately communicated to all stakeholders in real time (via text/email), then it is much more likely this outcome could have been changed.

As this reporter stated, “I sincerely hope this case is talked about every year at the beginning of any sports season, because if no one learns from this case we will surely be back in court again writing the same stories about more paralyzed young men and women who suffered the consequences.”

Addendum 2: Symptoms of Concussion

  • Headache and/or head pressure
  • Neck pain
  • Feeling like going to vomit
  • Nausea
  • Dizzy
  • Blurry vision
  • Double vision
  • Slurred speech
  • Radiating pain in arms or legs
  • Numbness/tingling in arms or legs
  • Sensitivity to light
  • Sensitivity to noise
  • “I don’t feel right”
  • “I can’t think clearly”
  • “I feel sluggish, groggy”
  • “I feel very tired”
  • “I feel nervous”
  • “I feel sad”
  • Memory loss

Signs of Concussion

  • Hard collision
  • Loss of consciousness
  • Slow to get up
  • Balance/unsteady walk
  • Falling to the ground
  • Holding head
  • Dazed or confused
  • Blank or vacant look
  • Facial cut and/or bruise
  • Seizure (fencing response)
  • Change in behavior
  • Vomits
  • Irritable
  • Inability to stop crying
  • Answers questions slowly

Since you’re here…
…we have a small favor to ask. More people are reading SimpliFaster than ever, and each week we bring you compelling content from coaches, sport scientists, and physiotherapists who are devoted to building better athletes. Please take a moment to share the articles on social media, engage the authors with questions and comments below, and link to articles when appropriate if you have a blog or participate on forums of related topics. — SF


Male Pole Vaulter

Critical Indicators for Pole Vault Part I: Mid-Marks

Blog| ByNoah Kaminsky

Male Pole Vaulter

Good coaches provide technical feedback that helps their athletes improve upon previous performances. Great coaches simplify technique, rely on a few critical indicators to assess, and provide individualized feedback, where they can be most confident and effective. Pole vault has a few exceptionally powerful indicators that will help you coach it successfully.

Mid-marks are a simple, yet effective way to predict the success of a jump and provide immediate feedback to the athlete. Certified coaching instructors teach the requisite knowledge of theory and practice for your event, but then they also tell you to find your personal style.

Mid-marks do not qualify as personal style. Mid-marks are effective, they are individualized, and they are critical to coaching the vault. Find other technical components of the vault to apply your personal style. Other critical indicators for pole vault include drill proficiency and hip movement. In this article, I focus on mid-marks and will address the other two indicators in forthcoming articles. For now, let’s understand mid-marks and discuss their benefits.

Sequence of Mid-Marks

In the following sequence, pole vault coaches should become proficient in addressing:

  1. Pole carry
  2. Run
  3. Plant
  4. Take-off
  5. Air mechanics

Your athlete must become proficient in this sequence, too. Therefore, Run becomes the first critical indicator for the event. Similar to any other jumping event, when the steps are off, the jump is off. Get the steps right, get the jump right. “Catching their mid” will address runway challenges so that the athlete can adequately set up their plant and take-off.

What Are Mid-Marks?

Mid-marks are a diagnostic measurement for the coach to assess the quality of an athlete’s plant and take-off. Mid-marks can be used generally and individually. In general, they help determine a new athlete’s approximate approach and grip, and they become more useful when applied individually.

From a 6-step approach, a mid-mark is the position of an athlete’s 6th stride on the runway, or their 3rd left step. For example, Craig’s 6-step approach starts at 82’ back from the box. His left foot will touch down six times on the runway before he takes off and attempts to clear a bar. Craig’s mid-mark is the position on the runway where his left foot touches down for the 3rd time during his approach. A reasonable mid-mark for Craig would be 52’ in this case. For someone who is a lefty, you would use their 3rd right step. Once you know how to “catch their mid,” you can use this measurement to address the athlete’s plant and take-off.

When an athlete has been in a coaching system for a long time, they should know their mid-mark and its progression in a given practice session, performance, or season. Mid-marks progress further back down the runway as an athlete matures and improves.

How to Use Mid-Marks

Regardless of pole vault style or model, mid-marks are useful data for all vaulters. When a vaulter hits their mid, it’s reasonable to expect that they will be set up for a good jump. Let’s consider some less than ideal mid-marks on the runway.

In the past few weeks, Amanda has typically hit a 42’ mid. Today in practice, Amanda consistently hit her mid-mark until her 7th jump. Amanda was under by about a foot and hit a 41’ mid-mark. Either:

  1. She needs a higher drive knee in the first step to correct her over-extended first stride, which caused her to be too far under the pole on take-off—this adjustment emphasizes gradual acceleration during the approach; or
  2. She needs to move back a half-foot because her first step was fine; she has loosened up from her warm-up and her previous jumps, and she’s taking longer strides that must be accommodated.

For option 2, I would encourage only a half-foot back adjustment to see whether Amanda remains under the pole again on her next jump. It’s not going to be obvious from one jump that she needs to move back the full foot. It’s important to use the next few jumps to assess how well Amanda will be set up for plant and take-off.

Now, consider Max, whose mid-mark is 48’. Max takes 15 jumps and has moved back a foot over the course of practice, but he’s still hitting a 48’ mid and his jump looks good. On Max’s 16th jump, he hits a 50’ mid and gets stood up by his pole on take-off. Max will either need to:

  1. Grip up and jump up because his run looks good and he’s moving the pole exceptionally well; or
  2. Extend his left arm more and jump up; or
  3. Move up a half-foot because he’s fatigued from his prior jumps and his stride has shortened slightly.

It’s the coach’s responsibility to assess the athlete based on the objective data available as well as a more subjective context. A good coach will know what’s necessary to create the best possible runway for their athletes. If Amanda often goes out too small, then a bigger first step will best support her. If Max has stronger arms than legs, it may be best to move him inward for the end of his practice session. Even the best vaulters put together relatively poor attempts when they’re outside their mid—over or under.

Why Should Athletes and Coaches Rely on Mid-Marks?

It’s hard to observe speed. Human eyes can observe relative speed easily, but absolute speed is much more difficult to see. Mid-marks help you measure speed.

When Amanda hit that 41’ mid in option 2, she sprinted faster because her nervous system was firing and her muscles had warmed up. Her speed was the determining factor in moving that mid-mark forward. Although she missed 42’, her increased speed predicted that she would have a better jump. Amanda’s higher speed and 41’ mid placed her too far in on take-off, so this one jump didn’t end up being that great. However, if we didn’t know her 41’ mid and its 42’ references, it would appear that Amanda needed to correct her plant and take-off. This was not the case since Amanda is consistently great on take-off.

Mid-marks monitor an athlete's speed on the runway & offer an evaluation of the setup for take-off. Share on X

Follow the correct coaching sequence and accommodate Amanda’s increased speed by moving her start position backward on the runway. There’s nothing wrong with Amanda’s plant and take-off. On her next jump, she will have an excellent take-off with good hip height. Speed creates the best jumps. Mid-marks monitor an athlete’s speed on the runway and offer an evaluation of the setup for take-off. Every time an athlete sprints down the runway, their mid-mark data is available, whether you use it or not. Collecting this data is easy, so it’s inexcusable not to have it.

Mid-marks will fit into different coaching systems and vault philosophies. Share on X

Mid-marks are objectively measured and subjectively determined. Your coaching system will have mid-marks that correspond with your vault philosophy. Some coaches encourage blocking big, which will bring mid-marks inward. (Blocking is a term that describes the position, or positioning, of the vaulter’s arms when they plant the pole.) Other coaches may emphasize letting the plant block the arms into position. This style will bring mid-marks outward. The vault philosophy doesn’t matter because the mid-marks remain consistent for athletes within a given coaching system. For example, Coach David “DJ” Johnston (from Lees-McRae College in North Carolina) developed a mid-marks chart that correlates grip, start on the runway, and approximate bar clearance height.

At Apex Vaulting Club, we rely on DJ’s chart for newcomers because it’s a great initial reference. As our athletes progress and move their approach farther back down the runway, we move away from DJ’s mid-marks because Apex athletes take off farther out than DJ’s recommendations. Again, DJ’s chart is a great place to start, but his system is his and your system is yours. If you know what you want from the take-off, over time you’ll know where to expect your mid-marks to land on the runway.

How Mid-Marks Apply to Other Events: The Long Jump and Triple Jump

Long Jump

The long jump approach resembles the pole vault approach in many ways, including initiation, posture, sprint mechanics, the penultimate step, and take-off. Mid-marks provide a reasonable check on the athlete’s approach before they reach the board for take-off. A coach will know if their athlete will foul the jump if the take-off foot touches down past the expected mid-mark.

Once again, fatigue will shorten the stride and poorly support the athlete’s acceleration down the runway. When it’s obvious in a competition or practice that the athlete is losing steam, move the start position inward or call it quits. I recommend the latter option. There’s no need to push through fatigue in fast-twitch events, and it would take a greater concerted effort to accommodate the approach in doing so.

Unlike vaulters, long jumpers don’t carry poles so their stride is less encumbered and longer than a vaulter’s stride. DJ’s chart does not apply. Instead, a different mid-marks chart based on a longer stride length is more appropriate. Here are David Johnston’s long jump mid-marks chart and Coach Jeff Martin’s (from Indiana State University) long jump mid-marks chart.

Triple Jump

Mid-marks support the triple jump, too. Under the same jumps coach, gradual acceleration may work better for some athletes, whereas constant and controlled velocity may work better for others. Coaches must know their system and their athletes extraordinarily well to develop a reliable chart, but I recommend keeping mid-marks more individualized in the triple jump.

Closing Thoughts

As stated, your coaching philosophy for an event may differ from the next coach, but mid-marks always apply, and the mid-mark charts already available offer a great place to start. Modify DJ’s or Martin’s chart to fit your system because no one knows your athletes better than you. Mid-marks are just one of three indicators that allow you to assess your athlete’s running mechanics—an imperative skill—which you can use practice drills to reinforce. Drills build skills. Stay tuned for my next two articles, which will address drill proficiency as an indicator of translational skills and hip movement as an indicator of pole speed.

Since you’re here…
…we have a small favor to ask. More people are reading SimpliFaster than ever, and each week we bring you compelling content from coaches, sport scientists, and physiotherapists who are devoted to building better athletes. Please take a moment to share the articles on social media, engage the authors with questions and comments below, and link to articles when appropriate if you have a blog or participate on forums of related topics. — SF


  • « Go to Previous Page
  • Page 1
  • Interim pages omitted …
  • Page 126
  • Page 127
  • Page 128
  • Page 129
  • Page 130
  • Interim pages omitted …
  • Page 164
  • Go to Next Page »

Primary Sidebar

FEATURED

  • Using Speed and Power Data to Bucket and Train Faster Athletes
  • Plyometric Training Systems: Developmental vs. Progressive
  • 9 (Fun!) Games to Develop Movement Skills and Athleticism

Latest Posts

  • Rapid Fire—Episode #16 Featuring George Green: Holistic Athlete Management
  • Rapid Fire—Episode #15 Featuring Kyle Brown: What is Universal Speed Rating (USR)?
  • Why We Don’t Perform Hang Cleans

Topics

  • Adult training
  • App features
  • Artificial Intelligence
  • Athlete
  • Athlete performance
  • Baseball
  • Buyer's Guide
  • Career
  • Certifications
  • Changing with the Game
  • Coach
  • Coaching
  • Coaching workflows
  • Coching
  • College athlete
  • Course Reviews
  • Dasher
  • Data management
  • EMG
  • Force plates
  • Future innovations
  • Game On Series
  • Getting Started
  • Injury prevention
  • Misconceptions Series
  • Motion tracking
  • Out of My Lane Series
  • Performance technology
  • Physical education
  • Plyometric training
  • Pneumatic resistance
  • Power
  • Power development
  • Practice
  • Rapid Fire
  • Reflectorless timing system
  • Running
  • Speed
  • Sports
  • Sports technology
  • Sprinters
  • Strength and conditioning
  • Strength training
  • Summer School with Dan Mullins
  • The Croc Show
  • Track and field
  • Training
  • Training efficiency
  • Wave loading
  • What I've Added/What I've Dropped Series
  • Youth athletics
  • Youth coaching

Categories

  • Blog
  • Buyer's Guide
  • Freelap Friday Five
  • Podcasts

COMPANY

  • Contact Us
  • Write for SimpliFaster
  • Affiliate Program
  • Terms of Use
  • SimpliFaster Privacy Policy
  • DMCA Policy
  • Return and Refund Policy
  • Disclaimer

Coaches Resources

  • Shop Online
  • SimpliFaster Blog
  • Buyer’s Guide
  • Freelap Friday Five
  • Coaches Job Listing

CONTACT INFORMATION

13100 Tech City Circle Suite 200

Alachua, FL 32615

(925) 461-5990 (office)

(925) 461-5991 (fax)

(800) 634-5990 (toll free in US)

Logo of BuyBoard Purchasing Cooperative. The word Buy is yellow and shaped like a shopping cart, while Board and Purchasing Cooperative are in blue text.
  • Facebook
  • Instagram
  • Twitter
  • YouTube

SIGNUP FOR NEWSLETTER

Loading

Copyright © 2025 SimpliFaster. All Rights Reserved.