Brendan Thompson is a Doctor of Physical Therapy and All-American sprinter (4x100m relay) from the University of Iowa, earning multiple Big Ten honors in his career there as well as degrees in Human Physiology (B.S.) and Psychology (B.A.). Since 2017, Brendan has used his elite speed background and education surrounding the human experience to help train athletes in the Greater Saint Louis region and across the country. His training focuses on improving biomechanics, speed, power, and other aspects of performance, and he does this through his LLC: Brendan Thompson’s Exceleration.
Freelap USA: Tempo training seems to come and go, similar to the need to condition being left to practice. Can you share your thoughts on why coaches who don’t use tempo running may be leaving something on the table?
Brendan Thompson: Carefully prescribed tempo training can help an athlete find and reinforce many qualities that can improve the ability to sprint at top speeds, including developing fluid turnover mechanics, proper striking patterns, and coordination and gauging different paces, as well as the ability to hit them with efficient energy management. Tempo training is also a form of conditioning in which the cardiopulmonary system can be enhanced to improve aerobic metabolism. While there are many influencers on social media who claim the aerobic system doesn’t tend to play a role in sprinting, it actually plays a bigger part in longer sprints and is critical in maximizing recovery between sprint efforts.
Without developing the aerobic system, the ability to sustain high-quality efforts in training will suffer, as the body simply can’t bounce back quickly enough to perform more max efforts in a reasonable time frame. This same quality is critical in sustaining a high level of performance while performing multiple efforts in competition spanning a given day, week, or month. I immediately think of jumpers performing three to six jumps per event, sprinters competing in two to four events per meet, and team sport athletes who have to repeatedly move quickly in short bursts as the demands of a game wear on.
Removing tempo from training is consciously choosing to pay a fortune in rest time in order to fill a small gas tank for each drag race, says @BrendanThompsn. Share on XAdditionally, many championships require multiple rounds of peak performance to qualify; thus, the ability to recover between each play, drive, quarter, or round is absolutely imperative. Removing tempo from training is consciously choosing to pay a fortune in rest time in order to fill a small gas tank for each drag race. Maximum-velocity training density is supported by tempo; therefore, qualities developed by tempo training will help maximize the volume of safe training exposures and enable athletes to repeatedly perform closer to their ceiling both in training and in competition.
Freelap USA: Running mechanics matter for higher top speed and acceleration. Will you explain what happens when athletes only know top gear? It seems a lot of athletes are getting injured or stagnating with one-dimensional training.
Brendan Thompson: There is a certain grace, style, and finesse to max-velocity sprinting that simply can’t be explored by putting the pedal to the metal all the time. Many coaches argue that mechanics will self-organize, and there is no need for direct intervention, which is true to a degree, but the average athlete won’t eventually exhibit shapes and patterns similar to an Olympic champion if left to their own devices. Poor mechanics practiced over and over reinforce poor mechanics and increase vulnerability to injury over time. Continuing to expose the athlete to these circumstances at maximal intensities is a recipe for disaster and tends to involve the hamstrings, shins, hip flexors, and/or the low back. Without opportunities to refine movement along the full spectrum of speed, an athlete will have minimal ability to consciously change their mechanics, as they’re maximally recruiting everything in a rigid posture throughout each repetition, chasing an arbitrary time.
Another issue with tunnel vision max-effort sprinting is the unintended consequence of teaching the athlete a non-ideal race model. An example of this is that when athletes exclusively train short distance (10-40 meters) max-effort sprints a few days per week, they eventually become conditioned to race to 40 meters rather than practice executing a race strategy through 40 meters. While being fast to 40 meters is great, there is no medal given out to the winner of the first 30-40 meters of the 100m dash. Ingraining this pattern into track sprinters reinforces bad habits of overexerting themselves too early in a race, only to begin decelerating sooner and to a greater degree than the rest of the competition.
If the training stimulus is always the same distance, same intensity, same rest intervals, and same volume, the athlete will reach a point of diminishing returns, says @BrendanThompsn. Share on XOn top of this, if the training stimulus is always the same distance, same intensity, same rest intervals, and same volume, the athlete will reach a point of diminishing returns, as they’ve potentially hit a relative ceiling of that repeated stimulus. While keeping training as simple as possible is easy and convenient, the human body is a much more intricate, complex organism that requires variable training stresses to continue challenging it to adapt.
Freelap USA: You are a DPT (Doctorate in Physical Therapy) and see athletes who deal with lingering issues. Instead of just shutting them down and going through a conventional rehabilitation phase, you work on running mechanics and control the loading process. Tell us more about why coaching speed has changed your vision of rehabilitation.
Brendan Thompson: While it is great to target an injury or lingering issue with directed exercises, any medical intervention that fails to identify and rectify the root of the issue will be short-lived. With overuse injuries or injuries related to poor lifestyle habits, rehabbing the tissue only addresses a piece of the puzzle. Without doing a movement assessment, whether by screening or breaking down film from the archives, it is difficult to know what may have led to the injury, as well as how to address that vulnerability.
Having analyzed thousands of patients and athletes with a wide variety of complaints and movement preferences, I’ve developed a sort of sixth sense for identifying problematic movements in asymptomatic populations that may be ticking time bombs for injury. Coaching myself and others in how to develop the skill of speed has made me a student of sport and allows me to easily identify outliers to ideal movement, as well as the stresses any given tissue may incur throughout.
Making the rehab process look like performance is extremely important, though tedious. It allows me to build a foundation of proper mechanics from the ground up, starting with controlled, low-intensity exposures and systematically progressing over the course of weeks or months until the athlete is sprinting fast with improved movement quality. The limiting factor during these progressions is not only tolerance, but also the quality of the movement as the intensities increase. I use this approach both with healthy athletes and athletes with lingering injuries; the difference being that healthy athletes don’t tend to be limited by tolerance to my chosen interventions.
Freelap USA: Video analysis is a simple and affordable way to get information and give feedback to your athletes. Can you expand on what you do that is practical for high school teams? Perhaps what you do when you have small groups and even larger teams?
Brendan Thompson: Dissecting kinematics for a group of 50 athletes may be a bit time-consuming for a team coach; however, they can use slow motion video analysis in these environments to look for more global issues. Setting up a tripod with a camera to get a side profile of the athletes as they sprint through a designated segment can reveal sources of mechanical issues and efficiency that a coach can easily correct with a cue or demonstration. Addressing each athlete individually in a large group setting may become cumbersome, but looking for common themes and then providing solutions to the whole group is both easy and beneficial.
In smaller groups or individual settings, I tend to dive deeper into the kinematic analyses to provider higher-resolution training solutions. We can get into the minutiae of stride parameters, postural issues, and extremely precise prescriptions of drills, exercises, and sprinting. Initially, video analysis can seem daunting, as you’re learning the ropes of the program you decide to use. With each successful analysis, you become much more efficient and can gradually scale quicker as you develop a systematic approach to each analysis.
With my first video breakdown, I wanted to measure every single parameter possible, but the reality is that this isn’t an economical or practical application of video analysis. Dial in on a few simple measurements such as stride length, stride frequency, and velocity—each is simple to assess, takes little time, and goes a long way in fixing flaws in a given sprinter’s performance.
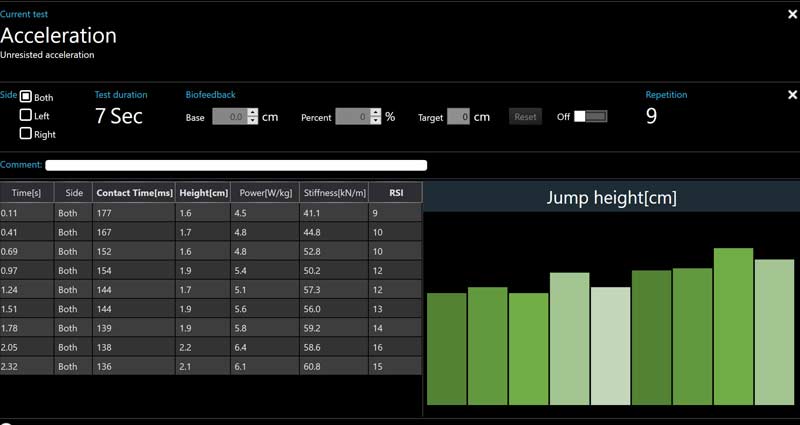
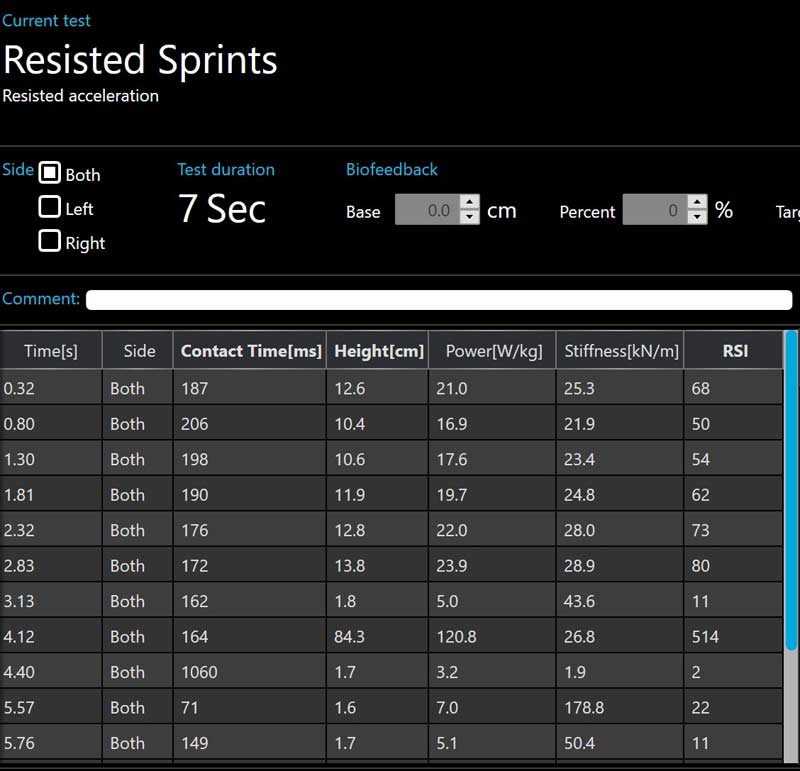
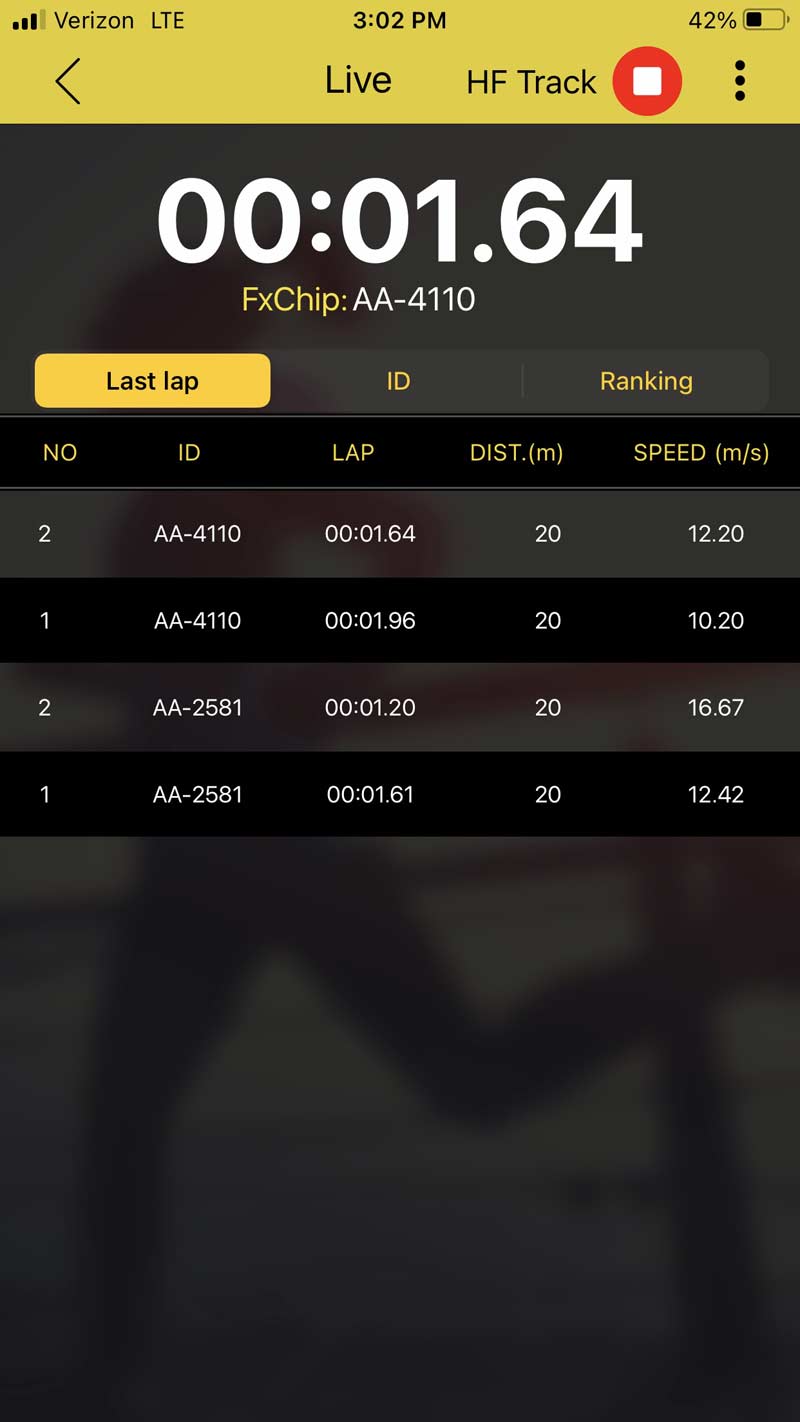
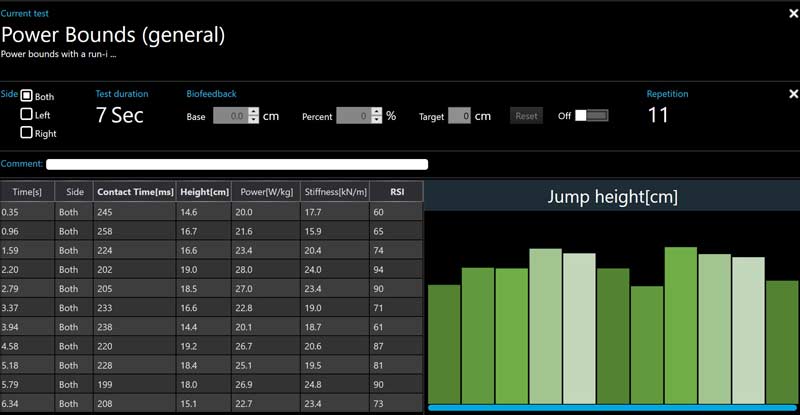
Freelap USA: You focus on athlete efficiency and use up to 10 splits to observe the rhythm and other components of skilled sprinting. Can you cover a few ways that you set up training to see how athletes perform in linear speed with higher-resolution information?
Brendan Thompson: In performing anything in training, from 20m starts to 40m sprints, 60m sprint-float-sprints, or 100m flys, I like to set up cones at each 10-meter segment to compare how an athlete executes from workout to workout. We can compare the results of each segment to similar workouts in the future and any time athletes cover the same distance in practice plus more. The results from 20m starts are compared to the first 20 meters of any workout that covers at least 20 meters at a similar intensity.
Similarly, I compare the 40m sprint profile to the first 40 meters of any fast 60m, 80m, or 100m. This helps to identify subtle changes in the way an athlete attacks a rep, if there are any, and also allows me to see where top speed tends to occur, how long it is held, the onset of fatigue, and the rate of deceleration. Seeing these comparisons helps to show A=B=C, in the sense that a given acceleration profile leads to a given top speed, which then leads to a given deceleration pattern. Too steep an acceleration curve is often followed by a premature top speed around 40 meters, and then deceleration occurring sooner and to a greater degree than a more gradual acceleration.
High-resolution training data allows us to make more tactful decisions regarding what the athlete actually needs to progress in training, says @BrendanThompsn. Share on XHow an athlete sets up their race is crucial to overall energy management and execution. Without 10-meter splits to profile sprint training, programming becomes a series of assumptions and conjectures, as we are essentially blindfolded and throwing things at the wall to see what sticks. High-resolution training data allows us to remove the blindfold and make more tactful decisions regarding what the athlete actually needs to progress in training.
Since you’re here…
…we have a small favor to ask. More people are reading SimpliFaster than ever, and each week we bring you compelling content from coaches, sport scientists, and physiotherapists who are devoted to building better athletes. Please take a moment to share the articles on social media, engage the authors with questions and comments below, and link to articles when appropriate if you have a blog or participate on forums of related topics. — SF