• Skip to content
  • Skip to primary sidebar
SimpliFaster

SimpliFaster

cart

Top Header Element

  • Facebook
  • Instagram
  • Twitter
  • YouTube
  • Login
  • cartCart
  • (925) 461-5990
  • Shop
  • Request a Quote
  • Blog
  • Buyer’s Guide
  • Freelap Friday Five
  • Podcast
  • Job Board
    • Candidate
    • Employer
    • Facebook
    • Instagram
    • Twitter
    • YouTube
You are here: Home / Blog

Blog

Belt Squat

Mastering the Belt Squat for Strength and Conditioning

Blog| ByWilliam Wayland

Belt Squat


Hip belt squats emphasize the legs with less load on the spine, load the lower body despite any torso or upper limb limitations, and shine in their potential for lower limb hypertrophy. Their recent resurgence has been pushed by strength sport athletes looking for improved leg development, strength coaches who want to load athletes in novel ways, and equipment manufacturers that continue to innovate and abstract with new designs.

Hip belt squats surfaced in the 1970s and have fallen in and out of favor since then, though they’ve always been in the background. According to the story, Louie Simmons invented the device in the mid-70s after injuring his back and was unable to squat. Using some ingenuity, he brought us the belt squat machine that Westside Barbell is known for.

The Soul of Belt Squatting

By removing the load from an athlete’s shoulders and upper trapezius, the hip belt squat places emphasis on the legs with less load on the spine. The removal of axial loading and subsequently lower trunk extension moments let us load the lower body despite any torso or upper limb limitations—hence its original application for powerlifters with blown backs. I’ve used variants with fighters who have injured upper bodies, particularly the shoulders, when even a hands-free safety bar squat caused pain or discomfort.

The hip belt squat also shines in its potential for lower limb hypertrophy. We can train the legs in a high-volume fashion with higher loads without high levels of lumbar fatigue. Anyone who has done high-rep back squats can attest to this. Some of my favorite stories from old-timers are about using belt squats with an exaggerated heel lift to really target deep knee flexion and torch what they describe as lower quads.

Belt squats come in various shapes and sizes, ranging from simple lever arms to weight stack pulley systems. At its most rudimentary, it suspends loads, such as dumbbells or plates, while standing on boxes to provide clearance. Belt squats often are accessory movements used as a plan B option for specific leg development when upper body limitations preclude more conventional squat options; the belt squat represents a vertically oriented task rather than what we commonly see with many leg press options and is a lot less compressive.

Hip belt squats are great for leg development when upper body limitations prevent more conventional squats, says @WSWayland. #BeltSquats Share on X

The belt squat does come with a few downsides, particularly excessive lumbar extension in some athletes—often those who exhibit excessive extension generally—especially if the belt is placed too high. We can sometimes mitigate this by placing the belt just over the hips or by using a harness over the hip belt.

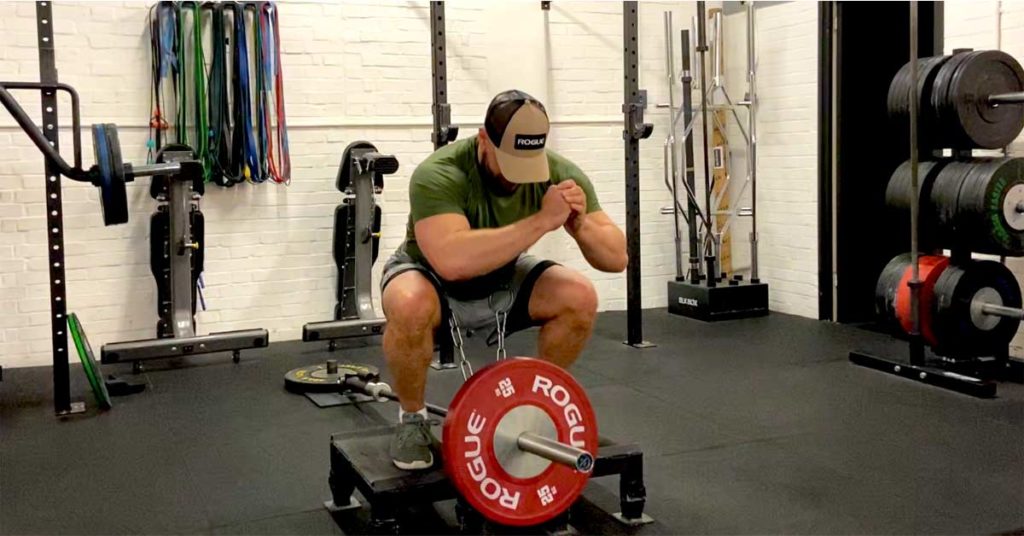
When executing the belt squat, watch for the hips rising faster than the shoulders. An upright object, like a hand support, can help mitigate this, which is why many belt squatters almost instinctively place their hands on their thighs. The belt squat design also influences this. Squatmax-MD, for example, suggests their design—which isn’t fixed like a lever arm—leads to low sheer stress and less gravitation toward lumbar extension.

I recommend avoiding belt squats with beginners or clients who haven’t taken the time to establish solid squat patterns. A precondition for getting the most out of belt squats is to make sure the client’s squat pattern is good. This may seem trite, though I’ve issued the same warning about the hand-supported squat. Novel squat variants may offer a back door to a loaded squat pattern, but the coordination of upper limbs, torso, and lower body is crucial for long term development.

As I said in my post about earning the back squat, “movement quality drives loading strategy and not the other way around,” and we should pay the same respect here. Much like the leg press, belt squats do not provide the same holistic coordinative challenge conventional squats do, so rotate belt squats or use them in a fashion that ensures good competency.

Very little real research has been done aside from a notable 2015 study by Gulick et al. that found similar muscle activation in back squats and belt squats (using a squatmax-MD machine). The study also showed greater activation of quadriceps and less for hip extensors, so belt squats could be very useful for bodybuilders and athletes who already focus on deadlifts, RDLs, and hip thrusts.


Video 1. The pin-style belt squat is popular in part because it’s inexpensive, but it may not be the right fit for all athletes. If an athlete does’t have the leg length or prefers not to go wide, then pin-style options may not work.

Another study on belt squats by Evans et al. (using a Pit Shark) found that a lever arm belt squat machine failed to activate the glutes similarly to the barbell back squat. This runs contrary to what well-known coaches have said, including Travis Mash: “The biggest benefit that I’ve noticed is that it really emphasizes hip extension.” “The way the belt sits, if you don’t activate your glutes you won’t reach extension, so it pretty much turns every single exercise into something that emphasizes the glutes.”

This may be an issue of technical execution regarding coaching, set-up, or the choice of belt squat device. The hip extension contribution, however, is not dissimilar to other squat variations, though the belt squat does have differing knee extension moment arms, hence the increased quad activation. It’s also possible that mileage may vary among belt squat device machines.

Belt Squat Options

Freestanding Belt Squats

Freestanding belt squats are the most rudimentary way to employ the movement. An athlete uses a conventional dip-belt and squats with the load slung between the legs. The issue is usually clearance, so you’ll see individuals do these standing on two boxes or benches so the weight can dip below their feet.

The major limitation to freestanding belt squats is the amount of load that’s practical or comfortable due to set-up and execution issues. It was this limitation that apparently spurred Louie Simmons to build his machine. Dismounting boxes with a heavy weight between the legs isn’t for the faint-hearted. The progression is to use belt squat lever arms or machines.

Belt squat marches and unilateral work, which I’ll discuss later in this post, can’t be performed with this type of set-up because the lateral swing of the load makes its very unstable.

A variant is landmine belt squats which use the landmine’s ad hoc lever attachment. While these can be a pain to set-up, they do offer an alternative. We can get some stability by turning it into a long-levered movement. The landmine allows us to load the movement more substantively than a conventional belt squat.

Another option is to use a single-ended loading pin for belt squats. Again this allows for greater loading, but the width of an Olympic-sized plate dictates stance width, which can be a problem for smaller athletes or when you want to do narrow stance squats.


Video 2. Using a landmine attachment, we can load the belt squat more substantively than we can a freestanding belt squat.

Lever-Based Belt Squats

Lever-based belt squats have become more popular recently due to modular set-ups, allowing them to be attached and unattached from modern rig or rack systems that save space, unlike a belt squat machine. These usually have a fall away catcher that allows the user to set-up, then stand up and perform the movement as the catcher swings away. The catcher then can be replaced and the weight returned to the set-up position.


Video 3. Lever-based belt squats are more popular now due to space-saving set-ups.

Belt Squat Machines

Belt squat machines with under-loaded pulley systems, such as the one popularized by Louie Simmons, have been around for a while. Pit Sharks and similarly designed machines generally take up a similar amount of floor space but are very effective robust lever-based machines.

Design considerations include the relationship between the lever arm, the load, and the athlete’s position. More recent designs place the load much closer to the center of gravity, which correlates much better with straight bar movements. We also increasingly see the addition of handles to make the movement hand-supported. This allows for increased loading and resists the forward pull the belt sometimes places on the athlete under very high loads.

More than Just Squats

Belt Squat Marches

Belt squat marches are another movement coming out of the powerlifting community. The idea is to stand tall in the belt squat while either marching on the spot or with different IR/ER on the unloaded leg. Loading the standing leg in an advantaged position certainly provides feel to the working muscles. These are used mostly as a warm-up or as activation for reps or GPP work for time. After air travel, I’ve used a band variation to stimulate hip flexors and glutes and get my hips feeling normal.


Video 4. The belt squat march, often used as a warm up exercise.

Split Squats and Staggered Belt Squats

It’s also worth considering split squats and staggered belt squats for a novel stimulus; I’m particularly keen on a staggered hand-supported belt squat. The main issues are set-up and comfort, as the variability in set-ups means that a split squat is often not viable but a staggered squat is.

Creativity goes a long way in setting this up. You can find an excellent example using a double harness with a double lever machine in Chris Korfist’s post about the Bulgarian split squat.


Video 5. I especially like the staggered hand-supported belt squat for a novel stimulus.

Belt Squat Romanian Deadlift

The belt squat RDL is another novel variant for the belt squat alone, the addition of dumbbells and kettlebells, and even band-anchored variations. A shift in belt position will create some sheer stress and potential traction in the lower back. This can benefit athletes who experience a lot of compression from conventional heavy barbell work. The RDL is a perfectly viable option as a special exercise or when the conventional RDL isn’t an option.


Video 6. The RDL with dumbbells and hip belt is a creative way to get a new stimulus with athletes. Experiment and see what works for your environment.

Ranged Trimetric Belt Squats

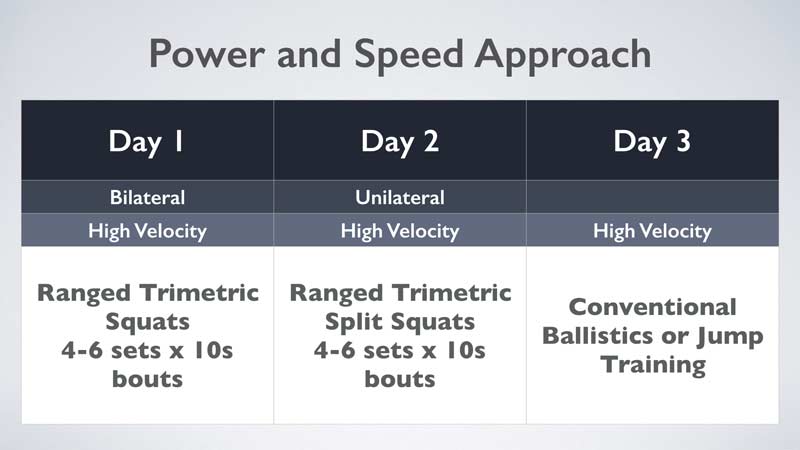
Although these are considered out in left field now, ranged trimetric belt squats are good for rapid contract-relax contexts. I’ve been using them with some of my grappling and MMA athletes to promote rapid contract-relax qualities without the limitation of ankle-based ground force characteristics we need for plyometrics. Because combat athletes spend a lot of time unshod on soft surfaces, their SSC isn’t particularly well developed because their spring ankle complex is not up to snuff.

Ranged trimetric squats usually are performed for contextual timed sets anywhere from 3-10s. I suggest using an underhand grip to allow for upper body contribution and stabilization while the athlete pulls and pushes rapidly in each direction. I file this under looks silly, does good in the category of movements. I have the benefit of owning my own gym, so the athletes aren’t too bothered about looking silly.


Video 7. Ranged trimetric belt squats promote rapid contract-relax qualities without the limitation of ankle-based ground force characteristics.

Integrating Belt Squats into Your Program

We can look at integrating belt squats in three ways: as a primary force-producing option, as an accessory, or as a substitutive option. Below are some programming suggestions on how to implement belt squatting across a training week.

The primary force-producing exercises make the most of the belt squat’s inherent stability and de-loading of the trunk. They focus very specifically on producing high levels of force under stable positions; variations like hand-supported positions allow for more loading.

Primary Approaches
Table 1. Implementing Belt Squat Primary Exercises


Power and Speed
Table 2. Training Power or Speed with Belt Squats


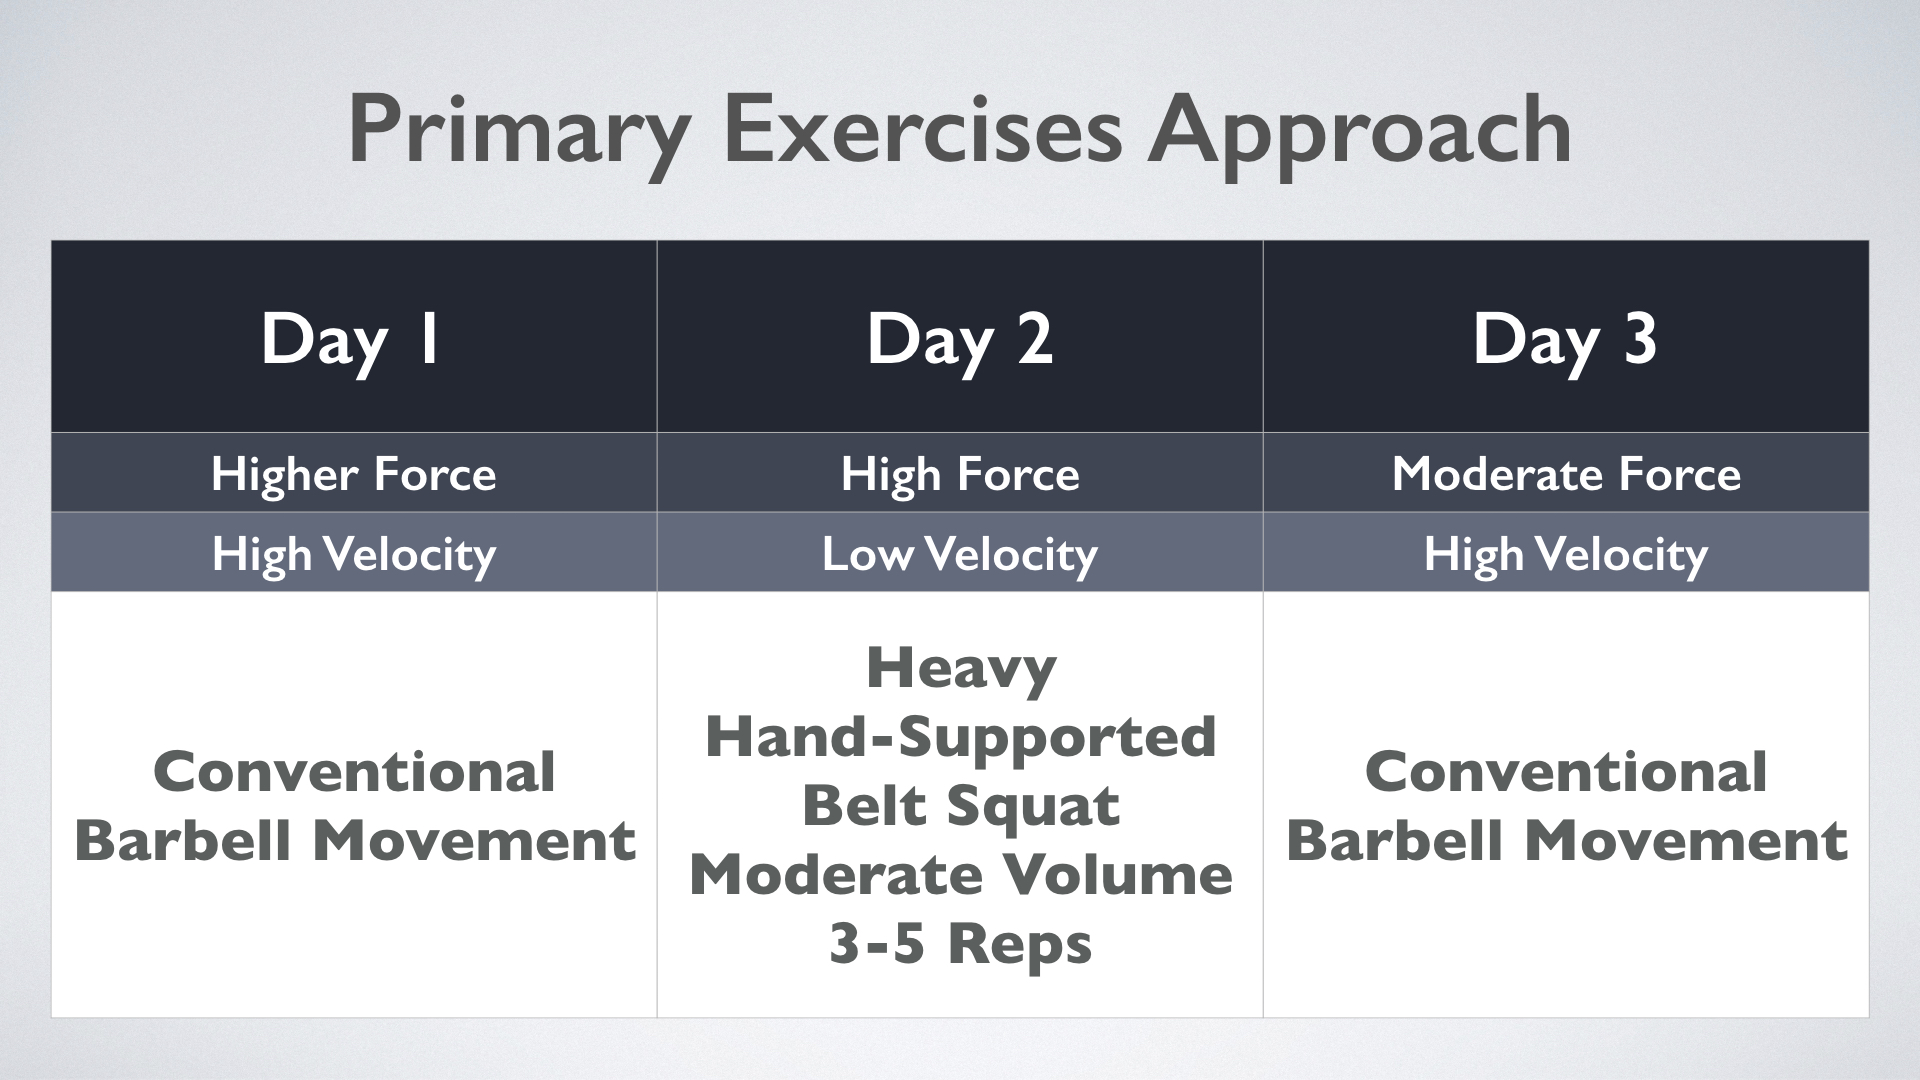
Accessory use makes the most of the higher structural stress that belt squatting allows for, so we can train for goals like specific hypertrophy or local fatigue tolerance. I usually place days like this at the end of the week, as the higher volumes at high loads can produce very high soreness levels.

Accessory Exercises
Table 3. Implementing Belt Squat Accessory Exercises


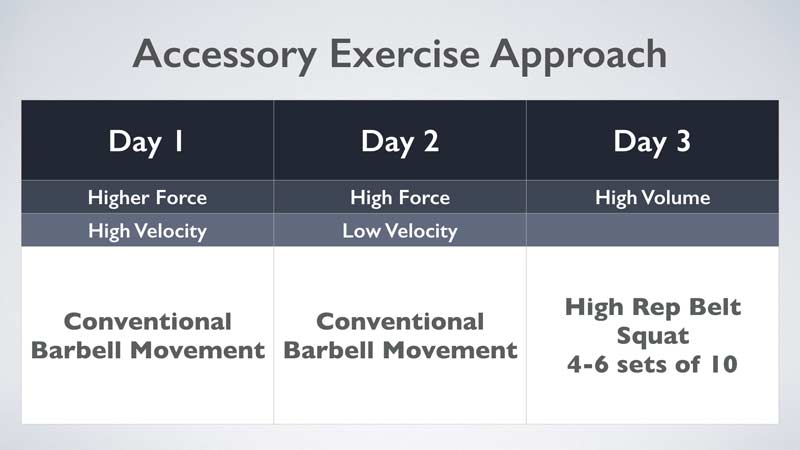
Use the substitutive approach when an athlete presents with a problem that precludes them from using conventional exercises with an axial loading component. This is often a preplanned change or sometimes a reactive substitution performed on the fly. Keeping plan B as close to plan A as possible is a rule of thumb.

Substitutive Exercises
Table 4. Implementing Belt Squat Substitutive Exercises

Conclusion

Belt squatting offers another way to target lower-body loading and, as with any variant like this, comes with many upsides and a few downsides. While its place is mostly as a supplementary exercise, its value shines in its ability to specifically target the lower body at the expense of some of the systemic stress of conventional lower-body compound movements. When timed correctly, they help maintain peripheral freshness in the upper limbs.

Belt squats shine in targeting the lower body without some of the systemic stress of conventional compound movements, says @WSWayland. #BeltSquats Share on X

Its other key use is with athletes who are experiencing something that prevents them from performing conventional barbell training, which was why the belts were used originally. We’ll probably see more equipment innovation going forward, as comfort, space, and expense all come into play when gym owners decide what to put in their facilities.

Since you’re here…
…we have a small favor to ask. More people are reading SimpliFaster than ever, and each week we bring you compelling content from coaches, sport scientists, and physiotherapists who are devoted to building better athletes. Please take a moment to share the articles on social media, engage the authors with questions and comments below, and link to articles when appropriate if you have a blog or participate on forums of related topics. — SF


Additional Reference

English, Nick, “Why the Belt Squat Could be Your Secret to Strength Gains,” BarBend (website), updated January 15, 2018.

Track Drills

When and When Not to Use Track Drills

Blog| ByChris Parno

Track Drills


Drills are used as tools; they don’t teach the movement concepts. That’s for the coach to impart to the athlete. Instead, drills are used to reinforce what we teach. When considering which drills to use, I find it essential to break down the concepts behind them to ensure they belong in my program.

Wickets, for example, look great at low intensities for YouTube videos and Instagram stories. But let’s put some context and meaning behind them—they help stabilize front-side mechanics and diagnose stride length issues. And while the toe drag has divided a world of coaches, turn it into a teaching drill, and athletes’ low heel recovery proficiencies may take off.

I admit I’m a Twitter guy. I enjoy following sports news, discovering new drills and concepts, and connecting with other coaches. Twitter is useful and quick, but not the only route of coach’s education. And when you leave education to your athletes, you get YouTube searches and misguided technical models based on the models of genetic monsters.

In this post, I advocate three drills I’ve seen criticized in some fashion on Twitter and other platforms: hurdle wall drills, wickets, and dragging the toe in acceleration.

Track and Field Drills

First, let’s talk about the concept of a drill within track and field. I find there are three types of coaches when using drills in their programs.

    1. Coaches who use drills as a tool to reinforce and stabilize the concepts they’re teaching their athletes.


    1. Coaches who use drills as time killers and fillers, when they run out of things to practice, or they don’t understand the purpose of a specific drill.


    1. Coaches who use drills to impress parents and prospective clients with flashy movements and equipment.


I’ve fallen into each of these categories during my coaching years. And as I’ve progressed, I try to live in the first. I take pride in teaching and educating my group of athletes so they know how a drill is useful. Why should your athletes do a wicket run if you don’t know the reason behind it?

I hope after you read the following drill explanations, you’ll start breaking down the concepts behind drills and ensure they belong in your program. If you pursue the truth as a coach, you ask questions and are open to the answer. If you already have all the answers, there is no need to break down new or current drills for understanding.

To battle our own confirmation bias based on our experiences, we must stay away from absolute statements and steer toward open conversations. When our ego is tied to our system and we hold true to that, it’s much harder to introduce potentially useful concepts to our athletes, which potentially limits their paths.

Disclaimer: There are many ways to get it done in the world of track and field. The art of coaching truly is sorting through the noise and helping your athletes improve through proven tactics.

With each drill, I’ll explain the following:

  1. Why use it
  2. When to use it
  3. Who to use it for
  4. How you know it’s improving your athletes

Hurdle Wall Drills

The hurdles are highly complex high-velocity movements. Imperfections in essential techniques can become catastrophic when we add intensity. There is a wide spectrum of beliefs about hurdle drills, from coaches drilling for hours before a session to coaches saying, “The best drill for hurdling is actually hurdling.” I find myself somewhere in the middle. I need to feel comfortable in foundational movements before moving forward to the whole movement.

If you went to 100 different hurdle sessions across ability levels, you’d probably see hurdle wall leads and trail drills done 100 different ways. I started thinking about the hurdle wall drill when I saw a prominent program’s instructional video lazily display a wall lead drill. The athlete walked up to the hurdle, brought their leg up, tapped the wall, and dropped their leg back to the ground. I thought, “If this athlete drills like this with their coach around, I can only imagine what they look like over a hurdle.”

When an athlete attacks a hurdle, they navigate a path that requires both vertical and horizontal force displacement off the ground, says @ChrisParno. Share on X

When an athlete attacks a hurdle, they navigate a path that requires both vertical and horizontal force displacement off the ground. This path (vector), based on hurdle height towards the hurdle, will produce the most efficient parabolic curve over the top. The diagrams below show the directional forces, displacement off the ground at the desired parabolic curve, and efficient parabolic traveling of the hips over the hurdle.

Sprint Hurdle Key Concepts
Image 1. The drawing on the top left directionally shows the vertical and horizontal forces. The top right drawing shows displacement off the ground at the desired parabolic curve, and the bottom left drawing shows efficient parabolic traveling of the hips over the hurdle.

I don’t think you’ll find a single successful hurdle coach who denies the importance of hip displacement at toe-off to set up the desired hurdle position. Because we know that we don’t get faster in the air, efficient clearance should be the premium driver in deciding what drills to use.

By breaking down the lead leg wall hurdle drill, the most important aspect is to step the take-off leg down quickly and feel the hips pass over this step, displacing upward and in toward the wall. The athlete then contacts the wall with a stretch in their hip flexor (men will experience more upward movement to navigate higher hurdles).

With the hurdle wall drill, it's crucial to step the take-off leg down quickly & feel the hips pass over the step, says @ChrisParno. Share on X

This accomplishes two of the criteria for efficient hurdling—a shallow parabolic curve (relative to hurdle height) and a stretch reflex in the take-off leg’s hip flexor to help efficient cycling of the trail leg at toe-off.

Now, if I were lazy and didn’t give my athlete any purposeful feedback, I would have them step up to the hurdle, plant their foot directly under their center of mass, and bring the lead leg up, tapping the wall before bringing it back to the ground. A coach seeking purpose in this drill will quickly realize this technique doesn’t directly resemble any aspect of the full hurdle movement, so they should adjust it or remove it from their program.


Video 1. The lead leg drill is a classic. Make sure your athletes understand the concept behind it first before adding it into the program.


Video 2. Another variation of the lead leg drill is also popular. Both drills have value, and you can use them in various sequences for countless purposes.

To ensure displacement occurs, the coach can put a piece of tape down on the track 4-6 feet back from the wall to give the athlete a visual. We can use an upside-down hurdle (pictured below) to provide a visual for take-off from the wall. Shorter or less proficient hurdlers should be closer to the wall, while taller or more proficient hurdlers can step down further away from the hurdle.

We can add the concept of the cut-step with an aggressive shortened final cycle of the take-off leg down to the ground before hip displacement, which helps the athlete get into this stretched position.

Another option is to perform the drill on a chain-link fence that gives upon contact. The flexing of the surface will further stretch out the hip motion before the fence recoils to its original position. So, if your outdoor track facility has only chain-link fences, you can still use this drill.

Lead Leg Drill
Image 2. An upside-down hurdle provides a visual for take-off from the wall.

For the trail portion of the wall drill, we’ll use the same thought process. The athletes want to displace the hips and stretch the hip flexor of the take-off leg (trail leg) before cycling. What purpose would this portion of the drill serve if the athlete was standing up tall and close to the wall mindlessly cycling their leg around?

Set up the drill with the hurdle slightly behind the hips and position the athlete at a slight angle to the wall. Lower the hurdle to allow the trail leg to travel through in the correct position (knee higher than the ankle). The stretch within the hip will assist in cycling the trail leg through, similar to the full hurdle motion.

To add some resistance, an athlete can take a light anchored stretch band and attach it around the ankle of the trail leg. This resistance can help reinforce the trail leg’s correct path while providing general strength opportunities within the hip.

Trail Leg Drill
Image 3. Place the hurdle slightly behind the hips and have the athlete lean in a slight angle to the wall.

These static wall drills are great for beginning and developing hurdlers. Proper execution plus instruction and feedback from the coach will let athletes feel correct attacking and cycling patterns early in a practice session. Mindless execution will only reinforce poor patterns.

At the elite level, this drill could be used as a periodic check-in for technique or a general warm-up and hip strengthening exercise. As a hurdler moves toward the elite level, more advanced specific hurdle drilling and full hurdle movements at high intensities will take the forefront.


Video 3. Athletes can use trail leg drills to work mobility and to warm-up for training. The trail leg drill can be used for both male and female athletes as well as advanced athletes.

Wickets

If you want to fire up a room of coaches quickly, mention wickets. You’ll elicit a plethora of opinions about whether wickets assist or detract from a sprinter. Wickets are an enigma—there are many opinions on the intent, execution, and rate of which you can analyze improvement or understanding. I’ll unpack my understanding of where and when I see the validity of this movement.

Athletes need technique before attacking wickets. Wickets are the end goal to your teaching and education of sprinting, says @ChrisParno. #wickets Share on X

First, wickets are an end goal—athletes need foundational biomechanically-backed technique work before attacking wickets. Wickets are a synthesizer and summation of your teaching and education of sprinting; think of training as reading and wickets as the book report. Wickets can reinforce and cement the sprinter’s force intentions and serve as a daily session check-in and benchmark of technical proficiency.

Here is my checklist for a wicket session:

    1. Maximum effort (purposeful intent to be sprinting at max velocity through the wickets). This requires an acceleration zone of 20-30m. Spikes are not required, but maximum intent is.


    1. Spacing must be set up for our end goal. If we have a sprinter looking to hit 2.20m per stride at max velocity in a race (based on trochanter length ranges), they eventually must work up to sessions where the wickets hit these distances through a progressive build-up. Randomized unmeasured wicket patterns won’t allow for a progressive stride length model similar to the desired race model of a 60m or 100m dash.


    1. Athlete Focus and Understanding. Wickets assist athletes in feeling and achieving front-side mechanics, high attack angles, and efficiency of leg recovery after toe-off. We must allow the athletes the platform to focus—there is external feedback from stepping up over a wicket and allowing the athlete to be in proper positions.


Wickets become troublesome when an athlete does them at submaximal intensities before they stabilize max velocity mechanics. It’s much easier for an athlete to hit technically sound sprinting positions at submaximal efforts.

To prevent reverting to poor technique, we use max effort & diligent intent with #wickets only after the drill's goal is understood, says @ChrisParno. Share on X

Often, I see athletes very proficient at a dribble knee or an A-run, but when they add intensity (speed), they revert to their previous techniques. To prevent this, we have maximum effort and purposeful intent with wickets, but only after the goal of the drill is understood.

How to Monitor Wickets

Coaching can be a copycat career, which is not necessarily a bad thing if we’re copying good habits. This leads to the next questions: How do we know wickets are working? Are coaches using wickets because they are the new fad? There are ways we can monitor the success of wickets.

First, you must have multiple spacings to allow for individual athlete body types. Vince Anderson, who has shared his wicket tables among other coaches, uses multiple spacings based on sprinting level and gender. Using Excel to create multiple tables based on existing tables or experience allows flexibility. It’s important to track which tables you’re using throughout the year for continued progression.

Video Feedback

A side-view of an athlete sprinting at max velocity shows us if they’re stabilizing with a biomechanically-backed technique. With mobile timing and filming programs, it’s easy to film athletes during each session for comparison.

Introducing an outside stimulus with wickets can positively affect the stride pattern. As an example, we’ll look at an athlete with a 90cm trochanter length (TL)—the length from the greater trochanter to the floor. Using the stride range multipliers of 2.5 and 2.7, we find this athlete’s ideal stride length ranges from 2.25-2.43 meters/stride (.90*2.5 and.90*2.7).

Introducing wickets as an outside stimulus can positively affect stride pattern, says @ChrisParno. #wickets #stridepattern Share on X

At the beginning of a training season, we’ll set up wickets lines to hit 2.20-2.25 by the end portion of the wickets (see image below). This lets us see if the athlete can handle the low end of their ideal range with good technical execution. In each subsequent session, we can lengthen the wicket distances to ensure the last 3-4 wickets are further into the athlete’s ideal range (based on TL).

For visual sake, a coach can give a 20-25m acceleration zone for the first wicket, using 16 wickets per line that are stretched out in total anywhere from 30-40m, based on spacing. The entire sprint distance of 50-60m (acceleration zone and wickets) lets the athlete work past the acceleration phase into max velocity to hit their ideal stride length range.

With larger groups, this level of precision will be tough, so group your athletes in similar stride length goals and set up multiple lines of wickets for athletes to progress through, if needed. Provide options for flexibility within your session.

Wicket Trochanter Table
Image 4. At the start of a training season, we set up this athlete’s wickets lines to hit 2.20-2.25 by the end portion of the wickets. This lets us see if they could handle the low end of their ideal range with good technical execution.

Timing

Another way to test for validity is to compare times from an athlete’s fly runs in a sprint session with their attempts through the wickets. Coach’s Eye, Hudl Technique, Dartfish, etc. make it easy to get timing feedback from video sessions. If your athlete can sprint a 20m fly in 1.98 seconds (25m build-in) and then over wickets from 25m-45m, a coach can use a mobile timing app and compare the times to ensure the athlete is exerting maximum effort.

The goal is to achieve these maximum efforts while reinforcing good techniques and working on lengthening stride length to the upper end of the athlete’s ranges. If you can achieve this, wickets are worthwhile.

It’s also important to understand your athlete’s level. For the developmental athlete, use wickets to reinforce front-side mechanics, as talked about above. For a more advanced or elite level athlete, use wickets to manipulate stride frequency.

Gary Winckler, among others, has popularized “shorter than” and “longer than” drills. These drills manipulate stride and step lengths (SL) and affect stride and step frequency (SF). SL and SF are inversely proportionate; generally, if stride length increases, the frequency will decrease.

Stride Range Distribution
Image 5. The athlete is trying to hit 2.25m for the low end of their stride range, which they will achieve by wicket 13 on the top line. The wickets progress up to this throughout the effort. With a 25m build-in, the athlete would hit it around the 50m mark.

For athletes who have issues overstriding (consequently having a low-frequency number in strides per second), a coach can set up wickets that work up to distance under the athletes’ desired stride ranges (based on TL). This forces an athlete to turn over their stride quicker, increasing the stride frequency in step per second.

Conversely, if we have someone who has issues projecting their stride and is routinely measured under their desired stride range (based on TL), a coach can progressively lengthen the wicket distances, as mentioned above, to lengthen the stride over time. We can manipulate training with wicket runs and then take these feelings to our sprinting sessions (without wickets) as we try to work toward the athlete’s ideal SL and SF.

Don’t view wickets as a fad or a new flashy way of sprinting. We can manipulate the wicket runs to achieve our coaching goals. The most important aspect for coaches is paying attention and being present during these sessions to ensure we achieve these goals.

Toe Drag

I saw a post calling this concept Toe Drag Swag. As you can imagine, arguments on both sides of the aisle littered the comment section. In my younger coaching days, I sat in front of YouTube and watched Asafa Powell’s slow-motion block start videos and decided this toe drag technique was the way an athlete was supposed to start. Later, Usain Bolt showed the toe drag, which furthered my bias in assuming this was the correct technique.

Since then, I’ve created a more robust understanding of start, block, and acceleration mechanics, and still believe there is a place for the toe drag. The concept is a vessel for athletes to understand the low heel recovery through block clearance and the first 2-4 pushes off the pads.


Video 4. The toe drag drill is popular due to low heel recovery benefits. Some athletes respond well to the drill, while others may not make great progress with it.

To break down low heel recovery, visualize an athlete’s legs mimicking pistons as they apply horizontal and vertical force into the track. Sprinters recruit large muscle groups, motor units, and move proximal (hip) to distal (ankle) in their firing patterns. At toe-off from the block pad, the hip and front of the thigh initiate the free leg’s movement as it recovers through to the front side.

If the movement’s goal is to originate from the proximal joint, the thigh will move forward first, and the knee and ankle will lag behind. The shin will remain low to the ground and the knee will remain relatively extended until the knees cross.

Low Heels
Image 6. The frame shots show the movement from toe-off through the initial knee cross of block clearance.

The opposite, and poorer movement, is produced through the misfiring of the proximal to distal patterns.

Acceleration
Image 7. In these frames shots, the toe-off has delayed movement of the thigh and upward path of the ankle. This creates a cycling pattern instead of a piston pattern, which prevents a fluid acceleration phase that helps push oneself tall down the track.

The cyclic pattern within the initial block clearance may also cause too much forward rotation of the body, shortened drive/acceleration phase, and increased time to cycle the foot back down to the ground. Generally speaking, the misfiring disallows a fluid acceleration phase to push oneself tall down the track.

Acceleration Myths and How to Break Them

Coaches need to dispel these myths: 

    1. Get as low as you can out of the blocks; it’s all about getting low


    1. Bend at the waist to be lower and more compact


    1. Be as quick as possible in the start (as if stride length isn’t a part of the equation)


To break these myths, I’ve introduced the toe drag concept in our fall general prep. The following progressions introduce the toe drag concept and then tailor it over time.

Initial Instruction. To teach the initial concept of low heel recovery, we do continuous toe drags in the grass or on an incline. The drill parameters are 5×10 pushes with continuous drags. Yes, this looks and feels strange. As the coach, I’m overcueing to create a new motor pattern and a new way of thinking. We do this for 3-4 practice sessions during the warm-up. Progressions then move to 4-6 pushes with drags, and then we allow the recovery of the stride to work upward.

Create and Refine Movement Within Higher Intensities. During our sprint warm-up, there are many opportunities for ascending explosive movements to prepare the body for the session. Within the first two weeks, we introduce the 2-push and go drill. This drill uses a 2-point crouch start to drive out at max effort. There are two pushes with toe drag followed by jogging and stopping for the next rep down the track. This progression introduces the two drag/low heel concept with high intensity behind it.

Stabilize the Movement. For the first 8-10 weeks of the fall general prep, we drill through sprint day warm-ups three days a week. As we start to work through more intense warm-ups, we introduce the toe drag to various start positions—the 2-point crouch, 2-point rollover, 2-point drop-in, 3-point, 4-point without blocks, standing block rollover starts, etc. This gives us many opportunities to stabilize the low heel movement while coordinating the technical acceleration model in multiple starting positions.

Internalize. Once the athletes understand how to control their limbs and perform the correct acceleration firing patterns, we perform the same style accelerations and allow the toe to come off the ground. This offers the benefits of the low heel during acceleration but doesn’t bring about any unforeseen friction from dragging the toe.

The detractors of the toe drag will ask the question: Why would you introduce unwanted friction?  It’s a valid question, and ultimately I agree with it. But when you dig deeper into the benefit low heel recovery brings to acceleration, it turns into a good teaching tool.

Conclusion

Performance always will have a bell curve. Most athletes and performances lie within biomechanically-backed technical models, with some individuality. Yes, Asafa Powell drags his toe, Aries Merritt swoops his lead arm over the top of his head when attacking the hurdle, and Andre De Grasse has one straight arm when sprinting.

But these technical models are outliers and shouldn’t drive our coaching. After Aries broke the hurdle world record, I spent years recruiting athletes and fixing these swooping top lead arms because they weren’t working for athletes who didn’t have the other world record-level physical tools.

Find the benefit of a drill within your events' conceptual model and learn how this drill will positively influence performance, says @ChrisParno. Share on X

Find the benefit of a drill within your events’ conceptual model and learn how this drill will positively influence performance. I firmly believe in the cycle of coaching. When I started out coaching, I only knew about coaching from the experiences I had as an athlete. Before I dove into professional development, my experience was my baseline.

Understand that how we teach and educate our athletes will be their future baselines if they choose to coach. Do your due diligence in understanding deeply the concepts you are trying to teach. Always ask the why, always search for ways to improve your athletes, and continue to dive into the true meaning of the drill.

Since you’re here…
…we have a small favor to ask. More people are reading SimpliFaster than ever, and each week we bring you compelling content from coaches, sport scientists, and physiotherapists who are devoted to building better athletes. Please take a moment to share the articles on social media, engage the authors with questions and comments below, and link to articles when appropriate if you have a blog or participate on forums of related topics. — SF


Tackle

Preparing the Young Athlete for Sport with Andy Ryland

Freelap Friday Five| ByAndy Ryland

Tackle


Andy Ryland is USA Football’s senior manager of education and training, and he has been with USA Football since 2010. He has consulted with programs at every level of competition and is widely recognized as a foremost expert on developing the fundamentals necessary for a successful shoulder tackle.

Ryland is a former Penn State linebacker and member of the U.S. Men’s Rugby team, and he is a primary instructor in the Advanced Tackling System. Ryland previously served as a Division 1 American football coach as well as working as a fitness coach in rugby. During his tenure with USA Football, Ryland became the lead clinician for USA Football’s in-person coach training events including its Coaching Certification and Football Development Model. Key initiatives spearheaded by Ryland throughout his time at USA Football include developing the Heads Up Football Program, training its Master Trainer Coach Educators, and the development of the Rookie Tackle game type that serves the FDM.

Freelap USA: What are some of the biggest mistakes being made in the preparation of young football players, and what does the industry need to do to change this? Are we doing a good job of making football kid-friendly?

Andy Ryland: Traditionally, football is filled with adult values. Eleven (11) players working in martial unison, operating as the perfect team to execute a play. Displaying grit, resilience, and sacrifice for the team. These are all noble goals, but the problem is some of these kids are so young that they still believe superheroes are real and think if they visit New York City, they may see a Ninja Turtle.

Teaching sport and life skills at an age-appropriate level is so often overlooked. Coaches can be informed on proper age-specific physical development goals, use a good youth-centric playbook, and consider how skills may need to be adapted to fit young, developing bodies. However, we often forget how we communicate that curriculum. We apply our own adult glasses to the game and teach that way.

If you are assigned a specific age group to coach, try to take a school teacher of that age/grade to lunch and pick their brains on how kids best learn, recommends @USAFootballMT. Share on X

Appropriate messaging and teaching tools allow us to better convey these messages. I tell coaches all the time, if you are assigned a specific age group to coach, try to take a school teacher of that age/grade out to lunch and pick their brains on how kids best learn, and their focus levels, engagement tools, and best teaching practices for that group. We at USA Football call it, “Thinking, Feeling, Behaving.” Understanding those aspects of children certainly helps your teaching and just might keep you from pulling your hair out.

Freelap USA: How do you address developing the skill of tackling in young athletes while minimizing risks and potentially harmful collision forces in this population?

Andy Ryland: Within contact skills, technical models matter. Not all technical models are created equal. Over the years we have learned that certain techniques or coaching points put players in poor positions or utilize strike points that we now know better than to recommend. We absolutely need to get that part right.

When dealing with youth or developing athletes, we must be very aware that skills are underpinned by physical qualities and their development in an individual athlete. Coordination, spatial awareness, and strength can limit the positions players are able to successfully perform on the field. Coaches need to have a keen understanding that technique cannot be developed in isolation. We must address all these aspects when it comes to rapidly growing youngsters if we hope for them to master the sport skill.

Technique and physical development are probably easier for most coaches to buy into but we always encourage coaches to address the psychological area, too, as part of our Football Development Model (FDM). What emotional considerations must be given to teaching contact skill? Are players comfortable in contact before we move them to collision? Are the friction and personal space aspects something the player is comfortable with, or do we need to introduce them to this before teaching the actual skill?

Implementing different game types also helps greatly because we can introduce contact skills in a gradual manner. Flag football introduces basic football movements while developing the athlete’s physical qualities. It also introduces them to Prep for Contact drills like tumbling, crawling, and grappling, which prepares them for specific contact skills later. Playing a modified game that introduces blocking and defeating blocks while still pulling flags slows down the skill-learning load and allows young athletes to build a solid base of two contact skills before we formally introduce the skill of tackling into the game.

This model, for youth, provides a progressive learning curve instead of cognitively overloading them by having them try to learn everything at once while they are still exploring the game.

Freelap USA: How do you maximize the decision-making and sport IQ abilities of the young football player without overtly specializing in the game of football at an early age? What things do you do within practice and the game itself to improve these elements of performance?

Andy Ryland: To preface this, being a proponent of one thing doesn’t mean you throw out the other. Isolated drills certainly have a place in teaching.

As for developing decisions and IQ, an important aspect of our coach education is being able to control spaces, distances, and the techniques used through small-sided games and games-based coaching. This has an added benefit of making youth sports fun as young players are usually most engaged in this type of activity.

Small-sided games are a funny thing in football because each play is so short, things can still look like a drill. However, the key is to design activities that have enough context and opportunity for decision-making that they train these items. As with any contact sport, small-sided games and games-based learning do not mean simply scrimmaging the entire practice but rather creating environments to help train skills.

Coaches who adopt a player-centered approach that leans more on guiding instead of telling really help players learn and discover concepts and solutions with the game, says @USAFootballMT. Share on X

Outside of practice structure, the coaching methods used dictate much of what follows. Coaches who adopt a player-centered approach that leans more on guiding instead of telling really help players learn and discover concepts and solutions within the game. Question-based coaching, leading to guided discovery, is a terrific way to promote this. Instead of telling (or worse, yelling) about what went wrong, try some questions: What did you see? What were they trying to do to you? What did you do? What could you do better next time? Simple questions to promote reflections and little micro-debriefs help players learn.

Freelap USA: At what point do you see weightlifting entering the equation for a young football player? Are there any 1RM benchmarks of any kind at a particular age group?

Andy Ryland: The reality is that the football landscape as it exists already shapes training a great deal. For the youth athlete, it is driven by parents’ choice and is not team-oriented. Parents may take children to an outside facility if they have a desire to train. Training can be undertaken at any number of ages if it is proper training—who wouldn’t take their youngest to Jeremy Frisch’s facility?

Children are not mini adults. They have unique needs and shouldn’t be following a shrunken college or high school program, says @USAFootballMT. Share on X

We encourage parents to be educated and do their due diligence. Is it shiny or flashy and looks like what you see a college or NFL player doing on TV? Or do the coaches have a good background in youth development and working with children your child’s age? Remember, children are not mini adults. They have unique needs and shouldn’t be following a shrunken college or high school program.

High school, and sometimes middle school depending on the school’s setup and how it runs its PE/S&C, is really where S&C becomes part of an athlete’s “program.” Part of any good long-term athlete development (LTAD) program is to promote a healthy and physically active lifestyle for life. We hope athletes develop patterns and skills that can last a lifetime, so I’d say we generally take a “slow cooking” philosophy, even at this stage. USA Football’s FDM teaches athletic movement foundations first and adds speed, strength, and power as athletes become developmentally ready.

Strength and power are undoubtedly needed for high-level football performance, but I’m sure your readers know that even the highest-level coaches are having spirited debates over 1RM testing vs. tracking heavy 2’s and 3’s during the training block, squat jump and trap bar jumps vs. Olympic lifts, bilateral vs. unilateral, what is used as the primary lower body exercise, etc. With that said, instead of backing a specific set of exercises as key performance indicators (KPIs), we look more at supporting positive growth in the current training structures. We are huge supporters of having a certified S&C coach overseeing these programs in every high school, who are knowledgeable in the age group they work with and make sure kids undertake programs being implemented with best practices.

Freelap USA: What’s your take on the eventual specialization of the young athlete into football (or any other sport, for that matter)? What type of timetable do you have in regard to the number of sports played and what the emphasis might be throughout various stages of development: early adolescence, middle school, and high school?

Andy Ryland: This is another question where I think the existing sport structure here in the U.S. impacts the answer to a degree. We know that almost every athlete will specialize in college. Yes, there has been a rise in football/baseball players as quarterbacks in recent years, and there are a good number of players that do collegiate track early in their football career running the 60m or throwing heavy things. (Fun random trivia: Pro Football Hall of Fame safety Ed Reed is the record-holder for javelin at the University of Miami.)

If we know specialization is coming, do we need to force it earlier, such as in high school? On the flipside, for the non-blue-chip athlete, would they benefit by specializing earlier to gain that last bit of performance that propels them to play at the next level? Regardless of the situation, what we most hope for is that the choice to specialize is the athlete’s choice. Too often, it now happens because of adult pressures, be it coach, parent, or skill trainer.

At the younger levels, I think it is worth looking at LTAD models around the world and across different sports. There is a reason the earlier levels are littered with words like “discover,” “explore,” “sample,” and “play.” Kids at these ages need multiple stimuli to help develop general athleticism, coordination, and a wide range of movement skills.

Sport sampling is so important because it’s very easy to settle on a favorite sport out of those you have tried. Place no limits on sports that children may explore, says @USAFootballMT. Share on X

Touching again on the psychological side, children are often just trying to find what they enjoy and what sports fulfill them. Sport sampling is so important because it’s very easy to settle on a favorite sport out of those you have tried. Place no limit on sports that children may explore. This exploration should continue through high school.

Consider an athlete who plays football, soccer, and baseball growing up. Post-puberty, his body type is that of an offensive lineman. If he now, with this new size, wants to explore throwing for track and field or becoming a heavyweight wrestler, it’s not in good conscience that a coach should hold him back, as he may discover the sport he truly loves.

Since you’re here…
…we have a small favor to ask. More people are reading SimpliFaster than ever, and each week we bring you compelling content from coaches, sport scientists, and physiotherapists who are devoted to building better athletes. Please take a moment to share the articles on social media, engage the authors with questions and comments below, and link to articles when appropriate if you have a blog or participate on forums of related topics. — SF


Carr

Episode 50: Kevin Carr

Joel Smith: Just Fly Performance Podcast, Podcast| ByMark Hoover

Carr

Kevin Carr is the Head Strength Coach at Mike Boyle Strength and Conditioning in Woburn, Massachusetts, where he has coached since 2008. He is the Co-Founder of the Certified Functional Strength Coach certification and Movement as Medicine Massage and Movement Therapy Clinic. Kevin works with all levels of athletes, from Olympic competitors to the general population athlete. He is considered an expert in physical preparation and human function.

Coach Carr received a bachelor’s degree in kinesiology from The University of Massachusetts-Amherst and a license in massage therapy from Cortiva Institute-Watertown. He is a Certified Strength and Conditioning Specialist through the NSCA and has earned multiple other certifications, including FMS, SFMA 1+2, NKT Level 1 and 2, FRC, FRR, and PRI.

Kevin gives us an inside look at MBSC, detailing the principles they adhere to in terms of modifying traditional lifts, as well as his thoughts on single leg training. He explains the thinking behind the MBSC philosophy of using both single and double leg squat movements with their athletes.

In this podcast, Coach Kevin Carr and Joel discuss:

  • The MBSC philosophy on adjusting the traditional powerlifting movements.
  • Creating a balance between multi-planar work and traditional sagittal plane work.
  • Training using big picture thinking for the programming of loads and intensity.
  • Understanding shin angles in the crossover step.
  • Using crawling and other primal movements in training.
  • Developing low trap and thoracic strength.

Kevin can be found on Movement as Medicine as well as at MBSC.

Podcast total run time is 53:23.

Keywords: single leg, change of direction, movement

Behm

Episode 49: Andreas Behm

Joel Smith: Just Fly Performance Podcast, Podcast| ByMark Hoover

Behm

Andreas Behm is the Sprints and Hurdles Coach, Education Director, and Recruitment Director at ALTIS in Phoenix, Arizona. Andreas came to his current position from Texas A&M University, where he served for eight years as a volunteer coach assisting with sprints and hurdles. He was named the U.S. Olympic Track Coach of the Year by the USOC in 2012.

Behm coached Aries Merritt to an Olympic Gold and 110m World Record in 2012, and he recently coached Chinese Hurdler Xie WenJun to a fifth-place finish at the Doha IAAF World Championships. He has coached athletes who have competed at three Olympic Games and eight World Championships.

Andreas discusses various concepts for designing and managing the program for any athlete seeking to gain speed. He gives his thoughts on weekly training setups, individualizing potentiation sessions, the relationship of the hurdles to other events and athletic arenas, and addressing and instilling rhythm in athletes, as well as ideas on special strength work for sprinters.

In this podcast, Coach Andreas Behm discusses with Joel:

  • Philosophies he developed working with top coaches.
  • How to individualize potentiation sessions for athletes.
  • Training hurdles in relationship to other events.
  • Using wickets in the training program for hurdles.
  • Using special strength exercises with his athletes.
  • Designing individualized programs for each athlete.
  • Lessons learned in his years of coaching.

Podcast total run time is 1:02:40.

Andreas can be found online at ALTIS and SimpliFaster.

Keywords: speed development, hurdles, potentiation, special strength

Chao

Episode 48: Dr. Daniel Chao

Joel Smith: Just Fly Performance Podcast, Podcast| ByMark Hoover

Chao

Dr. Daniel Chao is the Chief Executive Officer at System1 Biosciences. He is a med-tech entrepreneur specializing in brain performance, and a member of the Board of Directors of Halo Neuroscience, based in San Francisco, which develops neuroscience-based technology that accelerates performance gains for elite athletes.

Dr. Chao graduated with a B.A. in Biochemistry from Cal State-Berkeley in 1993. He went on to the Stanford University School of Medicine, where he earned an M.S. in neuroscience in 1999 and his M.D. in 2002. His first product at Halo Sport stimulates the motor cortex during athletic training to accelerate gains in strength, endurance, and skill.

Dr. Chao goes in-depth on skill learning and the future of enhancing the brain for performance gains. He gives us his insights into learning, skill acquisition, and achieving better performance.  Topics include neuroplasticity, neural drive, chemical versus electrical stimulation to the brain, and more.

In this podcast, Dr. Daniel Chao discusses with Joel:

  • The usage of medical drugs in relation to the human brain and their effectiveness.
  • The brain and its relationship to endurance performance.
  • How chemicals can affect brain and learning performance.
  • Teaching the brain to generate more neural drive to increase the rate of muscle fibers firing.
  • The value of sleep.
  • The importance of intent during repetition to reinforce feedback from practice.

Podcast total run time is 52:14.

Keywords: brain functions, neural training, brain performance, neuroplasticity

Girls-Basketball-Pizza

A Simple Plan for Educating High School Athletes on Nutrition & Performance

Blog| ByMissy Mitchell-McBeth

Girls-Basketball-Pizza


Three sports, preparing lesson plans for two different subjects, other duties as assigned, and attempting to balance a life outside of work. Sound familiar? This was my life as a high school sport coach. Did I realize that nutrition was important for athletes? Of course—but I never quite seemed to find the time to address the topic thoroughly. Instead, I relegated nutrition talks to pearls of wisdom like “no fried food on game day” and kept a clear spot on my desk for a coach of the year award. After all, when knowledge bombs of that magnitude detonate, people notice.

Fast-forward several years. I’m the full-time strength and conditioning coach at Byron Nelson High School in Trophy Club, Texas. This allows time to put together curriculum like a Sports Nutrition 101 presentation. In a perfect world, this lesson would occur on day one of an athlete’s high school career. However, few aspects of training the high school athlete are optimal. So, when does this nutrition talk happen?

It happens when it happens.

Sometimes a class period is allocated during the pre-season or early off-season. Sometimes the longer presentation is broken up into 5-minute segments delivered at the beginning of team character lessons. Sometimes, there is no presentation. Instead, there might be a brief discussion held at the end of a team lift. Often, the best nutrition talks are ones that are off-the-cuff but relevant to the current circumstance. The temperature is 105 degrees this week? Perfect! Let’s talk hydration because the environment makes those little ears receptive.

To keep things as simple as possible, we discuss four basic principles:

  • Eat early
  • Eat well
  • Eat often
  • Build a performance-enhancing plate

If an athlete hears nothing else and abides by these guidelines, they’ll be off to a great start.

Eat Early

Breakfast is the most important meal of the day. End of topic, next slide! But is it? Ask a room full of athletes what they ate for breakfast, and you’ll hear something along the following lines:

Athlete 1: “Pop-Tarts and a Gatorade!”

Athlete 2: “Fast food!”

Athlete 3: *Blink* “Ummm” *Blink* (Translation: I didn’t eat and rarely do.)

In cases one and two, we have a black-and-white teachable moment: make better choices. But case three? Many athletes report not having an appetite in the morning or avoid eating before morning workouts because they fear they’ll get sick. Both are valid concerns. But we can train the digestive system to tolerate food just as we train the body to run faster and lift more.

We can train the digestive system to tolerate food before morning training just as we train the body to run faster & lift more, says @missEmitche11. Share on X

Although this may sound silly, a non-breakfast-eater may need to start small. The first day’s breakfast might be a single cracker. Day two: add another cracker. Day three: add peanut butter. Eventually, they should tolerate a more substantial amount of food before training.

In most cases, athletes should pair carbohydrates with protein at all meals and snacks.

For morning training sessions, however, a bland, high-carbohydrate snack can give athletes the fuel they need without causing digestive distress. Dry cereal, toast, granola bars, or a PBJ are all great options.

Eat Well

Eat well is another seemingly obvious statement, but one that can prove overwhelming. Read five articles and you’ll get five different answers as to what constitutes a healthy diet. Further complicating matters, high school athletes are often at the mercy of their parents or their school to provide meals. Again, the environment is rarely optimal, but the goal is to make better choices within that environment.

H.S. athletes are at the mercy of their parents or school to provide meals, so we teach how to make better choices with what's available. Share on X

The first order of business is to alleviate the concern that one can never eat Reese’s or Pop-Tarts again. Often, people hear the word nutrition and shut down because they see it as too restrictive. Instead of aiming for 100% compliance, most people are very successful following an 80/20 plan. This means eating for performance 80% of the time and eating for pleasure 20% of the time. It’s a great jumping-off point to discuss what fueling for performance actually means.

First up on the agenda is discussing the role and best choices for each of the macronutrients: carbohydrates, proteins, and fats.

Carbohydrates

Carbohydrates are the body’s primary source of energy. While the Keto diet may be all the rage, carbs should make up the bulk of the diet for athletes participating in high-intensity sports. Based on their chemical structure, carbs are classified as complex or simple.

While Keto may be all the rage, carbs should make up the bulk of the diet for athletes participating in high-intensity sports, says @missEmitche11. Share on X

Sources of complex carbohydrates are whole grains, sweet potatoes, rice, pasta, and bread. Simple carbohydrates are found naturally in foods such as fruit and are added commercially in the form of sugar. Athletes should primarily focus on consuming complex carbohydrates because these provide more sustained energy. Simple carbs are used as a quick burst of energy 30 minutes before training or as fuel during practices or games lasting longer than two hours.

Proteins

Ask a room full of athletes about the role of protein in their diets, and you’ll likely receive the emphatic reply, “protein builds muscles!” The importance of protein is widely known, yet few athletes consistently consume enough of it. One issue is that athletes are often unaware of the best sources of protein. Lean proteins like white-meat chicken, fish, low-fat dairy, whey protein powder, eggs, and egg whites are all great choices.

Athletes also may not be clear on when they should consume protein. They should eat protein with carbohydrates at each meal and snack, except immediately before exercise. Not only does this increase total protein consumption, but it also promotes stable blood sugar.

While most athletes have never considered blood sugar outside of the context of diabetes, it tends to be one of the easier concepts for them to understand. Low energy, the shakes, lack of focus during 3:00 pm classes, and being hangry are all states athletes can remedy by stabilizing blood sugar. Hangry gets a laugh out of the group and gets the point across that protein is more than just filling out a size smedium jersey. It has a direct effect on energy levels, focus, mood, and performance.

Fats

While a performance-enhancing diet is low in fat by design, athletes must include healthy fats in their diet. Not only are fats important for cell membrane structure and hormone production, but certain types of fats (omega-3 fatty acids) also serve as powerful anti-inflammatories.

Since a gram of fat contains nine calories (versus four calories per gram of carbohydrate or protein), adding healthy fats can increase caloric density without increasing food volume. Caloric density is critical for an athlete attempting to gain weight. Nut butters, olive oil, avocado, and fatty fish like salmon are all sources of healthy fats.

Eat This Not That
Table 1. This chart helps athletes manage their food choices.


With each of these three macronutrients, I share an eat this, not that chart and discuss relative digestion time. From fastest to slowest: Simple carbs < complex carbs < protein < fat.

I include digestion time for two reasons. First, it explains that a high-fat meal like fast food slows digestion and diverts blood flow away from the working muscles. This leaves an athlete feeling sluggish and impairs performance. Second, digestion times tie into our third principle: eat often to have energy available for training.

Eat Often

Ultimately, we want an athlete’s diet to maximize the amount of energy available during workouts and for recovery between sessions. This means eating a sufficient amount of quality calories, keeping energy (blood sugar) levels stable throughout the day, and staying hydrated. Though eating 5-7 meals and snacks throughout the day is a great guideline, it’s helpful for athletes to understand what this looks like within the scope of their day.

Meal timing around training is summarized as follows:

  • A full meal 3-4 hours before a training session
  • A high-carbohydrate snack ~30 minutes before training (skip protein pairing here—the goal is quick energy and ease of digestion)
  • Ingesting simple carbohydrates when a training session is longer than 2 hours
  • Consuming recovery nutrition 0-2 hours post-training session

Wonderful, all set! Except this isn’t how school works. At. All. Based on class schedules, some kids have lunch at 10:30 am. After-school practice is five hours later. For these athletes, the neat little schedule of meal-snack-meal-snack, etc., doesn’t work.

Instead, their eating schedule could be meal-meal-snack-snack-snack-meal. Some might opt to snack at 10:30 am and take their meal to class so they can eat around noon, 3-4 hours before practice. Again, the high school setting is never optimal. Good news! Life rarely is—we have to adapt and prepare accordingly.

After we’ve laid out the schedule, we discuss the three goals of recovery nutrition:

  • Repair—take in protein to repair muscle damage accumulated during the training session
  • Replenish—consume carbohydrates to replace glycogen used for energy during training
  • Rehydrate—drink fluids to match loss during a training session

Within 45 minutes of exercise, athletes should drink fluids and eat a snack with a carb:protein ratio of between 3:1 to 4:1 grams. An easy and relatively cheap solution during this 45-minute window is 12-20 ounces of low-fat chocolate milk. Within 2 hours of a workout, athletes should consume a full meal following the plate method, our fourth and final concept.

The Plate Method: Putting It All Together

With most nutritional bases covered, it’s time to discuss how this looks within the context of a meal. In general, an athlete’s plate should be ½ complex carbohydrates, ¼ lean protein, and ¼ fruits and vegetables. A small salad and healthy fats are great additions to the well-balanced plate.

Performance Enhancing Plate
Image 1. While this presents an ideal meal for athletes, we won’t find it in school cafeterias.


A solid template, but still requires a little creativity. Of course, chicken, brown rice, and broccoli make an excellent meal, but realistically, how many student meals look this way? How often does that plate pass through a school cafeteria? Spoiler alert: never.

Our group activity comes in handy here. I place athletes into groups of 2-3 and direct each group to write down a meal that would benefit an athlete. For efficiency’s sake, I assign each group either breakfast, lunch, or dinner and provide a sheet of paper with a blank plate printed on it to guide their selections. But we don’t start quite yet.

Since kids can be incredibly literal, generalizing the plate method to traditional meals can be a disaster without a little nudge. Instead of turning them loose and having five groups present a strange amalgam of sardines, broccoli, and pasta (true story), I lead the activity by presenting a few options they might overlook to get to the “right” answer:

Sample Meal 1: Breakfast Burrito

  • Corn tortillas (complex carb)
  • Eggs, turkey sausage, a sprinkle of cheese (protein)
  • Fruit (fruit)

Sample Meal 2: Sandwich Box

  • Whole wheat bread, side of baked chips (complex carb)
  • Turkey, cheese (protein)
  • Lettuce, Tomato, side of fruit (veg/fruit)

Sample Meal 3: Spaghetti

  • Pasta (complex carb)
  • Lean ground beef (protein)
  • Red sauce, side salad (veg)

Armed with a few ideas, groups have about two minutes to build their plates. After the time expires, the small groups present their culinary masterpieces to the team. Tragically, Pop-Tarts have yet to make the cut. And now they know that—though a legitimate source of protein—any mention of sardines will result in the loss of speaking privileges due to the retching noises it elicits from the crowd.

Wrapping It Up

As with many areas of athletic performance, when it comes to nutrition, full-time consistency beats part-time intensity. The more times an athlete is exposed to information, the more likely they are to act upon it.

When teaching nutrition to athletes, full-time consistency beats part-time intensity, says @missEmitche11. Share on X

In addition to formal presentations and post-workout huddles, coaches can model these behaviors in their own diets, ensure that team meals include the four principles, and educate parents. It takes time and effort, but as the saying goes: the person at the top of the mountain didn’t fall there.

Since you’re here…
…we have a small favor to ask. More people are reading SimpliFaster than ever, and each week we bring you compelling content from coaches, sport scientists, and physiotherapists who are devoted to building better athletes. Please take a moment to share the articles on social media, engage the authors with questions and comments below, and link to articles when appropriate if you have a blog or participate on forums of related topics. — SF


Smith2

Episode 47: Joel Smith Q&A #2

Joel Smith: Just Fly Performance Podcast, Podcast| ByMark Hoover

Smith2

Joel Smith is the founder of Just Fly Sports and the JFS Podcast. Joel is an assistant strength and conditioning coach at the University of California, Berkeley, where he works with swimming, tennis, and water polo. He is the author of the books Vertical Foundations, Vertical Ignition, and most recently, Speed Strength. Before coming to Cal-Berkeley, Smith coached track and strength and conditioning at Wilmington College of Ohio.

Coach Smith earned a bachelor’s degree in exercise science from Cedarville University in 2006 and a master’s degree in the same area from Wisconsin LaCrosse in 2008. He is a Certified Strength and Conditioning Specialist through the NSCA and is also a USATF-certified coach.

Joel takes questions from listeners in this episode, covering a range of topics from strength and vertical jump to bounding and vertical jump transfer, training philosophy, and much more.

In this podcast, Joel discusses:

  • The training methods of Marv Marinovich.
  • Strength to vertical jump ratios.
  • If Nordic curls are helpful in improving jumping.
  • Practical ways to train vision in team sports.
  • His concept for improving the educational system for sports performance coaches.
  • Books he wished he had read at a younger age.

Podcast total run time is 45:05.

Joel Smith has written articles for SimpliFaster here.

Keywords: strength, speed, jumping, education, coaching philosophy  

Football Player Running

The NFL Combine 2.0

Blog| ByJustin Ochoa

Football Player Running


Every year, the NFL Scouting Combine proves to be the biggest job interview for about 250 young men trying to fulfill their lifelong dream of playing in the National Football League. For some, it can enhance their draft stock tremendously. For others, it may have a detrimental impact on their NFL draft position and, ultimately, their career.

Truthfully, I really enjoy the NFL Combine. I live in Indianapolis, which has been the host since 1987, so I had the pleasure of attending the Combine a few times in my professional career before it became a live spectator event. While it may have flaws when viewed through the lens of strength and conditioning, the overall event is run well, it’s inspiring to see the great performances, and it has a positive impact on my city.

The current battery of universal Combine drills may not feature the best choices for displaying an athlete’s potential in the sport, says @JustinOchoa317. Share on X

With that being said, like all coaches involved in football at any capacity, I can’t ignore the fact that the current battery of universal Combine drills may not feature the best choices for displaying an athlete’s potential in the sport. In addition, the style of training leading up to the event may also not be the best choice in terms of physical preparation for football.

Every year, when it’s time for the Combine, we see the resurgence of coaches (including myself) bring up valid critiques on how relevant the Combine process actually is:

  • These guys are just training to beat a test/drill…
  • What does the 225 bench have to do with playing football…
  • The “pro agility” test isn’t really a display of true agility…

Again, these are all valid thoughts that definitely open up some conversation on the topic. If you’re not a fan of the current set of drills, what would you change? I decided to explore that and come up with a hypothetical NFL Scouting Combine 2.0.

Below is my spin on the current Combine drills, what changes I think the NFL could benefit from, and why. For the sake of the article, I only looked at the “Big 6” drills, which everyone typically performs, regardless of position. I don’t take into account things like the Wonderlic Test, player interviews, position drills, injury evaluations, etc.

The “Big 6” consists of:

  1. 40-yard dash
  2. 225 bench press
  3. Vertical jump
  4. Broad jump
  5. 20-yard shuttle
  6. 3-cone drill

#1. Change the 40-Yard Dash (Kind of)

Right off the bat, we have to talk about the most popular drill of the Combine—the 40-yard dash. There is such an obsession over this drill because it focuses on speed, one of the biggest separators in team sports.

This drill can make or break a person’s draft stock, which is ironic because:

  1. It showcases a lot of top-end speed in a very acceleration- and COD-based sport.
  2. It’s one of the easier tests to hack with technique and Combine secrets for instant improvement.
  3. Everyone, regardless of position, runs it. Even though I love to see the hogs get rolling, their 40 time isn’t the most applicable drill option.

The obsession with this drill actually started in the 1940s, long before the Combine became what it is today. The idea behind it, at the time, was that the average punt had a hang time of 4.5 seconds and an average distance of 40 yards. In theory, that meant coaches were looking for guys who could run that distance in that time to be able to efficiently cover punts.

The 40-yard dash evolved into something much greater and even trickles all the way down to the grassroots level. There are so many misguided parents and youth athletes when it comes to speed, football preparation, and the 40 times—it’s truly getting out of control.

The Combine should make better use of time splits in the 40-yard dash and rank positions based on those splits as if they were part of their own separate drill, says @JustinOchoa317. Share on X

It’s clear that the 40-yard dash is here to stay, and it should. However, here’s my proposal for the NFL Combine 2.0. It’s very simple: just make better use of time splits and rank positions based on those splits as if they were part of their own separate drill.

40 Yard Splits
Figure 1. What does an athlete’s speed really look like? Breaking down the 40-yard dash into splits can give a better indication of how speed might translate by position on the field.


Yes, the NFL already takes splits now, but those numbers are seldom promoted or publicized. I had to dig to create the chart above, which illustrates how different a 4.28-second 40-yard dash can actually look.

We only see the final 40-yard dash time for all players and positions, because that’s what gets the attention of the viewers. Having each individual split as its own metric and its own drill would not only benefit the scouts, but also the athletes and spectators by providing more in-depth info on the drill.

0–10 Yards

This is an essential metric for all potential NFL athletes, because we get to see pure acceleration numbers. The sport of football requires acceleration and change of direction (which is essentially deceleration in one direction with immediate acceleration in another).

This 0- to 10-yard split gives scouts a better look at those power and acceleration qualities, especially if you consider the position each athlete plays. If two offensive linemen have an identical 40 time, but one has a faster 0–10 split, I would think that player has better acceleration power and would be the more enticing draft prospect.

10–30 Yards

We could really look at this as a flying 20. This would be great to see for skill positions. A lot of their work is done in a 20-yard radius and, in many cases, moving from tracking the ball, a player, or a gap and getting to top speed in that direction as fast as possible.

The NFL does capture 10- and 20-yard splits, but again, we never see those numbers. Those still count the drive phase, and I would love to see more of that fly-in speed as a metric of its own.

This isn’t saying the 0–10 or the entire 40 yards isn’t also important; this is simply another metric that can let GMs see the bigger picture. If you’re looking at two prospects with the same 40 time, looking at splits can tell you their strengths and weaknesses, and then you can take the demands of their position into account for further review.

40 Yards

Of course, we have to keep the original 40-yard distance in the mix. The world would come to a burning end if the Combine ever dropped this drill. It’s not a “bad” drill or pointless by any means, I just think using the splits more specifically and more publicly could do a lot of good for all athletes, teams, and spectators.

#2. Velocity-Based Bench Press

While we didn’t completely nix the 40-yard dash, I think the bench press test needs a complete makeover. In my opinion, out of all the drills in the entire Combine, putting 225 pounds on a barbell and getting as many reps as possible has the least translation to the sport.

Is it awesome to watch? Yes. But is it truly a metric that tells a story of what kind of athlete someone is? Not really.

For many of these men, it is not a test of strength at all. Many times, it ends up being more of an endurance drill with rep counts in the 20+ range and time under tension about 1200% longer than the average football play lasts.

I’ve also heard several horror stories of torn pecs and destroyed shoulders as a result of training for the max rep 225 bench press test. That obviously won’t help draft stock or career advancement at all.

Instead, let’s step into the year 2020 and use some technology to better utilize the bench press test at the Combine. My proposal is to use a velocity-based training system to capture bar speed and power output on an athlete hitting their body weight (on the bar) for 3 reps.

I propose making over the bench press test with a velocity-based training system to capture bar speed and power output on an athlete hitting their body weight (on the bar) for 3 reps. Share on X

This is more athlete-specific and sport-relevant. When an athlete puts their own body weight on the bar for this test, the benefits are threefold:

  1. They’re not going to failure and risking injury (plus, it may be even lighter than 225 for some athletes). If a potential pro athlete can’t bench press their body weight, it can raise some questions—you don’t need a max rep test to determine that.
  2. This weight is relative to the athlete and the other potential draftees in their position. For instance, 225 pounds for a right tackle is going to look different than 225 for a cornerback. It not only allows you to compare guys who are around the same size/position, but also compare the metrics to other positions with which they may often be paired in a game (e.g., DB and WR).
  3. We get to look at velocity (speed) and watts (power), which are much more important in the game of football than a redundant weight on the bar for max reps. These figures display speed and power, or possibly a lack thereof.

Ochoa Bench Press
Figure 2. The force-velocity relationship in the context of a velocity-based, 3-rep bench press assessment.


The test will last about the same amount of time as a football play, tracking athletic qualities that matter during those plays and keeping it relative to each individual with an ability to globally compare in a much safer way. Everyone wins.

#3. Reactive Strength Index Jumping

I won’t beat around the bush… It pains me to say this, but the vertical jump test is gone. I want to make it crystal clear that I am very much in favor of vertical jump testing, but as you read along, you’ll see why it doesn’t make the cut for my new and improved Combine.

The vertical jump is an amazing showcase of force production and athleticism, but I believe the broad jump is just as good. Unpopular opinion: I think it’s even better in some situations.

Showcasing power straight up and down is great, but I love the broad jump because of its horizontal, NOT vertical, displacement. Yes, there is jumping in football. You’re taught to catch balls at the high point, it’s useful for breaking up passes, etc. I totally get that, but so much more of the game takes place on the turf and not in the air. I think the horizontal power production matters more in this case, but we’ll talk more about that later.

My proposal is to swap out the vertical jump test and get a reactive strength index (RSI) reading for each athlete with a box drop jump.


Video 1. A football player performing an RSI box drop jump. I believe we should swap out the vertical jump test at the NFL Combine and use a box jump drop to get an RSI reading.

In a nutshell, RSI is a metric that represents an athlete’s ability to produce maximal forces in minimal time. In the example of the box drop jump, it takes into account jump height versus ground contact time. This scoring system tells us the efficiency of an athlete’s stretch-shortening cycle (SSC), which is an essential function in speed, agility, quickness, and—of course—jumping. The higher the RSI, the better the athlete’s SSC.

Just because someone can jump extremely high doesn’t mean they have an impressive SSC. A slow, high, jump doesn’t really tell us much in relation to football. In fact, many athletes with a slow SSC often have higher maximal strength capabilities, while fast SSC athletes often have higher reactive strength capabilities. For the sake of this test, I think the reactive piece holds more weight due to the nature and demands of the sport. Here’s an example of the same athlete with a slow versus fast SSC on a drop jump.

The vertical jump is cool, but I think using a box jump to get an RSI reading gives us a much better look at the important factors of an athlete’s abilities, says @JustinOchoa317. Share on X

I think that people could become obsessed with this test to the same extent they are with the 40-yard dash right now. We actually run this test as part of the intake and monitoring process at our facility, and it’s truly an amazing display of athleticism to see the RSI scores elite athletes can achieve. It’s definitely something our athletes take pride in and love to use to compete against others and themselves.

How cool would it be to see an offensive lineman get a 2.89 RSI score at 300 pounds? That is a guy that I would absolutely love to protect my quarterback.

The vertical jump is cool and all, but I think this type of data tracking gives us a much better look at the important factors of an athlete’s abilities. There are tons of options out there as far as what devices or equipment can track RSI, and it would be one of the more seamless changes on this entire list.

#4. Broad Jump, You Can Stay

As mentioned earlier, I really like the broad jump, both as a training tool and as a test. Obviously, context is key, but in this specific case I chose to scrap the vertical jump, so we can keep the broad jump.

To recap, the main reason for keeping the broad jump over the vertical jump is because of the horizontal displacement expressed in the movement and how that relates to football. That triple extension looks a lot like a sprint, and I love that.

Another reason is that I believe the broad jump is much harder to cheat than a vertical jump. On a manually tested vertical jump, there are many ways an athlete can cheat the system. The NFL obviously runs a tight ship in their testing protocols, but I’m sure athletes can still use some of these to get a slight advantage.

One way an athlete can cheat the vertical test is by limiting their initial reach. You reach up, then jump up, and the difference between those heights is your vertical jump result. This happens at pro days and other combines (especially high school), but maybe not so much on the big stage of the NFL Combine. It is still worth mentioning, though. Athletes can fake how high they can actually reach, making the initial reach lower, which adds to the end results of the jump.

It’s an unpopular opinion, but I think the broad jump is even better than the vertical jump in some situations, says @JustinOchoa317. Share on X

Aside from that, since this is a reaching jump test, your reach is obviously crucial. I’ve seen athletes access immediate increases in range of motion when it comes to reaching simply by performing some SMR on their lats, triceps, and/or pecs. If you alleviate the neural tone of those muscles, you can get better shoulder flexion. More shoulder flexion results in a better reach overhead, which can help an athlete touch maybe 1–2 more tabs on a Vertec and increase their score.

The broad jump definitely has some technique to it, but for the most part, what you see is what you get, and that is a great thing for Combine testing.

#5. 3-Cone Drill, You Can Stay Too

The 3-cone drill, or “L drill,” is another classic multidirectional drill that can be used in training or testing. In this case, I decided to actually keep this drill as is for the new and improved Combine event.

I really like this drill because it features acceleration, change of direction, and most of all, a little bit of curved running. That curved running piece, even if it is subtle, is really important for football players, as the game is not played on perfectly executed right angles. The game happens in all planes of motion, and I really like how this test features that aspect.

Is this a true test of agility? Not technically, but we can see plenty of different movements in one drill and I think that is still important, even in a closed-circuit environment.

I say all this leading up to the next change, which is to get rid of the “pro agility” test (another fan favorite). Similar to the broad jump versus vertical jump situation, one had to go, and I am in favor of the L drill for the reasons listed above.

#6. Reactive Agility Test

Last, but not least, we arrive at the pro agility test. Also known as the 5-10-5 or the 20-yard shuttle, this is another beloved Combine drill that, unfortunately, has to be replaced.

The 5-10-5 is not a bad drill, but I would propose replacing it with something a little bit more complex to showcase more of an athlete’s true agility. What I think the pro agility drill is missing is the reactionary piece. With today’s training technology and equipment, we can actually expose athletes to a more unpredictable and reactive drill that still requires them to showcase all the agility they would in the standard pro agility drill.

We can use today’s technology to expose athletes to a more unpredictable & reactive drill that still requires them to display the agility they would in a standard pro agility drill. Share on X

As is, the pro agility is another test that is extremely easy to hack for a better score. We know that a better score doesn’t necessarily mean a better athlete. Being good at a test doesn’t always translate to real life. I took Spanish courses in college all the way up to 400-level, no-English-allowed classes, but I can’t speak a lick of Spanish today. I was good at the tests, but it didn’t translate. This is how I feel about this particular test and several others listed above.

Instead, we can add some unpredictable elements to an agility-style drill. The initial setup can be the same as the 5-10-5 with three cones/lines all 5 yards apart, and then beyond the end, two end cones are a set of “finish line” timing gates on each side in the shape of a Y.

Ochoa Pro Agility
Figure 3. Diagram of an open, reactive agility test that more closely matches the decision-making element of agility on a football field.


The athlete starts in the middle, just as they would on a pro agility test. A screen displays either “L” or “R” to initiate the start of the clock, and as soon as that command comes up, the athlete begins their standard pro agility in that direction. Instead of a 5-10-5 yard sequence, there is a 5-10 sequence and then a 45-degree cut (5 yards) to finish the drill. That cut is also signaled by a timed command of L or R as soon as the athlete crosses the original start line. This gives them 5 yards to read and react to make the proper cut and finish.

We haven’t strayed too far from the original 5-10-5—about half of it is the same—but we’ve added a reactionary piece that I think is a huge indicator of true agility. We’ve also added a change of direction in a different plane of motion with the 45 degrees. This drill is equally as simple, and it will further challenge the athlete not only physically, but mentally as well.

A More Accurate Reading on Athletes

I think this battery of drills for the new and improved NFL Combine 2.0 would be incredibly entertaining to watch, but also give players, coaches, GMs, and fans a better reading on the athletes competing for these draft spots.

Change can be a great thing and athletes have evolved so much over the years. I believe any or all of these changes would have a positive impact on the Combine, says @JustinOchoa317. Share on X

It’s pretty apparent that the NFL loves tradition, but change can be a great thing. Athletes, in general, have evolved so much over the years. The things that people are capable of now are incredible, especially if you compare athletes today to those 30 years ago. While this was a hypothetical makeover of the current Combine from an S&C coach’s perspective, I do believe that any or all of these changes would have a positive impact on the event.

Since you’re here…
…we have a small favor to ask. More people are reading SimpliFaster than ever, and each week we bring you compelling content from coaches, sport scientists, and physiotherapists who are devoted to building better athletes. Please take a moment to share the articles on social media, engage the authors with questions and comments below, and link to articles when appropriate if you have a blog or participate on forums of related topics. — SF


Johnson

Episode 46: Yosef Johnson

Joel Smith: Just Fly Performance Podcast, Podcast| ByMark Hoover

Johnson

Yosef Johnson is the owner of Ultimate Athlete Concepts, a company based in Grand Rapids, Michigan, that he started in 2003 with the mission of “providing top quality information from the world’s leading coaches, scientists, and researchers.” Johnson has a quarter century of experience in the world of sports performance training. He has worked with athletes from the youth to pro levels and oversees the physical education program for the Reeths-Puffer School District.

Coach Johnson has had the unique privilege of close correspondence with top Soviet experts in the world of sport and human performance. He is one of the few coaches in the world to have personal relationships and mentorship with Dr. Yuri Verkhoshansky, Dr. Anatoliy Bondarchuk, and Dr. Michael Yessis. Coach Johnson has helped educate coaches and spread the popularity of the 1×20 strength training system invented by Dr. Yessis. He consults with and mentors both scholastic and private sector strength coaches.

Yosef lets listeners inside his connection with “The Big Three” in Russian sport performance methodology (Dr. Bondarchuk, Yuri Verkhoshansky, Dr. Yessis). He shares that knowledge with Joel and listeners of this episode. He discusses the 1×20 method that is gathering more and more notoriety, and also his knowledge of special strength methods, biomechanics, and long-term development.

In this podcast, Coach Yosef Johnson and Joel discuss:

  • When and where special strength exercises should be placed in an athlete’s program.
  • Ideas on what intensity levels to start young athletes with and how to progress.
  • The 1×20 system and its training effect.
  • Limiting factors of general strength and when to move into other modalities.
  • In what instances he would suggest using Olympic movements.
  • Anecdotes of his time with Dr. Bondarchuk.

Yosef Johnson can be found talking about Soviet strength and performance training on SimpliFaster.

Podcast total run time is 55:25.

Keywords: 1×20, special strength, Soviet System, general strength

Force Plate

A Practical Guide for Using Force Plates in Elite Sports

Blog| ByJake Schuster

Force Plate


Hundreds of professional sporting organizations are now using force plates due to their affordability and feasibility. Testing takes less than a minute to perform, provides rapid feedback, and produces objective data with high reliability when used properly.

Unfortunately, many people overcomplicate this tool or find the complexity daunting. This post serves as an actionable resource for those wanting to advance their evaluation of neuromuscular performance using force platforms. It’s no more or less than the musings of one avid force plate user.

While I’ve been incredibly fortunate to have extensive guidance in this area from the very best, including the outstanding mentorship of Dr. Daniel Cohen and further guidance from the likes of Dr. Phil Graham-Smith, Drew Cooper, and Daniel Martinez, any errors below are mine. Academic and detailed texts exist in the literature and more are on the way. I mention these at the end of this post.

A Word on Force Plates and Professional Growth

Many strength coaches are either into using technology or not. Hopefully, most are realizing that one way or another, technology is now a part of our jobs. Many have begun to use force plates and found themselves overwhelmed with the information and options or ended up overcomplicating matters and confusing athletes and staff—sometimes making their lives more difficult than necessary.

Throughout this post, I refer to preferred minimalist approaches. And while I offer significant detail, the vast majority of force plate users will benefit most from the information on protocols, setup, logistics, and data use—not complexity, test selection, or niche variables. Of course, this comes back to the concept of simplicity done very well, which is overused but still true!

In the day-to-day operations of sports science, we often seek answers to the following questions:

  1. What and how much did the athlete do. How hard did they work? What was the load?
  2. How did they respond to the load? What is their current status and readiness?
  3. How normal is the above, and if not, what are the necessary changes to the next prescribed load?

The first two questions have an important dovetailing dynamic that could use more attention, while the third question is a matter of systems engineering, analytics resourcing, and individual intelligence.

Given that leading sports science professionals openly admit that as a field, we are poor at assessing load, why are we not focusing more on response to load? After all, it matters less what has caused stress than the awareness and accommodation of the stress itself.

Understanding response to recent load is perhaps more valuable than information on the amount of the load, says @CoolHandJakeGS. #forceplates Share on X

Put another way, playing and running more than usual in last night’s game is not functionally different from a poor night’s sleep regarding today’s decisions. This detail and differentiation are useful, but we aren’t there yet. If we all agree that each day we are tasked with communicating to stakeholders the readiness of each athlete and our professional advice on their management, it’s fair to assume that clear and detailed understanding of athlete status—including their response to recent load—is significantly more valuable than information on the amount of the load.

Enter force plates.

Background: Technology, History, and Biomechanics

Force platforms, also called force plates, are (typically metal) surfaces upon which athletes can perform a variety of movements. The plates are under-rigged by strain gauges or load cells that measure force and time at high-frequencies.

Jumping, landing, and isometric movements typically are assessed through the derivations of impulse to produce velocity, momentum, and flight outputs and from these measures, power, acceleration and displacement. Assessments of the forces applied to and by objects are categorized as kinetic. Kinematics (or the motion of objects), on the other hand, require more (and much more expensive) technology and specialized biomechanical and statistical analyses.

Until recently, force plates often featured significant limitations on their feasibility in daily sporting environments:

  • Single, large, and very heavy platforms prevent limb-specific (and therefore asymmetry) outputs
  • Portability issues
  • Labor-intensive data extraction requiring both specialized computing skills and prohibitive amounts of time
  • Software limitations

Currently, there are multiple available technologies providing instantaneous feedback to users with automatic variable calculation in the dozens, with often over one hundred variables available to compare and contrast athletes and inter-individual variations over time. Of important note is that this article will focus on applications of uni-axial force platforms, measuring only vertical displacements; tri-axial force platforms providing insight on horizontal displacement and thus opening great possibilities for dynamic multidirectional assessments are of outstanding value in cases where an organization has the resources, time, buy-in, standardization of testing, and specialized skillsets available to evaluate the resultant data. However, as the vast majority of practitioners and organizations either do not have such resources and/or have not yet integrated “simple” vertical assessments into their programs for the greatest possible return of value, I will focus on those such applications here.

Force Plate Photo
Image 1. Jake Schuster (pictured, left) administering Bilateral Countermovement Jumps (CMJs) on ForceDecks forceplates. CMJs serve as a robust, easy-to-administer method of evaluating neuromuscular status.

Common Procedures: Types of Tests and Typical Prescriptions

We categorize tests on uniaxial force plates as jump-landing (or jumps), landing, or isometric movements. With rare exceptions, these evaluations are designed explicitly for standardized neuromuscular evaluations. This does not mean generic, nor without intended or possible application and transferability to sporting qualities. It means that the movements are not sport-specific and instead provide neuromuscular information from which we can derive sport-specific insights.

Force plate movement tests are not sport-specific; they provide neuromuscular information from which we can draw sport-specific insights. Share on X

An example is a sport where a technical coach perceives an athlete has a weakness with change-of-direction ability. When this happens, the physical preparation staff executes an intervention and examines pre- and post-measures of rates of force development in the eccentric phase of a countermovement jump. The staff uses this information to assess an objective marker of outputs representing the qualities necessary to execute the key movement skills.

Common Tests

In applied settings, the two most common tests performed are the double-leg countermovement jump (CMJ) and the isometric mid-thigh pull (IMTP). Each has variations, including a single-leg CMJ (SLCMJ) and the use of either a squat rack (IsoSquat) or parallel bars for the isometric pull. I encourage you to consider your population and facility logistics to decide the appropriate application.

The next most common tests are the squat jump (SJ) and drop jump (DJ). The SJ is excellent for examining isolated concentric qualities—jumping ability in the absence of an elastic component and countermovement.

Shot-put throwers, football linemen, rugby forwards, and ice-skaters probably all benefit more from regular SJ testing than other athletes, but it has its place in initial profiling and intermittent monitoring for any athlete. For example, quarterly or at each training-cycle changeover period.

Comparing SJ and CMJ outputs, such as jump height or peak power, provides context on eccentric and concentric qualities (sometimes called the eccentric utilization ratio). Output comparisons also provide a nice second layer of jump analysis that examines training adaptations or retention of qualities over periods of time, such as in-season.

The DJ is a very interesting test. For many practitioners, it’s the go-to test because it’s the method through which we can derive the most information—contact time as well as flight time—from jump mats and similar technologies.

I’m not a huge fan, however. Cases where athletes drop jump reliably are far too rare, and athlete aversion to the impactful movement is far too common. The test does help examine how an athlete lands on the ground and their ability to turn around and leave the ground as quickly as possible. But the movement is far less idiot-proof (easy to teach, hard to mess up à clean data) than CMJ.

The drop jump has a place in profiling and intermittent testing, but it has limited reliability and athletes are especially averse to it when sore, says @CoolHandJakeGS. Share on X

Also, athletes can use technical strategies that result in false-positive performances. Or they can feel far less coordinated than they do with similar sporting skills, which creates false-negative information. DJ has its place in profiling and intermittent testing, but for me, it’s not sufficiently valuable as a regular testing method.

Another common and essential jump test is the land-and-hold (LAH). LAH is a profiling and intermittent monitoring tool that’s criminally underrated. While we can learn much information from the landing of the CMJ, we derive more specific information and deliberate context from an isolated landing. I expect future research will demonstrate its use for lower body injury screening and rehabilitation. I imagine this as a centerpiece for diving, gymnastics, throwers, and aerial skiers.

The land-and-hold jump test is my dark horse pick for the top three must-do tests in any setting, says @CoolHandJakeGS. #forceplates Share on X

Performed single- or double-leg, the LAH is my dark horse pick for a top three must-do tests in nearly any setting. Credit to Will Morgan (Australia Winter Sports) and Phil Graham-Smith for pointing me toward this one and up-skilling me on it.

Finally, position-specific isometric tests have become quite popular recently, with a range of variations offered in the literature and current practices. Common favorites are the calf, hamstring/posterior chain, and shoulder tests.

Position-specific isometric tests are very useful, and demand for upper-body tests will grow as throwing and racquet sports modernize. Share on X

I’ve used all three in track and field and found them to be very useful. The supine single-leg posterior chain showed the strongest correlation to anything we measured to 60m and 100m sprinting performance in our Florida State sprinters during the 2017-18 season. While traditionally force plate tests have looked at lower body or total body movements, the demand for upper-body specific tests will continue to grow as throwing and racquet sports modernize (Ashworth 2018).

When to Administer Tests

For ideal best practice in any running-based or field and court sport, I suggest administering all of the above tests at the start of the season (and both start and end of preseason, if feasible). Administer the LAH, SL-CMJ, secondary Isos, and SJ tests monthly or at the turn of each training phase, and the CMJ + IMTP (or variation) or LAH as often as possible, preferably >3x/wk.

Test Administration and Cueing

As with any data collection, standardization and ecological validity are extremely important. One common fallacy when discussing CMJ eccentric variables is that they are not reliable. This is a byproduct of many studies that did not include cueing toward maximal velocity-effort.

When administering a CMJ, I cue the athlete to “be explosive and jump as high and as fast as you can!” If the athlete jumps as fast as they can, jump height will be true and, therefore, sensitive—reliable data is sensitive data.

Force Plate Drawing

Eccentric variables vary far more than concentric variables for the following reason: athletes are highly capable of altering jump strategy—often subconsciously or unintentionally—to take more time than typical for their countermovement (eccentric phase) to produce normal jump outputs. A classic example of a fatigued athlete is one who takes 100-200ms more than normal for the eccentric duration and yet produces a completely normal jump height. This is a common and brilliantly useful situation that practitioners should be looking for when administering CMJs.

When an athlete is cued to jump explosively and as fast as they can (often a second time after a slow first jump) during their attempts to jump quickly, their jump height may drop off, revealing fatigue. Conversely, a fresh athlete often displays reduced eccentric duration more than they will increased jump height or peak power.

With the IMTP & IsoSquat tests, and really any isometric test, pay attention to the athlete’s stability before the movement. The cueing depends on whether you’re interested in the rate of force development (RFD) or only peak force measures. Many practitioners do 1-3 reps of each, first cueing to ease into a true max and then instructing an explosive and fast pull.

Outputs: Variables and Meaningful Data

Force plate data is best examined through a lens zooming in and out. Many variables are useful to watch when profiling and screening athletes and when looking at long term trends. More acute and ongoing observations, however, are better narrowed to a handful of metrics known to be reliable (and therefore sensitive) and pertinent.

Where machine learning techniques are feasible, examining raw data or a large menu of variables can be beneficial. During week to week testing of the rhythms of a season, 3-6 variables from the CMJ are often sufficient to provide actionable monitoring information within healthy populations. The IMTP/IsoSquat, SJ, DJ, and LAH provide only a few variables that I’ll detail at the end of this section while the rest will focus on CMJ outputs.

Although there is always a place for loading up all of a players’ time-course data and examining their trends, I find it useful to break down typical “data views” to one of the following contextual purposes (each of which I examine more fully in the following sections):

Profiling and Screening: Initial, healthy baseline data to compare and contrast athletes within and between groups, evaluate their condition at the end of the offseason/start of the preseason, and filter for potential high-risk individuals.

Intermittent Monitoring: Monthly, quarterly, or at intervals representing the start or end of training and competitive phases specific to intended adaptations of physical statuses. Ideal for examining training effects and retention of qualities during competitive and high volume or low rest periods.

Load-Response Monitoring (LRM): As frequent as possible, with contextual accommodations for the acute and heteroscedastic nature of single data points. Match Day +2 is a typical LRM examination, comparing athlete data to their normal MD+2 as well as MD or MD- data. Discovering how an athlete typically enters a loaded period and how they respond to loads can be hugely beneficial for athlete management.

Rehabilitation: When an athlete is injured and in the return-to-perform (RTP) process, what we examine, how we examine it, and which tests we perform may be quite unique.

Profiling, Screening, and Intermittent Monitoring

In my experience, the variables of particular note in profiling, screening, intermittent monitoring, and long term athletic development (LTAD) (year to year) are often the same:

Jump Height. While we should not ignore this variable, we best treat it as a contextual placeholder representing overall athleticism and should not provoke reactions from day-to-day variation nor false negatives where stable. Mechanical and jump strategy variables described below are more sensitive.

Concentric Impulse and Eccentric Deceleration Impulse. These are phase-specific representations of force outputs. Deceleration, typically dependent on software applications, represents the eccentric phase minus unloading. Impulses are rate-vectors reported as Newton-Seconds (Ns). Impulse is the amount of force applied within the time taken. We can visualize it as the area under the curve/slope on a force-time trace. These (especially concentric) are closely related to jump height and are fairly stable, yet can evolve significantly with training effects and training age.

RSImod. Probably the ultimate catch-all jump performance metric that is also synonymous (though calculated slightly differently) with Flight Time:Contraction Time, RSImod encompasses how high and how fast. Anecdotally, RSI may continue evolving across training age after jump height plateaus, and there may be individual athletes who jump through the roof compared to those who jump very high and do so very fast!

Peak Power (relative and absolute). A mixed variable because explaining what exactly power is can be extremely ambiguous. Power is another interesting variable that provides isolated comparisons and, in contrast to jump height and RSI, can encompass body mass as a factor.

Load-Response Monitoring

For load-response monitoring, RSI can remain with the following sensitive variables added.

Eccentric Duration (ED). My favorite variable for monitoring readiness, or fatigue and freshness. ED will vary widely with jump strategy and mechanics provided we cue the athletes to consistently jump as fast as they can (or explosively). Transient or acute changes in RSImod likely will be reflected in ED, with athletes under fatigue or with otherwise impaired neuromuscular status demonstrating increased (elongated) ED. Individual sport athletes, when tapered or brought to peak for performances, can display reduced (shortened) ED.

Eccentric Deceleration RFD (EDRFD). Another favorite variable, this will wax and wane with ED, yet can represent quite different qualities. Stiffness is a misused term and concept, and this post will not cover spring-mass models. For me, EDRFD nicely represents an athlete’s bounce. If it’s poor, their ACL risk is possibly elevated (before considering asymmetries and a host of other factors). If it’s great, the athlete likely possesses a strong change-of-direction ability.

Concentric Impulse @ 100ms (Con-Imp100) (or another time constraint). Whereas total impulse answers the question of “how much force was applied in the time it took to complete the jump phase” (concentric, eccentric, etc.), Con-Imp100 informs how much force the athlete applied in the first 100ms of the concentric phase.

Concentric Rate of Power Development (Con-RPD). Cormie identified this in 2008 as a useful variable, essentially representing acceleration, using watts per second. Visualized as the slope of the power curve on a kinetics graph, RPD correlated with acceleration in collegiate sprinters in unpublished data. Sprinters who had higher RPD were consistently ahead at the 5m and 10m mark in races. RPD can be weight (/kg) or time (e.g., @50ms) constrained for more granular analysis.

Rehabilitation

Rehabilitation features its own set of contextual factors. First, great consideration—and the influence of medical staff—must be taken as to when we can integrate certain tests safely as well as at what stage certain variables become relevant. For example, bilateral CMJs reasonably may be integrated during lower body RTP far earlier than SL, though both are very useful and healthy baseline data is essential where feasible.

Further, practitioners will notice that eccentric peak velocity (Cohen, Aspetar in Press) may take a while to return to near healthy standards even when the rehabilitating athlete can perform jumps. Often asymmetries “disappear” early in the RTP process because athletes are not yet moving quickly enough to manifest intra-limb differences in meaningful magnitudes.

In any case, asymmetries and jump strategy or mechanical variables are likely to be a focus of RTP monitoring. While output variables such as jump height and total impulse may return to healthy baselines relatively quickly, EDRFD and its asymmetries, time-constrained impulses, and landing asymmetries often take far longer to revert to healthy norms in rehabilitating athletes.

Variables From Movements Other than the Countermovement Jump

Drop Jump. The DJ is typically integrated for contextual RSI information, though looking at contact time on its own has value, as does asymmetries.

Squat Jump. In the SJ, jump height is often the only metric used for comparison with CMJ-JH as a concentric utilization ratio, which essentially compares how much jump height ability the countermovement produces—how much force and velocity an athlete produces without an eccentric phase. We can also examine CMJ-parallel metrics from the concentric phase, including impulse, peak power, and RPD.

Land-and-Hold. The LAH typically provides only three metrics, all of which have contextual value. Time to stabilization (TTS) represents the duration between the instant of landing and the moment in which the weight (represented by force) detected by the plate stabilizes to within a set range, depending on the technology. Peak landing force refers to how stiffly or softly the athlete lands on the plates, which is relevant if we cue the athlete one way or the other. Asymmetry between limb-specific peak force is very interesting and can be a key marker during lower body injury rehabilitation. With that in mind, many practitioners choose to favor single-leg LAH and compare both TTS and peak landing forces between limbs once the athlete is cleared to do so.

Isometrics. With IMTP and other isometrics, variables can become quite nuanced with the right population. Stone’s recent 25-year review is a fantastic read on the topic. Most often, two metrics receive attention: peak force and RFD. Examining both, depending on cueing, is useful (see test administration section).

Looking Ahead: Future Research, Evolving Applications, and New Technology

New software capabilities will include auto-detection and analysis of traditional resistance training movements, such as squats and cleans, as well as more advanced force-time curve visualizations like waveform analyses. The research will begin to assess which variables may relate more closely to transient versus residual and chronic fatigue, as well as those which relate to more specific sport skills such as on-field speed.

While some inroads have been made in these areas already, much of this article’s content relies heavily on word-of-mouth best practice while the literature lags behind, as in any applied science.

Like most sports science information, there is work to be done to establish standards and benchmarks for different populations and variables. As each athlete and scenario is different, the question of “what is a good score” remains intentionally unanswered in many cases. The more data we can share, the more informed we’ll be, and the better technologies will be used.

Summary

Force plates are an extremely useful objective tool we can use to assess and monitor athletes, in particular their responses to load. Accordingly, force plates provide a very significant advantage over more limited jump-assessment technologies. I encourage you to use a broad range of tests in profiling and screening and intermittent monitoring and do very regular monitoring with CMJ (and, where feasible, IMPT/IsoSquat and LAH) over less frequent monitoring with more tests.

As with any sports science practices, data value and practice efficacy are directly affected by establishing meaningful changes and signal-to-noise balances, while minimizing report outputs and excessive data use as well as maximizing efficiency and actionable information streams.

Regardless of how well established a load monitoring system may be in a given environment, load management cannot be truly effective without a strong integration of load-response evaluations. Force plates provide an outstanding tool with which to do this.

Since you’re here…
…we have a small favor to ask. More people are reading SimpliFaster than ever, and each week we bring you compelling content from coaches, sport scientists, and physiotherapists who are devoted to building better athletes. Please take a moment to share the articles on social media, engage the authors with questions and comments below, and link to articles when appropriate if you have a blog or participate on forums of related topics. — SF


Further Reading and References

An upcoming Aspetar (Sports Medicine) Journal features a special collection of papers for those interested in neuromuscular monitoring in their programs, including a piece on rehabilitation and single-leg jumps. I highly recommend these! Also, when the NSCA releases its sports science programming, the textbook will include a chapter about using force plates, taking a more long-form and academic approach to the above concepts.

Cormack, Newton, McGuigan, et al. (2008). “Neuromuscular and endocrine responses of elite players during an elite Australian rules football season.” International Journal of Sports Physiology and Performance.

Mooney, Cormack, O’Brien, et al. (2013). “Impact of neuromuscular fatigue on match exercise intensity and performance in elite Australian football.” Journal of Strength and Conditioning Research.

Gathercole, Sporer, Stellingwerff, et al. (2015). “Alternative countermovement-jump analysis to quantify acute neuromuscular fatigue.” International Journal of Sports Physiology and Performance.

Bromley, Turner, Read, et al. (2018). “The effects of a competitive soccer match on jump performance and inter-limb asymmetries in elite academy soccer players.” The Journal of Strength and Conditioning Research.

Stone, O’Bryant, Hornsby, et al. (2019). “Using the isometric mid-thigh pull in the monitoring of weightlifters: 25+ years of experience.” UK Strength and Conditioning Association.

Constantine, Taberner, Richter, et al. (2019). “Isometric posterior chain peak force recovery response following match-play in elite youth soccer players: associations with relative posterior chain strength.” Sport (open access).

Taberner, Allen, Cohen. (2019). “Progressing rehabilitation after injury: consider the ‘control-chaos continuum.'” British Journal of Sports Medicine.

P Cormie, JM McBride, GO McCaulley. (2008). “Power-time, force-time, and velocity-time curve analysis during the jump squat: impact of load.” Journal of Applied Biomechanics.

Pfaff

Episode 45: Dan Pfaff

Joel Smith: Just Fly Performance Podcast, Podcast| ByMark Hoover

Pfaff

Dan Pfaff is the Head Jumps and Multi-Events Coach at ALTIS. He is the former Coaching Education Curriculum Chair for both the United States Track & Field Coaches Education Schools and the NACAC Caribbean Basin Project. During his coaching career, he has worked at the University of Texas at Austin, LSU, UTEP, and Wichita State. Coach Pfaff has coached 29 NCAA individual national champions and 150 All-Americans, and he has been a lead staff member on teams that have won 17 NCAA National Team Championships—15 women and two men.

Dan has served on five Olympic Games coaching staffs in five different countries and nine World Championships staffs for six different countries. He earned a bachelor’s degree in science education from Wright State University and an M.Ed. from the University of Houston.

In this episode, Coach Pfaff delves into the role of the weight room in speed development, special strength, and addressing strengths and weaknesses. He covers a variety of topics including cueing, team sport relationship to track and field, planning and organization, and static stretching.

In this podcast, Coach Dan Pfaff discusses with Joel:

  • The role of higher intensity barbell and Olympic lifts in building speed and power.
  • Comparing traditional lifts to special weight room movements in speed development.
  • Internal and external cues.
  • His most recent thoughts on planning and organizing training sessions.
  • The role of static stretching in a program.
  • His thoughts on the transfer of weight room strength to speed.
  • Using analogies and storytelling to increase coaching efficiency.

Podcast total run time is 43:21.

Dan can be found online at ALTIS. He also wrote about cultivating champion performers for SimpliFaster.

Keywords: speed development, strength and power, cue, program planning

  • « Go to Previous Page
  • Page 1
  • Interim pages omitted …
  • Page 96
  • Page 97
  • Page 98
  • Page 99
  • Page 100
  • Interim pages omitted …
  • Page 164
  • Go to Next Page »

Primary Sidebar

Latest Posts

  • Building a Better High Jump: A Review of Stride Patterns
  • How We Got Our First Sprint Relays to State in Program History
  • Science, Dogma, and Effective Practice in S&C

Topics

  • Changing with the Game
  • Game On Series
  • Getting Started
  • high jump
  • Misconceptions Series
  • Out of My Lane Series
  • Rapid Fire
  • Summer School with Dan Mullins
  • The Croc Show
  • track and field
  • What I've Added/What I've Dropped Series

Categories

  • Blog
  • Buyer's Guide
  • Freelap Friday Five
  • Podcasts

COMPANY

  • Contact Us
  • Write for SimpliFaster
  • Affiliate Program
  • Terms of Use
  • SimpliFaster Privacy Policy
  • DMCA Policy
  • Return and Refund Policy
  • Disclaimer

Coaches Resources

  • Shop Online
  • SimpliFaster Blog
  • Buyer’s Guide
  • Freelap Friday Five
  • Coaches Job Listing

CONTACT INFORMATION

13100 Tech City Circle Suite 200

Alachua, FL 32615

(925) 461-5990 (office)

(925) 461-5991 (fax)

(800) 634-5990 (toll free in US)

Logo of BuyBoard Purchasing Cooperative. The word Buy is yellow and shaped like a shopping cart, while Board and Purchasing Cooperative are in blue text.
  • Facebook
  • Instagram
  • Twitter
  • YouTube

SIGNUP FOR NEWSLETTER

Loading

Copyright © 2025 SimpliFaster. All Rights Reserved.