When and When Not to Use Track Drills

Summary
Coaches use drills to reinforce the movement concepts they teach, so it’s important to understand why a drill is used. Coach Parno breaks down the concepts behind the hurdle wall drills, wickets, and toe drags and explains why and how he uses them in is track and field program.
Drills are used as tools; they don’t teach the movement concepts. That’s for the coach to impart to the athlete. Instead, drills are used to reinforce what we teach. When considering which drills to use, I find it essential to break down the concepts behind them to ensure they belong in my program.
Wickets, for example, look great at low intensities for YouTube videos and Instagram stories. But let’s put some context and meaning behind them—they help stabilize front-side mechanics and diagnose stride length issues. And while the toe drag has divided a world of coaches, turn it into a teaching drill, and athletes’ low heel recovery proficiencies may take off.
I admit I’m a Twitter guy. I enjoy following sports news, discovering new drills and concepts, and connecting with other coaches. Twitter is useful and quick, but not the only route of coach’s education. And when you leave education to your athletes, you get YouTube searches and misguided technical models based on the models of genetic monsters.
In this post, I advocate three drills I’ve seen criticized in some fashion on Twitter and other platforms: hurdle wall drills, wickets, and dragging the toe in acceleration.
Track and Field Drills
First, let’s talk about the concept of a drill within track and field. I find there are three types of coaches when using drills in their programs.
-
- Coaches who use drills as a tool to reinforce and stabilize the concepts they’re teaching their athletes.
-
- Coaches who use drills as time killers and fillers, when they run out of things to practice, or they don’t understand the purpose of a specific drill.
-
- Coaches who use drills to impress parents and prospective clients with flashy movements and equipment.
I’ve fallen into each of these categories during my coaching years. And as I’ve progressed, I try to live in the first. I take pride in teaching and educating my group of athletes so they know how a drill is useful. Why should your athletes do a wicket run if you don’t know the reason behind it?
I hope after you read the following drill explanations, you’ll start breaking down the concepts behind drills and ensure they belong in your program. If you pursue the truth as a coach, you ask questions and are open to the answer. If you already have all the answers, there is no need to break down new or current drills for understanding.
To battle our own confirmation bias based on our experiences, we must stay away from absolute statements and steer toward open conversations. When our ego is tied to our system and we hold true to that, it’s much harder to introduce potentially useful concepts to our athletes, which potentially limits their paths.
Disclaimer: There are many ways to get it done in the world of track and field. The art of coaching truly is sorting through the noise and helping your athletes improve through proven tactics.
With each drill, I’ll explain the following:
- Why use it
- When to use it
- Who to use it for
- How you know it’s improving your athletes
Hurdle Wall Drills
The hurdles are highly complex high-velocity movements. Imperfections in essential techniques can become catastrophic when we add intensity. There is a wide spectrum of beliefs about hurdle drills, from coaches drilling for hours before a session to coaches saying, “The best drill for hurdling is actually hurdling.” I find myself somewhere in the middle. I need to feel comfortable in foundational movements before moving forward to the whole movement.
If you went to 100 different hurdle sessions across ability levels, you’d probably see hurdle wall leads and trail drills done 100 different ways. I started thinking about the hurdle wall drill when I saw a prominent program’s instructional video lazily display a wall lead drill. The athlete walked up to the hurdle, brought their leg up, tapped the wall, and dropped their leg back to the ground. I thought, “If this athlete drills like this with their coach around, I can only imagine what they look like over a hurdle.”
When an athlete attacks a hurdle, they navigate a path that requires both vertical and horizontal force displacement off the ground, says @ChrisParno. Share on XWhen an athlete attacks a hurdle, they navigate a path that requires both vertical and horizontal force displacement off the ground. This path (vector), based on hurdle height towards the hurdle, will produce the most efficient parabolic curve over the top. The diagrams below show the directional forces, displacement off the ground at the desired parabolic curve, and efficient parabolic traveling of the hips over the hurdle.
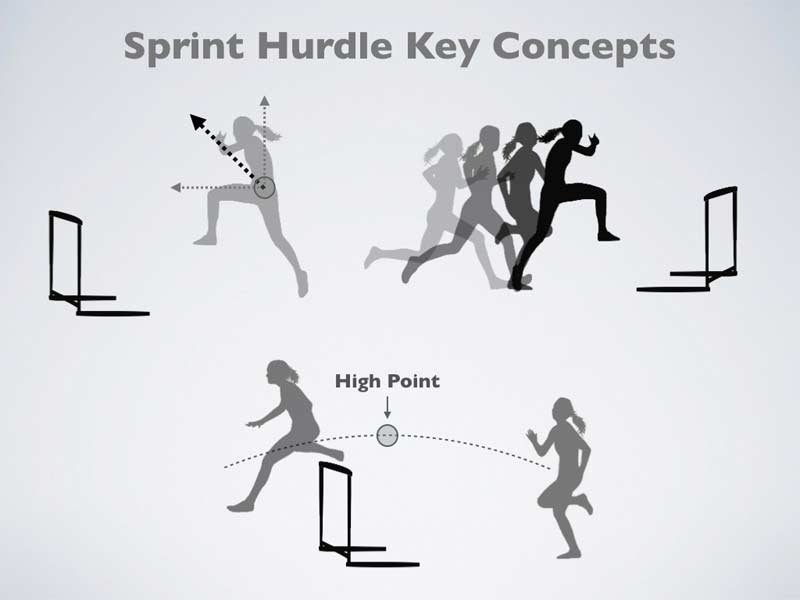
I don’t think you’ll find a single successful hurdle coach who denies the importance of hip displacement at toe-off to set up the desired hurdle position. Because we know that we don’t get faster in the air, efficient clearance should be the premium driver in deciding what drills to use.
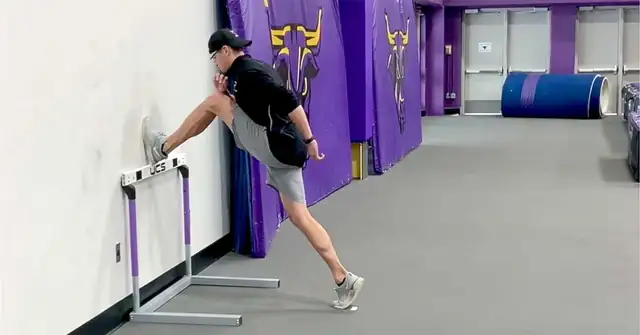
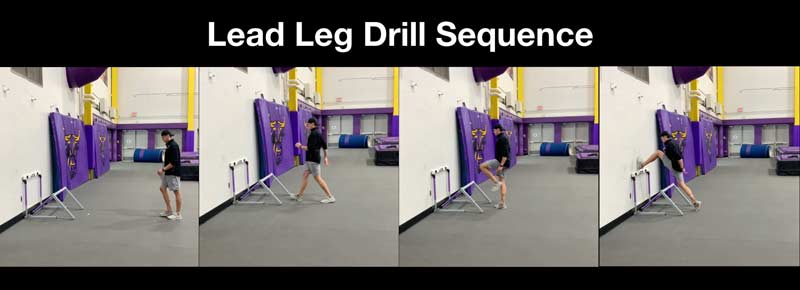
By breaking down the lead leg wall hurdle drill, the most important aspect is to step the take-off leg down quickly and feel the hips pass over this step, displacing upward and in toward the wall. The athlete then contacts the wall with a stretch in their hip flexor (men will experience more upward movement to navigate higher hurdles).
With the hurdle wall drill, it's crucial to step the take-off leg down quickly & feel the hips pass over the step, says @ChrisParno. Share on XThis accomplishes two of the criteria for efficient hurdling—a shallow parabolic curve (relative to hurdle height) and a stretch reflex in the take-off leg’s hip flexor to help efficient cycling of the trail leg at toe-off.
Now, if I were lazy and didn’t give my athlete any purposeful feedback, I would have them step up to the hurdle, plant their foot directly under their center of mass, and bring the lead leg up, tapping the wall before bringing it back to the ground. A coach seeking purpose in this drill will quickly realize this technique doesn’t directly resemble any aspect of the full hurdle movement, so they should adjust it or remove it from their program.
Video 1. The lead leg drill is a classic. Make sure your athletes understand the concept behind it first before adding it into the program.
Video 2. Another variation of the lead leg drill is also popular. Both drills have value, and you can use them in various sequences for countless purposes.
To ensure displacement occurs, the coach can put a piece of tape down on the track 4-6 feet back from the wall to give the athlete a visual. We can use an upside-down hurdle (pictured below) to provide a visual for take-off from the wall. Shorter or less proficient hurdlers should be closer to the wall, while taller or more proficient hurdlers can step down further away from the hurdle.
We can add the concept of the cut-step with an aggressive shortened final cycle of the take-off leg down to the ground before hip displacement, which helps the athlete get into this stretched position.
Another option is to perform the drill on a chain-link fence that gives upon contact. The flexing of the surface will further stretch out the hip motion before the fence recoils to its original position. So, if your outdoor track facility has only chain-link fences, you can still use this drill.
For the trail portion of the wall drill, we’ll use the same thought process. The athletes want to displace the hips and stretch the hip flexor of the take-off leg (trail leg) before cycling. What purpose would this portion of the drill serve if the athlete was standing up tall and close to the wall mindlessly cycling their leg around?
Set up the drill with the hurdle slightly behind the hips and position the athlete at a slight angle to the wall. Lower the hurdle to allow the trail leg to travel through in the correct position (knee higher than the ankle). The stretch within the hip will assist in cycling the trail leg through, similar to the full hurdle motion.
To add some resistance, an athlete can take a light anchored stretch band and attach it around the ankle of the trail leg. This resistance can help reinforce the trail leg’s correct path while providing general strength opportunities within the hip.
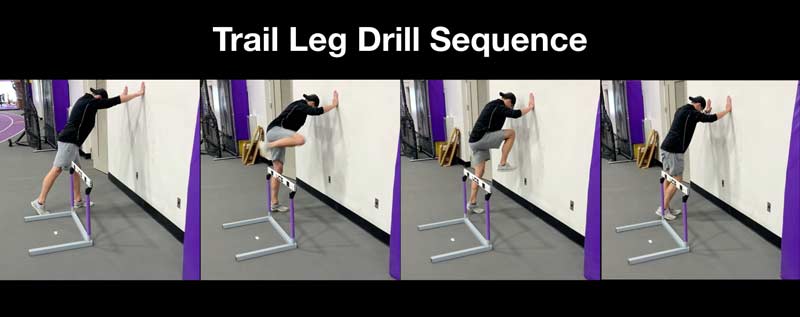
These static wall drills are great for beginning and developing hurdlers. Proper execution plus instruction and feedback from the coach will let athletes feel correct attacking and cycling patterns early in a practice session. Mindless execution will only reinforce poor patterns.
At the elite level, this drill could be used as a periodic check-in for technique or a general warm-up and hip strengthening exercise. As a hurdler moves toward the elite level, more advanced specific hurdle drilling and full hurdle movements at high intensities will take the forefront.
Video 3. Athletes can use trail leg drills to work mobility and to warm-up for training. The trail leg drill can be used for both male and female athletes as well as advanced athletes.
Wickets
If you want to fire up a room of coaches quickly, mention wickets. You’ll elicit a plethora of opinions about whether wickets assist or detract from a sprinter. Wickets are an enigma—there are many opinions on the intent, execution, and rate of which you can analyze improvement or understanding. I’ll unpack my understanding of where and when I see the validity of this movement.
Athletes need technique before attacking wickets. Wickets are the end goal to your teaching and education of sprinting, says @ChrisParno. #wickets Share on XFirst, wickets are an end goal—athletes need foundational biomechanically-backed technique work before attacking wickets. Wickets are a synthesizer and summation of your teaching and education of sprinting; think of training as reading and wickets as the book report. Wickets can reinforce and cement the sprinter’s force intentions and serve as a daily session check-in and benchmark of technical proficiency.
Here is my checklist for a wicket session:
-
- Maximum effort (purposeful intent to be sprinting at max velocity through the wickets). This requires an acceleration zone of 20-30m. Spikes are not required, but maximum intent is.
-
- Spacing must be set up for our end goal. If we have a sprinter looking to hit 2.20m per stride at max velocity in a race (based on trochanter length ranges), they eventually must work up to sessions where the wickets hit these distances through a progressive build-up. Randomized unmeasured wicket patterns won’t allow for a progressive stride length model similar to the desired race model of a 60m or 100m dash.
-
- Athlete Focus and Understanding. Wickets assist athletes in feeling and achieving front-side mechanics, high attack angles, and efficiency of leg recovery after toe-off. We must allow the athletes the platform to focus—there is external feedback from stepping up over a wicket and allowing the athlete to be in proper positions.
Wickets become troublesome when an athlete does them at submaximal intensities before they stabilize max velocity mechanics. It’s much easier for an athlete to hit technically sound sprinting positions at submaximal efforts.
To prevent reverting to poor technique, we use max effort & diligent intent with #wickets only after the drill's goal is understood, says @ChrisParno. Share on XOften, I see athletes very proficient at a dribble knee or an A-run, but when they add intensity (speed), they revert to their previous techniques. To prevent this, we have maximum effort and purposeful intent with wickets, but only after the goal of the drill is understood.
How to Monitor Wickets
Coaching can be a copycat career, which is not necessarily a bad thing if we’re copying good habits. This leads to the next questions: How do we know wickets are working? Are coaches using wickets because they are the new fad? There are ways we can monitor the success of wickets.
First, you must have multiple spacings to allow for individual athlete body types. Vince Anderson, who has shared his wicket tables among other coaches, uses multiple spacings based on sprinting level and gender. Using Excel to create multiple tables based on existing tables or experience allows flexibility. It’s important to track which tables you’re using throughout the year for continued progression.
Video Feedback
A side-view of an athlete sprinting at max velocity shows us if they’re stabilizing with a biomechanically-backed technique. With mobile timing and filming programs, it’s easy to film athletes during each session for comparison.
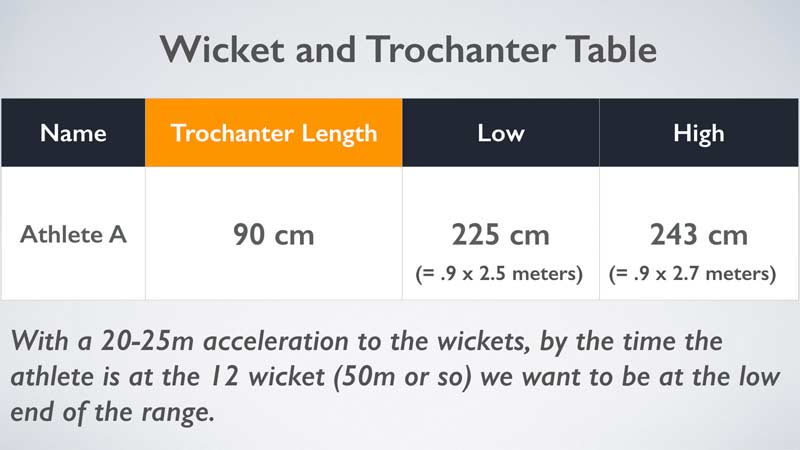
Introducing an outside stimulus with wickets can positively affect the stride pattern. As an example, we’ll look at an athlete with a 90cm trochanter length (TL)—the length from the greater trochanter to the floor. Using the stride range multipliers of 2.5 and 2.7, we find this athlete’s ideal stride length ranges from 2.25-2.43 meters/stride (.90*2.5 and.90*2.7).
Introducing wickets as an outside stimulus can positively affect stride pattern, says @ChrisParno. #wickets #stridepattern Share on XAt the beginning of a training season, we’ll set up wickets lines to hit 2.20-2.25 by the end portion of the wickets (see image below). This lets us see if the athlete can handle the low end of their ideal range with good technical execution. In each subsequent session, we can lengthen the wicket distances to ensure the last 3-4 wickets are further into the athlete’s ideal range (based on TL).
For visual sake, a coach can give a 20-25m acceleration zone for the first wicket, using 16 wickets per line that are stretched out in total anywhere from 30-40m, based on spacing. The entire sprint distance of 50-60m (acceleration zone and wickets) lets the athlete work past the acceleration phase into max velocity to hit their ideal stride length range.
With larger groups, this level of precision will be tough, so group your athletes in similar stride length goals and set up multiple lines of wickets for athletes to progress through, if needed. Provide options for flexibility within your session.
Timing
Another way to test for validity is to compare times from an athlete’s fly runs in a sprint session with their attempts through the wickets. Coach’s Eye, Hudl Technique, Dartfish, etc. make it easy to get timing feedback from video sessions. If your athlete can sprint a 20m fly in 1.98 seconds (25m build-in) and then over wickets from 25m-45m, a coach can use a mobile timing app and compare the times to ensure the athlete is exerting maximum effort.
The goal is to achieve these maximum efforts while reinforcing good techniques and working on lengthening stride length to the upper end of the athlete’s ranges. If you can achieve this, wickets are worthwhile.
It’s also important to understand your athlete’s level. For the developmental athlete, use wickets to reinforce front-side mechanics, as talked about above. For a more advanced or elite level athlete, use wickets to manipulate stride frequency.
Gary Winckler, among others, has popularized “shorter than” and “longer than” drills. These drills manipulate stride and step lengths (SL) and affect stride and step frequency (SF). SL and SF are inversely proportionate; generally, if stride length increases, the frequency will decrease.

For athletes who have issues overstriding (consequently having a low-frequency number in strides per second), a coach can set up wickets that work up to distance under the athletes’ desired stride ranges (based on TL). This forces an athlete to turn over their stride quicker, increasing the stride frequency in step per second.
Conversely, if we have someone who has issues projecting their stride and is routinely measured under their desired stride range (based on TL), a coach can progressively lengthen the wicket distances, as mentioned above, to lengthen the stride over time. We can manipulate training with wicket runs and then take these feelings to our sprinting sessions (without wickets) as we try to work toward the athlete’s ideal SL and SF.
Don’t view wickets as a fad or a new flashy way of sprinting. We can manipulate the wicket runs to achieve our coaching goals. The most important aspect for coaches is paying attention and being present during these sessions to ensure we achieve these goals.
Toe Drag
I saw a post calling this concept Toe Drag Swag. As you can imagine, arguments on both sides of the aisle littered the comment section. In my younger coaching days, I sat in front of YouTube and watched Asafa Powell’s slow-motion block start videos and decided this toe drag technique was the way an athlete was supposed to start. Later, Usain Bolt showed the toe drag, which furthered my bias in assuming this was the correct technique.
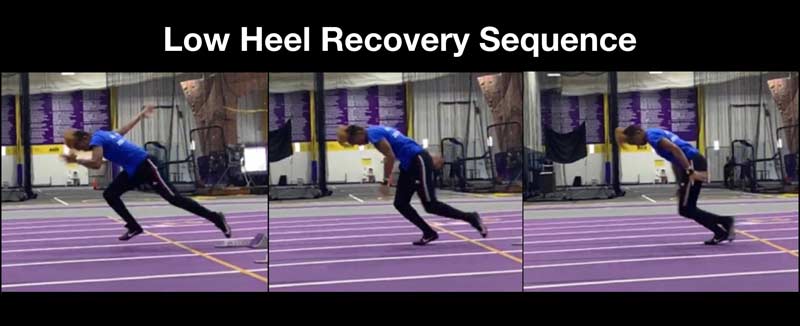
Since then, I’ve created a more robust understanding of start, block, and acceleration mechanics, and still believe there is a place for the toe drag. The concept is a vessel for athletes to understand the low heel recovery through block clearance and the first 2-4 pushes off the pads.
Video 4. The toe drag drill is popular due to low heel recovery benefits. Some athletes respond well to the drill, while others may not make great progress with it.
To break down low heel recovery, visualize an athlete’s legs mimicking pistons as they apply horizontal and vertical force into the track. Sprinters recruit large muscle groups, motor units, and move proximal (hip) to distal (ankle) in their firing patterns. At toe-off from the block pad, the hip and front of the thigh initiate the free leg’s movement as it recovers through to the front side.
If the movement’s goal is to originate from the proximal joint, the thigh will move forward first, and the knee and ankle will lag behind. The shin will remain low to the ground and the knee will remain relatively extended until the knees cross.
The opposite, and poorer movement, is produced through the misfiring of the proximal to distal patterns.

The cyclic pattern within the initial block clearance may also cause too much forward rotation of the body, shortened drive/acceleration phase, and increased time to cycle the foot back down to the ground. Generally speaking, the misfiring disallows a fluid acceleration phase to push oneself tall down the track.
Acceleration Myths and How to Break Them
Coaches need to dispel these myths:
-
- Get as low as you can out of the blocks; it’s all about getting low
-
- Bend at the waist to be lower and more compact
-
- Be as quick as possible in the start (as if stride length isn’t a part of the equation)
To break these myths, I’ve introduced the toe drag concept in our fall general prep. The following progressions introduce the toe drag concept and then tailor it over time.
Initial Instruction. To teach the initial concept of low heel recovery, we do continuous toe drags in the grass or on an incline. The drill parameters are 5×10 pushes with continuous drags. Yes, this looks and feels strange. As the coach, I’m overcueing to create a new motor pattern and a new way of thinking. We do this for 3-4 practice sessions during the warm-up. Progressions then move to 4-6 pushes with drags, and then we allow the recovery of the stride to work upward.
Create and Refine Movement Within Higher Intensities. During our sprint warm-up, there are many opportunities for ascending explosive movements to prepare the body for the session. Within the first two weeks, we introduce the 2-push and go drill. This drill uses a 2-point crouch start to drive out at max effort. There are two pushes with toe drag followed by jogging and stopping for the next rep down the track. This progression introduces the two drag/low heel concept with high intensity behind it.
Stabilize the Movement. For the first 8-10 weeks of the fall general prep, we drill through sprint day warm-ups three days a week. As we start to work through more intense warm-ups, we introduce the toe drag to various start positions—the 2-point crouch, 2-point rollover, 2-point drop-in, 3-point, 4-point without blocks, standing block rollover starts, etc. This gives us many opportunities to stabilize the low heel movement while coordinating the technical acceleration model in multiple starting positions.
Internalize. Once the athletes understand how to control their limbs and perform the correct acceleration firing patterns, we perform the same style accelerations and allow the toe to come off the ground. This offers the benefits of the low heel during acceleration but doesn’t bring about any unforeseen friction from dragging the toe.
The detractors of the toe drag will ask the question: Why would you introduce unwanted friction? It’s a valid question, and ultimately I agree with it. But when you dig deeper into the benefit low heel recovery brings to acceleration, it turns into a good teaching tool.
Conclusion
Performance always will have a bell curve. Most athletes and performances lie within biomechanically-backed technical models, with some individuality. Yes, Asafa Powell drags his toe, Aries Merritt swoops his lead arm over the top of his head when attacking the hurdle, and Andre De Grasse has one straight arm when sprinting.
But these technical models are outliers and shouldn’t drive our coaching. After Aries broke the hurdle world record, I spent years recruiting athletes and fixing these swooping top lead arms because they weren’t working for athletes who didn’t have the other world record-level physical tools.
Find the benefit of a drill within your events' conceptual model and learn how this drill will positively influence performance, says @ChrisParno. Share on XFind the benefit of a drill within your events’ conceptual model and learn how this drill will positively influence performance. I firmly believe in the cycle of coaching. When I started out coaching, I only knew about coaching from the experiences I had as an athlete. Before I dove into professional development, my experience was my baseline.
Understand that how we teach and educate our athletes will be their future baselines if they choose to coach. Do your due diligence in understanding deeply the concepts you are trying to teach. Always ask the why, always search for ways to improve your athletes, and continue to dive into the true meaning of the drill.
