Plyometrics are often used at the high school level to develop explosive athletes and train the stretch shortening cycle. They can enhance both an athlete’s elastic and explosive power. Like the weight room, too often it seems as though answers are sought here. There are no “white whale” drills/jumps that will yield overnight results.
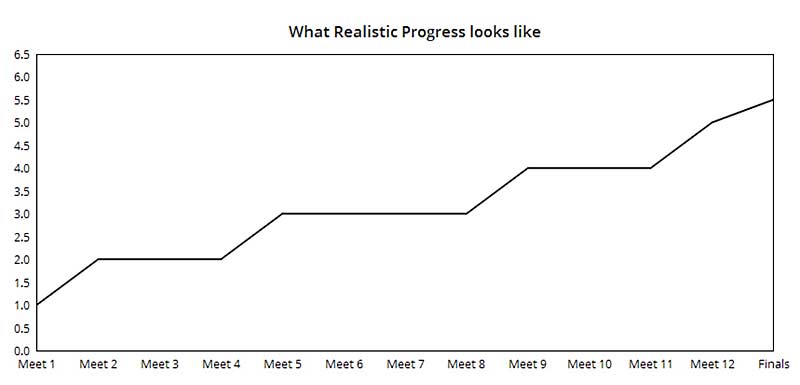
Rushing to go higher and faster isn’t always better in the absence of consistency, progressive overload, and the teaching of quality movement. While social media videos often show stunts such as vending machine box jumps, it is important to remember that certain athletes can do certain things because of their natural talent or their prior training. One exercise did not make the athlete.
In a season that is 10-12 weeks long for most athletes, it is important to be selective about the usage of plyometric drills. Here’s why:
Plyometrics are not our only focus. Blocks, relays, weight room, speed work, plyometrics—something has to give. If we try to do too many things at once or too quickly, it is worse than not implementing anything at all.
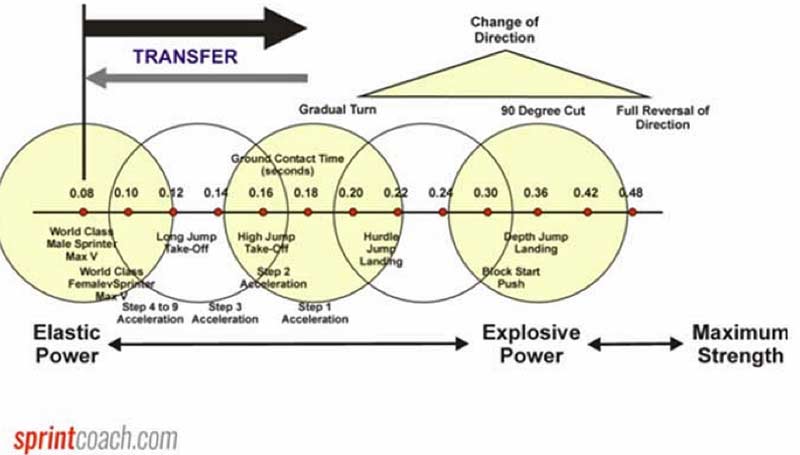
First and foremost, sprinters should be doing some form of sprinting often. The most elastic, plyometric thing that anyone can do is a maximum velocity sprint. Ground contact times are as low as .08 of a second. This means that plyometric training should support quality sprint training, but it cannot surpass sprint training’s effectiveness. Over the course of the season, patience and quality need to be prioritized over volume and level of difficulty. The prerequisite to plyometric training will be general movements such as skipping. Until this area looks good, depth jumps are just a pipe dream.
Improve the general qualities first, where mistakes are more easily forgiven and less harmful. With large groups, less is always more. Using fewer tools will let the athletes get better from week to week.
Plyometric Progressions
There are a few rules of thumb with regards to plyometric training:
- General movements before specific.
- Quality over quantity (nothing in a circuit and 20-40 total touches).
- Don’t do it under a state of fatigue. (It isn’t CrossFit.) Sprint before plyos and plyos before lifting (unless used as a part of contrast training).
- Bilateral before unilateral.1
- Slow before fast.1
- Low before high.1
That’s it. This heuristic approach keeps things simple because most of my athletes don’t need complicated and yours probably don’t either. This will also allow the tendons and ligaments of athletes with a low training age to properly adapt to the stress of these exercises.1
The drills below are a great place to start.
General Plyometrics/Jumps
- Skip for distance
- Field frolicker/gallops for height
- Primetimes
- Ankle pops
- Single leg drives
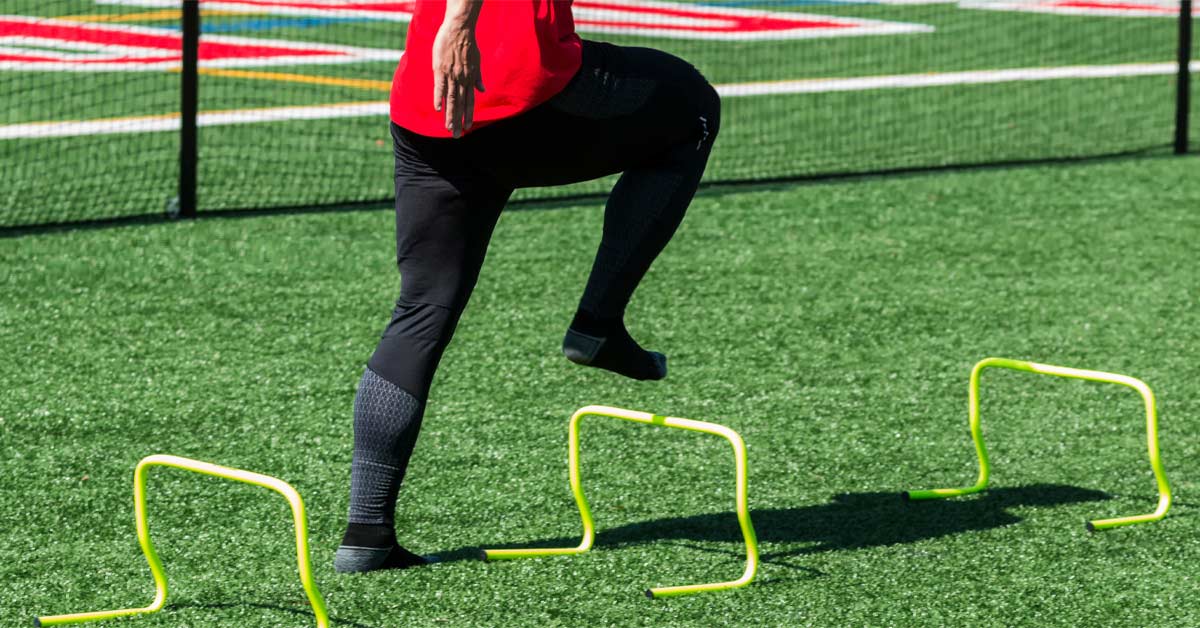
These five drills break the rules of “bilateral before unilateral” because they are basically general movements done with a higher degree of intent or maximum bounce. Some, like skip for distance, are more “explosive power” and others, like single leg drives, are more elastic in nature. The best part is they are not time-consuming to teach and the common linkage between these and all other plyos is the postural demands. They can often be part of a specific warm-up or included as main plyo sessions during general prep periods. My best athletes are almost always the best at these movements.
Video 1. General drills have elastic benefits. Just having a challenging warm-up is a good starting point before moving on to conventional plyometrics.
From here, I teach the first couple weeks’ landing drills and the hip hinge. The goal of these is to practice absorbing force. The landing drills are as useful to jumping as decelerating safely is to sprinting.
The entry-level drill is the snapdown from a position of triple extension. I cue the athletes with, “up, knees, ankles, hips” and arms overhead. The athlete “snaps down” into an athletic stance, not unlike the hip hinge drill. I look for the spine to be neutral and the eyes to look out. Stiffness is cued, although this is technically a misnomer as there is knee and hip flexion. What I am really asking is for them to land quickly and powerfully with a good base.
They should aim to keep their weight over midfoot (feel the floor with even pressure on big toe, little toe, and heel), feet under hips, and knees out, limiting valgus. Arms are cued to line up with the torso, shooting through the hips. This puts them in good position to redirect upwards on the concentric portion.
Video 2. Snap-downs are great ways to manipulate the body without creating a lot of soreness. Teaching the athlete to use their arms and range of motion is important when introducing plyos into a high school program.
It all starts here. This is the context for most other plyometrics. They must be able to quickly and repeatedly get to some variation of this position. If this drill doesn’t look decent, athletes are usually not ready for anything else, like hurdle hops or triple standing long jump.
Box jumps aren’t an inherently bad exercise, but they can become something they’re not very quickly, says @grahamsprints. #plyometrics. Share on XInevitably, some athlete will pipe up and ask, “When are we doing plyos?” (I’m assuming they mean box jumps.) The answer to that is “we already are,” and can best be summed up with this statement:
“Whatever force you can absorb, you can generate” – Tony Holler
Box jumps are not an inherently bad exercise, but they sometimes become something that they aren’t very quickly.
Jump training needs to improve COM displacement, not hip mobility, a higher box doesn't mean you’re jumping higher! pic.twitter.com/hEcKWcfjLZ
— Lachlan Wilmot (@lachlan_wilmot) September 23, 2016
Using the same cues, you might progress to landings from one step on a stair and then two, again working on stiffness. This gives an opportunity to work further on jumping without the pounding of executing an actual jump.
Video 3. Sticking the landing may not be great for little kids, but as athletes increase their body weight, it becomes a near necessity. Teaching athletes to jump starts with teaching them to land with the even distribution of joints.
These aforementioned landing drills and simple progressions set up the season and the athlete’s overall development, and fall under the bilateral/general categories. Landing and plyometric strength drills are the first boxes that need to be checked. Coach what you see and don’t rush. Your athletes need to learn to absorb and apply force safely and effectively before advancing to the power type plyometrics such as depth jumps, bounds, and high hurdle hops. You can’t be powerful without the presence of strength and technique.
Getting More Specific (Acceleration-Themed)
From here, you can get more specific. First, consider why you are doing certain plyometrics. There are so many variations out there that it is easy to second-guess yourself. Keep it simple and focus on what you think is essential with your current group of athletes.
Shifting to a narrower focus with good movement as the aim is better than trying to do it all. From a dynamic correspondence standpoint, one of the most common usages is to program plyometrics into an acceleration or max velocity complex. Acceleration is commonly referred to as “pushing,” and max velocity as “bouncing” or “dancing with the ground.”
Consider why you do certain plyometrics. Shifting to a narrower focus with good movement as the aim is better than trying to do it all, says @grahamsprints. Share on XBelow, activities A and C serve as reinforcement and context for learning acceleration technique to be used during the “B” sprint exercise.
a) Acceleration drill (2 minutes rest)
b) Acceleration (2 minutes rest)
c) Jump/plyo (longer rest period)
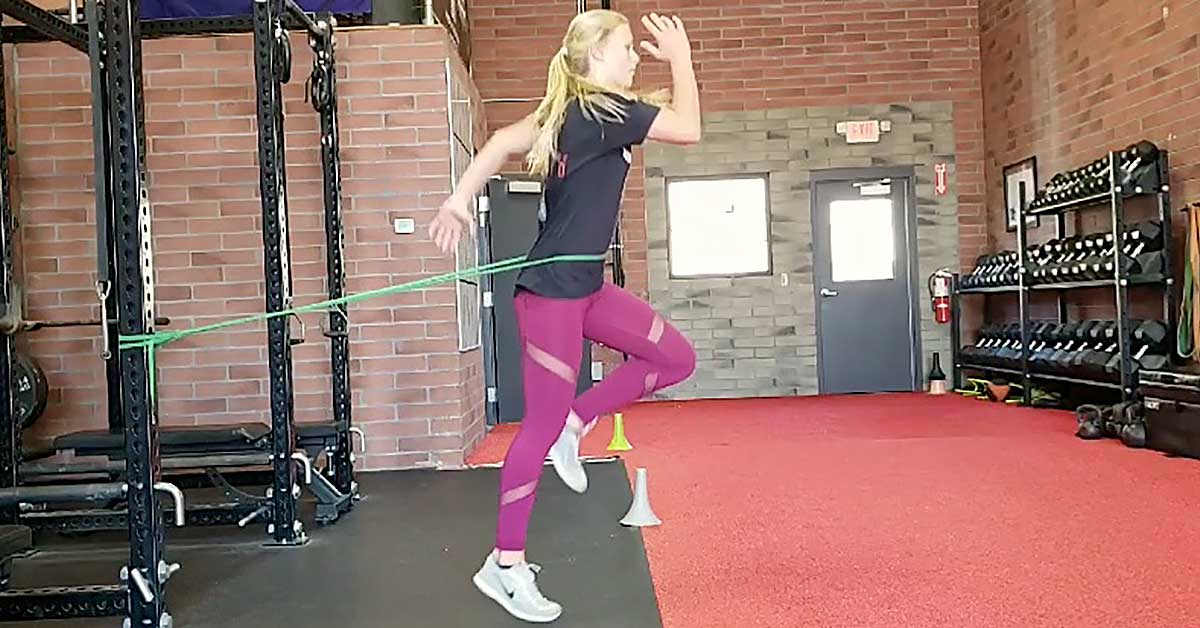
Adhering to the “slow before fast” guideline, these drills are first done with no countermovement. I like to start early season, with a three-second pause before exploding in the concentric phase on acceleration-themed days. So, in essence, we have a bilateral-specific-slow variation. I like these for several reasons:
- Teaches the athlete to get into an optimal position for good force application on the concentric portion.
- Mimics the acceleration phases of sprinting with longer ground contact times.
- Eliminating the countermovement reduces stored elastic potential energy that would be maximized with the stretch shortening cycle (similar to a block start). Three simple exercises specific to acceleration (longer, purposeful pushes) are ankle rocker jumps #1 (knee/no CM), #2 (knee & hip/no CM), and #3 (knee and hip with countermovement), stair drop to jump, and med ball diaper toss. These are all done with a three-second pause first. These all follow logically from the hinge and landing drills. I’m not sure you need to get too varied with the movements unless these become stale.
Video 4. Technically, pausing the landing and holding is not plyometric training, but teaching the entire movement from start to finish as soon as possible is vital for coaches who have little time. Groups can perform this drill safely and effectively.
Med ball diaper throws are great if the ability to hinge correctly is present. Start with a light load, as the usefulness of the med ball is less about the resistance it provides than the ball serving as an external cue to explode with the knees, ankles, and hips through the floor and finish with arms overhead. Once these look good in terms of the hinge and hip/leg drive, we add in a countermovement. High school athletes often use just their arms when first learning basic med ball throws. They should be cued to throw with their legs.
Video 5. Most medicine ball exercises are not plyometric, but they do help coaches teach jumping. Some medicine ball throws are more elastic and eccentric, but only if a rebound motion is involved.
Ankle rocker jumps have been popularized through the teachings of Chris Korfist and his foot/ankle complex work. Ankle rockers jumps are an excellent way for athletes to work on achieving the positive shin angles used during the acceleration phase and developing power at the end range of their ankle mobility while driving through the shin and finishing with the big toe. Going barefoot is a great option here to increase foot awareness.
Video 6. Ankle rockers are perfect for beginners learning to jump. In addition to teaching, ankle rockers reveal a lot about an athlete’s range-of-motion abilities.
Later, you can add in the countermovements and then continuous CMJ to further focus on powerful pushes.
Unilateral Acceleration-Themed
As far as unilateral work, sprinting is already unilateral, so outside of the general jumping drills in the first section, there isn’t much of a need to overshoot too much here.
Unilateral work and bilateral work in different planes, like the Altis Rudiment Series, can be plugged into warm-up routines, lest our multi-sport sprinters become solely “sagittal monsters.” Even though our sport isn’t about agility and change of direction, some of the athletes do sports where that is the case.
These are great for general hopping rhythms and good contacts as close to midfoot as possible.
In the past, I have programmed dynamic single leg step-ups and box pops during general prep periods, but I can’t always get to it due to having only a few boxes at the appropriate height (thigh less than parallel on box). Single leg stair drops (Korfist inspired) also develop lower limb stiffness and improve unilateral force absorption.
Video 7. Single leg hops and single leg emphasis exercises can vary in intensity and complexity. Often exercises can be low-grade plyometrics and gradually add intensity later.
These are a good point of entry with unilateral plyos. I don’t rush to the advanced items on the unilateral menu because, as long as our athletes are sprinting and getting stronger first, I can afford to be patient. Progressions made too quickly without basic movement pattern work can severely dilute the quality. It is better to sharpen the tools you have first than to worry about adding more tools to your repertoire.
It’s better to sharpen the tools you have first than worry about adding more tools to your repertoire, says @grahamsprints. Share on XGetting More Elastic (Max-Velocity-Themed Plyometrics)
Again, keeping it simple means matching up the plyometric with the sprint task. The only difference here is that instead of a blocked complex (a, b, c) like with the acceleration theme, I would run it as a series complex (a, a, a, b, b, b, c, c, c).
a) 20m dribble x 3 (mechanics and warm-up) with 3 mins between.
b) 10m timed fly x 3 (max speed metric) with 4-5 mins between.
c) Elastic plyometric to support max velocity training x 4 (5 reps per set). The series format allows the athlete to devote their full attention to each exercise and not fatigue themselves for their sprint reps. A and C still support B, but it keeps the sprint rep the main thing.
Entry level max-velocity-themed plyometrics (fast and shorter ground contacts) include:
- Partner-assisted pogos
- Unassisted pogos for height
Video 8. Partner pogos are popular because they are less stressful on the body and add to team culture. Pogos are great for all ages and abilities, but are mainly for youth athletes.
There is tremendous value in pogos alone when talking about developing elastic power and maximizing an athlete’s bounce and stiffness. These are easy to teach and a great introduction to elastic plyometrics of the high and fast variety. They are also a great way to screen bad posture, body movement, and incorrect foot placement before advancing to hurdle hops (low then high) and depth jumps.
Unilateral Work
Bounding is the best example of unilateral plyometrics with short ground contacts. Unless the athletes are proficient with bilateral work, I don’t overshoot here either. A good place to start is the “walk the dog bound.” A partner holds the athlete’s opposite leg while they sync up their arms with the cycling of their free leg. The free leg should land with flat-footed contact and have minimal collapse in the hips. Simple to do, but not easy. The partner hold gives a slight assistive lift so the jumper can focus on keeping their optimal posture. This is also a great drill to identify prospective triple jumpers and then start to develop quality ground contacts under their center of mass.
After some time working on this drill, the partner hold could disappear and they can try to replicate the quality of the rep with a regular single leg bound.
Alternate bounds often aren’t the best option in a workout—especially with athletes who are solely sprinters and not jumpers—because they are too advanced. I may periodically include them in warm-ups, where I can monitor and coach them with the whole group without wasting too much time.
Video 9. Walk the dog is another exercise that, if done right, teaches hops in a fresh way. The key is to ensure the hips are balanced and the foot is in front of the center of mass.
Simple Testing Plans
As coaches, we like having metrics to show that what we do works. It motivates us and promotes athlete buy-in. Looking ahead to the spring season, I want to include more data and testing. We have tracked our speed work during the last couple of years, but I have been unsure how to effectively and easily measure the jumps without creating a ton of work for myself. I know there is value here, but with large groups and an absence of fancy testing equipment to handle the logistics, it seems like a daunting task. After some thought though, I may have an imperfect solution.
On our two short sprint days during the first week, we will administer a triple standing long jump (three-hop test) or standing triple jump test to our athletes using the hash marks on the football field. I like these two tests because they are easy to teach and correspond highly to acceleration ability. One is unilateral and one is bilateral. They can help identify power athletes and which newcomers may be jumping candidates on day one.
Athletes will start at the end zone, lined up on the hash marks. Including the lines near the out of bounds, this gives us four “zones” to get the jump tests in simultaneously. Athletes can take their multi-jump attempt with a captain/spotter marking at each station with a yardstick. If an athlete sticks their landing past the 7-yard mark but not the 8-yard mark, the captain will spot and use the yardstick to measure the additional feet and inches from the 7-yard line (21 feet).
This poor man’s test should raise the intent and it adds another opportunity to record-rank-publish. The volume is low enough that even a complete novice will be fine. This will give you a starting number.
After athletes work on force absorption and application with the simple progressions mentioned previously, we retest them at the end of their general prep period (April vacation), and again before the postseason.
Sprinters First
High school track coaches have limited time and are not always able to provide a focused lesson. The above progressions are not perfect, but they are simple to do. The No. 1 goal is speed development. Plyometrics are a training piece that, when used in low dosages, can reinforce good habits and develop strength and explosiveness.
Providing basic #plyometrics matched up with the day’s theme is a simple way to implement plyometrics without #overtraining, says @grahamsprints. Share on XIt is easy to get caught up in the hype of high box jumps and the latest cool, complicated exercise. It is important to remember that most of our athletes are developing and need simple and repeatable exercises. If, at the end of the day, their movement and efficiency improve, then how they got there doesn’t matter. Providing basic plyometrics matched up with the day’s theme is a simple way to implement plyometrics without overtraining. For sprinters already sprinting three to four days a week, quality over quantity is the way to go.
Since you’re here…
…we have a small favor to ask. More people are reading SimpliFaster than ever, and each week we bring you compelling content from coaches, sport scientists, and physiotherapists who are devoted to building better athletes. Please take a moment to share the articles on social media, engage the authors with questions and comments below, and link to articles when appropriate if you have a blog or participate on forums of related topics. — SF
References
1. Max Aita. Strength Development for Weightlifting.