Future of Fast: Wearable Resistance Orientation and Velocity of Movement

Summary
In this second article on wearable resistance, John Cronin presents the third guiding principle of overloading with WR: orientation. There are many options for arranging WR micro loads and you can use these different orientations to achieve a range of outcomes for athletes with injury prevention, rehabilitation, and performance improvement.
Wearable resistance (WR) allows athletes to train with natural patterns and rhythms of movement that are more likely to promote transference to their sport or event. The efficacy of that transference, however, really depends on your understanding of some of the guiding principles around micro-loading. In a recent article, “The Future of Fast Is Light: Wearable Resistance Load and Placement,” I introduced the effects of mass and load placement (distance from the axis of rotation) on adaptation. The focus of this current article is understanding how to optimize the effects of WR by modifying the orientation and velocity of movement.
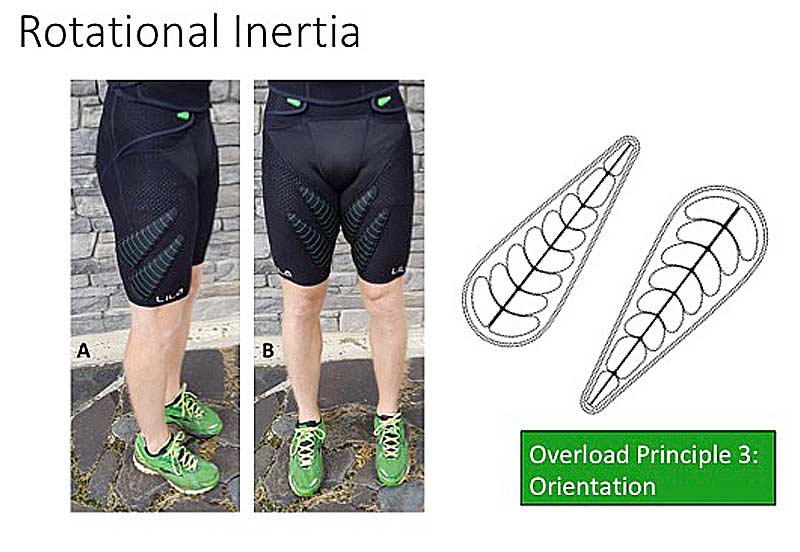
Orientation of Micro-Loads and Rotational Inertia
Following mass and placement, the third guiding principle of overloading with WR is that of orientation, which is related to the concept of placement and rotational inertia. As a quick reminder on the concept of rotational inertia introduced in Part 1 of the series, the resistance of an object to a change in rotation is the product of mass and distance of the mass from the axis of rotation: (I = mr2).
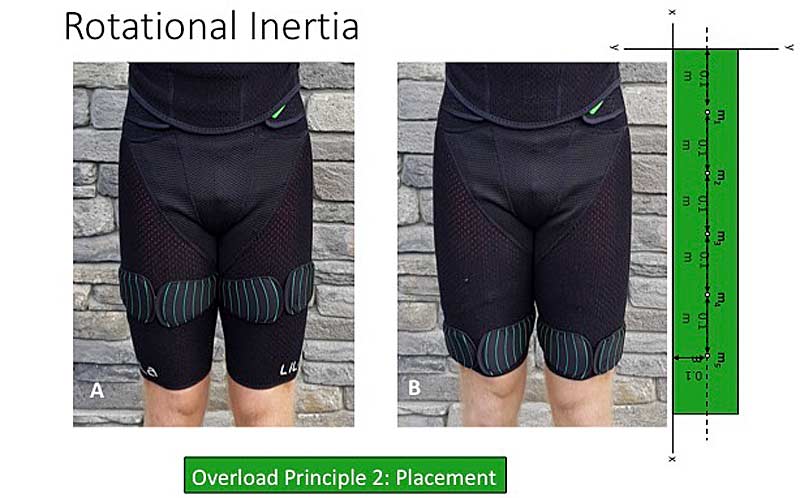
In terms of the thigh loading as in Image 1, Image 1B has greater rotational inertia than Image 1A as the same load is further from the hip axis of rotation. So what? Well, if you increase the rotational inertia, it will take more muscular effort from the hip flexors and extensors to initiate and control the movement of the thigh. Therefore, one of the ways you progress the resisted overload that an athlete is experiencing during unidirectional and multidirectional movements is to shift the load from A to B.
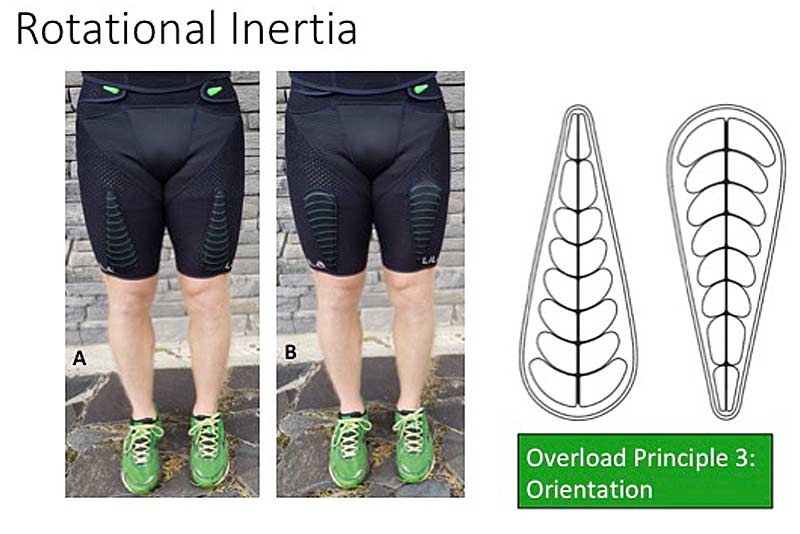
Now let’s get back to orientation. Placement not only affects rotational inertia but also the orientation of the micro-loads. Have a close look at Image 2 and the shape of the loads on the right—the loads are in a fusiform muscle shape, with a head tapering down to a tail. So what? Well, since there is more mass in the head and less in the tail, how you orient the load will affect the rotational inertia and therefore the amount of resisted overload the athlete feels.
You can observe a case in point in Images 2A and 2B—what do you see in A and B with the 200 gm/7 oz micro-loading? If you take a moment and put your response into words, hopefully what you said was, “I am seeing pretty much the same load placement, but the orientation of the micro-loads is different.” Image 2A has more of its load further away from the axis of rotation. Consequently, as the tail has less mass than the head of the load, this orientation in Image 2A has greater rotational inertia.
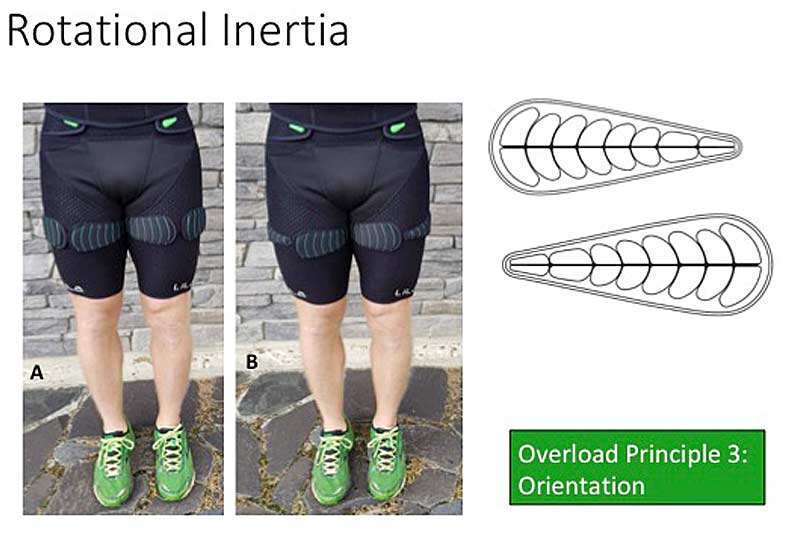
There are many options for arranging the loads and these different orientations can be used to achieve a range of outcomes. For example, see below in Image 3A where 400 gm/14 oz is loaded anteriorly (wide ends of micro-loads at the front of the thigh) versus the head-to-tail loading arrangement in Image 3B (which we call a neutral loading, with the load spread evenly over the anterior and posterior aspects of the thigh). Or look at the next image, where the orientation of the loads causes an external (4A) or internal rotation (4B). This will require activation of the hip internal and external rotators respectively, to maintain proper alignment.
So, the take home message here is that by adjusting the orientation of the weights, you can make subtle differences to the stimuli presented to the muscular system. I am sure for many of you this is intriguing because of the potential implications of this for performance, injury resistance, and injury rehabilitation in your specific sports.
What is really interesting about orientation is that you can start introducing a great deal of movement variability into a training session, which can increase synergistic and stabilizer muscle contributions and likely improve injury resistance. Let me give you an example:
Jess is a developing soccer player and, as her coach, I want to introduce this concept of movement variability and training different muscles to be stronger for kicking and sprinting. I know that striking a soccer ball can involve internal and external rotation, and if I can develop more strength in these muscles, they could contribute to better shooting and crossing, as well as unidirectional and multidirectional movement ability.
So, on Tuesday practices I decide to load Jess as in Image 4A, which promotes external rotation during the warm-up drills and requires the internal rotators to work harder to maintain proper alignment. During the Thursday warm-up, I load as in Image 4B, promoting internal rotation, which requires increased activation from the external rotators for proper alignment.
With these simple changes in orientation, I’ve changed the force vectors associated with the movement, and therefore the contribution of different musculature. I am pretty sure if you take a moment to reflect on this, you will understand how you can change orientation of the loads to assist with injury prevention and rehabilitation, as well as improving performance. That is, strengthening the internal and external rotators would most likely improve kicking performance and injury resistance for Jess.
Velocity and Wearable Resistance
Moving on from orientation, the fourth way you can overload using WR is by simply varying the velocity of movement. Now, to really understand the effect of velocity of movement on WR, I am going to provide a rudimentary example of how squatting 100 kg/ 220 lbs requires similar additional muscular work at the hip as moving 500 gms/~17 oz on each leg during sprinting. Warning: If you are not into biomechanics, push fast forward and skip this next paragraph and get to the messaging of the following paragraph. However, if you want a deeper understanding of this loading parameter, tuck into this next bit.
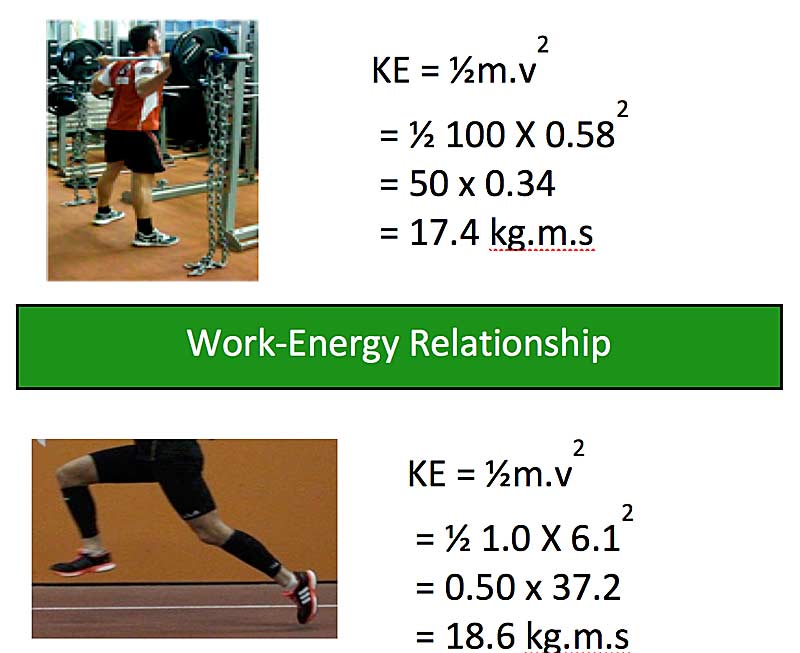
Another first principles (established science and not assumptions) approach to discussing the overload provided by WR and the effects of velocity of movement is to look at the work-energy relationship. Most simply put, the amount of mechanical work performed by a muscle group is determined by the mechanical energy associated with the movement, or conversely, the energy determines the muscular work. In terms of the formula:
- Mechanical work = kinetic energy (KE) =1/2m.v2+ potential energy (PE) = m.g.h. As the net change in height for both squat and sprinting is zero, the PE need not be calculated.
- Squat: So, let’s look at the squat. Let’s say this athlete’s 80% 1RM is 100 kg/ 220 lb, the peak velocity associated with an 80% 1RM lift = 0.58 m/s (Zink et al., 2006). Note this is a peak velocity and, theoretically, we should use an average velocity.
- Squat KE: If you put the numbers into the equation (see Image 5), you see we end up with around 17 kg.m.s of KE.
- Sprinting:Now let’s do the math for 500 gms (17 oz) on each leg while sprinting. A well-trained sprinter’s hip extension angular velocity is ~1000 degrees per second (deg/s), whereas an untrained sprinter’s is ~400 deg/s. For this example, I took the middle ground and used a hip extension velocity of 700 deg/s, which I converted into a linear velocity = 6.1 m/s.
- Sprinting KE: As you can see, the KE for moving the 1 kg load is slightly greater (18.6 kg.m.s) than the 100 kg load, so therefore the work performed by the hip musculature is slightly greater for the 1 kg loading.
How can this be so? Well, let’s have a close look at the formula: KE = 1/2m.v2.
What is more influential in producing KE—and therefore muscular work—is velocity of movement and not mass. This is because the effect of mass is halved, whereas velocity is squared. What are the implications and practical applications of this? Well, here are some key points to consider:
- Light loads (WR) moved fast result in substantial overload/muscular work.
- Such loading would seem ideal for sprinting, given the activity’s specific overload.
- Performing a movement with the same load at 50% vs. 90% of maximum velocity has very different KE and therefore muscular work requirements.
- Think about how you integrate WR into your sessions (e.g., you may well use WR in tempo runs that overload by % max velocity rather than changing mass, placement, and/or orientation).
- Scrutinize how you progressively overload before sprinting maximally with WR given what you know about KE now. However, remember this is only important depending on the masses you use, and the placement and orientation of the loading. If the load is light and placed close to the axis of rotation, then you can be less cautious.
Wearable Resistance Is the ‘Real Deal’
It is my hope that you now understand why the future of fast is light and how to use WR micro-loading to provide movement-specific resistance training. Just use it as part of what you are doing, but progressively overload based on feedback from your athletes using the four principles of WR overload.
Wearable resistance works and is a bonafide method of resistance training for speed. Share on XI have taken a first principles physics approach to show you how WR works and why it is the “real deal” in terms of a bonafide method of resistance training for speed. Remember, the effectiveness of this technology in changing speed capability is based on your knowledge and its application. In these first two articles, I have shown how to overload for speed by manipulating mass, placement, orientation, and speed of movement.
