• Skip to content
  • Skip to primary sidebar
SimpliFaster

SimpliFaster

cart

Top Header Element

  • Facebook
  • Instagram
  • Twitter
  • YouTube
  • Login
  • cartCart
  • (925) 461-5990
  • Shop
  • Request a Quote
  • Blog
  • Buyer’s Guide
  • Freelap Friday Five
  • Podcast
  • Job Board
    • Candidate
    • Employer
    • Facebook
    • Instagram
    • Twitter
    • YouTube
You are here: Home / Blog

Blog

Strong Kids

Why It’s OK for Kids to Be Strong!

Blog| ByKim Goss

Strong Kids


Nine years ago, I attended a seminar by Ivan Abadjiev, the Bulgarian weightlifting coach who developed a high-intensity program that revolutionized the sport. During the Q&A section, one coach asked Abadjiev at what age athletes could start lifting maximum weights. His answer: 8.

Perplexed, the coach clarified his question by explaining that he meant maximum weights—as in 100 percent. Abadjiev’s answer: 8.

The audience was stunned. After all, medical experts had warned us that heavy weights could permanently damage the growth plates of young athletes, stunting their growth and creating permanent disability. Although Abadjiev’s approach is designed to produce Olympic champions and is quite extreme (involving multiple training sessions per day), there are many benefits to getting young athletes to spend a little time in the weight room. For starters, consider the demands that many of our young athletes go through today—those that only play one sport.

Athlete Development in the Specialization Era

With the appeal of scholarships and pressure to win at all levels, parents are increasingly tempted to encourage their kids to specialize in one sport, year-round. I’ve worked with middle school soccer players who played not only on their school teams but also on at least one year-round club team. These athletes had practice 3-5 times a week and games on the other days—sometimes several games on a Saturday or Sunday. Where I live, rather than trying other sports, these athletes are also encouraged to participate in twice-a-week sport-specific training sessions, where they perform plyometric drills and energy system training. The pressure to specialize continues in high school with what is often called The Recruiting Wars.


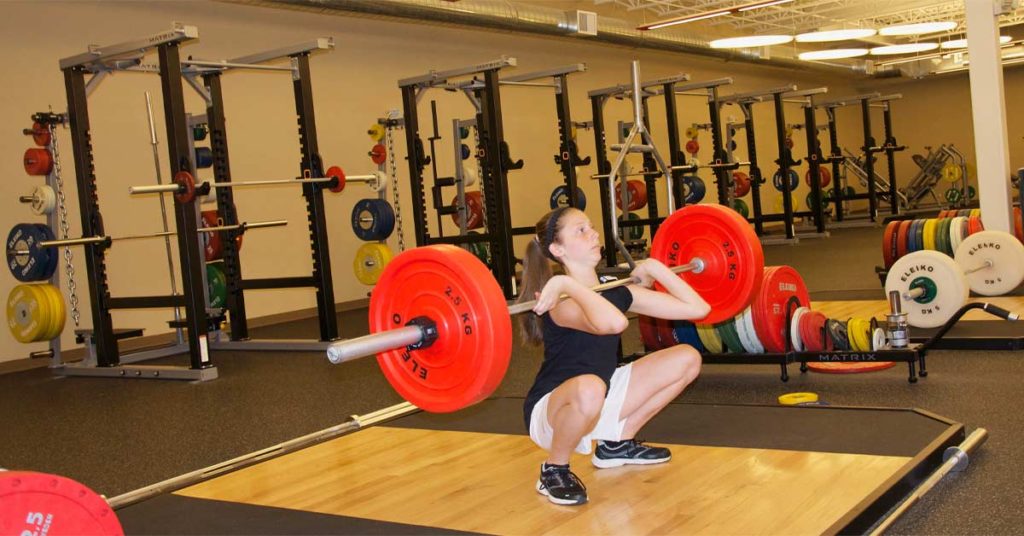
Video 1. Athlete Sierra Cuthill shows good form in the clean and jerk. Cuthill has played soccer, lacrosse, track (high jump and hurdles), and is trained in ballet. She started lifting at the age of 12, and by age 13 increased her vertical jump by nearly 8 inches to a best of 23.3 inches. Cuthill could perform a full snatch and clean and jerk with sound technique the first day she tried! As for academics, she is a straight-A student who is in a magnet program for business.

I know high school track coaches who discourage their star athletes from competing in multiple sports. Instead, the coaches expect them to participate in indoor track and outdoor track while also performing in track camps and demanding summer track workouts.

Likewise, I know high school football coaches who discourage their players from competing in summer track leagues in favor of participating in their strength and conditioning program. The unwillingness to share athletes creates considerable tension among a school’s coaching staff, with the athletes stuck in the middle. Is it any wonder that an estimated 70 percent of young athletes quit organized sports by the age of 13?

Besides the risk of burnout, focusing on one sport makes young athletes more susceptible to injury. One 2017 study of sports specialization involved 1,544 athletes (one-half were female), with an average age of 16 years. Those with a high specialization classification (i.e., focusing on one sport) had an 85 percent higher incidence of lower extremity injury. Yes, 85 percent! The researchers concluded, “Sport specialization appears to be an independent risk factor for injury, as opposed to simply being a function of increased sport exposure.”

Athletes who focused on one sport had an 85% higher incidence of lower limb injury. Weight training helps lower this risk. Share on X

So, what can be done? One answer is to have these athletes participate in a weight training program to help correct muscle imbalances that can lead to injuries.

Why Weight Training? Surveying the Research

One meta-analysis covering 25 studies of sports intervention methods involved 26,610 participants who, as a group, experienced a total of 3,464 injuries. Although athletes are always told to stretch to prevent injury, the researchers found no benefit from stretching. “Our data do not support the use of stretching for injury prevention purposes, neither before or after exercise.” In contrast, the researchers also concluded, “Strength training reduced sports injuries to less than one-third and overuse injuries could be almost halved.” And let’s not forget about concussions.

Youth Lifter Trio
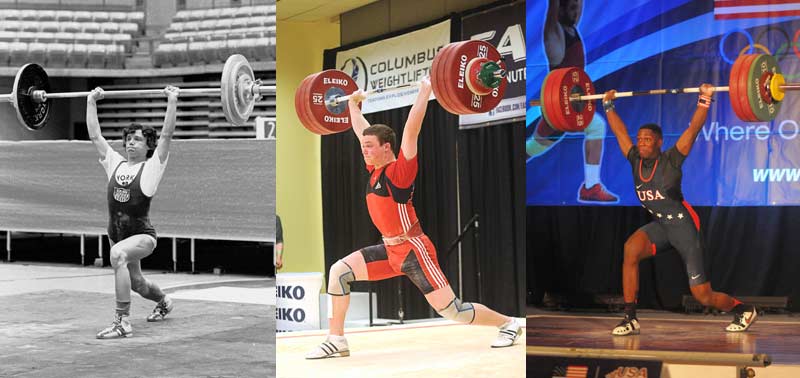
Image 1. Three youth weightlifting stars who went on to compete internationally at the Senior World Weightlifting Championships. Donnie Warner won the Senior Nationals at age 14 in 1973 (left), the youngest ever; Ian Wilson was the first 16-year-old in the United States to clean and jerk 400 pounds (middle); CJ Cummings clean and jerked his American record of 337 pounds at age 14 weighing only 136 pounds (right). Last year, Cummings broke all the junior world records in the 160-pound bodyweight class with a 339 snatch and a 425 clean and jerk (right). (Photos by Bruce Klemens.)


Studies on American football players show that strengthening the neck can significantly reduce the number of concussions. But there is much more to be gained from weight training than just strength. My strength coaching colleague Paul Gagné presented this year at the “Brains and Brawn Symposium” in Toronto, which focused on the effects of head injuries in sports. His number one takeaway from the symposium was that the best ways to avoid concussions are to avoid contact and learn how to absorb, store, and redirect force.

The best ways to avoid concussions are to avoid contact and learn how to absorb, store, and redirect force. Weightlifting trains these abilities. Share on X

“Take Wayne Gretzky,” Gagné said. “He was not a big guy or exceptionally strong, but he rarely got hurt—he had the vision to see the game in slow motion and instinctively knew how to move to avoid getting hurt. Likewise, my colleague Ben Velasquez recently visited Cuba, and said the boxing coaches he worked with appear to be following the lead of Floyd Mayweather by placing more emphasis on defensive skills with young boxers, not on increasing punching power.”

The ability to take a punch, Gagné said, is one reason weightlifting is superior to bodybuilding and powerlifting for athletes. “Weightlifters learn how to use the elastic qualities of their tissues to minimize the stress on the body and redirect that stress to produce higher levels of power.” Gagné added that flywheel training, which teaches athletes how to deal with rapid eccentric forces, can also be valuable for injury prevention.

Keira Trio
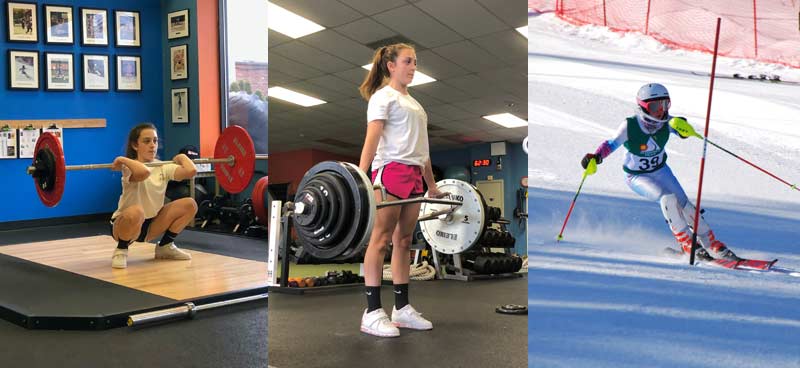
Image 2. Keara Medeiros is a multi-sport athlete who competes in alpine skiing and has trained in France and Austria. At 13 years of age, Medeiros full squatted over bodyweight, hex bar deadlifted over double bodyweight, and vertical jumped 23.4 inches. She is an honor student and will be traveling to Morocco this year to experience immersion in a different culture.


Many SimpliFaster readers are sprint coaches, and I realize that some don’t see much value in weight training. But consider one study that found 27 percent of girls and 29 percent of boys quit sports because of injury (or other health problems). How long do young athletes stay injured? Well, researchers who studied 17 high school track and field teams over one season (77 days), involving 174 males and 83 females, came to this conclusion: “A total of 41 injuries was observed over this period of time. One injury occurred for every 5.8 males and every 7.5 females. On the average, an injury resulted in 8.1 days of missed practice, 8.7 days for males and 6.6 days for females. Sprinting events were responsible for 46% of all injuries.”

When studying these numbers, consider that an injured athlete returning to practice may take at least a week to get back to where they were before the injury. Can you afford to have your athletes miss weeks of practice during the season, lose many more weeks of training getting back in shape, possibly miss several meets, and perform below your expectations? If you can’t, doesn’t it make sense to invest in a little “pre-hab” work in the weight room?

Risks vs. Rewards for Weight Training with Young Athletes

First, understand that 50 years ago, we would not be having this conversation. The only athletes lifting weights were male weightlifters and powerlifters, bodybuilders, and perhaps a few football linemen. (Although off-season training for many football players often was basketball for the “skill” players and wrestling for the linemen).

That was then.

This is now: volleyball players do cleans to improve their vertical jump; baseball players rep out bench presses to hit harder; swimmers perform weighted chin-ups for a more powerful stroke; and hockey players do biceps curls…well, for no apparent reason. Although there are a few holdouts, such as distance runners, many coaches do creative scheduling to accommodate all the athletes who want to pump iron to perform better and prevent injuries.

Gagne Maxine
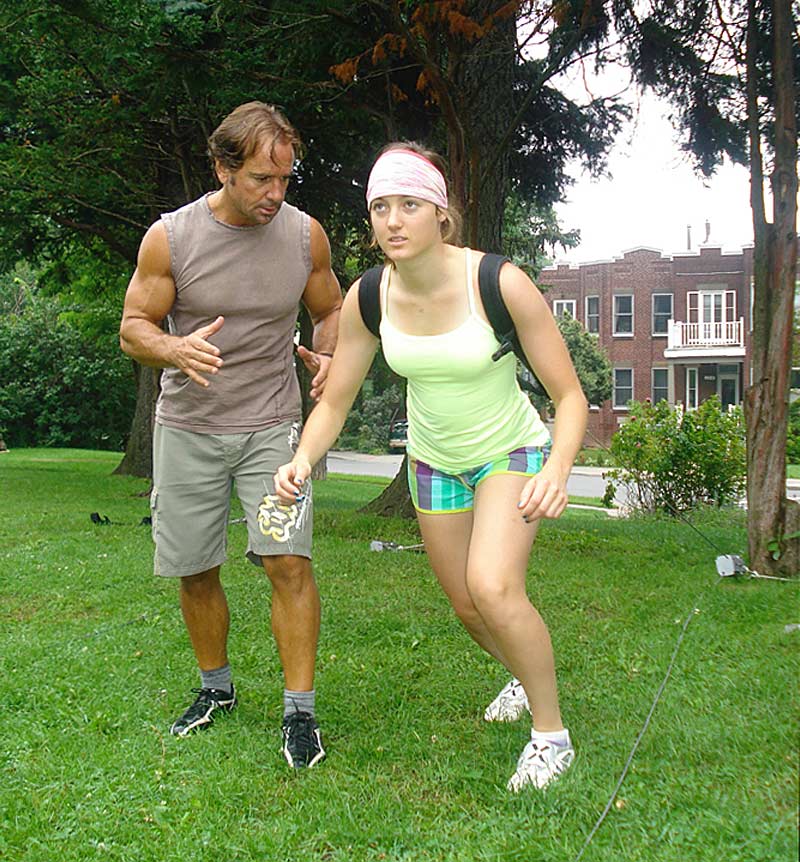
Image 3. Strength coach Paul Gagné works with Olympian Maxime Dufour-Lapoint, a 2014 Olympian in mogul skiing. Maxime’s sisters also competed in those Games, with her sister Justine winning gold and her sister Chloe winning silver. Gagné started with Justine when she was 10, Chloe when she was 12, and Maxime when she was 13. (Photo courtesy Paul Gagné.)


At this point, the question is not if weight training is an effective way for young people to achieve superior athletic fitness, along with improving self-esteem, but when it’s appropriate to start pumping iron.
Facts and Fallacies of Growth Plates

Perhaps because pretty much anyone can post on Twitter, there is this belief that a high level of stress will stunt an athlete’s growth. Two “real life” examples I hear are that weightlifters are shorter than other athletes of the same bodyweight, and women gymnasts today are much shorter than those in the past. Let’s start with weightlifters.

The perception is that heavy weights compress the spine, causing weightlifters to get shorter as they get stronger. Russian research apparently supports this belief, showing that more experienced weightlifters tend to be considerably shorter than inexperienced ones in the same bodyweight class. Nice try. The reason elite weightlifters are shorter than other athletes of the same bodyweight is that they carry more muscle mass!

Elite female gymnasts—athletes who certainly place a high level of stress on their body—tend to be short compared to other female athletes, but for a different reason. Thirty years ago, the average elite female gymnast was 5-foot-3; now the average is 4-foot-9. Simone Biles, one of the greatest (if not the greatest) gymnasts in the history of the sport, is just 4-foot-8. The current level of competition is so high and the movements are so difficult that shorter athletes have an advantage because:

  • Their stability is better
  • They can rotate faster
  • They have greater relative strength

The point here is that if you’re going to go with the idea that gymnastics training makes athletes shorter, it follows that playing basketball will make athletes taller because there are so many tall players in the NBA! With that nonsense dismissed, let’s look at some research addressing the fear that weight training stunts a young athlete’s growth by closing their growth (epiphyseal) plates.

First, premature closing of the growth plates is usually caused by hormonal influences, not injury. In the rare incident that a child injures a growth plate, the bone could certainly become deformed, but it will still grow.

Sports Palace
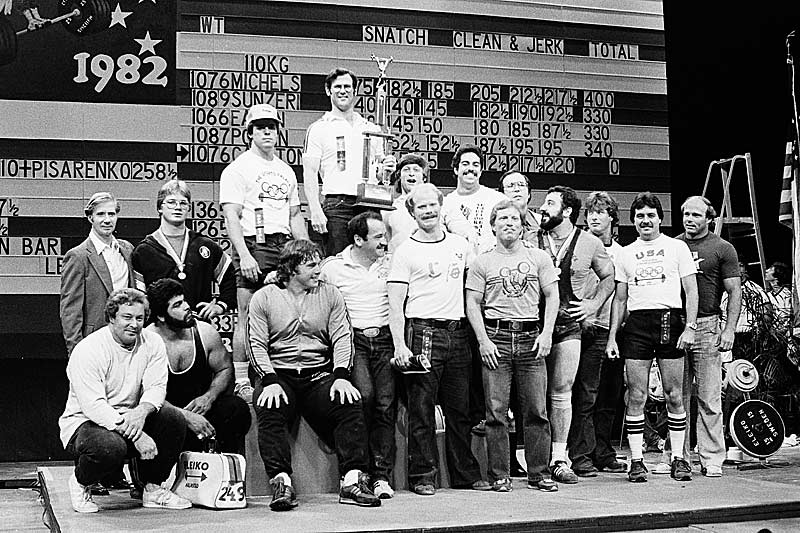
Image 4. Coach Jim Schmitz’s Sport Place team won eight straight national championships, and Schmitz served as the Olympic Games coach for three USA Weightlifting Teams. His athletes only trained 3x a week, for about two hours per workout, and most held fulltime jobs or were students. Success in strength training is not about training long, but smart!


One champion of young athletes pumping iron was the late Mel Siff, Ph.D., an outspoken exercise scientist whose doctorate thesis looked at the biomechanics of soft tissues. In his book, Facts and Fallacies of Fitness, Siff said this about growth plates: “Epidemiological studies using bone scans by orthopedists have not shown any greater incidence of epiphyseal damage among children who lift weights. On the contrary, bone scans of children who have done regular competitive lifting reveal a significantly larger bone density than those who do not lift weights. In other words, controlled progressive competitive lifting may be useful in improving the ability of youngsters to cope with the rigors of other sports and normal daily life.” Siff went on to explain what he meant by the “rigors of other sports.”

“Considerable biomechanical research has shown that the stresses imposed on the body by common sporting activities such as running, jumping and hitting generally are far larger (by as much as 300%) than those imposed by Powerlifting or Olympic Lifting,” Siff said. “In other words, the stresses imposed on the growth centres of the growing child’s body are markedly greater than those occurring in competitive lifting [sic]. If we well-meaningly think that potential growth plate damage is to be minimized, then we need to pay even greater attention to any sports which involve running, jumping, or hitting.”

What do today’s experts believe about the safety of weight training? Well, the results of a survey published in 2013 asked 500 experts in sports medicine if they agreed with the statement that weight training should be avoided until epiphyseal closure. “Overall, respondents answered that ‘this statement is very likely false,'” noted the researchers. “In sum, the expert consensus from our survey that strength training is safe for individuals with immature skeletons is consistent with data from medical literature.”

Why Serious Athletes Must Lift

Running and jumping are two basic components of athletic fitness, which is why many coaches supplement their athlete’s training with plyometrics. With sprinters, I found that if there’s a choice between plyos and lifting, their coaches will often choose plyos. In fact, in 1984 I asked Carl Lewis if he lifted, and he said that his coach often gave him a choice between plyos and lifting, and he chose plyos.

Can plyometrics help an athlete run faster and jump higher? Certainly, but the research shows that weight training can also do this and may do it faster—especially in the early stages of an athlete’s career.

In one eight-week study that compared weight training to plyometrics for improving the vertical jump, the weight training group did better—even though vertical jumping was part of the plyometric group’s training. Refining this idea, researchers have also looked at which is better for developing explosiveness: powerlifting or weightlifting.

In another study comparing weightlifting exercises to powerlifting, the weightlifters had superior improvements in the vertical jump. The researchers also tested the athletes’ power by having them perform vertical jumps with an additional 20 kilos/44 pounds and 40 kilos/88 pounds. Again, the weightlifters produced superior results, perhaps because the weightlifting stressed the elastic qualities of the tissues more effectively than powerlifting.

Young athletes who weightlifted jumped higher and sprinted faster. Share on X

As for sprinting ability, a 15-week study of 20 collegiate football players found that, compared to the powerlifting group, those players using weightlifting saw a “twofold greater improvement in 40-yard sprint time.” Yes, sprinters need to sprint, but if the goal is to fulfill an athlete’s physical potential, then shouldn’t a coach consider all available resources to make an athlete faster? And if strength didn’t matter for sprinting, why were so many elite sprinters caught for steroids? Just sayin’.

I often hear the statement, “A child is not a small adult, so don’t train them like one.” A better statement is, “You can’t have a specific program for a single age group because young people mature at different rates.” In a class of 12-year-old boys, some boys may have the physical maturity of an 11-year-old boy, and some a 12-, 13-, or even 14-year-old boy. Take the case of 2020 Olympic hopeful CJ Cummings.

Cummings began lifting at the age of 10. At age 11, he clean and jerked double bodyweight. Three years later, he clean and jerked an American record of 337 pounds to break the senior American record in the 136-pound bodyweight class, and last year he clean and jerked a junior world record of 425 pounds in the 160-pound bodyweight class. Certainly, CJ is an outlier in terms of physical maturity.

Unfortunately, many of the weight training workouts I’ve seen for kids are rather lame, doing little to develop strength, and few even consider teaching weightlifting (i.e., the snatch and the clean and jerk). Why am I a champion for weightlifting movements?

Weightlifting develops strength through a large range of motion, thus improving flexibility and stability. In fact, the overhead squat, which at the bottom is the catch position of a snatch, is one so-called functional screen used to determine flexibility and muscular imbalances. As for addressing the matter of risk versus reward, here are several proven benefits of performing the full lifts:

  • Strength (relative, absolute, speed/explosive)
  • Jumping ability (vertical, horizontal)
  • Short sprint speed
  • Muscle mass
  • Reduced body fat
  • Muscular endurance
  • Core strength
  • Cardiovascular health
  • Postural alignment
  • Body awareness
  • Reduced risk of injuries

That’s a lot of bang for your buck, such that the rewards they offer are certainly worth the risks associated with practicing them. Short on time? Do some clean and jerks and back squats, and you’ll address many of the goals of a strength and conditioning training program. But even a more complete lifting program doesn’t take as much time as you might think.

My weightlifting coach was Jim Schmitz, a 3x USA Team Coach for the Olympic Games. Schmitz’s Sports Palace Team won nine straight team titles at the Senior Nationals, and he coached athletes in seven Olympic Games. His athletes trained just 3x a week, about 90-120 minutes per session, Monday, Wednesday, and Friday—that’s it!

Why are so many coaches reluctant to perform the full Olympic lifts, preferring (if anything) the inferior partial-range variations, such as hang cleans? One reason so many coaches dislike weightlifting is because they believe the Olympic lifts performed from the floor are too difficult to teach. I agree that the full weightlifting movements are too hard to teach—if you don’t know how to teach them!

I’ve been involved in weightlifting for over four decades, and it’s rare when I cannot teach a decent male athlete how to perform a respectable power clean from the floor in about 15 minutes. And with females, it takes about that long to teach most of them a squat clean. Many of my weightlifting colleagues can do the same.

I often see good athletes learn to do technically sound clean and jerks, and sometimes snatches, during their first training session. Share on X

Yes, full lifts take longer to master, but often I see good athletes doing technically sound clean and jerks, and sometimes snatches, during their first training session. For example, below is a video of a female multi-sport athlete learning how to snatch for the first time—she did a dozen sets, and the entire session took about 25 minutes. Rather than badmouthing these lifts, coaches should meet with an experienced weightlifting coach and ask them to show how to teach these valuable lifts.


Video 2. For those who believe the Olympic lifts are too difficult to learn, here is multi-sport athlete Samantha Dwyer performing the full snatch for the first time. This workout took about 25 minutes.

Can athletes reach a high level of athletic performance without lifting weights? Certainly. It’s the nature of sport that, all things being equal, talent prevails. Usain Bolt lifted weights, but the workout I saw him doing on YouTube leads me to believe that Bolt is fast despite his lifting program rather than because of it. Likewise, the success of many college sports programs is strongly influenced by recruiting. In contrast, at the high school level where recruiting is not an option (except for some private schools), you have to make the best of what you’ve got.

Final Thoughts

I agree that some young athletes don’t have the emotional maturity to train in a weight room safely—these athletes don’t belong in a weight room. It’s also true that some coaches don’t have the skills to teach weight training properly—these coaches don’t belong there either. As Spiderman would say, “With the great power that can be developed in the weight room comes great responsibility!”

It’s true that a sound weight training program may not transform a mediocre athlete into a superior athlete, but it can help all young athletes perform better and be less susceptible to injury. As General George S. Patton said, “You can never be too strong!”

Since you’re here…
…we have a small favor to ask. More people are reading SimpliFaster than ever, and each week we bring you compelling content from coaches, sport scientists, and physiotherapists who are devoted to building better athletes. Please take a moment to share the articles on social media, engage the authors with questions and comments below, and link to articles when appropriate if you have a blog or participate on forums of related topics. — SF


References

Brenner, JS. and Council on Sports Medicine and Fitness. “Sports Specialization and Intensive Training in Young Athletes.” Pediatrics, Vol. 138:3, September 2016.

American Orthopaedic Society for Sports Medicine. “Sports specialization may lead to more lower extremity injuries.” ScienceDaily, July 23, 2017.

Hislop, MD, et al. “Reducing musculoskeletal injury and concussion risk in schoolboy rugby players with a pre-activity movement control exercise programme: a cluster randomised controlled trial.” British Journal of Sports Medicine, Vol. 51:1140–1146, 2017.

Milone, MT, et al. “There is no need to avoid resistance training (weight lifting) until physeal closure.” Physician and Sports Medicine, Vol. 41(4): 101-5, November 2013.

Lauersen, JB., et al. “The effectiveness of exercise interventions to prevent sports injuries: a systematic review and meta-analysis of randomised controlled trials.” British Journal of Sports Medicine, Vol. 48(11):871-7, June 2014.

Kelley, B., and Carchia, C. “Hey, data data—swing!” ESPN.com, July 11, 2013.

Watson, MD, and DiMartino, PP. “Incidence of injuries in high school track and field athletes and its relation to performance ability.” American Journal of Sports Medicine, Vol. 15(3):251-4, May-Jun 1987.

Siff, M. Facts and Fallacies of Fitness, (4th edition, 2000), 154-156.

McBride JM, et al. “A comparison of strength and power characteristics between power lifter, olympic lifters, and sprinters.” Journal of Strength and Conditioning Research, Vol. 13(1):58–66, 1999.

Hoffman, JR, et al. “Comparison of olympic vs. traditional power lifting training program in football players.” Journal of Strength and Conditioning Research, Vol. 18(1):129-135, February 2004.

Bilateral Landing

Plyometrics: Why Athletes Should Develop Landing-to-Takeoff Mechanics

Blog| ByMatt McInnes Watson

Bilateral Landing


Landing-to-takeoff (L-T) mechanics are critical skills for athletes to learn in speed and power sports. The discomfort for some coaches when it comes to coaching L-T mechanics for plyometrics (plyos) is due to unfamiliarity. As mentioned previously, it is obvious that, when performing plyos, athletes are often pushed to focus on a stimulus rather than on landing mechanics. As coaches and educators, we must understand the importance of what’s happening on the ground and how it influences movement, rather than just focusing on how a stimulus and response equation influences athletic development.

Landing Mechanics

Landing mechanics: the ability to deal with a landing and produce a takeoff.

I see landing drills or drop landings all over social media and in sport, and while they’re great for stabilization and dealing with forces, I don’t think they’re adequate enough on their own for takeoffs. L-Ts are considerably different from just landings. A stick landing may look similar to the kinematic sequence of an L-T, but there are clear physical differences.

Most of the time, landings in sport are the subsequent result of a takeoff or maneuver in the air. The popular stick landing techniques that are coached are for these sporting encounters—to find stability and to reduce fatigue and/or injury risks. Many common injuries or overuse issues are a result of faulty landing mechanics, in which an athlete is unable to stop the momentum of the incoming velocities when landing. L-Ts are vastly different in their aim to utilize energy. For us to really understand L-T mechanics, we have to delve into what happens in this sequence.

Although it may not be seen as a plyometric, the Eurostep move in basketball is a prime example of an L-T sequence that occurs regularly within the game. It may not be lightning fast like a long jump takeoff, but this L-T is of huge importance in basketball and similar sports for an attacking option to beat opponents in space. In the video here, you can see a prime example in which Manu Ginobili loads his left leg as he lands, and then unloads force to enable a change of direction to beat his defender.

Using a mirror drill to beat an opponent to a goal or objective is a simple way to introduce a Landing-to-Takeoff stimulus in training without deeming it an expert-level plyometric. Share on X
These simple but effective movements for beating opponents are a case of outmaneuvering the other player. Your athlete has to utilize force and express it at a faster rate than the opponent, and you can break this kind of movement down into drills with a partner. Using a mirror drill to beat an opponent to a goal or objective is a simple method for introducing an L-T stimulus in training without deeming it an expert-level plyometric. A fast-loading lunge step (bound) and change of direction loads a single leg with multiple times body weight at a rapid rate. This, along with a competitive situation, takes away the clinical drill setting that we may observe in a gym and creates a more specific L-T pattern.

Video 1. Landing mechanics

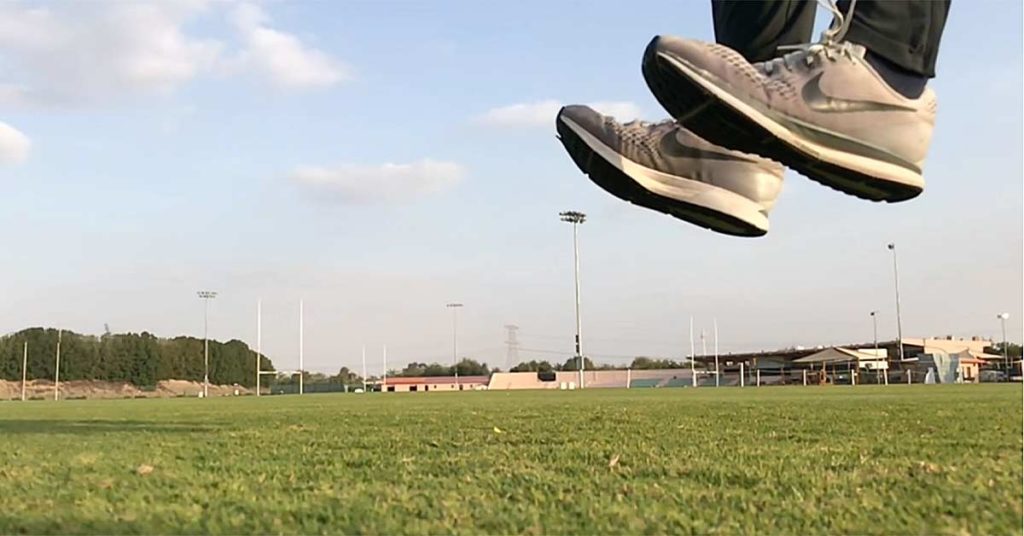
What to look for: You will notice as the foot comes into frame that the toes are up, which suggests a pre-activation of the lower leg in preparation for the landing. As the foot then comes into contact with the ground, it takes a split second to stabilize and settle, transitioning from the eccentric loading phase to the isometric force transfer phase.

Note: The mechanics of this landing might not be perfect, and ideally we want a full-foot landing to minimize stabilization time. Keeping extra time in GCT to a minimum is paramount for smooth L-Ts.  

You will now see that the foot is in mid-stance while the free leg swings through, as the isometric force transfer phase transitions into the concentric force unloading phase for takeoff. There isn’t much here to focus on, apart from making sure that the athlete finishes the movement right off the toe.

Keys: Use footwork tiers to teach landing mechanics. Using a softer surface at first (like grass) enables more of a feel. Use multiple landings to build a cyclical pattern of movements to build sensations.

What to Consider for Different L-Ts

Bilateral L-T: The synchronized coordination of both limbs allows for better control. Due to most of the load being distributed through the hips, the athlete can then trust the wide landing base. Incoming velocities for bilateral landings are unlikely to be fast, so prompt a full-foot landing that rolls through the foot and off the toes, which can support the maintenance of speed. 

Split-stance L-T: The front leg will receive a high percentage of the loading upon landing, while the back leg provides a stability anchor to facilitate better posture. The front leg should land with a full foot to deal with the load, with the back leg supported on the ball of the foot.

Note: Do not get these mixed with unilateral movements—there is often confusion with the classification of split-stance movements such as Bulgarian Split Squats as unilateral. They are not truly unilateral, and the posterior leg can offer support that single-leg movements have to create themselves.

Unilateral L-T: Unilateral landings require a much faster stabilization due to the reduction in the size of the contact base point for landings and incoming velocities. So, with bigger movements such as Ping hops, there is a required aggressive ground strike with the landing limb. If the athlete lacks the confidence to whip the foot into the ground, the likelihood is a passive landing and an insufficient kinetic energy production through the SEC.

Keys: Bilateral—if movements look unnatural, keep the focus on hip extension. Split stance—posture-driven, balance between the front and back, land simultaneously. Unilateral—keep things moving cyclically with the landing leg, focus on maintaining a set velocity. Unilateral L-T may be considered harder, but you should introduce both together. 


Video 2. Landing mechanics: bilateral and unilateral comparison

“What comes before will predict the future of the movement.”

A major factor for a strong L-T is the preceding action, and what’s happening on a neuromuscular level moments before landing. There are some valuable discoveries in studies (Mcbride, 2008) that have found athletes who produce greater performance outcomes in plyometrics activate soft tissue and pre-anticipate the ground long before less-experienced athletes. This shows us that more experienced performers prime themselves to actively strike the ground, and this is more apparent in highly dynamic movements such as depth jumps and hops. Worryingly, other studies are also finding that highly dynamic movements aren’t as intense as other movements like CMJs for some athletes.

If research provides us with evidence to show that athletes without a developmental background can’t utilize these bigger movements, then why are we using them, asks @McInnesWatson. Share on X

When you dig deeper, the athletes used in the studies have little-to-no real experience with dynamic training. This may suggest that in order for us to use certain movements to our advantage, we must teach athletes neuromuscular and proprioceptive control before progressing to more dynamic movements. If research provides us with evidence to show that athletes without a developmental background cannot utilize these bigger movements, then why are we using them?

Our question, as coaches, is how to progress an inexperienced athlete who is tentative in dealing with the high GRFs and lightning-quick GCTs to an athlete who strikes the ground with intent? And one who sequences this all in less than the blink of an eye?

Intent Means Well but Doesn’t Always Deliver

In recent years, many other coaches and I have seen the degradation of bounding (defined as a stride variation where R-L pattern emphasizes air time, vertical or horizontal, often in continuous rhythm). The S&C community seems to have changed the movement’s grace and natural beauty derived from the horizontal jumps. On a daily basis, I spot the stamping motion of concentrically focused bounds. This immediately confirms to me that an athlete has avoided many developmental stages of learning locomotive plyos and has gone straight to force-expressive bounds. This is just a small part of a whole array of plyos that are being forced onto athletes at the wrong stage of development and/or coached incorrectly.

We must recognize that the lower extremities (below knee) are the drivers of our first contact with the ground. Now, whether you want to see this as a ground-up or hip-down approach is up for discussion, but pre-anticipation of the ground cannot be solely driven from the hip in a stamping motion. Many coaches teach movements like bounding as a piston action from hip flexion to extension. They are not considering the finer details of how precise the foot and ankle need to be to deal with multiple times bodyweight in <0.25 secs.


Video 3. Concentric-focused bounds (Note: This video was created for learning purposes and is not the way I typically bound!)

Keys: Tough to create air time if the movement is cyclical, hard to recover foot = no time to prepare for landings. L-T won’t sound crisp and will feel flat and heavy-footed.

Note: You will find that athletes with a developmental background in plyos will perceive effort for even the most intense plyo as easier than beginners do. The unloading phase of a locomotive plyo gives a brief moment for the body to reset, rather than a continuation of held tension.

Resolutions to Building Better L-T Patterns

A large part of learning locomotive plyos on a developmental spectrum is the load-unload cycles we run through as we land and then become airborne. When we can recognize that the unload and airborne phase is equally as important as the loading and grounded phase, then locomotive plyos will become much easier to understand.

When we can recognize that the unload and airborne phase is equally as important as the loading and grounding phase, then locomotive plyos will become much easier to understand. Share on X

The lighter tiers, Footwork and Medium, feed into our ability to unload effectively and then prepare better for the next landing. We can all spot a tense sprinter or player, and we are quick to remedy these issues, but there are only a few who can spot an athlete unable to unload during a plyometric sequence. So the footwork and medium tiers teach timing and rhythm of force expression and preparation. Without this, an athlete cannot utilize the SEC effectively to express force through the L-T.

Locomotive plyos have the ability to feed the learning process of landings and takeoffs with their multiple variations, magnitudes, amplitudes, speeds, planes of movement, and forces.

Keys: All bounding L-T mechanics will be very similar. All bounds are about creating a form of air time. This regulates landing forces, and getting the landing right under the hip will initiate a stretch-reflex which gives a great pop to the movement.


Video 4. Variations to bounding

The learning that comes from a variation of locomotive plyometrics can provide proprioceptive and neuromuscular control responses. They help drive better pre-anticipative activation methods for muscles moments before landing. This runs in parallel with the adaptations that come at a tendinomuscular level, for dealing with eccentric loading and creating greater landing stiffness, etc. The CNS and proprioceptive feedback receptors begin to reprogram their anticipative skills for judging incoming velocities, falling heights, displacement of the CoM, the direction of incoming momentum, and the subsequent direction the athlete then needs to travel.

With all of this reprogramming and greater adapted tissues, the athlete then has the ability to produce a specific outcome need, like height, velocity, and direction of motion. This can prove to be important with in-game variable needs that may arise. The individual must be prepared well enough to produce what their body requires at moments of competitiveness. And who knows what our bodies will do to win!

Improve, Don’t Ignore, Your Athlete’s L-T Mechanics

The takeaway from this article should not drive you to neglect some of your plyometric practices, but inspire you to focus your coaching practices toward improving your athlete’s L-T mechanics. Our common denominator should always be how the L-T influences, and is influenced by, movement. If your athlete does struggle with L-T mechanics, then reduce your volume of ping work and bring them back to more footwork and medium tiers.

Our common denominator should always be how the Landing to Takeoff influences, and is influenced by, movement, says @McInnesWatson. Share on X

Keep an eye on how they move when they’re airborne, as this, too, could influence their L-T. Also, adding a small footwork and medium tier of plyos to your warm-up or activation series can drive proprioceptive and neuromuscular learning at a small price, but great effect, for your athlete’s programs.

Just remember that locomotive plyometrics should be dynamic and graceful!

Since you’re here…
…we have a small favor to ask. More people are reading SimpliFaster than ever, and each week we bring you compelling content from coaches, sport scientists, and physiotherapists who are devoted to building better athletes. Please take a moment to share the articles on social media, engage the authors with questions and comments below, and link to articles when appropriate if you have a blog or participate on forums of related topics. — SF


References

McBride, J. M., McCaulley, G. O., and Cormie, P. “Influence of pre-activity and eccentric muscle activity on concentric performance during vertical jumping.” The Journal of Strength & Conditioning Research. 2008; 22(3):750–757.

Van Hooren

Episode 52: Bas Van Hooren

Joel Smith: Just Fly Performance Podcast, Podcast| ByMark Hoover

Van Hooren

Bas Van Hooren is an athlete, applied sport scientist, Ph.D. candidate, and strength and conditioning specialist from Gronsveld, The Netherlands. He currently lectures at Fontys University of Applied Sports Sciences. As an athlete, Bas has won multiple medals at the national championships, including a gold medal at the national championship 3000m indoor in 2017.

Bas is currently pursuing his Ph.D. from Maastricht University, with a focus on research into hamstring injuries and injury prevention and performance enhancement. He earned a master’s degree in human movement sciences from Maastricht in 2016 and completed a B.S. in Sports and Movement from Fontys Hogeschool University in Eindhoven, NE.

In this episode, Bas goes into detail about muscle slack, gearing, and phasic considerations. He gives clear insights for how and what we program for athletes. He also gets in-depth into all things relating to performance and the health of the hamstring.

In this podcast, Bas Van Hooren discusses with Joel:

  • Eccentric and isometric functions of sports movements.
  • Muscle gearing and pennation concepts and their effect on an athlete’s coordination.
  • How chemicals can affect brain and learning performance.
  • Practical training of the hamstring.
  • The effect of movement velocity and intensity on fascicle length.
  • The acute effect of external load on muscle slack.

Podcast total run time is 54:19.

Bas Van Hooren talked to SimpliFaster about motor learning and muscle physiology concepts.

Keywords: hamstring training, muscle gearing, muscle slack, injury prevention

Korfist2

Episode 51: Chris Korfist

Joel Smith: Just Fly Performance Podcast, Podcast| ByMark Hoover

Korfist2

Chris Korfist is a track coach, former football coach, author, and sought-after speaker in the world of speed training. He is the co-owner of Track Football Consortium and owner of “Slow Guy Speed School.” Korfist is also the Director and one of the founders of Reflective Performance Reset, along with Cal Dietz and JL Holdsworth.

Coach Korfist is one of the most accomplished track coaches in Illinois high school history. He has trained multiple All-State, State Champion, and All-American athletes at the high school and college levels, as well as Olympic- and professional-level sprinters.

Chris delves into a variety of speed-related topics in this episode, with questions ranging from resisted sprinting and special strength work to overspeed training and reducing crossover gait. He discusses his thoughts on speed and power training. He also covers his season of training philosophy and provides insight into his training, technical assessment, and thought processes.

In this podcast, Coach Chris Korfist and Joel discuss:

  • How weather and environment affect drop-offs and programming.
  • Use of the 1080 Sprint.
  • Lower leg training-related sprinting styles emphasizing footstrike.
  • The relationship of the big toe to power out of the blocks.
  • Foot dynamics in sprinting.
  • Overspeed training.

Podcast total run time is 1:10:26.

Chris Korfist has written numerous blog posts for SimpliFaster here.

Keywords: training the feet, special strength, speed technology, track programming 

Female Shot Put

Using Video Analysis with the Discus and Shot Put Events

Blog| ByJim Aikens

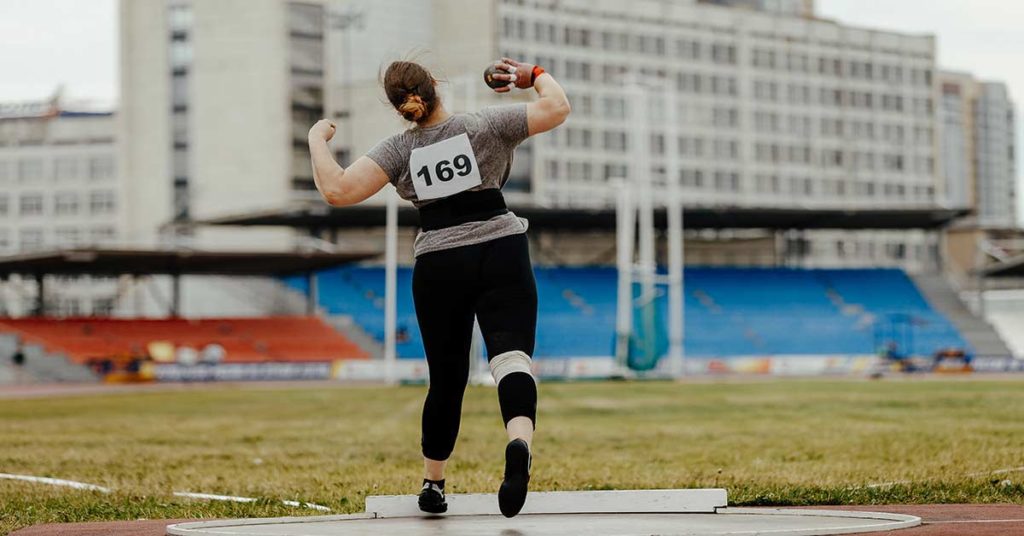
Female Shot Put


Ever since I retired, I have been asked to do more personal coaching with individuals both near my home and across the country. I am happy to do this, but I find it challenging when I try to get these athletes to look at the films of their throws.

Filming your throw and viewing what you do can be very beneficial. However, I have found that there are a lot of young throwers and coaches out there who are not sure what to look for when analyzing film and therefore don’t get much out of it. To help with this issue, I always attempt to educate my athletes and coaches on what to look for when they analyze film.

Over the years of my coaching career, I have come up with some key things I look for when analyzing a thrower’s video. This includes the balance/positions and acceleration of the athlete through the ring. In this article, I will only deal with rotational shot put and discus throwing. It is not my intent to go over technique as much as it is to show what I look at when evaluating video.

What to Look for

The first thing I look for in the video is the overall movement of the athlete. This is where the acceleration of the athlete through the ring comes in. If you view the entire throw, it is fairly easy to see if the athlete starts too fast for their ability and is therefore unable to accelerate through the throw. Remember, it’s not how fast you start the throw, it’s how fast the implement leaves your hand at the end of the throw. That is where acceleration and balance/position come in. Most young athletes start their throws too fast and, therefore, are not able to maintain proper positions to help ensure proper balance, which is ultimately what leads to the success of the throw.

When I evaluate a thrower’s video, I like to look at two primary viewpoints.

The first viewpoint is from the anterior side of the thrower (that would be the right side of a right-handed thrower). I feel this viewpoint is crucial to video analysis of the thrower.

When I evaluate a thrower’s video, I like to look at two primary viewpoints: the anterior side of the thrower and the back of the throw, explains @JimAikens. Share on X

You can see the proper setup as the thrower enters the ring, in the separation between the upper and lower body as they enter the ring, and the proper body alignment as the power foot lands in the middle of the ring during the single support phase. Once the post (block) foot makes contact in the front, you have a great view of the power position.

Finally, it is very easy to view whether there is proper separation between the lower and upper body during the delivery phase of the throw. Since the knee is attached to the thigh and the thigh to the hip, I always look to see if the knee is ahead of the shot just prior to the delivery of the shot. (With the discus, I go by the shoulder of the arm holding the discus.) If the knee is ahead, that shows you have good separation between the hips and shoulders.

The next viewpoint I like to use is from the back of the throw. This position enables me to see if the thrower is on balance out of the back of the ring. It also enables me to view the path of the sweep leg and see if the right leg and hip are properly engaged at the beginning and middle of the throw. You always look to see whether the hips are ahead of the shot or discus shoulder. As you will see, each viewpoint has its advantages.

Video Analysis Apps and Features

There are a number of good video analysis apps that coaches and athletes can use. I used to use Hudl Technique a lot, but lately I have been enjoying the benefits of the Dartfish video app. It has both a free and a paid version, and a wide range of video analysis capabilities.

You can measure angles and time sequences and use a number of tools to point out various aspects of the throw. There are almost too many features available in the app to name. One of the best features is the ease of sharing the videos with my throwers. I captured the pictures below, comparing the two throwers to each other, with my Dartfish app.

Comparing Athletes for Analysis

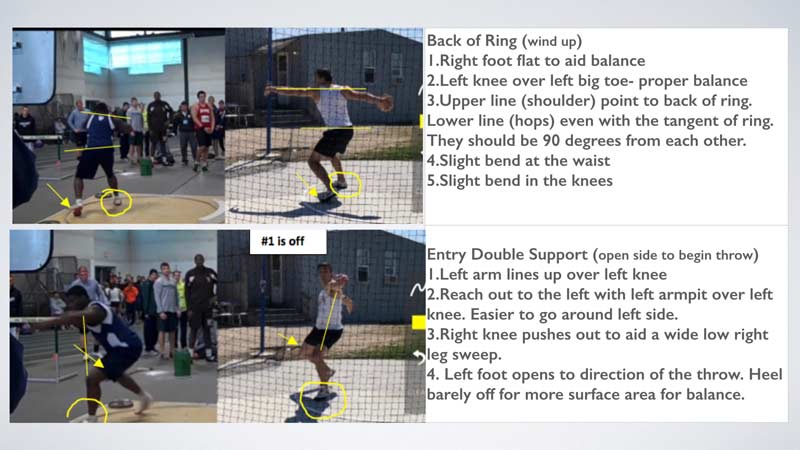
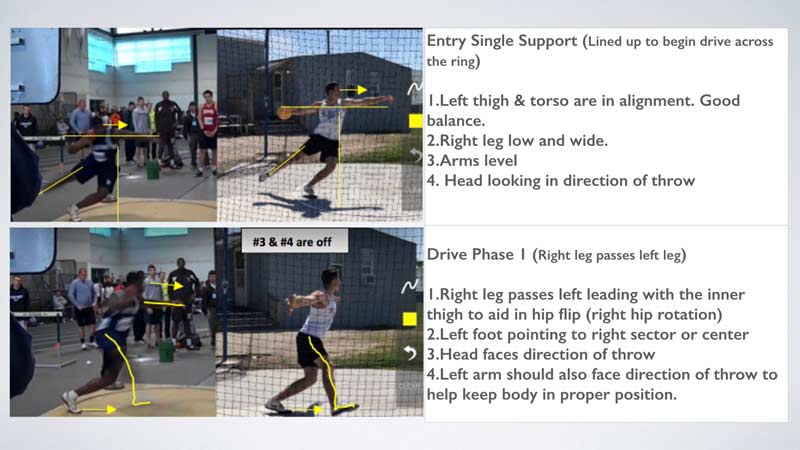
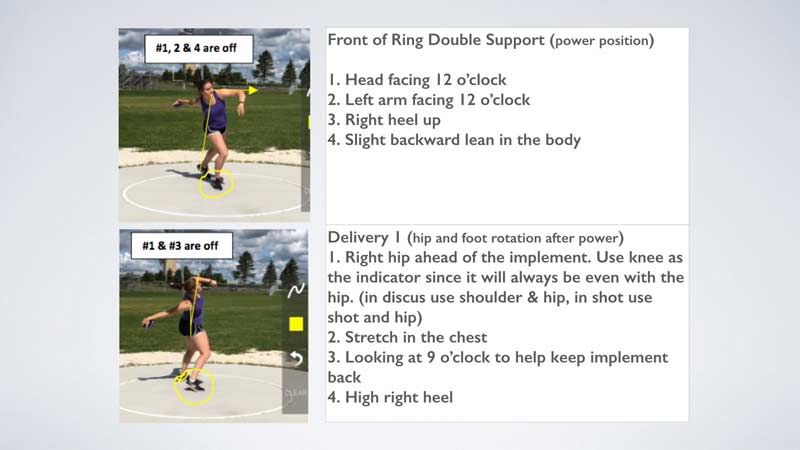
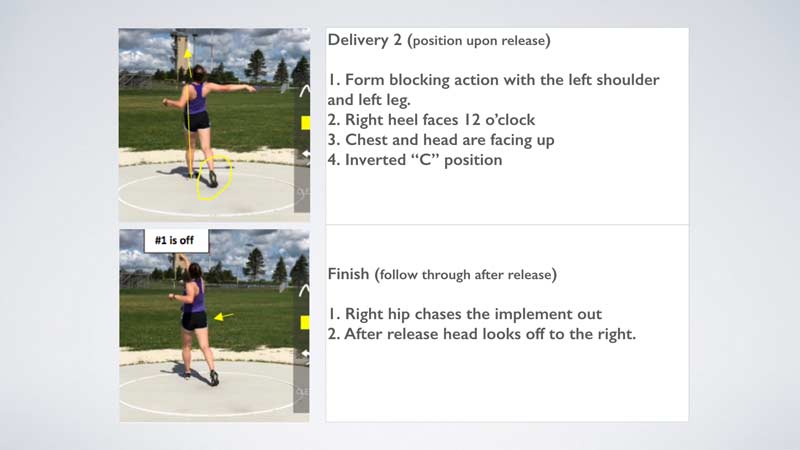
The pictures below are intended to show you what I look for when analyzing throwers on video. I usually break it down to 10 key positions in the throw, and each of these has around four points of emphasis to look at. I feel that if athletes achieve these positions, then the opportunity for a good throw greatly increases.

A throw has 10 key positions, with ~4 points of emphasis for each. If the athlete achieves these positions, the likelihood of a good throw greatly increases, says @JimAikens. Share on X

I like to compare my athletes to another athlete, so they have a better understanding of the position I am trying to get them to achieve. I may use 2–3 different throwers for comparison in an analysis due to the fact that some throwers have certain parts of their technique that are better than others. Using various throwers for a comparison enables me to get the correct position across to my athletes. I also use the many drawing features available in the app to emphasize these positions. As they say, a picture is worth a thousand words.

I made the picture sequences below for two throwers I work with. The first picture sequence is a male discus athlete who I work with being compared to a very good rotational thrower. I teach rotational shot and discus pretty much the same way. I am aware that there are differences, primarily in the middle and at the finish, but I address them individually on their own merits.

The second picture sequence is of a female discus thrower who I work with. In these examples, I am not so much trying to compare the different athletes as I am trying to show you how the different positions look with different people.

Keep in mind that with the more accomplished throwers, as I said earlier, not every position is 100% correct. We must also take style and personal preferences into account. Many more accomplished throwers are physically stronger and better athletes than the athletes I work with. They have developed slight adaptations to their style and technique over the years that enable them to use their developed strength and athleticism to their advantage.

Keep in mind that the more accomplished throwers may not get every position 100% correct. We need to also take style and personal preferences into account, says @JimAikens. Share on X

I wanted to show you a side view and a rear view so you can see they both have their advantages when it comes to analyzing film. As I mentioned, I like to analyze throws videos by breaking them down into the 10 separate positions and the approximately four points of emphasis in each position. This way, I can easily see and show my athletes the positions that they need to establish. Once they have a good visual on that, we can then go over the drills and skills needed to hit those positions.

The template I use for my athletes is similar to the ones below. I have found this format works well with all the athletes I coach, whether it’s an athlete at my school, a local athlete I coach privately, or an athlete from some other part of the country who I coach online.

Sequence 1. These photos show the anterior side view of the throw for a right-handed thrower. I compare my athlete with a more accomplished athlete in side-by-side photos, assessing 10 separate positions, with 2–5 points of emphasis in each position.

Aikens Video Analysis
Aikens Video Analysis 2
Aikens Video Analysis 3
Aikens Video 4
Aikens Video 5

Sequence 2. These photos show the back of the ring view of the throw for a right-handed thrower, assessing 10 separate positions with 3–5 points of emphasis in each position.

Aikens Video 6
Aikens Video Analysis 7
Aikens Video Analysis 8
Aikens Video Analysis 9
Aikens Video Analysis 10

I hope you have been able to learn something from this article. You may also find value in a series of blog pieces I wrote in 2018 for our local coaching group in Illinois, which described the trials and tribulations of building a throws program at a local school. The posts have a lot of good tidbits on practice organization and drills, and there are even a few good stories. If you like the series, you may want to read the rest of my articles from that first season at a new school to understand the importance of developing athletes for the long run.

Since you’re here…
…we have a small favor to ask. More people are reading SimpliFaster than ever, and each week we bring you compelling content from coaches, sport scientists, and physiotherapists who are devoted to building better athletes. Please take a moment to share the articles on social media, engage the authors with questions and comments below, and link to articles when appropriate if you have a blog or participate on forums of related topics. — SF


Winning Track

Building a Winning Track and Field Program with JT Ayers

Freelap Friday Five| ByJT Ayers

Winning Track


Coach JT Ayers has been coaching track and field for 13 years and is a two-time Orange County Track Coach of the Year. Since taking over as head coach at Trabuco Hills in 2014, his athletes have broken 31 grade-level, seven school, and two All-Time Orange County records, and his teams have ranked No. 1 in Orange County for three different years (2015, 2016, and 2018). Ayers is currently the Executive Director of CoachAyers.com, and he teaches full-time at Trabuco. He has written for SimpliFaster on how his team lifts for speed with mass specific force and is a contributor to coaches’ education locally.

Freelap USA: California is huge, fast, and a massive track and field powerhouse. Can you share the mindset that you get your athletes in so they can be fearless and confident?

JT Ayers: One of the biggest aspects of athletics in any sport is the fact that athletes must focus on competing with themselves before they can worry about competing against anyone else. We spend a lot of time reinforcing this at every practice. I strive to cast the vision of our team values daily.

We use phrases to remind them of this, such as “win the workout,” “be 1% better,” making smart choices outside of practice by “building your house,” and “discipline equals freedom.” We focus on positive attitudes toward the uncontrollable elements that arise, such as the other team/athlete(s) or even the weather. I ask the entire team, “How’s the weather outside?” and they reply loudly and together, “Perfect!” This teaches our team not to worry about the things we can’t control.

One of the biggest aspects of athletics in any sport is that athletes must focus on competing with themselves before they can worry about competing against anyone else, says @trabucotrack. Share on X

We go to great lengths to ensure that our athletes are able to see their individual improvement practice to practice, not just meet to meet, by keeping detailed logs of their times and marks from practice. All of this results in a strong level of confidence: The athletes are more interested in the process of becoming great than the outcome.

I love coaching track and sincerely believe we have a program full of young men who desire to be led well and are eager to help one another to be their best selves. We work hard and we work smart. There is a purpose in everything we do, and the athletes know this.

Freelap USA: Obviously, timing peak velocity is everything with your program. Can you share how you instruct running mechanics to complement electronic timing with Freelap?

JT Ayers: Freelap has been my favorite new tool that we purchased this past season. No offense to my assistant coaches, but it is probably our best assistant coach. All joking aside, gathering real-time data that is fully automatically timed allows me to keep detailed records of progress. This is crucial for any coach to maintain a high level of peak velocity training.

The times will not lie, and they will hold you accountable in your effort. Discipline and motivation become much easier to obtain with this in mind. While my athletes are running their speed Vmax or flys workout, I like to film them. I use my phone or iPad in the slow-motion setting. I like using one of the many apps out there where I can pause and draw lines for proper foot strike, posture while running, looking at the toe and ensuring it is up in a “neutral flexion.”

My athletes appreciate being able to see themselves running in between reps to receive encouragement and correction. Their running form is important, but the speed of the rep is always of the utmost importance. It’s impossible to film everything all the time; however, I can Freelap the athletes and have them share chips (we currently have eight) each rep. We have coaching cues that all my assistant coaches share like “run tall,” “good hands,” and “push-recover” while using this new technology.

Freelap USA: Three jump events are known for plyometrics, but high school athletes enjoy them with sprint events. What’s a smart way to incorporate explosive training outside the weight room besides medicine balls and hurdle hops (jumps)?

JT Ayers: At the end of our warm-up, we apply drills with an emphasis on force application and speed. This can include rocket jumps, A-skips, A-jumps, bounds, and wickets, to name a few. Hurdlers will then do more drills that are specific to hurdling, and these too can be considered plyometrics. For more on that, you can watch our video on these specific drills here.

I do believe there can be a negative return to doing too many plyometrics… Work smart with a focus on quality over quantity, says @trabucotrack. Share on X

Sprinting is applying force into the ground. We teach that and reinforce this idea in all that we do. I do believe there can be a negative return to doing too many plyometrics. Every plyometric in the weight room or outside on the track needs to have purpose and functionality for it to make sense in the athlete’s individual training. I do not like doing things just for the sake of doing them. I also monitor how often the athletes do these types of drills. Work smart with a focus on quality over quantity. 

Freelap USA: With blocks, how do you train groups, as it’s a lot of work mastering the setup and first few steps? Any ideas for those with large teams and few resources?

JT Ayers: This has always been a perceived weakness of mine as a coach. I am deeply interested in teaching this efficiently, but it has proven difficult. These past few years, through an exhaustive search and countless questions to other coaches, I was steered toward some incredible resources.

Another difficulty I encounter is that I have 55 boy sprinters and hurdlers, and I need to be creative in the way I teach each individual athlete how to properly accelerate to top speed. One way of being creative is by making the warm-up more than just a warm-up. Let me explain—I like to stand at different distances (15m, 20m) while the athletes do their final “get-offs” and we practice a proper drive phase. At the early stages of the season, we do acceleration drills and focus on specific drills incorporated into the athletes’ warm-up, like pushing with both feet. My goal is to make these skills intrinsic, and the athletes are also aware of what to execute to be successful.

Coach Vince Anderson has a brilliant acceleration chart that breaks down specific steps for different 100m marks. Our track has 20 small pieces of tape lined down the track in six different lanes based on ability level. This way I can push athletes in a challenging way based on their individual progress. I film the first 4–5 steps in slow motion to catch the athlete’s triple extension, shin angle, and force, as well the entire first 25m to gauge the length of their drive phase while looking at their ability to get to Vince Anderson’s tape marks. Regardless of what anyone does, it is important to have a written-out plan with benchmarks within a time frame that makes sense. 

Freelap USA: The 4x400m is a special event. How do you cultivate a culture of interest in this event when many athletes fear it? How does your speed endurance connect as well?

JT Ayers: The 4×400 is my favorite event in track and field. I take great pride when I have no trouble finding athletes to run this event at the end of the meet. At most dual meets, if the other coach is okay with it, we will run multiple 4x4s, and it is common to see 5–6 Trabuco coaches out there getting splits at the finish line. My team loves finishing the meet with this event. I say this humbly as I can; my athletes do not fear this event. They are excited about it.

It is not uncommon to see a Trabuco Hills Dual meet have 300+ athletes on both the boys and girls teams run from one side of the infield to the other as each runner makes the trip around the track. It is electric! I think this lack of fear comes from practicing courage every day. I like putting athletes into different circumstances in their training. You can do so much with a rep in any type of distance.

I will literally count out loud for 4–6 seconds for the athletes to get out at the beginning with purpose. They learn to “carry their speed” and build up at the right time to come off the turn with speed and with proper mechanics. Sometimes they will be chased and sometimes they will do the chasing—we call this “Sheep and Wolves.” The varsity athletes will even stand still, close their eyes, and visualize the race while I give them verbal cues or different circumstances with a stopwatch next to their ear.

Every one of our athletes understands how to run the 4x400, when the proper time to pass another runner is, and how to use their speed wisely in this event because we train for it. Share on X

Every athlete, no matter what their ability level, understands how to run the event, when the proper time to pass another runner is, and how to use their speed wisely in this event because we train for it. An athlete of mine once said that I played “mind games” when it came to training. Of course, I do! Using your speed wisely is crucial in the 400, but you must have speed first.

We train hard and we train fast. We also train smart. The 4×4 is a fistfight and giving athletes an opportunity to see what they are made of builds grit and wisdom. There is always something to learn in and from the 4×4.

Since you’re here…
…we have a small favor to ask. More people are reading SimpliFaster than ever, and each week we bring you compelling content from coaches, sport scientists, and physiotherapists who are devoted to building better athletes. Please take a moment to share the articles on social media, engage the authors with questions and comments below, and link to articles when appropriate if you have a blog or participate on forums of related topics. — SF


Ferrara Fitness Center

6 Steps for Building a Collegiate Sports Performance Program from Scratch

Blog| ByKeith Ferrara

Ferrara Fitness Center


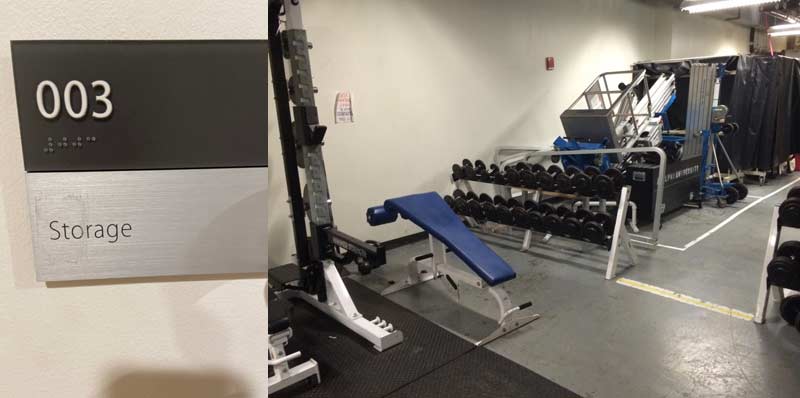
I can still remember my interview for my first collegiate strength and conditioning job. The “whoa” moment (for better or worse) happened when both the head and assistant athletic trainers brought me down to the prospective strength performance area for the student athletes. As we walked by a sign that read “Storage”—a sign that still stands today—I remembered the phrase “have an open mind.” Lo and behold, they opened the doors and we were dead smack in the middle of a storage closet: 600 square feet of mops, ladders, low lighting, dirty floors, and a random array of equipment donated from the rec center as they started to bring in new equipment of their own.

To this day, I am extremely grateful that the university decided to give me the position as the first strength and conditioning coach in school history and placed me in charge of programming for more than 400 student-athletes. This once-in-a-lifetime experience molded me into the coach I am today, and any new coach offered a similar opportunity to start a program should do so—IT IS CAREER-CHANGING.

Starting a strength and conditioning program from its bare bones may seem like a challenging task, but it is one of the most rewarding things I’ve ever done as a professional, says @bigk28. Share on X

Five and a half years later, we now have a completely renovated weight room double in size, four fully functioning multipurpose racks (which may not seem like a lot, but it is light years from where we started), some of the top technology you can find in the field, and the experience of training teams that have won 44 conference championships, including three national championships. Starting a strength and conditioning program from its bare bones may seem like a challenging task, but it is one of the most rewarding things I have ever done as a professional. In this article, I will describe the six essential steps that I believe you need to take to build a successful sports performance program from scratch.

Storage Closet
Image 1. The “storage” room converted into a performance area with donated equipment stacked inside before we properly arranged the space.

One

Meet With Your Athletic Director, Senior Administrators, and Business Manager

This might seem obvious, but it is the absolute first place you need to start: meeting with the people that control your budget as a department. While this may be a question you want to ask in the interview (yearly budget, small- and big-item budget, etc.), an administrator might not give an accurate answer since they may not be sure exactly what it takes to build up a sports performance facility. For example, our business manager told me on my first day that I had $1k to use on small-budget items and $1,500 to use on bigger items—this was nowhere near close to what was necessary to make the facility functional for an entire university.

Be prepared going into that meeting. Have a wish list of every single item you can imagine to make the perfect (for the time being) sports performance facility for you and your situation. Label item quantity, possible vendors to order from, and 3–4 prices from different companies to show you’ve done your homework. Again, they might not discuss this in your initial budget meeting, but at least you’ll be prepared when the time comes.

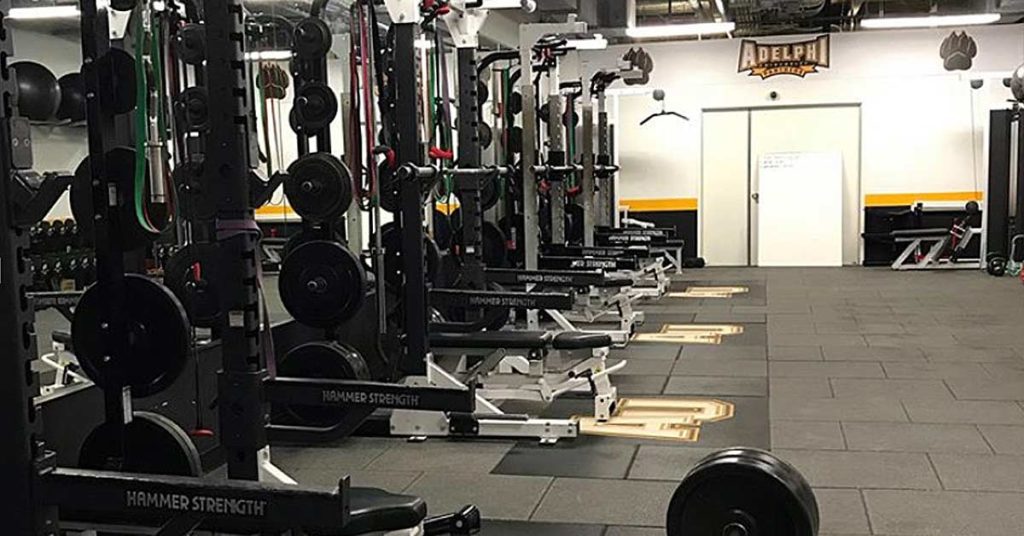
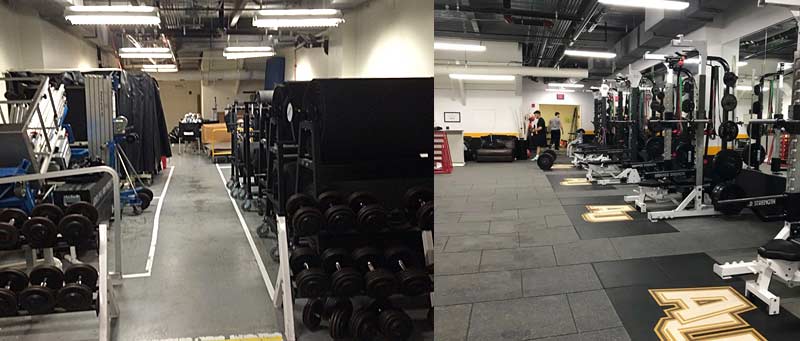
Adelphi Before After
Image 2. A “before” look at the storage room I took over and then the space after we upgraded it into a performance facility for athletes at the university.


This is not the time to hold back on what you think you need; ask for as much as possible and let them tell you what works and doesn’t. The worst thing you can do is have $10k worth of equipment needs but only have the courage to ask for $1k, and then the administration happily approves, thinking you were going to ask for a lot more. Go in asking for $10k and have them bring you down to $5k—trust me, it’s the right approach.

The first big-ticket items I asked for were flooring, multipurpose racks, multipurpose barbells (that we could use for Olympic movements) and bumper plates, says @bigk28. Share on X

These are the people you need to sell your vision to because they will be the ones who ultimately control what comes of your sports performance facility. Just to give you an idea, the first big-ticket items I asked for were flooring, multipurpose racks, multipurpose barbells (that we could use for Olympic movements), and bumper plates. Those items I mentioned are all I need to run my strength and speed program.

Two

Meet With Sports Coaches

Emails can seem taxing later in your career, but they will be your best friend when you’re new in the department. If you think that you’ll just sit back and have coaches knocking down your door, dying for their kids to work out…it won’t happen.

A handful of coaches may reach out to you because they had experience with a trainer in some form in the past, but odds are, if you start at a school with no prior sports performance coach, the sports coaches will have little knowledge about who you are and what you actually do. So, show initiative: Send out emails to every coach on campus, giving a brief introduction of who you are and what you want to meet about. Take care of the coaches who get back to you right away; those are the ones who will buy into your program immediately. There is no need to chase coaches down—when they are ready, they will come find you. (You will have enough to worry about in your first couple of weeks on campus as it is.)

When you meet with the coaches, just talk to them conversationally and ask about their program. Show interest in them and their athletes, as they are the most important part of your sports performance program. Have your sports performance plan ready as to what you would do with their team. This plan doesn’t have to be anything specific, but it shows coaches that you have already started the process of planning for their team. Some may want their teams in the weight room right away, some may want to have their teams only do “recovery sessions” on their field of play, some may just want a quick dynamic warm-up to get their teams introduced. Whatever the coach wants, say “Yes, coach! Sounds great!” You do not need them all-in on every aspect of your program from day 1. Just like any relationship, it takes time and building trust to have people all-in on what you do.

You do not need coaches all-in on every aspect of your program from day 1. Just like any relationship, it takes time and building trust to have people all-in on what you do, says @bigk28. Share on X

To this day, I continue to add different aspects of sports performance for all my teams and coaches. Whether it’s a new warm-up, new weight room plan, nutritional meetings, etc., you will be able to add in aspects of your program as time goes on. At Adelphi, I had six teams jump onboard right away for the first semester. By the second semester I had 12, and by the next year I had 19 teams working out in the sports performance facility.

We will talk about battles you will fight along the way, but you have won a big battle once you get all of your varsity sports participating in the sports performance program. Even if all teams don’t buy into your program, don’t sweat it. Fully commit to all the teams that commit to you. Those teams know where you are, and if they are interested, they will reach out to you. You cannot waste time on teams that don’t want to buy in when you could instead be focused on those teams that are already fully committed to your program.

Three

Post Job Openings for Assistant, Graduate, and Volunteer Assistant Coaches

This will be a big ego check for a lot of coaches, because for some reason we want to do it all by ourselves. We don’t think that anyone can train teams like us and we don’t want to ruin the brand-new program we just launched. This is my best advice to coaches who are starting a new program or find themselves as the only full-time coach at their school: YOU MUST DELEGATE RESPONSIBILITY OR YOU WILL STRUGGLE. I say this from firsthand experience.

For my first three years at Adelphi, I was in the weight room at all times for every single lift group. I remember some days I would get into the weight room around 4:30 a.m. and wouldn’t leave until 9:00 p.m. This is not safe or smart for you or your athletes. Although coaches don’t like to admit it, you can NEVER give 100% effort working 10–16 hours a day. Trust me, I tried it and failed miserably. I was never happy, I dreaded getting up each day for work, and after eight hours of groups I was beyond exhausted and just muscled through to the end of the day. That isn’t fair to you as a person, and it isn’t fair to the athletes who always expect you to give 100%.

I learned a lot through my first three years at Adelphi, and I am glad I went through this grind to realize this isn’t the answer, and no coach should have to experience it. Go back and talk to your athletic director or assistant athletic director about the budget for your assistant coaching staff. To start at Adelphi, I was given a small stipend and credits. It may not seem like a lot, but there are people of all ages in the field who are eager for experience. Make sure you do your due diligence and thoroughly dive into each candidate’s background to find out the best you can about what type of person you are bringing on your staff. You can teach anyone your philosophy, so it’s more important to find people who are passionate about the field and have an open mind to learning new ideas.

You and your assistants don’t always have to agree, and, in fact, it’s good to challenge one another, but your message to the coaches and the athletes must be consistent. I was so glad (for many reasons) I got married at the end of my third year, and we had our newborn son in my fourth year, because it forced me to let go and delegate. The most important thing in my life is my family; I love my job, but you will never get back the years with your kids when they are younger. BE SMART; DELEGATE! It will be the best thing for you, the department, and your athletes.

Four

Keep Your Programming Simple

On to the fun stuff. When you first start at a new program, you’ll want to make individual programs for every single team. You’ll want to show them you care, and an individual program for their specific sport is a step in the right direction. In my opinion, however, sport-specific training is one of the most fraudulent terms out there, used by people who don’t have a grasp on what they are doing, or who are trying to make a sale.

If you make a general plan, keep it simple. Odds are that most of the athletes you train have a very low training age and will make progress no matter what exercise or program you give them. With regard to the term “sports specificity,” I always ask the question, “What sports require you to be fast, explosive, strong, agile, mobile, etc.?” The answer is all of them.

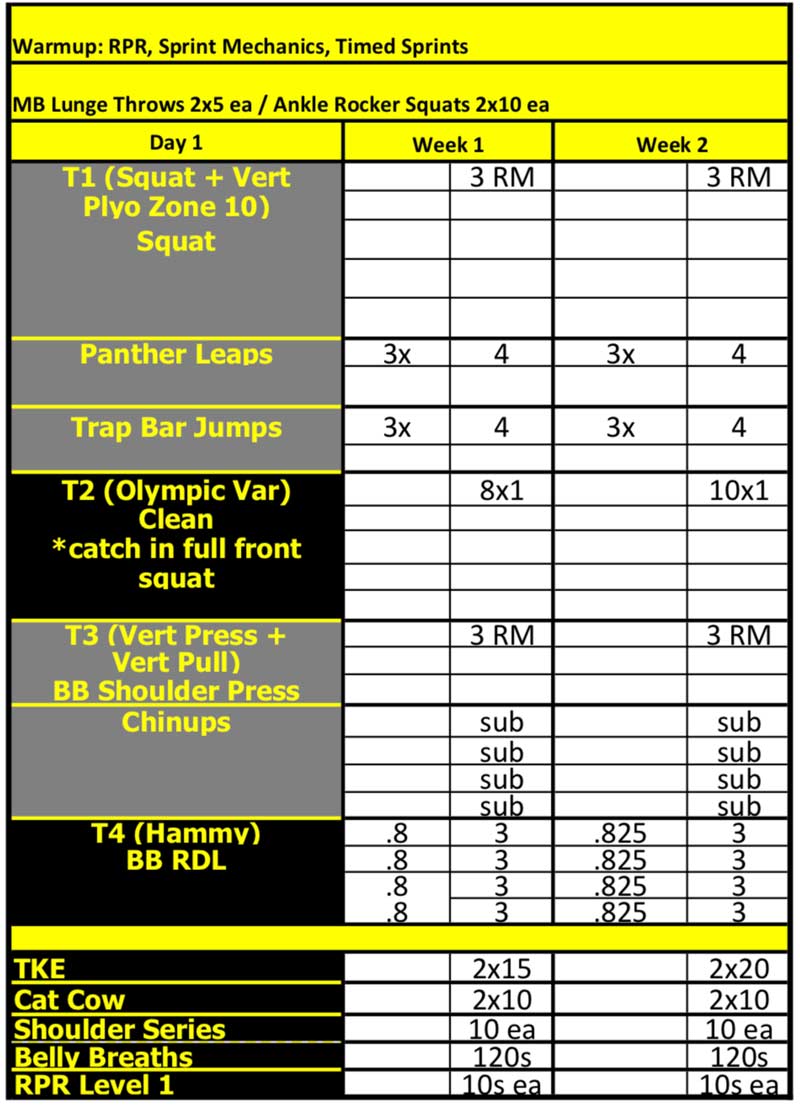
Ferrara Sample Workout
Figure 1. This is a sample workout for one of our teams running through their off-season program. We put a big emphasis on mastering the basics and giving maximal effort on each exercise while limiting CNS fatigue. Our main priorities in the off-season are to improve speed, strength, and power. Targeting those qualities helps the athletes reach their genetic potential and maximize their ability.


Determine what your program’s basics will be and master those basics. If you have a rack, a barbell, bumper plates, and space to sprint, you can put together an amazing sports performance program. Stay away from the gimmicks (they don’t work anyway). As the years go on, the specificity of the program turns to the individual athlete. I judge my program based on the team’s commitment, maturity level, and training level. If they show me full-blown commitment and a high maturity level, and make progress on each movement, I will start to make the program more “advanced.”

If you have a rack, a barbell, bumper plates, and space to sprint, you can put together an amazing sports performance program, says @bigk28. Share on X

Once athletes show me the appropriate strength improvements, we move on to more complex training methods. But in your first few years, speed (sprinting), movement efficiency, and strength should be your primary focuses. Every other quality will benefit from mastering the qualities mentioned.

Five

Define Your Culture

This will go a long way in determining how successful you are at the school that hires you. It doesn’t matter if you have the perfect sports performance program: If you do not show the athletes and coaches how much you care about them, not only as players, but as people, you will never get them to buy in. Take it upon yourself to get to know the athletes as people. Meet with teams before you begin your sports performance program to set expectations. Like the programming where you want to keep it as simple as possible, you want to follow the same principles here.

For me, the message was simple: show up on time, be respectful to your coaches and your teammates, and give 100% of what you had for that day. Sit down with the coaches and assign team leaders for the sports performance area. These are the athletes you will lean on to check the pulse of the team and help right any wrong that you may be experiencing. Today, kids want to know the why when they do any activity. Take the first few minutes to explain your workout and the why behind each movement.

If you can’t explain the why…don’t do that exercise. Everything in your program should have a purpose that you should be able to explain at any given moment. Will every athlete or coach agree with your program? The answer is simply no, and if you expect 100% buy-in, you’re lying to yourself. By the way, it’s okay that they don’t; but they should respect what you are trying to help them accomplish and that is to be the best possible athletes in their respective sports.

I tell every single one of my athletes, “This is your program, not mine…I give you the tools to paint, but you paint the masterpiece.” At the end of the day, the athletes will determine how successful the program is. As long as you put an honest effort into doing the best possible job, then you are doing everything you can. I simply relay the message to each team that if they don’t want to train, then don’t come. No hard feelings, but I only want people that have bought in 100% and want to reach their genetic potential. Not everyone will be weight room All-Americans and that’s just fine. We don’t want them to change who they are. We just want what’s best for them. SHOWING YOU CARE WILL BE THE CORNERSTONE OF BUILDING YOUR PROGRAM.

Six

Failure Will Happen and It’s Okay

One of the biggest learning curves as a coach is that you will fail; and those moments could potentially be the best of your career. Failure is how we learn! We will not be perfect, and that is fine. It is through failure that we learn what works and what doesn’t. My failures, not my successes, are the reason I have improved as a professional every single year. Even in my 10th year in the field, I continue to make mistakes—but the best thing I do is acknowledge what I did and figure out how I can improve going forward. Constantly reevaluate yourself and your program and always be ready to admit when you are wrong or where things can be better.

My failures, not my successes, are the reason I have improved as a professional every single year, says @bigk28. Share on X

A Recipe for Success

To close, building a sports performance program from scratch will be one of the most—if not the most—rewarding experiences of your professional career. If you go from working with multiple teams to working with just a few, it will be one of the easiest transitions you may experience. By following the steps above, I have built our program to be one of the best in the country. I will continue to adapt and grow because we need to constantly improve as professionals. Remember, delegating responsibilities, keeping your program simple, and showing everyone that you care will be some of the main reasons you have success at your new school.

Since you’re here…
…we have a small favor to ask. More people are reading SimpliFaster than ever, and each week we bring you compelling content from coaches, sport scientists, and physiotherapists who are devoted to building better athletes. Please take a moment to share the articles on social media, engage the authors with questions and comments below, and link to articles when appropriate if you have a blog or participate on forums of related topics. — SF


Long Jump

Building a Better Technical Model for the Long Jump

Blog| ByNoah Kaminsky

Long Jump


In 2017, World Athletics (formerly IAAF) published its first biomechanical reports since 2009. I do not know if any other reports were published for 2010-2016, but it was the Berlin 2009 World Championship data where I encountered the intersection of athletics and technology for the first time. In December 2015, my instructors for USATF Level 1 Coaching Education shared a few resources with my cohort to guide our young, hopeful careers. On Saturday night, as my subway banged its way back uptown, there I sat, squeezed and uncomfortably contorted between other passengers, with my eyes glued to my smartphone. The USATF lecture slides on physiology and technique from earlier in the day were good, but the Berlin 2009 World Championships Biomechanical Analysis of the Long Jump was mesmerizing.

I was star-struck. And I admit it took me a while to look beyond the still frame photography. The reports are truly a treasure trove of information. Whether you’re a coach, exercise physiologist, or an athlete, the biomechanical reports offer our community a better way to understand the limits of human performance. A team of kinesiologists analyzes the raw data from each event’s finalists and produce the reports, which detail everything from stride lengths to instantaneous velocities. The most striking observation I made was the relative stride pattern for long jumps at take-off. Out of 84 male and female elite long jumpers from 4 World Championships, 79 finalists relied on a long-short stride pattern to produce their best jumps.

If coaches want their athletes to develop this skill, they need to teach the correct stride pattern at take-off.

Not every report provides data we can translate into practice drills, but in the case of long jump, the reports are a valuable resource. As you might expect, faster athletes produced farther jumps, meaning the approach on the runway is a necessary skill to develop. As I’ve written previously, when an athlete demonstrates a skill 85% of the time, it will translate to their performance. Unfortunately, this doesn’t mean they’ll win the competition.

When my athletes take a good jump, I usually freeze up. I’m always looking for something to correct, but I quickly realize all I need to say is, “Good! Let’s do that again.” Then, a naturally gifted athlete with shoddy technique flies down the runway, hits the board just right on pure chance, and jumps way farther than my athlete. Maybe you can relate. This is common in high school sports, and college, too. We all know what it feels like to lose a competition to one of these athletes. The drive home afterward leaves you questioning your coaching. However, I refuse to believe this nullifies the hard work we invest day-in and day-out developing an unathletic freshman into a competitive senior athlete who scores points at the conference championship. Yet, in the moment, the loss certainly makes it feel like our coaching has been all for naught.

On the world’s stage, shoddy technique is a very unusual sight—for the long jump. I’m encouraged that the biomechanical reports don’t show evidence of such an upset. No medals were awarded to athletes who competed with an ineffective stride pattern at take-off.

In the long jump, the correct stride pattern at take-off includes an elongated penultimate stride followed by a shorter stride. This mechanic lowers the hips and effectively prepares the body to use its glutes, hamstring, quad, and calf muscles in the last stride. While I advocate adopting the evidence-supported stride pattern in the generalized technical model for the long jump, the wider coaching community continues to debate the technique.

Long-Short Take-Off in Long Jump Practice

Speed masks skill proficiency. So take it out of the equation. An athlete’s ability to use a long-short stride pattern is most evident from a shorter approach when speed is not a factor. I recommend a stride-stride-long-short jump drill to teach this skill.

Begin with your athlete standing feet together. Have them take a step back with the right foot, lean backward slightly, and raise their right hand. They should initiate the sprint with two regular strides, followed by a relatively longer penultimate stride and then a much shorter, flat-foot contact step to jump off the ground. It’s your job to watch their stride pattern and correct their mistakes. Here are some common errors:

    • If an athlete overstrides either step, they’ll go short-long or long-long. Let them try again.


    • If they go long-short but the jump seems flat, they probably didn’t have good posture at take-off. The right cue is “Chest up!”


    • Athletes may take too few or too many strides. Let them walk out their strides and try again.


In all circumstances, be honest with your athlete. Tell them what happened. Model the correct stride pattern for them and help them feel the motions pace-by-pace or at a walking pace. When athletes become more proficient at this skill, move them back and have them take four strides before going long-short.


Video 1. Coach Kaminsky demonstrates an effective long-short stride pattern at takeoff, compared with patterns that he does not recommend.

In addition to teaching the skill itself, you must teach awareness of the skill. Athletes need to know what the physical movements feel like as they drill the skill—both effectively and poorly. Only then can they make adjustments in response to your feedback.

In a sport where fast means everything, sometimes a slower, shorter approach has great value. Coordination may be more challenging on a smaller scale, but it’s more valuable for skill acquisition. Slower execution also allows you to observe your athletes’ movements more easily.

Biomechanical Analysis

Each quarter, USATF publishes its magazine Track Coach. I read every issue, and in the latest, Editor-in-Chief Russ Ebbets argues in support of technical models rooted in the fundamental skills for each event. Without reservation, I believe that a generalized technical model for every event is necessary and possible. As athletes progress, more nuanced technical considerations may become more critical. But any new considerations should build upon the generalized technical model, which remains reinforced by regular practice.

For example,athletes can adjust the relative length of their penultimate stride while maintaining the long-short stride pattern. If the average stride length is 1.50m, penultimate is 1.70m, and the last stride is 1.40m, they can adjust the penultimate stride to 1.75m while keeping the other stride lengths the same. Any such adjustment would require frequent reinforcement in practice to translate into performance.

In the end, it’s just a numbers game. One competition of 7 vs. 1 might not pass a test of statistical significance, but 79 vs. 5 provides a more reasonable justification for an accepted stride pattern. Last year, McCosker et al. (2019) analyzed the same World Athletics reports for a similar purpose. They determined that training design needs “to move beyond reductionist approaches to studying long jumping” because the current analysis is too frequently “provided by isolated biomechanical analysis of single jumping events.” I agree with the McCosker study. We cannot ignore the data. World Athletics collects a vast amount of data from elite competitions, and we need to use it to inform training design whenever possible, wherever appropriate.

World Athletics collects a vast amount of data from elite competitions. We need to use this data to inform training design. Share on X

I’m not a student of kinesiology or exercise science—my degree is in geology, and now I teach 7th and 8th grade. One of the most important lessons learned in middle school science is that a claim must be supported by convincing evidence for that claim to be accepted. Even when some small amount of evidence, like oddball outliers, refutes the claim, we must still accept the claim because a larger, more convincing body of evidence supports it. Just like long jumpers who go short-long and still make it to the finals of a world championship, we may not be able to explain why the outliers do not support our claim. That doesn’t nullify the evidence or its conclusion. Why should sport be any different? A jumper who relies on a short-long stride pattern may achieve a successful, competitive mark, but they are still an outlier. Their performance does not invalidate the accepted technical model.

Kaminsky Chart
Table 1. Performance data supports the accepted technical model for the long jump.


Coach the Fundamentals and Let Air Mechanics Fly

The long jump’s greatest challenges are the approach and take-off. Once an athlete is airborne, they can’t change their flight path. They can only prepare to land. When new athletes jump, you can usually tell which landing style will work best for them because their natural, untrained motions resemble the style they’re most comfortable with. Style disqualifies itself from the generalized technical model. There’s no reason to demand a new athlete learn the hitch kick if the hang works better for them. After take-off, they’re going to follow a predetermined flight path regardless of how they choose to land.

You can, however, teach the athlete a better stride pattern in their approach. As the athlete progresses, maybe the hitch kick will help prevent over-rotation. You can adjust the approach and take-off concurrently with air mechanics, but that still doesn’t qualify air mechanics for the generalized technical model.

Let’s face it: if NBA superstar Blake Griffin can hang from the rim by an elbow after dunking a basketball from an alley-oop off the backboard, then anyone can learn to hitch kick, sail, or hang. It just takes time to learn a different landing technique.

The World Championship long jump data supports the long-short stride pattern at take-off, so let's develop this skill in training. Share on X

We should not excuse poor techniques for personal style. Instead, treat air mechanics as technical subtleties, which I defer to the athlete for preference. Relative stride pattern falls into a generalized technical model because it does not change as an athlete progresses with age. The World Championship data supports the long-short stride pattern at take-off and suggests training should include developing this skill.

Other Considerations

I may be overlooking how other variables affected performance on that championship day, but it’s safe to say that each athlete prepared exceptionally for their competition. Because they arrived ready to compete at peak performance, I’m even confident in the marks short of their personal bests. In other words, the total number of jumps speaks louder than the quality of any single jump. We can mostly ignore the confounding variables.

I’m not arguing that the way I learned the long jump is better than the way you learned it. I’m arguing that the way I coach the long jump is supported by empirical data and reasonable analysis. Nowadays, you have to stomach the science. Incredibly athletic kids with little training will jump far if they get lucky and hit the take-off just right. On your way home afterward, you have to ask yourself if they could have jumped farther with a better stride pattern at take-off.

A biomechanical analysis will not support every skill worth learning. But in the case of the long jump, the data greatly supports the long-short take-off stride pattern. Since we can measure an athlete’s proficiency in this stride pattern by relative stride lengths and its frequency in execution, we should adopt this skill in the generalized technical model for the long jump.

In good conscience, I must urge caution in how this applies to track and field more broadly. The World Championships biomechanical analyses are useful educational tools, but they can also mislead us. In events with skill progression based on speed and strength, like pole vault and hurdles, we cannot drill developmental athletes to imitate exactly the mechanics of elite athletes. In the high hurdles, for example, drilling three steps between hurdles for beginning athletes will not work. It will be fruitless and frustrating. It might even turn the athlete away from the event or the sport overall. Instead, we can place hurdles closer together so beginners feel the faster rhythm of three steps. The same athlete would also practice five steps at regulation hurdle distances and switching legs with four steps.

Teach technical models rooted in the fundamentals so athletes will develop skills to sustain gradual improvement while they get stronger and faster. Share on X

The biomechanical analyses exist to increase our understanding of the theory for each event. The reports are not published to frustrate or belittle the experience of a beginner, who so greatly wants to succeed. So dive in. There’s more than enough data and great coaches who can develop broadly accessible technical models rooted in the fundamental skills for the respective event. We need to teach these models because athletes need to develop skills that will sustain gradual improvement while they get stronger and faster.

Since you’re here…
…we have a small favor to ask. More people are reading SimpliFaster than ever, and each week we bring you compelling content from coaches, sport scientists, and physiotherapists who are devoted to building better athletes. Please take a moment to share the articles on social media, engage the authors with questions and comments below, and link to articles when appropriate if you have a blog or participate on forums of related topics. — SF


References

Chris McCosker, et al., “How performance analysis of elite long jumping can inform representative training design through identification of key constraints on competitive behaviours,” European Journal of Sport Science, 19, no.3 (January 2019): 913-92.

Tucker, C.B., Bissas, A. and Merlino, S. (2019). Biomechanical Report for the IAAF World Indoor Championships 2018: Long Jump Men. International Association of Athletics Federations.

Tucker, C.B., Bissas, A. and Merlino, S. (2019). Biomechanical Report for the IAAF World Indoor Championships 2018: Long Jump Women. International Association of Athletics Federations.

Tucker, C.B., et al. (2018). Biomechanical Report for the IAAF World Indoor Championships 2017, Long Jump Men’s. International Association of Athletics Federations.

Tucker, C.B., et al. (2018). Biomechanical Report for the IAAF World Indoor Championships 2017, Long Jump Women’s. International Association of Athletics Federations.

Biomechanics Research Project in the IAAF World Championships Daegu 2011.

Hommel, H. Biomechanical Analyses of Selected Events at the 12th IAAF World Championships in Athletics, Berlin 15–23 August 2009. German Athletics Federation.

Belt Squat

Mastering the Belt Squat for Strength and Conditioning

Blog| ByWilliam Wayland

Belt Squat


Hip belt squats emphasize the legs with less load on the spine, load the lower body despite any torso or upper limb limitations, and shine in their potential for lower limb hypertrophy. Their recent resurgence has been pushed by strength sport athletes looking for improved leg development, strength coaches who want to load athletes in novel ways, and equipment manufacturers that continue to innovate and abstract with new designs.

Hip belt squats surfaced in the 1970s and have fallen in and out of favor since then, though they’ve always been in the background. According to the story, Louie Simmons invented the device in the mid-70s after injuring his back and was unable to squat. Using some ingenuity, he brought us the belt squat machine that Westside Barbell is known for.

The Soul of Belt Squatting

By removing the load from an athlete’s shoulders and upper trapezius, the hip belt squat places emphasis on the legs with less load on the spine. The removal of axial loading and subsequently lower trunk extension moments let us load the lower body despite any torso or upper limb limitations—hence its original application for powerlifters with blown backs. I’ve used variants with fighters who have injured upper bodies, particularly the shoulders, when even a hands-free safety bar squat caused pain or discomfort.

The hip belt squat also shines in its potential for lower limb hypertrophy. We can train the legs in a high-volume fashion with higher loads without high levels of lumbar fatigue. Anyone who has done high-rep back squats can attest to this. Some of my favorite stories from old-timers are about using belt squats with an exaggerated heel lift to really target deep knee flexion and torch what they describe as lower quads.

Belt squats come in various shapes and sizes, ranging from simple lever arms to weight stack pulley systems. At its most rudimentary, it suspends loads, such as dumbbells or plates, while standing on boxes to provide clearance. Belt squats often are accessory movements used as a plan B option for specific leg development when upper body limitations preclude more conventional squat options; the belt squat represents a vertically oriented task rather than what we commonly see with many leg press options and is a lot less compressive.

Hip belt squats are great for leg development when upper body limitations prevent more conventional squats, says @WSWayland. #BeltSquats Share on X

The belt squat does come with a few downsides, particularly excessive lumbar extension in some athletes—often those who exhibit excessive extension generally—especially if the belt is placed too high. We can sometimes mitigate this by placing the belt just over the hips or by using a harness over the hip belt.

When executing the belt squat, watch for the hips rising faster than the shoulders. An upright object, like a hand support, can help mitigate this, which is why many belt squatters almost instinctively place their hands on their thighs. The belt squat design also influences this. Squatmax-MD, for example, suggests their design—which isn’t fixed like a lever arm—leads to low sheer stress and less gravitation toward lumbar extension.

I recommend avoiding belt squats with beginners or clients who haven’t taken the time to establish solid squat patterns. A precondition for getting the most out of belt squats is to make sure the client’s squat pattern is good. This may seem trite, though I’ve issued the same warning about the hand-supported squat. Novel squat variants may offer a back door to a loaded squat pattern, but the coordination of upper limbs, torso, and lower body is crucial for long term development.

As I said in my post about earning the back squat, “movement quality drives loading strategy and not the other way around,” and we should pay the same respect here. Much like the leg press, belt squats do not provide the same holistic coordinative challenge conventional squats do, so rotate belt squats or use them in a fashion that ensures good competency.

Very little real research has been done aside from a notable 2015 study by Gulick et al. that found similar muscle activation in back squats and belt squats (using a squatmax-MD machine). The study also showed greater activation of quadriceps and less for hip extensors, so belt squats could be very useful for bodybuilders and athletes who already focus on deadlifts, RDLs, and hip thrusts.


Video 1. The pin-style belt squat is popular in part because it’s inexpensive, but it may not be the right fit for all athletes. If an athlete does’t have the leg length or prefers not to go wide, then pin-style options may not work.

Another study on belt squats by Evans et al. (using a Pit Shark) found that a lever arm belt squat machine failed to activate the glutes similarly to the barbell back squat. This runs contrary to what well-known coaches have said, including Travis Mash: “The biggest benefit that I’ve noticed is that it really emphasizes hip extension.” “The way the belt sits, if you don’t activate your glutes you won’t reach extension, so it pretty much turns every single exercise into something that emphasizes the glutes.”

This may be an issue of technical execution regarding coaching, set-up, or the choice of belt squat device. The hip extension contribution, however, is not dissimilar to other squat variations, though the belt squat does have differing knee extension moment arms, hence the increased quad activation. It’s also possible that mileage may vary among belt squat device machines.

Belt Squat Options

Freestanding Belt Squats

Freestanding belt squats are the most rudimentary way to employ the movement. An athlete uses a conventional dip-belt and squats with the load slung between the legs. The issue is usually clearance, so you’ll see individuals do these standing on two boxes or benches so the weight can dip below their feet.

The major limitation to freestanding belt squats is the amount of load that’s practical or comfortable due to set-up and execution issues. It was this limitation that apparently spurred Louie Simmons to build his machine. Dismounting boxes with a heavy weight between the legs isn’t for the faint-hearted. The progression is to use belt squat lever arms or machines.

Belt squat marches and unilateral work, which I’ll discuss later in this post, can’t be performed with this type of set-up because the lateral swing of the load makes its very unstable.

A variant is landmine belt squats which use the landmine’s ad hoc lever attachment. While these can be a pain to set-up, they do offer an alternative. We can get some stability by turning it into a long-levered movement. The landmine allows us to load the movement more substantively than a conventional belt squat.

Another option is to use a single-ended loading pin for belt squats. Again this allows for greater loading, but the width of an Olympic-sized plate dictates stance width, which can be a problem for smaller athletes or when you want to do narrow stance squats.


Video 2. Using a landmine attachment, we can load the belt squat more substantively than we can a freestanding belt squat.

Lever-Based Belt Squats

Lever-based belt squats have become more popular recently due to modular set-ups, allowing them to be attached and unattached from modern rig or rack systems that save space, unlike a belt squat machine. These usually have a fall away catcher that allows the user to set-up, then stand up and perform the movement as the catcher swings away. The catcher then can be replaced and the weight returned to the set-up position.


Video 3. Lever-based belt squats are more popular now due to space-saving set-ups.

Belt Squat Machines

Belt squat machines with under-loaded pulley systems, such as the one popularized by Louie Simmons, have been around for a while. Pit Sharks and similarly designed machines generally take up a similar amount of floor space but are very effective robust lever-based machines.

Design considerations include the relationship between the lever arm, the load, and the athlete’s position. More recent designs place the load much closer to the center of gravity, which correlates much better with straight bar movements. We also increasingly see the addition of handles to make the movement hand-supported. This allows for increased loading and resists the forward pull the belt sometimes places on the athlete under very high loads.

More than Just Squats

Belt Squat Marches

Belt squat marches are another movement coming out of the powerlifting community. The idea is to stand tall in the belt squat while either marching on the spot or with different IR/ER on the unloaded leg. Loading the standing leg in an advantaged position certainly provides feel to the working muscles. These are used mostly as a warm-up or as activation for reps or GPP work for time. After air travel, I’ve used a band variation to stimulate hip flexors and glutes and get my hips feeling normal.


Video 4. The belt squat march, often used as a warm up exercise.

Split Squats and Staggered Belt Squats

It’s also worth considering split squats and staggered belt squats for a novel stimulus; I’m particularly keen on a staggered hand-supported belt squat. The main issues are set-up and comfort, as the variability in set-ups means that a split squat is often not viable but a staggered squat is.

Creativity goes a long way in setting this up. You can find an excellent example using a double harness with a double lever machine in Chris Korfist’s post about the Bulgarian split squat.


Video 5. I especially like the staggered hand-supported belt squat for a novel stimulus.

Belt Squat Romanian Deadlift

The belt squat RDL is another novel variant for the belt squat alone, the addition of dumbbells and kettlebells, and even band-anchored variations. A shift in belt position will create some sheer stress and potential traction in the lower back. This can benefit athletes who experience a lot of compression from conventional heavy barbell work. The RDL is a perfectly viable option as a special exercise or when the conventional RDL isn’t an option.


Video 6. The RDL with dumbbells and hip belt is a creative way to get a new stimulus with athletes. Experiment and see what works for your environment.

Ranged Trimetric Belt Squats

Although these are considered out in left field now, ranged trimetric belt squats are good for rapid contract-relax contexts. I’ve been using them with some of my grappling and MMA athletes to promote rapid contract-relax qualities without the limitation of ankle-based ground force characteristics we need for plyometrics. Because combat athletes spend a lot of time unshod on soft surfaces, their SSC isn’t particularly well developed because their spring ankle complex is not up to snuff.

Ranged trimetric squats usually are performed for contextual timed sets anywhere from 3-10s. I suggest using an underhand grip to allow for upper body contribution and stabilization while the athlete pulls and pushes rapidly in each direction. I file this under looks silly, does good in the category of movements. I have the benefit of owning my own gym, so the athletes aren’t too bothered about looking silly.


Video 7. Ranged trimetric belt squats promote rapid contract-relax qualities without the limitation of ankle-based ground force characteristics.

Integrating Belt Squats into Your Program

We can look at integrating belt squats in three ways: as a primary force-producing option, as an accessory, or as a substitutive option. Below are some programming suggestions on how to implement belt squatting across a training week.

The primary force-producing exercises make the most of the belt squat’s inherent stability and de-loading of the trunk. They focus very specifically on producing high levels of force under stable positions; variations like hand-supported positions allow for more loading.

Primary Approaches
Table 1. Implementing Belt Squat Primary Exercises


Power and Speed
Table 2. Training Power or Speed with Belt Squats


Accessory use makes the most of the higher structural stress that belt squatting allows for, so we can train for goals like specific hypertrophy or local fatigue tolerance. I usually place days like this at the end of the week, as the higher volumes at high loads can produce very high soreness levels.

Accessory Exercises
Table 3. Implementing Belt Squat Accessory Exercises


Use the substitutive approach when an athlete presents with a problem that precludes them from using conventional exercises with an axial loading component. This is often a preplanned change or sometimes a reactive substitution performed on the fly. Keeping plan B as close to plan A as possible is a rule of thumb.

Substitutive Exercises
Table 4. Implementing Belt Squat Substitutive Exercises

Conclusion

Belt squatting offers another way to target lower-body loading and, as with any variant like this, comes with many upsides and a few downsides. While its place is mostly as a supplementary exercise, its value shines in its ability to specifically target the lower body at the expense of some of the systemic stress of conventional lower-body compound movements. When timed correctly, they help maintain peripheral freshness in the upper limbs.

Belt squats shine in targeting the lower body without some of the systemic stress of conventional compound movements, says @WSWayland. #BeltSquats Share on X

Its other key use is with athletes who are experiencing something that prevents them from performing conventional barbell training, which was why the belts were used originally. We’ll probably see more equipment innovation going forward, as comfort, space, and expense all come into play when gym owners decide what to put in their facilities.

Since you’re here…
…we have a small favor to ask. More people are reading SimpliFaster than ever, and each week we bring you compelling content from coaches, sport scientists, and physiotherapists who are devoted to building better athletes. Please take a moment to share the articles on social media, engage the authors with questions and comments below, and link to articles when appropriate if you have a blog or participate on forums of related topics. — SF


Additional Reference

English, Nick, “Why the Belt Squat Could be Your Secret to Strength Gains,” BarBend (website), updated January 15, 2018.

Track Drills

When and When Not to Use Track Drills

Blog| ByChris Parno

Track Drills


Drills are used as tools; they don’t teach the movement concepts. That’s for the coach to impart to the athlete. Instead, drills are used to reinforce what we teach. When considering which drills to use, I find it essential to break down the concepts behind them to ensure they belong in my program.

Wickets, for example, look great at low intensities for YouTube videos and Instagram stories. But let’s put some context and meaning behind them—they help stabilize front-side mechanics and diagnose stride length issues. And while the toe drag has divided a world of coaches, turn it into a teaching drill, and athletes’ low heel recovery proficiencies may take off.

I admit I’m a Twitter guy. I enjoy following sports news, discovering new drills and concepts, and connecting with other coaches. Twitter is useful and quick, but not the only route of coach’s education. And when you leave education to your athletes, you get YouTube searches and misguided technical models based on the models of genetic monsters.

In this post, I advocate three drills I’ve seen criticized in some fashion on Twitter and other platforms: hurdle wall drills, wickets, and dragging the toe in acceleration.

Track and Field Drills

First, let’s talk about the concept of a drill within track and field. I find there are three types of coaches when using drills in their programs.

    1. Coaches who use drills as a tool to reinforce and stabilize the concepts they’re teaching their athletes.


    1. Coaches who use drills as time killers and fillers, when they run out of things to practice, or they don’t understand the purpose of a specific drill.


    1. Coaches who use drills to impress parents and prospective clients with flashy movements and equipment.


I’ve fallen into each of these categories during my coaching years. And as I’ve progressed, I try to live in the first. I take pride in teaching and educating my group of athletes so they know how a drill is useful. Why should your athletes do a wicket run if you don’t know the reason behind it?

I hope after you read the following drill explanations, you’ll start breaking down the concepts behind drills and ensure they belong in your program. If you pursue the truth as a coach, you ask questions and are open to the answer. If you already have all the answers, there is no need to break down new or current drills for understanding.

To battle our own confirmation bias based on our experiences, we must stay away from absolute statements and steer toward open conversations. When our ego is tied to our system and we hold true to that, it’s much harder to introduce potentially useful concepts to our athletes, which potentially limits their paths.

Disclaimer: There are many ways to get it done in the world of track and field. The art of coaching truly is sorting through the noise and helping your athletes improve through proven tactics.

With each drill, I’ll explain the following:

  1. Why use it
  2. When to use it
  3. Who to use it for
  4. How you know it’s improving your athletes

Hurdle Wall Drills

The hurdles are highly complex high-velocity movements. Imperfections in essential techniques can become catastrophic when we add intensity. There is a wide spectrum of beliefs about hurdle drills, from coaches drilling for hours before a session to coaches saying, “The best drill for hurdling is actually hurdling.” I find myself somewhere in the middle. I need to feel comfortable in foundational movements before moving forward to the whole movement.

If you went to 100 different hurdle sessions across ability levels, you’d probably see hurdle wall leads and trail drills done 100 different ways. I started thinking about the hurdle wall drill when I saw a prominent program’s instructional video lazily display a wall lead drill. The athlete walked up to the hurdle, brought their leg up, tapped the wall, and dropped their leg back to the ground. I thought, “If this athlete drills like this with their coach around, I can only imagine what they look like over a hurdle.”

When an athlete attacks a hurdle, they navigate a path that requires both vertical and horizontal force displacement off the ground, says @ChrisParno. Share on X

When an athlete attacks a hurdle, they navigate a path that requires both vertical and horizontal force displacement off the ground. This path (vector), based on hurdle height towards the hurdle, will produce the most efficient parabolic curve over the top. The diagrams below show the directional forces, displacement off the ground at the desired parabolic curve, and efficient parabolic traveling of the hips over the hurdle.

Sprint Hurdle Key Concepts
Image 1. The drawing on the top left directionally shows the vertical and horizontal forces. The top right drawing shows displacement off the ground at the desired parabolic curve, and the bottom left drawing shows efficient parabolic traveling of the hips over the hurdle.

I don’t think you’ll find a single successful hurdle coach who denies the importance of hip displacement at toe-off to set up the desired hurdle position. Because we know that we don’t get faster in the air, efficient clearance should be the premium driver in deciding what drills to use.

By breaking down the lead leg wall hurdle drill, the most important aspect is to step the take-off leg down quickly and feel the hips pass over this step, displacing upward and in toward the wall. The athlete then contacts the wall with a stretch in their hip flexor (men will experience more upward movement to navigate higher hurdles).

With the hurdle wall drill, it's crucial to step the take-off leg down quickly & feel the hips pass over the step, says @ChrisParno. Share on X

This accomplishes two of the criteria for efficient hurdling—a shallow parabolic curve (relative to hurdle height) and a stretch reflex in the take-off leg’s hip flexor to help efficient cycling of the trail leg at toe-off.

Now, if I were lazy and didn’t give my athlete any purposeful feedback, I would have them step up to the hurdle, plant their foot directly under their center of mass, and bring the lead leg up, tapping the wall before bringing it back to the ground. A coach seeking purpose in this drill will quickly realize this technique doesn’t directly resemble any aspect of the full hurdle movement, so they should adjust it or remove it from their program.


Video 1. The lead leg drill is a classic. Make sure your athletes understand the concept behind it first before adding it into the program.


Video 2. Another variation of the lead leg drill is also popular. Both drills have value, and you can use them in various sequences for countless purposes.

To ensure displacement occurs, the coach can put a piece of tape down on the track 4-6 feet back from the wall to give the athlete a visual. We can use an upside-down hurdle (pictured below) to provide a visual for take-off from the wall. Shorter or less proficient hurdlers should be closer to the wall, while taller or more proficient hurdlers can step down further away from the hurdle.

We can add the concept of the cut-step with an aggressive shortened final cycle of the take-off leg down to the ground before hip displacement, which helps the athlete get into this stretched position.

Another option is to perform the drill on a chain-link fence that gives upon contact. The flexing of the surface will further stretch out the hip motion before the fence recoils to its original position. So, if your outdoor track facility has only chain-link fences, you can still use this drill.

Lead Leg Drill
Image 2. An upside-down hurdle provides a visual for take-off from the wall.

For the trail portion of the wall drill, we’ll use the same thought process. The athletes want to displace the hips and stretch the hip flexor of the take-off leg (trail leg) before cycling. What purpose would this portion of the drill serve if the athlete was standing up tall and close to the wall mindlessly cycling their leg around?

Set up the drill with the hurdle slightly behind the hips and position the athlete at a slight angle to the wall. Lower the hurdle to allow the trail leg to travel through in the correct position (knee higher than the ankle). The stretch within the hip will assist in cycling the trail leg through, similar to the full hurdle motion.

To add some resistance, an athlete can take a light anchored stretch band and attach it around the ankle of the trail leg. This resistance can help reinforce the trail leg’s correct path while providing general strength opportunities within the hip.

Trail Leg Drill
Image 3. Place the hurdle slightly behind the hips and have the athlete lean in a slight angle to the wall.

These static wall drills are great for beginning and developing hurdlers. Proper execution plus instruction and feedback from the coach will let athletes feel correct attacking and cycling patterns early in a practice session. Mindless execution will only reinforce poor patterns.

At the elite level, this drill could be used as a periodic check-in for technique or a general warm-up and hip strengthening exercise. As a hurdler moves toward the elite level, more advanced specific hurdle drilling and full hurdle movements at high intensities will take the forefront.


Video 3. Athletes can use trail leg drills to work mobility and to warm-up for training. The trail leg drill can be used for both male and female athletes as well as advanced athletes.

Wickets

If you want to fire up a room of coaches quickly, mention wickets. You’ll elicit a plethora of opinions about whether wickets assist or detract from a sprinter. Wickets are an enigma—there are many opinions on the intent, execution, and rate of which you can analyze improvement or understanding. I’ll unpack my understanding of where and when I see the validity of this movement.

Athletes need technique before attacking wickets. Wickets are the end goal to your teaching and education of sprinting, says @ChrisParno. #wickets Share on X

First, wickets are an end goal—athletes need foundational biomechanically-backed technique work before attacking wickets. Wickets are a synthesizer and summation of your teaching and education of sprinting; think of training as reading and wickets as the book report. Wickets can reinforce and cement the sprinter’s force intentions and serve as a daily session check-in and benchmark of technical proficiency.

Here is my checklist for a wicket session:

    1. Maximum effort (purposeful intent to be sprinting at max velocity through the wickets). This requires an acceleration zone of 20-30m. Spikes are not required, but maximum intent is.


    1. Spacing must be set up for our end goal. If we have a sprinter looking to hit 2.20m per stride at max velocity in a race (based on trochanter length ranges), they eventually must work up to sessions where the wickets hit these distances through a progressive build-up. Randomized unmeasured wicket patterns won’t allow for a progressive stride length model similar to the desired race model of a 60m or 100m dash.


    1. Athlete Focus and Understanding. Wickets assist athletes in feeling and achieving front-side mechanics, high attack angles, and efficiency of leg recovery after toe-off. We must allow the athletes the platform to focus—there is external feedback from stepping up over a wicket and allowing the athlete to be in proper positions.


Wickets become troublesome when an athlete does them at submaximal intensities before they stabilize max velocity mechanics. It’s much easier for an athlete to hit technically sound sprinting positions at submaximal efforts.

To prevent reverting to poor technique, we use max effort & diligent intent with #wickets only after the drill's goal is understood, says @ChrisParno. Share on X

Often, I see athletes very proficient at a dribble knee or an A-run, but when they add intensity (speed), they revert to their previous techniques. To prevent this, we have maximum effort and purposeful intent with wickets, but only after the goal of the drill is understood.

How to Monitor Wickets

Coaching can be a copycat career, which is not necessarily a bad thing if we’re copying good habits. This leads to the next questions: How do we know wickets are working? Are coaches using wickets because they are the new fad? There are ways we can monitor the success of wickets.

First, you must have multiple spacings to allow for individual athlete body types. Vince Anderson, who has shared his wicket tables among other coaches, uses multiple spacings based on sprinting level and gender. Using Excel to create multiple tables based on existing tables or experience allows flexibility. It’s important to track which tables you’re using throughout the year for continued progression.

Video Feedback

A side-view of an athlete sprinting at max velocity shows us if they’re stabilizing with a biomechanically-backed technique. With mobile timing and filming programs, it’s easy to film athletes during each session for comparison.

Introducing an outside stimulus with wickets can positively affect the stride pattern. As an example, we’ll look at an athlete with a 90cm trochanter length (TL)—the length from the greater trochanter to the floor. Using the stride range multipliers of 2.5 and 2.7, we find this athlete’s ideal stride length ranges from 2.25-2.43 meters/stride (.90*2.5 and.90*2.7).

Introducing wickets as an outside stimulus can positively affect stride pattern, says @ChrisParno. #wickets #stridepattern Share on X

At the beginning of a training season, we’ll set up wickets lines to hit 2.20-2.25 by the end portion of the wickets (see image below). This lets us see if the athlete can handle the low end of their ideal range with good technical execution. In each subsequent session, we can lengthen the wicket distances to ensure the last 3-4 wickets are further into the athlete’s ideal range (based on TL).

For visual sake, a coach can give a 20-25m acceleration zone for the first wicket, using 16 wickets per line that are stretched out in total anywhere from 30-40m, based on spacing. The entire sprint distance of 50-60m (acceleration zone and wickets) lets the athlete work past the acceleration phase into max velocity to hit their ideal stride length range.

With larger groups, this level of precision will be tough, so group your athletes in similar stride length goals and set up multiple lines of wickets for athletes to progress through, if needed. Provide options for flexibility within your session.

Wicket Trochanter Table
Image 4. At the start of a training season, we set up this athlete’s wickets lines to hit 2.20-2.25 by the end portion of the wickets. This lets us see if they could handle the low end of their ideal range with good technical execution.

Timing

Another way to test for validity is to compare times from an athlete’s fly runs in a sprint session with their attempts through the wickets. Coach’s Eye, Hudl Technique, Dartfish, etc. make it easy to get timing feedback from video sessions. If your athlete can sprint a 20m fly in 1.98 seconds (25m build-in) and then over wickets from 25m-45m, a coach can use a mobile timing app and compare the times to ensure the athlete is exerting maximum effort.

The goal is to achieve these maximum efforts while reinforcing good techniques and working on lengthening stride length to the upper end of the athlete’s ranges. If you can achieve this, wickets are worthwhile.

It’s also important to understand your athlete’s level. For the developmental athlete, use wickets to reinforce front-side mechanics, as talked about above. For a more advanced or elite level athlete, use wickets to manipulate stride frequency.

Gary Winckler, among others, has popularized “shorter than” and “longer than” drills. These drills manipulate stride and step lengths (SL) and affect stride and step frequency (SF). SL and SF are inversely proportionate; generally, if stride length increases, the frequency will decrease.

Stride Range Distribution
Image 5. The athlete is trying to hit 2.25m for the low end of their stride range, which they will achieve by wicket 13 on the top line. The wickets progress up to this throughout the effort. With a 25m build-in, the athlete would hit it around the 50m mark.

For athletes who have issues overstriding (consequently having a low-frequency number in strides per second), a coach can set up wickets that work up to distance under the athletes’ desired stride ranges (based on TL). This forces an athlete to turn over their stride quicker, increasing the stride frequency in step per second.

Conversely, if we have someone who has issues projecting their stride and is routinely measured under their desired stride range (based on TL), a coach can progressively lengthen the wicket distances, as mentioned above, to lengthen the stride over time. We can manipulate training with wicket runs and then take these feelings to our sprinting sessions (without wickets) as we try to work toward the athlete’s ideal SL and SF.

Don’t view wickets as a fad or a new flashy way of sprinting. We can manipulate the wicket runs to achieve our coaching goals. The most important aspect for coaches is paying attention and being present during these sessions to ensure we achieve these goals.

Toe Drag

I saw a post calling this concept Toe Drag Swag. As you can imagine, arguments on both sides of the aisle littered the comment section. In my younger coaching days, I sat in front of YouTube and watched Asafa Powell’s slow-motion block start videos and decided this toe drag technique was the way an athlete was supposed to start. Later, Usain Bolt showed the toe drag, which furthered my bias in assuming this was the correct technique.

Since then, I’ve created a more robust understanding of start, block, and acceleration mechanics, and still believe there is a place for the toe drag. The concept is a vessel for athletes to understand the low heel recovery through block clearance and the first 2-4 pushes off the pads.


Video 4. The toe drag drill is popular due to low heel recovery benefits. Some athletes respond well to the drill, while others may not make great progress with it.

To break down low heel recovery, visualize an athlete’s legs mimicking pistons as they apply horizontal and vertical force into the track. Sprinters recruit large muscle groups, motor units, and move proximal (hip) to distal (ankle) in their firing patterns. At toe-off from the block pad, the hip and front of the thigh initiate the free leg’s movement as it recovers through to the front side.

If the movement’s goal is to originate from the proximal joint, the thigh will move forward first, and the knee and ankle will lag behind. The shin will remain low to the ground and the knee will remain relatively extended until the knees cross.

Low Heels
Image 6. The frame shots show the movement from toe-off through the initial knee cross of block clearance.

The opposite, and poorer movement, is produced through the misfiring of the proximal to distal patterns.

Acceleration
Image 7. In these frames shots, the toe-off has delayed movement of the thigh and upward path of the ankle. This creates a cycling pattern instead of a piston pattern, which prevents a fluid acceleration phase that helps push oneself tall down the track.

The cyclic pattern within the initial block clearance may also cause too much forward rotation of the body, shortened drive/acceleration phase, and increased time to cycle the foot back down to the ground. Generally speaking, the misfiring disallows a fluid acceleration phase to push oneself tall down the track.

Acceleration Myths and How to Break Them

Coaches need to dispel these myths: 

    1. Get as low as you can out of the blocks; it’s all about getting low


    1. Bend at the waist to be lower and more compact


    1. Be as quick as possible in the start (as if stride length isn’t a part of the equation)


To break these myths, I’ve introduced the toe drag concept in our fall general prep. The following progressions introduce the toe drag concept and then tailor it over time.

Initial Instruction. To teach the initial concept of low heel recovery, we do continuous toe drags in the grass or on an incline. The drill parameters are 5×10 pushes with continuous drags. Yes, this looks and feels strange. As the coach, I’m overcueing to create a new motor pattern and a new way of thinking. We do this for 3-4 practice sessions during the warm-up. Progressions then move to 4-6 pushes with drags, and then we allow the recovery of the stride to work upward.

Create and Refine Movement Within Higher Intensities. During our sprint warm-up, there are many opportunities for ascending explosive movements to prepare the body for the session. Within the first two weeks, we introduce the 2-push and go drill. This drill uses a 2-point crouch start to drive out at max effort. There are two pushes with toe drag followed by jogging and stopping for the next rep down the track. This progression introduces the two drag/low heel concept with high intensity behind it.

Stabilize the Movement. For the first 8-10 weeks of the fall general prep, we drill through sprint day warm-ups three days a week. As we start to work through more intense warm-ups, we introduce the toe drag to various start positions—the 2-point crouch, 2-point rollover, 2-point drop-in, 3-point, 4-point without blocks, standing block rollover starts, etc. This gives us many opportunities to stabilize the low heel movement while coordinating the technical acceleration model in multiple starting positions.

Internalize. Once the athletes understand how to control their limbs and perform the correct acceleration firing patterns, we perform the same style accelerations and allow the toe to come off the ground. This offers the benefits of the low heel during acceleration but doesn’t bring about any unforeseen friction from dragging the toe.

The detractors of the toe drag will ask the question: Why would you introduce unwanted friction?  It’s a valid question, and ultimately I agree with it. But when you dig deeper into the benefit low heel recovery brings to acceleration, it turns into a good teaching tool.

Conclusion

Performance always will have a bell curve. Most athletes and performances lie within biomechanically-backed technical models, with some individuality. Yes, Asafa Powell drags his toe, Aries Merritt swoops his lead arm over the top of his head when attacking the hurdle, and Andre De Grasse has one straight arm when sprinting.

But these technical models are outliers and shouldn’t drive our coaching. After Aries broke the hurdle world record, I spent years recruiting athletes and fixing these swooping top lead arms because they weren’t working for athletes who didn’t have the other world record-level physical tools.

Find the benefit of a drill within your events' conceptual model and learn how this drill will positively influence performance, says @ChrisParno. Share on X

Find the benefit of a drill within your events’ conceptual model and learn how this drill will positively influence performance. I firmly believe in the cycle of coaching. When I started out coaching, I only knew about coaching from the experiences I had as an athlete. Before I dove into professional development, my experience was my baseline.

Understand that how we teach and educate our athletes will be their future baselines if they choose to coach. Do your due diligence in understanding deeply the concepts you are trying to teach. Always ask the why, always search for ways to improve your athletes, and continue to dive into the true meaning of the drill.

Since you’re here…
…we have a small favor to ask. More people are reading SimpliFaster than ever, and each week we bring you compelling content from coaches, sport scientists, and physiotherapists who are devoted to building better athletes. Please take a moment to share the articles on social media, engage the authors with questions and comments below, and link to articles when appropriate if you have a blog or participate on forums of related topics. — SF


Tackle

Preparing the Young Athlete for Sport with Andy Ryland

Freelap Friday Five| ByAndy Ryland

Tackle


Andy Ryland is USA Football’s senior manager of education and training, and he has been with USA Football since 2010. He has consulted with programs at every level of competition and is widely recognized as a foremost expert on developing the fundamentals necessary for a successful shoulder tackle.

Ryland is a former Penn State linebacker and member of the U.S. Men’s Rugby team, and he is a primary instructor in the Advanced Tackling System. Ryland previously served as a Division 1 American football coach as well as working as a fitness coach in rugby. During his tenure with USA Football, Ryland became the lead clinician for USA Football’s in-person coach training events including its Coaching Certification and Football Development Model. Key initiatives spearheaded by Ryland throughout his time at USA Football include developing the Heads Up Football Program, training its Master Trainer Coach Educators, and the development of the Rookie Tackle game type that serves the FDM.

Freelap USA: What are some of the biggest mistakes being made in the preparation of young football players, and what does the industry need to do to change this? Are we doing a good job of making football kid-friendly?

Andy Ryland: Traditionally, football is filled with adult values. Eleven (11) players working in martial unison, operating as the perfect team to execute a play. Displaying grit, resilience, and sacrifice for the team. These are all noble goals, but the problem is some of these kids are so young that they still believe superheroes are real and think if they visit New York City, they may see a Ninja Turtle.

Teaching sport and life skills at an age-appropriate level is so often overlooked. Coaches can be informed on proper age-specific physical development goals, use a good youth-centric playbook, and consider how skills may need to be adapted to fit young, developing bodies. However, we often forget how we communicate that curriculum. We apply our own adult glasses to the game and teach that way.

If you are assigned a specific age group to coach, try to take a school teacher of that age/grade to lunch and pick their brains on how kids best learn, recommends @USAFootballMT. Share on X

Appropriate messaging and teaching tools allow us to better convey these messages. I tell coaches all the time, if you are assigned a specific age group to coach, try to take a school teacher of that age/grade out to lunch and pick their brains on how kids best learn, and their focus levels, engagement tools, and best teaching practices for that group. We at USA Football call it, “Thinking, Feeling, Behaving.” Understanding those aspects of children certainly helps your teaching and just might keep you from pulling your hair out.

Freelap USA: How do you address developing the skill of tackling in young athletes while minimizing risks and potentially harmful collision forces in this population?

Andy Ryland: Within contact skills, technical models matter. Not all technical models are created equal. Over the years we have learned that certain techniques or coaching points put players in poor positions or utilize strike points that we now know better than to recommend. We absolutely need to get that part right.

When dealing with youth or developing athletes, we must be very aware that skills are underpinned by physical qualities and their development in an individual athlete. Coordination, spatial awareness, and strength can limit the positions players are able to successfully perform on the field. Coaches need to have a keen understanding that technique cannot be developed in isolation. We must address all these aspects when it comes to rapidly growing youngsters if we hope for them to master the sport skill.

Technique and physical development are probably easier for most coaches to buy into but we always encourage coaches to address the psychological area, too, as part of our Football Development Model (FDM). What emotional considerations must be given to teaching contact skill? Are players comfortable in contact before we move them to collision? Are the friction and personal space aspects something the player is comfortable with, or do we need to introduce them to this before teaching the actual skill?

Implementing different game types also helps greatly because we can introduce contact skills in a gradual manner. Flag football introduces basic football movements while developing the athlete’s physical qualities. It also introduces them to Prep for Contact drills like tumbling, crawling, and grappling, which prepares them for specific contact skills later. Playing a modified game that introduces blocking and defeating blocks while still pulling flags slows down the skill-learning load and allows young athletes to build a solid base of two contact skills before we formally introduce the skill of tackling into the game.

This model, for youth, provides a progressive learning curve instead of cognitively overloading them by having them try to learn everything at once while they are still exploring the game.

Freelap USA: How do you maximize the decision-making and sport IQ abilities of the young football player without overtly specializing in the game of football at an early age? What things do you do within practice and the game itself to improve these elements of performance?

Andy Ryland: To preface this, being a proponent of one thing doesn’t mean you throw out the other. Isolated drills certainly have a place in teaching.

As for developing decisions and IQ, an important aspect of our coach education is being able to control spaces, distances, and the techniques used through small-sided games and games-based coaching. This has an added benefit of making youth sports fun as young players are usually most engaged in this type of activity.

Small-sided games are a funny thing in football because each play is so short, things can still look like a drill. However, the key is to design activities that have enough context and opportunity for decision-making that they train these items. As with any contact sport, small-sided games and games-based learning do not mean simply scrimmaging the entire practice but rather creating environments to help train skills.

Coaches who adopt a player-centered approach that leans more on guiding instead of telling really help players learn and discover concepts and solutions with the game, says @USAFootballMT. Share on X

Outside of practice structure, the coaching methods used dictate much of what follows. Coaches who adopt a player-centered approach that leans more on guiding instead of telling really help players learn and discover concepts and solutions within the game. Question-based coaching, leading to guided discovery, is a terrific way to promote this. Instead of telling (or worse, yelling) about what went wrong, try some questions: What did you see? What were they trying to do to you? What did you do? What could you do better next time? Simple questions to promote reflections and little micro-debriefs help players learn.

Freelap USA: At what point do you see weightlifting entering the equation for a young football player? Are there any 1RM benchmarks of any kind at a particular age group?

Andy Ryland: The reality is that the football landscape as it exists already shapes training a great deal. For the youth athlete, it is driven by parents’ choice and is not team-oriented. Parents may take children to an outside facility if they have a desire to train. Training can be undertaken at any number of ages if it is proper training—who wouldn’t take their youngest to Jeremy Frisch’s facility?

Children are not mini adults. They have unique needs and shouldn’t be following a shrunken college or high school program, says @USAFootballMT. Share on X

We encourage parents to be educated and do their due diligence. Is it shiny or flashy and looks like what you see a college or NFL player doing on TV? Or do the coaches have a good background in youth development and working with children your child’s age? Remember, children are not mini adults. They have unique needs and shouldn’t be following a shrunken college or high school program.

High school, and sometimes middle school depending on the school’s setup and how it runs its PE/S&C, is really where S&C becomes part of an athlete’s “program.” Part of any good long-term athlete development (LTAD) program is to promote a healthy and physically active lifestyle for life. We hope athletes develop patterns and skills that can last a lifetime, so I’d say we generally take a “slow cooking” philosophy, even at this stage. USA Football’s FDM teaches athletic movement foundations first and adds speed, strength, and power as athletes become developmentally ready.

Strength and power are undoubtedly needed for high-level football performance, but I’m sure your readers know that even the highest-level coaches are having spirited debates over 1RM testing vs. tracking heavy 2’s and 3’s during the training block, squat jump and trap bar jumps vs. Olympic lifts, bilateral vs. unilateral, what is used as the primary lower body exercise, etc. With that said, instead of backing a specific set of exercises as key performance indicators (KPIs), we look more at supporting positive growth in the current training structures. We are huge supporters of having a certified S&C coach overseeing these programs in every high school, who are knowledgeable in the age group they work with and make sure kids undertake programs being implemented with best practices.

Freelap USA: What’s your take on the eventual specialization of the young athlete into football (or any other sport, for that matter)? What type of timetable do you have in regard to the number of sports played and what the emphasis might be throughout various stages of development: early adolescence, middle school, and high school?

Andy Ryland: This is another question where I think the existing sport structure here in the U.S. impacts the answer to a degree. We know that almost every athlete will specialize in college. Yes, there has been a rise in football/baseball players as quarterbacks in recent years, and there are a good number of players that do collegiate track early in their football career running the 60m or throwing heavy things. (Fun random trivia: Pro Football Hall of Fame safety Ed Reed is the record-holder for javelin at the University of Miami.)

If we know specialization is coming, do we need to force it earlier, such as in high school? On the flipside, for the non-blue-chip athlete, would they benefit by specializing earlier to gain that last bit of performance that propels them to play at the next level? Regardless of the situation, what we most hope for is that the choice to specialize is the athlete’s choice. Too often, it now happens because of adult pressures, be it coach, parent, or skill trainer.

At the younger levels, I think it is worth looking at LTAD models around the world and across different sports. There is a reason the earlier levels are littered with words like “discover,” “explore,” “sample,” and “play.” Kids at these ages need multiple stimuli to help develop general athleticism, coordination, and a wide range of movement skills.

Sport sampling is so important because it’s very easy to settle on a favorite sport out of those you have tried. Place no limits on sports that children may explore, says @USAFootballMT. Share on X

Touching again on the psychological side, children are often just trying to find what they enjoy and what sports fulfill them. Sport sampling is so important because it’s very easy to settle on a favorite sport out of those you have tried. Place no limit on sports that children may explore. This exploration should continue through high school.

Consider an athlete who plays football, soccer, and baseball growing up. Post-puberty, his body type is that of an offensive lineman. If he now, with this new size, wants to explore throwing for track and field or becoming a heavyweight wrestler, it’s not in good conscience that a coach should hold him back, as he may discover the sport he truly loves.

Since you’re here…
…we have a small favor to ask. More people are reading SimpliFaster than ever, and each week we bring you compelling content from coaches, sport scientists, and physiotherapists who are devoted to building better athletes. Please take a moment to share the articles on social media, engage the authors with questions and comments below, and link to articles when appropriate if you have a blog or participate on forums of related topics. — SF


Carr

Episode 50: Kevin Carr

Joel Smith: Just Fly Performance Podcast, Podcast| ByMark Hoover

Carr

Kevin Carr is the Head Strength Coach at Mike Boyle Strength and Conditioning in Woburn, Massachusetts, where he has coached since 2008. He is the Co-Founder of the Certified Functional Strength Coach certification and Movement as Medicine Massage and Movement Therapy Clinic. Kevin works with all levels of athletes, from Olympic competitors to the general population athlete. He is considered an expert in physical preparation and human function.

Coach Carr received a bachelor’s degree in kinesiology from The University of Massachusetts-Amherst and a license in massage therapy from Cortiva Institute-Watertown. He is a Certified Strength and Conditioning Specialist through the NSCA and has earned multiple other certifications, including FMS, SFMA 1+2, NKT Level 1 and 2, FRC, FRR, and PRI.

Kevin gives us an inside look at MBSC, detailing the principles they adhere to in terms of modifying traditional lifts, as well as his thoughts on single leg training. He explains the thinking behind the MBSC philosophy of using both single and double leg squat movements with their athletes.

In this podcast, Coach Kevin Carr and Joel discuss:

  • The MBSC philosophy on adjusting the traditional powerlifting movements.
  • Creating a balance between multi-planar work and traditional sagittal plane work.
  • Training using big picture thinking for the programming of loads and intensity.
  • Understanding shin angles in the crossover step.
  • Using crawling and other primal movements in training.
  • Developing low trap and thoracic strength.

Kevin can be found on Movement as Medicine as well as at MBSC.

Podcast total run time is 53:23.

Keywords: single leg, change of direction, movement

  • « Go to Previous Page
  • Page 1
  • Interim pages omitted …
  • Page 95
  • Page 96
  • Page 97
  • Page 98
  • Page 99
  • Interim pages omitted …
  • Page 164
  • Go to Next Page »

Primary Sidebar

FEATURED

  • Using Speed and Power Data to Bucket and Train Faster Athletes
  • Plyometric Training Systems: Developmental vs. Progressive
  • 9 (Fun!) Games to Develop Movement Skills and Athleticism

Latest Posts

  • Rapid Fire—Episode #15 Featuring Kyle Brown: What is Universal Speed Rating (USR)?
  • Why We Don’t Perform Hang Cleans
  • 1080 Sprint: Four Essential Tips You Won’t Find in the Manual

Topics

  • Adult training
  • App features
  • Artificial Intelligence
  • Athlete
  • Athlete performance
  • Baseball
  • Buyer's Guide
  • Career
  • Certifications
  • Changing with the Game
  • Coach
  • Coaching
  • Coaching workflows
  • Coching
  • College athlete
  • Course Reviews
  • Dasher
  • Data management
  • EMG
  • Force plates
  • Future innovations
  • Game On Series
  • Getting Started
  • Injury prevention
  • Misconceptions Series
  • Motion tracking
  • Out of My Lane Series
  • Performance technology
  • Physical education
  • Plyometric training
  • Pneumatic resistance
  • Power
  • Power development
  • Practice
  • Rapid Fire
  • Reflectorless timing system
  • Running
  • Speed
  • Sports
  • Sports technology
  • Sprinters
  • Strength and conditioning
  • Strength training
  • Summer School with Dan Mullins
  • The Croc Show
  • Track and field
  • Training
  • Training efficiency
  • Wave loading
  • What I've Added/What I've Dropped Series
  • Youth athletics
  • Youth coaching

Categories

  • Blog
  • Buyer's Guide
  • Freelap Friday Five
  • Podcasts

COMPANY

  • Contact Us
  • Write for SimpliFaster
  • Affiliate Program
  • Terms of Use
  • SimpliFaster Privacy Policy
  • DMCA Policy
  • Return and Refund Policy
  • Disclaimer

Coaches Resources

  • Shop Online
  • SimpliFaster Blog
  • Buyer’s Guide
  • Freelap Friday Five
  • Coaches Job Listing

CONTACT INFORMATION

13100 Tech City Circle Suite 200

Alachua, FL 32615

(925) 461-5990 (office)

(925) 461-5991 (fax)

(800) 634-5990 (toll free in US)

Logo of BuyBoard Purchasing Cooperative. The word Buy is yellow and shaped like a shopping cart, while Board and Purchasing Cooperative are in blue text.
  • Facebook
  • Instagram
  • Twitter
  • YouTube

SIGNUP FOR NEWSLETTER

Loading

Copyright © 2025 SimpliFaster. All Rights Reserved.