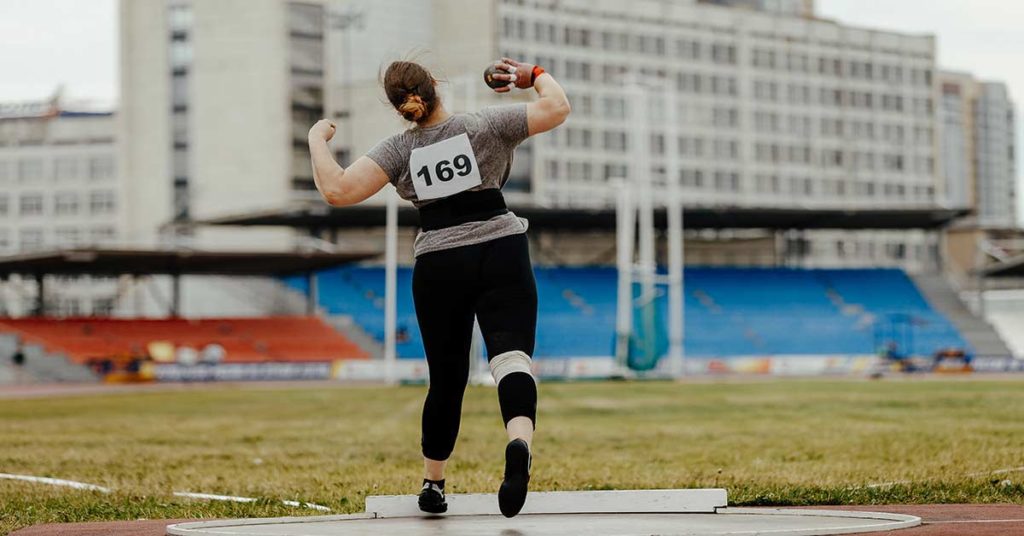
Ever since I retired, I have been asked to do more personal coaching with individuals both near my home and across the country. I am happy to do this, but I find it challenging when I try to get these athletes to look at the films of their throws.
Filming your throw and viewing what you do can be very beneficial. However, I have found that there are a lot of young throwers and coaches out there who are not sure what to look for when analyzing film and therefore don’t get much out of it. To help with this issue, I always attempt to educate my athletes and coaches on what to look for when they analyze film.
Over the years of my coaching career, I have come up with some key things I look for when analyzing a thrower’s video. This includes the balance/positions and acceleration of the athlete through the ring. In this article, I will only deal with rotational shot put and discus throwing. It is not my intent to go over technique as much as it is to show what I look at when evaluating video.
What to Look for
The first thing I look for in the video is the overall movement of the athlete. This is where the acceleration of the athlete through the ring comes in. If you view the entire throw, it is fairly easy to see if the athlete starts too fast for their ability and is therefore unable to accelerate through the throw. Remember, it’s not how fast you start the throw, it’s how fast the implement leaves your hand at the end of the throw. That is where acceleration and balance/position come in. Most young athletes start their throws too fast and, therefore, are not able to maintain proper positions to help ensure proper balance, which is ultimately what leads to the success of the throw.
When I evaluate a thrower’s video, I like to look at two primary viewpoints.
The first viewpoint is from the anterior side of the thrower (that would be the right side of a right-handed thrower). I feel this viewpoint is crucial to video analysis of the thrower.
When I evaluate a thrower’s video, I like to look at two primary viewpoints: the anterior side of the thrower and the back of the throw, explains @JimAikens. Share on XYou can see the proper setup as the thrower enters the ring, in the separation between the upper and lower body as they enter the ring, and the proper body alignment as the power foot lands in the middle of the ring during the single support phase. Once the post (block) foot makes contact in the front, you have a great view of the power position.
Finally, it is very easy to view whether there is proper separation between the lower and upper body during the delivery phase of the throw. Since the knee is attached to the thigh and the thigh to the hip, I always look to see if the knee is ahead of the shot just prior to the delivery of the shot. (With the discus, I go by the shoulder of the arm holding the discus.) If the knee is ahead, that shows you have good separation between the hips and shoulders.
The next viewpoint I like to use is from the back of the throw. This position enables me to see if the thrower is on balance out of the back of the ring. It also enables me to view the path of the sweep leg and see if the right leg and hip are properly engaged at the beginning and middle of the throw. You always look to see whether the hips are ahead of the shot or discus shoulder. As you will see, each viewpoint has its advantages.
Video Analysis Apps and Features
There are a number of good video analysis apps that coaches and athletes can use. I used to use Hudl Technique a lot, but lately I have been enjoying the benefits of the Dartfish video app. It has both a free and a paid version, and a wide range of video analysis capabilities.
You can measure angles and time sequences and use a number of tools to point out various aspects of the throw. There are almost too many features available in the app to name. One of the best features is the ease of sharing the videos with my throwers. I captured the pictures below, comparing the two throwers to each other, with my Dartfish app.
Comparing Athletes for Analysis
The pictures below are intended to show you what I look for when analyzing throwers on video. I usually break it down to 10 key positions in the throw, and each of these has around four points of emphasis to look at. I feel that if athletes achieve these positions, then the opportunity for a good throw greatly increases.
A throw has 10 key positions, with ~4 points of emphasis for each. If the athlete achieves these positions, the likelihood of a good throw greatly increases, says @JimAikens. Share on XI like to compare my athletes to another athlete, so they have a better understanding of the position I am trying to get them to achieve. I may use 2–3 different throwers for comparison in an analysis due to the fact that some throwers have certain parts of their technique that are better than others. Using various throwers for a comparison enables me to get the correct position across to my athletes. I also use the many drawing features available in the app to emphasize these positions. As they say, a picture is worth a thousand words.
I made the picture sequences below for two throwers I work with. The first picture sequence is a male discus athlete who I work with being compared to a very good rotational thrower. I teach rotational shot and discus pretty much the same way. I am aware that there are differences, primarily in the middle and at the finish, but I address them individually on their own merits.
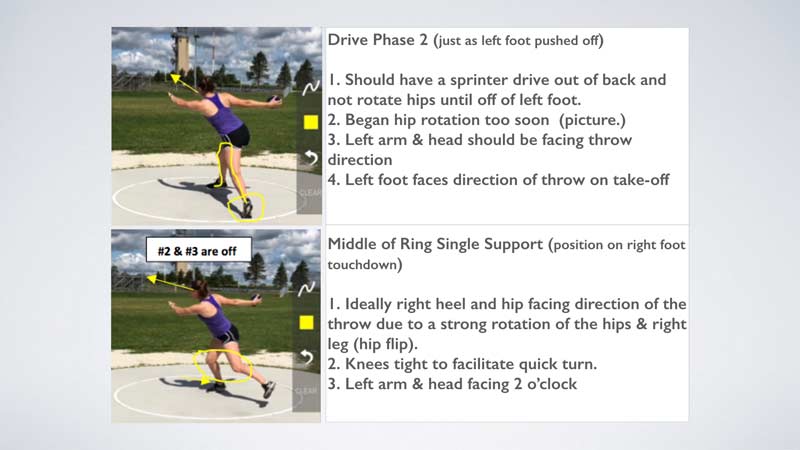
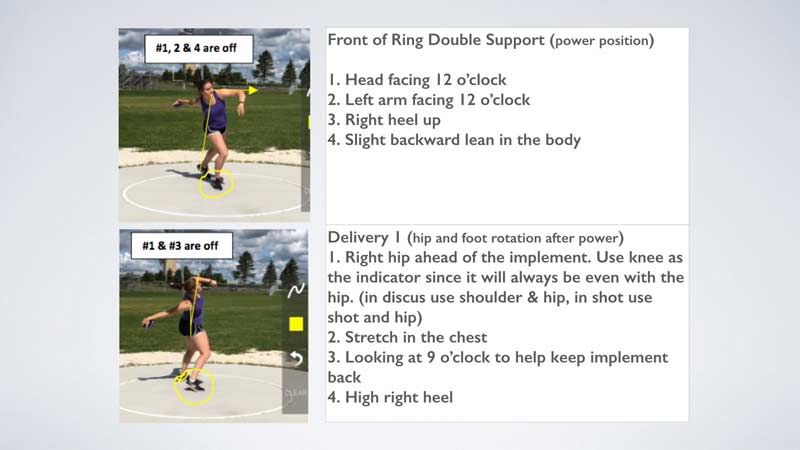
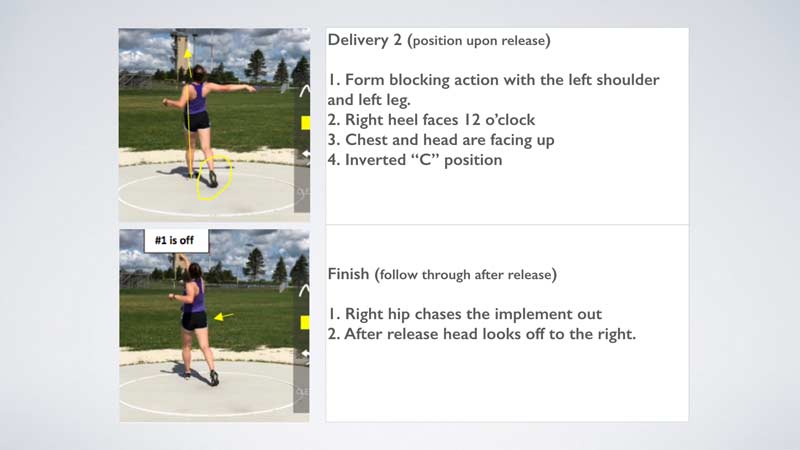
The second picture sequence is of a female discus thrower who I work with. In these examples, I am not so much trying to compare the different athletes as I am trying to show you how the different positions look with different people.
Keep in mind that with the more accomplished throwers, as I said earlier, not every position is 100% correct. We must also take style and personal preferences into account. Many more accomplished throwers are physically stronger and better athletes than the athletes I work with. They have developed slight adaptations to their style and technique over the years that enable them to use their developed strength and athleticism to their advantage.
Keep in mind that the more accomplished throwers may not get every position 100% correct. We need to also take style and personal preferences into account, says @JimAikens. Share on XI wanted to show you a side view and a rear view so you can see they both have their advantages when it comes to analyzing film. As I mentioned, I like to analyze throws videos by breaking them down into the 10 separate positions and the approximately four points of emphasis in each position. This way, I can easily see and show my athletes the positions that they need to establish. Once they have a good visual on that, we can then go over the drills and skills needed to hit those positions.
The template I use for my athletes is similar to the ones below. I have found this format works well with all the athletes I coach, whether it’s an athlete at my school, a local athlete I coach privately, or an athlete from some other part of the country who I coach online.
Sequence 1. These photos show the anterior side view of the throw for a right-handed thrower. I compare my athlete with a more accomplished athlete in side-by-side photos, assessing 10 separate positions, with 2–5 points of emphasis in each position.
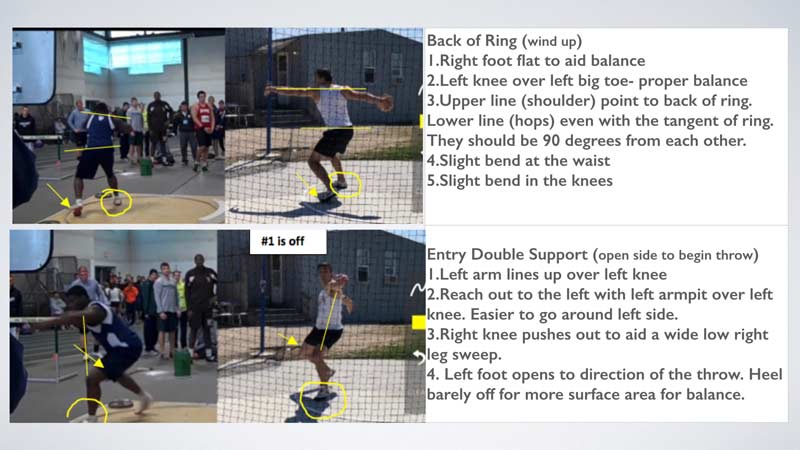
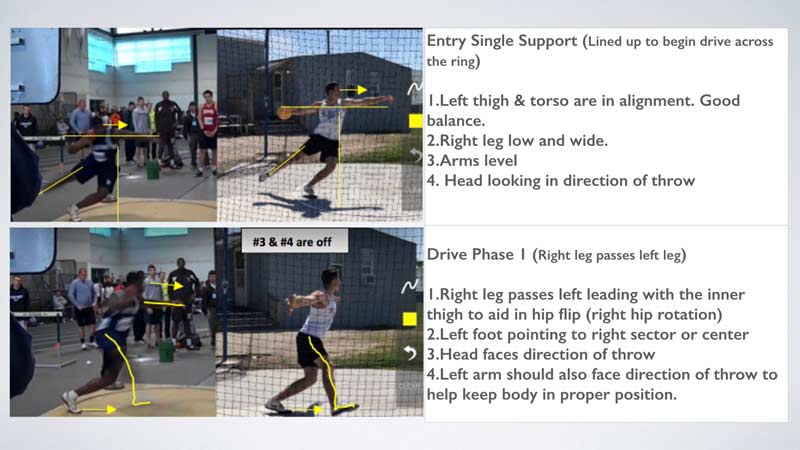
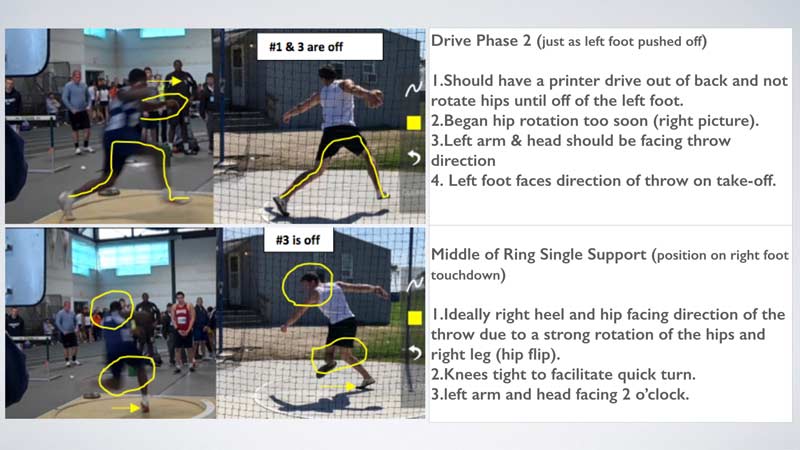
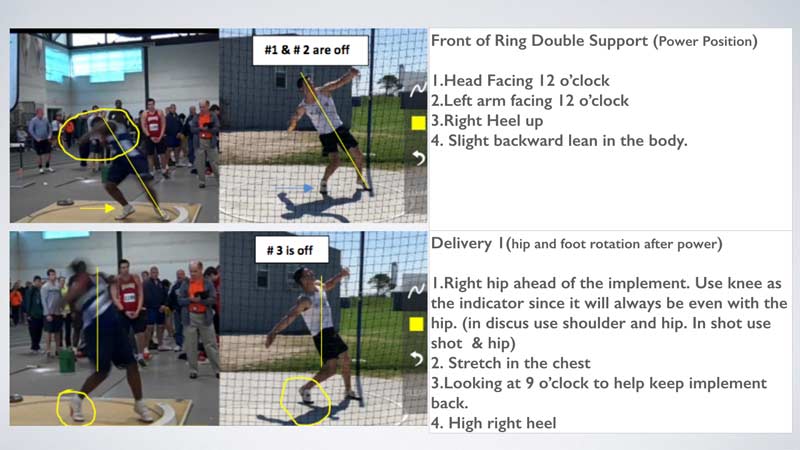
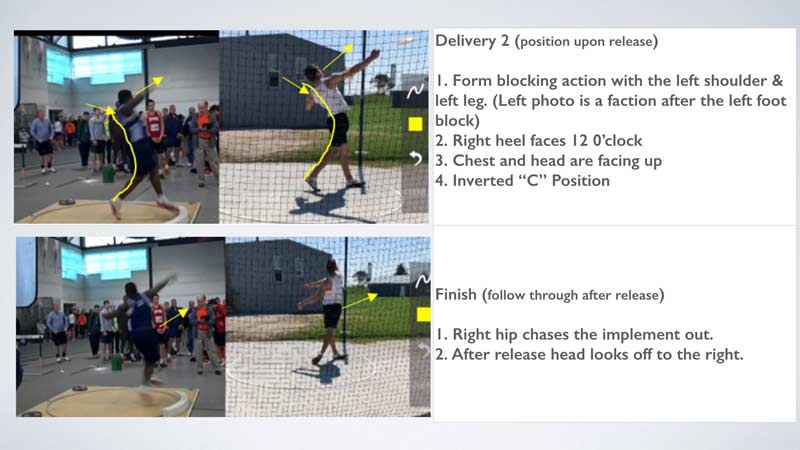
Sequence 2. These photos show the back of the ring view of the throw for a right-handed thrower, assessing 10 separate positions with 3–5 points of emphasis in each position.
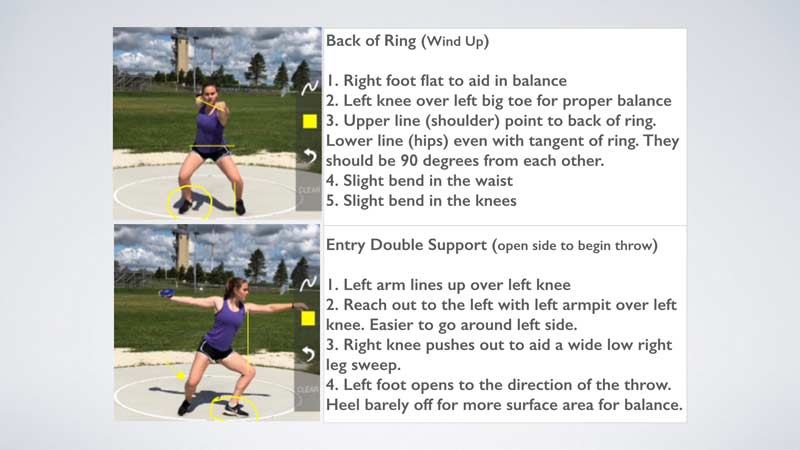
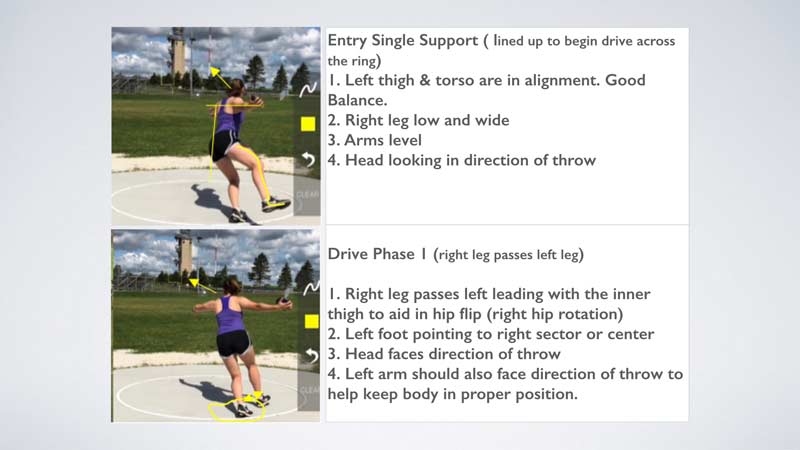
I hope you have been able to learn something from this article. You may also find value in a series of blog pieces I wrote in 2018 for our local coaching group in Illinois, which described the trials and tribulations of building a throws program at a local school. The posts have a lot of good tidbits on practice organization and drills, and there are even a few good stories. If you like the series, you may want to read the rest of my articles from that first season at a new school to understand the importance of developing athletes for the long run.
Since you’re here…
…we have a small favor to ask. More people are reading SimpliFaster than ever, and each week we bring you compelling content from coaches, sport scientists, and physiotherapists who are devoted to building better athletes. Please take a moment to share the articles on social media, engage the authors with questions and comments below, and link to articles when appropriate if you have a blog or participate on forums of related topics. — SF

