• Skip to content
  • Skip to primary sidebar
SimpliFaster

SimpliFaster

cart

Top Header Element

  • Facebook
  • Instagram
  • Twitter
  • YouTube
  • Login
  • cartCart
  • (925) 461-5990
  • Shop
  • Request a Quote
  • Blog
  • Buyer’s Guide
  • Freelap Friday Five
  • Podcast
  • Job Board
    • Candidate
    • Employer
    • Facebook
    • Instagram
    • Twitter
    • YouTube
You are here: Home / Blog

Blog

Sport Technology Injury Prevention

Integrating Technology into Athletic Speed Development and Injury Prevention with Rick Franzblau

Freelap Friday Five| ByRick Franzblau

Sport Technology Injury Prevention

Rick Franzblau is in his first year as the director of Olympic sports strength and conditioning at Clemson. During the previous three years, he served in the capacity of assistant director of Olympic sports strength and conditioning. He is responsible for the supervision of the assistant strength coaches, graduate assistants, and volunteer interns. Rick oversees strength and conditioning for the 14 Olympic sports that train in the Jervey weight room. He is directly responsible for the strength and conditioning efforts of the baseball, men’s soccer, and track and field teams.

Freelap USA: What is your approach to hamstring injury risk aversion? What are some things you see show up in athletes who tend to have problems with hamstring pulls?

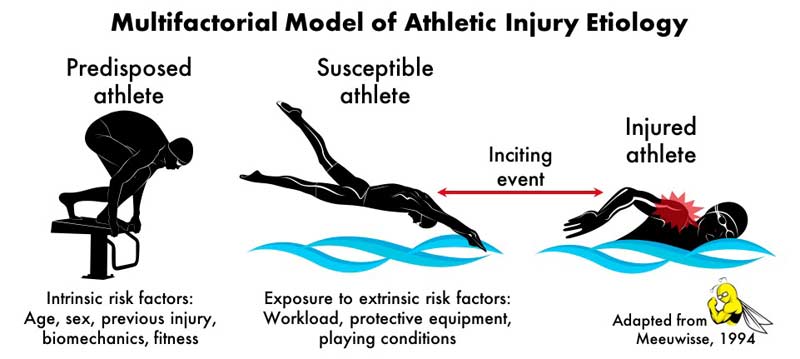
Rick Franzblau: Hamstring injury aversion is ultimately attributed to well-planned training on the physical preparation end, but also on the technical end. There are a number of factors that play an integral role, including sequencing of training, load management, biomechanics, eccentric strength, and general and specific work capacity, among others. Ultimately, all of these components are important and all impact one another to a certain degree.

Sequencing of training is paramount. Movement and technical sessions should always be planned first with strength sessions falling in line. Sprint sessions should be paired with intense hamstring training on the same day to allow for recovery between sessions. This also applies to sport practices, particularly for field sports. For instance, a soccer practice with larger volumes of high-speed running and more full-field type work will be paired with hamstring intensive work in the weight room. Conversely, a lot of small-sided games should be paired with more pushing or quadriceps dominant movements in the weight room.

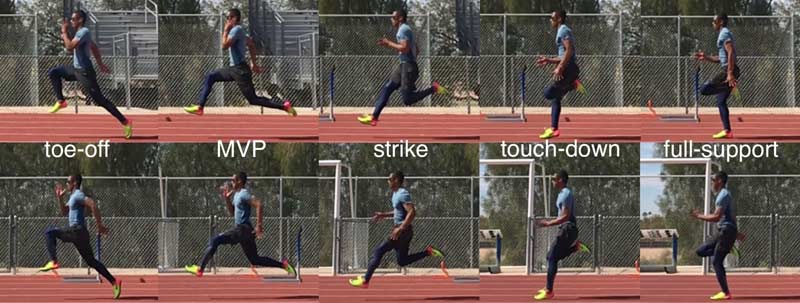
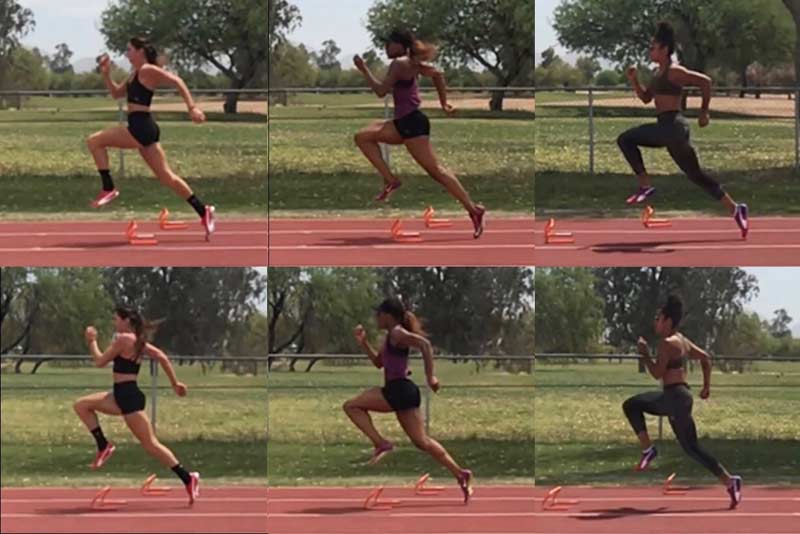
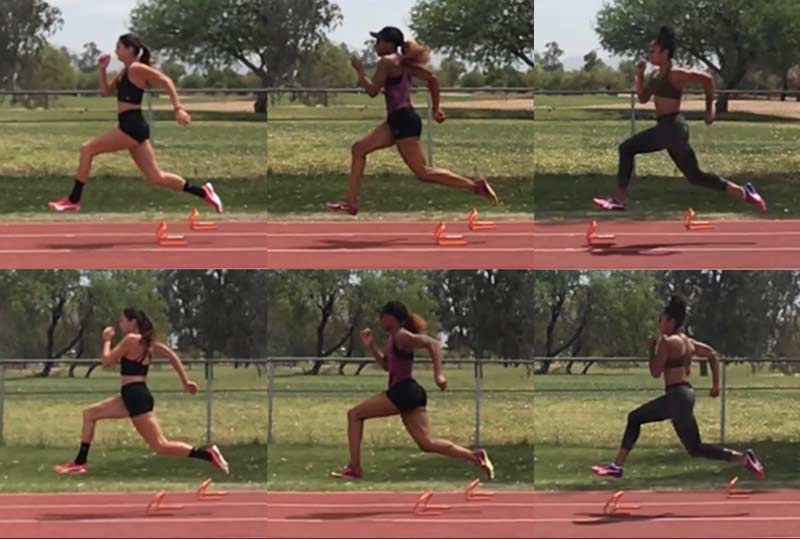
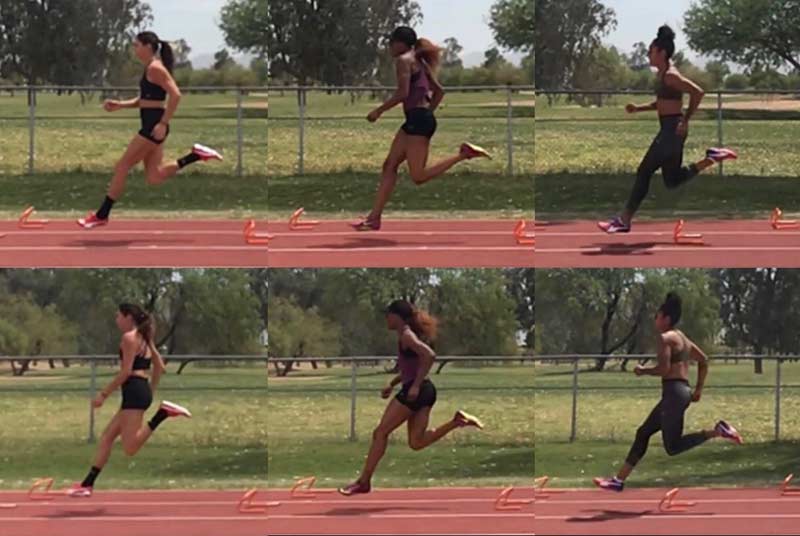
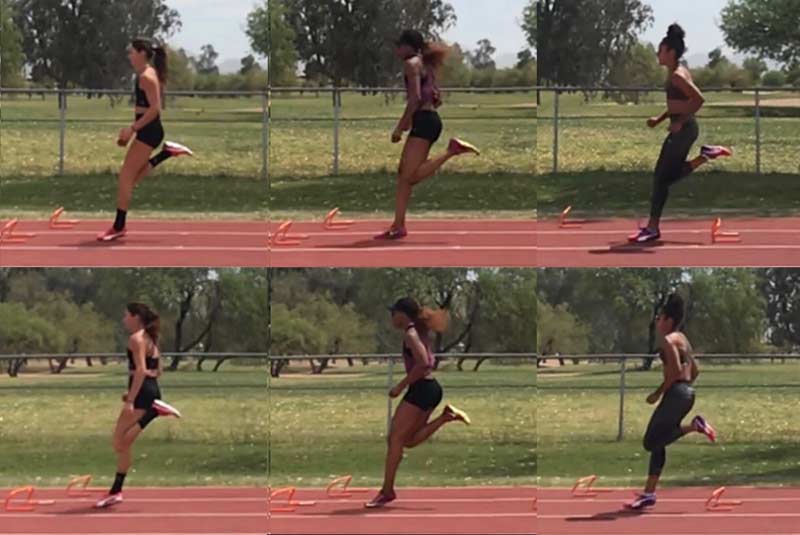
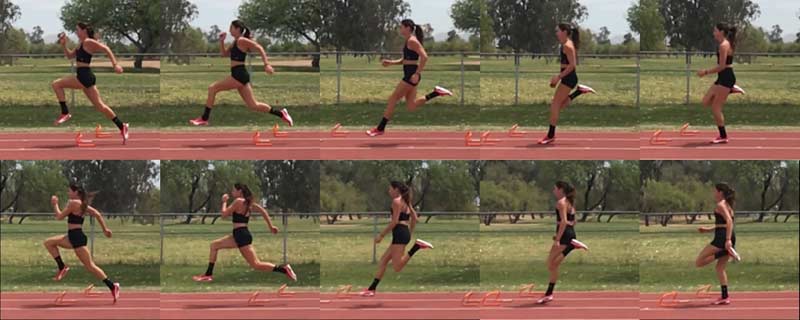
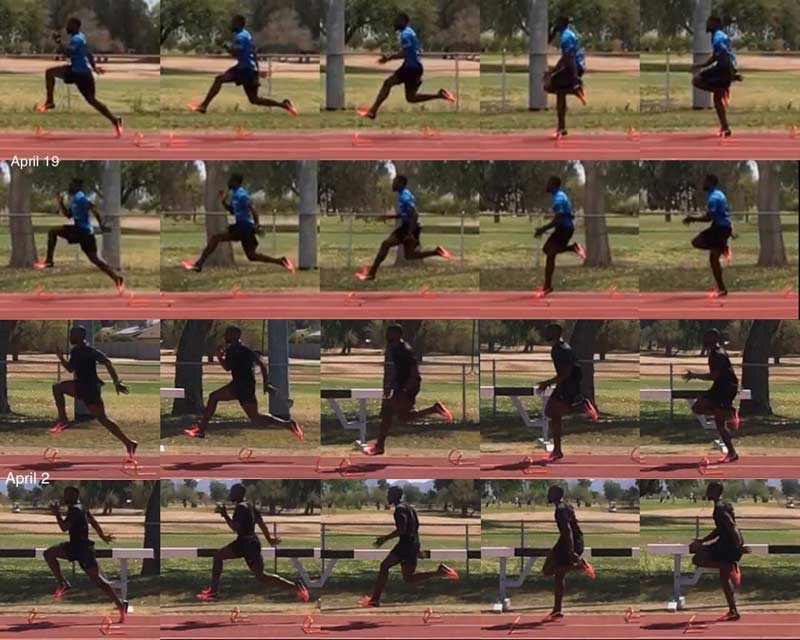
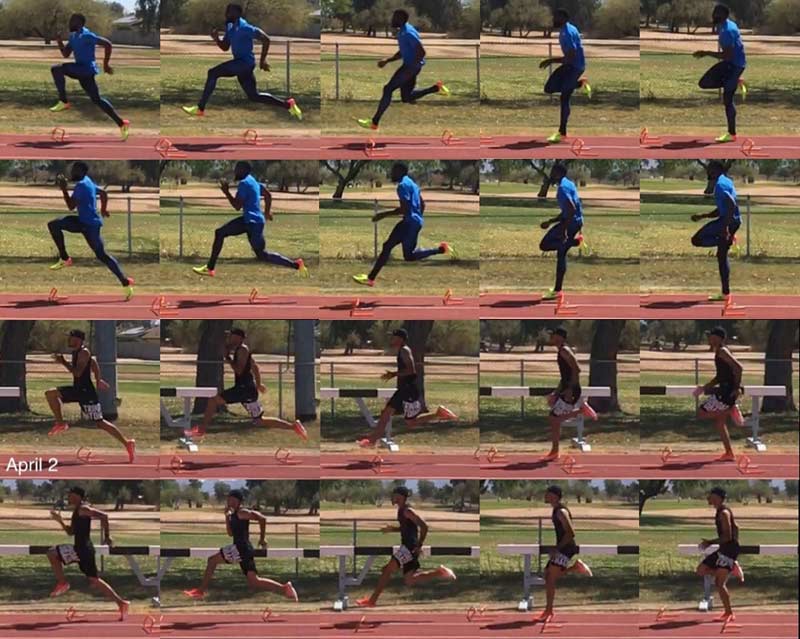
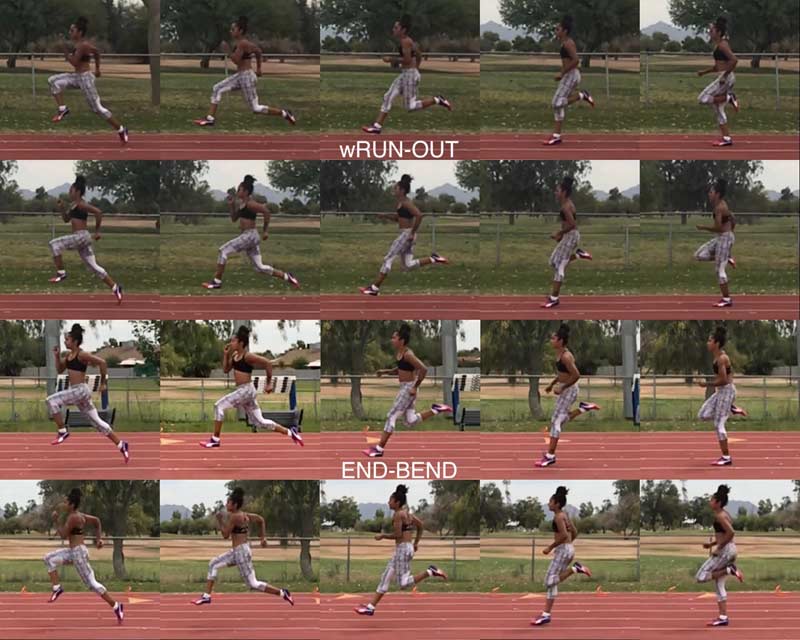
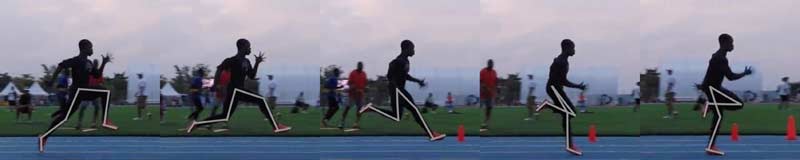
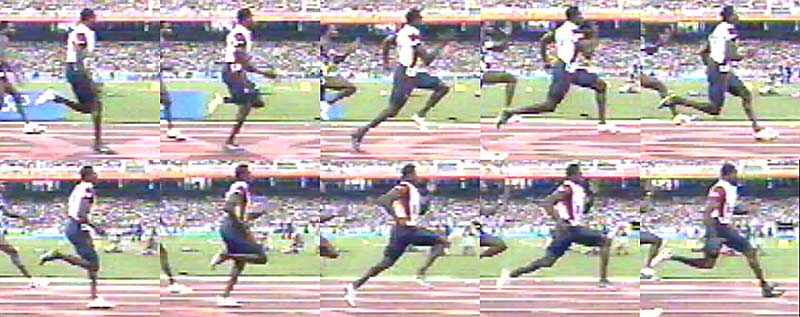
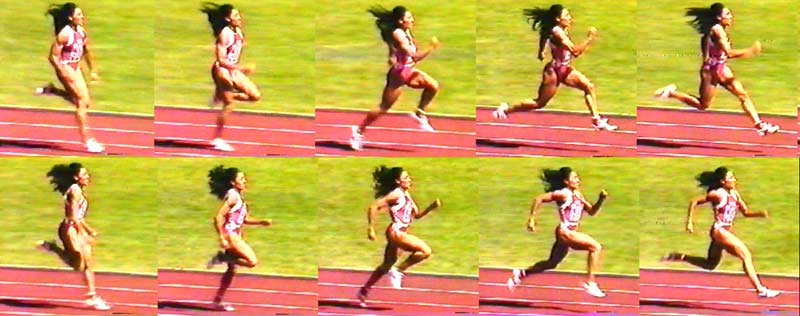
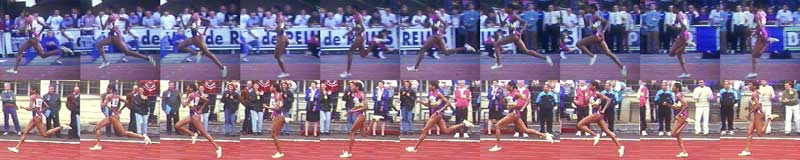
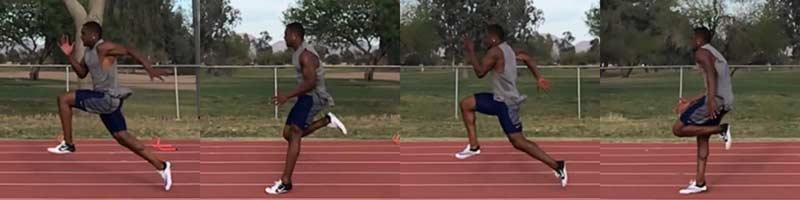
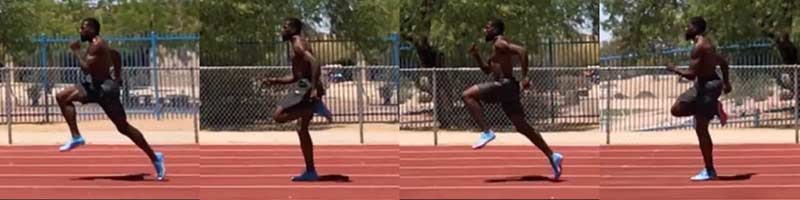
Biomechanics is another critical component that is relevant for sprinters and field sport athletes. Dangerous sprinting mechanics include excessive backside mechanics, oftentimes driven by anterior pelvic tilt and excessive plantar flexion, which can further drive the backside mechanics. To help with excessive backside mechanics, we use wicket drills with our field sport athletes, which helps them understand the positions they should be in. To be able to hold these positions under fatigue, they must also build up some specific capacity. Tempo running helps teach our athletes how to hold appropriate pelvic tilt, and by building up volumes of tempo running, they are getting “practice” at submaximal intensities.

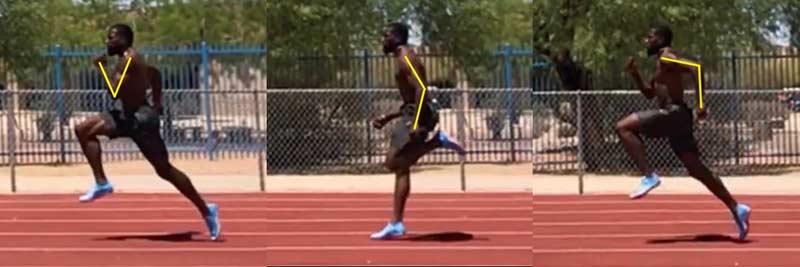
Ultimately, #postural issues drive a lot of mechanical issues in sprinting, says @FranzblauRick. Share on X

Cueing and drilling are helpful and drive some kinesthetic awareness, but ultimately, postural issues drive a lot of mechanical issues in sprinting. Breathing mechanics and excessive rib flare, particularly bilaterally, drive a lot of the excessively lordotic postures seen in sprinting. Improving breathing biomechanics by getting more internal oblique and transverse abdominal activation allows the diaphragm to operate in its respiratory role instead of compensating as a postural muscle. We follow progressions and drills proposed by the Postural Restoration Institute to help with this. Once the IOs and TAs can help create a zone of apposition, proper breathing mechanics can follow, preventing excessive lordosis and promoting thoracic flexion.

Hamstring strength plays a critical role in posture as well. The hamstrings, with their longer lever arm, are able to exert a much greater influence on posterior pelvic tilt than the glutes. Rewind the clock back eight to ten years and glute activation was the buzzword to help improve posterior pelvic tilt. With proper breathing mechanics and strong abdominals and hamstrings, you will have fewer posture-driven biomechanical breakdowns in sprinting.

Hamstring strength obviously plays a critical role in the avoidance of injuries. In particular, we focus on and test eccentric knee flexor strength via the Nordbord. While it is not a perfect test and people refute its specificity due to its low velocity and it being exclusively knee flexion, we have found it to be a useful strategy in mitigating hamstring issue risk. For our teams at Clemson, we have developed relative averages for each team and “red flag” individuals who fall below 15% of this mark.

Relative measures are imperative; bodyweight will allow you to leverage greater force in the sensors and it would be erroneous to simply set baseline outputs for male and female athletes. We also look at asymmetries left versus right, but these values are highly sensitive to fatigue and, if testing during a loading week or phase, this must be taken into consideration before adding strength parameters to a deficient side. We have seen changes of almost 15% week to week based on fluctuations in the volume of practice and training.

In terms of training for eccentric hamstring strength, we use a multi-layered progression with an end goal of performing heavy weighted eccentric Nordics. Through research and discussions with Vald Performance, we found that continuing to load Nordics eccentrically had greater benefits than adding the concentric portion and therefore making the eccentric component submaximal. These heavy Nordics are very helpful for increasing fascicle length of the biceps femoris, which is negatively correlated with hamstring strain.

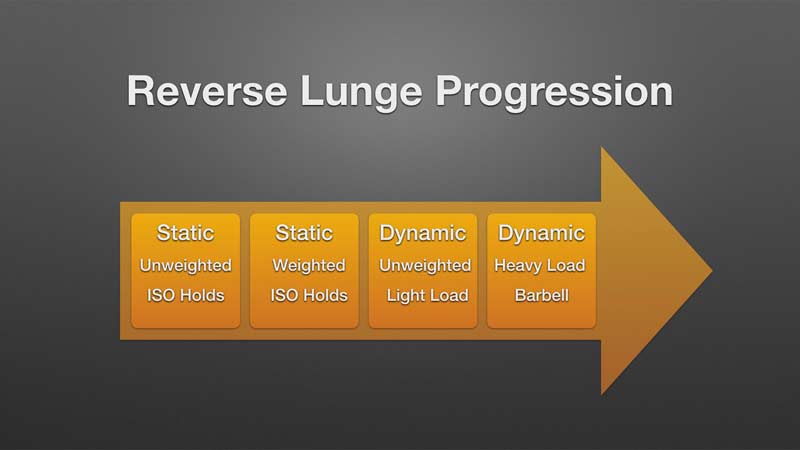
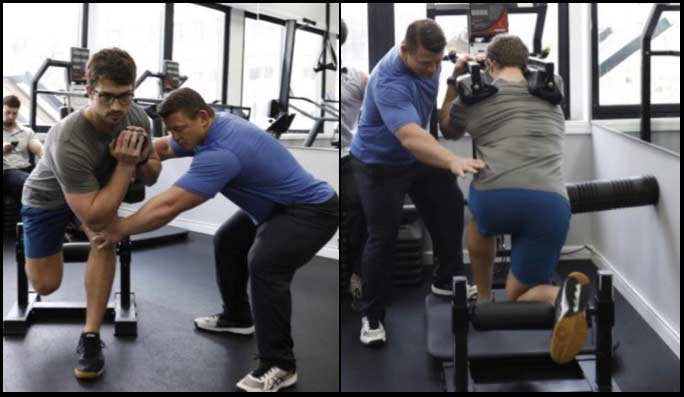
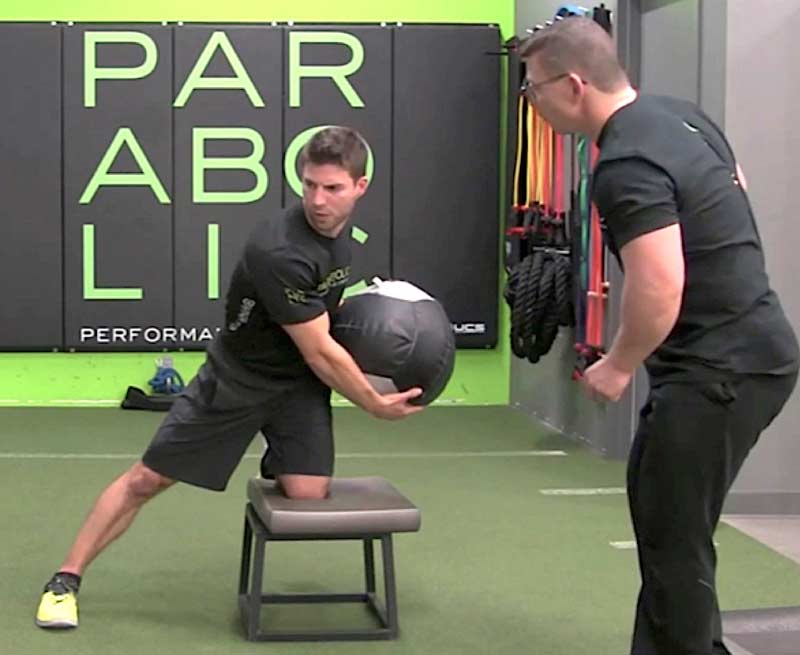
Continuing to load #Nordics eccentrically had greater benefits than adding the concentric portion, says @FranzblauRick. Share on X

In general, we try to do one knee-dominant and one hip-dominant hamstring exercise a week. Hip-dominant hamstring exercises tend to isolate the biceps femoris a little more effectively and are integral to a program. We do many versions of hip hinging patterns, including split stance RDLs, barbell RDLs, and most recently, a kBox deadlift into an RDL to provide eccentric overload. In certain phases, we also do some Bosch-inspired isometric work at length. Our go-to exercises are usually the single leg back extension with an isometric hold and the straight leg hip lift (heel on box).

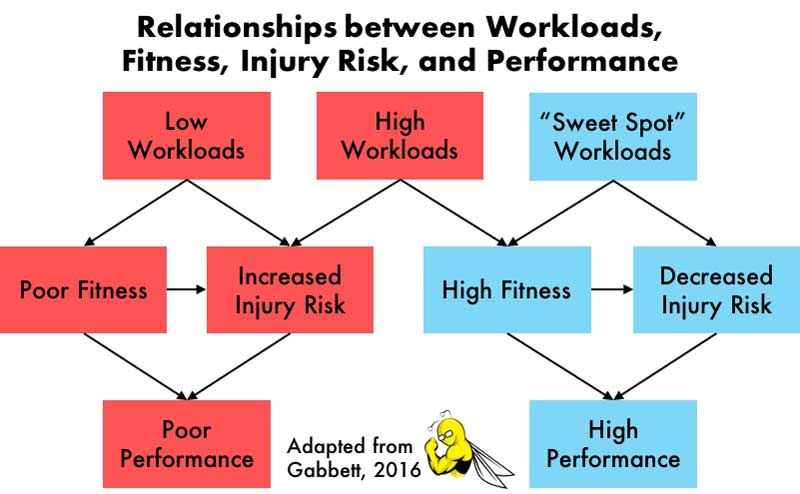
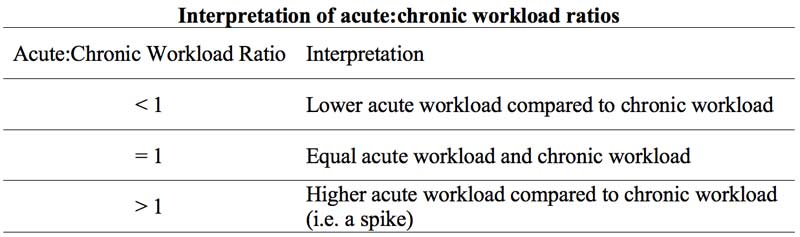
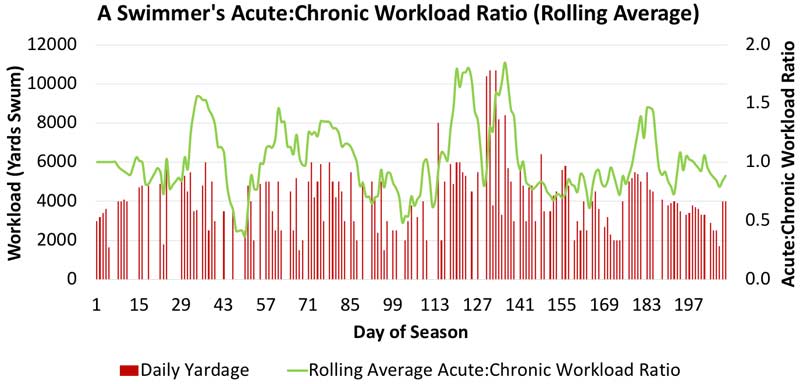
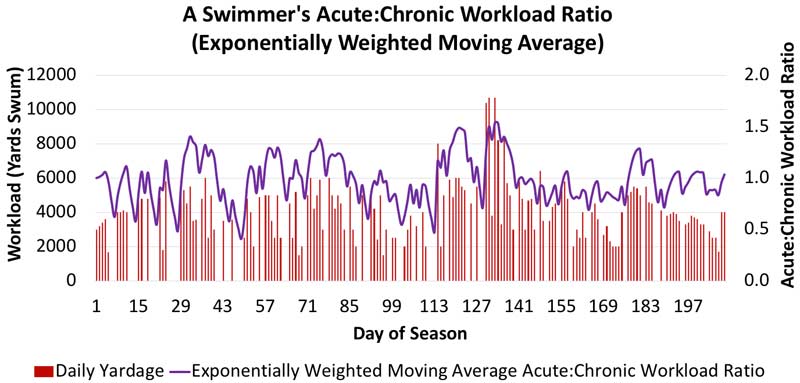
As mentioned earlier, fatigue plays a significant role in imbalances and that is where our focus on acute to chronic ratios of high-speed running becomes integral, particularly for our field sports. We use a 7:21 day approach for our soccer programs. In regard to hamstring injuries, we look at high-speed running distances and how we incrementally build these loads.

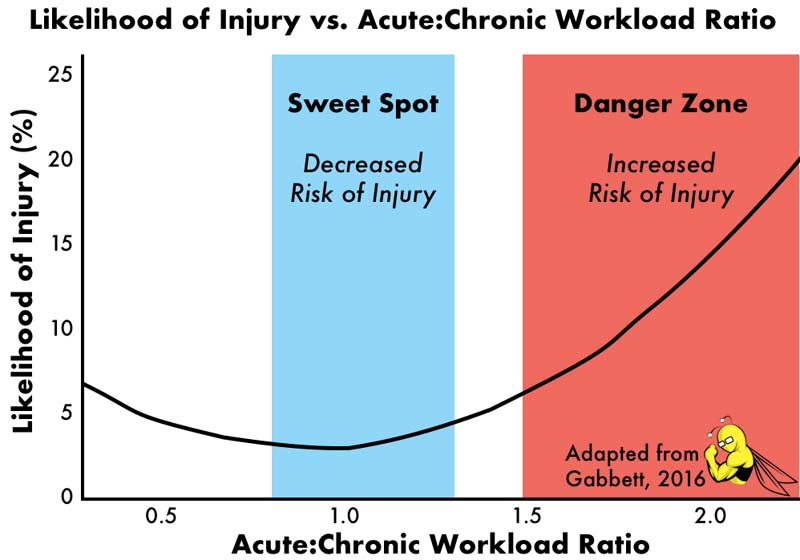
Tim Gabbett’s research has been instrumental in providing guidelines for building incremental loads and knowing when appropriate spikes are necessary. Generally speaking, acute to chronic ratios over 1.5 become dangerous. We have previously used a rolling method of measuring acute to chronic, but will experiment with moving to an exponentially weighted model where the previous week carries more weight than the data from three weeks ago.

Obviously, accruing high-speed running volumes is critical to preparing field sport athletes, but so is exposure to maximal velocity sprinting. Exposure to max velocity sprinting provides specific strength and coordination to the hamstrings that cannot be replicated by any other type of movement. This is particularly critical with reserve players who may not be getting exposure through matches and will need the stimulus in training.

Freelap USA: What are some of your favorite protocols to build strength (and specifically targeting fast-twitch fibers) using VBT? What are some techniques to build mass with the same VBT monitoring and what is the rationale behind it?

Rick Franzblau: When looking at selective hypertrophy of certain muscle fibers, we use fatigue percentages to more precisely stress targeted fibers. This is a more advanced programming method and is only used with our athletes that have at least a year of training age in our program.

Selectively targeting fast-twitch fibers is imperative when dealing with athletes who can’t afford to gain any more appreciable amounts of body mass, but need to continue to develop their explosive strength. This applies to some of our older and more developed position players in baseball and a large majority of our sprinters, jumpers, and hurdlers in track and field. Occasionally, a soccer or tennis athlete may fit into this category, but they generally do not spend enough time strength training to be concerned about excessive hypertrophy.

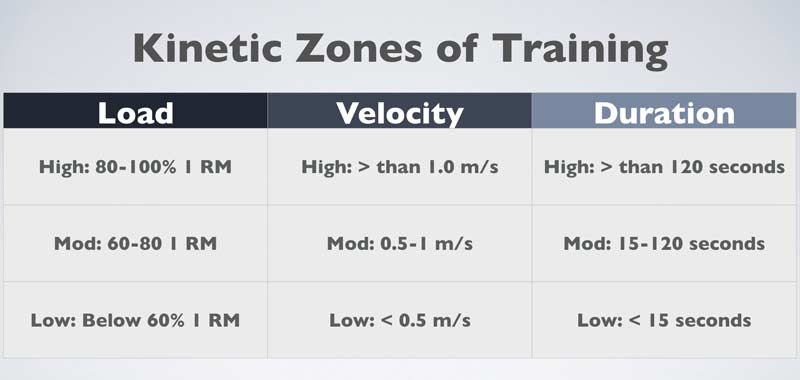
When applying these principles, we use fatigue percentages around 10% to selectively target fast-twitch fibers. When fatigue grows beyond 10%, Type IIa and Type I fibers start to pick up the slack. The athlete’s fatigue percentage consists of the percentage drop-off from their fastest rep to their slowest rep in a given set.

For example, a fastest rep of 0.5 m/s and a slowest rep of 0.45 m/s would be a fatigue percentage of 10%. We use open and closed sets to prescribe these methods. For instance, if we are training at 80%, we may do four sets of three reps with this group. In the closed set protocol, their fatigue percentage will determine how they adjust their weight for the next set. If they fatigue more than 10%, they will drop weight; if they fatigue less, they can make increases in their weight.

If we are doing open sets, the athlete will perform as many reps as they can before they fatigue the desired percent. To use the 80% example, if they did more than three reps then they would be able to increase their weight for their following set.  When using this method it is also important to set minimum thresholds for velocity so the athletes are not becoming rep “grinders.” In other words, they must also keep all of their reps above a certain velocity. An 80% squat will be around 0.5 m/sec (give or take, based on fiber type percentage), so we cannot have them hit reps of 0.40, 0.38., 0.37—this just means that they were excellent at grinding out multiple reps. These minimum thresholds are essential for implementing these protocols.

It is also important to understand that you can fatigue to greater percentages at lower intensities because of the higher starting velocity. For example, at 70% on a back squat you may use a fatigue percentage of 40% for your mass group, but if you are training them at 90% of their max you may use a fatigue percentage of 25%. The fatigue percentages are also lift-dependent. The velocity of bench presses are slower than squats at identical intensities, so you also have to adjust to smaller fatigue percentages on the bench versus the squat.

Freelap USA: What are your acceleration and resisted sprint protocols for athletes? How does the 1080 Sprint factor into this?

Rick Franzblau: Our acceleration progression and resisted sprint protocols are multifaceted. We are deliberate and patient with our athletes as we progress through the development of this coordinated skill. There are movement competency issues that have to be addressed with incoming freshmen, but there are almost always significant physical limitations that prevent athletes from achieving the positions we desire in their acceleration mechanics.

This is where drilling and skipping are very helpful in developing the lower leg, hip, and core strength necessary to develop appropriate acceleration mechanics. Drilling often gets a bad rap, and I agree for intermediate to advanced athletes, but for a field sport athlete learning proper sprint mechanics it is very helpful. Rudimentary series hops, ankling, A skips, and limb exchange drills are all staples in our program to help give our athletes the general qualities needed.

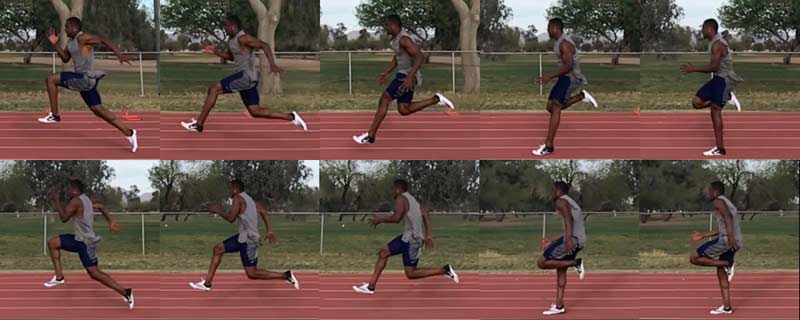
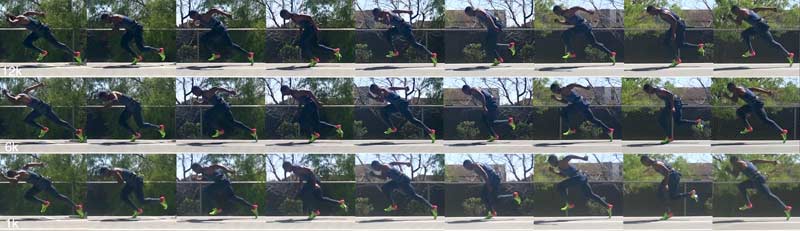
Drilling gets a bad rap, but it’s helpful for field sport athletes learning proper sprint mechanics, says @FranzblauRick. Share on X

To address the movement competencies, we progress through a series of drills on the prowler sled combined with some low-incline hill running. On the prowler, we start with an isometric hold to teach the athletes the key body positions in acceleration. The primary focuses are hips forward, knee forward, neutral ankle, and horizontal push on the back leg.

From there we progress to prowler marches, where athletes can begin to feel postures with slow deliberate limb exchange. Next, we move to prowler bounds: postural demand is increased as limb exchange is now forceful and the athletes must learn to pretense the ankle complex. Lastly, we move to a prowler shove, which begins to teach the athletes the concept of hip projection. In this maneuver, they basically drive the prowler as far as they can for five steps.

While progressing through the prowler series we also have our athletes perform low-incline sprints on a grass hill. The low incline helps facilitate hip position, appropriate force vectors, and low heel recovery. We start very short with these progressions (five steps) and progress to about 15 yards. Once achieving proficiency in these movements, we move to flat ground accelerations and eventually bleed them into our wicket progressions, eventually progressing to full sprints of 30 meters or more.

Freelap USA: How do you utilize data from the 1080 Sprint, force plate, and contact grid to alter plyometric prescriptions for athletes?

Rick Franzblau: This will be our first year looking at information from the contact grid in tandem with the force plate and 1080. For most of our sports outside of volleyball, sprint speed trumps vertical jumping ability (explosive strength) in terms of favored biomotor ability. With that said, we look closely at our load-velocity profile on the 1080 and compare it with our RSI numbers from the contact grid. The load velocity profile on the 1080 gives us a theoretical max velocity and max force for each athlete over a 20-meter run.

For non-collision sports, we prioritize theoretical max velocity. Now having tested dozens of athletes on the 1080, we are beginning to establish ranges for which athletes need more force-dominant work or more velocity-dominant work. In field sport athletes, we expect RSI numbers to correlate with theoretical max velocity.

In field sport athletes, we expect #RSI numbers to correlate with theoretical max velocity, says @FranzblauRick. Share on X

Athletes that need more high-velocity sprint work usually test lower on RSI also and need more elastic and multi-jump drills focusing on minimal contact time. An athlete needing force-dominant sprint work is also likely to test well on RSI and will require more high force jump drills with longer contact times (broad jumps up hill, heavy squat jumps, etc.) For track sprinters, the correlation is not as significant and RSI will be used more for an evaluation of readiness.

Freelap USA: How do you teach and monitor athlete recovery in your program?

Rick Franzblau: Recovery is an integral part of our introductory performance and wellness education program for our incoming athletes. This is an eight-series program that gives our student athletes a foundational understanding of all performance-related concepts. It is a multidisciplinary effort and can be summed up in one of the four core values of our weight room: Dominate the other 20 hours of the day.

Our sports psychology, strength and conditioning, athletic training, and nutrition staff all play an important and integrated role in promoting recovery. At the end of the day, one of our most important roles as a performance team is to manage the stress loads of the athlete while simultaneously building their resilience to physical, mental, and social stressors.

One of the most important roles of a performance team is to manage the stress loads of an athlete, says @FranzblauRick. Share on X

Our sports psych staff works with our athletes on techniques to promote proper breathing habits, mindfulness, and concepts that promote parasympathetic tone throughout the course of the day. Our nutrition staff educates our student athletes on nutrient timing and macronutrients, and on the use of specific recovery items such as tart cherry drinks. Athletic training and strength and conditioning work in tandem to assign appropriate use of specific modalities such as foam rolling, cold water immersion, Normatec, or active aerobic work.

Underlying all these ideas and concepts, and a critical component of our freshman educational program, is our focus on sleep. Sleep drives all the other factors that I have mentioned: improved carbohydrate metabolism, decreased perception of pain, improved parasympathetic tone, etc. We spend considerable time educating our student athletes on the importance of sleep and the sleep hygiene goals to shoot for. We combine this with objective measuring of sleep quantity and quality through our use of fatigue science Readibands.

Our collection and analysis of this data is again multifaceted, and all members of the performance team for each sport have access to this information. If we have athletes struggling with sleep, we can approach from a multidisciplinary standpoint and see if there are nutritional, psychological, academic, or sleep hygiene interventions that are necessary to aid them. Our objective sleep measures, in conjunction with our subjective wellness questionnaires, evaluation of internal and external training loads, and readiness testing (any combination of morning resting HR, contact grid RSI test, and groin squeeze), give us an overall sense of the recovery status of the student athlete. Evaluations of the athlete through velocity-based training and heart rate training will also help identify anything that could have been missed through the aforementioned measures.

Since you’re here…
…we have a small favor to ask. More people are reading SimpliFaster than ever, and each week we bring you compelling content from coaches, sport scientists, and physiotherapists who are devoted to building better athletes. Please take a moment to share the articles on social media, engage the authors with questions and comments below, and link to articles when appropriate if you have a blog or participate on forums of related topics. — SF


Reverse Lunge

The Reverse Lunge: Building a Foundation for Athletes

Blog| ByZach Dechant

Reverse Lunge

Virtually everyone knows the importance of leg strength in pitchers. Training the lower half of the body usually focuses on the big movements like squats and deadlifts. They dominate the landscape for most athletes, and rightly so. When you look at a pitching motion, the majority of the actual motion from leg pickup to release is performed through an interplay of single leg motion. That interplay could fill a novel, but the main concept is that each leg individually plays an important role in pitching.

Before our athletes ever do a #deadlift, we teach and train the weighted barbell reverse lunge, says @ZachDechant. Share on X

Building lower half strength with our younger athletes may deviate from the common thought. The reverse lunge is a staple in our program for incoming collegiate pitchers. Before our athletes ever dive into a deadlift, we teach and train the weighted barbell reverse lunge. Not only is it beneficial for creating strength in a split stance, but anecdotal and empirical research suggests it has a correlation to performance as well as injury prevention. For us, getting strong in a single leg movement outweighs the use of multiple double leg movements throughout a weekly mesocycle.

Performance and Lunge Strength Transfer

The first place to start with the lunge and its relationship to performance is to simply create more leg strength and motor control in the lower half. It has been well documented that leg strength can play a crucial factor in pitching velocity. The true transfer of a lunge movement to pitching is based upon several factors, with training age and the current level of the athlete potentially the most important. The lower the level of the athlete, the more transfer the lunge will have. As an athlete’s ability increases to a high or an elite level, you will find less transfer. Regardless, the lunge can be very beneficial along the path of development for many athletes.

A study by Matsuo in 2001 documented four common patterns (A, B, C, D) in pitchers’ landing legs. Categorizing pitchers by either high velocity or low velocity, Matsuo found that the amount of flexion and/or extension of the front knee varied by how hard each group threw. He classified A and B patterns as more knee extension dominant, and C and D patterns as more flexion dominant.

Groups A and B landed flexed, but drove the knee back hard into extension at ball release. The C and D patterns essentially stayed flexed on the knee through ball release. The results showed that 83% of the high-velocity group displayed a front leg moving from flexion into extension over the course of front foot contact to ball release.

AB Lunge
Figure 1. A study by Matsuo (2001) found four common patterns (A, B, C, D) in pitchers’ landing legs. He classified high-velocity throwing guys as mostly being A or B: knee extension dominant.


CD Lunge
Figure 2. The low-velocity pitching group dominated the C and D classifications, which were much more flexion dominant. From front foot contact to ball release, the knee either stayed close to the same angle (C) or actually sank into more flexion throughout the pitch (D). It’s interesting to note that no high-velocity pitchers fell into the D classification of the knee flexing more into the ball release.


Another study done in 2015 by McNally showed that stride leg ground reaction forces were strongly correlated with ball velocity as well. While the study was done with 18 former competitive baseball players, the ability to decelerate on the front leg and apply force opposite the direction of the throw was significant.

Both studies illustrate the importance of the front leg and the ability to brace and apply force. Again, the athlete’s level matters here in terms of specificity, but building a large base of strength can clearly assist athletes.

Addressing Weaknesses

A new athlete entering a program cannot hide their weaknesses. One of the most common weaknesses that I find in incoming athletes is single leg strength. Many have rarely done anything in the realm of a single leg movement. If they have, it has often been solely with high-rep bodyweight lunges.

One of the most common weaknesses that I find in incoming athletes is single leg strength, says @ZachDechant. Share on X

There are many reasons that single leg work may be a weakness. One reason may simply be the time availability at the high school level. Many programs have limited time, and therefore coaches may choose to focus on large movements that athletes can do quickly. Single leg work may get lost in that mix or may not rank high enough on the scale of importance for the time available.

Athletes that do train in high school are often thrown into a one-size-fits-all basic program. Even if time is not an issue, programs are commonly built around the big basics such as squat and/or deadlift. Numbers are often important to coaches, and the reverse lunge isn’t a numbers lift. Therefore, it often gets looked over in the grand scheme of programming. Single leg movements aren’t sexy and don’t get the social media views that a big-time squat or deadlift does.

The Lumbar Spine

The prioritization of single leg movements over bilateral through our developmental phase is due to the large rise in back issues with incoming athletes. Pars fractures, and even disc injuries, dominate the landscape of high school/junior college baseball due to the high volume of skill work and low or nonexistent volume of training. Deficiencies in core strength and/or pelvic control, hip mobility issues, faulty movement patterns, and even the mechanics of how an athlete rotates all factor into the equation for a lumbar stress fracture.

Due to increased back issues w/ incoming athletes, we prioritize single leg movements over bilateral, says @ZachDechant. Share on X

The same muscles responsible for transferring rotational force through the body are also responsible for the deceleration of those same movements to protect the spine from injury. The spine undergoes large extension and rotation forces in any rotational movement. Athletes who cannot control end ranges of motion will end up ramming bony anatomy together while decelerating rotational movements. The result are stress fractures in the lumbar spine.

The first step is to eliminate movements that put large forces through the lumbar spine in the form of extension-based patterns. Squats, deadlifts, and RDLs are usually no-no’s for rehabilitating stress fractures. These bilateral movements often put athletes through large ranges of flexion and extension, and put huge forces through the vertebrae, causing once-dormant problems to again rear their head. Stress fractures that are asymptomatic will often stay hidden until they aren’t. If you want to find one, start putting athletes who are largely extended under load and see what happens.

Injury Prevention Benefits

The role of the kinetic chain in any rotational movement, especially that of pitching, cannot be overlooked. The legs, pelvis, and core all play fundamentally important roles in the buildup and transmission of energy. Weaknesses and/or breakdowns in the chain of a throwing athlete can transfer stress distally to the shoulder and elbow.

A 2013 study done by the Ben Hogan Sports Medicine clinic back found interesting results with UCL injuries and single leg testing. It looked at 60 baseball athletes, 30 healthy and 30 recently diagnosed with UCL tears. Players with UCL tears scored significantly lower on the Y Balance Test for both stance (P<.001) and lead (P<.001) lower extremities, compared to the non-injured athletes.

The Y Balance Test requires motor control of the lower half, transfer of body weight to each leg, core control, balance, and mobility to complete. The finished test looks for asymmetries. A deficiency in any of the above, or huge imbalances, could be a red flag for pitchers.

While you should view every study with a bit of skepticism, the findings of this data suggest there could be a potential association between impaired single leg ability and UCL tears in high school and collegiate baseball players.

Josh Heenan, strength coach, and president of Advanced Therapy and Performance in Omaha, Nebraska, has found similar results with the weighted reverse lunge. Based on data from more than 1,400 athletes, he and his colleagues view the reverse lunge as an important movement for pitchers for its correlation to velocity, as well as injury. They have created the “90mph formula” based on years of research with their athletes.

The formula is a roadmap, based on five training metrics, that they have found to be consistent with pitchers that can throw over 90 mph. Being strong in the reverse lunge is one metric in the formula. Those that do throw 90 mph or harder, yet can’t hit all the training metrics in the formula, are exponentially more prone to injury. While not published research yet, Josh and those at ATP have seen and shown the importance of the reverse lunge on lower body strength, and specifically on single leg strength in pitchers.

Progression to the Reverse Lunge

Progressing into the barbell reverse lunge often depends on the level of the athlete. The most common progression we take with our incoming athletes goes from static to dynamic. We work from unloaded to loaded through both those steps.

Lunge Progression
Figure 3. An effective progression starts with an isometric action and moves toward dynamic action. In addition to contraction type, advancing the athlete using simple progressive overload is a natural option.


Static

  1. ISO Lunge – Unweighted
    1. The ISO lunge teaches body positioning and the creation of tension.
    2. Low-level athletes will start at 15 seconds each leg with a 10-second rest between legs. We add time over the course of the progression, up to 30 seconds.
  2. ISO Lunge – Weighted
    1. When the athlete can maintain 30 seconds, we add weight to the movement in the form of holding a plate in the front.
      1. Start back at 15 seconds each leg.
      2. Build to 30 seconds again.
    2. Note: You can use larger time frames here, but I find that 15- to 30-second sets fit well within the overall program as far as difficulty, ability to maintain posture, and training time are concerned.

Dynamic

  1. Single Arm DB Reverse Lunge
    1. Athletes hold one DB in the hand opposite of their front leg.
    2. This achieves two things:
      1. Only holding one DB means a lighter overall load is used and movement efficacy can be prioritized.
      2. The single arm hold challenges the core musculature to a higher degree than holding two dumbbells does. It specifically emphasizes the all-important quadratus lumborum and obliques. Both are incredibly important muscles in back health and pelvic control.
    3. Reps are usually done in the 5-10 per leg range.
    4. Athletes perform all reps on one side before switching.
  2. Barbell Reverse Lunge
    1. We prefer the front squat variation.
      1. Athletes must be familiar with the front squat grip before undertaking this movement. The ability to hold the bar correctly sets up the rest of the entire movement.
    2. Athletes alternate lunges in this variation: Right leg then left leg until they complete all reps.
    3. Load the barbell up.
      1. Train this pattern to be strong.

Just because athletes are performing a lunge movement doesn’t mean they can’t use low reps with high loads. Many coaches are nervous to train single leg patterns heavy with the barbell. In many cases they are right, as it is often difficult to maintain balance and/or dump a barbell if something goes wrong during the movement.

Just because athletes perform a #lunge movement doesn’t mean they can’t use low reps with high loads, says @ZachDechant. Share on X

That is one reason I prefer the front squat grip variation over the back squat. Holding and dumping the barbell becomes fairly easy and inconsequential when in front. The same can’t be said when the bar is on the back.

Parting Thoughts on Coaching the Reverse Lunge

Coaches also think of lunges as an assistance movement and pigeonhole it to be used only for higher reps and lighter weight. This couldn’t be further from the truth. The use of heavy loads has given us phenomenal gains in the past. Moving through the listed progressions wisely should set athletes up for success with the loaded barbell.

Athletes must show competence to use the weights early on. However, they will often shock you with how strong they really are in single leg patterns. It’s not uncommon for our pitchers, after a full training block, to reach upwards of 80-100% of their front squat max for heavy singles to triples on the reverse lunge.

Don’t be afraid to train with sets in the same zones as you would on other big compound movements, says @ZachDechant. Share on X

Don’t be afraid to train with sets in the same zones as you would on other big compound movements. The use of one to five reps per side can be incredibly effective in building a big and strong lower half. Heavy reverse lunges can be an asset in any program.

Since you’re here…
…we have a small favor to ask. More people are reading SimpliFaster than ever, and each week we bring you compelling content from coaches, sport scientists, and physiotherapists who are devoted to building better athletes. Please take a moment to share the articles on social media, engage the authors with questions and comments below, and link to articles when appropriate if you have a blog or participate on forums of related topics. — SF


References

Bohannon, Richard W., et al. “Relationship of Pelvic and Thigh Motions During Unilateral and Bilateral Hip Flexion.” Physical Therapy. 1985: 65(1); 1501–1504. doi:10.1093/ptj/65.10.1501

Garrison, J. Craig, et al. “Baseball Players Diagnosed with Ulnar Collateral Ligament Tears Demonstrate Decreased Balance Compared to Healthy Controls.” Journal of Orthopaedic & Sports Physical Therapy. 2013: 43(10); 752-758. doi:10.2519/jospt.2013.4680

MacWilliams, Bruce A., et al. “Characteristic Ground-Reaction Forces in Baseball Pitching.” The American Journal of Sports Medicine. 1998: 26(1); 66–71. doi:10.1177/03635465980260014101

Matsuo, T., et al. “Comparison of kinematic and temporal parameters between different pitch velocity groups.” Journal of Applied Biomechanics. 2001: 17(1); 1-13.

McNally, Michael P., et al. “Stride Leg Ground Reaction Forces Predict Throwing Velocity in Adult Recreational Baseball Pitchers.” Journal of Strength and Conditioning Research. 2015: 29(10); 2708–2715. doi:10.1519/jsc.0000000000000937

Altitude Running

Making the Most of Your Stint at Altitude

Blog| ByDavid Granato


Altitude Running

Living and training at altitude has a number of beneficial effects for endurance athletes. Many high-level endurance athletes, across many different sports, live at altitude full-time, or use periods of altitude training to enhance their performance.

At the 2017 NCAA Cross Country Championships, in Divisions I and II, both the Men’s and Women’s team champions were from schools located at altitude. In Division I on the men’s side, Northern Arizona University, located in Flagstaff at 6,910 feet above sea level, won its second team title. On the women’s side, the University of New Mexico, located in Albuquerque at 5,312 feet, also won its second team title. In Division II, Adams State University, located in Alamosa, Colorado at 7,544 feet, won both the men’s and women’s team races for its 44th and 45th cross country team titles.

Additionally, a survey of medalists from the 2004 Athens Olympics found that 80% utilized altitude training in some form during their preparations.

The difficult questions, when using periods of altitude training rather than living at altitude, are when to go, for how long, and what to do while there in order to make the most of it. Before we can answer these questions, we need to look at the physiological adaptations to altitude to understand why it is beneficial.

How Much Does Altitude Improve Performance?

Altitude training increases aerobic ability by increasing the volume of red blood cells in the body, as well as the density of mitochondria and capillaries. The result is the ability to run faster for the same distance, or further at the same pace, improving endurance performance.

According to the USATF, 4 weeks at altitude can improve performance by 1-2%, and even up to 5%. Share on X

According to the USATF, a 28-day stint at altitude can improve performance by 1-2%, and some athletes have improved up to 5%. That doesn’t sound like much, but for a 31:00 10K runner, that is an improvement of 18-37 seconds, and up to 93 seconds.

Physiological Adaptations to Altitude

Living at altitude results in an increase in naturally occurring erythropoietin. Erythropoietin, abbreviated as EPO, is a hormone produced in the kidneys that stimulates the production of red blood cells. Artificial EPO—synthetic or taken from human or animal sources—was originally developed for cancer patients to increase their red blood cell count, but it has become notorious for its use as a performance-enhancing drug, to exceed the levels naturally and safely produced by the body.

This increased red blood cell production depends on the altitude at which you live, and for how long you live there. Higher altitudes and longer residences result in the production of greater amounts of red blood cells.

In addition to greater oxygen availability as a result of more red blood cells, the efficiency of oxygen use also increases, as a result of the increase in bisphosphoglyceric acid, or BPG. BPG stabilizes deoxygenated red blood cells, allowing for greater oxygen removal from the cells to the working muscles.

Training at Altitude Variations

In order to maximize the effects of altitude, there are different ways an athlete can choose to live and train in a high-altitude environment.

Live High Train Low

Live high train low (LHTL) gives the benefits of altitude without as many of the negatives. The athlete still gains the physiological effects of living at altitude, while maintaining the ability to run sea level paces or sea level workouts. This is only possible in a few locations in the U.S., where there is easy access to both high and low altitudes within a short travel distance.

You can also simulate this type of training at sea level with the use of expensive altitude tents or altitude chambers. Altitude tents simulate the effects of altitude by increasing the percentage of nitrogen in the air, which decreases the percentage of oxygen.

Most altitude training, especially when athletes do short periods of it, will be live high train high (LHTH).

Live High Train High

When training at altitude, it is not always easy to travel to sea level or even lower altitudes. In these circumstances, living and training at the same or similar altitudes are employed. This format allows for the physiological changes to occur, but does require some adjustments to be made to training to accommodate the demands of altitude.

Adjusting Your Training

The reduced availability of oxygen essentially results in a reduced ability to run, as well as a reduced ability to recover from hard efforts, especially before adaptations have occurred.

Running slower, especially on easy days, is necessary to allow for proper recovery. This is because not only does living at altitude affect the acute ability to perform work, but the chronic effect slows down the recovery process.

At altitude, run for the same number of minutes a typical run for mileage would take at sea level. Share on X

Running for minutes, rather than miles, will result in the effect of running at sea level, without the psychological pressure to hit a certain mileage goal. Running for the same number of minutes a typical run for mileage would take at sea level is a good goal to shoot for. For example, instead of running for 10 miles at a 6:30 pace, at altitude you should just run for 65 minutes.

This same principle can be applied to tempo runs—running at a given effort for the same amount of time rather than a particular distance. This requires some discipline, because it is tempting to run too fast, in an attempt to run sea level pace or what you think altitude pace should be, especially when wearing a GPS watch. However, just like at sea level, when you run your tempo runs too fast, too much lactate is produced and the purpose of the workout is lost.

When performing interval workouts, you can modify them in three different ways for a given workout. If that given workout would be 6×1600 @ 5:00 with 2:30 rest at sea level, here are three examples to modify that.

    1. The first, and simplest, modification would be to perform the same distance, with the same rest, but at a slower pace to accommodate the altitude. Given an altitude of 7,500 feet, this would result in a workout of 6×1600 @ 5:18 with 2:30 rest. The problem with this workout is that when you go back to sea level and try to race at a 5:00 pace, it will feel challenging neuromuscularly. You will not be efficient at that pace because you have not run it, despite being aerobically fit from the altitude training. This type of modification is good, but it should also be matched with workouts that will neuromuscularly prepare you for the pace of sea level racing.


    1. The second strategy, to accommodate sea level pace, would be to increase the recovery between the intervals, in order to run them at the same pace. This would result in a workout of 6×1600 @ 5:00 with perhaps 3:00 or 3:30 rest. However, this begins to change the physiological effect of the workout, as the rests become very long between intervals, and the pace is faster than a 10K effort, at the current altitude.


  1. Finally, you can break the intervals into shorter bouts to increase total rest so that you can run faster paces. A possible permutation of this workout would be 6x4x400 @ 75 with 60 seconds’ rest between reps, and the original 2:30 rest between sets. This modification approximates the results of a sea level workout, allows for sea level paces to be run, and keeps the recovery short enough to continually stimulate the proper energy system. The repetitions are also short enough that the altitude will not affect you as much as it would in longer repetitions.

Other Factors

When you train at altitude, there are a few other things you should know about to stay as healthy as possible.

When you live/train at altitude, take iron supplements, get more sleep, hydrate & dress in layers. Share on X

Iron Supplements

Athletes training at altitude should take iron supplements, as iron is a necessary component of red blood cell production. There are two different types of supplemental iron that can be taken: liquid and pill form. The liquid form is superior because it has a much higher absorption rate, relatively, than pill form. However, it is also more likely to upset your stomach. The recommendation would be to try the liquid form, and if you can’t handle it, take the pill form instead.

Many manufacturers recommend that their iron supplements be taken with food. This will reduce the likelihood of stomach upset, but will also severely impede absorption. To maximize the already low absorption rates, do not take iron within an hour before or after eating, and only pair it with a high vitamin C liquid. Avoid calcium in this period, because it especially impedes iron absorption.

Take iron for a few weeks before the start of altitude training, to build up the ferratin stores that are used when creating new red blood cells. If ferratin stores are too low to create new red blood cells, spending a few weeks at altitude will not have the hoped-for beneficial effects.

Sleep

While living and training at altitude, it is important to get more sleep, for two reasons. The first is that sleep quality can be worse while at altitude, so spending more time in bed to get the same number of REM cycles and quality becomes necessary. The second is that altitude is an additional stressor on the body, which requires extra recovery.

Dehydration

Most altitude locations have very low humidity. When this is combined with the higher respiration rate at altitude, there is a greater loss of water through expiration and sweating. In order to replace this, it is necessary to drink extra water frequently, and in larger volumes than usual, the whole time you are at altitude.

Temperature Changes

Because of the elevation, temperature changes are much greater at higher elevations, compared to lower elevations. Keep this in mind when you plan to spend more than a few hours outside. If you are planning on increasing elevation, be prepared for a decrease of anywhere from 3-6 degrees Fahrenheit, depending on conditions, per 1,000 feet of elevation gain. Dress in layers that you can add or remove as necessary.

Altitude Sickness

Altitude sickness is a reaction to increasing altitude too quickly. It usually occurs above 10,000 feet; however, it can occur at any point. The symptoms include a headache, nausea, loss of appetite, shortness of breath, fast heart rate, and fatigue. The only remedy is to reduce your elevation, or take supplemental oxygen. You can preempt altitude sickness by taking iron ahead of time, hydrating properly and adequately, and increasing your altitude a little at a time.

How High to Live

For short stints at altitude, the best elevation seems to be between 7,000 and 8,000 feet. One study suggested that, during a short stint, only athletes that lived and trained in this range had measurable increases in Vo2 max, as well as improvements in 3,000-meter race performances.

The comfort of a lower elevation may balance out the larger emotional stress of a higher altitude. Share on X

Any elevation above 3,000 feet is considered altitude, with increasing physiological response as altitude increases, up to about 9,000 or 10,000 feet. The comfort and convenience of a lower elevation might also balance out the extra physiological effects but increased emotional stress of a higher altitude location. Especially with your first trip to altitude, making it an easy and comfortable experience outweighs trying to get as high as possible, or trying for some optimal altitude.

The Optimal Length of Stay at Altitude

There is a clear increase in red blood cells after just one week at altitude, but the increases are exponential for each additional week. This is especially true in the three- to four-week range.

A stay of 3-4 weeks will result in the best ratio of red blood cell production to time at altitude. Share on X

Any time spent at altitude will result in some improvement in red blood cell production, but a stay of three to four weeks will result in the best ratio of red blood cell production, compared to time spent at altitude.

References

Chapman, Robert & Wilber, Randy. “Altitude Training for Sea Level Performance: Best Practices and Timing for Championships.” Handout for 2011 IAAF Athletic Championships, Daegu, South Korea.

Since you’re here…
…we have a small favor to ask. More people are reading SimpliFaster than ever, and each week we bring you compelling content from coaches, sport scientists, and physiotherapists who are devoted to building better athletes. Please take a moment to share the articles on social media, engage the authors with questions and comments below, and link to articles when appropriate if you have a blog or participate on forums of related topics. — SF


Monitoring Stress

The Stress Scale for Athletes: A New Method to Monitor Athlete Performance

Blog| ByAdam Menner

Monitoring Stress

Because nothing in life is perfect, daily stressors inevitably will inhibit our ability to train optimally. I knew I couldn’t manage the external stressors that my athletes experienced, but I decided I could create something that would account for their level of readiness on any given day.

The Stress Scale for Athletes dramatically changed the way I train athletes. The scale allows me to apply the appropriate training load for a session based on an athlete’s readiness that day despite any stresses they’re dealing with outside the gym. I’ve used it for the past eight months, and it has served us surprisingly well with significant results.

The information I present is a culmination of existing concepts, including the Prilepin’s Chart, the rate of perceived exertion (RPE) scale, and fatigue management concepts I’ve put together based on “in the trenches” empirical data. I’ve recorded hundreds, if not thousands, of different numbers in my ten notebooks that I carry with me daily. I hope this information helps you well in your training and coaching.

Recognizing the Stress Problem

We all experience stress. Stress manifests itself in many ways, both acutely and chronically. Furthermore, all stressors are not created equal—to an extent. However, both types of stress have a large effect on our training and the ability to recover from each training session.

A training session consisting of 4×10 volume squats puts significant stress on the body and will cause fatigue in most of us. Emotional pain is a stressor as well, for example a break up with a significant other. One physical, one physiological, both cause systemic stress on the body that will inhibit optimal subsequent training sessions.

When thinking about stress, it’s useful to start with the General Adaptation Syndrome. Very small amounts of stress won’t provoke a very robust adaptive response, while more stress increases adaptation. Too much stress—to the point where we can’t cope physically or psychologically— decreases the rate of adaptation.

Keep in mind that, while our bodies don’t differentiate types of stress to a great degree, the specific adaptations to various stressors (lifting weights, a car crash, and tight work deadlines, for example) will differ. Also, the body’s general response to any stressor is very similar regardless of the specific stressor we encounter.

This means that all the stressors in life pool together and dip into the same reservoir of “adaptive reserves” available for recovering from those stressors. This allows us to adapt so we’ll be better equipped to handle them next time. With strength training, this means bigger and stronger muscles, more resilient tendons and connective tissue, and bones that can handle heavier loading.

Our bodies need a certain amount of stress to function normally. If we remove all the stressors from our lives, our bodies begin to deteriorate. For example, if we were to win the lottery and spend a year lying on the couch watching reality TV, facing no stressors that challenge us physically or mentally, we’d be much weaker and in much worse health than we are now with some baseline level of physical and psychological stress.

When stress levels exceed our adaptive reserve threshold, additional stress has negative effects. Share on X

Past that baseline level, additional stress causes beneficial adaptation with diminishing returns and eventually negative returns. The first input of any stress causes the largest beneficial adaptation. More stress will have an additive effect, though each additional unit of stress doesn’t add as much benefit as the first. Once the total amount of physical and psychological stress exceeds the threshold of what our adaptive reserves can handle, any additional stress will cause negative effects.

My Challenge as a Coach

It’s nearly impossible to monitor an athlete’s stress levels since we have little control over the external things that happen to them outside the weight room. In most cases, we see our athletes no more than 8-10 hours a week. There are 168 hours in the week. That leaves athletes with at least 158 hours experiencing other external and internal stressors.

As coaches, our job is to ensure our athletes feel good, are ready to perform, and can sustain a healthy lifestyle that is conducive to sport success. Because we cannot control everything that happens outside the gym, we must create training programs that will most benefit our athletes no matter what’s going on in their lives.

Coaches must create training programs that most benefit athletes despite their life stresses. Share on X

My professional athletes are always ready to go because they’ve dedicated their entire lives to training. They take the necessary steps to put themselves in the best position to succeed. I don’t train many professional athletes at a time, however, because of their busy schedules.

Like most coaches, the bulk of my athletes consist of high school and collegiate athletes, ranging from 14-22 years old. Thisis where things get tricky. We all know what amazing things happen during those years: partying, late nights, relationships, breakups, school work, and the daily stress of home life. These may seem small to us now, but we all remember how much they influenced us at that age and how we felt on a daily basis.

One week my athletes came in, and the weights were moving. They were hitting numbers 25-30lbs over what we prescribed for the day. The problem with this happened during the following weeks of training. They did not even come close to the numbers they were supposed to hit based on their performances the previous week. As always, I asked them how they felt, what they ate, how they slept, and how their weekends were. The answers always changed. “I didn’t sleep well” or “I had a rough weekend” or “I didn’t have time to eat.”

This was when I knew I couldn’t keep prescribing the same thing week after week with minor tweaks here and there. I needed a holistic training program overhaul.

Concrete Steps Toward a Solution: Stress Scale for Athletes

Since I couldn’t manage the external stressors my athletes experienced, I created a method to account for their level of readiness on any given day. Below are outlines of two tables you may have seen before.

Prilepin's Chart
Image 1. Prilepin’s Chart is probably the most widely used reference for developing training programs. It gives pretty accurate parameters for where you should be in the given percentages.

1-3-5 Reps
Image 2. The chart shows a combination of RPE and what that percentage should look like for 1, 3, and 5 reps during training. Again, these are not exact numbers, just estimates. I found this chart through Mike Tuchscherer of Reactive Training Systems.

As the reps increase, the perceived intensity of each load decreases. Obviously a 5RM should be at a lower percentage than a 1-2RM, which is why 5 reps @ RPE 5 would be about 60-65% and a single rep @ RPE 5 would be around 80%. Volume work around 80% of your 1RM could fall anywhere between 3-6 reps, so an 80% single would be no problem, thus an RPE 5 on the RPE Scale.

At this point, I had Prilepin’s Chart and an RPE table with estimated percentages that closely resembled Prilepin’s Chart. I now needed to account for how the athletes felt, how much volume they could handle, and how much they could recover from each training session.

The Stress Scale
Image 3. I created the Stress Scale for Athletes using the two tables above as well as information about how my athletes felt, how much volume they could do, and their recovery from each training session.

When looking at the Stress Scale for Athletes, keep in mind these key definitions:

  • Training Effect (TE)—the training objective and desired effect for the day.
  • Percentage of 1RM—based on Prilepin’s Chart, the objective of each percentage.
  • RPE—a number value based on effort and associated with a given percentage of your 1RM.
  • Fatigue Management Levels (FML)—how fatigued you are, based on your RPE.
  • Minimum Effective Dose (MED)—the minimum amount of volume to get the desired outcome and training effect for that training session, based on Prilepin’s Chart.
  • Maximum Recoverable Volume (MRV)—the most amount of volume an athlete can handle during a particular training session to recover and progress in the subsequent training session. This concept was brought to me by Dr. Mike Israetel of Renaissance Periodization and has been extremely useful in training my athletes.

How to Start with Your Athletes

Here’s how to use the Stress Scale with your athletes. Start by asking them how each set felt, starting with warm-ups up to their working sets. Use the chart to compare and contrast your data. From here, you can modify the training plan based on how your athletes feel that day. I left room for flexibility because everyone is going to perceive certain training loads differently. This allows more flexibility in your coaching program as well.

Based on all of the information in the table, here is an example of how I would use the Stress Scale with my athletes.

Example of the Stress Scale for Athletes

1RM Squat = 315

Work for the Day = Squat 3×5 @ RPE 7 | 70-75% = 240

  • Bar x 10
  • 135 x 10 @ RPE 4 | 50% x 10
  • 185 x 5-8 @ RPE 5 | 60% x 8
  • 225 x 5 @ RPE 7.5-8 | 70% x 5
  • 240 is the target range for the day but 70% (225) felt like an 8 RPE according to the Stress Scale; 70% should be an RPE 6-7 at the most. This would put your fatigue level at 3 vs. 1-2 according to the Stress Scale.

You now have two options:

1. Option A. Cut back to 225 @ RPE 7 (70%) and hit your MED—15 reps.

2. Option B. Go up to 240 @ RPE 8 but cut back your volume to 6-14 reps total (MED for that range).

  • FML represents how fatigued the athlete is for that particular day or possibly week. It’s not perfect, but it is a very strong representation of the athlete’s output for that training session. Overall intensity does not always create the most stress. Overall volume can cause significant stress for an athlete as well.

Observations and Results

I’ve been using the Stress Scale for eight months. During this time, my athletes have hit numerous PRs. More importantly, they’re always working within the appropriate ranges for the day as opposed to trying to hit percentages or numbers based on what they did last week. They’ve progressed week to week without overexerting themselves, which protects against getting hurt.

The Stress Scale also allows the athletes to take ownership of their bodies and how they feel. Our job as coaches is not only to lay out a plan and guide our athletes, but to teach them how to take care of their bodies, how to train properly, and how to live a healthy lifestyle. The Stress Scale helps give ownership and accountability to my athletes.

Final Thoughts

Training athletes is about health, progression, and longevity. There is a time and place for heavy metal, ammonia caps, and yelling. However, the day in and day out grind will not always provide these energy levels. We need a way to improve our athletes every single time they step foot in the facility. I hope this becomes a useful tool that you can use in training yourself and your athletes.

Since you’re here…
…we have a small favor to ask. More people are reading SimpliFaster than ever, and each week we bring you compelling content from coaches, sport scientists, and physiotherapists who are devoted to building better athletes. Please take a moment to share the articles on social media, engage the authors with questions and comments below, and link to articles when appropriate if you have a blog or participate on forums of related topics. — SF

1x20 Deadlift

Lifting Intensity and the 1×20 System with Matt Thome

Freelap Friday Five| ByMatt Thome

1x20 Deadlift

Matt Thome began his role as the Head Strength and Conditioning Coach at Michigan Tech in August 2012. In August 2015, his responsibilities shifted to a 50/50 split appointment between Athletics and the Kinesiology and Integrative Physiology Department. He is currently responsible for the preparation of the football and men’s basketball teams and teaches several courses throughout the year.

Freelap USA: How has your utilization of the 1×20 system (Phase 1: 1×20 reps; Phase 2: 1×14 reps; Phase 3: 1×8 reps) evolved over the years, or do you use it the same way as when you started?

Matt Thome: For me, it’s mostly been a refining process with the 1×20 progression over the years. The general concepts/principles have always been there as Dr. Yessis laid them out, but my implementation has gotten better with my understanding of the nuances within the program. For example, when and how you change the general exercises and recognizing that a team needs to make a change, experimenting with different general exercises, progressing athletes from phase to phase and progressions year to year, etc.

I think this is the same with any training system. You could almost say that once you have a good understanding of the “rules,” you are able to experiment to get more creative with stretching them a bit.

Freelap USA: What is your approach to making adjustments for athletes in a large group based on individual responses to a program?

Matt Thome: When working with a large group, I think the No. 1 thing you can do is educate your athletes. Once the athletes know what they’re doing, the majority of the “individualization” is pretty easy. Basically, you teach them how to autoregulate—when to keep the weight the same, when to increase, when to drop down, etc. Now, for a while this means telling them exactly what to do and why they are doing it, but you will gradually be able to allow them more freedom.

When working with a large group, I think the No. 1 thing you can do is educate your athletes, says @matt_thome. Share on X

In terms of individualizing exercises and progressing intensities, that’s something I do on a case-by-case basis. Sometimes this means modifying an exercise or selecting a better exercise for that athlete on the fly; sometimes it may mean programming something completely different (within means) for several athletes depending on their needs. I also might progress an exercise or the intensity (for example, from 1×20 to 1×14) for an individual athlete or group of athletes who are ready to do so before the rest of the team. I generally organize training groups (Gold, Black, White, Grey) by class, but will shift people around (up or down) as needed.

Freelap USA: What is the heaviest, relative to maximal intensity, you will go for a standard strength set? How often do you test maximal strength on a yearly basis?

Matt Thome: The heaviest I have gone with athletes for quite a few years is about 80% or 1×8 RM. With only going up to one set at about 80% or so, we’ve still had three to six football players every year able to hit 500lbs or more for 8+ reps in a back squat. It seems to me that you can get “strong enough” by using only one set at an 80-85% load two days per week. Now, I’m not at all saying that max effort work is useless. It’s a powerful stimulus and can be useful for phase potentiation or post activation potentiation even if there is no goal to further increase strength.

I believe you can get ‘strong enough’ by using only one set at an 80-85% load two days per week, says @matt_thome. Share on X

I don’t test max strength at all. Like I said, max effort work is a powerful stimulus and should be treated as such. Throwing in a week of maxing out is going to have an effect on everything you do for several weeks following. Not that this is always a bad thing either, but with the 1×20 progression it just seems pretty pointless to test strength. We record the weights and reps they hit every training session; if I want to know how strong someone is, I just look at what weights they’re hitting.

That being said, I think it’s a good practice to make sure you document some of those numbers (from training) periodically. Maybe one to two times per year, depending on the sport and what makes sense in their yearly calendar.

Freelap USA: How are you making use of barbell speed monitoring for your athletes, and what training phases does this happen in?

Matt Thome: I was using a pretty inexpensive accelerometer to measure peak and average velocities for a while. It was great to determine a load for dynamic effort work and then to “re-test” (or just throw the accelerometer on the bar during training) every three to four weeks to adjust the weight. However, the device we used was inconsistent as to whether it actually worked that day or not, so it wasn’t great for autoregulation and it ended up being more trouble than it was worth.

If I had a better tool for monitoring barbell velocity, I would use it once we get to the point where athletes use higher velocity dynamic effort work and also for Olympic lifts. I’ve seen that some people use it with strength work but this doesn’t seem to be necessary to me, especially within the 1×20 paradigm.

In terms of monitoring velocity with dynamic effort lifts, I see two primary modes of progression: maintain a constant velocity range and progress the weight (most common) or maintain a constant weight and shoot to increase the velocity. I’ve played around with a mixture of both. I don’t think there’s a right or wrong way to do it, just a different means of introducing novelty.

Freelap USA: What are some modes of injury prevention that you feel are unique to your training and methodology?

Matt Thome: I did a short write-up and a follow-up podcast with Jay DeMayo on cvasps.com a few years ago on this. I think we tend to overcomplicate this issue, or at least over-think it. If we deconstruct the issue, it’s much simpler then it appears.

You can categorize almost all injuries as being a result of too much stress and/or poor technique. Poor technique is pretty self-explanatory—an acute or chronic injury could occur due to poor technique in the sport or in the weight room. Technical breakdown could also be caused by inappropriate training load relative to the athlete. “Too much stress” is relative to that particular injured tissue. You could also say that this particular tissue has too little strength (or force-absorbing capabilities, etc.) relative to the specific demands imposed in competition, practice, etc.

First build up general strength in each joint, then gradually increase specificity, says @matt_thome. Share on X

Thus, we need to develop athletes to withstand these specific demands. I think if you take a good look at Verkhoshansky’s “dynamic correspondence,” that will help quite a bit (same muscle groups, ROM, emphasis portion of the ROM, type of muscular contraction, and speed/force of movement). In other words, first build up general strength in each joint, then gradually increase specificity. When put this way, injury prevention is primarily intelligent training.

Since you’re here…
…we have a small favor to ask. More people are reading SimpliFaster than ever, and each week we bring you compelling content from coaches, sport scientists, and physiotherapists who are devoted to building better athletes. Please take a moment to share the articles on social media, engage the authors with questions and comments below, and link to articles when appropriate if you have a blog or participate on forums of related topics. — SF

Biomechanics Program Design

An Objective Biomechanics Model for Better Program Design

Blog| ByPat Davidson

Biomechanics Program Design

Exercise program design is an applied solution for the inherently complex task of strategically manipulating the biological expression of the human life form. The degree of complexity and depth to human physiology is one of the most daunting puzzles facing scientists. Long story short, we as coaches and sports scientists are trying to understand and manipulate a system that the best and brightest minds of all time couldn’t and cannot fully grasp.

This is really hard stuff, and it is my belief that the best we can do is create inaccurate models that are rooted in basic science and simple rules that maximize utility and reproducible numerical results. It is also my belief that the only way you can actually design a comprehensible and comprehensive training system is to design it around biomechanics rather than physiological principles. You will ultimately affect appropriate physiological pathways as a by-product of training the relevant and appropriate domains within a biomechanics model.

The only way to design a comprehensive training system is around biomechanics, not physiology. Share on X

If you can work your way through this article and grasp the central tenets of the fundamental principles here, I think you’ll see that this is perhaps the most useful model currently in existence for designing fitness programs.

A New Training Model – Designing with Biology

Biology, as a single coherent discipline, is said to have begun in the 19th century. Biology traces its roots to ancient times, and is heavily influenced by medicine, botany, and zoology; however, we can say that it is still relatively young compared to things like mathematics. Exercise science falls under the umbrella of biology, and is essentially in its infancy from the timeline perspective of scientific inquiry.

Whenever there is a young scientific realm, one of the first things that needs to be done is a taxonomy of the phenomena within that domain. The most famous scientific taxonomy is the one constructed for life forms (Systema Naturae) that was put together by Carolus Linnaeus. You can effectively classify any form of life on the planet by going through the hierarchical arrangement of Linnaeus’ taxonomy.

In my mind, the world of exercise is not very different from the world of life. Life on planet Earth is incredibly diverse, with what seems to be an infinite number of variations on each type of creature, plant, or fungi. Some forms of life are so bizarre that it is hard to believe they exist. From our perspective, many animals don’t seem to make any sense at all; however, each living thing on this planet makes perfect sense in the environmental niche that it has come to occupy and take advantage of.

In the world of exercise, there are so many ways that humans choose to move that it seems to defy all possible logic. Some methods of physical exertion look ridiculous—bordering on comedic, dangerous, or misguided—yet they exist, and will probably continue to exist for a long time. Those of us who work in the world of exercise and gravitate towards a scientific perspective are often mortified by what we perceive to be stupid approaches to training, but this is likely due to the perspective we take from the lens we have been taught to view things through.

Fear not for your sanity though, my empirically minded brethren, for I would like to present to you a model you can use to classify and categorize all forms of exercise, along with a model you can use to grade the degree to which the movement you are witnessing represents optimal. To accomplish such a feat, I believe that you must take a biomechanics path rather than a physiological path.

The six levels of biomechanics hierarchy are pattern, stance, plane, load, velocity, and duration. Share on X

The biomechanics model I present here is based on the idea that biomechanics is divided into two primary domains: kinematics and kinetics. Kinematics describes the quality of the shapes that life can assume and move through, and kinetics provides quantitative information on movement. In my model, I divide kinematics into three sections: pattern, stance, and plane. I also divide kinetics into three sections: load, velocity, and duration. It is my belief that you can arrive at any exercise you could fathom by describing it via the six levels of this biomechanics hierarchy.

Getting Started with Key Movement Patterns

The topic of movement patterns has a large amount of ambiguity, and you should feel free to come up with different patterns than what I have here. Ian King was one of the first to begin thinking along the lines of creating an exercise taxonomy, and many of us gravitate back towards his list of primary resistance training patterns whenever we think about designing a training plan for athletes.

Great coaches like Boyle and Verstegen were wise to begin thinking of designing training days based on concepts such as linear and multidirectional movement directions/patterns. However, it’s time to upgrade and expand these models, and make them more objective. Having said that, here are the patterns that I use in this section of the Exercise Taxonomy.

Exercise Taxonomy
Image 1. This is a simple and pragmatic grouping of movement training, outlining the hands-on approach to training.

When I talk about stance, I mean the arrangement of the feet relative to each other and relative to the center of mass of the axial skeleton. I divide stance into three realms: bilateral symmetrical, asymmetrical front/back, and asymmetrical lateral.

Bilateral symmetrical stances are common in life and sport, and involve the two feet being next to each other and bearing equal weight from the skeleton above. The bilateral symmetrical stance is often a ready position in sports (pre-snap linebackers, pre-pitch baseball players, free throw position in basketball, etc.), and is the position from which certain athletic movements take place, such as two-foot vertical jumping. In the world of exercise, the bilateral symmetrical stance is essentially the place we find ourselves in when performing nearly every weight room movement imaginable.

The asymmetrical front/back stance can most easily be thought of as a lunge position; however, in this model it would be any instance where one foot is in front of the other foot. The asymmetrical front/back staggered position of feet is ubiquitous within athletics, as it is the only way to run. It is how we create first steps, jab steps in basketball, and shots in wrestling, to name a few.

The asymmetrical lateral staggered stance is where one foot remains under the center of mass of the axial skeleton, and the other foot is kicked out to the side like a kickstand and resides outside the axial skeleton. In the world of exercise, the lateral lunge is the easiest way to think of the presentation of this stance. Kettlebell lifting is also an exercise where this stance is used with some frequency, as movements like the Turkish Get-Up and the windmill both feature this foot arrangement throughout or in part of the movement. The asymmetrical lateral stance displays itself in sport mostly in movements featuring change of direction, such as cutting, but also in throwing motions, and is seemingly the only way to ice skate.

The Essence of the Planes of Motion

You will probably be introduced to the three anatomical cardinal planes of motion in one of the first three chapters of any anatomy textbook. Rather than belaboring the identification and definitions of these planes that we should all know, I would like to share what I perceive as the essence of each plane for humans.

The sagittal plane is your anti-gravity plane. Mastering the sagittal plane allows you to avoid falling on your face or your back. The frontal plane is the plane you have to regulate to ultimately create forward propulsion. Optimal forward propulsion occurs when a center of mass shifts side to side (truly in a sigmoidal pathway), but stays within the boundaries of the base of support (inside the feet). Those who display aberrant frontal plane mechanics stagger back and forth like they’re drunk, and lose energy that should be contributing towards moving forward. The transverse plane allows us to coil and uncoil for high rate of force development striking and throwing maneuvers.

Do what you will with this paragraph, because it is speculative; however, I do not see enough people asking appropriate questions, such as what the purpose of the cardinal planes of movement are from an overarching perspective, so I’m putting the discussion forward. My statements here regarding the purposes and essences of these planes guide me through the way that I coach exercises that I believe target a specific plane of motion. My confirmation that an exercise targeted a specific plane is the individual I am coaching reporting that they feel a muscle corresponding to an appropriate plane.

When attempting to train the sagittal plane, the affected muscles should be flexors and extensors. When targeting the frontal plane, individuals should feel adductors and abductors, and when going after the transverse plane, rotator muscles should be working. The specifics of knowing that an activity represents competency within a specific plane of motion will be covered in Part 2 of this article series.

Kinetic Zones and Individualizing Training

As we move into the kinetics side of the discussion, I would like to start out by saying that I have created my own arbitrary differentiations for what will constitute different levels of load, velocity, and duration. With all three of the kinetics variables, I try to keep things simple and divide them into three zones. If you want to create your own system with more levels or fewer levels that’s on you, and that’s fine.

I divide load into activities that use high load, moderate load, and low load. I divide velocity into high velocity, moderate velocity, and low velocity. I divide duration into long duration, moderate duration, and short duration. To provide some level of numerical bumpers to these three levels of load, velocity, and duration, the following may be useful to people.

Load Velocity Duration Chart
Chart 1. This chart shows another straightforward approach to overload. Note the zones and options listed for essential development.

So now that I have introduced you to all the factors at play, let’s discuss how a coach would go about utilizing this information. I would start with the kinematics information. First, what movement pattern are you trying to train? Once you have identified the pattern, what stance are you going to put the athlete in? Now that you have a pattern and a stance, what plane of motion do you want them to move in?

Now we shift our attention to the kinetics variables. How much load do you want to provide? What velocity do you want the load moved at? How long would you like this movement to take place for? Once you have provided an answer for all of these questions, you choose your tool (e.g., barbell, medicine ball, etc.) and you arrive at an exercise.

Start with the kinematics information, decide on the kinetics variables, and then pick your tool. Share on X

For the most part, the first thing you want to do with athletes at the beginning of a session is to “warm them up.” How would I use the model being presented here? As a very simple example, I’ll choose the locomotion pattern in the asymmetrical front/back staggered stance performed in the sagittal plane, performed with low load, low velocity, and moderate duration. What is that? Jogging the length of a football field.

Maybe you are a coach who bases things on FMS principles, and you’re of the belief that you can improve the mobility and/or stability of an athlete with a prescribed activity. You choose knee dominant, bilateral symmetrical stance, sagittal plane, low load, low velocity, and moderate duration, and you come up with an activity like a squat to stand. I could list countless examples, but warm-up is generally a time of low-load, low-velocity, and short- to moderate-duration activities that can try to either mimic the activities you want to train or attempt to improve the overall movement capabilities of the individual you are coaching.

As training sessions move beyond warm-ups, I would likely next do activities with low load, high velocity, and short duration (aka, speed, agility, plyometrics, or medicine ball throwing), and I would arrive at the activity by defining it from a kinematics perspective. Change of direction with a lateral asymmetrical stance in the frontal plane in this circumstance would be a 5-10-5. Throwing from a bilateral symmetrical stance in the transverse plane would be rotational med ball throws facing towards a wall. Triple extension from an asymmetrical front/back stance in the sagittal plane would be a split squat jump.

The Weight Room – Loading Smarter

Following low-load, high-velocity, short-duration activities, it is very likely that I would next proceed to the weight room with the athlete. The first weight room activities would most likely be lifts with high load, high velocity, and short duration. The most obvious example that fits into this category is Olympic lifts. Cleans and snatches, and their derivatives, are generally triple extension, bilateral symmetrical stance, sagittal activities. Split jerks would feature a transition into an asymmetrical front/back staggered stance.

Outside of Olympic lifts, it becomes difficult to think of activities that fall into this kinetics category; however, the sport of Strongman may provide some alternatives. Stone loading and tire flipping provide alternative triple extension, bilateral symmetrical, sagittal plane activities that require very little coaching. Tire flipping also features the transition into the asymmetrical front/back stance similar to split jerks.

The sport of Strongman may provide some alternative but similar kinetic activities as Olympic lifts. Share on X

An activity that lives in this kinetics category and also features a transverse plane element is the circus dumbbell clean and press. To be able to clean the dumbbell, the athlete needs to bring the bell up to only one shoulder, which requires rotation to accomplish the task. Outside of the circus dumbbell, which many strength and conditioning coaches likely are not versed in performing or coaching, it is difficult to think of other activities in this kinetic realm that feature moving in any other plane but sagittal.

Coach in gym cueing his athlete's lifts.
Image 2. Muscle recruitment is not just about load prescription; it’s about mechanical instruction. Over time, coaches can fine-tune their programs with a combination of technique and training.

After performing high-load, high-velocity, short-duration lifts, the most likely next kinetics realm that we would move to would be high-load, low-velocity, short- to moderate-duration activities. Classic examples of movements in this category would be deadlifts, squats, presses, rows, and pull-ups. Most of the activities in this realm are going to be bilateral symmetrical, sagittal plane activities, as these seem to be the stance and plane that lend themselves most to developing strength.

Generally speaking, most coaches attempt to put an activity from the major lifting categories somewhere in their weekly training programs. At some point, athletes will perform a hip-dominant, knee-dominant, horizontal push/pull, and vertical push/pull activity from this kinetics domain at least once a week in their program.

The next component of training in a standard model would be assistance lifts. This could have some movement pattern bleed over from the previous category, but could also feature movements from categories such as locomotion (loaded carries and sled work), and throwing (Turkish Get-Ups and windmills—I consider these to be the same pattern), along with core exercises focusing on the pelvis (Nordics) and ribs (planks). These activities would generally be classified as moderate load, moderate velocity, and moderate duration from a kinetics perspective.

The activities coming from hip dominant, knee dominant, horizontal push/pull, and vertical push/pull would often be unilateral choices once we’ve reached this component of training. Prior to creating this training/programming matrix, I really struggled with knowing where to put the kettlebell grind lifts. I simply did not have a bucket to know where those kinds of things belonged, other than putting them in as assistance activities after the main lift.

Describing these activities biomechanically has helped me fit them into a program more accurately. Share on X

Now I understand that a Turkish get-up for three reps each hand fits into the previously mentioned kinetics domain, and is a throwing activity performed from an asymmetrical lateral stance focusing on the transverse plane. I also understand that farmer’s walk for 100 feet is moderate- to high-load locomotion at moderate to slow velocity for moderate duration with an asymmetrical front/back stance in the sagittal plane. This ability to describe these activities has led me to think about where they would fit into a program much more accurately.

Coaching Biomechanics
Image 3. Medicine ball training is not about adults using toys; it’s about training tools coached correctly. Small changes to stance and loading make a big difference when working with athletes or regular joes.

The last piece of a very simple training day would be some kind of conditioning exercise. Conditioning in this case is low-load, low-velocity, long-duration kinetic activity. I usually try to think of cyclic activities for this kinetic domain. Common weight room conditioning activities include jogging, stationary bikes, Jacob’s Ladder, VersaClimber, slide board, and rowers.

Jogging is asymmetrical front/back stance sagittal locomotion. A spin bike is locomotion (this is questionable—you’re free to disagree) from an asymmetrical front/back stance in a sagittal direction, but if you use an arm and leg bike, that would add transverse plane to the equation because the movements of the arms would rotate the trunk. Jacob’s Ladder is also locomotion in an asymmetrical front/back stance in the sagittal plane, and is a great option for individuals who need impact removed from their training.

The VersaClimber is locomotion in an asymmetrical front/back stance, but is a frontal plane dominant movement, as individuals move like upright salamanders while using this piece of equipment. The slide board is change of direction in a lateral asymmetrical stance with the movement taking place in the frontal plane. Rowers feature a combination of knee-dominant and horizontal pulling (hard to categorize), and are bilateral symmetrical stance sagittal tools.

To help the reader conceptualize the whole puzzle, here are three tables that visually demonstrate the taxonomy concept for specific exercises.

Barbell Deadlift Chart

Split Squat Chart

Rotational Medicine Ball Chart
Charts 2-4. These three charts are prime examples of how to place training modalities in a systematic way for better balance and training outcomes. Use of the loading guide and the exercise taxonomy list makes programming fast, efficient, and very effective.

The easiest example that I can think of involving grossly imbalanced movers and a high degree of injury is CrossFit. When analyzing the types of movements done in CrossFit, almost all take place in a bilateral symmetrical stance, and move in the sagittal plane. CrossFitters warm up in this stance and plane, they lift in this stance and plane, and they even condition in this stance and plane (burpees, wall-balls, rowers, high-rep Olympic lifts, etc.). Other stances and planes of movement are largely neglected. With CrossFit, you also see times when the athletes are forced to do unpredictable, random events at competitions. You’ll see an inability to cope with certain new events, as well as high rates of injuries in those new events (swimming and peg board are two classic examples).

CrossFit is an easy example of involving grossly imbalanced movers and a high degree of injury. Share on X

It is my opinion that different stances and planes are distinct biomechanic realms with limited carryover to other stances and planes of movement. The accurate assessment of strength, speed, and fitness in specific stances and planes featuring various patterns executed with different loading schemes, velocity presentations, and durations will become a critical task for coaches moving into the future of the sports performance coaching.

Parting Thoughts on Biomechanics and Program Design

Every sport features levels of dominance in terms of what stances athletes assume, what planes they move through, what patterns they execute, what kinds of loads they encounter, what sorts of velocities they need to be able to produce, and what kinds of durations they need to continue to move through. Targeting those kinematic and kinetic realms is a great way to provide fairly specific stimuli in the training process.

Beyond specificity of training, athletes also seem to benefit from the performance of training movements that target antagonist tissues to their sports moves, as this is believed to have injury prevention elements. We should begin to try to quantify the number of movements that athletes perform in specific kinematic and kinetic realms.

We should quantify the number of movements athletes do in specific kinematic and kinetic realms. Share on X

Such an endeavor, using the taxonomy and tables that I have provided here, would be an enormous undertaking, and would require computer systems to accurately model out how much movement an athlete actually performs in a specific pattern, stance, and plane at specific loads, velocities, and durations. If we could see the total quantity of movement in these biomechanical domains, we may get a glimpse into the likelihood of injury potential for an individual, and possibly see that there is a movement rate-limiting factor preventing further progress towards sport-specific goals.

Since you’re here…
…we have a small favor to ask. More people are reading SimpliFaster than ever, and each week we bring you compelling content from coaches, sport scientists, and physiotherapists who are devoted to building better athletes. Please take a moment to share the articles on social media, engage the authors with questions and comments below, and link to articles when appropriate if you have a blog or participate on forums of related topics. — SF


Wicket Drill

How to Build Speed Hurdles for the Wicket Drill

Blog| ByMario Gomez

Wicket Drill

Coaching is expensive. It consumes your personal time and bank account. We get paid in personal satisfaction, passion, happiness, competitiveness, and growth. However, our bank statements only reflect withdrawals for expenses and tiny amounts of monetary deposits for work. If you break down a coach’s stipend and divide it by the amount of hours spent on work, it most likely averages to pennies on the hour. Coaching is a labor of love. Increasingly, budgets are being reduced, particularly in sports like track and field.

If this situation describes you, you have to be creative with spending. Speed Hurdles are not cheap. A new set of six can cost as much as $40. Adjustable ones are even more costly. We tried using small cones or disc cones, but they didn’t have the same benefit as actual wickets. The solution: build your own wickets. This article serves as a practical guide in creating wickets in a frugal and simple manner. It outlines how we created 20 wickets for less than $2.00 apiece. You can change the dimensions to create wickets for whatever purpose is desired.

The next article, Part 2, discusses how we use the wickets, with special emphasis on the different spacing according to the skill levels of your athletes and the time of season. In the meantime, grab the spare change in your savings jar and build your first wicket!


Video 1. How to build speed hurdles for the wicket drill.

Total Materials

  1. Five 10-foot-long PVC pipes, half-inch width (5x$2.18 each pipe = $10.90).
  2. Forty 90-degree half-inch elbows (40×22 cents per elbow = $8.80).
  3. 40 half-inch PVC insert fitting Ts (40×48 cents apiece = $19.20).

Materials for Each Wicket

  • One 14-inch length PVC pipe
  • Two 6-inch lengths PVC pipe
  • Two PVC T fittings
  • Two 90-degree PVC elbows

Construction

  1. Cut one 14-inch piece of PVC pipe to use as the crossbar (top) of each wicket. Next, cut 19 more equal pieces, using the first length as a model. This accounts for 280 inches of the 10 PVC pipes, leaving 420 inches.
  2. Cut one 6-inch pipe segment to serve as a guide for the posts (sides) of each wicket. Then cut 39 more equal pieces. This uses another 240 inches of the PVC pipe. That leaves 80 inches of unused PVC pipe, which you may be able to use elsewhere.
  3. Use two elbows, one at each end of the 14-inch crossbars, to join the crossbars with the 6-inch posts and form the top and sides of the wickets.
  4. Insert a T at the bottom of each post to serve as the base of the wicket.
Six inch post with measurement
Figure 1. Cut the 1/2″ PVC into 6″ and 14″ sections.

Speed Hurdle
Figure 2. Final assembly of the speed hurdle.

After building the first set, we created 40 more wickets so we could have three different settings to accommodate all skill levels within our program. It added slightly to the overall cost but the added benefits are invaluable.

Since you’re here…
…we have a small favor to ask. More people are reading SimpliFaster than ever, and each week we bring you compelling content from coaches, sport scientists, and physiotherapists who are devoted to building better athletes. Please take a moment to share the articles on social media, engage the authors with questions and comments below, and link to articles when appropriate if you have a blog or participate on forums of related topics. — SF

Sprint Acceleration

The ALTIS Kinogram Method

ALTIS| ByStuart McMillan

Sprint Acceleration

Altis Logo

One of the most frequent questions we hear from visiting coaches at ALTIS is “How did you develop your ‘coaching eye’?”

The answer is really quite simple: We have watched a lot of athletes do stuff, and we paid very close attention while doing so! In the days when iPhones, inexpensive high-speed cameras, biomechanical analysis apps, and wearables did not exist, watching closely was our only option to better understand what was going on.

Now that these technologies are available to us, it is imperative that we don’t forget about the importance of developing our “real-time” eye. If we do this correctly, technology can support us through the process, giving today’s coaches a leg up on those of us who had to do it the “old-fashioned” way.

We suggest a strategic implementation of technology. For example, combine repetitions using Freelap with ones that do not, try to estimate the repetition time before checking the app, watch video after sessions and limit it during them, etc.

It is with this objective in mind that we offer the following method of analysis that we use at ALTIS in support of our daily coaching. It is called the ALTIS Kinogram Method, and it is based on an analysis system that is more than a century old.

This article makes up one single section of the Sprint Module within the new 12-module ALTIS Essentials Course, which we have designed to be the initial step into all coach education pathways. It provides a concise introduction to core topics that underpin successful coaching in all sports. We crafted this exciting new addition to the ALTIS Education Platform for individuals seeking to gain a succinct overview of essential coaching theory and its application, in a condensed short-course format. We are extremely proud of the work that has gone into this course, and if you haven’t already taken the foundation course, we encourage you to check it out!

What Defines Sprinting?

First, before delving into the details of the analysis method, we need to have a common understanding of the definition of “sprinting.” Any discussion pertaining to “sprinting” is truly referring to running at maximal or near-maximal speeds. The overarching aim of sprinting is for the performer to propel their body down the track, pitch, field, or court as fast as possible.

If we consider this task simply, the athlete who can most appropriately project their body forward in the shortest time frame, and maintain top-speed the longest, will be the most successful. This type of motion has specific kinematic characteristics differentiating its gait from walking, jogging, or sub-maximal running. Understanding what the gait cycle looks like is therefore a key tool in being able to error-detect and correct.

Gait

The gait cycle is the basic unit of measurement in gait analysis. It begins when one foot comes into contact with the ground and ends when the same foot contacts the ground again.

Key landmarks in the gait cycle include:

  • Touch-down: The point where the foot contacts the ground.
  • Stance phase: The weight-bearing phase of the gait cycle. During the stance phase, the foot is on the ground acting as a shock absorber, mobile adapter, rigid lever, and pedestal, as the body passes over the support leg. Stance ends when the foot is no longer in contact with the ground.
  • Toe-off: The beginning of the swing phase of the gait cycle where the foot leaves the ground.
  • Swing phase: The phase where the foot is no longer in contact with the ground and the free leg is recovering forward in preparation for ground touch-down.
  • Flight phase: Seen in running only, this represents the period when neither foot is in contact with the ground. This includes the swing phase above.

Humans transition from a walking gait to a running gait at a certain speed threshold—generally 2.0–2.7m/s (Schache et al., 2014). The demarcation between walking and running occurs when periods of double support during the stance phase of the gait cycle (both feet simultaneously in contact with the ground) give way to two periods of double float at the beginning and end of the swing phase of gait (neither foot touching the ground).

In running, there are no periods when both feet are in contact with the ground. As the athlete’s speed increases, less time is spent in stance. Jogging is normally seen at speeds of approximately 3.2–4.2 m/s; running at around 3.5 to 6.0 m/s; and sprinting anywhere upwards from there, depending on the individual.

Sprinting Gait

When approaching maximal speed, we see subtle gait differences to that noted in sub-maximal running. As running speed increases, time spent in swing increases, stance time decreases, double float (flight time) increases, and cycle time shortens. Generally, as speed increases, the initial contact changes from being relatively rearfoot to relatively forefoot. This is important to understand, as it relates to footwear, cognitive control of ground strike, and questions in regard to dorsiflexion and plantar flexion. We will discuss this further a little later in this article.

The ALTIS Kinogram

Eadweard J. Muybridge, in the 1880s, was the first to examine sprint kinematics, and display it in pictorial form. He used cinematographic and dynamographic techniques to explore vertical reactions during various gaits (Vazel, 2014).

Running Man
Image 1. Eadweard J. Muybridge first examined sprint kinematics and displayed it in pictorial form in the 1880s.


“Chronophotography” soon replaced “cinematography.” A “kinogram” is a set of still pictures derived from a video source. First found in 1880s French physiology textbooks, it was also used to describe movement in USSR biomechanics publications in the early 1930s. Kinogram is often used as a synonym for chronophotography, but is differentiated through the optional choice of frame usage. With chronophotography, the time interval between still frames remains constant; with kinograms, we can select the frames as we feel are most appropriate (Vazel, 2018).

A kinogram is a set of still images derived from video, with the most appropriate frames selected. Share on X

ALTIS coaches use five frames—three stance phase frames and two flight phase frames—which form the ALTIS Kinogram Method. The three stance phase frames are termed “touch-down,” “full-support,” and “toe-off.” The two flight phases are termed “MVP” (maximal vertical projection) and “strike,” which is the initial point at which the swing-leg hamstring is under maximal stretch.

Altis Kinogram
Image 2. These five frames form the ALTIS Kinogram Method. It is up to individual coaches to determine the appropriate positions for their own athlete group, and whether there should be any change from what we recommend.

With the overarching understanding that each athlete has their own individual mechanical solution to a movement puzzle, we will nevertheless offer our thoughts on what we feel are appropriate positions for each of these frames. It is up to individual coaches to determine what is appropriate for their own athlete group, and whether there should be any discrepancy from what we recommend.

Understand that we feel these are the most relevant positions for a sprint population. They are not necessarily the positions we would seek from a team sport athlete within the confines of playing their sport. Having said that, it is imperative that the coach and athlete understand the rules before breaking them. Understanding the most efficient acceleration and upright mechanics will form a starting point from which coaches and athletes can adjust appropriately to their own sport, event, or position.

First, we offer the reasons why we feel a kinogram method is a viable means to observe movement:

  1. Identify asymmetries and identification of when mechanics are abnormal: While asymmetries, in and of themselves, may not be a “bad thing,” observing left leg-right leg differences and tracking them over time will give coaches a good understanding of how the athlete will “normally” move. If we can identify an acceptable level of asymmetry for each athlete, we can then observe when the athlete falls outside of what we feel is an acceptable bandwidth around their “normal.” For this reason, it is important that we consistently observe their movement, and are critical with our analyses.

    Understand that the athlete is a dynamic system and there will be variability around their movement solution from day to day and week to week. Our job as coaches is to improve their solution over time, while ensuring that any variability throughout this progression is within what is normal for them. This is how we keep athletes healthy—keep them moving in a way that is familiar to them, while patiently improving it over time.
  1. Track mechanical improvement over time: We run each athlete though a kinogram every week, and can thus visually depict any regression or progression of the technical model over time in an easy-to-understand manner. Comparing videos over time is very difficult—especially without expensive software. The Kinogram Method may take a little longer to build, but it is more effective in the long run.
  1. Compare kinematics across athletes and groups: As mentioned, it is important that we respect individual differences across our athlete groups. However, it is just as important that we respect biomechanical truths; coaching to an ”athlete-centered” solution does not give a coach permission to ignore these truths. Comparing across our athlete population, or with coaches across the world, can help a coach to better understand positions, cause and effect, progressions, and individual athlete differences. We encourage all coaches to post their kinograms on either social media or the private ALTIS Facebook Agora Group, to promote further discussion.
  1. Track impact of intervention, therapeutic or otherwise: The improvement of mechanics stems primarily from two sources—the volitional action of the athlete to incorporate a technical change, or the improved efficiency of movement brought on through a therapeutic intervention. Regardless of the cause of the change, a kinogram is a simple way to track change over time and much easier than high-speed video, which may require expensive applications.
A kinogram is a simple way to track changes over time and is much easier than high-speed video. Share on X
  1. Improve understanding of key positions, and how/what we can do to affect them: It’s one thing to identify key positions; it’s another altogether to understand how to interpret them, and use this interpretation to affect change. Still frames make it much easier for coaches to identify aberrant positions than real-time observation and video review. While it is important for coaches to improve their observational abilities, a kinogram can act as a “bridge” and provide context to the positions that we feel are important.
  1. Gain a better understanding of individual athlete solutions: Over time, coaches will become comfortable with inter-group bandwidths and, once the kinogram process has been repeated multiple times with each athlete, they will become more knowledgeable about the unique mechanics of each athlete.
  1. Simple feedback process to athlete, given visual feedback that they can gain an understanding of quickly: Perhaps most importantly, a kinogram is an effective and efficient way for a coach to discuss mechanics with an athlete. At every level, it is important that an athlete understand the importance of improving technique. The kinogram method can provide a visual for the athlete to refer to.
  1. Allow for better communication between athlete and coach, by building a common language: As above, the kinogram affords an opportunity for a coach and athlete to sit down, discuss mechanics, and come to common agreement about positions and technical objectives for future training sessions.
  1. Compare, contrast, and discuss with other coaches around the world through common kinematic positions: As discussed, the kinogram is an easy way for coaches to “compare notes.” We sincerely hope that this method is adopted throughout the speed-power world at every level of sport—truly building a network of interactive and interested coaches seeking to better understand, teach, and improve sprint mechanics.
  1. Compare with other athletes from all over the world—at both the level that your athlete group is currently, and with elites from now and in the past. It’s fun for athletes to see how they match up with their friends; with others at their level around the state, country, or planet; and with elite professionals.
  1. Allow us to compare mechanics at different velocities, on different surfaces, with different footwear, and in different tasks within, or between, training sessions.

How to Build a Kinogram

At first, this may seem like a big undertaking, but with practice, our coaches are able to film, capture, and produce the kinogram final product in less than five minutes. It may be challenging if a coach has a group of 30 athletes, but it is important to understand that every repetition of every athlete in every session is not necessary. We attempt to build one kinogram for each athlete per week, normally during a similar training session.

Our Protocol

  1. First, it is important to standardize filming. We capture at high-speed video, with an iPhone set in landscape mode, from 11 meters away. It is important that the distance be consistent—too close will give subsequent frame capture parallax issues, and too far away will lead to decreased resolution. We have found that 11 meters is the appropriate distance away. We take one knee, and film from about mid-torso height. We do not pan the camera: we simply hold it level and press record just before the athlete sprints into view.
  1. Try to have something in the background that you can use as a frame of reference when capturing frames. We are lucky that we have a fence on either side of the outside of the track that we use. If you don’t have a fence, perhaps you can set up a few hurdles in the background.
  1. Once you are ready to capture your frames, pause the video and scroll to the point where the athlete is closest to the middle of the video. This is where you will want to capture your stills—closest to perpendicular to the camera.
  1. When you have the video paused in the appropriate section, zoom in on the video, and slide your finger or thumb across the manual scrolling slider at the bottom of the screen, to stop at the appropriate frame.
  1. Using the screen-capture option, capture frame stills at each of the previously mentioned positions. Following is how we recognize each position, in order:
  • Toe-off: The last frame before the athlete’s support-leg foot is in contact with the ground.
  • MVP: The maximal height of vertical projection, as defined by the position where both feet are parallel to the ground.
  • Strike: Because of the relative difficulty in defining this position, we have determined that using the opposite leg is more efficient. The “strike” position is defined as when the opposite thigh is perpendicular to the ground.
  • Touch-down: The first frame where the swing-leg foot strikes the ground.
  • Full-support: The frame where the foot is directly under the pelvis—the toe of the foot should be plumb vertical with the ASIS of the pelvis.
  1. We then repeat this sequence for the other leg, giving us 10 still pictures in total.
  1. There are generally two ways to present the pictures: from left to right or in the direction the athlete is sprinting. So far, we have chosen the former, although we continue to experiment. We often see numbers placed in each frame, so that they are easier to refer to in discussions. As we only use five frames per step, and our kinograms have been internal only, we have yet to add numbers. Once we begin sharing them more widely, we will endeavor to number each picture.
  1. It is now time to edit the pictures so they can be consistent with each other.
  1. Go into your photo application edit mode, press edit, and select the “square” option.
  1. With the objective of having the athlete cover most of the picture, edit the picture so that the bottom of the frame is one of the track lines, and then line up a fence or hurdle in the background with one of the horizontal lines, so we have a consistent size across the group of pictures. Center the athlete in the middle of the frame.
  1. Repeat this step for each of the other nine pictures.
  1. Go through the pictures, and ensure consistency of positioning.
  1. Using an external application (we use PutPic), combine the pictures together in two rows of five frames, and save to your picture application.
  1. You are ready to check out your kinogram! 

Kinogram Analysis

Following, we will offer the frame positions, key anatomical landmarks, and our expectations of athlete shapes within these positions. In addition, we have attempted to identify and comment on a few of the more frequent questions we are asked, as well as offer our thoughts on some of the sport’s more controversial subjects.

We will detail the following five frames in order:

  1. Toe-off
  2. MVP
  3. Strike
  4. Touch-down
  5. Full-support

We do not profess that these kinograms display “perfect” form. Rather, we chose them because of the relative similarities of the training session and the similar abilities of the athletes, as well as some of the unique differences that are evident. We encourage coaches to form their own conclusions as to where these athletes fit into their own understanding of mechanical efficiency.

Toe-Off

Toe-off is the last frame at which the rear leg (stance leg) foot is in contact with the ground.

Toe Off
Image 3: Toe-off is the last frame at which the rear leg (stance leg) foot is in contact with the ground.

  • The stance-leg foot should be perpendicular to the ground.
  • There should be a slight extension of the hip of the stance leg: The athlete should be encouraged to push vertically into the ground while they are upright sprinting. Excessive late stance-phase pushing can lead to excessive hip extension, and a stunted swing-leg recovery.
  • We should see only a small amount of hip extension at toe-off.
  • There should be a noticeable lack of complete extension at the knee joint of the stance leg. Over-pushing horizontally at top speed not only compromises the ground-to-air ratios, but it reduces the athlete’s vertical displacement. This means there is not enough time for the thigh to block in the correct position in front of the body; nor enough time for the lower leg to swing out and put a stretch on the hamstring and gluteal group. This causes a reduced scissoring action and a strike point underneath the COM, exacerbating the rear-side elliptical running cycle.
  • We will observe an approximately 90-degree angle between the thighs.
  • The toe of the swing leg should be directly vertical to the swing-leg kneecap.
  • The front-leg shin will be relatively parallel with the rear-leg thigh.
  • We should observe approximately 90 degrees of flexion of the foot of the swing leg.
  • The forearms should be approximately perpendicular to each other.
  • The rear arm should be relatively open at the elbow, while the front arm should be relatively closed.
  • It is important that there is NO lumbar extension whatsoever, so no arching of the back.

Discussion Point: ‘Triple Extension’

Triple extension refers to the simultaneous extension of the ankle, knee, and hip joints. Coaches should understand, however, that complete and full triple extension rarely occurs in sprinting. On toe-off, we do not see complete extension at the knee, as the thigh moves immediately forward after this point. Furthermore, the activity of extensor muscle groups deteriorates before complete triple extension can support increased force production to contribute to speed production. Requesting triple extension from an athlete is an excellent way to promote increased ground-contact times, anteversion of the pelvis, a relatively larger back-side sprint cycle, ultimately slower velocities, and higher incidence of injury.

MVP

MVP is the point at which there is maximal vertical displacement of the center of mass, as determined by the lowest point of both feet parallel to the ground.

Kinogram MVP
Image 4. MVP is the point at which there is maximal vertical displacement of the COM, as determined by the lowest point of both feet parallel to the ground.

  • Approximate 90-degree angle between thighs.
  • A greater-than-110-degree knee joint at the front leg (this angle is highly independent).
  • Dorsiflexion of front-leg foot.
  • Fluid and relaxed throughout. It is in MVP position where we should observe maximum “peace” in the athlete (as discussed in the ALTIS keyword section of the Essentials Course).
  • Neutral head carriage.
  • Straight line between rear-leg knee and shoulders.
  • A slight cross-body arm swing that will bring the hand towards the midline in front of the torso, and away from the midline behind the torso. This is due to the natural rotation of the spine, and is not something that should be excessively encouraged or discouraged. We will discuss this point further a little further on. 

Discussion Point: Is Recovery of the Free Leg at Toe-Off Active or Passive?

Some coaches suggest that the recovery of the swing leg from back-side to front-side is a passive by-product of the forces generated at toe-off, while others propose the athlete should actively attempt to bring the leg into a position of hip flexion. It is important to understand that the recovery mechanism of the swing leg should be a very free, very fluid function. If the athlete strikes the ground appropriately, with the appropriate negative foot speed, the appropriate angle of force application, and the appropriate force, the heel will come to the buttock with the femur at zero and that transference will generally be sufficient to lift the knee.

At toe-off, the recovery mechanism of the swing leg should be a very free, very fluid function. Share on X

For example, many kids do skipping activities. They can skip all day long and their hip flexors don’t get tired, but if they do a high knee drill in which they have to think about using the hip flexors, they burn out quickly.

If the hip flexors “test weak,” it is generally due to musculoskeletal “dysfunction,” faulty enervation, neural entrapment, or antagonist inhibition, rather than what has often been described as “weakness.” Coaches are encouraged to understand this prior to prescribing any specific hip flexor strengthening protocols.

Strike

Strike is the point at which the rear-leg knee is directly vertical to the pelvis, and the femur is perpendicular to the ground. This point should correspond approximately to the first point of maximal extension at the front-leg knee joint.

Kinogram Strike
Image 5. Strike is the point at which the rear-leg knee is directly vertical to the pelvis, and the femur is perpendicular to the ground. This point should correspond approximately to the first point of maximal extension at the front-leg knee joint.

  • The thigh of the recovery leg will be close to perpendicular to the track, with the knee directly vertical from the pelvis.
  • The “strike” is where we will observe close to maximal stretch of the front-leg hamstring—it can be compared to the point where a match head first comes into contact with the striking surface—whereas the initial ground contact at touch-down is equivalent to the flame alighting (thus the name “strike”).
  • We should see approximately a 20- to 40-degree gap between the thighs. Faster athletes will have faster rotational velocity, will place greater stretch on their hamstrings at “strike” position, and will have greater reflexive contraction at stretch, and a more violent extension of the front thigh towards the ground.
  • The foot of the front leg will begin to supinate in preparation for touch-down.
  • The two flight-phase frames described thus far are the most variable between athletes. If coaches are interested in this further, we encourage them to consider research on attractors and fluctuators: stable and unstable components within a movement.
The two flight-phase kinogram frames of MVP and strike are the most variable between athletes. Share on X

Discussion Point: Lower-Leg Swing and ‘Clawing’

If we simply observe the sprinting action without an understanding of the holistic nature of the way the body moves—through reflexes, co-contractions, fascial slings, etc.—we may assume that the lower-leg swing, and the concomitant pull-back towards the ground, is a volitional extension of the lower leg in front of the knee, and an active clawing of the foot towards the ground. In fact, there are many coaches who still use “pulling,” “clawing,” and “pawing” as primary sprinting cues. This is highly problematic.

It is important to understand that the out-swing of the lower leg (extension at the knee joint) is a result of the reversal of the contraction of the upper thigh (hip flexion to hip extension). Once the thigh blocks at approximately 90 degrees and starts to move backwards, the lower leg extends while the hip continues to open. The leg then comes back hard under the hip through a scissoring action, which reverses the pendulum and the cycle repeats itself. To repeat: The “casting out” of the lower leg is not a volitional action; it is simply a result of a strong reflexive action of the posterior chain extending the thigh back towards the COM.

Touch-Down

Touch-down is the point at which the front foot first contacts the ground.

Touch Down
Image 6. Touch-down is the point at which the front foot first contacts the ground.

  • Knees together. Faster athletes, or those who push relatively more vertically, may have their swing-leg knee slightly in front of the stance-leg knee. If the swing-leg knee is excessively behind the stance-leg knee, it is normally indicative of slower velocities, weaker athletes, or over-pushing horizontally. Understand, however, that—as is the case with all positions—individual differences exist. One of the jobs of a coach is to determine when it is appropriate to make a technical change, and when it is appropriate to leave well enough alone.

    A prime example here is the form of the great French sprinter Marie-José Pérec, whose positions were not in line with what we describe here. Having said that, it is important to build models based on what works for most of the people, most of the time. As coaches, we should be very careful about modeling “outlier” techniques. An example of this is in the late 1980s, when sprinters around the world tried to copy Ben Johnson’s jump start, only to find out that nobody other than Johnson himself could successfully pull it off. They lacked the necessary power abilities.

    As an interesting aside, while coaches have for years thought that “knees together” is an appropriate position at touch-down, this actually rarely occurs in competition. It is theorized that perhaps the increased arousal levels of the competitive arena lead to athletes over-pushing horizontally, and impede their ability to recover the swing leg in time for “knees together” at touch-down. An example of this occurred in the most recent IAAF World Championships in London 2017, when of all 16 of the 100m finalists in the women’s and men’s competitions, only one (Kelly-Ann Baptiste of Trinidad and Tobago) achieved this position at maximum velocity. All others either did not achieve this position at all, or were only able to achieve it with one leg (for example, Usain Bolt, Reece Prescod, and Yohan Blake).

  • The shank of the shin should be close to perpendicular to the ground, with the heel directly underneath the knee.
  • The swing-leg foot will be tucked under the gluteals, with the foot dorsiflexed.
  • The hands will be approximately parallel to each other, with the elbow angles of both arms similarly open, and the hands close to the intersection of the gluteals with the hamstrings.
  • Initial contact will be with the stance-leg foot slightly inverted and plantar-flexed, contacting the ground initially with the outside of the ball of the foot.

Discussion Point: Elbow Angles, Undulation, and Oscillation

It is important that all coaches understand that sprinting is a rotational-torsional activity. At toe-off (point of maximum extension at the hip), we will observe slight oscillation at the hip axis. To counteract this, we will observe similar oscillation at the shoulder axis through mid-thoracic counter-rotation. Similarly, if we watch from front or behind, we will observe counter-undulations at the hip and shoulder axes.

It is important that coaches do not try to limit these rotations in an effort to force the athlete into some sort of linear “perfection.” Our spine rotates for a reason; it is our job to make the most appropriate use of this, not to limit it unnaturally. From the side view, we should see a smooth wave-like motion of the hip, as it drops to its lowest point through late-stance full-support and rises maximally through MVP.

Understanding joints and muscle timing systems is critical to leveraging speed. Share on X

Understanding joints and muscle timing systems is critical to leveraging speed. The human body is a hydraulic system where we have fluid in our joints. Hydraulics have a huge impact on our muscle and connective tissue systems to allow us to move greater forces.

The arms play a very important role in sprinting, and react to imbalance—so flail or compensation is always the result of something causing imbalance. If an arm is coming across the body, look at the opposite leg; arms counterbalance and help establish balance. The arms angulate from the shoulders, whereby the humerus acts like a pendulum; therefore, tension in the shoulders should be avoided as it impacts the oscillation of this pendular action.

The elbow joint should angulate through the swing commensurate with the knee joint. Rigid arm angles mean rotation shifts towards lumbar joints, which are better designed for flexion and extension than rotation. Many low back problems can be sourced to the relationship between the hip and shoulder axes undulating and oscillating with one another. We cannot stress enough the importance of allowing the elbow joint to open as the hands pass by the hip at touch-down. The arms will naturally close in front of and behind the body, so we will not need to cue this with most athletes.

Arm Undulation
Image 7. Note the angulation at the elbow joint.

Full-Support

Full-support is the point at which the stance-leg foot is directly under the pelvis, as indicated by the great toe approximately vertical to the front of the pelvis, and the heel approximately vertical to the rear of the pelvis.

Full Support
Image 8: Full-support is the point at which the stance-leg foot is directly under the pelvis, as indicated by the great toe approximately vertical to the front of the pelvis, and the heel approximately vertical to the rear of the pelvis.

  • The swing-leg foot will continue to be tucked underneath the gluteals, with the foot fully dorsiflexed.
  • The swing-leg thigh will swing in front of the hip to form a “figure four” position in relation to the stance leg. The swing-leg thigh will be approximately 45 degrees relative to perpendicular.
  • Lower-body stance-leg amortization (yielding) should be consistent from the left to right leg. There will be relatively more yielding at the ankle joint than there will be at the knee and hip joints.
  • Excessive yielding can manifest from a lack of specific strength abilities, a relatively more horizontal application of force, or initial touch-down too far in front of the COM. Understanding amortization factors should be of paramount importance for all coaches, as not only does it affect how we ask athletes to move, but also what we ask them to do. For example, over-yielding at the ankle joint may be a mechanical issue or a strength issue; the good coach will understand both the problem (e.g., weak posterior lower-leg musculature) and the appropriate input (e.g., strengthening of the lower-leg musculature).
  • The stance-leg knee will yield slightly from touch-down. The degree of yielding is specific to the level of the athlete. The best athletes in the world will yield significantly less than their slower counterparts.
  • The stance-leg foot will roll from outside to in (pronation), with all toes coming into contact with the ground.
  • The foot will continue to pronate through full-support and into toe-off, with the great toe being the last point of contact. If the great toe does not flex appropriately, and/or if there is a bunion, we may see excessive pronation and a concomitant “whipping” motion of the lower leg (observing from behind). If we observe this, it is imperative that we normalize function of the great toe; otherwise it will compromise effective mechanics and athlete health.

Discussion Point: Dorsiflexion

How the foot contacts the floor is also critical. One of the greatest myths in sprinting at the high school level is that athletes should “get up on their toes” at high speed, or “run on their toes.” This is simply not what happens, and is a teaching concept that coaches should never utilize.

It is a high school level sprinting myth that athletes should ‘get up on their toes’ at high speed. Share on X

While it is important that athletes understand the importance of a stable foot and ankle, we will always plantar flex prior to touch-down. Plantar flexion just prior to ground contact is a reflexive action that intensifies as velocity increases, so we will never observe a dorsiflexed touch-down during a maximum intensity sprint. Having said that, for athletes who over-plantar flex, and contact the ground too far in front of the COM, cueing dorsiflexion earlier in the sprint cycle can have a positive effect, though rarely is it the sole culprit.

Understand that what we do while on the ground will determine, for the most part, what happens while we are in the air. If the athlete over-pushes out of the back side, it will set up a relatively more horizontal parabola, excessive plantar flexion on the front side, and early touch-down. If you see a big rear-side “butt kick” and no knee lift, it generally means the athlete doesn’t understand pathways and ground contact time. Excessive plantar flexion during the back-side cycle, and spending too much time on the ground behind the COM, causes this.

Many question as to whether dorsiflexion needs to be taught in the running cycle. Athletes who experience negative interference from previous activities will suffer if they strike the ground excessively plantar-flexed, or complete the running cycle in a plantar-flexed position. In this case, the foot will collapse upon touch-down at a radical rate, and amortization rates during the early-stance phase will be significantly faster than if the ankle and the foot are stiffer.

When we observe elite sprinters, we tend to see relatively closed angles at the ankle joint inches away from ground contact prior to the reflexive opening. So, for athletes who have negative transference from other sports (gymnasts, for example), cueing dorsiflexion may be critical: it reduces injury, shortens lever systems, and promotes healthy joint hydraulics, and timing.

Exercises designed to strengthen the front of the shins are not appropriate at any time. Share on X

Understand also that the inability to dorsiflex is rarely due to a lack of strength of the plantar flexors; thus, exercises designed to strengthen the front of the shins are not appropriate at any time, and will generally lead to more problems than they solve. Instead, coaches are advised to measure the passive range of motion at the ankle joint, and ensure that the athlete even has the ability to dorsiflex in the first place. If the passive ROM is not sufficient, then this needs to be addressed before any dorsiflexion cue can take effect.

Global Kinogram

Global
Image 9. A full kinogram highlighting all five positions.

  • Neutral head carriage, with eyes looking directly ahead. The human body is an inverted pendulum subject to imbalance through improper head position, and that impacts weight distribution further down the chain. Therefore, if the head is out of position, there will be an impact in lower-body joint dynamics. Athletes who throw their head back or push their chin forward create imbalanced forces. In the upright running cycle, the head should be held in neutral alignment with the cervical spine. Understand that any deviation from this will also negatively affect lumbar vertebrae position, and possibly pelvic alignment.
  • The pelvis should remain neutral throughout the cycle. This is most-negatively affected by over-pushing out of the back-side, placing excessive stretch on the flexors of the hip to stabilize the pelvis, excessive flexion at the lumbar vertebrae, and a concomitant anteversion of the pelvis. This is perhaps the single greatest technical error we see, from young athletes all the way up to elite professionals.
  • A lack of stiffness and control in the lumbopelvic region is also sub-optimal, as forces cannot be transferred optimally upon ground contact through the storage and return of elastic energy. Maintenance of a braced trunk and the ability to do this at speed is therefore an important consideration. The point of ground-strike relative to the pelvis and the angle, and force application at which they’re striking the ground, has huge ramifications on pelvic posture. If an athlete strikes the ground a little posterior, there’s a greater tendency to have anteversion of the hips; if the strike is too far out in front, the hips have a tendency to move into retroversion, and vice versa.
  • Relaxed hands. It is not especially important whether the hands are closed or open—just that they carry no tension. We will often even observe sprinters who accelerate with hands closed, and open them as they begin to stand up through the course of the sprint (or vice versa). This is something that should be left to the discretion of the athlete. Encourage them to try both, and go with the one that feels most comfortable: i.e., the one where there is less tension.
It is not especially important whether the hands are closed or open—just that they carry no tension. Share on X
  • Slight forward lean of the torso (though this should rarely need to be cued).
  • We should only observe tension in the muscles that are active at the particular point in time. Excessive tension in non-active movers will only lead to compromised performance.

Discussion Point: Posture

This term refers to both the static and functional relationships between body parts, and the body as a whole. The concept includes over 200 bones and some 600 muscles, not to mention the endless chains of fascia and various connective tissue systems. Efficient body mechanics is a function of balance and poise of the body in all positions possible—including standing, lying, sitting, during movements, and in a variety of mediums. These systems are monitored, driven, and controlled by a complex network of proprioceptors and their related members.

These functions can be further evaluated by observing excessive stress on joints, connective tissue, muscles, and coordinative action. In the sport of track and field, “active alerted posture” is the goal of all sportsmen. This can be defined by the balanced action of muscle groups on both sides of body joints at six levels:

  • Ankle joints
  • Knee joints
  • Hip joints
  • Lower back
  • Head and neck
  • Shoulder girdle

People often try to design training schemes for posture of the spinal column, head, and pelvis in static routines in which they’re stationary. We see athletes doing incredible balance work in a pretty stationary motif and they look world-class, but when they run down the track, these different postural landmarks just don’t hold up. Posture at speed is very dynamic and involves complex communication between the body’s systems that is difficult to replicate in the weight room.

Some Case Study Examples

Once we understand the expectations of each of the positions, as well as how and/or when these positions can be compromised, we can begin to identify ways in which kinograms can be used over and above simple single-run analysis. As previously discussed in the justifications section, there are a multitude of different ways we can use the kinograms. While each coach should use methods that are most appropriate for the time, circumstance, and athlete population they work with, we will provide a few examples here of how we have used them in our own practice.

Asymmetries

Asymmetries
Image 10. Left-right asymmetries are easily identified in this kinogram.

Left-right asymmetries are easily identified in the above kinogram. We see in the upper frames that the swing-leg foot is significantly further behind the swing-leg knee at toe-off, for example. This gives us a starting place to attempt to identify why this is so.

Discussion Point: Symmetry

The body craves symmetry. If we observe asymmetry, it is almost always due to a musculoskeletal issue—rather than a technical “mistake” on the part of the athlete. If we identify an asymmetry, it is prudent for the coach to attempt to understand why it is evident, rather than try to cue the athlete out of it. If we identify, for example, that one side of the body has a tight hip flexor relative to the other side of the body (which is evident in the above kinogram), then we can prescribe additional stretching or a therapeutic intervention. This is a far more appropriate reaction to an asymmetry than asking the athlete to focus on one side over the other, which will generally just add fuel to the fire.

Athletes are great compensators—the superior ones compensate better than the less superior—so it is often very difficult to identify the driver of any musculoskeletal discrepancy. This is a challenge that we can only address through consistently and attentively analyzing movement.

The key to keeping athletes healthy is understanding the reasons their movements may be abnormal. Share on X

Watch your athlete-group closely. Watch as many videos as you can get your hands on. Build out your kinograms, and share with others. Eventually, we will all become better at not only analyzing movement, but understanding the reasons why movement may be abnormal. This is truly the key to keeping athletes healthy!

Progression over Time

Progression
Image 11. The athlete in these kinograms was asked to work on pushing more vertically. The upper kinogram shows the athlete pushing overly vertical, while the lower kinogram shows him over-pushing out the back.

On the bottom kinogram above, we can see that the athlete is over-pushing out the back—spending a little too long on the ground behind the COM.

The athlete was asked to work on pushing more vertically—bouncing down the track, rather than pushing horizontally—and in warm-up wicket runs to slightly over-exaggerate this feeling. Thus, we see the upper kinogram, where the athlete has pushed overly vertical, and ends up with the free-leg foot significantly in front of the free-leg knee at toe-off. This position has, however, set up a greater hamstring stretch at “strike,” an increased rotational velocity, and a more appropriate touch-down relative to the bottom kinogram.

Intra-Group Comparisons

Comparison
Image 12. This kinogram shows the similarities between two elite sprinters (PRs of 9.91 and 9.94).

The above kinogram shows the similarities between two elite sprinters (PRs of 9.91 and 9.94). There are far more similarities between all these frames than there are differences, which highlights not only common positions and solutions, but also a common technical model.

Discussion Point: ‘Modeling’ Technique

Over time, all athletes will develop their own individual, idiosyncratic movement solutions. Generally, however, the closer an individual solution is to the most-efficient mechanical model, the better the athlete will be. The best athletes in any sport will almost always have a solid grounding in fundamental techniques.

It is important to understand, though, that individual differences do exist. One of a coach’s jobs is to determine if this difference is significant enough that we should step in and attempt to make a technical tweak, to close the gap to the more “appropriate” model. There is no doubt that this is a multi-layered, complex decision to make.

Following are a few heuristics to help us decide:

  1. If the athlete is young (i.e., still growing), then we source the root of the discrepancy, and attempt to make the change.
  2. If the individual solution is asymmetrical, this should not be addressed through a technical tweak. Rather, we need to understand the source of the asymmetry, and address that.
  3. If the individual solution is so far off the most-efficient mechanical model that it is having negative effects on athlete health, then we source the root of the discrepancy, and attempt to make the change.

“Mechanics are the heart of every legit/complete S&C program. Fitness, strength, power, etc. are all SIDE effects.” –Dr. Kelly Starrett

Task Variance

The kinogram below compares an athlete executing two different sprinting tasks.

End Bend
Image 13. This kinogram compares an athlete executing two different sprinting tasks.

The upper kinogram shows the athlete sprinting off the end of a 220-centimeter wicket lane, while the lower kinogram shows two consecutive steps at the beginning of the straight-away at the end of a 60-meter end-bend run. (The first step begins 10 meters off the end of the bend.)

The purpose of this comparison is to see how stable the model is by comparing the potentiating, more controlled task to a more race-specific task.

Historical Perspectives

Carmelita Jeter Kinogram
Image 14. The five-frame kinogram for Carmelita Jeter.

It’s sometimes fun to go back in time, and see how athletes from previous generations sprinted. Above, we see the five-frame kinogram for Carmelita Jeter. We have drawn lines over it to more easily depict and measure the angles, if we wanted to analyze it further.

Shawn Crawford Kinogram
Image 15. Kinogram for Shawn Crawford, 9.89.

Flo-Jo Kinogram
Image 16. Kinogram for Florence Griffith-Joyner, 10.54.

Historical Outliers

Donovan Bailey

Kinogram of Donavan Bailey
Image 17. In this kinogram for Donovan Baily, you can clearly identify significant asymmetries.

1996 Olympic Champion Donovan Bailey seemed to “gallop” down the track, especially when he was at maximum velocity. In the kinogram above, you can clearly identify significant asymmetries. In fact, Bailey had a significant anthropometric abnormality, so expecting symmetry would have been a fool’s errand.

Marie-José Pérec

Marie-Jose Pérec kinogram
Image 18. This pair of kinograms shows the different between Pérec’s stride in the 100m (top) and the 200m (bottom).

As discussed previously, French sprinter Pérec had an extremely unique stride: long, and relatively back-side dominant. Nevertheless, she enjoyed great success. Above, we also see the difference between Pérec’s stride in the 100m (upper kinogram) and the 200m (lower kinogram).

Jesse Owens

Jesse Owens Kinogram
Image 19. Owens had a short arm carriage and relatively choppy stride.

Notice the short arm carriage of Owens, and relatively choppy stride. Michael Johnson adopted this a few generations later.

An Optional Kinogram Series for Those Short on Time

An optional kinogram series for those with less time can be based on the only two attractors during the gait cycle: touch-down and toe-off. All other positions may be predicted from these two frames.

Gait Cycle Kinogram
Image 20. Those with less time can base an optional kinogram series on the only two attractors during the gait cycle: touch-down and toe-off. All other positions may be predicted from these two frames.

Dr. Nick Winkelman, motor learning expert and Head of Athletic Performance & Science for Irish Rugby, offers an interesting alternative that relates to the relative angle of projection:

The question of appropriate selection of frames as it relates to prioritization and simplicity, “is to identify the lowest number of technical landmarks that, if changed, have the largest impact on the entire technique; therefore: 1) toe-off, and 2) full-support. Interestingly, toe-off precedes the primary horizontal change in force-motion (i.e., back to front) and full-support precedes the primary vertical change in force-motion (i.e., down to up). I feel that these force-motion shifts (i.e., eccentric to concentric) carry the variability that echoes through the coordination that connects these space-time points. Thus, good coaching can be directed at these time points, with physical development working on the neuromuscular factors that need to deliver the coordinative message.”

Below is what the kinogram would look like if we followed Dr. Winkelman’s recommendation. It is certainly something to consider.

4-frame Kinogram
Image 21. A two-frame kinogram using toe-off and full-support, per Dr. Winkleman’s recommendation.

Additionally,a two-frame kinogram may be a better way to capture acceleration mechanics.

Coaches with less time can base an optional kinogram series on the touch-down and toe-off. Share on X

We use this method to capture projection and rise elements of the acceleration, compare them across time, and even compare them across varying external loads, as shown below.

Kinogram of Acceleration
Image 22. This kinogram shows a sprinter accelerating out of the blocks with the equivalent of 40%, 20%, and 3% of additional body-weight in resistance, using the 1080 Sprint machine.

This kinogram shows a sprinter accelerating out of the blocks with the equivalent of 40%, 20%, and 3% of additional body-weight in resistance—using the 1080 Sprint machine. This kinogram was an effective and efficient way for us to track any mechanical changes with the additional external load.

The Value of Kinograms

We hope you have found this article valuable. Whether you coach football players, softball players, or sprinters, we also hope you will enjoy the kinogram process, and the insight this can give you into the mechanics of the athletes you coach. Please share these kinograms online, through your social media channel of choice (tag @ALTIS), as well as on the ALTIS Agora Facebook page. We look forward to continued discussions around efficient sprint technique, and the impact effective mechanics can have both on performance and health.

Be sure to check out the new ALTIS Essentials Course!

The authors would like to thank Drs. Nick Winkelman, JB Morin, and Ken Clark for their input, and especially PJ Vazel for the wealth of information he continues to provide.

Since you’re here…
…we have a small favor to ask. More people are reading SimpliFaster than ever, and each week we bring you compelling content from coaches, sport scientists, and physiotherapists who are devoted to building better athletes. Please take a moment to share the articles on social media, engage the authors with questions and comments below, and link to articles when appropriate if you have a blog or participate on forums of related topics. — SF


Dan PfaffCoach Dan Pfaff is a globally recognized expert in the field of coaching and coach education. With more than 40 years coaching across multiple track & field disciplines, Dan has led 49 Olympians to nine medals. He has lectured in 27 countries and consults across multiple sports, delivering coach education to national governing bodies and private organizations globally, in sports ranging from football and basketball to rugby, soccer, golf, and baseball.

Nerve Cell

Cutting-Edge Sports Physiology with Dr. Martin Gibala

Freelap Friday Five| ByMartin Gibala

Nerve Cell

Dr. Martin Gibala is a professor and chair of the Department of Kinesiology at McMaster University in Hamilton, Canada. He studies the beneficial effects of exercise at the molecular to whole-body level in both healthy individuals and people with chronic diseases. Gibala’s research on the physiological adaptations to interval training has attracted immense scientific attention and worldwide media coverage. He is the author of a bestselling book on the topic, The One-Minute Workout: Science Shows a Way to Get Fit That’s Smarter, Faster, Shorter.

Freelap Friday Five with Dr. Martin Gibala

Freelap USA: A lot of confusion exists with the lactate response, as some coaches feel that changes in pH are meaningless, while others feel a rise in lactate is an anabolic trigger. To help coaches who are not strong in physiology, how can they understand fatigue better with regard to the lactate response?

Dr. Martin Gibala: Lactate is often (mis)characterized as a metabolic waste-product that accumulates under conditions of hypoxia or reduced oxygen availability and is linked to fatigue. The reality is that lactate is an important metabolite that plays a central role in the coordination of whole-body metabolism. During exercise, for example, lactate produced in skeletal muscle can be released into the bloodstream and circulate to other tissues such as the heart and liver, which can take up the lactate and use it as a source of energy. (As an aside and with respect to terminology, within the physiological pH range of muscle and blood, ~99% of “lactic acid” is dissociated into lactate ions [La–] and protons [H+].)

Lactate can also serve as a signaling molecule muscle and influence the expression of certain genes, although the significance for exercise-mediated adaptations in human skeletal muscle is unclear. The precise role of cellular hypoxia in lactate production is controversial; while the accumulation of blood lactate during exercise is associated with the capacity for whole-body oxygen delivery, lactate can also be produced in skeletal muscle under fully aerobic conditions. This is because other factors such as fiber type, enzyme concentration and activity, and circulating hormones also affect lactate metabolism.

While #lactate accumulation may play a role in athlete fatigue, it is not likely the primary cause, says @gibalam. Share on X

Fatigue is a complex phenomenon with numerous potential causes that range from reduced central nervous system activity to inhibition of the proteins that interact to produce muscle contraction. Certainly, high levels of lactate can reduce the amount of force generated by muscle fibers; however, while lactate accumulation may play a role in the fatigue experienced by athletes in certain circumstances, it is unlikely to be the sole or even primary cause.

Freelap USA: Mitochondrial adaptations are difficult to measure outside the lab. When coaches use low-intensity training to balance out their high-intensity training to rest joints and muscles, what can be done outside of interval training? Is aerobic conditioning for team sports dead or are there ways to further improve an athlete’s conditioning outside repeated sprints? Is traditional steady training of any value to athletes or is it just a waste of time?

Dr. Martin Gibala: The precise role of exercise intensity, duration, and volume in mediating mitochondrial adaptations to exercise is unclear, no doubt in part owing to individual variability in training responsiveness. There is evidence that exercising under conditions of reduced carbohydrate availability can augment mitochondrial adaptations even in highly trained individuals. This does not mean that athletes should routinely restrict carbohydrates; rather, periodic sessions commenced with reduced muscle glycogen content may be an effective strategy to augment training adaptations by increasing metabolic stress without changing absolute load or intensity.

Most team sports are characterized by intermittent bursts of high-intensity exercise, but that does not mean traditional aerobic conditioning or continuous moderate-intensity exercise training cannot play a role. Cross-training using novel exercises or approaches (e.g., rowing, swimming, cycling uphill) can be a great way to maintain cardiorespiratory fitness while reducing the absolute load on muscles and joints that are habitually utilized to perform sport-specific activities, while also providing a mental break from the sameness of routine training.

Freelap USA: Repeated sprints require a lot of intensity. What do you think is a great field test for coaches wanting something practical in soccer or American football? Do you have any practical recommendation for coaches who don’t have much equipment besides electronic timing and a video camera?

Dr. Martin Gibala: Repeated sprint ability, or the capacity to perform intermittent bursts of intense exercise with limited recovery, is an important attribute for many team-sport athletes. I like simple, practical tests that simulate the event-specific work as closely as possible: recovery patterns are important to objectively track performance capacity (and changes over time, in order to evaluate the effectiveness of specific training programs and interventions). Such tests can be tailored to athletes who play different positions and thus are subject to different task demands.

#RecoveryPatterns are important to objectively track performance capacity (and changes over time), says @gibalam. Share on X

One example is six to eight repeats of 20-meter “all out” sprints with 20 seconds of recovery. This protocol has been used to distinguish performance between forwards, midfielders, and defenders, and was also shown to be a valid marker of competitiveness, such that higher scores were associated with a higher caliber of play. Another test involving five repeats of 30 meters with 30 seconds of recovery was shown to be a reliable measure of performance in young male soccer players.

Freelap USA: Satellite cells. You did a research study on eccentric training and type II fibers—could you explain how this information is useful to both sports medicine staff and strength and conditioning coaches?

Dr. Martin Gibala: This work was done in collaboration with McMaster colleagues and investigated the extent to which muscle stem cells, or satellite cells, are involved in mediating responses to nonhypertrophic exercise stimuli. There is evidence that satellite cells play a role in skeletal muscle remodeling in response to resistance exercise. This is consistent with the theory that following mechanical stress, such as weightlifting exercise, satellite cells are activated and contribute to the repair and formation of new functional muscle fibers.

Satellite cells may play a role in skeletal muscle remodeling in response to #resistance exercise, says @gibalam. Share on X

Our research examined the possible involvement of satellite cells in response to cycling-based high-intensity interval exercise, which does not result in significant muscle hypertrophy. The results showed an expansion of the muscle satellite cell pool and suggested stem cells may play a role in the remodeling of muscle fibers after nonhypertrophic exercise. These findings are not of direct relevance to clinicians, trainers, and coaches, but are important to establish the underlying mechanisms that govern skeletal muscle adaptation. This is essential for understanding how skeletal muscle remodels in response to different exercise stimuli and may have significant implications for conditions such as aging and various pathologies.

Freelap USA: Many teams are using β-Alanine for repeated work capacity. Can you share your thoughts on how this supplement fares under scientific scrutiny?

Dr. Martin Gibala: A recent review by researchers, including those affiliated with the Australian Institute of Sport, identified beta-alanine as an “established” supplement, along with four others: caffeine, creatine, nitrate, and bicarbonate. This designation meant the researchers deemed there was “robust evidence that (the) supplements can enhance sports performance when used according to established protocols.” Beta-alanine is the rate-limiting precursor to carnosine, an amino acid derivative that acts as an intracellular buffer in skeletal muscle.

Daily supplementation in the form of oral ingestion of 3.2-6.4 g/kg of beta-alanine for several weeks can increase muscle carnosine content by ≥50%. This has been associated with small but statistically significant performance improvements of 2-3% in laboratory-based continuous and intermittent exercise tasks lasting from ~30 seconds to 10 minutes in duration. The relative improvement appears to be somewhat smaller in more highly trained individuals, and there is less evidence available based on sport-specific or “field” type settings that more closely simulate normal athletic competition.

Dosing typically involves smaller amounts spread throughout the day (e.g., 0.8 to 1.6 g/kg every few hours) or the use of slow-release formulations, in order to reduce the potential for side effects, which can include itchiness and transient numbness or a “pins and needles” sensation. Similar to most nutritional compounds, there is considerable individual variability in the responsiveness to supplementation.

Since you’re here…
…we have a small favor to ask. More people are reading SimpliFaster than ever, and each week we bring you compelling content from coaches, sport scientists, and physiotherapists who are devoted to building better athletes. Please take a moment to share the articles on social media, engage the authors with questions and comments below, and link to articles when appropriate if you have a blog or participate on forums of related topics. — SF

Athlete Sleeping on Train

Is Sleep the Most Underrated Hack for Performance Enhancement?

Blog| ByLeslie Sherlin


Athlete Sleeping on Train

Analytics have become a religion in sports. And why not? Coaches are looking for every possible way to squeeze more skill out of their athletes, and a data-driven approach makes sense.

But most developing athletes need something much simpler: more sleep.

It shouldn’t come as a surprise. Still, it’s rarely recognized as the low hanging, performance enhancing fruit that it is. I suspect that’s because it isn’t well understood.

Sleep, Memory, and Skill Development

Sleep prior to a big event is the most important, right? Not necessarily. It’s actually sleep after a lesson, practice, or big game that impacts skill development. If you don’t sleep the night after training, you’ll never learn. It doesn’t matter if you sleep well the following nights. Getting seven to eight hours of sleep allows the brain to process events from the day, and commit it to knowledge.

It is the sleep after a lesson, practice, or big game that impacts skill development. Share on X

When we sleep, we repeatedly go through 90-to-120-minute cycles. Within those cycles, there are two main types of sleep: deep and rapid-eye-movement (REM). Deep sleep comes first. During this process, the brain consolidates memories and rebuilds energy stores. As the night goes on, the balance shifts, with REM dominating the final cycles. You’ve probably heard most of the dreams we remember occur during REM.

Solidifying knowledge requires both types of sleep. Phase one, which happens during deep sleep, is basically a rehearsal: Your brain files away the facts and practices the moves it learned that day. Phase two is integration. This is where those facts and lessons are combined with existing knowledge. This happens during REM.

There is an excellent study conducted at MIT that demonstrated how sleep helps build long-term memories in mice. Spoiler alert: Researchers were able to determine that the mice were replaying new experiences in their brains as they slept.

Sleep and Recovery

Many benefits of getting enough sleep—clearer thinking, more consistent metabolism—are well established and widely understood. Most coaches should also be aware of the connection between sleep and growth hormone secretion.

But the effects of sleep deprivation are less understood and more worrisome.

Clinically, we know that sleep deprivation leads to depression, high blood pressure, weight gain, heart disease, and possibly mortality. But here’s what track and field coaches need to know about sleep deprivation:

Numerous studies have shown that reaction time nearly triples when a person misses an entire night of sleep. Regularly it’s at about a quarter of a second. Didn’t sleep last night? Ok. It’ll increase to 800 to 900 milliseconds.

Losing that half a second on the track is, well, costly.

And here’s another doozy: After just one week of sleeping five hours or less each night, a man’s testosterone levels drop as if he’s aged about 11 years. You’re aware testosterone is critical to male sexual behavior and reproduction, but it also plays a critical role in recovery — think muscle mass and strength, bone density, and even decision-making abilities.

Techniques for Better Sleep

“Get a good night’s rest. We’ve got a big day tomorrow.” You’ve said this before, so you’re already prescribing sleep. Excellent.

But how many of your athletes can’t quite shut their minds off when it’s time to rest? They’re too excited, too anxious for the big meet. If you’re coaching developing athletes, it’s probably a big number.

One simple technique we prescribe our athletes (in addition to neurofeedback) is a combination of breathing exercises, heart rate monitoring, and sleep tracking. It sounds complicated. It’s actually very simple. So simple, we’ve turned it into a free app—SenseSleep.

Sense Sleep App

Basically, your brain should be produced relaxed brain waves when it’s time to go to bed. This can be difficult to do when you’re mind is racing with thoughts about tomorrow. Research has shown that controlled breathing exercises can help the brain enter a more relaxed, sleepy state.

Here’s how it works:

Record your heart rate — If your heart is beating too quickly, your brain and body are probably too active to fall asleep—obviously. It’s a simple indicator in your autonomic system, and it’s a measurement you can watch improve in real time.

Begin breathing exercises — SenseSleep will guide you through simple breathing exercises designed to lower your heart rate, calm your brainwaves, and prepare your body for rest.

Rate your sleep — The next time you open SenseSleep, you’ll rate your night’s sleep on a scale of 1 through 5. This allows you to track improvement over time and learn what techniques work best for you.

Sense Sleep Log


Thanks For Reading

If you’d like to learn more about self-regulation techniques like biofeedback and neurofeedback, feel free to follow me on Twitter @LeslieSherlin or my Facebook page. For more information about SenseLabs be sure to check out our Twitter (@sense_labs), like our Facebook page, or visit our website SenseLabs.

Please share so others may benefit.


Creatine Supplement

Creatine: Not Just for Muscle

Blog| ByCraig Pickering


Creatine Supplement

If you’re involved in sports that require speed, power, and strength, then you’ve likely come across creatine before. The supplement gained prominence in the early 1990s as a method of enhancing strength, and since then research has continued to explore its use as a sports performance aid.

Beyond muscle, creatine is a supplement that can optimize performance across many different realms, says @craig100m. Share on X

In this article, I’ll give an overview of the research underpinning creatine’s use as a training aid, but also focus on some of the more novel findings regarding creatine. This includes its use as an agent to prevent disuse atrophy in injured athletes, as a cognitive enhancer, and as a potentially important agent in the recovery from concussion. Given these important new findings, we can no longer just consider creatine from the perspective of muscle, but instead view it as a supplement that can optimize performance across a number of different realms.

What Is Creatine?

Creatine is a naturally occurring, nitrogen-containing molecule that tends to be found in animal flesh. Creatine’s main role in humans is as part of the ATP-PC energy system—the method by which we produce energy rapidly during high-intensity exercise, such as in sprinting or lifting heavy weights. Our body utilizes adenosine triphosphate (ATP)—the “energy currency” of the cell—to power muscle contraction; here, the breaking of a bond between one of the phosphate molecules and adenosine creates the energy required for contraction.

This leads to a buildup of adenosine diphosphate (ADP), which the body can’t utilize for energy quite as readily. Instead, it needs to add an additional phosphate molecule to ADP, recycling it back to ATP. This reaction requires an additional phosphate molecule to be found from somewhere, and the most readily available source is from phosphocreatine, one of the major ways creatine is stored in the body.

Creatine Supplementation for Performance

Given that we need energy to train, and given that the majority of speed, strength, and power adaptations come from high-intensity exercise, a logical step was for researchers to take a closer look at whether creatine supplementation could increase muscular levels of creatine. If it could, then in theory we would have greater amounts of phosphocreatine available, and so could both sustain high-intensity exercise for longer and also recover from it quicker.

An early study from 1992 was one of the first to test this hypothesis. In this case, the researchers recruited 17 males and females of differing ages (ranging from 20-62 years old), and differing levels of fitness. It was found that 5g of creatine (the amount found in just over 1kg of steak) resulted in a decent increase in blood plasma levels of creatine, and that supplementation of 5g four to six times per day for at least two days led to a substantial increase in creatine levels within the muscle.

Subsequent research indicated that, following a loading phase comprised of six days of consuming 20g of creatine per day, the increased creatine levels could be maintained with an intake of just 2g per day. A daily dose of 3g per day, with no loading phase, was found to be similarly effective at increasing and maintaining creatine levels, such that, today, most athletes skip the loading phase and just consume creatine at a set dose.

But do increased creatine stores lead to enhanced performance? Well, the short answer is yes—this has been exceptionally well-researched over the years, such that we can now be very confident that creatine supplementation can enhance performance in exercise tasks lasting less than 30 seconds (where the ATP-PC system plays a large role), strength, and strength endurance, as well as potentially aiding in improvements in body composition. There is also some evidence that creatine supplementation may enhance aerobic endurance performance, potentially due to an increased ability to train at higher workloads.

Creatine Supplementation for Recovery

Alongside its clear and replicated performance benefits, there is also the potential that creatine can act to support recovery from exercise, which a number of different studies have explored. Such a positive effect of creatine supplementation has been shown for recovery from sprint-based exercise, resistance training, endurance exercise and competition, and eccentric loading protocols. In particular, it appears to enhance the repeated bout effect, whereby we experience less soreness following prior eccentric loading.

Although not all studies show such a positive effect, none show a negative effect, and so creatine supplementation may be a worthwhile consideration as a recovery agent. Furthermore, chronic ingestion of creatine enhances muscle glycogen resynthesis following prolonged exercise, illustrating that it might be a useful method of enhancing recovery between repeated bouts of endurance exercise, such as those seen in heats and finals at major championships, or in team sports that compete on a weekly basis.

Creatine Supplementation and Injury

Creatine has also shown promise as an agent that may enhance the post-injury rehabilitation process. This can be especially true when immobilization has to occur, for example when a cast is worn. In a 2009 study published in the Journal of Strength and Conditioning Research, researchers recruited seven male subjects and had their arm placed in a plaster cast for seven days on two different occasions. On one occasion they received a placebo, and on another they consumed 20g of creatine per day for the duration of immobilization.

Creatine has shown promise as an agent that may enhance the post-injury rehabilitation process, says @craig100m. Share on X

The researchers found that creatine supplementation maintained lean muscle mass to a greater extent than placebo following immobilization, which in turn was associated with better maintenance of strength and strength endurance. These results have since been replicated—although an effect is not always found—and, given that increasing the strength of an injured body part post-injury is a crucial part of the return-to-play process, it’s easy to understand how a better maintenance of muscle mass and strength during the early injury immobilization phase may be worthwhile.

Creatine Supplementation and the Brain

Given what I’ve reviewed so far, it’s clear that creatine has a multitude of positive physiological effects on performance across a variety of different domains, from strength to sprints to endurance training. But its positive effects don’t just end there. While the majority (~95%) of the creatine in our bodies is found in our muscles, a smaller proportion can be found in the brain, where, as in muscle, it has a role to play in the production of energy.

This gives creatine the potential to be a useful neurocognitive enhancer. A great example of this is creatine’s use in the management of Parkinson’s disease. It is believed that Parkinson’s develops through mitochondrial dysfunction, indicating that there is a breakdown in the optimal production of energy in the brain. Because creatine can help offset this metabolic dysfunction, it may well be useful here, and is in fact undergoing testing in clinical trials. Such cognitive effects have also been shown in non-diseased subjects, including the elderly and those who may consume lower-than-normal dietary levels of creatine, such as vegetarians.

Perhaps one of the more exciting neurocognitive uses of creatine, from a performance perspective, is that it appears to mitigate some of the negative effects of insufficient sleep. This could be important when it comes to sports that have a higher neurocognitive demand, characterized by the need to make many decisions in a short period of time, as in many team sports.

One exciting neurocognitive use of creatine—it may lessen some adverse effects of inadequate sleep, says @craig100m. Share on X

This was shown in a neat 2011 study, published in the Journal of the International Society of Sports Nutrition. Here, researchers put 10 elite rugby players through a rugby passing skill test on 10 different occasions. Half of the times the subjects undertook the passing test, they had slept for between seven and nine hours the previous night; the other times, they had slept for between three and five hours. Ninety minutes before the start of each trial, they took a placebo, creatine (either in a dose of 50 or 100 mg/kg), or caffeine (in a dose of 1 or 5 mg/kg).

The results indicated, unsurprisingly, that sleep deprivation negatively affected skill execution, but that the use of either creatine or caffeine reduced this negative effect. Regarding the creatine, subjects taking the higher dose (100 mg/kg, equivalent to 8g creatine in an 80kg individual) performed slightly better than those taking the 50 mg/kg dose. As such, while we all understand the importance of getting a good night’s sleep, for times when this hasn’t happened—perhaps due to travel, or pre-competition nerves—creatine represents a potentially useful avenue to at least rescue some of the expected performance loss.

While it is obvious to state that exercise depletes energy stores, and that this is a cause of fatigue, we are starting to understand that there is in fact a two-way interaction between the brain and body when it comes to determining how fatigued an individual is during exercise. (The excellent book Endure by Alex Hutchinson explores this particularly well.) Briefly, it is thought that fatigue—defined as the inability to maintain a certain workload—occurs, in part, through the brain’s interpretation of a multitude of signals, including those measuring energy stores. There is the possibility here that additional muscular creatine, derived through supplementation, could act to “trick” the brain into thinking there is more energy available, allowing the athlete to exercise for longer.

Additionally, physical exercise also causes cognitive fatigue and, given that creatine supplementation can enhance cognitive function, it may also improve cognitive function towards the end of prolonged training and competition events, enhancing decision-making under fatigue. This could be especially important in team sport tournaments that have the possibility of extra time or overtime, and even penalty shootouts; here, the enhanced skill levels of the players with less cognitive fatigue (augmented by creatine supplementation) might be the difference between winning and losing.

Creatine and Concussion

So far, we have looked at how creatine supplementation may be able to enhance performance, but the most recent aspect of creatine research has been exploring how it might act as a neuroprotective agent when it comes to recovering from concussions. Following a concussive injury, research has shown that creatine concentrations in the brain decrease, and this, in turn, causes changes in metabolism within the brain cells, lengthening recovery time. Additionally, there is the potential that creatine can act as an antioxidant within the brain, supporting the recovery from concussive events.

The use of creatine as a neuroprotector has been tested experimentally, both in animal models and, more recently, in humans. The results from the animal models were positive: supplementation with creatine prior to the concussive event was associated with up to 50% less damage to the brain cells, which was mediated by creatine’s protective effects on the mitochondria. In the human studies, children who were suffering from a concussion were infused with ~0.4 grams of creatine per kilogram of bodyweight (a substantial creatine dose) every day for six months. They tended to showed improvements in memory, communication, and behavior, and had shorter hospital stays, when compared to the placebo group.

Though more studies are needed, creatine appears to improve the recovery from concussive injuries, says @craig100m. Share on X

While these early results are promising, clearly there needs to be a greater amount of research carried out in this field before we can make more concrete statements. However, even based on the preliminary work undertaken so far, it does appear that creatine supplementation can enhance the recovery from concussive injuries—and certainly doesn’t seem to be negative. Based on the animal studies, there may be an additional protective advantage from creatine supplementation prior to the concussion happening, which is perhaps an added consideration for those athletes competing in contact sports.

Tentative Creatine Supplementation Recommendations

When it comes to the form of creatine to be used, there are many different types out there. The “original” form is creatine monohydrate; the research base suggests that this form is both safe for long-term use and also effective. As a small caveat here, given the fairly recent advent of creatine supplementation, the majority of studies are carried out over short time periods. As such, there are actually very few studies examining the effects of long-term (i.e., years) creatine supplementation, although data does suggest that continuous use for five years is not associated with any negative consequences in healthy individuals. Based on this, it seems sensible to suggest that those consuming creatine should have periods of time where they don’t utilize supplemental creatine. I tended to have eight continuous weeks per year in the off-season where I didn’t consume any supplemental creatine.

There is much less research on the alternative forms of creatine, so it’s difficult to ascertain their long-term safety and effectiveness. However, from the research that I have seen, they appear to offer no real advantages over creatine monohydrate. Therefore, given that this form is the cheapest, it seems the most sensible route for consumption.

A further consideration is that there is likely individual variation in the response to creatine supplementation. For many people, creatine will be readily available from diet. In people who consume meat on a daily basis, about half of their daily creatine requirements (2-3g) could be coming from dietary sources, with a pound of uncooked meat generally providing somewhere between 1 and 2 grams of creatine. As a result, many people likely need to supplement with less creatine than they might think.

A study from 2017 further explored this individual variation. Here, the researchers recruited 15 children (aged 10-12 years old), 31 adults (18-45 years old, of which just under half were vegetarian), and 18 elderly subjects (aged between 62 and 84 years). The subjects were given a placebo for seven days, and then switched to creatine (at 0.5 grams per kilogram of body mass) for seven days. At baseline, the adult vegetarians had the lowest levels of dietary creatine intake, which is unsurprising given that creatine is found in animal flesh. The adult omnivores had the highest intakes, with the children and elderly adults having similar intakes.

Creatine supplementation increased the muscle creatine content of both the children and the elderly subjects, and also the vegetarian adults, but was found to have a less-robust effect in adult omnivores. This demonstrates that the impact of creatine supplementation can vary as a function of regular diet, with those who consume the least creatine through dietary sources responding the best. There were no differences between the male and female subjects in this study, suggesting that sex has no impact on the responsiveness to supplementation.

Based on all the above, what advice could we give to people considering creatine supplementation? First, creatine has been shown to be effective at enhancing both performance in, and longer term training adaptations from, high-intensity exercise, including sprint and resistance training. Therefore, for athletes involved in sports that require high levels of performance in these traits, creatine represents a potential avenue for performance enhancement. There is less evidence that it may support aerobic endurance performance, although, again, as far as I am aware there are no studies demonstrating a negative effect of creatine supplementation. Given that athletes of all sports should be utilizing some resistance training, there is the potential for creatine to be effective.

The two methods commonly utilized when supplementing with creatine are either a loading method, which usually involves doses of around 25g per day for about a week, followed by a maintenance phase of 3-5g per day, or just ingestion of the maintenance dose (3-5g per day). Anecdotally, I always preferred just dosing with a smaller amount, but for extended periods of time.

Alongside creatine’s impact on training, it also has beneficial effects on post-exercise recovery, and potentially as a neurocognitive enhancer. As such, creatine is now present in many pre- and post-exercise ready-made mixes, which athletes might wish to consider. The combination of creatine and caffeine pre-competition (or even during competition, if the competitive bout is prolonged) may enhance the decision-making ability, and offset feelings of fatigue. Similarly, following a maximal exercise bout, such as during competition, supplementation with creatine may boost recovery.

The optimal dose for both these scenarios is dependent on the athlete’s current intake of creatine, both through diet and supplementation. If the athlete is already consuming supplemental creatine at the maintenance dose of 3-5g per day, then doses above this are unlikely to offer any additional effect. However, if they are not currently consuming creatine (many athletes reduce creatine intake prior to competition), then larger doses of 10-20g might be appropriate.

If an athlete suffers an injury, creatine supplementation might be a worthwhile intervention, says @craig100m. Share on X

When it comes to recovery from injuries, creatine supplementation has been shown to mitigate the losses of muscle mass and strength following disuse. As such, if an athlete suffers an injury, creatine supplementation might be a worthwhile intervention. The dose used in many studies was 20g per day, although if the athlete is already consuming creatine such a loading phase may not be required.

Finally, athletes in contact sports, particularly those that may predispose to head trauma and concussion, might be interested in the neuroprotective aspect of creatine supplementation. Some studies suggest that supplementation prior to a head injury is required to reap the full benefits, pointing to an advantage to keeping creatine stores topped up throughout the competitive season in these players. However, post-injury supplementation has also been shown to be effective, often using doses of 15-20g per day. To my knowledge, no study has compared the impact of pre-injury supplementation with that of post-injury supplementation, so it’s unclear which, if either, is more effective.

How I Used Creatine

I started using creatine in 2005, just after I won the European Junior Championships and was looking to take my training to the next level. In my first year, I utilized a loading phase of 5 x 5g doses per day for seven days. I personally didn’t like this—I found that I had gastrointestinal distress, and my muscles also felt very “full,” although this is completely anecdotal. The following years, I hit on a schedule that worked for me:

  • Training Phase: During my training phases, I would consume 5g of creatine, usually post-workout, roughly on a six-weeks-on, two-weeks-off cycle.
  • Pre-Competition Phase: In the run-up to competition, I would stop taking creatine perhaps four to five days before a race. I did this initially on the advice of a successful training partner, although I’m not sure this is necessary. Anyway, creatine stores are typically well-maintained for a few days after stopping supplementation and, given that training intensity was low, I can’t imagine they degraded too much.
  • Immediately Pre-Race: As part of my pre-race stimulant drink, which I would take roughly 60 minutes prior to racing, I would consume around 3g of creatine.
  • Immediately Post-Race: Here, I would consume a slightly larger bolus dose of creatine, usually around 10g, in order to “top up” my stores and enhance recovery
  • Off-Season: I stopped consuming creatine for six to eight weeks during my off-season, just as a way of periodizing my approach.

Recommendations for Creatine Supplementation

 In summary, creatine appears to be an effective nutritional aid to support not just performance, but also recovery—from both exercise and injury. As more recent research shows, creatine may also impact the brain, as both a neurocognitive enhancer and a neuroprotective agent.

Supplementing with creatine, most commonly in the form of creatine monohydrate, can increase both muscular and brain stores of creatine, which allow it to exert its benefits. Because creatine is found in the diet through consumption of animal flesh, those that consume large amounts of meat on a regular basis may not respond as well to creatine supplementation as those who don’t consume much creatine through dietary sources, such as vegetarians, children, and the elderly.

People who eat meat regularly may not react as well to creatine supplementation as those who don’t, says @craig100m. Share on X

A loading phase of ~20-25g per day for seven days can rapidly increase creatine stores, which should then be followed by a maintenance dose of 3-5g per day. Alternatively, athletes may wish to just follow the maintenance protocol, which will increase creatine stores, albeit at a slower rate.

Finally, creatine supplementation appears safe for healthy individuals, as long-term continuous intakes of up to five years have shown no negative side effects. However, I would always recommend having periods within the year where the athletes periodizes their intake as per their need.

Since you’re here…
…we have a small favor to ask. More people are reading SimpliFaster than ever, and each week we bring you compelling content from coaches, sport scientists, and physiotherapists who are devoted to building better athletes. Please take a moment to share the articles on social media, engage the authors with questions and comments below, and link to articles when appropriate if you have a blog or participate on forums of related topics. — SF


Sprained Ankle Injury

How to Train More Without Getting Hurt

Blog| ByTravis Pollen

Sprained Ankle Injury

When training and rehabilitating athletes, the sports science professional has two crucial but apparently paradoxical responsibilities: He or she is simultaneously charged with minimizing risk of injury (or re-injury) and maximizing performance. However, to maximize performance, high workloads are required, and high workloads are often associated with increased injury rates.

Therein lies the “training–injury prevention paradox.”1 How can the practitioner help improve the athlete’s performance if the more the athlete trains, the more likely they are to sustain an injury? Is there a way to enhance performance without increasing injury risk? To solve this paradox, Australian applied sports scientist Tim Gabbett recently developed the Acute:Chronic Workload Ratio Model.1

Types of Workloads

Before delving into the model, an understanding of workloads is essential. In general, a workload is any training or competition stimulus an athlete undergoes. There are two different types of workloads: external and internal.2 External workloads correspond to the amount of work an athlete performs (e.g., distance, speed, duration, or total pitches thrown). Internal workloads denote the athlete’s physiological or psychological response to an imposed external workload (e.g., blood lactate, heart rate, or rating of perceived exertion).

Because different athletes respond to the same external workload with different internal workloads, both types provide useful data.3 Often, internal and external workloads are multiplied to create a “combination workload.” The most common combination workload has been termed “exertional minutes” and is the product of training duration and session rating of perceived exertion.1 For example, suppose an athlete’s rating of perceived exertion for a 90-minute training session is 8 out of 10. This would correspond to a workload of 720 arbitrary units.

Effects of Workloads on Injury Risk and Performance

When an athlete takes on a workload in training or competition, two performance-altering processes occur: fitness and fatigue.4,5 Naturally, fitness enhances the athlete’s performance. In conjunction, the athlete develops physical qualities that protect against injury (e.g., strength, power, and repeated-sprint ability).6,7 Furthermore, the more injury-free the athlete remains, the better they perform.

Conversely, Dr. Gabbett explains that fatigue causes the athlete’s performance to suffer.1 Fatigue also subjects the athlete to increased injury risk, which would further impair performance. The nature of the workload determines the degree to which fitness or fatigue dominates the athlete’s response to the imposed workload.1

The nature of the workload determines whether fitness or fatigue dominates the athlete’s response, says @trpollen. Share on X

For example, high workloads lead to high fitness, but they can also lead to high fatigue and, consequently, increased injury incidence. This relationship is well-documented across a variety of sports (e.g., rugby, Australian football, and baseball), levels of play (e.g., youth, sub-elite, and professional), and workload types (e.g., external, internal, and combination).8-14 The studies have consistently shown that as all types of workloads increase, injury incidence also increases. Moreover, reducing training duration and intensity tends to reduce injury rates.9

Based on this research, the simple solution to the injury problem would seem to be a sweeping reduction in workloads. In fact, in an effort to reduce injuries, some sports medicine practitioners do lobby for reduced workloads.15 However, reducing workloads may actually have the contradictory consequence of hampering the fitness response, a necessary component for injury reduction as well as performance.1

Workloads and Performance
Figure 1. The relationships between workloads, fitness, injury risk, and performance. While the simple solution to injury problems would seem to be a reduction in workloads, that may have the contradictory consequence of hampering the fitness response, which is a necessary component for injury reduction and performance.

The 10% Rule

According to Dr. Gabbett, the problem with high workloads lies not in the absolute workloads themselves, but rather in an athlete’s relative preparedness for them.1 From this perspective, the so-called “10% rule” is another proposed solution to the training-injury prevention paradox. The rule states that an athlete should not increase their week-to-week workloads by more than 10%.16,17

The issue with high workloads is not a workload itself, but the athlete’s relative #readiness for it, says @trpollen. Share on X

The 10% rule is most commonly applied to running, but prospective data on rugby players and Australian footballers also supports the recommendation.1,18 For example, a 15% or more increase in weekly workload put ruggers at upwards of a two to five times increased likelihood of injury compared to a 10% or lower increase.1 Nonetheless, despite this prospective data, in a large-scale randomized controlled trial of 486 runners, there was no difference in injury incidence between those following the 10% rule and a standard training program.16

The Acute:Chronic Workload Ratio

While the 10% rule may be a field-expedient heuristic in some cases, Dr. Gabbett’s Acute:Chronic Workload Ratio Model endeavors to characterize athletes’ preparedness more completely. Dr. Gabbett asserts that an athlete’s preparedness is dictated by their chronic workload.1 Chronic workload is the workload an athlete is accustomed to on a medium-term basis. It’s typically calculated as a rolling average of the preceding four weeks. This time frame may be more indicative of the athlete’s current level of fitness than the previous week alone (as with the 10% rule).

The acute:chronic workload ratio may be the best solution to the training-injury prevention paradox, says @trpollen. Share on X

Meanwhile, the acute workload is that which the athlete faces presently, typically over the most recent week. The quotient of the acute and chronic workloads represents the acute:chronic workload ratio. Values of the acute:chronic workload ratio much larger than 1.0 can be interpreted as workload “spikes.”

ACWR Interpretation
Figure 2. The interpretation of the Acute:Chronic Workload Ratio. Dr. Gabbett says that an athlete accustomed to a high chronic workload will respond to a high acute workload with increased fitness, performance, and resilience to injury. Emerging data supports his claims about the relationship between the acute:chronic workload ratio and injury.

The acute:chronic workload ratio may represent the ultimate solution to the training–injury prevention paradox. Dr. Gabbett posits that an athlete accustomed to a high chronic workload will respond to a high acute workload with increased fitness, performance, and resilience to injury.1 On the other hand, an athlete who is not accustomed to a high chronic workload will respond to a high acute workload with fatigue, impaired performance, and increased injury. Emerging data supports Dr. Gabbett’s claims about the relationship between acute:chronic workload ratio and injury.

The Workload ‘Sweet Spot’

An explosion of recent work in a range of sports (e.g., cricket, soccer, rugby, Australian football, basketball) has shown increased injury incidence is in fact associated with spikes in the acute:chronic workload ratio.19-23 Across sports, the “danger zone” for increased injury appears to be acute:chronic workload ratios over 1.5. Meanwhile, the acute:chronic workload ratio “sweet spot,” which minimizes injury risk, lies in the 0.8-1.3 range.1

ACWR Sweet Spot
Figure 3. Recent research has shown increased injury incidence in athletes corresponds with spikes in the acute:chronic workload ratio. The “danger zone” for increased injury appears to be where ratios are over 1.5; the “sweet spot,” which minimizes injury risk, lies in the 0.8-1.3 ratio range.

Thus, the ultimate solution to the paradox appears to be consistent application of workloads within the sweet spot range. In this way, athletes can progress to high chronic workloads gradually, with minimal load-related injuries along the way. In turn, the high chronic workloads will enhance fitness and performance, further protecting against injury.20

The Acute:Chronic Workload Ratio in Practice

In practice, monitoring an athlete’s acute:chronic workload ratio can be fairly straightforward. Take swimming, for example. The only essential piece of information needed is the swimmer’s daily yardage (an external workload), which the coach or swimmer can supply. From there, rolling averages of the previous seven days (acute workload) and 28 days (chronic workload) can be calculated and divided to yield the acute:chronic workload ratio. Workload data from one swimmer’s 29-week competitive season is shown below.

ACWR Rolling Average
Figure 4. This chart shows the workload data from one swimmer’s 29-week competitive season. While most of their acute:chronic workload ratio lies in the 1.0 ± 0.3 range, there are clear workload spikes. Fortunately, the swimmer didn’t sustain an injury secondary to those spikes.

While much of the depicted acute:chronic workload ratio lies in the 1.0 ± 0.3 range, there are three clear regions with large workload spikes (beginning at Days 34, 124, and 136). Fortunately, this athlete did not sustain an injury secondary to these spikes. It’s important to note in this example that the yardage data doesn’t capture the swimmer’s internal response to the daily workloads. It could be that the upticks in workload were characterized by mostly low-intensity yardage, which may not be as much cause for concern from a fatigue and injury standpoint. To obtain information of this nature, the athlete’s heart rate or session rating of perceived exertion would also have to be monitored.

The #AcuteChronicWorkload ratio model has implications for athletes that span the entire season, says @trpollen. Share on X

Dr. Gabbett’s Acute:Chronic Workload Ratio Model has implications that span the entire season. During pre-season screening, it flags athletes who are at risk based on low off-season chronic workloads.24 During the competitive season, the model improves our ability to manage workloads, which could reduce injury incidence and enhance performance. For an athlete with an injury, the model assists sports medicine practitioners in return-to-play decision-making.25 By gradually increasing the athlete’s workloads to pre-injury levels, it prepares them to return to play while avoiding re-injury.26

As Always, More Research Is Needed

While a lot of high-quality research has already been conducted in this area, there remains much to learn about acute:chronic workload ratios. Investigators have often selected one- and four-week acute and chronic workload windows, respectively. However, more work is needed to determine the merits of shorter and longer time frames for both acute and chronic workloads.1

In addition, over the past year, the best method for calculating the acute:chronic workload ratio has also been hotly contested. A potential limitation of the rolling average method is that it doesn’t account for the diminishing effects of training over time. For example, a workload imposed three weeks ago gets the same weight in the rolling average chronic workload as one from the previous week. For this reason, some authors favor an exponentially weighted moving average, which weights more recent workloads more heavily than older ones.27,28

To illustrate the difference between the two methods for calculating the acute:chronic workload ratio, we can take the same swimmer’s data from above and apply the exponentially weighted moving average. The two methods yield similar but slightly different results for the acute:chronic workload ratio. As shown below, using the exponentially weighted moving average method, the magnitude of each of the three workload spikes from the rolling average method drops substantially. More research is needed to determine which method is best for predicting injury.

ACWR-EMWA
Figure 5. This chart uses the same swimmer’s data as in Figure 4, but applies the exponentially weighted moving average instead of the rolling average. Using this method, the magnitude of the three spikes drops substantially. We need more research to determine which method is better for predicting injury.


Lastly, the vast majority of the work thus far has been conducted in field and court sports. To add to the data from cricket, soccer, rugby, Australian football, and basketball, more research is needed in diverse sports populations. In particular, different athletic populations may exhibit different acute:chronic workload ratio sweet spots. Although the 0.8-1.3 range is the current best available evidence, we must be cautious in extrapolating current findings to other, as yet unstudied, sports.1 In addition to studying more sports, replication studies and randomized controlled intervention trials are needed to further validate the Acute:Chronic Workload Ratio Model.29

Building on the Acute:Chronic Workload Ratio

Given what we already know about the acute:chronic workload ratio, it represents an exciting evolution in our understanding of the relationships between training, performance, and injury risk. Based on the available evidence, workload monitoring appears to be a crucial component of injury risk assessment. Yet workload spikes certainly aren’t the only risk factors for athletic injury.

Based on the evidence, workload monitoring seems to be a crucial part of injury risk assessment, says @trpollen. Share on X

What the Acute:Chronic Workload Ratio Model doesn’t account for are the myriad intrinsic risk factors that can predispose an athlete to injury, such as age, sex, previous injury, biomechanics, and cardiovascular fitness.30 To more fully describe an athlete’s injury risk, a multifactorial injury prediction model would be needed, including intrinsic risk factors as well as workloads.

Athlete Injury Etiology
Figure 6. The Acute:Chronic Workload Ratio Model doesn’t account for the myriad intrinsic risk factors that can predispose an athlete to injury. Dr. Gabbett has been involved in a more comprehensive modeling effort that advances the idea that an athlete’s predisposition for injury is not static. Instead, his/her intrinsic risk factors are constantly modified by fitness and fatigue adaptations to previously imposed workloads.

As it just so happens, Dr. Gabbett has been involved in a more comprehensive modeling effort with the recent “Workload–Injury Etiology Model.”2 This new model advances the idea that the athlete’s predisposition for injury is not static. Instead, his or her intrinsic risk factors are constantly being modified by fitness and fatigue adaptations to previously imposed workloads. In this way, this model highlights the importance of repeated player testing (e.g., of strength, power, conditioning) throughout the season, not just in the pre-season.

Training and competition workloads don’t exist in a vacuum, either. The above-described workloads also don’t account for all the potential stressors in an athlete’s life. Additional stressors like nutrition, sleep, interpersonal relationships, academic demands, and travel can all impact an athlete’s workload response.31 To characterize an athlete’s status more completely, practitioners should also consider collecting ongoing objective or subjective measurements of stress, recovery, well-being, and readiness.32 Options here include daily assessments of grip strength, resting heart rate, heart rate variability, and self-reported wellness questionnaires.

This multipronged monitoring approach may be just what athletes need to train more without injury, says @trpollen. Share on X

The sports science professional should closely observe athletes for physiological and psychological signs and symptoms of fatigue and under-recovery using the above objective or subjective measures, especially in the presence of intrinsic risk factors and workload spikes. A heads-up to the rest of the team staff about the data and its potential implications for injury may be warranted, along with strategies for temporarily reducing workloads and promoting recovery. Indeed, this type of multipronged approach to monitoring may prove to be exactly what we need to train more without getting hurt.

Since you’re here…
…we have a small favor to ask. More people are reading SimpliFaster than ever, and each week we bring you compelling content from coaches, sport scientists, and physiotherapists who are devoted to building better athletes. Please take a moment to share the articles on social media, engage the authors with questions and comments below, and link to articles when appropriate if you have a blog or participate on forums of related topics. — SF

References

  1. Gabbett, TJ. “The training-injury prevention paradox: Should athletes be training smarter and harder?” Br J Sports Med. 2016; 50(5):273-280.
  2. Windt J & Gabbett TJ. “How do training and competition workloads relate to injury? The workload–injury aetiology model.” Br J Sports Med. 2017; 51(5):428-435.
  3. Jones CM, Griffiths PC & Mellalieu SD. “Training load and fatigue marker associations with injury and illness: A systematic review of longitudinal studies.” Sport Med. 2017; 47(5):943-974.
  4. Banister EW, Calvert TW, Savage MV & Bach T. “A systems model of training for athletic performance.” Aust J Sport Med. 1971; 7:57-61.
  5. Morton R. “Modelling training and overtraining.” J Sports Sci. 1997; 15:335-340.
  6. Gabbett TJ & Domrow N. “Risk factors for injury in subelite rugby league players.” Am J Sports Med. 2005; 33(3):428-434.
  7. Gabbett TJ, Ullah S & Finch CF. “Identifying risk factors for contact injury in professional rugby league players – Application of a frailty model for recurrent injury.” J Sci Med Sport. 2012; 15(6):496-504.
  8. Gabbett TJ. “Influence of training and match intensity on injuries in rugby league.” J Sports Sci. 2004; 22(5):409-417.
  9. Gabbett TJ. “Reductions in pre-season training loads reduce training injury rates in rugby league players.” Br J Sports Med. 2004; 38(6):743-749.
  10. Gabbett TJ & Domrow N. “Relationships between training load, injury, and fitness in sub-elite collision sport athletes.” J Sports Sci. 2007; 25(13):1507-1519.
  11. Killen NM, Gabbett TJ & Jenkins D. “Training load and incidence of injury during the preseason in professional rugby league players. J Strength Cond Res. 2010; 24(8):2079-2084.
  12. Gabbett TJ & Jenkins DG. “Relationship between training load and injury in professional rugby league players. J Sci Med Sport. 2011; 14(3):204-209.
  13. Fleisig GS, Andrews JR, Cutter GR, et al. “Risk of serious injury for young baseball pitchers: A 10-year prospective study.” Am J Sports Med. 2011; 39(2):253-257.
  14. Gabbett TJ & Ullah S. “Relationship between running loads and soft-tissue injury in elite team sport athletes. J Strength Cond Res. 2012; 26(4):953-960.
  15. Gabbett TJ & Whiteley R. “Two training-load paradoxes: Can we work harder and smarter, can physical preparation and medical be teammates?” Int J Sports Physiol Perform. 2017; 12(Suppl 2):S50-S54.
  16. Buist I, Bredeweg SW, Van Mechelen W, Lemmink KAPM, Pepping GJ & Diercks RL. “No effect of a graded training program on the number of running-related injuries in novice runners: A randomized controlled trial. Am J Sports Med. 2008; 36(1):33-39.
  17. Johnston CAM, Taunton JE, Lloyd-Smith DR & McKenzie DC. “Preventing running injuries: Practical approach for family doctors.” Can Fam Physician. 2003; 49:1101-1109.
  18. Rogalski B, Dawon B, Heasman J & Gabbett TJ. “Training and game loads and injury risk in elite Australian footballers. J Sci Med Sport. 2013; 16(6):499-503.
  19. Weiss KJ, Allen SV, McGuigan MR & Whatman CS. “The relationship between training load and injury in men’s professional basketball.” Int J Sports Physiol Perform. 2017; 12(9):1238-1242.
  20. Hulin BT, Gabbett TJ, Lawson DW, Caputi P & Sampson JA. “The acute:chronic workload ratio predicts injury: High chronic workload may decrease injury risk in elite rugby league players.” Br J Sports Med. 2016; 50(4):231-236.
  21. Hulin BT, Gabbett TJ, Blanch P, Chapman P, Bailey D & Orchard JW. “Spikes in acute workload are associated with increased injury risk in elite cricket fast bowlers.” Br J Sports Med. 2014; 48(8):708-712.
  22. Erhmann FE, Duncan CS, Sindhusake D, Franzsen WN & Greene DA. “GPS and injury prevention in professional soccer.” J Strength Cond Res. 2016; 30(2):360-367.
  23. Murray NB, Gabbett TJ, Townshend AD, Hulin BT & McLellan CP. “Individual and combined effects of acute and chronic running loads on injury risk in elite Australian footballers.” Scand J Med Sci Sport. 2017; 27(9):990-998. doi:10.111/sms.12719.
  24. Drew MK, Cook J & Finch, CF. “Sports-related workload and injury risk: Simply knowing the risks will not prevent injuries: Narrative review.” Br J Sports Med. 2016; 50(21):1306-1308.
  25. Blanch P & Gabbett TJ. “Has the athlete trained enough to return to play safely? The acute:chronic workload ratio permits clinicians to quantify a player’s risk of subsequent injury.” Br J Sports Med. 2016; 50(8):471-475.
  26. Morrison S, Ward P & DuManoir GR. “Energy system development and load management through the rehabilitation and return to play process.” Int J Sports Phys Ther. 2017; 12(4):697-710.
  27. Murray NB, Gabbett TJ, Townshend AD & Blanch P. “Calculating acute:chronic workload ratios using exponentially weighted moving averages provides a more sensitive indicator of injury likelihood than rolling averages.” Br J Sports Med. 2017; 51(9):749-754.
  28. Williams S, West S, Cross MJ & Stokes KA. “Better way to determine the acute:chronic workload ratio?” Br J Sports Med. 2017; 51(3):209-210.
  29. Bahr R. “Why screening tests to predict injury do not work — and probably never will…: a critical review.” Br J Sports Med. 2016; 50:776-780. doi:10.1136/bjsports-2016-096256.
  30. Meeuwisse WH. “Assessing causation in sport injury: A multifactorial model.” Clin J Sport Med. 1994; 4:166-170.
  31. Quarrie KL, Raftery M, Blackie J, et al. “Managing player load in professional rugby union: A review of current knowledge and practices.” Br J Sports Med. 2017; 51(5):421-427.
  32. Gabbett TJ, Nassis GP, Oetter E, et al. “The athlete monitoring cycle: a practical guide to interpreting and applying training monitoring data.” Br J Sports Med. 2017; 51:1451-1452.

  • « Go to Previous Page
  • Page 1
  • Interim pages omitted …
  • Page 130
  • Page 131
  • Page 132
  • Page 133
  • Page 134
  • Interim pages omitted …
  • Page 164
  • Go to Next Page »

Primary Sidebar

FEATURED

  • Using Speed and Power Data to Bucket and Train Faster Athletes
  • Plyometric Training Systems: Developmental vs. Progressive
  • 9 (Fun!) Games to Develop Movement Skills and Athleticism

Latest Posts

  • Rapid Fire—Episode #16 Featuring George Green: Holistic Athlete Management
  • Rapid Fire—Episode #15 Featuring Kyle Brown: What is Universal Speed Rating (USR)?
  • Why We Don’t Perform Hang Cleans

Topics

  • Adult training
  • App features
  • Artificial Intelligence
  • Athlete
  • Athlete performance
  • Baseball
  • Buyer's Guide
  • Career
  • Certifications
  • Changing with the Game
  • Coach
  • Coaching
  • Coaching workflows
  • Coching
  • College athlete
  • Course Reviews
  • Dasher
  • Data management
  • EMG
  • Force plates
  • Future innovations
  • Game On Series
  • Getting Started
  • Injury prevention
  • Misconceptions Series
  • Motion tracking
  • Out of My Lane Series
  • Performance technology
  • Physical education
  • Plyometric training
  • Pneumatic resistance
  • Power
  • Power development
  • Practice
  • Rapid Fire
  • Reflectorless timing system
  • Running
  • Speed
  • Sports
  • Sports technology
  • Sprinters
  • Strength and conditioning
  • Strength training
  • Summer School with Dan Mullins
  • The Croc Show
  • Track and field
  • Training
  • Training efficiency
  • Wave loading
  • What I've Added/What I've Dropped Series
  • Youth athletics
  • Youth coaching

Categories

  • Blog
  • Buyer's Guide
  • Freelap Friday Five
  • Podcasts

COMPANY

  • Contact Us
  • Write for SimpliFaster
  • Affiliate Program
  • Terms of Use
  • SimpliFaster Privacy Policy
  • DMCA Policy
  • Return and Refund Policy
  • Disclaimer

Coaches Resources

  • Shop Online
  • SimpliFaster Blog
  • Buyer’s Guide
  • Freelap Friday Five
  • Coaches Job Listing

CONTACT INFORMATION

13100 Tech City Circle Suite 200

Alachua, FL 32615

(925) 461-5990 (office)

(925) 461-5991 (fax)

(800) 634-5990 (toll free in US)

Logo of BuyBoard Purchasing Cooperative. The word Buy is yellow and shaped like a shopping cart, while Board and Purchasing Cooperative are in blue text.
  • Facebook
  • Instagram
  • Twitter
  • YouTube

SIGNUP FOR NEWSLETTER

Loading

Copyright © 2025 SimpliFaster. All Rights Reserved.