• Skip to content
  • Skip to primary sidebar
SimpliFaster

SimpliFaster

cart

Top Header Element

  • Facebook
  • Instagram
  • Twitter
  • YouTube
  • Login
  • cartCart
  • (925) 461-5990
  • Shop
  • Request a Quote
  • Blog
  • Buyer’s Guide
  • Freelap Friday Five
  • Podcast
  • Job Board
    • Candidate
    • Employer
    • Facebook
    • Instagram
    • Twitter
    • YouTube
You are here: Home / Blog

Blog

Barefoot Running

Optimizing Foot Function for Running with Dr. Emily Splichal

Freelap Friday Five| ByDr. Emily Splichal

Barefoot Running

Dr. Emily Splichal, podiatrist and human movement specialist, is the founder of the Evidence Based Fitness Academy, creator of the Barefoot Training Specialist®, BarefootRx®, and BARE® Workout Certifications, and inventor of Naboso Barefoot Technology. With over 16 years in the fitness industry, Dr. Splichal has dedicated her medical career towards studying postural alignment and human movement as it relates to barefoot science, foot-to-core integration, and from-the-ground-up training.

She is active in barefoot training research and barefoot education as it relates to athletic performance, injury prevention, and movement longevity. Dr. Splichal has presented her research and barefoot education both nationally and internationally, with her Barefoot Training Specialist® Program in over 35 countries worldwide and translated into 12 languages.

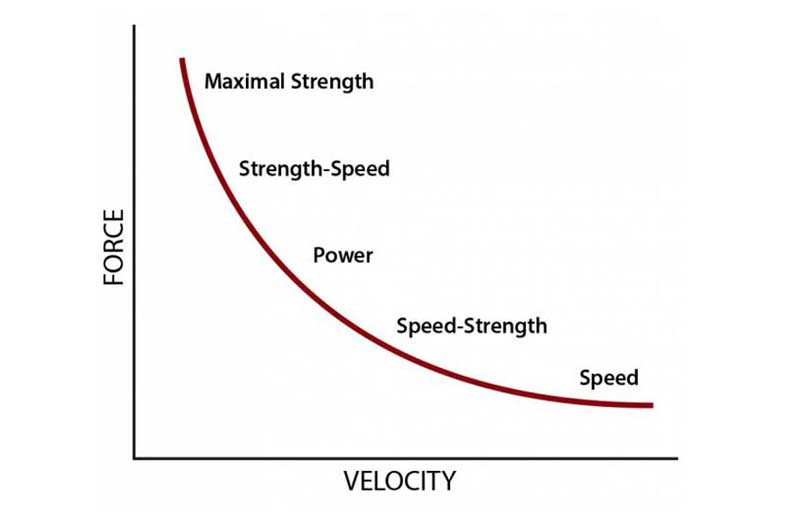
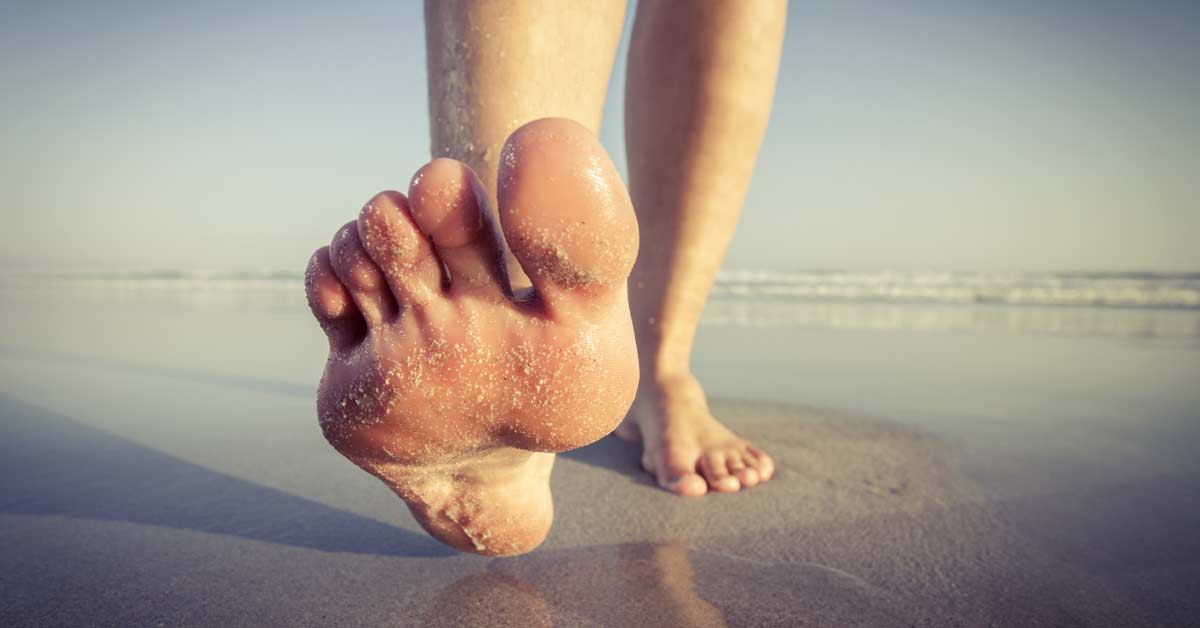
Freelap USA: What constitutes a “well-functioning” foot for running? What are some things that would lead you to see someone who can apply force to the ground well?

Dr. Emily Splichal: A well-functioning foot is one that is meeting the demands of running from both a biomechanical and neuromuscular perspective. Biomechanically, with every step we take, a well-functioning foot must be able to dance back and forth between supination and pronation very quickly—and within a small range of motion. The closer a foot is towards neutral, the easier it is to lock and unlock with each foot contact.

Neuromuscularly, a well-functioning foot must be sensory sensitive and myofascially integrated. This means that the plantar foot must be able to perceive the rapid onset of impact forces while creating a fascial tension response that happens before the foot even contacts the ground. This can be observed in a foot that has rapid contact time, which is through rapid stiffness before foot contact.

In a foot that can meet the demands of running, both biomechanically and neuromuscularly, you would notice shortened contact time, faster speed, and a fluidity and flow to their movement patterns.

Freelap USA: How do running shoes affect the natural function of the foot?

Dr. Emily Splichal: If we stick with biomechanical and neuromuscular aspects of the foot, running shoes can positively or negatively affect both characteristics. From a biomechanical perspective, a shoe with a heel toe drop will shift the natural mechanics of the foot. Now, if the foot needs more stability, the heel toe drop may be a positive effect. However, in most cases a heel toe drop interrupts the natural unlocking mechanism of the foot, thereby creating an increase in supination of the foot. This alters the window of range of motion the foot moves through during impact.

For optimal propulsion, our rearfoot needs to be able to spiral relative to the fixed forefoot, says @Doctor_Legs. Share on X

Another feature of footwear that alters natural foot mechanics is a shank, often presented as a plastic shell in the shoe that runs from heel to sulcus. It forces the foot to shift forward in a lever movement; however, due to the rigidity of this structure, it blocks torsion of the shoe and foot. Restricted torsion in footwear is one of the most common causes of insufficient stiffness and push-off. For optimal propulsion, our rearfoot needs to be able to spiral relative to the fixed forefoot.

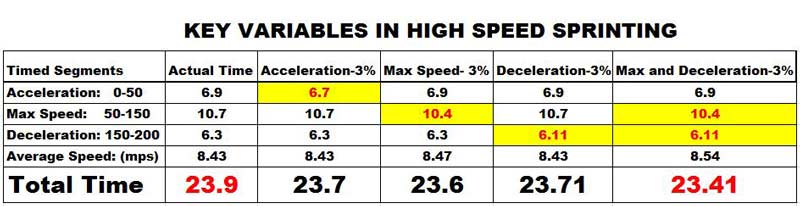
From a neuromuscular perspective, cushioning in footwear is one of the most controversial topics. From a natural foot function perspective, we need the sensory stimulation of impact forces and the cushions in shoes dampen or block them. Our nervous system uses the vibratory stimulation of impact forces to determine how hard we are striking the ground and to maintain dynamic balance. If the foot is not strong enough to absorb the impact forces entering the foot, then less cushioning in shoes can cause an increased risk for impact-related injuries. The best way to keep feet strong enough to offset impact forces is to integrate foot strengthening exercises into the athlete’s programming.

Freelap USA: Could you expand on the importance of the rearfoot, how torsion works, and how we can assess this? What are some training modalities to help improve this area of function?

Dr. Emily Splichal: All joints in the body move in an integrated and coupled fashion, and the foot is no different. When we look at the mechanics of the rearfoot, every time our ankle dorsiflexes, it creates an eversion moment in the subtalar joint. This eversion of the subtalar joint creates an internal rotation of the tibia. Conversely, every time we plantarflex the ankle, it leads to inversion of the subtalar joint and external rotation of the tibia.

It is these coupled joint movements that allow for integrated power and the release of energy. When it comes to runners, the foot needs to achieve sufficient inversion and tibial external rotation at push-off. If footwear restricts this, it can limit the runner’s speed and contact time.

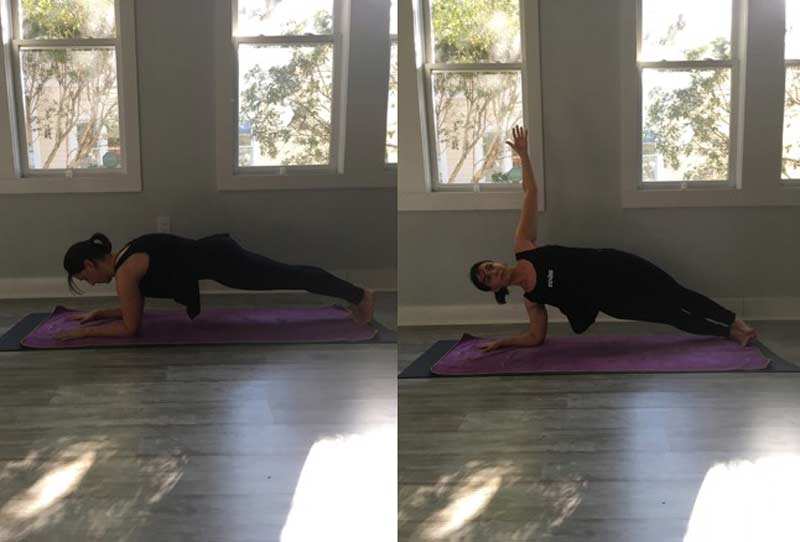
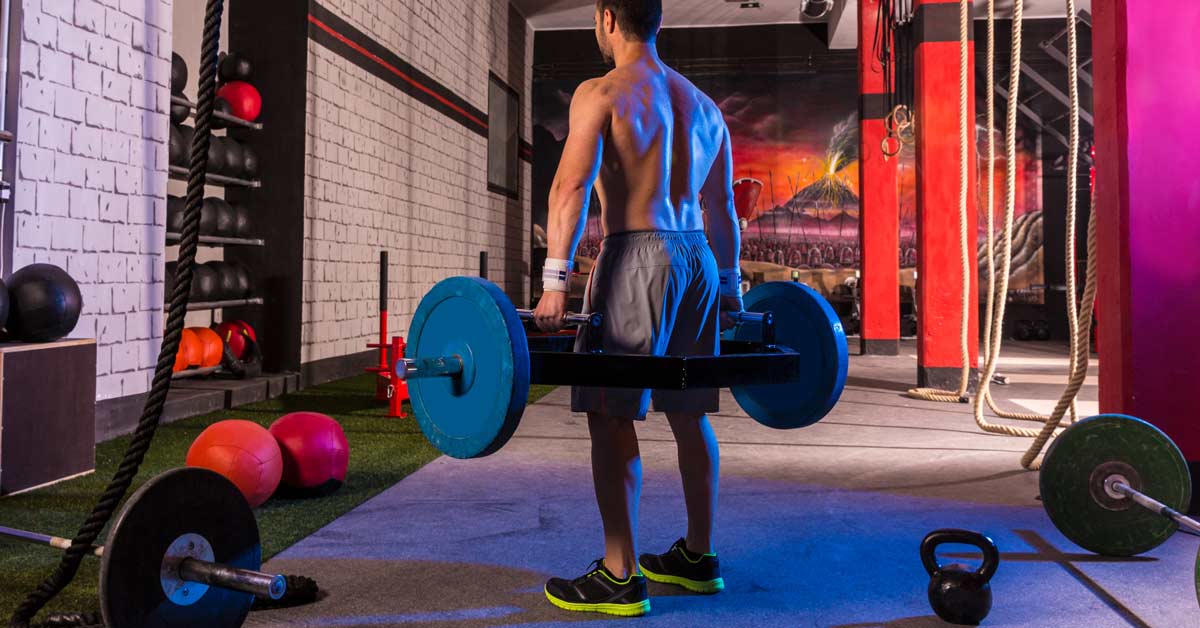
You can train this integrated joint coupling with the following exercise.


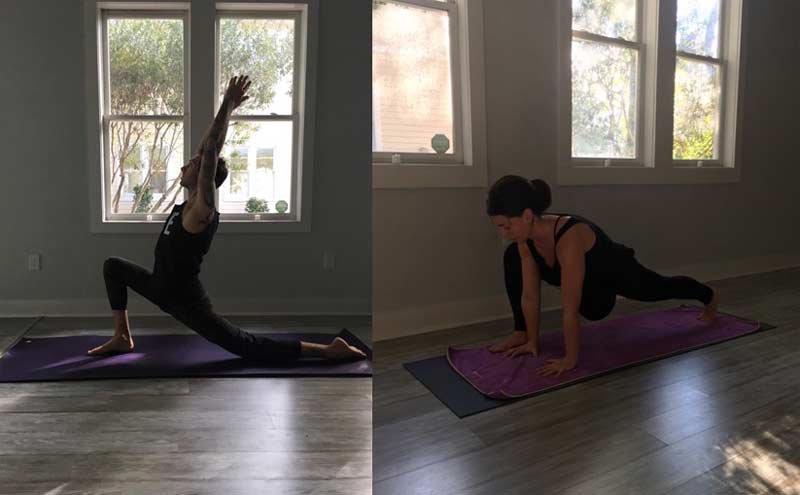
Video 1. A variation on the short foot exercise, this foot-to-core movement strengthens the muscles of the feet and lower leg up into the deep abdominals and glutes. This helps train the integrated joint coupling needed by runners for power and energy.

Freelap USA: What’s your take on “toe strength” and mobility, and how do we know if this is something our athletes should look at?

Dr. Emily Splichal: Toe flexor strength is extremely important to a runner’s performance. Research has shown that there is a direct relationship between toe flexor strength and acceleration and vertical jumps. Push-off, whether in running, walking, or jumping, requires a force going downward into the ground. This downward force creates a stable base and eliminates shifting during acceleration and power release. Force application would be greatly compromised if there was no downward force—for instance, think about running on ice.

The long toe flexors and plantar fascia play a critical role in toe purchase and this downward force during push-off, with both being the most active during the lever phase of the foot or propulsion. You should integrate exercises that strengthen this action of the foot into all runners’ programming. These all target the long flexors. Short foot is a long flexor exercise, as it targets the Deep Front Fascial Line, which includes the long flexors.

Freelap USA: What are some of the best exercises we can use to improve foot strength as it relates to the running cycle?

Dr. Emily Splichal: My three favorite exercises for strengthening the foot for running include short foot, a ball between the heel raise, and short foot single leg training—all done barefoot and ideally on the Naboso Proprioceptive Mat. The unique texture of the Naboso Proprioceptive Mat is designed to enhance foot stimulation, which will help runners tune into their feet.

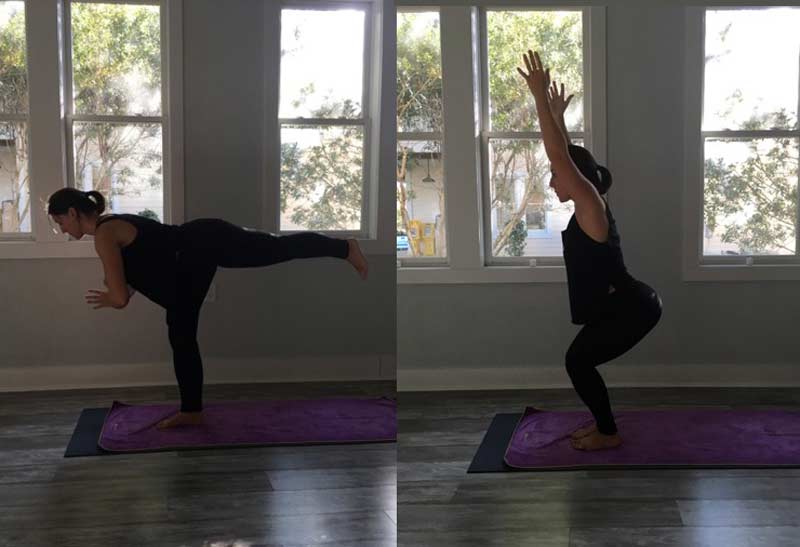
Short foot is an activation exercise that I use to coordinate the timing of the foot engagement with core engagement. It also strengthens toe flexor strength, which we just discussed as important for the push-off phase of running.


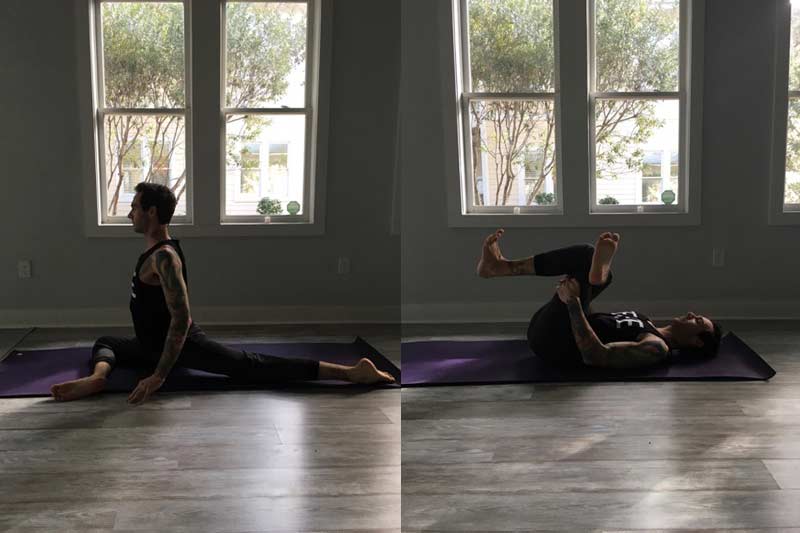
Video 2. The short foot exercise strengthens the small muscles of the feet, helping the body absorb impact and thus, helping prevent running injuries. Use it to coordinate the timing of foot engagement with core engagement, and to strengthen toe flexor strength.

The ball between the heel exercise that I mentioned earlier combines the power of short foot with a targeted posterior tibialis exercise. Myofascially, the posterior tibialis connects to our core muscles and therefore plays a role in the integrated stability of the foot.

Runners need exercises that integrate foot activation with core activation and breathing patterns, says @Doctor_Legs. Share on X

You can combine all of these into a series of exercises that integrate foot activation with core activation and breathing patterns. I advise my patients who are runners to do five minutes of these short foot single-leg exercises before they run. The impact on their rate of stabilization and force production is powerful.


Video 3. These short foot single-leg exercises have a powerful impact on a runner’s rate of stabilization and force production. I advise my patients who are runners to do five minutes of these before they run.

Since you’re here…
…we have a small favor to ask. More people are reading SimpliFaster than ever, and each week we bring you compelling content from coaches, sport scientists, and physiotherapists who are devoted to building better athletes. Please take a moment to share the articles on social media, engage the authors with questions and comments below, and link to articles when appropriate if you have a blog or participate on forums of related topics. — SF

Gluten-free

Do Gluten-Free Diets Increase Athlete Performance?

Blog| ByCraig Pickering

Gluten-free ingredients

Gluten-free diets are becoming increasingly popular, with sales of gluten-free foods reaching over $4 billion and growing in the United States alone. Many people attribute various symptoms to gluten including fatigue, bloating, and a general lack of energy. As always, athletes are quick to jump on any new trend, and gluten-free diets are no different.

Perhaps most famous among these athletes is Novak Djokovic, who quite often attributes his mid-career resurgence to avoiding gluten (and, of course, has a gluten-free book available). In fact, a 2015 questionnaire-based study shows that more than 40% of high-level athletes follow a gluten-free diet more than half the time. If so many athletes follow a gluten-free diet, should you? And, if you do, will it improve your performance?

Gluten and Celiac Disease

First let’s understand a little bit about the purported villain. Gluten is a protein found in wheat products and gives dough its chewy texture. Gluten is well-established as a trigger for celiac disease, which is an autoimmune disorder that affects the small intestine.

When people with celiac disease consume gluten, they have an abnormal immune response that causes an inflammatory reaction. Repeated exposures can lead to a wasting of the microvilli–small, finger-like structures in the small intestine that serves to increase its surface area, making absorption easier. When the immune response is triggered, people with celiac disease can experience such symptoms as diarrhea and bloating as well as malabsorption of nutrients. None of these are ideal for athletes.

While these symptoms sound scary, we’ve all likely suffered them in the past. Fortunately, celiac disease is somewhat rare. The vast majority of people with the disease have a genetic predisposition to it, specifically around a set of HLA genes. These genes play a role in immune function by enabling the body to distinguish self from non-self cells. Having these genes doesn’t mean you will get celiac disease. Indeed, the vast majority of people with the risk genetic variants never develop celiac disease. In total, about 1% of people develop celiac disease, although that differs across countries and ethnic groups.

The only treatment for celiac disease is a gluten-free diet, and those who suffer from it do need to avoid gluten. There’s another condition known as non-celiac gluten sensitivity (NCGS), which isn’t celiac disease but is a sensitivity to gluten. Approximately 10% of people have NCGS, although it’s quite a new diagnosis and is somewhat less well understood.

Gluten and High-Level Athletes

If 10% of people have celiac disease or NCGS, why do more than 40% of high-level athletes follow a gluten-free diet most of the time? According to the 2015 questionnaire-based study, those who reported following a predominately gluten-free diet did so based on a self-diagnosed gluten sensitivity (which is worrying) or no symptoms at all.

Ten percent of the athletes did have a clinically diagnosed gluten sensitivity, which is well within the normal range for a population. Almost as many had coaches, trainers, or a naturopathic doctor who recommended the gluten-free diet. Only 0.5%, or two people in the entire 910 subject sample, had a gluten-free diet prescribed by a nutritionist or dietician.

The sources of information about gluten and gluten-free diets is also concerning.

  • Of the gluten-free athletes, 29% said their main source of information was the internet, closely followed by their coach (26%) and other athletes (17%).
  • Only 15% of the gluten-free athletes said that their main source of information was either a dietician or a medical professional, the most appropriate professionals to make recommendations regarding a gluten-free diet.

Gluten and Athletic Performance

Because of how trendy and popular this diet has become, many athletes avoid gluten even though they don’t have any symptoms because they believe it will improve performance.

But will it? That’s what a study published in 2015 attempted to explore. Researchers put 13 endurance cyclists with no clinical history of celiac disease through a blind trial where the athletes consumed a diet either with or without gluten for seven days. They didn’t know which diet they were on because the gluten was included in a bar that had a gluten-free counterpart. After following each diet for seven days, the cyclists underwent a time-trial cycle test.

There was no difference in performance among the athletes consuming the gluten-free and gluten-containing diets. There was also no difference in their subjective feelings of well-being or on markers of inflammation. Simply put, for athletes who do not have gluten sensitivity, a gluten-free diet has no impact on performance.

For athletes who do not have #gluten sensitivity, a gluten-free diet has no impact on performance, says @craig100m. Share on X

How Does a Gluten-Free Diet Affect Athlete Nutrition

Gluten likely doesn’t have a positive effect on exercise performance, meaning we don’t need it to perform at our best. But because gluten is prevalent in foods, researchers are concerned that following a gluten-free diet may lead to nutritional inadequacy; it requires eliminating foods that contain nutrients that athletes need.

An obvious example is carbohydrates, many of which (bread, pasta, etc.) contain gluten. Athletes typically need more carbohydrates to support their training, and following a gluten-free diet may prevent them from meeting this requirement. Gluten-free diets can also be expensive, with some estimates putting the increased cost at 2.5 times that of a balanced diet containing gluten.

This isn’t to say that a gluten-free diet is always bad. Returning to the questionnaire study, 80% of the athletes who followed a gluten-free diet reported improved gastrointestinal symptoms, indicating they experienced some positive effects from eating non-gluten foods.

Of course, the true effects of gluten are hard to tease out. Only 10% of people should show sensitivity to gluten, and far more athletes self-report symptoms of gluten sensitivity that are resolved when following a gluten-free diet.

Prolonged #endurance exercise causes gastrointestinal distress in up to 90% of athletes, says @craig100m. Share on X

It’s important to point out that a large number of the gluten-free athletes (70%) in this study participated in endurance sports. Prolonged endurance exercise causes gastrointestinal distress, affecting up to 90% of athletes. Of course, a combination of factors can cause this gastrointestinal distress, including a reduction in blood flow to the gastrointestinal tract and consumption of very high carbohydrate sports drinks.

From a dietary perspective, FODMAPs (fermentable oligosaccharides, disaccharides, monosaccharides, and polyols) are linked to gastrointestinal distress, and reducing these foods can reduce symptoms of irritable bowel syndrome and non-celiac gluten sensitivity. Indeed, endurance athletes suffer far fewer symptoms of gastrointestinal distress on a low FODMAP diet when compared to a high FODMAP one, as shown by more recent research by Dana Lis, author of many of the papers explored in this article.

A targeted reduction in FODMAPs, as opposed to gluten, may be a better approach for athletes who self-diagnose gluten sensitivity. They should still work with a doctor and a dietician to explore all the potential causes, just in case they do have celiac disease.

Reducing #FODMAPS rather than #gluten may help athletes who self-diagnose gluten sensitivity, says @craig100m. Share on X

Of course, like a gluten-free diet, a low FODMAP diet also has the potential to be nutritionally inadequate, which is why it should be undertaken under supervision by a dietician or nutritionist. Fortunately people can reintroduce many FODMAP foods until they identify the ones causing the most distress. Athletes also have the option to periodize the low FODMAP diet around races or more intense training sessions, where they reduce FODMAP intake to minimize their symptoms and follow a more standard diet outside this time.

How to Decide If a Gluten-Free Diet is Appropriate

So where does this leave athletes considering a gluten-free diet? If they’re considering the diet because they’ve heard that it enhances performance, the research suggests it does not. If they’re considering the diet because they have gastrointestinal symptoms, it’s worth exploring under medical supervision where they can be screened for celiac disease.

If gluten sensitivity is ruled out, other foods components may be causing the gastrointestinal distress. The most common culprits are FODMAPs. Again, exploring this should take place under the supervision of a dietician. Finally, an athlete may consume low FODMAP foods around competitions and important training sessions, where gastrointestinal distress is more likely, and then follow a more standardized diet at other times.

If an athlete has no symptoms of gluten sensitivity, like most people, there’s no reason to follow a gluten-free diet. As Dana Lis’ research shows, too many athletes and coaches are self-diagnosing gluten sensitivities. This may lead to inadequate nutrition or might hide the symptoms of other gastrointestinal issues that should be addressed.

Since you’re here…
…we have a small favor to ask. More people are reading SimpliFaster than ever, and each week we bring you compelling content from coaches, sport scientists, and physiotherapists who are devoted to building better athletes. Please take a moment to share the articles on social media, engage the authors with questions and comments below, and link to articles when appropriate if you have a blog or participate on forums of related topics. — SF

Yoga Warrior Pose

Why Yoga Is Important For Soccer Players

Blog| ByTroy Cole

Yoga Warrior Pose

Yoga continues to grow in popularity in Western culture and with soccer players, and you do not have to go far to find a yoga studio offering a range of classes that will benefit you no matter where you are within your training regimen. Many top professionals advocate for yoga, saying it improves the longevity of an athlete’s playing career.

Ryan Giggs seems to be the individual speaking the loudest and he probably means the most to the community, as he tallied an astonishing 963 appearances with Manchester United of the Premier League. Riddled with injury early in his career. Giggs often refers to yoga as his “Fountain of Youth” and a huge reason behind his ability to play into his 40s. Beyond that, I can speak personally to the amazing benefits of yoga, as an extremely unrecognized name in the lower divisions of professional soccer.

Giggs refers to yoga as his “Fountain of Youth” and the reason he’s able to play into his 40s. Share on X

So, this begs the question: Should every soccer player “do” yoga? If yoga really is the answer to solving all physical problems, then why isn’t every single Premier League Club investing all of their money and time into this amazing practice? If it were only that simple…

“It tests parts of your body that you just don’t use in football [soccer]. The first time I did it, about five years ago, I was completely knackered. I went home from the training ground and slept for three hours in the afternoon. I actually dreaded yoga for the first year because it made muscles I didn’t know I had ache, although I know some of the lads think it’s really a bit soft.” –Ryan Giggs

This quote from Giggs points to the obvious growing pains to practicing yoga that take time to work past. On top of that, there are also many other priorities when it comes to the physical preparation of a soccer player. Since time and energy are limited, other players may need to focus on other specific areas of preparation, involving resistance exercise, conditioning, speed work, etc.

Although yoga has been in existence for thousands of years, it is still fitting that elite-level athletes have begun looking deeper into the reasons that this ancient practice has stood the test of time. You don’t have to look far within professional sports to see yoga’s widespread popularity.

To speak in clearer terms directly related to physical preparation, this article talks about six critical components of training, and how yoga integrates into each of them. These six essential areas are strength, speed/power, flexibility/mobility, cardiovascular fitness/energy systems development, recovery, and mental/emotional well-being.

Strength

If strength is the maximal amount of force that you can apply against a load, then yoga is not necessarily the first thing that comes to mind to train strength. Strength coaches often use external load in the form of barbells and dumbbells, along with additional equipment to assist in a progressive resistance program. However, a missing link that yoga may provide is in the context of core strength, posture, and positioning.

Yoga properly instructs the holding of poses and “bracing” of the core. On top of that, most strength coaches agree that proper core bracing will help transfer loads better from prime movers to carry over to major compound lifts such as a squat or a deadlift. Yoga may not be the fastest way to get strong, but it can add value to a strength program.

Here are a few poses that will apply to strength building in isometric fashion:

Forearm Plank

This isometric anti-extension core position is essential for low back health, core strength, and spinal stability. According to Stuart McGill, Ph.D., a professor of spine biomechanics, repeated 10-second holds help create residual stiffness of the core. This stiffness of the core will help the more global muscles of the arms and legs transfer forces, leading to greater athletic performance.

Form:

  • Maintain a neutral spine.
  • Keep chin packed.
  • Tighten your abdominals.
  • Activate your glutes to keep a neutral pelvis

Forearm Plank Forearm Side
Image 1: The Forearm Plank is an isometric anti-extension core position that helps with low back health, core strength, and spinal stability. Image 2: The Forearm Side Plank is an isometric core exercise that builds stability and rigidness, and can help alleviate back pain.


Forearm Side Plank

Another isometric core exercise, the Forearm Side Plank is essential in building stability and rigidness. Another key muscle engaged in the Side Plank is the quadratus lumborum, which plays a major role in alleviating back pain.

Form:

  • Maintain a neutral spine.
  • Keep chin packed.
  • Engage your core and raise your hips to form a straight line from the feet to the head.

Crescent Lunge

This posture is accessible to most soccer players, and helps strengthen the glutes, quads, and hamstrings. When held, it also helps lengthen the hip flexor on the back leg. When an athlete holds this posture, it helps to encourage a more aligned lunge position like the one used in sprinting.

Form:

  • Step one of your feet back about 3-4 feet, staying on the ball of your back foot and keeping your back fully extended.
  • Bend your top knee, flexed to stack directly over your ankle and try to keep your thigh close to parallel with the ground.
  • Extend arms overhead and slightly engage your core while maintaining a neutral spine.
  • Hold the posture for 3-5 breath counts, or around 30-45 seconds.

Crescent Lunge Warrior 2
Image 3: The Crescent Lunge strengthens the glute, quads, and hamstrings. Holding the position also lengthens the hip flexor on the back leg. Image 4: The Warrior Two engages the glutes, quads, and hamstrings in both legs, and opens up the abductor and adductor muscles.

Warrior Two

Another beginner-level pose, Warrior Two helps open up the muscles involved in frontal plane movements like the abductor and adductor muscles. You also engage the glute muscles, quads, and hamstrings in both legs.

Form:

  • Set up in a wide stance.
  • Keep your front toes pointed forward, while the back toes are at a roughly 90-degree angle.
  • The front knee is directly over the ankle, and in line with the second and third metatarsal bones.
  • Your shoulders remain over the hips.
  • Hold the posture for 3-5 breath counts or around 30-45 seconds.

Warrior Three

Warrior Three uses strength across the whole posterior chain, including the hamstrings, calves, ankles, and back. Single leg balance is increased along with posture and full body coordination.

Form:

  • Pressing your weight through one foot, start to lift the opposite leg back, drawing your full body parallel to the ground.
  • Keep your top leg fully engaged with a slight bend in your knee and your shin remaining vertical.
  • Hold the posture for 3-5 breath counts or around 30-45 seconds.

Warrior 3 Chair Pose
Image 5: The Warrior Three uses strength across the whole posterior chain. It also increases single leg balance, posture, and full body coordination. Image 6: The Chair Pose helps you properly contract the glutes, quads, hamstrings, and calves.

Chair Pose

The Chair Pose helps strengthen the muscles in the hips, knees, and ankles. You are able to properly settle in on contracting the glutes, quads, hamstrings, and calves when holding this position.

Form:

  • Your feet are hip-width apart to ankles touching.
  • Elevate your arms in the overhead position.
  • Shift your hips back first, before bending the knees to lower your body.
  • Posture muscles on the back keep the torso lifted as the lower body sinks down.
  • Hold for 3-5 breaths or 30-45 seconds.

Speed/Power

Power is essential to soccer players and athletes in all sports. The variable of speed added with force applied to a load is often what separates great athletes from just good athletes. Training power is no one-size-fits-all mold in itself; however, most training programs work along the force/velocity (F/V) curve to train power.

Yoga can ultimately use body resistance to train on the lower ends of force and velocity shown in Figure 1 below (because of the slow speed and isometric holds.) Slower speeds and isometric holds allow for the time and conscious control needed to properly recruit groups of muscles instead of relying on our primary/global muscles, which tend to take over.

Force-Velocity Curve
Figure 1. Force Velocity Curve.

Speed is perhaps the most talked about training principle in all of sports. Once again, speed is improved through a holistic approach, working on a number of aspects together that make an athlete fast. Yoga is by no means going to make you a track star overnight; nevertheless, you can argue that proper body positioning plays a part in speed.

Flexibility/Mobility

Flexibility and mobility are two components that can be constantly worked on and that will pay massive dividends. If you have ever trained with soccer players, you know how important it is to be mobile in all directions. On top of that, the rate of soft tissue injuries originating at the hip (hamstrings, glutes, hip flexors, and adductors) is extremely high. Flexibility and mobility are not going to prevent all injuries in these areas; however, we have enough science to say that normal hip mobility, in conjunction with healthy flexibility, can help soccer players move more efficiently through a full range of motion. When turning to yoga for inspiration, there are poses that you can easily “steal” to add to your warmups and cool-downs for opening up the hips.

Some yoga poses to add mobility specific to soccer in warm-ups and cooldowns are:

Low Lunge

The Low Lunge is a great way to focus on the hip flexor group, including psoas and iliacus muscles. This area receives a lot of attention due to its importance in hip flexion and proper hip extension.

Form:

  • Keep a neutral spine.
  • Put your back knee down and behind your hip.
  • Maintain a slight posterior pelvic tilt.
  • Actively draw the back hip forward.

Low Lunge Lizard Lunge
Image 7: The Low Lunge is a great way to work the hip flexor group, including psoas and iliacus muscles. Image 8: The Lizard Lunge’s main benefit is mobilization of the hip flexor group, inner hips, and outer hips.

Lizard Lunge

The major benefit of this pose is the ability to mobilize the hip flexor group and the inner and outer hips.

Form:

  • From push-up position, place a foot outside your hands.
  • Keep your spine neutral with your hips square with the ground.
  • Stay on the ball of your back foot, engaging quad and glute muscles and lengthening the hip flexors.
  • Variations can include lowering on your forearms or drawing your top knee away from your body to stretch the outer hip. 

Pigeon Pose

Another hip opener, the Pigeon Pose helps increase external rotation of the hip on the front leg and lengthens the hip flexors on the back leg.

Form:

  • Place your front shin down and close to parallel with the front of the mat.
  • Make sure your spine stays neutral and lifted.
  • Keep your hips squared off with your top shin.
  • Your back thigh will point towards the floor and extend back.

Pigeon Pose Figure Four
Image 9: The Pigeon Pose increases external rotation of the hip on the front leg and lengthens hip flexors on the back leg. Image 10: The Figure Four lengthens the external rotators and abductors of the hip, and places less stress on the knee than the Pigeon Pose.

Figure Four

Similar to the Pigeon, the Figure Four position helps lengthen the external rotators and abductors of the hip. This variation allows your spine to be neutral by remaining on the floor and places less stress on the knee than the Pigeon Pose.

Form:

  • In a lying position, place one lateral ankle directly on the opposite knee.
  • Hug behind the hamstring on the extended leg to bring the shin being stretched closer to your body.

Downward Dog

While activating your upper body, you also lengthen the whole backside of the body from the hips down, including hamstrings, calves, Achilles, and ankles.

Form:

  • From a position on your hands and knees, start to lift your hips to the sky.
  • Press firmly into your hands, drawing your head and chest through (and between) your arms.
  • Allow your heels to draw down and back to help lengthen the hamstrings and calves.

Downward Dog Recovery
Image 11: The Downward Dog activates your upper body and lengthens the whole backside from the hips down. Image 12: A yoga session can go a long way in helping a team recover from a heavy competition day, serving as an aerobic flush and calming mechanism.

Cardiovascular Fitness/Energy Systems Development

Soccer is all about variety when it comes to energy systems. A soccer match requires sprinting, jumping, and rapid change of direction(ATP-PC), and longer striding (glycolytic), with 90 minutes of constant moving and low-level activity (aerobic). Furthermore, soccer can have a pretty high demand on the cardiovascular system. With each training session and game requiring high bouts of intensity for up to two hours, stressing the higher energy systems outside of soccer is not always the best bang for your buck in season. In season, a foundational yoga practice can work as a low-level aerobic session without stressing the same joints and soft tissue as a light jog. In the offseason, you can utilize more of a cross-training effect by doing a faster-moving yoga practice, often dubbed “power yoga.” During a season or even on a heavier training day, you can still get an aerobic benefit from a foundational yoga class.

Here are three example metrics for recent heart rates during a foundational yoga practice (Figure 2), a powerful practice (Figure 3), and a soccer match (Figure 4).

Movement Summary
Figure 2. Heart rate during a session of foundational yoga.

This is a sample of a 38-minute yoga session with the participant wearing a heart rate monitor. With the heart rate peaking at 140 beats per minute and averaging just under 100 beats per minute, the cardiovascular system is working enough to elevate cardiac output without placing excessive stress on the system.

Yoga Heart Rate
Figure 3. Heart rate during a session of power yoga.

Right away, you can notice the difference in stress on the cardiovascular system with a different style of yoga practice. Power yoga requires more movement in harder poses that can elevate the heart rate. In terms of energy systems worked, most of the class targets the aerobic zone, with a few bouts that reach low-level anaerobic zones. Although the primary intentions of this class were not to specifically target the cardiovascular system, power yoga is a great way to experience the benefits of aerobic training without stressing any of the joints like you might with running. This is useful during a block of cross-training where you are trying to receive cardiovascular benefits while staying away from the soccer field.

Soccer Heart Rate
Figure 4. Heart rate during a 90-minute soccer match.

This sample metric is a 90-minute soccer game, including half time. It shows an example of what your cardiovascular system goes through during a normal match. Your highest energy systems (ATP-PC/anaerobic) are being stressed constantly, which brings the highest amount of intensity to both your physical body and central nervous system. Because you are constantly exposed to this type of stressor, engaging in a more passive mode of exercise, like yoga, can really help complement the demands of a soccer match.

Recovery

There are more competitions, more travel, less time between competitions, and higher demands than ever in the sport of soccer. Recovery is a massive variable in both an individual’s and a team’s success. When battling fatigue and still trying to maintain fitness, everyone looks for new ways to recover.

Using examples from the world’s elite organizations, it is clear that the day after heavy competition is used as a recovery-focused day. On this day, players usually do some sort of “aerobic flush,” followed by a number of modalities to help recover the muscles, tendons, and joints. Beyond utilizing yoga as an aerobic flush on a recovery day, you can also utilize yoga-like movements in your immediate recovery after training sessions and/or competition.

Recovery Yoga Session

Sessions can include the use of yoga techniques that include breathing, calming music, and mental imagery, along with tailored postures and positions to assist players with recovery.

Mental/Emotional Well-Being

Perhaps one of the most neglected areas in sports is the psychosocial aspect within all teams. With all the sorts of daily stressors, meditation and relaxing techniques seem to be talked about with more regularity. Yoga’s attention to breathing techniques and bringing people to the present moment are some highly underestimated benefits for team sports. With mindset truly making or breaking top athletes, it is necessary that we begin to look at ways of improving this area.

Beyond the physical realm of yoga, some often-overlooked benefits can include:

  • Increased focus
  • Increased mental clarity
  • Learning to detach from negative feelings/emotions
  • Bringing intention, purpose, and motivation

Yoga: Simple, Timeless, and Easy to Implement

Enough information is available to show the benefits that yoga brings to the sport of soccer. Beyond that, players can take what they learn about yoga to develop a personal practice that may include breathing techniques on top of the physical poses that complement them best. Whether players are stiff, beaten up, or inflexible, they can take up yoga.

Yoga is simple and timeless, and makes a great complement to any training drills and exercises. Share on X

Ultimately, you will benefit by including yoga as a part of your program if you utilize it correctly. As the next off-season begins, you can certainly find ways to add in yoga to your program and shock your athletes’ systems. Like almost everything, starting something new can be difficult. However, with consistency, you will see results and decide for yourself as to yoga’s place within your training program. Depending on players’ time and energy, you may practice yoga two to three times weekly or just include 15 minutes’ worth of postures in your warm-up and/or cooldown. Different variations of the practice of yoga will only be a benefit.

Our world is full of technology, with all types of gadgets, gizmos, and “groundbreaking” training methods. Yoga is simple and timeless: It’s one of the oldest practices known to mankind and makes a great complement to your team sport or life. Not only will you see and/or feel the immediate benefit from a single session, you will also realize the lasting benefits that go along with a consistent yoga practice.

Since you’re here…
…we have a small favor to ask. More people are reading SimpliFaster than ever, and each week we bring you compelling content from coaches, sport scientists, and physiotherapists who are devoted to building better athletes. Please take a moment to share the articles on social media, engage the authors with questions and comments below, and link to articles when appropriate if you have a blog or participate on forums of related topics. — SF

Running Plyometrics

Special Strength and Plyometric Development with Joseph Coyne

Freelap Friday Five| ByJoseph Coyne

Running Plyometrics

Joseph Coyne is an exercise physiologist and sport scientist from Gold Coast, Australia. He is currently the Physical Preparation Coach for the Chinese Athletics Association’s jump & sprints section, where he handles the rehabilitation and strength and power training for China’s best track and field athletes. Previously, he was the Performance Manager at the Chinese Olympic Committee’s National Sports Training Center in Beijing in the lead up to the Rio Olympics. Athletes supported by this program won 34 medals (including 19 gold medals) at the 2016 Olympics. As a speaker, Joseph has lectured at many international conferences, including in China, United Kingdom, United States, Australia, and New Zealand.

Freelap USA: You’ve talked about the idea of maximal jump displacement in light of a specific ground contact time, rather than simply going for a raw RSI score. Can you go into some specifics of how this might play out in training?

Joseph Coyne: I feel that although RSI is a great start with athletes, it can be misleading. A lot of times a really short contact time can make an RSI look great even though displacement isn’t that good. And I think you must always go back to the critical aspect or main aim for the sport, and that is displacement, both for sprinting (e.g., getting to 100m in a sprint) and jumping (e.g., long jumping as far as possible).

You must always go back to the sport’s main aim, and that is displacement for #sprinting and jumping, says @josephcoyne. Share on X

Just like RSI, the same goes for peak power or peak force. It can be a really sexy number, but it will always be secondary to displacement in my line of thinking. Anyway, this displacement is obviously constrained by an absolute contact time (e.g., ~80-90ms for elite sprinters and ~120-130ms for the last step in the long jump) and this is obviously related to RSI, but I feel that you should view it from that slightly different lens—at least in more advanced jumpers/sprinters.

Practically, if you’re doing jumps for training and you want to start tracking this, a contact mat like SmartJump is the easiest way of doing it. SmartJump is great because you can set a contact time to keep below and it’ll give real-time feedback if the athletes spend too long on the floor.

For example, two jumps I like keeping track of in my battery are a repeated 2L or 1L pogo and a 1L depth jump from 40cm in the takeoff leg. The pogo is going to relate to maximal velocity reasonably well and the 1L depth jump from 40cm is going to relate to the last step takeoff for a jumper—at least in the takeoff leg. The pogo for 2L I would normally aim for below 100ms (it’s quite hard to get lower even with 2L) and the 1L depth jump from 40cm, below 150ms.

Once you have those rough guidelines and you obviously have your particular athletes, you can decide whether you: 1) get them to those CTs first and then try to maximize displacement second or 2) keep as much displacement as possible while working on getting the CTs down gradually.

Freelap USA: What is your approach to applying special strength, and when is it appropriate to get beyond the “standard” battery of cleans, squats, and single-leg hinges in the weight room when it comes to building speed?

Joseph Coyne: Because the main aim is to get transfer with everything you do, and loaded sprinting and jumping drills can be excellent for skill acquisition, I personally would start as soon as the athlete can consistently perform the drill that you want to load. So, for example, if you want to load a high knee/front-side run, I don’t see a problem with putting some weight on it as soon as they can do it well consistently.

Staying away from this type of training because you want to hit some magical squat number in the gym beforehand is a big mistake because you won’t be influencing the F-V curve around your chosen activities (e.g., sprinting and jumping). Of course, when you start loading it, you don’t have to go crazy. Holding a 3-5kg medicine ball in various positions (e.g., on chest, outstretched arms, overhead) or wearing a 5kg weight vest are really easy ways of starting before putting a barbell on their back to do the drill.

In application, I would probably start just with a bit of it in technical or gym sessions and then, once you get to a decent barbell strength level (e.g., 1.8x BW squat, 1.3x BW clean, 1x BW snatch), you should really increase your focus on this type of training. The other consideration is the stage of the season and you can generally go less at the start of the season and more towards competition time. Obviously, the stronger, more competent athlete might do more at the start than the novice athlete would. A taller, longer-legged athlete might also do more of this compared to a shorter athlete with a longer torso.

As an example, I’ve been part of final periods before major competitions where six to eight weeks out, all we used for “strength” were weight vests, ankle weights, ball throws, etc., except for a couple of barbell lifts like a step up and clean once or twice a week.

Freelap USA: How do you approach bar speed monitoring with your track athletes throughout the weekly and monthly training cycles?

Joseph Coyne: There are heaps of strategies, but generally I guess I have three defunct approaches: 1) same speed, 2) same load, and 3) decreasing loads. The first approach would be to set the minimum speed threshold that I want an athlete to stay over and then they go as heavy as possible while maintaining that speed. For example, with a clean, if they start from a hang and there is a countermovement/SSC, then I like speeds above 2.2m/s. With no countermovement/SSC (e.g., from the floor or blocks), above 2m/s is where I would set the standard. Then from week to week you just want them to get heavier above that speed.

The second approach is to get faster and faster using a set weight. An example here would be a non-countermovement jump and 100% BW load, and each week you ask your athlete to go a bit quicker.

The third approach is based around peak power (which is obviously related to bar speed), where you: a) find the weight the athlete produces peak power at and then b) you decrease the weight from week to week, but ask the athlete to maintain the peak power as close as possible to what they can achieve at their peak power weight.

For example, an athlete’s peak power weight in a six-rep repeated 2L jump is 50kg where they can achieve 60W/kg. From here, you would aim to decrease the weight from week to week but keep the peak power as close as possible to 60W/kg. This is a great one for getting F-V curve adaptations to start to emphasize where you actually compete in a sport—with no additional load!!

As a quick note, these approaches use mean velocity for a classic strength lift (e.g., squat, step up) and peak velocity for a ballistic lift (e.g., Olympic derivative, loaded jump). Because not many of my programs have non-ballistic lifts, I mainly deal with peak velocity.

Freelap USA: What considerations do you make in hamstring training for athletes as they become more advanced in their maximal speed?

Joseph Coyne: Ha ha… This could be a dissertation for me! I feel that once an athlete can start sprinting above 10ms, the hamstrings become a lot more fragile and you have to be pretty careful with how you train them—outside of obviously sprinting, which of course is the best hamstring training for what we want to do!!

An example of this is that I had to be really careful with doing Nordics with the sprint/jump athletes I trained in China. None of them had great knee flexion strength relative to bodyweight and they couldn’t do too much Nordic volume or they would all either: 1) not be able to run fast due to soreness or, even worse, 2) pick up posterior knee pain. So I used a really low-volume approach with them: Think 2×3 or 2×4, once a week.

After there is a basic proficiency and hamstring strength relative to bodyweight, one of the main things I then consider when I train them is I want to remodel an athlete’s hamstrings to have longer fascicle length and improved eccentric strength. This is all based on Opar & company’s hamstring “Quadrant of Doom” matrix. The important thing to consider here is that isometric and concentric actions can actually shorten fascicle lengths, whereas eccentric actions (along with sprinting, in a recent paper) lengthen the fascicle.

That means you at least have to emphasize the eccentric part of an exercise or, in some cases, only perform the eccentric contraction. Cool ways of doing this include drops to catch with a barbell or bodyweight, or using something like a flywheel. In saying that, please don’t throw the baby out with the bathwater and drop all isometric and concentric training for the hamstrings!! It all depends on the context of where the athlete is at: You might concentrate on eccentrics for one portion of your training plan.

Don’t throw the baby out with the bathwater and drop all #isometric & concentric hamstring training, says @josephcoyne. Share on X

The type of volume I mentioned above has also been shown by the same research group to be as effective as a high volume (think 5 x 10) approach in changing fascicle length. So always do as little as possible!

Other things to consider are that you want to use knee flexion and hip extension movements. You probably have to take any ground-based exercise to standing and then to a gait cycle if you want to have a good chance of getting a protective effect in sprinting. So, for knee flexion, that could mean a continuum of something like: 1) a supine hip flexed manual eccentric knee flexion; 2) a Nordic; 3) a walking lunge into an A cycle; and 4) a band-resisted A/B drill. For hip extension, it could be something like: 1) eccentric accentuated hip extension in a GHR; 2) a kBox RDL; 3) a scissor jump; and 4) a band-resisted straight leg bound.

Other considerations include also doing specific jumps (e.g., a RDL jump) targeting the hamstrings and frequency-based hamstring exercises (e.g., speed exchanges on a Swiss ball) to try and get contraction speeds closer to what you might get in sprinting. Lastly, I also focus a lot on cleaning up femoral and sciatic nerve tension to help with the sprinting.

Freelap USA: What are some of your favorite training methods and applications using the 1080 Sprint?

Joseph Coyne: My experience with the 1080 has generally involved Randy Huntington barking orders at me to set it up at different speeds or loads (ha ha). Everything I’ve done with it has been under his guidance with his group of long jumpers in China.

In saying that, I think we did some great work with it as a contrast or potentiator between or before free sprints. For example, a resisted acceleration on the 1080 might be alternated with a free acceleration or an approach (or even a sled acceleration for a sled change in mode). Another example might be a set of resisted/assisted flys before the sets of free flys for maximal velocity.

I think the assisted work and the level of control you can have with it can really give a nice benefit; provided you make sure mechanics and the nervous system are respected and you progress to less and less load pulling you on the 1080. Things I would like to do in the future include playing further with accelerations at peak power (~50% max velocity à la Cross/Morin, etc., although you can just see it automatically on the 1080). I also would love to work with it with field and court sport athletes for change of direction speed.

Since you’re here…
…we have a small favor to ask. More people are reading SimpliFaster than ever, and each week we bring you compelling content from coaches, sport scientists, and physiotherapists who are devoted to building better athletes. Please take a moment to share the articles on social media, engage the authors with questions and comments below, and link to articles when appropriate if you have a blog or participate on forums of related topics. — SF

Female Sprinter Block Start

Debating Speed: Is Acceleration, Max Velocity, or Speed Endurance Most Important?

Blog| ByKen Jakalski

Female Sprinter Block Start

Perhaps the “safest” answer to the question of what contributes most to getting a sprinter to the finish line faster would be to say acceleration, max velocity, and speed endurance are all interconnected. Each makes an essential contribution as a specific point. You can’t get to top speed without accelerating, and you can’t sustain max velocity over multiple 10-meter segments without experiencing a decline in top end speed.

But what if you had to choose just one for the sake of argument? What would that be? And what if the debate then involved the insights of a respected biomechanist vs. the convictions of a highly successful high school track coach? Would their choice be the same?

In his book, Sports Biomechanics: The Basics, professor Anthony Blazevich asks the following question in the opening paragraph of his first chapter: “In a 200 meter race, who would most likely win, the athlete with the fastest acceleration or the athlete with the highest top speed?”

Chemistry teacher and track coach Tony Holler, of Plainfield North, would not hesitate in giving his opinion. However, before we get to that, let’s look at an interesting parallel issue that my SupportForce, Inc. partner, Barry Ross, presented 10 years ago.

A Tale of Two Sisters: Two Approaches to Training for Speed

In the blog post, “A Tale of Two Sisters: Finding Common Ground,” Ross profiled two sisters. He was coaching one of them at the time, and both were successful in their respective track events. Sasha was a short sprinter whose longest competitive race was the 400. Her best effort was a 14.13 in the 100 meter hurdles. Her younger sister, Tara, was a middle-distance runner with a best in the 800 of 2:11. The two had a chance to race head-to-head in the “outlier” race for both of them: the 400.

What would happen? Sasha’s focus in training was on short, high-speed efforts. Younger sister Tara trained for the 800 in a more conventional manner.

Ross compiled ASR (anaerobic speed reserve) data on both girls. Sasha’s 10 meter T1 test was a 1.09, and her top 300 meter T2 time was 40.5. Sasha’s top aerobic speed was 4.44 m/s, her anaerobic speed was 4.26 m/s, and her anaerobic speed reserve was 9.24 m/s.

Anaerobic Speed Reserve Calculations
Figure 1. The analysis from the Weyand/Bundle speed algorithm for Sasha, a short-distance sprinter.

Tara’s T1 10-meter fly was 1.20 and her 300 meter T2 best was 41.5. Her aerobic speed was 5.43 m/s, her anaerobic speed was 2.75 /m/s, and her anaerobic speed reserve was 8.38 m/s.

Anaerobic Speed Reserve
Figure 2. The analysis from the Weyand/Bundle speed algorithm for Tara, a middle-distance runner.

Tara was much slower in terms of anaerobic speed and anaerobic speed reserve, but had nearly a full 1 m/s faster aerobic capacity—not surprising for an 800 runner. From this data alone, you would suspect Tara would have the decided edge in the 400.

However, Ross looked more closely at what he suspected might be a key factor: Sasha’s 1.09 meter fly vs. Tara’s 1.20. Ross felt that her .11 second difference over 10 meters was enormous. For the fly’s 10-meter distance, she ran 10.17 m/s compared to Tara’s 8.3 m/s. Sasha’s 300 speed was 7.41 m/s, while Tara’s was 7.23 m/s. Calculating out to 800 meters, Tara has the advantage: 6.67 m/s compared to Sasha’s 6.14 m/s. But the race was the 400m, which was not the “preferred” event for either girl.

So, how would that head-to-head 400-meter race turn out? The ASR projection had Tara at 57.7 and Sasha at 58.2, but with a 3% margin of error in the algorithm, the results could be closer or farther apart. Ross did have his suspicions. After all, he once ran Alyson Felix head-to-head against the best 800 runner in their conference, and she won by a considerable margin.

An Agreement, Not a Debate

At this point, let’s jump back to Blazevich’s question about acceleration vs. top speed, which is interesting because his charts suggested that top speed was the critical factor. That would not surprise Tony Holler, who has always been adamant about the significance of training his cats to be fast: “Never will a 1.08 sprinter outperform a .98 sprinter if both are healthy. Usain Bolt ran the fastest 10-meter segment in human history: 0.81. Enough said.” 

Holler further emphasized the importance of top end speed: “By the way, the 4 x 400 is a sprint relay. Anyone who tells you otherwise is probably a distance coach and doesn’t understand sprinting.” 

These comments are worth considering relative to both Blazevich’s opening question, and what might happen when the 800 runner comes down to the 400. Blazevich based his conclusion on collecting data similar to what Ross did with the ASR speed regression algorithm. Blazevich looked at times over 50 meters to chart acceleration. He also looked at times between 50 and 150 meters to assess top speed, and times from 150 to 200 meters to analyze deceleration from fatigue. I used his approach in assessing one of my own sprinters.

Key Variable in High-Speed Running
Figure 3. Maximum running speed influences Improvements in average speed.

So, what were Blazevich’s conclusions, what did I see in my analysis, and what was the answer he asked his readers to determine?

“The greatest improvement in running times are achieved by improving average speed, which is most affected by improvements in maximum running speed.”

After comparing the average speed and total times for running 200 meters, Blazevich explained his position, noting that “improving the maximum speed phase of the race by 3% has a more profound effect on the average speed, and therefore on the total time, than improving any other individual phase.”

Why? Blazevich saw the maximum speed phase being twice as long (100 meters) as the acceleration or deceleration phases (both 50 meters).

Therefore, what we end up with is an agreement and not a debate. The runner who improves average speed the most will run the fastest 200, and they can accomplish this best by improving their maximum running speed. And it appears that this might have some implications even for the 400. Holler’s response: “We get fast all year and then we train to hold our speed for up to 400 meters.”

But what really happened in the “Tale of Two Sisters” running the 400?

Max Speed Is the Key to Track Speed

The race was a photo finish. Tara ran 58.44 and Sasha ran 58.46. Ross chose this particular race because the 400 seemed to be common ground between more aerobic dominant races and more anaerobic dominant races. Both sisters were very competitive athletes, especially against each other.

Tara followed traditional middle-distance training protocols, while Sasha ran significantly shorter distances in training. For example, Sasha’s longest workout training distance was 55 meters. Her average high speed distance was a fly-in 25 meters, and the average number of reps per workout was five.

It is interesting that the ASR algorithm pretty much predicted what happened. And note at what race distance things began to change. You can also look at the last column in the chart to see what it projected Tara’s best time in the 800 might be.

Speed Projection
Figure 4. Putting the data from the two sisters into the Weyand/Bundle speed algorithm.

I also found it interesting that the “meeting point” of the two athletes with different ASR profiles was 20 meters short of the 400-meter distance. Note that Sasha had the advantage up to that point. That’s important for those who believe that the “drop dead” type sprinters (100-200) can’t be competitive in the longer sprint race without more classical 400-meter training. It appears that it is very possible to run this race and deliver competitive times without having to resort to longer, intermediate paced workout runs.

Considering the unique nature of this challenge, and just how close the competitors were at the finish, I don’t believe the results dispute Holler’s overarching philosophy:

Max speed is the key to track speed. No other predictor comes close.

Since you’re here…
…we have a small favor to ask. More people are reading SimpliFaster than ever, and each week we bring you compelling content from coaches, sport scientists, and physiotherapists who are devoted to building better athletes. Please take a moment to share the articles on social media, engage the authors with questions and comments below, and link to articles when appropriate if you have a blog or participate on forums of related topics. — SF

References

  • Banta, Ryan J. Sprinter’s Compendium Vervant Publishing, 2017
  • Blazevich, Anthony J. Sports Biomechanics: the Basics: Optimising Human Performance. Bloomsbury Publishing, 2013
  • Ross, Barry. “A Tale of 2 Sisters: Finding Common Ground.” Bearpowered, 2008, www.bearpowered.com
Why We Sleep

Why We Sleep Book Review

Book Reviews| ByCraig Pickering

Why We Sleep

We all know that we need sleep. Research consistently shows the negative effects of not getting enough sleep: It increases our risk of a variety of ailments, including coronary heart disease and diabetes; leads us to make errors in our daily life; can make simple tasks—such as driving—much more dangerous; and impacts our moods. The same is true for sport, and there likely isn’t an athlete around who hasn’t been told about the importance of sleep. And yet, we know that athletes, and indeed coaches, don’t get anywhere near enough, with research often reporting an average sleep duration of fewer than seven hours per night.

The Caffeine-Adenosine Link

There are various reasons for this. We ingest more caffeine than ever before, evidenced by the fact that 2.2 billion cups of coffee are consumed daily across the world. Caffeine is a stimulant, and works by blocking adenosine from binding to its receptors. Adenosine is the chemical responsible for making us feel sleepy; it builds up over the course of the day, creating something called “sleep pressure,” which makes us tired and (hopefully) sends us to sleep. When we sleep, we remove the adenosine from our brain, so that when we wake up the next day, the sleep pressure is gone, and we can attack the day refreshed.

That’s all fine in theory, but of course we don’t get enough sleep, meaning that we don’t have the time to get rid of all the adenosine in our brain. Therefore, when we wake, that sleep pressure remains. This causes many of us to self-medicate in the form of caffeine, which stops adenosine from having its effect (although it doesn’t remove it from our brain) so that we can function. This becomes a self-perpetuating cycle: We consume more caffeine because we’re tired, and we’re tired because we don’t get enough sleep.

The caffeine-adenosine link was one of the first things I learned from my recent reading of Why We Sleep by Matthew Walker, founder of the Center for Human Sleep Science, and a professor of neuroscience at the University of California, Berkeley. The book is the most recent in a long line of “sleep self-help” bestsellers, including Night School, The Sleep Revolution, and Sleep: The Myth of 8 Hours. The popularity of these books tells a story in itself; adults know they need more sleep, a fact constantly reinforced by these book sales, and yet they don’t. So why is this?

Humans Are the Only Animals That Skip Sleep

Well, as Shona Halson, a leading expert on sleep in sport recently wrote, change is difficult, and we often believe the effort required to make a change isn’t worth it. The addictive nature of social media means we can’t resist checking our devices before bed, and before we know it, half an hour has passed. Similarly, the always-available entertainment on Netflix means that we want just one more episode before we go to bed, and the next thing we know we’ve binge-watched four hours and are facing another night of insufficient sleep.

All animals sleep, but humans are the only ones that elect to shorten or avoid this behavior. Share on X

Here’s another interesting fact from the book for you: all animals sleep, and yet humans are the only ones who routinely elect to shorten or avoid this behavior. It says a lot about human nature that we think we can overcome or simply ignore our hardwired biological need to meet our minimum requirement of sleep. Another fact from the book is that after a poor night’s sleep, the brain will never get back all the sleep it has lost, even if there is somewhat of a sleep rebound effect the following night. Routinely skipping out on a sufficient amount of sleep represents the loss of an opportunity for recovery that you will never get back.

A Breakdown of the Book

Of all the books on sleep I’ve come across, this is perhaps the one that best explores the science underpinning our need for sleep. The book contains chapters on how sleep enhances learning, and how a lack of sleep drives a number of health issues, including Alzheimer’s, cancer, and Type 2 diabetes. There is also a whole section dedicated to dreams, and what their purpose may be. For me, the key takeaway when it comes to the science is this: Sleep is so important to humans that, through evolution, we’ve found it best to spend around eight hours a day doing it—even when our risk of being attacked is much higher—rather than “evolve” our way out of needing sleep.

The book is split into four main sections, each comprised of three to five chapters. The first section deals with what sleep is, how it evolved, and how it works. This section was perhaps the most interesting for me, because it covered aspects I hadn’t come across before. Typically, I approach sleep from a sports performance perspective, as opposed to an evolutionary and biological aspect, so having this information at hand is really useful.

The second part of the book explores why we should sleep. Personally, a lot of this was old news to me, as it focused on the well-established health issues that can occur due to lack of sleep. The most interesting chapter in this section dealt with how sleep can affect the brain, especially learning and creativity. Both of these are crucial not just for athletes, but also coaches, who often have to utilize their creativity to effectively solve problems.

Sufficient sleep can help an athlete emotionally recover from the setback of poor performance. Share on X

The third part focused on dreaming, which was also interesting. A particular standout fact for me was the section on how sleep allows us to emotionally “deal with” stressors that have occurred during the day, resolving them and allowing us to move on. Again, this has a huge carryover into sport, where athletes can often dwell on poor performance, to the extent that it can have a lasting effect on them. Getting sufficient sleep can therefore aid in the process of the athlete recovering from such setbacks.

Finally, the last section looks at how we, and society in general, can sleep better. From a sporting perspective, the main thing appears to be avoiding early morning practices, especially with teenagers—they have a delayed circadian rhythm, and so getting up early can stunt their development.

A Deeper Look at Sleep Requirements

Overall, I’d recommend this book if you wish to know more about sleep. It’s far more general than Nick Littlehales’ book, which focuses on improving your own sleep. Instead, this book is a more generalized exploration of what sleep and its associated dream states are, what functions they play, and the societal and personal issues associated with a lack of sleep. As such, it’s also a deeper, perhaps more scientific look (similar to Wiseman’s Night School) at our requirement for sleep.

Athletes aren’t the only ones impacted by poor sleep—coaches are too. Share on X

This can be as much of a wake-up call for coaches as it can for athletes. Being under-slept leads to poorer decisions, which can reduce athlete performance, and can also impact your moods, making interactions with your athletes difficult. Quite often, coaches focus on improving their athlete’s performance—perhaps it’s time they focused on their own.

Since you’re here…
…we have a small favor to ask. More people are reading SimpliFaster than ever, and each week we bring you compelling content from coaches, sport scientists, and physiotherapists who are devoted to building better athletes. Please take a moment to share the articles on social media, engage the authors with questions and comments below, and link to articles when appropriate if you have a blog or participate on forums of related topics. — SF


Posterior Chain Exercises

The Posterior Chain: A Modern Approach and Perspective

Blog| ByHunter Charneski

Posterior Chain Exercises

What has happened to the posterior chain? Not too long ago, it was all the rage in the strength and conditioning industry, thanks in large part to Louie Simmons and his consistent feats of creating the strongest athletes on the planet. However, with long term athletic development now the new gold standard with today’s athlete, craftsmanship of the posterior chain seems to be a thing of the past—a fossil, forgotten.

The pendulum has swung too far in favor of athletes’ ‘show’ muscles over their ‘go’ muscles, says @huntercharneski. Share on X

I am not naïve enough to discount the importance of the anterior chain, as it is the “yin” to the posterior chain’s “yang,” but I do believe the pendulum has swung too far in favor of athletes’ “show” muscles. You win with what you cannot see, you win with what is behind you, and you most certainly win with a powerful set of “go” muscles. Having said that, let us set the mirror aside for now and walk through the progression model I use to aid the development of robust and resilient athletes on the quest for strength and speed.

Who Am I Serving?

Before I detail our plan, I have to preface it with the truth: I do not work with elite athletes. The athletes I am blessed to serve hope to bridge the gap between good and great. I share that for two reasons:

  1. Athletes aged 8-18 years old can become drastically better with nearly any training method, system, or parameter.
  2. Piggybacking off that, if you expect a never-before-seen, earth-shattering model for how I progress my athletes’ posterior chains, you will be radically disappointed. We perform the basics, with ruthless attention to detail.

I am lucky to serve a myriad of athletes: hockey, wrestling, tennis, you name it. The one commonality among all the athletes that darken our door is their burning desire for speed. However, they lack the driver (mechanics—specifically, upper body mobility), engine (posterior chain), tires (intermuscular coordination), and pit crew (competent coaches).

My Philosophy and the Plan

Our “philosophy” for the development and layering of the posterior chain may seem underwhelming to most readers, as we liken this model to a postage stamp—we stick to one thing until we get where we want to go. Depending on the quantitative or qualitative prescription, we either build muscle or movement. Particularly with qualitative prescription, it is not the “what” but the “how” that is of the utmost importance to us. The first progression model I detail is that of the dreaded hinge.

Hinge Progression

Building the Hinge is somewhat of a duality. We aim to cement a foundational movement pattern, as hinging can become bastardized quickly once we apply load. Having said that, we do need to overload the system in order to produce the horsepower needed (initially) for our athletes to go from 0-60 in no time. Fortunately for our athletes, they need not choose between “the ball and the sword,” as we provide both.

Figure 1. Hinge Progression from Level 1 through Level 4 movements.
Hinge Progression Movement Volume
Hinge vs. Pipe 4 sets x 8-12 reps
Band Pull-Throughs 4 sets x 6-10 reps
Kettlebell RDL 4 sets x 6-8 reps
Barbell RDL 3 sets x 6-8 reps

Hinge vs. Pipe

In my experience, athletes (especially youth) have tremendous difficulty differentiating between their hips and lower back. We have found success time and time again with the progression above, and the journey begins with an extremely sophisticated gadget—a PVC pipe.

The pipe provides phenomenal tactile feedback for the athlete, as it’s in constant contact with the head, spine, and coccyx. This allows the athlete to self-teach and correct before and during the movement’s execution, because if the pipe or body strays from the three points of contact, they are sure to fail.


Video 1. The pipe provides phenomenal tactile feedback for the athlete, as it’s in constant contact with the head, spine, and coccyx. This allows the athlete to self-teach and correct before and during the movement’s execution.

While the pipe takes care of everything above the waist, what strategy do we employ if the athlete, despite keeping spinal neutrality, wants to move vertically and not horizontally? We have found the following two options to be successful 100% percent of the time:

  • Place a foam roller behind athlete and cue them to “knock” it over with their butt.
  • Tell a story (with or without roller) of how they help their parents unload groceries from the car with their hands full of bags, and all they have left to do is shut the car door. Since both arms are full of groceries, how are they going to shut the car door? By pushing back with their butt.

Do not fall for the sucker’s choice and underestimate the value of this Level 1 movement. As coaches, we tend to progress too quickly based not on the athlete’s level of engagement, but our own. Coaches will typically get bored before an athlete ever comes close. Let us take our own advice and trust the process. Athletes typically perform this movement for a minimum of four weeks before we progress to Level 2. 

Don’t progress too quickly based on your own level of engagement instead of the athlete’s, says @huntercharneski. Share on X

Band Pull-Throughs

Our Level 2 movement in the hinge progression may seem extremely elementary at first glance, and believe me, I felt the same initially. Most other camps (if this movement is in their repertoire) utilize a weighted cable, but due to my facility’s operational and financial restrictions, we had to resort to an elastic band. Technology is never in short supply in our system (sarcasm).

Athlete after athlete, rep after rep, I began to feel affinity for this movement. Truth be told, even if I did have access to a weighted cable tower now, I would still use the elastic band. Why? The band serves as a form of accommodating resistance, where the “weight” increases (band stretches) as the athlete engages their glutes and extends her hips. Conversely, when the resistance is at its relative maximum, it is easier for the athlete to hinge backwards as the band literally “pulls” her hips. In short, the feedback the band provides makes this movement accessible because:

  • The resistance is highest at the beginning or “top” of the movement, allowing the athlete to feel her hips move horizontally, resulting in performing a flawless hinge.
  • The resistance is lowest while the athlete is in the hinge position, allowing her to forcefully push her hips forward without having to overcome substantial “load.” A cue that works for us time and time again is for the athlete to “race” the band to the top.

One common issue we see with this movement is that, as the athlete pushes her hips back and perfects the hinge, her toes leave the floor. I don’t know about you, but the ground is a piece of real estate we like our athletes to have a relationship with; it is their personal force-plate—use it!

Having said that, when this happens, we cue the athlete to “curl” their big toes into the ground. This accomplishes two things:

  • She feels her whole foot on the ground—
  • By curling her big toe into the ground, she also accesses substantially more glute activation while extending her hips. Try it, I dare you—


Video 2. The band serves as a form of accommodating resistance, where the “weight” increases (band stretches) as the athlete engages her glutes and extends her hips. Conversely, when the resistance is at its relative maximum, it is easier for the athlete to hinge backwards as the band literally “pulls” her hips.

Band pull-throughs are timeless, can serve a myriad of athletes regardless of sport or training age, and can be utilized at any point in a coach’s periodization plan. This movement can be prescribed with triphasic applications, dynamic effort, or just “greasing the groove” to cement this pattern. Of course, there is the concept of overload, which is where we progress into Levels 3 and 4. 

Kettlebell & Barbell RDL

Only after our athletes display extreme ownership and proficiency in Level 2 will we place an external load in their hands. Enter an “oldie but goodie” with the RDL. This is where the progression begins to shift from movement to muscle, and we begin crafting the engine with Levels 3 and 4. Again, our series is nowhere near revolutionary; we simply overload the athlete to maintain a highly adaptive state.

Our cue quiver varies only slightly with these two variations, but the setups are almost identical:

  • Tall and tight (cue them to be somewhere between a “sad dog” and “macho man”).
Neutral Posture
Image 1. Athletes typically enter our facility in a state of flexion (sad dog) or extension (macho man). The goal is to bring neutrality to the spine and be “tall and tight.”

  • “Soften” the knees (unlock).
  • Make a “double chin” to keep head in line with spine.
  • Breathe and brace.

As the movement begins with horizontal displacement, that is when our cueing begins to differ:

Kettlebell

  • Drop the bell between the shoelaces.
  • (If they want to “pull” or bend their arms.) Our hands are just “hooks.”

Barbell

  • Curl the wrists under (prevents “throttling” of the bar).
  • (If the bar begins to stray from their body.) The bar is a paintbrush; “paint” your legs.

To ensure a forceful lockout, we have found success with “squeeze the penny,” an external cue meaning there is a penny between the athlete’s butt cheeks. Hey, we work with kids. External cues (no matter how strange) get the job done.

One common issue we see every now and then (especially with barbells) is the athlete’s spine beginning to resemble the “sad dog”—as the photo above depicts—as the barbell approaches the knee. To rectify this, we have almost exclusively employed a snatch-grip when programming the barbell RDL. The wider hand placement allows the athlete to push his hips back more efficiently, rather than feeling the weight “pull” him out of the groove.

As this process plan goes on, you will notice Levels 3 and/or 4 have the briefest descriptions or rationales. This is because, as I mentioned, it is simply overload at this point in the process, and the foundation (Levels 1 and 2) matters most. A pyramid is only as tall as its base, so let the drill do the talking and the athlete do the walking.

Deadlift Progression

The Hinge Progression’s focus was two-sided, as we aimed to develop proper movement, but also sprinkled in some overload to keep eliciting positive change and build some “go.” The Deadlift Progression’s focus is much narrower: muscle.

Figure 2. Deadlift Progression from Level 1 through Level 3 movements.
Deadlift Progression Movement Volume
Deadlift Patterning with Band 4 sets x 8-10 reps
Kettlebell Deadlift 4 sets x 5-8 reps
Trap Bar Deadlift 5 sets x 5 reps

Deadlift Patterning with Band

We want to build an engine capable of spectacular force production, and Level 1 kicks off that process nicely by teaching the athlete to extend her hips violently, while also subconsciously developing the proper arm mechanics needed for sprinting by driving her hands down, not back. This will create vertical displacement when we get her to upright running. Win.


Video 3. This exercise is a favorite of mine to teach as it requires a high level of interaction between athlete and coach.

The order of cues that has worked when teaching this movement are:

  1. Sit in a chair.
  2. Arms like Superman.
  3. Squeeze your armpits.
  4. Squeeze the penny.

The band provides excellent tactility for staying “tall and tight” as discussed earlier. After at least a month with this exercise and an upgrade in bands resistance-wise, Level 2 won’t pose a problem. The athlete will be more than capable of moving the weight vertically without straying from the way.

Kettlebell Deadlift

Do not undervalue this exercise. I will say that again, do not undervalue this exercise. The Kettlebell Deadlift is not merely a placeholder between Levels 1 and 3, but a wonderful expression of force around the athlete’s center of mass.

This movement is excellent for developing an intimate relationship between athlete and floor, as it is rare that one of my athletes can execute this movement from the floor on Day 1. Our “to-the-floor” layer is as follows:

  • KB Deadlift + two Mats – four weeks
  • KB Deadlift + one Mat – four weeks
  • KB Deadlift from floor

Now, you don’t need me to tell you that we do not train robots. The nice and neat four-week layers are not set in stone; we rely on the best coaching tool we have—our eyes—when determining whether (or not) to progress an athlete.

Do not undervalue the Kettlebell Deadlift, says @huntercharneski. Share on X

The mats serve not only as a mediator between athlete and floor, but also as a source of extrinsic motivation. In my environment, we may have 15 youth athletes at one time, and several have “earned the right” to pull the bell from the floor. A young person becomes extremely motivated by her peers: as the mat provides extrinsic motivation to work towards the floor, she becomes intrinsically motivated to “earn the right” as well. Did I mention not to undervalue this exercise?

The “problem” we encountered with this exercise was determining when to progress an athlete to Level 3—the Trap Bar Deadlift. How do we objectively determine this? I am not sure if we can, but we decided to employ Dr. Yessis’ 1×20 method in order for a young person to bridge the gap from bell to bar. If the athlete can pull our heaviest bell, weighing 88 pounds, for one set of 20 reps at a 212 tempo, he will have “earned the right” to step into the Trap Bar.

My rationale behind this is not sexy. I just fell back to the size principle, in which slower twitch fibers are recruited initially and, as the set progresses and fatigue onset begins, the faster Type IIB fibers are called upon to execute the remainder of the set. If the athlete can prove to me that he can handle a progression from lower to higher intensity, combat fatigue, and maintain focus all in one set, he has my endorsement for Level 3. If you have a better way, feel free to let me know, but this is what has worked for us. 

Trap Bar Deadlift

This movement has been catching a lot of flak lately in the S&C community. I am not one to say it is perfect by any means; all I know is what I know. What I know is the athletes in my environment benefit immensely from this final installment in our deadlift progression.

I believe one reason for the flak it has caught is because many coaches and athletes bastardize the Trap Bar Deadlift by making it no different than a squat, with the bar in their hands as the lone differentiator. If properly coached and executed, this movement is hip dominant, leaving the quads out of it. The only argument I can imagine for keeping it quad-dominant is that an athlete’s quads are working harder during acceleration than the posterior chain. This is true, I won’t argue that, but my priority is building more horsepower, not torque.


Video 4. If treated as a hinge and not a knee-flexion exercise, the Trap Bar Deadlift is a valuable tool in any coach’s exercise pool. Unfortunately, it is too often coached and executed no differently than a squat.

Aside from the athlete’s learning curve from bell-to-bar, fatigue is the only issue I have with Level 3. Conversing with and observing the athletes is critical, as any time we use our hands to “grip” something, neural fatigue becomes a very real thing. It can lead to overtraining and possibly injury, as form is often the first to decay. As JL Holdsworth has said, “That which has the potential to do great good, also has the potential to do great harm.”

Knee Flexion/Extension Progression

When I laid out the progression for knee flexion/extension, I had one thing in mind: sprinting (surprise, surprise). As the Hinge Progression focused mainly on building muscle, or the athletes’ engines, we focus our attention now on the tires (movement), or more specifically, the athletes’ intermuscular coordination. More digestibly, the vigorous relationship between the agonists and antagonists.

Figure 3. Knee Flexion/Extension Progression from Level 1 through Level 4 movements.
Knee Flexion/Extension Progression Movement Volume
Partner CHG (Eccentric Only) 4 sets x 6 reps
Val Slide Leg Curls 4 sets x 6-8 reps
Seated Band Leg Curls 4 sets x 10-20 reps
Sprinting 4 good runs

In my opinion, and in the opinion of many coaches smarter than me, for hamstring development to best aid in speed, three non-negotiable qualities must be met:

  1. High movement velocity/frequency
  2. Violent alternating flexion and extension
  3. Hamstring is stretched under load of eccentric phase, not concentric

Partner CHG

Many in the industry refer to this movement as Glute Ham Raise or GHR, but leave it to me to be the rebel, as there is an important piece that is missing in the common title—the calves! Calf Ham Glute is what we call this partnered exercise. Care to guess why? Didn’t think so.


Video 5. This is about as general as it gets in terms of hamstring development to aid in speed. There is low movement velocity and zero alternation of flexion and extension, but the athlete’s hamstrings are stretched under load during the eccentric. This exercise is valuable in the off-season and for injury prevention.

This exercise’s contraction is eccentric only, not because we are sick and sadistic with our athletes, but because:

  • We are building general strength qualities, something they do not yet possess. I have yet to see a novice perform a perfect Nordic curl in our environment.
  • The prolonged eccentric re-lengthens and remodels the tissue, having a positive influence on injury prevention.

In order for an exercise to be worthy of our exercise “pool,” it needs to meet the following criteria: safe, economical, efficient. The Partner CHG passes with flying colors on all three, especially in economy. It requires zero equipment, just another organism (I couldn’t help myself; had to throw that buzzword in there), which is never an issue at my facility as it is 100% group training sessions.

For us, as coaches, to consider an athlete’s execution of the Partner CHG a success, three things need to be displayed with optimal proficiency:

  1. Straight line, head-to-knee (this is not a razor curl).
  2. Glute performs an isometric contraction—squeeze the penny!
  3. A 3-5 second eccentric contraction, as the athlete “lets the floor come to her.”

While this may be one of the most “foolproof” exercises known to humanity, even the Partner CHG is not immune to mistakes and errors. If the athlete performing the movement is unable to display any sort of eccentric control, we again utilize an incredibly advanced piece of equipment – the elastic band. The accommodating assistance of the band helps his descent to resemble “falling” into foam, rather than crashing to the earth like a sack of potatoes.

Band Partner CHG
Image 2. The band allows the athlete to “fall” more slowly to the floor, as the resistance increases the closer she gets to the floor. The band will also aid in the return (concentric) portion of the exercise.

Val Slide Leg Curls

In Level 2, we reincorporate the concentric component, and the athletes are so “thankful” we do so. The Val Slide Leg Curl is our Level 1 turned upside down, as the athlete’s upper back and head are now cemented to the ground, while the legs have more degrees of freedom. The same muscles are recruited (calf, ham, glute), and by dorsiflexing the feet we incorporate the calves, especially during the concentric phase. We call upon the glutes once again via isometric contraction for the movement’s duration. (Level 1 and 2 are great forms of fascial raking, because we “wake up” down-regulated glutes, as our athletes are also students who literally sit all day). Lastly, the hamstrings now move “freely” through all three contraction types, eliciting encouraging adaptation for the trainee.

The only issue we run into with Val Slide Leg Curls is the athlete lacking the general strength to hold himself “up” in order to execute the movement properly. Now, I’m no master of movement, and in my environment one thing you learn to stomach quickly is the question, “What level of imperfection are you OK with?” With that, I have no problem allowing an athlete to drive his elbows into the ground so he can then access the full range of motion needed to execute the exercise.

“Load it…explode it!” is a cue you will hear time and time again as our athletes execute Level 2. We encourage a controlled (not slow) eccentric component, followed by a concentric contraction with some violence to back it up. In the Knee Flexion/Extension Progression, the main focus is to get the athletes moving from slow to fast, as the ultimate goal is the expression of high force at high velocity (i.e., sprinting). This is followed by Level 3. 

Seated Band Leg Curls

We now begin to assemble (somewhat) the qualities needed for the athletes to run fast by incorporating high-movement velocity and alternating flexion/extension. At first glance, this exercise may seem easier, or even elementary, compared to Levels 1 and 2. As coaches, we must remember we need to get these youngsters strong first, before they can display their strength quickly (which is essentially what is performed in Level 3).

With the athlete seated on a bench or box and facing the rack or wherever the band is fastened, cue her to forcefully flex and extend her legs by likening it to “flicking a light switch ON and OFF as quickly as possible.” It seems simple enough, right? Often, two key elements of this exercise get overlooked:

  1. The athlete’s posture: If her back is as crooked as a question mark, you need to address it. Posture is first on my sprinting “checklist.”
  2. The athlete’s toes: If her toes are lax, or even worse—plantar flexed—cue her to “bring her toes to her shins,” as this will engage the calf in this exercise. More importantly, her ankles will be stiff, not gooey, when she strikes the ground when sprinting.

Sprinting – The Timeless Modality

Newsflash: If you are an athlete at our facility, you will sprint—a lot. I will spare you the benefits of sprinting, as you can surely find that in any other piece I have written and it is beyond the scope of this article. In terms of posterior chain development, is there a better option than sprinting? High force, high velocity, fast alternation of flexion and extension, and it is not bilateral.

While the athletes at my facility will undoubtedly accelerate and sprint during their progression from Levels 1 to 3, it is only to make sprinting more tolerable and decrease their “effort,” as sprinting should be a relaxed endeavor. Al Vermeil once told me, “It is not how fast you can contract, it is how fast you can relax.”

At this stage of the game, we have built an engine, and we have provided an excellent set of tires to “move more freely” with a high RPM.

Upper Body Posterior Chain Progression

Figure 4. Upper Body Posterior Chain Progression from Level 1 through Level 3 movements. Ninety-five percent of our athlete population never makes it past Level 1 or 2.
Horizontal Row Vertical Row Shoulder Stability
½ Kneeling Single Arm Row ½ Kneeling Lat Pulldown Face Pulls
Recline Row Tall Kneeling Lat Pulldown Single Arm Face Pulls
3-Point Dumbbell Row Isometric Chin-Up Hold Double Arm Face Pulls

I must preface the upper body segment by bringing awareness to the fact that the majority of the athletes we work with are of the team sport variety. You may be wondering what that has to do with anything. This is prudent to note because we aim to provide the optimal, not maximal, amount of muscle.

Again, why does this matter? it matters because the goal is speed, and if we pack on too much muscle, sprinting mechanics will deteriorate because the increased muscularity will diminish the degrees of freedom needed to express high force at high velocity. If the lower body is the engine, the upper body is the driver, and the posterior shoulder’s swing action orchestrates the symphony of projection from the waist down.


Video 6. This is a phenomenal Level 1 movement for beginners. As is often the case with young athletes, the “reaching” portion of the movement gets them out of extension as the scapula glides forward.


Video 7. We employ this movement to not only achieve upward/downward rotation, but elevation/depression as well through reaching. This is a staple in our chin-up progression.

Of course, these are team sport athletes we are talking about, so we do overload and progress the levels in order to elicit an appropriate level of hypertrophy and strength necessary to protect them. To continually overload with reckless abandon becomes detrimental to the athlete for the reasons stated before. Remember, posterior chain is the “go” not the “show,” which is why all but one exercise across all three categories uses the athlete’s own body or an elastic band. The fastest athletes I work with all have great relative strength.

I could dissect each category and level for the upper body posterior chain progression, but that simply wouldn’t be realistic, as 95% of our athlete population never makes it past Level 1 or 2. However, regardless of category, the progression (or lack thereof) from level to level must be done with an extreme amount of discipline and fortitude. The majority of athletes I work with have never seen Level 2 in shoulder stability. Why not? That’s the wrong question—why do I need to progress them if they: a) are getting stronger; b) have hypertrophied; and c) have unrestricted range of motion? Movement > Muscle.

Final Thoughts on Applying Posterior Chain Training

I work primarily with young athletes. What is their greatest need, or want? Ask anyone between eight and 18 years old, and they will tell you they wish to become faster. Speed is king. What problems are they facing? Whether it is their coach, their teammates competing for playing time, or the opposition, the external enemy is easy to identify.

While these external enemies don’t stand a chance, I am more concerned with the internal enemy: the athlete’s confidence, or lack thereof. An athlete shouldn’t have to question herself or her abilities, which is exactly why I take great pride in the crafting of the posterior chain.

This #PosteriorChain progression plan gifts the athlete with a powerful set of ‘go’ muscles, says @huntercharneski. Share on X

Is the anterior chain important? No question. Are other training modalities important? No question. Do we take time to address other aspects of training, leaving no stone unturned? No question. But we have been where they are. By giving them this plan, we gift them a powerful set of “go” muscles, transforming them from Ford Bronco to Ferrari on their journey to success, and helping them avoid potholes on the way.

Since you’re here…
…we have a small favor to ask. More people are reading SimpliFaster than ever, and each week we bring you compelling content from coaches, sport scientists, and physiotherapists who are devoted to building better athletes. Please take a moment to share the articles on social media, engage the authors with questions and comments below, and link to articles when appropriate if you have a blog or participate on forums of related topics. — SF

Full Squat

An Introduction to Strength and Strength Training

Blog| ByJamy Clamp

Full Squat

Most literature defines strength as the ability to produce force by muscular contraction. Newton’s first law of motion states that an object will remain at rest unless a force is placed upon it. For instance, my cup of tea will not move unless I push against it. This law refers to inertia, which is essentially an object’s reluctance to move.

Newton’s second law of motion, referring to the acceleration of an object, states that force is a product of mass (kg) and acceleration (meter/second). Finally, Newton’s third law states: “For every action, there is an equal reaction.” For this, imagine a baseball player or cricketer catching a ball. Unless they want their teeth caved in, they apply a force against the ball to prevent any further negative work.

Now, imagine this principle during the bench press. To overcome the gravity of a significant mass, we apply a greater quantity of force to the barbell. This is an example of positive work. Recently, a golf coach highlighted the importance of the third law in his sport during a conversation. In theory, if a golfer can apply more force against the floor, the clubhead velocity that they can generate should be greater. With more velocity, as well as other technicalities, the ball should travel further.

Verkhoshansky and Siff refer to strength as having two divisions: structural and functional.1 Structural training is the process of affecting the musculature itself, such as an increase in actin and myosin filaments as a result of heavy strength training. Generally, structural training serves the purpose of inducing hypertrophy, whether it is myofibrillar, where an increase in the density of fibers is evident, or sarcoplasmic, where cellular cytoplasm increases. Functional adaptations are the products of training that are then expressed during sports performance: for instance, strength-speed. While it may seem obvious that understanding the purpose of training is imperative before programming, there is a distinct difference between the two in terms of the variables of load, sets, reps, rest, and variation.

Cycle of Performance Contributors
Figure 1. Cycle of performance contributors.2 While physical ability is most likely to affect an athlete’s performance on the field, court, or track, or in the pool, there are many other performance contributors that also play a part.

Fortunately, and certainly more recently, coaches and parents alike have “succumbed” to the premise that physical ability is not the sole contributor to performance. It is the most likely to change the outcome on the field, court, or track, or in the pool but, without addressing the more holistic elements, there is a chance that athletes work at 70%. Coaches are mainly full-time strength and conditioning practitioners, but also part-time (bordering on full-time) life coaches.

Types of Strength

There is more to strength than what we see when a powerlifter grinds a 475-pound deadlift. That would be a case of absolute strength, which is the maximum amount of tension and force applied to an object, irrespective of mass. You just get that weight up and hope that you do not pass out.

Absolute Strength

Absolute strength refers to the level of effort (load lifted) with no relation to body mass. Where absolute strength is trained, the load is going to be at 1RM.

Relative Strength

Whereas absolute strength does not consider body mass, relative strength does. Generally, you can calculate relative strength by dividing your body mass by your 1RM.

Speed-Strength

With speed-strength, there is a tendency for players and coaches alike to believe that they are training power. While there is a fine line between the two qualities, speed-strength still requires a significant amount of force in order to overcome the load on the bar. But, having said that, the load on the bar is ultimately irrelevant if performance on the field of play does not improve. So, a better definition of speed-strength is the physical ability to generate high force and do so at high velocity, hence the confusion with power.3 Generally speaking, speed-strength can be trained within the 80-90% range of 1RM.

Specific Strength

As the principle of specificity suggests, specific strength refers to the motor skills required to perform a particular sporting movement. In essence, specific strength is the force that is capable of being exerted during sport skills, or imposed on somebody, as in the case of rugby. Many coaches will likely program specific strength phases as the general preparation period (GPP) approaches its conclusion.

The work of Frans Bosch focuses on the specific and often highly complex nature of sport skills. The motor pattern refers to the movement required, whereas the sensorimotor ability involves internal sensory input, such as muscle tension (slack). Therefore, it seems that specific strength training should not simply attempt to mimic the sporting movement but incorporate the sensorimotor demands.4

There are many resources regarding specific strength, none more useful than the original Special Strength Training (Verkhoshansky). However, a coach’s knowledge and, importantly, their understanding of their sport are both invaluable when considering specific strength training. A lot of research, while useful, is performed by scientists within a controlled environment.

A coach’s knowledge and understanding of their sport are invaluable for specific strength training, says @JamyClamp. Share on X

This is where a deep understanding of the sport that the coach works in is paramount. I will use the “jackal” position as an example from rugby. Done with precision and aggression, it is one of the most valuable assets to possess on the rugby field. Besides practicing the position during rugby training, players can supplement it with exercises performed in the weight room. However, that requires an understanding of the demands and experience with “jackaling.”

Why Strength Training?

It is correctly stated that strength alone does not mean that the player is more competent on the field. Having a standard of strength means that they are in a position to lift more with, hopefully, a greater velocity. The ultimate goal is for that player to make use of their weight room ability to affect the execution of their sports skills. 

Does training lead to a better performance during the game or event? 

If the answer is no, it is essential to address why.

Sport Performance Equations
Figure 2. The equations used to calculate various strength properties. Momentum is a valuable expression, of particular importance to those involved in collision sports, such as rugby. Ultimately, players with greater momentum are more likely to gain yards on the field but, to do that, velocity must also be high.

Power

Power requires strength. After all, power is the product of force and velocity. Now, just because an athlete is strong, it does not mean they will naturally be able to realize that strength in the form of power. Genetic makeup can dictate an awful lot in terms of muscle fiber types, tendon lengths, and body types, to name a few. Anaerobic power ability is more difficult to train than aerobic endurance ability. Mitochondrial density is relatively quick to increase. However, it is more taxing to alter the characteristics of a muscle and motor unit.

Strength Endurance

Strength endurance is the ability to produce and exert force over a prolonged period of time. There is an element of damage limitation with this strength quality because it is accepted that force will not be as significant as it is during low repetition training, but the goal is to maintain force output.

Production of Force

Rate of force development (RFD) is essentially what coaches improve and maintain. To increase RFD, the amount of force (ma) needs to increase, while reducing the time taken to displace an object. Broadly put, to improve RFD, it is only beneficial to train with greater loads (kg) and higher velocities; hence the popularity of velocity-based training (VBT).

As we sprint, the generated force is exerted into the ground. These forces are also known as ground reaction forces. In the case of sprinting, force is applied both vertically, resulting in flight time, and horizontally, resulting in meters gained. To run at speed, we have to minimize time spent in the air, as it is essentially time misspent, and maximize horizontal force. In short, there are a number of potential factors that contribute towards force production, none more prominent than neural drive and muscle architecture.

Reduction of Force

With force reduction, it is essentially a matter of being able to tolerate work around the musculoskeletal system. The premise of robustness largely centers on this quality because, simply put, if a player struggles to maintain a degree of postural integrity upon impact, they will likely find themselves with a problem. However, it is obviously unrealistic to expect a player to maintain “perfect” posture. I find the concept of robustness problematic because, ultimately (and funnily enough), the body is quite a rigid structure.

Landing mechanics also involve force reduction. A go-to example is the young player that has a relatively powerful vertical jump. However, that same player struggles to control their landing, as their ankles roll and their knees come together. To complement the more concentric, explosive action, it is important to be able to control the eccentric movement. An athlete’s training maturity, strength training, and time spent practicing landings will likely improve their ability to land efficiently. Interestingly, the collision that occurs during plyometric exercise, such as depth jumps, can contribute towards ossification.5 A mechanical load that is compressive in nature essentially generates the neurological impulses that stimulate the elicited adaptation.

Stabilization of Force

To explain stabilization, I have not encountered a better analogy than: “Can you shoot a cannon from a canoe?” You might be able to, but you would likely end up in the drink and your intended target would likely breeze on by. Therefore, being stable and in control of our movement lends itself to a more efficient utilization of force. For example, during the stance phase as the foot progresses from touch-down to mid-stance to take-off, the ankle absorbs a large amount of force. If the ankle becomes unstable, generally through pronation or supination, force is being lost. Generating force is an extremely valuable athletic quality; however, if stability is not present, that same quality is undervalued.

The Three General Determinants of Strength

Determinants of strength are essentially factors that contribute towards this physical quality. Broadly, they include central (nervous system) and peripheral (muscular system) contributors. However, strength involves a little more than simply increasing the cross-sectional area (CSA) of a muscle. Generally, there are three categories that will contribute towards, and determine, strength: biomechanical, physiological, and psychological.

The 3 general determinants of strength are #biomechanical, #physiological, and #psychological factors, says @JamyClamp. Share on X

Biomechanical Determinants of Strength

Forces are quantified within two categories: vector and scalar. Definitions of each can be found below.

  • Vector: Magnitude (force production) with a specific direction (horizontal or vertical).
  • Scalar: Magnitude (force production) without a specific direction.

As we apply force to an external object, such as the garden plot or a player on the rugby field, it is a vector because it has a direction. A mass is scalar, because it’s lazy and, without anyone pushing it, it stays still. As the Joker says; “All it needs is a little push.” By understanding that strength and force is essential if we wish to move objects with speed and efficiency, the importance of the component is further highlighted.

Force Velocity

Force Velocity Curve
Figure 3. The force-velocity curve (FVC): Where force is high, velocity is low, and vice versa. For the sake of generality, the main purpose of understanding the relationship between force and velocity is to try to shift the curve towards the right.

The force-velocity curve (FVC) falls within biomechanical determinants. Where force (N) is high, velocity (m/s) is low. Conversely, where force is low, velocity is likely greater. The types of force production, such as power and maximal strength, are placed throughout the curve. Power is often viewed as the “holy grail” of performance. It is shown to be sandwiched between strength-speed, where the magnitude of the lift is still quite slow but the force is relatively high, and speed-strength, whereby the velocity is noticeably greater. For the sake of generality, the main purpose of understanding the force-velocity relationship is to try to shift the curve towards the right.

Leverage

Biomechanics is “the area of science concerned with the analysis of mechanics of human movement.”6 Ultimately, the length of our limbs can control a fraction of the lifts performed in the weight room. A taller individual, with a long femur, then has the task of pulling a load further to lockout, but the length of our limbs cannot be changed unless we take to them with a piece of sandpaper. Mechanically, it is a matter of adjusting according to the individual because they must make the most of their mechanics.

Physiological Determinants of Strength 

Broadly, physiological determinants include central (nervous system) and peripheral (muscular system) factors. Central determinants are largely centered on the adaptation or, in some cases, the temporary maladaptation of the nervous system. Conversely, peripheral determinants tend to involve changes in the architecture of the muscle.

Muscle Architecture

As the saying goes, “a larger muscle is more likely to exert greater force.” In practical terms, more forceful muscles tend to be larger muscles, but this is dependent on the type of training performed. A bodybuilder might have larger musculature than a powerlifter, but which individual generally lifts greater weight?

Aagard et al.7 monitored the response of human pennate muscle, which run parallel to their associative tendon, to a 14-week heavy strength training regime. Training load varied from three to ten repetition maximums (RM), until the latter weeks (10-14 weeks), where ranges varied between four and six RM. To summarize their study, the CSA of type 1 muscle fibers was not statistically significant, but that does not mean it was time wasted.

I look at #fatigue as a crossover between physiological and psychological determinants for strength, says @JamyClamp. Share on X

Linking back to structural training, it is the rep and set ranges that largely determine the effect that lifting has on muscle architecture. Training at 85-100% of a rep max is within the myofibrillar hypertrophy range; however, there will likely be the potential benefit of increased density. Conversely, as intensity increases and volume decreases (high rep/low set), loads used are usually much less in relation to %1RM.

Further to muscle architecture, it is well-known that endurance-based athletes are likely to be dominant in type 1 fibers, with slow twitch characteristics. Type 1 fibers produce less force, but they are capable of producing force over a prolonged period of time. Therefore, they lend themselves to strength-endurance training. Opposite to these, fast twitch fibers generate much larger levels of force. The dominance of particular fiber types progresses nicely into the way that genetics maintain a pivotal role in strength.

Genetics

Much the same as our leverage potential, genetics are an element of performance that cannot be altered, or at least not cheaply or quickly. We can only make use of the ingredients that we have in season, so we must strive to optimize the product. Numerous products exist that allow for genotyping and, fortunately, I have completed a DNA test. As my knowledge does not yet extend far enough into the depths of genotypes, there a number of standout genes that could have an influence on strength.

Alpha-actinin-3 (ACTN3) is associated with filament sliding velocity8; therefore, a deficiency in this particular gene could reduce power-generating potential. To elaborate, Yang et al. studied the difference in allele frequency (ACNT3) between power (n=46) and endurance (n=194) athletes. They found variations amongst the two categories of athletes, although not significant, that promoted the athletic quality in which they competed. Essentially, if there is the luxury of genotyping, it is useful, but ultimately, we can generally tell if someone is likely to be power or endurance dominant—the “eyeballing” analysis. 

Endocrinology

Hormones are the mediators of the large majority of human processes. A significant fluctuation in hormonal balance can have detrimental effects either way. Hormones can be broadly categorized as being either anabolic, constructing, or catabolic, destructing. In the anabolic group, there are the infamous pair of testosterone and growth hormone, and their derivatives. Most noticeably, cortisol—also known as the “stress hormone”—is labelled catabolic. Epinephrine and norepinephrine, adrenaline and noradrenaline (for the British among us), respond almost immediately to strength training, as we strive to produce greater force.9

It is important to understand that endocrinology is not all lab coats and suspicious scientists. The hormonal response to training is critically important and the benefits can be obvious.

Fatigue

I look at fatigue as a crossover between physiological and psychological, and my opinion is substantiated by physiologist Tim Noakes. The typical indicators of fatigue are undeniable: hydrogen accumulation, due to lactate not being utilized as a fuel, causing the “burn”; a loss of homeostatic control; an increased partial pressure of carbon dioxide within arterial blood; and glycogen depletion, which reduces ATP turnover.10 They are some, but not all, of the potential physiological culprits behind fatigue. Psychologically, the Central Governor Mode suggests that fatigue is subconsciously controlled in order to prevent a “catastrophic” decline in performance. Essentially, we are naturally offering our best attempt at controlling homeostasis.

Psychological Determinants of Strength

While strength is primarily a physical component of performance, psychology will often play a pivotal role in the expression of the quality. To gain the full benefits of strength training, every element of a session needs to be executed with intensity, commitment, and effort.

Motivation

Exerting force against a heavy object to prevent it from crushing us irrefutably involves a reasonable amount of effort. So naturally, at a particular moment in time, motivation has a significant role in the expression of strength in the weight room. I am sure we have all experienced training days where we know, after our first set, that we will likely be “embracing the grind,” as opposed to pressing and pushing like a knife through butter. This is where a coach earns a percentage of their bacon because, at times, it is just not sensible to adapt the session based on the player’s current condition, and this is hugely important because being stubborn and ignoring potential signs of fatigue is negligible.

Motivation has a significant role in the expression of strength in the weight room, says @JamyClamp. Share on X

A point where technology and motivation join forces is through the use of velocity-based training. Essentially, VBT provides knowledge of performance feedback on a rep-by-rep basis. Granted, an athlete who is relatively experienced in the weight room is likely to acknowledge when they are fatiguing but, with VBT, there is an objective measure that clarifies the issue. Linking back to motivation, sportspeople are largely innately competitive breeds, so a challenge to maintain or increase their velocity is valuable, as long as it is kept under control.

Intent to Lift

The hard-nosed coaches will likely bang the drum to this and I’m not saying it is wrong to attempt to ignite or, in some cases, reignite the fire. The intent that an athlete has to lift plays a pivotal role in the training outcome. But if there is a lack of intent during training, does it not seem logical to ask why? The boot camp “shouty shouty” approach might work for some, but I’ve found it often makes matters worse. As the cycle of performance contributors shows, strength is not just lifting big. As soon as we treat the athletes we work with like weightlifting robots, we lose ground. Take the time to understand why they are not lifting with intent because, if you understand their “why,” you can coach far more effectively.

‘Here, There and Everywhere’ Athletes

They are fired up and willing to crack their head against another player’s hip at speed, but they then simply exist, and cruise in neutral, during strength training. While it may be frustrating for the coach, it is not uncommon, so again, provide a “why” and highlight how the training will benefit them on the field both in the short term and, perhaps more importantly in the coach’s eye, in the long term.

Personality

“High-wired characters tend to suit high-wired sports.” (Nick Newman) I accept that this statement is a slight generalization. However, I think it runs true most of the time. Picture the start line before the 100-meter dash. Now, picture the start line before the 1500-meter run. I have noticed significant differences, and a coach can learn a lot from the personality of an athlete, and manage their approach. However, you should never cage athletes because of their personality characteristics. It is a balancing act.

Strength: An Important Ingredient, but Not the Only Ingredient

Overall, strength is a critical part of performing and doing so with efficiency, as well as doing it on a regular basis. Hopefully, there is an understanding that it is not a “deal breaker” in the sense that, without great maximal strength, a career will be washed away. Strength is a part of the recipe, but there are other ingredients required to bake a nice cake.

Since you’re here…
…we have a small favor to ask. More people are reading SimpliFaster than ever, and each week we bring you compelling content from coaches, sport scientists, and physiotherapists who are devoted to building better athletes. Please take a moment to share the articles on social media, engage the authors with questions and comments below, and link to articles when appropriate if you have a blog or participate on forums of related topics. — SF

References

  1. Verkhoshansky, Y. and Siff, M. 2009. “Supertraining.” 6th ed. Verkhoshansky SSTM; Rome.
  2. Stone, M., O’Bryant, H., Garhammer, J., McMillan, J., and Rozenek, R. 1982. “A Theoretical Model of Strength Training.” NSCA Journal. 36-39.
  3. Bompa, T. and Haff, G. 2009. “Periodization: Theory and Methodology of Training.” Human Kinetics: Champaign.
  4. Bosch, F. 2015. “Strength Training and Coordination: An Integrative Approach.” 2010 Publishers: Rotterdam.
  5. Ohashi, N., Robling, A., Burr, D., and Turner, C. 2002. “The Effects of Dynamic Axial Loading on the Rat Growth Plate.” Journal of Bone and Mineral Research. 17 (2), 284-292.
  6. The British Association of Sport and Exercise Science. (Online). BASES. Available at: http://www.bases.org.uk/Biomechanics
  7. Aagard, P., Andersen, J., Poulsen-Dyhre, P., Leffers-Mette, A., Wagner, A., Magnusson, P., Kristensen-Halkjaer, J., and Simonsen, E. 2001. “A mechanism for increased contractile strength of human pennate muscle in response to strength training: changes in muscle architecture.” Journal of Physiology. 534 (2) 613-623.
  8. Yang, N., MacArthur, D., Gulbin, J., Hahn, A., Beggs, A., Easteal, S., and North, K. 2003. ACTN3 “Genotype is Associated with Human Elite Athletic Performance.” American Journal of Human Genetics. 73 (3) 627-631.
  9. Kraemer, W. and Ratamess, N. 2005. “Hormonal responses and adaptations to resistance exercise and training.” Sports Medicine. 35 (4) 339-361.
  10. Noakes, T. 2007. “The Central Governor Model of Exercise Regulation Applied to the Marathon.” Sports Medicine. 37 (4) 374-377.
Sled Training

Digging into Elite Sprint Kinetics and Training with JB Morin

Freelap Friday Five| ByJB Morin

Sled Training

Jean-Benoit (JB) Morin is currently full professor at the Faculty of Sport Sciences of the University of Nice Sophia Antipolis (France). He is a member of the Laboratory of Human Motor Function, Expertise Sport and Health. He obtained a Track & Field Coach National Diploma in 1998 and a Ph.D. in Human Locomotion and Performance in 2004 at the University of Saint-Etienne, France (Prof. Alain Belli), in collaboration with the University of Udine, Italy (Prof. Pietro diPrampero). He was an assistant professor at the Sport Science Department of the University of Saint-Etienne and member of the Laboratory of Exercise Physiology from 2005 to 2014. He is also an associate researcher with the Sports Research Institute New-Zealand (SPRINZ) at Auckland University of Technology.

JB’s field of research is mainly human locomotion and performance, with specific interest in running biomechanics and maximal power movements (sprint, jumps). He teaches locomotion and sports biomechanics, and strength training and assessment methods. He has published approximately 110 peer-review journal articles since 2004. JB’s main collaborations are with French sprinters and the French Rugby Federation, teaching professional coaches about sprint mechanics and training for acceleration. He is also a consultant for professional sports groups around the world in soccer, rugby, sprint, and other power-speed sports. He practiced soccer in competition for 10 years, practiced and coached track and field (middle distance and 400m hurdles) for eight years, and he is now enjoying trail running, road cycling, and triathlons.

Freelap USA: Are heavy sleds more of a strength stimulus or technique stimulus for athletes, and why?

JB Morin: I would say it depends on the overall level of strength and sprint acceleration skills of the athletes. What we observed in our own practice with athletes and in our pilot research is that:

  1. For already strong athletes, it is more of a “technique” stimulus. Note that by “strong” we mean athletes with a high level of maximal strength in a gym-based testing context, who do not necessarily apply that strength with good effectiveness (what we term “technique” here) into the ground when sprinting. It means that, thanks to heavy sled training, they will be able to orient their force application into the ground more horizontally, from the beginning of the sprint (maximal effectiveness) and as running velocity increases (limit the decrease in effectiveness with increasing velocity).

    One of the possible explanatory mechanisms is that heavy loads (contrary to lighter ones) will allow a more inclined position of the body during the sprint acceleration push, and also keep this inclined position longer over the acceleration, so more time is spent applying very horizontally oriented force into the ground. Practice and observations also show that the work done at the ankle and foot to transmit the power generated by the lower limb is huge in heavy sled conditions compared to lighter loads. This also contributes to improved “technique” through less energy dissipation at the ankle and more energy transferred into the ground.

    This is key, as the strength of a chain is that of its weakest link, so whatever your lower limb power generation capability, if your ankle-foot system is not able to transmit that power output into the ground and it “deforms” under tension, this impairs your technique—and by extension, your acceleration performance. I have no experimental results to support this view of things but man, heavy sled work magnifies this foot-ankle “weakness,” while you don’t evidently observe it with lighter loads. So I guess training will induce positive adaptations on that very specific point. I’m really looking forward to experimental research addressing this hypothesis.

  2. For weaker folks, the above-mentioned points still apply, but in addition, the overload generated by heavy sleds will potentially add to lower limb strength (and horizontal ground reaction force in particular) in both absolute and sprint-specific terms. Again, no experimental results are available here to my knowledge, since only pilot research has been published in 2017 with heavy sleds (i.e., loads >80% body mass). We need more research!

    Anecdotally, we initially designed our heavy sled study based on one of my master’s student’s requests: “I’m coaching amateur soccer players, and we don’t have access to a gym nor enough time to develop lower limb strength and sprint ‘technique’ separately. Heavy sled work may be an effective combo to directly improve BOTH specific sprint force output AND ‘technique.’”

Anyway, I consider heavy sleds a key component of a comprehensive sprint training “toolbox,” not more (magic stick, Twitter-buzz, as some naysayers contend), but not less! The feedback I have from people using them is very positive overall. 

Freelap USA: How does the relationship of vertical to horizontal force change throughout the course of a 100m sprint?

JB Morin: To avoid confusion, there are no “vertical” or “horizontal” forces. Both are components of one single force vector: the ground reaction force (GRF) vector. So, the orientation of this vector in the sagittal plane of motion (let’s consider its mean value over a support phase, since it changes at each instant) will give the distribution and, all other things being equal, the respective magnitude of the VTC (vertical) and HZT (horizontal) components.

Observations made during treadmill and overground experiments show that the GRF is basically oriented forward at the beginning of a sprint (by extrapolation, a 100m) and this overall orientation decreases linearly with increasing velocity during the acceleration. This means that the relative HZT component (net or support average force in the antero-posterior direction) decreases over time. This explains that the acceleration also decreases over time as a sprinter reaches maximal velocity. By definition, at maximal velocity, the forward acceleration over a running step is null and the overall orientation of the GRF is VTC.

Thus, we could summarize this by saying that the relative orientation of the GRF “verticalizes” as velocity increases, and is then VTC during the maximal velocity phase. Then, during the slight deceleration phase observed systematically towards the end of the 100m, the HZT component of the GRF is negative, which means that the orientation of the overall GRF vector is negative relative to the vertical.

One very important thing here is the fact that the mean (net) HZT component being null at maximal velocity does not mean that NO force is applied in the antero-posterior direction! It just means that the negative force output (braking phase of the step) and impulse cancel out with the positive (propulsive phase of the step). Basically, in the HZT direction, you “brake” as much as you “push,” so your resultant change in velocity is constant—you’re at maximal velocity.

Now let’s talk about the magnitude of VTC and HZT components (i.e., the amount of GRF applied into the ground). The big issue here is that the VTC component includes bodyweight and the effects of gravity, while the HZT component does not. Yep, gravity field applies to us overall along the vertical axis.

For instance, my lower limb force output will split into 2000 N for the VTC component versus “only” 300 N for the HZT component during the first steps of my acceleration. While this seems to be a huge difference, it is partly explained by the fact that my force output “deals with” my bodyweight in the VTC direction and not in the HZT direction. If gravity applied in the horizontal direction, life would become a real mess! I hear and read sometimes that “horizontal force is like vertical force, but tilted 90°.” This would only be true if gravity also was tilted 90°.

VTC force isn’t more important to sprint performance than HZT force because their magnitudes differ, says @jb_morin. Share on X

It does not make much sense to state that “VTC force is more important to sprint performance than HZT force” just because their magnitudes are different. Rather, experimental data shows that fast people are able to apply their GRF more horizontally during the acceleration phase (and thus, produce a relatively greater HZT component) and then, as they reach maximal velocity, they are able to produce more GRF over very short times available during the support phase in order to maintain this maximal velocity for as long as possible.

Of course, it is not an I/O issue, HZT and then VTC. It is a continuum in which the relative importance seems to shift from the HZT component to the VTC one. However, one thing is sure: If you can push your acceleration phase from 25m (beginners) to 70m (world record), then good things happen. First, your running velocity at the end of acceleration is greater (provided you can apply enough GRF to handle it). Second, your maximal velocity and deceleration phases will be shorter. A 100m race is damn long if your acceleration is completed after 30m.

Freelap USA: What are some qualities of top 100m sprinters that cause them to stand out from lesser sprinters?

JB Morin: As explained above, biomechanics research shows that the ideal combo would be the ability to:

  1. Apply great amounts of GRF per unit bodyweight (within the very short support phases), first with an overall orientation that is as horizontal as possible and for as long as possible (acceleration phase).
  2. Then, once maximal velocity has been reached (as late as possible into the race, provided you accelerate maximally and don’t pace this, of course), keep on applying as much GRF per unit bodyweight as possible in the overall VTC orientation. Knowing that no positive acceleration is possible at that time, the objective should be to limit overall deceleration (thus, deceleration during the support phase, since nothing happens in the air regarding braking/propulsive actions) and, at best, maintain running velocity.

Basically the “HZT vs. VTC” debate is not a debate. Sprinters should apply as much GRF as possible, per unit body weight, with an orientation of the GRF vector that is as horizontal as possible (within balance and limbs replacement constraints, of course). Eventually, when the step-averaged GRF vector orientation is actually VTC (at maximal velocity), it indirectly means “now push vertical” as a rough, overall message.

Basically the ‘HZT vs. VTC’ debate is not a debate. Sprinters should apply as much GRF as possible, says @jb_morin. Share on X

We can simulate what would happen if athletes could maintain a horizontally oriented GRF vector from a typical “ratio of force” value of 70% in the starting blocks (i.e., the HZT component is 70% of the resultant GRF vector, which is typical from elite sprinters and equates to an angle of GRF orientation of 35° above the ground) to 0% (vertically oriented GRF) once they cross the 100-meter line instead of 60m or 70m at best. This would lead to a longer acceleration phase, faster terminal velocity, and much faster 100m overall. That should be the objective—never stop accelerating. The reality is that the best sprinters lose 5% of ratio of force every new meter per second generated, so basically the 70% in the starts drops to 0% at maximal velocity within a generated 12m/s velocity and 70m for the best athletes.

If: (a) the initial value of ratio of force (or horizontal orientation of the GRF vector) is greater; and/or (b) the rate of decrease with increasing velocity is lower; and/or (c) the athlete can generate more GRF at very high velocity within the support phase duration and limbs repositioning time constraints, then the 100m time would be lower. I admit this is theoretical, but we must at least consider it when designing training programs to push the boundaries of high performance.

Freelap USA: What are some ways that coaches can determine the force/velocity profile of a sprinter?

JB Morin: Research so far has presented the aforementioned concepts and data using instrumented sprint treadmills, and sprint tracks equipped with force plate systems. All in all, three or four labs in the world may produce this kind of comprehensive analysis. The good news is that my group and Dr. Pierre Samozino, in particular, have worked in recent years to propose a field method based on split times or velocity measurements that allow accurate measurements from much more accessible inputs. This method is based on the laws of dynamics and has been tested against force plate gold reference systems.

Basically, the practical and cost-time-effective aspects of this macroscopic approach far outweighs the inevitable slight loss in accuracy. We published a spreadsheet and tutorial to run the entire analysis from only three to five split times, and get the results directly. Note that an iPhone and iPad app named “MySprint” also runs these computations—all you need is athletes to run a 0-to-30m all-out sprint. 

Freelap USA: What are the corrections for being either force or velocity deficient, as far as sprint acceleration is concerned?

JB Morin: The issue here is that I’m not sure what “deficient” means in terms of force or velocity outputs in sprinting. Although we are now able to compute an individual optimal force-velocity profile that maximizes jump height for a given power output in jumping (from which we calculate the force or velocity deficit) we are not (yet) able to compute the optimal profile in sprinting. Therefore, a “force-deficient” or a “velocity-deficient” athlete is judged so based on group comparison to their sport, level of practice, gender, age, position, etc.

Typically, I base some of my consultancy work on profiling groups of athletes (e.g., rugby teams) and comparing them for force, velocity, and power outputs, as well as indices of GRF orientation. We compare individuals to the median of the group and split them into percentiles around this median. Then, we can identify players with no, small, or large deficits in any of these mechanical variables.

The puzzle of a potentially “optimal profile” is sometimes complex, since it also depends on the targeted sprint distance. (Pierre Samozino’s most recent computations, study, and publication are in progress.) But it is really exciting to see that one single player may have a totally different mechanical profile from another. As I see things, there is no reason for training them with the same “corrections.”

It is exciting to see that one player may have a totally different mechanical profile from another, says @jb_morin. Share on X

So, our current practice and research basically tries to identify which method(s) is/are efficient to address which deficit. First things first, we showed in a pilot study that heavy sleds (>80%) could be a solution to address sprint-acceleration specific force deficit or an issue in the effectiveness of GRF orientation. But our knowledge here is really like a toddler—we definitely need more research as to what correction method works to fix what type of deficit, in what type of athlete!

It’s a life of research, but I guess now all the necessary concepts and assessment methods are available to all. There is a way now to design more specific and individually tailored training programs and studies, instead of just giving X or Y common training regimen to a group of athletes and studying the group response. The “group” may be faster on average, but what about the athletes?

Since you’re here…
…we have a small favor to ask. More people are reading SimpliFaster than ever, and each week we bring you compelling content from coaches, sport scientists, and physiotherapists who are devoted to building better athletes. Please take a moment to share the articles on social media, engage the authors with questions and comments below, and link to articles when appropriate if you have a blog or participate on forums of related topics. — SF

Snow Boarder

Finding the Measures That Matter with Sport Tech

Blog| ByScott Damman

Snow Boarder

There is no doubt that 2017 was a big year for the discussion and adoption of sport performance feedback technology. For some, the talk may seem like old hat, but I think last year saw a critical mass of various levels of team sport making purchases. From high school through elite levels, teams are buying force plates, velocity-based training (VBT) barbell trackers, smart medicine balls, timing gates, and the list goes on.

Tech purchases have gotten ahead of the understanding of what to do with their valuable feedback, says @Scott_Damman. Share on X

However, I think there is a caveat to this phase of adoption. The purchases of feedback tech have gotten ahead of the understanding of what to do with the valuable information. Many have purchased the Ferrari, but do not know how to drive it. Or, as we say out where I live in rural Colorado, the cart has been placed before the horse.

Don’t Get Caught in the Past: Update Your Metrics

I get most of my support calls from high school coaches who made a VBT tech purchase and now need to know what to do with the information. If you spend the money on a Ferrari, you damn well need to know how to drive it, right? The point is, the recent investments on the table will demand that we step up our collective game to figure out how to create best practices around the array of tech options.

The part that alarms me a bit is that much of this sport tech has been around for decades, but we are still living in the 1990s with its applied use. The big-budget teams have had access to these tools (for example, VBT tech) for more than 20 years and still often get stuck on one metric: full range-of-motion concentric AVG speed. In other words, the VBT mullet of metrics. 

Let me share the athlete experience I had nine years ago—the experience where the light bulb came on regarding the measurements that may really matter. In 2008-09, I was working with a National Alpine team, applying the Myotest device for jump performance baselining and fatigue monitoring. For those who may not be aware of the Myotest, which is no longer available, it was a Swiss company that created the first field-use and wireless accelerometer sport feedback tool. The product was pioneering, and much of what you see today related to team VBT applications (estimates of 1RM, force/velocity profiles, power profiles, etc.) originated with the Myotest.


Video 1. The Canadian Cowboys in 2009, testing muscle stiffness properties—kilonewton meter (kN-m)—using the Myotest plyometric jump protocol. Here is a two-time World Champion hitting 67.3 kN-m. Matt Price (second from the right), who is currently the L.A. Kings (NHL) Head of Strength & Conditioning, was the Director of Sports Performance for Alpine Canada at the time. I’m on the far right.

One of the monitoring protocols set up by Matt Price, the Alpine Director of Sport Performance (now with the NHL’s L.A. Kings), was a body weight squat jump. This called for strict adherence to the protocol for testing: static position with NO countermovement. They used this protocol, along with a few other jump protocols (like you see in Video 1) to monitor fatigue during the grueling World Cup season. I met up with the team when they came through Colorado (Beaver Creek) for a World Cup stop, and assisted with some data collection and analysis. In 2009, this stuff was very new, so Matt and I spent a good deal of time “talking shop,” and Matt was forward-thinking in how he could best apply this feedback.

Understand which metrics or analysis from an athlete’s #data represent the difference-making stuff, says @Scott_Damman. Share on X

I was always curious to understand how the Myotest data helped define the athlete. In other words, which metrics or analysis I could pull from the instant feedback that represented the difference-making stuff. Instead of looking athlete to athlete, I started with a wide comparison of a world-class ski racer vs. a regular Joe: comparing the two-time World Champion skier in the above video to me.

The Surprise Results and the Light Bulb

You can see the comparison report below: Test 1 is me, Test 2 is the athlete. If you look between the two yellow arrows, you will see our comparison results for power, concentric force, speed, and jump height. Today’s mainstream performance feedback conversation, especially VBT with the barbell, definitely tilts on the side of speed (meters per second), along with power (watts).

Sport Test Data
Figure 1. The comparison report between Scott Damman (Test 1) and a two-time World Champion skier (Test 2). If you look between the two yellow arrows, you will see the comparison results for power, concentric force, speed, and jump height. Take a few minutes to study this report. Some of the information, although accurate, may be misleading, while other parts definitely tell the story.

If we only look at the two popular performance indicators, speed (m/s) and power (watts), for this comparison report, we see that the power output was virtually identical and the difference in speed was 8%. The concentric force output was identical, with 0% difference. On paper, these two guys look very close. Comparing speed and power is a fairly typical performance evaluation these days. However, these comparison results sure did not make much sense to me, and they certainly did not help answer my question of finding the measures that matter; measures that define the true athlete. But, upon digging a bit deeper and analyzing the force curve, the picture starts to get clearer.

The black arrows in the report point to two very different-looking forces curves. Using the Myotest software, I set triggers to look at force production from 0-200 milliseconds (ms). Instead of looking at the full range-of-motion jump outputs, the 0-200 ms time “window” represents rate of force development (RFD). The elite athlete created 1153 newton during that time window, while the regular guy created 319 newton. The athlete generated 360% more force within the initial 200 ms of the squat jump. Light bulb. The takeaway is that this RFD measure may be a measurement that really matters.

It’s Time to Update and Evolve

With the recent and rapid adoption of sport tech feedback tools, let’s make sure the conversation and modern application make the purchases worthwhile. It is the responsibility of the thought leaders and innovators to help the entire market evolve.

Last year I wrote, “Is It Time for Coaches to Rethink Velocity-Based Training?,” with the intent to spur conversation about the measurements that matter and redefine how we apply sport tech feedback. Specific to this case, velocity-based training. Since this article was published, the public discussion has been alarmingly low. The VBT mullet still reigns, and that, quite frankly, is a bit of a sad state of affairs.

Since you’re here…
…we have a small favor to ask. More people are reading SimpliFaster than ever, and each week we bring you compelling content from coaches, sport scientists, and physiotherapists who are devoted to building better athletes. Please take a moment to share the articles on social media, engage the authors with questions and comments below, and link to articles when appropriate if you have a blog or participate on forums of related topics. — SF

Bench Press

How to Master Horizontal Pressing Exercises for Sport

Blog| ByWilliam Wayland


Bench Press

Countless people have written about the bench press, largely as a function of the fact it is a contested lift in powerlifting. Powerlifting’s approach to bench has had an enormous influence on weight room approaches the world over. Many athletes—especially those responsible for their own strength training—often grab their first program in the form of a powerlifting template. This generally results in young athletes exhibiting the shoulder pathologies of those who are much older. Trying to divorce horizontal pressing from its powerlifting sensibilities goes down as well as suggesting we drop the catch from cleans.

There has been heavy reporting of tight anterior shoulders and poor scapular mobility due to an overuse of the bench, and with good reason. Poor pressing technique, over-eager number chasers, questionable ROM, and training imbalances can wreak havoc on an athlete population. The bench press, much like the vertical press, isn’t going anywhere and should form part of a well-balanced and nuanced training approach. Contact athletes—especially those engaged in push and framing type contacts—benefit from powerful pressing, from top to bottom.

If you’ve read any of my articles, you’ll sense an overarching theme of finding intensification and load where we can, so standing one-arm cable pressing and one-armed and landmine presses that look like they came fresh off a physiotherapist’s photocopier are not going to cut it!

Horizontal Pressing and Athletic Performance

The flat bench has taken a battering in the modern age of clickbait-oriented content and trainers looking to gain traction with antithetical commentary. The anti-bench approach is lionized widely, but the bench didn’t get us here—weight room culture is probably more to blame. The kids just won’t stop benching!

You’d think tight anterior shoulders and poor scapular mobility due to an overuse of the bench are an international health crisis the way some coaches go on. In my last pressing article I discussed similar concerns found with appropriate and excessively cautious implementation of the overhead press. It seems anterior pressing is pathologized in general.


Video 1. A good starting point is doing flat bench presses with a grip that is more narrow than traditional benching. Shoulders that can’t tolerate conventional-style bench pressing respond favorably to this alternative.

There are two trends I notice as soon as an athlete suffers a shoulder injury or develops a pathology. One is to give them a work-around to address the deficiency, allowing them to press, but not fixing the problem. Movement pragmatism is fine provided you get under the hood and fix the issue instead of putting a neutral grip Band-Aid on it. The other is to pathologize them to within an inch of their lives and do anemic press variations ad infinitum, largely perpetuated by a fear-of-injury culture. Fix the problem and get the bar loaded.

Any strength coach worth their salt will generally include some sort of pressing. Upper- and lower-body power and maximal dynamic strength variables were positively correlated to punch acceleration, and pressing strength, in particular, has a strong relationship with upper limb speed.

Any strength coach worth their salt will generally include some sort of pressing, says @WSWayland. Share on X

Some of the most impressive benching I’ve seen has come from throwers. It makes sense that heavy horizontal pressing and vertical pressing would be a key component for athletes in contact sports and sports requiring high-force, high-velocity movements like throwing, pushing, and opponent head and neck control and stiff arm limb contact. It’s why, to some extent, as context influences programming, bench-pressing is non-existent in programs for athletes that operate at very high velocities. However, this is probably built on a base of pressing in their junior years. So, when coaches suggest they don’t bench-press X athlete, there is probably some disingenuity there. Given the propensity to press, I’ve outlined a few variations below that allow for an athlete-centric horizontal pressing approach.

Old School Inclines—They Work

One of the big questions that hangs over horizontal pressing is its functionality, especially the flat bench, which is ostensibly laying on a bench and pressing upward. But let’s not be the harbinger of reductive absurdism; otherwise, we could pull apart snatches, squats, and planks as not being “specific.”

Likewise, the incline bench seems to benefit from the notion that the torso angle in relation to the arms is more sports-specific, while in combat sports I’ve seen bench derided as a bodybuilding exercise that should be avoided at all costs. On the other hand, I’ve seen suggestions that driving through the feet and angle of execution more closely resembles a punch. We could possibly justify it as compromise between horizontal and vertical pressing. Coaches working with throwing athletes seem to have strong opinions on the matter. They are thoroughly keen on the movement and talk of numbers being moved on an incline bench that would make any powerlifter worth his salt blush.


Video 2. Adding chains to incline pressing is a great way to challenge the end range of the movement. Learn to set up chains properly and you will see the benefits down the road.

Bill Starr has written some classic articles discussing how incline pressing seems to be a lost art. “They don’t know that in the late 1950’s and early 60’s the top strength athletes used the incline as their primary upper-body exercise. Greats such as Parry O’Brien, Dallas Long, Randy Matson, Al Oerter and Harold Connolly handled well over 400 pounds on the incline. Ken Patera used it to enhance his overhead press and ended up with an amazing 507, which will forever stand as the American record in the Olympic press.” Much of the research seems to flit between incline bench recruiting more pec major and delt, while having similar tricep recruitment as its flat bench relative.

I am a proponent, often making use of thick grips to make the positioning more comfortable. Done properly, it is difficult to cheat on the movement, but a prudent strength coach may have to police arching in the uninitiated. “You can squirm, you can jerk about and you can rebound the bar until you cough up blood, but you’re never going to find an effective method of cheating on the incline. That’s what I like about it.” –Bill Starr

The incline bench, plus dips and push-downs, is about as close as we get to a Bill Starr press trivium. It’s not a horrible way to approach arm extension if needed. Yes, total numbers will take a hit initially when switching from flat to incline pressing, but this is worth sacrificing for greater ROM. Talking about angles on the bench, I’m a fan of higher inclines, ranging anywhere from 45 to 70 degrees.

Try Close Grip Incline Bench Press

Close grip incline pressing benefits from the potential crossover of torso to limb angle, as well as the degree of the joint angle from the closer hand position on the bar movement and ROM being much greater than with the flat and regular incline benches. Flat bench can become an exercise in ROM manipulation due to the influence of powerlifting practices in strength and conditioning, which favor total weight moved over work done. Close grip incline pressing gives the athlete few places to hide, due to the extremes of elbow extension and flexion involved.

Close grip incline pressing gives the athlete few places to hide, says @WSWayland. Share on X

This is very evident with the population of combat athletes I work with. They often have long arms and shorter clavicular anatomy so close grip incline bench puts them in a position they despise; no ego lifting here. We know, thanks to the classic Green & Comfort (2007) study, that “Reducing grip width to <=1.5 biacromial width appears to reduce this risk and does not affect muscle recruitment patterns, only resulting in a +/-5% difference in one repetition maximum.”

To quote Mike Robertson: “The close-grip bench is an excellent exercise because it’s very ‘real world.’ When you bench press, for example, usually your arms are deviated away from the midline of your body. On the other hand, when you push things in real life, usually your arms are in tight to your body. A great example is a stiff-arm in football. The arm is in close to the body to create the greatest mechanical advantage. Even though you don’t lie down in football, a close-grip incline is a great exercise to improve your stiff-arm strength.”

This close grip position is something I employ with the MMA fighters and grappling athletes, as a hands-tight-to-body position is crucial in pressing, pulling, and framing in these sports. The scapular positioning is better than what we often see in flat benching; incline pressing without depressing the shoulder blades is difficult. You can argue that this scapular positioning could be detrimental but the transfer correlates, as well as 75% of the stuff we do that doesn’t look anything like the sporting action. There is no reason you can’t iron this out with ballistics later on.


Video 3. Incline pressing with higher-than-typical angles is a great option for athletes. Adding thick grips and chains makes a difference that athletes notice, and is a great compromise for those that don’t do vertical presses enough.

The deeper ROM on incline can aggravate some athletes with cranky shoulders. In this case, to reduce AC joint stress, I employ the close grip bench press with a lot of accommodating resistance, such as chains. This enhances tricep drive in the movement, as the movement has a serious sticking point about halfway through. The use of accommodating resistance can also be a novel way to reduce joint pain and makes incline pressing more tolerable for the uninitiated. In turn, you can combine this with thick and false grip pressing, which leads in to the next section.

Add Fat Grip and False Grip Pressing

Thick grip training is nothing new and has been posited as a novel avenue for improving all-over strength for some time. We know grip strength has a strong relationship to general athleticism and robustness. Rather than slap thick grips on to finish up a set of curls, there’s no reason we can’t employ this across a variety of exercise options.

I noticed that thumbs-free thick grip pressing is a boon to athletes with elbow and shoulder issues, says @WSWayland. Share on X

Working largely with a population of fighters, we use a lot of thick grip modalities because it has numerous carryovers to their sport. I also noticed that thumbs-free thick grip pressing was a boon to athletes with elbow and shoulder issues.

Christian Thibaudeau, who has promoted the use of false grip (and thick bars), has remarked on this online: “When you take a regular grip [bench press], your hands turn in slightly. This automatically forces you into an internal shoulder rotation position…This puts stress on the shoulder joint, and if you try to tuck the elbows in—despite the natural inclination for the elbows to be out—you create a lot of torque at the elbow joint. So you either increase the stress on the shoulders or the elbows, neither of which is good. By using a thumbless grip you can easily keep a more neutral hand position, which makes it much more natural to lower the bar while staying tucked. This reduces shoulder stress without increasing torque at the elbows, resulting in a less stressful bench press.”

False thick grip pressing, for instance, seems to be inherently more comfortable and it’s easier on wrists. I’ve been using it extensively with some of my athletes. Despite my initial hesitation, we’ve not had an athlete lose a bar yet. The false grip and the need for intensive stabilization and focus on bar contact make for better pressing. Let’s be clear: The bar is not sitting on the palms as if they were pressing a pair of Faberge eggs. The athlete must wrap their hands around the bar as tight as they can. Pull thumbs under and squeeze actively with fingers down on the bar as much as they can the whole time.

Increasingly thick grip pressing and other work has been shown to be highly impactful in athletes we wouldn’t expect, such as golfers, as recently highlighted by Cummings et al.’s recent Fat Grip Training study. This, however, was a full-body approach to thick grip work. There is a small amount of research looking at thick grip, and very little on thumbs-free pressing.


Video 4. In this video, I share my wisdom on pressing, as I work with an array of athletes in different sports.

I’m being pragmatic here, but something special comes from a stabilization standpoint when we apply eccentrics or pauses with the use of thick grip work in the press, largely as a great need for focus, stability, and lat recruitment. Most of my athletes report that it is a far more full-body affair.

What About Loaded Push-Ups?

Loaded push-ups and suspended push-ups, in particular, became a darling for many “functional” training experts. I’m all for bodyweight intensification, to a point.

Loaded push-ups offer scapular freedom, simplicity, and very low technical coaching investment. This should be the base upon which you build most horizontal pressing variations.


Video 5. Even advanced athletes should still integrate push-ups into their training. You can insert loaded push-ups into nearly any program, and they are timeless options. 

Mladen Jovanic suggests that suspended push-ups are a worthwhile replacement, or at least the next best supplementary exercise to bench. He suggests that “Using rings forces you to use shoulder stabilizers more and allows for ‘natural’ movement of the scapula, and also allows shoulder rotation which can allow lower joint stress (penalty) compared to barbell bench press. Since the stability is compromised, the load used will probably be less than in bench press, hence bench press should still be performed to provide an overload (depend on the athlete need to upper body push strength).” I do, however, disagree with Mladen on his opinion of the incline press, which he seems to think is worthless.

While push-ups possibly offer similar levels of muscular activity compared to bench and freedom of the scapular, loading push-ups, especially with intensive means, becomes difficult. Draping chains over the athlete while palming bands over their back and wearing a loaded vest becomes impractical.

Push-ups make for great volume-based options, but we need to be clear that, aside from abstractions into callisthenic trickery such as feet elevated, one-handed push-ups in a weighted vest and the like, push-ups are hard to really load heavy. 

Floor Pressing – Try It and See

Floor presses really allow you overload the triceps without placing undue stress on the elbows or shoulder. This is a common complaint among heavy pressers and it makes sense that floor pressing can give your shoulders a well-deserved rest with shorter ROM. This shortened row means that stress across the anterior shoulder is kept to a minimum, which is the reason I use it for athletes with shoulder issues. Much like other presses, thick grips seem to make this better.


Video 6. Anyone with a grappling or MMA background can see why floor pressing makes sense. It’s a pressing position off the back that requires powerful chest and tricep recruitment, often from a dead start. This has applicability for making a frame when in the bottom position, stiff arming, bench press mount escaping, and so on.

The floor press teaches tightness and tension on the floor, and the lack of leg drive and any real arch means that movement cannot be assisted: It’s just you, your triceps, your chest, and your shoulders. You can further increase tricep recruitment by bringing your grip closer. You can perform it with a hip bridge, turning it into a bridged floor press—a movement that requires neither a rack nor a spotter and but does require a lot more lat stabilization.

I usually use the floor press as an accessory exercise for the bench press or sometimes cycle it into a program as the main pressing movement. I use it often with grapplers, peaking them with reverse band floor presses done explosively. Give it a try and experiment with it, as it is one exercise that is purely pragmatic in application because research on the movement is scant at best. Most of the information we have on it comes largely from powerlifting sources, aside from dumbbell floor pressing popping up in a few NSCA and physiotherapy manuals.

Important Caveats to Pressing

Pressing comes with a big question mark, as Bob Alejo highlighted in his recent post, “Myths and Misconceptions of Training the Overhead Athlete.” “Based on the evidence and common sense, it’s likely that pull volume should be significantly higher than pressing volume (I recommend a 2:1 ratio) to reduce the risk of poor shoulder function, pain, and injury.”

As I stated in the press article, pressing needs to be earned with progressions coming from the floor up to unilateral to bilateral underload, offset by a diet of heavy pulling both vertically and horizontally. Bad posture, weak scapular stabilization, and poor rotator cuff function are your responsibility to fix or move towards fixing; pressing should be earned. And, as Bob mentions in his article, pressing is built on a foundation of not only rowing, but also the action of the upper body doing heavy hinging. In short, a strong upper back and posterior chain is the price we pay for a quality press.

In short, a strong upper back and #PosteriorChain is the price we pay for a quality press, says @WSWayland. Share on X

Taking this into account, much of the pressing I prescribe comes with a heavy dose of eccentric upper back work, hinge, and overhead pressing. Extensive usage of heavy neutral grip lowering, which Carl Valle touches upon in this eccentric exercise article, is noteworthy. I find a mix of NG lowering and close grip incline pressing makes a pretty effective combination for many athletes. Heavy RDLs and snatch grip RDLs, which require extensive shoulder and scapular bracing, are another addition to this.

Suggested Reading

“The Affect of Grip Width on Bench Press Performance and Risk of Injury” 

“Comparison of chain- and plate-loaded bench press training on strength, joint pain, and muscle soreness in Division II baseball players”

Since you’re here…
…we have a small favor to ask. More people are reading SimpliFaster than ever, and each week we bring you compelling content from coaches, sport scientists, and physiotherapists who are devoted to building better athletes. Please take a moment to share the articles on social media, engage the authors with questions and comments below, and link to articles when appropriate if you have a blog or participate on forums of related topics. — SF


Kettle Bell Training

Soviet Strength and Performance Training with Yosef Johnson

Freelap Friday Five| ByYosef Johnson

Kettle Bell Training

Yosef Johnson has nearly 24 years of sports performance training experience, and began working with Dr. Michael Yessis in 1994 as his protégé. He formed Ultimate Athletic Concepts (UAC) in 2003 and began publishing books in 2005. Yosef has had the unique privilege of close correspondence with top Soviet experts in the world of sport and human performance. He has worked with athletes from youth to pro level. He routinely consults with and mentors a number of strength coaches in the private and scholastic sectors, and has been a major player in the spread and implementation of the 1×20 strength training system invented by Dr. Yessis. Yosef oversees the physical education program for the Reeths-Puffer School District in Michigan.

Freelap USA: What are some ideas you’ve been experimenting with in regard to balancing velocity-based training work and the tail end (1×8 section) of the 1×20 system?

Yosef Johnson: The 1×20 isn’t a system. It’s just part of the GPP. I would call what we do the “Yessis system,” as most of it is unique in comparison to other systems. As the improvements slows in the 1×20 phase, we extend the GPP with 1×14. This allows us to get more improvement in the desired traits by simply increasing the intensity, albeit with one that is much lower than average. We then challenge max strength in a phase that combines 1×8 and 1×14.

We normally use two separate but similar movements instead of repeating the exact movement. This allows us to keep stimulating adaptation through a low-intensity mechanism. For example, we might use a half squat at 1×8 and a quarter squat at 1×14. After a time, we will flip flop that order as quarter squats have better transfer to most sports.

We also intensify our jumps and transition into plyometrics when appropriate. This will lead in to VBT work as well. We may use various percentages with the half squat and then move to the quarter squat with another percentage. We will also use a heavier/lighter approach with the VBT. We might use six sets with two at 50%, two at 60%, and then go back to 50% for the last two. The last two sets are the most explosive.

As time passes, the athlete gets “strong enough.” Hence, you spend more time in the velocity phase. Once there, the key is to juggle the movements every three to six weeks with moderate changes. Further from this, you should also juggle percentages. Dr.  Bondarchuk changes every exercise and the percentages at the end of each two- to four-week cycle with world-class guys. We do something similar, but the main distinction is that we use a wider range of exercises.

Freelap USA: What is your take on how and when to approach the integration of “special strength” exercises in an athlete’s program? Also, before we get any further, what is your definition of “special strength” exercises?

Yosef Johnson: Special strength is defined differently amongst the experts. I would say the Dr. Verkhoshansky’s principle of dynamic correspondence is probably the definitive answer to what a special exercise is. That being said, Dr. Bondarchuk and Dr. Yessis further distinguished these in shades of gray. The idea is to work from the very general along a spectrum to the very specific, as they will transfer from one to another and give a better result than simply going from the most general exercises to the competition exercise.

It still baffles me how many coaches don’t see the value in the knee drive exercise or pawback, when we know for certain that the hip flexors are involved in running and how they contract, and the same for the hip extensors. The arguments against these exercises is that they can’t approach the forces developed in running. This is not entirely true as the forces do reach a high level. This is per the work of Dr. Yessis. Nonetheless, we know they contribute to running speed, yet we neglect them. If nothing else, you would think in the era of corrective exercises and “prehab” work, these would have value to prevent injury. It seems we don’t see the forest for the trees.

Remember that general strength has to be established as the foundation for special strength. Share on X

In the early stages, most of the training should be general. As time passes, more special work should be implemented. However, the primary focus is on learning the proper motor pattern. This is best used with the 1×20 approach to ingrain the motor pattern deeply. The general line of thinking is 80/20 general to special in early training and, at the high level, 80/20 special to general.

It should be remembered that general strength has to be established as the foundation for special strength. Using special strength too early or exclusively would be a mistake. That being said, special exercises can be used early on to develop good technique and motor ability. It is used as a learning tool and not to develop fatigue.

Freelap USA: What are some of the downfalls of traditional “powerlifting”-based templates for training athletes?

Yosef Johnson: They are training to be athletes, not powerlifters. Powerlifters are not good at any other sports, so why should athletes train like them? Powerlifting focuses on three lifts, but athletes need to develop their whole body with many exercises

The intensity level with powerlifting is far too high, especially with high school and college athletes. When using this at these stages, imprints are made on the nervous system that cannot be undone and will inhibit adaptation at later stages of the career.

As Bondarchuk has stated, there is an upper limit to the transfer of general exercises to different sporting actions.

Powerlifters are not good at any other sports, so why should athletes train like them? Share on X

Dr. L. Garkavi also established that even with high-level athletes, medium-intensity loads work best, as was brought out in Natalia Verkhoshansky’s lecture on GAS. The key is to find what spurs adaptation. Logically, you should start very low and intensify until you see adaptation taking place. If you start too high, it’s far more difficult to find the threshold of adaptivity. Further, you can leave imprints on the nervous system that make it less plastic for future training methods. Lastly, Bondarchuk states that athletes that are lower than high level should NEVER use loads above 90% and that those loads should never occupy more than 10% of the high-level athlete’s training.

Freelap USA: Are there aspects of Anatoliy Bondarchuk’s training that can be directed, or merged with, traditional forms of training for non-throws athletes?

Yosef Johnson: It would be a sea change. He uses power training almost exclusively. Hence, he rarely has athletes move any loads slowly. He clearly showed that general strength has a ceiling of transferability. His star pupil, Yuri Sedykh, did not perform any strength test or other indicators better than other throwers, with the exception of the 9KG hammer and the event implement. Nonetheless, he is still the world record holder 30 years later and no one is even close to breaking it.

We must understand that strength is only one of a multitude of indicators. Does anyone know how strong Randy Moss, Allen Iverson, or Usain Bolt is? Common sense tells you that there are myriad factors involved, known and unknown.

Secondly, his use of heavier and lighter implements can be used in baseball, football, hockey, and basketball, amongst many others. Weighted shorts can be worn to achieve the same objective in just about any sport. You should choose the correct equipment and the correct weight, and when you do, they can be very effective.

Freelap USA: What are the biggest general principles of the Russian Sport Science engine that seem to miss the Western World of training?

Yosef Johnson: Intensity and volumes levels are far too high. We should not hear of cases of rhabdomyolysis in today’s world. I think is borderline criminal. We have a very poor understanding of technique and skill execution. We focus too much on lifts and tests and not enough on what is required for proficiency in the sport. We don’t look at sporting movements from an advanced biomechanical point of view to see what is involved to form a basis for specialized exercises.

We focus too much on lifts and tests and not enough on what’s required for proficiency in the sport. Share on X

It’s sad when you see people “teaching” pitching a baseball who have zero knowledge of biomechanics. They use modeling approaches that are silly at best. They mimic whoever the best performer happens to be at the moment. If you were to ask 10 Major League managers how a pitcher should throw, you would get 10 different opinions. All of these opinions are from people we deem to be experts.

There is a void of solid periodization schemes in our system. Most schemes I see have no logical progression leading from the beginning of off-season to the beginning of the next season.

We still don’t know what plyos are. We actually put our athletes at risk by grossly mishandling this powerful method. I would dare say our attempts have hurt more athletes in the U.S. than they have helped.

We do not lay out long-term plans for players; we only forecast out weeks or months. Training should be viewed like music lessons. It’s a long methodical process to develop someone to their maximum potential.

Lastly, we do not have a sports science field in the U.S. This is why we are still 30 years behind where the Russians left off after the fall of the USSR. We have zero research being done on our athletes. Further, the USOC is not equipped to centralize the flow of this information even if it was available.

Since you’re here…
…we have a small favor to ask. More people are reading SimpliFaster than ever, and each week we bring you compelling content from coaches, sport scientists, and physiotherapists who are devoted to building better athletes. Please take a moment to share the articles on social media, engage the authors with questions and comments below, and link to articles when appropriate if you have a blog or participate on forums of related topics. — SF

  • « Go to Previous Page
  • Page 1
  • Interim pages omitted …
  • Page 134
  • Page 135
  • Page 136
  • Page 137
  • Page 138
  • Interim pages omitted …
  • Page 164
  • Go to Next Page »

Primary Sidebar

FEATURED

  • Using Speed and Power Data to Bucket and Train Faster Athletes
  • Plyometric Training Systems: Developmental vs. Progressive
  • 9 (Fun!) Games to Develop Movement Skills and Athleticism

Latest Posts

  • Rapid Fire—Episode #16 Featuring George Green: Holistic Athlete Management
  • Rapid Fire—Episode #15 Featuring Kyle Brown: What is Universal Speed Rating (USR)?
  • Why We Don’t Perform Hang Cleans

Topics

  • Adult training
  • App features
  • Artificial Intelligence
  • Athlete
  • Athlete performance
  • Baseball
  • Buyer's Guide
  • Career
  • Certifications
  • Changing with the Game
  • Coach
  • Coaching
  • Coaching workflows
  • Coching
  • College athlete
  • Course Reviews
  • Dasher
  • Data management
  • EMG
  • Force plates
  • Future innovations
  • Game On Series
  • Getting Started
  • Injury prevention
  • Misconceptions Series
  • Motion tracking
  • Out of My Lane Series
  • Performance technology
  • Physical education
  • Plyometric training
  • Pneumatic resistance
  • Power
  • Power development
  • Practice
  • Rapid Fire
  • Reflectorless timing system
  • Running
  • Speed
  • Sports
  • Sports technology
  • Sprinters
  • Strength and conditioning
  • Strength training
  • Summer School with Dan Mullins
  • The Croc Show
  • Track and field
  • Training
  • Training efficiency
  • Wave loading
  • What I've Added/What I've Dropped Series
  • Youth athletics
  • Youth coaching

Categories

  • Blog
  • Buyer's Guide
  • Freelap Friday Five
  • Podcasts

COMPANY

  • Contact Us
  • Write for SimpliFaster
  • Affiliate Program
  • Terms of Use
  • SimpliFaster Privacy Policy
  • DMCA Policy
  • Return and Refund Policy
  • Disclaimer

Coaches Resources

  • Shop Online
  • SimpliFaster Blog
  • Buyer’s Guide
  • Freelap Friday Five
  • Coaches Job Listing

CONTACT INFORMATION

13100 Tech City Circle Suite 200

Alachua, FL 32615

(925) 461-5990 (office)

(925) 461-5991 (fax)

(800) 634-5990 (toll free in US)

Logo of BuyBoard Purchasing Cooperative. The word Buy is yellow and shaped like a shopping cart, while Board and Purchasing Cooperative are in blue text.
  • Facebook
  • Instagram
  • Twitter
  • YouTube

SIGNUP FOR NEWSLETTER

Loading

Copyright © 2025 SimpliFaster. All Rights Reserved.