• Skip to content
  • Skip to primary sidebar
SimpliFaster

SimpliFaster

cart

Top Header Element

  • Facebook
  • Instagram
  • Twitter
  • YouTube
  • Login
  • cartCart
  • (925) 461-5990
  • Shop
  • Request a Quote
  • Blog
  • Buyer’s Guide
  • Freelap Friday Five
  • Podcast
  • Job Board
    • Candidate
    • Employer
    • Facebook
    • Instagram
    • Twitter
    • YouTube
You are here: Home / Blog

Blog

Over The Bar

High Jumping the JAC Way

Blog| ByEli Sunquist

Over The Bar

The high jump is one of the most exciting events to watch in track and field. Athletes run very fast in a straight line, make a slight turn to the left or right, jump as high as they can off of one leg, and then try and contort their bodies over a bar that is only about an inch in diameter. At a high level, the event is extremely fun to watch. At all levels, it is extremely fun to coach.

The athlete competes against others but also against the bar, always trying to challenge themself and their personal best. In this article, I want to share the fundamentals of the event, as well as how we at the Jacksonville Athletic Club train for the high jump, including training ideas throughout the year.

Objectives of the High Jump

Simply put, the objective of the high jump is for the athlete to get their hips as high as possible over a fiberglass bar, without knocking it off. The high jump and pole vault events share the same objective: Jump as high as possible, in a safe manner. Like any other jumping event, having a well-rehearsed and comfortable approach is paramount to success. Much time should be spent in practice working on the full approach. I will go into this much further later on, but you should know that most success in the high jump is due to a good approach, which athletes must practice on a regular basis.

You should spend much of the time in practice working on a high jumper’s full approach. Share on X

Basics of the Event

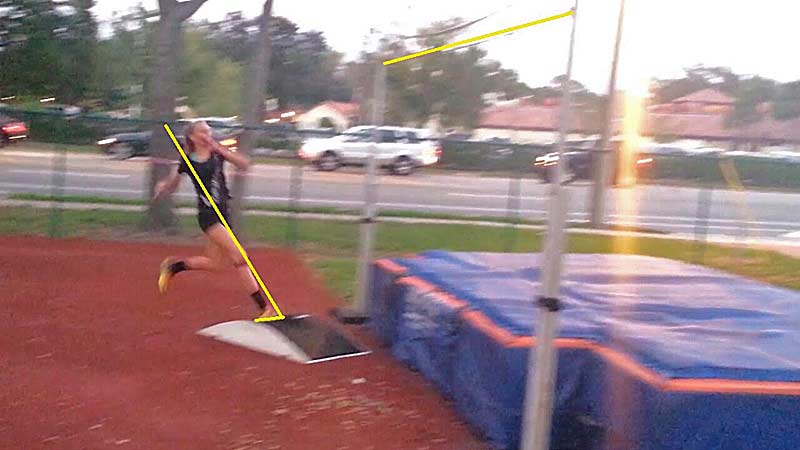
The approach: The high jump is the only jumping event where the athlete must run an approach that is not completely linear in nature. After anywhere from one to six steps in a straight line to establish speed in the approach, the athlete will then run a curved approach towards the bar in order to establish a good takeoff position from the bar. Most traditional approaches have the last five steps of the approach run around the curve. The straight part of the approach is where the athlete sets up a good acceleration pattern, and the curved part of the approach is where the athlete establishes a good lean and gets their body in an optimal position for takeoff.

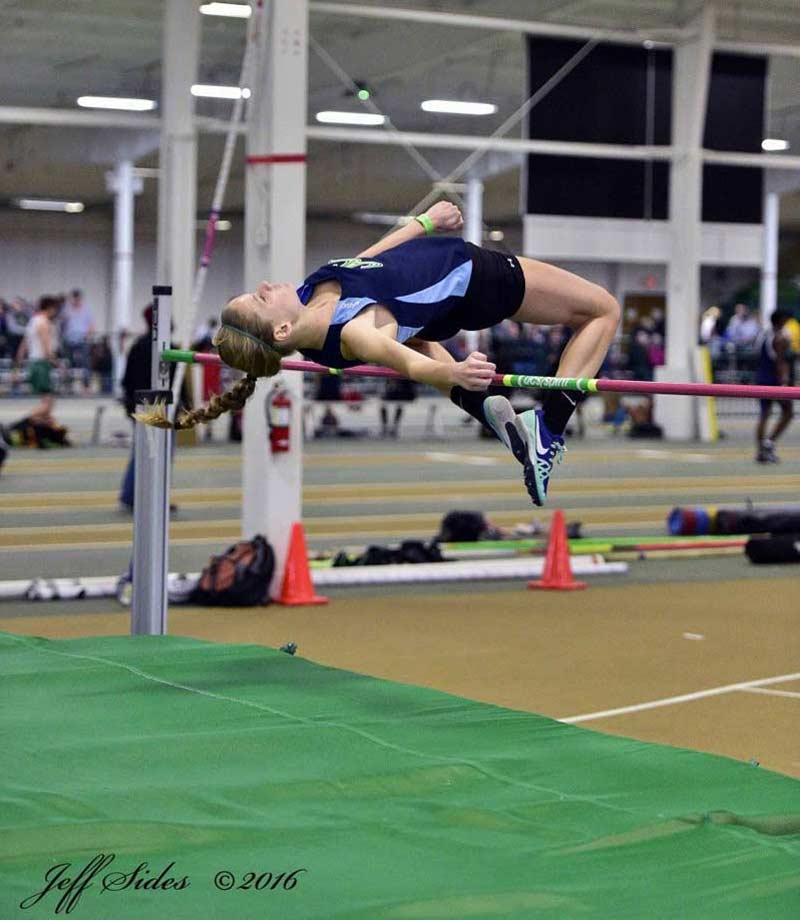
The lean: One of the most important parts of the high jump approach (and therefore the high jump as a whole) is the body lean away from the bar. The curve in the approach is what takes the athlete into the pit, and the lean away from the bar (from running a good curve) is what gives the jumper time in which to bring everything UP before going IN. Since the jumper will automatically be traveling into the pit, the lean away from the bar (good space between the shoulders and the crossbar) is paramount to making sure the jumper gets all of their height before the bar. Once fully off the ground, the athlete can then just focus on rotating quickly over the bar. We try to cue our athletes to “keep their shoulders away from the bar” or simply “lean away from the bar” as they work on the curved portion of the approach.

Abby HJ Lean
Image 1. The lean away from the bar (good space between the shoulders and the crossbar) is paramount to making sure the jumper gets all of their height before the bar. This shows a good lean before takeoff from the right foot.


The takeoff: It sounds simple, but if the jumper is able to run a good approach, with a good lean away from the bar (see above), then the jumper only needs to be thinking about jumping up as high as possible, straight up into the air. If the ultimate goal of this event is height, that is all that the jumper needs to be thinking about at takeoff. The curved approach will take the jumper into the pit once they become airborne, so it is jumper’s job to think about jumping straight up in the air at takeoff. Good features of a high jump takeoff include pushing off of the entire foot, driving the non-takeoff knee very fast straight up, fully extending the takeoff leg off the ground, and driving the inside shoulder (or non-takeoff leg side shoulder) straight up into the air as well.

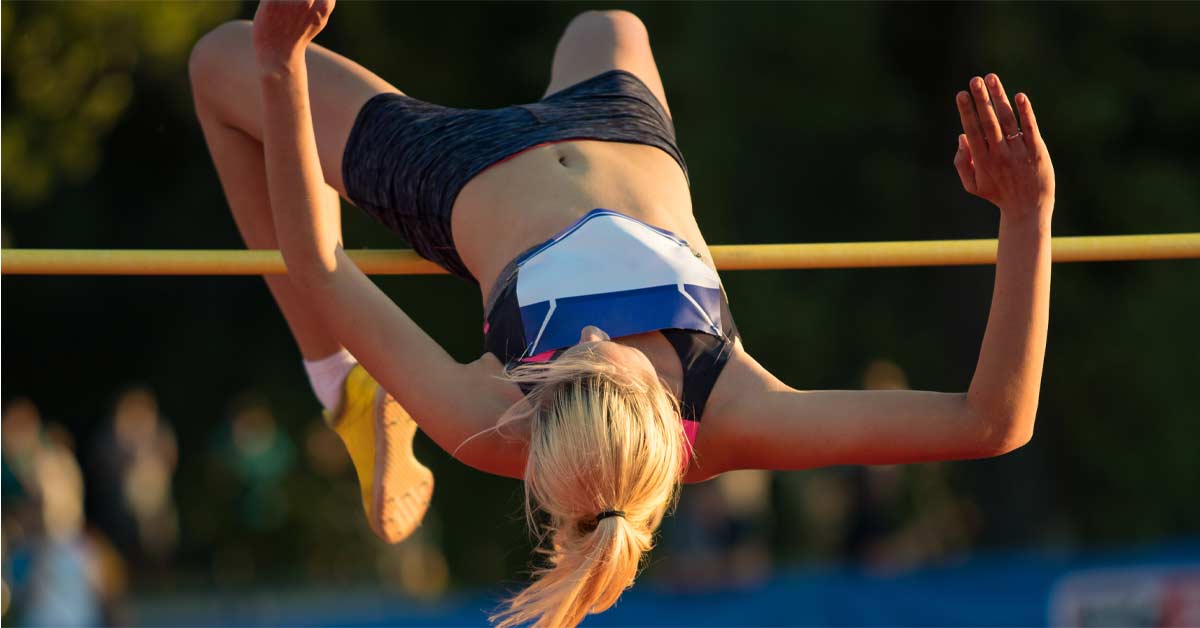
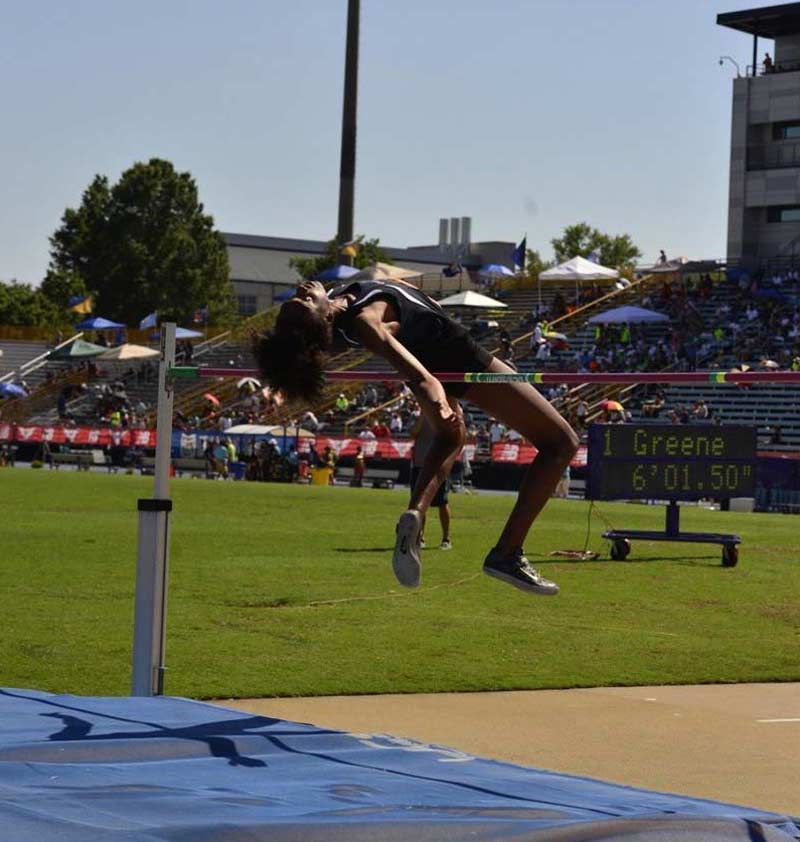
Rotation over the bar: As we have discussed in other articles, much like a long jump landing or hollowing out the chest over the pole vault crossbar, this part of the jump is almost the “icing on the cake,” so the athlete should only work on it AFTER they’ve focused in on all the other parts of the jump. I have seen jumpers who rotate over the bar perfectly, contorting their bodies like an acrobat, but still only jump marginal heights due to their poor approaches and take-off fundamentals. A proficient approach, good lean, and aggressive vertical takeoff determine your success in the high jump so much more than good rotation over the bar.

Madison High jump
Image 2. One of our high jumpers clearing the bar. Effective bar clearance comes from trying to rotate quickly over the bar. We tell our jumpers to try and get their shoulders down to the mat as quickly as possible (Photo by Jeff Sides).

Simply put, when the athlete feels like their hips are over the bar, they should try and press their shoulders down to the mat as fast as possible. This will allow the hips to keep rising, as well as allow the legs and feet to quickly rotate over the bar. The longer the jumper travels over the bar, the more likely they are to knock the bar off. Effective bar clearance comes from trying to rotate quickly over the bar. We tell our jumpers to try and get their shoulders down to the mat as quickly as possible.

High jump success depends on a proficient approach, good lean, and aggressive vertical takeoff. Share on X

Donald Thomas is a world champion and three-time Olympian, and he goes over the bar in a very “non-ideal” position. However, he can jump over 7’9” in the high jump (one of the highest jumps in the history of the event) due to his jumping ability at takeoff. Of course, if he improved his rotation over the bar he could jump higher, but 90% of what he is able to accomplish comes from what he does on the ground.

What We Do in Training

Approach runs from full: At least one day a week, throughout the training year, we do full approach runs. In the fall training period, they might be done in tennis shoes, just to work on the rhythm and posture of the approach. From the very beginning of the training year, our jumpers work on establishing a good rhythm for their full approach run. The majority of our athletes will go from seven to 10 steps, and we will do anywhere from four to eight of these approaches at the beginning of a jump session.

Sometimes the jumper performs the approach with a modified takeoff into the pit, sometimes with a scissor jump over a bungee, and other times instead of taking off, they simply keep running around the curve and back the other way, much like a horseshoe pattern. No matter how they end the full approaches, the keys we look for are good rhythm, good body lean around the curve, and tall body position around the curve. The coach will usually watch these approach runs from the opposite side from which the jumper is running, to look at the lean away from the bar. (For example, a left-footed jumper will run towards the right standard before the curve, and the coach will stand to the side of the left standard to watch the curve and body lean.)

The keys to a good approach are good rhythm + good body lean & tall body position around the curve. Share on X

Scissors from full: As mentioned above, sometimes we do scissor jumps from a full, as an extension of working on the full approach. The takeoff in a scissor jump should be directed completely vertically, with the free knee (opposite leg) swinging up very quickly, and then blocking. The jumper will then simply step over (or attempt to) the bungee or bar.

Scissors from 4-6 with no mat: One drill we use that I borrowed from my mentor “Fuzz” (yes, that is real) is short approach scissor jumps, over a bar, but with no pit to land on. They go from just four to six steps, and scissor jump a bar, then (hopefully) land safely on the ground, on their feet. It is so much easier to jump into the bar when you know that you will land on a big, comfortable, mat. When you take the mat away, the jumper will only jump into the bar once—they won’t like the sensation of landing hard on the track, and will self-correct on the next few jumps. This drill, if done in a safe manner, can be very helpful in teaching a good lean away at takeoff, and then a complete vertical jump at takeoff.

Jump from 6: Most of our high jumping in practice is from a short approach. We do a lot of jumps from six steps, as the jumper can still bring some speed into the jump, as well as take a lot of jumps without tiring out too quickly. We look for the same fundamentals that we would from a full approach: good speed, good lean around the curve, staying tall throughout the curve, and a takeoff that is vertical in nature. We also try to watch from the side opposite to where the athlete jumps from, so that we can see the shoulders away from the bar at takeoff, and see the inside shoulder and knee drive up fully before going back into the mat.

Bryson High Jump
Image 3. Vertical jumps can be very mental, so we make training as much of a positive environment as we can.

Jump from 6 off ramp: Want to know a way to give your high jumper even more jumps in practice, more time in the air, and more confidence? For $99.95, you can learn this one special trick the experts don’t want you to know! Or you can just keep on reading…

One of the drills our athletes love to do is jump from six steps off an elevated ramp. The ramp we have is about 6 inches high and is large enough that if a jumper has a bad approach, they can still jump off it and not worry about breaking their ankle (that would be bad). Athletes really like jumping off the ramp for one simple reason: They can jump really high off the ramp. That makes the activity fun for the athlete, and one they enjoy working on.

We like to start off pretty low, then go up in 3-6 inch increments, with the goal of getting the jumper to extend off the ramp longer and longer to keep jumping at the bungee. If a female jumper who has a PR of 5’ starts with the bungee at 5’ from six steps off the ramp, she should have no problem jumping at that height. However, if you keep the bungee there, the jumper will get used to jumping high enough to clear the bungee, but then not much higher.

Moving the bungee up forces the jumper to put more pressure into the takeoff and to extend more at the takeoff, to try to have a good attempt at the higher bungee. We have had athletes jump off the ramp at heights that were almost 2 feet over their current PR. Did they come close to clearing the bungee? Of course not. But the goal of this drill, and the reason it is so much fun for the athlete, is to try to jump as high as possible. This is so much easier if they have something really high to jump towards.

The main reason we jump from six off the ramp is simply to jump at high bungees, to get the athlete used to jumping high at takeoff. We also jump from six off the ramp to work on rotation over the bar, as well as having competitions over a bar.

To work on rotation over the bar, we put the bar up around the athlete’s PR, and have them jump off the ramp (which gives them more time in the air) and work on rotating over the bar properly. The goal is now to work on what they do over the bar, and not so much how high they can jump. We will usually do this eight to 10 times, leaving the bar at a manageable height, so that they don’t have to worry so much about the takeoff, but rather think more about rotating fast over the bar.

The final exercise we do off the ramp from six steps is to compete in one jump over a bar to try to set a new six-step ramp PR. We have club records for this activity, and it is a lot of fun to have the athletes compete against themselves, each other, and past club members. So, you can have your athletes do this “simple” exercise of jumping from six steps off the ramp to try and accomplish different goals: jumping up as high as possible, working on rotation over the bar, and working on bar clearance at higher heights. I have yet to work with a jumper who didn’t enjoy this drill, and this is usually the one activity we do the most on jump days.

Jump from 4: Early on in the year (fall period), we jump off the ground and off the ramp from four total steps. The same principles apply here, with just a shorter approach. From this short approach, we usually put a bar to work on rotation over the bar, but at a height that is not too challenging for the athlete.

No “back over” work: The only time we do “back over” work is when we are teaching a complete beginner how to high jump. A lot of time is wasted in high jump training doing back flops and all sorts of cool-looking “Matrix”-type moves in the air, when in reality what matters most is a good lean and takeoff. If you do these things correctly, the rotation over the bar becomes much easier.

Nicole High Jump
Image 4. We only do “back over” work when we are teaching a complete beginner how to high jump. Our focus is instead on teaching good lean and takeoff because when they are done correctly, rotation over the bar is easier (Photo by Jeff Sides).

Bungee vs. bar: In our training, we mostly high jump with bungees, due to the fact that we have a lot of athletes jumping at one time. If we want to work on rotation work over the bar (from a run), we will have the jumper jump over a lower bar, to work on some of the rotation mechanics in the air. I have found that much like Pavlov’s dog, athletes have been conditioned to equate the bar falling off with failure. They could have done a great job with the approach, and done something minuscule over the bar to cause it to fall, but as soon as a jumper knocks a bar off their first thought/instinct is one of failure.

I find that athletes equate the bar falling with failure, even if they did everything else right. Share on X

The vertical jumps can be very mental, so we try to make training as much of a positive environment as we can. I know other coaches who only use bars in practice, and they have had a lot of success as well doing it that way. It is up to you to do what works best for your system and your athletes. I have just found it to be better in our group to use the bungee more than the bar in training.

Practice Ideas Throughout the Year

While a complete training schedule for the high jump is beyond the scope of this article (you can find a detailed training plan in our articles on training for the jumps, as well for the combined events), I did want to mention that we train all of our high jumpers as either combined event athletes (heptathletes and decathletes) or as jumpers who are able to do the horizontal jumps as well.

A better overall athlete becomes a better high jumper, so we work really hard at getting our jumpers faster, stronger, and more coordinated, and this has carried over very well into the development in their high jumping ability. Our high jumpers will usually high jump one to two days a week, and work on speed, power, coordination, as well as general strength development on the other days.

Final Thoughts

The high jump is one event where we have had a lot of success over the past few years, and I believe this is due to how we teach the event, and how we train our high jumpers to be better athletes first, and then focus on the “high jump stuff.” We have found drills and exercises that work, and we are able to have our athletes buy into our system of teaching the high jump. Most of the success comes from the athlete wanting to get better, doing what is necessary, and trusting the program.

We train our high jumpers to be better athletes first, and then focus on the “high jump stuff.” Share on X

This event is not rocket science (although it has the closest resemblance to such study, as both are trying to put a body in flight…), but HOW you teach and coach it can make a huge impact on the athlete’s success in the event. If you want your athletes to jump high in meets, they need to jump high in practice. Off a ramp, attempting really high heights over a bungee, or jumping high bars from a short approach all help accomplish this goal.

Acknowledgments

I would like to thank the following coaches and mentors for all of their wisdom and guidance as I learned how to coach the high jump better: Glenn McAtee, Dr. Drew Hardyk, Fuzz Ahmed, Robert Olesen, Boo Schexnayder, Noel Ruebel, and Clark Humphries. All of you have taught me so much, and all of the improvements we have had in this event are a reflection of your knowledge and insight, so thank you again!

Since you’re here…
…we have a small favor to ask. More people are reading SimpliFaster than ever, and each week we bring you compelling content from coaches, sport scientists, and physiotherapists who are devoted to building better athletes. Please take a moment to share the articles on social media, engage the authors with questions and comments below, and link to articles when appropriate if you have a blog or participate on forums of related topics. — SF

Sprinters Tapering

Speed and Power Physiology, Tapering, and Performance with Andy Eggerth

Freelap Friday Five| ByAndy Eggerth

Sprinters Tapering

Andy Eggerth, a 15-time Atlantic Sun Coach of the Year and two-time USTFCCCA South Region Coach of the Year, is the Director of Track and Field and Cross Country at Kennesaw State University. He was also the head men’s coach for Team USA in the IAAF Challenge Capital Cup Combined Event in the summer of 2017.

Freelap USA: What is the role of energy substrates in short-term power (under 10 seconds)? Is there anything metabolic (as opposed to neural) that coaches need to consider and train in a 100m dash setting?

Andy Eggerth: I think about this often enough and the conclusion that I usually come to is that the metabolic effects and energy substrate consideration is largely a by-product of proper neuromuscular training. We all know that stored ATP and creatine phosphate (CP) are the primary substrates for maximal efforts in the 10-second range. We don’t have much (if any) control over ATP stores, but can increase CP stores through creatine loading.

There aren’t any specific #metabolic factors coaches need to think about when addressing the 100m, says @CoachEggerth. Share on X

A lack of CP is not a cause of fatigue in a 100m dash though, so any benefits gained from loading would be primarily from slightly extended training sessions or better recovery between multiple runs. I do not believe there are any specific metabolic factors that coaches need to think about or target training toward when addressing the 100m.

Freelap USA: What are some things that can play into the “tapering” process for a speed and power athlete from a physiological perspective? From a nervous system perspective?

Andy Eggerth: Several years ago, I had a sprinter that the trainers wouldn’t allow to do track workouts for three weeks, but they would let her lift weights. I knew that I needed to keep the nervous system stimulated, so three days each week I had her doing probably 20-30 sets of Olympic lifts per day with probably somewhere around 60 reps per session. In her next race, she PR’d by two-tenths in the 100m.

Tapering can come in many forms. Coaches need to be aware of Acute Relieving Syndrome, where unloading too much, too fast can shut down the systems and then the athlete feels flat. This is the reason I loaded up on Olympic lifts so much—to be sure the CNS didn’t shut down, so to speak.

The nervous system is the primary consideration for the speed/power athlete, so we don’t want to be in a state of neural fatigue, but must be neutrally stimulated. This is the art of coaching, knowing where your training has come from and how the athlete responds, which can be a little different each season as the athlete is at a different point in their life and has varying outside influences.

Often, a successful peak is more about successfully managing arousal levels than tapering training, says @CoachEggerth. Share on X

Regarding tapering from a physiological perspective for a speed/power athlete, we’re considering enzymes, maintaining an anabolic state, and like the nervous system—eliminating fatigue, but remaining stimulated. Sometimes coaches back off too much…if it’s been working all season, you probably don’t need to make drastic changes.

I’m a firm believer that one of the biggest factors in peaking is very simply arousal levels. Athletes are able to perform at their physical highest at the championship because that’s what their mental focus has been on for however many months or years. Often, a successful peak is more about successfully managing arousal levels (to allow correct technical execution) than it is about tapering training.

Freelap USA: What are some procedures to determine if a power athlete (more of a 100-200m person or a jumper) may be more or less responsive to a regular dose of increased blood lactate in a workout than others?

Andy Eggerth: Talking with your athletes and asking the right questions, in alignment with what you as the coach are seeing, will reveal their needs. I have some athletes that love bodybuilding and feel much better from doing it, and others that feel it’s a waste of time and effort. Likewise, with some tempo running…some feel they really need it, while others feel better from 30m block starts.

I don’t just listen to what they want, however, especially with young athletes because they don’t know their body yet or what works or doesn’t work. With veterans, I give them a lot of control over the process. We’ve all had those young sprinters that lack a work ethic so all they want to do is block starts as though that’s the golden ticket.

Conversely, some coming from a high school background with big volumes of tempo running may feel they need it, but are often wrong. This is where it’s important to listen to them, consider what they’re saying, and maybe even move training in that direction to keep them happy and confident, but observe their adaptations to training to dial in what they respond best to.

A lot of times you’ll just see from the competition results how they are responding to the lactate boluses you have designed in your training. Maybe your whole group performs better than you expected at a particular meet and then, as you’re following traditional periodization, they don’t feel as good or perform as well as you’d expect at a later competition. You might go back to look at your training to see what the major differences are.

There’s probably more accurate scientific means to determine an athlete’s responsiveness to lactate than my guess and check, but this is what I work with on my budget.

Freelap USA: What should a coach be considering with athletes in light of dopamine and serotonin levels through the course of a training week?

Andy Eggerth: Serotonin levels spike in overtraining situations while dopamine levels crash. You’re likely to see moodiness, poor sleep patterns, lethargy, and so forth. If your training week is correctly designed, athletes should be in pretty good moods and hungry to train all week. If you’re starting to get laziness, moodiness, and this type of thing late in the week, then you may have dialed in the intensity/density/volumes incorrectly. Or, as is common in the college ranks, it’s due to a poor lifestyle, relationship issues, and/or academic stresses.

If you correctly design your training week, athletes are in good moods and hungry to train all week, says @CoachEggerth. Share on X

It might not be a matter of overtraining, but rather under recovering…sleeping five hours per night, eating garbage, consuming too much alcohol or other drugs. At the end of the day, the result is the same for the effectiveness (or lack thereof) of your training plan, so more recovery needs to be prescribed.

Freelap USA: What is an important aspect of coaching track athletes that you feel is underappreciated, or not often considered?

Andy Eggerth: I have an analytical mind, so I’d like to design training like programming a computer but that is completely ineffective when dealing with the human condition. What I continually learn more and more is that to be effective, we need to have a close relationship with our athletes, understanding what is going on in their lives, and meeting their emotional needs for love and acceptance. It’s like the old saying, “Nobody cares how much you know until they know how much you care.”

Since you’re here…
…we have a small favor to ask. More people are reading SimpliFaster than ever, and each week we bring you compelling content from coaches, sport scientists, and physiotherapists who are devoted to building better athletes. Please take a moment to share the articles on social media, engage the authors with questions and comments below, and link to articles when appropriate if you have a blog or participate on forums of related topics. — SF

Teaching the Glide Shot Put Sequence

Teaching the Glide Shot Put Drill Sequence

Blog| ByJim Aikens

Teaching the Glide Shot Put Sequence

While coaching the throws for over 35 years, I have had the honor of coaching both successful rotational throwers and successful glide throwers. I have spoken about the glide at several track clinics around the country and, when I do, I seem to spend most of the time speaking about the power throw (stand throw). The actual glide never seems to get the attention it deserves.

I have a story for you. I went to a throws clinic once that was supposed to cover both rotational and glide shot putting, as well as the discus throw. The clinic was nearly seven hours long with a 45-minute lunch break. During this clinic, the speakers talked for five hours and 15 minutes about rotational throwing. Then, with about 45 minutes left, the coaches in charge said, “And now we will talk about the glide.” The talk then pretty much said that you should slide backward into the power position and put the shot. Believe me, there is a little more to it than that.

The rotational technique is an outstanding way to propel a shot put a great distance. But the rotational technique is not for everyone. This is my first year coaching at a new school and the kids haven’t had a real throws coach in forever. They have zero concept of throwing and my job is to try to get them to throw the shot as far as possible, as soon as possible. There are some kids who just take naturally to the rotational technique, but there are a large number who don’t.

I like to teach the glide technique to my athletes because I feel it is an easier technique to master and it helps the athletes develop a good finish on the ball. While I start off teaching my athletes the glide at the beginning, for the reasons I mentioned above, I still do rotational drills with them to see if they have a natural feel for the movement. If they do, I will pursue that with them.

Before I go any further, I want to let you know that I think the most important thing is to develop a solid stand throw from the power position, so we work on that every day. I will continue to work the rotational technique with my athletes every year to see if they have developed the athleticism and rhythm that it takes to be successful with the rotational technique. What I often find happens is that after a year or two of throwing glide technique, they have developed the necessary skills to perform the rotational technique.

I have had numerous throwers switch from glide to rotational and be very successful. I believe that one reason more college and post-collegiate throwers use the rotational technique is that they have all year to do work and develop that technique. As a high school coach with kids playing other sports, you’re lucky if you have five months—maybe more if you can get the kids to throw some over the summer.

When I teach each drill, I explain where and how it fits into the larger scheme of the throw, says @JimAikens. Share on X

When beginning to teach the glide technique, the first thing I like to do is show the kids videos of some gliders and point out some of the key phases of the glide. I think they need to know the big picture of how the glide should look before I can break it down into individual pieces for them. Then, when I teach each individual drill, I can explain where and how it fits into the larger scheme of the throw.

I like to use John Brenner’s technique as a model. I also show them David Storl’s and Al Feurbach’s techniques because I want to expose them to different styles. As a coach, you need to remember that once the basic pattern for the throw is established, it’s OK to let the athlete experiment with some variations that may work better for them. You never know until you try.


Video 1. This is a video of a practice throw done by Ethan, a glider I coached last year. Once an athlete establishes a basic pattern for their throw, it’s OK to let them experiment with variations that may work better for them.

Power Position Shuffles

Recently, I started teaching the glide a little differently. After I taught athletes the power, which they must continue to work on constantly, I taught them what I call the “Power Position Shuffle.”

For this, they simply start in the power position and then move their power foot to their blocking foot. They do this while keeping their knees bent and their weight primarily on their power foot. Then they move their blocking foot back and they are in the power position again. From there, they execute a standing throw. After some practice, they are able to move backwards fairly quickly.

I like this drill because it reinforces several key concepts:

  1. It helps the athlete become familiar with the feel of moving backwards and doing a stand throw.
  2. It helps the athlete work on keeping their upper body back and not opening up during the movement, which is a very common mistake for many gliders.
  3. It is easier for the athlete to get into a good power position and feel what it is like to throw from that with some momentum. Also, the athlete can really work on their power foot drive since the power foot is in a good position.
  4. If the athlete is not yet ready to glide in a meet, this drill gets better results than just throwing from the power position.


Video 2. After some practice of the Power Position Shuffle drill, athletes can move backwards fairly quickly. The drill helps athletes become familiar with the feel of moving backwards and doing a stand throw, and reinforces other key concepts.

Back of the Ring

In teaching the glide, I feel that it is important to emphasize a couple of key points. First, it is important to start in a balanced position and to load the power leg (the leg that you push and drive off of in the stand throw). To ensure proper loading of the power leg, the athlete’s hips must be directly over the power foot. The athlete must also lower down onto a bent power leg in order to drive effectively off of it.

If the hips are not over the power leg (they usually drift to the front of the ring when the block leg is drawn in), the athlete will not be able to drive properly out of the back of the ring. Then, they will more than likely rise up as they leave the back of the ring or have trouble getting their power foot into the proper position. My beginning gliders perform drills to help them feel this position. The back of the ring, T position, and gather drills help them to align properly and feel the correct alignment of hips over the power foot.

Back of the Ring Drill

The Back of the Ring drill teaches athletes to correctly load their weight over their power foot in the back of the ring. This helps them prepare for proper balance and position in the back of the ring. Their foot should stay flat to help them stay balanced. Notice how the hips are stacked over the power foot.


Video 3. The Back of the Ring drill teaches athletes to correctly load their weight over their power foot in the back of the ring.

T Position Drill

This drill teaches the athlete to load their back leg properly for the glide in the back of the ring. The key points are that the athlete keeps their power foot flat for balance and they should have a long left arm to counterbalance the extended left leg. I want the athletes to raise the block leg parallel to the ground, if possible. This ensures that the hips stay over the power leg.

The T Position Drill helps athletes build the strength & balance needed at the start of the throw, says @JimAikens. Share on X

The drill also helps the athlete build the strength and balance they need at the beginning of the throw. Once the athlete is in the “T” position, they should try to lower and raise themselves on their power leg. This assists the thrower in developing the proper alignment of hips over the power leg foot when they enter the crouch position in the back of the ring.

Remind your athlete to bend at the waist and keep their hips over the power foot. They should also slightly round their back.


Video 4. The T Position Drill teaches the athlete to load their back leg properly for the glide in the back of the ring. It also helps them build the strength and balance they need at the beginning of a throw.

Gather Drill

This drill helps teach the athlete the balance and strength needed to gather or bunch the body with the correct alignment before they drive off of the power leg from the back of the ring. This gather is important in order to properly load the power leg so the athlete can drive off of the power leg and get across the ring. Even if you like to teach a more active start to the glide, this is a great beginning drill.


Video 5. The Gather Drill is a great beginning drill. It teaches the balance and strength needed for an athlete to gather their body with the correct alignment before they drive off the power leg from the back of the ring.

Once the athlete develops proper mechanics and strength in the back of the ring, a more advanced technique you can have them do is rise up onto a straighter power leg and extend to the ball of the foot. After they reach this position, the athlete then drops straight down (with hips in alignment with the power foot) onto the power leg foot. This adds even more power, as well as a stretch reflex, to the drive of the power leg.

More movement in the back of the ring tends to cause more balance issues that will affect the throw, says @JimAikens. Share on X

Again, I want to emphasize that this is for more accomplished athletes. I have found that more movement in the back of the ring tends to cause more issues with balance that will affect the throw. Video 6 below shows my glider from last season using this technique.


Video 6. This advanced technique adds even more power, as well as a stretch reflex, to the drive of a power leg. Use it only after an athlete develops proper mechanics and strength in the back of the ring, and only with more accomplished athletes.

Exiting the Back of the Ring

The next key point of the glide is the proper exiting of the back of the ring. Keep in mind that it is called the glide, not the hop. I used to teach that athletes should unseat coming out of the back of the ring. Unseating is the hips falling backward towards the front of the ring. This falling back (unseating) of the hips lets gravity help the athlete get across the ring.

However, I found this to be a very difficult thing to teach. More often than not, the athlete would try to unseat and not have enough weight on their right leg for an effective push from the power leg. Additionally, they would rise up because prematurely dropping their hips would cause them to raise up out of the back of the ring.

Later, I realized that if the power leg was loaded properly and an effective drive was created, the unseating action would happen as a result of that proper drive. This is much like a rotational thrower developing the proper shin and thigh angle out of the back of the ring, as a result of being on balance in the back of the ring, and then going around their left side as they drive in to the center of the ring.

To create proper drive out of the back of the ring so the thrower doesn’t rise up, there should be a correct sequence of events that happen. As discussed above, the thrower should be down on their power leg. Then, the thrower should fully extend their blocking leg. After the full extension of the blocking leg, the thrower drives off the power leg heel, driving the power leg to full extension.

The entire time this is happening, I use a cue for my athlete to tell them to try to keep their stomach on their thigh. This helps to keep their upper body low and back—most early gliders raise up out of the back. Also, I like the athlete to come off their heel. If the athlete drives off of their toe, they usually push up and hop across the ring. Driving off of the toe also makes it harder to get their foot underneath them in a proper power position. It is crucial for them to place their power foot under in the correct position, and get the power heel raised as soon as possible, in order to create the pivot and push necessary for proper power leg drive in the power position.

The following drills will help to develop these skills.

Blocking Leg ‘A’ Drill

This drill helps develop the proper drive and extension angle of the extending blocking leg. The leg kicks down toward the toe board, not up in the air. (Notice the left foot lands facing 9:00—this helps the athlete balance). You must remind the athlete to stay down. I use the cue, “stomach on thigh.”

Finally, this helps the athlete realize that they come off the heel of their foot and not the ball of their foot in the glide. Athletes who come off the ball of their power foot will either hop across the ring or have a difficult time getting their foot into the proper underneath position.


Video 7. The Blocking Leg “A” Drill helps develop the proper drive and extension angle of the extending blocking leg. It also reminds athletes that they should come off the heel of their foot in the glide—not the ball.

Often, the athlete will have difficulty extending their block leg back or kicking it too high. To help rectify this problem, you can place a medicine ball behind the athlete for them to kick out at. Hitting the medicine ball gives the athlete feedback as to whether they extended their leg properly.


Video 8. You can use a medicine ball as feedback on proper leg extension. Place it behind the athlete for them to kick out at.

Power Leg Pull Drill

This drill helps the athlete develop the concept of coming off of the heel of their power foot in the back of the ring, and turning the foot slightly so they land on the ball of the foot. The athlete will try to rise up in order to get their foot underneath them. They must learn to stay low and focus on getting the foot under them in a proper position. It may help for you to place your hand on the thrower’s back to help remind them to stay low.


Video 9. The Power Leg Pull drill helps the athlete develop the concept of coming off the heel of their power foot in the back of the ring, and turning the foot slightly so they land on the ball of the foot.

Working on the Entire Movement

The rhythm and balance of the full throwing movement is just as important as the technique. The Wall Glide #1, Wall Glide #2, Chair Glide, and Glide-Check-Put are designed to blend together the above movements and their timing to help build a fluid movement and proper timing for the whole throw. Athletes should work on these drills in conjunction with the drills in the previous section to properly develop the entire glide throw motion.

To help the athlete improve on specific aspects of the throw, I use the Step Back Power, Banded Glide, Mini Glide and Double Glide drills. Each of these works well in perfecting certain aspects of the glide throw that an athlete may need to improve upon. In the description given for each drill, I have written what piece of the glide I believe the drill helps to improve.

Wall Glide #1

This drill is great for starting to tie it all together. The athlete faces the wall and performs a slight drive with their blocking leg. They then must focus on pushing off the heel of the back (power) foot and landing on the ball of the slightly turned power foot. This drill also helps to reinforce the timing with which the left leg initiates the glide.

The athlete doesn’t move very far off the wall, and they keep their hands on the wall. This helps the athlete feel the “X” tension that is created as the shoulders keep facing back while the hips face sideways, or open up.


Video 10. The Wall Glide #1 drill starts to tie it all together. It also helps reinforce the timing for the left leg to initiate the glide.

Wall Glide #2

This is the same as Wall Glide #1, but this time the hands can leave the wall. The athlete must still keep them facing the wall. The athlete should try to gain some distance from the wall on this drill by producing a more forceful blocking leg drive and a power leg push off the heel.


Video 11. The Wall Glide #2 drill is similar to the Wall Glide #1, except the athlete’s hands can leave the wall. They should also try to gain some distance from the wall with a more forceful blocking leg drive and power leg push off the heel.

Chair Glide

This is a nice drill to follow the wall glides. This drill really helps put it all together. Athletes should not lean on the chair—just grab a hold of it to help keep their shoulders back. They can go through the entire set up to the glide and then grab on to the chair and perform a more forceful Wall Glide #2.

Holding on to the chair helps to keep the athlete’s shoulders facing back and the athlete from rising up during the glide (since they are holding on to the chair). A nice variation to this drill is to have the athletes hold on to the chair with their non-throwing hand while holding a shot in the other hand. They can then just glide or even throw from this variation of the chair glide.


Video 12. The Chair Glide drill uses a chair to help the athlete perform a more forceful Wall Glide #2. Holding on to the chair helps keep the athlete’s shoulders facing back and the athlete from rising up during the glide.

Glide, Check, Put

This is a great drill for developing proper form for the entire glide. The athlete goes through the proper sequence of setting up the glide, and then they try to perform a perfect glide landing correctly in the power position. Often, when first starting out, the athlete will let their weight shift too far toward the toe board, which takes their weight off their power leg. This, as we know, is not a good thing.

This drill helps them to feel that and work on hitting the position properly. As the coach, you (or another teammate) will make corrections by moving the athlete into the proper position. Once they achieve the proper position, then the athlete performs a stand throw. Eventually, the athlete’s adjustment time will be smaller and smaller, until there is no adjustment time at all.


Video 13. The Glide, Check, Put drill helps athletes develop proper form for the entire glide. Once they achieve the proper position, they can perform a stand throw.

Step Back Power

This is a great drill in many ways. It helps the athletes feel what it is like to load the power leg in the glide. It also helps them develop a fast-acting power foot, since it is easier to not let the power foot heel hit as it would in an actual glide. The other point of emphasis in this drill is to work the hips around while keeping most of their weight on the power leg.

In this drill, the athlete may also feel what it is like to move backwards and throw. They can work on keeping their shoulders back and not open up during the glide. The drill helps them to learn to stay low and not rise up as they move through the ring. Since this drill develops more momentum than a stand throw, an athlete could perform it for distance in a meet.


Video 14. The Step Back Power drill does many things for the athlete, including helping them feel what it’s like to load the power leg in a glide and develop a fast-acting power foot. Since this drill develops more momentum than a stand throw, an athlete could perform it for distance in a meet.

Banded Glide

The Banded Glide drill is great for someone with issues getting their power foot into the proper placement in the glide. Tie a TheraBand (I like to use green) onto each ankle and have the athlete perform the glide. The slight pull of the TheraBand helps the power foot get into a better position. I have also had my athletes throw with the TheraBand on with good success.

You know how drills always look good, but as soon as athletes actually try to do the entire movement, things don’t look quite as good? I usually have them do six with the band and two without the band and then repeat the set. The only issue is that it is a bit of a pain taking the TheraBands off and putting them on again.


Video 15. The Banded Glide drill is great for an athlete having issues getting their power foot into the proper placement in the glide. Tie a TheraBand onto each of their ankles and have them perform the glide. I usually have them do six with the band and two without it, and then repeat the set.

Glide Drills for the More Experienced Thrower

Mini Glide

Once the athlete has a handle on the basic glide, this drill helps them develop the power leg drive necessary for the glide. The athlete performs this drill by lining up in the back of the ring position. Instead of curling their leg in and going knee to knee, have them extend the left leg so it doesn’t aid in the movement across the ring. All the work is done by loading (dropping down) and driving off of the power leg. I have also had my athletes throw off of this drill with good success.


Video 16. The Mini Glide drill helps athletes develop the power leg drive necessary for the glide. Instead of curling their leg in and going knee to knee, the athlete extends the left leg so it doesn’t aid in movement across the ring. All the work is done by loading and driving off of the power leg.

Double Glide

Once the athlete has a handle on the basic glide, I feel that the Double Glide is one of the best drills for a glider. It helps work on getting the right foot under the athlete in the proper position to produce force for the throw. Also, this drill will help to ensure the athlete stays back and low on the power leg and doesn’t rise up.

The athlete starts in the back of the ring position and performs a glide, followed immediately by another glide without resetting. If the athlete rises up or doesn’t get their foot in a good position, they will not be able to complete the second glide. It is best to start the athlete on this drill without throwing and then graduate to throwing the shot with the drill.


Video 17. The Double Glide drill helps the athlete work on getting the right foot under and in the proper position to produce force for the throw. Starting in the back of the ring position, the athlete performs a glide, followed immediately by another glide without resetting. If they rise up or don’t get their foot in a good position, they won’t be able to complete the second glide.

Don’t Forget to Practice the Entire Movement

After the athlete has worked with drills and developed some proficiency with them, they should have a passable glide. In drills, I like to use a progression where the athletes first use nothing, then use a med ball, and finally work with the shot. By using med balls, I have found that it helps the athlete focus on proper lower body movements since the upper body is occupied with the med ball.

Early in my career, I was big on drills, and I still am. My mistake was I would practice lots of drills without practicing the entire movement. As a result, my athletes got really good at drills but did not develop as fast as I would have liked with the entire movement. I learned over time that I first needed to teach the drills so the athletes could get better at individual parts of their throw.

While drills help athletes improve at single throw parts, they must also practice the full movement, says @JimAikens. Share on X

After that introductory period, it is always better to mix drills with full throws. For example, if an athlete is having a hard time using their right leg properly to drive out of the back, I would do some Banded Leg Glide drills and then some full throws without the bands on. I would continue this process for two or three sets. I now use this recipe with all of my athletes and drills for both my gliders and rotational throwers.

I hope you have found this article helpful. If you have further questions, want further explanations, or just want to talk throws, please feel free to contact me at [email protected].

Since you’re here…
…we have a small favor to ask. More people are reading SimpliFaster than ever, and each week we bring you compelling content from coaches, sport scientists, and physiotherapists who are devoted to building better athletes. Please take a moment to share the articles on social media, engage the authors with questions and comments below, and link to articles when appropriate if you have a blog or participate on forums of related topics. — SF

Pulling Exercises

7 Upper Back Pulling Exercises for Athletes

Blog| ByWilliam Wayland

Pulling Exercises

The upper back is often considered the hallmark of a truly strong athlete. I’ve seen heavy back training referred to by some as armor building, bulletproofing, and other similar protective sentiments. While it plays that role terrifically well, it can also be a performance driver in athletes whose sports require a strong back and/or find back strength a limiting factor.

Back strength is not just for GPP and youth athletes. The problem stems from the fact that most of what we know about back training comes from either bodybuilders or physiotherapists. Disentangling back training from notions of “health” and/or “size” can be tricky.

Heavy back training isn’t just armor building—it can also be a performance driver for some athletes, says @WSWayland. Share on X

Strength coaches don’t help much either, as they put the focus on training force projection in a largely sagittal anterior direction—pressing and squatting (including single leg work) rule the roost from an exercise consideration standpoint. This makes sense, as most athletes are about navigating the space in front of them. Upper back work is not forgotten, but it is often not loaded with the same intent or intensity.

Functional training has railroaded upper body pulling exercises into band flailing, contralateral and fractional plate-wielding abominations. These exercises are often regulated into the “necessary for structural balance” class of exercises. Meanwhile, athletes are still fed a steady diet of upper body presses if they are still pressing at all, and doing a lot of what is perceived as good for their “structural balance” although any study of push-pull intensities will suggest otherwise. I’m pretty sure old-school coaches did just fine pairing bench with bent-over rows in a 2:1 pull:push ratio and going about their day.

Upper Body Pulling
Image 1. A pulling motion uses nearly every upper back muscle, but depending on the exercise, some are used more than others. Focus more on the vectors of how you pull, not just the muscles the pattern uses.

Some athletes—particularly combat athletes, athletes in “gi” sports (judo, sambo, jiujitsu, Cornish wrestling), and athletes participating in small watercraft sports or snows sports involving ski poles, for example—require low-velocity yielding and rapid ballistic or repetitive-type pulling. Of note are snatching type actions that involve a pulse or rapid contract/relax type action with mere milliseconds to establish a grip before the pull is initiated, which is a movement we rarely see in the weight room.

The other factor seems to be the connection with extremity strength in the hands in upper body pulling exercises and its seemingly subsequent relationship with full body strength. The ability to grip, pack, and brace as a common determinant of success in hinging and other lower body exercises is a relationship that most pragmatic strength coaches understand and explore. If we can’t organize the upper back/posterior chain under load, we will only see breakdown when we axially or anteriorly load the lower body.

Getting beyond the IYT shoulder exercises, bench chest-supported rows, and band pull-aparts, here is a selection of exercises I’ve found to be highly conducive to purposeful upper back training. This is by no means an exhaustive list, so you can surely add many more of your own.

One

Neutral Grip Lowering

Neutral grip lowering is a foundation of upper body pulling that we implement in our training programs. The ability to yield eccentrically in a neutral grip position is a fundamental skill that pays dividends in total body control above the pelvis. To quote Carl Valle’s “6 Sure-Fire Eccentric Exercises to Build (and Rebuild) Athletic Monsters: “Eccentric work is great for heavy athletes and weak athletes alike. An elite NFL lineman who has a poor strength to weight ratio or a young athlete who is starting from zero can see rapid improvements in pulling ability.”

As athletes advance w/neutral grip pull-ups, the quality of their #RDL and pressing patterns improve, says @WSWayland. Share on X

Neutral grip seems to serve us better than an underhand or overhand grip, as most athletes naturally move through a larger ROM. The finish and start positions seem to be of a higher quality than the “body English” excuses for pull-ups we often see with an overhand grip. As athletes advance with neutral grip pull-ups, I always notice that the quality of their RDL and pressing patterns get better as much of the worked musculature assists and supports these movements.


Video 1. Ideally, the athlete keeps their rib cage down as they pull. Many athletes will tilt backward, arching and trying to turn neutral grip lowering into more of a rowing action than a vertical pulling one.

Two

Oscillatory Rows

Oscillatory exercises attempt to manipulate the rapid contraction and relaxation relationships found in high-velocity movement. This manipulation of reciprocal inhibition is what separates studs from duds in an athletic sense.

You can assign oscillatory movements to just about any movement, but they really shine in the form of a single arm form. The athlete, however, has to focus on moving the load around 3-4 inches back and forth; a weaker/less-coordinated athlete will generally use a larger ROM, say 5-6 inches, to achieve the same effect due to them being more inefficient. The athlete must ensure they are not using perturbations from the torso to “cheat” so movement comes from the body and not the working limb. Done properly, the movement requires good bracing and scapular positioning.

Oscillatory rows come in two flavors: advantaged and disadvantaged. Much like the name suggests, advantaged are performed where limb lengths are mechanically at an advantage and disadvantaged are performed where the movement is at its most difficult mechanically. Apply both or either in a fashion that matches common sports positions. Advantaged positions are usual for activation and neural drive and make sense in peaking applications.


Video 2a and 2b. You can use extended oscillatory work as a GPP method to improve tissue tolerance; work periods can be 30 seconds. I employ these with grappling athletes using gi cloth or thick grip modifications.

Three

Catch and Release Variations

The ability to rapidly accelerate and decelerate pulling actions is something we rarely see trained. Undoubtedly, the foundation of upper back strength is found in controlled heavy rowing and vertical pulling. What stands out as good GPP practice for back training in the off-season hangs around during peaking like a hangover. If we increase velocities anteriorly then it makes sense to also increase them posteriorly.

If we increase velocities anteriorly then it makes sense to also increase them posteriorly, says @WSWayland. Share on X

Advanced athletes need preparation for the rapid acceleration and deceleration that sport requires. This can take two forms, such as accelerating an external load concentrically as in snatching rows and decelerating rapidly as in catching rows.


Videos 3 and 4: Adding velocity components to the exercises dramatically changes the dynamics of the movement to add athleticism without being too cute. Rowing doesn’t have to be tacked on at the end of a workout or be overly vanilla—it deserves the same effort and thought behind it as other workout movements.

We can also implement bodyweight ballistic movements, as in some sports such as wrestling, grappling, and jacket sports (judo, jiujitsu, etc.) where the athlete may accelerate themselves. We can use bodyweight catch release rows, which I unashamedly stole from Keir Wenham-Flatt and have found work as an excellent pairing with clap push-ups for an explosive push/pull combination. The momentary ballistic nature of the movement means we can train high limb speeds combined with rapid deceleration at the bottom movement, getting a good two-for-one pairing.


Video 5. Bodyweight catch release rows require rapid acceleration of bodyweight. You can modify their difficulty simply by adjusting the height of the bar.

Four

Banded Barbell Row

An understandable fondness exists in attaching accommodating resistance to movements involved in squat and press patterns for athletes as these actions dominate most sports. There is no reason why we can’t do this with upper body pulling either as a pull release (no eccentric) or straight reps. Usually, you can easily implement it by having the athlete loop a band over the bar and step into it.


Video 6. Eccentric-less training options are useful for athletes looking to train explosive pull or athletes that are injured and cannot tolerate deceleration.

Five

Eccentric Single Arm Ring/Suspension Row

Suspension training with rows can be rather redundant for any athlete, especially if they have impressive strength-weight ratios, where the need for weighted vests and the like becomes a limitation. We can manipulate the variables to make this simple exercise much harder.

Pulling up with two arms and lowering with one makes it a great way to introduce single arm lowering without the limitation of a concentric single arm body weight row. Stabilizing on the eccentric single arm lowering is easier than stabilizing on a single arm concentric row. Occasionally, you will see athlete “collapse” at the bottom—not only is this dangerous, as the sudden jerking drop can loosen or damage suspension, but it also hurts the athlete. Encourage them to choose an angle that allows for full control of the movement.


Video 7. The classic 2 up and 1 down is a timeless option for strength coaches. Athletes using eccentric overload with rows can quickly and safely gain strength.

Six

Eccentric and Isometric Single Arm KB or DB Rows

The meat and potatoes of upper back work are built from quality heavy single arm rowing using both eccentric and isometric contractions, which help build a robust and strong upper back. Single arm rows add a contralateral/cross-body element, especially if done as a three-point row with one arm braced and two feet on the floor. The key is to keep the non-focused movement elements as fast as possible; don’t waste energy on a slow eccentric when you trying to keep the quality of the isometric high.

Positioning is crucial here: Athletes need to focus on a “proud” position and resist letting the scapular roll forward and getting the traps involved. I encourage athletes to try to get the elbow back to the hip.


Video 8. Contractions don’t need to be uniform or isolated; they can be sequenced in ways that provide both overload and variation. Inserting isometric pulses also helps keep athletes alert and strict with technique.

Seven

Snatch Grip RDL/Snatch Grip Deadlift

These two movements are final worthy mentions even though they are not strictly upper back exercises—at least, not directly. This is one of Dan John’s armor builders; a movement that makes the body, in conjunction with terrific back and grip bracing, work as “one piece.” Snatch-grip deadlifts are like standard deadlifts except that the grip is much wider.

How wide? I usually regard it as anything wider than the smooth rings on the bar: longer armed lifters will be closer to the collars while shorter armed lifters will be nearer to the smooth ring. Olympic lifting purists may moan about grip width, but I’m after increasing ROM and time under tension, not building a better snatch. I find that upper back and grip development happen very fast when performed diligently. In most cases, lifters will need to use straps to maintain their grip with heavier snatch-grip deadlifts.

I find that upper back and #grip development happen very fast when performed diligently, says @WSWayland. Share on X

The wide grip places the traps and lats under constant tension. Posterior chain development and improved hip and back extension are another positive aspect—I have written in the past how grapplers are often chronically overflexed. I’m not trying to “fix” anything here, but borrowing from Dr. Stuart McGill’s idea about creating tension in one area to alleviate it in another, snatch grip deadlifts seem to do much for T-spine discomfort. In the athletes I use them with, forcing extension is sometimes desirable.

The wider grip forces you into a lower position; almost into a full squat. This lower position also changes the position of your torso, thus requiring more of the emphasis on the entire back, hamstrings, and glutes, and forcing good extension. A word of warning, however: Those with poor mobility should probably skip this deadlift variation. Personally, I am a big fan of this in combination with heavy front squats as the two complement each other well, placing larger emphasis on posterior and anterior chains, respectively.

Sequencing Upper Back Training over a Training Cycle

Upper back work never gets much love from a sequencing standpoint; it is often added as an afterthought in a “corrective capacity” or as a counterweight to pressing work. There is no reason it cannot be a lead upper body movement, used in clusters or contrast and complex work. A simple contrast would be heavy rows combined with a catch release row, for example, and you could expand this into a full upper body complex.

Potentiation Clustered Rows

  • 1. Barbell Row 3 x 1,1,1,1,1
  • Rest 10s
  • 2. Catch Release Row 3 x 1,1,1,1,1
  • Repeat 1.

I generally use the compress cluster complex below to compress upper body work for time-poor athletes, so we can integrate pushing and pulling. I usually keep them separate to keep the quality higher.

Upper Body Cluster Complex

  • 1a. Banded Barbell Row 3 x 1,1,1
  • 1b. Barbell Bench 3 x 1,1,1
  • 2a. Catch Release Row 3 x 1,1,1
  • 2b. Clap Push-Up 3 x 1,1,1

You can draw out this change in the mode of exercise selection over training blocks depending on the goals of the athlete. The intensity of the eccentrics and isometrics means they will be primarily used in strength development; they can cause a lot of soreness due to high levels of stress on tissue.

Banded, catch only, and disadvantaged oscillatory rows still require high levels of force production but at high velocities, lending themselves as power options. This is also where you might employ Olympic lifting variations if you are so inclined, marring the explosive connection between upper and lower body.

Finally, catch release rows and advantaged rows work well in peaking and priming work because they lend themselves to high levels of excitability at low levels of force production. Athletes feel “switched on” after these movements.

Peak Pulling
Image 2. When you prescribe pulling motions, you should follow classical or contemporary training theory by progressing with a purpose. Mixing in various loads and velocities creates a complete pulling athlete.

This broad approach would be cycled over weeks and months, or, as seen below, optimized every one to two weeks during a busy in-season, so that the focus undulates over the playing/training week. You can modify this for athletes playing weekend or midweek games.

In-Season Golf Weekly Example
Image 3. Weekly loading of the upper back in-season requires thought as to how practices and competition interact with rowing patterns. Mixing exercises and progressions is up to what the athlete is able to do for that specific session.

As you will notice, a recurrent theme in this schedule (Image 3) is the use of eccentric exercise in training the upper back. Eccentrics work particularly well in a sport with high limb velocities, as the back is a powerful protective decelerator. In addition, the ability to maintain “posture” in combative or contact sports is heavily tied to the ability to brace against an opponent trying to break t-spine position—think snap down in wrestling or posturing in MMA. This is something that eccentrics are very useful for teaching an athlete to maintain.

More Wisdom on the Benefits of Upper Back Training

The corrective hype we see espoused as an approach to upper back work means we see too much worry about kyphosis, posture, and scapular positioning in those who probably just need a consistent diet of heavy upper body pulling. Work on the latter, as the former will probably not be much of problem.

We can do better than upper back work that is mainly bodybuilding and/or functional exercise, says @WSWayland. Share on X

Intensive upper back training will not open any secret doors or act as a key to performance. Some athletes will need specific approaches to upper back strength (i.e., baseball players), but the rest of the community need not adhere to the approach promoted by some coaches whose athlete populations require special care. Much of the approach I espouse is based on the work of pragmatic coaches getting results in the field. A lot of what we see proposed as upper back work is, by and large, bodybuilding and/or functional exercise, and I think we can go one better than that.

Since you’re here…
…we have a small favor to ask. More people are reading SimpliFaster than ever, and each week we bring you compelling content from coaches, sport scientists, and physiotherapists who are devoted to building better athletes. Please take a moment to share the articles on social media, engage the authors with questions and comments below, and link to articles when appropriate if you have a blog or participate on forums of related topics. — SF

Bulgarian Split Squat

My Love Affair with the Bulgarian Split Squat

Blog| ByChris Korfist


Bulgarian Split Squat

Throughout my followings of internet gurus, I have met, tried, experimented, visited, believed and argued many different points at different times. Louie Simmons was my first. I subscribed to Powerlifting USA to read his column, bought chains, bands, glute ham machines, reverse hypers and a Westside Barbell T-shirt which he gave me (the dog on the shirt was actually his dog). I spent multiple days at the old pizza shop in a strip mall on Demorest Ave in Columbus. Louie is a great coach, incredibly knowledgeable and a great person. In fact, he is such a great person that he said to me it was time to move on and learn from others because what he does, powerlifting, could only get me to a certain point. I needed new concepts that would get me closer to my goal of developing sprinters. He introduced me to John Davies, and I learned a lot. But I still needed more. I saw Bompa, Verkhoshanky, Siff, Weyand, Schroeder, Poliquin, Pfaff, Seagrave, and others speak on multiple occasions. I was one of the first in the US to have a Nemes vibrating plate sold by the Kraaijenhofs and delved into the Bosco stuff. My success was good but not where I wanted to be. Dan Fichter of wannagetfast, got us connected to DB Hammer who was selling limited consultations; we paid to have questions answered and teach us how to build programs that got great results for high school athletes. DB taught me the importance of the Bulgarian split squat and isometric strength. Thus, my love affair began.

Split Squat Technique Generates Biggest Gains

Test an athlete on a movement that matters—40 yard dash, vertical jump, etc.—create a workout, stay with something for three weeks and remeasure. Repeat with others and see what works.

Along this journey, I have kept data on my athletes. I am a track coach who has access to many athletes with a variety of capabilities, and I have a gym and train athletes in a one on one/small group setting. And with these groups, I have always tried to keep notes, film and results on my athletes because my quest is to find exercises that improve athletic development and more importantly sprinting speed. Test an athlete on a movement that matters—40 yard dash, vertical jump, etc.—create a workout, stay with something for three weeks and remeasure. Repeat with others and see what works. For me, the isometric split squat has been a staple that generates powerful athletes. My fastest guys, 10.5-10.8/100m range have always had the strongest “holds” – that is what we call them – and they all jump between 35 to 40 inch vertical jump.

Hammer Strength Deadlift Machine
Figure 1: Hammer Strength Deadlift Machine


The evolution of the exercise for me has been an interesting journey. Holding heavy weight in that position can be difficult, even with the safety squat bar. So, while assembling my gym, I came across a yellow Hammer Strength Deadlift machine on eBay for $200 in Seattle. I won it and paid $400 for shipping, and it changed my gym. It came with a bar installed to put your back foot on, and all we had to do was grab and hold for the allotted 30 sec. The problem was that grip strength became the limiting factor. We added straps, but that didn’t work. We tried a variety of belts, OK for some people. But thanks to iron mind straps and Spud belt-squat belts, we put together a system that is very effective because the weight goes to the lower body and is not limited to upper body strength.

Deadlift Machine with Athlete
Figure 2: Deadlift Machine with Athlete


The position of the athlete may vary. But, basically, one foot goes forward, and one goes back. The weight should hang along the side of the hip, so the weight doesn’t pull the athlete forward. When the athlete squats into position, the knee moves forward over the second toe, and the hips sink back into a squat position. My cue for the athlete is to think that a rope is pulling your knee forward, and a rope is pulling your hips back to stretch the hamstring. It should look like a chair tipped forward. The athlete should feel the pressure in the glute and hamstring of the forward leg and a stretch in the hip flexors in the rear leg. If an athlete feels it in the lower back or quad, their form is off, or the weight is too much. Some athletes get a more intense contraction going down deeper while others get a better contraction not going down as far or even slightly leaned forward. I think the ankle rocker (knee going forward) is key. Once the ankle breaks 90 degrees, the athlete will get a good glute contraction. Another cue is that the shin should be parallel to the spine. That is the perfect position to get a good hip drive in my opinion. We start with a hold in that position for 30 seconds and continually add weight as we progress. You will be shocked to see how fast people increase weight. After a couple of weeks of the 30 second holds, we progress to the Cal Dietz Triphasic holds, where the athlete drops down fast holds for a three count and powers up. A coach can always change the workout with supersets and giant sets by adding single leg jumps or drops from a box.

Deadlift Machine Sideview
Figure 3: Deadlift Machine Sideview


What I have found is that the stronger athletes get at this exercise, the faster they run and the higher they jump. I have had athletes who could squat the house but couldn’t run or even hold their body weight in the position. But, once their body learned the position and strengthened this aspect of their movement, they ran faster and jumped higher. Athletes that start with me who can already run may not be great at some of the traditional lifts but always seemed to do very well in the isometric exercises.

Why do I think this is the case? Isometric strength is responsible for stopping the momentum from an action. So, going down in a vertical jump, there needs to be a strength type to stop the movement going down. Most people are slow to reverse this momentum and lose energy in the concentric portion of the jump. Another way to look at it is that it creates a platform to push from. A rubber ball works great on concrete but not so great on sand.

Exxentric kBox Lunges
Figure 4: Athlete demonstrates Bulgarian Split Squats on the kBox. Photo courtesy Exxentric.


My latest excursion takes this concept one step further, inertial training. Or in my case, an Exxentric kBox from SimpliFaster. It is a flywheel concept where one pulls on a cable that is connected to a flywheel. As they pull, the wheel spins. At the end of the strap, the flywheel reverses directions and pulls the strap back to the origin. The key is that the athlete stops the spin and reverses the wheel. By the way, the wheel pulls back harder than the concentric pull. Some people call this eccentric training and it is. But, as I sit and spot on my kBox, I have noted that the more explosive people are the ones who can stop that wheel more quickly than others. Again, they are stopping a momentum, in this case a fast moving cable trying to suck them through a small hole in a 25 pound machine. Even more interesting is that fact that as some of the athletes who are less explosive got stronger in their isometric squats, the better they reversed the wheel and the higher they jumped and the faster they ran. So the combination of these tools has been very effective in training athletes to be more explosive.

Since you’re here…
…we have a small favor to ask. More people are reading SimpliFaster than ever, and each week we bring you compelling content from coaches, sport scientists, and physiotherapists who are devoted to building better athletes. Please take a moment to share the articles on social media, engage the authors with questions and comments below, and link to articles when appropriate if you have a blog or participate on forums of related topics. — SF


Fatigued Athlete

Raising the Ceilings of Performance with Aaron Davis

Freelap Friday Five| ByAaron Davis

Fatigued Athlete

Aaron Davis is a sports performance/health coach with 10 years’ experience coaching athletes and teams across multiple sports. Aaron firmly believes health and performance go hand in hand, and he utilizes multiple diagnostic technologies and labs. He is a constant student of sports performance and health—drawing upon knowledge from leading experts in the field.

Aaron coaches athletes in the Austin, Texas, area, as well as international and U.S. athletes remotely. He shares his experiences and training philosophy by speaking at seminars and writing for Train Adapt Evolve.

Freelap USA: What is the role of blood oxygen levels in determining how a particular workout will impact an athlete?

Aaron Davis: Oxygen gives us a proxy on the bio-energetics of the cells, specifically how the protein-ion-water system of the cell is behaving. Regardless of the physiological reaction we are aiming for during a workout, monitoring O2 can assist with understanding load (e.g., knowing when enough is enough).

In regard to training density, frequency is a powerful adaptive stimulus. However, there are too many times we can’t take advantage of it because we overdose workouts for the sake of the workout looking sexy or our admiration of our own coaching ego on paper. These workouts generally elicit emotional responses from the athletes that satisfy some small spot in us as observers.

Monitoring O2 can assist with understanding load (e.g., knowing when enough is enough), says @DavisXCTF. Share on X

They also push peripheral adaptations of mechanical proteins while underdeveloping the energetic components to support the extension and/or quality of work in the future. The upside is that in 50 years, the athletes will have a dossier of heroic workout stories as they pop wheelies in the nursing home and giggle about the good ol’ days.

Circling back, O2 allows us to know how the protein-ion-water system is behaving via its close ties to phosphocreatine, with O2 recovery running close to parallel with the phosphocreatine (PCr) system (McCully 2013). Since PCr is the first on call when it comes to ATP resynthesis, having a proxy on PCr is important considering that the ability to also resynthesize PCr from glycolysis and the oxidative system keeps the cell in a “ready state” (cellular retention of K+/protein unfolding). The excess loss of K+ may be a signal that cells are no longer in the ready state, but are in a state of fatigue (meaning the cell will need to take time to regenerate or regain its ready state). The feeling of soreness may govern this process.

Freelap USA: How do you monitor oxygenation, and how do you steer the course of training based on your findings?

Aaron Davis: I use a technology called Moxy to monitor oxygenation, though the Omegawave Team system can also tell the story of the O2 environment the muscle will encounter. This is monitored by the gas exchange reading showing either normal or hyper/hypoventilation present (shifts of the O2 dissociation curve).

Apart from stopping a workout once the physiological stimulus is reached, as mentioned above, monitoring muscle oxygen saturation (SmO2) and total hemoglobin (tHb) will give an idea of the readiness of the peripheral system for metabolic work. If central mechanisms are in place but low SmO2 shows up in the periphery, we generally will not target a HIIT metabolic workout; instead, we train what’s ready.

As for allowing SmO2/tHb to guide the workouts, we look for specific reactions to elicit an adaptation. For example, if we are to improve a cardiac limitation then I am going to monitor a low-priority muscle. During the workout or interval, I will work up to an intensity (e.g., frequency of coordination, velocity, or power output) before a compensation takes place. In a non-priority muscle, compensations will look like a decrease in total hemoglobin, SmO2, or both. If we push the cardiac system too far, it will limit delivery to non-priority muscles by shunting blood to the priorities.

Over time, we push this threshold further and further in resistance to fatigue and power output. One caveat: I also monitor respiratory rate and depth because that matters and it doesn’t have to be solely nose breathing, contrary to what is out there. It’s all about the relationship between the heart and lungs.

Blocks don’t have to look that different from one another—it just takes slight nuances between them, says @DavisXCTF. Share on X

Setting up blocks of training underneath this idea of “limiters” of performance is quite simple.

  • Block 1 – Improve the Limiter
  • Retest
  • Block 2 – Improve the Limiter
  • Retest

Blocks don’t have to look that different from one another. The whole focus in training regardless of demands (speed, power, endurance) is to do what matters for the athlete. Refine the process and cut out the BS. Therefore, slight nuances between blocks are all it takes.

Freelap USA: What tools do you utilize to monitor fatigue in athletes? How does it depend on the type of athlete you are working with?

Aaron Davis: The major players are Omegawave and Moxy, though we do run lab tests, nutrition recalls, phase angle, orthopedic measurements, gait analysis, and electrophotonic imaging (EPI).

Fundamentally, we always look at health regardless of the athlete’s objective. It helps us as a team combat time (which is always an adversary when it comes to preparation). I am not a big believer in the existence of overtraining anymore, but more so in energy allocation. I have spent way too much time with people that, on paper, shouldn’t be functioning normally, let alone performing well, yet they still do.

I am not a big believer in the existence of overtraining anymore, but more so in energy allocation, says @DavisXCTF. Share on X

With that said, “functioning normally” is a bit blurry, but if performance is your objective, energy may need to be stolen from other systems to support the main drivers. This is where monitoring can really help make better decisions. Again, time is your adversary in this situation—the allocation of energy and the undertraining of other systems will only come back and kick you in the ass in due time. Yet, if you are aware of the trends, you can manipulate this.

Freelap USA: What are your biggest points of emphasis in facilitating recovery outside of training, as well as the lifestyle of an athlete?

Aaron Davis: It comes down to compromise and trust between coach and athlete, with an agreement that the data tells a story without emotion. We operate in steps, though my tendency is to always push. We are fortunate that we are in the private sector and operate more as a concierge service. I only have five to seven athletes on my roster for in-person training at a time. With that said, a lot of time and money will be wasted if we don’t uphold our obligations and meet our objectives both as athletes and as coaches. The environment in which we operate increases motivation to facilitate recovery.

If I had to pick one thing we tweak first, it will always be sleep. Sleep is the biological signal for energy conservation. Heat can dissipate electronic energy used for biological processes, so it makes sense that we spare energy during sleep from processes like temperature regulation and muscle tone via the CNS. Sleep allows time for storing biological energy. Without this in place, we lose time and everything expands.

Sleep is the one thing we always tweak first in the lifestyle of an athlete, says @DavisXCTF. Share on X

Simple fixes, and some interventions we may use, include: nutrition (carbs later in the evening); supplementation (e.g., B12 at night); no shadows after sunset (lamps instead of overhead lights—eliminating lower peripheral vision signaling); blackout curtains; temperature; exploring different mattresses/pillows; blue blockers if needed; and dead time for screens.

Freelap USA: What is your assessment process with incoming athletes, and what schools of thought do you draw from?

Aaron Davis: Every athlete that comes in fills out an extensive health questionnaire and goals/objectives, and completes a blood panel (CBC and CMP), three-day nutrition log, orthopedic evaluation, and Omegawave and Moxy assessments (strength, HIIT, and endurance protocols).

When it comes to evaluating an athlete’s physiology, our schools of thought are a mashup of PRI and osteopathic principles from a structural perspective, alongside a systems-based approach. This approach of systems-based thinking was inspired by Russian physiologist P.K. Anokhin, and has been an underlying theme within our practice for the last five years.

I can’t predict emergent outcomes between systems, so we stick with what we can influence, says @DavisXCTF. Share on X

It sounds fancy, but it’s really just a simple way of analyzing and loading specific systems, then seeing how they play together with their friends in performance. If they don’t, we go back to the drawing board. I am not smart enough to predict emergent outcomes between systems, so we stick with what we can influence, take notes, and repeat.

Reference

Terence E. Ryan, W. Michael Southern, Mary Ann Reynolds, and Kevin K. McCully. “A cross-validation of near-infrared spectroscopy measurements of skeletal muscle oxidative capacity with phosphorus magnetic resonance spectroscopy.” Journal of Applied Physiology. 2013; 115(12): 1757–1766.

Since you’re here…
…we have a small favor to ask. More people are reading SimpliFaster than ever, and each week we bring you compelling content from coaches, sport scientists, and physiotherapists who are devoted to building better athletes. Please take a moment to share the articles on social media, engage the authors with questions and comments below, and link to articles when appropriate if you have a blog or participate on forums of related topics. — SF


Monitoring Training and Performance

Monitoring Training and Performance in Athletes Book Review

Book Reviews| ByCraig Pickering

Monitoring Training and Performance

Over the past decade, there has been an increasing amount of attention placed on how coaches and support staff can best monitor the training process. The goal of this process is twofold: first, it enables us to get a fairly decent idea as to how fatigued the athlete is at any given point in time; and second, it gives us an idea as to how well the athlete is adapting to the given training load.

Both aspects are important, and the information gained from such monitoring techniques—provided they are both valid and reliable—allows us to make better decisions about the type of training the athlete should carry out, and what intensity the athlete can best respond to on any given day. I recently explored these aspects in “Monitoring the Training Process,” but if you are interested in taking an even closer look at the whys and hows of monitoring the training process, there is a fantastic book—Monitoring Training and Performance in Athletes, authored by Mike McGuigan and published last year—that drills down into the details.

Mike McGuigan’s fantastic book drives down into the details of monitoring the training process. Share on X

McGuigan is well-placed to author such a book, as he is a professor of strength and conditioning at AUT University in New Zealand, and was formerly a power scientist with High Performance Sport New Zealand. He has also authored/co-authored a number of papers exploring the relationships between performance on a test and training adaptations/load. (This includes the use of Rating of Perceived Exertion within resistance training; the relationship between training load and injury in basketball players; and the use of the countermovement jump as a method of monitoring neuromuscular recovery).

The first chapter of Monitoring Training and Performance in Athletes is an exploration of the reasons we should monitor athletes. Of course, while we tend to focus on training-based parameters such as load and intensity—as mentioned in the introduction—non-training aspects will also come into play here. These affect the neurochemical and hormonal environments in which the athlete presents prior to receiving the training stimulus, which in turn can affect the adaptive response. Such “outside” stressors undoubtedly play an important role in how well the athlete can tolerate a training load, and so should be considered in the data collection process.

There are non-training aspects of monitoring athletes to consider in the data collection process. Share on X

Chapter 2 delves into the various tools available for those looking to monitor the training process. This is an (fortunately gentle) introduction into various different statistical methods that coaches will need to understand, such as z-scores and t-scores, which give us an idea as to how far the athlete’s present data point is from the norm. This “norm” can be within an individual over time, which is useful for monitoring training load. It can also be for a specific individual against the rest of the team, which is useful for identifying athletes who do much better or worse than their teammates on a given performance test, allowing for the personalization of training within teams. There is also a discussion around test reliability and validity: simple concepts that are often overlooked when it comes to developing a training program, and where errors can severely hamper the interpretations made from the data.

Test reliability & validity are simple concepts often overlooked when developing a training program. Share on X

Chapter 3 explores the various aspects that contribute to physiological training stress. Here, we get an introduction to the various models that are often used to explain the training-induced stress response, such as Selye’s General Adaptation Model and the Fitness-Fatigue model. Building on this, there is then a discussion of the different markers that coaches can use to determine when an athlete is moving towards a maladaptive state, such as non-functional overreaching or overtraining.

This knowledge base is further built upon in Chapter 4, which gives us examples of tools we can use to quantify the training stress, such as external load (think GPS and power meters) and internal load (think RPE and heart rate). There is also an overview of different wellness questionnaires in this section.

Chapter 5 then moves into measures of fitness and fatigue, perhaps representing the chapter of most interest. Examples given here include various vertical jumps as a measure of neuromuscular fatigue; heart rate measures (including HRV); and hormonal, biochemical, and immunological markers, which are perhaps outside of the financial and practical reach of most coaches. At the end of the chapter, there is an overview of various performance tests that you can utilize. Chapter 6 then moves into the way coaches often use these aspects in practice, with special reference to the various technologies available, including light gates such as those offered by SimpliFaster.

Chapter 7 is where it all comes together: How can the coach integrate the various monitoring methods within their coaching practice? This can be as simple as determining readiness to train using the previous 24-48 hours’ worth of wellness data provided by the athlete, or monitoring within session performance using a velocity-based method. Within this conversation are discussions regarding barriers to effective monitoring, along with guidelines for conducting in-house studies determining the effectiveness of particular monitoring techniques for your athletes, which may be of interest to some coaches. Following this, the final two chapters explore athlete monitoring guidelines for both individual (Chapter 8) and team sport (Chapter 9) athletes.

Many coaches know they should monitor the training process, and this book will help them do it. Share on X

Overall, I found this book very useful—monitoring the training process is something that many coaches know they should do. However, it isn’t always possible to keep up-to-date with all the research, and so many coaches feel like they don’t have the required knowledge base on which to build an effective monitoring program. This book aims to change that.

A particular strength of the book is that it makes often-challenging concepts, particularly relating to statistics, easier to understand, and it gives plenty of practical examples. As a result, I would strongly recommend this book to those coaches who want to start implementing training monitoring programs, but are unsure of how to start. This book should make things much clearer for you.

Since you’re here…
…we have a small favor to ask. More people are reading SimpliFaster than ever, and each week we bring you compelling content from coaches, sport scientists, and physiotherapists who are devoted to building better athletes. Please take a moment to share the articles on social media, engage the authors with questions and comments below, and link to articles when appropriate if you have a blog or participate on forums of related topics. — SF

To Drill Or Not To Drill

To Drill or Not to Drill

Blog| ByDoug Kechijian

To Drill Or Not To Drill

If you are a performance or sports medicine professional with an internet connection, you may have noticed that the practice of prescribing drills is somewhat under attack. The underlying suggestion during these drill critiques is effectively that movement skill cannot be cultivated by practicing the components of a complex task. Coaches who employ “drills” are sometimes derided as simpletons in various social media echo chambers.

This practice speaks to the increasingly pervasive tactic whereby we characterize those with whom we disagree ideologically as extremists. Coaches who see value in drills must only do drills, while coaches who utilize something like small-sided games just let athletes play to the exclusion of everything else. The “drills” conversation is really a proxy for larger discussions about things like part/whole training, generalism/specialization, and reductionism/complexity. As with most trendy topics, the actual conversation isn’t really novel.

Systems and Interventions

In a complex system, the whole is not the sum of its parts. The interactions between the components of a system produce meaningful effects that can’t always be objectively quantified or measured. The relationship between generalism and specialization also helps to inform complex systems. The closer or more specifically training mimics the competitive environment, the greater the degree to which the whole is reflected relative to a component part.

Regardless, most coaches would concede that some degree of general ability is necessary to actualize specific performance. Sometimes, however, specific words evoke emotional responses that stifle productive discussion. “Drills” might be one of those words. If we replaced “drills” with something like “general abilities,” perhaps the idea of doing drills wouldn’t be so contentious.

If we say ‘general abilities’ instead of ‘drills,’ maybe the idea of #drills won’t be so contentious, says @greenfeetPT. Share on X

General training is not a substitute for specific training but a supportive element that raises the specific or “whole” ceiling. The whole is not the sum of the parts but working on the parts can improve the whole. Training provides both local and systemic inputs to a system. Some local inputs influence systemic behavior or output more profoundly than others, but no intervention (like a drill) is ever purely local in nature. In other words, looking at a few trees can inform us about the forest’s overall beauty. We just don’t want to stare at the same trees for too long.

The question is not whether we should do part or whole training (e.g., drill or not drill), but how we can seamlessly integrate the two. This interplay is the essence of coaching.

The question isn’t whether to do part or whole training, but how to seamlessly integrate the two, says @greenfeetPT. Share on X

In any complex system, extremes are maladaptive. Asystole (absence of electrical activity) and ventricular fibrillation (completely disorganized electrical activity) are both lethal heart rhythms. The extreme political left and right can’t operate outside their respective ideological fortresses. Doing only drills is tantamount to rigidity, while only scrimmaging or formally competing is closer to chaos.

While reductionism cannot explain the behavior of a complex system, neither does proceeding as if the system operates with no boundaries. In any conversation (training, political, ethical), determining what constitutes reasonable boundaries is the difficult—and interesting—part. Unfortunately, social media doesn’t incentivize the nuance required to continually refine these boundaries.

From this point on, I’ll cease to use track and field or sport-specific analogies because the audience here might already have preconceived notions or prejudices about the utility of drills as they pertain to something like running. Again, drilling in the context of track and field or sport preparation is not a unique phenomenon. Regardless of the subject, it’s difficult to have a conversation without defining what it is that we’re discussing. For purposes here, a drill is “an intervention that minimizes the degrees of freedom to bias a specific behavioral output.”

“Drills” are sometimes necessary to reduce the potential of being overwhelmed by all the variables that influence behavior. A drill constrains the parameters affecting the behavior of the system to minimize potential influences. To be clear, even actual sport games have constraints or rules governing behavior, but a drill, by definition, is always more restrictive than the actual game or competitive environment.

By definition, a drill is always more restrictive than the actual game or competitive environment, says @greenfeetPT. Share on X

Designers of randomized controlled trials utilize a similar rationale. These trials are “controlled” because they systematically mitigate the potential for confounding variables to influence outcomes, albeit imperfectly. Hence, the reason an experimental and control group should be as identical as possible, except for the variable or intervention under investigation. Again, drilling is just a proxy for the timeless conversation about the balance between chaos and rigidity.

Of course, drilling alone does not simulate competitive environments, but how many coaches do drills at the exclusion of everything else? The drilling/no drilling dichotomy we see on social media platforms is straw man fodder. The “debates” that occur on social media often poorly reflect reality. Coaches in both internet camps likely do similar things from a programming standpoint, even if their emotional allegiances suggest otherwise.

The Military as a Model

Military training may provide insight into the relationship between part and whole training or between reductionism and complexity. Video 1 below depicts highlights of an Air Force Pararescue team conducting a training mission or “scrimmage.” The team reaches the objective area via fixed wing freefall parachute insertion, patrols to the survivor under night vision goggles, and medically stabilizes and packages the survivor prior to exfiltrating him via rotary wing hoist.


Video 1. Military training may provide insight into the relationship between part and whole training or between reductionism and complexity. Even in training, a mission can take anywhere from 10-36 hours to plan, rehearse, and execute—the closest thing the military has to a scrimmage.

Even in training, this type of scenario may take anywhere from 10-36 hours to plan, rehearse, and execute. These types of full mission profiles, or FMPs, are the closest things the military has to a full dress rehearsal. FMPs are to the military what scrimmaging or special physical preparation is to sport.

In the weeks preceding a deployment—effectively the military’s “preseason”—they conduct a series of FMPs covering a variety of contingencies in an effort to “peak” for the real thing. The concept of periodization or planning is not unique to sport. FMPs are highly time- and resource-intensive, however. Moreover, FMPs are a reflection of requisite skills and disciplines (parachuting, medicine, shooting, small unit tactics, etc.), but they don’t necessarily develop them.

That’s where part training or drills come in. During an FMP, a Pararescueman might not fire his weapon or treat a single patient even when one of his teammates does. The scenarios aren’t so contrived/constrained that they ensure each participating member will encounter identical opportunities to perform various tasks. Instead, they are designed to be realistic.

FMPs aren’t conducive to skill development because there is insufficient repetition of the constituent performance elements. Hence the popularity in sport preparation of concepts like block training. Militaries have recognized the utility of block training for thousands of years. Block training deliberately targets specific qualities at the expense of others because the adaptive process is finite.

The military prioritizes different qualities or skills throughout various developmental cycles. Prioritization exists on a continuum. Seldom does a military training block, of which drills are a component, address a single quality and nothing else. The devil, however, is in the details.

Similarly, most sport coaches are not so extreme that they adhere to a pure block periodization type of model. The most effective training models are usually hybrid solutions because extremes are maladaptive. Sometimes, drills are necessary to further hone in on specific skills and to provide a frame of reference from which greater complexity can be derived at a future time.

The most effective training models are usually hybrid solutions because extremes are maladaptive, says @greenfeetPT. Share on X

Drilling is a means of providing variability to a system. Variability allows a system to better self-organize under stress. Without variability, behavior emerges out of necessity, not out of “choice.” Video 2 is an example of a drill or part training that a Pararescue team might utilize to prepare for the dynamic environment in which they typically operate.


Video 2. Freefall simulation is an example of a drill or part training that a Pararescue team uses to prepare for the dynamic environment in which they typically operate. Sometimes, drills are necessary to further hone in on specific skills and to provide a frame of reference from which greater complexity can be derived at a future time.

Finding the Right Balance

As frustrating as it may be, there is likely no ideal ratio of part to whole training or between drills and more complex movements. It is probably safe to say, however, that embracing specificity or whole training to the extreme is akin to preparing for a mixed martial arts fight solely via sparring. Thankfully, high-level MMA fighters do more than spar, otherwise during title fights on pay-per-view, we’d watch what amounts to bar fights minus the beer bottles and chairs. Actually, watching bar fighting in a ring minus the improvised weaponry might be fun, but the skill level wouldn’t be very high. Similarly, hitting pads or a heavy bag does not constitute adequate preparation for a competitive fight in itself.

Embracing specificity to the extreme is like preparing for an #MMA fight solely by sparring, says @greenfeetPT. Share on X

Be wary of studies or people who misinterpret studies that “prove” drills are not effective at improving performance or skill acquisition. Drills work much differently in practice than they do in research protocols. During the latter, everybody performs the exact same protocol regardless of his/her technique and/or performance limitations. During the former, a coach identifies something that warrants an intervention, prescribes a specific “drill” to address this limitation, and alternates between drilling and the complete movement until the athlete achieves the desired performance or aesthetic outcome.

Research protocols are necessarily rigid and unyielding. However, coaching is the continual act of tinkering and trial and error. It’s about embracing and managing uncertainty until you get it “right,” despite not always knowing what “right” really is.

Since you’re here…
…we have a small favor to ask. More people are reading SimpliFaster than ever, and each week we bring you compelling content from coaches, sport scientists, and physiotherapists who are devoted to building better athletes. Please take a moment to share the articles on social media, engage the authors with questions and comments below, and link to articles when appropriate if you have a blog or participate on forums of related topics. — SF

Breathe

Breathe New Life into Your Performance!

Blog| ByChris Gallagher


Breathe

You breathe about 20,000 times per day, so imagine the impact that breathing can have on daily living—your habitual posture, your repetive movements, everything that influences your body’s ability to move and perform.

How much time do you or your athletes typically spend on warming up and mobility and flexibility routines? Going through post-session cooldown routines full of static stretching? Pre- and post-session foam rolling or myofascial release?

No doubt all this stretching, rolling, and (to use Kelly Starrett’s parlance) smashing your soft tissue accounts for a considerable amount of training time. Much of this is time well-spent in improving the ability to make the shapes required for effective performance.

How many of you, though, go through 10-20 minute warmup routines, mobility work between sets, 10-15+ minutes of cooldown, maybe even separate and specific mobility and flexibility sessions, yet fail to see significant improvement in these areas?

“Every breath you take, every move you make, every bond you break, every step you take.” – The Police

If we’re completely honest, mobility and flexibility work is not the most exciting part of training. While it’s necessary and essential, it often seems tedious and repetitive. Unlike other aspects of strength and conditioning, it is often difficult to see the kind of consistent progress that you can with times, loads, and numbers. As a result, many athletes lack the discipline to perform sessions in which the rewards are not immediately apparent.

The longer these types of sessions last, the more likely that athletes will rush through them or skip individual aspects. That’s just human nature. Of course many educated and dedicated athletes understand the benefits and will follow the program to the letter and “get it done.” This doesn’t change the fact you will encounter many athletes who do not have this attitude. For them, you need to implement training strategies that bring real and obvious benefits.

Chris: The Problem

I have to hold my hand up and admit to being the kind of person who needs a quick remedy with a real and obvious effect. When you feel something is clearly working, it is easier to maintain that discipline.

I have struggled for a long time with mobility restrictions, and tightness in different areas, primarily in my anterior hip, calves, and ankles, particularly down my right side. I have at different times tried a consistent application of various techniques to remedy this condition. Static stretching of key muscle groups—hip flexors, hamstrings, adductors, and lower back. Dynamic flexibility warmup protocols. Foam rolling and other self-myofascial release techniques. I have watched many mobility WOD videos and incorporated band distraction into stretching routines.

Some of these techniques have given me short-term relief or benefits. Others have had little impact. I have been the recipient of high-level therapeutic intervention on more than one occasion and with more than one experienced practitioner. Having a skilled physiotherapist or manual therapist put their hands on you, massage and manipulate your joints and soft tissue, is of course far more effective than self-remedies. The effects are much greater and usually last a bit longer. But having not played sport at a high enough level to receive daily intervention, I find that by the time of my next weekly appointment I am back to square one.

A combination of therapeutic intervention and self-corrective techniques have been enough to stop my lack of mobility and flexibility from worsening, or at least slowed the decay. It has not, however, led to obvious enduring improvement.

One intervention, though, did lead to a bit of a “Eureka!” moment. I had previously read articles on the effects of proper diaphragmatic breathing on posture and movement quality. In particular, some postings of Ryan Brown (of Dark Side Strength and Conditioning) on the Juggernaut Training Systems website were enlightening.

The concept of breathing improving posture and movement quality was interesting to me. Improving physical performance without increasing the workload and training strain for me or my athletes sounded too good to pass up. But daily life got in the way. With restricted training time I barely had time to fit in the big-ticket items like squats and power cleans and so—stupidly, I think—I didn’t implement the breathing drills.

Until recently, that is. As Dr. Tom Nelson mentioned in this article, something as simple as breathing is too often and too easily dismissed. Becoming increasingly frustrated with my jammed-up hip, I decided to give it a try.

Lying flat on my back on the gym floor, I spent several minutes trying to relax, breathing as deeply as possible, then deeply exhaling. As I was lying there contemplating how ridiculous I probably looked, I felt a rather bizarre sensation. My psoas—previously strung as tight as a piano wire—suddenly and completely released. There was real and obvious relief.

When I stood up and walked around, pulled my knee high into my chest, and performed a few squats, the increased mobility and freeness with which I could move my hip was hard to believe. Even just walking around, my hips felt more aligned, like my right femur was sitting more properly in the socket, and I wasn’t being pulled and rotated out of position.

I probably should not be surprised by such emphatic results. The summary of Dr. Eric Janota’s lecture in the same article as Dr. Nelson mentioned that the “psoas is intimately attached to the diaphragm.” Therefore, anything that encourages proper movement and alignment of the diaphragm can reasonably be expected to have a beneficial influence on the psoas.

Steph: Anatomy and the Solution

At this point we will discuss some basic human anatomy and physiology. Breathing is an active process, with the primary muscles of respiration being the intercostal muscles (located between the ribs) and the diaphragm. During inspiration these muscles contract. The intercostals contract to elevate the ribs and sternum, increasing the front-to-back dimension of the thoracic cavity. Contraction of the diaphragm moves it downward and increases the vertical dimension of the thoracic cavity. This lowers air pressure in the lungs, with air flowing in.

During exhalation, these muscles relax. The diaphragm, ribs, and sternum return to their resting position and the thoracic cavity returns to its pre-inspiratory volume, increasing pressure and resulting in air being exhaled.

Incomplete or faulty breathing patterns lead to problems that affect the habitual positions of these structures and ultimately the posture. There are three main types of breathing: clavicular breathing from high up in the shoulders and collarbones, chest breathing from the center of the chest, and abdominal breathing. It is the latter that engages the diaphragm the most and activates the vagus nerve, triggering the body’s relaxation response that is necessary for renewal, healing, and repair.

One explanation for the relief Chris and others have felt through incorporating proper diaphragmatic breathing into their daily routine could have to do with regulation of the autonomic nervous system (ANS). There are two components to the ANS: sympathetic (SNS) and parasympathetic (PNS). The PNS down-regulates the nervous system, calming the body, promoting relaxation, rest, and sleep, and slowing down the heart rate and breathing.

The vagus nerve controls the PNS. By being aware of the anatomy of breathing, you understand the mechanism of a sudden release of chronic tension in the psoas. Deep diaphragmatic breathing activates the vagus nerve, stimulating the PNS to calm and relax the body’s muscles.

There is a more substantial relationship between the diaphragm and psoas. Anatomically, both structures have origins in the lumbar spine. If you are looking for a greater connection between the deep breathing muscles and the psoas, I recommend educating yourself in anatomy trains and the myofascial meridians. Chris’s chronic problem areas with large amounts of tension follow precisely along a myofascial line, with the greatest tension in the right ankle and hip. This line connects the breathing muscles and the anterior musculature such as the psoas.

Myofascia surrounds the muscles, making an interconnected web throughout the entire body that allows transmission and dissipation of tension and compression across the body. This myofascial system also allows for the transmission of muscle movement. According to Dr. Thomas Myers, there are 12 myofascial meridians or lines in the human body. A breakdown at one point along these lines can be realized as a symptom anywhere throughout that line. Relating this to Chris and his issues, his problematic right side follows a certain pattern that corresponds exactly to the deep front line myofascial meridian.

Deep Front Line Fascia
Figure 1. Deep Front Line Fascia.


This deep front line is like the myofascial core running from the bottom of the foot, passing up behind the bones of the lower leg and knee, and continuing up inside the thigh. Here it divides into a line passing in front of the hip, pelvis, and lumbar spine, while another track goes up the back of the thigh. At the psoas-diaphragm interface, the deep front line goes up through the rib cage along numerous paths and finishes on the underside of the neurocranium and viscerocranium.

Chris has suffered from plantar fasciitis on his right side and has tight medial soleus, hip adductors, medial hamstrings, and right psoas. Continuing up, he struggles with flail chest and a tight shoulder complex closely related to this frontal line.

If Chris had a problem or knot along the line near the psoas, the deep breathing might have been beneficial for several reasons. In addition to activating the vagus nerve and stimulating the PNS to relax his body, it also may have helped to soften the myofascial knot through active muscle contraction to release his psoas. It is incredibly hard to manipulate the diaphragm manually. Therefore, the deep breathing could have helped to unwind whatever tension had built up over years of training, habitual poor posture, and inadequate breathing patterns.

Summing up

Bad habits and lazy, incomplete breathing can lead to poor posture and misalignment of the rib cage, diaphragm, and pelvis. Regular correct diaphragmatic breathing can help you and your athletes stimulate the PNS to relax the body and musculature to release tension developed and stored by these faulty breathing mechanics and associated postures.

Practicing deep breathing and relaxation on a daily basis can help restore posture, mobility, and lower back health, and correct movement patterns. Something as simple as correct breathing patterns can improve pelvic alignment, removing anterior tilt and generating immediate improvements in sprinting postures and performance. Correct and efficient posture is essential in assuming the right positions to generate force in big-ticket exercises such as the squat, in which poor breathing patterns and postures can lead to inferior performance and a reduced ability to produce force.

Spend time with your athletes cueing correct pelvic alignment. Start them on the floor as if they were about to perform a basic crunch. Ensure that their backs follow a normal neutral curve and have them breathe deep into their back, using their abs as a brace to maintain abdominal tension and draw air up into their lungs. If they have difficulty breathing correctly in this position, you can regress the drill by having them place their feet up against a wall with knees tracking over toes and hip and knees at 90 degrees to give additional stability to the hips. Athletes with greater body awareness, can be progressed to lying with their legs out straight and even incorporating breathing drills into standing and other exercises.

Diaphramatic Breathing
Figure 2. Diaphragmatic Breathing is an active process.


Proper diaphragmatic breathing is an active process, but your athletes should also try and relax as much as possible while trying to maintain the right positions. Ask them to practice five minutes of full inhalation and exhalation and see how this benefits their habitual posture, mobility, force-generating capabilities, and performance.

We hope you find the information in this article useful and would love to hear your experiences. If you are interested in learning even more about these ideas, research more from the likes of Ryan Brown.

Since you’re here…
…we have a small favor to ask. More people are reading SimpliFaster than ever, and each week we bring you compelling content from coaches, sport scientists, and physiotherapists who are devoted to building better athletes. Please take a moment to share the articles on social media, engage the authors with questions and comments below, and link to articles when appropriate if you have a blog or participate on forums of related topics. — SF


Jump Test

Jump Testing and Athlete Monitoring with Daniel Martinez

Freelap Friday Five| ByDaniel Martinez

Jump Test

Daniel Martinez is the head strength and conditioning coach at Trinity University in San Antonio, Texas, and recently completed the demands of the Edith Cowan University M.S. in Strength and Conditioning.

Freelap USA: What are the main pieces of information that a coach can gain from a force plate that they may not be able to from a simple switch mat?

Daniel Martinez: A force platform is basically a fancy scale that allows us to look at the force-time relationship and, using forward dynamics, identify characteristics within a given movement that demonstrate an output and how athletes performed that movement across all phases of contraction (eccentric, isometric, and concentric). This is an important differentiator, as there is a large body of research demonstrating that these characteristics vary widely by individual, sport, and task.

A switch mat is a good first step, especially if we consider the “compared to what” question, but a switch mat cannot differentiate across the contraction phases. A lot of my testing demonstrates that athletes interpret much of performance testing with a concentric output focus. Additionally, I often critique velocity-based training by stating what we largely describe is concentric velocity-based training and, if training becomes unnecessarily biased towards the concentric phase of contraction, based on VBT or switch mat outcomes, we still leave a large amount of adaptation on the table.

This is one of those biases that many of us are generally aware exists but do not always take specific steps to address: Analyzing forces without consideration for time is narrow, as is analyzing time without an understanding of forces as they need to be applied. This is most commonly expressed with respect to force as a weight room issue where strength is not contextualized properly in terms of its impact on a specific performance. The same is true of just looking for movements that are rapid (e.g., fast foot drills or even drop jumps), but not assessing whether this optimizes the development of force within that time window from a needs perspective with respect to desired movement outcomes.

At the same time, I often tell colleagues that most disagreements we have regarding the structure of the strength and conditioning program and performance testing are more likely longitudinal and sequential considerations. Critics of classic periodization often get caught up in variability or task specificity, but the reality is that there is something to be said for aligning stressors in a way that allows the workload distribution to create greater harmony. Our willingness to zoom in or zoom out on this depends on a load of contextual factors, which makes superficial discussions on the subject reek of an unnecessary agenda. If performance is a symphony, then we first need to understand that it is not always about louder drums (e.g., a hypertrophy or strength block), but sometimes we do need the drums to be louder! With this in mind, it makes a lot of sense to line up a training plan as a vector quantity towards a target, with both a magnitude and a direction, but this will also require some critical thinking.

Consider aligning #stressors in a way that allows workload distribution to create greater harmony, says @entheosathletic. Share on X

The easy example of this is the common practice of longer duration eccentrics as a first step in a specific program. This addresses the force side of this contractile characteristic, but leaves out the force-time element of eccentric stress that in team sport is most commonly expressed in landings, decelerations, and change of direction with large eccentric/negative velocities. Most of us would not propose to utilize classic “plyometrics” early in a training plan. However, that does not mean we should not address the qualities of gross deceleration capability, especially if doing so will smooth out the return to team sport practice and the chaos it contains. (Where inevitably, and despite heaps of weight lifted, the starting and stopping leads to wide-scale soreness across many teams.) The key is the workload distribution and the dosage: Training deceleration in small doses early functions like a vaccine and can generate a resiliency effect if done properly.

Freelap USA: How can this information steer the direction of an athlete’s training?

Daniel Martinez: Returning to the training structure and periodization issues from the previous question, we have a clearer picture of where we need to go and where an athlete is coming from. We often see an athlete who has either optimized these relationships or is in the process of adapting. Athletes who have optimized relationships will demonstrate greater harmony in their symphony and the force-time relationships will check a lot of boxes, resulting in very solid performance outcomes.

If an athlete is adapting, then we may see specific characteristics that are either amplified or lagging in their contribution to performance. For example, during heavier workloads—especially those that emphasize eccentric characteristics properly—we see eccentric characteristics spike, but concentric outputs come out flat. This makes a lot of sense if we consider that every action has an equal and opposite reaction. The forces being overcome now are larger and therefore set the athlete up for some nice delayed training effects as we get that bonus effect of overload and adaptation (super-compensation, if you will).

So, the eccentric values spike and in one common relationship we will see concentric impulse (force x time) creep up slowly through the training cycle while concentric impulse up to 100 milliseconds stays depressed. So, do several other readiness measures in line with what you would expect, while the athlete’s force absorption capability slowly adapts to larger acute and chronic workloads. Eventually, harmony is achieved as both values are optimally expressed, leading to more problem-solving in the chase for competitive excellence.

To make actionable decisions on where the adapting athlete and the optimized athlete should go, we also always need to know what the timeline contains regarding important performance targets and/or competitions, and this is an area where there is room for compromise regarding periodization structure. Using the example from above, if the athlete has optimized these relationships and they have important competitions almost immediately, then one would not stray too far from this optimization with shorter training cycles and a more balanced distribution of work that is vertically integrated and sequenced in a rational form. If, however, they are far away from competition and we sense that we are far enough from our primary aim that we can disrupt this harmony in the hunt for the athlete’s best efforts not yet achieved, then we do exactly that.

People miss the boat on this, believing periodization is just variability, because there are positions that will support improved load tolerance and resiliency. Additionally, training that supports these positions will create training effects that can and will be amplified in the cycle that follows. As mentioned before, critics often advocate for the timing of such a thing, and this may mean using such alternative methods in a less concentrated form.

The alternative of working with a traditional periodization plan may move the athlete further away from performances consistent with the current demands of their competitive season, but we cannot just insert plyometrics or isometrics into a training plan or specific cycle for shock value. A good training plan teaches athletes that every load lifted should have purpose and intent longitudinally and sequentially, and that this can be organized into a rational plan. Learning to do so properly teaches athletes the discipline necessary to surf their true force-velocity curve, where every movement has intent and purpose in the way it is executed.

We can’t just put #plyometrics or #isometrics into a training plan or specific cycle for shock value, says @entheosathletic. Share on X

The alternative is neglecting this deep work for the shallow sort, which is the equivalent of teaching an amateur surfer how to shred the crap out of the kiddie pool. They may feel explosive, but they do not learn to maximally express forces and velocities consistent with their intended performance target. In short, what makes these methods for everyone makes them not what they truly are. Compromise as you believe necessary, but remember most of us overreach in the short term and under-reach in the long term. As it has been said: “If you want to go fast, go alone. If you want to go far, go together.”

Freelap USA: What are your favorite jump tests, and why?

Daniel Martinez: The countermovement jump is the backbone of what my current role requires. It aligns closely with characteristics central to adaptation in the weight room and mirrors many of the demands that will be placed on many team sport athletes. Not to be redundant, but this is the point where the training’s longitudinal and sequential factors will influence test selection. The drop jump and 10-5 RSI are both outstanding additions to a testing protocol for specific reasons. But, then again, so are the isometric mid-thigh pull and both bilateral and unilateral posterior chain/hamstring tests.

It all depends on how zoomed in or out one must be in their role. I like the drop jump because you have a test that you can shift longitudinally as an athlete adapts, provided that you can spend the necessary time with the athlete to develop the requisite qualities. I also like the 10-5 RSI, as you have a surrogate for the drop jump but do not introduce factors that can negatively influence elasticity and the coordination of the effort. This is because the athlete initiates the test with a countermovement jump and uses repeat fast ground contact efforts to provide a measure of fast SSC reactive strength.

At the same time, Dave Hamilton’s work on the drop jump paints a very clear picture on the utility and limitations of the drop jump/RSI. If you move above the 150-millisecond window, you lose the ability to utilize the reactive strength index as a reliable readiness tool because a broader time window allows athletes to exploit a wider variety of mechanisms that will generate comparable outcomes (i.e., varying strategies lead to similar performances but also create a lot of noise in the measurement). An easy way to think about this is to consider whether there is truly a 1:1 change in the reactive strength index, or whether specific jumping positions will lead to more favorable outcomes on one factor while potentially compromising the other. This does not mean a drop jump test is useless with the potential noise that comes along with it, just that you introduce contextual factors that should give you pause in drawing any firm conclusions.

In line with these issues, we must also consider from what positions these forces are being applied and within what time window. Or, as I prefer to contextualize this problem: We use this test in order to do what? We want to relate these test performances to specific characteristics we can quantify, while keeping training performances authentic towards a performance goal and not towards a specific test outcome. (This is the reason that time normalization, as it is typically done in much of the research, has limitations. Time is a huge factor in how athletes generate a specific performance and their coordinative strengths and limitations will influence how this is expressed.)

Freelap USA: What would the tiers of athlete monitoring look like, in terms of budget, from low to high? What would you choose at each level and why?

Daniel Martinez: Moving across the three buckets I use in my process, we need to be able to effectively quantify: 1) movement (positions); 2) output (forces = gas pedal and brakes); and 3) readiness. I am terrible at moving towards the abstract, so I will just finish this by writing that the same processes we use to create effective training curriculums, syllabi, and training plans are the same processes for creating a monitoring system.

Create a #monitoring system with the same processes you use to create effective training plans, says @entheosathletic. Share on X

In line with dynamic systems theory, it must also align with your environment, task, and athletes. The more closely this can authentically zoom in and zoom out on performance characteristics of training and competition, the better. Anything that falls out of line with this orientation can potentially compromise your training culture and testing outcomes, as you have moved towards a monitoring for monitoring’s sake program.

Freelap USA: What are the greatest uses, and misuses, of sport technology right now?

 Daniel Martinez: I don’t know that this can be so cut and dry. Part of improving sport/performance science is driven through hypothesis and good observation. With that comes overreaching, at times. This is the same process many sport and S&C coaches discuss when they talk about blowing athletes up… so we will make many of the same mistakes in athlete monitoring, analytics, etc.

But the question should not be whether science can improve our performance and understanding of sport, because we know it can. The question would be better if we had sport coaches and more traditional strength and conditioning coaches asking, “Do I want this guy/girl on my team?” I know several individuals like this who have grabbed onto specific sport technologies because they know it will make their team better.

We should make them feel the same way about “us.” I want people to not want to compete against me, and that lines up well with what many of these coaches desire. My willingness to use performance science and technology to do so will always be a big part of that, but so will my coaching instincts.

Since you’re here…
…we have a small favor to ask. More people are reading SimpliFaster than ever, and each week we bring you compelling content from coaches, sport scientists, and physiotherapists who are devoted to building better athletes. Please take a moment to share the articles on social media, engage the authors with questions and comments below, and link to articles when appropriate if you have a blog or participate on forums of related topics. — SF

Social Media Battles

How Coaches Can Debate and Win on Social Media

Uncategorized| ByBob Alejo

Power Lift Sport Science Education

Social Media Battles

Without a doubt, this article was prompted by two recent debates I was involved in on Twitter that went every which way. One was the hotly contested and always good for entertainment debate regarding the functional movement screen. The other was over whether an athlete should skip a meal if the only choice is a donut. Both threads contained the qualities that many people with differences in opinion display when the topic is near and dear to them—dismissiveness, lack of scientific support, abundance of scientific support, emotional responses—and both were much longer than they should’ve been!

We all want our words to persuade other people because, well, we all think we have some substance to share. As if I did not know it before, in the midst of the second “battle” (donuts vs. nada), I realized you could choose, within a matter of characters, the person least likely to be persuaded to believe, understand, or listen to anything other than what they believe. It wasn’t an epiphany, to be sure.

We all want our words to persuade other people because we all think we have some substance to share, says @Coach_Alejo. Share on X

I certainly am not a social media expert. Instead, I’m like a lot of us who are just practitioners talking about training and promoting our own thoughts and personal experiences in an effort to educate. That said, I saw something over the last eight months (when I started to “crank it up” on social media) that was painfully obvious during debates and exchanges: an overwhelming intolerance to different beliefs and facts. I definitely like to “stimulate thought” every now and then, so I want to put into print what I think are some shared thoughts, observations, and personal opinions.

Data Wins Every Time

You’d like to think that data wins an argument, but that’s not always the case. Why? Because, people historically dig in even harder in support of their stance and refuse to back down once they realize: a) they have no data to support their claims; or b) the data they do have is bootleg compared to the opposition. Sometimes, to protect their pride when they feel impending defeat closing in on them, they begin to shape the narrative around the data to something they might be able to justify instead of the original stance they’ve been hammered on.

The Freedom of Speech Act is clearly in effect on social media. That’s good, but it doesn’t mean you must engage with every view you don’t like. However, you know as well as I do that there are some things you won’t let pass you by. Let me rephrase that in my own terms—can’t let pass you by! And I say, if you’re going to debate, opinion is worthless either for or against a stance. You open yourself up to all kinds ridicule, credibility loss, and worse, public defeat. So, don’t come to the fight unequipped. Do your homework on the topic.

If you’re going to debate, opinion is worthless either for or against a stance, says @Coach_Alejo. Share on X

In the good debates I’ve been in or seen, plenty of science and numbers are thrown around: evidence-based support for hypotheses or results. In this type of back and forth, sometimes there is no overwhelming evidence either way, but everyone gains knowledge, including those just observing. It’s typical of intelligent, prepared practitioners: wanting to spread the good word is never a bad thing.

Personal data makes a huge impact. I’ve begun to use the phrase, “This is what I did and this is what happened.” It’s hard to argue against that idea, and let me tell you why. First, the statement is clearly not taking credit for anything, although the supporting information that perhaps can be dealt out later may show otherwise.

For instance, when somebody asks me how well my program worked during the “Moneyball”-era while I was with the Oakland As, my canned answer is “I don’t know.” First, you have to identify what “worked” means, and second, I can’t help but think I contributed in some way, but who knows what it accounted for. What I can do is show you what I did during those years and tell you the results. Whether I accounted for X number of wins is for others to decide. Frankly, with our pitchers (Hudson, Mulder, and Zito), push-ups and sit-ups would have been enough!

It’s tough to say: “Our speed training program led to a championship.” Actually, it’s a pretty dumb thing to say. For sure, “Here is our speed program and our team won a championship” is a true statement. We are strength and conditioning coaches, nothing more and nothing less. When you are debating whether your program is good or not, just stick to that program: jumping higher; running faster; getting stronger; and reducing the risk, incidence, and severity of injury. One argument is inarguable: “Evidence” tends to reduce doubt, hesitation, and skepticism! While not my original phrase (I can’t remember where I found it), it’s true.

No Absolutes

Perhaps, likely, maybe, unlikely, doubtful, conceivably, tends to… These are valuable words when posting a conclusion in the athletic performance world. Understand that there are things in the philosophical and methodological aspects of training that are not 100% efficacious. Some are pretty close, but pretty close is not “never” or “always.” Use common sense here. Once you go to “not once” or “at all times,” you are either never going to be wrong or always going to be wrong. For example:

“If you squat heavy in-season in a timely manner, then you will likely lessen your risk of lower-body injury.”

Is different than:

“If you squat heavy in-season, you will lessen your risk of lower-body injury.”

The second version is just not true. While the squat is a great lower-body exercise, there are no guarantees that the risk of lower-body injury will automatically decrease. There are many factors that contribute to reduced risk of injury, including the fact that the squat is not the only effective lower-body exercise for health and performance. And, lower-body injury could be a result of more than strength and power loss (fatigue, sleep, hydration levels, collisions).

That said, there is a preponderance of evidence to support that the retention of strength and power levels in-season is linked to healthier athletes and therefore forms a solid hypothesis about timely, higher intensity, lower-body training being advantageous. In addition, “will likely” opens the door to the fact that the person who squats might not reduce their chance for injury given the variables mentioned earlier. So, the first version is a hypothesis—using qualifiers like “timely” and “likely” doesn’t say the squat is the only exercise or the best exercise, or even the only variable in lower-body health. It is, however, a solid statement.

Think about this: When you read a peer-reviewed study or listen to a researcher talk, if you pay attention you will hear those words I mention above (i.e., perhaps, likely, maybe, etc.), along with their hesitation to absolutely confirm most things 100%. If you think about it, even the best studies have limitations and statistical boundaries that just don’t allow for always or never. The saying, “I’m not young enough to know everything” is as obvious as ever to me today. On the other hand, I am old enough to say that for a topic that is so heated and popular, I have yet to read or hear by word-of-mouth one piece of documented evidence that pressing overhead is bad for pitchers or overhead athletes!

Just Because You Read Research Doesn’t Mean You’re a Researcher

If you’re not a researcher, arguing with someone who does research by using research you’ve read is like sucking a piano through a straw (Steve Martin, circa 1970s)! Victory is impossible. Especially if you are arguing, let’s say, with a Ph.D. exercise physiologist/nutritionist about nutrition. You don’t think that they’ve probably already read that same paper you’ve cited while they were writing their own research?! C’mon, of course they have, and they probably have a better understanding of every word in the paper AND the supporting information and citations.

These guys are giant walking, talking sample sizes of information. Take caution before you walk into this snare. I’m not saying you can’t disagree with them, but remember: you are disagreeing with the science that they read and deal with every day, and not them!

The Dogpile

Of course, I participate in dogpiles—that’s what really smart friends are for! Enlist the help of folks that can fully support your argument: people who have anecdotal information (personal or otherwise), scientific evidence, or personal peer-reviewed research backing your claim. Better yet, three letters: P-h-D. Get those cats in on the argument when you want to slam the door shut or expose someone.

I don’t feel bad; not one bit. I feel it’s my duty to have actual experts enter an argument, and beneficial to all. I mean, I’m probably spitting back info they have taught me anyway, so why not hear it directly from them? Not to mention that it sounds really cool when they fire off the science, study after study.

‘I Feel,’ ‘I Think,’ or ‘IMO’ as an Explanation

If there is any time in the history of athletic or sports performance to not have to guess at a theory, it’s now. Geez, with the internet, you’re only one “click” away from the answer to any question. So, as mentioned earlier, come prepared with information.

The other issue with this approach arises when you have the data, anecdotal information, or science, yet somehow you are persuaded to posit with “in my opinion.” I say that’s too soft. Look, if you are confident with your stance (you have data, personal accounts, peer-reviewed research), there’s no reason to make what you know is true, “kinda” true. My example is this: Creatine has yet to be proven to cause cramps. It’s not my feeling or my opinion—it’s the facts! In other words, if it is necessary to use “maybe” to corroborate your claim, “maybe” you shouldn’t be in the debate.

In 2018, it’s an outdated claim to say you can’t prove it, but you know that it works, says @Coach_Alejo. Share on X

Likewise, if your stance against data and peer-reviewed work is, “I feel…” then frankly, you lose. “Science is lagging behind what’s happening in the gym” is a lazy argument because you say what you’re doing works, but you can’t prove it. There are rooms full of science that might not be exactly what you are speaking about, but will allow for a pretty damn good theory for what you are doing. By the way, this should include some evidence (assessments of sorts) that what you are doing works. To say you can’t prove it but you know that it works is an outdated claim in 2018. If that’s how you feel, why wouldn’t you want to seek the proof?! As an educator, you should at least want to educate.

Self-Imposed Ignorance

After a few volleys of contrary opinions, there might be a point where the stakes of the conversation rise to a higher level. This is when vetting a combatant not familiar to you is fairly important. Knowing the background of the people in an escalating debate is critical for a few reasons.

As an example, most of us in the field have enough knowledge about endocrinology to either: a) talk with general adequacy about hormonal effects of training, or b) be dangerous. In the event the discussion is about hormones and endocrine glands, it would be good to know if the opposition is an endocrinologist!

Have a good speed program? It’s hard to propose that your program has significantly more merit when the person in the conversation has coached several medalists and you have not. There are a lot of guys out there who are pretty damn smart and experienced, and at the same time have some anonymity. Not everyone puts a resume or their deadlift PR on their home page. On the good side, not everyone has a resume or a deadlift PR.

Exercise some restraint early to test the waters a bit during a difference of opinion. It could go a long way in creating a great discussion and perhaps an ally for future discussions.

‘Who Have You Coached?’ and Other What-Have-You-Done Statements

Maybe because I’m older, I actually don’t mind when someone oversteps the boundaries of respect and practicality. Of course, there has to be a significant difference in experience levels and accomplishments for someone to get away with this. However, all in all, this type of response isn’t the first or second line of defense in a debate, but it does have some merit and validity given the right circumstance.

The key for me is if someone with little experience and associated accomplishments tells me that what I’ve been doing all along is wrong, or a philosophy that I’ve held for some time does not work—then it’s on! Not just “ineffective,” but that my way just does not work and has no benefit at all. If the dissenter also adds, “And, here’s how you do it,” they’ve now piqued my interest, and my ire.

Here’s another angle: If you think the pros aren’t different than college, you’re mistaken; I can personally attest to it. If you think working with a Power 5 team is no different than working with a mid-major athlete, I hope you have the chance to see that it definitely is, as I have. Others may have a different perspective than I do, and I can understand that. What I am saying is, depending on the argument, take caution with the tone of your voice.

Let me add some clarity here: This is not about what job is better or whether you are a better coach if you are at a Division I vs. a Division III. This is about training methodology, psychology of the athlete, environment, etc. My experience has shown me that it’s different. Not me, but “it.”

Depending on the argument, take caution with the tone of your voice, says @Coach_Alejo. Share on X

So, let me ask the question: Should an experienced coach (let’s say 20+ years) have more credibility than an inexperienced coach (let’s say 10 years or less), given that they have coached at the same levels? Yes, no question. If you had a choice, would you want a CPA in business for 22 years doing your taxes or one who’s been in business for nine years? To build your new house, would you choose a master carpenter with 23 years’ experience or a carpenter with eight years in? Your Mercedes needs an engine repair—do you choose the 20-year mechanic or the five-year guy?

I don’t want to hear “Your teams were going to be great anyway—you get the best athletes,” or “Just because you’ve coached for 20 years, it doesn’t mean anything.” People saying that: a) haven’t worked with great athletes, or b) haven’t coached for 20 years! They’re a non-player in a debate if that’s their go-to support mechanism for an argument. I am not saying younger or less-experienced coaches have no credibility. In fact, I ask younger coaches (everyone is younger than me now) for advice every chance I get these days. After all, one has to stay current. But when I need sage advice, I call the guys who have been throwing down for at least 20 years. It’s a trust and credibility issue.

On the other hand, I’d be irresponsible—and dishonest—to proclaim that only coaches at major universities or professional teams that can boast All-Americans and championships are credible. This isn’t a true statement. But the social media arguments aren’t usually over how many winning teams you’ve coached. That’s a math debate and too easy to decide the winner. This is the reason evidence-based data is important: actual training information and output to compare and put up as collateral in a spat.

I will say, though, that coaches who have worked with champions have had special experiences. Championship athletes and teams have a special makeup and the coach that works with them should be seen as having a unique exposure to a sometimes-rare environment. I, for one, am fortunate enough to say, it is different.

Before you start doubting someone’s career achievements, the sure-bet response is to stick to the topic. Stay with personal accounts and science-based responses. I’ll talk about emotional response later, but for sure when you get to the “What have you done?!” level, the fireworks will happen.

Emotional Investment in Conclusions

It’s great to be passionate about our profession. The need to teach others to improve on the field of play, and to watch athletes you have trained succeed in athletic endeavors, is honorable and selfless. Also, it is important to understand the science or contribution of methods to performance because it may turn out that eventually that contribution might (or might not) affect your athletes. However, to truly be passionate in a selfless way is to disassociate yourself from personal bias, removing an emotional attachment defying science and data, to do what’s best for the athlete.

To be passionate in a selfless way, detach from personal bias to do what’s best for the athlete, says @Coach_Alejo. Share on X

For sure, I’ve had things I liked or things I did that got good results. To stick with those things after receiving information that other methods or variations worked better, or that what I was doing just wasn’t valuable, wouldn’t honor those I work with. I’m not saying it’s easy to find out that the path you’re on isn’t the best path, but it is certainly better than having more knowledge and doing nothing with it. This shows up in a few forms:

Continually wearing out a point that’s already been agreed upon or an entirely different point than the discussion.

Let’s say there are a few talking points about a method or philosophy. It’s exhausting to have a conversation when folks keep talking about something that has been agreed upon in the debate and they won’t move off it! It tells me that they aren’t versed enough on the main thread, they’ve come out against the topic and can’t really defend themselves, or that they’re so “married” to their point that they can’t get out of their own way.

For example, if the argument is whether the bench press is sport-specific for football, I think we can all agree that bench-pressing 400lbs doesn’t guarantee that you will be a good blocker or the age-old wisdom that you don’t play the game on your back. Really?! Re-hashing those two points looks foolish, considering the measurable effect the bench press has on upper body pressing strength, contributing to shoulder health or adding much-needed muscle in the pec/shoulder/tricep area. These are all fairly valuable to a football player; ergo, sport-specific to football. Regardless, the topic is not whether the game is played on your back!

“______ is useless!”

Virtually nothing is useless. Even a bad example is helpful in some way. In our world, it’s typically not about something working. As Bob Ward, the longtime strength and conditioning coach of the Dallas Cowboys, said to me, “Everything works.” The question should be about what works best. In other words, if I took two cans of green beans and did lateral shoulder raises, there is going to be an effect—it works. But there certainly won’t be as much strength gain as if I used DBs for the same exercise for five to eight reps at the appropriate weight over a period of time—this works best!

Nearly nothing is useless: The question is typically not about what works, but what works best, says @Coach_Alejo. Share on X

I understand the need to drive home a point, but using terms like “useless” in a debate (I can’t say I haven’t been guilty of this) is, without a doubt, an emotional response and not helpful in discourse. My experience is that it’s usually a swipe at a company or person associated with the method, product, or theory. And it’s not helpful.

Dismissing the science.

Not paying attention to good research—stacks of it, in some cases—is a waste of everyone’s time. Really, it’s professionally irresponsible. I understand that one study does not make great evidence and is not the gold standard, but that doesn’t mean you should dismiss it entirely.

High-protein diets are not harmful to the kidneys, and it is not true that they are solely calories in/calories out (where those calories come from is significant). That’s the science—you can’t disagree. I don’t know how else to say it other than it drives me nuts when I hear someone say, “I disagree” in those instances. You can’t make up your own science! It reveals the level of knowledge of the practitioner, and it’s not good.

“Nothing I’ve read says that” is another sad answer. I have only one response to that: You haven’t read enough! Again, start with the internet!

Don’t Maintain a Position of Ignorance

I stand by this statement I’ve said many times before: I am not a scientist, but what I do is based on science. We don’t have the luxury of not keeping current with the latest studies. Nor do we have the option of not choosing, when applicable and possible, a better method or thought when presented with one.

Since you’re here…
…we have a small favor to ask. More people are reading SimpliFaster than ever, and each week we bring you compelling content from coaches, sport scientists, and physiotherapists who are devoted to building better athletes. Please take a moment to share the articles on social media, engage the authors with questions and comments below, and link to articles when appropriate if you have a blog or participate on forums of related topics. — SF

Long Term Athletic Development

Long-Term Athlete Development and Team Sports

Blog| ByNathan Kiely

Long Term Athletic Development

*Note: Quotations from Kiely refer to John Kiely, not the author of this article.

We’ve all heard lots about periodization. Heck, I bet we’ve all read countless books, listened to many podcasts, and even attended a few seminars and conferences dedicated to the planning of training. But what exactly is periodization? Gamble (2006) said: “[P]eriodization offers a framework for planned and systematic variation of training parameters, in a way that directs physiological adaptations to the training goals required of the sport.”

Training is periodized to optimize performance outcomes in competition. Each sport will have its own constraints based on: the training and match schedule; the pre-season and in-season length; the coaches’ access to athletes; and the training time at various stages of the season—not to mention the training culture of the sport, head coach, and even country in question. Due to these reasons, a variety of periodization schemes have been developed over the years. The majority of these were traditionally modelled on Olympic sports like track and field and weightlifting.

Typical periodization models seen in these Olympic sports that have been adapted for teams include, but are not limited to, nonlinear, block, fractal, and conjugate sequences (Kiely 2012). More recently, team sports have worked to break this mold and more advanced tactical or agile periodization methodologies have been formed to meet the ever-changing demands of the games to which they’re applied (Kiely 2012).

The Shortfalls of Traditional Periodization for LTAD in Team Sport

“Teach these kids to do the basics savagely well and all else will follow suit.”

Team sports in a development setting are a combination of the chaos we expect in open age groups, in addition to all the issues associated with working with kids. A development setting is often characterized by athletes with poor motor skills, faulty biomechanics, mixed messages from coaches and parents, low training age, fundamental misunderstandings of the process of training, the emotional stress and process of personal discovery, and development of a sense of self associated with being an adolescent, as well as mixed stages of development within the one cohort.

For team sport athletes in an #LTAD setting, periodization is less important than consistency, says @nathankiely1992. Share on X

With so many interrelated factors to consider, the strength and conditioning coach has a challenging job. For this reason, periodization throughout training when working with team sport athletes in an LTAD setting is less important. What matters is consistency and habit creation. Athletes should be able to turn up to strength and conditioning sessions and know what to expect and how to prepare.

“The human body is either in a state of optimisation or adaptation—never both simultaneously.”

This “steady as she goes system” can be interjected with periods of variety and high-intensity training modalities in short, sharp blocks. Progress can be fast and meeting the athletes where they’re at is essential. Build a wide and stable base over time, then test the athletes with a challenging week (volume load equated to avoid acute spikes) to stimulate sudden performance improvement. Teach these kids to “do the basics savagely well” and all else will follow suit.

Transmutation blocks followed by speed-power training using velocity-based training or advanced tapering models are not only out of place, but are redundant when working with 16-year-olds. The problem with these models is they focus mainly on rigid preparation for performance outcomes, rather than steady progression and agile training themes with an eye on long-term adaptation. Dr. Andy Galpin reminds us that the human body is either in a state of optimization or adaptation—never both simultaneously. So, to maximize development, performance optimization must suffer. And this is for the long-term good. Think big picture.

“Be there to facilitate—not dictate—when they ask for your help.”

The emphasis for developing athletes should always be on both creating a learning environment characterized by technique and fostering competition in training to keep things fun. This is where the competitive juices can flow and a love for the sport itself will be nurtured within the context of learning new skills. Remember, if they fall in love with the game, they’ll intrinsically want to do the hard work required to excel. Be there to facilitate—not dictate—when they ask for your help.

The Simple Way: Accumulate-Intensify-Repeat

For the various reasons stated above, I have developed a system built on the backbone of the KISS principle. The KISS principle is a straightforward concept: “Keep it simple, stupid.” I have cut out the rough edges and built my model around two training blocks with concise goals.

One of the basic tenets of Siff’s strength training bible Supertraining (2003) is that all training plans should invariably resemble the sequence of periods characterized by the application of extensive training methods—known as an accumulation phase—and subsequent stages of intensive training—the intensification phase. These two phases complement one another, as one develops movement skills (motor learning), conditions connective tissues, fosters hypertrophy of muscle structure, and builds work capacity; while the other subsequently emphasizes the development of neurological adaptations (intra and intermuscular coordination), speed and power of movement, and competitive application of sport-specific skills.

I propose the ideal model of periodization for LTAD in team sport athletes is the cyclical application of longer accumulation (four to six weeks) and short, sharp intensification (two to four weeks) phases in a repeated fashion. These should remain concurrent in nature with all physical abilities/capacities equally distributed throughout all programs.

In the weight room, these two phases could resemble what Bompa & Buzzichelli (2015) would classify as general anatomical adaptation and maximal strength phases. Coaches can utilize training blocks during which they expose their athletes to larger volumes of training across many different movements in order to build work capacity and physical literacy, while simultaneously strengthening connective tissue. Subsequently, the coach can then interject high intensity methods—with a noticeable decrease in volume—to maximize functional adaptations.

“Interjecting training novelty into habituated patterns may lead to sudden performance improvements… Regular variation and/or periods of high-intensity training are not unique to any particular periodization philosophy and appear to be a hallmark of elite programs regardless of the stated methodology employed.” – Kiely (2012)

Evidence suggests that habitualized training, interspersed with periods of novel or high-intensity training, is critical for physical development and high performance (Kiely 2012). Coaches should view accumulation phases as a time for training to remain consistent with steady progression and intensification blocks as a chance to introduce novelty and competition or to focus intently on a specific adaptive response based upon the areas that need the most attention. Being an agile and flexible coach is critical in this phase, as firmly holding onto the plan presumes you know precisely how every single individual will adapt to every session—a rather naive assertion.

The strength and conditioning coach should identify all the physical abilities they believe to be important for their sport, and devise and categorize two separate conditions under which to train them. A progression model from movement simplicity to complexity also needs development to ensure variation occurs in a safe manner. These conditions should be extensive measures (to be trained in accumulation phase) and intensive measures (to be trained in intensification phase).

Develop skills, an aerobic base, and hypertrophy (structural/capacity development) in extensive training and then intensify all training modalities to maximize functional/power qualities. At the completion of the two training blocks, reset and repeat with the subsequent accumulation phase starting at a higher absolute intensity, which is now relatively extensive in nature for the athletes.

What Not to Do

Often, knowing what is not best can be the most useful in directing us on the path to what is. Here are some key shortfalls to avoid when planning training for LTAD in team settings:

  1. Don’t use stringent block periodization of general anatomical adaptation, hypertrophy, max strength, transmutation, power/speed, etc. These need to be sprinkled throughout the whole program, all the time.
  2. Don’t place a heavy emphasis on special strength training exercises or advanced exercise variations. Instead, polarize between general preparatory exercises and the competition exercise in athletes with low training age (<3 years) and focus more on special preparatory and special developmental as training age increases (Bondarchuk’s model of exercise classification).
  3. Don’t limit exposure to only a few different lifts. It’s all about exposure, exposure, exposure. Build a wide variety of movement skills and a robust, versatile physical literacy. Jump and land; fall and tumble; throw, catch, clean and jerk; snatch; squat; hinge; lunge; brace and rotate; push and pull; and, mostly importantly, sprint. Have a solid and concise progression model in place to make these various movement qualities logical and digestible for your athletes—ensure the process makes sense to them.
  4. Don’t ignore external stressors. Rather, try to align intensification blocks with down time in study commitments and social stressors. Reduce intensity to align with exams, etc.
  5. Don’t focus on outputs. Rather than focusing on the weight on the bar, the split time in the sprint, or the height on the jump, create a technically focused model whereby the athletes’ input into the exercise is the focus. Technique should always trump load.
  6. Don’t try to build an elite athlete right now. Arm your athletes with the skills to fit seamlessly into any subsequent program they may be a part of. Your athlete’s gym skills reflect on you as a coach and subsequent coaches will judge you based upon this. I want the 19-year-old with great weightlifting skills and clean running mechanics joining me straight out of school—not the guy or girl who has the 2x bodyweight squat, yet rounds their back and has a bung hip from grinding through messy reps.

Build a Broad Movement Vocabulary

When we have many abilities to train, no perfect model for the distribution of these across training time exists. Mladen Janovic proposes we utilize the “1/N heuristic,” whereby we simply divide training time equally among all options. This is particularly applicable in the LTAD setting, where building a broad movement vocabulary is essential.

Here are some practical examples of movements for both accumulation and intensification training blocks:

Accumulation block (extensive training measures): Mobility, weightlifting technique (barbell complexes), landing and deceleration progression, tempo-controlled hypertrophy training, extensive low-level plyometrics and medicine ball throw variations, running skills (posture, range, and alignment), MAS running 70-100%, long high-speed running efforts (up to 60m), linear/multidirectional tempo, and technical/tactical sport skills.

Intensification block (apply variability wherever possible): Load weightlifting variations, intensified core strength lifts to develop neurological/functional adaptations, ballistic resistance training, intensive plyometrics and medicine ball throw variations, resisted sprints, short/intense sprints (less than 30m) and live reactive agility, HIIT >120%MAS, and opposed/competitive sport skill sessions.

Since you’re here…
…we have a small favor to ask. More people are reading SimpliFaster than ever, and each week we bring you compelling content from coaches, sport scientists, and physiotherapists who are devoted to building better athletes. Please take a moment to share the articles on social media, engage the authors with questions and comments below, and link to articles when appropriate if you have a blog or participate on forums of related topics. — SF

References

Bompa, T. and Buzzichelli, C. 2015. Periodization Training for Sports, 3E. Human Kinetics.

Gamble, P. 2006. “Periodization of training for team sports athletes.” Strength and Conditioning Journal, 28(5), p. 56.

Kiely, J. 2012. “Periodization paradigms in the 21st century: evidence-led or tradition-driven?” International journal of sports physiology and performance, 7(3), pp. 242-250.

Siff, M.C. 2003. Supertraining. Supertraining Institute.

  • « Go to Previous Page
  • Page 1
  • Interim pages omitted …
  • Page 133
  • Page 134
  • Page 135
  • Page 136
  • Page 137
  • Interim pages omitted …
  • Page 164
  • Go to Next Page »

Primary Sidebar

FEATURED

  • Using Speed and Power Data to Bucket and Train Faster Athletes
  • Plyometric Training Systems: Developmental vs. Progressive
  • 9 (Fun!) Games to Develop Movement Skills and Athleticism

Latest Posts

  • Rapid Fire—Episode #16 Featuring George Green: Holistic Athlete Management
  • Rapid Fire—Episode #15 Featuring Kyle Brown: What is Universal Speed Rating (USR)?
  • Why We Don’t Perform Hang Cleans

Topics

  • Adult training
  • App features
  • Artificial Intelligence
  • Athlete
  • Athlete performance
  • Baseball
  • Buyer's Guide
  • Career
  • Certifications
  • Changing with the Game
  • Coach
  • Coaching
  • Coaching workflows
  • Coching
  • College athlete
  • Course Reviews
  • Dasher
  • Data management
  • EMG
  • Force plates
  • Future innovations
  • Game On Series
  • Getting Started
  • Injury prevention
  • Misconceptions Series
  • Motion tracking
  • Out of My Lane Series
  • Performance technology
  • Physical education
  • Plyometric training
  • Pneumatic resistance
  • Power
  • Power development
  • Practice
  • Rapid Fire
  • Reflectorless timing system
  • Running
  • Speed
  • Sports
  • Sports technology
  • Sprinters
  • Strength and conditioning
  • Strength training
  • Summer School with Dan Mullins
  • The Croc Show
  • Track and field
  • Training
  • Training efficiency
  • Wave loading
  • What I've Added/What I've Dropped Series
  • Youth athletics
  • Youth coaching

Categories

  • Blog
  • Buyer's Guide
  • Freelap Friday Five
  • Podcasts

COMPANY

  • Contact Us
  • Write for SimpliFaster
  • Affiliate Program
  • Terms of Use
  • SimpliFaster Privacy Policy
  • DMCA Policy
  • Return and Refund Policy
  • Disclaimer

Coaches Resources

  • Shop Online
  • SimpliFaster Blog
  • Buyer’s Guide
  • Freelap Friday Five
  • Coaches Job Listing

CONTACT INFORMATION

13100 Tech City Circle Suite 200

Alachua, FL 32615

(925) 461-5990 (office)

(925) 461-5991 (fax)

(800) 634-5990 (toll free in US)

Logo of BuyBoard Purchasing Cooperative. The word Buy is yellow and shaped like a shopping cart, while Board and Purchasing Cooperative are in blue text.
  • Facebook
  • Instagram
  • Twitter
  • YouTube

SIGNUP FOR NEWSLETTER

Loading

Copyright © 2025 SimpliFaster. All Rights Reserved.