• Skip to content
  • Skip to primary sidebar
SimpliFaster

SimpliFaster

cart

Top Header Element

  • Facebook
  • Instagram
  • Twitter
  • YouTube
  • Login
  • cartCart
  • (925) 461-5990
  • Shop
  • Request a Quote
  • Blog
  • Buyer’s Guide
  • Freelap Friday Five
  • Podcast
  • Job Board
    • Candidate
    • Employer
    • Facebook
    • Instagram
    • Twitter
    • YouTube
You are here: Home / Blog

Blog

Bedroom Soccer Skills

Yes, Informed Continuity: A 3-Phase Plan for Coaching Through Cancellations

Blog| ByNathan Huffstutter

Bedroom Soccer Skills


Coaching youth sports, I operate with a handful of “All the Time” principles: have fun, never quit, and do no harm. These principles apply whether I’m coaching teenage girls in a competitive soccer match or managing elementary schoolers in a recreational softball game. They apply during the most unpleasant weather, during early morning games at faraway fields, and even during times of great stress and uncertainty.

Over the past week, my email inbox has gone from trickle to flood with announcements of precautionary measures, postponements, and cancellations, as schools, sports leagues, and local attractions first labored to find the best course of action amid the pandemic and inevitably then opted to shut down. Within this necessary abundance of caution, the missing piece in the last wave of cancellation messages has been proposed alternatives.

And for those in leadership positions, that’s the responsibility—to assess a given situation and say “Okay, here’s what’s next.”

Among other teams, I currently coach the Girls 2009 Flex soccer team for the DMCV Sharks soccer club in San Diego. We have 14 multisport athletes on this team, girls who also play softball, baseball (you got that right), basketball, flag football (damn straight), and even one starting to run cross country. For this group of high-energy girls, cancel everything means an awful lot of cancelling.

To stem the tide of shutdown and postponements, I’m launching a YES, Informed Continuity program to keep the team active, motivated, connected, and, above-all, safe, explains @CoachsVision. Share on X

To stem the tide of shutdowns and postponements, I chose this team to launch a YES IC (Yes, Informed Continuity) program to keep the girls active, motivated, engaged, connected, and, above-all, safe during the coming weeks and/or months. It follows a simple progression:

  1. Active Anywhere (home-based independent activities)
  2. Own the Game (structured, partner-based games and challenges)
  3. Different Formation, Same Team (small group sessions)

This program is a road map for what coaches are tasked to do in the first place: provide structure and strategy where there was none. As the managing editor for the blog here at SimpliFaster, I’m hoping we can use our platform and community as a hub for coaches to inspire one another to continue leading our athletes through this major disruption in play.

Yes, Informed Continuity

With young athletes, one of the simplest coaching tools is teaching them to change self-talk from what they did wrong (or didn’t do at all) into what they will do right the next time. It is a 180-degree shift in mindset and intent, changing “I pulled my head on that swing” or “I turned toward pressure with the ball” into “I will keep my nose on the ball” or “I will play the way I’m facing.”

In a wave of cancellations and NO’S, this program starts with a YES. It starts with declaring what you can and will do. You don’t suddenly need to be an online coaching expert, says @CoachsVision. Share on X

Importantly, in a wave of cancellations and NO’S, this program starts with a YES. It starts with declaring what you can and will do. You don’t suddenly need to be an online coaching expert or pretend to be that which you are not. Follow the simple principles: have fun, never quit, do no harm.

Phase 1 – Active Anywhere

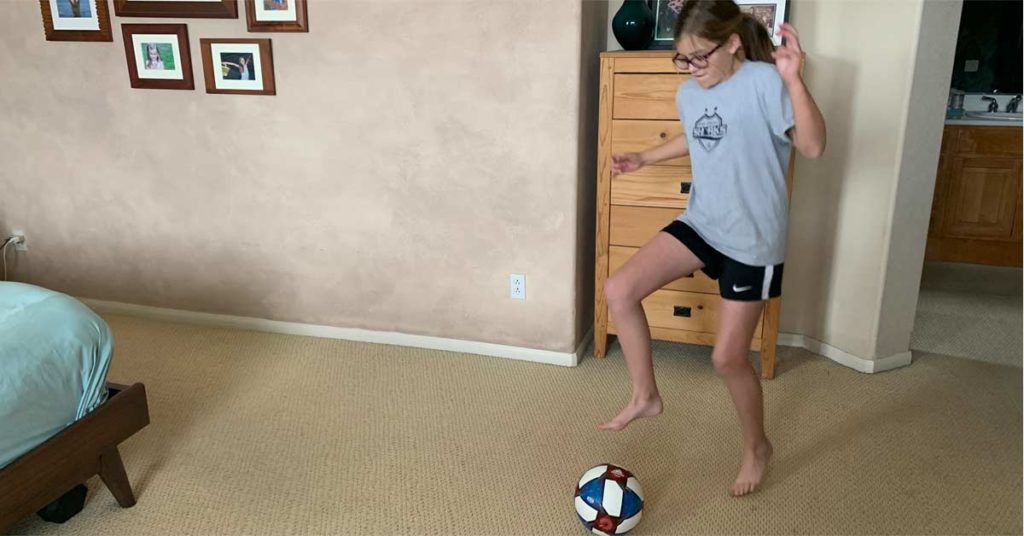
During this initial period of nebulous, near-quarantine for my team, I promised to provide at least two structured weekly activities that the players can do at home (or anywhere). Are we looking for amazing individual athletic gains? No—we are simply adding something where suddenly there was nothing.

Continuity. Kids need it—when you’re small, continuity is what gives the world shape.

Like most teams, we have a team scheduling app with a calendar, messaging, and player availability features. Rather than using the “Availability” tab to confirm the intent to attend a team activity, for my ’09 Flex team we will begin using our Team Snap account to show that they have independently completed our planned team activity. The “Yes” tab becomes “I have done it.”

In addition to marking completion via our scheduling app, I will encourage my players to connect with their teammates via FaceTime, text, or any medium of their choosing before and after each planned activity. This is crucial. Practice, games, and tournaments may be stricken from the calendar, but the team and LTAD carry on. Never quit.

What does this look like? Again, you don’t need to become an online coaching savant. For the 9- and 10-year-old girls on my soccer team, here’s what we’ll be doing this coming week in our two planned sessions:

Session 1: Movement Basics

WARM-UP (Standing or Walking):

  • 10 x Frankenstein Toe Touches
  • 5 x each leg RDL Toe Touches 
  • 10 x Knee-to-Chest Hugs
  • 10 x Open & Close the Gate
  • 10 x Flamingo Lunges
  • 10 x Grass/Carpet Pickers (or substitute “Runners” Wall Stretch)
  • 10 x Side Lunges

LEGS & JUMPS

  • 2 x 10 Walking or Standing Lunges (BONUS: add ~3 lb. barbells in each hand)
  • 3 x 20 Jumping Jacks
  • 2 x 10 Tuck Jumps
  • 3 x 10 Bodyweight Squats
  • 2 x 10 Star Jumps
  • 2 x 5 Squats holding to a count of 10 at the bottom range of each
  • 2 x 10 Skater Jumps

ARMS & CORE

  • 5 x 2 Push-Ups (quality over quantity!)
  • 3 x 30-second Planks
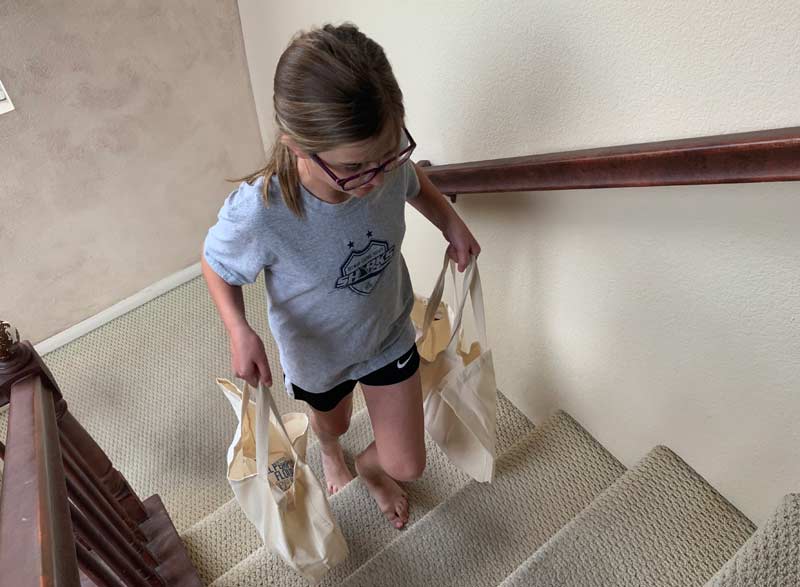
  • 3 x 30-second “Farmer’s Carry”  (For this they can use light dumbbells, 5 lb. bags of flour in grocery bags, books in handled bags… Just keep each side relatively equal.)
  • 2 x 10 Reverse Crunches 
  • 2 x 20-second Single-Leg Planks (each leg)

BONUS CHALLENGE

  • 5 Stick and Land Stair Jumps (Jump from stair to wide landing with safe two-leg landing)
  • Banded Shuffles (If you have resistance bands. If not, regular shuffling can substitute.)
  • Standing Broad Jumps (three jumps out, three jumps back, space providing)
  • Pull-Ups or Chin-Ups
  • Flour Sacks Carry
    Image 2. Your players will all have unique features in their homes. For young athletes, challenge them to be creative with stairs, light weights (here, two grocery sacks with 5 lb bags of flour), or other opportunities their homes present. Less for specific results and more to connect their creativity with the physical side.

Session 2: Individual Ball Skills

WARM-UP (same)

BASIC SKILLS & FITNESS

  • 3 x 25 Toe Taps
  • 3 x 25 Bells
  • 3 x 25 Sole Rollovers
  • 3 x 10 Squats holding ball overhead
  • 2 x 10 Hand Walks
  • 3 x 10 Star Jumps

ADVANCED SKILLS (Watch full three-minute demo by Yael Averbuch first. Then, replay going through each skill individually, pausing the clip and executing for two minutes before moving forward to the next skill.)

  • Single Foot Cuts
  • Roll to Cut
  • 2-Footed Cuts
  • Tap-Tap Roll
  • 4-Touch “Tab Ramos” Combo
  • “Pulling” Sole-V Inside
  • “Pulling” Sole-V Outside
  • “Pulling” Sole-V Behind the Back
  • Scissor
  • Step-Over

CHALLENGE

  • Not-A-Soccer-Ball-Juggling. Using a tennis ball, racquet ball, whiffle ball, or any ball of choice, set a baseline number in your first three juggling attempts and then continue juggling until you beat that number by three.
Ideally, Phase 1 will be one of weeks and not months, but plan in a way that is sustainable, says @CoachsVision. Share on X

These Phase 1 activities are the types of things I forward to my players during rainy weeks or stretches when field access is limited. Ideally, this initial phase will be one of weeks and not months, but plan in a way that is sustainable and be prepared to move directly to Phase 2 as soon as doing so falls within your club/league/community guidelines.

Phase 2 – Own the Game

At this point, we begin regaining control of what has been taken away and move out of solo, home-based activities and into sessions that can be conducted with a teammate, sibling, or friend. For my soccer players, this will take the form of planned wall skills and games they can play on school/park handball walls, soccer “tennis” volleying games on grass or blacktop, and non-contact shooting games on local fields.

Because kids have opportunities to play year-round, they’ve had fewer opportunities to adapt the game on their own, so in this phase they will need explicit instructions in order for these sessions to resemble a true team activity and not a playdate. (This is not to denigrate pick-up games and informal, sports-based play—those are vital and necessary for kids, but simply fall into a different category.)

For these sessions, I’ll be sending the partner-based activity to my team with a warm-up, progression, rules, and approximate times so there is a plan to follow.

Session 1: Soccer H-O-R-S-E

WARM-UP (10 minutes)

  • Team Dynamic Stretching Routine (3 minutes)
  • Mobility Warm-Up. Mark ~20 linear yards for: Skips, Carioca Runs, Side Shuffles, Backpedal, 3 Steps-Forward 2 Steps-Back, Full Sprint (5 minutes)

SKILL (20 minutes)

  • Dribble Vectors. Begin at middle of marked 20 yards and dribble for 6–7 touches in any direction, then perform one of the 10 Advanced Skills. Continue pattern without expanding beyond a reasonable diameter of space (2 minutes on, 30 seconds off, for 10 minutes total).
  • Partner Passing. Two-touch passing, either foot. Two-touch passing, same foot (do right, then left). One-touch passing. Throw-in, trap, return pass. (2 minutes each, 10 minutes total).

PLAY: Soccer H-O-R-S-E (30 minutes)

  • There are nine “Zones” the players can shoot for: Lower Left, Middle Left, Upper Left, Lower Center, Mid-Center, Upper Center, Lower Right, Middle Right, Upper Right.
  • Player #1 selects the spot they will be shooting from and announces the target zone they will be shooting for. If their shot hits that zone, Player #2 must execute the same shot. If Player #2 fails to execute the made shot, they have the letter “H.” If Player #1 does not make their initial shot, Player #2 can then select any spot to shoot from and any target zone for their own shot.
  • If Player #1 makes their shot and Player #2 also makes the shot, Player #1 selects a new spot to shoot from and a new target zone. Players cannot repeat a made shot during the same game.
  • Alternate in this manner until a player has the letters H-O-R-S-E. Try to complete three full games in 30 minutes.

CHALLENGE (10–15 minutes)

  • Alphabet Juggling: Juggle ball with partner announcing a letter (A, B, C, D) for each successful exchange from partner to partner in the air. See how far in the alphabet you and your partner can go without the ball hitting the ground.

Phase 3 – Different Formation, Same Team

Whatever the timeline presented as each community moves through the crisis, this final stage is a transition toward the resumption of regular team activities. Each step represents defined progress, which is again key when coaching young athletes—they respond to forward movement and understand where they’re going based on where they’ve been.

Defined progress is key when coaching young athletes—they respond to forward movement and understand where they’re going based on where they’ve been, says @CoachsVision. Share on X

So, when circumstances safely allow it, I’ll resume modified in-person coaching for my Flex team and plan small group and non-contact team activities, such as a range of fitness-based activities (beach, trail, and hill runs) to accompany partial or full groups for skills, drills, and games. Whether this phase is four weeks or four months out, it is difficult to be predictive in terms of what “best practices” for one of these sessions might look like…. Are small-sided games advisable or inadvisable? Should a team of 14 come out as a full group, two groups of 7, or three groups of 5-5-4? Those are specific details every coach can adjust to within the phase—the important thing is having the confidence and a plan to get here.

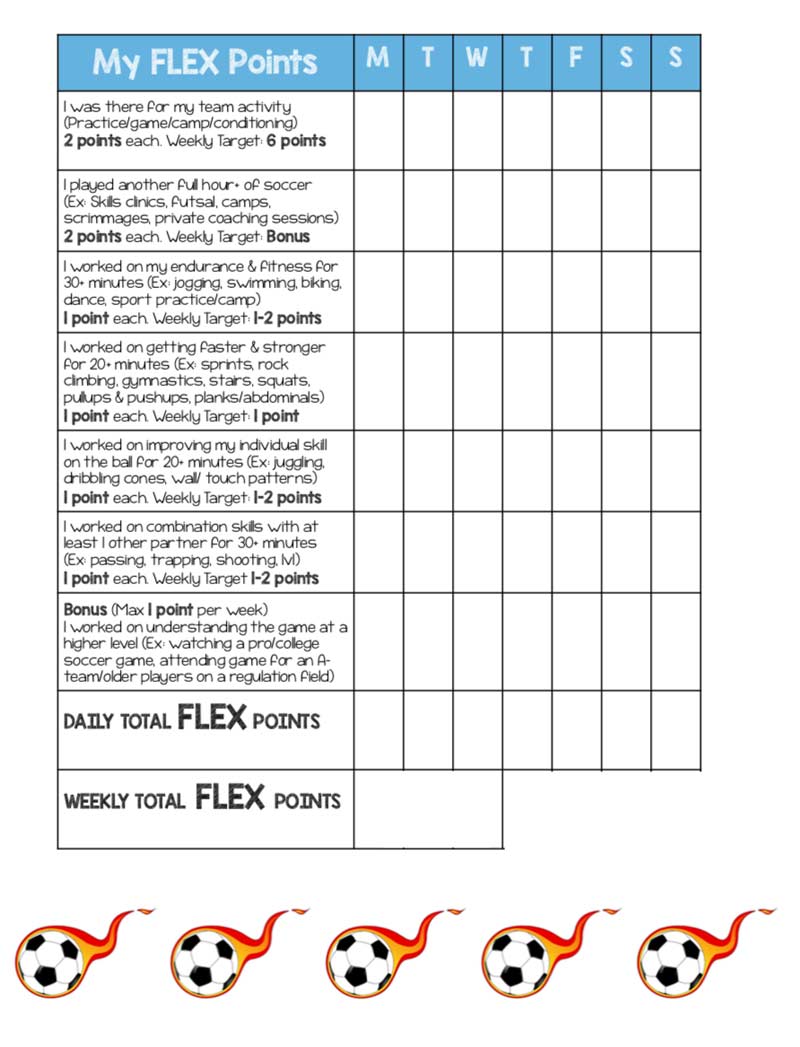
On this path, assign your athletes an activity journal to keep them motivated, competitive, and accountable within the team. Many SimpliFaster followers have adopted Tony Holler’s “Record, Rank, Publish” ethos for speed and weight room training, and the same simple concept applies even in uncommon circumstances. For years, I’ve used the sheet below for my multisport athletes to track their activities and track/reward their efforts across a range of fields. We hold occasional one- or two-week competitions with prizes, while also encouraging the kids to consistently track their progress in a self-directed manner.

Flex YES IC
Image 2. Coaches can create a simple weekly tracking system for players to score points with a range of activities for a range of qualities.

#YesIC

As you’ve been reading this, hopefully you’ve come up with better ideas than these for remote sessions; or perhaps you already had those better ideas but didn’t have the platform to send them.

This program is a simple outline, waiting to be filled in. We’ll be following and sharing #YesIC on our social media pages, where coaches can ideally offer their own ideas for workouts, team communication strategies, and safe best practices—providing the Informed element of Informed Continuity that SimpliFaster’s community of coaches and performance professionals is uniquely able to contribute. The floor is open. You can  also send ideas, workout plans, and video clips to me via email: [email protected] and we will make every effort to continue supporting coaches and athletes regardless of the challenges our current moment in time presents.

You got this. Remember: have fun, never quit, and do no harm.

Since you’re here…
…we have a small favor to ask. More people are reading SimpliFaster than ever, and each week we bring you compelling content from coaches, sport scientists, and physiotherapists who are devoted to building better athletes. Please take a moment to share the articles on social media, engage the authors with questions and comments below, and link to articles when appropriate if you have a blog or participate on forums of related topics. — SF


Adarian Barr

Episode 64: Adarian Barr

Joel Smith: Just Fly Performance Podcast, Podcast| ByMark Hoover

Adarian Barr

Adarian Barr is a Track and Field Coach and Owner of Barrunning, a company based out of Woodland, California, that teaches athletes the fundamentals of balance and the role of the foot in human performance. His collegiate track and field coaching stops have included UW-Superior, Indiana State, and UNC Pembroke. Adarian has invented nine devices, from footwear to sleds to exercise devices.

Coach Barr earned a Bachelor of Arts in Political Science from California State University in 1996 and a Master of Arts in Health, Physical Education and Fitness from Cal State-Chico in 2000. He is a USATF Level II coach in the sprints, jumps, hurdles, and relays. His work on speed and biomechanics is being adapted by many coaches who want a deeper understanding into the innate function of the body.

Adarian gives us insight into his ideas on sprinting, timing, and why a variety of modern coaching cues and ideas on sprinting don’t work. He talks about when and when not to cue, sprint posture and breathing, foot strike, and other areas of his unique coaching style.

In this podcast, Coach Adarian Barr and Joel discuss:

  • His unique style of coaching.
  • His philosophies on sprinting and timing.
  • Correct posture, breathing, and arm positioning for sprinting.
  • Proper lower limb mechanics.
  • Creating vertical lift with the arms.
  • Creating torque to apply force.

Podcast total run time is 1:03:41.

Keywords: track and field, sprinting, sprint mechanics, timing

Jovanovic Review

Strength Training Manual: The Agile Periodization Approach Book Review

Blog, Book Reviews| ByChris Gallagher

Jovanovic Review


Mladen Jovanovic’s Strength Training Manual: The Agile Periodization Approach is an unconventional and creative perspective on planning and organizing strength training. This first book represents Volumes 1 and 2 of the full work and is, by the author’s admission, more theory-based. (He plans for Volume 3 to have a more practical application.) The evolution in the author’s writing, from his early articles to this latest text, is readily apparent.

Mladen is far more widely read and researched on topics such as statistics and philosophy than I am, but his articles, his social media, and this book make these topics and concepts more accessible to me and other strength coaches. As much as I believe I am knowledgeable in coaching athletes, training, and physiology, Mladen’s writing highlights how much more I have to learn in some (surprisingly?) related areas. This reinforces the messages of coaches like Stuart McMillan and authors like David Epstein who contend generalists will triumph in a specialized world. The author draws on many areas to inform and instruct his ideas and his approach to training, including philosophy, mathematics and statistics, business, and IT and the software industry.

No matter how smart or experienced we are as coaches, our mental processes will sometimes be wrong. “Agile periodization” is the concept of minimizing the downside. Share on X

All coaches utilize various heuristics, rules of thumb, or assumptions. However, no matter how smart or experienced we are, by their very nature these mental processes will be wrong from time to time. The major theme of “agile periodization,” introduced early in the manual, is the concept of minimizing the downside.

In statistical terms, we want these errors to be type I (underestimating) rather than type II (overestimating). At its worst, a type II error may be catastrophic (injury). A type I error may mean the athlete is undercooked from a training point of view, but they will live to fight another day. This a central tenet of agile periodization: the analogy of slow cooking the athlete with respect to strength training.

Risk Figure
Figure 1. Illustration of the Barbell Strategy, an important concept underlying agile periodization. Protect from the downside by putting more emphasis on low risk/low reward training strategies while investing a smaller amount of your resources into higher risk activities or overemphasizing individual qualities.


I have to be honest in that I personally found some of the first chapter dry and hard-going, but it is important to understand the thought processes and perspective of the author for the rest of the book. (Mladen admits “he is pretty sure going through this chapter was painful” for the reader.) I found myself re-reading several sentences or paragraphs to fully digest the meaning. The author provides examples of how this scientific, statistical, philosophical knowledge impacts his approach to planning and coaching, so it is valuable, and it is only one section of the book that helps set the scene for what follows in the three volumes.

Mladen’s personality comes through in the writing, which ensures some of the drier scientific text is more reader-friendly. The use of personal anecdotes, everyman language and stories, and self-deprecating humor makes for a more engaging read, which is essential for such a thick and concept-dense textbook. A picture speaks a thousand words. Although the book is thick and contains a lot of info, the text is regularly broken up with graphs and charts that succinctly illustrate the meaning of the associated text and make the information easier on the eye.

The Strength Training Manual provides novel takes on classical training theory. For example, it introduced me to Mladen’s adaptation of Dan John’s system of classifying strength training. (Check out the book for yourself if you, too, are unfamiliar with this.) Looking at existing problems from new perspectives can only be of benefit to us all and perhaps allows us to see new and alternative solutions to age-old questions and problems.

“One cannot jump phases,

the simplicity of an expert can be seen as the ignorance of the beginner.”

At a superficial level the book is a basic training manual: how to program training, how to select exercises, how to tackle important qualities. At a deeper level it gets you to think more intently about your training philosophies; what you believe is important and why. And, more importantly, to realize that while you have some guiding principles, you need to have an appropriate amount of flexibility in these principles to adapt to new situations and environments. Or at least to consider if your existing training mantra is robust enough to apply in situations and environments other than the one in which you presently operate.

This book makes you consider whether your existing training mantra is robust enough to apply in situations and environments other than the one in which you presently operate. Share on X

This is not to say you must go out and apply any of Mladen’s categorization methods. (The author himself cautions against doing this blindly; instead exhorting you to decide what is important for you in your situation.) It is merely a question to ask if you need to reconsider how you think about training programming and theory beyond the entrenched training lore.

The Strength Training Manual gives you an insight into the psyche of a practitioner who clearly thinks deeply about his craft and researches strength training and many related (some loosely, some more directly) fields. It is a great opportunity to peer into the mind of a creative and unorthodox thinker. For example, an important concept Mladen touches on is whether to employ a bottom-up or top-down approach to training. There are compelling arguments on either side of that debate. Purchase the book to read a comprehensive, reasoned analysis of this question from Mladen.

Volumes 1 and 2 are, again by the author’s admission, heavy on the theory side. But there are nuggets of wisdom from a practical perspective. For example, organizing training when equipment is limited and/or athlete capability or proficiency is mixed, or, for example, running multiple stations with varying dependency on coaching input.

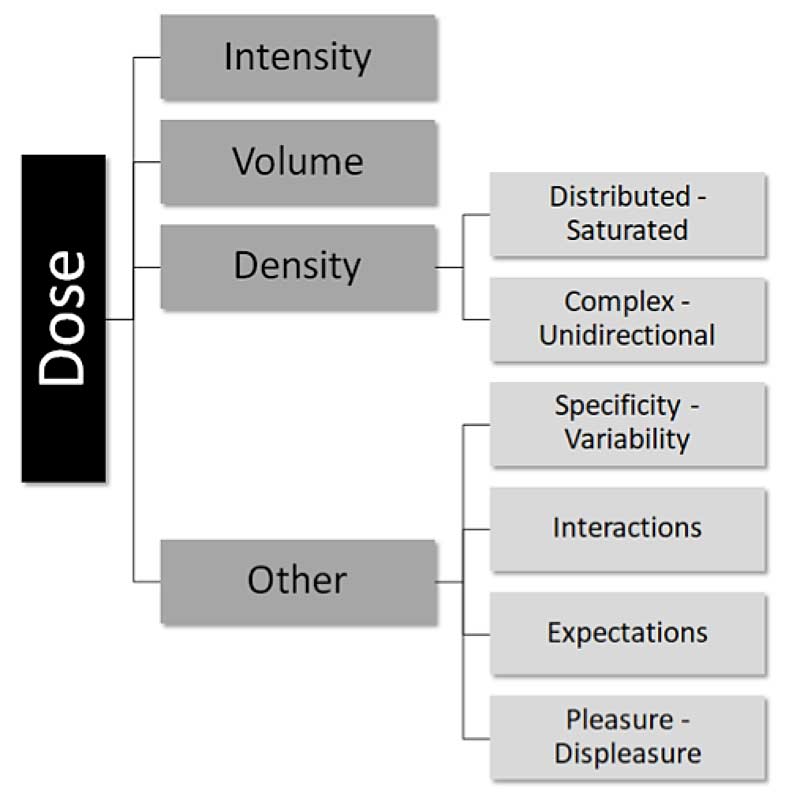
Training Dose
Figure 2. Seemingly basic training constructs may in fact be far more complex than they initially appear. For example, training dose is not as simple as intensity and volume.


There may be a dichotomy between the seemingly “optimal” program and the robustness of the program in a real-world applied setting (i.e., what happens when someone misses one of the optimal sessions?).

In the middle chapters the book perhaps dives down a few mathematical and statistical rabbit holes. Mladen introduces many novel ways of analyzing, interpreting, or classifying training methods. This can be daunting and confusing for the reader. But it can also be seen as a window into the complex and interconnected way he looks at physiological and training concepts—the plurality of the many small-world models, as Mladen likes to refer to it.

We must be cautious in applying small-world, scientific, optimal “truths” to the real world of athlete development. Share on X

As Mladen frequently points out, laboratory-based, scientifically “proven” constructs depend upon simplification of the real world into “small world” models that permit scientific rigor and validity. But it is for these very reasons that we must be cautious in applying small-world, scientific, optimal “truths” to the real world of athlete development. That is not to say this scientific data is not useful, but a reminder that it is only one piece of evidence-based practice rather than the whole story.

Agile Periodization
Figure 3. Agile periodization is founded upon the concept of progressing training through iterations. Each training cycle provides an opportunity to analyze the athlete’s response to the latest n=1 training study and inform future iterations.


Agile periodization is characterized by the concept of “estimation through iteration,” and I see instances of this in my own coaching and programming methodology. An example of this may be the use of embedded testing to inform and guide subsequent training cycle loading. (Perhaps embedded testing is an intuitive deduction of experienced coaches?)

If you take even just one new idea away from a book, it has been worth the time invested. One such example here was introducing me to Paul Carter’s concept of pre-work sets. I have used some of these ideas in a small way before; for example, walking out and holding an even heavier weight before attempting a heavy squat. But I didn’t have a name for these methods and the “pre-work” sets described in this book encompass this and other ideas with which I haven’t yet experimented.

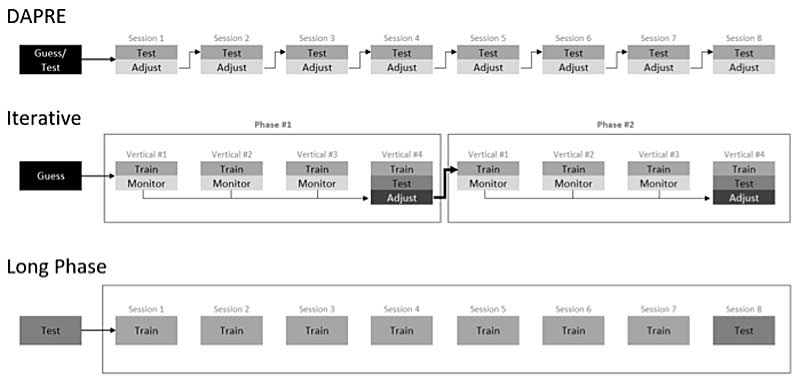
The final chapters present a comprehensive catalog of planning and programming routines alongside an equally exhaustive list of regulating systems (e.g., APRE) This could be both a strength and weakness of the text with the volume and detail of information perhaps overwhelming for some. This exposes the reader to a smorgasbord of options for organizing training sessions and cycles. But it could also lead to paralysis by analysis or variety for its own sake if they don’t have a strongly grounded training philosophy. (This supports Mladen’s own assertion within the text that it is perhaps more suitable for more experienced coaches who have a greater wealth of coaching experience to draw on when deciding what tools or methods to employ).

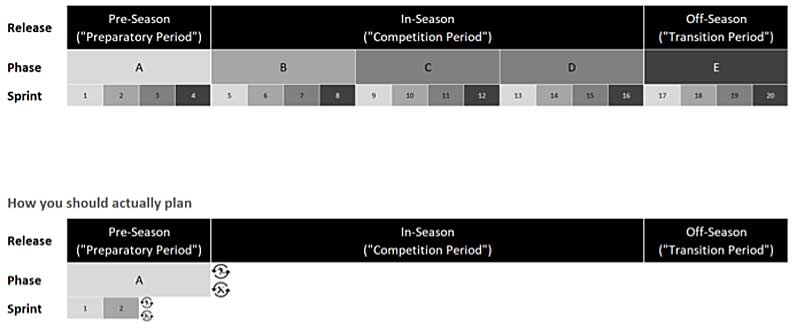
Contemporary vs Agile
Figure 4. Illustration of the differences between “contemporary” periodization and annual planning and Mladen’s agile periodization.


Toward the end of the text, Mladen provides the example in figure 4 of how agile periodization compares and contrasts with traditional periodization and annual planning. The overarching philosophy is to know where we are heading with respect to the ultimate training goal and destination, but to only plan one or two cycles into the future. Here I see strong parallels with Stuart McMillan’s “micro dictates the macro” ideology. (When several intelligent people say similar things, there’s a good chance they are onto something!)

Not Easy, but Worth It

I am paraphrasing here, but a simple synopsis of the content and message of the manual could be as follows: rather than trying to write the optimal program, try to find the most robust solution that will satisfy your aims when assumptions are proven wrong.

To paraphrase, rather than try to write the optimal program, try to find the most robust solution that will satisfy your aims when assumptions are proven wrong. Share on X

Don’t expect an easy read with Strength Training Manual: The Agile Periodization Approach. As with most things in life, you only get out of it what you put in. Invest some time reading the book and ruminating on the information it contains. You are sure to be rewarded with new insights and invaluable training knowledge and personal reflections.

This first book, consisting of Volumes 1 and 2, contains a fairly comprehensive collection of training planning and progression strategies. If nothing else, it may serve as an extensive reference resource for creating your own training templates. Mladen promises more to come in Volume 3.

Since you’re here…
…we have a small favor to ask. More people are reading SimpliFaster than ever, and each week we bring you compelling content from coaches, sport scientists, and physiotherapists who are devoted to building better athletes. Please take a moment to share the articles on social media, engage the authors with questions and comments below, and link to articles when appropriate if you have a blog or participate on forums of related topics. — SF


Josse 2

Episode 63: Cameron Josse

Joel Smith: Just Fly Performance Podcast, Podcast| ByMark Hoover

Josse 2

Cameron Josse is the Athletic Performance Coach for Indiana University’s football program. Before that, he served as the Associate Director of Football Performance for the University of Charlotte, and prior to that position he was the Director of Sports Performance for DeFranco’s Training Systems in New Jersey. He also has spent time at The University of South Carolina as a sports performance intern working with football, men’s soccer, and track and field.

Josse is a 2013 graduate of the University of Rhode Island, where he earned a bachelor’s degree in kinesiology. While at Rhode Island Josse played defensive back for the Ram’s football team. He earned his master’s degree in exercise science from William Paterson University of Jersey. Coach Josse is certified through the NSCA as a Certified Strength and Conditioning Specialist (CSCS) and also holds certifications as a Certified Physical Preparation Specialist (CPPS) and a Functional Range Conditioning Mobility Specialist.

Cameron gives us his speed-building ideology, along with lessons he has learned from Joe DeFranco’s legendary training templates. He covers insights he has gained from his heavy-resisted sled training cycles, special strength for speed, top exercises for speed specific to acceleration with technical considerations of common football sprint patterning, and lifting progressions for athletes from all levels.

In this podcast, Coach Cameron Josse discusses with Joel:

  • Rationale for the use of his heavy sled protocols.
  • Lessons learned and adjustments he will make after his latest heavy sled training cycle.
  • Using special strength exercises to improve sprint performance.
  • Creating a self-corrective training environment.
  • Max speed differences between football players and track athletes.
  • Sprint mechanics.

Coach Josse can be found at SimpliFaster, where he has written about power and speed training for American football players, change of direction drills, and more.

Podcast total run time is 1:03:17.

Keywords: sled training, sprinting, top end speed, combine training

Stretch Anatomy

Combining Movement Quality and Muscle Power with Nicole Foley

Freelap Friday Five| ByNicole Foley

Stretch Anatomy


Nicole Foley is an assistant coach of East Coast Gold Weightlifting, one of the most decorated and renowned national teams in the country. Inside of ECG headquarters, she has developed and grown a youth/junior weightlifting program, and she is the Events Coordinator and Meet Director. Coach Foley is also the Co-Founder of Rude-Rock Strength and Conditioning and works as an independent contractor out of the Iron Asylum (Virginia Beach, VA), where she is a strength coach and the resident Olympic Weightlifting coach. Nicole is the Social Media/Marketing Coordinator for East Coast Gold Weightlifting and several other exercise-based companies.

Nicole received her BA in Dance and Corporate Communications from James Madison University and her MS Ed. in Sport Management from Old Dominion University. From 2015–2019 she was the Head Coach of the Old Dominion University Dynasty Dance Team, capping off a 15-year career as a dance coach and instructor. She is recognized through the NSCA as a Certified Strength and Conditioning Specialist. Through USA Weightlifting she has received her Advanced Sport Performance certification and has coached athletes at the national level.

Freelap USA: You have a solid background in weightlifting and coach those lifts with some of your clients. Due to your passion for the sport, how do you manage your natural bias (the one we all have as humans)? Do coaches sometimes overcompensate and not use the lifts at all for fear they will appear biased?

Nicole Foley: Splitting my time as an Olympic weightlifting coach, a strength and conditioning coach, and a personal trainer comes with its obstacles; however, it also comes with some great rewards. As an independent contractor at the Iron Asylum, I have a wide variety of clients: from general population weight loss clients to Olympic weightlifters with aspirations of competing, and everything in between. I always let the athlete’s goals and needs dictate the programming direction. After a thorough assessment of the athlete, I decide whether weightlifting is the best tool to use with them or not.

I always let the athlete’s goals & needs dictate the programming direction. After a thorough assessment of the athlete, I decide if weightlifting is the best tool to use with them, says @nicc__marie. Share on X

If an athlete wants to be more explosive and has the movement capability to perform the Olympic lifts, then I will 1000% incorporate some variations of the lifts and their respective accessories. That doesn’t mean I will build the entire program around Olympic weightlifting. On the other end, if a person seems apprehensive about the lifts and coaching the lifts wouldn’t be any more beneficial to their program goals than any other movement, then why force something on someone? In my experience, the more I work with a person and they see my training or some of the weightlifters I work with, their curiosity begins to grow.

About a year and a half ago, I had a runner come to me wanting to improve her mile times and training splits. She didn’t know much about Olympic weightlifting aside from what she saw through CrossFit but knew that she needed strength training in order to help improve her sport. As we progressed, she began to enjoy the feeling and intensity of lifting heavy weight more than her weekly 8+ milers and training split protocols. She grew curious in the gym and began asking about Olympic weightlifting and if I thought it would be something she could try. After working together for several months, I knew it was time to feed her curiosity, so I began incorporating clean pulls and power cleans into her programming.

Eventually, she found herself more excited to come to the gym to train than to lace up her sneakers and hit the road. One day she came to my wide-eyed and said, “I don’t want to run anymore. I want to weightlift, and maybe one day compete at a local meet.” From that day forward we made the transition, and now her training program is reflective of a true Olympic weightlifting program: incorporating the main lifts, weightlifting accessories such as pulls or snatch balances, strength lifts, mobility work, and general accessories.

Freelap USA: Weightlifting is a sport and can benefit from the strength and conditioning coaches who understand the needs of preparation. Can you share how you may do things differently than other weightlifting coaches?

Nicole Foley: In traditional sports, athletes have strength and conditioning and then sport-specific practice. For a weightlifter, our sport-specific practice is in the weight room. That doesn’t mean that the only thing we should be focused on are the Olympic lifts. Just like any other athlete, weightlifters need to have strength and conditioning and sport-specific practice.

Now, this is obviously not going to be an S&C program in the traditional sense because we do not want to burn out the athlete to the point that their training suffers. However, it is imperative that weightlifters understand how to move and train to be well-rounded. Weightlifting exists predominantly in the sagittal plane; however, there is more going on than meets the eye. For instance, the rotational mechanics of the glenohumeral joint during a snatch or clean and the accompanying internal rotation torque at the hip during deep flexion are two examples of this.

Moreover, some of the more glaring (and common) non-sagittal movement deviations that we’ve all seen include lateral shifting in the bottom of the squat, torso rotation in the overhead position of the snatch, lateral shifts in jerk recovery, and excessive dynamic valgus knee collapse, to name a few. As coaches, it is our responsibility to correct these deficiencies, but on the platform that athlete is going to do whatever it takes to save a lift. So, it is also our job as coaches to make sure their bodies are prepared for anything.

On the platform the athlete will do whatever it takes to save a lift, so it is our job as coaches to make sure their bodies are prepared for anything, says @nicc__marie. Share on X

At East Coast Gold Weightlifting, I have the good fortune of training and working under my mentor, Phil Sabatini. Phil has an extensive background in the sport of weightlifting and is a former collegiate strength coach and exercise science professor. He taught me how to look at training and coaching weightlifting as more than just the snatch and clean and jerk. As I learned how to dissect the lifts, we spoke about the kinematics and biomechanics of the movements and the muscle actions of the body that can affect various points of the lift. This elucidated more discussion of general strength and conditioning and how we can use that to build a stronger and more sustainable weightlifter.

Every program I write prescribes an appropriate warm-up targeting mobility and/or stability (athlete dependent), along with accessory work to be completed after their main lifts. One thing I have noticed is that old-school coaches provide online programs that only include the Olympic lifts and main strength lifts; warm-up consists of an empty bar, load it and go. However, that could be a disservice to those athletes because not every weightlifter has an athletic background or foundation built to handle such repetitive movement. Even those with a solid strength foundation still need variety in their movement patterns to continue preventing injury and creating resilience.

Freelap USA: How have you changed your mind on exercise selection over the years in training the team sport athlete? Have you replaced any movement or dropped an exercise altogether?

Nicole Foley: My exercise selection hasn’t changed much over the years. It’s Olympic weightlifting: we snatch and clean and jerk, squat, pull, and press. What has evolved are the variations, technical drills, movement explanations, and cueing of the lifts.

These lifts are the most technical movements an athlete can perform. I have grown to recognize which variations I should incorporate more with certain athletes versus others. If I have an athlete who has a low back injury, then I am strategic about how often we pull from the floor and use more block work to provide the necessary training volume without compromising the athlete.

When it comes to coaching, your ability to provide context and general understanding is crucial. It can be difficult to explain to someone how to pull themselves under a bar, but one of the best analogies I’ve ever heard (and “stole”) was from my fellow coach, Brenden McDaniel. He described the timing of using the elbows to pull your hips down like pulling yourself down a waterslide. Never has anything so complex made so much sense.
Being able to improve on how you go about coaching and explaining the lifts is more valuable and practical than simply removing an exercise. There are progressions and regressions that you can utilize based on an athlete’s abilities. It is the instruction that is ever-changing in this sport because, as people change how they communicate with one another and learn from one another, a coach should adapt how they teach.

Freelap USA: Your dance background is a massive advantage for you, as you coached it for years. Can you explain the unique benefit dance has given you for teaching and observing the athlete?

Nicole Foley: Dance and weightlifting in the same sentence is not something you hear often, but the reality is that they are much more linked than you might realize. The goal of a dancer is to be strong, explosive, and able to accelerate and decelerate, move at different tempos, and change direction quickly, all while looking graceful and effortless in their performance. Weightlifting also checks all those boxes. There is a grace and fluidity to the Olympic lifts that only comes with true proficiency.

Dancers spend hours and hours of rehearsal time going through the same movements and movement phrases to perfect every last detail. It is a tireless but necessary process in order to perfect their craft. As a dance coach, you require the ability to look at the same eight-count phrase 20 or more times in search of any discrepancies between dancers to ensure the synchronicity of their body placement, technique, and timing. It is tedious for a coach to clean each movement to perfection, and there are times you will spend an entire rehearsal on one section of a piece and not even look at anything else until the dancers have it just right. The ability to go through this process and not get bored or aggravated with looking at the same thing over and over again is a skill in and of itself.

Weightlifting works in the same manner. You have to be able to look at a lift over and over and over again to see what is happening with the athlete in each individual rep. Then you need the knowledge and understanding of how to correct it. A lot of people look at a clean and see that they made the lift, or they missed the lift. But a coach understands that every make as much as every miss can have some sort of improvement. I spent my entire life looking at the same performances and dissecting them down to the one dancer’s arm being a degree or two out of a position in comparison to the others around them. In weightlifting, it isn’t about the synchronicity of the other lifters around them, but the synchronicity of the athlete and the barbell. Where is the athlete’s weight being distributed as they move through the lift, what is the timing of transitioning under the bar, are they pulling too early, etc.?

In order to perfect the minute details of these highly technical lifts, you have to break down and dissect what the body does as it moves through the positions, says @nicc__marie. Share on X

In order to perfect the minute details of these highly technical lifts, you have to break down and dissect what the body does as it moves through the positions. You need a sharp eye that can navigate through the technique in real time. It can be difficult to watch the same thing over and over again and not get bored, but whether it is my type A personality or my years of coaching dance, I find a calmness to breaking down the movement and enjoy the tedious process of fine-tuning the technique. Either way, I know I wouldn’t have the eye for this if it wasn’t for the endless hours spent cleaning choreography and training my eye to find the slightest changes or differences in movement, and I owe all of that to my first love, dance.

Freelap USA: Strength and conditioning is a very complicated process at times, but it’s often that coaches overthink it. How has your evolution as a coach improved your programming and design of workouts?

Nicole Foley: Confidence, plain and simple. In the beginning, I felt the need to prove how much I knew. I tried to incorporate as many exercises and movements as possible to keep clients from getting bored and to show how smart I was. Up to this point, my subject matter education was an ACE textbook, and I knew I had a lot of work to do.

After meeting my now-husband, Danny Foley, I began to see the opportunities in this field and the importance of understanding the basics. It doesn’t have to be complicated in order to be successful. We spent a lot of long nights studying, and he helped break down academic principles into real-world application. I stopped looking at programming as the Mount Everest of training and started looking at the body, how it moved, and how things felt when moving in a certain pattern. Being able to apply this gave my programming better structure by incorporating exactly what the athlete needed—no more and no less. With this newfound knowledge, my confidence grew, and my programming evolved naturally.

Whereas I used to switch up exercises too quickly in an effort to keep the athlete engaged, I began to understand that this was not an optimal way to develop proficiency and see true progression—especially in weightlifting. Depending on the training age of the athlete and the goal of the program, we spend 3–4 weeks on the same movement variations and provide variety in the accessory movements. It is a lot more difficult to understand and improve a technical deficiency in the lift if you only see that variation once every two months. When I reinforce a movement position or variation for several weeks, the athlete can see their progression and direct their training focus to what their specific lift variation tries to emphasize. Then I use the accessory lifts to progress and challenge the athlete while breaking up some of the monotony of training.

My programming is still evolving as I learn and progress forward in the field, but at the end of the day, consistency is key. Without that consistency, true technical knowledge of the lifts will never develop.

Since you’re here…
…we have a small favor to ask. More people are reading SimpliFaster than ever, and each week we bring you compelling content from coaches, sport scientists, and physiotherapists who are devoted to building better athletes. Please take a moment to share the articles on social media, engage the authors with questions and comments below, and link to articles when appropriate if you have a blog or participate on forums of related topics. — SF


Hurdler

A Five-Phase Model for the 300-Meter Hurdles

Blog| ByTyler Germain

Hurdler


The first time I ran the 300-meter hurdles was a disaster.

I’d been bamboozled by my high school coach, who had convinced me to run track as a sophomore by telling me I’d just be a jumper. “You’ll stay in shape for football,” he said. But when we got off the bus for a meet against Flint Northwestern, he told me I’d be running the hurdles.
I had never run over a hurdle before, but I had eaten two roast beef sandwiches on the bus ride down. What could possibly go wrong?

That day I learned a few things: first, I was a pretty lousy jumper; second, the 300-meter hurdles is just about the hardest race that exists at the high school level; and third, roast beef sandwiches taste a lot better on the way down than they do on the way up. I hope you never have to learn that final lesson the way I did.

I eventually became a decent enough hurdler over the next few years, but that first race was doomed from the start. And while my lack of experience and belly full of beef were certainly contributing factors, there was another: I had no plan.

My experience was not unique. In 16 years of coaching the 300-meter hurdles, I’ve learned that most kids have no plan. They definitely don’t have one that they’ve developed on their own (or, if they do, chances are it’s trash). Some don’t even have one that was given to them by their coaches. Others have been given a plan, but they don’t follow it out of fear of the race, forgetfulness, or the special confidence in their own nonexistent expertise that only a high schooler can have.

I’ve seen kids with gorgeous technique over the hurdles get eaten alive by kids whose form was mediocre at best because they ran the phases with purpose, says @TrackCoachTG. Share on X

So, let’s talk about plans. I want to share with you a 300-meter hurdle model that has worked for me and for the athletes I have coached. I won’t talk much about hurdling mechanics in this piece. Hurdling technique is certainly important, but not nearly as important in the 300 as it is in the 100/110. But even more than that, I’ve seen kids with gorgeous technique over the hurdles get eaten alive by kids whose form was mediocre at best because they ran the phases with purpose. I saw a kid named Emanuel Sledge from Saginaw Arthur Hill (11.10, 22.75) run 39.05 in the 300 hurdles despite looking like he was long jumping every 35 meters. That was in 2006, and it still sticks with me.

Breaking the Race into Phases

I’m not so arrogant to think that this is the only way to run the 300-meter hurdles, but I’m just arrogant enough to say that if your current advice to athletes is some iteration of “run as hard as you can as long as you can” or mostly a hype-speech littered with the words “heart” and “guts,” this race plan will help your kids get better.

The 300-meter hurdle race has eight hurdles and what I consider to be five distinct phases:

  1. The Start (up to and including the first hurdle)
  2. The Backstretch (hurdle 2, leading up to hurdle 3)
  3. The Curve (hurdles 3, 4, and 5)
  4. The Homestretch (hurdles 6, 7, and 8)
  5. The Finish (between the final hurdle and the finish line)

Breaking the race into phases is the equivalent of chunking a project. Like many high school coaches, I’m also a teacher. In the classroom, if I assign a project to students without helping them break it into components and without helping them devise a plan for approaching the project effectively, I’m setting them up for failure. Some will become so overwhelmed that they’re unable to even begin; others will dive in blindly and realize halfway through that they’ve been going about things all wrong. While a certain amount of problem-solving on their part is necessary, I need to at least give them a map to follow.

Whiteboard Race
Image 1. Whiteboard diagram of Coach Germain’s five phases in a 300-meter hurdle race. These are the Start, Backstretch, Curve, Homestretch, and Finish.


“Run as hard as you can as long as you can” sounds deceptively simple, but it doesn’t put kids in the best position to succeed. A five-phase checklist helps athletes from a psychological perspective in that they can focus on executing one component at a time, rather than facing the daunting task for what it is: a 300-meter sprint with stuff in the way.

For some, the idea of this race is so intimidating they’re beaten before the gun has fired. For others, half the race will pass them by before they realize they’re not in it. Obviously, we want to avoid these things at all costs.

1. The Start

As with any sprint race, the start in the 300-meter hurdles is incredibly important. I’ve heard all kinds of terrible advice as it relates to starting this race, including—I kid you not—go out at about 75% and then kick it in at the end. You should never, under any circumstance, coach athletes this way.

I tell my kids all the time, “You might not be able to win the race with your start, but you can definitely lose the race with it.” If an athlete gets out of the blocks too slowly, the rest of the pack will pass them by. The runner who gets out at 100% and the one who gets out at 75% will both be in pain when they cross the finish line. If you’re going to be in pain regardless, then you may as well get out hard and have something to show for it at the end, right? For these reasons, I cue athletes to try to be the first person to the first hurdle.

I cue athletes to try to be the first person to the first hurdle… It’s much easier to run fast when fresh than it is when tired, says @TrackCoachTG. Share on X

The beauty of the 300-meter hurdle race is that there is room for full acceleration, something the 100-/110-meter race does not offer. With 45 meters to work with, athletes can cycle through an entire push phase and transition into an upright sprinting position before approaching the first hurdle. Coach kids to use their explosive energy systems early when they’re readily available to the body. It’s much easier to run fast when fresh than it is when tired. Getting out of the blocks with anything less than accelerating to maximum velocity in mind is a guaranteed way to make sure maximum velocity is never attained, because it definitely isn’t going to come in the final 60 meters of the race.

2. The Backstretch

After coming off the first hurdle, we’ve entered what I call the Backstretch phase. Our athletes should already be running fast here because they accelerated to top speed and cleared the first hurdle with technique so beautiful it could make grown men weep. But while speed is still the priority in the Backstretch phase, it’s much looser­: more like the way we coach kids to run the backstretch of the 400.

The main thing I tell my athletes to do here is a phrase I borrowed from Ryan Banta, author of The Sprinter’s Compendium: “run tall and maintain.” If we tell athletes something else—“float the backstretch” or “relax,” for example—they will inevitably slow down. Slowing down is bad, and we want to avoid it for as long as we can.

Hurdle Race

Telling athletes to run tall reminds them that they should be in an upright sprinting posture between the hurdles; telling them to maintain reminds them that they need to continue to be fast through the second and up to the third hurdle and avoid deceleration.

3. The Curve

As athletes approach the third hurdle, they’re entering the Curve phase. The athletes have now run 100 meters at or near the top speed they can muster, and both speed and mechanics will begin to deteriorate slightly here. Plus, maybe I’ve been uniquely unlucky in my career, but it has been my experience that wind often presents itself most as a factor in the curve. If you coach in a warm-weather state and don’t battle wintery conditions well into April (grumble grumble, mutter mutter), then you might take a different approach here. But for me, I remind kids in the curve of the importance of their forward lean over the hurdle. Even if wind isn’t a factor, there is very little downside to asking athletes to refocus on their technique over the hurdles, so they don’t begin floating or hurdling in an upright position.

There’s very little downside to asking athletes to refocus on their technique over the hurdles so they don’t being floating or hurdling in an upright position, says @TrackCoachTG. Share on X

The cue that I use is to tell my athletes to “hurdle downhill”—in other words, to imagine themselves not as needing to elevate in order to clear the hurdle, but as running at a decline and staying down on the barrier.

I also want my athletes pressing to the inside of the curve with a slight inward lean, which means controlling their eyeballs, feet, and arms. First, I cue athletes to “look two lines in.” What I mean here is not for them to violently turn their head and stare at the runner two lanes inside of them, but to slightly shift their eyes to the left and choose a new focal point that isn’t directly in front of them. They’re not running straight, so focusing straight ahead doesn’t make a lot of sense, and it causes athletes to end up drifting back toward the middle or outside of the lane.

Next, we need to consider the actual foot strike in the sprinting mechanics. Boo Schexnayder talks about using the feet to apply force outwardly when coaching curve running in the high jump approach, and while this curve is much less dramatic than a high jump curve, the basic principle still applies. Finally, arm action should also be slightly altered in the curve, with the outside arm approaching the chin as opposed to the cheek. These three things done in unison will help keep your athletes positioned where they need to be.

At the final hurdle of the Curve, the hurdles are nearly even with one another. At this point, I like using the “slingshot” terminology, not because I actually think kids are going to somehow magically get faster coming out of the turn, but because I want them to think about themselves as re-accelerating, resuming their standard upright, eyes-forward posture, and believing that they can be fast going into the final 100 meters of the race. I want them to think of themselves as getting faster here, even if it’s not actually true, rather than letting negative self-talk creep in and convince them of their own slowness and imminent demise.

4. The Homestretch

I love watching the 300-meter hurdles. There’s something beautiful about the spacing of the hurdles and being able to see exactly where each runner stands each time they go over them. In a 400 or a 200 we can eyeball the stagger and estimate who has made up the most ground, but in the 300-meter hurdles there is a visual marker every 35 meters that lets us know exactly who is in front of whom and by how much.

There might be no more beautiful moment than when the stagger has been completed and all the hurdles line up for the first time in the straightaway of the homestretch. There are right around 80 meters to go, and the sixth hurdle tells the tale of how successful your first five were.

For most athletes, the homestretch is the hardest part of the race, and with good reason. With every second that passes, it becomes harder for the body to coordinate explosive movement and overall stability, and technique is often the first thing to go when fatigue sets in. At this point, I prompt athletes to focus on that coordination.

What I cue will depend on what I see my athlete doing at this phase of the race, and it may even change from day to day when we work on the different phases in practice. I might tell them “tall!” or “fast hands!” as they sprint between the hurdles. I might remind them “down!” over the hurdle to keep them from elevating and to remind them that they’re faster when they’re on the track than when they’re sailing over the barrier. I want trail legs snapping “back to the middle and down” so they can continue sprinting.

Speaking of sprinting, the way we coach our athletes’ sprinting technique and how we train speed endurance matters more in the Homestretch than anywhere else in the race, largely because of how it directly impacts hurdling technique. Simply put, if kids are too slow and their force production has diminished too greatly, they will not have enough speed to carry them through the barrier efficiently. This can manifest as:

  1. The athlete slowing down even more as they approach the hurdle because they’re afraid they might not have enough speed to get over.
  2. Jumping over the hurdle and landing in a near standstill while other athletes pass them by.

Hurdle technique matters, but if they don’t maintain sprinting technique, then optimal hurdle technique isn’t going to happen anyway.

Hurdle technique matters, but if they don’t maintain sprinting technique, then optimal hurdle technique isn’t going to happen anyway, says @TrackCoachTG. Share on X

The last hurdle seems like it’s a foot taller than the others. It has always been this way, it always will be, and I’m still not sure it isn’t taller than the others. There is nothing I can tell you to offset this phenomenon. Good luck.

5. The Finish

There are only eight physical hurdles in this race, but there is one last mental hurdle that needs to be cleared: After touchdown on the final hurdle, there are still 10 meters to go before the finish line. Every hurdle coach in the world has watched a kid get passed in the final 10 meters of the race because they did not sprint off the final hurdle. They’re exhausted. They’re in pain. In their mind, the race is over. We cannot let this happen.

Every point matters, and sometimes the final 10 meters is the difference between winning and coming in second, or scoring a point in eighth and not scoring at all. Sometimes it’s the difference between a PR and coming up short. These are 10 important meters.

In my practices, we never finish at the finish line. When we work on the final phase of the race, I put cones another 5–10 meters beyond the finish line, and athletes need to sprint through the cones. I coach my athletes to “catch one!” after touchdown on the final hurdle—meaning, pick the closest person and try to beat them through the line. If they’re in the lead, well, they have to finish hard to avoid getting caught.

After touchdown on the final hurdle, there are still 10 meters to go before the finish line…Drill this phase until it becomes second nature to kids, says @TrackCoachTG. Share on X

Here’s the thing. All of this seems so obvious that it almost feels silly to mention it. Maybe you haven’t mentioned it to your kids for that very reason: Of course athletes need to sprint through the line in every race. But it has been my observation that in the 300-meter hurdles more than any other race, kids don’t do it. And if we don’t convince them of it in practice and teach the finish as a distinct phase that isn’t bound by a white line on a track, but as a final, 15-meter, all-out, everything-they’ve-got (heart! guts!) sprint, we can almost guarantee that some day they will experience being passed because, in their mind, they were done.

Drill this phase until it becomes second nature to kids. Show them video of athletes who didn’t finish and cost themselves because of it (see at the 5:25 mark here). The last hurdle is not the finish line.

Taking It to the Track

So, there you have it: a plan you can put in place today that will give your 300-meter hurdlers a tangible strategy for success in the hardest race on the track. To recap, here are the phases and their cues:

  • The Start—Be the first person to the first hurdle
  • The Backstretch—Run tall and maintain
  • The Curve—Look two lines in; hurdle downhill; slingshot
  • The Homestretch—Run tall; fast hands; stay down
  • The Finish—Catch one, sprint, through the line

Just make sure they don’t eat any roast beef sandwiches on the bus.

Since you’re here…
…we have a small favor to ask. More people are reading SimpliFaster than ever, and each week we bring you compelling content from coaches, sport scientists, and physiotherapists who are devoted to building better athletes. Please take a moment to share the articles on social media, engage the authors with questions and comments below, and link to articles when appropriate if you have a blog or participate on forums of related topics. — SF


Splichal

Episode 62: Dr. Emily Splichal

Joel Smith: Just Fly Performance Podcast, Podcast| ByMark Hoover

Splichal

Dr. Emily Splichal is a podiatrist, human movement specialist, and consultant, and a leader in barefoot science, rehabilitation, and performance. She is the Founder of the Evidence Based Fitness Academy, creator of multiple barefoot training courses, and inventor of Naboso Barefoot Technology. Dr. Splichal has more than 16 years in the fitness/performance field. She is actively involved in barefoot training research and education to improve athletic performance, reduce injury, and improve movement.

Dr. Splichal earned a B.S. in Biology/Forensic Science from Hamline University before getting her Doctor of Pediatric Medicine degree from the New York College of Podiatric Medicine in 2008. She added a master’s degree in human movement from A.T. Still University. She trained as a surgeon through Beth Israel Medical Center in New York, NY, and Mount Vernon Hospital in Mt. Vernon, NY. Splichal is currently enrolled in a Fellowship for Anti-Aging and Regenerative Medicine from the American Academy of Anti-Aging Medicine George Washington University.

Dr. Splichal gives us an in-depth look into the feet and their impact on performance. She shares her thoughts on how we coach and cue the feet in training and lifting movements. She dives into the critical muscles that support the arch and stiffness of the foot, and how to optimally train them for maximum performance and health.

In this podcast, Dr. Emily Splichal and Joel discuss;

  • Training the foot for maximum speed and quickness.
  • Toe gripping and potential outcomes related to performance.
  • Cueing the foot to improve strength in the weight room.
  • Drills to improve strength of the foot.
  • Foot type most conducive to speed.
  • The importance of foot and core being connected.

Podcast total run time is 52:36.

Dr. Splichal can be found at her website, and in a Friday Five interview on SimpliFaster.

Keywords: foot training, movement skills, speed, cueing

Falling

Why We Should Teach Athletes How to Fall

Blog| ByChristopher Tocco

Falling


One of the first lessons that Marines learn in Basic Training is the art of falling. It wasn’t until I got into strength and conditioning that I realized how versatile and vital that lesson proved to be. I have fallen with a fully loaded rifle when rolling to cover from enemy fire. I have fallen in a soccer game with a “friendly” assist from an opponent. I’ve slipped on a patch of ice outside of a local watering hole during the dead of winter. Knowing how to fall saved me from a potentially catastrophic injury in each circumstance.

Teaching athletes the proper ways to fall can simultaneously train their vestibular systems, their coordination, and their proprioception. Share on X

The ability to fall correctly, however, goes beyond injury prevention. Teaching athletes the proper ways to fall can simultaneously train their vestibular systems, their coordination, and their proprioception. Consider a parkour athlete’s ability to jump and roll out of extreme heights without injury. This isn’t some genetic gift—it’s a set of skills that allows them to walk away unscathed.

Teaching athletes the proper skills to fall will set them up for success for a lifetime—the athlete’s parents will instantly realize their child’s health is your top concern. This article will be a short, concise way on how to implement various falls into your training.

The Falling Epidemic

Falls cause 37.3 million injuries each year1, and if that doesn’t alarm you, falls are also the second greatest cause of unintentional deaths globally—exceeded only by motor vehicle collisions2. One fall-related injury is so common that it has earned an acronym, FOOSH (Fall on an Outstretched Hand): “A FOOSH type of injury is the second most common type of sports injury.”

Preventing injuries is a top priority for parents and coaches alike, and rightly so. The quest for injury prevention, however, is often launched without first scouting for low-hanging fruits. Given the frequency and magnitude of injuries from falls, learning to fall properly can be a first step in injury prevention that will pay dividends long after the athlete retires from competitive sports. Furthermore, mastering falling skills will improve athletic performance and translate quickly to the court or the field.

Mastering falling skills will improve athletic performance and translate quickly to the court or the field. Share on X

Many of my athletes come to me barely able to stand after a somersault. Within a few short weeks of training, however, they are capable of popping up off the ground and continuing a play. As we age, the ability to fall in an athletic fashion becomes harder and harder. Practicing falling skills will not only help with coordination but also with longevity. In the elderly population, even those falls that are due to low-energy mechanisms are associated with higher hospitalization rates, longer lengths of hospital stays, and higher rates of mortality.3 Ten to fifteen percent of emergency room visits are attributed to falls.4 Injury prevention strategies should start with learning how to properly fall.

How to Teach Falling the Right Way

With new athletes, I incorporate falls into my first few sessions and then review them periodically. I aim to give the athlete the proper tools to utilize in various off-balance situations rather than preaching one specific way to fall.

Once my athletes are comfortable with rolling, they typically do that more than any break fall. I implement rolls as reactionary drills by having athletes roll, recover, and react to a stimulus (colored agility dot, ball, number, etc.).  The athlete learns to stay in the play rather than lying there helplessly. These drills mimic in-game scenarios and randomize training. The drill is effective and enjoyable for the athlete as well.

Key Concepts to Building Falling Skills:

  1. DO NOT have athletes plant hand or elbow during any point of the fall.
  2. ALWAYS have athletes keep their chin tucked away from ground when falling.
  3. Have athletes start these movements as close as possible to the floor and progress by adding height/speed.
      Lying > Seated > Squatting > Kneeling > Standing > Walking > Jogging > Running

Front-Break Fall from a Kneeling Position


Video 1. Front-Break Fall. Key situations: pushed from behind trying to head the ball in soccer; pushed in football; diving back to a base in baseball to avoid pickoff.

  1. Athlete kneels down with a mat in front of them. Cue the athlete to raise their chin to the sky.
  2. Athlete bends their elbows close to their body and has palms facing the direction they will fall. This allows the athlete to displace the force from the fall.
  3. Have athletes begin to fall forward and then break their fall with their forearms and palms, which should strike the ground simultaneously. Fingers should be extended.
  4. Ensure that the athlete keeps their chin high to avoid striking the floor with their head.

Side-Break Fall from a Kneeling Position:


Video 2. Side Break Fall. Key situations: FOOSH most commonly occurs in this fall; Football player being pushed out of bounds; attempting to remain upright.

  1. Athlete assumes a single-leg kneeling position.
  2. They look to the opposite shoulder of the falling direction.
  3. They begin to fall to the deck and break their fall with their arm slapping the floor, with their forearm and hand hitting simultaneously.
  4. Their break arm should land under the head, or at a 45° angle toward their feet.
  5. Have athlete stretch out the falling side leg and allow the other leg to bend, allowing their foot to contact the ground.

Rear-Break Fall from Squatted Position:


Video 3. Rear-Break Fall. Key situations: quarterback being pushed to the ground; basketball player taking a hard foul.

  1. Athlete gets down to a low squat position and tucks their chin into their chest.
  2. They roll backward to begin the fall.
  3. Keeping the chin tucked to their chest, have them slap the floor with both arms extended and palms facing down to disperse the force. Arms should hit at a 45° angle from the body.
  4. Keeping head tucked forward will protect head and neck areas from injury.

Front Roll from Squatted Position


Video 4. Front Roll. Key situations: any fall with forward momentum; being tripped during running on a play.

  1. Athlete gets down to a low squat position and tucks their chin into their chest.
  2. They distribute weight onto the balls of their feet and ensure hips are higher than shoulders (think frog stance or position).
  3. Have athlete begin roll and ensure their head does not contact the floor during the roll.
  4. Have athlete maintain a flexed spine in order to transition out of the roll.
  5. This movement is very similar to the side roll and many times can be adjusted on the fly if the athlete is capable.

Backward Roll from Squatted Position


Video 5. Backward Roll. Key situations: Any fall with backward momentum; being pushed over on a kickoff when the play is continuing on.

  1. Have athlete get down to a low squat position and tuck their chin into their chest.
  2. Athlete places hands on shoulders with palms facing up.
  3. They begin by rolling back, being sure to keep a tucked chin.
  4. Athlete plants their hands and pushes themselves up to complete the roll.
  5. They land on feet and extend arms to stand up.

Reactive Falling Drills


Video 6. Reactive Falling Drills. Key situations: makes athletes use their fall skills in sport environments to gain a comfort level, reactivity, and awareness to the play.

  1. Use an external stimulus to create an environment where the athlete must roll, recover, and react.
  2. Start by having an athlete perform a roll.
  3. Use colored agility dots, cones, balls, people, numbers, etc. and have athletes react to this cue after completing the roll.
  4. This helps with in-game transitions and keeps the athlete in the play.

A Valuable Lesson

Never assume an athlete has the ability to carry out a well-executed fall. I learned this when I first began teaching one of my athletes how to fall—I asked a high school football player (QB1) if he could perform a simple somersault. With a raised eyebrow, he replied with a cocky, “Are you serious? Of course, I can.”

Never assume an athlete has the ability to carry out a well-executed fall. Share on X

What ensued next was a horrific display of exactly what you don’t want to do. This athlete began his somersault by placing the full weight of his body on the neck/head area. When he rolled over, the neck and spine were placed in an extremely compromising position. I was immediately overcome with anxiety at the potential spinal injury I had just allowed to happen and wondered if I needed to grab my C-collar and spine board (just kidding). Luckily, that particular athlete ultimately finished the somersault unscathed.

That circumstance, however, taught me a valuable lesson to not assume the abilities of any athlete, especially pertaining to falling. Previously, this athlete had broken his wrist from a FOOSH mechanism, so he was eager to continue to learn how to fall properly. Now he is confident in his ability to fall and to properly protect himself from future injury. He has grown to love the falling drills we practice on a weekly basis, and it became a significant buy-in factor for both him and his parents.

Today, when I explain to parents that their son/daughter can expect to learn how to fall, they instantly love the idea and question why others haven’t taught this skill. It immediately shows that we (the coaches) care about an athlete’s well-being and injuries caused by falling. As coaches, we have the ability to change the falling narrative by introducing these falls into every athlete’s repertoire.

References

1. “Falls.” World Health Organization, World Health Organization, www.who.int/news-room/fact-sheets/detail/falls.

2. Granhed H, Altgarde E, Akyurek LM, David P (2017) Injuries Sustained by Falls – A Review. Trauma Acute Care 2:38. doi: 10.21767/2476-2105.100038

3. Lee, Hyeji et al. “Severe Injuries from Low-height Falls in the Elderly Population.” Journal of Korean medical sciencevol. 33,36 e221. 5 Jul. 2018, doi:10.3346/jkms.2018.33.e221

4. Spaniolas, Konstantinos, et al. “Ground Level Falls Are Associated with Significant Mortality in Elderly Patients.” The Journal of Trauma: Injury, Infection, and Critical Care, vol. 69, no. 4, 2010, pp. 821–825., doi:10.1097/ta.0b013e3181efc6c6.

Since you’re here…
…we have a small favor to ask. More people are reading SimpliFaster than ever, and each week we bring you compelling content from coaches, sport scientists, and physiotherapists who are devoted to building better athletes. Please take a moment to share the articles on social media, engage the authors with questions and comments below, and link to articles when appropriate if you have a blog or participate on forums of related topics. — SF


Tony Holler

Episode 61: Tony Holler

Joel Smith: Just Fly Performance Podcast, Podcast| ByMark Hoover

Tony Holler

Tony Holler is the Owner of “Feed the Cats” speed program and the Head Track Coach at Plainfield North High School in Illinois. Holler taught chemistry at PNHS for 38 years, and during his time there he also coached football for 28 years and basketball for 15. He is the Co-Founder/Co-Director of the Track Football Consortium with Chris Korfist. Tony is a member of the Illinois Track and Field Hall of Fame.

Coach Holler has led his track teams to three Illinois State championships. His athletes hold multiple team and individual state track records.

Tony is part of a track and field family legacy. His son, Quinn Holler, served as Plainfield North’s relay coach in 2018 (setting a state record in the 4×1) and now coaches at Tinley Park Andrew. His other son, Alec Holler, coaches at Edwardsville. In 2016, Alec coached the best hurdler in Illinois history, Travis Anderson (13.59 in 110 HH). Tony’s father, Don Holler, coached basketball at the high school and college levels for 47 years.

Coach Tony Holler, in this episode, gives us a look inside his track practice schedule, which focuses on minimal effective dose, speed, and precision. His model of low-dose training has proven effective, and he details this “Feed the Cats” approach.

In this podcast, Coach Tony Holler and Joel discuss:

  • Periodization by fluctuating the mode of speed training throughout the year.
  • An in-season lactate training program.
  • The X factor workouts and the rationale behind them.
  • Making track practice about performance not time.
  • The importance of record, rank, and publish.
  • The evolution of his sprint philosophy.

Tony can be found at SimpliFaster, where he’s written several articles on speed and other topics.

Podcast total run time is 54:57. 

Keywords: Feed the Cats, speed, minimum effective dose, track and field

Van Dyke Schmarzo

Episode 60: Matt Van Dyke and Max Schmarzo

Joel Smith: Just Fly Performance Podcast, Podcast| ByMark Hoover

Van Dyke Schmarzo

Matt Van Dyke is the Associate Director of Applied Sports Science at the University of Texas at Austin and works directly with the Longhorn Football Program. Before coming to the UT, he was the Associate Director of Sports Performance at the University of Denver. Matt is certified by the Collegiate Strength and Conditioning Coaches Association (SCCC) and earned his bachelor’s degree in exercise science from Iowa State University.

Max Schmarzo is the owner and CEO of Strong by Science. He is also the Director of Sports Science at The Resilience Code, a company that specializes in offering personalized solutions to health and wellness needs. Max is an NSCA Certified Strength and Conditioning Coach (CSCS) and NATA Certified Athletic Trainer (ATC). He received his M.S. in Kinesiology from Iowa State University.

Matt and Max have authored a book on training athletic power called Applied Principles of Optimal Power Development, which is a practical, research-backed manual on developing power in athletes.

They chat in-depth about the concepts of building athletic power and cover topics such as the utilization of isometrics in power development, ranges of motion in basic lifts, training to develop power, complex training, and velocity-based training.

In this podcast, Coach Matt Van Dyke and Coach Max Schmarzo discuss with Joel:

  • Full range of motion vs. shorter and more specific ranges of motion.
  • Potentiation, structural, and neural functions of isometrics.
  • The importance of maximal intent for each rep.
  • Building strength as a base to power.
  • Maximal isometrics.
  • Neural demands of structural and functional training.

Matt and Max can both be found at Strong by Science.

Podcast total run time is 1:06:36.

Keywords: isometrics, power development, VBT, complex training

Programming Plan

Programming Precursors: Pre-Program Checklist for Strength Coaches

Blog| ByCody Hughes

Programming Plan


Strength and conditioning coaches are under the spotlight more than ever. The field is under more scrutiny than ever—as it should be. The media-driven world we live in gives us the ability to see a snapshot of many different strength training programs around the country. This can be a trap for a lot of coaches out there running programs in many different leagues and levels.

As the old adage says, “Never judge a book by its cover,” right? Well, this is not a reality. We make judgments every single second of our lives. Coaches make judgments the second they see an athlete move. Great coaches have protocols in place once they identify gaps in movement patterns. We must understand that judging a book by its cover is not always a bad thing. It can go one of two ways.

First, a young coach may see a snapshot of a training session and think it’s a missing piece to their program or that it may take their athletes to the next level. This can be dangerous because of the lack of context in which it was prescribed. Second, the same mistake can be made by the experienced coach who sees that same snapshot and proclaims that it’s inappropriate programming or coaching. Unfortunately, this happens every single day on social media.

Because we live in a world of instant information, I want to shed some light on the steps that performance coaches must take before ever writing an exercise, volume, or intensity prescription. I hope this post gives perspective for every young coach out there looking for guidance on programming and why everything in training, and in life, is relative.

We must address five main categories in every program before we write it. We often speak of how powerful the basics of training can be and why being a principle-driven programmer is more effective than an exercise-driven programmer. Before we can even get to training principles, we must first address our uncontrollable circumstances: population, time, resources, manpower, and relational dynamics.

Population

No matter where you coach, always understand that the logo is not what drives the organization—the people do. We must dive deep to understand the people we work for and the people we serve. The strength coach’s responsibility is to progress the physical capabilities of athletes while minimizing injury risk.

Assessing Your Athletes

When coming into a program, the coach must first assess the athletes’ current abilities so they can have an idea of where to start. How do we do this? Some coaches like to begin with a movement assessment, such as the FMS. I find that the FMS is not a great use of time. Instead, when I began at my new position at Madison Academy, we simply began to train. Watching my athletes move was enough for me to gain that context. As long as you base your initial program on basic movement patterns (squat, hinge, lunge, push, pull, brace, jump, land), you’ll see where you need to go.

This may look different from the professional to the college level. It may look different from the college to the high school level. This may even look different from one team to another at the same level. It may look different on the same team from year to year! Shocker, right? Programs should not be written before you consider and analyze the specific needs of your athletes fully.

What does this look like? When I was responsible for the baseball and softball programs at Division 1 McNeese State University, I decided to stay away from the Olympic movements in training. I based this decision on the risks and rewards and the importance of the wrist and hand. I also believe the demands of a predominantly rotational sport will not see as much benefit from a primary movement in the vertical sagittal plane. Some coaches may disagree, but it’s my stance on this specific parameter.

In my current position at the high school level, I’m implementing a primarily developmental model that uses the same basic movements across all students and athletes. Everyone cleans, everyone squats, everyone deadlifts. While I make some individual modifications, this model looks different in my current population than the ones I served before. The outlook for my high school athletes is not the same as the outlook I had for my college athletes playing one sport.

Number of Athletes

Next, consider the number of people you’re serving. Some coaches, especially at the high school level, are serving 300+ athletes every week. Some coaches are managing 60-80 athletes in a weight room in a single session. We must consider these factors before programming begins. If the schedule and circumstances happen to give you no choice but to train a large number of athletes at once, you must keep things as simple as possible. This has more to do with the coach-to-athlete ratio, which I’ll touch on later in this article.

Movement Ability and Training Age

The last consideration is the movement competency and training age of the population you’re training. Before executing the training program to progress the athletes properly, we must perform determining assessments and evaluations that give a clear picture of how to begin. One of the simplest ways to do this is to use a movement-based standard training template that allows for enough volume to assess and light enough intensity to be safe and work from there.

Time

The next factors to consider before programming are time and schedule. In the majority of strength and conditioning settings, we cannot control these. In the high school setting, for example, the schedule is usually set in stone due to the class structure during the day. On the other hand, some high-level college sports, such as men’s basketball, may have their own facility and only 16 guys on the roster. Scheduling training can have more flexibility with a schedule like that. When scheduling is more flexible, programming strategies can be as well.

My current schedule is 85 minutes in a “block” high school schedule. We designate ten minutes before and after class for dressing in and out. We have a total of 65 minutes to complete our training. Because we function on an alternating schedule (set of four classes on one day and a different set of four classes the next), we only get in two days of training per week. This is a major component of my programming template, selections, and protocols. Many high schools get to train every single day, but with less time to train.

The majority of training is scheduled by team based on weight room availability, practice time, time of year, and other variables. In the high school setting, you often see an entire football team training at the same time in a facility that’s not built for it. This can be unsafe and also inconducive to sound programming and coaching. I’ve seen programs train their football team with 80+ guys at once and only 2-3 coaches coaching or “supervising.” It’s economical from a scheduling and time standpoint, but not at all from a quality standpoint. Lots of these variables are out of our control, and we need to analyze them fully before program creation begins.

If you’re pushed into this circumstance, I recommend being a savage at the simple movements, such as a primary squat movement, primary hinge movement, a single-leg movement, an upper-body push, and an upper-body pull. Having a large number of athletes makes it difficult to coach technique at a high level. Sometimes you have to do the best you can with the hand you’re dealt, but make sure your athletes are getting the best out of the situation they’re in.

Resources

Resources may be the biggest variable affecting programming capabilities. Every school and team have different resources available to them to use for training. Some of the best facilities in the country have a large weight room with many racks and lots of space, which often is attached to an indoor turf area where athletes can do a lot more than they could inside a weight room. You also must consider weight room exercise equipment. How many racks are available? Do you have bumper plates? Do you have bands? Do you have dumbbells? What barbell types do you have? We must consider all of these things in our programming. Weight rooms across the country all look different. Here are a few examples from my experience.

As a volunteer intern at Mississippi State, I was fortunate to be a part of the strength staff for Nick Savage and company. Before the summer began, the first thing we did as interns was to rearrange the room for how Coach Savage and his staff wanted it based on their programming that summer. He wanted to work in primary training blocks, then work accessories and auxiliary work off a rotation. After the main training blocks were finished, one coach and his guys would go to a station that would involve anything from neck training, shoulder care, back work, and even some arm farm. This type of training would not have been possible without the number of machine resources and weight room space.

When I moved on from MSU to West Alabama as a graduate assistant, the resources were drastically different. Going from a 12,000 square foot facility to a 2,000 square foot facility can change things quickly. Keep in mind, having fewer resources is not an excuse for bad programming or bad training. At West Alabama, we had racks, bumper plates, barbells, and a few dumbbells. I had the privilege to work for my mentor Joseph Boyd who got better results with those items than most coaches get with much more. The team was two wins away from a national championship appearance.

You may have to simplify your training program due to weight room resources, but that's no excuse to program poorly. Share on X

Resources may not be things you can control initially, but they’re something that every strength coach should strive to build. The best coaches can get results with athletes using less. I hear many young coaches complain most about weight room resources. You may have to simplify things, but that’s no excuse to program poorly.

Many coaches overlook the management, workflow, and logistics of training execution when designing a training program. Share on X

One of the biggest factors that many coaches, especially young coaches, don’t consider is the management, workflow, and logistics of training execution. Lots of coaches put down a training program that will maximize power output but may not be possible to execute due to logistical complications and population size. For example, a coach may have read about Triphasic Training or French Contrast training and want to implement it into their current training program. What if the coach does not have the space to allow for a logistical flow to go from the strength movement to the power movement to the speed/overspeed movement? It’s not good to force a round peg into a square hole. A better strategy is to get very good at a few things than to be mediocre at many things.

Manpower

The athlete-to-coach ratio is important in training sessions. Many places have only one strength coach, and they have to take care of all training duties and coaching by themselves. At the highest level of college football, five full-time coaches are allowed. Most programs add up to 5-10 interns to aid in many things, such as setup and breakdown. At the highest level, the programming capabilities are endless because they have the manpower to execute the plan.

Training and Coaching

First, the manpower allows for more athletes to train and receive proper coaching. When there are too many athletes per coach, the training session becomes more of a managerial role than a coaching role when specific systems and routines are not in place.

In a weight room, most coaches are concerned with safety. This is common sense. The higher the coach-to-athlete ratio, the higher the risk. To keep order and flow intact, the strength coach may use an on-the-whistle pacing strategy. This may be done rep by rep, set by set, or block by block. To do this, you must have someone responsible for keeping up the pace. I don’t recommend pacing rep by rep. It will turn your athletes into robots. It may be a good method to evaluate if your athletes are completing every rep, but at what cost? You may be counting reps, but are the reps quality reps in the first place? These are questions you must ask.

I like to work off a block-to-block or tier-to-tier pacing strategy. After studying movement types, volumes, and intensities over time, I developed a good feel for how long a block should last in my system. In my current system, I have 2-3 athletes working per rack. No more, no less. For our primary movements, it takes anywhere from 10-13 minutes to complete our first block or tier of the day. This allows some freedom to coach up individuals while making sure everyone is training at the correct pace. I use a visual clock that athletes can see. Some coaches use software such as Rack Performance to help pace their training. Whatever you decide to use, it’s best to use a pacing guide that fits your training parameters. Observe how long training tiers take, decide if that’s too fast, too slow, or just right, and then create your pace.

Setup and Breakdown

Second, the manpower allows for quicker setup and breakdown of the room. Staff with more members can be more efficient during training sessions, especially if transitions or rotations are involved. I’ve even seen interns changing weight for athletes so training sessions can go smoother and faster. This is only possible if you have the manpower available to do so. If you don’t, implementing things such as barbell loading references can help speed up transitions. I have charts posted around my weight room that tell what plates belong on each side for barbell loads from 45 lbs to 500 lbs. They’ve been a huge help to our efficiency.

Relational Dynamics

The art of communication and coaching comes into play in this last category of programming precursors. The relationship dynamic between a strength coach and sport coach is a major variable when programming. Many coaches are fortunate to have the full backing of their sport coach to allow them to do what they are professionally trained and educated to do. What most people don’t see is the groundwork of trust that was laid before that happened. Whether the trust is earned from working with that sport coach over time or the strength coach receives a high recommendation from someone the sport coach trusts, full support comes from the strength coach consistently getting results over time.

Lots of strength coaches in the industry complain a lot about the leverage the sport coach has over them. I don’t believe that a sport coach has much business building training sessions that are impractical but, at the end of the day, they are responsible for their team. It’s the strength coach’s job to communicate on a high level to gain the sport coach’s trust to get the job done.

It's the strength coach’s job to communicate to gain the sport coach's trust. And it's up to both to communicate with private coaches. Share on X

The sport-strength coach dynamic will always exist in team sports. Unfortunately, this fails most at the high school level and the communication with private sector coaches. Lots of athletes are looking to “outwork” their opponents and train with private trainers on top of their school training. This can be really beneficial or detrimental. It’s up to the sport and strength coaches to communicate with the athlete and their private trainer to create the most holistic approach possible. This is not the norm. If used properly, private training can help an athlete develop to their highest level much quicker. This is what we want for our athletes, right? It has to be about the athlete, not ourselves.

Want things to get better? Invest in relationships. Reach out to the private sector coach to learn what they’re doing and establish a communication line. Sit down with your sport coaches to explain everything behind your program and why it will make the team better. This doesn’t happen overnight, but if you commit to the pursuit of a healthy relationship with these individuals, your training program will go to a whole new level.

Conclusion

There are other factors we should consider before prescribing an exercise, volume, or intensity. Some of these are the athletes’ sports demands, injury history, and practice plan implementation. We must do a better job as strength coaches to apply stimulus that makes the most sense for the environment our athletes are living in. We often get caught up in our own world of the weight room and do not consider the stressors that are happening outside of it. The next time you write a program, consider the above categories to put together the most appropriate training stimulus for your athletes to continue to develop and remain healthy.

Since you’re here…
…we have a small favor to ask. More people are reading SimpliFaster than ever, and each week we bring you compelling content from coaches, sport scientists, and physiotherapists who are devoted to building better athletes. Please take a moment to share the articles on social media, engage the authors with questions and comments below, and link to articles when appropriate if you have a blog or participate on forums of related topics. — SF


Blocks_Header

Tackling the Starting Block Conundrum Using Simple Assessment Tools

Blog| ByKen Jakalski

Blocks_Header


Aside from what a sprinter wears as they report to the starting line for a race, there is no piece of equipment they carry out to the track that’s more important than a set of starting blocks. Yet, despite blocks being used in the Olympics for more than 70 years, how best to set these blocks remains a conundrum. Just go to any junior high­ school meet—or even many high school meets—and you are sure to find athletes completely perplexed by how best to set up two angled pedals attached to a single metal rail.

Besides what a sprinter wears to the starting line for a race, there is no piece of equipment they carry out to the track that’s more important than a set of starting blocks, says @Zoom1Ken. Share on X

Many sprinters simply look to the athletes next to them, set their blocks the same way, and hope they don’t stumble on the start. If they do stumble, their coaches get upset, point out that their poor start cost them a good time, and feel obligated to give them some kind of quick lesson—not just how to place their blocks, but how to slide the pedals to their proper locations along the rail.

Then, right when athletes appear to figure it out, they go to meets where the pedals are not locked into the rail and, sure enough, at least one of those pedals falls out of its slot and bounces on the track (or on the sprinter’s foot). Or course, the sprinter can’t remember what slot the pedal came out of. Watching the perplexed sprinters trying to figure it out, you’d think they were being asked to line up colors on a Rubik’s Cube!

History of the Starting Block

But that wasn’t always the case. There were no starting blocks when Harold Abrahams won the 100-meter gold medal in the 1924 Olympics. Back then, the only piece of equipment sprinters carried onto the track was a trowel for digging two holes to place their feet in. Sprinters took meticulous care making those starting holes, concerned about precisely where their first foot out of the holes would place them. In fact, Abrahams once mentioned how he also carried a piece of string cut to the length of his first stride, put the string down on the track, extended it forward, and then made a mark in the track where he focused his eyes when he heard the “set” command.

George Simpson, a 20-year-old star from Ohio State, set the 100-yard world record at 9.4 in 1929, but the IAAF did not recognize that mark because Simpson had used a piece of equipment: starting blocks. Until 1948, the best “carry on” item sprinters brought to the track remained that trowel for digging holes at the spots where they wanted to place their feet. Such holes were not only unstable, but they were also a “groundskeeper’s nightmare” on dirt, grass, or cinder tracks. Track and field historians believe that the trowel was still in use in the 1970s and early ’80s before the newer, rubberized surfaces became more affordable.

Starting Blocks
Image 1. Modern blocks are now a part of sprinting, but in the past athletes had to dig into a dirt track. Now every athlete is using starting blocks, and each year more research is published on the subject.


Even though starting blocks were used in the ’48 Olympics for the first time, sprinters still struggled with them. In the 1956 Melbourne Olympics, U.S. sprinter Thane Baker put down his starting blocks pointing in the wrong direction. In yet another piece of bizarre starting block trivia, 1980 Olympic gold medalist Alan Wells of Britain didn’t want to use starting blocks, but they were then required by the IAAF for the Olympic Games. Just three months before the Moscow Games, Wells had not even used blocks in competition because he “preferred to start with his feet firmly on the track.”

Finding the Right Positioning

Starting blocks have evolved over the years, but not without controversy. In the 1930s, the generally accepted orthodox position was often called the “Duffy” start because that’s the way Georgetown champion Arthur Duffy set his blocks. His feet were 17 inches apart, and his front foot 8 inches from the starting line. Duffy believed this position resulted in a primary push from both legs and not just the front leg.

Much of the thinking at the time centered on the belief that it was best to place the feet as close to the starting line as possible. For example, Coach Larry Snyder noted that if an athlete’s foot is 8 inches from the starting line, that athlete would be ahead of the sprinter whose front foot was 18 or more inches behind the line. This is one of the reasons why the Australian or “kangaroo” style start was not accepted at first. The front pedal was set 17–19 inches behind the starting line, with the back foot pedal 10–12 inches behind the front one. Coaches believed this position put the feet too far behind the starting line. Again, this notion of sprinters losing too much ground to sprinters who crowded the line was a major concern.

Sprinters like the great Jesse Owens did not do much to change coaches’ minds. Owens moved both feet closer to the line, believing that being nearer to the starting line put him nearer to the finish line. Larry Snyder’s insights clearly had an influence on Owens, but he never crowded the line by the 2 or 3 inches that Snyder believed optimal.

Research in the early ’50s cast some doubt on the benefit of “hugging the line” as much as coaches had advocated. The highly respected Franklin Henry noted that a 16- to 21-inch difference from toe to toe is the best distance, and that the 11-inch bunch start was the poorest. Though the bunch was effective at getting the sprinter off the blocks quickly, slower times were the result because the spacing did not put sprinters in a good running position. With a bunch start, Henry believed that sprinters would not be able to recover from that disadvantage.

Though the bunch start was effective at getting the sprinter off the blocks quickly, slower times were the result because the spacing didn’t put sprinters in a good running position. Share on X

Ken Doherty said it best: “Undoubtedly, in the United States since 1890, there have been more speeches, more arguments, more try-this-try-that, and more research on the placement of starting blocks than on any other track and field problem.”

What about the blocks themselves? Some have pedals fixed in the rails; other designs have easily detachable pedals. Many blocks now allow the sprinters to adjust the angle of each of the pedals. Doherty notes that “there are numerous papers discussing the optimum position for creating maximum drive from power generated, but using blocks is much more about comfort and control than exact science.”

However, thanks to a rather unique Excel file created by Brian Mackenzie, a Level 4 performance coach with British Athletics, coaches and athletes can take five specific measurements and then plug them into his chart to determine the most effective pedal angles and spacing.

With Mackenzie’s easy-to-use (and free) formula, sprinters can set their blocks based on the numbers that are provided after they have inputted their limb segment data. Mackenzie doesn’t try to “sell” the benefits of his formula. In fact, he begins by explaining that block setting is really a simple process. “Place the front block two foot-lengths from the starting line and the rear block another foot length between the front and rear block. From that point, spacing can be adjusted based on performance over the first several strides.” In other words, athletes can try this simple method to see if the setting feels good or, more importantly, results in faster starts.

Block Model
Image 2. Many coaches prefer angles, but adjusting a human body to a set position may benefit from the use of lengths instead. Use the calculator provided on the website link to maximize a starting position using body part lengths.

This is really how most sprinters approach block setting, and that’s probably all they need to do. In terms of ideal angles of the leg in the “set” position, Mackenzie notes that the leading knee angle should be 90–110 degrees, and the rear knee angle 120–135 degrees. Again, nothing controversial here, but for those who follow the old carpenter’s rule of “measure twice, cut once,” there is value in a personal assessment like the one Mackenzie presents.

Each sprinter gets a personalized sheet, which serves as a simple instruction manual. This means they adjust the blocks on their own without a coach hovering over them, says @Zoom1Ken. Share on X

I have had assistant coaches ask if taking these measurements was really necessary, and if the recommendation from the data actually suggested a placement that would be much different from what the athlete would have determined on their own, just based on the above simple guidelines—or “trial and error” based on feel. My response is always the same: Each sprinter gets a personalized sheet, and that sheet serves as a simple instruction manual. This means they adjust the blocks on their own without a coach hovering over them.

Unconventional Blocks and Starts

So, an interesting question: Why are they even called “blocks”? This may have been related to the 1927 starting block patent that George Bresnahan of Iowa filed as a “foot support,” which he then described as “what might be termed a starting block.” As you can see in this image of the patent, they are basically hinged blocks of wood with butterfly screws to create a solid base of support and angle.

In general, starting blocks have evolved slowly. The rail or platform for the angled pedals has been progressively shortened, but some manufacturers have had to modify their design to accommodate sprinters and hurdlers with longer legs. It makes you wonder if they should have used Mackenzie’s formula with various sprinters before determining that a shorter rail length was better.

Blocks were actually approved by the IAAF in 1937, but because of World War II, they were not used in competition until the ’48 Games.

A final note: What inspired me to take block setting this seriously? It was an image of the starting technique of ’72 Olympic champion Valery Borzov. His start so impressed Ken Doherty that he developed a sketch just to make Borzov’s start a point of special analysis in his Track and Field Omnibook. Borzov’s block spacing appears to be as little as 10 inches apart—what would be considered more like the questionable “bunch” spacing in standard block setting terms. His front block was 25 inches to the starting line. His eyes are straight down, hands spread wide, and arms above 110 degrees. This position placed his center of gravity low and far ahead of his feet.

This position was intended to aid forward drive, but it appeared problematic because of the increased risk of stumbling and causing a much shorter first step. But note how Borzov compensated. His foot is placed low in the front pedal, and the front of his spikes is actually on the track and not against the block itself. This allowed for greater flexion and extension, and that front-of-the-foot contact with the track apparently increased his application of force and basically prevented him from stumbling.

This prompted Doherty to claim that the result, “may well be an improvement over the best possible on-your-marks placement.” Jimson Lee, in an excellent blog post on Borzov’s mechanics, said something similar: “He has one of the greatest sprinting techniques out of the blocks and running at top speed.”

Interesting in that, competing indoors following his gold-medal Olympic performance in Munich, Borzov was seen starting indoor races from a three-point stance. This prompted many coaches to wonder if the Ukrainian Express had developed an even faster technique for block starting. It turned out he had a hand injury painful enough for him to avoid taking a risk with his typical “unconventional” start!

More Than a Thought: The Best Possible Block Setting

Give Brian Mackenzie’s calculator a try. The five measurements he recommends that we take of a sprinter while in the “set” position give us another way to test what we assume may be the best possible block setting for each of our athletes. It gives us something more to think about during our thinking process.

In “Hamlet,” when a probing Rosencrantz disagrees with Hamlet about Denmark being a prison, Hamlet says, “There is nothing either good or bad but thinking makes it so.”

In the debate over what is the best block setting for sprinters, I offer a somewhat different twist on Hamlet’s insight: There is nothing like good data from sound research to cure what might be bad thinking.

Since you’re here…
…we have a small favor to ask. More people are reading SimpliFaster than ever, and each week we bring you compelling content from coaches, sport scientists, and physiotherapists who are devoted to building better athletes. Please take a moment to share the articles on social media, engage the authors with questions and comments below, and link to articles when appropriate if you have a blog or participate on forums of related topics. — SF


References

Doherty, Ken. Track and Field Omnibook; a Complete Guide for Coach and Athlete. Tafmop Publishers, 1976.

Mackenzie, B. (2001) Sprint Starting Block Settings [WWW] Available from: https://www.brianmac.co.uk/sprints/blockset.htm [Accessed 11/9/2019].

Duncanson, N. The Fastest Men on Earth: The Story of the Men’s 100 Metre Champions. Andre Deutsch Publishers, 2011.

Brewer, John. Running Science: Optimizing Training and Performance. University of Chicago Press, 2017.

  • « Go to Previous Page
  • Page 1
  • Interim pages omitted …
  • Page 93
  • Page 94
  • Page 95
  • Page 96
  • Page 97
  • Interim pages omitted …
  • Page 164
  • Go to Next Page »

Primary Sidebar

FEATURED

  • Using Speed and Power Data to Bucket and Train Faster Athletes
  • Plyometric Training Systems: Developmental vs. Progressive
  • 9 (Fun!) Games to Develop Movement Skills and Athleticism

Latest Posts

  • Running Through Time: An Athlete’s Story of Resilience and Recovery
  • Rapid Fire—Episode #14 Featuring Rodrigo Alvira Isla: Training Smarter in the NBA and G League
  • Maximizing Success in the Weight Room: A College Strength Coach’s Playbook

Topics

  • Adult training
  • App features
  • Artificial Intelligence
  • Athlete
  • Athlete performance
  • Baseball
  • Buyer's Guide
  • Career
  • Certifications
  • Changing with the Game
  • Coach
  • Coaching
  • Coaching workflows
  • Coching
  • College athlete
  • Course Reviews
  • Dasher
  • Data management
  • EMG
  • Force plates
  • Future innovations
  • Game On Series
  • Getting Started
  • Injury prevention
  • Misconceptions Series
  • Motion tracking
  • Out of My Lane Series
  • Performance technology
  • Physical education
  • Plyometric training
  • Pneumatic resistance
  • Power
  • Power development
  • Practice
  • Rapid Fire
  • Reflectorless timing system
  • Running
  • Speed
  • Sports
  • Sports technology
  • Sprinters
  • Strength and conditioning
  • Strength training
  • Summer School with Dan Mullins
  • The Croc Show
  • Track and field
  • Training
  • Training efficiency
  • Wave loading
  • What I've Added/What I've Dropped Series
  • Youth athletics
  • Youth coaching

Categories

  • Blog
  • Buyer's Guide
  • Freelap Friday Five
  • Podcasts

COMPANY

  • Contact Us
  • Write for SimpliFaster
  • Affiliate Program
  • Terms of Use
  • SimpliFaster Privacy Policy
  • DMCA Policy
  • Return and Refund Policy
  • Disclaimer

Coaches Resources

  • Shop Online
  • SimpliFaster Blog
  • Buyer’s Guide
  • Freelap Friday Five
  • Coaches Job Listing

CONTACT INFORMATION

13100 Tech City Circle Suite 200

Alachua, FL 32615

(925) 461-5990 (office)

(925) 461-5991 (fax)

(800) 634-5990 (toll free in US)

Logo of BuyBoard Purchasing Cooperative. The word Buy is yellow and shaped like a shopping cart, while Board and Purchasing Cooperative are in blue text.
  • Facebook
  • Instagram
  • Twitter
  • YouTube

SIGNUP FOR NEWSLETTER

Loading

Copyright © 2025 SimpliFaster. All Rights Reserved.