• Skip to content
  • Skip to primary sidebar
SimpliFaster

SimpliFaster

cart

Top Header Element

  • Facebook
  • Instagram
  • Twitter
  • YouTube
  • Login
  • cartCart
  • (925) 461-5990
  • Shop
  • Request a Quote
  • Blog
  • Buyer’s Guide
  • Freelap Friday Five
  • Podcast
  • Job Board
    • Candidate
    • Employer
    • Facebook
    • Instagram
    • Twitter
    • YouTube
You are here: Home / Blog

Blog

Swim Coach

How Reflective Practice Improved My Coaching

Blog| ByXavier Roy

Swim Coach

A coach should continually reflect, adapt, and innovate to develop, both as a professional and as an individual.3 Indeed, according to some authors, “it is the capacity of coaches to practice, reflect and then learn from their experience that is central to developing coaching effectiveness.”13

How can we implement reflective practice on a daily, weekly, monthly, or yearly basis? This article provides reflective tools that coaches can easily use in their daily practice along with examples from my work in Canadian university football.

As an interesting starting point, we can combine the different sources of information that represent the constant change associated with sport and use the combined information to support the coach’s decision and training processes.12 Nowadays, data is required not only to evaluate and track improvements in training and competition but also to help coaches make training decisions. 

Decision Making Information
Image 1. This chart shows how coaches can combine various sources of information to make decisions regarding training. It’s adapted from Kiely’s article, “Periodization Paradigms in the 21st Century: Evidence-Led or Tradition-Driven?”(12)

Tools to Implement Reflective Practice

Using statistics, video analysis, and discussions with peers enables the coach to take a step back and evaluate an event.7 Different sports will generate different sets of game-related statistics. For example, in Canadian university football, we had a game-related key performance indicator (KPI) that characterized our defensive play. Per game, we wanted less than three explosive plays or plays where the opponent’s offensive unit completed a play of more than 20 yards. These statistics provided coaches with specific information regarding the game’s tactical aspect.

Reflective Cards

Reflective cards can be part of our data analysis either post-training or post-competition.4,5,10 As part of my Ph.D. thesis, we asked Canadian university football coaches to fill out post-competition reflective cards. The cards contained a few questions related to contextual variables (opponent, score, home or away, weather, etc.), game-performance KPI, and weaknesses they should address in the upcoming week of practice.

We also had coaches fill out reflective cards after each training session during the week, answering prompts such as:

  • briefly describe the training session
  • evaluate what went well and what went not so well
  • explain why they went well and why they did not
  • propose improvements for the next training session

Reflective cards, as opposed to a reflective journal, take a few minutes to complete, are straight to the point, and can provide valuable information that coaches can compile and review.

Video and Voice Recording

Time can be a limiting factor, however, when using a written form of reflective practice. Luckily easy access to technology gives us other tools to use such as video. As reported by Kidman,11 videotaping oneself while conducting a training session has gained popularity in coach education settings as a means to self-train. Another interesting method we can pair with video is the Thinking Aloud (TA) method where coaches are asked to verbalize their thoughts while performing a coaching task.

Using a Dictaphone or microphone, for example, they can then put into words their inner speech; encode and vocalize any scents, visual stimuli, or movement; and explain their thoughts, ideas, hypotheses, or motives regarding a specific task. TA shares some principles with Schön’s “reflection-in-action” by allowing “coaches to reflect-on their in-event reflections” when reviewing the recordings19 by themselves or with the help of a coach educator or mentor.

Reflective Journal
Image 2. While useful, time and motivation can be barriers to written journaling strategies for sports coaching.

Obtaining Objective and Subjective Data

We can obtain objective and subjective data in a variety of ways. To gather information on external training loads (work completed by the athlete and measured independently of their internal characteristics) and internal training loads (the relative physiological and psychological stress imposed on the athlete), we can use three main approaches:18

  • the observational approach
  • the physiological approach
  • the subjective approach

We could also add any neuromuscular assessments to these approaches, such as various jump tests.

Training Load Monitoring
Image 3. Observational, physiological, and subjective data collection are three approaches coaches can take to monitor training load (1,9,16).

With Canadian university football players, we monitored internal training loads using the Session-RPE method (sRPE = duration of training x RPE) to gather information about training. Looking retrospectively at the data collected over the previous two years, we were able to adjust the training content to match the various demands of the student-athletes better.

For example, in the graph below, we can identify increased acute training load and decreased freshness levels at the beginning of the winter semester, during winter camp, at the beginning of summer training, and during the pre-season. Equipped with this information, the coach can adjust training and implement more recovery methods before or after these periods to facilitate recovery. The coach could also plan for lower training load at specific times in the academic calendar, such as the last two weeks of April when student-athletes have assignments to hand in and exams to prepare for.

Combining objective and subjective data such as training load with wellness questionnaires is a powerful way for coaches to optimize training and prevent overtraining. It also provides good feedback about how players are handling different stressors and sets the dialogue for good communication between the coach and the athletes.

Training Load 1 Year
Image 4. With information about how training loads correspond with athlete freshness levels, coaches can plan training and recovery periods.

Daily Introspection

Reflective practice requires a certain degree of introspection from the coach and should be a daily activity.15 One could use a reflective journal, reflective cards, video, shared reflections, or an oral approach such as TA to implement a reflective practice.

Writing down one’s actions and thoughts following an event or a day’s work in a journal or logbook quite often serves as an introduction to reflective practice. However, recent studies question this approach,2 especially the time it takes to sit down, pause, and reflect.14 Moreover, the entries in a coach’s reflective journal at first might look more like descriptions of the various events rather than a reflection on those events.

Critical reflection on events improves a coach's decisions and training processes, says @xrperformance. Share on X

Instead, coaches can engage in a critical reflection. This requires coaches to not only question their thought-process but also question or review their beliefs and values regarding their experiences as well as the wider social context of their practice.6,8 This “self-induced momentary confusion” can be supported and guided by a coach educator or mentor, who can help motivate one to sustain a reflective practice.

Here’s a very good example of this support system as described by Gallimore.3 A struggling high school basketball coach implemented reflective practice after meeting and communicating over several years with legendary basketball coach John Wooden. The high school coach’s practice and coaching record improved over these years.

In the end, a reflective practice appears to benefit both professional and personal development in various fields, including coaching. Using reflective practice to improve one’s knowledge and coaching qualities, such as communication, also impacts the coach’s athletes. The coach-athlete-performance relationship would likely benefit from taking time to reflect. Fellow coaches are encouraged to triangulate the different sources of training decision-making information that best fits their own coaching context.

References

  1. Borresen, J., & Lambert, M. I. (2009). The quantification of training load, the training response and the effect on performance. Sports medicine (Auckland, N.Z.), 39(9), 779‑ http://doi.org/10.2165/11317780-000000000-00000.
  2. Dixon, M., Lee, S., & Ghaye, T. (2013). Reflective practices for better sports coaches and coach education : shifting from a pedagogy of scarcity to abundance in the run-up to Rio 2016. Reflective Practice, 14(5), 585‑ http://doi.org/10.1080/14623943.2013.840573.
  3. Gallimore, R., Gilbert, W., & Nater, S. (2014). Reflective practice and ongoing learning: a coach’s 10-year journey. Reflective Practice, 15(2), 268‑ https://doi.org/10.1080/14623943.2013.868790.
  4. Ghaye, T. (2008). Putting reflection at the heart of good practice: The user guide. Reflective Learning-UK.
  5. Gilbert, W. (2017). Coaching Better Every Season : A Year-Round System for Athlete Development and Program Success. Windsor, Ontario: Human Kinetics.
  6. Gilbert, W., & Trudel, P. (2013a). The Role of Deliberate Practice in Becoming an Expert Coach : Part 3- Creating Optimal Settings. Olympic Coach Magazine, 24(2), 15‑
  7. Gilbert, W., & Trudel, P. (2013b). The Role of Deliberate Practice in Becoming an Expert Coach: Part 2 – Reflection. Olympic Coach Magazine, 24(1), 35‑
  8. Hickson, H. (2011). Critical reflection : reflecting on learning to be reflective. Reflective Practice, 12(6), 829‑ http://doi.org/10.1080/14623943.2011.616687.
  9. Hopkins, W. G. (1991). Quantification of training in competitive sports. Sports Medicine, 12(3), 161‑
  10. Hughes, C., Lee, S., & Chesterfield, G. (2009). Innovation in sports coaching: the implementation of reflective cards. Reflective Practice, 10(3), 367‑ http://doi.org/10.1080/14623940903034895.
  11. 11.Kidman, L. (2005). Athlete-centred coaching: Developing inspired and inspiring people. (T. Tremewan, Éd.). Christchurch, New Zealand: Innovative Print Communications Ltd.
  12. Kiely, J. (2012). Periodization paradigms in the 21st century: Evidence-led or tradition-driven? International Journal of Sports Physiology and Performance, 7(3), 242‑ https://doi.org/10.1123/ijspp.7.3.242.
  13. Knowles, Z., Borrie, A., & Telfer, H. (2005). Towards the reflective sports coach : issues of context, education and application. Ergonomics, 48(November), 1711‑ http://doi.org/10.1080/00140130500101288.
  14. Knowles, Z., Gilbourne, D., Borrie, A., & Nevill, A. (2001). Developing the Reflective Sports Coach : A study exploring the processes of reflective practice within a higher education coaching programme. Reflective Practice, 2(2), 185‑ http://doi.org/10.1080/14623940120071370.
  15. Lyle, J. (2002). Sports coaching concepts : A framework for coaches’ behaviour. London: Routledge.
  16. Robson-Ansley, P. J., Gleeson, M., & Ansley, L. (2009). Fatigue management in the preparation of Olympic athletes. Journal of sports sciences, 27(13), 1409‑ http://doi.org/10.1080/02640410802702186.
  17. Schön, D. A. (1983). The reflexive practioner: How professionals think in action. Basic Books Inc.
  18. Wallace, L. K., Slattery, K. M., & Coutts, A. J. (2009). The ecological validity and application of the session-RPE method for quantifying training loads in swimming. Journal of strength and conditioning research, 23(1), 33‑ https://doi.org/10.1519/JSC.0b013e3181874512.
  19. Whitehead, A., Cropley, B., Miles, A., Tabo, H., Quayle, L., & Knowles, Z. (2016). ‘Think Aloud’: Towards a framework to facilitate reflective practice amongst rugby league coaches. International Sport Coaching Journal, 3(3), 269‑

Since you’re here…
…we have a small favor to ask. More people are reading SimpliFaster than ever, and each week we bring you compelling content from coaches, sport scientists, and physiotherapists who are devoted to building better athletes. Please take a moment to share the articles on social media, engage the authors with questions and comments below, and link to articles when appropriate if you have a blog or participate on forums of related topics. — SF
Squat Rack

Owning the Intangibles in the Strength and Conditioning Profession with Mark Watts

Freelap Friday Five| ByMark Watts

Squat Rack

Mark Watts is a fifth-grade school teacher and U8 Girls Soccer coach in Columbus, Ohio. Watts was formerly the Director of Education at elitefts.com and the host of the Elitefts Sports Performance Podcast. He has a master’s degree in exercise science & health promotion from California University of PA and a master’s degree in elementary education from Clarion University of PA. He has held professional certifications through the NSCA, CSCCa, NASM, and USAW.

Freelap USA: What is one of the biggest problems with the upward growth of the strength and conditioning professional?

Mark Watts: The strength and conditioning profession has become more about attrition than upward mobility. Coaches have been expressing their needs to be more valued at their own universities or in athletics in general for decades. Strength coaches that have survived a sport coaching change are anomalies and no one you ever talk to actually knows any strength coach that has retired.

For most strength coaches, their ability to feed their family is directly tied to wins and losses, says @MJ_Dubs_XIII. Share on X

Even the best, most experienced strength coaches who were always deemed “untouchable” have taken the necessary steps to venture into administration or academics. For some strength coaches, being associated with the football or basketball coaches has given them job stability and financial freedom, but for most, it has meant their ability to feed their family is directly tied to wins and losses.

Freelap USA: You’ve talked about the difficulty of the strength and conditioning profession being the difficulty of quantifying effectiveness. What aspects can, and cannot, be quantified in the job of a strength coach?

Mark Watts: This profession is so much about process and progress and so little about outcome and product to the individuals that perform in it every day. The issue is, as we know, that the process can rarely be quantified. What compounds this issue is that the specific aspects that can be quantified, (testing results, injury rates, wins and losses, etc.) have two distinct inconsistencies.

First, these quantifiable measures may not have a correlation, let alone causation, to on the field/court/track performance. Improvements in performance tests may not be directly responsible for wins and losses.

Strength coaches generally don’t want the blame for wins and losses, or the credit for them either, says @MJ_Dubs_XIII. Share on X

Second, improvements in these performance tests are not necessarily because of the guidance of the strength and conditioning coach. The team that wins is usually the team with better players. Just as strength coaches generally don’t want to take the blame for wins and losses, they usually won’t take credit for them, either. This goes back to no real quantifiable way to evaluate a strength coach’s impact on performance.

Freelap USA: How can the sports performance industry properly prepare and guide interns for career success? What’s your advice to young aspiring strength coaches in such a saturated field?

Mark Watts: An important question that everyone in our profession should be honest about is whether we are really taking responsibility for guiding interns for career success. I really don’t think most sports performance professionals have a vested interest in truly developing the people around them. Whether this is due to lack of time, lack of resources, or something much more disheartening like the desire to keep our peers from career advancement, I am unsure if there are sincere efforts to do so.

There are several pieces of advice I would give to aspiring strength coaches. Not everyone is at the same level before they start this journey, but most of this will apply to the majority of coaches seeking a career in the field.

1. Make sure it is really what you want to do. There are countless numbers of recent college graduates who suddenly decide that “coaching is not for them” after accepting a full-time internship. Just because you enjoy the gym doesn’t mean you should be a strength coach. If you like working out, join a gym. Most coaches learn early that for almost all coaches, the hours, the money, and the job security make pursuing the profession very difficult. The only way you will know for sure is if you volunteer and find out what the job is really like.

2. Be honest with yourself. How are you different from the other thousands of exercise science majors? Having a degree and being certified is the bare minimum for anyone pursuing a career in the field. The opportunities you will usually get are indicative of the work you’ve put in. Any coach would rather get paid to coach as opposed to volunteer. But, if you turn down the volunteer internship, is it because you have paid opportunities? If a position was a paid position, would you be in contention for it compared to your peers?

3. You have to jump through the hoops. You need the degree and the certification. Having these does not guarantee a job, but not having either will keep you from getting a job. Trevor Kashey, one of the smartest men I know, said this: “An exercise science degree doesn’t mean you know how to exercise, it just means you know how exercise works.” So, with your degree, you still need to spend time under the bar, and under the direction of a mentor.

Having a certification doesn’t mean you are a good coach. What it means is you are willing to understand the basics of keeping athletes safe and will continue to make an attempt at continuously learning. Without that certification, you have to explain why you are more hirable than every other coach that sacrificed to become certified. It may not make a huge difference overall, but it can make one on a resume, and in a court of law, in case you are in a situation where you need it.

4. You must volunteer. I don’t know any head strength and conditioning coach that is willing to pay someone to learn how to be a coach. Whether it is fair or not, the difference between one coach and another is usually their experience. For every strength coach not willing to work for free, there are 10 that will. I don’t know if that is good for the financial progress of our profession, but that seems to be the reality.

Freelap USA: What should the attitude of a coach and athlete be towards competition? We tend to see some interesting behavior around the times of championship games, and I’d like to hear your take on what you feel coaches and athletes should ultimately be motivated by.

Mark Watts: If we are talking about competition between teammates, I feel coaches may sometimes go overboard with their methods of facilitating competitive drills between teammates. Whether it is the sport coaches or strength coaches, I sometimes question the motives and the effectiveness of some of these competitive drills, but then again, it is not my program. Somehow, these coaches feel this is a necessary step in the process.

Coaches may go overboard with their methods of facilitating competitive drills between teammates, says @MJ_Dubs_XIII. Share on X

I think if you are going to improve factors like competitiveness, mental toughness, resiliency, etc. you must be able to do two things. First, you must be able to define it. Second, you must be able to measure it. If you can do both of those tasks, then you must be able to prove they correlate to performance. I guess I need further convincing that wrestling a stick away from another player or winning a tug-of-war goes beyond an acute training effect and will actually improve sport performance.

Freelap USA: What is the biggest impact a strength coach can make on an athlete?

Mark Watts: Being a strength and conditioning coach means you are able to set goals for athletes they can’t set for themselves, and objectively assess them. There is so much subjectivity in coaching a sport, particularly non-stopwatch sports. Strength and conditioning coaches try to do everything they can to remove that subjectivity, even when their own jobs cannot be objectively quantified. Strength coaches can hold athletes accountable in ways that sport coaches can’t. The weights don’t lie, the stopwatch doesn’t lie, etc. Athletes have standards they can meet without multiple variables affecting how they meet them.

S&C coaches can hold athletes accountable in ways that sport coaches can’t, says @MJ_Dubs_XIII. Share on X

The second impact would be self-efficacy. The combination of self-confidence and an increase in skill sets can directly impact performance on the field or court. Athletes understand that the investment they make in the weight room can lead to success in their sport. The greater that investment, the more difficult it is for athletes to quit. To me, that is the intangible that makes the most significant difference.

Since you’re here…
…we have a small favor to ask. More people are reading SimpliFaster than ever, and each week we bring you compelling content from coaches, sport scientists, and physiotherapists who are devoted to building better athletes. Please take a moment to share the articles on social media, engage the authors with questions and comments below, and link to articles when appropriate if you have a blog or participate on forums of related topics. — SF


Scholarship Application

7 Steps to Land a College Roster Spot

Blog| ByBryan Drotar

Scholarship Application

Are your athletes counting on you to help them find a college roster spot? As coaches, our athletes view us as experts. We may not know everything about the recruiting process, but we do have an obligation to give our athletes encouragement, and assistance if they want to compete in college.

You need to be able to offer them direction on getting started. Here are a few guidelines you should pass on to your athletes.

What Athletes Can Do

Tell your athletes to be proactive. The athletes willing to market themselves are the ones who will have the most opportunities. Share these seven easy-to-remember steps your athletes should take. Since a teenager will feel like you’re asking them to scale Mt. Everest, encourage them (and their parents) to take one step at a time.

Tell athletes to be proactive: Those willing to market themselves will have the most opportunities, says @bryan_drotar. Share on X

1. Research colleges. Athletes should come up with a list of 10 colleges that have the athletic programs that interest them. This list will change over time, but it will help them get started. They should research the academics, athletic program, area, etc. and make sure each school is a place that would interest them even if they were no longer on the team.

2. Contact coaches. They should call and email each coach to introduce themselves and make the coach aware of their interest. If the coach responds, they should send follow-up emails and phone calls regularly.

“When a high school athlete takes the time to send an email with their contact information, personal best marks, academic information, etc. it means they are serious about considering Duke as a potential university.” Rhonda Riley, Duke University Cross Country Coach.

3. Fill out the questionnaire on the team’s home page. This will get the athlete into the database of both the coach and the admissions department.

“If an athlete knows they are interested in our college, they should reach out to someone on our coaching staff or complete a recruit questionnaire.” Scott Bahrke, Northwestern College Cross Country and Track & Field Coach

4. Prepare a video highlight film. Athletes should post the film on YouTube and send a link to each coach they are in contact with.

  • Highlight starts and show complete races.
  • Jumpers and throwers should make sure their technique is clear and visible.
  • Be as close to the event as possible so there is an unobstructed view.

5. Keep college coaches updated. Athletes should let college coaches known when they will be competing.

6. Send stats. Keep track of the athlete’s stats and the event(s) they were in, and have them send the information to college coaches. The place the athlete finished is not that important.

“We are in a very objective sport where the initial 90+% of recruit filtering takes place by simply using their marks/performances.” Bob Braman, Florida State University Track & Field Coach

7. Attend camps. Athletes should go to university camps and summer camps where coaches from the schools that they are interested in will be working. These are advertised on the program’s web page. They will see a link or a banner to click on.

What Coaches Can Do

One of the most important things you can do is give your athletes honest guidance about the collegiate level at which they can be successful. Some coaches will only recommend Division 1 or 2 programs, but there can be excellent coaching and competition at every level. The continuum is NCAA D1, D2, D3, NAIA, and NJCAA (JUCOs). Give them several options to look at based on their talent, work ethic, and academic level. If you don’t know, don’t make it up. Ask another coach for their opinion.

Give your athletes honest guidance about the collegiate level at which they can be successful, says @bryan_drotar. Share on X

You can also assist athletes in getting film. Good quality is the key to good film. It doesn’t have to be expensive: You can use your tablet or phone. Try to use a tripod if you can. If you don’t have the resources to film your athletes, ask the parents and see who has the skill and equipment to get it done for you.

Finally, contact college coaches for your athlete. Coaches at Division 1 and Division 2 have strict guidelines governing them when they contact athletes. The club or high school coach is often the intermediary for communication. It is your job to provide a reference for the athlete and relay information from the college coach to the athlete. This is how athletes can verbally commit to a school before a college coach is allowed to call them.

Remember: Your reputation is on the line each time you speak with a coach. Your honesty and integrity about an athlete will impact whether a college coach uses you or your athletes in the future.

“A student athlete that has interest in a particular school should have his or her coach contact the school.” Gary Pepin, University of Nebraska Track & Field Coach

Help Position Athletes for Future Success

As coaches, our job doesn’t stop at the finish line; our goal isn’t to see an athlete win the next meet. Our goal should be to help an athlete transition their hard work and talent into future successes. For many athletes, the next prize for which they are competing is a college roster spot. They need to earn that prize, but coaches can help.

A coach’s goal is to help an athlete transition their hard work and talent into future successes. Share on X

Jeff Jenkins, Piedmont College cross country and track & field coach, lists three common mistakes that student-athletes make during the recruiting process:

  1. They wait too late to begin.
  2. They make premature, uninformed decisions.
  3. They don’t communicate effectively.

Your goal is to coach an athlete’s recruiting mindset. Teach, educate, and guide them through the process. Coach toward the best version of their future.

Since you’re here…
…we have a small favor to ask. More people are reading SimpliFaster than ever, and each week we bring you compelling content from coaches, sport scientists, and physiotherapists who are devoted to building better athletes. Please take a moment to share the articles on social media, engage the authors with questions and comments below, and link to articles when appropriate if you have a blog or participate on forums of related topics. — SF
Yael Averbuch

The Path to Ball Mastery with Techne Futbol

Blog| ByYael Averbuch

Yael Averbuch

It all started because I did what I always do when I’m a bit “down” or lonely—I grabbed my soccer ball and went out to find a wall to kick off of. In my typical fashion, I got obsessed trying to master some challenge I set for myself. Not thinking much of it, I decided to film myself and post the video on YouTube to see if anyone else could do it. From there, it became a fun little experiment—who out there in the world of the internet would try my skill challenge and post a video of themselves doing it?

And so, my YouTube channel grew and I felt the power of technology tying us all together; people from all over the world who shared this common interest. To my surprise, many people reach out and tell me how they use my training ideas or that their kids spend hours trying a certain Backyard Skill Challenge. It has become my way to give back.

Love the Journey

When I was 9, I dreamed of becoming a professional soccer player. Thanks to the hours and hours I spent on my own with the soccer ball, I’ve been able to live that dream. I was incredibly fortunate as a young player to have some amazing coaches and mentors, including my parents, who inspired me to spend time with the soccer ball, mastering the tool of my trade.

Players, parents, and coaches often ask me what’s the most important thing young players can do to set themselves up for success. My answer: Spend time with the ball! So many youth soccer players are playing the game without having mastered some of the basics that are vital to not only performing well and becoming elite, but enjoying the game more fully.

Technique is one of the few things that athletes have complete control over, says @Yael_Averbuch. Share on X

From ages 11-14, I was the only girl on an all-boys team. Overall, the boys were much more aggressive and athletic than me, even at that age. This was the time frame where I REALLY started to hone my technique. Not only is technique the great equalizer—there’s no reason that male and female players of any age should have a gap in technical ability—but it’s one of the few things athletes have complete control over.

Some people are born faster, quicker, bigger, or smaller, and there’s not much we can do about that. You can certainly improve your athletic capabilities, whatever they may be, in small percentages. But technique is something you have full control over as an athlete. There’s no magic or predisposition to it. It’s a simple equation—your ability correlates to the time you’ve put in to master the skill.

Moreover, ball control and skill are not qualities that exist in a vacuum. Developing these areas forces players to improve coordination, agility, quickness, and even flexibility and endurance. The process of practicing repetition and working towards mastering the ball also encourages athletes to be self-coaches and really delve into the concept of deep practice, which trains focus and mental toughness as well.

It’s a simple equation—your ability correlates to the time you’ve put in to master the skill, says @Yael_Averbuch. Share on X

Long term, I always had a vision of offering soccer players something a bit more substantial than the random training videos I put out on YouTube. When I was a young player, all that was available were a few VHS tapes that my dad would order from soccer catalogs. When they came in the mail, we’d watch them over and over and I’d write down all the skills from them to go out and practice on my own until I had them memorized. To this day, I can still quote lines from those videos!

Nowadays, there are thousands of videos out there all over YouTube and social media. There are tutorials, training sessions, freestyle, trick shots. I always tell players: “There’s no limit to what you can learn to do with the ball!” In addition to my YFutbol channel, here are a few YouTube channels I recommend:

  • Beast Mode Soccer
  • Trainer Gorres – Performance Coach
  • Indi Cowie
  • F2Freestylers

With so many amazing ideas and resources out there, I saw that it could be hard for young players to figure out what’s most important to work on if they have the time and desire to train on their own. So, the idea for Techne Futbol was born.

Training with Techne

I wanted to create a way to curate all the amazing content available and give players an actual blueprint to follow to achieve their dreams. After all, that’s what I had done for myself, with the help of my amazing mentors and the limited resources I could find at the time. Beginning with the very ambitious vision of creating a personal trainer for each and every player out there, I set out to start with the minimum viable product.

Techne app
Image 1. I created the Techne Futbol app to curate all of the amazing content available and give players a blueprint to follow to achieve their dreams. The app includes stats, drills, leaderboards, and so much more.


App Features

  • Profile Page: Each player can create a profile and view their stats: Total/Daily/Weekly Time Trained, Training Streak.
  • Training Sessions: Every training session includes 30 total drills, all with a demo video and written description. Many drills have an option to adjust the difficulty so players can work along a progression, depending on their current ability. Each drill also includes a timer, which allows the player to work on the skill for one minute and then adds that time to their training log.
  • Sock System: Similar to the belt system in martial arts, we have a Training Sock system where players earn their next level of socks after logging a certain amount of time in the app.
  • Leaderboard Competition: Players can compete with others from all over the U.S. and the world and view where they stand on our Leaderboards.
  • Time Trials: To measure technical proficiency, players are prompted to record scores in the app for various time trials. They can work to improve these scores over time and track their progress.

Types of Drills

  • Juggling: If you love juggling, it’s probably because you’re good at it. If you hate it, it’s probably because you haven’t spent enough time practicing to make it fun! I think juggling is one of the most important skills to master, not just for first touch. It helps with balance and coordination, and it’s easy to keep track of your progress because you can count your juggles.
  • Dribbling: The app includes stationary ball work, dribbling through cones set up in different formations, 1v1 moves, and pretty much any way you can imagine being on the move with the ball at your feet. Dribbling is cool to practice because there are a lot of different ways to be a good dribbler. Personally, I don’t often attempt to dribble past players (like Messi or Mallory Pugh), but I do pride myself on being able to maintain possession of the ball in tight spaces.
  • Wall Work: While growing up, I always used to try to force my sister to train with me. On the days she refused, the wall was the perfect training partner. It never says no! I used to spend hours at the schoolyard near my house, kicking against the wall.

Anywhere/Anytime:

  • One thing I like to stress through Techne is to get creative with your training. I train on/in fields, parking lots, parking garages, tennis courts, racquetball courts, driveways, and the house. That way there are no excuses. There’s always a way to make it work if you want to train!
Get creative with your training—there’s always a way to make it work if you want to, says @Yael_Averbuch. Share on X

Inspiring Youth Soccer Players to Own Their Development

The amazing thing about business and technology is that they’re incredibly similar to athletics in some ways. You start off with the grand vision of what you want to make or who you want to be. Then you ask yourself: “What can I do right now with the tools I have?” and “What should I be doing every single day to bring me closer to that vision?” As in athletics, I was well aware of my areas of expertise (my strengths) and where I would need to find experts I trust to guide me.

From the start, I employed the help of a friend and advisor, Samantha Weber. A former college soccer player, she understood the vision, and had also worked in the tech world in San Francisco. Samantha had a good understanding of business and technology, which I certainly lacked. She connected me with a freelance developer, Daniel Woodall.

Over roughly seven months, Dan built out the first version of Techne. It was a subscription-based web app that offered subscribers a weekly training session based on a drill library that I had spent hundreds of hours preparing as we built out the first version of the app. The idea was to spend minimal money (although if you could monetize my sweat equity it would definitely not be minimal!) and then scale up as we proved the concept was viable.

Since September 25, 2016, when we first opened signups and October 2, when the first training session went live, not a day has gone by that work hasn’t been put in to improve the product and user experience. Since then, we expanded our subscription system to allow for groups and I’ve brought an amazing developer, Russell Richardson, on board as a partner in the business. Through Russell’s work, Techne Futbol is now in the Apple and Google Play app stores and we continue to push forward on product development, chipping away with a very ambitious long-term vision in mind.

I view the project as threefold: the technology/product development, the development of the Techne system as a whole and the subscriber experience, and the actual training content. Each of these pieces is a constant work in progress. My goal is to form a community of people who care deeply about the process of mastery and skill development in soccer and leverage their expertise and passion to grow the Techne brand. The future will include more options for players and coaches to customize training sessions, as well as more training content from other players and coaches around the world.

Yael Techne
Image 2. Training with Techne is about empowerment. Techne subscribers tell me how much more confident they feel when they play, and that they can feel themselves improving and doing things on the field that they couldn’t do before.

Training with Techne is about embarking on a journey. It’s about making the ball your friend and understanding the process of mastery. But more importantly, it’s about empowerment. Techne subscribers comment all the time on how much more confident they feel when they play, and that they can feel themselves improving and doing things on the field that they weren’t able to before. And players don’t have to rely on their parents, coaches, or any fancy equipment to make that improvement. All they need is a ball, a wall, and the Techne app!

It’s been a fun but exceedingly challenging process to share this part of the sport that I love so much in a quality and engaging way. I’ve fallen in love with the puzzles of technology and business, in a similar way to falling in love with the soccer ball as a young girl. Techne Futbol has brought me full circle in some very powerful ways.

Since you’re here…
…we have a small favor to ask. More people are reading SimpliFaster than ever, and each week we bring you compelling content from coaches, sport scientists, and physiotherapists who are devoted to building better athletes. Please take a moment to share the articles on social media, engage the authors with questions and comments below, and link to articles when appropriate if you have a blog or participate on forums of related topics. — SF
Grip Strength

Is Grip Strength as Important as We Think It Is?

Uncategorized| ByBob Alejo

Power Lift Sport Science Education

Grip Strength

Grip strength is a huge topic. It is often associated with performance enhancement and not just with those sports that common sense would lead you to think of first—baseball, judo, racquet sports, strong man competitions, etc. Programs dedicate time to specifically train grip. But is it just one of those things we talk about as being important or do we focus on it as a necessary component because there will be a glaring weakness if we don’t train it? Is it merely another one of those things that everyone talks about, so it must be true?

Well, I’m here to tell you the information out there is pretty clear and also inconclusive, at the same time. I’d be lying if I said I wasn’t surprised. Let me explain.

How important is #gripstrength? The supporting information is pretty clear, and also inconclusive, says @Coach_Alejo. Share on X

Several factors influence grip strength: age, sex, hand size and grip span, posture, and position of the shoulder, forearm, and wrist (Espana-Romero et al., 2010). When you add in the validity and reliability of the dynamometer, the settings used for the test, and the different protocols, it’s easy to see that testing for grip strength is a cloudy proposition at best. In the Espana-Romero study alone, there were different results using the same test protocol but three different dynamometers!

Look, for sure if you can’t hold something well in sports (ball, bat, jersey, judo gi, barbell), your success is limited. My question is how much importance and commitment should be put on improving grip strength and what support exists beyond “I think it helps our athletes.”

Where Do the Studies Come From?

While I focused on athletic-related information, I found a tremendous amount of work on everything but that. As Mike Young (PhD, Athletic Lab owner and founder, member of Power Lift’s Sports Science Educational Board) pointed out to me and I found to be true, there’s a great amount of grip strength work related to mortality, wellness, quality of life and aging, and specific diseases like CPD, arthritis, diabetes, and hypo/hyperthyroidism.

Roberts et al. (2011) concur, as illustrated in the introduction portion of their review: “As an assessment measure, grip strength has been shown to have predictive validity and low values are associated with falls (Sayer et al., 2006), disability, impaired health-related quality of life (Syddall et al., 2009), and prolonged length of stay in hospital (Kerr et al., 2006), as well as increased mortality (Gale et al., 2007; Cooper et al., 2010).” It’s a simple and apparently obvious tool when looking at wellness. Other health-related handgrip studies include: LeWine, 2016; Pedão et al., 2014; Syddall et al., 2009; and Cooper et al., 2010.

On the other hand, athletic studies come from all levels—male, female, adolescents, high school, collegiate, and non-elite. I will cite some of the sparse information on elite and professional athletes in this article.

The Validity and Reliability of Grip Strength Testing

Before going all in on grip strength as a performance assessment, you’d have to start with the validity and reliability of the grip testing: both the protocol and the instrument. It is definitely more muddled than the results themselves. In the Espana-Romero study again, for example, the position of the elbow AND the dynamometer used (as I mentioned, three were in the study) have conflicting results in the same study.

The researchers looked at how elbow position affected grip strength in 12-16-year-old males and females using the TKK, Jamar, and DynEx dynamometers. Without going into too much detail, strength levels were significantly higher when the elbow was flexed at 90 degrees with the TKK. Results of the study indicate that of the three dynamometers, the TKK offered the highest validity and reliability for that “particular population,” if for no other reason than the TKK could be adjusted to 12-16-year old hand size whereas the Jamar and DynEx were not practical to accommodate that size.

When working with college hockey and possible future NHLers, comparison to NHL Combine grip testing scores would make sense for goal setting and programming. The NHL Combine uses the Jamar dynamometer for grip strength testing. For the test, the athletes put their arm overhead and fully extend it, squeeze the dynamometer as tightly as possible, and slowly release their arm down to their side (Chiarlitti et al., 2017). I thought it odd to have a grip test overhead until I read a study (Su et al., 1994) showing that the shoulder flexed at 180 degrees (overhead) and arm fully extended had the highest mean grip (using the Jamar) out of four positions (shoulder flexed at 0-90-180 degrees, and elbow flexed at 90 degrees/0 degrees shoulder flexion).

The point is that each dynamometer has its virtues and limitations in measurement of error, validity, and reliability. Different populations (age, sex, gender) are also affected by not only the dynamometer, but the protocol as well. The following are some additional references that include the topics of validity, reliability, and test protocols: Cardenas-Sanchez et al., 2016; Roberts et al., 2011; and Yingling et al., 2017.

Grip Training vs. Forearm Training: They’re Not the Same Thing

Here it is—doing wrist curls is forearm training. Opening and closing your hand is grip training. Sure, you get grip training just from weight training (as illustrated in most studies) and isometric strength is important (pinching, holding), but flexion and extension of the gripping muscles is the only way to comprehensively train the grip from an anatomical and kinesiological perspective.

Doing wrist curls is forearm training—opening and closing your hand is #grip training, says @Coach_Alejo. Share on X

Think about it: In what other area do we ONLY do isometric training? The grip is comprised of the strength of each finger and often the thumb. While forearm strength is important, there is no way to get to that strength if the grip “gives out”—if it’s not strong enough. If you are in a sport that requires forearm strength via the grip, you must give training the grip, including finger strength, equal training time for both volume and intensity.

I ran into a few great hand studies in engineering and ergonomic journals that were very enlightening from a data standpoint. Amis (1987) published a study that is critical for all of us in sports performance. It was an investigation of “maximal isometric cylindrical grasping actions” of cylinders 31-116 mm (1.22-4.56 in.) in diameter. He was able to measure all three phalangeal segments of each finger and their force contribution to grip and found the “…mean contributions of fingers from index to little were: 30, 30, 22 and 18%, proportions that did not vary significantly for the range of grasp diameters.” As the cylinder size increased, grasp forces decreased. Simply—and I see very little of it—finger training is grip training.

Another study looked at isometric gripping force on five cylinders of different sizes (Edgren et al., 2004): 2.54 cm (1 in.), 3.81 cm (1.5 in.), 5.08 cm (2 in.), 6.35 cm (2.5 in.), and 7.62 cm (3 in.). Edgren goes on to note that “On average, magnitude increased 34.8 N as handle diameter increased from 2.54 cm to 3.81 cm, and then monotonically declined 103.8 N as the handle diameter increased to 7.62 cm.” The 7.62 cm “handle” data from this research (the study was to benefit those designing tool handle sizes, optimizing grip for varying hand sizes) showed the smallest force. That both the smallest and largest cylinders showed the least amount of force illustrates the role of hand size and finger strength capabilities.

Comprehensively train the grip by flexing and extending the fingers, like you would any muscle, says @Coach_Alejo. Share on X

These two studies clearly demonstrate the contribution of the fingers to grip strength. Training must include different-sized training widths for isometric gripping, and gripping strength should be trained with a full range of gripping motion. Comprehensively train the grip by flexing and extending the fingers, like you would any muscle in the body.

Does Grip Strength Make Us Better at Sports?

There has been a very recent review addressing exactly this question: “A brief review of handgrip strength and sport performance” (Cronin et al., 2017; 203 references). A full discussion on the validity and reliability of dynamometers and protocols, this review covers the spectrum of sports and the relationship of handgrip strength and performance. The following is a mix of quotes and paraphrased summary:

Two sporting grips were deemed common, or at least a variation of the two:

  1. Precision grip—used for grasping sphere-shaped objects (e.g., balls)
  2. Power grip—used for grasping cylindrical-shaped objects (e.g., clubs, bats, rackets, sticks, and paddles).

The study was divided into five categories:

  1. Stick, club, bat, racket, and ball sports
  2. Water sports
  3. Climbing and gymnastics
  4. Combat sports
  5. Strength disciplines

1. Handgrip Strength in Stick, Club, Bat, Racket, and Ball Sports

“Trivial to nearly perfect correlations” were found between handgrip strength and throwing velocity; throwing energy; cricket bowling accuracy; 10-pin bowling accuracy; bat, club, and stick/puck speed; bat energy; fielding percentage; and golf, field hockey, ice hockey, and lacrosse shot. The authors suggest that handgrip strength has less of a relationship with actions that have a “high amount of technical precision and accuracy.”

This information suggests that the timing and sequencing of the force applied to an implement or object by the hand (palm, digits, and thumb) in sport is of greater importance than the magnitude of applied force alone. In addition, perhaps a handgrip strength threshold is reached where gaining more strength is of no advantage “where the coordination and timing (e.g., bat, club, stick, and racket sports) of skilled actions is more important.”

“Strength (e.g., bench press strength and wrist, elbow, shoulder, and knee torque), ballistic (e.g., medicine ball throw distance, and bench throw velocity and power), flexibility (e.g., shoulder and wrist), and anthropometric (e.g., body mass, lean mass, height, and arm span) measures were also moderately to very largely correlated with serving, spiking, and throwing velocity in tennis, volleyball, and handball athletes, respectively.” Ergo, when two or more key variables are analyzed, they better predict performance-based measures than any one variable (grip strength).

2. Handgrip Strength in Water Sports

In water sports, the hand is usually involved in propulsion through the water in some form. “Other single and multiple measures of strength (e.g., tethered swim force, upper arm, shoulder, and abdominal flexion), along with horizontal jump performance, aerobic and anaerobic capacity, anthropometry (e.g., height, arm span, and foot length), and flexibility (ankle and shoulder range of motion) are of equal or greater importance (than grip strength) to predicting swim performance in adolescent, teenage, and adult swimmers.”

Even though there were moderate to large correlations between handgrip strength and throwing velocity in elite water polo athletes, it was found that “certain anthropometric characteristics, such as limb length, height, lean muscle mass, and somatotype along with throwing technique, may be greater predictors of throwing velocity in water polo athletes.”

3. Handgrip Strength in Climbing and Gymnastics

The average observer would think, as the correlated and comparative information showed, there is plenty of good evidence suggesting that “a high amount of relative HGS is advantageous” for success in climbing and gymnastics (rings, bars). Although the research is limited, one study had a very large correlation between handgrip strength and handgrip strength endurance in ring athletes. With relative body mass being as important for climbing as in gymnastics, “large to very large correlations were observed between maximum relative hand grip strength, crimp grip strength, pinch grip strength, and rock climbing ability.”

4. Handgrip Strength in Combat Sports

Handgrip strength for combat sports (boxing, mixed martial arts, wrestling) seems more applicable than in a lot of sports. Although the studies with great correlations were not unanimous, there were moderate and very large relationships found between HGS and wrestling success and boxing competition ranking. Related to those data points, elite male athletes had much larger handgrip strength production than sub-elite groups, as did elite adult over sub-elite adults.

Elite combat sport athletes seem to possess greater overall maximum strength, explosive strength, lower-body fat percentages, and greater aerobic and anaerobic capacities in comparison with amateur and sub-elite combat sport athletes. It makes sense.

Comparing the grip strength of elite and non-elite Brazilian jiujitsu players (Da Silva et al., 2012) found tests that were reliable and sport-specific: “Considering that endurance as well as the grip on the lapel of the opponent’s kimono are vital to success in grappling combat sports, it seems these tests (maximum static lift and maximum number of repetitions) can be an important aspect of the physical evaluation of these athletes. In fact, our results showed elite athletes were superior in performance when compared to recreational practitioners of BJJ.”

5. Strength Athletes

Due to a lack of current research examining handgrip strength in strength athletes, only a small cohort could be reviewed. While not a specific handgrip study, Fry et al., 2006, observed large differences between the elite (stronger) and sub-elite junior Olympic weightlifters. As in other previously noted studies, the stronger grip group was also “more impulsive (i.e., vertical jump) and stronger across all lifts (i.e., snatch, clean and jerk, front squat, back squat, and bench press).”

 Note: “Efficacy off Handgrip Strength in Predicting Total Body Strength Among High Performance Athletes” (Jawan et. al., 2014) was an interesting piece. I only had access to an abridged version of the full text. From what I could find out, including the abstract, the high-performance athletes (N=100; 21 sports; team and individual sports) used in this study “represented their university, state, or country in sports and were reported as being healthy and fit through the interview sessions held before selecting them into the program.”

 Oddly, this study found no significant correlation between handgrip strength and “all the 1RM tests, including the bench press, lat pull-down, the leg press, leg extension, and strength test. Likewise, the leg power test also showed no significant correlation with the handgrip strength test. Hence, this study showed that the handgrip was not a significant measure of total body strength of high-performance athletes.” It was really the only study I read that showed no correlation between overall strength and handgrip strength.

Baseball

Baseball has some very good grip strength studies, although not many at the MLB level. However, the information is enough to develop some pretty good suppositions. It’s pretty simple: Swinging a bat, hitting, and throwing a ball with a strong grip could be beneficial. Spaniol (2009) sums it up in his article about a baseball-specific test battery he proposed: “It is strongly suggested that one such test, grip strength, be included in the assessment process because research suggests a positive relationship between grip strength and throwing velocity, bat speed, and batted-ball velocity.”

Grip strength plays a role in baseball, but not the most critical role, says @Coach_Alejo. Share on X

It’s also clear that there is a significant difference (stronger) in grip strength from high school to NCAA NAIA to specifically NCAA DI. I would say age has something to do with the increase from high school to college and perhaps skill level influences the differences between NAIA and DI college players. Nonetheless, grip plays a role. Additionally, based on the kinetic chain involved in hitting, grip strength does not play the most critical role.

The following is a summary of a few studies that should stimulate some thought:

Fry et al., 2011 – For NCAA DI baseball players, there was a significant relationship between batted ball velocity, grip strength, and incline bench press; squat strength was not significantly correlated. Eleven of the 31 participants had played a season prior to the study, so there were performance statistics to compare. For the 11, grip strength was significantly correlated to slugging percentage but “non-significantly” to batting average. Also reported was that grip strength was lower than previous studies, perhaps due to a “different hand grip dynamometer used.”

Hoffman et al., 2009 – Significant bivariate correlations were found between grip strength and home runs, total bases, and slugging percentage. Speed and lower body power were also significantly correlated with baseball specific performance variables.

Mangine et al., 2013 – Assessing professional pitchers and position players from under-20 to 35+ years of age (seven groups divided into three-year increments: under 20, 20-22, 23-25, etc.), of the eight total variables measured, grip strength, lean body mass, and total mass were the only variables to peak in the 29-31 age group; others peaked at a younger age.

Watanabe et al., 2017 – Vertical jump height correlated with individual performance records (total bases, slugging percentage, and stolen bases) of professional Japanese female baseball athletes. Grip, back, and lower-limb strength, and hamstring “extensibility” were not significantly correlated with game performance.

Kohmura et al., 2008 – This study proposed a testing protocol for college players that did not include grip strength. Most baseball studies typically include a gripping test as some assessment.

Szymanski and colleagues [2004, 2006, 2009, 2010, 2010] – In two articles (2009 & 2010), statistically significant relationships were demonstrated between grip strength, bat-end speed, and batted-ball exit speed in adolescent, high school-aged, and college athletes. In other articles (2004, 2006, 2010), grip strength training and a traditional (stepwise periodized) total body strength training significantly increased forearm and grip strength.

The group that completed additional grip strength and forearm training had statistically greater improvements in the seven grip and forearm variables tested compared to the control group; however, the additional supplemental grip strength and forearm training group did not have any further improvements in bat velocity (BV), center of percussion velocity (sweet spot; CV), or hand velocity (HV) in high school baseball players, indicating that a total body weight training program “…alone is a sound approach to statistically increase linear BV, CV, and HV in high school baseball players.”

Kinetic chain impact on swinging/rotating with an implement—in this case, a bat—is not related to any one variable. Improving kinematics and kinetics (forces that cause motion) of swinging a baseball bat is more complex and, in general, related to proper swing mechanics and power. (Many thanks to my friend and colleague, David Szymanski for co-authoring these two paragraphs with me. And by that, I mean thanks for the lesson!)

FYI baseball people: Grip a baseball or clench your fist and feel the ulnar collateral ligament area—tightened and flexed! Wouldn’t it make sense that with all that gripping of the baseball, there should be some balance in grip training with finger and wrist extension (the opposite of gripping), knowing there is a direct effect on that area!? We already know the throwing arm is out of balance and spend a great deal of time addressing balance—not necessarily a 50/50 balance—yet not one word about the grip. Why not the grip?

Golf

A study comparing fat grip resistance training with regular grip resistance training (Cummings et al., 2018) found “…that training with FG (fat grip) compared with normal diameter bars can significantly increase both RT (resistance training; left hand grip strength) performance and golf driving performance (ball speed, carry, drive distance) in DI male golfers.”

Fat bar training note: Ratamess et al., 2007, concluded what most of us already know, “the use of 2- and 3-inch thick bars may result in initial weight reductions primarily for pulling exercises presumably due to greater reliance on maximal grip strength and larger hand size.”

What’s your intent when using fat grip training? If it’s for grip training, good idea. At the same time, bar width will lighten your load, thereby sacrificing pulling strength and maybe pressing strength for grip. It’s a nonsensical proposition if you are trying to optimize pulling strength or hypertrophy by way of a given exercise. It’s like limiting squat loads because you want to do calf raises.

Tennis

Even though the force transducers measuring grip tightness were built into a mechanical arm and wooden rackets were used (4.37” grips), the results were interesting (Elliot, 1982). Tighter grips “increased the reaction impulse and rebound velocity of the ball (balls were delivered by a ball machine; racket velocities were approximated to that of college-level baseline drives), particularly for off-center impacts.” No surprise given the amount of conflicting grip strength conclusions in sport. Grabiner et al. (1983) found in a primary conclusion, contrary to Elliot, “…that grip firmness plays no role in tennis other than pre- and post-impact implement control.” Smart et al. (2011) found grip strength significantly correlated to post-test serve velocity, but so did bench press, vertical jump height, squat, gender, and arm length.

Four other studies (Ulbricht et al., 2016; Girard et al., 2009; Genevois et al., 2013; Baiget et al., 2014) looking at serve velocity or physical parameters. Two did not include grip strength as an assessment and the other two gave no real recommendation of any kind for grip strength contribution to performance. To me this points to a lack of grip strength studies and a lack of interest or punctuation for grip strength.

My Anecdotal Experience, Hypotheses, and Common Sense

Hand size and strength play a role in sporting success, albeit not a crucial role. Think about it: The bigger the hand, the more coverage you’ll have “up the handle” on a bat and therefore better control of the bat head. These benefits would be obvious in racquet sports.

Strength aside, the control of the implement in these cases would be important. Bigger hands would mean more jersey to grab and hold, more gi to control, better wrist control, or holding a submission in wrestling (not the piledriver or throwing someone over the ropes). To anybody who’s done it, the more hand you can put on a football, basketball, baseball, or any ball for that matter—not to exclude a shot put, javelin, or disc—the better control and direction you might have of the object.

Gripping is a common, everyday thing. You could posit that reversing the action of gripping (opening the hand and fingers as wide as possible against resistance) makes total sense. We always talk about muscle balance in the legs, shoulder, and trunk, but I hardly ever hear of that discussion in relation to grip during all the grip hullabaloo. Putting an elastic band around the fingers and thumb and opening the hand against that resistance makes total physiological sense. So much so that if you’re saying grip strength is that important, then reverse grip movements should be on the workout sheet too!

There are times when grip strength, or at least maximum grip strength, is not needed. It’s important, but not always necessary. I know of programs spending up to 15 minutes of a 45-60-minute workout on grip strength. A coach has to shrewdly address committing 25% of a workout to grip, knowing that there are several other more important parameters most of the time. A well-rounded program includes grip strengthening—it’s called training. A coach can’t dismiss that. Research has proven it.

A well-rounded program includes grip strengthening—it’s called training. A coach can’t dismiss that, says @Coach_Alejo. Share on X

My takeaway from my investigation is that the impact each finger has on grip strength is magnified when you look at the force produced over a range of gripping widths. Therefore, train the flexion and extension of the fingers through many ranges of motion!

Summary

After reading some 70 abstracts and studies, as I said in the second paragraph of this article, it’s pretty clear that it’s unclear how much gripping contributes to athletic or physical performance. Stronger people have stronger grips than weaker people; bigger people (body mass) have stronger grips than smaller people; older people have stronger grips than younger people. If you want to be able to hold heavy objects, lift heavy objects—this is common sense to anyone who has coached at least one month.

I only saw grip strength having predictive validity when it relates to wellness. Studies have shown that grip strength increases with grip strength training added to regular lifting. Studies have also shown that the added increase in grip strength did not improve performance. In fact, Layton et al. showed that in racquetball tournament play, there was no “significant or practical difference” between first place finishers and the remainder of the field.

Research shows that #GripStrength is important, but not critical to athletic performance, says @Coach_Alejo. Share on X

Grip strength is shown to be important, but not critical to or predictive of athletic performance. There are plenty of correlates, but overall it appears as if grip strength is a by-product of other measures and qualities and not the other way around.

Since you’re here…
…we have a small favor to ask. More people are reading SimpliFaster than ever, and each week we bring you compelling content from coaches, sport scientists, and physiotherapists who are devoted to building better athletes. Please take a moment to share the articles on social media, engage the authors with questions and comments below, and link to articles when appropriate if you have a blog or participate on forums of related topics. — SF
References

Abraldes, J.A., Canossa, S., Soares, S.M., Fernandes, R.J. & Garganta, J.M. “Relationship Between Hand Grip Strength and Shot Speed in Different Competitive Level Water Polo Players.” Center of Research, Education, Innovation and Intervention in Sport. 2014.

Amaral, J.F., Mancini, M. & Novo Júnior, J.M. “Comparison of three hand dynamometers in relation to the accuracy and precision of the measurements.” Brazilian Journal of Physical Therapy. 2012.

Amis, A. “Variation of finger forces in maximal isometric grasp tests on a range of cylinder diameters.” Journal of Biomedical Engineering. 1987.

Baiget, E., Fernandez-Fernandez, J., Iglesias, X., Vallejo, L. & Rodrıguez, F.A. “On-court endurance and performance testing in competitive male tennis players.” The Journal of Strength and Conditioning Research. 2014.

Cardenas-Sanchez, C., Sanchez-Delgado, G., Martinez-Tellez, B., Mora-Gonzalez, J., Löf, M., España-Romero, V., Ruiz, J.R. & Ortega, F.B. “Reliability and validity of different models of TKK hand dynamometers.” American Journal of Occupational Therapy. 2016.

Chiarlitti, N.A., Delisle-Houde, P., Reid, R.E.R., Kennedy, C. & Andersen, R.E. “The Importance of Body Composition in the National Hockey League Combine Physiologic Assessments.” The Journal of Strength and Conditioning Research. 2017.

Cooper, R., Kuh, D. & Hardy, R. “Objectively measured physical capability levels and mortality: systematic review and meta-analysis.” British Medical Journal. 2010.

Cronin, J., Lawton, T., Harris, N., Kilding, A. & McMaster, D.T. “A brief review of handgrip strength and sport performance.” The Journal of Strength and Conditioning Research. 2017.

Crossland, B.W., Hartman, J.E., Kilgore, J.L., Hartman, M.J. & Kaus, J.M. “Upper-body anthropometric and strength measures and their relationship to start time in elite luge athletes.” The Journal of Strength and Conditioning Research. 2011.

Cummings, P.M., Waldman, H.S., Krings, B.M., Smith, J.W. & McAllister, M.J. “Effects of fat grip training on muscular strength and driving performance in division I male golfers.” The Journal of Strength and Conditioning Research. 2018.

Da Silva, B., Marocolo, M., de Moura Simim, M.A., Rezende, F.N., Franchini, E. & da Mota, G.R. “Reliability in kimono grip strength tests and comparison between elite and non-elite Brazilian Jiu-Jitsu players.” 2012.

Derwin, J. “Effective Methods of Grip Strength Development.” NSCA COACH 2.3 | NSCA.COM.

Edgren, C.S., Radwin, R.G. & Irwin, C.B. “Grip force vectors for varying handle diameters and hand sizes.” Human Factors: The Journal of the Human Factors and Ergonomics Society. 2004.

Elliott, B. “Tennis: the influence of grip tightness on reaction impulse and rebound velocity.” Medicine & Science in Sports & Exercise. 1982.

España-Romero, V., Ortega, F.B., Vicente-Rodríguez, G., Artero, E.G., Rey, J.P. & Ruiz, J.R. “Elbow position affects handgrip strength in adolescents: validity and reliability of Jamar, DynEx, and TKK dynamometers.” The Journal of Strength and Conditioning Research. 2010.

Follmer, B., Dellagrana, R.A., Franchini, E. & Diefenthaeler, F. “Relationship of kimono grip strength tests with isokinetic parameters in jiu-jitsu athletes.” Revista Brasileira de Cineantropometria e Desempenho Humano. 2015.

Fry, A.C., Ciroslan, D., Fry, M.D., LeRoux, C.D., Schilling, B.K. & Chiu, L.Z. “Anthropometric and performance variables discriminating elite American junior men weightlifters.” The Journal of Strength and Conditioning Research. 2006.

Fry, A.C., Honnold, D., Hudy, A., Roberts, C., Gallagher, P.M., Vardiman, P.J. & Dellasega, C. “Relationships Between Muscular Strength and Batting Performances in Collegiate Baseball Athletes.” The Journal of Strength and Conditioning Research. 2011.

Gale, C.R., Martyn, C.N., Cooper, C. & Sayer A.A. “Grip strength, body composition, and mortality.” International Journal of Epidemiology. 2007.

Garcia Pallerés, J., López-Gullón, J.M., Torres-Bonete, M.D. & Izquierdo, M. “Physical fitness factors to predict female Olympic wrestling performance and sex differences.” The Journal of Strength and Conditioning Research. 2012.

Genevois, C., Frican, B., Creveaux, T., Hautier, C. & Rogowski, I. “Effects of two training protocols on the forehand drive performance in tennis.” The Journal of Strength and Conditioning Research. 2013.

Girard, O. & Millet, G.P. “Physical Determinants of Tennis Performance in Competitive Teenage Players.” The Journal of Strength and Conditioning Research. 2009.

Grabiner, M., Groppel, J. & Campbell, K. “Resultant tennis ball velocity as a function of off-center impact and grip firmness.” Medicine & Science in Sports & Exercise. 1983.

Hoffman, J.R., Vazquez, J., Pichardo, N. & Tenenbaum, G. “Anthropometric and performance comparisons in professional baseball players.” The Journal of Strength and Conditioning Research. 2009.

Jawan, L., Adnan, R., Sulaiman, N. & Ismail, S.I. “Efficacy of Handgrip Strength in Predicting Total Body Strength Among High Performance Athletes.” In Proceedings of the International Colloquium on Sports Science, Exercise, Engineering and Technology. 2014.

Kerr, A., Syddall, H.E., Cooper, C., Turner, G.F., Briggs, R.S. & Sayer, A.A. “Does admission grip strength predict length of stay in hospitalised older patients?” Age and Ageing. 2006.

Kohmura, Y., Aoki, K., Yoshigi, H., Sakuraba, K. & Yanagiya, T. “Developments of a baseball-specific battery of tests and a testing protocol for college baseball players.” The Journal of Strength and Conditioning Research. 2008.

Layton, J.S. & DeBeliso, M. “Is There a Relationship between Maximal Grip Strength and Racquetball Success? A Pilot Study.” Athens Journal of Sport. 2017.

LeWine, H. “Grip strength may provide clues to heart health.” Harvard Health Blog. Posted May 19, 2015, 12:11 pm, Updated September 08, 2016, 5:16 pm.

Mangine, G.T., Hoffman, J.R., Fragala, M.S., Vazquez, J., Krause, M.C., Gillett, J. & Pichardo, N. “Effect of age on anthropometric and physical performance measures in professional baseball players.” The Journal of Strength and Conditioning Research. 2013.

Pedão, S.T., Aguiar, S., Cunha, B.P. & de Freitas, P.B. “Grip and load force control and coordination in object manipulation during a night of sleep deprivation.” Sleep and Biological Rhythms. 2014.

Platzer, H.P., Raschner, C. & Patterson, C. “Performance -determining physiological factors in the luge start.” Journal of Sports Sciences. 2009.

Ploegmakers, J.J., Hepping, A.M., Geertzen, J.H., Bulstra, S.K. & Stevens, M. “Grip strength is strongly associated with height, weight and gender in childhood: a cross sectional study of 2241 children and adolescents providing reference values.” Journal of Physiotherapy. 2013.

Ratamess, N.A., Faigenbaum, A.D., Mangine, G.T., Hoffman, J.R. & Kang, J. “Acute muscular strength assessment using free weight bars of different thickness.” The Journal of Strength and Conditioning Research. 2007

Roberts, H.C., Denison, H.J., Martin, H.J., Patel, H.P., Syddall, H., Cooper, C., & Sayer, A.A. “A review of the measurement of grip strength in clinical and epidemiological studies: towards a standardised approach.” Age and Ageing. 2011.

Sayer, A.A., Syddall, H.E., Martin, H.J., Dennison, E.M., Anderson, F.H. & Cooper, C. “Falls, sarcopenia, and growth in early life: findings from the Hertfordshire cohort study.” American Journal of Epidemiology. 2006.

Smart, J., McCurdy, K., Miller, B. & Pankey, R. “The Effect of Core Training on Tennis Serve Velocity.” The Journal of Strength and Conditioning Research. 2011.

Spaniol, F. “Baseball Athletic Test: A Baseball-Specific Test Battery.” Strength and Conditioning Journal. 2009.

Su, C.Y., Lin, J.H., Chien, T.H., Cheng, K.F. & Sung, Y.T. “Grip strength in different positions of elbow and shoulder.” Archives of Physical Medicine and Rehabilitation. 1994.

Syddall, H.E., Martin, H.J., Harwood, R.H., Cooper, C. & Aihie Sayer, A. “The SF-36: a simple, effective measure of mobility-disability for epidemiological studies.” Journal of Nutrition, Health and Aging. 2009.

Szymanski, D.J. & DeRenne, C. “The Effects of Small Muscle Training on Baseball Hitting Performance: A Brief Review.” Strength and Conditioning Journal. 2010.

Szymanski, D.J., DeRenne, C. & Spaniol, F.J. “Contributing factors for increased bat swing velocity.” The Journal of Strength and Conditioning Research. 2009.

Szymanski, D.J., McIntyre, J.S., Szymanski, J.M., Molloy, J.M., Madsen, N.H. & Pascoe, D.D. “Effect of wrist and forearm training on linear bat-end, center of percussion, and hand velocities and on time to ball contact of high school baseball players.” The Journal of Strength and Conditioning Research. 2006.

Szymanski, D.J., Szymanski, J.M., Molloy, J.M. & Pascoe, D.D. “Effect of 12 weeks of wrist and forearm training on high school baseball players.” The Journal of Strength and Conditioning Research. 2004.

Szymanski, D.J., Szymanski, J.M., Schade, R.L., Bradford, T.J., McIntyre, J.S., DeRenne, C. & Madsen, N.H. “The relation between anthropometric and physiological variables and bat velocity of high school baseball players before and after 12 weeks of training.” The Journal of Strength and Conditioning Research. 2010.

Trosclair, D., Bellar, D., Judge, L.W., Smith, J., Mazerat, N. & Brignac, A. “Hand-Grip Strength as a Predictor of Muscular Strength and Endurance.” The Journal of Strength and Conditioning Research. 2011.

Ulbricht, A., Fernandez-Fernandez, J., Mendez-Villanueva, A. & Ferrauti, A. “Impact of fitness characteristics on tennis performance in elite junior tennis players.” The Journal of Strength and Conditioning Research. 2016.

Watanabe, Y., Yamada, Y., Yoshida, T., Matsui, T., Seo, K., Azuma, Y., Hiramoto, M., Miura, Y., Fukushima, H., Shimazu, A., Eto, T., Saotome, H., Kida, N. & Morihara, T. “Relationship between physical fitness at the end of pre-season and the in-season game performance in Japanese female professional baseball players.” The Journal of Strength and Conditioning Research. 2017.

Yim, S.Y., Cho, J.R. & Lee, I.Y. “Normative Data and Developmental Characteristics of Hand Function for Elementary School Children in Suwon Area of Korea: Grip, Pinch and Dexterity Study.” Journal of Korean Medical Science. 2003.

Yingling, V.R., Webb, S., Inouye, C., O, J. & Sherwood, J. “Muscle power predicts bone strength in Division II athletes.” The Journal of Strength and Conditioning Research. Post Acceptance: August 29, 2017

NFL Player with Football

Assessing NFL Combine Drills with Paul Beckwith and Pro Scouts

Freelap Friday Five| ByPaul Beckwith

NFL Player with Football

Paul Beckwith is the Director of Sports Performance at Apex Athletic Performance in Columbia, SC, and has trained athletes in the National Football League, Major League Baseball, PGA Tour, and Major League Soccer. He was recently in Indianapolis for the NFL Combine, after preparing several athletes for the event.

“With the idea and understanding that 90% of the grade of an NFL athlete comes from game film, medical reports, and personal interview, the actual ‘Combine tests and drills’ are what I call an up-close-and-live audition of athleticism,” Beckwith said.

While there, Paul spoke with NFL scouts about the Combine showcase. In this modified Freelap Friday Five, contributed via 1080 Motion, Paul shared with us some of what he heard from these scouts and how they evaluate the individual drills as they assemble their profile of each prospective player.

One Speed Tests: Less Is More (Not Always, but Often)
Scout: For certain positions, the 40-yard dash matters greatly. It’s important for wide receivers and cornerbacks, not so much for linemen and quarterbacks. Our league is about speed, and this test helps attach some speed numbers to players. It’s not as important as people think, but it’s not as overrated as people think, either.

The NFL is about speed: For certain positions, the 40-yard dash matters greatly. Share on X

Beckwith: I know a few colleagues around the league who value the results of the 10-yard split more than any other speed metric here. I still haven’t seen any verified data that backs that up, but I get it. Initial burst and quickness are obviously important.

Two Shuttle and Agility Tests: Direct Transference to the Sport
Scout: I love the 20-yard short shuttle. Stiff athletes can’t escape the shuttles with good times. Burst, bend, and lateral range are tested, and tightness is exposed.

The three-cone drill is the single most important drill at the Combine, plain and simple. Share on X

Beckwith: The three-cone drill is the single most important drill at the Combine, plain and simple. Regardless of position, I want to know how the player performs in space, and this helps show change of direction, explosiveness, and overall athleticism. There is validity to this test translating to the football field.

Three Jump Tests: Minimal Utility for Football
Scout: The higher you can jump, the better, but it’s more of a threshold drill. As long as you jump at a certain level, depending on your position, you’re fine. The best numbers in this drill don’t tell me much.

The broad jump is an overrated drill. Share on X

Beckwith: The broad jump is an overrated drill. It helps gauge lower body muscles and twitch, I suppose, but you can’t convince me it necessarily translates to an athlete being a better player.

Four Bench Press: Drop It
Scout: If we forgot to do this drill at the Combine, no one would miss it. It’s overrated and useless. If a player has a low number of reps, he’s not a weight room guy—but we already knew that.

Five
What is the likelihood of the Combine changing to reflect what we now know about sport science, particularly transference between drills or tests and the sport performance they supposedly predict?

Beckwith: The Combine isn’t going to change drastically. It’s too established. Plus, at its core it’s as much about entertainment and furthering the NFL narrative in February as it is about scouting.

The way to improve the Combine isn’t to change the drills, but to expand how they’re measured. Share on X

People are attached to the mystique of the 40-yard dash, and that’s fine. The way to improve the Combine is not to change the drills, but to expand how they’re measured.


Video 1. High performance professionals can use technological tools and analytics to create a blueprint to prepare athletes for the Combine.

Teams can compare the big numbers—that’s what they’re looking at to compare athleticism. As sports science/sports medicine practitioners, we can use the more detailed analysis to really understand how to create a blueprint for that athlete to make sure that you fix them and have them ready between now and when they show up at that first camp.

That’s the next step: Use the Combine not just to evaluate players, but to maximize those players’ abilities once they latch on with a team.

Since you’re here…
…we have a small favor to ask. More people are reading SimpliFaster than ever, and each week we bring you compelling content from coaches, sport scientists, and physiotherapists who are devoted to building better athletes. Please take a moment to share the articles on social media, engage the authors with questions and comments below, and link to articles when appropriate if you have a blog or participate on forums of related topics. — SF
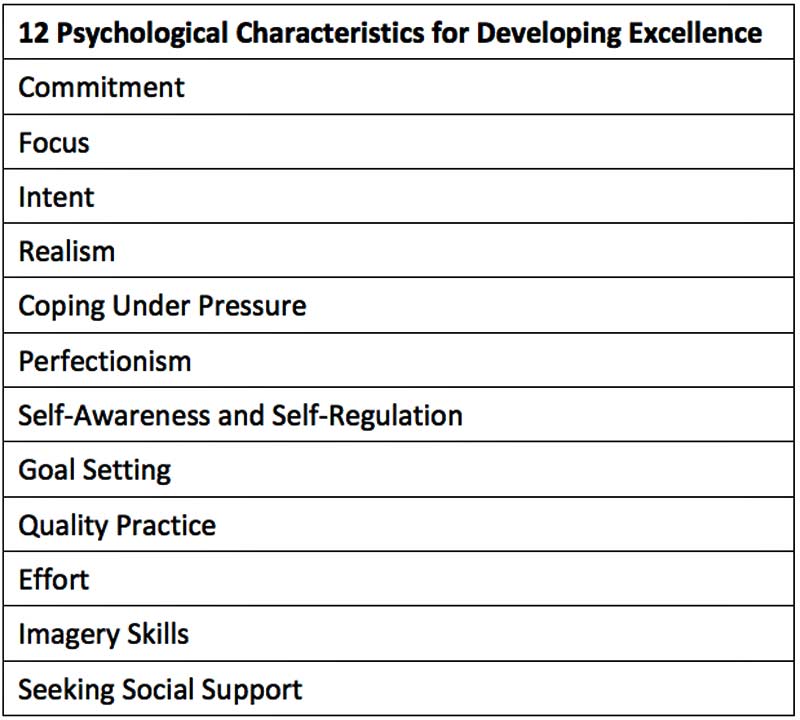


A digital watch with a black strap and a metal case is displayed on a white background. The watch is attached to a dark, adjustable chest strap heart rate monitor. The watch screen shows a time of 12:03:54.

A Buyer’s Guide for Coaches for Team Heart Rate Monitoring Systems

Buyer's Guide / ByChristopher Glaeser


Heart Rate Monitors

As the wearable market grows, so does the accessibility to heart rate data. Commercial heart rate monitors have been around for decades, but they are still viable options for coaches and athletes wanting to know how training challenges the cardiovascular system. While there have been major technology breakthroughs with hardware and software since the late 1970s, the science is still the same and there have been very few advancements outside of TRIMP and heart rate variability (HRV) measurement.

The interest in mechanical loading from other sensor technology has led to us seeing heart rate measurement take a back seat for now. Even with the rise in popularity of GPS-guided player tracking, the measures of the heart are timeless for supporting coaching decisions and athletic development.

Why Heart Rate Monitoring Is Still Relevant

Since the early 2000s, we have observed a slow and slight decline in the heart rate monitoring of practices. At the same time, there has been increased interest both in the autonomic nervous system from HRV data and in player tracking technology from GPS-powered systems. New is not always better, and the inclusion of both heart rate monitoring and player workloads is a perfect match.

The inclusion of both heart rate monitoring and player workloads is a perfect match. Share on X

External loading options like player tracking systems are an estimate of the total and type of work, while internal response options like heart rate monitoring measure the physiological reaction to the bout of work. Add in the fact that real-time HRV readings can be done now, so many coaches like adding that safety net to overtraining by scanning a team right after warming up for practice. Including a complete monitoring option to practices and training provides a robust checks and balances to the work and recovery of sport preparation.

Heart Rate Data
Image 1. Devan McConnell is one of the few coaches in the U.S. not to leave metabolic and heart rate data tracking. The extra work is worth it, and he is a leader in monitoring in the U.S.


Currently, there is declining interest in heart rate monitoring, but we expect a rebound for several reasons. The main reason the data is growing in interest is that smart fabrics and newer textiles are improving the user experience of wearing a chest band. There is surging interest in wrist-based products, but the research indicates that data is not as good as a chest strap option.

The second reason why data is coming back in vogue with heart rate monitoring is the improvement in data aggregation from athlete management system (AMS) software. In the past, juggling data alone—the common burden of smaller club and college coaches—was just too much. Now the burden of exporting or transferring data is lifted, and the coach is free to do the analysis instead of the monkey work.

With the burden of exporting data lifted, coaches are free to do analysis instead of monkey work. Share on X

Heart rate data is more important for endurance sports and open field continuous sports like soccer, but with team practices in power-oriented sports lasting hours, the data is just as relevant as in the past.

Understanding Heart Rate Monitor Signal Quality and Telemetry Demands

Before coaches or athletes look into features and other secondary benefits, the two key areas that make or break a heart rate system are the quality of data and how the data is pushed out either in real time or post session. The first step in getting an accurate heart rate is not a technology decision, but an anatomical choice with where to measure. Sensors near the heart, such as a shirt or strap, are common because of signal quality. Other options like finger and wrist measures are fine, but artifact problems increase and signal fidelity decreases as the measure becomes more distal to the midpoint of the body. Electrocardiograms (ECG or EKG) will sometimes use “limb leads,” but the primary zone of measurement is the chest.

The first step in getting an accurate heart rate is an anatomical choice of where to measure. Share on X

Unlike health monitoring options, body motion can really corrupt the data quality of sensors away from the heart. That’s why the Apple Watch and Mio bands are great for recreational athletes, but not for competitive athletes that push the limits and need solid data. The heart rate monitor market can be confusing because buyers must be informed whether the watch collects and displays data or whether sensors on the watch actually collect the data directly. EKG tests are the gold standard in collecting a comprehensive signal beyond changes in heart rate, and that type of information is beyond the scope of this article. Omegawave, a physiological monitoring system, does provide very high resolution data, but that enters the realm of medical data, not coaching information.

Transmitting the signal should be a non-issue today with the advancement of wireless transmissions, but things break down or fail with any technology. On paper, several options like ANT+ and LE Bluetooth sound robust, but the more moving parts, the more likely something will go wrong. Often the problem is not the transmission but a battery issue or something like a strap not placed properly. Also, conductance breaks down because sweat will literally corrode the materials used to collect the data, even if it helps improve a signal. Some products provide boosting components to help outdoor or indoor signal capture, and that is a necessity when looking at real-time data and wanting no transmission loss.

Software and Third-Party Applications

The common frustration with nearly all heart rate monitoring systems is the general pattern of less support for software engineers than for hardware engineers. In the past, some software platforms looked rushed or last minute compared to the hardware, but now web-based software is solving the problem. The other growth area is apps that are agnostic to consumer products and provide a way to visualize, analyze, and store the heart rate data.

The line between consumer products and team enterprise is becoming fuzzier, as a company like Polar provides a leaderboard app for tablets that exploits the ability to sync multiple Bluetooth chest straps, but only for short ranges. We see million-dollar athletes using the same technology anybody can access from a local sporting goods store, which is another example of the way technology is improving and becoming less expensive at the same time.

Polar Heart Rate Graph
Image 2. The key to software is ensuring that coaches can customize their settings and be able to automate charts and reports. Typical TRIMP and load metrics are common in the industry.


Next are the added-value services or proprietary analysis applications like iTrimp and the countless endurance market tools. Also included in this category are athlete management systems that either allow for customized dashboards and reporting or provide a suite of tools to apply smarter decisions. As the additional data streams increase, expect the heart rate monitor companies to minimize their software to the essentials, and focus on their ability to share data with platforms that can analyze the data as well as fuse multiple data sets.

Very little progress or innovation occurred in the last decade regarding heart rate monitoring due to the interest in GPS player tracking, but there is promising evolution in some circles. Many coaches who use heart rate monitoring in isolation are trying to calculate load instead of the response to load, which is a fair approach but far less valuable. The current trend is to use very high level statistical analysis of all of the data to detect patterns of fatigue in advance of injury. As early detection improves, so does the opportunity for better planning. This way you can avoid unnecessary resting due to poor sequencing when the weekly total load may be appropriate.

TRIMP, a measure of estimated physiological load, can be done with nearly every system. Besides that metric, there is very little other heart rate driven scoring of note. One clever way to maximize the usefulness of heart rate monitoring is to use HRV indices with standardized recovery runs and warm-ups. Linear running provides more precision than chaotic environments because you can compare it week to week. Other than regeneration and preparation sessions, combining workload responses of other sensors is the typical approach to modern training.

Essential Differences Between Team and Individual Systems

While stereotyped as dated, products used radio in the past to send heartbeat signals from chest bands to a unit that could then pass it to a digital option like a computer. Later, infrared transfer to a USB dongle was the standard, but now local area networks are using other wireless options. Team systems differ from individual systems because they relay connect every athlete to one device instead of one sensor to one smartphone or watch.

All of this may sound like minor or unnecessary details, but the vital challenge is making practices run smoothly with technology, not have coaching chores interfere with instruction or supervision. Some team systems have been known to work intermittently because teams are a small part of company profits and resources are usually spent on the consumer market. Even today, some systems fail from time to time because of firmware updates or interference, but in general there is higher stability.

The challenge is having practices run smoothly with technology, and not interfere with coaching. Share on X

Consumer products are fine for endurance athletes, because most distance runners, cyclists, and triathletes are disciplined to collect their own data and push it to the cloud, or similar. Team sports need team solutions not because of the differences between activities, but the differences in personalities. Many small groups with engaged athletes that work with their private coaches are willing participants in the data collection because they selected the coach in the first place, but teams are drafted and not voluntary, so the contribution of the athletes is minimal, for the most part. The more advanced the athlete, specifically in team sport, the less likely they are driven to do much of the leg work in getting data to central repositories like AMS options.

A very common and important question is about the difference between managing a group of individuals and guiding a team. The technology used, as well as the type of sport and environment, can be the difference between spending a small amount of money and having to fork over much more capital. When you buy an enterprise team product, you buy convenience with passive data aggregation instead of expecting an active or permission-based data process.

You should ponder, and answer, these four vital questions before spending a single dollar on a heart rate monitoring system. The answers will help determine what you should invest in.

  1. Am I trying to manage a sport team in real time or do I need the information later?
  2. Does the athlete train on their own and are they used to uploading their own data?
  3. Am I by myself managing this, or do I have help from other coaches and/or a sport scientist?
  4. Do I plan to use the company software or do I have an athlete management system?

Those four questions are imperative for deciding if you need to spend money on the more costly but powerful team options. Team pricing is not about bulk rates or getting a heart rate sensor for each athlete—it requires a lot of support expenses that are beyond the budgets of some colleges and most high schools. What is not included are policies and logistical areas such as cleaning shared straps or replacing batteries. Any data collection process must be a well-oiled machine to work sustainably.

Any data collection process must be a well-oiled machine to work sustainably. Share on X

The Top Options for Heart Rate Monitoring in Sport

For the purposes of clarity, we have divided the listed companies into two groups: enterprise and individualized consumer products. Individualized systems can be scaled with the right software, and this is why coaching products like TrainingPeaks are so popular in the endurance market. Health and fitness platforms are also banking on the BYOD or bring your own device environment, where an API allows for heart rate data to be sent and shared to the cloud.

Cardio Sport RT
Image 3. The increase in quality of consumer products makes business models harder at the elite level. The gap between pro and consumer products is now smaller than ever.


Regardless of what you use, make sure you know that the true limit is not the technology but the participation attitude of the athlete. It’s possible to use consumer products and create a near enterprise environment, but the convenience of doing so is not ideal and some logistical juggling is necessary.

Team Enterprise Solutions

Polar Pro: Perhaps the leader in team heart rate products, Polar has had a lot to do with improving the market size of the heart rate products from their commercial systems with endurance in the late 1990s and early 2000s. Many research studies looking at HRV and other serious indices have used the Polar heart rate straps to collect data, and their products are considered research-grade for heart rate monitoring. Now the Polar company has entered the smart textile market with a shirt similar to Hexoskin. Polar is similar to Garmin, but instead of adding heart rate to GPS devices, they took their team heart rate products and added GPS data to them. 

FirstBeat: Like Polar, FirstBeat is from Northern Europe and really understands the sports market. They provide both passive physiological monitoring with group HRV testing and active heart rate monitoring. The strength of FirstBeat has to be their software, as they have excellent reporting and data visualization.

FirstBeat gained a lot of momentum when they showed up on the Jumbotron player data with the Buffalo Sabers years ago, and this was a key example for literally understanding the big picture. FirstBeat is always cutting-edge with both science and technology, and they’re hugely popular in both Europe and North America. FirstBeat is expanding to wellness and fitness, as they specialize in stress management, not just conditioning. 

Zephyr: Made famous from the Chilean mine disaster, Zephyr is a team product with an open form of data transmission. Zephyr is stronger on the hardware than the software side, as their products are really a hardware play. Omnisense is their software, and it’s solid, but it’s likely better for real-time management with a large sport science team than a fitness coach alone.

Developers embraced their product because they offered an SDK and API (software programming tools), but as a consumer product they didn’t have enough market share to gain traction. Zephyr worked with other companies as a white-label solution, but the heart rate and accelerometer data for team sport is very limited, especially for combines that are speed- and power-oriented. 

Hexoskin: Hexoskin made their debut earlier with our apparel review, and they are the only true breathing rate data available. Other sensors are on the shirt—typical ones like accelerometers for activity—but the conductive fabric provides quality data appropriate for HRV measures. Many different sports teams and space, military, and research organizations use Hexoskin. Like many smart fabrics, the amount of washing is limited, but because of their comfort many coaches use them for pilot studies to deep-dive into more surveillance-type investigations like stress during a day, similar to the First Beat offerings.

Other systems like Activo are available, but due to the adoption pattern, they didn’t make the list. We can classify Hexoskin as an enterprise solution because of their experience with military and professional teams, but they are more of a scale-friendly system than a team system.

Individual Consumer Products

Here are three companies that provide high-quality products that you can find at the local sports department store or running shop. All of the products connect directly to a smartphone for live feedback or to upload data to the cloud. 

Suunto Ambit Series: The Suunto Ambit3 delivers a very sophisticated and rich experience, and is one of the top sport watches for any athlete, regardless of sport. One of the key benefits, besides connecting to a comprehensive web portal, is the ability to program the watch using their online software. You can literally form apps that are custom to the needs of the athlete and the data now connects with TrainingPeaks.

The heart rate strap is soft and comfortable, and this greatly improves the user experience for the athletes. Additionally, the system now connects to a smartphone app for those wanting simple fitness requirements, and the company provides other peripheral devices that can enrich the data capture process, like foot pods similar to the Runscribe. 

Wahoo Fitness TICKRx: Unlike the other two companies, the TICKRx is a smart heart rate strap, providing additional sensors to detect motions and other metrics like stride and cycling information. The strongest part of Wahoo is that it connects with many different apps and their own smartphone program is excellent. The app includes nearly any exercise routine for general fitness and work capacity, such as cycling and running, and all the data can be exported via .csv. The Wahoo user experience is perhaps the best in the business, because they understand the needs of the average Joe who just wants to get the nuts and bolts, not excessive features that only confuse the athlete or coach.

Garmin Sport: Garmin is more known for their GPS systems, but they smartly decided to enter the sports market. The company TomTom quickly followed suit a few years later with their own product that is also solid, but due to their short history, we do not include them in this review. Fitbit and other commercial products are more fitness-oriented and inappropriate for serious athletes, but Garmin’s history and ability to execute are the reasons we included them. Their heart rate component is a strong-enough feature to warrant their inclusion on this list, since most athletes just want to relay the measurements to a software platform or app, and the market fuels the value of the heart rate data.

Most athletes just want to relay biometric measurements to a software platform or app. Share on X

The classification of the product does not affect the quality of the data, meaning that difference isn’t there between a professional and off-the-shelf product. What is there is the ability to collect all of the data at once to one location rather than each athlete using a watch or connecting to a smartphone. Also consider having two systems if you have a large budget, as some athletes who are engaged in training may want to use something during the off-season.

Investing in the Future

Heart rate monitoring isn’t going anywhere soon, so don’t underestimate its value now and in the future. Heart rate is likely to be standardized as part of the wearable space, as the cost of sensor hardware and the ability to transmit the data is very inexpensive. It’s hard to predict the future of heart rate monitoring because the battle between smart textiles and second skin patches is going to grow, with nobody likely capturing the whole market. The current options are more than sufficient to deliver a good user experience as well as actionable data, so getting involved with heart rate monitoring is a wise venture.

Since you’re here…
…we have a small favor to ask. More people are reading SimpliFaster than ever, and each week we bring you compelling content from coaches, sport scientists, and physiotherapists who are devoted to building better athletes. Please take a moment to share the articles on social media, engage the authors with questions and comments below, and link to articles when appropriate if you have a blog or participate on forums of related topics. — SF
 

Game Day Performance

How to Enhance Performance on Competition Day

Blog| ByCraig Pickering


Game Day Performance

As athletes and coaches, we spend all of our time preparing to perform at the highest possible level in competitions. But what if we’re leaving some of our training-derived improvements on the table? That was the question posed by two leading sports performance researchers, Dr. Liam Kilduff and Dr. Christian Cook at a recent symposium I attended.

The key problem, as presented by Dr. Kilduff, is that athletes often prepare inadequately at competitions. The idea of the warm-up is to enhance subsequent performance, and there are many mechanisms that achieve this. One is the increase in muscle temperature that improves nerve conduction velocity, which boosts force production.

And yet, quite often after completing the warm-up at many high-level competitions, the athlete undergoes a long perod of inactivity in the call room. At the Olympic Games, I was called up roughly 60 minutes before my races. At the World Youth Championships, I had an even longer 75-minute call room period. Given that this can reduce body temperature (both core and muscular) and that for every 1 degree Celsius reduction in muscular temperature there is a concurrent 3% reduction in the amount of force produced by the leg muscles, it’s clear that an extended cooling period can seriously hamper performance.

During the symposium, Dr. Kilduff presented data from elite team sport players showing that the lowest distances covered by these players occurred within the first 10 minutes of each half. This is puzzling because, at this point, they should be at their freshest. Yet they are underperforming relative to later in the game.

It’s criminal to prepare an athlete for competition, only to waste the last 1%-2% of potential performance on competition day. Following these excellent presentations, I decided to look at the referenced studies, do some of my own research, and put together a guide on how best to enhance performance on the day that it matters most—competition day—through various priming activities. None of these represent an increase in physical capacity; the athlete already gained those improvements through training. All these do is allow the athlete to perform to their potential.

Step 1. Lay the Foundations

Competition represents the ultimate test for athletes, especially high-level competitions. They provide the opportunity to excel but also to fail—in many cases very publically—so athletes are often very nervous before competition. This often harms their sleep the night before. Poor sleep has the potential to negatively influence cognitive, motor, and physiological performance, which is less than ideal for competing.

Sleep

Indeed, the research indicates that athletes often get less sleep prior to competition, a finding which is often replicated. Note that many of the papers exploring sleep and performance study subjects that are sleep deprived, meaning they haven’t slept at all. This doesn’t necessarily mirror what happens in athletes pre-competition—many get at least some sleep, and some suffer no problems at all—but it does represent the worst case scenario.

I’ve written about sleep numerous times, including sleep and athletes and sleep science. Athletes should already have good sleep hygiene habits in place, meaning this should be a relatively easy box to tick. Also, the first night in a new sleeping environment is often restless, negatively impacting sleep. For big competitions, it might be better to arrive a few days early to reduce the impact.

Caffeine

Some good news in this area comes from caffeine. In athletes who were acutely sleep deprived, both low (1mg/kg) and moderate (5mg/kg) doses of caffeine lessened the loss of skilled performance and physical performance. Caffeine can also enhance mood in sleep-deprived athletes, which in turn may affect motivation. This means that we want to consider using caffeine on competition day, not just for its positive effects on sleep loss but also for its other ergogenic properties. I’ve written extensively about caffeine including its effect on performance and how it does so as well as a journal review on the subject.

To summarize, caffeine enhances performance through a variety of mechanisms. For most people, 3-6mg/kg of body weight of caffeine (for example, 210mg-420mg of caffeine for a 70kg male) consumed roughly one hour before competition is a good starting point. There is significant individual variation for each person’s optimal caffeine strategy, however. To determine what’s best for an athlete, use caffeine in training and lower level competitions and experiment with the dose and timing until you find a strategy that works.

Testosterone

Next, consider priming the athlete’s anabolic hormones, especially testosterone. While many of us typically think of testosterone’s large role in muscle hypertrophy, it’s also acutely linked to motivation. A 2013 study found that there was a strong link between pre-workout testosterone levels and the workloads voluntarily selected by the athletes in their next training session. The athletes with high testosterone levels worked harder, indicating they were more motivated. Increased testosterone levels also increased the chances of a rugby team winning a match.

While optimizing testosterone levels tends to occur in a chronic, long-term setting, there are some things we can do during the pre-competition window to further enhance it. For example, use short video clips. A 2012 study showed different types of videos to a group of male athletes before a squat-based training session. After watching aggressive, motivational, and erotic videos, the athletes’ testosterone levels increased, correlating with an enhanced 3RM in the next squat session. Using aggressive and motivational videos represents a potential method to explore. Before my competitions, I listened to a Vince Lombardi speech, which motivates me even now.

Step 2. Prime Performance With Pre-Performance

Testosterone levels tend to drop during the afternoon and into the evening under normal circadian conditions. The bad news is that most competitions take place during this time. So, what can we do? It turns out that resistance training raises testosterone levels acutely, and levels remain elevated for hours. Could this positively impact performance?

A 2013 study put this to the test. A group of researchers put 14 well-trained throwers, both male and female, through a morning resistance training session to see what effect it would have on an evening power test. The session included 4 sets of 6 reps on the power clean at 35% 1RM, followed by 2 sets of 6 reps of the back squat, one set at 50% 1RM and the other at 85%, all of which counted as a warm-up. Following this, the athletes underwent a protocol of back squats to fatigue and sets of 4 reps on the power clean exercise, with a focus on moving the bar at high speed.

Four to six hours later, the throwers tested their backward overhead shot throws and vertical jumps. Compared to the control group, which did not exercise in the morning, the athletes threw the shot significantly further after their morning resistance training session. This concept was also tested in elite rugby union players with a morning session of 3RM bench presses and squats, which enhanced power and speed performance tests.

Of course, undertaking a morning resistance training bout is not always practical as it requires access to a weight room nor is it necessarily palatable to athletes and coaches, who may well be concerned about excessive fatigue pre-competition. A 2016 study examined the impact of different morning exercise regimes on subsequent afternoon performance. The different interventions were: control with no training; weights with 5 x 10 reps on the bench press at 75% 1RM and 90 seconds recovery; cycling with 6-second maximum sprints followed by 54 seconds recovery, and running 6 x 40m sprints with a full 180-degree turn halfway and 20-second recoveries after each sprint.

Morning sprints can enhance sport performance later in the day, says @craig100m. Share on X

The sprinting trial enhanced subsequent sprint and vertical jump performance to the greatest extent and had the greatest effect on testosterone. The bench press protocol had similar but smaller results while the cycling protocol only enhanced vertical jump performance. The good news is that in team sport athletes at least, a morning exercise bout of sprinting can enhance later performance without needing access to a weight room.

Step 3. Warm Up Properly

While we all think we know how to warm up, research has consistently found that warm-ups need to have periods of high-intensity exercise to enhance subsequent performance. This concept was tested in Olympic level standard bob-skeleton athletes in a study published in 2013. The athletes did their normal warm-up or a more intense version of their warm-up with more emphasis on sprint drills, sprints, and shorter rest periods. The more intense trials enhanced the athletes’ performance during testing. These athletes won the last three Winter Olympic titles in the women’s events, which shows how important research like this can be.

Intensity can also enhance endurance performance. Another 2013 study recruited 11 well-trained middle distance runners and had them undertake an 800m time trial following two different warm-up protocols. In the first, the runners undertook 6 x 50m strides. In the second, they undertook 2 x 50m strides and a single 200m high-intensity run. Following the 200m sprint, the athletes were approximately 1% faster than the 800m time trial, representing an important marginal gain.

Step 4. Protect What You’ve Got

Once an athlete has warmed up, the key is to maintain these improvements while waiting for the competition to start. The majority of research in this area focuses on maintaining the increased temperature that results from the warm-up. This is important. Research suggests that one can lose two degrees Celsius of heat after 20 minutes of passive rest following the warm-up, which is enough to harm competition performance significantly.

So what can we do to keep what we’ve got? Over the past decade, a lot of research has looked into passive heat maintenance and its effectiveness at maintaining body temperature. If we go back to the bob-skeleton study, the most effective strategy was to have an intense warm-up followed by wearing a jacket lined with a survival blanket (the foil-looking blankets). This approach is also effective for team sport athletes.

After the warm-up, put on clothing that will maintain your body heat until you compete, says @craig100m. Share on X

The key take home is that, just because you feel warm after the warm-up, does not mean you’ll still be warm when you compete. It’s far easier to keep the heat you have than try to warm yourself up again. After the warm-up is complete, put on clothing that will maintain your body heat.

Keep in mind that in some environments, it’s important that you’re not too hot, especially in prolonged endurance races.

When I competed in bobsleigh (bobsled), my heat maintenance strategy was very different from my strategy when competing in track and field. Even while I was still sprinting, however, it was rare that I was too hot. Most races were in the evening when it’s cooler and, as a result, I tended to overdress for the call room. Usually that meant three t-shirts and tracksuit top along with Lycra tights and jogging bottoms over my race kit. My goal was to continue to sweat throughout.

Step 5. Use PAP

Post-activation potentiation (PAP) acutely enhances a muscle group’s performance following contraction. Most commonly, this is achieved by heavy weight training. It’s perhaps best known from the myth that Ben Johnson warmed up for a World Record 100m run with sets of maximal squats just before his race.

The key to properly harnessing PAP’s performance-enhancing capabilities is ensuring there is enough time for the muscle groups to recover from the activating exercise and not to lose that effect by having too much time pass. In a 2008 study conducted with professional rugby players, researchers lead by Liam Kilduff tested the effect of different recovery periods following a PAP protocol on subsequent countermovement jump height and power. The PAP protocol was 3 x 3 back squats at 87% 1RM.

Unsurprisingly, after a 15-second recovery, vertical jump performance decreased and then recovered significantly by the 8-minute mark. At this point, the players’ vertical jump increased by almost 5%. This improvement wasn’t as prevalent at the 4- and 12-minute marks and almost entirely disappeared by the 16-minute mark, suggesting that the effects of PAP are short-lived. Similar results were reported in elite swimmers.

These findings, however, are likely specific to the subjects and protocols, as other studies have reported different optimal time frames. For example, Gilbert and colleagues used 5 x 1 at 100% 1RM back squats and found that it took 15 minutes before the rate of force development (RFD) was enhanced. Until the 15-minute mark was reached, RFD was actually harmed. Conversely, Gullich and Schmidtbleicher used an isometric leg press as a PAP stimulus, finding that RFD was enhanced after 3 minutes.

Just how practical is all of this? We run into the same problems seen with morning priming sessions—it can be impractical to carry out heavy back squats very close to a race, especially 8 minutes before the race. And I’ve never been in a call room that had a squat rack. The good news is that it doesn’t have to be a heavy resistance exercise. A plyometric stimulus (3 x 10 alternate leg bounds) was effective compared to no PAP stimulus after 4 minutes, although this effect was lost by the 8-minute point.

The effects of PAP can be transient and difficult to judge correctly, which means they can negatively impact performance. Many methods are also impractical. Anecdotally, however, I know a lot of sprinters who do some explosive jumping activity in the call room. I also know that many bobsleigh athletes use band-resisted vertical jumps before competition. Whether these exercises have any physiological effect, or whether it’s psychological, is open to speculation. There is perhaps enough research to suggest trying out some form of plyometrics during training to see if it affects sprint performance before attempting it during competition.

The Role of the Coach

Many of the recommendations I’ve made in this article address the athletes because after all, they are the ones who have to go out and perform. However, the behavior of the coach and the setting of the environment in which athletes find themselves can also impact competition performance.

Returning briefly to testosterone, you’ll recall that watching motivational video clips can increase testosterone and hence performance. The environment in which an athlete views these clips can also impact the testosterone response. If positive coach feedback follows the clips, the hormonal response is more favorable than when the coach gives negative feedback (or when athletes motivate themselves).

Positive feedback enhances #testosterone far greater than negative feedback, says @craig100m. Share on X

This is also true for post-game coach feedback, which can set the hormonal scene for subsequent competition performance. Again, positive feedback enhances testosterone to a far greater extent than negative feedback as does watching post-match videos with friends as opposed to strangers. I suggest the athletes feel less threatened in these situations.

Unanswered Questions

While the advantages of pre-competition priming, heat maintenance, and PAP are well established and replicated, some unanswered questions remain. For individual, short-duration sport athletes whose competition is often continuous, the effects are clear and obvious—a loss of heat in the period between warm-up and competition can harm physical and hence competition performance. The steps outlined in this article will doubtlessly be beneficial.

When it comes to intermittent team sport activities, however, or more prolonged activities, the impact is less clear. Although elite team sport players may exhibit reduced workloads in the first 10 minutes of each half of a match, it isn’t clear what effect offsetting this reduction would have. For example, if priming and heat maintenance enhances player performance in the first 10 minutes of the match, what is the subsequent cost? Does the player use more energy and fatigue quicker, and does this reduce total distance covered later in the match? Or do priming and heat maintenance enhance match performance in the first 10 minutes without any subsequent loss of performance?

We just don’t know, but it’s important to consider. We don’t necessarily want to put a lot of effort into enhancing performance early in the match if it harms performance later in the match. If subsequent performance reduction does occur, coaches could plan for it. They might select the three players who they plan on substituting within the match and prime them pre-match, so their subsequent workload is higher, allowing them to “leave more on the pitch.”

Pulling This All Together

The key takeaway from all of this research is that we can enhance our performance on competition day by making small changes. It’s also important to be highly pragmatic in these circumstances. For example, if an athlete gets stressed out because they are unable to find facilities to do their morning priming session, the overall effect is negative. That said, we can make some suggestions for competition day that may well enhance performance:

  1. About 6 hours before the competition, consider undertaking some form of priming exercise. For throwers and team sport, some heavy resistance training may be appropriate if facilities are available. For sprinters and runners, a warm-up that includes some form of intense exercise should work. Be sure to practice this outside of the big competitions before you use it.
  2. Roughly 2-3 hours before competition, have the athletes watch a motivational video. If they load this on a portable device like a smartphone, it can be watched immediately before entering the call room.
  3. If the athlete hasn’t slept well (and even if they have), consider using caffeine. For most people, a dose of caffeine 60 minutes before the competition starts is ideal, although there will be considerable individual variation. For prolonged events, take the caffeine dose closer to or during the competition.
  4. Make sure your warm-up follows a progressive intensity model, and include some very high-intensity efforts at the end.
  5. Use passive heat maintenance techniques to maintain muscle temperature between the end of the warm-up and the start of the competition.
  6. Consider utilizing PAP as a sharpener very close (~10 minutes) to competition. For athletes in a call room, this may be a series of vertical jumps. Don’t do this too close to the race, and experiment in training first.

By heeding this advice, athletes hopefully will be able to unlock the final 1-2% of their performance that’s often left on the table following an inadequate pre-race preparation. As always, experiment, find out what works for you, and then unleash it on the world.

Since you’re here…
…we have a small favor to ask. More people are reading SimpliFaster than ever, and each week we bring you compelling content from coaches, sport scientists, and physiotherapists who are devoted to building better athletes. Please take a moment to share the articles on social media, engage the authors with questions and comments below, and link to articles when appropriate if you have a blog or participate on forums of related topics. — SF
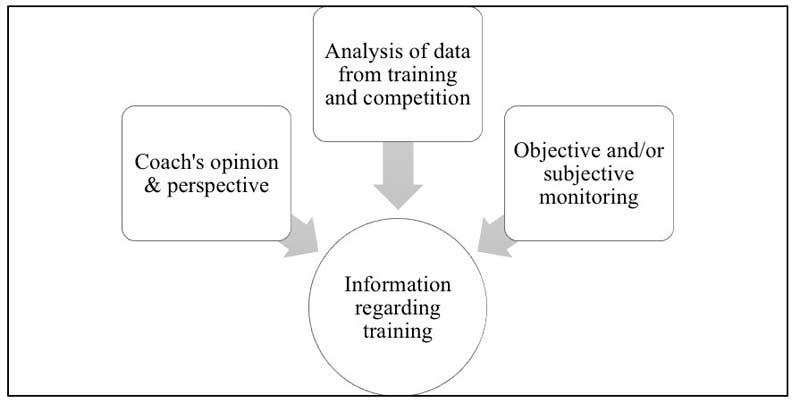
 

Over The Bar

High Jumping the JAC Way

Blog| ByEli Sunquist

Over The Bar

The high jump is one of the most exciting events to watch in track and field. Athletes run very fast in a straight line, make a slight turn to the left or right, jump as high as they can off of one leg, and then try and contort their bodies over a bar that is only about an inch in diameter. At a high level, the event is extremely fun to watch. At all levels, it is extremely fun to coach.

The athlete competes against others but also against the bar, always trying to challenge themself and their personal best. In this article, I want to share the fundamentals of the event, as well as how we at the Jacksonville Athletic Club train for the high jump, including training ideas throughout the year.

Objectives of the High Jump

Simply put, the objective of the high jump is for the athlete to get their hips as high as possible over a fiberglass bar, without knocking it off. The high jump and pole vault events share the same objective: Jump as high as possible, in a safe manner. Like any other jumping event, having a well-rehearsed and comfortable approach is paramount to success. Much time should be spent in practice working on the full approach. I will go into this much further later on, but you should know that most success in the high jump is due to a good approach, which athletes must practice on a regular basis.

You should spend much of the time in practice working on a high jumper’s full approach. Share on X

Basics of the Event

The approach: The high jump is the only jumping event where the athlete must run an approach that is not completely linear in nature. After anywhere from one to six steps in a straight line to establish speed in the approach, the athlete will then run a curved approach towards the bar in order to establish a good takeoff position from the bar. Most traditional approaches have the last five steps of the approach run around the curve. The straight part of the approach is where the athlete sets up a good acceleration pattern, and the curved part of the approach is where the athlete establishes a good lean and gets their body in an optimal position for takeoff.

The lean: One of the most important parts of the high jump approach (and therefore the high jump as a whole) is the body lean away from the bar. The curve in the approach is what takes the athlete into the pit, and the lean away from the bar (from running a good curve) is what gives the jumper time in which to bring everything UP before going IN. Since the jumper will automatically be traveling into the pit, the lean away from the bar (good space between the shoulders and the crossbar) is paramount to making sure the jumper gets all of their height before the bar. Once fully off the ground, the athlete can then just focus on rotating quickly over the bar. We try to cue our athletes to “keep their shoulders away from the bar” or simply “lean away from the bar” as they work on the curved portion of the approach.

Abby HJ Lean
Image 1. The lean away from the bar (good space between the shoulders and the crossbar) is paramount to making sure the jumper gets all of their height before the bar. This shows a good lean before takeoff from the right foot.


The takeoff: It sounds simple, but if the jumper is able to run a good approach, with a good lean away from the bar (see above), then the jumper only needs to be thinking about jumping up as high as possible, straight up into the air. If the ultimate goal of this event is height, that is all that the jumper needs to be thinking about at takeoff. The curved approach will take the jumper into the pit once they become airborne, so it is jumper’s job to think about jumping straight up in the air at takeoff. Good features of a high jump takeoff include pushing off of the entire foot, driving the non-takeoff knee very fast straight up, fully extending the takeoff leg off the ground, and driving the inside shoulder (or non-takeoff leg side shoulder) straight up into the air as well.

Rotation over the bar: As we have discussed in other articles, much like a long jump landing or hollowing out the chest over the pole vault crossbar, this part of the jump is almost the “icing on the cake,” so the athlete should only work on it AFTER they’ve focused in on all the other parts of the jump. I have seen jumpers who rotate over the bar perfectly, contorting their bodies like an acrobat, but still only jump marginal heights due to their poor approaches and take-off fundamentals. A proficient approach, good lean, and aggressive vertical takeoff determine your success in the high jump so much more than good rotation over the bar.

Madison High jump
Image 2. One of our high jumpers clearing the bar. Effective bar clearance comes from trying to rotate quickly over the bar. We tell our jumpers to try and get their shoulders down to the mat as quickly as possible (Photo by Jeff Sides).

Simply put, when the athlete feels like their hips are over the bar, they should try and press their shoulders down to the mat as fast as possible. This will allow the hips to keep rising, as well as allow the legs and feet to quickly rotate over the bar. The longer the jumper travels over the bar, the more likely they are to knock the bar off. Effective bar clearance comes from trying to rotate quickly over the bar. We tell our jumpers to try and get their shoulders down to the mat as quickly as possible.

High jump success depends on a proficient approach, good lean, and aggressive vertical takeoff. Share on X

Donald Thomas is a world champion and three-time Olympian, and he goes over the bar in a very “non-ideal” position. However, he can jump over 7’9” in the high jump (one of the highest jumps in the history of the event) due to his jumping ability at takeoff. Of course, if he improved his rotation over the bar he could jump higher, but 90% of what he is able to accomplish comes from what he does on the ground.

What We Do in Training

Approach runs from full: At least one day a week, throughout the training year, we do full approach runs. In the fall training period, they might be done in tennis shoes, just to work on the rhythm and posture of the approach. From the very beginning of the training year, our jumpers work on establishing a good rhythm for their full approach run. The majority of our athletes will go from seven to 10 steps, and we will do anywhere from four to eight of these approaches at the beginning of a jump session.

Sometimes the jumper performs the approach with a modified takeoff into the pit, sometimes with a scissor jump over a bungee, and other times instead of taking off, they simply keep running around the curve and back the other way, much like a horseshoe pattern. No matter how they end the full approaches, the keys we look for are good rhythm, good body lean around the curve, and tall body position around the curve. The coach will usually watch these approach runs from the opposite side from which the jumper is running, to look at the lean away from the bar. (For example, a left-footed jumper will run towards the right standard before the curve, and the coach will stand to the side of the left standard to watch the curve and body lean.)

The keys to a good approach are good rhythm + good body lean & tall body position around the curve. Share on X

Scissors from full: As mentioned above, sometimes we do scissor jumps from a full, as an extension of working on the full approach. The takeoff in a scissor jump should be directed completely vertically, with the free knee (opposite leg) swinging up very quickly, and then blocking. The jumper will then simply step over (or attempt to) the bungee or bar.

Scissors from 4-6 with no mat: One drill we use that I borrowed from my mentor “Fuzz” (yes, that is real) is short approach scissor jumps, over a bar, but with no pit to land on. They go from just four to six steps, and scissor jump a bar, then (hopefully) land safely on the ground, on their feet. It is so much easier to jump into the bar when you know that you will land on a big, comfortable, mat. When you take the mat away, the jumper will only jump into the bar once—they won’t like the sensation of landing hard on the track, and will self-correct on the next few jumps. This drill, if done in a safe manner, can be very helpful in teaching a good lean away at takeoff, and then a complete vertical jump at takeoff.

Jump from 6: Most of our high jumping in practice is from a short approach. We do a lot of jumps from six steps, as the jumper can still bring some speed into the jump, as well as take a lot of jumps without tiring out too quickly. We look for the same fundamentals that we would from a full approach: good speed, good lean around the curve, staying tall throughout the curve, and a takeoff that is vertical in nature. We also try to watch from the side opposite to where the athlete jumps from, so that we can see the shoulders away from the bar at takeoff, and see the inside shoulder and knee drive up fully before going back into the mat.

Bryson High Jump
Image 3. Vertical jumps can be very mental, so we make training as much of a positive environment as we can.

Jump from 6 off ramp: Want to know a way to give your high jumper even more jumps in practice, more time in the air, and more confidence? For $99.95, you can learn this one special trick the experts don’t want you to know! Or you can just keep on reading…

One of the drills our athletes love to do is jump from six steps off an elevated ramp. The ramp we have is about 6 inches high and is large enough that if a jumper has a bad approach, they can still jump off it and not worry about breaking their ankle (that would be bad). Athletes really like jumping off the ramp for one simple reason: They can jump really high off the ramp. That makes the activity fun for the athlete, and one they enjoy working on.

We like to start off pretty low, then go up in 3-6 inch increments, with the goal of getting the jumper to extend off the ramp longer and longer to keep jumping at the bungee. If a female jumper who has a PR of 5’ starts with the bungee at 5’ from six steps off the ramp, she should have no problem jumping at that height. However, if you keep the bungee there, the jumper will get used to jumping high enough to clear the bungee, but then not much higher.

Moving the bungee up forces the jumper to put more pressure into the takeoff and to extend more at the takeoff, to try to have a good attempt at the higher bungee. We have had athletes jump off the ramp at heights that were almost 2 feet over their current PR. Did they come close to clearing the bungee? Of course not. But the goal of this drill, and the reason it is so much fun for the athlete, is to try to jump as high as possible. This is so much easier if they have something really high to jump towards.

The main reason we jump from six off the ramp is simply to jump at high bungees, to get the athlete used to jumping high at takeoff. We also jump from six off the ramp to work on rotation over the bar, as well as having competitions over a bar.

To work on rotation over the bar, we put the bar up around the athlete’s PR, and have them jump off the ramp (which gives them more time in the air) and work on rotating over the bar properly. The goal is now to work on what they do over the bar, and not so much how high they can jump. We will usually do this eight to 10 times, leaving the bar at a manageable height, so that they don’t have to worry so much about the takeoff, but rather think more about rotating fast over the bar.

The final exercise we do off the ramp from six steps is to compete in one jump over a bar to try to set a new six-step ramp PR. We have club records for this activity, and it is a lot of fun to have the athletes compete against themselves, each other, and past club members. So, you can have your athletes do this “simple” exercise of jumping from six steps off the ramp to try and accomplish different goals: jumping up as high as possible, working on rotation over the bar, and working on bar clearance at higher heights. I have yet to work with a jumper who didn’t enjoy this drill, and this is usually the one activity we do the most on jump days.

Jump from 4: Early on in the year (fall period), we jump off the ground and off the ramp from four total steps. The same principles apply here, with just a shorter approach. From this short approach, we usually put a bar to work on rotation over the bar, but at a height that is not too challenging for the athlete.

No “back over” work: The only time we do “back over” work is when we are teaching a complete beginner how to high jump. A lot of time is wasted in high jump training doing back flops and all sorts of cool-looking “Matrix”-type moves in the air, when in reality what matters most is a good lean and takeoff. If you do these things correctly, the rotation over the bar becomes much easier.

Nicole High Jump
Image 4. We only do “back over” work when we are teaching a complete beginner how to high jump. Our focus is instead on teaching good lean and takeoff because when they are done correctly, rotation over the bar is easier (Photo by Jeff Sides).

Bungee vs. bar: In our training, we mostly high jump with bungees, due to the fact that we have a lot of athletes jumping at one time. If we want to work on rotation work over the bar (from a run), we will have the jumper jump over a lower bar, to work on some of the rotation mechanics in the air. I have found that much like Pavlov’s dog, athletes have been conditioned to equate the bar falling off with failure. They could have done a great job with the approach, and done something minuscule over the bar to cause it to fall, but as soon as a jumper knocks a bar off their first thought/instinct is one of failure.

I find that athletes equate the bar falling with failure, even if they did everything else right. Share on X

The vertical jumps can be very mental, so we try to make training as much of a positive environment as we can. I know other coaches who only use bars in practice, and they have had a lot of success as well doing it that way. It is up to you to do what works best for your system and your athletes. I have just found it to be better in our group to use the bungee more than the bar in training.

Practice Ideas Throughout the Year

While a complete training schedule for the high jump is beyond the scope of this article (you can find a detailed training plan in our articles on training for the jumps, as well for the combined events), I did want to mention that we train all of our high jumpers as either combined event athletes (heptathletes and decathletes) or as jumpers who are able to do the horizontal jumps as well.

A better overall athlete becomes a better high jumper, so we work really hard at getting our jumpers faster, stronger, and more coordinated, and this has carried over very well into the development in their high jumping ability. Our high jumpers will usually high jump one to two days a week, and work on speed, power, coordination, as well as general strength development on the other days.

Final Thoughts

The high jump is one event where we have had a lot of success over the past few years, and I believe this is due to how we teach the event, and how we train our high jumpers to be better athletes first, and then focus on the “high jump stuff.” We have found drills and exercises that work, and we are able to have our athletes buy into our system of teaching the high jump. Most of the success comes from the athlete wanting to get better, doing what is necessary, and trusting the program.

We train our high jumpers to be better athletes first, and then focus on the “high jump stuff.” Share on X

This event is not rocket science (although it has the closest resemblance to such study, as both are trying to put a body in flight…), but HOW you teach and coach it can make a huge impact on the athlete’s success in the event. If you want your athletes to jump high in meets, they need to jump high in practice. Off a ramp, attempting really high heights over a bungee, or jumping high bars from a short approach all help accomplish this goal.

Acknowledgments

I would like to thank the following coaches and mentors for all of their wisdom and guidance as I learned how to coach the high jump better: Glenn McAtee, Dr. Drew Hardyk, Fuzz Ahmed, Robert Olesen, Boo Schexnayder, Noel Ruebel, and Clark Humphries. All of you have taught me so much, and all of the improvements we have had in this event are a reflection of your knowledge and insight, so thank you again!

Since you’re here…
…we have a small favor to ask. More people are reading SimpliFaster than ever, and each week we bring you compelling content from coaches, sport scientists, and physiotherapists who are devoted to building better athletes. Please take a moment to share the articles on social media, engage the authors with questions and comments below, and link to articles when appropriate if you have a blog or participate on forums of related topics. — SF

Sprinters Tapering

Speed and Power Physiology, Tapering, and Performance with Andy Eggerth

Freelap Friday Five| ByAndy Eggerth

Sprinters Tapering

Andy Eggerth, a 15-time Atlantic Sun Coach of the Year and two-time USTFCCCA South Region Coach of the Year, is the Director of Track and Field and Cross Country at Kennesaw State University. He was also the head men’s coach for Team USA in the IAAF Challenge Capital Cup Combined Event in the summer of 2017.

Freelap USA: What is the role of energy substrates in short-term power (under 10 seconds)? Is there anything metabolic (as opposed to neural) that coaches need to consider and train in a 100m dash setting?

Andy Eggerth: I think about this often enough and the conclusion that I usually come to is that the metabolic effects and energy substrate consideration is largely a by-product of proper neuromuscular training. We all know that stored ATP and creatine phosphate (CP) are the primary substrates for maximal efforts in the 10-second range. We don’t have much (if any) control over ATP stores, but can increase CP stores through creatine loading.

There aren’t any specific #metabolic factors coaches need to think about when addressing the 100m, says @CoachEggerth. Share on X

A lack of CP is not a cause of fatigue in a 100m dash though, so any benefits gained from loading would be primarily from slightly extended training sessions or better recovery between multiple runs. I do not believe there are any specific metabolic factors that coaches need to think about or target training toward when addressing the 100m.

Freelap USA: What are some things that can play into the “tapering” process for a speed and power athlete from a physiological perspective? From a nervous system perspective?

Andy Eggerth: Several years ago, I had a sprinter that the trainers wouldn’t allow to do track workouts for three weeks, but they would let her lift weights. I knew that I needed to keep the nervous system stimulated, so three days each week I had her doing probably 20-30 sets of Olympic lifts per day with probably somewhere around 60 reps per session. In her next race, she PR’d by two-tenths in the 100m.

Tapering can come in many forms. Coaches need to be aware of Acute Relieving Syndrome, where unloading too much, too fast can shut down the systems and then the athlete feels flat. This is the reason I loaded up on Olympic lifts so much—to be sure the CNS didn’t shut down, so to speak.

The nervous system is the primary consideration for the speed/power athlete, so we don’t want to be in a state of neural fatigue, but must be neutrally stimulated. This is the art of coaching, knowing where your training has come from and how the athlete responds, which can be a little different each season as the athlete is at a different point in their life and has varying outside influences.

Often, a successful peak is more about successfully managing arousal levels than tapering training, says @CoachEggerth. Share on X

Regarding tapering from a physiological perspective for a speed/power athlete, we’re considering enzymes, maintaining an anabolic state, and like the nervous system—eliminating fatigue, but remaining stimulated. Sometimes coaches back off too much…if it’s been working all season, you probably don’t need to make drastic changes.

I’m a firm believer that one of the biggest factors in peaking is very simply arousal levels. Athletes are able to perform at their physical highest at the championship because that’s what their mental focus has been on for however many months or years. Often, a successful peak is more about successfully managing arousal levels (to allow correct technical execution) than it is about tapering training.

Freelap USA: What are some procedures to determine if a power athlete (more of a 100-200m person or a jumper) may be more or less responsive to a regular dose of increased blood lactate in a workout than others?

Andy Eggerth: Talking with your athletes and asking the right questions, in alignment with what you as the coach are seeing, will reveal their needs. I have some athletes that love bodybuilding and feel much better from doing it, and others that feel it’s a waste of time and effort. Likewise, with some tempo running…some feel they really need it, while others feel better from 30m block starts.

I don’t just listen to what they want, however, especially with young athletes because they don’t know their body yet or what works or doesn’t work. With veterans, I give them a lot of control over the process. We’ve all had those young sprinters that lack a work ethic so all they want to do is block starts as though that’s the golden ticket.

Conversely, some coming from a high school background with big volumes of tempo running may feel they need it, but are often wrong. This is where it’s important to listen to them, consider what they’re saying, and maybe even move training in that direction to keep them happy and confident, but observe their adaptations to training to dial in what they respond best to.

A lot of times you’ll just see from the competition results how they are responding to the lactate boluses you have designed in your training. Maybe your whole group performs better than you expected at a particular meet and then, as you’re following traditional periodization, they don’t feel as good or perform as well as you’d expect at a later competition. You might go back to look at your training to see what the major differences are.

There’s probably more accurate scientific means to determine an athlete’s responsiveness to lactate than my guess and check, but this is what I work with on my budget.

Freelap USA: What should a coach be considering with athletes in light of dopamine and serotonin levels through the course of a training week?

Andy Eggerth: Serotonin levels spike in overtraining situations while dopamine levels crash. You’re likely to see moodiness, poor sleep patterns, lethargy, and so forth. If your training week is correctly designed, athletes should be in pretty good moods and hungry to train all week. If you’re starting to get laziness, moodiness, and this type of thing late in the week, then you may have dialed in the intensity/density/volumes incorrectly. Or, as is common in the college ranks, it’s due to a poor lifestyle, relationship issues, and/or academic stresses.

If you correctly design your training week, athletes are in good moods and hungry to train all week, says @CoachEggerth. Share on X

It might not be a matter of overtraining, but rather under recovering…sleeping five hours per night, eating garbage, consuming too much alcohol or other drugs. At the end of the day, the result is the same for the effectiveness (or lack thereof) of your training plan, so more recovery needs to be prescribed.

Freelap USA: What is an important aspect of coaching track athletes that you feel is underappreciated, or not often considered?

Andy Eggerth: I have an analytical mind, so I’d like to design training like programming a computer but that is completely ineffective when dealing with the human condition. What I continually learn more and more is that to be effective, we need to have a close relationship with our athletes, understanding what is going on in their lives, and meeting their emotional needs for love and acceptance. It’s like the old saying, “Nobody cares how much you know until they know how much you care.”

Since you’re here…
…we have a small favor to ask. More people are reading SimpliFaster than ever, and each week we bring you compelling content from coaches, sport scientists, and physiotherapists who are devoted to building better athletes. Please take a moment to share the articles on social media, engage the authors with questions and comments below, and link to articles when appropriate if you have a blog or participate on forums of related topics. — SF
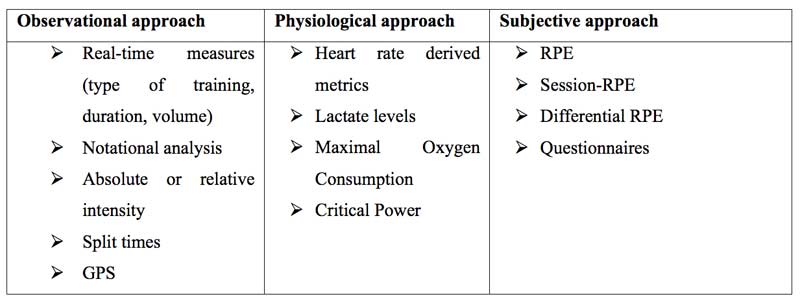
Teaching the Glide Shot Put Sequence

Teaching the Glide Shot Put Drill Sequence

Blog| ByJim Aikens

Teaching the Glide Shot Put Sequence

While coaching the throws for over 35 years, I have had the honor of coaching both successful rotational throwers and successful glide throwers. I have spoken about the glide at several track clinics around the country and, when I do, I seem to spend most of the time speaking about the power throw (stand throw). The actual glide never seems to get the attention it deserves.

I have a story for you. I went to a throws clinic once that was supposed to cover both rotational and glide shot putting, as well as the discus throw. The clinic was nearly seven hours long with a 45-minute lunch break. During this clinic, the speakers talked for five hours and 15 minutes about rotational throwing. Then, with about 45 minutes left, the coaches in charge said, “And now we will talk about the glide.” The talk then pretty much said that you should slide backward into the power position and put the shot. Believe me, there is a little more to it than that.

The rotational technique is an outstanding way to propel a shot put a great distance. But the rotational technique is not for everyone. This is my first year coaching at a new school and the kids haven’t had a real throws coach in forever. They have zero concept of throwing and my job is to try to get them to throw the shot as far as possible, as soon as possible. There are some kids who just take naturally to the rotational technique, but there are a large number who don’t.

I like to teach the glide technique to my athletes because I feel it is an easier technique to master and it helps the athletes develop a good finish on the ball. While I start off teaching my athletes the glide at the beginning, for the reasons I mentioned above, I still do rotational drills with them to see if they have a natural feel for the movement. If they do, I will pursue that with them.

Before I go any further, I want to let you know that I think the most important thing is to develop a solid stand throw from the power position, so we work on that every day. I will continue to work the rotational technique with my athletes every year to see if they have developed the athleticism and rhythm that it takes to be successful with the rotational technique. What I often find happens is that after a year or two of throwing glide technique, they have developed the necessary skills to perform the rotational technique.

I have had numerous throwers switch from glide to rotational and be very successful. I believe that one reason more college and post-collegiate throwers use the rotational technique is that they have all year to do work and develop that technique. As a high school coach with kids playing other sports, you’re lucky if you have five months—maybe more if you can get the kids to throw some over the summer.

When I teach each drill, I explain where and how it fits into the larger scheme of the throw, says @JimAikens. Share on X

When beginning to teach the glide technique, the first thing I like to do is show the kids videos of some gliders and point out some of the key phases of the glide. I think they need to know the big picture of how the glide should look before I can break it down into individual pieces for them. Then, when I teach each individual drill, I can explain where and how it fits into the larger scheme of the throw.

I like to use John Brenner’s technique as a model. I also show them David Storl’s and Al Feurbach’s techniques because I want to expose them to different styles. As a coach, you need to remember that once the basic pattern for the throw is established, it’s OK to let the athlete experiment with some variations that may work better for them. You never know until you try.


Video 1. This is a video of a practice throw done by Ethan, a glider I coached last year. Once an athlete establishes a basic pattern for their throw, it’s OK to let them experiment with variations that may work better for them.

Power Position Shuffles

Recently, I started teaching the glide a little differently. After I taught athletes the power, which they must continue to work on constantly, I taught them what I call the “Power Position Shuffle.”

For this, they simply start in the power position and then move their power foot to their blocking foot. They do this while keeping their knees bent and their weight primarily on their power foot. Then they move their blocking foot back and they are in the power position again. From there, they execute a standing throw. After some practice, they are able to move backwards fairly quickly.

I like this drill because it reinforces several key concepts:

  1. It helps the athlete become familiar with the feel of moving backwards and doing a stand throw.
  2. It helps the athlete work on keeping their upper body back and not opening up during the movement, which is a very common mistake for many gliders.
  3. It is easier for the athlete to get into a good power position and feel what it is like to throw from that with some momentum. Also, the athlete can really work on their power foot drive since the power foot is in a good position.
  4. If the athlete is not yet ready to glide in a meet, this drill gets better results than just throwing from the power position.


Video 2. After some practice of the Power Position Shuffle drill, athletes can move backwards fairly quickly. The drill helps athletes become familiar with the feel of moving backwards and doing a stand throw, and reinforces other key concepts.

Back of the Ring

In teaching the glide, I feel that it is important to emphasize a couple of key points. First, it is important to start in a balanced position and to load the power leg (the leg that you push and drive off of in the stand throw). To ensure proper loading of the power leg, the athlete’s hips must be directly over the power foot. The athlete must also lower down onto a bent power leg in order to drive effectively off of it.

If the hips are not over the power leg (they usually drift to the front of the ring when the block leg is drawn in), the athlete will not be able to drive properly out of the back of the ring. Then, they will more than likely rise up as they leave the back of the ring or have trouble getting their power foot into the proper position. My beginning gliders perform drills to help them feel this position. The back of the ring, T position, and gather drills help them to align properly and feel the correct alignment of hips over the power foot.

Back of the Ring Drill

The Back of the Ring drill teaches athletes to correctly load their weight over their power foot in the back of the ring. This helps them prepare for proper balance and position in the back of the ring. Their foot should stay flat to help them stay balanced. Notice how the hips are stacked over the power foot.


Video 3. The Back of the Ring drill teaches athletes to correctly load their weight over their power foot in the back of the ring.

T Position Drill

This drill teaches the athlete to load their back leg properly for the glide in the back of the ring. The key points are that the athlete keeps their power foot flat for balance and they should have a long left arm to counterbalance the extended left leg. I want the athletes to raise the block leg parallel to the ground, if possible. This ensures that the hips stay over the power leg.

The T Position Drill helps athletes build the strength & balance needed at the start of the throw, says @JimAikens. Share on X

The drill also helps the athlete build the strength and balance they need at the beginning of the throw. Once the athlete is in the “T” position, they should try to lower and raise themselves on their power leg. This assists the thrower in developing the proper alignment of hips over the power leg foot when they enter the crouch position in the back of the ring.

Remind your athlete to bend at the waist and keep their hips over the power foot. They should also slightly round their back.


Video 4. The T Position Drill teaches the athlete to load their back leg properly for the glide in the back of the ring. It also helps them build the strength and balance they need at the beginning of a throw.

Gather Drill

This drill helps teach the athlete the balance and strength needed to gather or bunch the body with the correct alignment before they drive off of the power leg from the back of the ring. This gather is important in order to properly load the power leg so the athlete can drive off of the power leg and get across the ring. Even if you like to teach a more active start to the glide, this is a great beginning drill.


Video 5. The Gather Drill is a great beginning drill. It teaches the balance and strength needed for an athlete to gather their body with the correct alignment before they drive off the power leg from the back of the ring.

Once the athlete develops proper mechanics and strength in the back of the ring, a more advanced technique you can have them do is rise up onto a straighter power leg and extend to the ball of the foot. After they reach this position, the athlete then drops straight down (with hips in alignment with the power foot) onto the power leg foot. This adds even more power, as well as a stretch reflex, to the drive of the power leg.

More movement in the back of the ring tends to cause more balance issues that will affect the throw, says @JimAikens. Share on X

Again, I want to emphasize that this is for more accomplished athletes. I have found that more movement in the back of the ring tends to cause more issues with balance that will affect the throw. Video 6 below shows my glider from last season using this technique.


Video 6. This advanced technique adds even more power, as well as a stretch reflex, to the drive of a power leg. Use it only after an athlete develops proper mechanics and strength in the back of the ring, and only with more accomplished athletes.

Exiting the Back of the Ring

The next key point of the glide is the proper exiting of the back of the ring. Keep in mind that it is called the glide, not the hop. I used to teach that athletes should unseat coming out of the back of the ring. Unseating is the hips falling backward towards the front of the ring. This falling back (unseating) of the hips lets gravity help the athlete get across the ring.

However, I found this to be a very difficult thing to teach. More often than not, the athlete would try to unseat and not have enough weight on their right leg for an effective push from the power leg. Additionally, they would rise up because prematurely dropping their hips would cause them to raise up out of the back of the ring.

Later, I realized that if the power leg was loaded properly and an effective drive was created, the unseating action would happen as a result of that proper drive. This is much like a rotational thrower developing the proper shin and thigh angle out of the back of the ring, as a result of being on balance in the back of the ring, and then going around their left side as they drive in to the center of the ring.

To create proper drive out of the back of the ring so the thrower doesn’t rise up, there should be a correct sequence of events that happen. As discussed above, the thrower should be down on their power leg. Then, the thrower should fully extend their blocking leg. After the full extension of the blocking leg, the thrower drives off the power leg heel, driving the power leg to full extension.

The entire time this is happening, I use a cue for my athlete to tell them to try to keep their stomach on their thigh. This helps to keep their upper body low and back—most early gliders raise up out of the back. Also, I like the athlete to come off their heel. If the athlete drives off of their toe, they usually push up and hop across the ring. Driving off of the toe also makes it harder to get their foot underneath them in a proper power position. It is crucial for them to place their power foot under in the correct position, and get the power heel raised as soon as possible, in order to create the pivot and push necessary for proper power leg drive in the power position.

The following drills will help to develop these skills.

Blocking Leg ‘A’ Drill

This drill helps develop the proper drive and extension angle of the extending blocking leg. The leg kicks down toward the toe board, not up in the air. (Notice the left foot lands facing 9:00—this helps the athlete balance). You must remind the athlete to stay down. I use the cue, “stomach on thigh.”

Finally, this helps the athlete realize that they come off the heel of their foot and not the ball of their foot in the glide. Athletes who come off the ball of their power foot will either hop across the ring or have a difficult time getting their foot into the proper underneath position.


Video 7. The Blocking Leg “A” Drill helps develop the proper drive and extension angle of the extending blocking leg. It also reminds athletes that they should come off the heel of their foot in the glide—not the ball.

Often, the athlete will have difficulty extending their block leg back or kicking it too high. To help rectify this problem, you can place a medicine ball behind the athlete for them to kick out at. Hitting the medicine ball gives the athlete feedback as to whether they extended their leg properly.


Video 8. You can use a medicine ball as feedback on proper leg extension. Place it behind the athlete for them to kick out at.

Power Leg Pull Drill

This drill helps the athlete develop the concept of coming off of the heel of their power foot in the back of the ring, and turning the foot slightly so they land on the ball of the foot. The athlete will try to rise up in order to get their foot underneath them. They must learn to stay low and focus on getting the foot under them in a proper position. It may help for you to place your hand on the thrower’s back to help remind them to stay low.


Video 9. The Power Leg Pull drill helps the athlete develop the concept of coming off the heel of their power foot in the back of the ring, and turning the foot slightly so they land on the ball of the foot.

Working on the Entire Movement

The rhythm and balance of the full throwing movement is just as important as the technique. The Wall Glide #1, Wall Glide #2, Chair Glide, and Glide-Check-Put are designed to blend together the above movements and their timing to help build a fluid movement and proper timing for the whole throw. Athletes should work on these drills in conjunction with the drills in the previous section to properly develop the entire glide throw motion.

To help the athlete improve on specific aspects of the throw, I use the Step Back Power, Banded Glide, Mini Glide and Double Glide drills. Each of these works well in perfecting certain aspects of the glide throw that an athlete may need to improve upon. In the description given for each drill, I have written what piece of the glide I believe the drill helps to improve.

Wall Glide #1

This drill is great for starting to tie it all together. The athlete faces the wall and performs a slight drive with their blocking leg. They then must focus on pushing off the heel of the back (power) foot and landing on the ball of the slightly turned power foot. This drill also helps to reinforce the timing with which the left leg initiates the glide.

The athlete doesn’t move very far off the wall, and they keep their hands on the wall. This helps the athlete feel the “X” tension that is created as the shoulders keep facing back while the hips face sideways, or open up.


Video 10. The Wall Glide #1 drill starts to tie it all together. It also helps reinforce the timing for the left leg to initiate the glide.

Wall Glide #2

This is the same as Wall Glide #1, but this time the hands can leave the wall. The athlete must still keep them facing the wall. The athlete should try to gain some distance from the wall on this drill by producing a more forceful blocking leg drive and a power leg push off the heel.


Video 11. The Wall Glide #2 drill is similar to the Wall Glide #1, except the athlete’s hands can leave the wall. They should also try to gain some distance from the wall with a more forceful blocking leg drive and power leg push off the heel.

Chair Glide

This is a nice drill to follow the wall glides. This drill really helps put it all together. Athletes should not lean on the chair—just grab a hold of it to help keep their shoulders back. They can go through the entire set up to the glide and then grab on to the chair and perform a more forceful Wall Glide #2.

Holding on to the chair helps to keep the athlete’s shoulders facing back and the athlete from rising up during the glide (since they are holding on to the chair). A nice variation to this drill is to have the athletes hold on to the chair with their non-throwing hand while holding a shot in the other hand. They can then just glide or even throw from this variation of the chair glide.


Video 12. The Chair Glide drill uses a chair to help the athlete perform a more forceful Wall Glide #2. Holding on to the chair helps keep the athlete’s shoulders facing back and the athlete from rising up during the glide.

Glide, Check, Put

This is a great drill for developing proper form for the entire glide. The athlete goes through the proper sequence of setting up the glide, and then they try to perform a perfect glide landing correctly in the power position. Often, when first starting out, the athlete will let their weight shift too far toward the toe board, which takes their weight off their power leg. This, as we know, is not a good thing.

This drill helps them to feel that and work on hitting the position properly. As the coach, you (or another teammate) will make corrections by moving the athlete into the proper position. Once they achieve the proper position, then the athlete performs a stand throw. Eventually, the athlete’s adjustment time will be smaller and smaller, until there is no adjustment time at all.


Video 13. The Glide, Check, Put drill helps athletes develop proper form for the entire glide. Once they achieve the proper position, they can perform a stand throw.

Step Back Power

This is a great drill in many ways. It helps the athletes feel what it is like to load the power leg in the glide. It also helps them develop a fast-acting power foot, since it is easier to not let the power foot heel hit as it would in an actual glide. The other point of emphasis in this drill is to work the hips around while keeping most of their weight on the power leg.

In this drill, the athlete may also feel what it is like to move backwards and throw. They can work on keeping their shoulders back and not open up during the glide. The drill helps them to learn to stay low and not rise up as they move through the ring. Since this drill develops more momentum than a stand throw, an athlete could perform it for distance in a meet.


Video 14. The Step Back Power drill does many things for the athlete, including helping them feel what it’s like to load the power leg in a glide and develop a fast-acting power foot. Since this drill develops more momentum than a stand throw, an athlete could perform it for distance in a meet.

Banded Glide

The Banded Glide drill is great for someone with issues getting their power foot into the proper placement in the glide. Tie a TheraBand (I like to use green) onto each ankle and have the athlete perform the glide. The slight pull of the TheraBand helps the power foot get into a better position. I have also had my athletes throw with the TheraBand on with good success.

You know how drills always look good, but as soon as athletes actually try to do the entire movement, things don’t look quite as good? I usually have them do six with the band and two without the band and then repeat the set. The only issue is that it is a bit of a pain taking the TheraBands off and putting them on again.


Video 15. The Banded Glide drill is great for an athlete having issues getting their power foot into the proper placement in the glide. Tie a TheraBand onto each of their ankles and have them perform the glide. I usually have them do six with the band and two without it, and then repeat the set.

Glide Drills for the More Experienced Thrower

Mini Glide

Once the athlete has a handle on the basic glide, this drill helps them develop the power leg drive necessary for the glide. The athlete performs this drill by lining up in the back of the ring position. Instead of curling their leg in and going knee to knee, have them extend the left leg so it doesn’t aid in the movement across the ring. All the work is done by loading (dropping down) and driving off of the power leg. I have also had my athletes throw off of this drill with good success.


Video 16. The Mini Glide drill helps athletes develop the power leg drive necessary for the glide. Instead of curling their leg in and going knee to knee, the athlete extends the left leg so it doesn’t aid in movement across the ring. All the work is done by loading and driving off of the power leg.

Double Glide

Once the athlete has a handle on the basic glide, I feel that the Double Glide is one of the best drills for a glider. It helps work on getting the right foot under the athlete in the proper position to produce force for the throw. Also, this drill will help to ensure the athlete stays back and low on the power leg and doesn’t rise up.

The athlete starts in the back of the ring position and performs a glide, followed immediately by another glide without resetting. If the athlete rises up or doesn’t get their foot in a good position, they will not be able to complete the second glide. It is best to start the athlete on this drill without throwing and then graduate to throwing the shot with the drill.


Video 17. The Double Glide drill helps the athlete work on getting the right foot under and in the proper position to produce force for the throw. Starting in the back of the ring position, the athlete performs a glide, followed immediately by another glide without resetting. If they rise up or don’t get their foot in a good position, they won’t be able to complete the second glide.

Don’t Forget to Practice the Entire Movement

After the athlete has worked with drills and developed some proficiency with them, they should have a passable glide. In drills, I like to use a progression where the athletes first use nothing, then use a med ball, and finally work with the shot. By using med balls, I have found that it helps the athlete focus on proper lower body movements since the upper body is occupied with the med ball.

Early in my career, I was big on drills, and I still am. My mistake was I would practice lots of drills without practicing the entire movement. As a result, my athletes got really good at drills but did not develop as fast as I would have liked with the entire movement. I learned over time that I first needed to teach the drills so the athletes could get better at individual parts of their throw.

While drills help athletes improve at single throw parts, they must also practice the full movement, says @JimAikens. Share on X

After that introductory period, it is always better to mix drills with full throws. For example, if an athlete is having a hard time using their right leg properly to drive out of the back, I would do some Banded Leg Glide drills and then some full throws without the bands on. I would continue this process for two or three sets. I now use this recipe with all of my athletes and drills for both my gliders and rotational throwers.

I hope you have found this article helpful. If you have further questions, want further explanations, or just want to talk throws, please feel free to contact me at [email protected].

Since you’re here…
…we have a small favor to ask. More people are reading SimpliFaster than ever, and each week we bring you compelling content from coaches, sport scientists, and physiotherapists who are devoted to building better athletes. Please take a moment to share the articles on social media, engage the authors with questions and comments below, and link to articles when appropriate if you have a blog or participate on forums of related topics. — SF
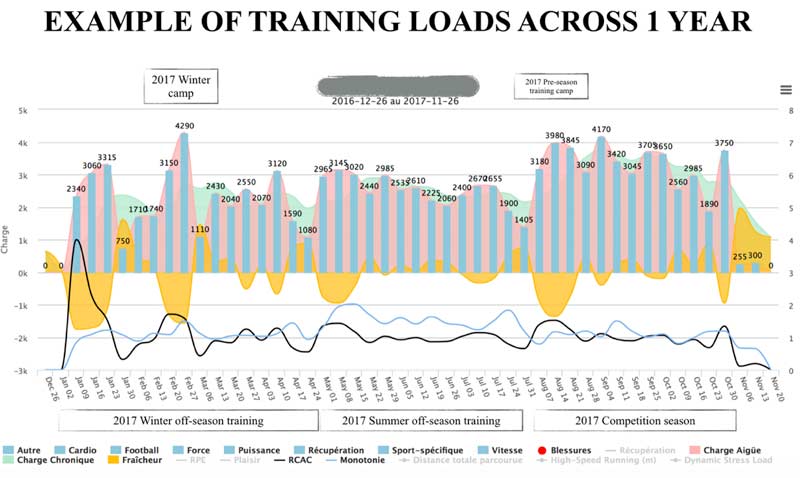
Pulling Exercises

7 Upper Back Pulling Exercises for Athletes

Blog| ByWilliam Wayland

Pulling Exercises

The upper back is often considered the hallmark of a truly strong athlete. I’ve seen heavy back training referred to by some as armor building, bulletproofing, and other similar protective sentiments. While it plays that role terrifically well, it can also be a performance driver in athletes whose sports require a strong back and/or find back strength a limiting factor.

Back strength is not just for GPP and youth athletes. The problem stems from the fact that most of what we know about back training comes from either bodybuilders or physiotherapists. Disentangling back training from notions of “health” and/or “size” can be tricky.

Heavy back training isn’t just armor building—it can also be a performance driver for some athletes, says @WSWayland. Share on X

Strength coaches don’t help much either, as they put the focus on training force projection in a largely sagittal anterior direction—pressing and squatting (including single leg work) rule the roost from an exercise consideration standpoint. This makes sense, as most athletes are about navigating the space in front of them. Upper back work is not forgotten, but it is often not loaded with the same intent or intensity.

Functional training has railroaded upper body pulling exercises into band flailing, contralateral and fractional plate-wielding abominations. These exercises are often regulated into the “necessary for structural balance” class of exercises. Meanwhile, athletes are still fed a steady diet of upper body presses if they are still pressing at all, and doing a lot of what is perceived as good for their “structural balance” although any study of push-pull intensities will suggest otherwise. I’m pretty sure old-school coaches did just fine pairing bench with bent-over rows in a 2:1 pull:push ratio and going about their day.

Upper Body Pulling
Image 1. A pulling motion uses nearly every upper back muscle, but depending on the exercise, some are used more than others. Focus more on the vectors of how you pull, not just the muscles the pattern uses.

Some athletes—particularly combat athletes, athletes in “gi” sports (judo, sambo, jiujitsu, Cornish wrestling), and athletes participating in small watercraft sports or snows sports involving ski poles, for example—require low-velocity yielding and rapid ballistic or repetitive-type pulling. Of note are snatching type actions that involve a pulse or rapid contract/relax type action with mere milliseconds to establish a grip before the pull is initiated, which is a movement we rarely see in the weight room.

The other factor seems to be the connection with extremity strength in the hands in upper body pulling exercises and its seemingly subsequent relationship with full body strength. The ability to grip, pack, and brace as a common determinant of success in hinging and other lower body exercises is a relationship that most pragmatic strength coaches understand and explore. If we can’t organize the upper back/posterior chain under load, we will only see breakdown when we axially or anteriorly load the lower body.

Getting beyond the IYT shoulder exercises, bench chest-supported rows, and band pull-aparts, here is a selection of exercises I’ve found to be highly conducive to purposeful upper back training. This is by no means an exhaustive list, so you can surely add many more of your own.

One

Neutral Grip Lowering

Neutral grip lowering is a foundation of upper body pulling that we implement in our training programs. The ability to yield eccentrically in a neutral grip position is a fundamental skill that pays dividends in total body control above the pelvis. To quote Carl Valle’s “6 Sure-Fire Eccentric Exercises to Build (and Rebuild) Athletic Monsters: “Eccentric work is great for heavy athletes and weak athletes alike. An elite NFL lineman who has a poor strength to weight ratio or a young athlete who is starting from zero can see rapid improvements in pulling ability.”

As athletes advance w/neutral grip pull-ups, the quality of their #RDL and pressing patterns improve, says @WSWayland. Share on X

Neutral grip seems to serve us better than an underhand or overhand grip, as most athletes naturally move through a larger ROM. The finish and start positions seem to be of a higher quality than the “body English” excuses for pull-ups we often see with an overhand grip. As athletes advance with neutral grip pull-ups, I always notice that the quality of their RDL and pressing patterns get better as much of the worked musculature assists and supports these movements.


Video 1. Ideally, the athlete keeps their rib cage down as they pull. Many athletes will tilt backward, arching and trying to turn neutral grip lowering into more of a rowing action than a vertical pulling one.

Two

Oscillatory Rows

Oscillatory exercises attempt to manipulate the rapid contraction and relaxation relationships found in high-velocity movement. This manipulation of reciprocal inhibition is what separates studs from duds in an athletic sense.

You can assign oscillatory movements to just about any movement, but they really shine in the form of a single arm form. The athlete, however, has to focus on moving the load around 3-4 inches back and forth; a weaker/less-coordinated athlete will generally use a larger ROM, say 5-6 inches, to achieve the same effect due to them being more inefficient. The athlete must ensure they are not using perturbations from the torso to “cheat” so movement comes from the body and not the working limb. Done properly, the movement requires good bracing and scapular positioning.

Oscillatory rows come in two flavors: advantaged and disadvantaged. Much like the name suggests, advantaged are performed where limb lengths are mechanically at an advantage and disadvantaged are performed where the movement is at its most difficult mechanically. Apply both or either in a fashion that matches common sports positions. Advantaged positions are usual for activation and neural drive and make sense in peaking applications.


Video 2a and 2b. You can use extended oscillatory work as a GPP method to improve tissue tolerance; work periods can be 30 seconds. I employ these with grappling athletes using gi cloth or thick grip modifications.

Three

Catch and Release Variations

The ability to rapidly accelerate and decelerate pulling actions is something we rarely see trained. Undoubtedly, the foundation of upper back strength is found in controlled heavy rowing and vertical pulling. What stands out as good GPP practice for back training in the off-season hangs around during peaking like a hangover. If we increase velocities anteriorly then it makes sense to also increase them posteriorly.

If we increase velocities anteriorly then it makes sense to also increase them posteriorly, says @WSWayland. Share on X

Advanced athletes need preparation for the rapid acceleration and deceleration that sport requires. This can take two forms, such as accelerating an external load concentrically as in snatching rows and decelerating rapidly as in catching rows.


Videos 3 and 4: Adding velocity components to the exercises dramatically changes the dynamics of the movement to add athleticism without being too cute. Rowing doesn’t have to be tacked on at the end of a workout or be overly vanilla—it deserves the same effort and thought behind it as other workout movements.

We can also implement bodyweight ballistic movements, as in some sports such as wrestling, grappling, and jacket sports (judo, jiujitsu, etc.) where the athlete may accelerate themselves. We can use bodyweight catch release rows, which I unashamedly stole from Keir Wenham-Flatt and have found work as an excellent pairing with clap push-ups for an explosive push/pull combination. The momentary ballistic nature of the movement means we can train high limb speeds combined with rapid deceleration at the bottom movement, getting a good two-for-one pairing.


Video 5. Bodyweight catch release rows require rapid acceleration of bodyweight. You can modify their difficulty simply by adjusting the height of the bar.

Four

Banded Barbell Row

An understandable fondness exists in attaching accommodating resistance to movements involved in squat and press patterns for athletes as these actions dominate most sports. There is no reason why we can’t do this with upper body pulling either as a pull release (no eccentric) or straight reps. Usually, you can easily implement it by having the athlete loop a band over the bar and step into it.


Video 6. Eccentric-less training options are useful for athletes looking to train explosive pull or athletes that are injured and cannot tolerate deceleration.

Five

Eccentric Single Arm Ring/Suspension Row

Suspension training with rows can be rather redundant for any athlete, especially if they have impressive strength-weight ratios, where the need for weighted vests and the like becomes a limitation. We can manipulate the variables to make this simple exercise much harder.

Pulling up with two arms and lowering with one makes it a great way to introduce single arm lowering without the limitation of a concentric single arm body weight row. Stabilizing on the eccentric single arm lowering is easier than stabilizing on a single arm concentric row. Occasionally, you will see athlete “collapse” at the bottom—not only is this dangerous, as the sudden jerking drop can loosen or damage suspension, but it also hurts the athlete. Encourage them to choose an angle that allows for full control of the movement.


Video 7. The classic 2 up and 1 down is a timeless option for strength coaches. Athletes using eccentric overload with rows can quickly and safely gain strength.

Six

Eccentric and Isometric Single Arm KB or DB Rows

The meat and potatoes of upper back work are built from quality heavy single arm rowing using both eccentric and isometric contractions, which help build a robust and strong upper back. Single arm rows add a contralateral/cross-body element, especially if done as a three-point row with one arm braced and two feet on the floor. The key is to keep the non-focused movement elements as fast as possible; don’t waste energy on a slow eccentric when you trying to keep the quality of the isometric high.

Positioning is crucial here: Athletes need to focus on a “proud” position and resist letting the scapular roll forward and getting the traps involved. I encourage athletes to try to get the elbow back to the hip.


Video 8. Contractions don’t need to be uniform or isolated; they can be sequenced in ways that provide both overload and variation. Inserting isometric pulses also helps keep athletes alert and strict with technique.

Seven

Snatch Grip RDL/Snatch Grip Deadlift

These two movements are final worthy mentions even though they are not strictly upper back exercises—at least, not directly. This is one of Dan John’s armor builders; a movement that makes the body, in conjunction with terrific back and grip bracing, work as “one piece.” Snatch-grip deadlifts are like standard deadlifts except that the grip is much wider.

How wide? I usually regard it as anything wider than the smooth rings on the bar: longer armed lifters will be closer to the collars while shorter armed lifters will be nearer to the smooth ring. Olympic lifting purists may moan about grip width, but I’m after increasing ROM and time under tension, not building a better snatch. I find that upper back and grip development happen very fast when performed diligently. In most cases, lifters will need to use straps to maintain their grip with heavier snatch-grip deadlifts.

I find that upper back and #grip development happen very fast when performed diligently, says @WSWayland. Share on X

The wide grip places the traps and lats under constant tension. Posterior chain development and improved hip and back extension are another positive aspect—I have written in the past how grapplers are often chronically overflexed. I’m not trying to “fix” anything here, but borrowing from Dr. Stuart McGill’s idea about creating tension in one area to alleviate it in another, snatch grip deadlifts seem to do much for T-spine discomfort. In the athletes I use them with, forcing extension is sometimes desirable.

The wider grip forces you into a lower position; almost into a full squat. This lower position also changes the position of your torso, thus requiring more of the emphasis on the entire back, hamstrings, and glutes, and forcing good extension. A word of warning, however: Those with poor mobility should probably skip this deadlift variation. Personally, I am a big fan of this in combination with heavy front squats as the two complement each other well, placing larger emphasis on posterior and anterior chains, respectively.

Sequencing Upper Back Training over a Training Cycle

Upper back work never gets much love from a sequencing standpoint; it is often added as an afterthought in a “corrective capacity” or as a counterweight to pressing work. There is no reason it cannot be a lead upper body movement, used in clusters or contrast and complex work. A simple contrast would be heavy rows combined with a catch release row, for example, and you could expand this into a full upper body complex.

Potentiation Clustered Rows

  • 1. Barbell Row 3 x 1,1,1,1,1
  • Rest 10s
  • 2. Catch Release Row 3 x 1,1,1,1,1
  • Repeat 1.

I generally use the compress cluster complex below to compress upper body work for time-poor athletes, so we can integrate pushing and pulling. I usually keep them separate to keep the quality higher.

Upper Body Cluster Complex

  • 1a. Banded Barbell Row 3 x 1,1,1
  • 1b. Barbell Bench 3 x 1,1,1
  • 2a. Catch Release Row 3 x 1,1,1
  • 2b. Clap Push-Up 3 x 1,1,1

You can draw out this change in the mode of exercise selection over training blocks depending on the goals of the athlete. The intensity of the eccentrics and isometrics means they will be primarily used in strength development; they can cause a lot of soreness due to high levels of stress on tissue.

Banded, catch only, and disadvantaged oscillatory rows still require high levels of force production but at high velocities, lending themselves as power options. This is also where you might employ Olympic lifting variations if you are so inclined, marring the explosive connection between upper and lower body.

Finally, catch release rows and advantaged rows work well in peaking and priming work because they lend themselves to high levels of excitability at low levels of force production. Athletes feel “switched on” after these movements.

Peak Pulling
Image 2. When you prescribe pulling motions, you should follow classical or contemporary training theory by progressing with a purpose. Mixing in various loads and velocities creates a complete pulling athlete.

This broad approach would be cycled over weeks and months, or, as seen below, optimized every one to two weeks during a busy in-season, so that the focus undulates over the playing/training week. You can modify this for athletes playing weekend or midweek games.

In-Season Golf Weekly Example
Image 3. Weekly loading of the upper back in-season requires thought as to how practices and competition interact with rowing patterns. Mixing exercises and progressions is up to what the athlete is able to do for that specific session.

As you will notice, a recurrent theme in this schedule (Image 3) is the use of eccentric exercise in training the upper back. Eccentrics work particularly well in a sport with high limb velocities, as the back is a powerful protective decelerator. In addition, the ability to maintain “posture” in combative or contact sports is heavily tied to the ability to brace against an opponent trying to break t-spine position—think snap down in wrestling or posturing in MMA. This is something that eccentrics are very useful for teaching an athlete to maintain.

More Wisdom on the Benefits of Upper Back Training

The corrective hype we see espoused as an approach to upper back work means we see too much worry about kyphosis, posture, and scapular positioning in those who probably just need a consistent diet of heavy upper body pulling. Work on the latter, as the former will probably not be much of problem.

We can do better than upper back work that is mainly bodybuilding and/or functional exercise, says @WSWayland. Share on X

Intensive upper back training will not open any secret doors or act as a key to performance. Some athletes will need specific approaches to upper back strength (i.e., baseball players), but the rest of the community need not adhere to the approach promoted by some coaches whose athlete populations require special care. Much of the approach I espouse is based on the work of pragmatic coaches getting results in the field. A lot of what we see proposed as upper back work is, by and large, bodybuilding and/or functional exercise, and I think we can go one better than that.

Since you’re here…
…we have a small favor to ask. More people are reading SimpliFaster than ever, and each week we bring you compelling content from coaches, sport scientists, and physiotherapists who are devoted to building better athletes. Please take a moment to share the articles on social media, engage the authors with questions and comments below, and link to articles when appropriate if you have a blog or participate on forums of related topics. — SF
  • « Go to Previous Page
  • Page 1
  • Interim pages omitted …
  • Page 132
  • Page 133
  • Page 134
  • Page 135
  • Page 136
  • Interim pages omitted …
  • Page 164
  • Go to Next Page »

Primary Sidebar

FEATURED

  • Using Speed and Power Data to Bucket and Train Faster Athletes
  • Plyometric Training Systems: Developmental vs. Progressive
  • 9 (Fun!) Games to Develop Movement Skills and Athleticism

Latest Posts

  • Running Through Time: An Athlete’s Story of Resilience and Recovery
  • Rapid Fire—Episode #14 Featuring Rodrigo Alvira Isla: Training Smarter in the NBA and G League
  • Maximizing Success in the Weight Room: A College Strength Coach’s Playbook

Topics

  • Adult training
  • App features
  • Artificial Intelligence
  • Athlete
  • Athlete performance
  • Baseball
  • Buyer's Guide
  • Career
  • Certifications
  • Changing with the Game
  • Coach
  • Coaching
  • Coaching workflows
  • Coching
  • College athlete
  • Course Reviews
  • Dasher
  • Data management
  • EMG
  • Force plates
  • Future innovations
  • Game On Series
  • Getting Started
  • Injury prevention
  • Misconceptions Series
  • Motion tracking
  • Out of My Lane Series
  • Performance technology
  • Physical education
  • Plyometric training
  • Pneumatic resistance
  • Power
  • Power development
  • Practice
  • Rapid Fire
  • Reflectorless timing system
  • Running
  • Speed
  • Sports
  • Sports technology
  • Sprinters
  • Strength and conditioning
  • Strength training
  • Summer School with Dan Mullins
  • The Croc Show
  • Track and field
  • Training
  • Training efficiency
  • Wave loading
  • What I've Added/What I've Dropped Series
  • Youth athletics
  • Youth coaching

Categories

  • Blog
  • Buyer's Guide
  • Freelap Friday Five
  • Podcasts

COMPANY

  • Contact Us
  • Write for SimpliFaster
  • Affiliate Program
  • Terms of Use
  • SimpliFaster Privacy Policy
  • DMCA Policy
  • Return and Refund Policy
  • Disclaimer

Coaches Resources

  • Shop Online
  • SimpliFaster Blog
  • Buyer’s Guide
  • Freelap Friday Five
  • Coaches Job Listing

CONTACT INFORMATION

13100 Tech City Circle Suite 200

Alachua, FL 32615

(925) 461-5990 (office)

(925) 461-5991 (fax)

(800) 634-5990 (toll free in US)

Logo of BuyBoard Purchasing Cooperative. The word Buy is yellow and shaped like a shopping cart, while Board and Purchasing Cooperative are in blue text.
  • Facebook
  • Instagram
  • Twitter
  • YouTube

SIGNUP FOR NEWSLETTER

Loading

Copyright © 2025 SimpliFaster. All Rights Reserved.