In recent years, force velocity profiling in sprinting has become more accessible to coaches. With great works being published by JB Morin and Dr. Pierre Samozino, Micheal Cahill, Matt Cross, Cameron Josse, and many others, the popularity and accessibility of force velocity profiling has become easier to understand and perform for coaches with devices as readily available as a phone camera and an app or a spreadsheet.
From what I have read from other coaches, much of the process and training seems to follow these steps:
- Perform force velocity profile testing with the athletes you coach. Depending on the results and interpretations, determine what distance and velocity decrement you need to have your athletes work at.
- Perform a sled-pull load-velocity profile. If you are not familiar, a sled-pull load-velocity profile would involve having your athletes perform an unresisted, timed acceleration and then performing between 3-5 more sled-resisted accelerations with an incremental increase in weight on the sled. The results are then analyzed in a spreadsheet to allow you to determine the slope of the load-velocity relationship so you can predict what load will cause each velocity decrement.
- Based on the velocity decrement you believe you need to target and based on the results of the load-velocity profile, set up a training cycle where your athlete uses a specific weight that is estimated to provide the specific velocity decrement you are targeting for the next training cycle.
I believe this method can be improved upon with some simple tweaks.
One problem with the above process is found in the testing of the load-velocity profiling. Like any other testing done with athletes in a real-world setting, the load-velocity profiling results can always be influenced by a variety of factors out of your control. For example:
- How much sleep the athlete got the night before.
- What their eating or hydration habits were like the day of testing.
- The weather on the day you tested (if you are not fortunate enough to have an indoor area).
- General athlete readiness.
This leads to downsides similar to those resulting from using an estimated one rep max for percentage-based training in weight room training. Sometimes, the estimated maxes are not accurate and day-to-day readiness can vary the true on-the-day max by amounts of up to 15%, giving you a 30% range to be working in.
This is one reason velocity-based training and autoregulation in the weight room has become almost a standard for many programs and coaches—it allows each athlete to work at the exact weight they need to be working at on that day based on their readiness. I believe this approach can and should be taken when it comes to training acceleration with sleds.
Velocity-based training and autoregulation in the weight room has become almost a standard for many programs and coaches, says @CoachJonHughes. Share on XProposed Improvements
I’m not going to rehash how to perform force-velocity profiling or load-velocity profiling, there are already many great research articles and resources written on how to perform those by authors much smarter than I. What I will cover below is a simple way to perform an autoregulatory approach once you have determined the velocity decrement you believe the athletes you coach need to be working at. One other positive of this approach is that it eliminates the need to perform load-velocity profiling in a dedicated testing session because it is essentially done on the fly during the workout.
In this example, we are going to assume it’s been determined through force-velocity profiling that the athlete needs to use the following workout parameters: 20m accelerations with a 20% velocity decrement.
Step 1 – Set up your automatic timing system to the distance your training session dictates.
Step 2 – After the athlete is warmed up, have them complete a rep unloaded. Note the time, and calculate the time needed for the specific velocity decrement. For example, let’s say the athlete runs 2.90 seconds to 20m.
- First, convert the time to average velocity – 20m/2.90s = 6.89m/s.
- Next, multiply the velocity by the percent of velocity the athlete would be running at after the decrement. So, for a 20% decrement, multiply their average velocity by 0.80. This gives you a velocity of 5.51m/s.
- Then convert this back into a time: 20m/5.51m/s = 3.63 seconds.
So, the athlete needs to find a weight that with a maximum effort would slow them down to where they are running approximately 3.22s for 20m.
Step 3 – Using research that has established estimates for percentages of body weights that cause certain decrements to occur, take an educated guess at how much weight needs to be on the sled.
Step 4 – Have the athlete perform a sprint with that weight, note the time and then adjust the weight for the next rep if needed. Within 2-3 reps, you should have narrowed it down to a certain weight that gets the athlete close to the target time and velocity decrement.
The first time you perform this, it might take some trial and error to find the correct weight (one downside compared to just selecting a weight based on a profile). However, this is going to be much more accurate based on how the athlete is presenting on the day, and the benefits will increase throughout the training cycle.
When you start the next workout, you should have the recorded weights that were used during each rep from the last session along with the times hit. Looking back at this data will allow you to dial in the weight needed very quickly for the next training session.
The benefit of this method is that it is going to account for the athlete’s readiness each training session, as well as account for improvement throughout the cycle instead of just selecting a weight and using it for the duration of the entire cycle. This becomes even more dialed in if your workout includes a contrast session where you are mixing both loaded and unloaded reps.
Each time an unloaded rep is run, use that as the new target time and recalculate the loads for the next set (an example workout/chart is shown below under point 2). Many times, the athletes’ unloaded reps will end up being much faster because of the potentiation effect, allowing you to increase the weight for the next set.
The athletes’ unloaded reps will end up being much faster because of the potentiation effect, allowing you to increase the weight for the next set, says @CoachJonHughes. Share on X3 Tips to Effectively Apply This Process in Your Sessions
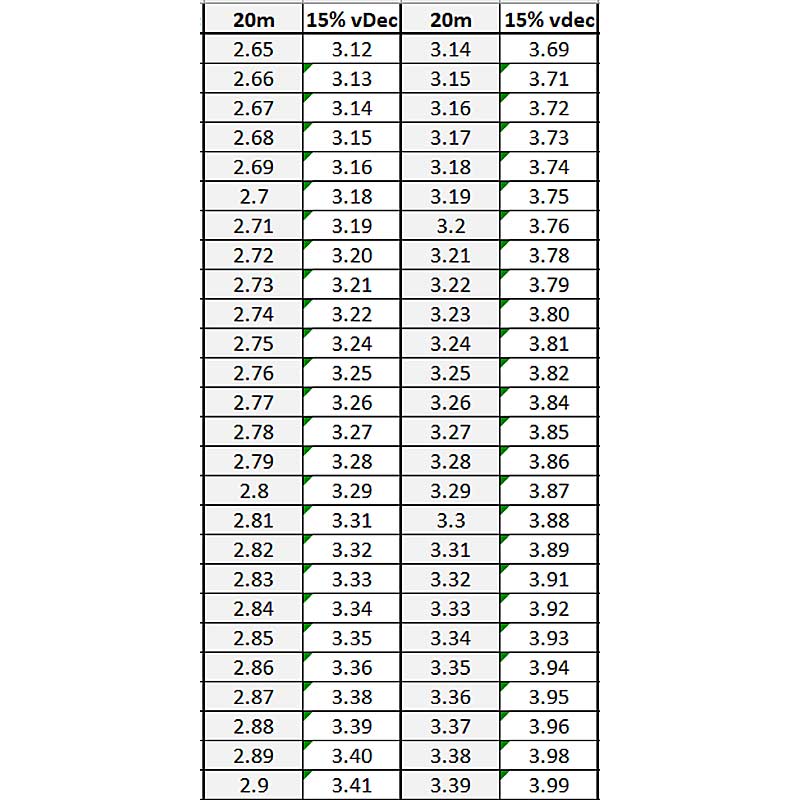
1. Create charts. Calculating the target goal time needed for the velocity decrement for each athlete can take a little time, especially if you have multiple athletes and you are trying to stick to a strict rest schedule. I use a chart like in the picture below that allows me to just easily convert the time the athletes do hit to the target velocity decrement they need to hit. I have multiple charts for each decrement percent and distance I use for workouts and then have it laminated so I can take it out to the track.

2. Track each rep and the weight used. This is recommended for several reasons. One, it allows you to look back from rep-to-rep—as well as workout-to-workout—to see progress and know approximately how much weight each athlete needs to be using each week. Two, it will allow you to look at trends throughout the cycle and across multiple cycles. I use a chart like the one below that can be tweaked depending on the workout. Print it out and and track the weights and times in real time at practice.

3. Perform these sessions in a loaded/unloaded complex and set/rep scheme. For instance, a common scheme is two reps loaded, one rep unloaded. Many times, the unloaded rep after the loaded reps will be faster than the first rep performed that day because of the potentiation effect, meaning a weight adjustment needs to be made, usually adding 2.5-5lbs. Again, this only becomes clear by tracking the times in real time, making it a more accurate workout than simply selecting a load to use a whole cycle based on a load-velocity profile test that might have been done 3 weeks ago on a bad day.
Additional Notes/Suggestions
I perform these workouts using a Freelap timing system, with the start cone set 1m beyond the start line. It’s important the athletes are mature and focused enough to start in the same spot on the line and in the exact same way each time to help eliminate timing inconsistencies. If you are using a system that is set on the lane lines, make sure the athlete has centered the sled in the lane before they start running. I have had a few cones hit with the sled, but luckily no damage has occurred!
When the athletes know every rep is being timed, it also motivates them to use maximal effort during each sled pull. They begin competing against themselves by trying to hit a faster time to be able to put more load on the sled.
One thing to watch out for is the mechanics of the run. Your athletes must be disciplined enough to still understand that they need to hit good postures, shapes, and rhythms. While they are trying to run fast to the assigned distance, I want to make sure they understand that their rhythm still needs to be in context of running a 100 so that they do not lose the proper postures and overstride. There are ways to achieve a faster time to a short distance, but it does not set them up in good shape to be able to continue that acceleration down the track in the context of a 100m race.
Your athletes must be disciplined enough to still understand that they need to hit good postures, shapes, and rhythms, says @CoachJonHughes. Share on XFor more information on load velocity profiling and force velocity profiling, check out the work by some of the authors listed at the beginning of this article.
Let me know what you think of this process and training approach on Twitter: @CoachJonHughes
Further Reading
“A Spreadsheet for Sprint Acceleration Force-Velocity-Power Profiling,” by JB Morin & Pierre Samozino, jbmorin.net.
“Interpreting Power-Force-Velocity Profiles for Individualized and Specific Training,” by JB Morin & Pierre Samozino. Researchgate.net, Dec 2015.
“Sled-Pull Load-Velocity Profiling and Implications for Sprint Training Prescription in Young Male Athletes,” by Cahill et all, Researchgate.net, May 2019.
“Force-Velocity Profiling In Sled-Resisted Sprint Running: Determining the Optimal Conditions For Maximizing Power,” by Matthew R. Cross. Auckland University of Technology, 2016.
“Force Production Capacities In Sprinting. How to Optimize the Force – Velocity Profile?” by Pierre Samozino, 1080 Motion webinar.
[freela-share]


