Efficient Readiness Testing with Jump Mats for Any Setting

Summary
Since jump mats are becoming more accessible, affordable, and popular in all settings of sports performance, Coach Justin Ochoa views readiness testing as a great way to get a return on your investment for the equipment. Here, he presents readiness testing protocols, best practices, mistakes, and benefits.
As coaches, we’re constantly searching for ways to help our athletes get the absolute most out of their time in the gym. One of the most effective ways we can do this is by implementing a readiness testing protocol into our programs—this helps us manage athlete load and stress and individualize programming and autoregulation methods. It can also play a role in limiting risk factors related to overuse injuries in athletes.
Sounds like such a no-brainer, right? And with the tools and resources we have access to today, this is easier than it’s ever been.
Or…is it?
Sure, the amount of technology we have to test and monitor outputs is at an all-time high, but with that also comes the much harder part of the equation—managing that data. After all, data alone is just a bunch of numbers with no context. It’s worthless without the time or knowledge to actually manage and analyze it.
The amount of technology we have to test and monitor outputs is at an all-time high, but with that also comes the much harder part of the equation—managing that data, says @JustinOchoa317. Share on XWe’ve seen a massive emphasis on the data management side of the sports performance industry. Most professional and high-level collegiate sports teams now have sports scientists on staff who are solely responsible for interpreting athlete data and communicating findings to the athletes and staff. It is no longer enough to simply collect data or track progress; you have to know what it means, why, and what to do next.
That alone can be a full-time job on top of all the other hats performance coaches wear. I fell victim to this issue early in my career—I tried to test and track everything. I tested and tracked so much that I couldn’t even analyze what I was collecting. Trying to influence athletes to get wearables for the RHR and HRV, trying to get athletes to fill out daily questionnaires with clarity and honesty, trying to use VBT data to create my own RPE scale that would determine the athlete’s workload, trying to combine all of the above and more in the name of athlete management…you name it, I probably tried it for at least three months. The result was a lot of wasted time, a lot of wasted money, and potentially leaving results on the table due to majoring in the minors.
I had to turn to the old adage—addition by subtraction—and throw out things that weren’t delivering a substantial bang for my buck in terms of return(s) on investment: time, money, or attention.
One assessment I kept and continue to find value in is measuring athlete readiness via jump testing. No, it’s not perfect. It has pros and cons, but it delivers high-quality info for coaches. Even at first, it was a daunting task that almost didn’t make the cut because I made it way harder and more complex than it needed to be. I also made a huge mistake in how I conducted my readiness testing. In this article, I want to share some best practices for readiness jump testing and hopefully give you takeaways to utilize in your own environment.
One assessment I kept and continue to find value in is measuring athlete readiness via jump testing. It has pros and cons, but it delivers high-quality info for coaches, says @JustinOchoa317. Share on XWhat Is Readiness Jump Testing?
If you’re not familiar with the concept of readiness testing, it’s not as fancy as it may sound. And it’s certainly not proprietary to the performance field: readiness testing is simply a way to measure and monitor how prepared an athlete is to perform the given tasks at hand. In most cases, that would be a workout, a practice, or a game.
Coaches can use a test or series of testing protocols to develop readiness standards for their athletes and then compare the results of each session to the baseline to determine how “ready” that athlete is for that day’s tasks. They can then alter the plans appropriately if the situation warrants it.
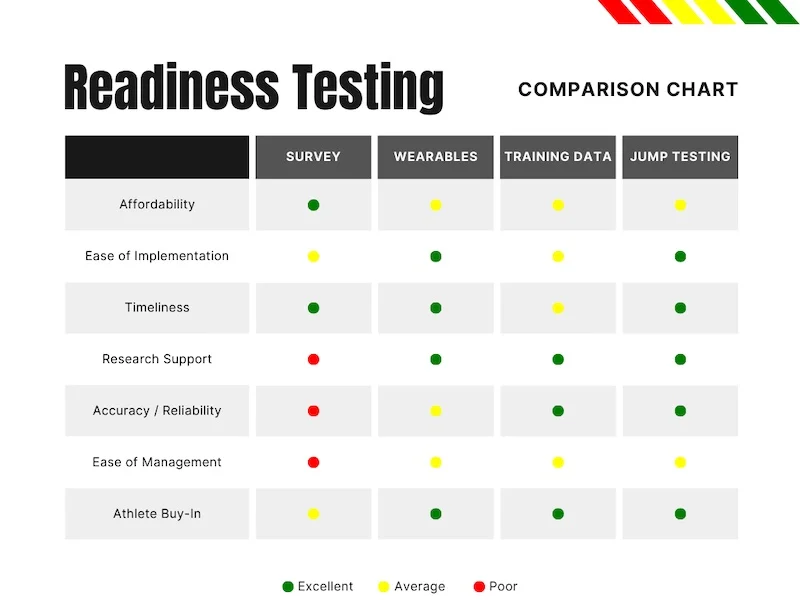
Aside from jump testing—the actual topic of this article—a few other methods that I won’t go too deeply into include:
- Wearable tech: Oura Ring, Whoop Band, FitBit, Apple Watch, HRV products, etc.
- Questionnaires: How did you sleep? How is your mood? What have you eaten today?
- Other training data: VBT data, force plate data, RPE post-session, etc.
All these are great options, but jump testing delivers the best results with a reasonable investment of time and money combined with higher compliance from the athletes and coaches involved. These tests provide valuable data on an athlete’s neuromuscular system, power output, and reactive capabilities.
All jumps and jump testing I talk about throughout this article will refer to jumps on a jump mat. I use the SkyHook Jump Mat. Other popular options include the Plyomat, the Just Jump mat, the Swift EZ Jump, and the Jawku Vertical Jump Tester. These tests can also be performed on force plates or with a Vertec system.
Types of Jump Testing
Keep in mind that I am trying to simplify jump testing and get it down to the most necessary components possible. There are dozens of jump-testing options out there—especially when it comes to force plate data—and some rabbit holes we can dive down (for better or for worse). This article will not cover an exhaustive list—I’ll be detailing my three most used, most repeatable, and most valid ways to test on jump mats.
1. Countermovement Jump (CMJ)
The CMJ—aka a regular ol’ vertical jump test—has been one of the most utilized and reliable testing methods for not only measuring athlete readiness but also force and power outputs. It’s time-sensitive, affordable, repeatable, and, most of all, objective.
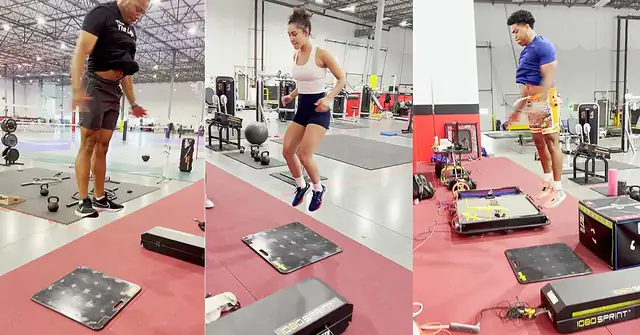
Video 1. Countermovement jump using the Skyhook contact mat: “Step on the mat, jump as high as you possibly can, and land safely on the mat.”
The higher the vertical, the more we can assume about that athlete’s power production potential. Additionally, the more we can assume about some of their other athletic qualities, such as relative strength and sprint speed.
On our CMJ tests (and all jump tests), we let athletes use their own unique jump technique with little to no cueing. We correct potentially dangerous movements, which are rare, but other than that, I want to see the athlete use their own strategy to produce the jump. Our training programs can address all of the other factors not relevant to measuring the athlete’s readiness on that given day.
We correct potentially dangerous movements, which are rare, but other than that, I want to see the athlete use their own strategy to produce the jump, says @JustinOchoa317. Share on XAs it pertains to the readiness of an athlete and their CMJ performance, we use a “stoplight” system to help autoregulate that athlete’s program if needed.
- Green means go, proceed as normal, maybe even push it.
- Yellow means proceed with caution or slow down to reassess the situation.
- Red means stop and reassess the situation, possibly changing some programming.
We also use the athlete’s baseline testing with statistical values such as standard deviation and coefficient of variation to help get that daily testing number down to the true performance change. This helps influence conversations and programming decisions based on how much that performance has dropped compared to their baseline. I’ll cover that process and scale in-depth later in the article.
2. RSI Pogo Jump
Another jump test I absolutely love for training and readiness purposes is the RSI pogo jump test. I use a 4/2 method; others use a 10/5 method. Tomayto, Tomahto.
The reactive strength index, or RSI, measures an athlete’s ability to utilize the stretch-shortening cycle efficiently. This not only represents an athlete’s elasticity and reactive ability, but it can indicate neuromuscular efficiency as well. RSI can also help drive programming decisions in terms of which end of the force-velocity curve an athlete needs to tailor their training toward.
Video 2. RSI Pogo Jump: The measurement itself, although it’s kind of unclear what unit of measurement RSI actually is, is calculated by dividing jump air time (or jump height) by ground contact time.
You can get to a really good RSI score by having a lot of air time with minimal ground contact time—producing large amounts of force in a very small amount of time. You can alter your score, whether positive or negative, with a change in either one of those components.
The 4/2 method, which is built into the SkyHook Jump Mat that I use, is performed by hopping onto the mat and then completing four pogo jumps in a row before landing safely on the mat. Each jump has its own recorded air time and ground contact time. The software will take the best two of those four jumps to produce the athlete’s RSI score. The PlyoMat also provides this exact method. A slightly different version is featured on the Just Jump mat, where the athlete jumps four times, and it takes the average across those four jumps to produce the RSI score.
The 10/5 jump is a similar concept that I used in the past before switching from IMUs to jump mats. This test is a series of 10 pogo jumps, with the RSI calculated from the last five of those 10 jumps.
In my opinion, all of these test options can be useful. As a coach, you know your setting and athletes best, so ultimately, it’s up to you to choose the best method for your environment. What device you use could also play a role in which methods you choose. I chose to go with what is built into my device to help me save time and guarantee consistent testing protocols.
3. Drop Jump Test
This is also a measurement of RSI, but in a less repetitive method in terms of the athletic outputs. Rather than multiple jumps, the drop jump involves stepping off a box or platform (onto a jump mat) and immediately performing an explosive jump upon landing.
Similar to the 4/2 RSI test, this drop jump test emphasizes an athlete’s ability to rapidly switch from eccentric to concentric, making it a great training tool that also serves as a test: both “tests” are also common plyos that most athletes do some variation of in training.
Video 3. In testing, it’s crucial to ensure that the box or platform athletes drop from is always the same height. In training, we’ll progress the height of drops, but in testing, we don’t want to tarnish our test validity by jumping from various heights and comparing apples to oranges.
Making a Test Part of Your Routine
Again, these are not the only tests available for readiness testing, but they are the ones I have the most confidence in—they are easy to coach and execute, athletes enjoy them, and they can all be performed on a jump mat.
My test of choice is the RSI 4/2. We do it daily. I would suggest choosing one test and making that the test. Sure, you could test all three because they technically showcase three different force production strategies, but then you would be right back at square one: data overload. Simplifying things is the name of the game here. So, choose one, roll with it, and master it.
I would suggest choosing one test and making that THE test. Simplifying things is the name of the game here. So choose one, roll with it, and master it, says @JustinOchoa317. Share on XWe have our testing baked into the warm-up. All of our warm-ups feature breath work, mobility work, some dynamic stretching, and rudimentary plyometric drills before each athlete breaks off into some personalized “daily vitamins” in their warm-up.
The final piece of our warm-up always includes some sort of nervous system excitement in the form of a jump or throw; then, we follow that up with our testing for the day. It doubles as a readiness test but also another explosive drill for the athlete to prepare them for whatever may be next in their session for the day (i.e., sprints, lifting, skill work).
The method allows us to test the athletes when they’re feeling as ready as possible for that given day, and it also builds some routine into the process to help the athlete feel comfortable with the tests.
Readiness Jump Testing Protocol
Ok, I’ve rambled long enough about the prerequisites—now it’s time for the main course. (But then I may go back to rambling for a bit, so please stick around.)
This will be the most important section of this article because it corrects the mistake I made during the first five years of readiness jump testing in my own program. It wasn’t until I read “Establishing the Reliability & Meaningful Change of the Drop-Jump Reactive-Strength Index” (Beattie & Flanagan) that I realized I was making a huge mistake in my readiness tracking.
The mistake was that I was not accounting for the completely normal fluctuation in results that may occur, not only between trials but also within the same day, due to various factors. And what Beattie & Flanagan proved in their research is that we must take those fluctuations into consideration during baseline testing to build in a “zone” or “range” of what’s normal since normal is a moving target.
Not including this method can create a phenomenon of crying wolf—not by the athlete, but by the coach. Failing to account for the variance of what is normal can create a false-negative, leading to the coach overcorrecting, overanalyzing, and making far too many unnecessary changes to the athletes’ programs when they likely could have let them train as normal and keep those valuable reps.
You know the phrase, a strength coach’s first job is to do no harm, right? Well, do no harm was starting to feel like do no work. My readiness testing was starting to feel like I was in search of reasons to autoregulate the programs and “keep them fresh,” but really, I was just taking away good opportunities to impose some stress on a fully ready and able young athlete.
When I reflect on that brief time in my career, I loved the results the athletes got, but I also wonder: “Could we have gone harder?” “Could I have pushed them a little more?” “How much better would those athletes be if I did?”
The reality is that since jump mats give us fractional results, this concept posed a legitimate issue for me because the jump results are not on the inch or the half inch; they are presented in tenths of inches. This makes it very common to have three very similar-looking jumps that are not the exact same result. For example, it’s not uncommon for a trial of three vertical jumps to look like this:
- Attempt 1: 29.73
- Attempt 2: 30.12
- Attempt 3: 28.83
I have never seen an athlete perform three identical jumps on any jump mat system. I have never even seen two of the three jumps be identical. By not accounting for this, I was making my testing inaccurate and inconsistent—thus, rendering it invalid.
What Beattie & Flanagan discovered was that to establish a readiness test’s reliability, we need to get statistical techniques involved to determine the true change in performance. That’s where the mathematical terms you haven’t heard since high school come into play: standard deviation (SD) and coefficient of variation (CV). And for a guy that lived by the “C’s get degrees” slogan throughout college, this absolutely blew my mind.
What the heck do those two terms even mean, though?
- A standard deviation is a measure of how dispersed the data is in relation to the mean. A low standard deviation means data is clustered around the mean, and a high standard deviation indicates data is more spread out.
- The coefficient of variation is the ratio of the standard deviation to the mean. The higher the coefficient of variation, the greater the level of dispersion around the mean. It is generally expressed as a percentage.
So, the kicker is that to find the CV, we must first find the SD because the equation is:
100 x (standard deviation/mean) = coefficient of variance (CV)
This is so crucial because if we use jump testing to determine an athlete’s readiness, we need to account for the subtle differences between even their healthiest, best, and most “ready” jumps.
If we use jump testing to determine an athlete’s readiness, we need to account for the subtle differences between even their healthiest, best, and most ‘ready’ jumps, says @JustinOchoa317. Share on XIf we go back to the example jumps I used above—29.73, 30.12, and 28.83—that’s a mean of 29.56, an SD of 0.54, and a CV of 1.83. That CV of 1.83 represents that any change in performance less than 1.83% is entirely normal for that athlete.
This data is powerful because it allows you to truly track meaningful change in performance and alter your programs, or not, based on that.
My general rule used to be that if an athlete’s readiness test drops by more than 10%, then we go on an autoregulation program to alter volume and intensity for the day. Not accounting for the CV, I probably stripped athletes of perfectly fine opportunities to train the program as initially planned.
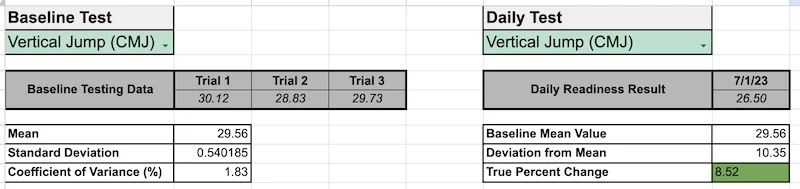
Keeping the same hypothetical athlete numbers used above, let’s say they jump a 26.5 on their readiness test. That’s more than 10% off their baseline mean (10.35%). But the true change in performance is only 8.52% because we know that they could have a 1.83% variance on their testing on any given day. The math there is the 10.35 deviation from the mean, minus the built-in CV of 1.83, to equal 8.52. So, instead of cutting them off from training that day, they’re green as long as no other red flags are apparent.
With the power of friends who actually paid attention in math class, Google Sheets, and YouTube, I created a template here that coaches can use to do all of the math shown above in less than three seconds. With that template, you can duplicate the sheets for each of your athletes and quickly input their daily readiness test results.
The sheet will show the true change in performance based on their baseline testing data and give you a red, yellow, or green cell to indicate how a coach should move forward with that athlete in the program.
I currently have it set up to stay green—meaning no intervention is needed—when the true change in performance is 0%–9.99%. It will display a yellow—meaning potential intervention is needed—when the true change in performance is between 10% and 14.99%. And finally, it will display red—meaning intervention is needed—when the true change in performance is a 15% drop-off or greater.
Readiness Testing Best Practices and Benefits
By now, I hope you’re all-in and excited about the concept of readiness jump testing, but if you need to be persuaded a little bit more, below is a quick overview of just a few of the many benefits that readiness testing can bring to your programming.
First, readiness jump testing enables coaches to establish an athlete’s baseline performance level—this is crucial for the daily readiness piece, but it also sets a baseline for performance metrics. By assessing the athlete’s jump height, power, and RSI, you can gain insights into their current physical capabilities and monitor those daily for readiness and long term for program results. This information serves as a foundation for setting realistic goals and designing personalized training programs tailored to the individual athlete’s needs.
Coaches can also gain valuable insights into an athlete’s specific strengths and weaknesses. Athletes with a high vertical and low RSI may be effective at using sheer force to produce athletic outputs and could benefit from gaining elasticity through training. Athletes who are very fast but have a low vertical jump may lack general force production qualities and could benefit from exposure to that in training. Testing vertical or RSI daily for readiness could double as extra reps at whatever end of the force-velocity curve an athlete may need.
Another key benefit is the ability to see real-time training progression and results without having to have a classic “testing day.” Regularly implementing readiness jump testing throughout an athlete’s training program allows coaches to monitor the progress that they’ve made day-to-day or week-to-week and share that feedback with the athletes. We can see small weekly increases in vertical jump or RSI simply by having that as a part of the athlete’s program. By comparing data from previous assessments, you can track improvements in power output, explosiveness, and reactive strength. This information allows for targeted adjustments to training protocols, ensuring continuous progression and preventing performance plateaus.
Another key benefit is the ability to see real-time training progression and results without having to have a classic ‘testing day,’ says @JustinOchoa317. Share on XLast but not least, the main reason we would want to utilize this testing method is to ultimately improve an athlete’s performance. The test is designed to measure readiness to train, meaning we want to make sure that our athletes constantly get the optimal doses of training volume and recovery methods to support that. After all, we want them to train. We don’t want to search for reasons for them not to train but rather, program work that allows them to get results, feel good while doing so, and transfer those results to their sport.
It’s a major benefit to be able to show an athlete all of the things above and do so in as little as five minutes a day. The return is well worth the investment of both time and financial resources.
All of this is great in theory, but implementation is the name of the game. Here are some best practices that have helped me make readiness jump testing a valuable asset to our program over the years.
-
- Establish a clear objective for your system. What do you want to get out of the testing process? Define the purpose and objectives of daily readiness jump testing and how this will (or won’t) positively impact your program. What tests do you want to perform, and why? What devices and tools will you use? How will you store, track, and manage the results? This is different for every coach, but starting with a clear why is always a great move. If you ever get off-track or don’t like the way the testing process is going, you can turn back to that and see if you’re still in alignment with the reason you started in the first place.
-
- Standardize the testing and tracking procedures. This includes consistent warm-up routines, testing equipment, measurement techniques, data management, and instructions for athletes. This also includes retesting and re-establishing the baselines for each athlete. As athletes improve, there will come a time when they need to set a “new normal” to account for those gains. Standardization ensures reliability and minimizes variability in the testing process. All that being said, we work with humans in a gym and not robots in a lab. Don’t beat yourself up if you run into minor imperfections. It’s a marathon. Just try to keep it apples to apples as much as you can.
-
- Seek athlete feedback. It’s often said that athletes don’t care how much you know until they know how much you care. Ensure that athletes understand the purpose and benefits of readiness jump testing and that it is a function of maintaining their well-being. Educate them on how the testing results will be used to optimize their training and performance. Encourage athletes to actively engage in the process by providing feedback and sharing their observations regarding their readiness and recovery. Make it as interactive as possible. Monitor their compliance and address any barriers or challenges they may encounter.
-
- Remember that testing is just a tool. We can use these testing methods to make informed decisions regarding training adjustments, recovery strategies, or individualized interventions. But don’t become so over-reliant on the tests that you forget the human element of coaching. Consider contextual factors. Integrate the testing results with other assessment tools and subjective feedback from athletes to form a more comprehensive picture of readiness. Use this as a tool, but know that you, the coach, make the final decision.
- Have a plan. Build out your system of what actually happens based on an athlete’s readiness testing results. I have a stoplight system of red, yellow, and green (as discussed above). If green is the program as written, yellow and red would slightly modify exercise selection, volume, and intensity. Having a set plan in place will make life easy and keep the flow of the sessions really smooth. Coaching can be hectic and stressful, but when a system is set up, and a plan is in place, it truly helps us make practical decisions on the fly because the hard work was done upfront.
Since jump mats are becoming more and more accessible, affordable, and popular in all settings of sports performance, I truly believe that readiness testing is a great way to get a return on your investment for the equipment.
The daily jumps are ingrained in the culture of our gym. It’s not even written or posted anywhere on an athlete’s program, but they know it will happen every day, and they embrace it as a challenge—not only against their training partners but against themselves from their last session.
There is no perfect system, and jump testing doesn’t give us all the answers, but it checks many boxes and delivers immense value, says @JustinOchoa317. Share on XI love to hear things like “Remind me what I got last time” or “What’s my all-time best? I’m about to beat it” before a rep of daily testing. It shows me the athlete truly cares, and not only about their results. They believe in the process it takes to get there, with daily jump testing being an ingredient in their recipe.
There is no perfect system, and jump testing doesn’t give us all the answers, but it checks many boxes and delivers immense value. By implementing some of these methods, coaches can gather important athlete data to help make better decisions, deliver better training programs, and ultimately help athletes maximize their athletic potential through more intelligent training.
