When laying out a training program, we always want to do what is best for our athletes and fill multiple boxes from the physical preparation checklist. This requires considering characteristics such as movement capacity, general strength, and coordination, along with several other subcategories that lead to more physically prepared and durable athletes.
Crawling is one of the most fundamental movements with which to examine general, foundational human abilities. Other than rolling, crawling is the first effective means of movement we perform as infants. Crawling is the first step that we take to get from point A to point B, though somewhere along the way we forget this and miss out on the value in crawling for athletic development.
When looking to develop the most robust athletes possible, crawling movements should be a cornerstone of training—especially in the training for youth athletic development. Share on XWhen looking to develop the most robust athletes possible, crawling movements should be a cornerstone of training—especially in the training for youth athletic development. Crawling patterns promote total body strength and body and spatial awareness, and they create an engaging environment for young athletes to be challenged in and have fun.
Looking outside of youth athletes, crawling is still beneficial—though the older the individual, the less potential there is for movement development and quick learning (kids are like sponges). That doesn’t mean crawling won’t offer improvements: along with the previous mentioned benefits, crawling is great to develop hip and shoulder mobility, as well as trunk and spine stability in a slightly older population. These are things that I still want to develop in my high school, college, and tactical athletes.
Introducing Crawling with Isometrics
Introducing crawls is about focusing on positioning: teaching how to get into proper positions and then maintaining them when disrupted.
Introducing crawls is about focusing on positioning: teaching how to get into proper positions and then maintaining them when disrupted. Share on XThe two base crawl positions I recommend starting with are the bear and crab crawl positions. When labeling the isometric holds, we will refer to four-point, three-point, and two-point positions, designating to how many limbs you have for support. This also makes for an easy progression if you are in a group setting or writing a long-term program.
Video 1. Bear Crawl Iso Series. Holding the isometric for the bear crawl, you want to keep the hands under the shoulders, knees under the hips, and a neutral spine when holding each position.
Video 2. Crab Crawl Iso Series. The crab crawl is similar to the bear crawl but with the hips staying off the ground during the hold.
When holding the positions, it’s important to evenly distribute your weight through your points of contact, especially when performing a hold with fewer limbs.
Holding the crawl positions for time should only be progressed to longer durations once the athlete has demonstrated complete control over the position. Clearly, a two-point hold will look different then a four-point one and allow time for the individual to gather themselves and balance, but they shouldn’t be falling onto the ground.
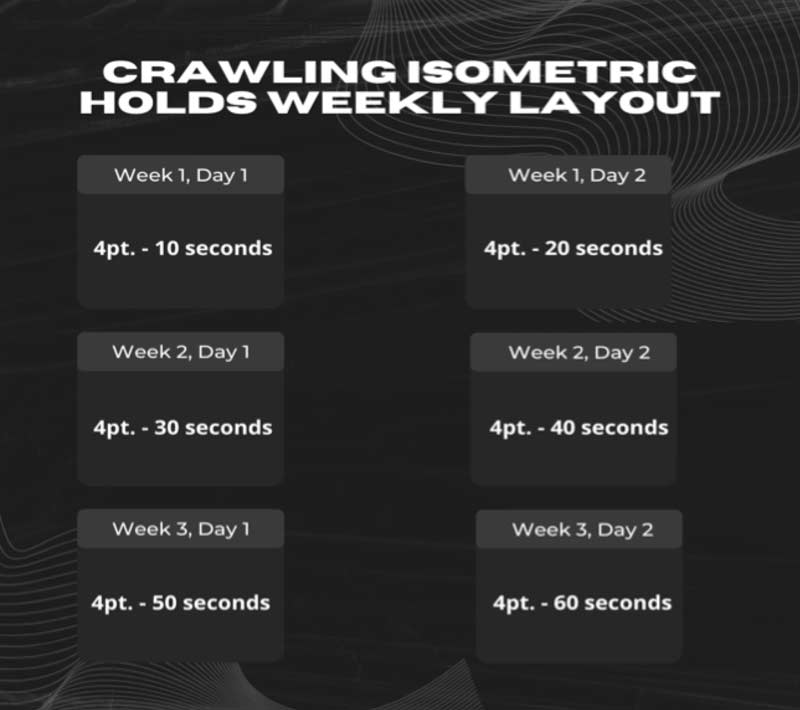
You may increase time from session to session or weekly, depending on how many times you implement crawls into the program. I start at a manageable 10-second hold and work up to 60 seconds for four-point holds. I have worked in longer holds, 75–90 seconds, but those were specific cases and more appropriate for those athletes.
When doing a three-point hold, you have to consider that if you perform each position for 20 seconds, that would be a total of 80 seconds; so, either give rest in between each position or account for total time, holding each position for a decreasing duration. If an athlete can manage a 60-second hold, they can begin moving with the crawls.

This is three weeks of a progression of time. Once completed, you can then progress into a three-point position and conclude with the tougher two-point position.
Taking it one step farther, you can also add resistance or a little chaos through partner perturbation if you’re able.
Video 3. Advanced Iso Holds. When adding resistance, I use either a weighted vest or chains, as these are safer, more comfortable options.
Crawling
Once positions are set, you can begin having the athletes crawl in motion. Here you will begin to challenge the positions that were easy before.
There are several variations of crawling that can and should be incorporated into an athlete’s training on a regular basis. The more practice and exposure to various crawling patterns, the more the athlete will gain from the movement. I typically keep crawling exercises between 5 and 20 yards. Five yards is a great marker to begin at, with most exercises being performed in the 10- to 15-yard zone, and 20 yards being where I cap the exercises.
Video 4 & 5. Bear Crawl & Crab Crawl. Once the distance begins to exceed 20 yards, fatigue begins to settle in and can dramatically affect the movement, leading to more risk than reward.
When performing the crawls, the cues will be different depending on the crawl, but universally you want to maintain proper, consistent body positioning throughout the movement.
Video 6. Spiderman Crawl. The Spiderman crawl forces the athlete to keep their body as low to the ground as possible. This helps with hip mobility and a high amount of upper body strength.
Video 7. Monkey Crawl. Monkey crawls allow the athlete to push away from the ground with their lower body while pulling themselves forward with their upper body. This is also great for hip mobility while achieving total body synchronization.
Video 8. Shrimp Crawl. If you have ever done a Brazilian jiu-jitsu class, you have probably performed a drill known as shrimping—a movement where you essentially bridge the hips and curl your body in, moving yourself down the mat with your hips. While I don’t use the shrimp crawl for the same reason as jiu-jitsu does, it is an excellent way to teach individuals how to use their hips to create movement.
Video 9. Butt / Back Crawl. The butt crawl has been popularized by former powerlifter and coach Donnie Thompson. It is fantastic to help with lower body warm-ups and activation by shifting your hips up and side-to-side to create movement.
The back crawl is a humbling movement where the athlete begins on their back. Have them maneuver down the field like the butt crawl, shifting with their shoulders, lower back, and hips.
Keep these movements shorter in distance, 3–5 yards, as they are difficult to cover a lot of ground with.
Video 10. Plank Crawl. The plank crawl can be performed from either the hands or elbows and is exactly what you are probably imagining. The athlete locks themselves into a plank position and then begins crawling down the field, working to maintain body position.
Video 11. Tactile Cues. If athletes are struggling with the movements, including tactile cues with equipment can help teach and drive the intent of the exercise. An example of this is the commonly seen cone or object on the flat back when performing a bear crawl. Another option that may be easier for coaches to implement is the use of a stick to keep the athlete in position.
Video 12. Crawls in Various Lanes. Many of the crawls previously mentioned can also be performed in other directions such as backward, laterally, and in a circular movement. This helps keep the options fresh but doesn’t change the movement entirely.
Advanced Crawls
If your athletes are crushing the crawling exercises seen so far, here are five more advanced variations that you can place into the program for those they may be appropriate for.
1. Kettlebell Resisted Backward Crawl
While adding external load to crawls is not high on my list, this banded kettlebell setup is an exception and a phenomenal exercise. I first came across this exercise from John Hunt, an athletic trainer and professor who primarily works with baseball players of all levels.
Video 13. Kettlebell Resisted Backward Crawl. The crawl involves tying two resistance bands together and anchoring one end to a heavy kettlebell and the opposite end around the athlete’s waist.
The athlete pushes away from the ground, fully extending the arms, as they begin dragging the kettlebell. This is great for shoulder and trunk stabilization but also hammering at the connection between the upper body and trunk—a good alternative to get the arms overhead in a stressed but safe manner.
2. Disc Crawls
The athlete places their feet onto a pair of Valslides and begins making their way down the field while maintaining a strong body position. I introduce this exercise first going backward, where the athlete can push themselves away from the ground as opposed to pulling themselves going forward.
Video 14. Disc Crawls. Each direction is difficult and requires the hips to stay engaged as you drive your feet into the discs the entire time.
3. Ab Wheel Crawls
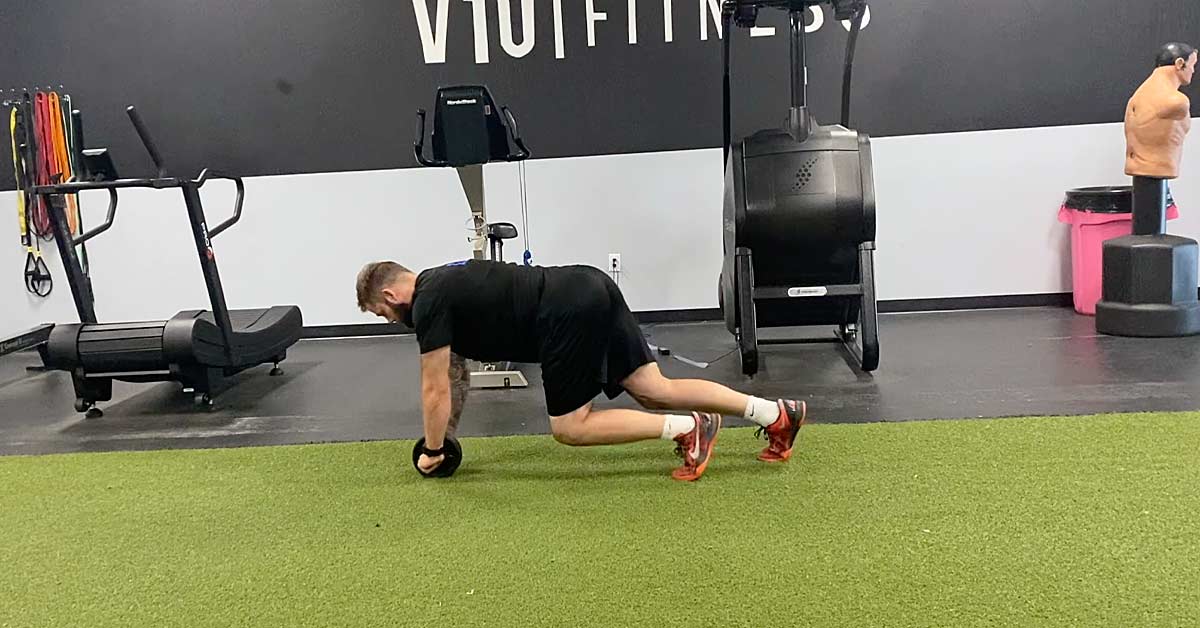
This is similar to the disc crawls but this time the athlete has their hands on the ab wheel as they crawl down the field.
Video 15. Ab Wheel Crawls. Perform this movement slowly, working to maintain a complete flat back while in motion.
4. Plus Sit-Out
Adding the sit-out component to crawls continues to push the qualities of total body strength and coordination.
Video 16. Plus Sit-Out. This is also great to include some rhythm into the crawls, as they should be on a cadence of when to sit out.
5. Plus Drag
Video 17. Plus Drag. Dragging a kettlebell or sandbag during a crawl requires tremendous amounts of trunk and spine strength and should be used only with the athletes who have demonstrated the ability and capacity to do so.
Honorable Mention
While not technically crawling, I do find tumbling drills work hand-in-hand with the movement.
Video 18. Tumbling Drills. Activities such as rolls, cartwheels, falling, and other movements work similar characteristics as crawling but require different movement and landing strategies.
Applying Crawling
Applying crawling movements to games and competition is the final objective. Don’t be overly cautious when doing this with younger athletes—kids shouldn’t be worried about their perfect crawling positions when you tell them they’re going to play a game where everyone crawls around like a bear. Keep it stricter when the environment is more controllable (such as the isometric holds), but there are ways to keep games fun, yet safe.
Video 19. Catch Game. When introducing games, start from the isometric position in the same way you introduced the crawls to begin the progression.
A simple toss and catch, or even Simon Says from the bear or crab position, promotes additional challenges. From there, you can implement more speed and movement to the games, having races and chases.
Video 20. Capture the Flag. Another, more complex game is Capture the Flag. Using a flag or even a towel can create a competition for athletes to try to crawl into better positions to capture their opponents’ markers for victory. We also use this or ankle tag for a quick, fun warm-up. Crawling is far too beneficial to be excluded from your athlete’s physical preparation. Share on X
Crawling is far too beneficial to be excluded from your athlete’s physical preparation. From helping improve mobility to strength and coordination benefits, it serves as a complete exercise prescription. It is also a fun way to enhance engagement during training sessions. You can follow the crawling progressions as you see fit and work to improve these capacities over time to benefit your athlete’s physical development.
Since you’re here…
…we have a small favor to ask. More people are reading SimpliFaster than ever, and each week we bring you compelling content from coaches, sport scientists, and physiotherapists who are devoted to building better athletes. Please take a moment to share the articles on social media, engage the authors with questions and comments below, and link to articles when appropriate if you have a blog or participate on forums of related topics. — SF


