The 1080 Sprint is a powerful tool for measuring and training speed, but as with most equipment, it’s the small details that can make the biggest difference. After using the 1080 Sprint for 6 years, I’ve picked up a few things that aren’t always obvious in the user guide but can make an impact in both the quality of your data and the safety of your athletes.
These lessons came from real sessions, real athletes, and real moments where the numbers didn’t match what my coaching eye was telling me. When the 1080’s Peak Velocity was consistently higher than our GPS readings, it made me question: which number do I trust when giving feedback, and will it hold up next session?
I also started noticing timing inconsistencies when athletes looked their same consistent speed but suddenly “improved” by 0.3 seconds…that is, until I saw the slack in the cord and realised that was skewing the start trigger. I also recognized unique cord-anchoring issues when I began sharing turf training space; meanwhile, every snapped cord told the same story as it always broke where the rope was twisted (not at the carabiner).
These small-but-pivotal moments helped refine how I make best use of the 1080. Based on those experiences, in this article I’ll share four tips that I now rely on in every session. From choosing the right velocity metric for consistent analysis to best practices for setup and safety that will save you time, avoid injury risks, and improve the quality of your sessions:
- Which velocity metric should you record?
- Safety first—keep the cord straight.
- Find the optimal anchor point.
- Get the first step right for accurate timing.
1. Which Velocity Metric Should You Record?
In working with the 1080 Sprint, one of the first decisions coaches face is choosing which metrics to focus on. To analyse sprint velocity, for example, you can choose from Peak Velocity, Top Speed, and Average Velocity.
For our purposes today, I’m going to talk about Peak Velocity and Top Speed. You may say “aren’t they the same?” And on the surface, the measures may appear interchangeable…but they’re not:
- Peak Velocity is 1080 Sprint’s raw, unfiltered velocity metric.
- Top Speed is their filtered velocity metric.
Back when I first started using the 1080 Sprint, we used the Peak Velocity metric; since that time, however, 1080 Motion began to include Top Speed in their latest software. So, does it really matter which one you take? Put simply, yes! And it comes down to resonance, or the cord whiplash effect (as seen in Video 1 below).
When the cord whips back and forth it can create noise, and this noise can lead to spikes in velocity that are not the true representation of the athlete’s velocity—for this reason, 1080 Motion applies a filter.
Video 1. Cord resonance in linear sprint.
To dive a little bit deeper, I conducted in-house testing with four professional rugby players across a range of resisted sprint conditions—from 15kg at 10 meters down to 1kg at 30 meters—while recording their speed using GPS and the 1080 Sprint. You can see the results, averaged across the four players, in Table 1 and Table 2.
What I found was:
- Top Speed, which is the filtered metric, closely matched the GPS velocities, typically coming in around 2–3% higher.
- By contrast, Peak Velocity, which is unfiltered, showed markedly higher numbers than the GPS values by 8–10%.
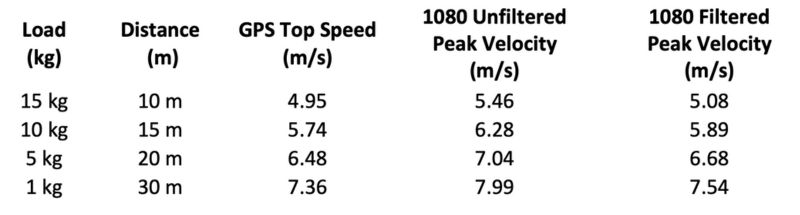
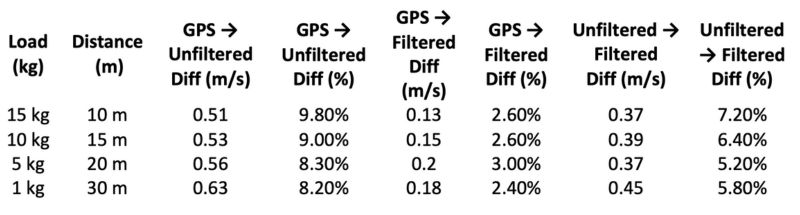
Interestingly, I expected the heavier resisted conditions to reduce the cord resonance, which in theory should reduce the gap between unfiltered and filtered velocity readings. That, however, was not the case. In fact, the data showed a slight trend in the opposite direction—as the load decreased, the velocity values between GPS, filtered, and unfiltered readings became more similar. This suggests that cord behaviour and signal smoothing are not improved by heavier resistance, and that resonance variability persists regardless of load.
The take-home message? Use the Top Speed metric when analysing data for more reliable results, especially when comparing across sessions, athletes, or to other tools like GPS.
Use the @1080motion Top Speed metric when analysing data for more reliable results, especially when comparing across sessions, athletes, or to other tools like GPS, says @jonobward. Share on X2. Safety First—Keep the Cord Straight
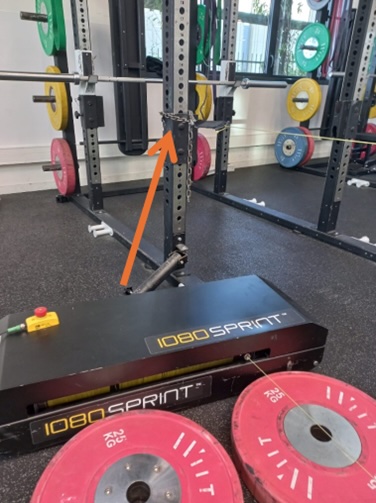
When using Gear 2 on the 1080 Sprint—which allows you to impose >15kg of resistance—coaches need to check that the cord isn’t twisted before the athlete’s rep starts. It’s a small detail that doesn’t seem like much of a big deal…until it is.
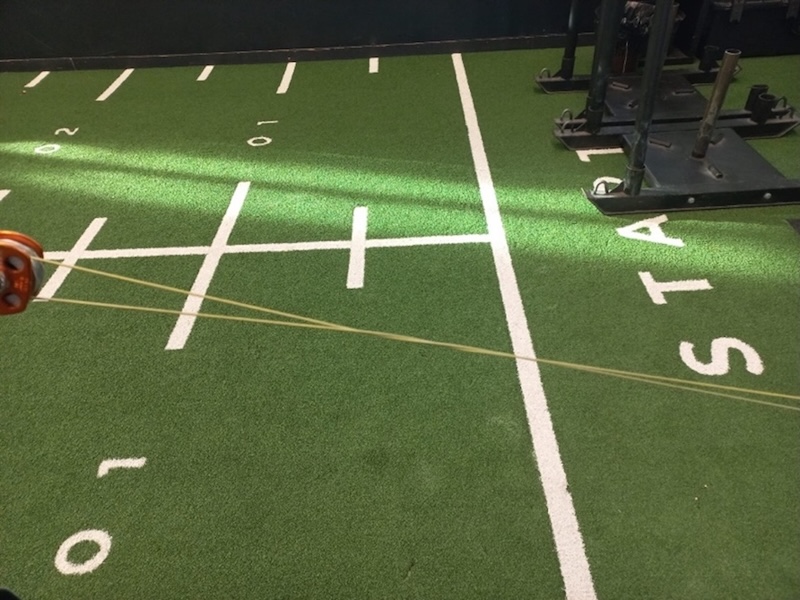
In Image 1 (above), you can see the cord is twisted. When the athlete runs with the cord twisted, it creates friction that can eventually cause the rope to suddenly snap. I’ve had this happen, and when it does, the athlete doesn’t get a warning: the cord snaps mid-sprint and they end up face planting. I was worried about injuring the guys in training and then having to go tell the Head Coach a player is out for the upcoming weekend game. Not what you want!
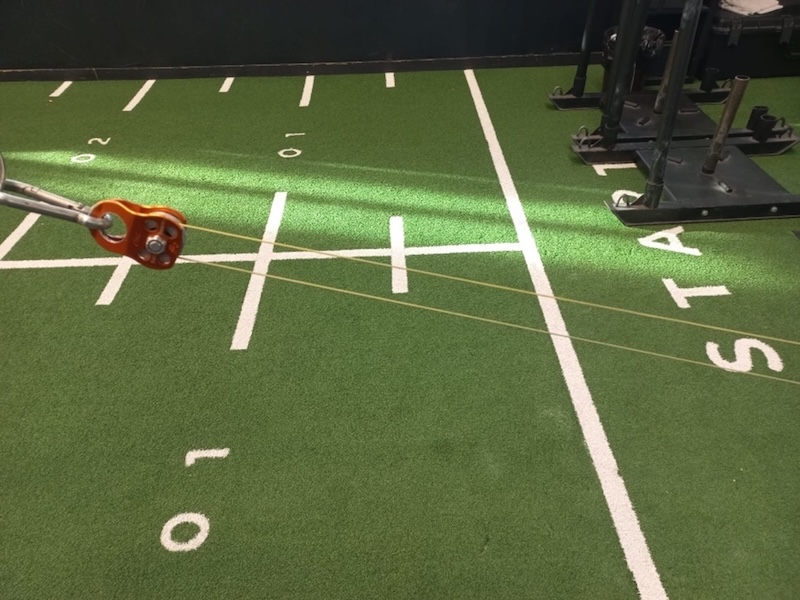
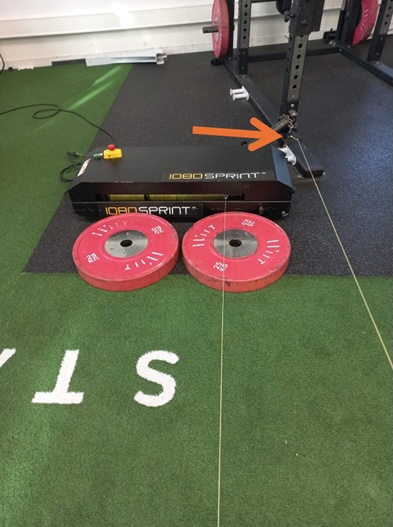
Now compare that to Image 2 (below), where the cord is untwisted. That’s what you want to see before every sprint. It only takes a few extra seconds, but checking the cord before each rep—especially when you’re running in Gear 2—should be part of your routine. It’ll save your cord, your budget, and most importantly, your athletes!
3. Find the Optimal Anchor Point
This tip is also important when using Gear 2. If you’re using a wall attachment to attach the cord to an external anchor point—in my case, a squat rack—make sure that anchor point is only slightly higher than the machine. If it’s attached too high (Image 3) or offset to the side (Image 4), the cord can pull the athlete upwards or sideways, disrupting their sprint mechanics.
Several of my athletes have said they can’t “get low” when the attachment point is too high, as it pulls them out of position, especially during the early phase of the sprint. When I’m coaching my athletes to rise progressively over the first 5-10m, I don’t want the cord pulling them upright and disrupting their run. My take home message here:
- Anchor the cord low and in line with the 1080 Sprint to minimise the impact the cord placement can have on the sprint (see Image 5 below).

Image 5. Optimal anchor placement with the cord fixed in line with and just above the 1080 Sprint.
4. Get the First Step Right for Accurate Timing
Lastly, coaches collecting data need to be mindful of how their athletes initiate the first steps of their sprint. The 1080 Sprint begins timing once the cord exceeds a velocity of 0.2 m/s. If the athlete takes a step backward before sprinting, they can introduce slack into the cord (see Video 2 below).
Video 2. Starting a sprint with unwanted slack in the cord.
The machine doesn’t start timing until after the slack is taken up—so in the example above, this will make it seem like your athlete was faster out the blocks than they really were, giving an inaccurate sprint time. To avoid this, tell your athletes to drive out and don’t rock back to then drive out.
The @1080motion Sprint begins timing once the cord exceeds a velocity of 0.2 m/s. If the athlete takes a step backward before sprinting, they can introduce slack into the cord, says @jonobward. Share on XFinal Message
The 1080 Sprint is an awesome bit of kit, but like anything, the value is in how you use it. These four tips might seem minor, but over time they make a big difference. Whether it’s picking the right metric, checking the cord, setting the anchor, or cueing that first step, these are habits I’ve built into every session and learned from the field.
If you’re using the 1080 Sprint regularly, make this part of your checklist as you’ll save time, protect your gear, and get much more out of your sessions.