Speed training is a layered, multifaceted process dependent upon a range of factors. Whether linear or multidirectional speed, there are physical, technical, rhythmic, and mental components that will impact success. One piece of this layered process is the strength and stability of the trunk and spine.
When I say the trunk and spine, I refer to the areas of the midsection, lower back, and pelvis. This goes beyond having strong abdominal muscles and needs to be addressed with more than just ground-based ab exercises. Particularly when performing aggressive speed drills that involve high intensities, quick changes of direction, or sudden decelerations, the trunk and spine could be a key limiting factor and potentially even a link leading to an injury down the road.
Strength and stability of the trunk and spine goes beyond having strong abdominal muscles and needs to be addressed with more than just ground-based ab exercises. Share on XThis area needs to be prepared and strengthened with the utmost intent and specificity to not only help the athletes achieve the most out of drills but also to round out their physical capabilities and support injury reduction in any way possible.
When to Implement Trunk and Spine Training
When beginning to integrate trunk and spine training directly into speed sessions, coaches can simply place it within the preparation to help ready the athletes for the session ahead.
Another option would be to utilize the exercises in the session itself and complex or superset them with the speed drills. Doing this could help enhance the drill being performed and make it task-specific at a muscular level. We want to be able to make direct connections with our athletes and have exercises carry over for one another.
Pairing a particular trunk and spine exercise, such as an isometric hold, can help raise the body’s threshold or ability to prevent movement in that particular range, in the hope that it can also carry over when the athlete performs the speed drill again. Additionally, these drills are fantastic to include in a training design because they can be done right outside on the field!
An example would be using a band stabilization exercise to train a specific isometric in between reps of an athlete running sprints (if the coach feels this is appropriate, as each situation is different).
Simply using the exercise as active recovery between reps is efficient and preferable to having athletes just stand around for their recovery. Yes, they need to rest, and this rest can be several minutes depending on the speed of the athlete and the distance covered, but we also know:
- The perceptions of sports coaches regarding time between reps.
- Parents may not understand this amount of rest in training.
- Total time is a limiting factor.
Also, having a determined, overzealous athlete sit for four minutes can be the most daunting task of the session, no matter how much logic you offer them.
While I will always defend my programs and sessions in a constructive way to those I work for, incorporating the trunk and spine exercises as active recovery is a win for everyone. The exercise isn’t physically taxing enough to hinder their next sprint, is beneficial enough to not waste anyone’s time, and makes a positive impact.
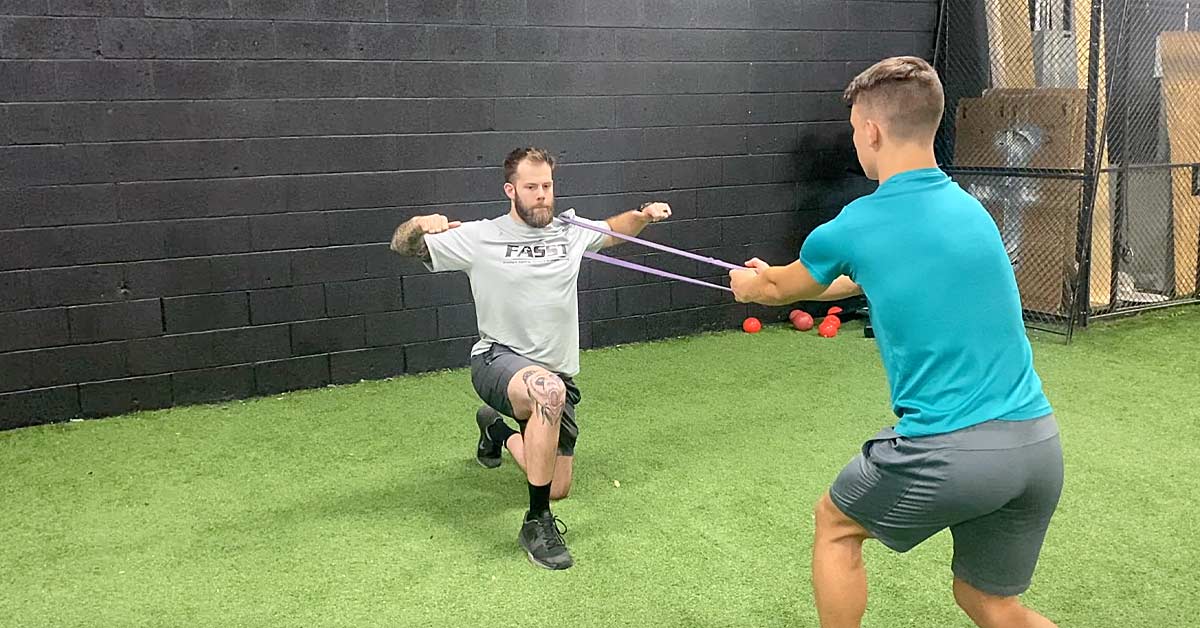
Incorporating trunk and spine exercises as active recovery is a win for everyone. The exercise isn’t physically taxing enough to hinder the athlete’s next sprint and makes a positive impact. Share on XBand Stabilization Series
There is no limit to band stabilization exercises, as you can perform these exercises in a variety of ways. You can alter the position of the athlete from a kneeling to a split squat position (and everything in between), as well as where the band is anchored to the athlete. Anchoring the band around the waist allows for multiple angles of pull and anchoring the band around a single-sided shoulder allows for forward and backward motion. When going over the shoulder, the athlete will have their arms up and elbows back, making two “L’s” if we were to look down on them. Doing this helps prevent trunk rotation and fires up the upper back.
The band can even be anchored around the leg to attempt to pull the limb into a specific position, forcing the athlete to counterbalance this and work their way out. This is usually only performed in special circumstances, such as with a now-cleared athlete with a previous injury history.
When applying the resistance, I recommend going right up to the point where the athlete feels they will lose the position being held. Pull right up to that line but be careful not to cross it or you will pull the athlete over onto the ground. Going right up to the line will be uncomfortable for that athlete, though, and you may see some breakdown of position; if so, just slightly release some tension or coach them back into position.
Perform each hold for 10-30 seconds, progressing either by moving onto the next position or increasing band tension.
Video 1. Full Kneeling Position
When going from the full kneeling position, the closer the knees are together, the more difficult it is for the athlete. Widening the knees creates a wider base and more stability.
Video 2. Half-Kneeling Position
Be mindful during the half-kneeling position to keep monitoring the down knee and keep the body symmetrical, as the leg will occasionally rotate in or get into all sorts of positions depending on how much resistance is given. The resistance can be applied to either side with the knee being down.
Video 3. Split Squat Position
The split squat position is by far the most difficult position listed here and can be performed off either side of the leg that is up. Aligning your athletes on a line can help them maintain proper body positioning of the lower body throughout this exercise if needed.
Video 4. Glute Bridge Position
The glute bridge is performed from a stronger position, so athletes can do this movement with more resistance than the others. It can be progressed by using a heavier band or taking it into a single leg stance.
Some other exercises that you can use to blend trunk and spine training into your speed sessions are resisted marches and skips.
Single Arm Band or Sled Walks
You can use a resistance band or light sled to start incorporating more dynamic exercises to challenge the trunk and spine.
I would first recommend performing these exercises with a resistance band as opposed to a sled because you can better manage the resistance added during the exercise and adjust it if needed. You can use a single resistance band or tie a couple of bands together to better distribute resistance slowly. Loop the resistance band around the athlete’s shoulder and apply just enough resistance so the athlete feels challenged and the band is trying to pull them to rotate to that side.
The exercise should be performed forward and backward. Cues for both directions are to focus on walking a straight path, with a slight lean in the direction you walk, while keeping everything in linear alignment: feet, hips, and shoulders, pointed as straight ahead as possible.
The athlete keeps their arms up and pulls their elbows back, making it easy to spot trunk rotation but also get some upper-body stability involved. If this position alone is too much for the athlete, have them simply place their hands behind the head in a prisoner position. This regressed version offers more stability.
Video 5. Band Single Arm Walks—Forward and Backward
Athletes are genuinely surprised how difficult this is if they do it correctly, and a little resistance goes a long way! Once the athlete has progressed to perform the exercise on a sled, I typically start even my strongest and fastest athletes with just 25 pounds loaded on the sled.
When using the sled, it’s easiest to loop the belt or harness of the sled around the shoulder and perform the same way. With the sled, though, the weight is what it is—there is no adjusting during the exercise, so the athlete has to remain stable and must not stop moving.
Video 6. Sled Single Arm Walks—Forward and Backward
Perform these exercises for sets of 20-40 yards, as fatigue begins to quickly affect proper body position.
Another movement to perform with the sled or bands is a drag using a single-arm isometric hold. Using a single arm forces the opposite side to remain stable, so if I’m performing the exercise with the handle in my right hand, my left side needs to contract and lock me in to prevent unnecessary movement.
Video 7. Sled Row Isometric Hold Back Walk
Weighted Offset Marches and Skips
Offset, weighted exercises such as marches and skips blend the weight room with more rhythmic and fluid drills such as skipping.
When performing these exercises, hold a kettlebell or dumbbell ranging from 5-30 pounds in one hand. The weight chosen will depend on the exercise being performed—skips are more difficult than marches and isometric holds—and you also need to consider the capabilities of the athlete.
Perform these movements for 10-20 yards, focusing on proper body posture and alignment and preventing the chest from collapsing down or crossing the knee or foot over the body’s midline. Athletes can perform these exercises in two positions:
- By holding one weight by the side, in a suitcase carry position.
- On one side held up in a front rack position.
Weighted Offset March Holds
Performing the offset march position in an isometric is a great way to introduce the movement and begin building a base from the ground up. While holding the implement on one side, the opposite side leg will raise, and the athlete will hold this position for the desired time.
This should be performed on both sides and done from each position: suitcase and front rack. Hold anywhere between 10 and 30 seconds per side to begin.
Video 8. Weighted Offset Marches Iso Hold
Weighted Offset Marches & Skips
Once the athlete is comfortable with the isometric position, slowly began progressing them to movements. Regardless of the variation or position, the universal cues will be having a strong, upright posture, popping the thigh up off the ground to about hip height rapidly, and maintaining a consistent, fluid, rhythmic timing throughout the exercise.
Some common errors I see during these exercises are body posture and coordination going everywhere. Even those athletes who can perform skips perfectly may struggle with the addition of the load.
When progressing this offset series, I would begin in the suitcase position first and move from marches (slow/fast) to skips (individual/continuous) before concluding with power. Then, moving through the same series from the front rack position.
Of course, this could appear differently depending on the situation and athlete, but that is a logical setup to use.
Video 9. Weighted Offset Marches and Skips—Suitcase Position.
Video 10. Weighted Offset Marches and Skips—Front Rack Position.
Video 11. Weighted Offset Power Skips.
The Next Level
Integrating trunk and spine training into speed sessions can be simple yet take your athletes and your sessions to the next level. Placing these movements into the athlete’s preparation or complexing them with specific exercises can help correct postural weaknesses and raise the body’s threshold during high-speed drills.
Integrating trunk and spine training into speed sessions can be simple yet take your athletes and your sessions to the next level. Share on XThese exercises can be performed directly out on the field with just a resistance band, sled, or a few weights and begin the necessary process of blending the weight room and field.
Since you’re here…
…we have a small favor to ask. More people are reading SimpliFaster than ever, and each week we bring you compelling content from coaches, sport scientists, and physiotherapists who are devoted to building better athletes. Please take a moment to share the articles on social media, engage the authors with questions and comments below, and link to articles when appropriate if you have a blog or participate on forums of related topics. — SF
