[mashshare]
When you think of box jumps, I am pretty sure you don’t think of 2- to 4-inch boxes. I’m quite certain you think of BIG boxes ranging from 24–48 inches high. Just like you, I love having my athletes explode up on the big boxes and express high rate of force and incredible landing skills—but the BIG box’s little cousin is maybe even more important for different expressions of athleticism. Let me explain…
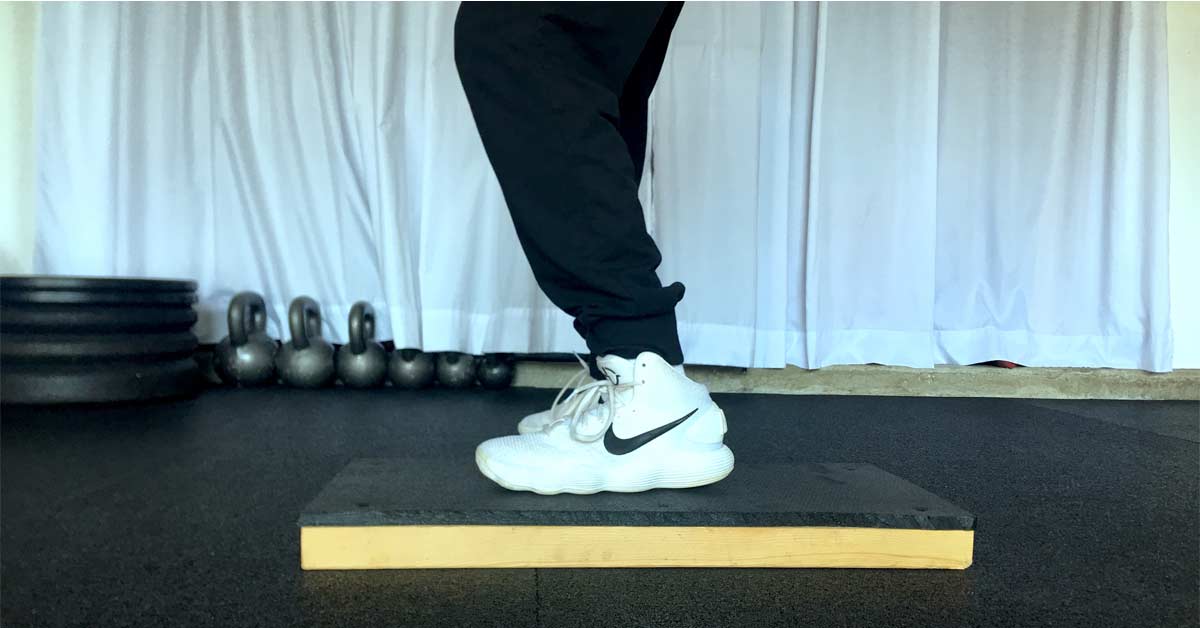
When I speak of using low boxes, I refer to a box that is roughly 2–4 inches high (I have gone as high as 6 inches, but I found those boxes were not as versatile and didn’t express what I wanted) and roughly 18 inches wide by 24 inches long. If low boxes are not in your budget, but you happen to have lots of Olympic-sized bumper plates, they work just fine.
If low boxes aren’t in your budget, but you happen to have lots of Olympic-sized bumper plates, they work just fine, says @leetaft. Share on XBefore I dive deep into low box training strategies, can I tell you a little about the history of how I created this method of low box training? Sorry, I’m going to anyway…
When I was roughly 25 years old, in 1991, I found myself doing a mentorship at one of the most well-known tennis academies in the world: Bollettieri Tennis Academy (now known as IMG Academy) in Bradenton, Florida. The very first day I arrived, I drove into the parking lot, parked my car, started walking to the office, and nearly got run over by a car backing out. Guess who it was? Bjorn Borg!!! Man, I never thought I would be excited to get hit by a car, but that would have been cool. Sorry, I digress.
As a strength and speed coach, part of my job at Bollettieri was to work with the up-and-coming young talent. I noticed these athletes struggling to change directions after a ground stroke and run down a drop shot or lob. They would take an additional gather step after the original foot plant, and I just knew that was costing them valuable time—especially at their elite level.
I also noticed, in the corner of the weight room, a stack of hardly used step aerobics steps. I dusted off a few and started practicing on my own with some concepts I thought of when I was lying in bed at night thinking about how I could help these tennis players change direction quicker. My goal was to get them to plant the foot, create immediate stability, and reaccelerate back toward the middle of the court, or toward the next shot. It seemed simple enough…
Wouldn’t you know it—after a couple days of messing with the low boxes during my breaks and at night, I came up with these concepts of how to build more reactive speed so the players could not only NOT take additional gather steps with the plant leg, but could also redirect, or reaccelerate, in the new direction so much faster. I knew I couldn’t throw them into the most challenging concepts or drills, and that I needed to progress them and build their reactivity off the ground first. So, I started with the teaching concept of progressing simple to advanced, slow to fast, more stable to less stable (I guess I learned something in my college pedagogy class after all). Long story short, the low box concepts, which I have tweaked over the years, were born.
The progression I briefly mentioned goes kind of like this:
- The athlete learns to quickly jump on and off the low box with a major focus on feet, ankles, and lower leg energy versus those big deep bending jumps that take way too long. This sets the stage to use elastic response versus longer power responses. It also builds strong feet, ankles, and lower legs.
- Next, I have the athlete quickly jump on and off, but with a straddle technique, to begin the concept of “quick reacceleration” from a lateral plant. Even though they are not moving laterally during this drill, the foot goes from a quick loading to exploding position (pronation and supination), the leg plant closely represents a plant angle to change direction, and the upper body learns to control positions of the lower body.
- Finally, I begin to add in these powerful and reactive lateral shuffle patterns over the low box with a quick return to the start. The athletes gain valuable “subconscious” sensations as to where their limbs and body are in space, and then begin to self-organize.
I didn’t know what I didn’t know back then, but what I did know was to cue the athletes to stay level and not rise up and down—which we know isn’t as fast as traveling in a straight line. What this cue did is actually force the athletes to plant on an angle that matched the speed at which they were coming into the plant. For example, if I made them go really fast over and back, it simulated them sprinting after a wide forehand and having to change directions quickly to get back into the court. But if I had them go at submaximal speeds, it was more like them reaching a narrowly hit shot where they didn’t have to move far to hit it and return.
Training with low boxes allows the coach to dial in on variations in vertical displacement jumps with a much higher emphasis on the elastic response versus the longer duration power jumps of a big box. What the low box offers that the big box doesn’t is the multidirectional force application emphasis seen during change of direction—truly an amazing strategy!
What the low box offers that the big box doesn’t is the multidirectional force application emphasis seen during change of direction, says @leetaft. Share on XBefore I give you a series of drills used with the low box, let me go ever so slightly deeper into the concepts behind the low box training methods.
One of the characteristics of an athlete’s change of direction during live sport is how quickly it occurs. The athlete plants their foot and, within tenths of a second, the athlete moves in a new direction. But there is more to it than simply seeing the athlete move quickly.
In order for the athlete to change direction like a rabbit dodging danger in an all-out chase, they must apply force into the ground at angles which effectively and efficiently control their mass and momentum. So, when the athlete leg plants at an angle, and body control is harnessed because the leg plants with the joints fairly straight (not like a 90-degree angle seen in a squat), there is a stretch shortening response to the musculotendinous unit. The stretch shortening cycle (SSC) is what creates the “elastic rubber band” effect. Well, the low box strategies can mimic these quick elastic responses beautifully!
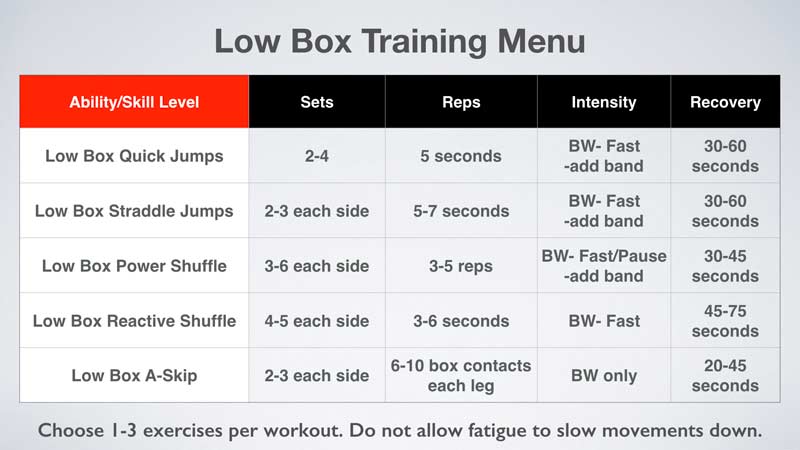
Rather than boring you by going over the detailed aspects of why low box training is impactful, let me share several low box strategies while I inject a little science to back it up. But before I do, take a look at this easy-to-follow chart on how to program for these exercises.

Exercise Strategy #1– Quick Low Box Jumps
When an athlete sprints, they do so with a great deal of foot, ankle, and lower leg responsiveness. I mean, they use their lower quadrant like springs. Once the foot hits the ground, it is important to quickly store and release energy in order to be fast. The quick low box jumps are a great way to build stiffness in the tendon (more neurological CNS quickness via proprioceptive stimulus) and joints. They are a low-amplitude, low-intensity way to create the elastic response with a proper joint loading strategy.
Now, as we all should know by now, there is never a free ride. There will always be things that can go wrong with even the simplest of drills. With the quick low box jumps, if the athlete doesn’t keep their shoulders over the box, every time the foot springs off the box, the athlete will be pushed further from the box. This leads to very poor coordination and, even worse, loss of quickness off the ground as they regain balance with a big long jump back to the low box.
I personally feel that they can avoid the other issue easily, which is the loss of a quick bounce off the round or box due to untimed arm action. This is why I have the athlete place hands on hips while all the energy from the ground surges through the body and doesn’t get dissipated by a delayed sloppy arm action. The arms can be a powerful tool, but these drills are isolated enough where it won’t matter if you use them to help “lift” the athlete on the quick jump.
Take a look at video 1. The progression would go from single low box quick jumps to single low box resisted quick jumps to multiple low box quick jumps. There are many ways to measure how quickly or efficiently the athlete performs these drills, but I say keep it simple and easy for the athlete to challenge themselves. In that case, I love using a short duration bout of 7 seconds to see how many times the athlete can land on the box. I chose 7 seconds because, in my experience, around that time frame is when the athlete starts to slow down—we can assume the ATP-PC system starts to yell for help at this point, as it has less and less supply.
Video 1. Repeated jumps for stiffness are something any athlete can do, so they’re not just for beginners. Advanced athletes can build up to single leg (hops) when they are able to maintain the same rhythm and quickness.
Notice how the joint angles in the ankle are loaded through dorsiflexion, and the knees and hips are fairly straight to elicit an elastic response versus a power response (deep bending).
Exercise Strategy #2 – Straddle Jumps
This exercise is the start of the journey to improve lateral change of direction ever so subtly. The athlete begins by standing on top of the box facing the long way. They quickly jump off and back on while attempting not to “jump” into the air by raising the center of mass, but rather, lifting the feet on and off the box. By the simple fact that the feet land outside the shoulder width and the athlete is in more of an athletic stance, lateral forces are being included.
The important characteristics are that the athlete must have dorsiflexed ankles and allow the foot to be flat—although most of weight is toward the balls of feet, the knees are slightly bent, hips are pushed back to help support the knees, and the shoulders remain forward for balance and to load the hips. When the athlete “springs” off the floor and returns their feet back onto the box, there should be little, if any, raising of the head or center of mass, as what would be seen in vertical jumping.
Man! Think of how important this skill is for an athlete who frequently jump stops, split steps, or squares up to challenge an opponent. Court and field sport athletes will benefit tremendously from this strategy.
Court and field sport athletes will benefit tremendously from a straddle jump exercise strategy on low boxes, says @leetaft. Share on XKind of like I mentioned earlier, the big mistake I see is that athletes like to pop up rather than just flex at the ankles, knees, and hips to return the feet back to the box. They’ve got to stay athletic!
To progress this drill, simply add a band, which creates a pulling action to the right or left, depending on which direction the athlete faces. This band acts as a form of artificial momentum similar to the momentum an athlete would feel if they were shuffling laterally and had to change direction. A beginner would use less tension compared to an advanced athlete with great control and body awareness.
In video 2, you can see how the band slightly pulls the athlete off center of the box. The athlete must reorient their body to land back on the box with both feet. This constant pull of the band is a stimulus; the athlete must act on this stimulus and remain in balance, as well as perform the exercise quickly. If you want to really challenge an athlete on this exercise, the coach or partner holding the band can begin to pull the band slightly back or forward to throw the athlete into a need to “tilt” their body to regain orientation on the center of the box. This works like a charm to get the athlete to feel pressure and adjust to it on the spot.
Video 2. Footwork that is stationary is excellent for team sport athletes who need to move rapidly to create space in small areas. Unlike agility ladders, small box straddle jumps create vertical stiffness qualities if performed properly.
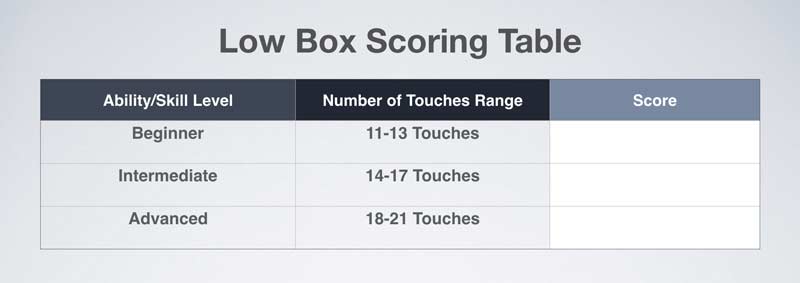
One of my favorite challenges is to see how many foot contacts the athlete can have in 7 seconds while straddling on and off. They get a point when the feet touch the box. My highest count to date was 21 touches by a college softball player—unbelievable! Here is a little chart to score the low box straddle.

Exercise Strategy #3 – Lateral Power Shuffle
In order for athletes to learn the footwork sequence of this exercise, I have them begin by pushing themselves one time over the box using a lateral shuffle technique. The low box is perfect for this, as it allows the backside leg to load more and the frontside leg to lift and clear forward. The athlete simply pushes hard performing one shuffle over the box; the back leg ends up on the box while the front leg lands off and decelerates the athlete. This is repeated going back over the box with the opposite leg now the “power leg.”
In video 3, you will notice the athlete creates a push-off angle with the back leg in order to create acceleration in the direction of the box. If the back leg had a vertical shin angle, the athlete would be more likely to rise up than move laterally. The key to the low box lateral shuffle is to move the center of mass over the box to the opposite side in order to create power, rather than just switching the feet side to side and not actually moving the body laterally.
The progression would be to add a resistance band. This aids in power production.
Before you view the video, let’s see if we both understand what’s going on here. If I have one foot on the box and one off and am in an athletic parallel stance, what’s really going on with my posture and position? First of all, having one foot on a box that is 2 inches higher causes my pelvis to actually lift higher on that side, meaning my opposite-side pelvis is lower. This is perfect, because in the lateral gait cycle, when an athlete pushes off hard to shuffle and the back leg extends long to push off (just like the back leg of a sprinter coming out of the blocks), the backside of the pelvis needs to drop to allow the foot to stay in contact with the ground longer.
Okay! So, what’s that mean for the frontside pelvis? Well, it has to lift, right? If I want to clear that front leg while the back leg is pushing, I need to lift the thigh and abduct and externally rotate a bit. In order for this to happen, I need the pelvis to get out of the thigh’s way so it has space; not to mention that it adds stability via the adductor muscles when it tilts and the front leg reaches out in front (more on that in another article).
Video 3. Shuffle work is great for defensive needs as well as general lateral movement. Teams can get a lot out of a set of low boxes by sharing equipment and alternating athletes.
The mistake I often see is the athlete attempting to REACH with that front leg without allowing the back leg to push the center of mass over the box. This causes all kinds of problems and results in a slower push-off. I cue my athletes to push the ground away so they can explode over the box and switch feet—one on the box and one off.
Exercise Strategy #4 – Lateral Reactive Shuffle
In this strategy, the setup is identical to the lateral power shuffle. The exercise starts with a power shuffle over the box, but immediately upon planting the deceleration foot, the goal is to quickly return to the starting position. So now the athlete is truly using the low box to aid in change of direction quickness.
Notice in video 4 that the plant leg is extremely wide. This is because the intent of the athlete is not to simply stop—it is to change direction quickly and return to the start. Once the athlete returns to the start, a two-second pause is allowed, and the drill is repeated. This is amazing at improving change of direction.
If the athlete needs to be challenged with greater mass and momentum control, the progression is to add a band around the waist and pull the athlete into the change of direction.
The lateral reactive shuffle drill can get a little hairy if athletes don’t create proper foot plant positions. This means the foot must be perpendicular to the direction of travel, so the ankle has a chance to be properly dorsiflexed and loaded. Plus, if the foot is somewhat externally rotated, the athlete tends to do what I call “knee glide.” This is when the knee glides in the direction of the toes and slows the movement down versus being stable and pushing off to extend the knee during change of direction. The width of the foot outside the hip and shoulder needs to be adequate to manage the momentum and have ability to stop and reverse the momentum.
I like to cue the athlete to stay “compact” and “tight” during an aggressive foot plant, says @leetaft. Share on XThe other issue I see is when the shoulder does what I call “sway” and tilts toward the plant leg. This sway can ruin a great leg plant angle because the ground reaction forces traveling back up through the body get leaked out the ribs rather than traveling through the core and out the shoulders. I like to cue the athlete to stay “compact” and “tight” during an aggressive foot plant.
Video 4. Adding a reactive component to shuffle movements bridges the general movement to a more athletic form. Coaches should only progress to reactive options when the athlete is coordinated and skilled at the basic shuffle exercise.
A great way to challenge athletes with an appraisal is to take points away for a delayed push-off, reacceleration, shoulder sway, or knee glide. I love to record and play the video back with the athlete watching, and we score it together. This teaches them (as well as annoys them when I get picky).
Exercise Strategy #5 – Elevated A-Skips
One of my favorite ways to challenge my athletes is to change the landing surface by using a low box. The goal is to have the athlete perform 1–2 A-skips on the ground, and then perform them on a 2- to 4-inch low box. This requires the athlete to project themselves up quickly as they push through the box. This is a very good coordination exercise and helps teach the athlete to extend through the leg and hip while remaining in a tall posture. Also, because the athlete projects themselves higher, they must absorb more forces quickly upon landing in order to get right back into the A-skip pattern.
The key to this A-skip while using random positions of the low box is to cue the athlete to stay tall, strike down, and strike the box with a dorsiflexed ankle so they can spring off the box or ground.
An issue I encounter using this drill with athletes for the first time is that they want to sink into the box versus attack the box. They also will get caught reaching for the box—we can’t have that! I preach to them to accelerate their hips over the box so they can strike down versus reach.
Video 5. Skipping and other movements off a low box add a new dimension that coaches love. You can find small learning opportunities in training sessions when you add a subtle adjustment to common drills.
In video 5, notice how the athlete performs various A-skips between the boxes to challenge coordination and rhythm.
Going Low Is a Smart Move
The goal of any training program is to challenge the human system so there is an adaptation to the new stress and a subsequent improvement. The low box strategies mentioned in this article are simply that—strategies to challenge the athletic system to force an improvement in multidirectional athleticism.
When implementing low boxes, always err on the side of caution and use lower boxes that are extremely stable, says @leetaft. Share on XWhen implementing low boxes, always err on the side of caution and use lower boxes that are extremely stable. If you use too high of a box, the athletes’ postures and positions change, and the angles of force production and reduction are altered in a negative way.
Enjoy implementing low box training into your program!
Since you’re here…
…we have a small favor to ask. More people are reading SimpliFaster than ever, and each week we bring you compelling content from coaches, sport scientists, and physiotherapists who are devoted to building better athletes. Please take a moment to share the articles on social media, engage the authors with questions and comments below, and link to articles when appropriate if you have a blog or participate on forums of related topics. — SF
[mashshare]


