
After having the same repetitive conversations on the reason I don’t use certain exercises and techniques, I felt obligated to voice an opinion with this flywheel article. It took me years to migrate from simple VersaPulley exercises in a warm-up to something more sophisticated, and I know detailing the journey can help new users of flywheel machines.
As stated in the medicine ball article on SimpliFaster, it’s better to cut out the fluff exercises and use only what is valuable and effective. Although you may rarely use an exercise, if it has a purpose you should still place it in the toolbox just like any other exercise, but in the bottom drawer. I list my favorite exercises here and explain why I include them, and also how to get more out of each rep. I also include not just the general techniques, but the specific nuances that are different than their barbell or dumbbell counterparts.
How I Chose the Exercise List
My decisions were not made in a vacuum, but based on the best solutions for a holistic program for athletes, so don’t skip to the exercise list right away. Because I also want to help the majority of programs, I didn’t include two key exercise groups: upper body and torso exercises. I will write something on conic options down the road, but most of the popular benefits in eccentric or isoinertial training are with machines. SimpliFaster reviewed conic machines in the Buyer’s Guide on Flywheels, so I geared this article towards squatting platforms only. Upper body training is mainly arm flexion and extension movements or push-ups—things I think are nice to have but not essential.
Finally, the list of exercises is not just about the motion, but also the performance of the exercises. I have seen some isometric variants for potentiation or similar purposes, but if you buy a flywheel, use it for its main purpose: eccentric overload.
If you buy a #flywheel system, use it for its main purpose: eccentric overload, says @ShaneDavs. Share on XFor the record, I intend for this group of exercises to help with knee joint injury prevention, and hamstring and groin health. They represent most of the exercises I use most frequently in training; the rest are horizontal pulls with conic options.
An Important Warning Before Adding or Trying the Exercises
While the benefits of the flywheel exercises here are huge, some risk exists with any training protocol, including isoinertial training. Unlike barbells, spotting and other protective measures are really not possible with flywheel platforms. A rack can be set up to prevent descent with a barbell squat, but so far I have not seen anything equivalent to the flywheel leg options.
If you are not prepared and the athlete is overcome by the overload, they will be pinned to the base or platform. However, I have seen only one person get pinned and it was a strength coach experimenting with the machine. Otherwise, I have not witnessed a single injury, accident, or error using the equipment over the years. This is not a testament to my coaching or exercise selection, it’s just that eccentric training with mature, focused athletes means that they are likely fighting the resistance and are on high alert.
I am not saying that flywheels create some mythical survival contraction, but rapid eccentrics do recruit muscle fibers uniquely. The central nervous system (CNS) treats eccentric contractions differently, thus explaining the higher levels of force and work capability by the body compared to concentric contractions. All of the exercises here are designed to deplete the athlete at the end of a workout or, if added sets are included, to exhaust the athlete as a replacement session.
The videos here are authentic; meaning, they are typical of what an athlete will do after a few sessions. While the technique is solid, you can see how some of the clips reveal limitations and learning curves. While the joint angles and positions are easy to see, how the body receives the forces is less visible and must be explained.
I include some progressions and tips here, but for the most part the descriptions of how to perform the movements, along with the videos, should be more than enough to implement the exercises. I always recommend that coaches try and master the movements so they can experience the firsthand perspective for better instruction. Learning by doing really helps reduce the learning curve and error rate.
Note: A coach or trainer needs to prescribe any and all of the listed exercises, and we are not responsible for injuries or poor performance due to fatigue. Your performance of the exercises below means you accept the risk and are under the guidance of proper supervision or are educated on how to apply sports training modalities.

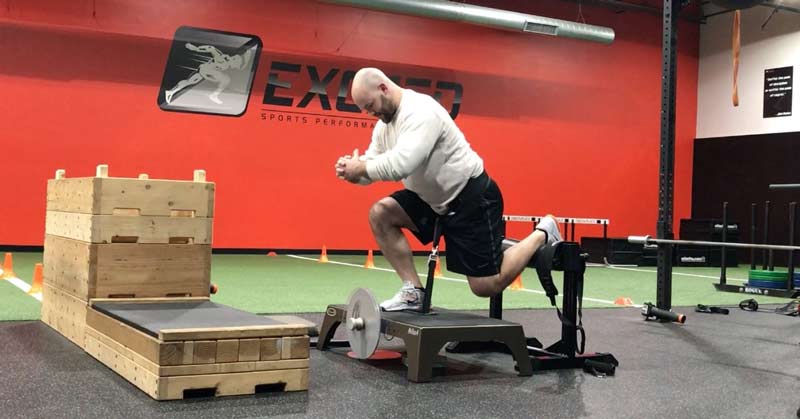
Depletion Belt Squats with Biofeedback
The use of the kMeter or other flywheel sensor is perfect for small groups, rehabilitation settings, or one-on-one training. In addition to feedback, the ability to test athletes periodically is also a major benefit, and using an Apple TV with external speakers can really help create an environment for better power testing and profiling, along with training. Squatting is the primary reason I use flywheels, and it’s one of the main engines to ACL and knee injury prevention. I do use single-leg exercises, proprioception training, foot function assessments, and other methods of preparation, but eccentric squatting works like a charm.
Instead of a shoulder harness, I have found that a belt works great with flywheel training. I prefer belts because:
- Shoulder harnesses create more total force concentrically to rebound back into isoinertial momentum, but they are total body in nature and recruit lumbar extensors heavily.
- Waist belts are cheaper and speed up small group training. When you have a limit on equipment, it compromises workflow.
- Athletes with poor pelvic control can use waist belts to learn to control lordosis by managing the tilt of the hips.
Another factor in training depletion squats is knowing when to cut off the reps when the forces drop. For the record, I don’t have enough data or a large enough athlete population to give a precise drop-off suggestion, but I have a pearl of wisdom: Don’t chase a number, but look for bad movement trends like compensations that look wrong to the naked eye.
I prefer to keep the reps in the range of six to 10 for depletion work, and decide to stop sets based on average overload (percentage). If the athlete can’t hit a sufficient eccentric positive contribution, I stop the set or exercise series.
Video 1. This shows the most common way to train with a flywheel, but adding biofeedback drastically increases output and precision of loading. Remember that a 90-degree or shallower squat is typical with flywheel squatting—personally, I like faster time frames for athletes.
Squat depth is a tricky factor in the equation, but in my experience, athletes that have deep squats still prefer shallower actions. In fact, the differences between the barbell displacement and flywheel squat distances become larger as the speed of the camshaft increases. I am currently researching jumping data from force plates and style of flywheel squatting for peak outputs, and hope to have better answers down the road.
A good takeaway here is to watch posterior tilt, as athletes tend to get into spinal flexion earlier due to the stance style selected. Follow the same principles of barbell squatting technique for selecting flywheel depth.
Coach Tip: The kMeter audio readings give instant feedback, so you can stop based on the dropoff in speed, force, or any other change. I typically hit my best numbers at reps past 10.

Squat to Romanian Deadlift Combo
One of the most wicked and unholy exercises is the squat to Romanian Deadlift (RDL) combo that proliferates on the internet. SimpliFaster went over the benefits of the RDL, and this is a little different and worth adding only after athletes can at least hit the 1.5x bodyweight threshold. If you can do a great heavy RDL with polished technique, don’t bother doing this movement. In fact, what is necessary is that you can pull from the floor in a squatting drive, something that may look like a deadlift, but is more like a hexagonal bar pull. Some coaches deadlift the bar up and lower it like a RDL, but adding more of a squatting motion unloads the paraspinals and helps reduce fatigue.
Video 2. The key to the exercise is not the RDL motion, but transitioning back into a squatting pull-up by dropping the butt down and getting into the pulling motion quickly. I don’t recommend doing this exercise for overload until the sequence looks polished as a warm-up or GPP movement.
I like the movement because it’s like adding nitro to the conventional RDL, due to the early eccentric force, and it’s also a good warm-up for traditional training. Conventional RDLs tend to have slower motions, which is a great benefit for teaching, but rapid eccentrics do help with increasing recruitment and the EMG readings I have seen show a difference. I have no solid evidence that flywheel RDLs are dramatically different than traditional RDLs in lengthening the structures of the hamstring group, but I am confident this exercise is worth implementing for general hamstring preparation.
I don’t teach or suggest this exercise to any athlete I work with unless they have one year of eccentric training with flywheels under their belt. The rationale for delaying the implementation of the exercise is that I want nearly no learning curve to interfere with training time, but will allow some wiggle room minutes to let athletes problem-solve the task. An athlete doesn’t need to crank reps quickly; just performing them as part of a warm-up provides a great stretch and wakes up the body better than only using bar complexes.
My final advice on this exercise is a word of caution: Don’t do this with athletes who are not good barbell lifters. Fragile athletes who do finesse-style training will get crippled by this sequence of movements. I don’t use this with athletes who are not able to lift from the floor or have a history of back injuries that are mechanical in nature.
Coach Tip: Each athlete can create tension to the hamstrings differently, and some need to use a bar attachment. Due to the flywheel, resistance force is higher earlier on the lift, so use a position that allows a safe and effective reception to the load.

Jerk and Elevated-Style Split Squats
The split squat has gained a lot of traction, but like any trend, time will tell how effective it is as more research comes out. Electromyography research on the split squat was done years ago, but the studies found nothing earth-shattering. Other exercises, like the hip thrust, are being researched to show transfer value, not just EMG activity. I have analyzed the split landing style of jerks, rear foot elevated split squats, single-leg squats, and bilateral squats. While what I have seen with traditional barbells is very straightforward, flywheels are mostly unknown.
The reason that we, as coaches, differentiate terminology so much is because the small differences matter. A single leg squat, a lunge, and a split squat are different animals. While similar in benefits, their differences in execution matter enough to put attention on those individual applications.
Video 3. The Flywheel Split Squat option has important set-up and execution details that really matter. It’s important you consider safety, as using the wrong equipment can increase the risk of injury.
The most obvious need with flywheel split squats is a solid platform to apply forces with the rear leg for balance and/or propulsion. No platform is perfect, but with the right placement of accessory equipment, doing either the rear leg unsupported split squat or a jerk-style option is a breeze. After you create a solid setup, the next decision is what option matches the needs of your program. Split squats without support are different than a double support option, but mainly on the eccentric hamstring activity side. Currently, what happens when you change the vector to angle forward is unknown, but any time resistance angles change, the recruitment of muscle groups should theoretically also change.
Some potentiation research is available on low load and light load split squats, and while this is great for warm-ups for speed work, I don’t think it’s worth doing in weight training unless the workout has enough volume and intensity to create a strong training stimulus. Potentiation training is great for helping the next exercise, but as primary drivers of performance, the volumes and intensities are usually not high enough to be staples in a program. It would be interesting to see the longitudinal studies on potentiation exercise volumes as a control to paired training to determine whether they alone are enough to be good developers of strength and power.
Overall, the constant tension of the split squat is a great way to help with hypertrophy in those that need muscle mass. Any claim that there is far less strain on the spine when doing a split squat is simply a leap of faith that has no documentation. If the rear leg does have too much involvement, it will torque the sacrum. Remember that no exercise is “free of sin,” especially as overloads reach higher levels. Be careful on heavy split squat training just as with any other exercise.
Coach Tip: The split squat is a great option for beginners who need to put on muscle mass and learn a movement through repetition. You can use different rear leg apparatus and methods to create a split squat, but make sure the foot is in the middle of the flywheel machine for balance.

Assisted Lateral Squats
Lateral squats are similar to split squats as they are single-leg overload options, but they are not a pure unilateral movement. The only true single-leg exercise I recommend here in the series is the RDL option I will outline later. Lateral squats are like split squats in that they are double supported but single leg emphasized. Single-leg training with flywheels has a lot of potential for overload due to the fact two legs can help drive the weight up and one leg can take the brunt of the work down. Assisting the weight up with two legs, even if it’s the non-primary driver, just adds a small boost, and is enough to make a difference.
Video 4. Preference and technique influence how you emphasize the propulsion leg with lateral squatting. Flywheels add vector-specific benefits so angled movements are safe and effective. I believe the harness is important to consider when doing lateral squat exercises.
Some set-up requirements are necessary for lateral squats, just like split squats, but they’re not a big problem for most gyms or even outdoors. The key variables are width and pushing angle. Besides those two choices, lateral squat variations are nearly endless. I like rhythmic alternating conventional squats with double support up and single-leg emphasis down, but the lateral squat shown above is a great option too, provided the support leg helps with vertical forces up so all of the eccentric overload down is high.
The right single-leg training with flywheels has a lot of potential for overload, says @ShaneDavs. Share on XI have not seen change-of-direction performance improvements from this exercise, but I do see changes in tendon and connective tissue reported as soreness after games. Frankly, sled drags with a crossover step are movements that may have general benefits, but frictional forces are not as effective as isoinertial resistance options. I do both for hockey players but not for other sports, as the contraction time periods in skating are more connected to strength than elastic modalities.
We need more innovation in flywheel exercise creation, as the lateral squat is a great movement and the reductions in groin injuries with soccer and hockey have been enough to statistically merit its inclusion. Ideally, I would have a better theory for the reason this movement pattern benefits athletes, but for now I will trust that something is going on that is worth exploring.
Coach Tip: I liked this exercise more than I thought I would. You can use the footbar acessory or go flat footed. The key is the transition from receiving the force on one leg to shifting to a position of double-leg concentric pushing for a true overload.

Single Leg Romanian Deadlifts
The only time I like single-leg RDLs is with the flywheel option, due to the fact the athlete is tethered with the strap. Three options exist for the hand, or hand combination, to use: the supported leg side, both arms, or the opposite arm. Some trainers have taken a leap in speculating that gripping the bar or handle hard will leverage force irradiation, thus recruiting more muscle fibers elsewhere. While it’s cool to make conjectures on grip and distal muscle groups, this has yet to be seen anywhere in the research for this type of exercise. Olympic lifters that demonstrate great power usually relax their arms and have a hook grip; they don’t strangle the bar as much as we think they do.
Video 5. Here is a video series of three different grips with the single-leg RDL. Athletes need more skill for successful muscle recruitment with a single leg, but the flywheel adds some balance support to the exercise.
Based on my experience, the theory that the adductors will recruit more motor units utilizing the same side grip doesn’t have much merit, but I understand why somebody would draw the conclusion at first glance. A skilled athlete can benefit from any grip style, provided they know how to control the forces from the foot up to the pelvis. The most important detail of single-leg RDLs with a flywheel is that you can put some serious force into the ground, provided you really cue the pull from the hip and keep the spine long and tight. Flywheel single-leg RDLs with slower speeds and higher forces seem to help teach the lift better, and they prevent cheating on the movement.
The last point of contention I see with the research is the flair or external rotation and muscle activation with single-leg RDLs. While I appreciate the theory and some of the findings, it is a stretch to believe that major muscle-building possibilities will occur with foot position. Along with a balanced foot, band resistance with a slow spin can help an athlete pull harder.
Balance is the overarching variable at play; thus, higher outputs cancel potential anatomical leverages. Some athletes may benefit from small foot positions, but loading and balance usually override muscle recruitment’s small benefits.
Coach Tip: The placement of the foot relative to the strap is crucial. If you have the medial part of the foot facing the strap, the flywheel system will pull you in. Strap placement is beneficial for some athletes to teach how to resist the medial forces. I think another point to consider is that the entire range of motion is more loaded with the flywheel than with the end range in DB versions.
Create Your Own List and Decide What Works for You
Again, this list consists of my favorite and most valued exercises for platform-style flywheel training. I have seen a dramatic reduction in injuries to the soft tissues of at-risk athletes and those that have come to me with a laundry list of surgeries and previous muscle and joint trauma. Athletes with a history of injuries who are known to be “injury prone” have made returns with increased performance and durability that caused me, a free weight guy, to respect and value flywheel machines. Create your own list of exercises and contraction styles and see what works for you.


