
Training around pain and injuries can be vexing, irrespective of the mode or the nature of the injury. The better part of my work over the last five years has explicitly revolved around this premise: How do I get this athlete to achieve tangible progress when X/Y/Z aren’t feasible options? Apart from some combination of reverse-engineering and problem-solving, finding the answer also requires a robust understanding of who the athlete is as a person and what their present limitations consist of.
Another root of this problem is the connotations we’ve created within strength training over the years. For instance, if we want to improve muscular strength, we automatically associate this with bench/squat/deadlift. If we want to improve conditioning, we immediately default to long runs, cycling, or bodyweight circuits. When it comes to power, most of us are under the impression that we must do cleans/jerks/snatches and heavy plyometrics in order to achieve our goals.
What I generally do is see how far from the ‘optimal’ I have to go for an athlete and then assess the return on investment, says @danmode_vhp. Share on XAll of these assumptions are short-sighted and patently false. In perfect conditions, of course, we understand what’s optimal, but we have to thoroughly understand the relativity to training. In my opinion, we are too quick to fall into the trappings of conventional biases. A common example of this is improving power for someone if they can’t do cleans or intensive plyos. What I generally do is see how far from the “optimal” I have to go for an athlete and then assess the return on investment. For instance, using a jammer snatch variation for an athlete who’s coming off rotator cuff surgery and isn’t quite ready for a barbell.
Start with the Spectrum
At its fundamental root, power is the summation of force applied during a movement and the velocity at which it moves (P= F*v). The first step in the process is—injury notwithstanding—identifying where the athlete is deficient on the force-velocity curve: Are they slow because they’re weak, or are they weak because they’re slow?
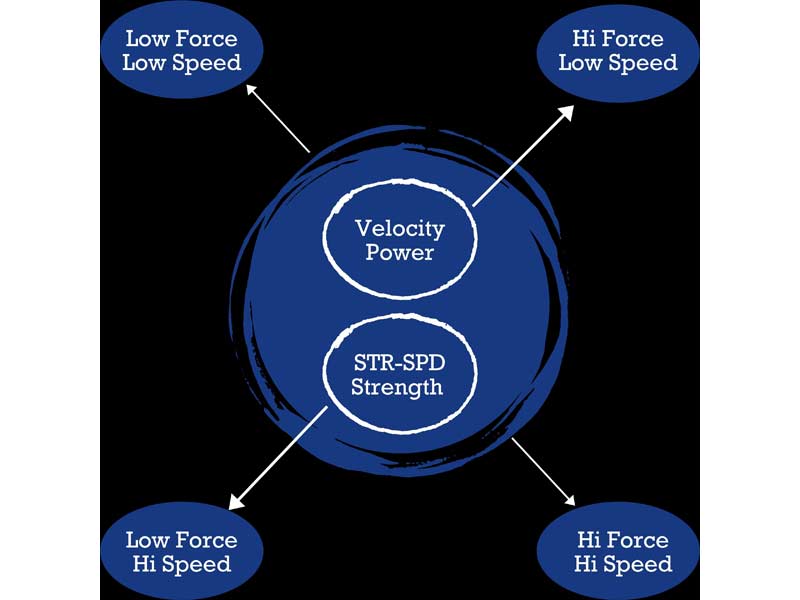
So, for athletes who can’t move a lot of weight but move relatively high loads at high velocities (low force/high speed), I program mostly strength-based applications. I take the opposite approach for athletes who are high force/low speed. And for athletes who are either low or high in both, they’re the easiest—they get a certain dose of each training mode.
Identify the Constraints
Once we observe the athlete for where they are deficient in terms of strength versus speed qualities, we need to thoroughly understand the hard limitations the athlete has, or what can be referred to as individual constraints. Movement constraints can be broadly classified in three ways:
- Physical
- Internal
- External
The physical constraints are the easiest to identify, as these are simply the objective measure of how the injury affects them. In most cases, we can identify these based on the time point of where the athlete is post-injury and what their eligibility is for things like intensity/load/range of motion. The internal constraints are much more difficult to identify, and this really relies more on our ability to communicate and understand our athletes as opposed to the objective analysis of injury.
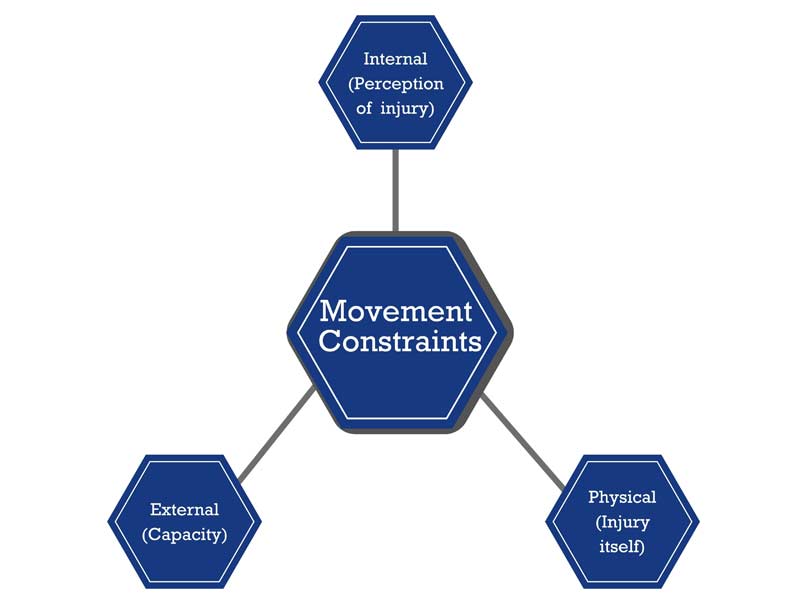
The internal constraints have much greater variability between athletes, as everyone experiences pain and injury in a very individual manner. However, a caveat to be mindful of here is that internal constraints will not be linear (across time), nor will they be consistent between movements. In other words, the athlete’s perception of pain and ability are multivariant, and throughout the training process a number of things will influence it. The athlete will also have varying levels of confidence based on the tasks at hand, so where confidence may be present in certain areas, it can’t be assumed for others.
Finally, we have external constraints, which are essentially the athlete’s tolerance levels for intensity, ranges of motion, or volume based on their response to training. We can also include environmental items here, such as the type of resistance being used, the surface or position they are working from, or the instruction being delivered by the coach. Where the internal constraints are largely driven by the athlete’s perception, the external constraints are more governed by the coach and represent the factors that we mostly have control or influence over.
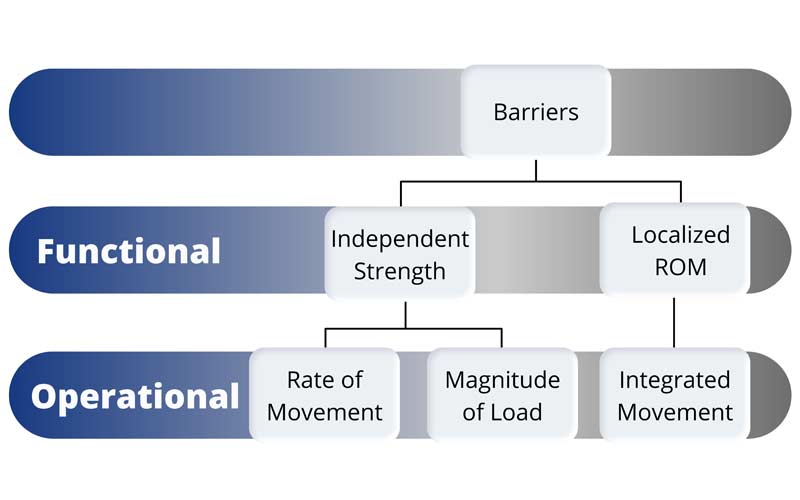
Navigating Barriers
In addition to physical and mechanical constraints (i.e., compromised hip extension, inability to load over body weight on single leg squat), we must also recognize the global decrements that have manifested. For barriers, I look at these as either being functional or operational. Put simply, functional barriers speak to getting impaired movement back to a proficient state. Operational barriers, on the other hand, include more secondary aspects such as the rate of movement, load tolerance/capacity, and integrated tasks such as change of direction.
When athletes have difficulty with functional barriers, the solutions are largely predicated on isolating the area in question and working to get back to a balanced state—for example, closing the margin on left/right leg in a Y Balance Test. Navigating functional barriers is not difficult in most cases; it really just requires time and patience. Operational barriers are a bit more involved and tend to require a little more nuance. But broadly speaking, what we’re concentrated on with operational barriers is getting the athlete to demonstrate full kinetic integration without the injured area showing any lag. From there, we want to emphasize the capability of the area and work toward what will be demanded of them in sport/duty.
Virtually any barrier can be overcome—it really just comes down to how much accommodation is needed and how much return the athlete would receive by doing so. Engineering extremely complicated and cumbersome strategies for minimal returns is an imprudent and foolish way to go about this. What we’re focused on is efficiency, in which the strategies and applications we present are logical and simple to replicate, and (most importantly) provide a sufficient stimulus for the athlete. This is going to require thorough explanation and objectives from the coach, as the athlete must understand why they are performing certain variations and, more importantly, what these incremental steps are building toward.
Adaptive Power Options
Over the years, I’ve identified a handful of applications or specific pieces of equipment that I commonly rely on for adaptive power options. Bear in mind that there isn’t anything inherently right or wrong with equipment/movement selection, it’s simply a matter of what you can coach proficiently and what the athlete is confident/capable of using or doing. This is a short list of some of the adaptive variations with which I’ve found success. Note that, for some, these were just temporary alternatives to work back to conventional selections; for others, though, these provided long-term or even permanent substitutes. Also, these are introduced in a progressive manner, meaning I would progress an athlete 1-4 chronologically.
1. Band Unloaded
Band unloaded variations can be utilized in a myriad of ways; in this context, however, I’ll use this as an entry-level means for reacclimating the athlete to move under velocity conditions. What this setup does is reduce the athlete’s body mass as they move through a given range of motion (increased band tension = decreased mass).
In turn, this gives the athlete a better opportunity to execute movement with greater speed—and, in most cases, improved confidence. Again, generally speaking, this would be the first installment and would be followed by doing the movements at true body weight, progressing to light loading with speed emphasis and finally to a reflexive/ballistic fashion. I’ve found this to be a highly effective strategy and have used it for an array of movements, but below are what I believe are the best to get familiar with:
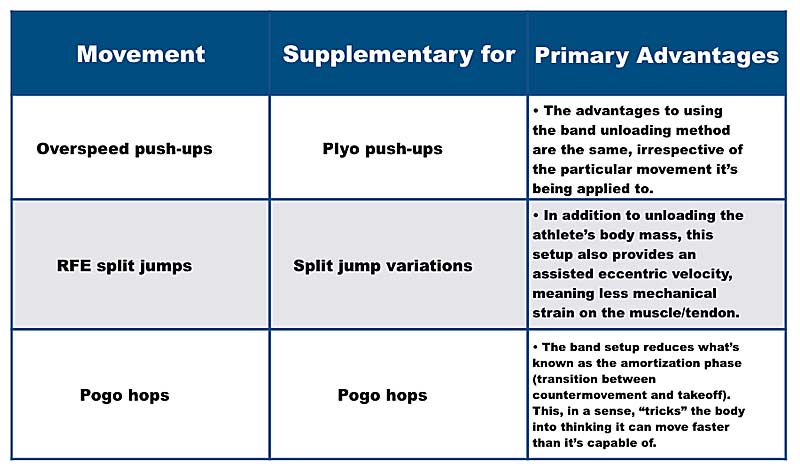
Table 1. Band unloaded exercises. Video examples of each exercise can be found on the playlist here.
Video 1. Band-assisted pogo hops.
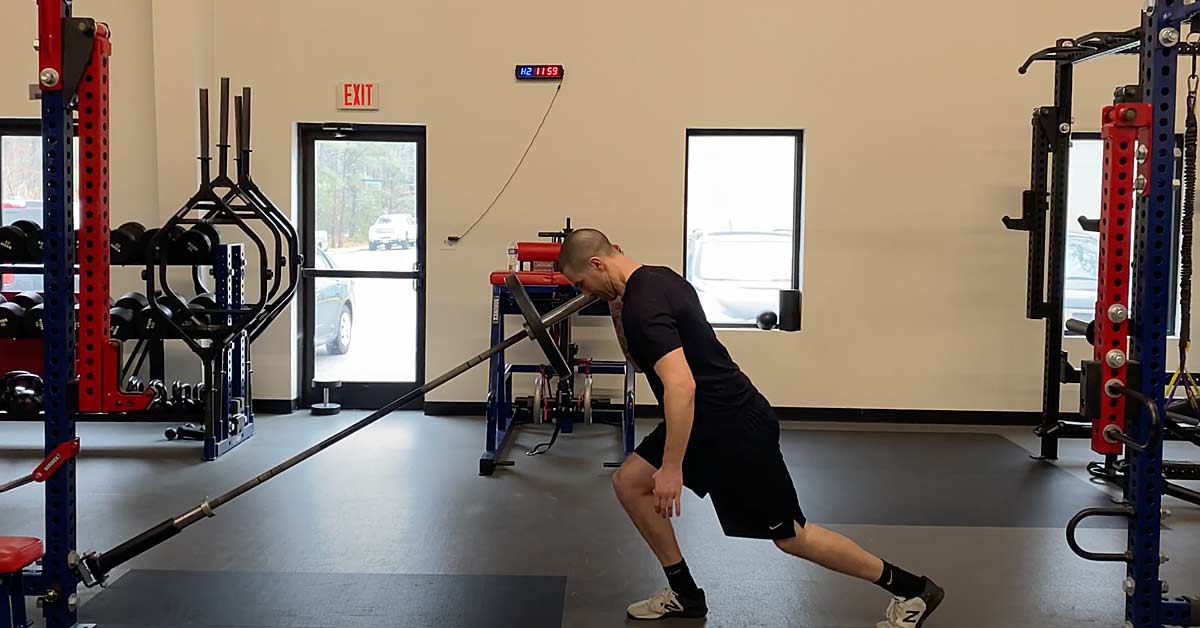
2. Jammer/Cable (*guided path of motion)
The primary reason for using a cable and/or jammer setup is to provide the athlete with a guided path of motion. If nothing else, I believe this takes away a variable by not having to focus on stabilizing the path of motion, which then results in the athlete being able to concentrate their efforts more purely on “just move fast.”
The primary reason for using a cable and/or jammer setup is to provide the athlete with a guided path of motion, says @danmode_vhp. Share on XThe cable and jammer, for the most part, can be viewed as interchangeable, although I know jammer arms aren’t exactly commonplace for most. Just be aware the cable setup will have slightly more demand for the athlete to organize the path of motion, so if you do have access to jammer arms, I would suggest introducing those first, as the athlete can really concentrate on the rate of motion.
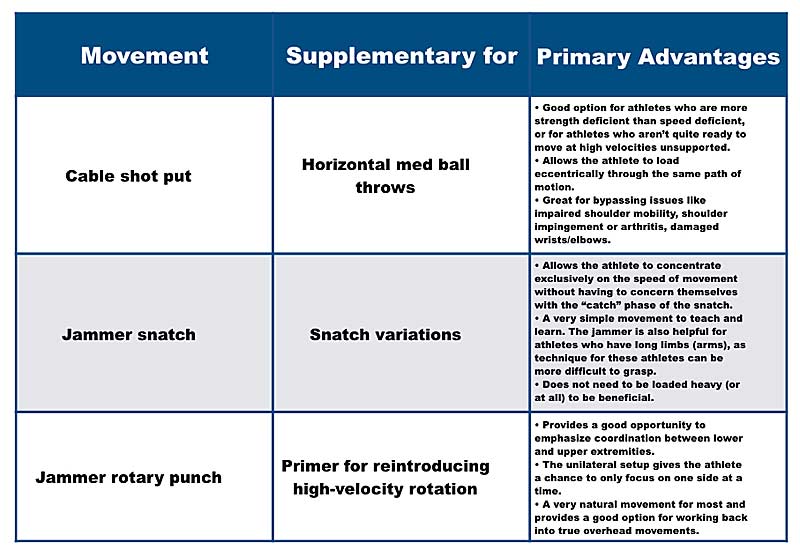
Table 2. Jammer/cable exercises. Video examples of each exercise can be found on the playlist here.
3. Landmine Variations
We all know my love for the landmine by now, but I believe it really demonstrates its value with the injured population. With the landmine setup, first and foremost, we give the athlete a better platform to work from, as the unfixed base allows them to utilize the most effective path and ranges of motion given their individual constraints.
The multiplanar nature of the landmine also promotes a high degree of biofeedback, which can help the athlete ‘feel’ their way into optimal movement patterns, says @danmode_vhp. Share on XThe multiplanar nature of the landmine also promotes a high degree of biofeedback, which can help the athlete “feel” their way into optimal movement patterns. For adaptive power using the landmine, I’ve particularly found success with the following variations:
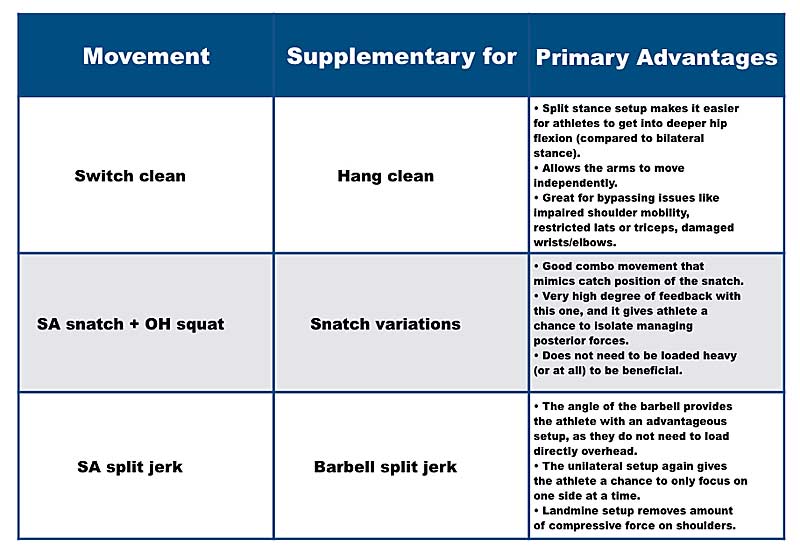
Table 3. Landmine-based exercises. Video examples of each exercise can be found on the playlist here.
Video 2. Landmine switch clean.
4. Med ball variations
Med ball variations are a more common accessory option for training power qualities; however, I think some coaches and trainers overlook how beneficial med ball work can be, specifically for the injured population. When I incorporate med ball drills with injured athletes, I mostly do so to promote organic and optimal movement for the athlete. In other words, when performing med ball drills, the athlete will naturally and intuitively find the path of motion that best accommodates them.
When performing med ball drills, the athlete will naturally and intuitively find the path of motion that best accommodates them, says @danmode_vhp. Share on XHaving fewer technical restrictions often bodes well for the athlete. Moreover, med ball work usually gives the athlete an immediate and overwhelming sense of how their body is moving in space. Med ball drills are also typically perceived by the athlete as low-threat movements, which will help them feel more confident executing things under velocity conditions. There are really endless variations I could include here, but for the sake of brevity, here are just a few of the ones I commonly program:
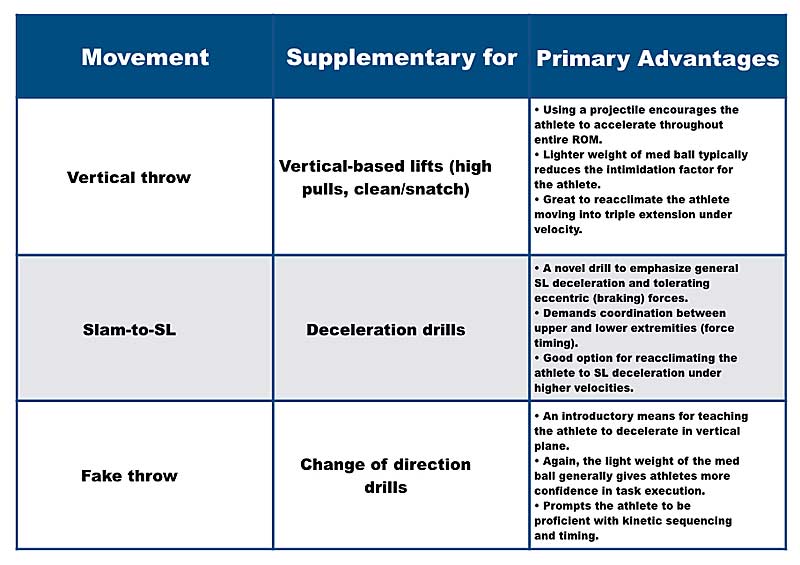
Table 4. Med ball variations. Exercises can be found on the playlist here.
Rate of Progression
I should be clear that everything provided in this article is intended for athletes who have already completed conventional rehab and physical therapy and have been cleared by their physician. The rate at which you move your athletes is predicated on their present ability and long-term goals. I know that sounds open-ended, but it’s really difficult to generalize and say there is some empirical timeline.
That said, I’ll leave you with a few points to consider:
- For some athletes, these are just short-term options until fully healthy; for others, they can be more permanent or long-term solutions. I also utilize everything found in the charts in my accessory blocks.
- Personally, I establish deceleration proficiency before going max effort on acceleration.
- Orthopedic injuries require more strength emphasis.
- Soft tissue injuries (normally) require more speed emphasis.
- However, it’s critically important to load soft tissues heavy and slow before light and fast. Tendons need to be loaded heavy and under eccentric conditions before I move into any true speed work.
- Pay attention to modalities your athletes appear to have the most success with. An example would be seeing greater return on a landmine press than a barbell push press. If something works, stick with it.
Irrespective of injury or sport, be sure to have your athletes demonstrate proficiency in multiple planes of motion under a variety of tempos

