
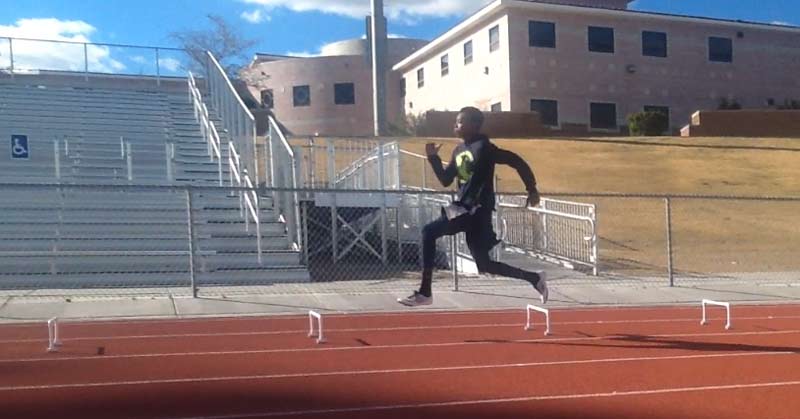
We use wickets with our sprinters, hurdlers, jumpers, and distance athletes. Here is how we implement them within our program. Regardless of the type of systematic approach your program follows, wickets should be a part of your coaching toolbox.
The speed hurdles used in these videos were built using the material and instructions described in the article “How To Build Speed Hurdles for the Wicket Drill.”
Spacing Requirements
The settings described here are only suggestions. It’s up to each coach to play around with spacing based on skill of the athletes, time of the season, and mastery of the drills.
Basic Wicket Drill
I stole this drill from Marc Mangiacotti, assistant men’s sprint and hurdles coach at Harvard. He also serves as horizontal jumps coach.
We use this drill with all of our sprinters who have not truly sprinted in the fall. It resembles the end of a 400. As athletes prepare for fly 10s, we use this drill as a precursor to the workout.
We set up nine wickets. The first 3 are spaced at 1.45 meters (4’9″), the next 3 at 1.52 meters (5′), and the last 3 at 1.59 meters (5’3″). The athletes have a 4–8 step lead-in with no marks and starts sprinting at sub-maximal speed. While sub-maximal sprinting sounds like a contradiction—I know Coach Tony Holler will frown at this description—it allows the athletes to understand and experience the drill for the first time. As athletes get faster, the more difficult it is to coordinate all the movements involved in sprinting during max velocity.
Video 1. Example of Basic Wicket Drill
Wickets with a 6-Step Lead In
Matt Gifford recently wrote, “The Acceleration Ladder” for Freelap. The article explained the purpose and usefulness of the “stick drill.” He discussed distance settings for proper acceleration mechanics, based on individual differences such as physical makeup, skill, power, and time of year. For the wicket drill, we provide similar settings for the first six steps based on the initial spacing between the 1st and 2nd wickets. These initial settings are also determined by skill level, training age, time of the season, surface, and other factors. Don’t be afraid to fail and start with different settings.
Vince Anderson, the assistant track coach at Texas A&M University, describes the spacing of the first six steps: “Logic would dictate that the stride length over the first hurdle is exactly the same as the space between the first two hurdles, with ground contact dead in the middle of hurdles 1 and 2. Each run-in step, working back toward the origin, is reduced by 3 inches. Athletes should hit every piece of tape on the run-in and over the first hurdle.” His last words must be understood so the drill isn’t ruined before it even begins. The tape or mark Coach Anderson refers to asks athletes to push their hip over and allows the shin to push back into that mark. If athletes are casting out over the tape, acceleration is done. Latif Thomas, president and CEO of Complete Track and Field, says, “Once the toe lands in front of the knee during acceleration, YOU’RE done.” Make sure athletes don’t make this error during the first six steps in the acceleration of the drill.
As mentioned earlier, each coach will have to play around with spacing and distance. For the purposes of this article, I will show the settings we normally use when we introduce wickets at practice after the basic wicket drill, specifically for freshman boys or newbie sprinters. We set out ten wickets. Eventually, we add five more with the distance spacing continuum and ultimately bring the total to 20 to 21 wickets.
Since the distance between the first set of wickets is 5′, use this setting to space out the first six steps using cones, discs, or tape. If the drill is performed ideally, the athlete will land in the middle between wickets 1 and 2. Using this mark, the coach counts back five feet toward the start to mark the 6th acceleration step. Following the advice of Coach Anderson, each remaining step to the beginning will be reduced by 3″.
Therefore, in the case of having a distance of 5′ for the first set of hurdles, the acceleration steps would have the following marks: 1=3’6″, 2=3’9″, 3=4′, 4=4’3″, 5=4’6″, and 6=4’9″, followed by the first wicket placed 2’6″ after the sixth acceleration step to begin the spacing for the remainder of the wickets. Adding all the acceleration marks (24’9″) and 2’6″ (half of 5′) for the first wicket the total distance from the start to the first hurdle is 27’3″.
The first distance setting between the 1st and 2nd wicket for freshmen boys is 5 feet. The next set of wickets, 2 and 3, will also be 5 feet apart. For the next set of wickets, 3/4, the distance will increase by 3 inches (to 5’3″). Just as the distance between 2/3 remains the same as 1/2, so too will the distance between 4/5. Hurdles 5/6 and 6/7 will again be increased by 3″ to 5’6″. After 6/7 the setting is increased by another 3″ to 5’9″ through the next three sets of wickets (7/8, 8/9, 9/10) as opposed to only two sets earlier. Moving forward with wickets 10/11, 11/12, and 12/13, the distance again increases by 3 inches, to 6′.
For the next three sets of wickets (13/14, 14/15, 15/16) you only increase each setting by 2″ as opposed to the previous 3″. So the distance between 13/14, 14/15, and 15/16 will be 6’2″. For wickets 16/17, 17/18, and 18/19 the increase drops to 1 inch, meaning the settings will be 6’3″. Finally, settings for 19/20 and 20/21 again increase by 1″, to 6’4″. Below are the settings in feet and inches for 21 wickets to serve as an example for the foundation of this drill.
| Speed Hurdle Spacing | |||||||||
| 1/2=5′ | 2/3=5′ | 3/4=5’3″ | 4/5=5’3″ | 5/6=5’6″ | 6/7=5’6″ | 7/8=5’9″ | 8/9=5’9″ | 9/10=5’9″ | 10/11=6′ |
| 11/12=6′ | 12/13=6′ | 13/14=6’2″ | 14/15=6’2″ | 15/16=6’2″ | 16/17=6’3″ | 17/18=6’3″ | 18/19=6’3″ | 19/20=6’4″ | 20/21=6’4″ |
Video 2. Example of wicket drill with 6-step acceleration
Here is another example. Tyrone Otte, a sophomore at Chapin, recently ran a 3.29 fly 30. While I don’t want to overwhelm you with more math, this shows he could run an 11.81 100, 23.5 200, and 400 between 51.7 and 52.5. Obviously, this doesn’t necessarily mean he will, but it does give the coaching staff an indication of his potential. Based on these times, I can determine a more appropriate wicket setting.
Acceleration steps into wickets for Tyrone: The distances in parenthesis show the overall distance. For example, during acceleration step 2 the distance in parenthesis is 8’3″ to demonstrate the total distance of acceleration marks two steps away from the starting line.
| Speed Hurdle Spacing | |||||
| 1=4′ | 2=4’3″ (8’3″) | 3=4’6″ (12’9″) | 4=4’9″ (17’6″) | 5=5′ (22’6″) | 6=5’3″ (27’9″) |
Wicket marks after acceleration steps: Again the number in parenthesis represents the total distance away from the starting line. For example, wicket 1 is only 2’9″ from the 6th acceleration step, but 30’6″ from the beginning point.
| Speed Hurdle Spacing | |||||||||
| 1=2’9″ (30’6″) | 2=5’6″ (36′) | 3=5’9″ (41’6″) | 4=5’9″ (47’3″) | 5=6′ (53′) | 6=6′ (59′) | 7=6’3″ (65′) | |||
| 8=6’3″ (71’3″) | 9=6’3″ (77’6″) | 10=6’6″ (83’9″) | 11=6’6″ (90’3″) | 12=6’6″ (96’9″) | 13=6’8″ (103’3″) | 14=6’8″ (109’11”) | |||
| 15=6’8″ (116’7″) | 16=6’9″ (123’3″) | 17=6’9″ (130′) | 18=6’9″ (136’9″) | 19=6’10” (143’6″) | 20=6’10” (150’4″) | 21=6’10” (157’2″) | |||
Over the course of 6 acceleration steps and 21 wickets (27 steps), a beginning freshman—having learned how to run through wickets with proper posture a minimum of three times—will have covered 143’11”, or 43.8 meters. Compare that to Tyrone, who by simply increasing the beginning 1st acceleration step by 6″, will have covered 157’2″ (47.9 meters) over the course of 27 strides. This difference of 4 meters is huge in the world of track.
Video 3. Tyrone Otte performing wickets with increased spacing
The measuring and math for all these settings can be tedious. Coach Anderson has a chart with the available settings already configured. It uses both English and metric systems. Furthermore, Ron Grigg, director of cross country/track and field at Jacksonville University, created a 400/600/800 training program for Complete Track and Field. Included in the program is an Excel chart with metric settings that makes the process easy. When you enter the desired setting in a cell, it computes the six acceleration steps and distances up to 21 wickets. Coach Grigg increases wicket settings by 3 cm (about 1 inch) following the same continuum as described earlier.
Both charts fall within a foot of each other at the end of 27 steps, so the difference is not dramatic. For example, if I used the initial spacing of 5’6″ or 1.67 meters as previously mentioned for Tyrone, the final wicket would be placed at 157’2″ (47.9 meters) using Coach Anderson’s settings. Coach Grigg’s settings would place the final wicket at 157’11” (48.13 meters)—a difference of less than a foot.
The biggest takeaway is that every coach will have to play around with numbers and settings. Both charts make the process of putting down marks much simpler.
Complexed Wickets
ALTIS, the elite coach and athlete training environment in Phoenix, frequently posts videos of athletes sprinting through wickets on their Twitter and Instagram accounts. They recently published a video demonstrating how they use wickets. Stuart McMillian, performance director and lead sprints coach at ALTIS, posted a tweet demonstrating complexed wickets. After sprinting through a predetermined amount of wickets, athletes continue to sprint for up to 30 meters or do a fly 30.
ALTIS Coach Andreas Behm on the benefits of the wicket drill.
In his 400/600/800 meter training program, Coach Grigg also stated, “I have found great value in setting up a cone 20 meters beyond the end of the wickets and asking the athlete to keep the same technique. This is a great evaluation tool to see if they have drastic changes when no wickets are present.” With complexed wickets, a coach can time and evaluate a fly 10, fly 20 or even fly 30.
For example, in the prior example of a high school freshman boy, he would have sprinted 44 meters. Adding a fly 10 gives him more than 50 meters of quality sprinting. Again, coaches can play around with distances. A coach may only want to do 40 meters of max velocity. He could set up 30 meters of acceleration and wickets and put the fly 10 at the end as another example of complexed wickets. This is the artistry of coaching.
Video 4. Example of Complexed Wickets
Conclusion
This article describes just some of the ways in which coaches can use wickets to improve sprinting form. This summer I observed coaches in Chicago using wickets to ensure that athletes maintained a tall posture and neutral pelvis. Athletes held PVC pipes over their heads. It worked. I honestly think wicket drills are a game-changer. If they are used appropriately, your sprinters will achieve personal bests because they will know how it feels to truly sprint. If you train fast, you will run fast. The wicket drill proves that. It’s another example of coaches being as creative as possible.
Video 5. Athlete Difference sprinting with Wickets

